

Page 1

MiiCraft
Hello!
Thank you for your interest and support in purchasing our MiiCraft 3D
Printer. We hope our MiiCraft 3D Printer is just what you needed for your
application and interest. Should you have any additional questions, please
feel free to email us at [email protected]
Sincerely,
MiiCraft Team
3D Printer
User Guide
Version 1.1
Page 2

Table of Content
1 Introduction ................................................................................................................................................. 1
1.1 Special Note ........................................................................................................................................ 1
2 Package Content .......................................................................................................................................... 2
2.1 Handling Instructions ..................................................................................................................... 2
3 System Requirements ............................................................................................................................... 3
3.1 Hardware ............................................................................................................................................ 3
3.2 Software ............................................................................................................................................... 3
4 Software Installations ............................................................................................................................... 4
4.1 Installations Instructions .............................................................................................................. 4
4.2 Unique RGBMASK file placement ............................................................................................... 5
5 Hardware Setup .......................................................................................................................................... 6
5.1 Install Trigger Driver ...................................................................................................................... 6
5.2 Connect MiiCraft 3D Printer to PC .............................................................................................. 6
5.3 Install Arduino Mega Driver......................................................................................................... 6
6 System Setup ................................................................................................................................................ 7
6.1 Display Check .................................................................................................................................... 7
6.2 Turn off Power Saving Functions ............................................................................................... 7
7 Unit Operations ........................................................................................................................................... 8
7.1 Launch MiiCraft Suite...................................................................................................................... 8
7.2 MiiCraft Modeler .............................................................................................................................. 9
7.3 MiiCraft Slicer ................................................................................................................................. 11
7.4 MiiCraft Checker ............................................................................................................................ 12
7.5 MiiCraft Printer Control .............................................................................................................. 13
7.6 Printed Model Cleaning............................................................................................................... 16
7.7 Post Curing ...................................................................................................................................... 17
7.8 Removing Model ............................................................................................................................ 17
8 Test Print .................................................................................................................................................... 18
8.1 Print Sample Model (Optional) ................................................................................................ 18
Page 3

MiiCraft 3D Printer User Guide Rays Optics Inc.
1 Introduction
This guide is created to provide you with basic understanding of system requirement, setup
instructions and operating procedure for your MiiCraft 3D Printer.
This guide will cover the following topics. Should you have any additional questions, please feel
free to email us at [email protected]
Package Content
System Requirements
System Set-up
Software Installations
Unit Operations
1.1 Special Note
Please pay close attention to the special notes when they appeared in the User Guide.
Note:
Warning:
Page 1
Page 4
MiiCraft 3D Printer User Guide Rays Optics Inc.
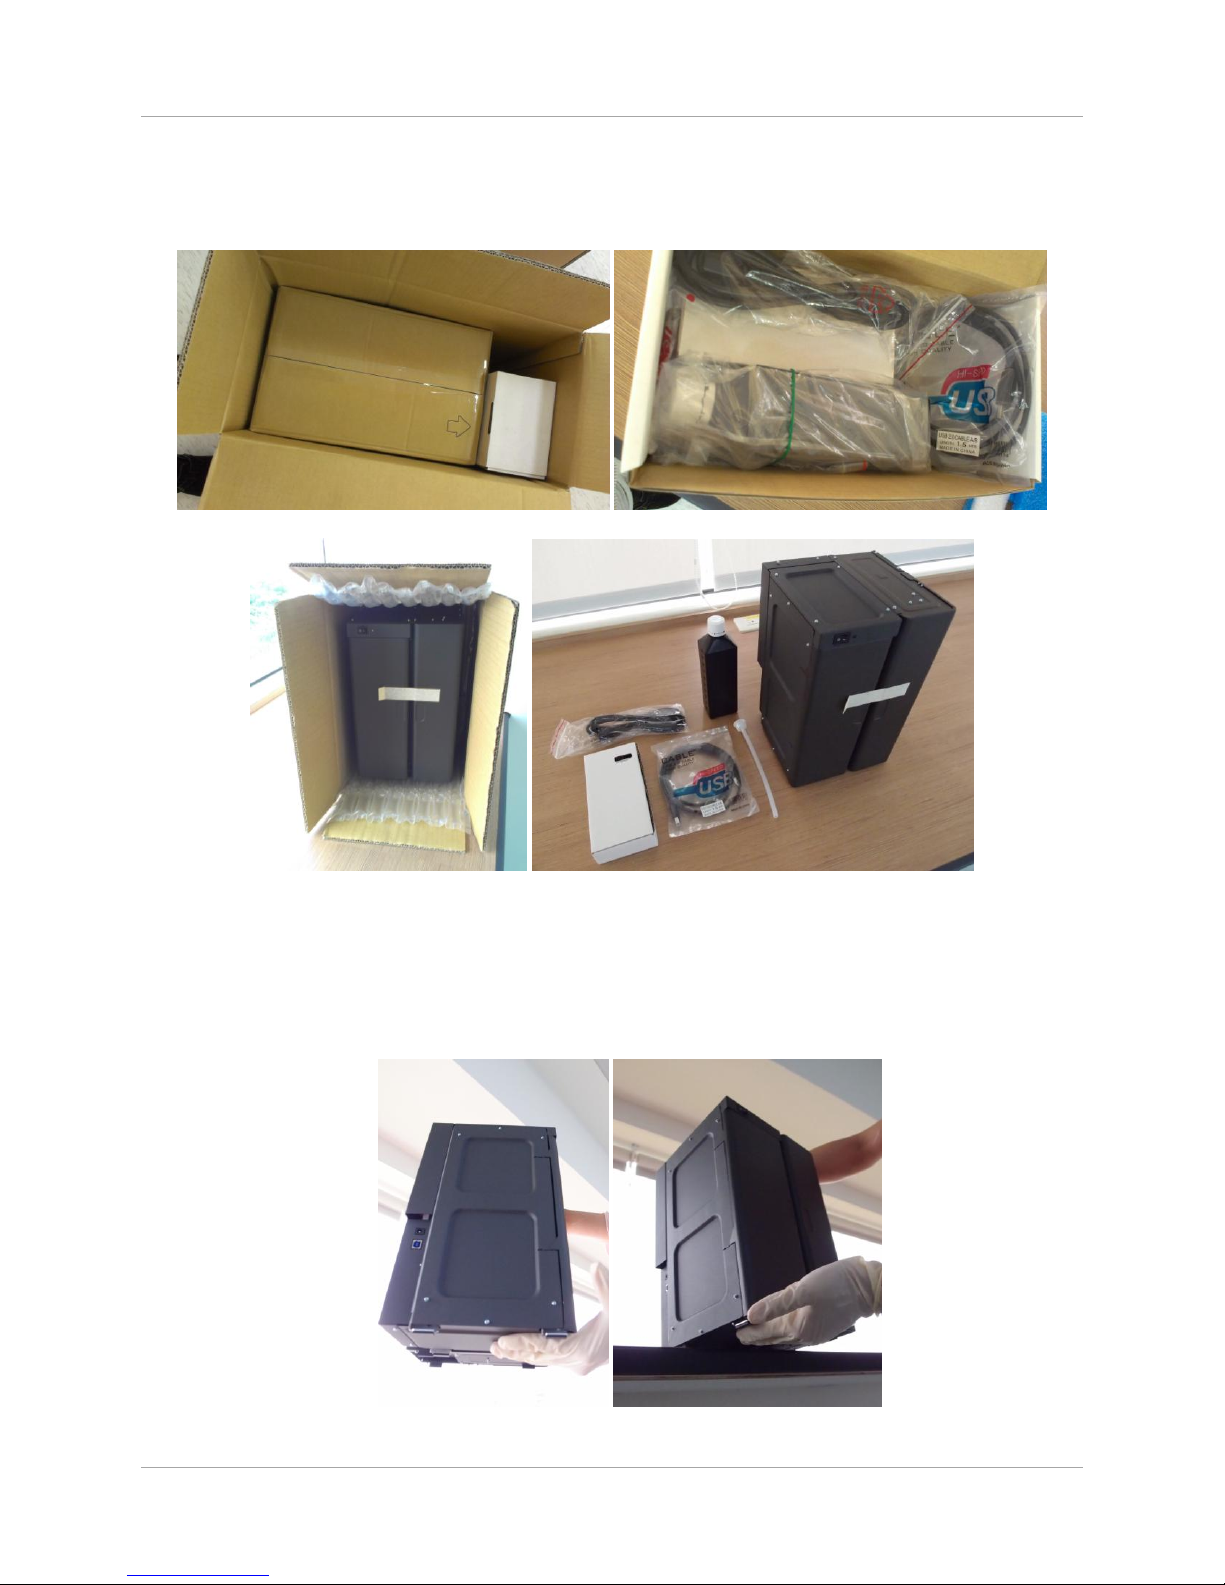
2 Package Content
2.1 Handling Instructions
During transportation of the unit. Always have at least one hand to support the bottom
area of the 3D Printer.
Page 2
Page 5

MiiCraft 3D Printer User Guide Rays Optics Inc.
3 System Requirements
3.1 Hardware
Windows based PC with USB ports.
Windows XP and Windows 7 Operating System
Mac OS and Linux PC are not yet supported
3.2 Software
MiiCraft Suite is Open Source software based on Python. It requires installation of
Python 2.x
The MiiCraftSetupVxx.zip has three components
o Sources folder – the source code and prerequisites software
o python-2.6.6.msi – Python setup program
o setup.py – MiiCraft Suite setup program
We have included Python 2.6.6 in MiiCraft’s software package. Users can also download
different version of Python at http://www.python.org/
Note:
Python version 2.6.6 or above is recommended
Warning:
MiiCraft Suite is not compatible with Python version 3.x
Please use Python version 2.x to operate MiiCraft 3D Printer
Page 3
Page 6
MiiCraft 3D Printer User Guide Rays Optics Inc.
4 Software Installations
4.1 Installations Instructions
Step 1:
Download MiiCraftsetup.zip from link provided in your shipment confirmation email
Unzip MiiCraftSetup.zip to a temporary directory, eg. C:\temp
Locate the MiiCraftSetup folder from the zip file, it has three components
Sources folder – the source code and prerequisites software
python-2.6.6.msi – Python setup program
setup.py – MiiCraft Suite setup program
Step 2: Install Python
Move mouse pointer to python-2.6.6.msi and double click to execute setup program.
Note:
If you already have Python 2.X installed, you can skip reinstalling Python 2.6.6
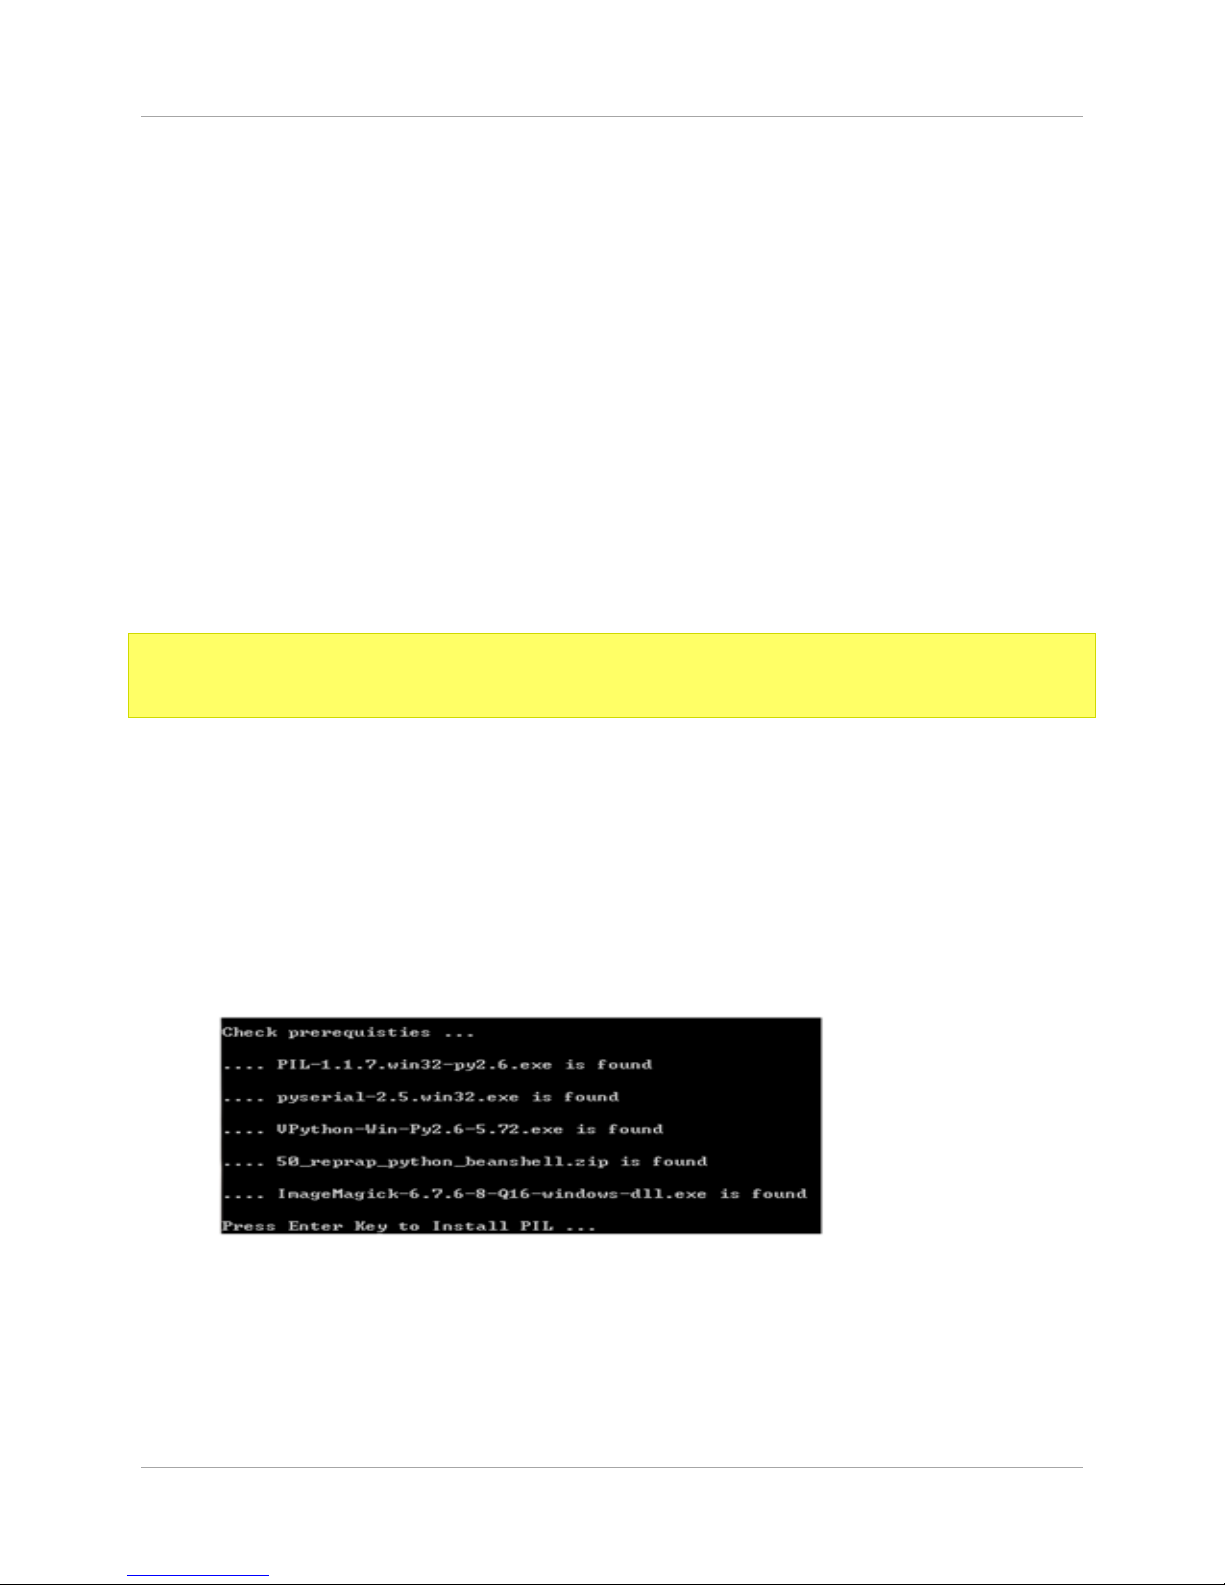
Step 3: Install MiiCraft Suite
Move mouse pointer to setup.py and double click to execute setup
Follow the instructions in the Command line window to complete installations. User
must press enter key to continue install prerequisites software.
o Python Image Library (PIL 1.1.7 is recommended)
o PySerial (v2.5 is recommended)
o VPython (v2.6.5.72 is recommended)
o ImageMagik (v6.7.6-1Q16 is recommended)
o Skeinforge (50_reprap_python_beanshell.zip is recommended)
Setup process will automatic check and install prerequisites software
Page 4
Page 7

MiiCraft 3D Printer User Guide Rays Optics Inc.
4.2 Unique RGBMASK file placement
Each MiiCraft 3D Printer have a “unique” CorrectRGB_MASK.png file that will be
provided to you via email.
After above installation is complete, copy and paste the CorrectRGB_MASK.png file in
the default MiiCraft Suite folder located in C:\MiiCraft
Page 5
Page 8

MiiCraft 3D Printer User Guide Rays Optics Inc.
5 Hardware Setup
Warning:
All Drivers must be installed “BEFORE” connecting MiiCraft 3D Printer to Computer
5.1 Install Trigger Driver
Download MiiCraftsetup.zip from link provided in your shipment confirmation email
Unzip MiiCraftSetup.zip to a temporary directory, eg. C:\temp
Locate TriggerDriver folder within Source folder under extracted MiiCraftSetup folder
Double click on TriggerDriver.exe and follow the installation process
Note:
Restart your computer after TriggerDriver installation
5.2 Connect MiiCraft 3D Printer to PC
Connect adaptor to MiiCraft 3D Printer
Connect USB cable from MiiCraft 3D Printer to PC
Power on the Printer
Windows will search for drivers and compatibilities.
o Chances are Windows will not be able to recognize Arduino Mega Driver
o We would need to update or reinstalled Arduino Mega Driver
Note:
If Windows successfully found Arduino Mega Driver, it is still recommended to update
Arduino driver again based on section 4.3
5.3 Install Arduino Mega Driver
Open Device Manager from Window’s control panel
Search for unknown USB device
Right click on unknown USB device and select “update driver software”
Select “Browse my computer for driver software”
Select “Arduino drivers” folder within Source folder under extracted MiiCraftsetup
folder
Once the folder is selected, click on next to install the driver
Once the driver is successfully installed, you should see Arduino Mega Driver listed in
the Window’s Device Manager
Page 6
Page 9
MiiCraft 3D Printer User Guide Rays Optics Inc.
6 System Setup
6.1 Display Check
Warning:
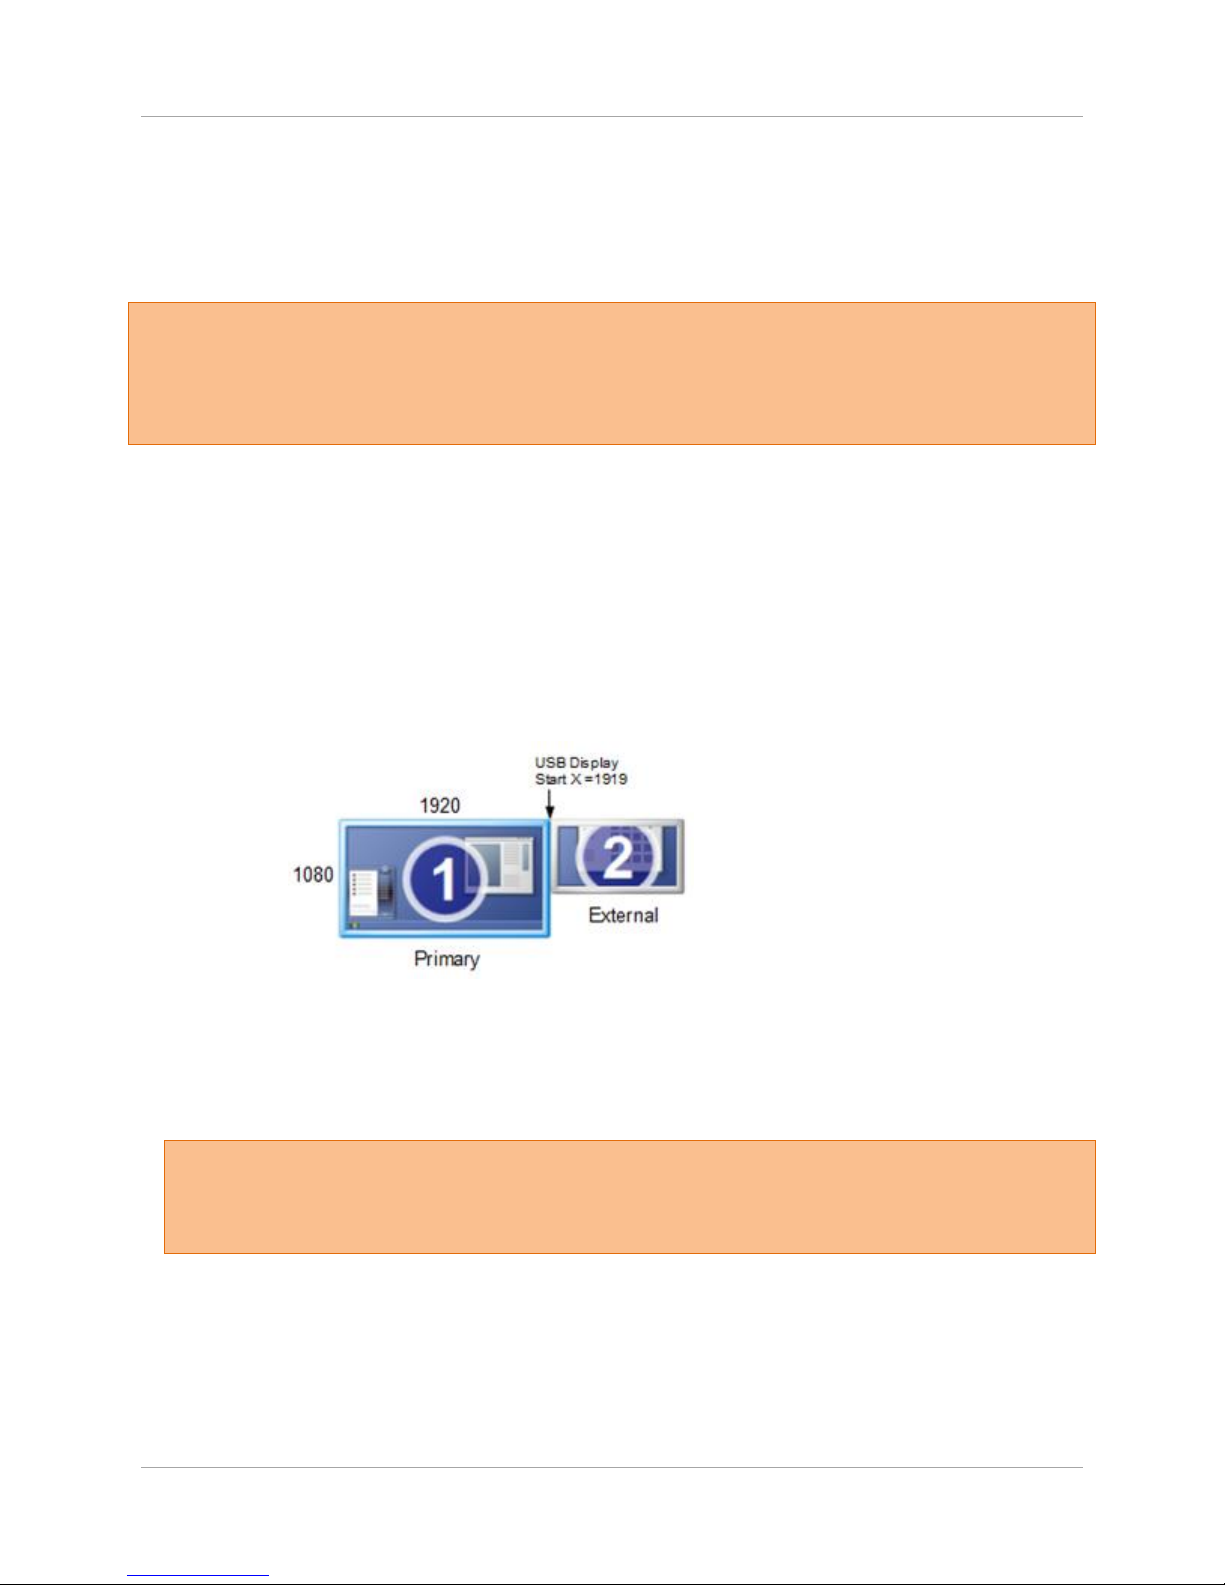
MiiCraft uses USB external monitor to display sliced patterns. It is important
external monitor display is setup properly for MiiCraft 3D Printer to function
correctly
Need to check if the value of USBDisplyStartX in the MiiCraftSuite.ini file (file is located
in c:\MiiCraft)is 1 less than your computer primary monitor resolution.
For example,
o if your primary monitor resolution setting is 1366 x 768 than the value in the
USBDisplayStartX should be set to 1365
o if your primary monitor resolution setting is 1920 x 1080 than the value in the
USBDisplayStartX should be set to 1919
Make sure the USB display is on the right hand side of the primary monitor and aligned
at the top as shown below:
6.2 Turn off Power Saving Functions
Screen Saver needs to be turned off during 3D printing.
Make sure your PC will not go into “hibernate” or “sleep” mode during 3D Printing
Warning:
3D Printer process will FAIL if the screen saver is active during 3D Printing
operation
Page 7
Page 10
MiiCraft 3D Printer User Guide Rays Optics Inc.
7 Unit Operations
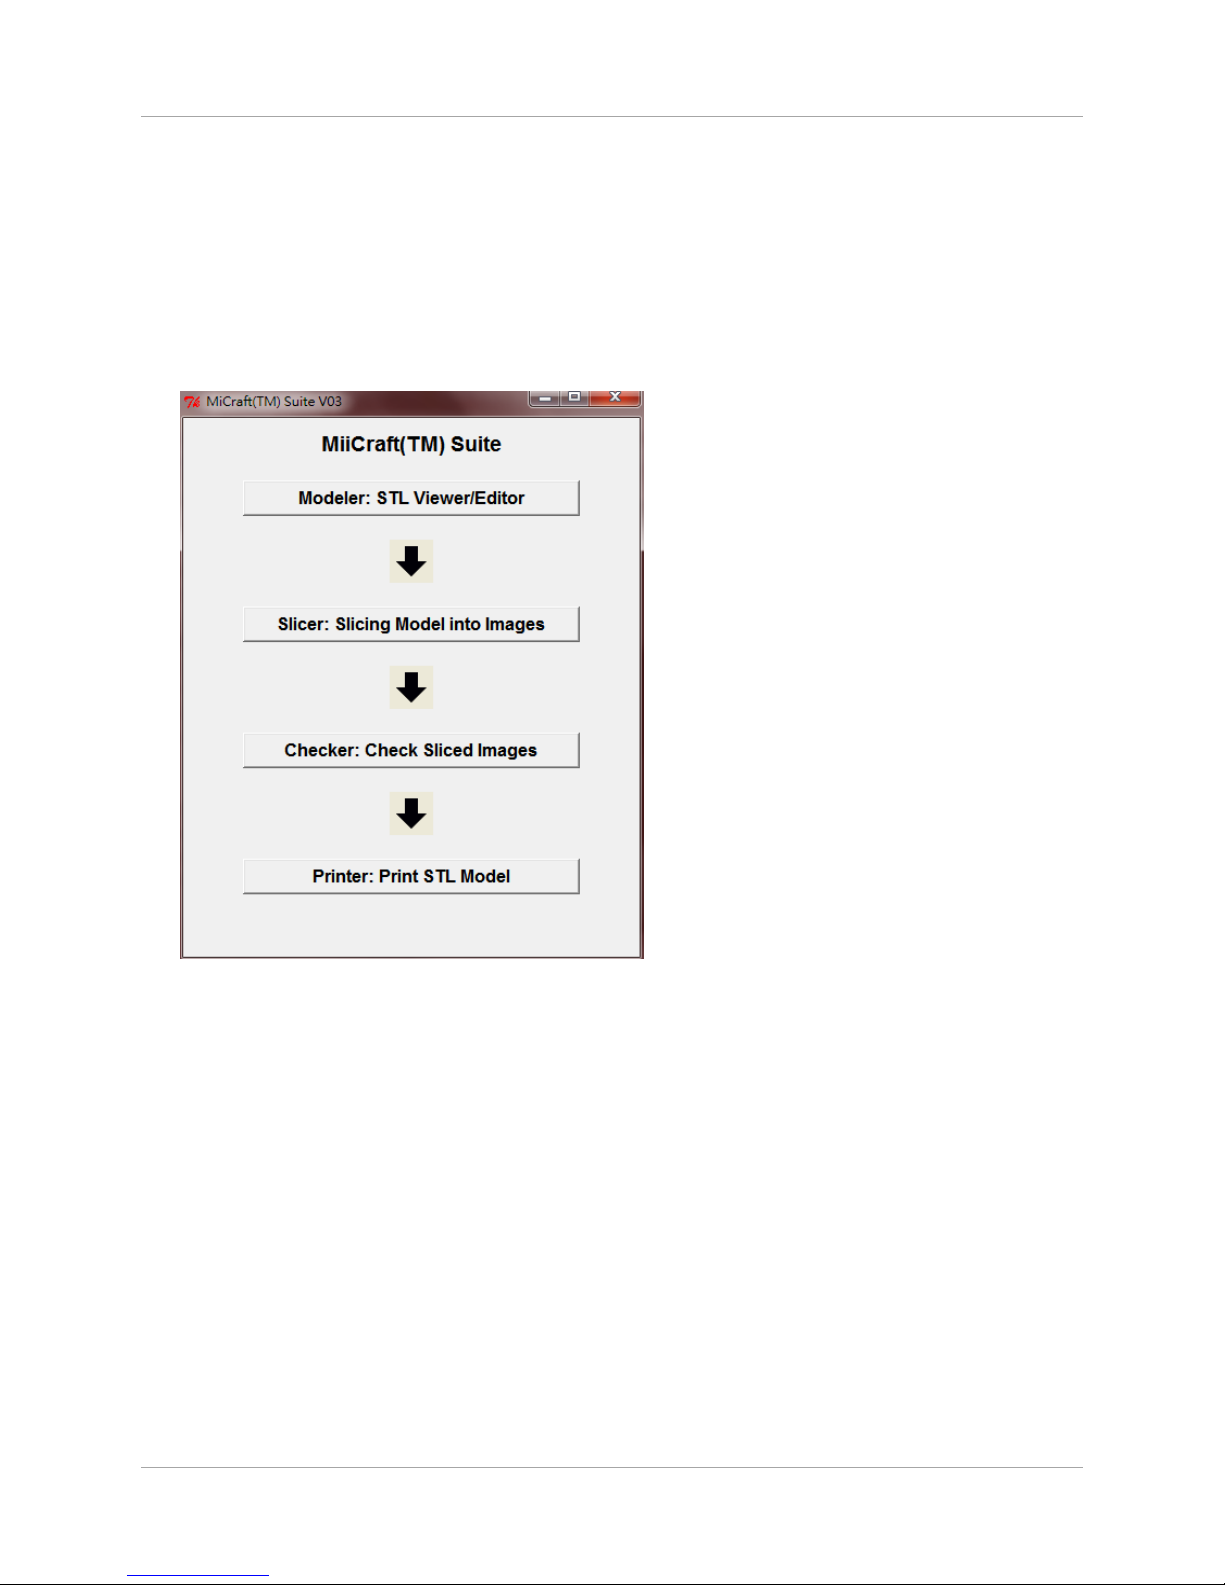
7.1 Launch MiiCraft Suite
Double click on MiiCraftSuiteVxx
Follow the steps and launch the individual sub-programs to start Printing process
It is recommended that user close each individual program once finish using it.
Page 8
Page 11
MiiCraft 3D Printer User Guide Rays Optics Inc.
7.2 MiiCraft Modeler
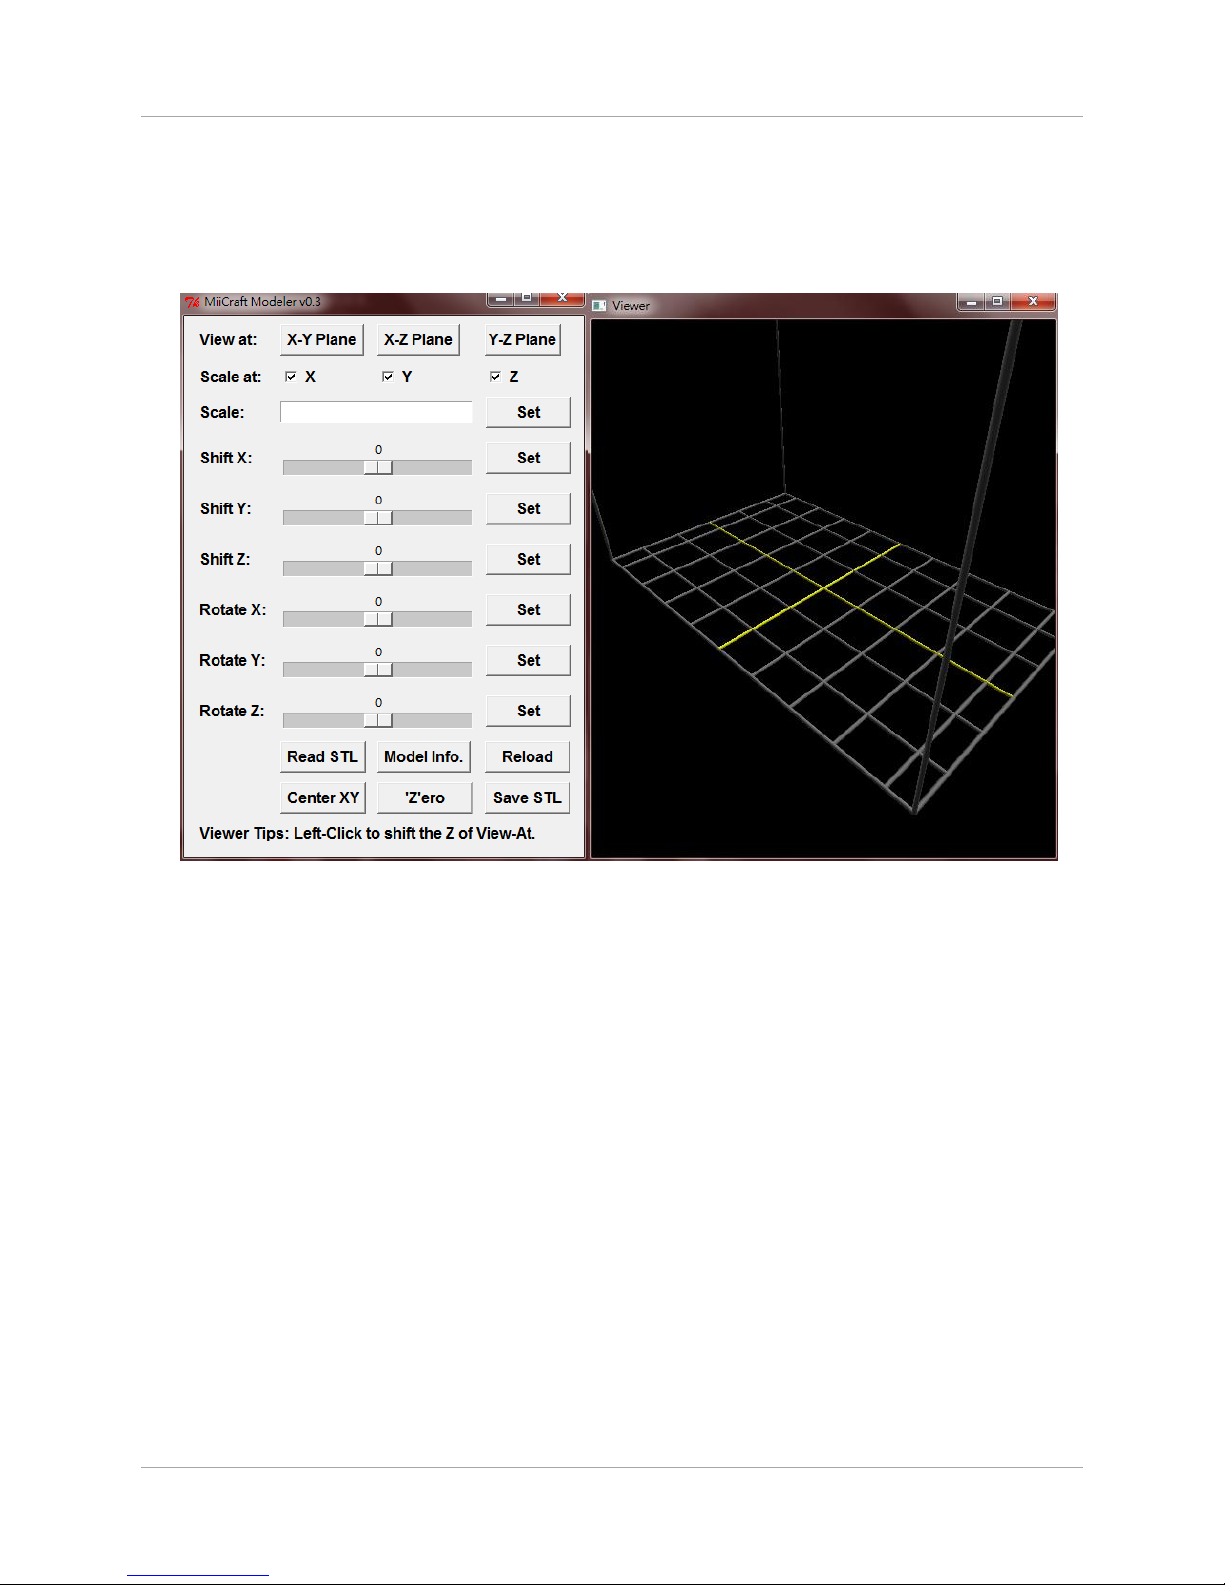
Click on Modeler in MiiCraft Suite Vxx
Load your STL file in the model by clicking “Read STL”
The grid shown in the Modeler is the X-Y Plane printable area for MiiCraft 3D Printer
All model needs to stay within this boundary
Page 9
Page 12

MiiCraft 3D Printer User Guide Rays Optics Inc.
Load STL Model
Center Model to XY
plane
Save STL Model
Zero the Model to X-Y Plane
Reload Last Saved
STL Model
Scale the model
Modeler Functions
Warning:
You must save STL model before proceeding to Slicer program regardless if there’s
any changes to the model.
Page 10
Page 13
MiiCraft 3D Printer User Guide Rays Optics Inc.
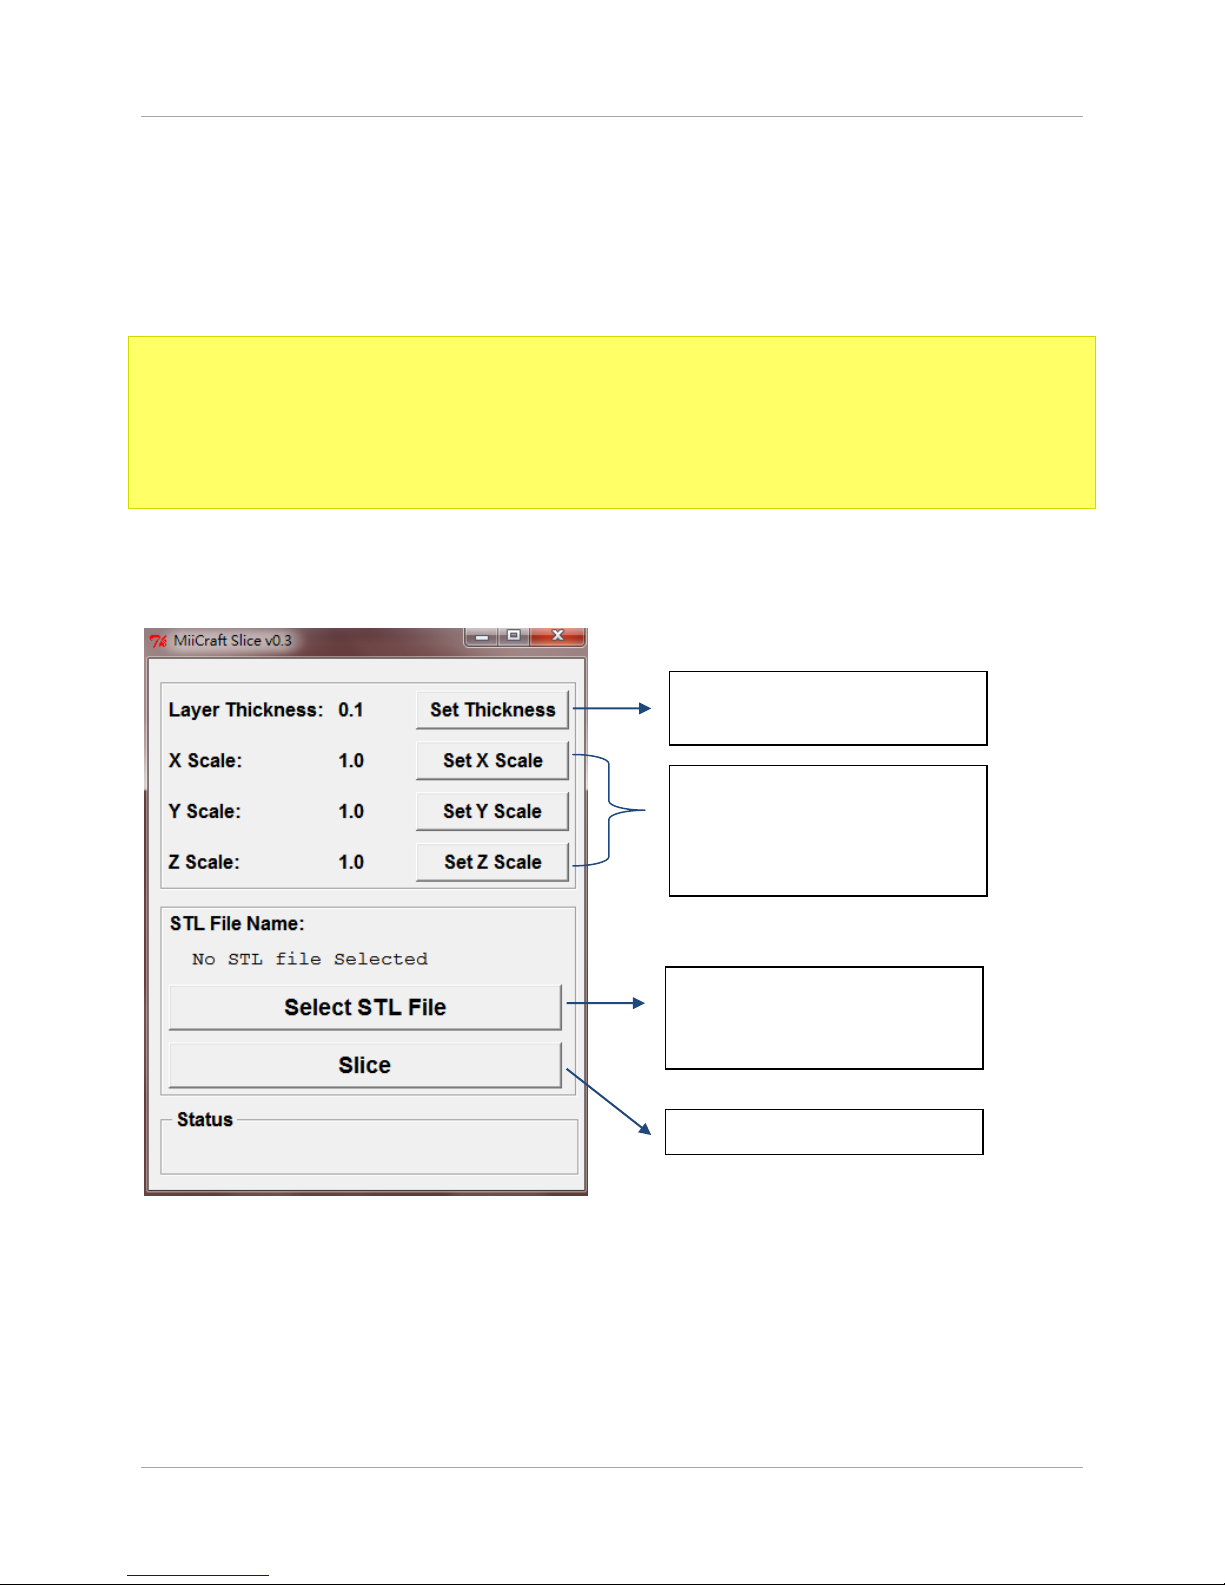
Scale the model before
slicing. All the model
scaling here will NOT be
saved to STL model
Set the desire layer
thickness in mm
Select the STL file you
saved from MiiCraft
Modeler
Start the Slicing Process
7.3 MiiCraft Slicer
Select the STL File that you saved from using MiiCraft Modeler
You have the option of X, Y and Z plane of the model
Set layer thickness in mm
Note:
At this moment, MiiCraft 3D Printer only support layer thickness of “0.1mm” or
“0.05mm”
User can try to print at thinner layer thickness but we cannot guarantee Printed model
performance
Click on Slice to begin slicing models
Slicer Functions
Page 11
Page 14
MiiCraft 3D Printer User Guide Rays Optics Inc.
7.4 MiiCraft Checker
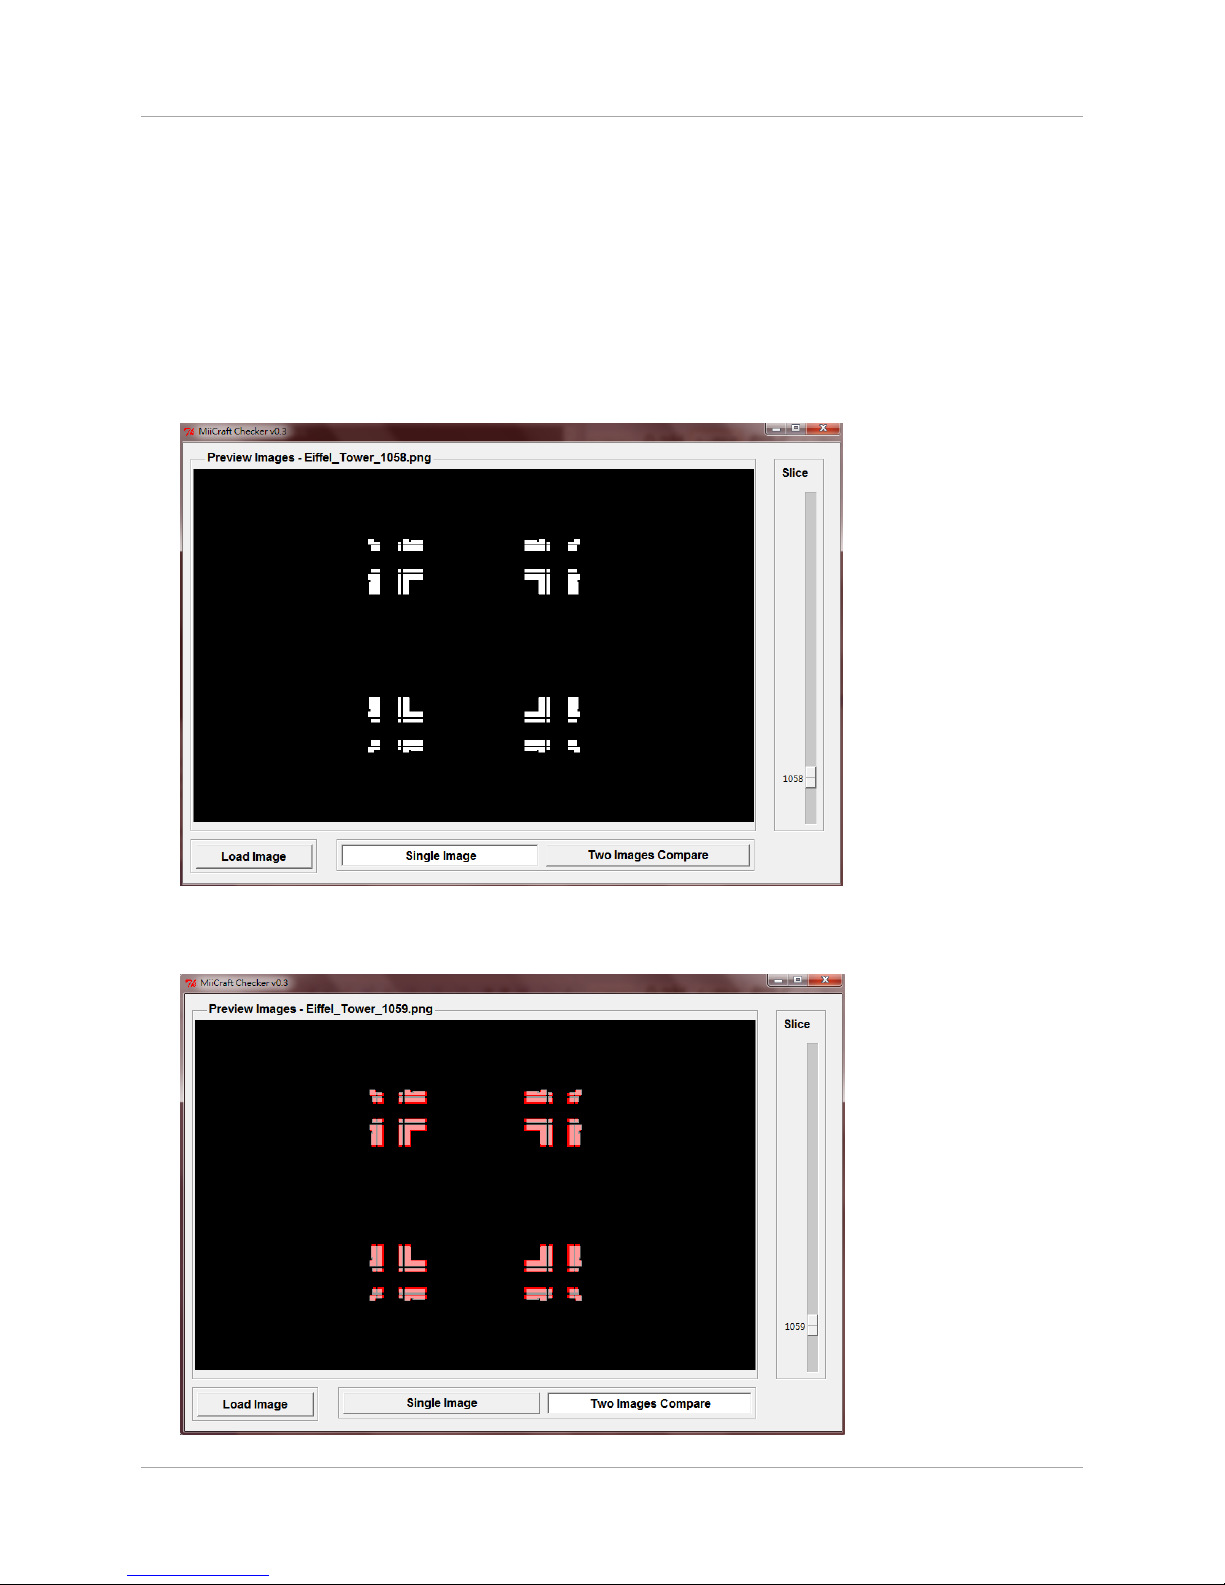
Visual Check of sliced image to ensure there’s no isolated islands
For model to be printed successfully, user need to check the following
o The filled portion in the image is the part of the indented in the model design
o Make sure there’s always some overlap between the filled portion in the
previous image
MiiCraft Checker – Single image mode
MiiCraft Checker – Two image mode (overlapped image will be in pink color)
Page 12
Page 15
MiiCraft 3D Printer User Guide Rays Optics Inc.
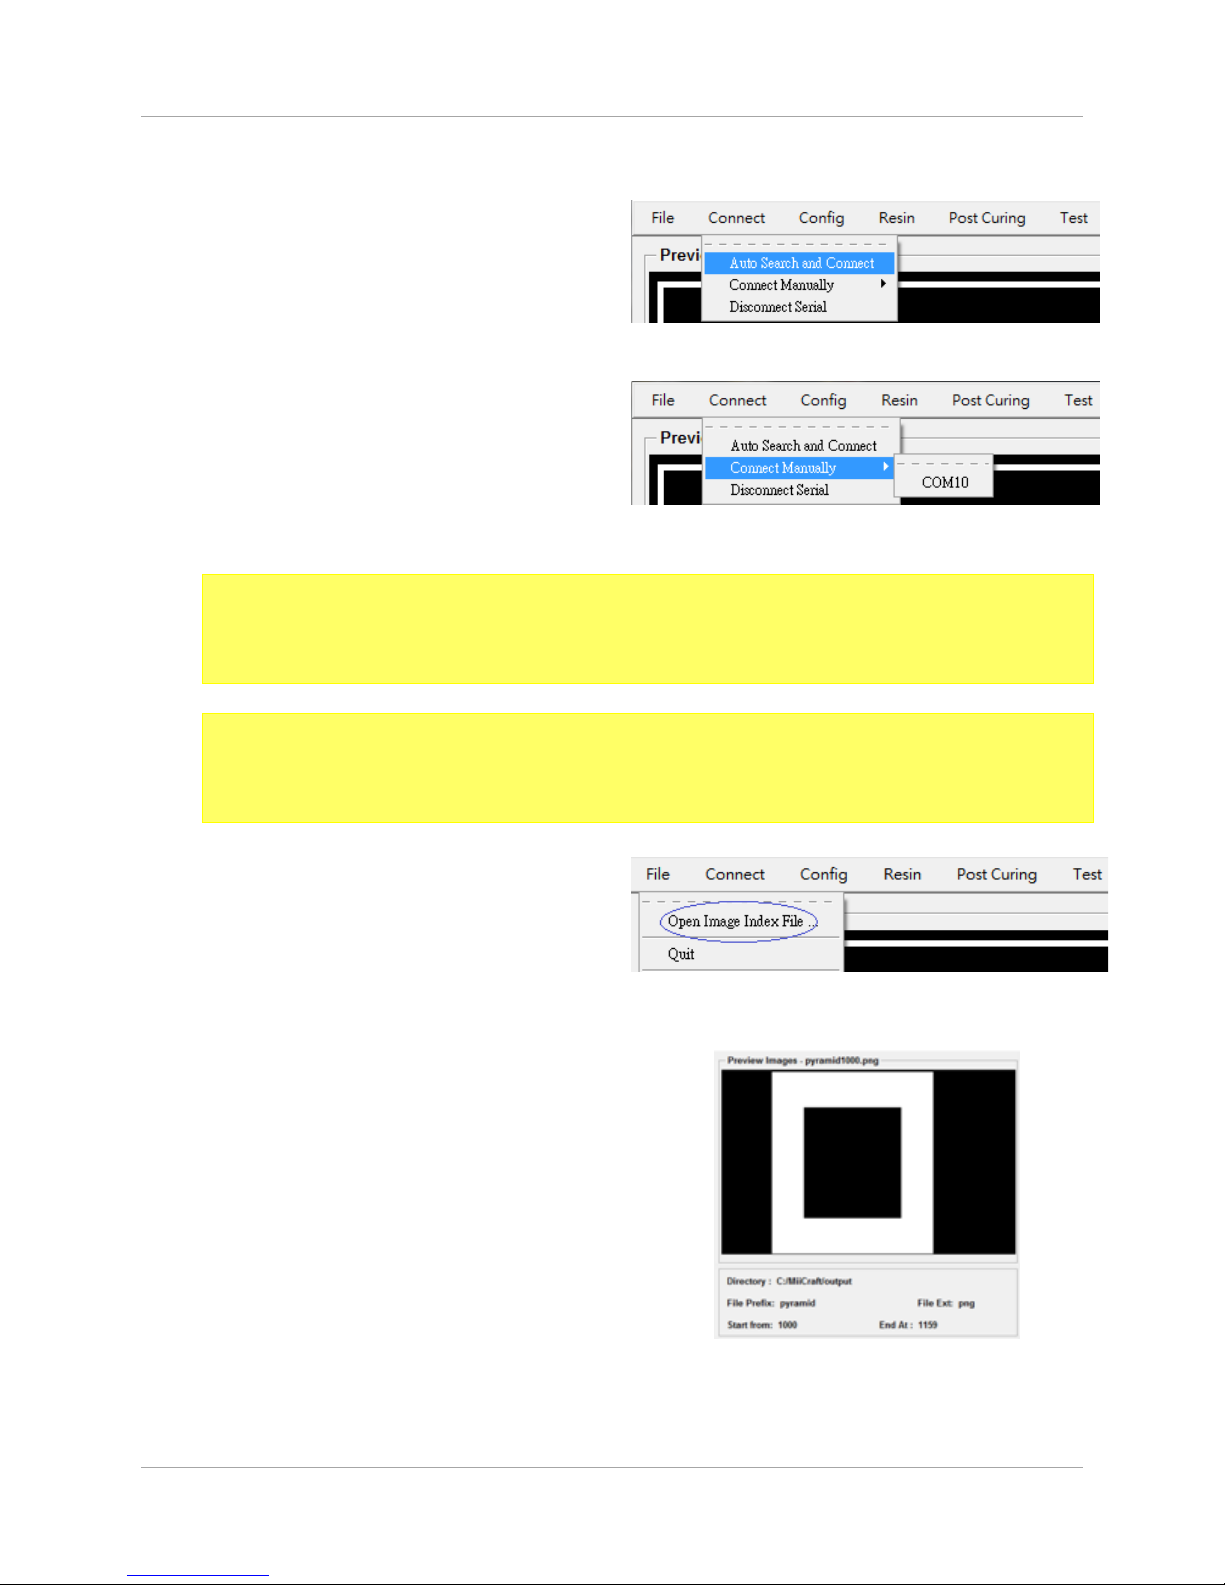
Establish connection via clicking on Connect
and Select “Auto Search and Connect”
There are two ways to connect to Printer.
1) Go to main menu, and select Connect →
Auto Search and Connect, then system
will automatically search and connect to
Printer.
2) if you know the connecting port of
Printer, go to main menu, and select
Connect → Connect Manually → COM?.
Select “Auto Search and Connect”
Select “Connect Manually”
Load the image index file (***.idx), which is
located in the “output” folder in the
MiiCraft folder
Select “Open Image Index File”
Once loaded, the sample of the 1
st
image
will preview in the Printer Control panel
Preview of 1st image
7.5 MiiCraft Printer Control
Note:
Once clicked, please pay attention to LED light on Printer. It will flash once after
connection is established. (connection can take from 2sec to 10sec)
Note:
If application cannot automatically find MiiCraft 3D Printer, please make sure the
device driver has been installed.
Page 13
Page 16
MiiCraft 3D Printer User Guide Rays Optics Inc.
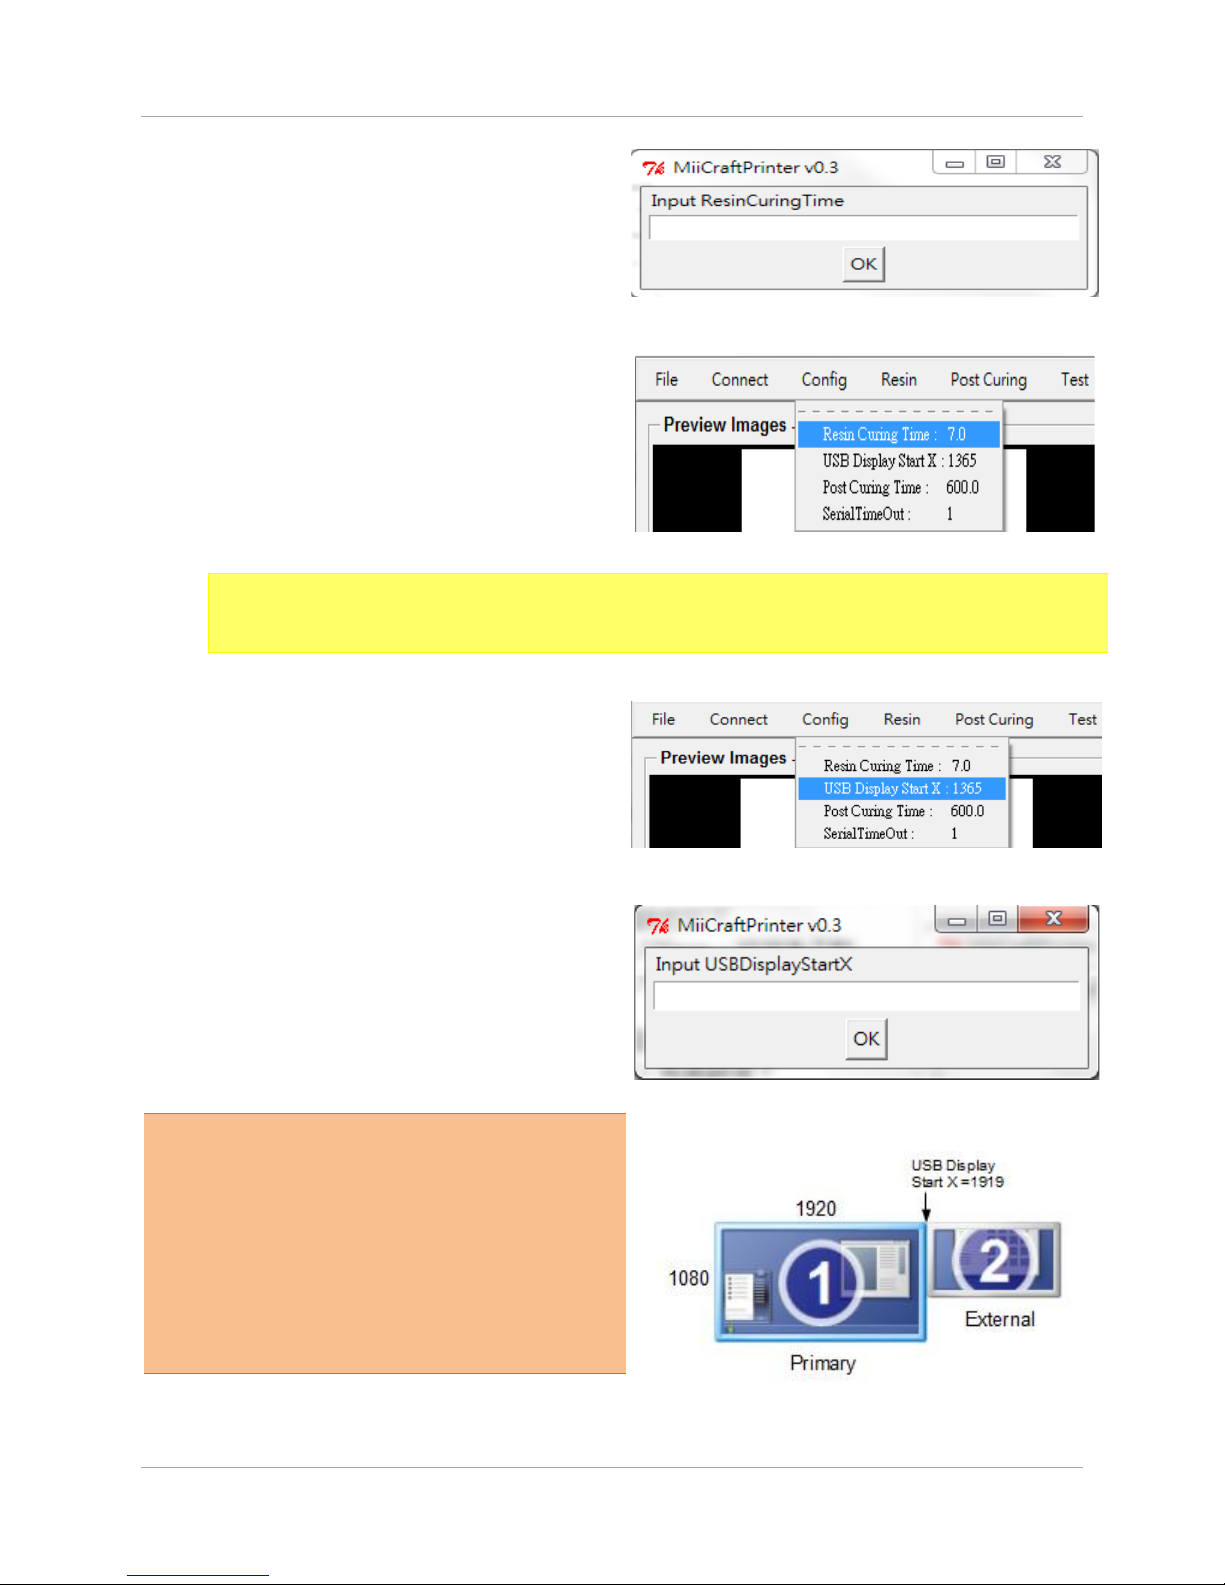
Setting resin curing time
1. Go to main menu, and select Config →
Resin Curing Time, then system will pop
a setting dialog.
2. Depending on your resin, key in the
curing time. Recommended settings are
o 7.00 sec for 100 micron layer
thickness
o 3.50 sec for 50 micron layer
thickness
3. Step3. Click “OK” button to apply the
setting.
Select “Resin Curing Time”
Setting dialog
Note:
Please make sure the selected layer thickness matched the required Resin curing time.
Setting the USB display start X
1. Go to main menu, and select Config →
USB Display Start X, then system will pop
a setting dialog.
2. Key in 1 less than your computer
primary monitor resolution. If your
primary monitor resolution setting is
1920 x 1080 than the value in the
USBDisplayStartX should be set to 1919
3. Click “OK” button to apply the setting.
Warning:
MiiCraft uses USB external monitor to
display sliced patterns. It is important external
monitor display is setup properly for MiiCraft
3D Printer to function correctly.
3D Printer process will FAIL if the screen
saver is active during 3D Printing operation.
Select “USB Display Start X”
Setting dialog
A example of setting USB Display Start X
Page 14
Page 17
MiiCraft 3D Printer User Guide Rays Optics Inc.
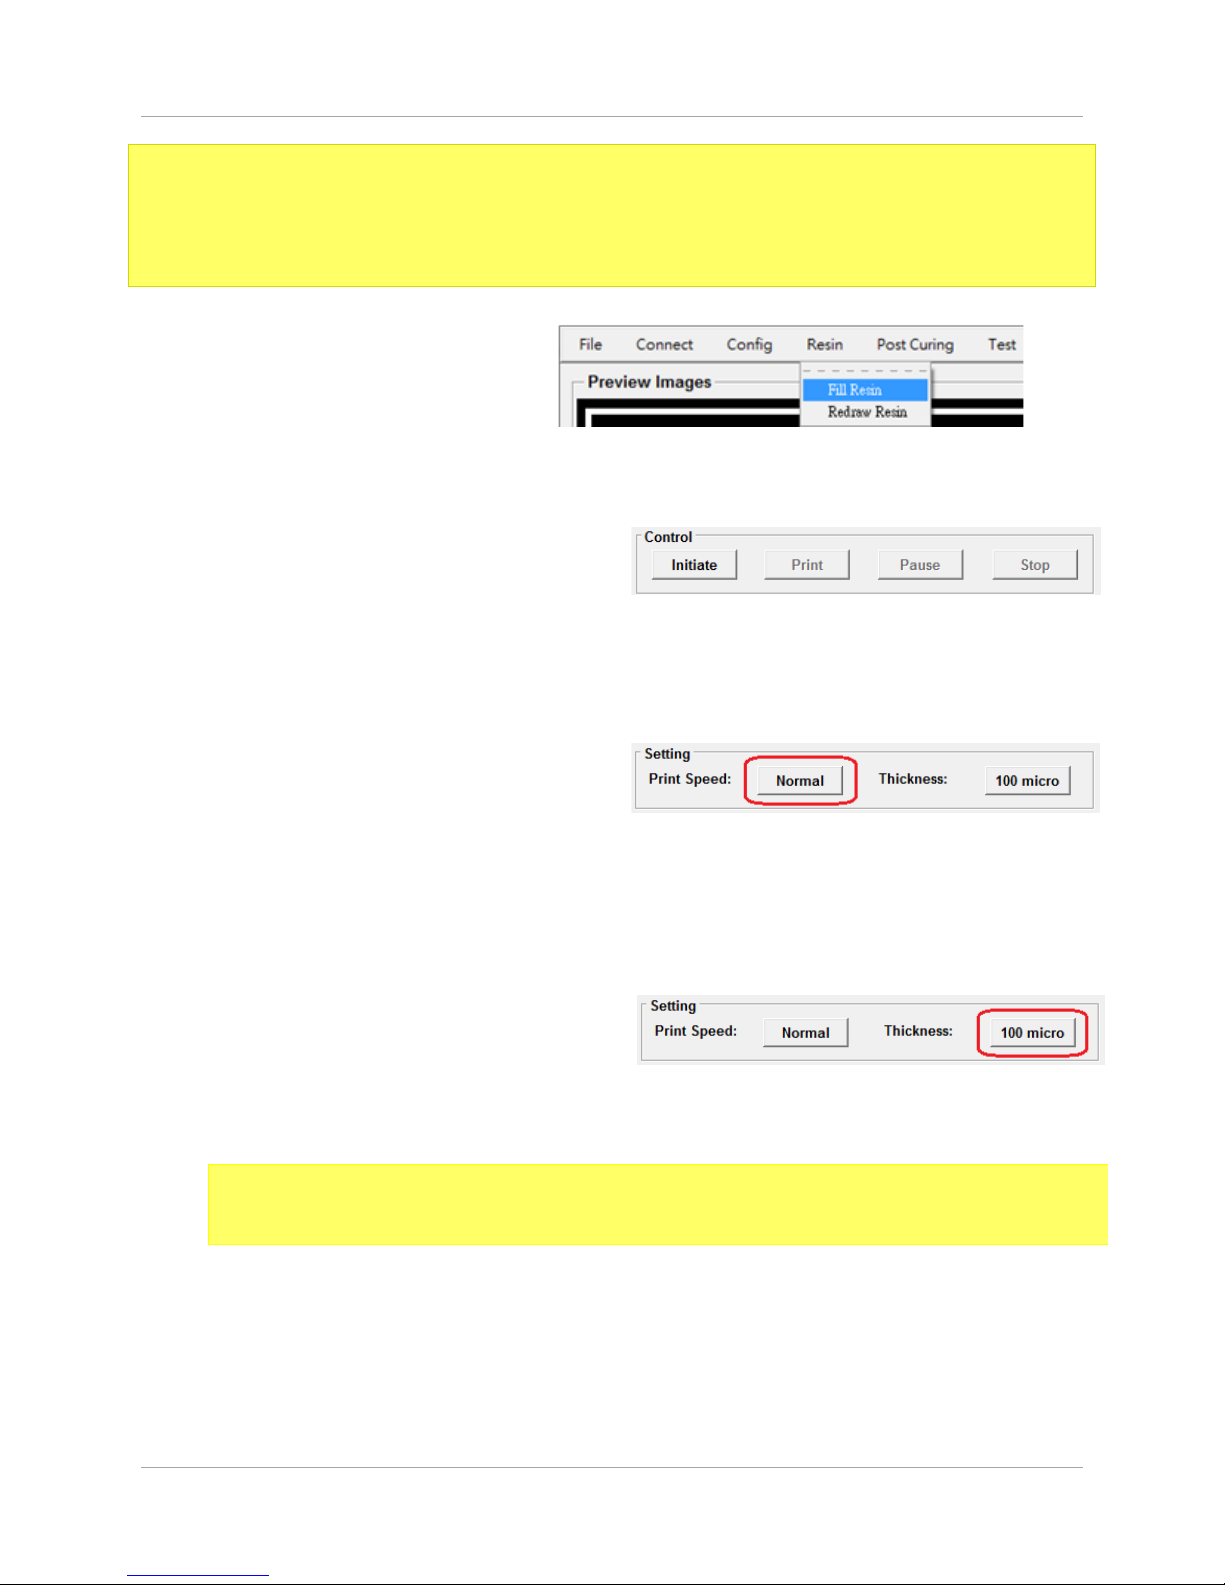
Fill Resin tank before printing
Select “Fill Resin”
Initiate MiiCraft 3D Printer
This feature allows the hardware to
perform the resetting to avoid unusual
state caused by hardware errors (such
as mandatory power outages, etc.).
Click “Initiate” button in Control frame.
Initiate MiiCraft 3D Printer
Set print speed
Click the button after “Print Speed” label
to switch speed.
Normal: Print 3 cm (@100 micro) per
hour, for general print.
Slow: Print 2 cm per hour, applies to
models with weak structural strength.
Switch print speed
Set thickness
100 micron for 7 secs curing time.
50 micron for 3.5 secs curing time.
Switch thickness
Note:
Please make sure the selected layer thickness matched the required Resin curing time.
Note:
The initial value of all the Config options are defined in C:\MiiCrafte\MiiCraftSuite.ini
Any changes modification made from the Printer Control will not modify the initial
value. If you want to modify the initial value, please directly edit the file.
Page 15
Page 18
MiiCraft 3D Printer User Guide Rays Optics Inc.
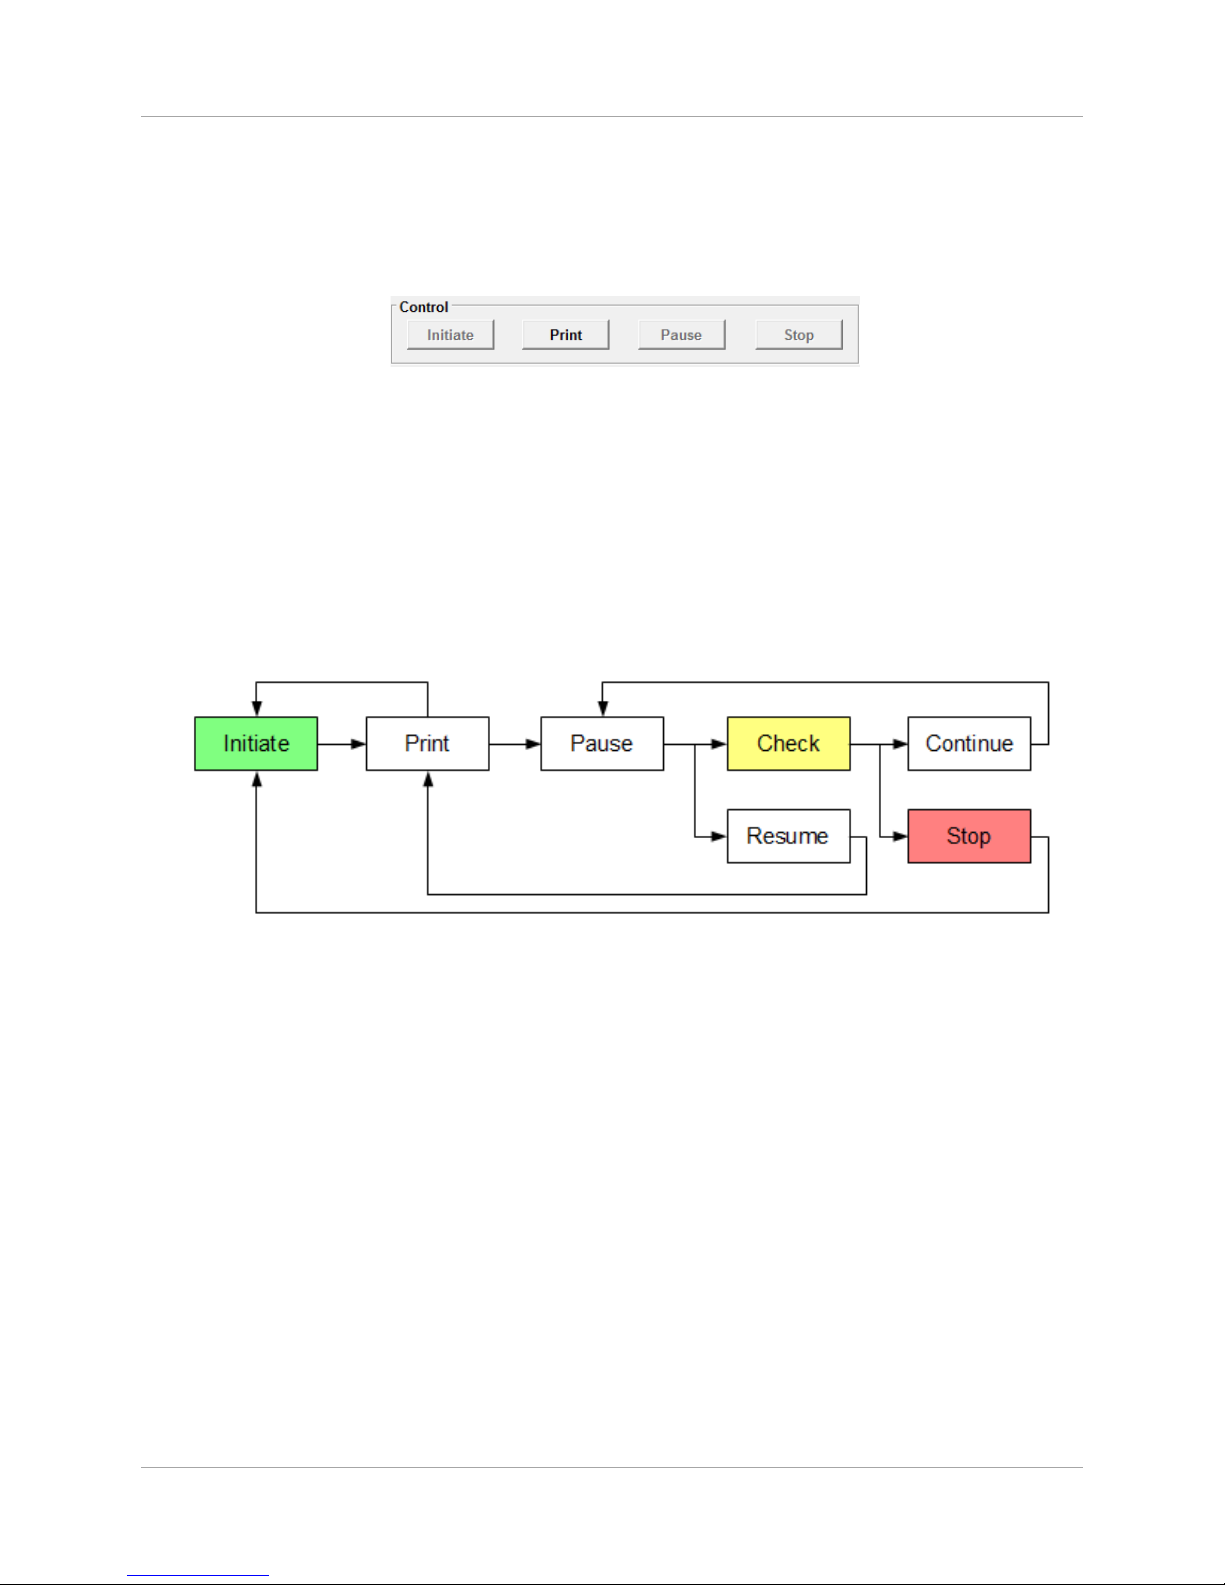
Operation Flow
All operations of print are in the Control frame, in which, the button has different function at
different state.
Control frame
The main processes as shown below. After initialization, click the “Print” button to start the print
task, you can click the “Pause” button to pause printing action at any time, but Printer still
running until working layer are completed. At pause state, you can directly click the “Resume”
button to return print task, or click the “Check” button to check the printed 3D model status, the
production platform will slowly rise by 5 cm, in order to conveniently observe the model. After
confirmation, please click the “Continue” button, the production platform will sink and go back to
“Pause” state. Or click the “Stop” button to stop the print task.
The operation flow of print
7.6 Printed Model Cleaning
The printed model will be attached to the “Pick” once it is finish printing
Remove the Pick from MiiCraft 3D Printer by lifting the Black handle bar securing it
upwards
Clean the excess resin via rising it with Alcohol
o Suggest to use one of the those consumer ultra sonic cleaner with Alcohol to
clean the model
o The setting on the Ultra Sonic Cleaner should not be higher than 30w and longer
than 30sec at one time
Air dry the Alcohol once you have finish cleaning the printed model
Page 16
Page 19
MiiCraft 3D Printer User Guide Rays Optics Inc.
7.7 Post Curing
Before loading the model into MiiCraft Post Curing device, user need to “fold” the Pick
Handles downwards toward the model
Load the folded Pick into MiiCraft Post Curing device
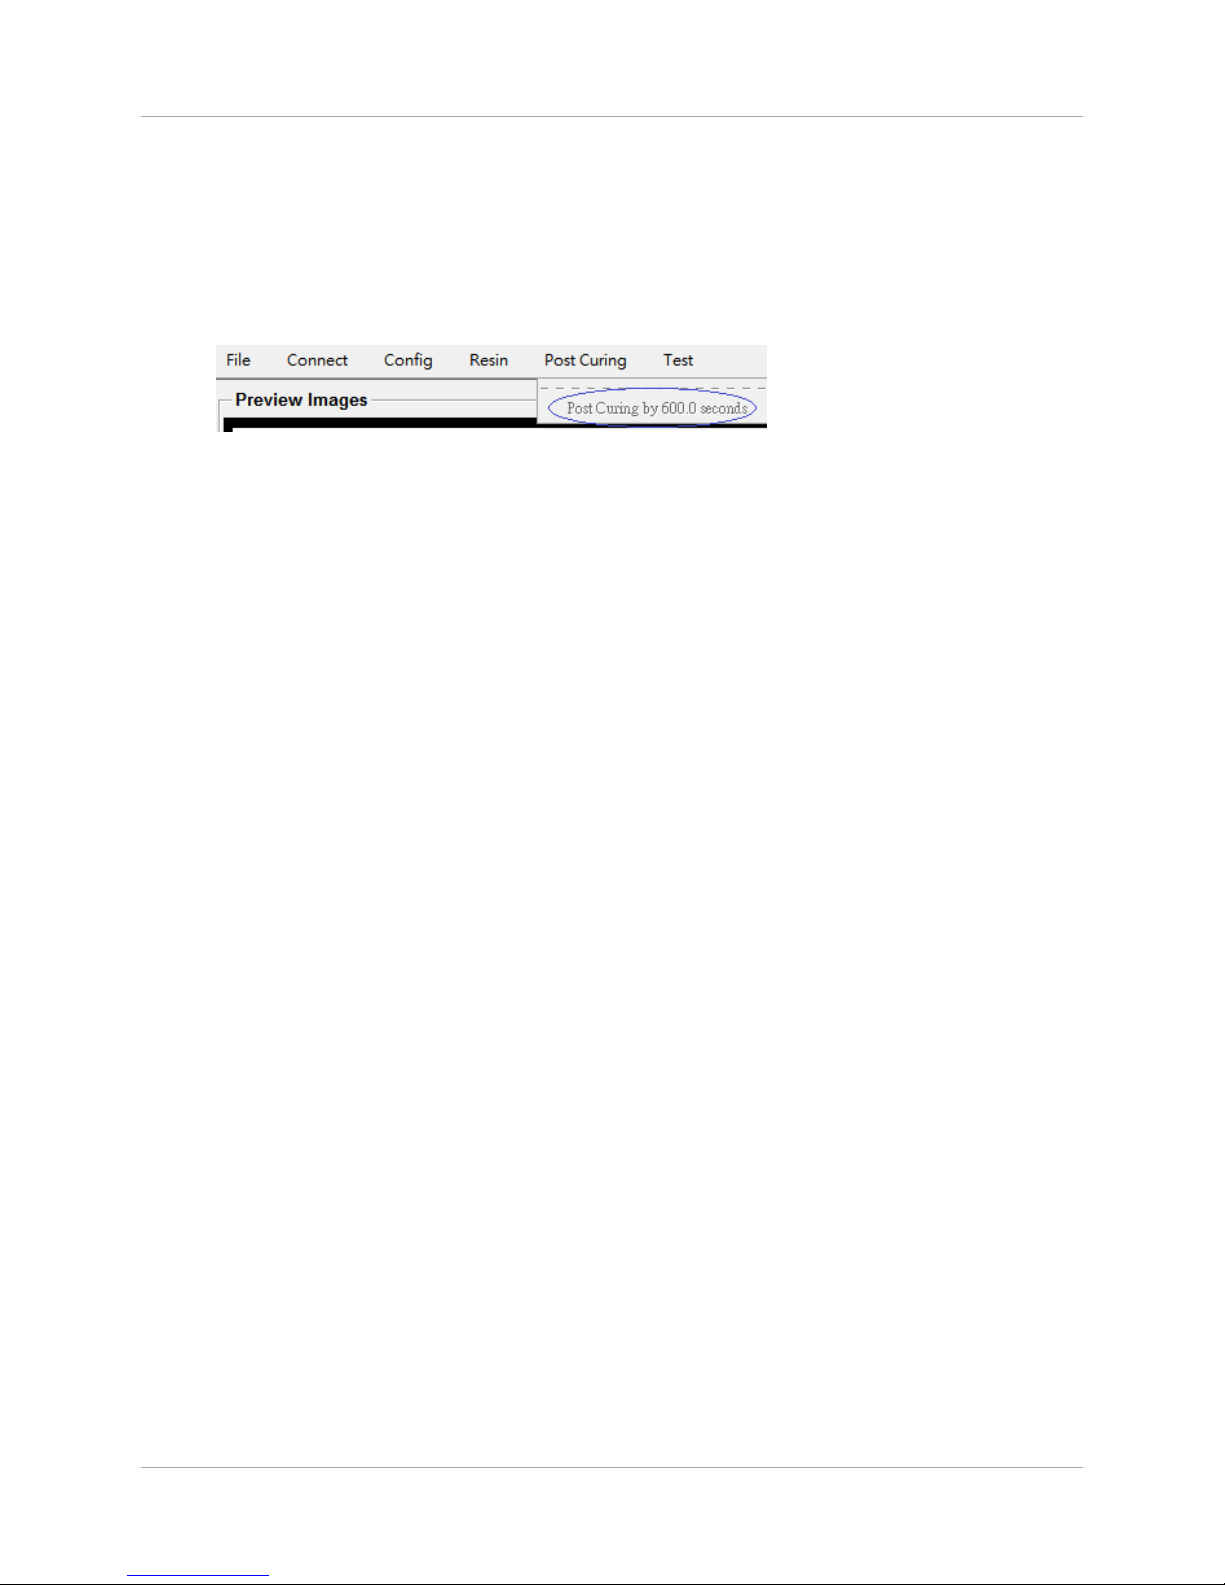
Select “Post Curing” tab to start the post curing process
o Post Curing time is set to 10min by default
The door to the Post Curing device must be shut in order for process to start
7.8 Removing Model
Once post curing is complete, model can be removed from the Pick by slowly lifting the
bottom edge of the model by using a knife.
Page 17
Page 20

MiiCraft 3D Printer User Guide Rays Optics Inc.
8 Test Print
8.1 Print Sample Model (Optional)
Double-click c:\MiiCraft\MiiCraftPrinter_V03.py
From Menu, select Connect-> Auto Search and Connect to connect to the 3D Printer
From Menu, select File-> Open Image Index File, then browse
C:\MiiCraft\sample\Hexball\Hexball.idx
Click on "Initialize" button, the stage will move up to the HOME position.
When the stage reaches the HOME position, click "Print" button to start printing.
When printing finished, move the printed object with the stage from the printer unit to
the post-curing unit.
Close the door of the post-curing, then from Menu, select Post Curing-> Post Curing by
600 seconds.
After post curing is down, remove the object from the stage.
Page 18
 Loading...