

Page 1
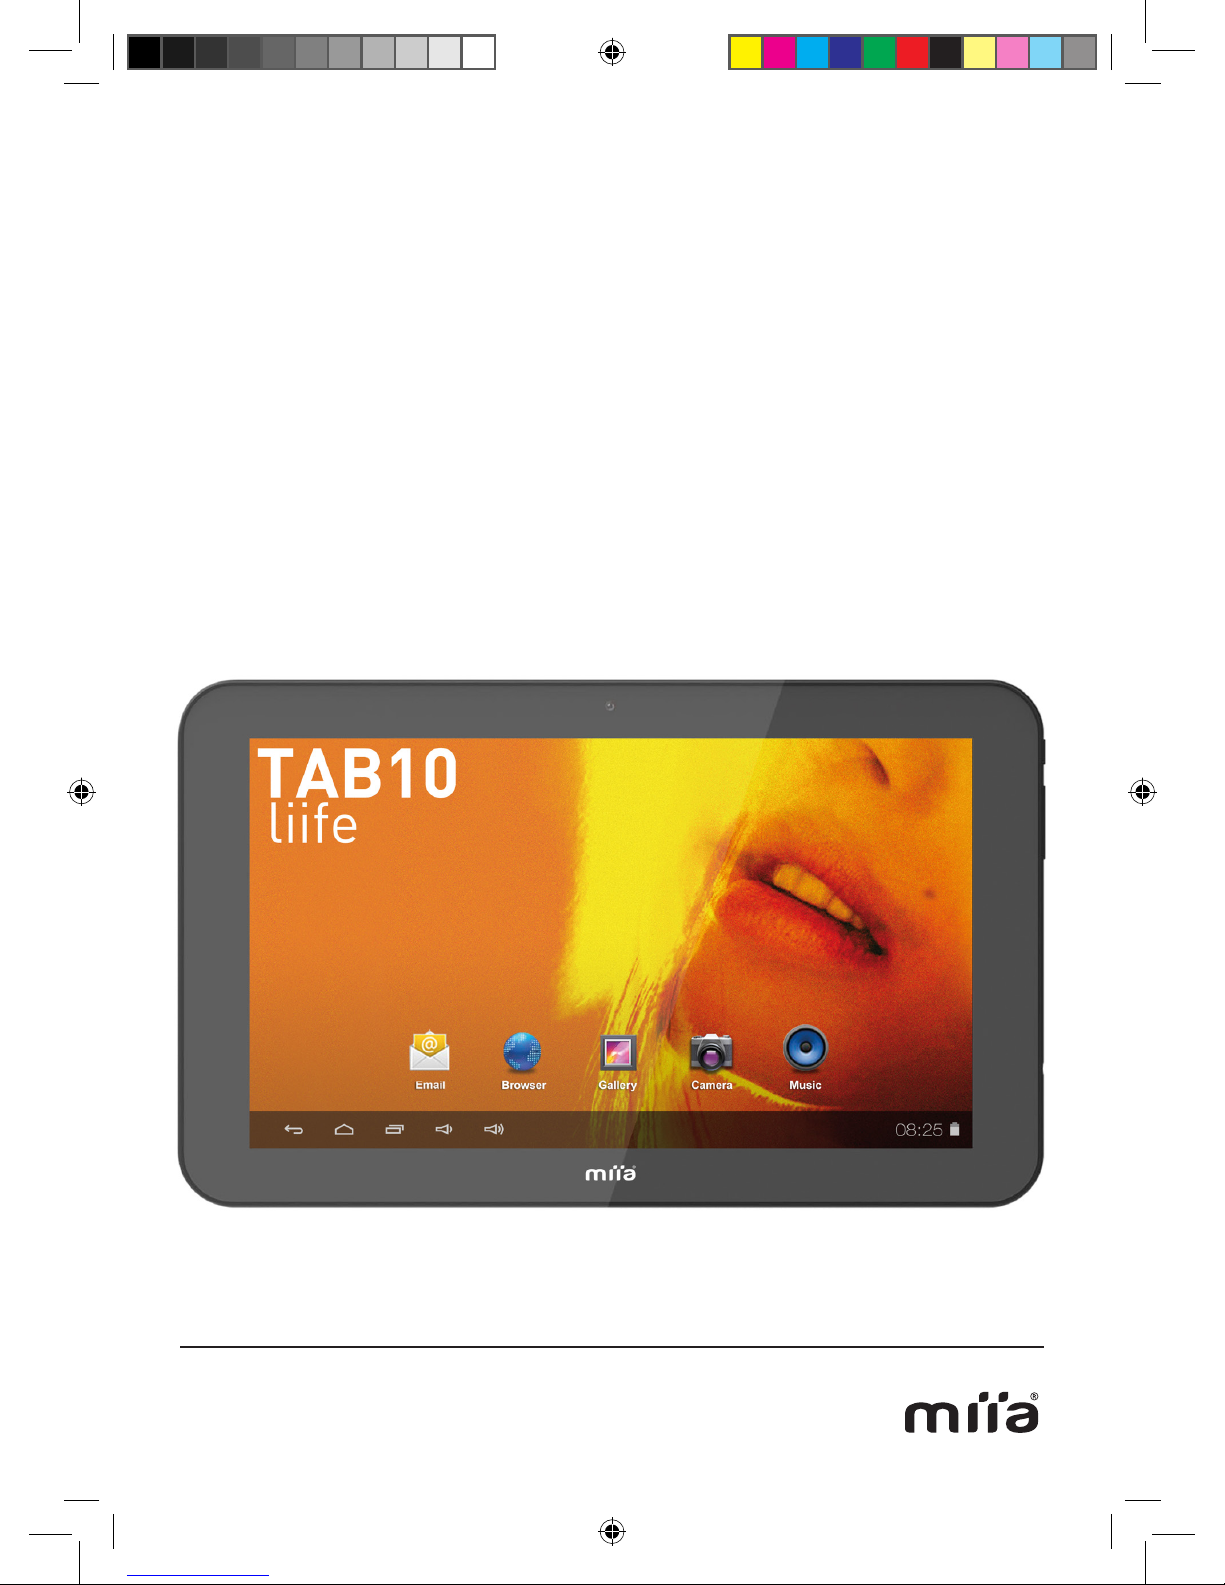
MIIA
MT100
liife
7”
ENG
MIIA MT-100
Manuale d’uso
Page 2
Page 3
3
Important safety instructions ................................................................................................... 4
Overview .................................................................................................................................. 7
Location of controls ................................................................................................................. 7
Keys ......................................................................................................................................... 8
Touch operation ....................................................................................................................... 8
Tablet Applications .................................................................................................................. 9
State Icons ............................................................................................................................ 10
Preparation ............................................................................................................................ 11
Connecting PC and Data Transmission................................................................................. 11
Charge ................................................................................................................................... 12
Use Micro SD card ................................................................................................................ 12
Basic Function ....................................................................................................................... 13
Main screen ........................................................................................................................... 14
Main menu ............................................................................................................................. 14
Settings ................................................................................................................................. 15
Wireless and networks .......................................................................................................... 15
Bluetooth ............................................................................................................................... 16
Device .................................................................................................................................... 18
Personal ................................................................................................................................ 18
Accounts ............................................................................................................................... 19
System .................................................................................................................................. 19
Music ..................................................................................................................................... 20
Video&Picture ........................................................................................................................ 21
Online .................................................................................................................................... 23
Camera .................................................................................................................................. 24
Email ...................................................................................................................................... 25
Troubleshooting: .................................................................................................................... 26
Miia Games ........................................................................................................................... 28
Product specication ............................................................................................................ 29
CONTENTS
Page 4
4
IMPORTANT SAFETY INSTRUCTIONS
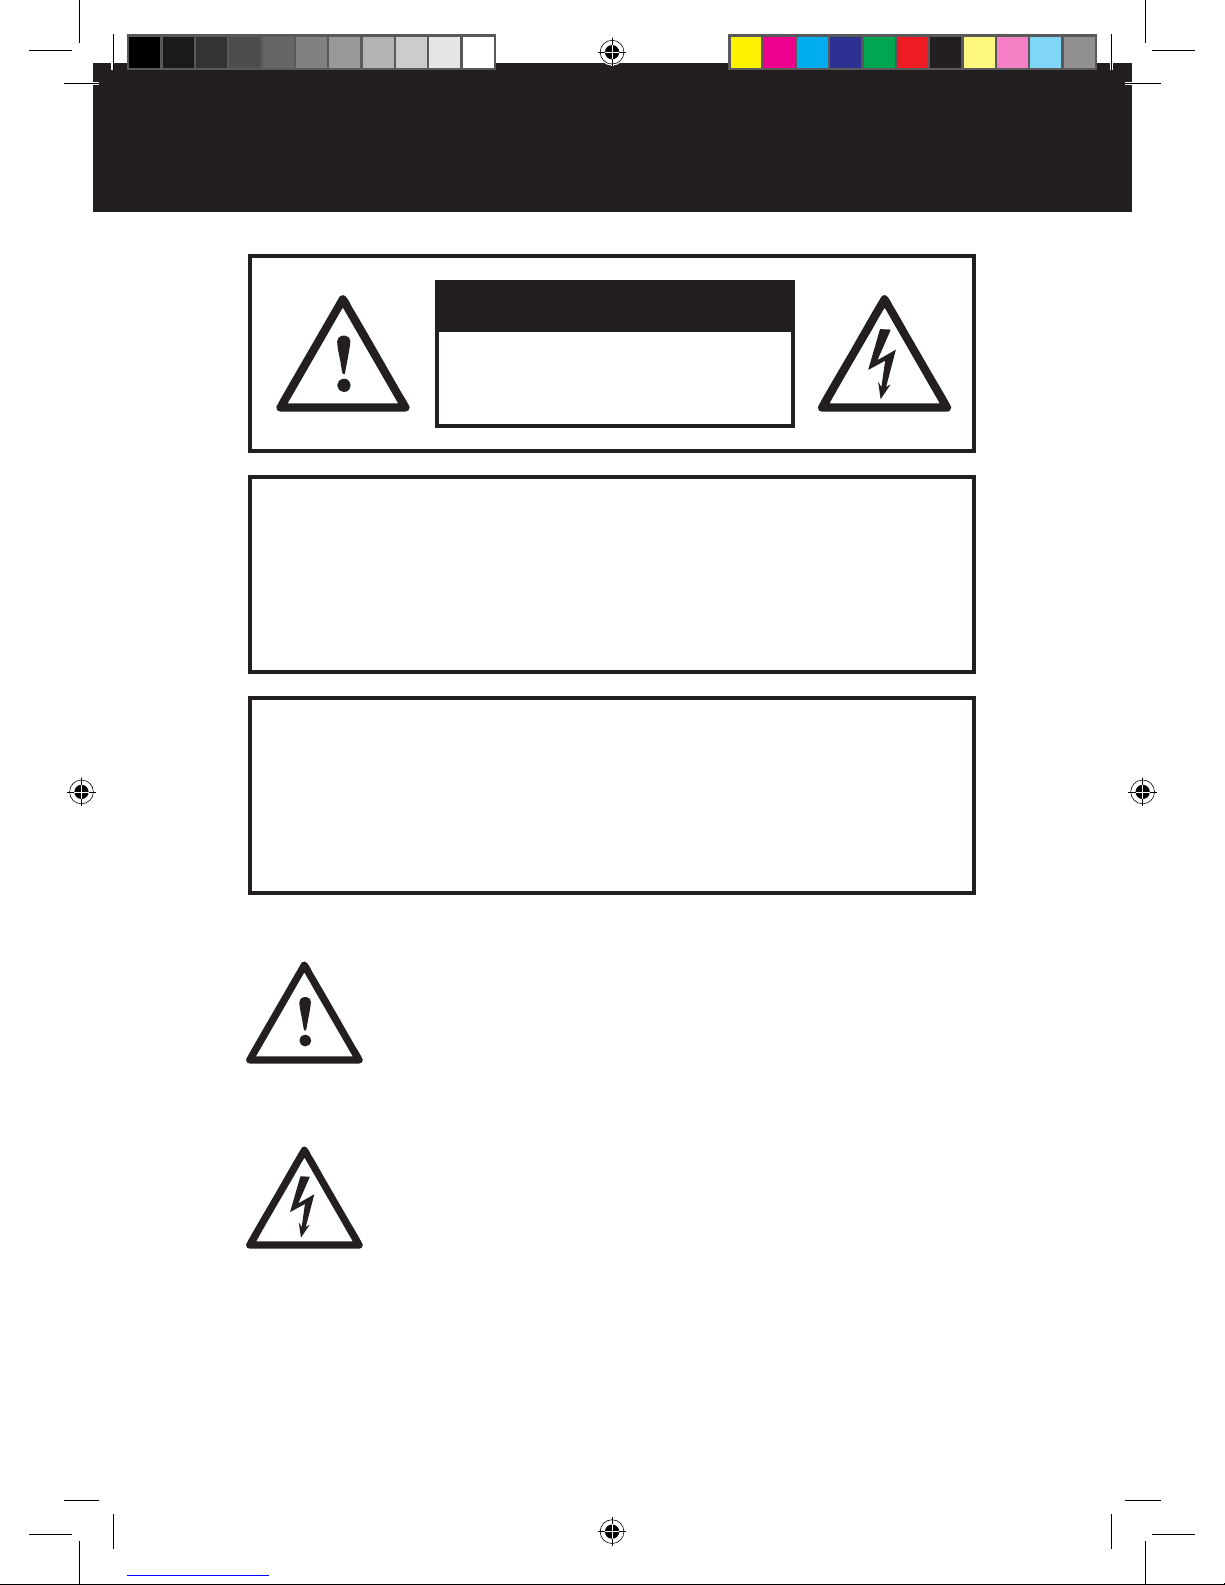
The lightning flash with arrowhead symbol within an equilateral
triangle is intended to alert the user to the presence of uninsulated
dangerous voltage within the product’s enclosure that may be of
sufficient magnitude to constitute a risk of electric shock to persons.
The exclamation point within an equilateral triangle is intended
to alert the user to the presence of important operating and
maintenance (servicing) instructions in the literature accompanying
the appliance.
Before using the unit, be sure to read all operating instructions carefully.
Please note that these are general precautions and may not pertain strictly to
your unit.
CAUITION
RISK OF ELECTRIC SHOCK
DO NOT OPEN
WARNING
TO REDUCE THE RISK OF FIRE OR ELECTRIC SHOCK,
DO NOT EXPOSE THIS PRODUCT TO RAIN OR
MOISTURE
WARNING
TO REDUCE THE RISK OF FIRE OR ELECTRIC
SHOCK, AND ANNOYING INTERFERENCE, USE THE
RECOMMENDED ACCESSORIES ONLY.
Page 5
5
1) Read these instructions.
All the safety and operating instructions should be read before the product is operated.
2) Keep these instructions.
The safety and operating instructions should be retained for future reference.
3) Read all warning.
All warnings on the product and in the operating instructions should be adhered to.
4) Follow all instructions.
All operating and use instructions should be followed.
5) Do not use this apparatus near water.
Do not use this product near water and moisture, for example: near a bathtub,
Wash bowl, kitchen sink or laundry tub; in a wet basement; or near a swimming pool.
6) Clean only with dry cloth.
Unplug this product from the wall outlet before cleaning. Do not use liquid cleaners or
aerosol cleaners. Use a dry cloth for cleaning.
7) Do not block any ventilation openings.
Install in accordance with the manufacturer’s instructions.
8) Do not install near any heat sources such as radiators, heat registers,
stoves, or other apparatus (including ampliers) that produce heat.
9) Only use accessories specied by the manufacturer.
10) Power source
This product should be operated only from the type of power source indicated in the
marking label. If you are not sure of the type of power supply to your home, consult your
appliance dealer or local power company. For products intended to operate from battery
power, or other source, refer to the operation instructions.
Note:
Refer all servicing to qualied service personnel. Servicing is required when the unit has
been damaged in any such as the following: the power-supply core or plug has been
damaged, liquid has been spilled into the unit, the unit has been exposed to rain or moisture,
the unit has been dropped or the unit does not operate normally.
Page 6
6
This manual contains important safety precautions and information for correct usage.
Please be sure to read this manual carefully before use to avoid any damage to the
device.
1. Do not place the product in hot, wet or dusty environments.
2. Do not place the product in hot environments. Especially in summer, do not place it in a car
with all the windows closed or in the sun.
3. Avoid dropping or smashing the product and do not shake the TFT screen excessively as
it may cause damage.
4. Select a suitable volume and avoid loud sound while using headphone/earphones. Turn
down the volume or stop using the product if your ears start hurting or ringing.
5. In the following situations, please charge the product:
A. When battery is running low a pop up window will alert you to charge.
B. System automatically shuts down, and it turns off soon after restart.
C. Operation buttons do not work properly.
D. The unit will not turn on.
Nota: Chargers of other models cannot be used for this device because they may cause
damage to the device that will void the warranty. Please contact our customer service
department if you need a replacement charger.
• Do not disconnect the device while formatting, downloading and/or uploading; otherwise,
application errors may occur.
• We are not responsible for any memory erasure or loss caused by damage or product
maintenance, or other personal reasons.
• Do not disassemble the product, and avoid cleaning the product with ethyl alcohol, thinner,
or benzene.
• Do not use this product in areas which prohibit the use of electronic devices.
• Do not use this product while driving or walking in the street, as it may cause an accident.
Notes:
• This device is not waterproof.
• All images in this manual are for reference only. Specifications and appearance of the
product and the screens are subject to change without prior notice.
Page 7
7
OVERVIEW
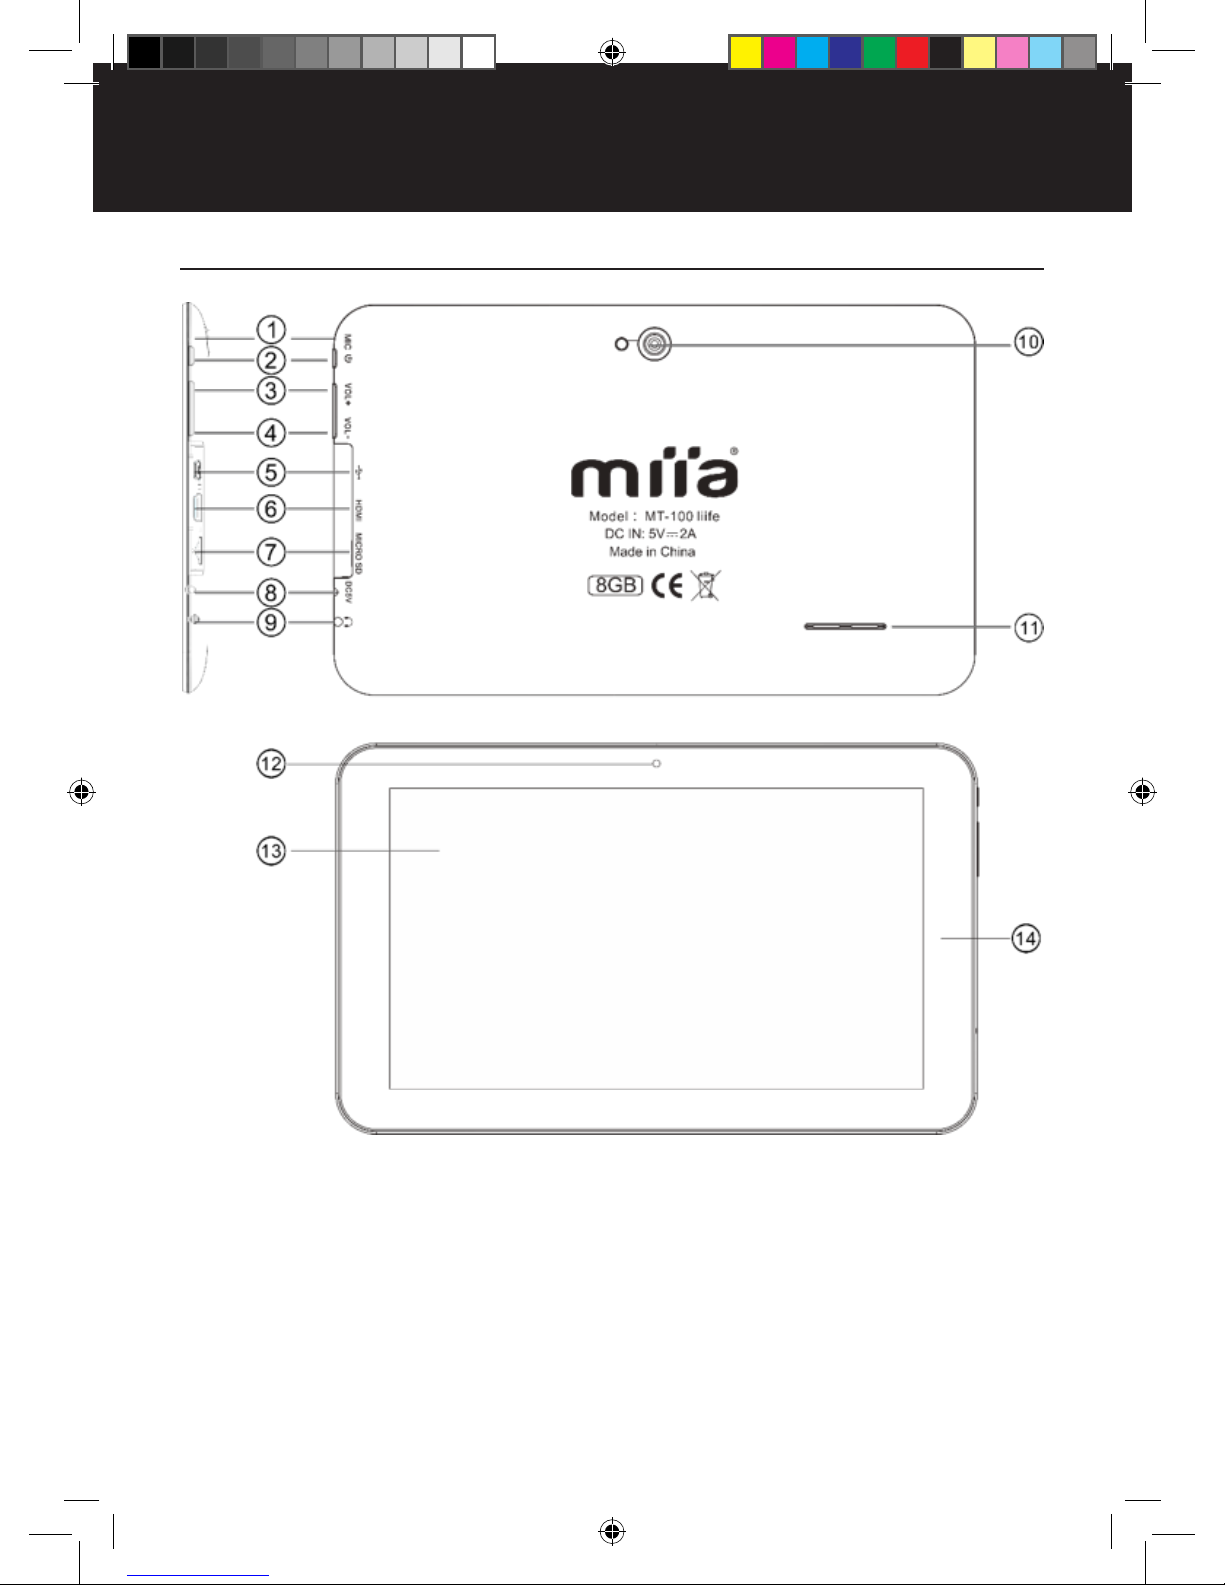
Location of controls
MIC
Power key
VOL +
VOL -
Micro USB OTG
HDMI
Micro SD
DC IN jack
Headphone
Real camerar
Speake
Front camera
TFT LCD
Touch panel (TP)
Page 8
8
Keys
Touch operation
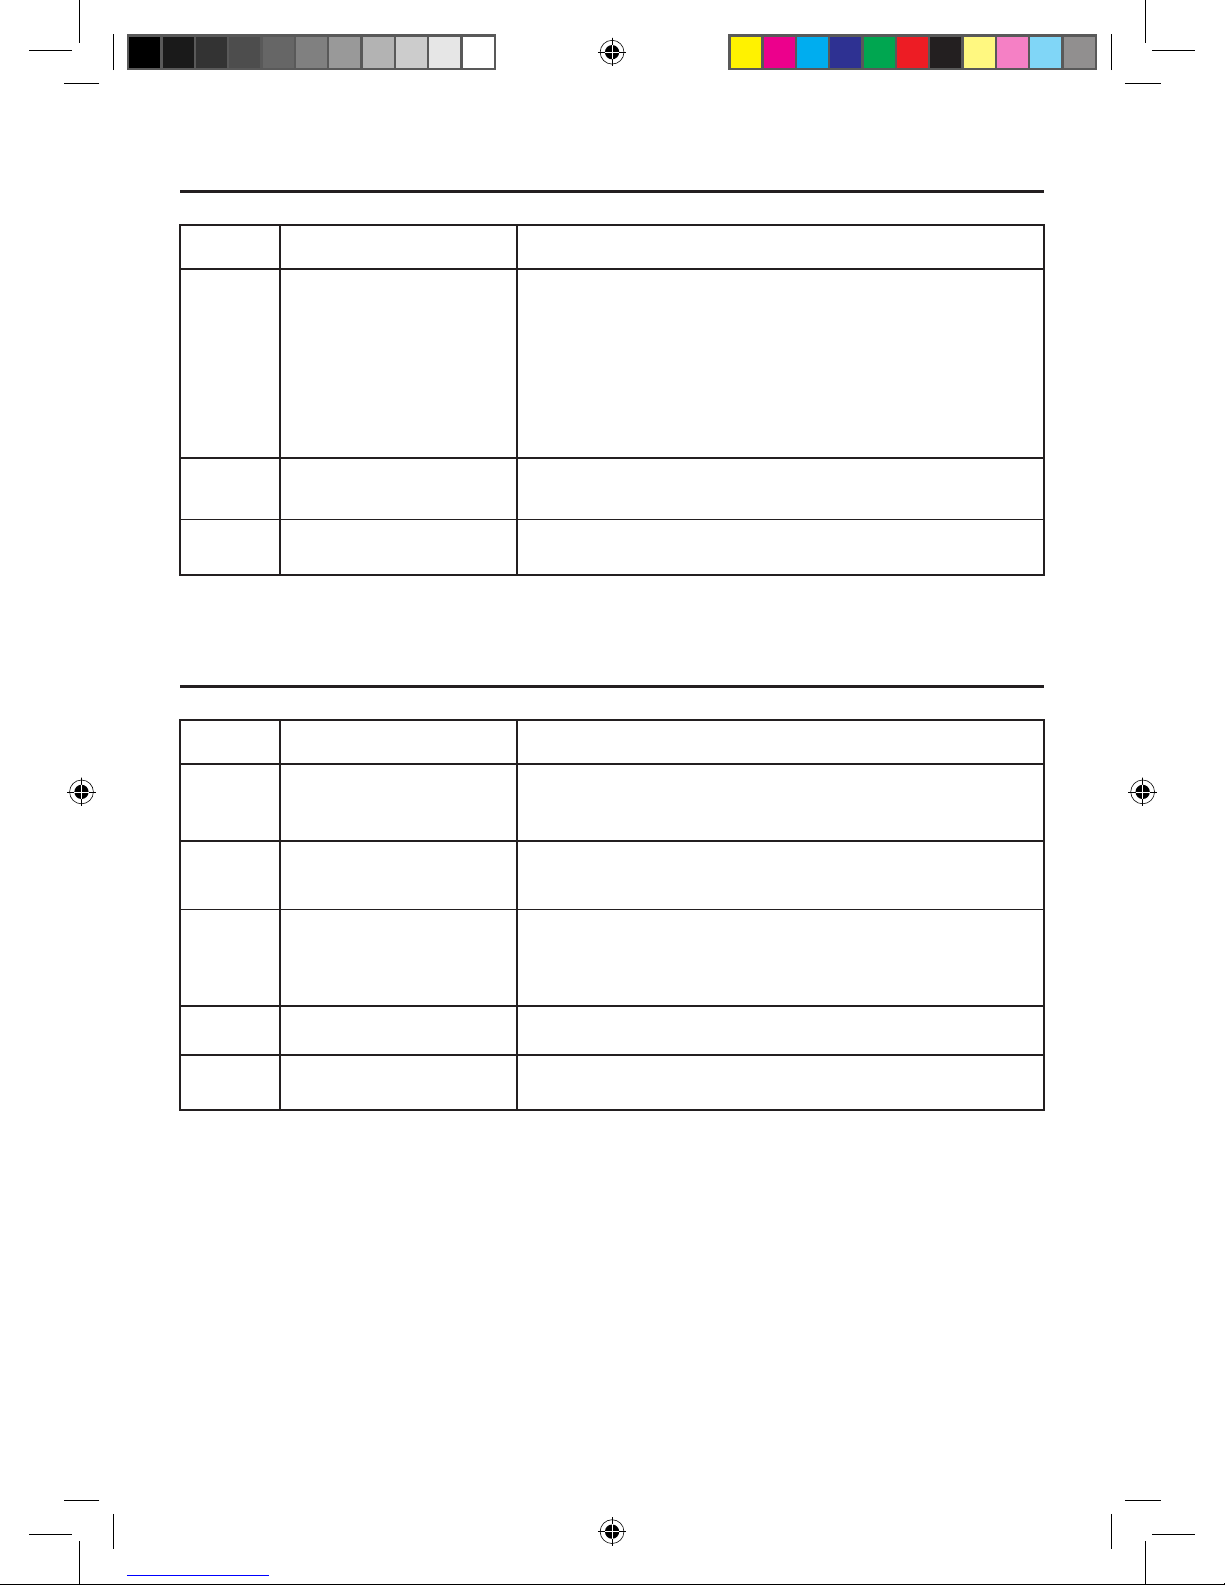
No. Name Function Definition
Power key
VOL - Key Use to decrease the volume
VOL + Key Use to increase the volume
No. Name
1
Short press
2
Long press
3
Slide/Drag
operation
4
Hand written operation
5
Virtual key
Function Definition
Means touching an icon for less than 1.2sec to activate
it.
Means touching an icon for more than 1.2sec to
activate it.
Means the touch trace direction. Mainly used in
picture/page turning/drag etc
It is mainly for typing characters/symbols.
It belongs to the virtual keyboard.
1) One long press (about 8sec) to power on
the Tablet
2) One long press (about 8sec) to power off
the Tablet
3) One short press(about 1sec) to activate
from standby
Page 9
9
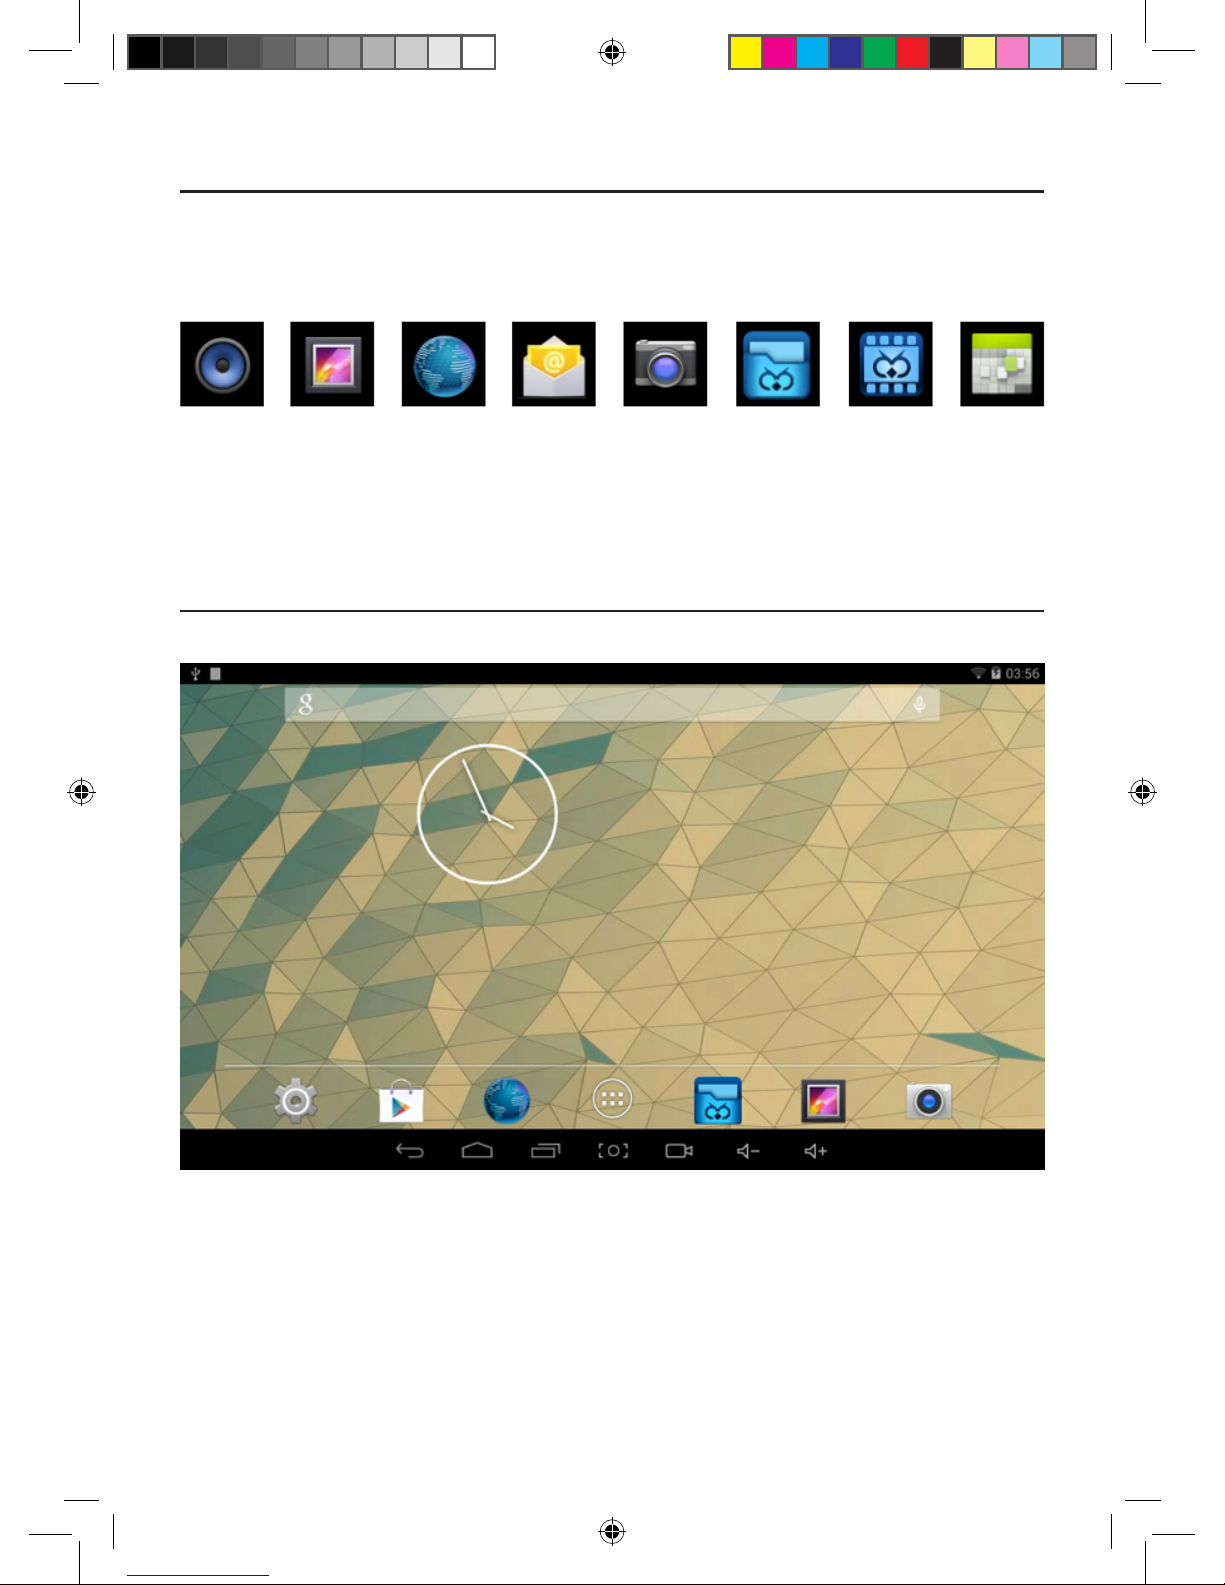
Tablet Applications
State Icons
The Status bar menu is as follows:
On the bottom of screen status bar, there are seven operation icons.
Music Picture Browser E-mail Camera File OWL Calendar
Library Manager Player
Some applications can be customized according to the users’ needs. The following list is the
common basic applications:
Page 10
10
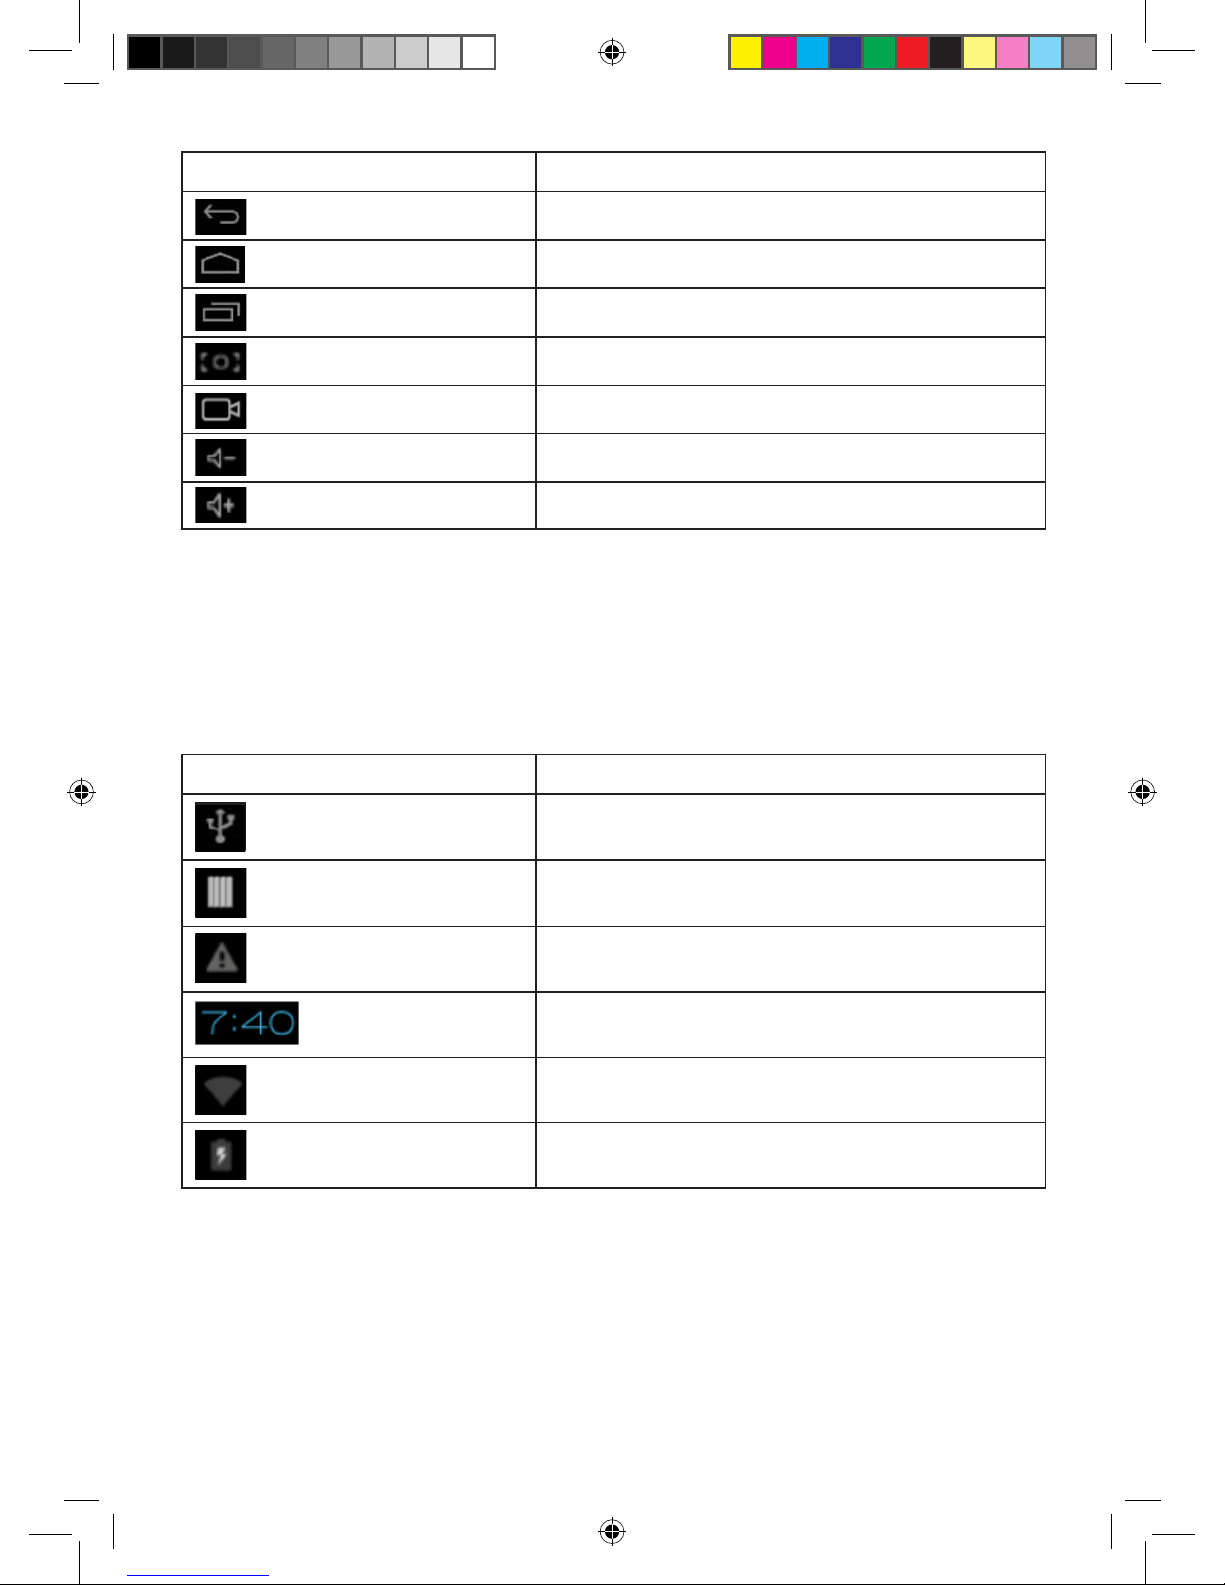
The icons below display the current information of the tablet:
Icons
Return soft key
Home soft key
Shortcut key
Screenshot key
Screen Recorder key
Volume -
Volume +
Icons
USB connecting state
USB state
SD card connecting state
Time
Wi-Fi
Battery
Implications
Go back /return to previous action
Go back to Home screen
Shows all open applications as thumbnails, select one to
open it to full screen.
Full screenshot
Screen Recorder
Decrease Volume
Increase Volume
Implications
Display the USB connecting status
Displays if the USB is connecting correctly
Shows the status of the Micro SD socket
Shows the current time
Shows the signal strength of the wifi connection being
used with the tablet
Shows the current charge left on the battery
Page 11
11
PREPARATION
Connecting PC and Data Transmission
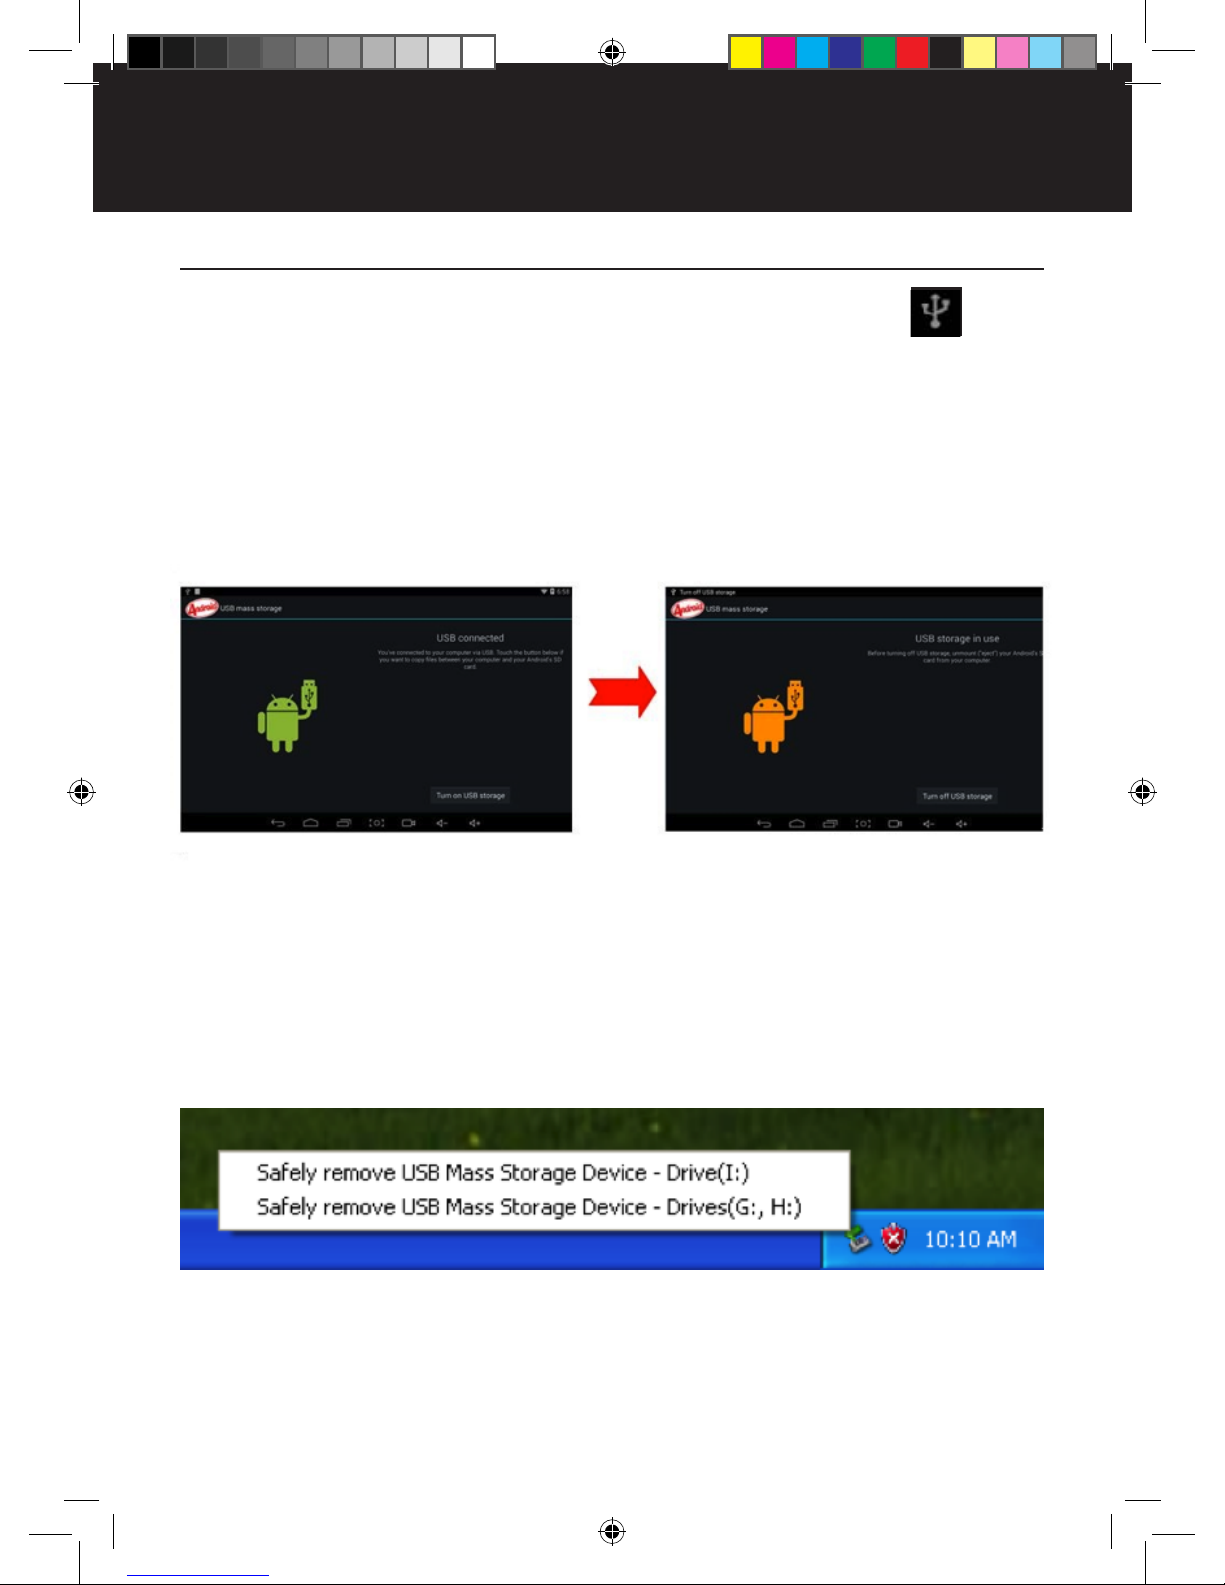
Connect your tablet to your PC by using the USB cable.
1. Use the provided USB cable to connect your PC and Tablet. The USB icon will
appear on the top left side of the status bar, it shows that the devices are connected.
press the icon and slide down to open menu.
2. Activate the message USB connected “Touch to copy files to/from your computer. Now
press “Turn on USB storage” Now you can transfer files.
3. Doing the above you can also access any inserted Micro SD card and transfer files to and
from the PC to the Micro SD card. Press Turn off USB storage to end the connection.
Note: If you Micro SD card is formatted to NTFS, please safely remove them on your PC, then
press “close USB storage device”, otherwise files may be lost, (below shows safely remove)
Page 12
12
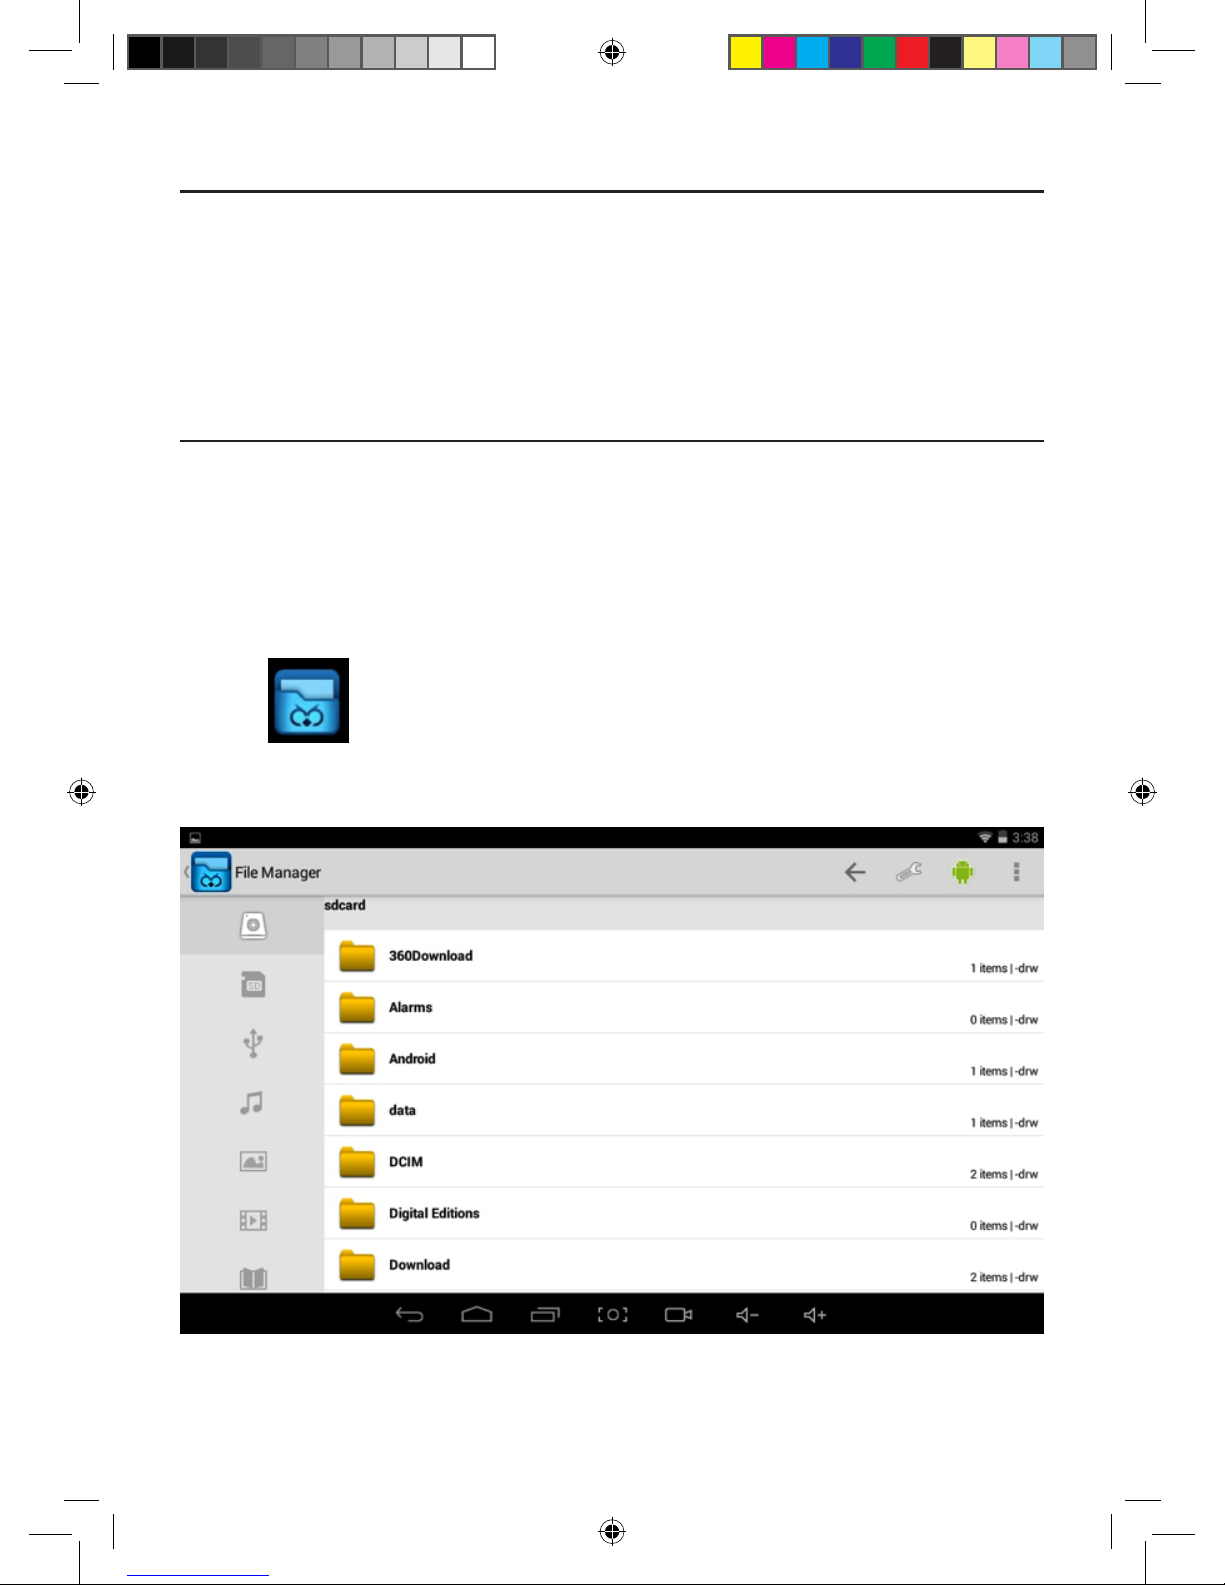
File Manager operation:
Click the File Manager application icon to view the files on all storage devices such
as: SD Micro card, USB device. You can quickly and easily access and use any files on these
devices.
Charge
Use Micro SD card
The tablet has a built-in high capacity Polymer Li-Ion-battery. You can charge the battery
using the provided battery charger or by using the 5V USB output on a PC with the USB cable
provided.
When the battery is low, a pop up window will remind you, so please make sure you always
have your battery charged appropriately.
The Tablet is compatible with SD Micro cards up to 32MB to extend your memory on the
Tablet. Please be careful when inserting and removing the Micro SD card.
Page 13
13
BASIC FUNCTION
Main screen
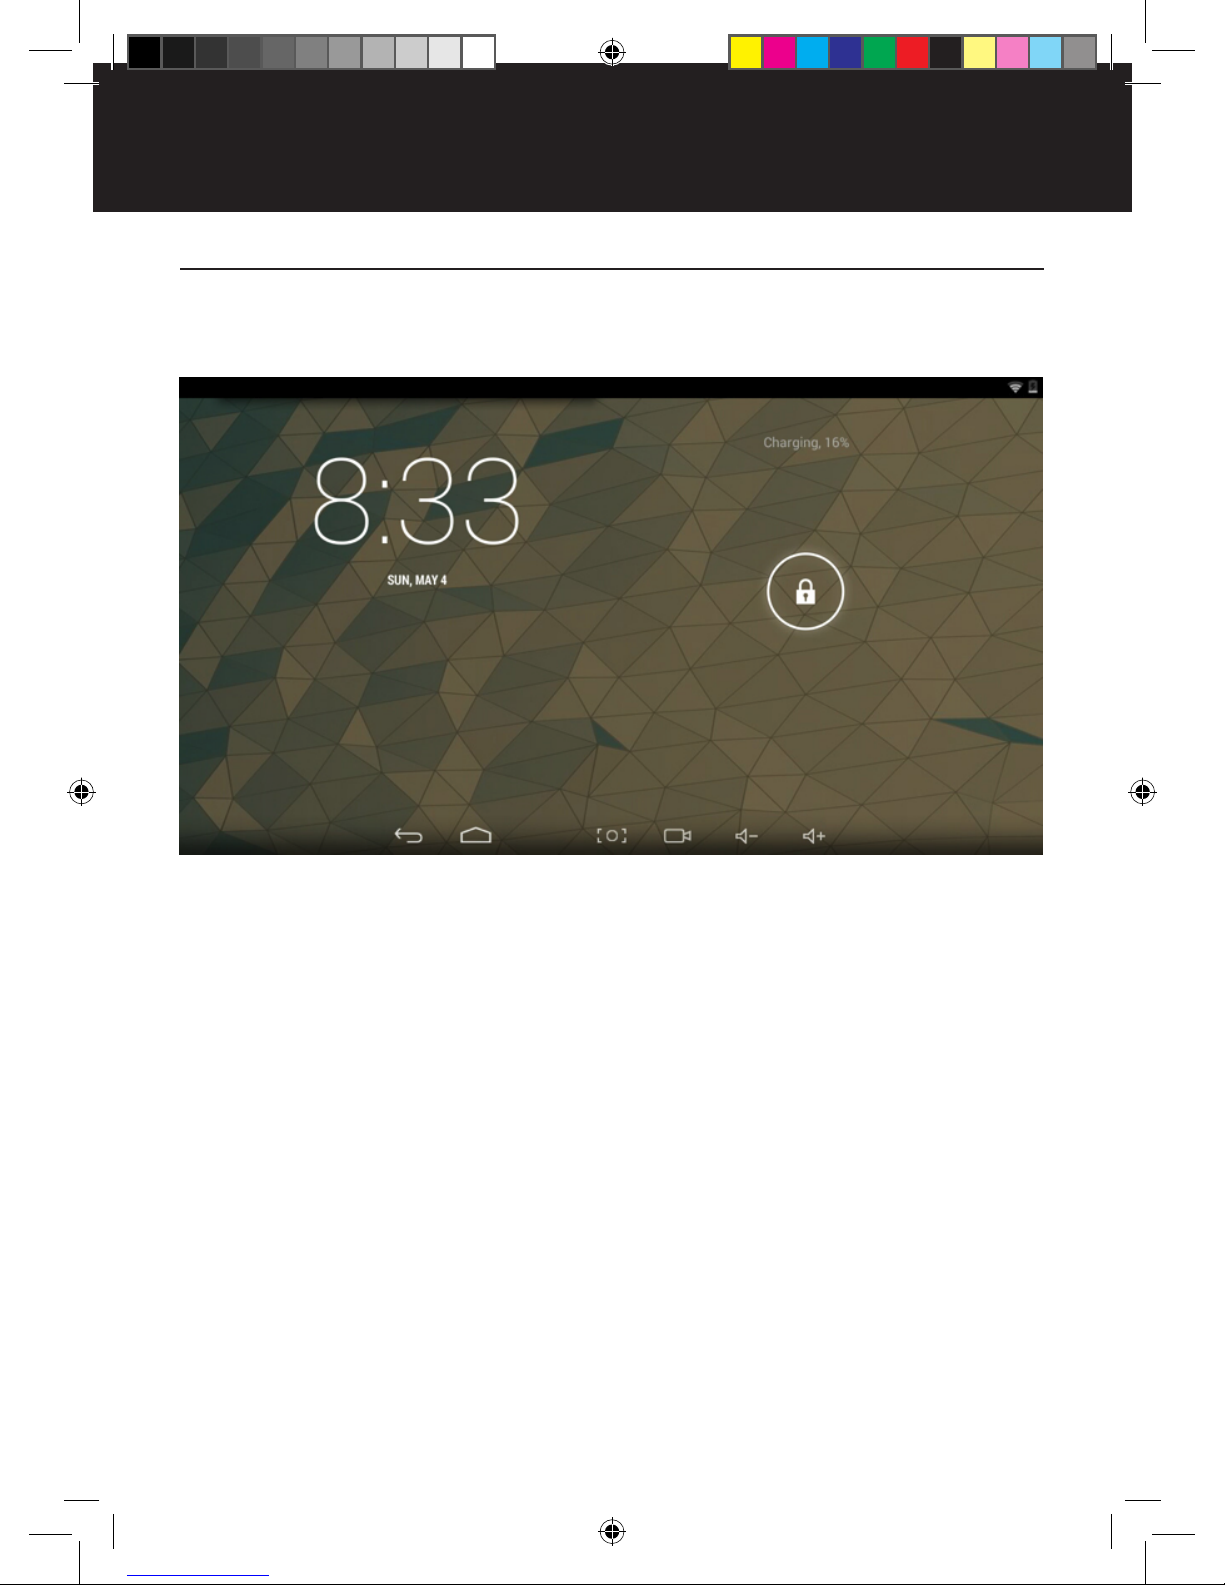
When you first start your tablet the tablet is set to lock the screen. To open you need to drag
your finger over the padlock symbol to access your apps and files.
Once you have unlocked and are on the main apps screen you can quickly change the window
by sliding left and right to view your apps. The tablet supports 5 windows.
Page 14
14
Main menu
To access the Main screen click on the Home symbol . Press the icon at the
bottom of the Home screen. All your apps will be visible on the screen, slide the window along
to view them all.
Open or switch applications
Select an app icon and press it to open. You can press the Home symbol at any time
to return to the main screen.
Add apps to the Home screen
Press and hold your finger on the app you want to add to the home screen, after a few
seconds a short cut to the app will automatically be created and visible on the home screen.
Zoom in or zoom out
You can enlarge or make smaller your pictures or web viewing by opening and closing your
thumb and index finger on the touch the screen.
View the tablet horizontal or vertical
The tablet supports the screen rotation function. So whatever way you are viewing your
tablet (wide or long) the screen will automatically adjust and rotate.
Page 15
15
SETTINGS
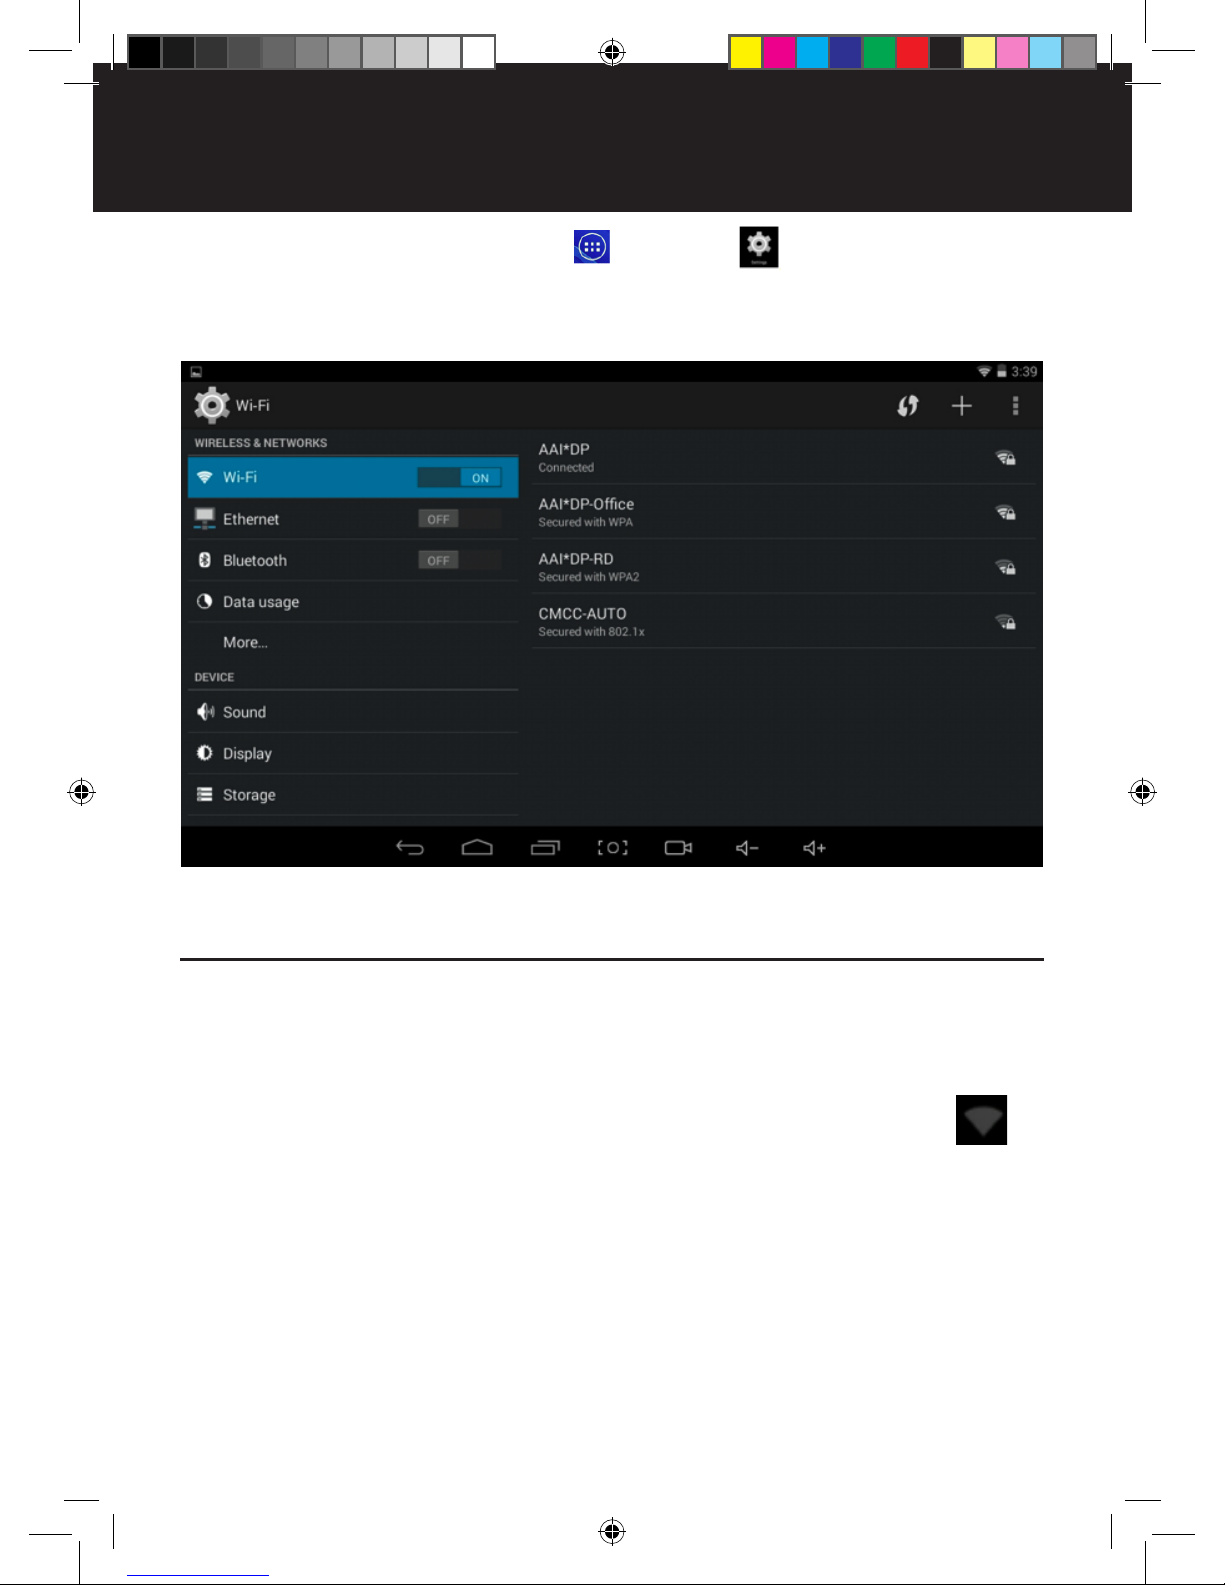
On the Home screen press the app icon and select , the settings consists of all
wireless, networks , device options, personal options, accounts and system options.
Wireless and networks
1. Connessione Wi-Fi:
1 • The Wi-Fi option in Settings needs to be set to ON. Press your chosen Wifi connection
and if needed add the Wi-Fi key.
2 • After the tablet connects to your Wi-Fi network, the Wi-Fi status bar symbol will
show the signal strength.
3 • Once the Wi-Fi connection has been connected. As long as you are in the wifi range of
this network every time the tablet is turned on it will automatically connect.
4 • In Settings set the Wi-Fi OFF to turn off the Wi-Fi function.
Page 16
16
Bluetooth
How to use Bluetooth:
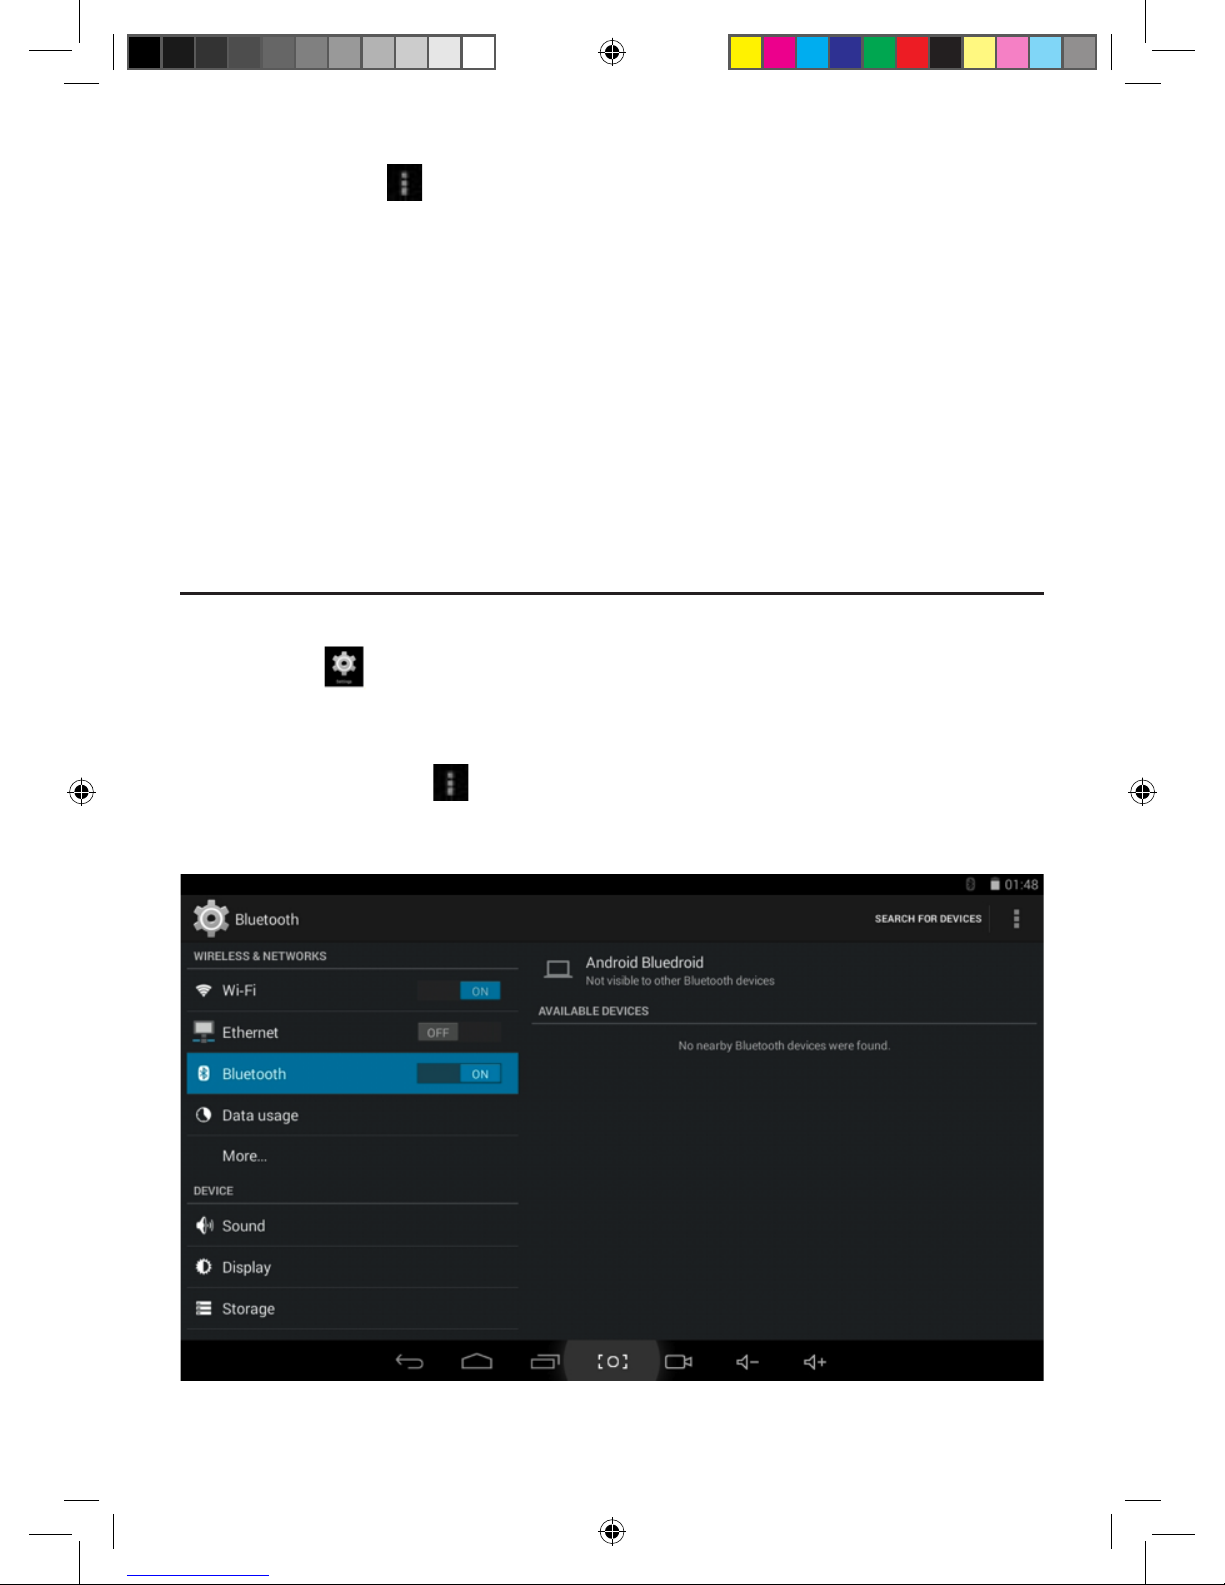
1. Select the icon. Inside the settings menu select Bluetooth and turn ON. Android
Bluedroid is the name of your device. The default setting is “ Only visible to paired Bluetooth
devices”. Tap on Android Bluedroid to change this setting if needed to “Visible to all Bluetooth
devices”. Select the icon on the top right of the screen to select the Visibility timeout
option.
Reminder:
(1) Click the icon on the top right side of the screen and more advanced options for Wi-Fi
settings will be available. Each setting is explained on the screen of its function.
2. Data Usage Information
Displays the data traffic information, you can also see the information of applications used.
3. More
Set Airplane Mode, VPN, Portable hotspot, Mobile network, etc.
If you need to surf the Internet by 3G, first you need to turn off WIFI and Ethernet then
plug the 3G dongle with SIM card to tablet’s USB port. The tablet will connect the network
automatically, once connected the 3G logo will appear in the menu.
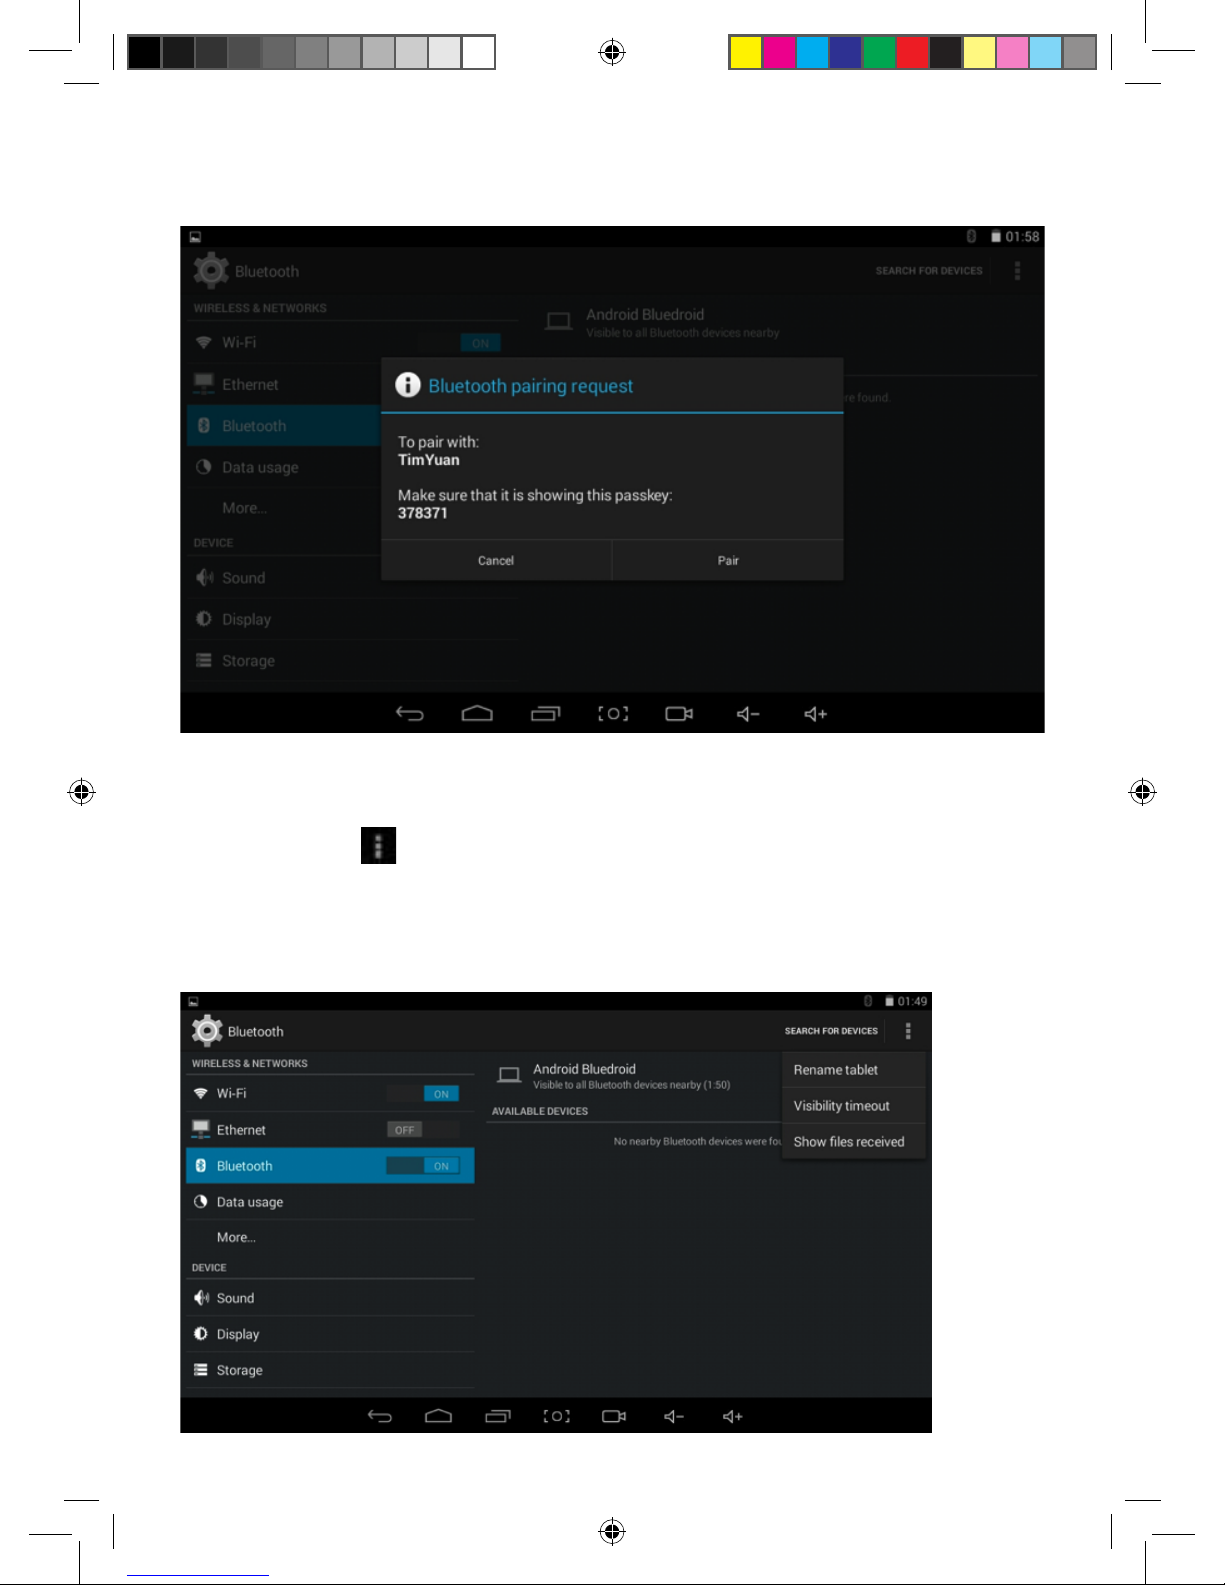
2. Select “Search for Devices” to pair with the device you want pairing.
Page 17
17
3. Once the devices are paired, you can send and receive files. The distance between each
device when communicating should be no more than 10 meters.
4. To turn off the Bluetooth function set the Bluetooth switch to OFF
Reminder:
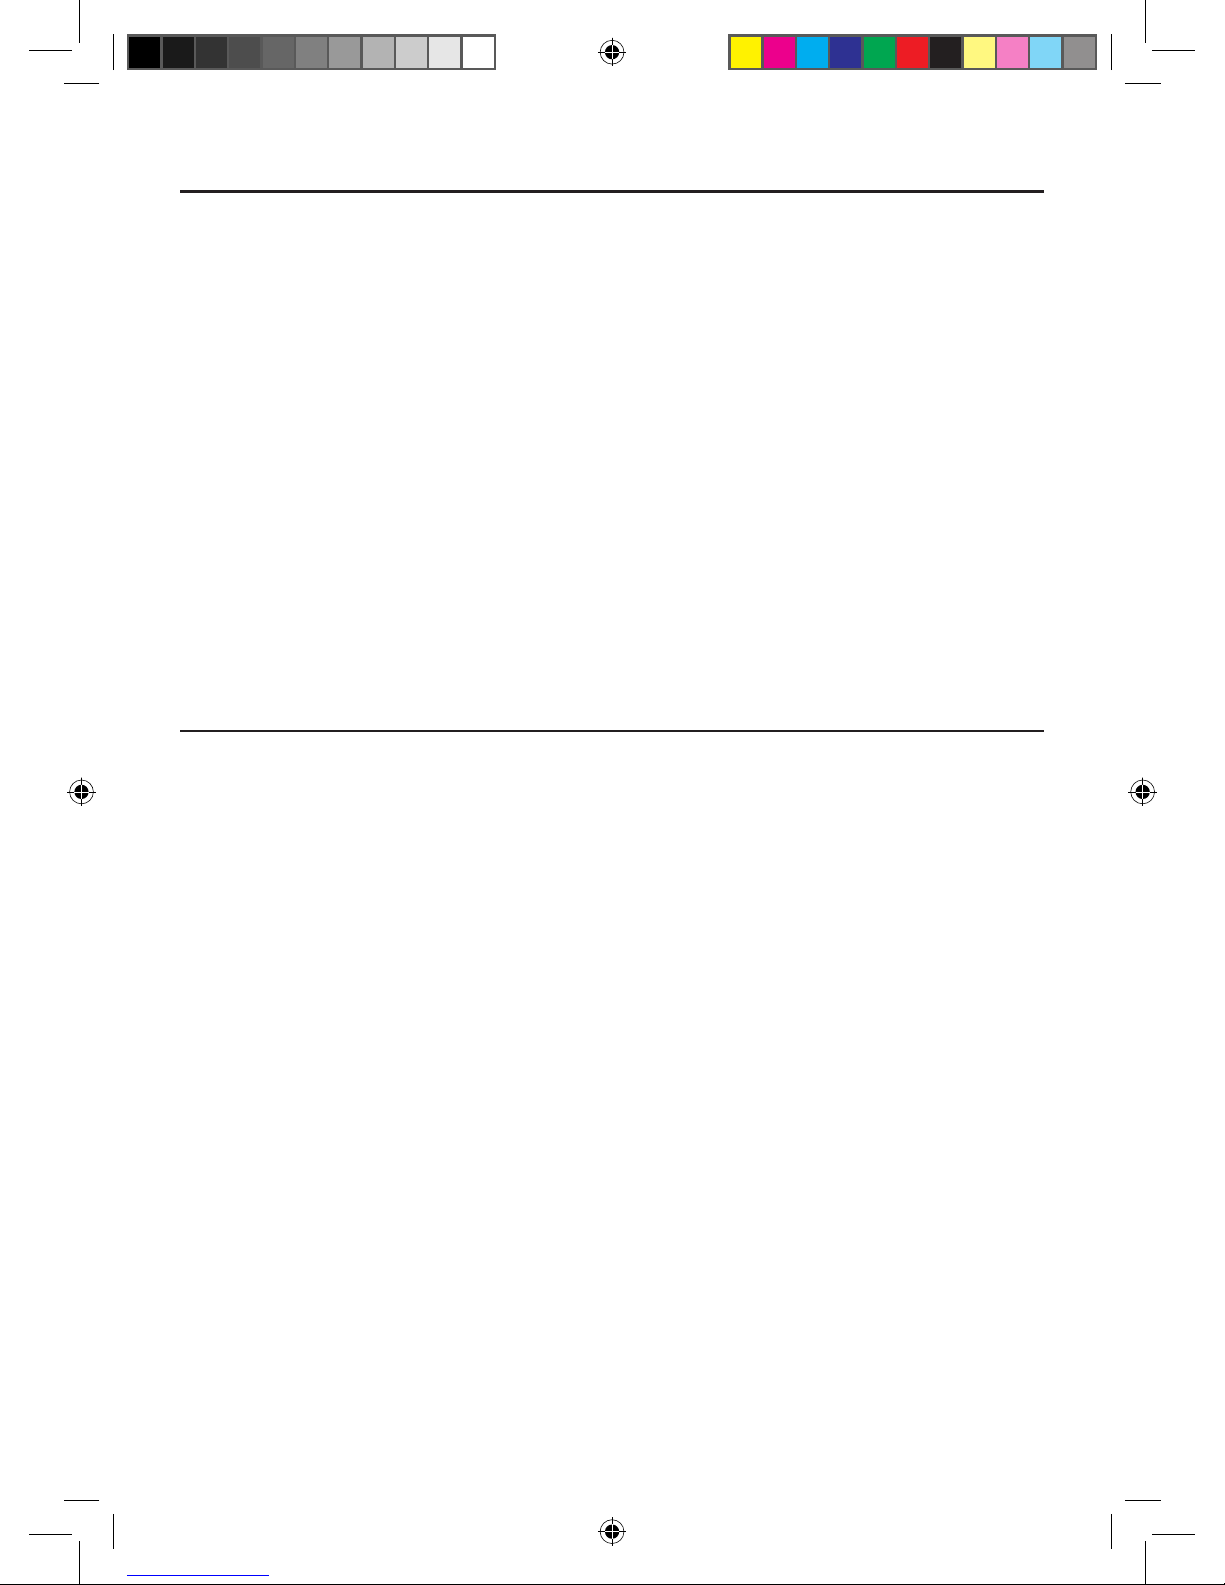
You can select the icon on the top right side of the tablet to view the below options.
Rename tablet
Visibility timeout
Show files received
Page 18
18
Device
Personal
Includes sound, display, storage, battery and applications.
1 • Sound setting
Enables the user to change all sound settings required for the Tablet and applications.
2 • Display setting
Enables the user to customize all aspects of the display on the tablet including Wall paper,
Brightness, Font size ect…..
3 • Storage
Enables the user to see availability of memory available on all internal and external storage
devices.
4 • Battery
Shows the level of battery charge still available.
5 • Applications
Shows a list of all applications stored on the tablet. By selecting an app you can see all the
relative information you need to know regarding that app.
1. Location services
Allowing apps that use data from sources such as Wi-Fi and mobile networks to determine
your approximate location, this system will collect these anonymous location data and send
to Google. This can only be activated in the initial setup of the tablet if made available by you.
2. Security
Includes screen security, passwords, device administrators and credential storage.
Screen security:
1 • Screen lock: Choose how and if you want the screen to lock.
2 • Owner information: Set the owner information which will be displayed when the screen
is locked.
3 • Passwords: Enables to display the characters or not option when typing in the
password.
Device administration:
1 • Device administrator: View or deactivate device administrators.
2 • Unknown sources: If apps are unknown or maybe dangerous, this setting will warn you
each time an app is being downloaded from an unreliable source.
Credential storage:
1 • Trusted credentials: Display confidential CA certification.
2 • Install from SD card: Install certification from SD card.
3 • Clear evidence: Delete all certifications.
3. Language and input
Language: Choose the language which you require.
Spelling checker: Will check and correct your on screen spelling.
Personal dictionary: Click the “ADD” button on the upper right side of screen; you can
add vocabularies to create your own dictionary.
Page 19
19
Keyboard and input: this option list the input installed in MID, you can do some related
settings to each input.
4. Backup and reset
Backup and restore
1 • Backup my data: Back up app data, Wi-Fi passwords, and other settings to Google
servers.
2 • Backup account: Back up to debug-only private cache.
3 • Automatic restore: When reinstalling an app, restore backed up settings and data.
Personal data:
Factory data reset: Erase all data partition; clear all user data in tablet.
Accounts
System
Manage accounts and synchronize information. Press “ADD an ACCOUNT” on the upper
right side of screen, you can add Google account, company account or email account.
1. Date and time
You can acquire date and time automatically or select the date and time manually.
2. Accessibility
TLarge font: Select large font
Autorotation screen: Turn on/off the screen rotation function
System performance: there are three options, including “performance balanced”
“power saving prior” and “performance prior”.
1 • Performance balanced: The tablet will adjust the power consumption to that of the
performance of the Tablet. (Recommended option)
2 • Power saving prior: (Not recommended option)
3 • Performance prior: If you choose this option, the performance of tablet will be the best.
Because of the large power consumption, the battery life will be reduced considerably.
Note: Some apps or games do not allow the screen rotation function. This is not a fault.
3. Developer options
This option is only used by developers.
4. Printing
With cloud print to a wireless printer you can print over the network to securely send files.
5. About tablet
On this option, you can check the status of the tablets, legal information, tablet model number,
Android version, kernel version and build number.
Page 20
20
2. A long press on any song or folder name, you can add them to play list, delete them and
search them.
You can play music while using other applications. Such as: while browsing pictures /read
txt /surf the internet. When the music is playing in the background. On the top left side of the
screen the status bar displays , press and drag down to reveal your menu options
to return to the music list.
MUSIC
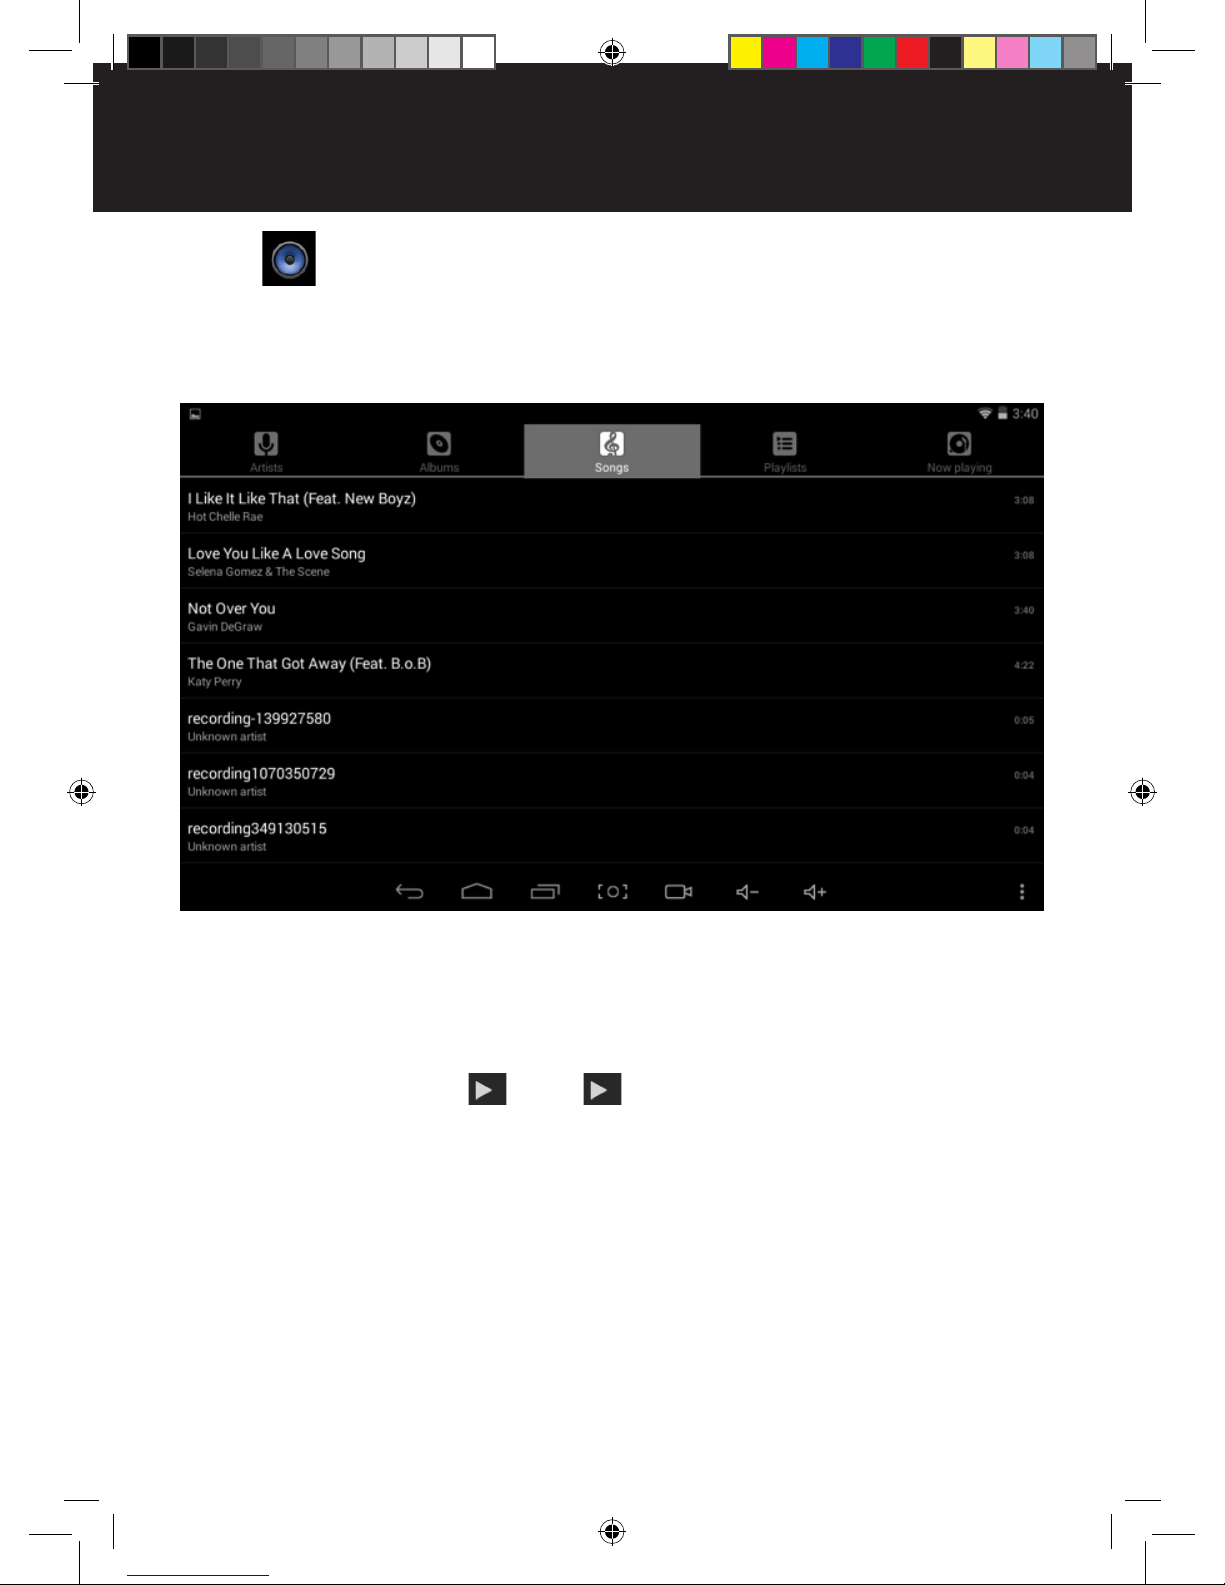
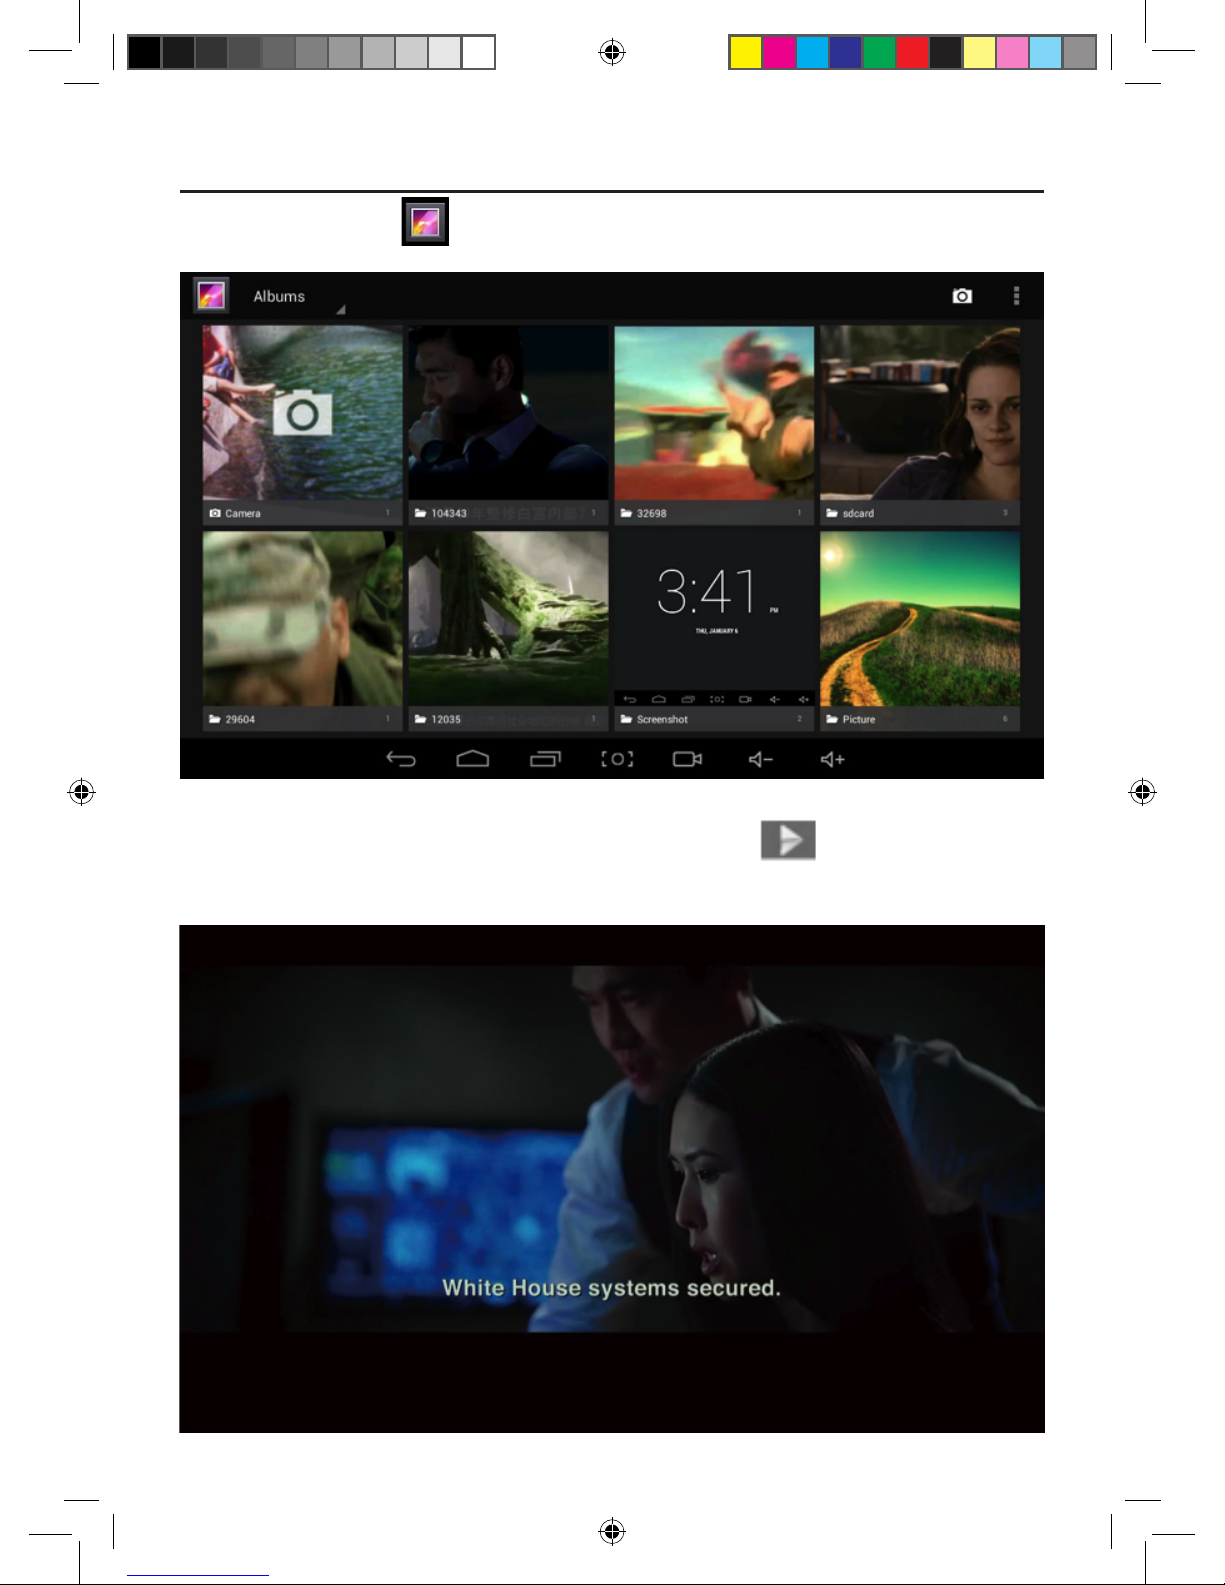
1.Press to enter the following music library, all the music files are listed separately on
the basis of Artists, Albums, Songs, play list and now playing, press any option to enter the
list.
Page 21
21
Video play
Press video folder, and wait a minute. After analyzing, press to start play, displaying
as follows:
Video&Picture
Click the picture library to view your pictures / images:
Page 22
22
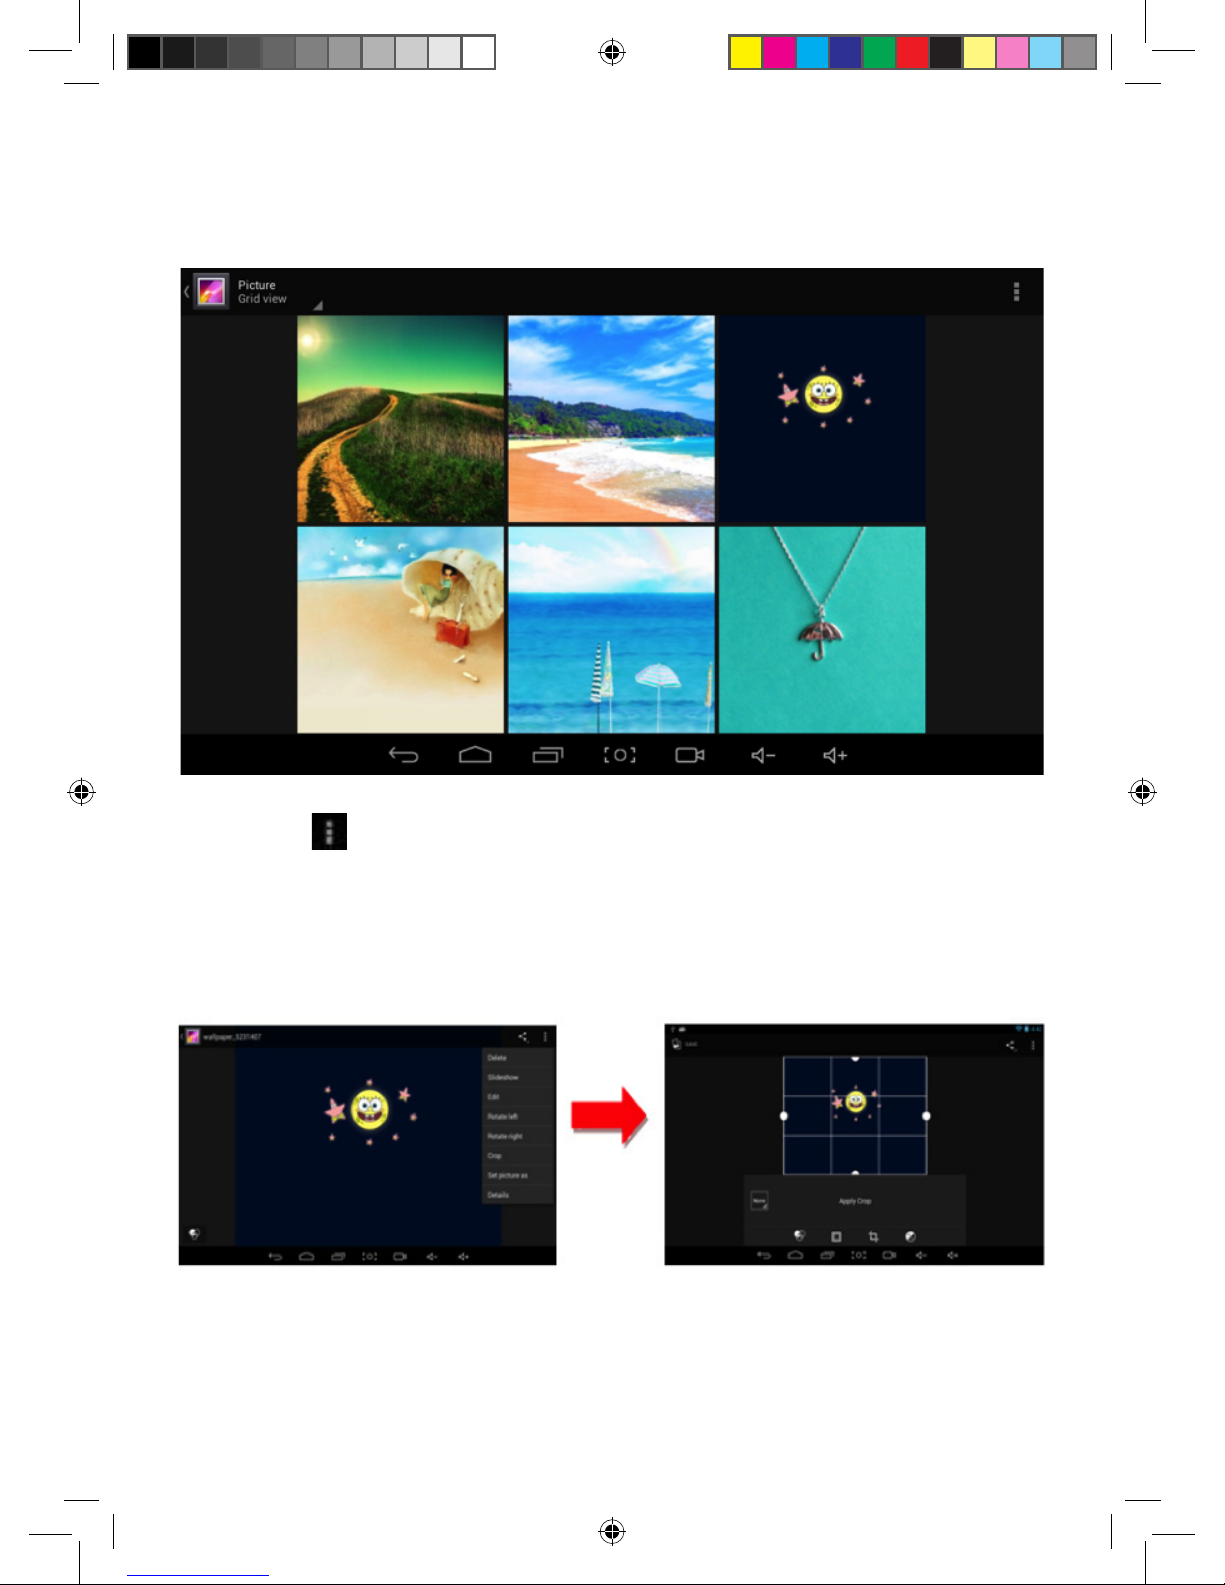
Picture viewing
Choose picture folder, shown as the following screenshot:
Click the icon you can choose from the options slideshow, editing, rotating left, rotating
right, cropping etc. If you choose “crop”, you can cut and resize the picture. After selecting
the area you want to crop, press the “OK” button on the top left of the screen.
Page 23
23
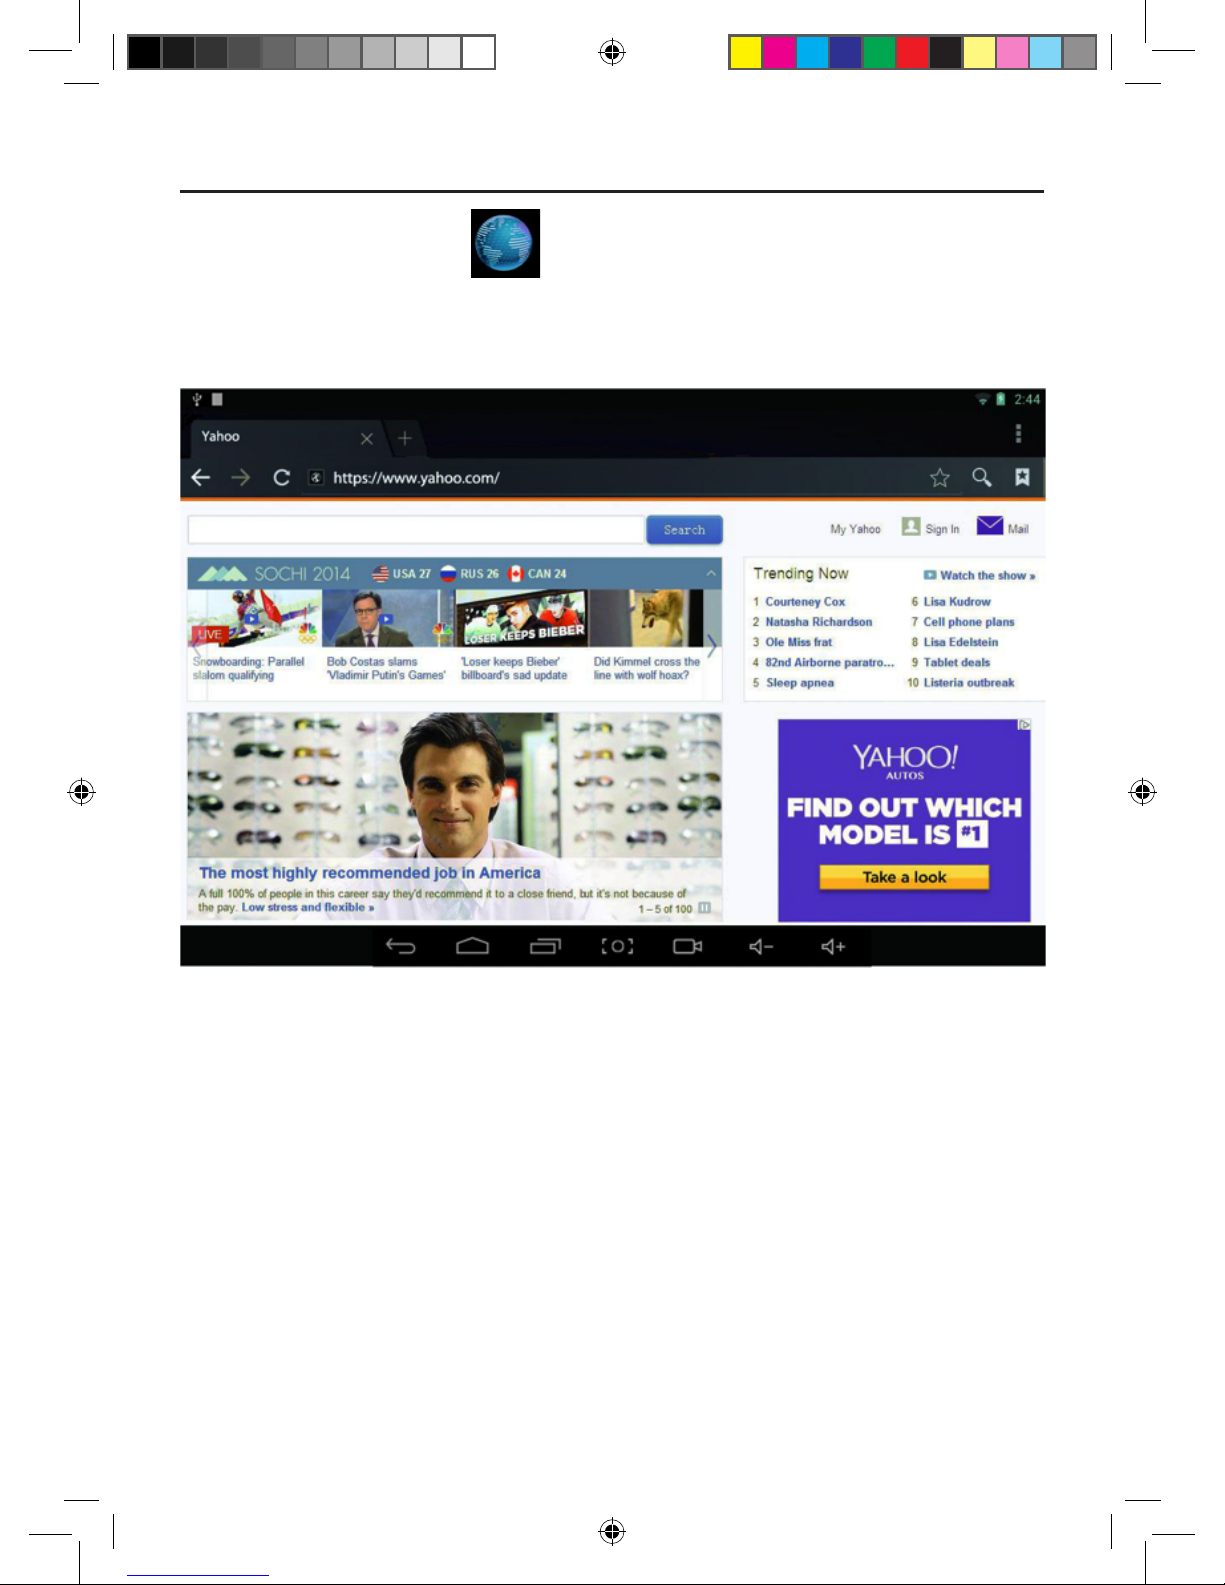
Online
Open the browser by pressing , enter webpage. Before surfing the Internet, ensuring
your tablet has been connected to the Wi-Fi, 3G or Ethernet.
Example of Yahoo web page below:
Online video play, such as on sites like Youtube:
Page 24
24
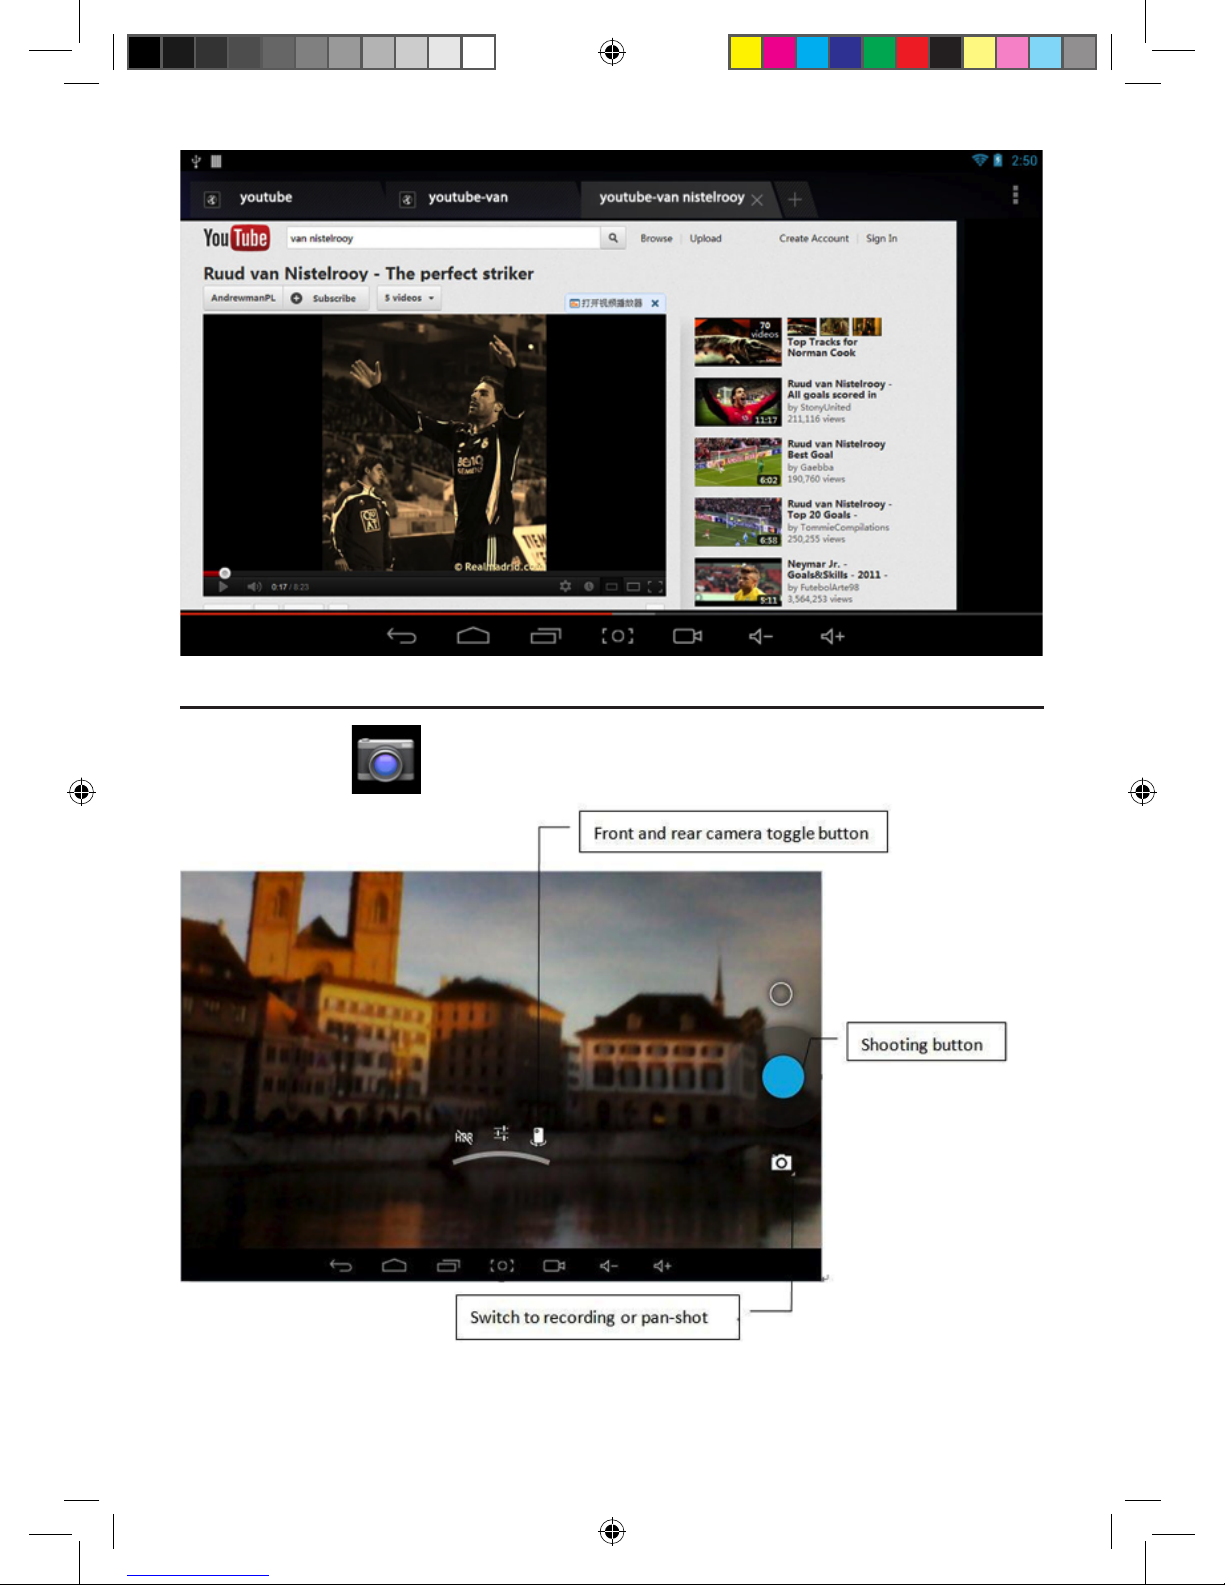
Select pan-shot, press photograph icon, move the lens left or right slowly to take
photos. Slide the screen to the left to view your photos or videos.
Camera
Press the symbol to operate the camera function.
Page 25
25
You can send or receive emails
Click Email , and login your account and password, then you can send emails.
Page 26
26
TROUBLESHOOTING
• Cannot power on the Device
- Connect the supplied AC/DC Adapter.
• Can not go online
- Check if your Wi-Fi setting is correct, correct password may be needed.
- Check if your router is working properly.
- Check your signal bar on the Device. It may not be connected due to weak signal.
• How to buy/download the applications from the internet
- Make sure your device is already connected to the Wi-Fi/ network.
- Search, Buy, Download and Install the desired applications by following the on screen
instruction.
WARNING:
Personal details and Credit Card information may be required, please stay
Alert!
• Unable to Read E-books
- Some online bookshops require their own application to buy, download, read and manage
e-book purchases. Applications can be downloaded from the web or by going into the
Opera Mini or Amazon APP store and searching for a suitable one.
- Barnes and Nobles uses its own reader application, called “Nook”. Most other book
stores will use third party applications such as Aldiko, which can be downloaded from the
Opera Mini or Amazon APP store.
• How to copy and read PDF-DRM and EPUB-DRM books from PC?
- The tablet does not support PDF and EPUB-DRM eBooks to be transferred from PC.
• Media files can’t be found:
- If new files were added onto the device; click the “File Manager” icon on the APPS menu
to search.
- Use correct Apps to open corresponding media files. Click “OWL Player” to play video
files. Click “Gallery” to view photos. Click “Music” Player to play music.
• Can’t find the desired button within the screen
- Use the arrow keys to scroll Up and Down (Right to Left) to display the buttons behind
the main screen.
• Can’t turn to next page in e-book reading
- Double left click on the mouse or press & hold left mouse button to go from right to left
to turn to next page.
• How to enter the Settings menu while applications/programs are running
- After turning on the application/program, click the Option button where is normally listed
Page 27
27
on the bottom of the screen to enter settings menu. Set each setting as instructed by the
on screen instructions (functions depend on the software of the applications).
• Cannot connect to Wi-Fi or the Wi-Fi signal is weak
- Make sure Wi-Fi is available in your location and you are authorized (with correct
password) to connect to it.
- The device may be too far from the signal source. Move your device closer to the signal
source.
• How to remove personal data/email accounts from the device:
- In the settings menu, select and enter “Backup & reset” setting.
- Click “Factory data reset” button to enter.
- Click “Reset tablet ” button.
- Click “Erase SD card” button to start reset. Wait until the device finishes resetting by
itself. The device will turn off automatically. (It may need a few minutes).
IMPORTANT:
After Factory Data reset, all users’ data (users installed applications, passwords,
e-mail accounts, g-mail accounts, media files etc...) will be deleted. Backup
this data before resetting.
PRECAUTIONS:
For the correct use and good performance of the player, the user must fully understand the
manual as well as following the instructions provided.
• Please avoid high temperatures (over 35°C) or low temperatures (below -5°C).
• Avoid any impact to the tablet.
• Never let the tablet come into contact with chemicals such as benzene, thinner etc.
• Do not use the tablet close to strong magnetic fields, electric field etc.
• Keep away from direct sunlight or heating appliances.
• Never privately disassemble, repair or modify the tablet.
• Using the tablet and the earpiece during bicycling, driving a car and motorcycling are likely
to cause danger.
• Loud music can damage the ears. Be careful with loud volume.
Page 28
28
MIIA GAMES
Enter a world of fun with the Miia Games App and discover always new games!
How it works:
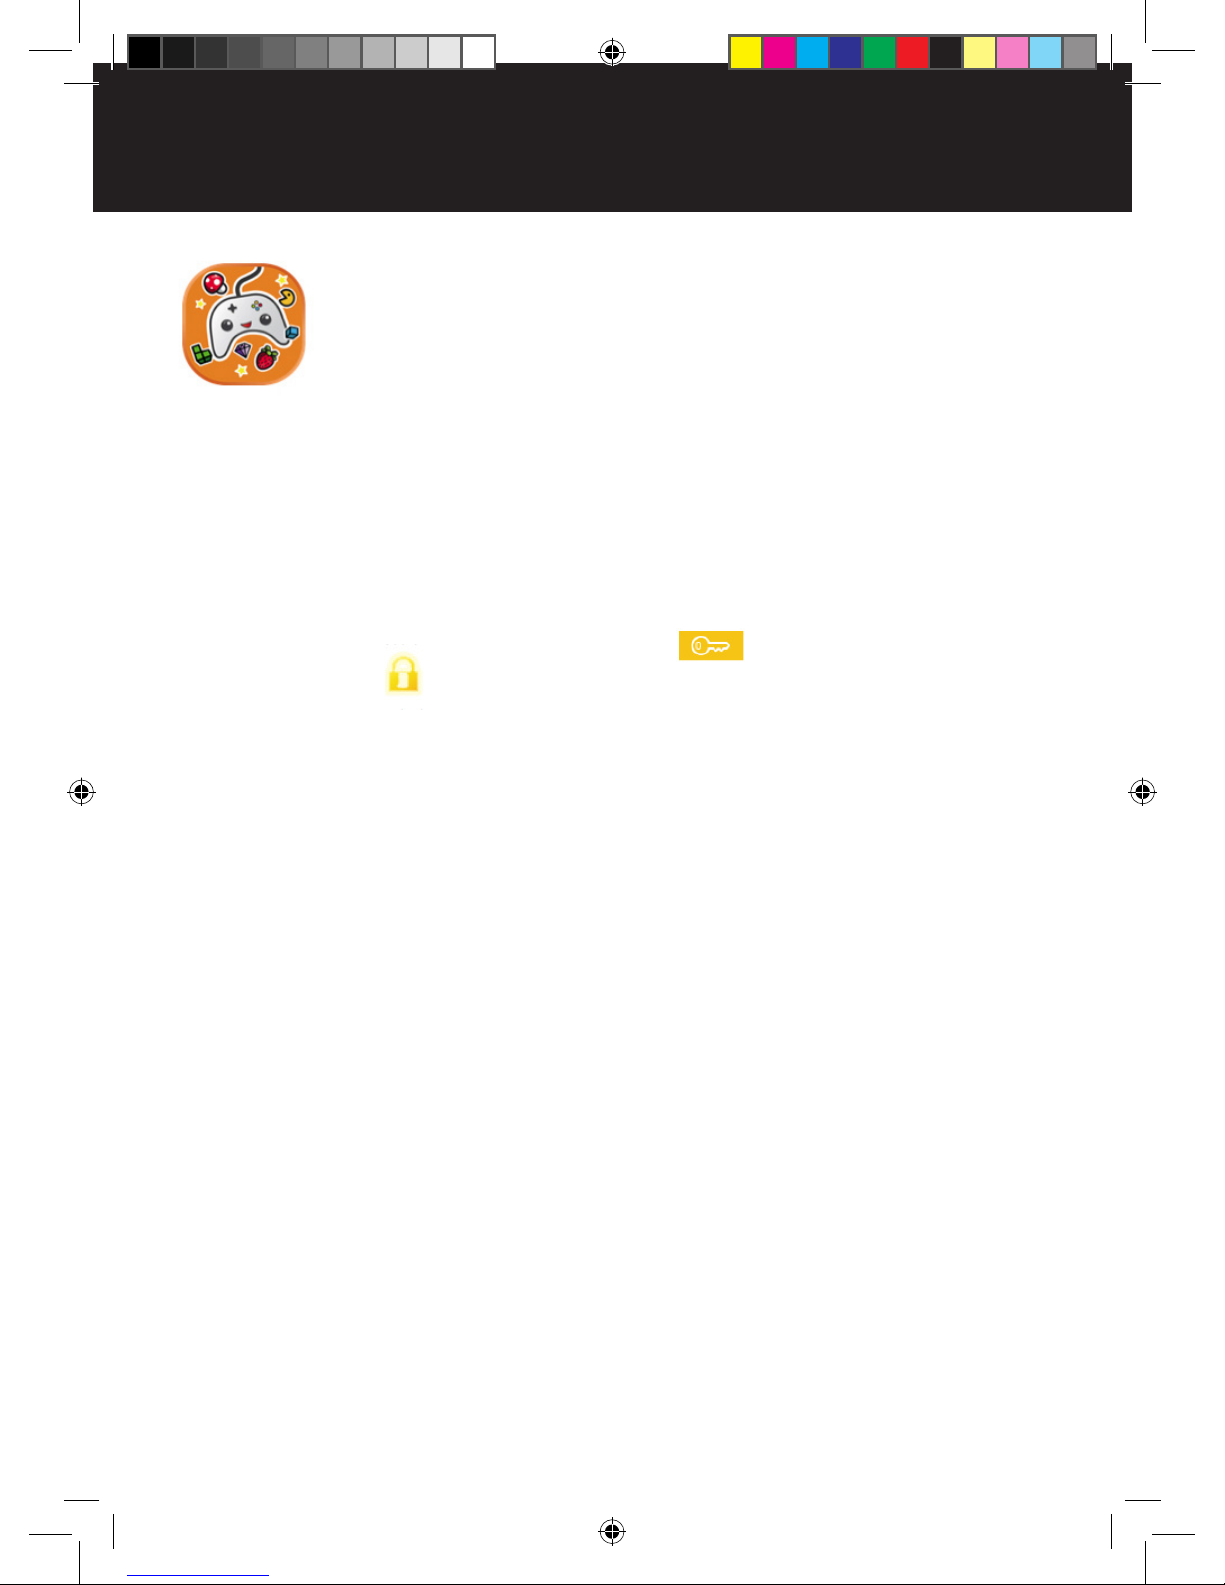
• By clicking on the Miia Games icon you will find 3 games available for you right away!
• Choose the game you like the most and start playing: you don’t need to download any
other Apps and you will be able to play without heaping your device memory.
• To unlock all other games click on the “key” icon at the top right or on the games
with a yellow lock There is plenty of them and always new!
• By clicking on the “key” button or on locked games, you can choose the payment method
you like and, at payment received, you will get an unlock PIN to access all games, with no
other payment needed.
• Then insert your PIN, together with your email or your telephone number, and start
playing!
Remember: to use the application you will have to be connected to the Internet and your code
will be valid in the Miia Games App of all Miia devices.
Have fun with Miia & GamePix!
Page 29
29
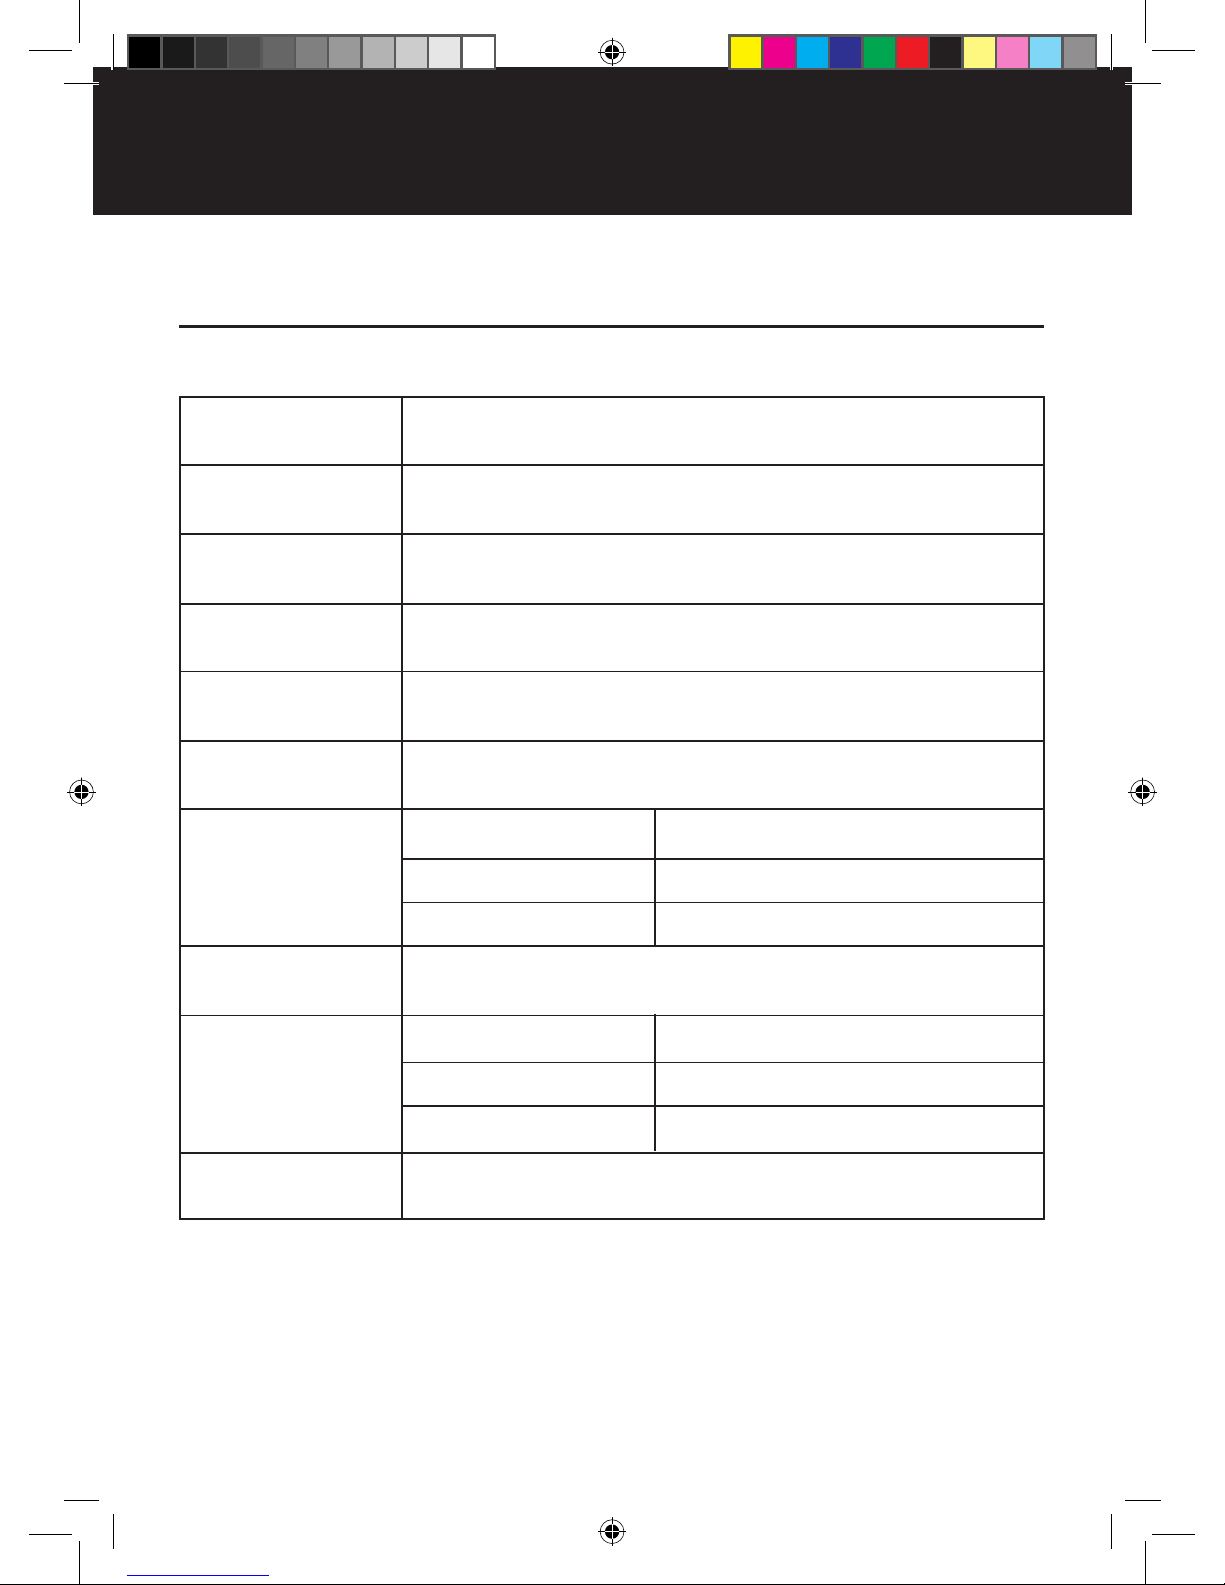
PRODUCT SPECIFICATIONS
Processor
SDRAM
Flash memory
Wi-Fi
Bluetooth
USB and HDMI
Screen
Operating System
Others
Accessories
MT-100 liife
ATM7029B Quad core 1,2 GHz CortexA9
1GB DDR3
Integrated 8GB
External SD card up to 32 GB
IEEE802.11 b/g/n Wireless internet
REALTEK RTD8723
USB 2.0 OTG high speed and HDMI connection
Dimensions
Resolution
Characteristics
ANDROID 4.4.2
Dimensions
Weight
Battery
Charger Input: 230V~ 50 Hz, Output: 5V DC 2 A
USB cable
10.1” TFT screen
1024X600
Multi touch screen
269 * 164 * 10,5 mm
652 gr
Lithium Polymer 5000 mAh, 3,7V
Page 30
Page 31
The product works with batteries covered by European directive 2006/66/CE, which may not be disposed of with normal
household waste. Inquire about local regulations relating to the separate collection of batteries: proper disposal prevents
negative consequences for the environment and health.
INFORMATION FOR USERS
Pursuant to Legislative Decree no. 49 of 14 March 2014 “Attuazione della Direttiva 2012/19/UE sui riuti di
apparecchiature elettriche ed elettroniche (RAEE)”
The symbol of the crossed out wheeled bin on the equipment indicates that the product must be collected
separately from other waste at the end of its useful life. Therefore, the user must turn in the equipment, complete
with all its essential components, at the end of its useful lifetime to an appropriate centre for separate collection of
electrical and electronic waste. The user may also take to the retailer at the time new equipment of an equivalent
type is purchased, trading one item for one item, or one item for zero items for devices measuring less than 25 cm on
the longest side. Suitable separate collection for ensuring that the equipment is recycled, handled and disposed of
compatibly with environmental obligations prevents possible negative effects on the environment and human health.
It also favours the recycling of the materials that the device is made of. Improper disposal of the product by the user
implies the application of administrative penalties as per D. Lgs n. Legislative Decree no. 49 of 14 March 2014.
Return the product to the retailer at the time of purchasing another equivalent product; trade one item to one item.
Information on the SAR certication (Specic Absorption Rate)
The device is compliant with European Union (EU) standards that limit human exposure to radio frequencies (RF)
issued by telecommunication devices and radios. These standards prevent the sale of mobile devices that exceed a
level of maximum exposure (also called SAR) equal to 2.0 W/kg.
During the test, the highest SAR level recorded for this model was equal to 0.744 W/kg. During normal use, the
actual SAR level may be much lower, since the device was designed to emit only the radio frequency energy needed
to transmit the signal to the closest base station. Through the automatic issuance of energy at lower levels where
possible, the device reduces the overall exposure to radio frequency energy for users.
Page 32
Produced by:
Future Graphics spa
Via Domenico Fontana 12 - 00185 Rome - Italy
MADE IN CHINA
We the manufacturers, Future Graphics SPA, hereby declare that the product Miia MT-100 liife meets
the requirements of the R&TTE Directive (EC).
The complete Declaration of Conformity is available from the company: Future Graphics SPA,
Via Domenico Fontana, 12 - 00185 Rome
 Loading...