

Page 1
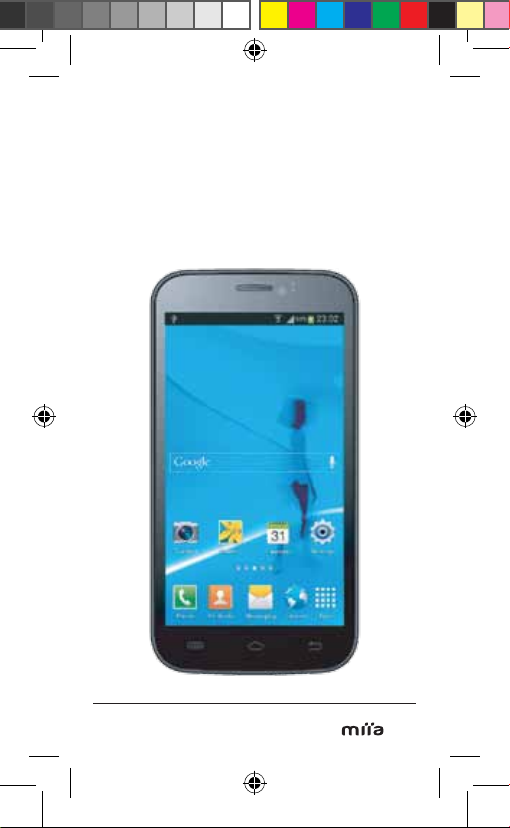
MIIA
PHONE
ST-510
ENG
Instruction manual
Page 2

READ ME FIRST
· Please read all safety precautions and this
manual carefully before using your device to
ensure safe and proper use.
· The descriptions in this manual are based
on the default settings of your device.
· Images and screenshots used in this
manual are based on the default settings of
your device.
· Available features and additional services
may vary by software or service provider.
1
Page 3

CONTENTS
SAFETY AND USAGE INFORMATION .......4
SAFETY WARNINGS .................................... 4
ASSEMBLING ............................................ 10
INSTALL THE SIM CARD AND BATTERY... 10
CHARGE THE BATTERY ............................11
USE A MEMORY CARD .............................13
GETTING STARTED .................................. 16
TURN YOUR DEVICE ON AND OFF ..........17
USE THE TOUCH SCREEN ........................17
LOCK OR UNLOCK
THE TOUCH SCREEN AND KEYS ............. 19
GET TO KNOW THE IDLE SCREEN ........... 19
APPLICATION ............................................. 20
ENTER TEXT ..............................................22
DOWNLOAD FILES FROM THE WEB ........ 23
SYNCHRONIZE DATA ................................24
COMMUNICATION ....................................26
CALLING ....................................................26
MESSAGING .............................................. 30
EMAIL ......................................................... 32
CONTACTS ................................................. 34
ENTERTAINMENT ..................................... 38
CAMERA ....................................................38
GALLERY ....................................................38
VIDEO PLAYER ...........................................40
MUSIC ........................................................ 41
FM RADIO ..................................................43
SOUND RECORDER .................................. 43
2
Page 4

BROWSER ..................................................44
CONNECTIVITY .........................................46
BLUETOOTH .............................................. 46
WI-FI ........................................................... 47
MOBILE NETWORK SHARING ..................49
VPN CONNECTIONS .................................50
TOOLS .......................................................52
CLOCK ....................................................... 52
CALCULATOR ............................................ 52
FILE MANAGER ..........................................53
CALENDAR ................................................53
SETTINGS .................................................. 54
SIM MANAGEMENT ................................... 54
WIRELESS E NETWORK ............................ 55
USER PROFILES ........................................ 55
DISPLAY .....................................................55
SECURITY .................................................. 56
APPS .......................................................... 57
LANGUAGE & INPUT .................................57
DATE & TIME .............................................. 58
SCHEDULE POWER ON/OFF .................... 58
MIIA GAMES .................................................. 59
PLAY STORE ..................................................60
3
Page 5
SAFETY AND USAGE
INFORMATION
To prevent injury to yourself and others
or damage to your device, read all of the
following information before using your
device.
SAFETY WARNINGS
Keep your device away from small
children and pets
Keep your device and all accessories out of
the reach of small children or animals. Small
parts may cause choking or serious injury if
swallowed.
Protect your hearing
To avoid possible
damage to your hearing,
limit the amount
of time listening
at high volumes
Install mobile devices and equipment with
caution
Ensure that any mobile devices or related
equipment installed in your vehicle are
securely mounted. Avoid placing your
device and accessories near or in an air
bag deployment area. Improperly installed
wireless equipment can cause serious injury
when air bags inate rapidly.
4
Page 6

Avoid interference with pacemakers
Maintain a minimum of 15cm between
mobile devices and pacemakers to avoid
potential interference. If you have any reason
to suspect that your device is interfering with
a pacemaker or other medical device, turn
off the device immediately and contact the
manufacturer of the pacemaker or medical
device for guidance.
Turn off the device in potentially explosive
environments
Do not use your device at refueling points
(service stations) or near fuels or chemicals.
Turn off your device
whenever directed by warning signs or
instructions. Your device could cause
explosions or re in and
around fuel or chemical storage and transfer
areas or blasting areas. Do not store or carry
ammable
liquids, gases, or explosive materials in the
same compartment as the device, its parts,
or accessories.
Handle and dispose of batteries and
charger with care
· Use only approved batteries and chargers
specically designed for your device.
Incompatible batteries and chargers can
cause serious injuries or damage to your
device.
· Never dispose of batteries or devices
in a re. Follow all local regulations when
5
Page 7
disposing used batteries or devices.
· Never place batteries or devices, on or in,
heating devices, such as microwave ovens,
stoves, or radiators. Batteries may explode
when overheated.
· Never crush or puncture the battery.
Avoid exposing the battery to high external
pressure, which can lead to an internal short
circuit and overheating.
Do not use the device if the screen is
cracked or broken
Broken glass or acrylic could cause
injury to your hand and face. Damage
cause by careless handling will void your
manufacturer’s warranty.
SAFETY PRECAUTIONS
Drive safely at all times
Avoid using your device while driving and
obey all regulations that restrict the use of
mobile devices while driving. Use hands-free
accessories to increase your safety when
possible.
Follow all safety warnings and regulations
Comply with any regulations that restrict the
use of a mobile device in a certain area.
6
Page 8
Turn off the device near medical equipment
Your device can interfere with medical
equipment in hospital or health care facilities.
Follow all regulations, posed warnings, and
directions from medical personnel.
Turn off the device or disable the wireless
function when in an aircraft
Your device can cause interference with
aircraft equipment. Follow all airline
regulations and turn off your device or
switch to a mode that disables the wireless
functions when directed by airline personnel.
Handle your device carefully and sensibly
· Do not disassemble your device due to a
risk of electric shock.
· Do not allow your device to get wet with
liquids as it may cause serious damage
and will change the color of the label that
indicates water damage inside the device.
Do not handle your device with wet hands.
Water damage to your device can void your
manufacturer’s warranty.
· Avoid using or storing your device in dusty,
dirty areas to prevent damage.
· You device is complex electronic device,
try to protect it from impacts and rough
handling to avoid serious damage.
· Do not paint your device, as paint can clog
certain parts and prevent proper operation.
· If your device has a camera ash or light,
avoid using it close to the eyes of children or
animals.
7
Page 9
· Your device may get damaged by exposure
to magnetic elds. Do not use carrying cases
or accessories with magnetic closures or
allow your device to come in contact with
magnetic elds for extended periods of time.
Protect batteries and chargers from
damage
· Avoid exposing batteries to very cold or
very hot temperatures (below 0°C or above
45°C). Extreme temperatures can reduce the
charging capacity and life of your batteries.
· Prevent batteries from contacting metal
objects, as this can create a connection
between the + and - terminals of your
batteries and lead to temporary or
permanent battery damage.
· Never use a damaged charger or battery.
Use your device in the normal position
Avoid contact with your device’s internal
antenna.
Ensure maximum battery and charger life
· Avoid charging batteries for more than a
week, as overcharging may shorten battery
life.
· Over time, unused batteries will discharge
and must be recharged before use.
· Disconnect chargers from power sources
when not in use.
· Use batteries only for their intended
purpose.
8
Page 10
Handle SIM cards and memory cards with
care
· Do not remove a card while the device is
transferring or accessing information, as this
could result in loss of data and/or damage to
the card or device.
· Protect cards from strong shocks, static
electricity, and electrical noise from other
devices.
· Frequent writing and erasing will shorten
the life span of memory cards.
· Do not touch gold-colored Contacts or
terminals with your ngers or metal object. If
dirty, wipe the card with a soft cloth.
Ensure access to emergency services
Emergency calls from your device may not
be possible in some areas or circumstances.
Before travelling in remote or undeveloped
areas, plan an alternated method of
contacting emergency service personnel.
9
Page 11
ASSEMBLING
Install the SIM card and battery
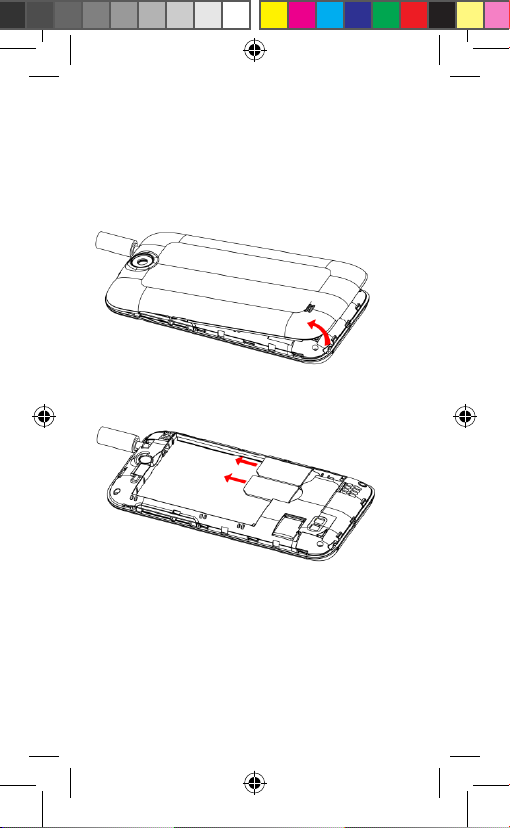
If the device is on, press and hold [Power
key] > Power off to turn it off.
1. Remove the back cover.
2. Insert the SIM cards.
Note
· Place the SIM cards into the device with the
gold-colored Contacts facing down.
· If you do not insert SIM cards, you can only
use your device’s non-network services and
some menus.
10
Page 12
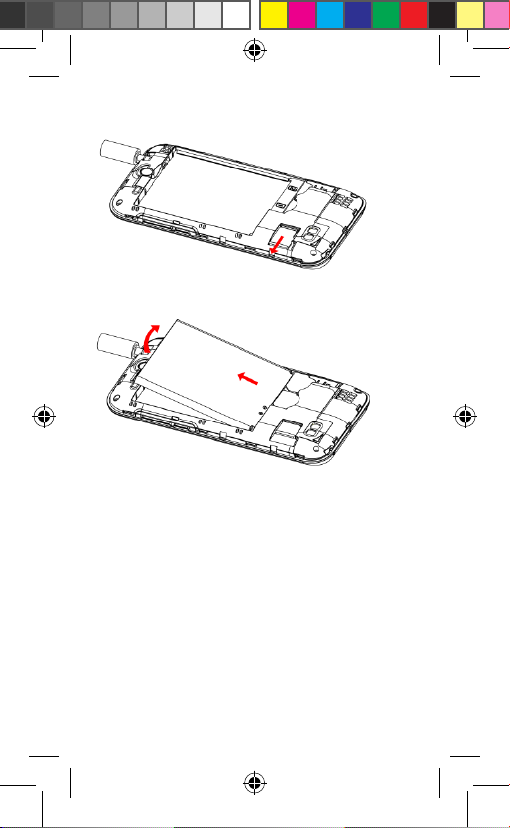
3. Insert the T card.
4. Insert the battery.
CHARGE THE BATTERY
Before using the device for the rst time, you
must charge the battery. You can charge the
device with the provided travel adapter or by
connecting the device to a PC with PC data
cable.
Charge with the travel adapter
1. Plug one end (micro-USB) of PC data
cable into the multifunction jack.
2. Plug the other end of the PC data cable
into USB port of travel adapter.
11
Page 13
3. Plug the travel adapter into a power outlet.
Note
· You can use the device while it is charging,
but it may take longer to fully charge the
battery.
· While charging, the device may heat up,
this is normal and should not affect your
device’s lifespan or performance.
· If your device is not charging properly,
bring your device and the charger to service
center.
· Improperly connecting the travel adapter
can cause serious damage to the device.
Any damage caused by misuse is not
covered by the warranty.
4. When the battery is fully charged, unplug
the travel adapter from the device and then
from the power outlet.
Caution: Do not remove the battery before
removing the travel adapter. Doing this may
cause damage to the device.
12
Page 14
Charge with the PC data cable
Before charging, ensure that your PC is
turned on.
1. Plug one end (micro-USB) of PC data
cable into the multifunction jack.
2. Plug the other end of the PC data cable
into USB port on a PC.
Note: Depending on the type of PC data
cable you are using, it may take some time
before charging begins.
USE A MEMORY CARD
Insert a memory card
To store additional multimedia les, you must
insert a memory card.
Caution: We use approved industry
standards for memory cards, but some
brands may not be fully compatible with your
device. Using an incompatible memory card
may damage your device or the memory
card and can corrupt data stored on the
card.
Note: You device supports only the FAT le
structure for memory card. If you insert a
card formatted with a different structure,
your device will ask you to reformat the
memory card.
· Frequent writing and erasing of data will
shorten the lifespan of memory card.
· When you insert a memory card in your
device, the le directory of memory card will
appear in the sdcard folder under the internal
memory.
13
Page 15

1. Remove the back cover.
2. Unlock and lift the memory card holder.
3. Insert a memory with the gold-colored
Contacts facing down.
4. Close and lock the memory card holder.
5. Replace the back cover.
REMOVE THE MEMORY CARD
Before removing a memory card, rst
unmount it for safe removal.
1. In idle mode, open the application list and
select Settings > Storage > Unmount SD
card.
2. Remove the back cover.
3. Unlock and lift the memory card holder.
4. Remove the memory card.
5. Close and lock the memory card holder.
6. Replace the back cover.
Caution: Do not remove a memory card
while the device is transferring or accessing
information, as this could result in loss of
data or damage to the memory card or
device.
14
Page 16

FORMAT THE MEMORY CARD
Formatting your memory card on a PC may
cause incompatibilities with your device.
Format the memory card only on the device.
In idle mode, open the application list and
select Settings > Storage > Unmount SD
card > Erase SD card.
Caution: Before formatting the memory
card, remember to make backup copies of
all-important data stored on your device. The
manufacturer’s warranty does not cover loss
of data resulting from user actions.
15
Page 17
GETTING STARTED
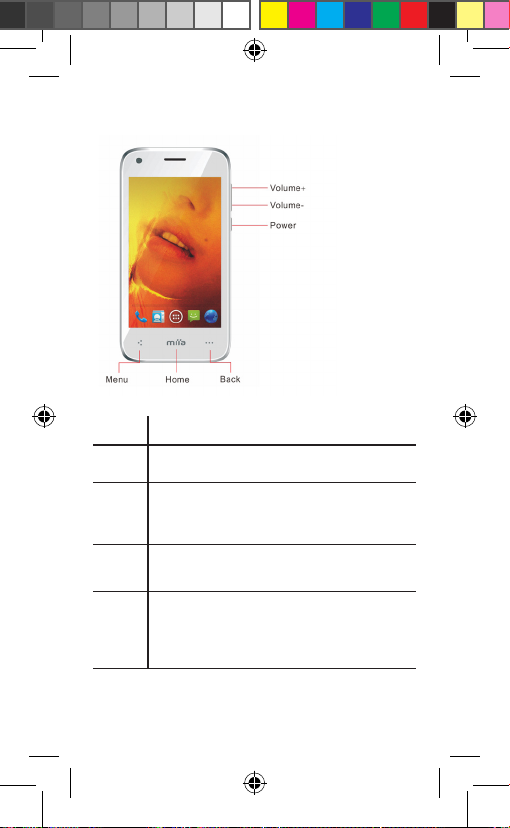
Key Function
Menu Open a list of options available
on the current screen.
Home Return to the idle screen.
Open the list of recent applications
(press and hold).
Back Return to the previous screen.
Volume Adjust the device’s volume.
Power Turn on the device (press and hold);
Access the quick menus
(press and hold);
Lock the touch screen.
16
Page 18
Turn your device on and off
To turn on your device, press and hold [
Power ].
If you turn on your device for the rst time,
then set up your device by following the onscreen instructions.
To turn off your device, press and hold [
Power ] and then select Power off > OK.
Use the touch screen
Your device’s touch screen lets you easily
select items or perform functions. Learn
basic actions to use the touch screen.
Note
· To avoid scratching the touch screen, do
not use sharp tools.
· Do not allow the touch screen to come into
contact with other electrical devices.
Electrostatic discharges can cause the touch
screen to malfunction.
· Do not allow the touch screen to come into
contact with water. The touch screen may
malfunction in humid conditions or when
exposed to water.
· For optimal use of the touch screen,
remove the screen protection lm before
using your device.
· For best performance, tap the touch screen
with your ngertip. The touch screen will not
react to touches of sharp tools, such as a
stylus op pen.
17
Page 19
Control your touch screen with the following
actions:
· Tap: Touch once with your nger to select
or launch a menu, option, or application.
· Tap and hold: Tap an item and hold it for
more than 2 seconds to open a pop-up
option list.
· Drag: Tap and hold your nger on an item,
and then drag your nger to move the item.
· Double-tap: Tap twice quickly with your
nger to zoom in or out while viewing photos
or maps.
· Scroll: Tap and drag your nger up, down,
left, or right to move items on lists.
Note
· Your device turns off the touch screen when
you do not use the device for a specied
period. To turn on the screen, press [ Power ].
· You can also adjust the backlight time. In
idle mode, open the application list, select
Settings > Display > Screen timeout.
18
Page 20
LOCK OR UNLOCK THE TOUCH
SCREEN AND KEYS
You can lock the touch screen and keys to
prevent any unwanted device operations.
· To lock, press [ Power ].
· To unlock, turn on the screen by pressing [
Power ], and then slide up to unlock.
GET TO KNOW THE IDLE SCREEN
When the device is in idle mode, you will see
the idle screen. From the idle screen, you
can view your device’s status and access
applications.
The idle screen has many panels. Scroll left
or right to a panel of the idle screen.
MOVE ITEMS ON THE IDLE SCREEN
1. Tap and hold the item to move until it
magnied.
2. Drag the item to the location you want.
REMOVE ITEMS FROM THE IDLE SCREEN
1. Tap and hold an item to remove until it
magnied and the trash bin appears at the
bottom of the idle screen.
2. Drag the item to the trash bin.
3. When the item turns red, release the item.
19
Page 21

Use the shortcuts panel
In idle mode or while using an application,
tap the indicator icon area and drag your
nger down to open the shortcuts panel.
You can activate or deactivate wireless
connections features and access a list of
notications, such as message, calls, events,
or processing status. To hide the list, drag
the bottom of the list up.
Scroll left or right to use the following
options:
· Brightness / Timeout: Tap to adjust
brightness and timeout.
· Auto rotation / Wi-Fi / Bluetooth / Data
conn. / Airplane mode: Tap to Enable or
disable the corresponding feature.
· General / Silent / Meeting / Outdoor: Tap
to activate the prole.
· Battery percentage :can see the rest
percentage
Application
Access applications
1. In idle mode, tap to access the application
list.
2. Scroll left or right to access another
application screen.
3. Select an application.
20
Page 22
Note
· When you use applications provided by
Google, you must have a Google account. If
you do not have a Google account, sign up
for a Google account.
· You can add a shortcut to an application
by tapping and holding the application icon
to the location list. You can move the icon to
the location you want to on the idle screen.
4. Press [ Back ] to return to the previous
screen; Press [ Home ] to return to the idle
screen.
Note: Your device has a built-in motion
sensor that detects its orientation. If you
rotate the device while using some features,
the interface will automatically switch to
landscape view. To set the interface & not
to rotate the content automatically when the
device is rotated, select Settings > Display,
clear the check box of Auto-rotate screen.
ACCESS RECENT APPLICATIONS
1. Press and hold [ Home ] to open the list of
applications you have accessed recently.
2. Select an application to access.
21
Page 23
USE THE TASK MANAGER
Your device is a multitasking device. It can
run more than on application at the same
time. However, multitasking may cause
hang-ups, freezing, memory problems, or
additional power consumption. To avoid
these problems, end unnecessary programs
using the task manager.
1. In idle mode, open the application list and
select Settings > Apps .
2. Select the label of Running. The list of all
applications currently running on your device
appears.
3. To close an application, select an
application > Stop.
ENTER TEXT
You can enter text by selecting characters on
the virtual keyboard.
Tips: Press and hold [ Menu ] to appear/hide
the virtual keyboard.
CHANGE THE KEYBOARD TYPE
1. Tap the text input led and select Input
method.
2. Select a keyboard type.
22
Page 24
USE ANDROID KEYBOARD
1. Tap the text input led and select Input
method > Android keyboard.
2. Enter text by selecting alphanumeric keys.
COPY AND PASTE TEXT
While you are entering text, you can use the
copy and paste feature to use text in other
applications.
1. Double-tap the text led and then selects
Select word or Select all, from the option list.
2. Drag or across the text you want to
highlight.
3. Select Copy to copy; or Cut to cut the text
onto the clipboard.
4. In another application, double-tap the text
led and then selects Paste to insert the text
from the clipboard into the text led.
DOWNLOAD FILES FROM THE WEB
Caution: Files you download from the web
can include viruses that will damage you
device. To lessen your risk, only download
les from sources you trust.
Note: Some media les include Digital
Rights Management to protect copyrights.
This protection may prevent you from
downloading, copying, modifying, or
transferring some les.
23
Page 25
TO DOWNLOAD FILES FROM THE WEB:
1. In idle mode, open the application list and
select Browser.
2. Search for a le or application and
download it.
SYNCHRONIZE DATA
You can synchronize data with various web
servers and back up or restore your data.
Once the synchronization is completed, your
device stays connected to the web. If any
change is made on the web, the updated
information will appear on your device and
will automatically begin synchronization, and
vice versa.
Note: This feature may be unavailable
depending on your region or service provider.
SET UP A SERVER ACCOUNT
1. In idle mode, open the application list and
select Settings > Add account
2. Select Add account > an account type.
3. Follow the on-screen instructions to
complete the account setup.
ACTIVATE AUTOMATIC SYNC
1. In idle mode, open the application list and
select Settings > Add account
2. Select an account.
3. Select the applications you want to
synchronize. To exclude applications from
automatic synchronization, clear the check
boxes of the applications you want.
24
Page 26
SYNCHRONIZE DATA MANUALLY
1. In idle mode, open the application list and
select Settings > Accounts & sync.
2. Select an account.
3. Select Sync all. Your device will
start synchronizing the data you set for
synchronization.
25
Page 27
COMMUNICATION
CALLING
Learn to use calling functions, such as
making and answering calls, using options
available during a call or customizing and
using call-related features.
Make a call
1. In idle mode, open the application list and
select Phone.
2. Enter an area code and a phone number.
3. Tap to make a call.
4. To end the call, select End.
Answer a call
1. When a call comes in, select Answer.
Note
· When a headset is plugged into the device,
you can press the headset button to answer
a call.
· To mute the ringtone, press [ Volume ].
2. To end the call, select End.
Reject a call
When a call comes in, select Reject.
Call an international number
1. In idle mode, open the application list and
select Phone.
2. Tap and hold 0 to insert the + character.
3. Enter the complete number you want to
dial (country code, area code, and phone
number).
26
Page 28
4. Tap to make a call.
Use options during a voice call
You can use the following options during a
voice call:
· To adjust the voice volume, press [ Volume ].
· To turn off the mouthpiece so that the other
party cannot hear you, select Mute.
· To place a call on hold, select Hold.
· To activate the speakerphone feature,
select Speaker.
· To open the phonebook, select Contacts.
· To dial a second call, select Add call, and
then dial a new number.
· To open the dialing screen, select Dial Pad.
· To record the conversation, press [ Menu ] >
Start recording.
· To converse with the other party via a
Bluetooth headset, press Bluetooth.
27
Page 29
View call log
In idle mode, open the application list and
select Call Log. The status bar will display
when you have missed calls.
· Tap to view all call logs; Tap to view
dialed calls; Tap to view answered calls;
Tap to view missed calls.
· Tap to select resource of call log.
· Tap a call log to make a voice call.
· Tap to view details. You can select the
corresponding operations.
Use additional features
You can use various other call-related
features, such as Fixed Dialing Number
(FDN) mode, or call forwarding or barring.
Set call forwarding
Call forwarding is a network dependent
feature to send incoming calls to another
number that you specify.
You can set this feature separately for
several conditions when you are not able to
answer calls, such as
when you are already on the phone or when
you are outside of the service area. To set
call forwarding for voice/video calls:
1. According to the menu in a dial interface
Settings > Call settings > Voice Call > Call
forwarding > select SIM card.
2. Select a condition.
3. Enter a number to which calls will be
forward and select Enable. Your settings will
be sent to the network.
28
Page 30
Set call barring
Call barring is a network dependent feature
to restrict certain types of calling or prevent
others from making calls with your device.
1. According to the menu in a dial interface
Settings > Call settings > Voice Call > Call
barring > select SIM card.
2. Select a call type to restrict.
3. Enter a call barring password and select
OK. Your settings will be sent to the network.
Set call waiting
Call waiting is a network dependent feature
to alert you of an incoming call while you are
already on a call.
According to the menu in a dial interface
Settings > Call settings > Voice Call >
Additional settings > select SIM card. Select
the check box of Call waiting. Your settings
will be sent to the network.
29
Page 31
MESSAGING
Learn to create and send text (SMS) or
multimedia (MMS) message, and view
or manage messages you have sent or
received.
Send a text message
1. In idle mode, open the application list and
select Messaging.
2. Select Compose new message.
3. Select To eld to enter a number manually
or tap to select one from phonebook.
4. Select Type text message eld to enter
your message text.
5. Select Send to send the message.
Send a multimedia message
1. In idle mode, open the application list and
select Messaging.
2. Select Compose new message.
3. Select To eld to enter a number manually
or tap to select one from phonebook.
4. Press [ Menu ] > Add subject > select
Subject to add a subject for the message.
5. Select Type text message eld to enter
your message text.
6. Press [ Menu ] > Attach to add emotion or
attachment.
7. Select Send to send the message.
30
Page 32
View a text or multimedia message
1. In idle mode, open the application list and
select Messaging.
2. The messages are grouped into message
thread by contact, like a messenger.
· Select a thread to view detail.
· Tap and hold a thread or message to select
an option in pop-up menu.
Listen to voice mail messages
If you have set missed calls to be diverted to
the voice mail server, callers may leave voice
messages
when you do not answer incoming calls. To
access your voice mail inbox and listen to
voice mail message:
1. In idle mode, open the application list and
select Phone, and then tap and hold 1.
2. Follow the instructions from the voice mail
server.
Note: You need to save the voice mail server
number before accessing the server. Your
service provider can give you the number.
31
Page 33
EMAIL
Learn to send or view email message via
your personal or company email account.
Set up an email account
1. In idle mode, open the application list and
select Email.
2. Enter your email address and password.
3. Select Next (for general email accounts,
such as Google Mail and Yahoo) or Manual
setup (for other company email accounts).
4. Follow the on-screen instructions.
When you are nish setting up the
email account, the email messages are
downloaded to your device. If you create
more than two accounts, you can switch
between email accounts; Press [ Menu ] >
Accounts and select one you want to retrieve
message from.
Send an email message
1. In idle mode, open the application list and
select Email > an email account.
2. Press [ Menu ] > Compose.
3. Select To eld to enter an email address
manually. Press [ Menu ] > Add Cc/Bcc to
add more recipients.
4. Select Subject eld to enter a subject.
5. Select Compose Mail eld to enter your
email text.
6. Press [ Menu ] > Add attachment to attach
a le.
7. Select Send to send the email.
32
Page 34
Note: If you are ofine or outside your
service area, the message will be held in the
message thread list until you are online and
in your service area.
View an email message
When you open an email account, you can
view previously retrieved emails ofine or
connect to the email server to view new
messages. After retrieving email messages,
you can view them ofine.
1. In idle mode, open the application list and
select Email > an email account.
2. Press [ Menu ] > Refresh to update the
message list.
3. Tap and hold a message in the list to
select an option in pop-up menu.
4. Select an email message. From the
message view, use the following options:
· To reply to the message, select Reply.
· To forward the message to other Contacts,
press [ Menu ] > Forward.
· To delete the message, select Delete.
· To display the pictures in the message,
select Show pictures.
33
Page 35
CONTACTS
Learn to create and manages a list of your
personal or business Contacts stored on the
phone’s memory card or a SIM card. You can
save names, phone numbers, email address
and more for your Contacts.
Create a contact
To create a contact from dialing screen:
1. In idle mode, open the application list and
select Phone.
2. Enter a phone number.
3. Tap CREATE NEW CONTACT
4. Select a memory location.
5. Enter contact information.
6. Select DONE
To create a contact from Contacts:
1. In idle mode, open the application list and
select Contacts
2. Tap add a contact.
3. Select a memory location.
4. Enter contact information.
5. Select Contacts.
Find a Contacts
1. In idle mode, open the application list and
select Contacts
2. Scroll up or down on the contact list or tap
to input a name to search.
3. Select a contact’s name to view the
details.
34
Page 36
Delete a Contacts
1. In idle mode, open the application list and
select Contacts.
2. Press [ Menu ] > Delete contact.
3. Select the check boxes of the Contacts
you want to delete.
4. Select Delete > OK to delete them.
Tip: Tap and hold a contact and then select
Delete contact to delete the contact.
CONTACTS GROUP
By creating groups of Contacts, you can
manage multiple Contacts and send
message or email to an entire group.
Create a group of Contacts
1. In idle mode, open the application list and
select Contacts.
2. Press [ Menu ] > Groups.
3. Select Add group.
4. Enter a name and select DONE.
Add members into a group
1. In idle mode, open the application list and
select Contacts.
2. Press [ Menu ] > Groups > select a group.
3. Select Add members.
4. Select the check boxes of the Contacts
you want to add.
5. Select DONE.
35
Page 37
ìMove members to a group
1. In idle mode, open the application list and
select Contacts.
2. Press [ Menu ] > Groups > select a group.
3. Press [ Menu ] > Move members.
4. Select the check boxes of the Contacts
you want to move.
5. Select Move > Select the other group >
OK.
Remove members from a group
1. In idle mode, open the application list and
select Contacts.
2. Press [ Menu ] > Groups > select a group.
3. Press [ Menu ] > Remove members.
4. Select the check boxes of the Contacts
you want to remove.
5. Select Remove > Select the other group
> OK.
Set a speed dial number
1. According to the menu in a dial interface--
> Speed Dial
2. Select a location number > select a
contact.
3. Select a phone number (if necessary).
Tip: You can quickly dial this number by
tapping and holding the location number on
the dial screen.
36
Page 38
Copy Contacts
To copy Contacts from a SIM card or phone
to another SIM card or phone:
1. In idle mode, open the application list and
select Contacts.
2. Press [ Menu ] > More > Import/Export.
3. Select a memory location > Next.
4. Select another memory location > Next.
5. Select the check boxes of the Contacts
you want to copy.
6. Select Copy > OK.
Import or export Contacts
To import contact les (in vcf format) from a
memory card to your device:
1. In idle mode, open the application list and
select Contacts.
2. Press [ Menu ] > more > Import/Export.
3. Select SD Card > Next.
4. Select Phone > Next.
5. Select the check boxes of the les you
want to import.
6. Select Copy > OK.
37
Page 39

ENTERTAINMENT
CAMERA
Learn how to capture and view photos and
videos. To use camera, insert a memory
card.
In idle mode, open the application list and
select Camera.
Capture a photo
1. In idle mode, open the application list and
select Camera.
2. Aim the lens at the subject and make any
necessary adjustments
3. Tap to take a photo. The photo is saved
automatically.
Record a video
1. In idle mode, open the application list and
select Camera.
2. Switch to the camcorder.
3. Aim the lens at the subject and make any
necessary adjustments.
4. Tap to start recording.
5. Tap to stop recording. The video is
saved automatically.
GALLERY
Learn to view photos and play video saved in
your device’s memory or on a memory card.
38
Page 40
View a photo
1. In idle mode, open the application list and
select Gallery.
2. Select a folder.
3. Select a photo (with no icon) to view.
While viewing a photo, use the following
options:
· To view more photos, scroll left or right.
· To zoom in, place two ngers on the screen
and spread them apart. To zoom out, move
your ngers closer together. You can also tap
or , or double-tap the screen.
· To view photos in a slideshow, select
Slideshow.
· To delete a photo, select Menu > Delete.
· To use additional features with a photo,
select Menu > More and use the following
options:
· Details: View the photo detail.
· Set as: Set a photo as wallpaper or caller ID
image for a contact.
· Crop: Crop an image from a photo.
· Rotate left: Rotate a photo anti-clockwise.
· Rotate right: Rotate a photo clockwise.
39
Page 41
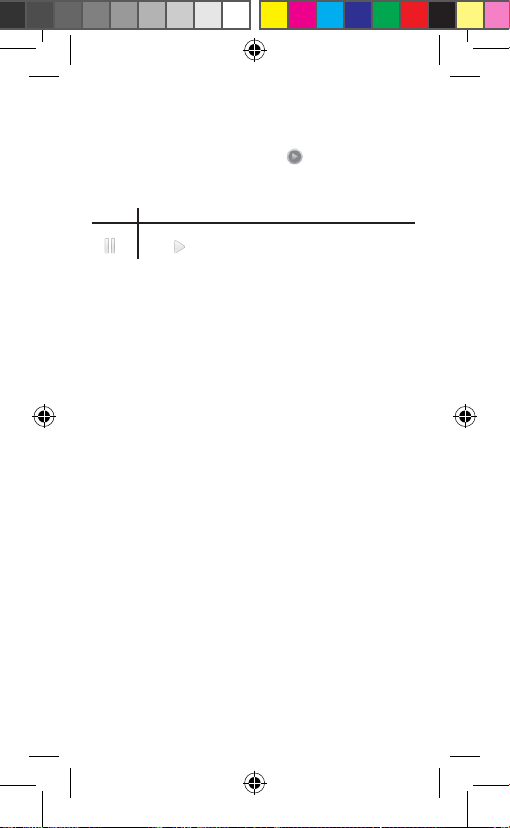
Play a video
1. In idle mode, open the application list and
select Gallery.
2. Select a video ( with the icon) to play.
3. Control playback with following icons:
Icon Function
Pause playback;
Tap to resume playback.
Video Player
Learn to use the video player to play various
kinds of videos.
Note
· Some les formats are not supported
depending on the software of the device.
· If the size exceeds the memory available, an
error may occur when you attempt to play it.
· Playback quality may vary by content type.
· Some les may not play properly depending
on how they are encoded.
1. In idle mode, open the application list and
select Video Player.
2. Select a video to play.
3. Control playback with following icons:
40
Page 42
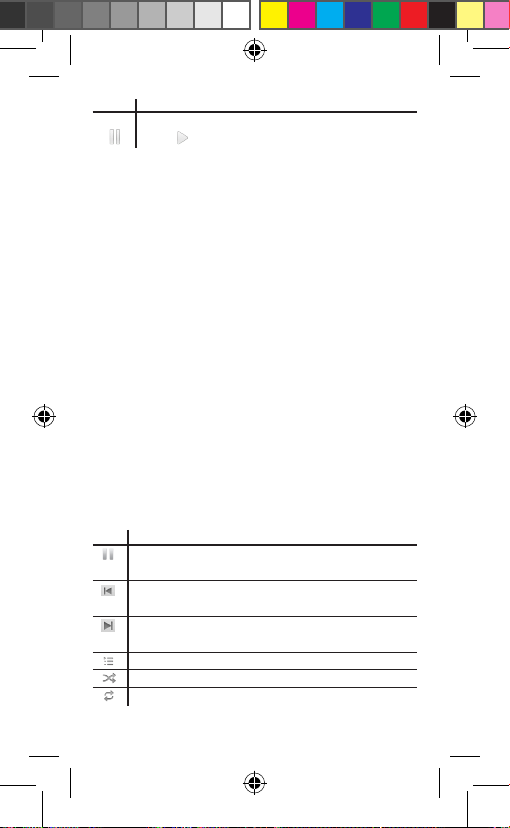
Icon Function
Pause playback;
Tap to resume playback.
Music
Learn to listen to your favorite music while
on the go with the music player.
Note
· Some les formats are not supported
depending on the software of the device.
· If the size exceeds the memory available, an
error may occur when you attempt to play it.
· Playback quality may vary by content type.
· Some les may not play properly depending
on how they are encoded.
Play music
After transferring music le to your memory card:
1. In idle mode, open the application list and
select Music.
2. Select a music category.
3. Select a music le.
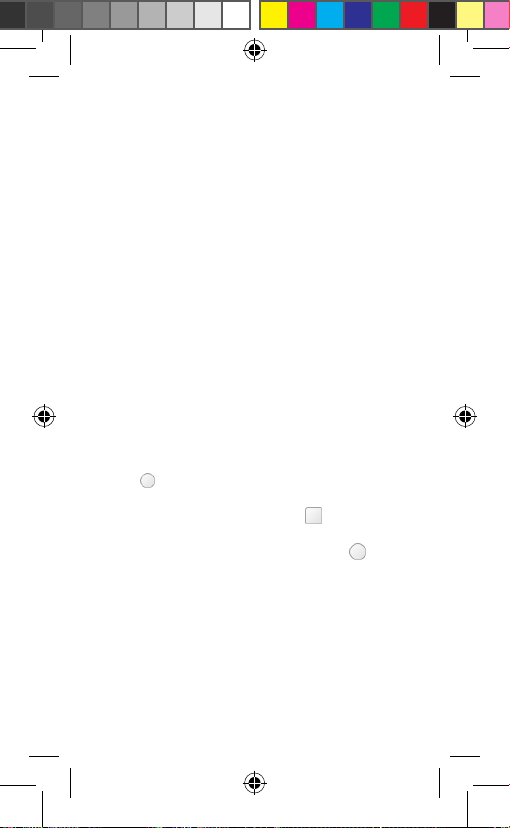
4. Control playback with following icons:
Icon Function
Pause playback;
Tap to resume playback.
Skip backward;
Scan backward in a le (tap and hold).
Skip forward;
Scan forward in a le (tap and hold).
Show the current playlist.
Activate shufe mode.
Change the repeat mode.
41
Page 43

Create a playlist
1. In idle mode, open the application list and
select Music.
2. Select a music category.
3. Tap and hold the artist, album, or song,
and then select Add to playlist.
4. Select New > enter the playlist name >
Save to one or all of songs of the selected
artist or album to the playlist.
Tip: During playback, you can add the
current song to a playlist by press [ Menu ] >
Add to playlist.
Use a song as ringtone
To use a song as ringtone:
1. In idle mode, open the application list and
select Music.
2. Select a music category.
3. Tap and hold a song and then select Use
as phone ringtone.
Tip: During playback, you can use it as
ringtone by press [ Menu ] > Us as ringtone.
42
Page 44
FM RADIO
Learn to listen to music and news on the FM
radio. To listen to the FM radio, you must
connect a headset, which serves as the radio
antenna.
Listen to the FM radio
1. Plug a headset into the device.
2. In idle mode, open the application list and
select FM Radio. The FM radio scans and
saves available stations automatically.
Note: The rst time you turn on the FM radio,
it will start automatic tuning.
SOUND RECORDER
Learn to operate your device’s sound
recorder.
Record a voice memo
1. In idle mode, open the application list and
select Sound Recorder.
2. Tap to start recording.
3. Speak into to mouthpiece.
4. When you are nished, tap to stop and
save the memos.
5. To record more voice memos, tap again.
Play a voice memo
1. In idle mode, open the application list and
select Music.
2. Select Playlist > My recordings.
3. Select a voice memo.
43
Page 45

BROWSER
Learn to access and bookmark your favorite
web pages.
Note
· Available icons may vary depending on your
region or service provider.
1. In idle mode, open the application list
and select Browser to launch a specied
homepage.
2. To access a specic webpage, select the
URL input eld, enter the web address (URL)
of the webpage, and then tap .
3. To return to previous page, press [ Back ].
While browsing a webpage, use the following
options:
· To reload the current web pages, tap .
· To zoom in, place two ngers on the screen
and spread them apart. To zoom out, move
your
ngers closer together.
· To view all windows, press Windows. Tap
to close the corresponding page.
· To go to the a next page in history, press
[ Menu ] > Forward.
· To go to the a previous page in history,
press [ Back ] .
· To bookmark the current webpage, press
[ Menu ] > Bookmarks > Add bookmark.
· To search for text on the webpage, press
[ Menu ] > More > Find on page.
44
Page 46
· To send the webpage address (URL) of the
webpage to others, press [ Menu ] > Share
page.
· To view the web pages history, press
[ Menu ] > More > History.
45
Page 47
CONNECTIVITY
BLUETOOTH
Bluetooth is a short-range wireless
communications technology capable of
exchanging information over a distance of
about 7-8m without requiring a physical
connection.
Turn on the Bluetooth wireless feature
In idle mode, open the application list and
select Settings > Wireless & networks >
Bluetooth, select the check box of Bluetooth.
Find and pair with other Bluetoothenabled devices
1. In idle mode, open the application list
and select Settings > Bluetooth > Scan for
devices.
2. Select a device.
3. Enter a PIN for the Bluetooth wireless
feature or the other devices’ Bluetooth PIN,
if it has one, and select OK. Alternatively,
select Accept to match the PIN between
your device and the other device.
4. When the owner of the other device
enters the same PIN or accepts the
connection, pairing is complete. If the paring
is successful, the device will automatically
search for available services.
Note: Some devices, especially headsets
or hands-free car kits, may have xed
Bluetooth PIN, such as 0000. If the other
device has a PIN, you must enter it.
46
Page 48
Send data via the Bluetooth wireless
feature
1. Select a le or item from an appropriate
application or File Manager.
2. Select an option for sending data via
Bluetooth.
Note: The method for selecting an option
may vary by data type.
3. Search for and pair with a Bluetoothenable device.
Receive data using the Bluetooth wireless
feature
1. In idle mode, open the application list
and select Settings > Wireless & networks >
Bluetooth, click on MiiaPhone MP400. Your
device is visible to other Bluetooth devices
for 120 seconds.
2. When prompted, enter the PIN for the
Bluetooth wireless feature and select OK (if
necessary).
3. Select Accept to conrm that you are
willing to receive data from the device.
WI-FI
Learn to use your device’s wireless
networking capabilities to activate and
connect to any wireless local area network
(WLAN) compatible with IEEE 802.11 b/g/n
standards.
47
Page 49
Activate the Wi-Fi feature
In idle mode, open the application list and
select Settings > Wireless & networks > WiFi, select the check box of Wi-Fi.
Note: An active Wi-Fi network running in the
background will consume battery power. To
preserve battery power, activate the Wi-Fi
network only when needed.
Find and connect to a Wi-Fi network
1. In idle mode, open the application list
and select Settings > Wireless & networks >
Wi-Fi settings. The device will automatically
search for available Wi-Fi networks.
2. Select a network under Wi-Fi network.
3. Enter a password for the network (if
necessary).
4. Select Connect
Add a Wi-Fi network manually
1. In idle mode, open the application list and
select Settings > Wireless & networks > WiFi settings > Add network.
2. Enter the SSID for the network and select
the security type.
3. Set the security settings depending on the
selected security type.
4. Select Save.
48
Page 50
MOBILE NETWORK SHARING
Learn to set your device as a wireless
modem or wireless access point for PCs
or other devices, and share your device’s
mobile connection.
Share your device’s mobile
network via Wi-Fi
1. In idle mode, open the application list
and select Settings > Wireless & networks >
More > Tethering & portable hotspot.
2. Select the check box of Portable Wi-Fi
hotspot.
3. Select Portable Wi-Fi hotspot > Congure
Wi-Fi hotspot to congure network setting to
use your device as an access point.
4. When you are nished, select Save.
5. From another device, locate your device’s
name in the available connection list and
connect to the network. Your device shares
the mobile network connection on another
device.
Share your device’s mobile
network via USB
1. Using USB cable, connect the
multifunction jack on your device to a PC.
2. In idle mode, open the application list
and select Settings > Wireless & networks >
More > Tethering & portable hotspot.
3. Select the check box of USB tethering
to activate the USB tethering. Your device
shares the mobile network connection on
your PC.
49
Page 51
4. To stop sharing the network connection,
clear the check box of USB tethering.
Note: The sharing method for the network
connection may differ depending on the PC’s
operating system.
VPN connections
You can create virtual private networks
(VPN) and connect to your private network
securely through a public network, such as
the internet.
Note: Your device should already be
congured with internet access. If you have
trouble accessing the internet, you need to
edit connections. If you are not sure about
the connection information to enter, ask your
service provider.
Set up VPN connections
1. In idle mode, open the application list
and select Settings > Wireless & networks >
More > VPN settings > Add VPN.
2. Select a VPN type.
3. Customize the connection information.
Note: Available options may vary depending
on the VPN type.
50
Page 52
· VPN name: Enter a name of the VPN server.
· Set VPN server: Enter the IP address of the
VPN server.
· Enable encryption: Set to encrypt the VPN
server.
· Set IPSec pre-shared key: Enter a pre-
shared key.
· Enable L2TP secret: Set to use the L2TP
secret password.
· Set L2TP secret: Enter the L2TP secret
password.
· Set user certicate: Select a user certicate
that the VPN server uses to identify you. You
can import from the VPN server or download
from the web.
· Set CA certicate: Select a certicate
authority (CA) certicate that the VPN server
uses to identify you. You can import from the
VPN server or download from the web.
· DNS search domains: Enter the domain
name server (DNS) address.
· When you are nished, press [ Menu ] > Save.
Connect to a private network
1. In idle mode, open the application list and
select Settings > Wireless & network > VPN
settings.
2. Select a private network to connect.
3. Enter the user name and password and
select Connect.
51
Page 53
TOOLS
CLOCK
Learn to set and control alarms.
Set a new alarm
1. In idle mode, open the application list and
select Clock.
2. Set alarm > On > Add alarm.
3. Set alarm time and then select Set to set
details,and so on
Stop an alarm
When the alarm sounds:
To stop the alarm, select Dismiss.
To repeat the alarm after 10 minutes, select
Snooze.
Delete an alarm
1. In idle mode, open the application list and
select Clock.
2. Press [ Menu ] > Alarms.
3. Tap and hold an alarm you want to delete
and then select Delete alarm > OK.
Calculator
Learn to perform mathematical calculations
directly on your device like a typical handheld or desktop calculator.
1. In idle mode, open the application list and
select Calculator.
52
Page 54
2. Use the keys that correspond to
the calculator display to perform basic
mathematical operation. To use the scientic
calculator, press [ Menu ] > Advanced panel.
File manager
Learn to quickly and easily access all of your
images, videos, music, sound clips, and
other types of les
stored in memory card.
1. In idle mode, open the application list and
select File manager.
2. Select a folder.
3. Select a le to open.
In a folder, press [ Menu ] to use the following
options.
· To create a new folder, select Create folder.
· For additional operations of folders and
les, press [ Menu ] > Edit > select folders or
les > press [ Menu ] > select an operation.
CALENDAR
Learn to create and manage daily, weekly,
or monthly events, and set alarms to remind
yourself of important events.
53
Page 55
Create an event
1. In idle mode, open the application list and
select Calendar.
2. Press [ Menu ] > New event.
3. Enter the details of the events as required.
4. When you are nished, select DONE
View events
To change the calendar view:
1. In idle mode, open the application list and
select Calendar.
2. Select a view mode from the top of the
calendar.
To view events of a specic date:
1. In idle mode, open the application list and
select Calendar.
2. Select a date on the calendar. In monthly
view, days with scheduled events are
indicated by a small rectangle.
3. Select an event to view its details.
SETTINGS
To access the settings menu:
· In idle mode, open the application list and
select Settings.
· In idle mode, press [ Menu ] > Settings.
SIM management
· SIM Information: Select a SIM card to
edit SIM name, enter phone number, set
background color,
or set display numbers.
· Default Settings: Select the default SIM
card for voice call, Video call, messaging,
54
Page 56
and data connection.
· General settings
· Roaming: Enable or disable data roaming,
and select roaming reminder.
· Contacts & binding: Associate Contacts
with a specic SIM card.
WIRELESS E NETWORK
Wi-Fi:
Turn the Wi-Fi feature on or off.
Bluetooth
Turn the Bluetooth wireless feature on or off.
· Bluetooth settings
· Bluetooth: Turn the Bluetooth wireless
feature on or off.
· Scan for devices: Search for available
Bluetooth-enabled devices.
More
· Airplane mode
VPN : Set up a connection to virtual private
networks (VPNs).
· Tethering & portable hotspot
· Mobile networks
· Data usage: View the data usage.
· Access Point Names: Set up access point
names (APNs).
· Network operators: Search for available
networks and select a network for roaming.
· USB Internet.
55
Page 57
User Profiles
Tap next to a prole to activate it.
Select a prole to customize it:
· Vibrate: Set when the device will vibrate for
various events.
· Volume: Adjust the volume level for
ringtone, alarm, and notications.
· Voice call ringtone: Select a ringtone to alert
you on incoming calls.
· Default notication sound: Select a
ringtone to alert you to events, such as new
messages.
· Dial pad touch tones: Set the device to
sound when you touch the keys on the
dialing screen.
· Touch sound: Set the device to sound when
you select an application or option on the
touch screen.
· Screen lock sound: Set the device to sound
when you lock or unlock the touch screen.
· Vibrate on touch: Set the device to vibrate
when you touch the keys.
Note: Silent mode can only set up vibrate
Display
Change the settings for display.
· Brightness: Set the brightness of the
display.
· Auto-rotate screen: Set whether or not to
rotate the content automatically when the
device is rotated.
· Sleep: Set the length of time the device
waits before turning off the display’s
backlight.
56
Page 58
Location access
· Use wireless networks: Set to use Wi-Fi
network and/or mobile networks for nding
your location.
Security
Change the settings for securing your device
and the SIM card.
Screen lock
Set an unlock security code. When you set
your security code, this option changes to
Change screen lock.
· None: Disable the screen lock.
· Pattern: Set an unlock pattern to unlock the
screen.
· PIN: Set a PIN (numeric) to unlock the
screen.
· Password: Set a password (alphanumeric)
to unlock the screen.
· Set up SIM card lock
· Lock SIM card: Activate or deactivate the
PIN lock feature to require the PIN before
using the device.
· Change SIM PIN: Change the PIN used to
access SIM data
Apps
Change the settings for managing installed
applications .
· Running: View the services you are using
and access them to manage.
· Downloaded: view your downloads APK
· ALL: view all APK on your phone
57
Page 59
Language & input
Change the settings for text input.
· Language: Select a display language for all
menus and applications.
· Personal dictionary: You can add a word to
user dictionary.
· Keyboard input methods: Select a default
keyboard type for text input.
Date & time
Access and alter the following settings to
control how time and date are displayed on
your device.
· Automatic date&time:: Automatically update
the time when you move across time zones.
· Set date: Set the current date manually.
· Select time zone: Set your home time zone.
· Set time: Set the current time manually.
· Use 24-hour format: Set the time to be
displayed in 24-hour format.
· Choose date format: Select a date format.
Schedule power on/off
Set a specied time to power on or off the
device.
58
Page 60
MIIA GAMES
Enter a world of fun with the Miia
Games App and discover always
new games!
How it works:
• By clicking on the Miia Games icon you
will nd 3 games available for you right
away!
• Choose the game you like the most and
start playing: you don’t need to download
any other Apps and you will be able to play
without heaping your device memory.
• To unlock all other games click on the
“key” icon at the top right or on the
games with a yellow lock
There is plenty of them and always new!
• By clicking on the “key” button or on
locked games, you can choose the payment
method you like and, at payment received,
you will get an unlock PIN to access all
games, with no other payment needed.
• Then insert your PIN, together with your
email or your telephone number, and start
playing!
Remember: to use the application you will
have to be connected to the Internet and
your code will be valid in the Miia Games
App of all Miia devices.
Have fun with Miia & GamePix!
59
Page 61
PLAY STORE
The Play Store has many applications that
you can quickly and easily download to your
Phone.
1. Tap the Play Store application icon.
Play Store login information. If you have
not yet registered an account, tap Register.
Otherwise, tap Login and enter your login
information and then tap login again.
2. You can select applications from the
default Featured group, by Categories, Top
(latest, hottest, random), or search by name.
3. Tap on an application, → Download.
4. After the app is downloaded, tap Install.
5. Tap Open to launch now, or Done to return
to the Play Store screen.
After downloading apps, tap on History to
manage the installed applications. You can
add and/or view comments from other users,
launch apps, and uninstall them.
60
Page 62
SPECIFICATIONS
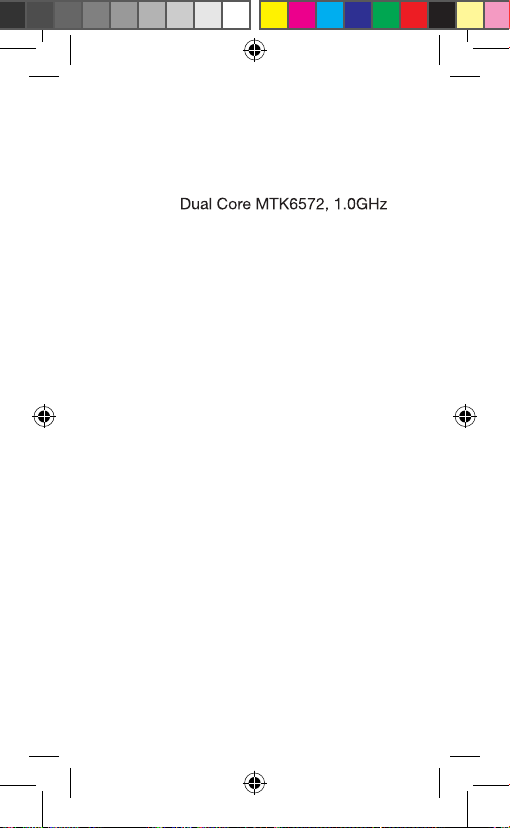
Dual Sim: (voce + data; voce)
Display: 5” 960x540 QHD IPS
Processor:
Internal Memory: 4GB
RAM: 512MB
Front Camera: 0.3 MP
Rear Camera: 5.0 MP con FLASH
Operating System: Android 4.4 KitKat
Battery Lithium: 1700 mAh 3,7V
Standby Mode: 100 h
Call mode: 300 min.
Bluetooth
GPS
3G
Wifi
61
Page 63
INFORMATION FOR USERS
Pursuant to Legislative Decree no. 49 of 14 March
apparecchiature elettriche ed elettroniche (RAEE)”
The symbol of the crossed out wheeled bin on the
equipment indicates that the product must be collected
separately from other waste at the end of its useful life.
Therefore, the user must turn in the equipment, complete with
all its essential components, at the end of its useful lifetime to
an appropriate centre for separate collection of electrical and
electronic waste. The user may also take to the retailer at the
time new equipment of an equivalent type is purchased, trading
one item for one item, or one item for zero items for devices
measuring less than 25 cm on the longest side. Suitable separate
collection for ensuring that the equipment is recycled, handled
and disposed of compatibly with environmental obligations
prevents possible negative eects on the environment and
human health. It also favours the recycling of the materials that
the device is made of. Improper disposal of the product by the
user implies the application of administrative penalties as per D.
Lgs n. Legislative Decree no. 49 of 14 March 2014.
Return the product to the retailer at the time of purchasing
another equivalent product; trade one item to one item.
The device is compliant with European Union (EU) standards
that limit human exposure to radio frequencies (RF) issued by
telecommunication devices and radios. These standards prevent
the sale of mobile devices that exceed a level of maximum
exposure (also called SAR) equal to 2.0 W/kg.
During the test, the highest SAR level recorded for this model
was equal to 0,264 W/kg. During normal use, the actual SAR level
may be much lower, since the device was designed to emit only
the radio frequency energy needed to transmit the signal to the
closest base station. Through the automatic issuance of energy
at lower levels where possible, the device reduces the overall
exposure to radio frequency energy for users.
The product works with batteries covered by European
directive 2006/66/CE, which may not be disposed of with normal
household waste.
Inquire about local regulations relating to the separate collection
of batteries: proper disposal prevents negative consequences for
the environment and health.
62
Page 64
Produced by:
Future Graphics spa
Via Domenico Fontana 12 - 00185 Rome - Italy
MADE IN CHINA
We the manufacturers, Future Graphics SPA, hereby declare that the product Miia ST-510 meets the
requirements of the R&TTE Directive (EC).
The complete Declaration of Conformity is available
from the company: Future Graphics SPA,
Via Domenico Fontana, 12 - 00185 Rome
 Loading...