

miGuard SPS260 Instructions Manual
Solar Powered Siren
These instructions should be read in conjunction with your miGuard Wireless
Burglar Alarm System Installation and Operating Instructions, and be retained
for future reference. The Siren can also be used as a standalone Alarm System
when connected to miGuard Sensors.
Introduction
Fit the Siren to the outside of the building in a position that is clearly visible and at a
height which is relatively inaccessible to an intruder.
Although the Siren is designed to work on any aspect wall, for optimum performance
try to avoid fixing it to a North facing wall, or to a wall with shadows cast by walls,
trees and roof overhangs.
For optimum radio signal reception mount the Solar Siren at a minimum distance of 1
metre away from any external or internal metalwork (drainpipes, gutters, radiators, etc)
Positioning
SPS260
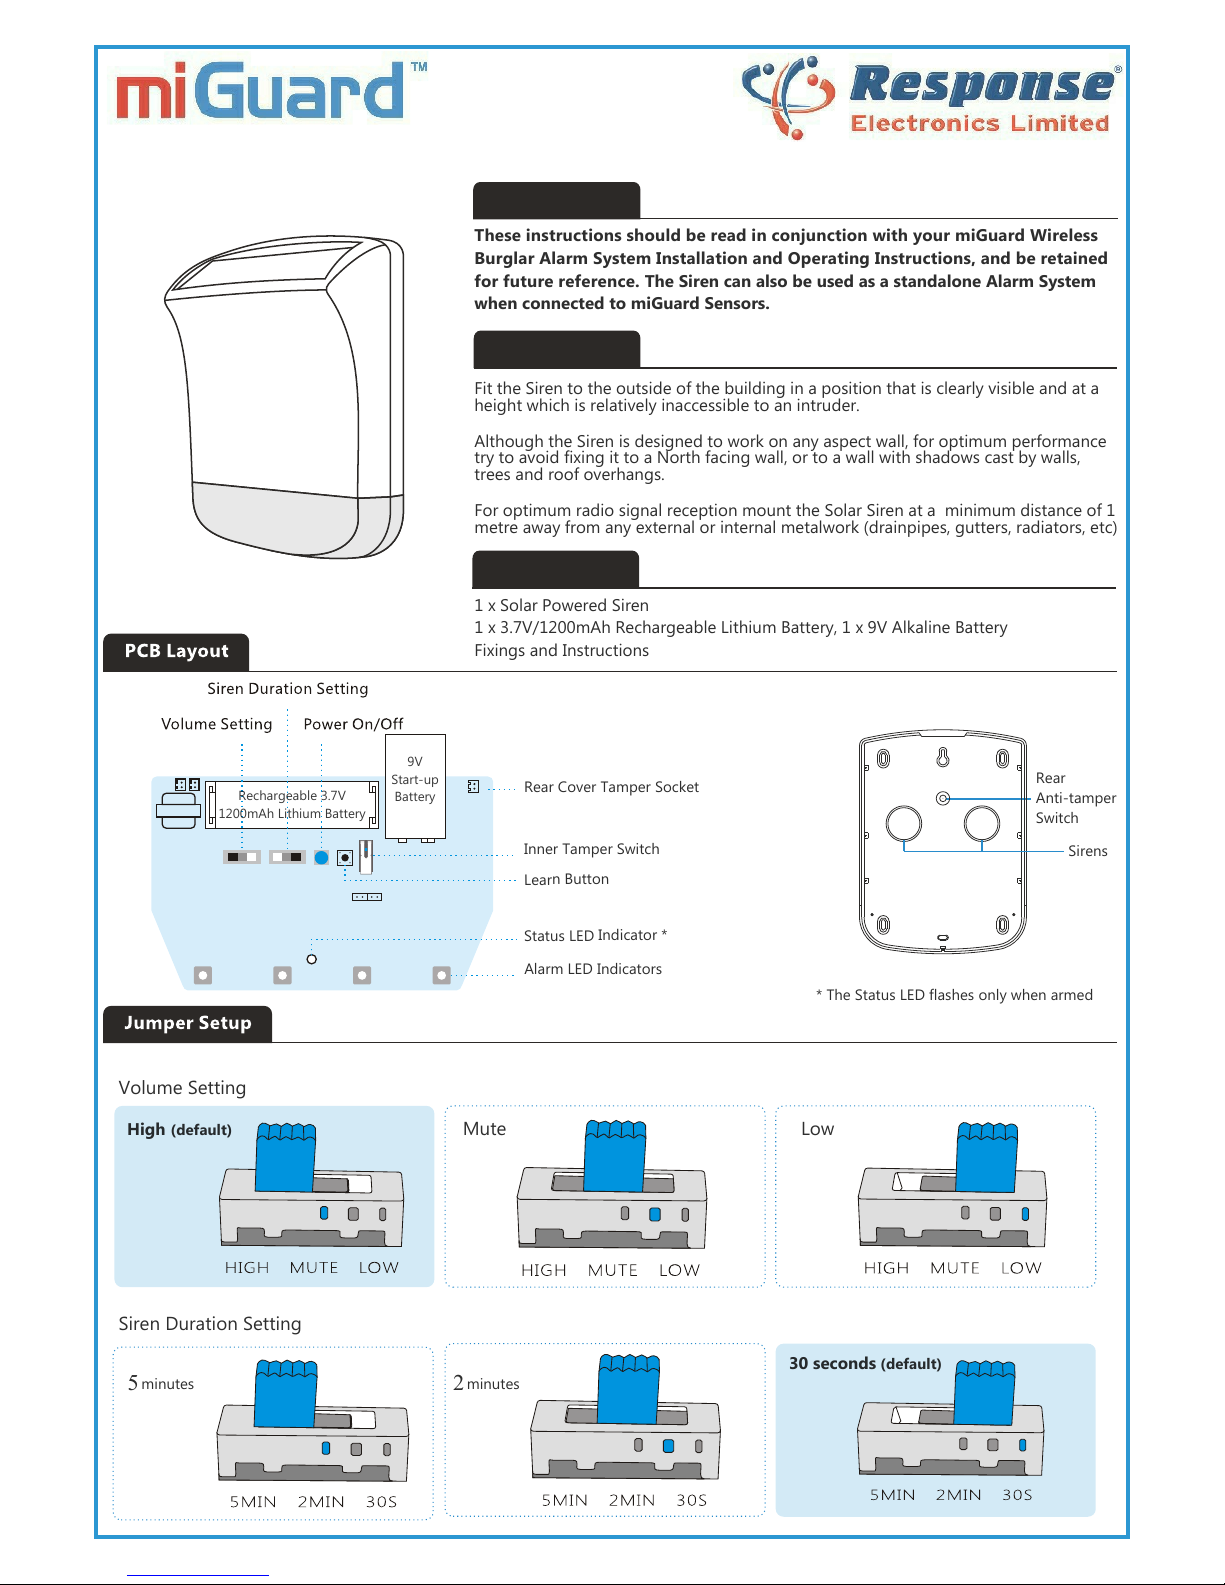
Contents:
1 x Solar Powered Siren
1 x 3.7V/1200mAh Rechargeable Lithium Battery, 1 x 9V Alkaline Battery
Fixings and Instructions
Rear
Anti-tamper
Switch
Sirens
Learn Button
Inner Tamper Switch
Alarm LED Indicators
9V
Start-up
Battery
Rechargeable 3.7V
1200mAh Lithium Battery
Rear Cover Tamper Socket
Status LED Indicator *
* The Status LED flashes only when armed
30 seconds (default)
2
minutes
5
minutes
Siren Duration Setting
Volume Setting
High (default) Mute Low
INSTRUCTIONS
The Siren will sound and the strobe lights will flash upon
alarm activation.
Disarming the System will stop the siren sounding. If not
disarmed the Siren Status Indicator will flash once every 2
seconds for one hour (visual notification of an alarm event).
When installed as part of a miGuard Wireless Burglar Alarm
System, the Siren must be registered to the Control Panel only.
When installed as a Siren only Alarm System (without a
Control Panel), all of the Alarm Accessories must be
registered to the Siren.
The Siren will sound and the strobe light will flash upon
activation of a connected Accessory.
Disarming the System will stop the siren sounding. If not
disarmed the Siren Status Indicator will flash once every 2
seconds for one hour (visual notification of an alarm event).
1. Press the Learn Button on the Solar Siren (0.5 seconds), the system goes
into Learn Mode after one beep is heard.
2. Press the Arm Button on the Control Panel.
3. The Wireless Accessory is learned successfully after a second beep.
4. If two beeps are heard, the accessory is already linked.
5. To finish learning the Accessories, press the Learn Button
again to exit Learn Mode after one beep.
6. The Control Unit is now Armed, press Unlock to Disarm the Control Unit.
Connecting to a Control Panel
1. Press the Learn Button (0.5 seconds), the system goes into Learn Mode
after one beep is heard.
2. Press the Test Button on the additional Accessory or trigger the
Accessory once.
3. The Wireless Accessory is learned successfully after a second beep.
4. If two beeps are heard, the accessory is already linked.
5. To finish learning the Accessories, press the Learn Button
again to exit Learn Mode after one beep.
Connecting with Wireless Accessories
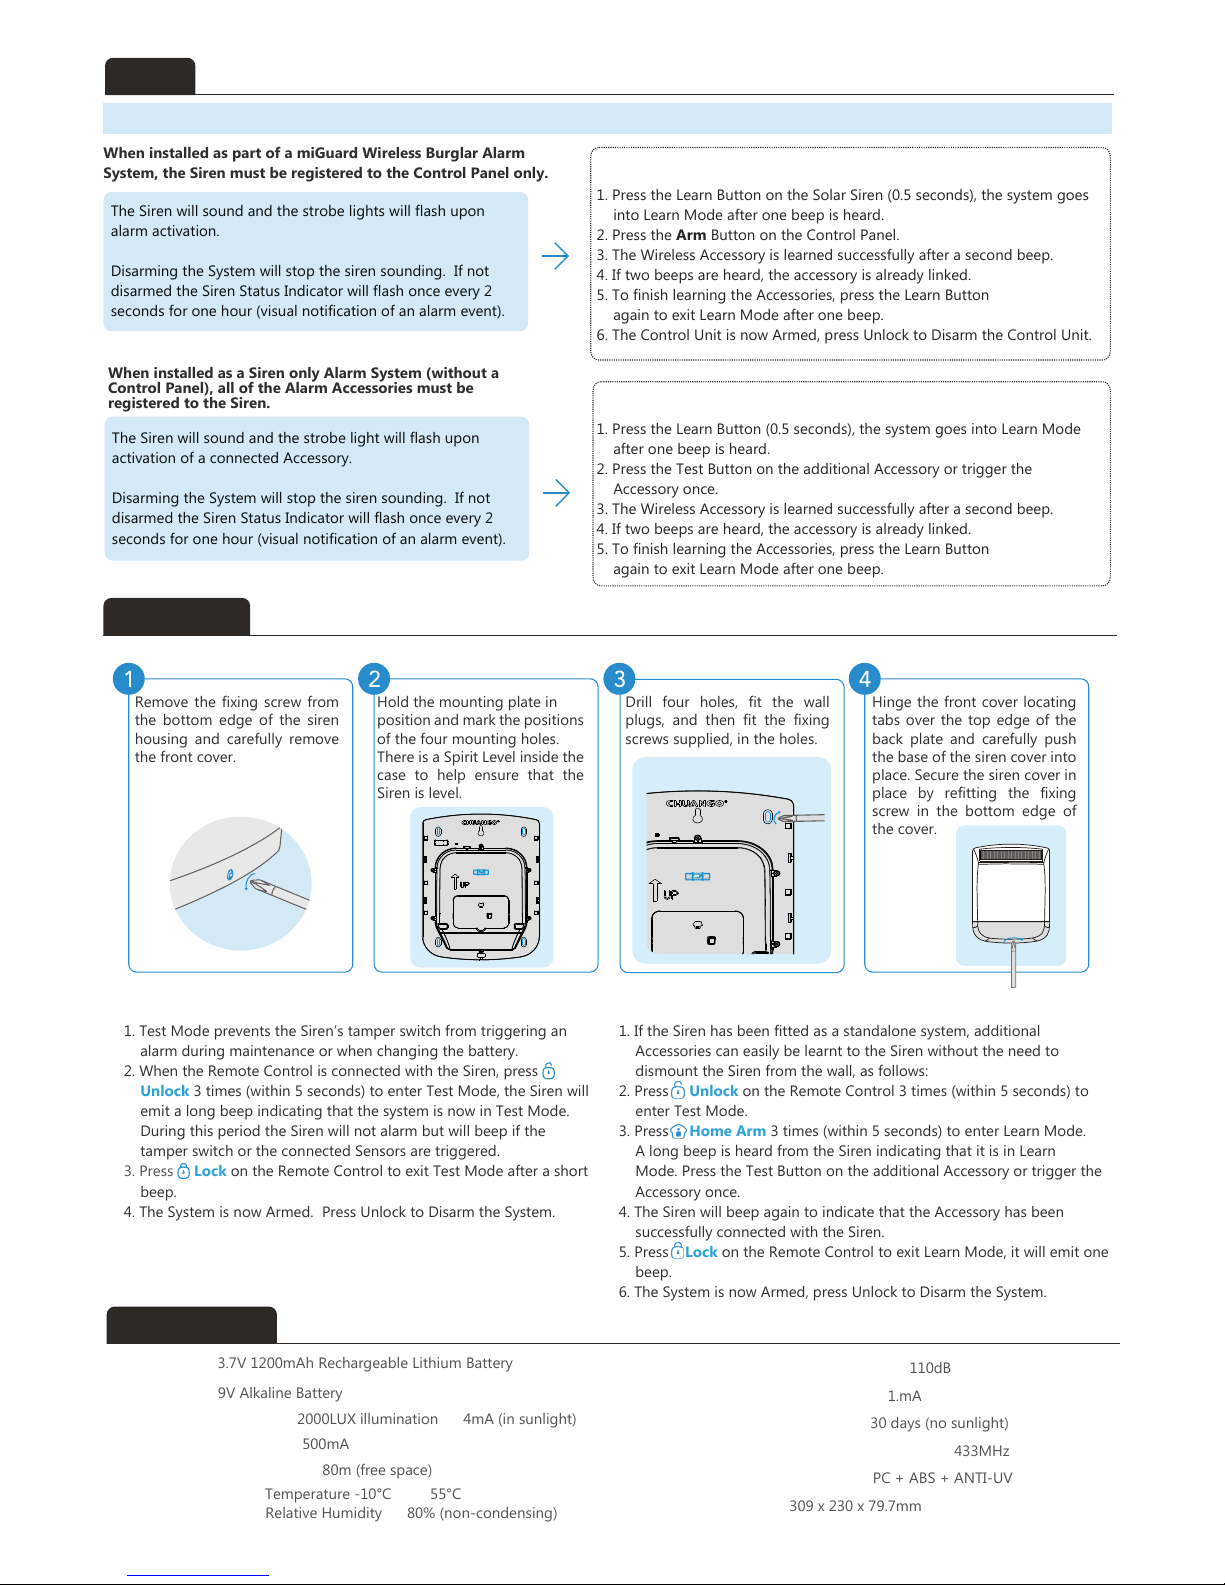
Remove the fixing screw from
the bottom edge of the siren
housing and carefully remove
the front cover.
Usage
Installation
Hold the mounting plate in
position and mark the positions
of the four mounting holes.
There is a Spirit Level inside the
case to help ensure that the
Siren is level.
Drill four holes, fit the wall
plugs, and then fit the fixing
screws supplied, in the holes.
Hinge the front cover locating
tabs over the top edge of the
back plate and carefully push
the base of the siren cover into
place. Secure the siren cover in
place by refitting the fixing
screw in the bottom edge of
the cover.
Specifications
Back-up Power: 3.7V 1200mAh Rechargeable Lithium Battery
Start-up Power: 9V Alkaline Battery
Solar Panel Output Current: 2000LUX illumination
≥
4mA (in sunlight)
Maximum Alarm Current:
≤
500mA
Wireless Receiving Distance:
≤
80m (free space)
Operating Conditions: Temperature -10°C
~ +
55°C
Relative Humidity≤80% (non-condensing)
Test Mode Enter/Exit Learning Status using a connected Remote Control
1. If the Siren has been fitted as a standalone system, additional
Accessories can easily be learnt to the Siren without the need to
dismount the Siren from the wall, as follows:
2. Press Unlock on the Remote Control 3 times (within 5 seconds) to
enter Test Mode.
3. Press Home Arm 3 times (within 5 seconds) to enter Learn Mode.
A long beep is heard from the Siren indicating that it is in Learn
Mode. Press the Test Button on the additional Accessory or trigger the
Accessory once.
4. The Siren will beep again to indicate that the Accessory has been
successfully connected with the Siren.
5. Press Lock on the Remote Control to exit Learn Mode, it will emit one
beep.
6. The System is now Armed, press Unlock to Disarm the System.
1. Test Mode prevents the Siren’s tamper switch from triggering an
alarm during maintenance or when changing the battery.
2. When the Remote Control is connected with the Siren, press
Unlock 3 times (within 5 seconds) to enter Test Mode, the Siren will
emit a long beep indicating that the system is now in Test Mode.
During this period the Siren will not alarm but will beep if the
tamper switch or the connected Sensors are triggered.
3. Press Lock on the Remote Control to exit Test Mode after a short
beep.
4. The System is now Armed. Press Unlock to Disarm the System.
Please connect the 9V Battery and press the Power on/off button prior to the installation.
Maximum Siren Volume: 110dB
Standby Current:
≤
1.mA
Standby Time:
≤
30 days (no sunlight)
Wireless Receiving Frequency: 433MHz
Housing Material: PC + ABS + ANTI-UV
Size: 309 x 230 x 79.7mm
 Loading...