

Page 1

Revision 1.1.3
(c) 2007, HDMI Ltd
MigliaTV
User Guide
Page 2

Table of contents
Introduction and Overview of MigliaTV . . . . . . . . . . . . . . . . . . . . . . . . . . . . . . . . . . . . . . . . . . . . . . . . . . . . . .1
Software installation . . . . . . . . . . . . . . . . . . . . . . . . . . . . . . . . . . . . . . . . . . . . . . . . . . . . . . . . . . . . . . . . . . . . . .3
Installing MigliaTV . . . . . . . . . . . . . . . . . . . . . . . . . . . . . . . . . . . . . . . . . . . . . . . . . . . . . . . . . . . . . . . . . . . . . . . . .4
Setting up the MigliaTV for viewing and recording . . . . . . . . . . . . . . . . . . . . . . . . . . . . . . . . . . . . . . . . . . .5
Introduction . . . . . . . . . . . . . . . . . . . . . . . . . . . . . . . . . . . . . . . . . . . . . . . . . . . . . . . . . . . . . . . . . . . . . . . . . . . . . .6
Serial Number and Registration . . . . . . . . . . . . . . . . . . . . . . . . . . . . . . . . . . . . . . . . . . . . . . . . . . . . . . . . . . . . . .6
Setting up your TV Hardware for TV reception . . . . . . . . . . . . . . . . . . . . . . . . . . . . . . . . . . . . . . . . . . . . . . . . . .6
Using the MigliaTV Menus . . . . . . . . . . . . . . . . . . . . . . . . . . . . . . . . . . . . . . . . . . . . . . . . . . . . . . . . . . . . . . . . .9
MigliaTV Menus . . . . . . . . . . . . . . . . . . . . . . . . . . . . . . . . . . . . . . . . . . . . . . . . . . . . . . . . . . . . . . . . . . . . . . . . . . .10
Using the MigliaTV Onscreen Remote . . . . . . . . . . . . . . . . . . . . . . . . . . . . . . . . . . . . . . . . . . . . . . . . . . . . . . .15
MigliaTV onscreen remote . . . . . . . . . . . . . . . . . . . . . . . . . . . . . . . . . . . . . . . . . . . . . . . . . . . . . . . . . . . . . . . . . . .16
Using the MigliaTV Preferences . . . . . . . . . . . . . . . . . . . . . . . . . . . . . . . . . . . . . . . . . . . . . . . . . . . . . . . . . . . .17
MigliaTV preferences overview . . . . . . . . . . . . . . . . . . . . . . . . . . . . . . . . . . . . . . . . . . . . . . . . . . . . . . . . . . . . . . .18
The General menu . . . . . . . . . . . . . . . . . . . . . . . . . . . . . . . . . . . . . . . . . . . . . . . . . . . . . . . . . . . . . . . . . . . . . .19
The Video input menu . . . . . . . . . . . . . . . . . . . . . . . . . . . . . . . . . . . . . . . . . . . . . . . . . . . . . . . . . . . . . . . . . .20
The image sub-menu . . . . . . . . . . . . . . . . . . . . . . . . . . . . . . . . . . . . . . . . . . . . . . . . . . . . . . . . . . . . . . . . . . .20
The Video compression sub-menu . . . . . . . . . . . . . . . . . . . . . . . . . . . . . . . . . . . . . . . . . . . . . . . . . . . . . . . . .21
The Audio sub-menu . . . . . . . . . . . . . . . . . . . . . . . . . . . . . . . . . . . . . . . . . . . . . . . . . . . . . . . . . . . . . . . . . . .21
The TV Tuner sub-menu . . . . . . . . . . . . . . . . . . . . . . . . . . . . . . . . . . . . . . . . . . . . . . . . . . . . . . . . . . . . . . . . .22
The plugins menu . . . . . . . . . . . . . . . . . . . . . . . . . . . . . . . . . . . . . . . . . . . . . . . . . . . . . . . . . . . . . . . . . . . . . .23
Scheduling a recording with MigliaTV . . . . . . . . . . . . . . . . . . . . . . . . . . . . . . . . . . . . . . . . . . . . . . . . . . . . . .29
Schedule a recording with MigliaTV . . . . . . . . . . . . . . . . . . . . . . . . . . . . . . . . . . . . . . . . . . . . . . . . . . . . . . . . . .30
Scheduling a recording with TitanTV . . . . . . . . . . . . . . . . . . . . . . . . . . . . . . . . . . . . . . . . . . . . . . . . . . . . . . . .33
Registering with TitanTV . . . . . . . . . . . . . . . . . . . . . . . . . . . . . . . . . . . . . . . . . . . . . . . . . . . . . . . . . . . . . . . . . . . .34
TitanTV plug-in settings . . . . . . . . . . . . . . . . . . . . . . . . . . . . . . . . . . . . . . . . . . . . . . . . . . . . . . . . . . . . . . . . . . . . .35
Scheduling a recording . . . . . . . . . . . . . . . . . . . . . . . . . . . . . . . . . . . . . . . . . . . . . . . . . . . . . . . . . . . . . . . . . . . . .35
Scheduling a recording with tvtv . . . . . . . . . . . . . . . . . . . . . . . . . . . . . . . . . . . . . . . . . . . . . . . . . . . . . . . . . . .36
Initial setup . . . . . . . . . . . . . . . . . . . . . . . . . . . . . . . . . . . . . . . . . . . . . . . . . . . . . . . . . . . . . . . . . . . . . . . . . . . . . . .37
tvtv plug-in settings . . . . . . . . . . . . . . . . . . . . . . . . . . . . . . . . . . . . . . . . . . . . . . . . . . . . . . . . . . . . . . . . . . . . . . . .37
Using the tvtv service . . . . . . . . . . . . . . . . . . . . . . . . . . . . . . . . . . . . . . . . . . . . . . . . . . . . . . . . . . . . . . . . . . . . . .38
Using the recording window toolbar . . . . . . . . . . . . . . . . . . . . . . . . . . . . . . . . . . . . . . . . . . . . . . . . .40
Using the Toolbar . . . . . . . . . . . . . . . . . . . . . . . . . . . . . . . . . . . . . . . . . . . . . . . . . . . . . . . . . . . . . . . . . . . . . . . . . .41
Playing back files created with MigliaTV . . . . . . . . . . . . . . . . . . . . . . . . . . . . . . . . . . . . . . . . . . . . . . . . . . . . .43
Software Video Players . . . . . . . . . . . . . . . . . . . . . . . . . . . . . . . . . . . . . . . . . . . . . . . . . . . . . . . . . . . . . . . . . . . . .44
Codecs . . . . . . . . . . . . . . . . . . . . . . . . . . . . . . . . . . . . . . . . . . . . . . . . . . . . . . . . . . . . . . . . . . . . . . . . . . . . . . . . .44
Warranty agreement . . . . . . . . . . . . . . . . . . . . . . . . . . . . . . . . . . . . . . . . . . . . . . . . . . . . . . . . . . . . . . . . . . . . . .45
Page 3

Introduction and Overview
of MigliaTV
MigliaTV User Guide
Page 1
Page 4

Introduction
Thank you for choosing a TV product from Miglia Technology. Your TV product combined with the MigliaTV
software allows you to watch and record TV and video on your Mac.
System requirements:
The system requirements are dependant on the TV hardware you are using, but as a general rule, the minimum
requirements are the following:
• Mac with built-in USB 2.0 connectivity
• G4/1.5 GHz or higher, G5, Intel processor
Note: TVMini+ requires a G5 or Intel processor
• 512 MB of RAM
• Mac OS X 10.4.x or 10.5.x
• QuickTime 7.x
User Guide Overview
This User Guide will guide you through software installation and explain the functions and options of the
MigliaTV software.
Technical Support
Should you ever have any questions regarding your product, please do not hesitate to contact Miglia Technology.
The best way to contact technical support, is to fill out a ‘Technical Support Case Form’. Please go to
http://www.miglia.com/Support and click on the link relevant to your hardware product
MigliaTV User Guide
Page 2
Page 5

Software
Installation
MigliaTV User Guide
Page 3
Page 6

I. Installing MigliaTV
1. Insert the Installation CD that shipped with your TV product into your CD/DVD drive.
2. Before installing the version available on the CD, check for any available updates on the Miglia site. Doubleclick on the icon named ‘Check for software updates now!’ to access the website page.
3. Double-click on the ‘’Install MigliaTV” icon to launch the installer. Select the startup drive of your choice and
click on ‘Install’. Note that you will be asked for your administrator password when performing the
installation.
Note: The administrator password is your Mac OS X password that you selected when you first ran Mac OS X.
It is not the software activation key.
4. Once the installation process is finished, quit the installer
5. The MigliaTV folder will be located in the ‘Applications’ folder of the volume containing
your system software.
Page 7

MigliaTV User Guide
Page 5
Setting up MigliaTV for
viewing and recording
Page 8

MigliaTV User Guide
Page 6
Introduction
This chapter will guide you through the initial setup of MigliaTV. Before proceeding, make sure you have
connected your TV hardware to your Mac and to an antenna or cableTV outlet. For details on how to connect your
TV hardware, please refer to the Hardware Setup Documentation for your specific TV product.
I. Serial Number and Registration
1. Launch MigliaTV located in your Applications folder
2. You will be asked to enter your software activation key located on the CD sleeve or the CD itself. Enter the
32 digits serial number with the dashes as shown below:
XXXX-XXXX-XXXX-XXXX-XXXX-XXXX-XXXX-XXXX
II. Setting up your TV Hardware for TV reception
The Setup Assistant will launch automatically on the first startup of the software. You can also access it at
anytime via MigliaTV > Setup Assistant
The MigliaTV Setup Assistant will guide you through the set up process and create a list of settings based
on your choices and hardware configuration.
1. Start by selecting your country. If your country is not in the list, select the relevant TV standard via the
‘Other’ option.
Page 9
MigliaTV User Guide
Page 7
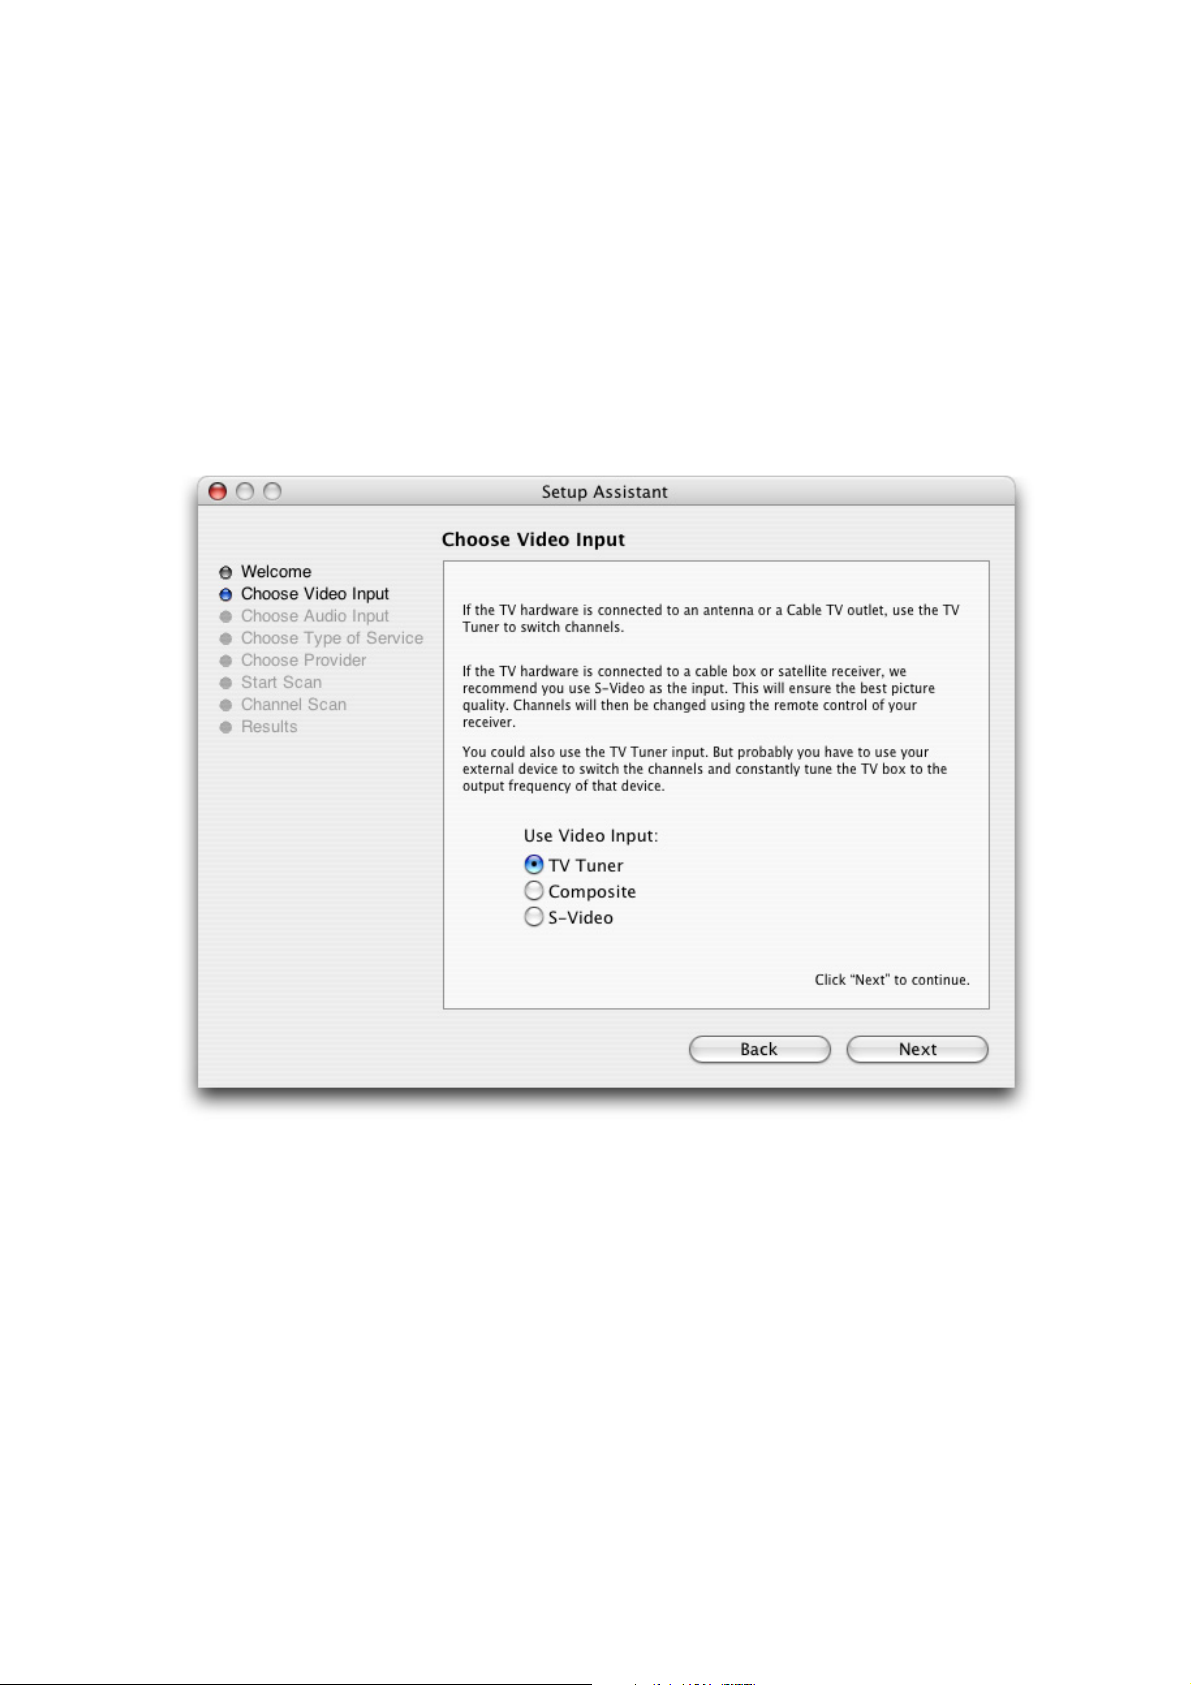
2. The Setup Assistant will ask you to choose the type of connection you are using.
If you connect your card directly to an antenna or a cable TV outlet, choose the ‘TV Tuner’option.
If you are subscribing to a premium or digital cable service or to digital satellite, use the S-Video
connection, as this will ensure the best picture quality possible. Channels will have to be switched with the
remote control of your cable or satellite receiver.
If you are using your TV product for video capture from a VCR, camcorder or DVD player, choose either
composite or S-Video.
Then Click Next
3. Composite or S-Video Connection
If you have selected TV Tuner as the input, please skip to step 6.
Select the audio input based on your connection.
Click on Next and skip to step 5
Page 10
MigliaTV User Guide
Page 8
USA residents only
If you have selected TV Tuner as the input connection, the Setup Assistant will ask you to enter your ZIP
code to download the relevant channel naming templates from TVGuide.com. This will name the channel
automatically.
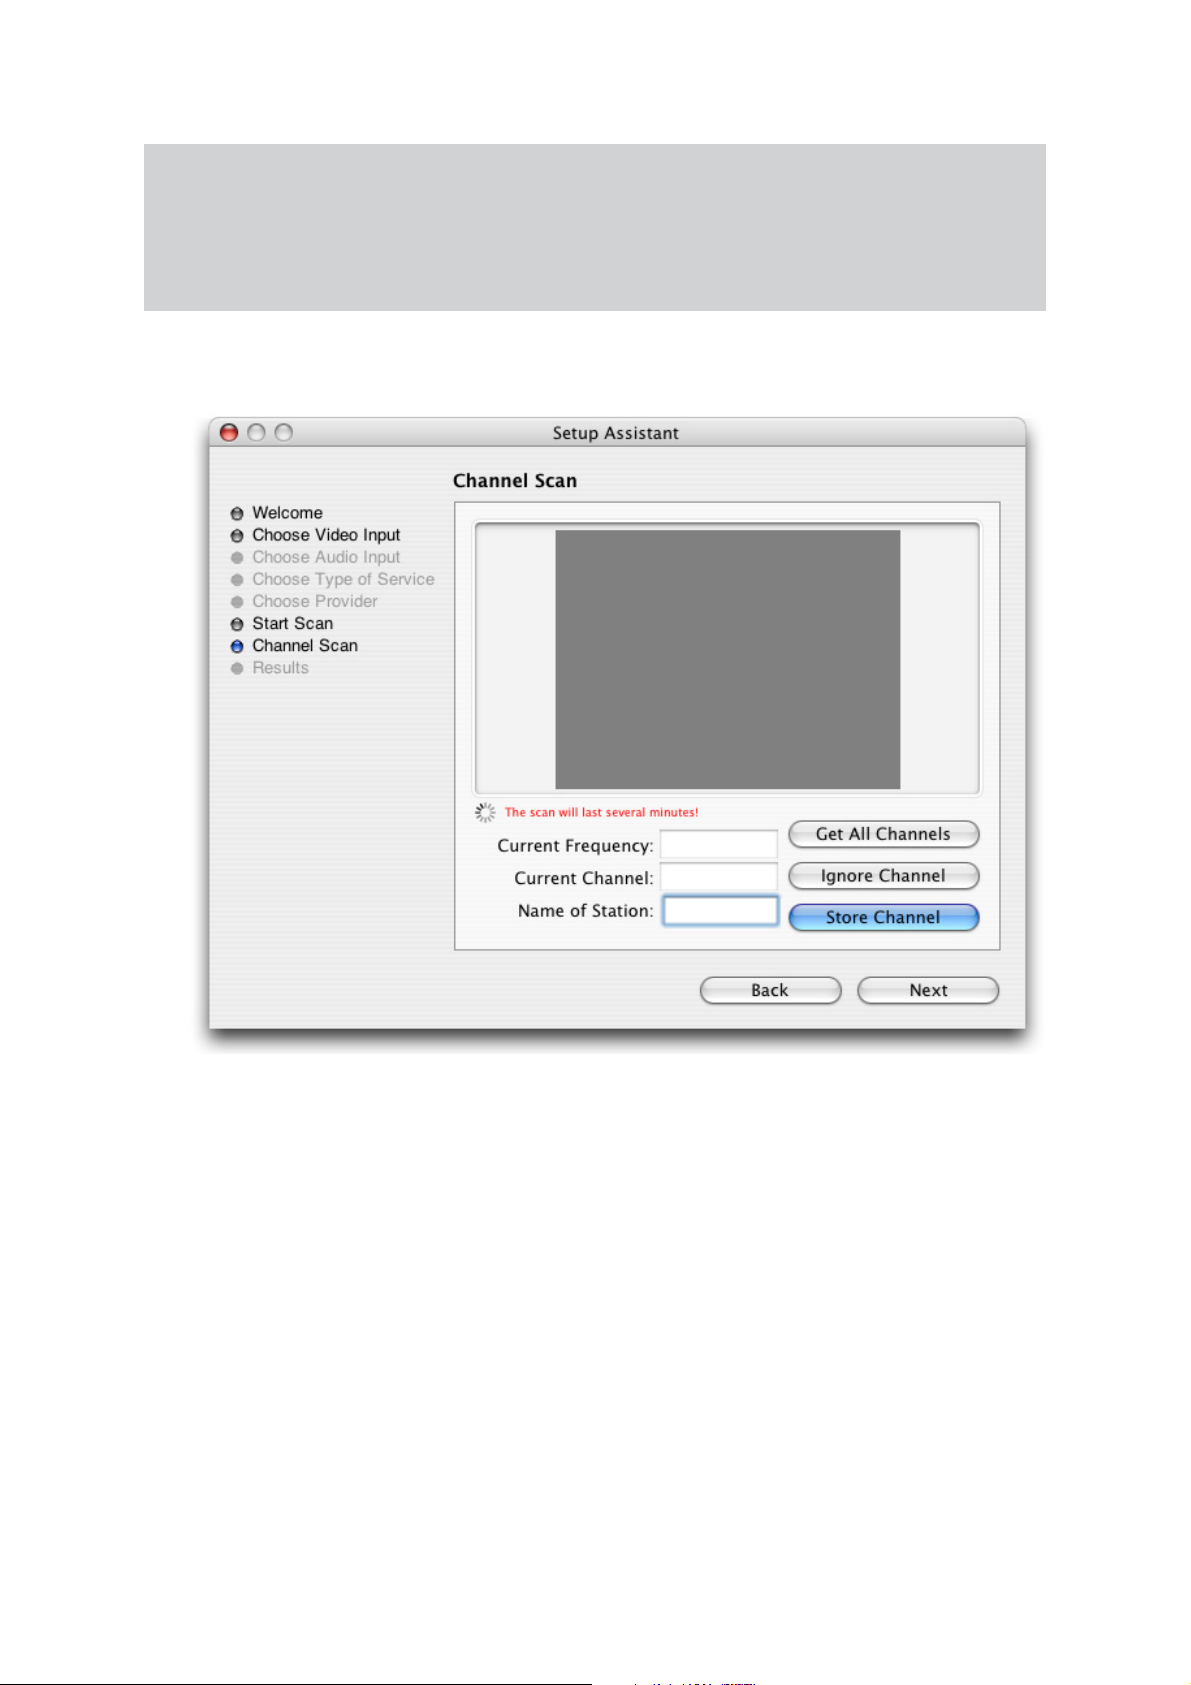
4. TV Tuner Connection:
Press the ‘Start Scan’ button to start the automatic channel search.
You will be given three options during the channel scan:
Get all Channels: The software will scan and store all channels without interruption until the
process is complete. This option will not allow you to name individual
channels and some channels with poor reception may be stored. Naming
and deleting stations can be performed at a later stage in the preference menu.
Ignore Channel: When the software finds a channel, it will be displayed in the preview
window leaving you the decision to store or discard it. By clicking ignore,
you skip a channel and enable the scan to continue.
Next Channel: Once a channel is found you can enter a name (this is optional) and press
‘Next Channel to store it and continue the scan. Repeat the operation until
all channels are found. The Assistant automatically moves to the next
5. Once this operation finished, the Setup Assistant will create video compression and display settings based on
the performance of your computer. These settings can be modified at a later stage by using the Preferences
menu.
6. If you wish to view live TV, you can open the TV window via the View menu.
Page 11

MigliaTV User Guide
Page 9
Using the MigliaTV
Menus
Page 12

MigliaTV User Guide
Page 10
I. MigliaTV Menus
Various functions are accessible via the menu bar:
1. The MigliaTV Menu lets you access:
About box: Displays about box with version number
Preferences... Opens the Preferences menu for the MigliaTV application
Setup Assistant: Launches the Setup Assistant
TitanTV Listings
or tvtv Schedule: Opens your web browser to access the tvtv or TitanTV online guide page.
Software Update: Checks online if a new version is available. This check is also performed automatically once
a week if an internet connection is open.
Hide/Show/Quit: Standard Hide, show and quit options.
Page 13

MigliaTV User Guide
Page 11
2. The File menu contains the following options:
New Recording: Enables you to create a new scheduled recording.
Record: Records what is displayed in the live TV window
3. The Edit menu contain the standard OS provided options as well as the option to clear entries in the
Recordings window
Page 14

MigliaTV User Guide
Page 12
4. The View Menu contains the video related commands.
Quarter Size: Displays the TV window in Quarter size
Half Size: Displays the TV window in half size
Actual Size: Sets the TV window to the original aspect ratio of the broadcast, eg. this is the picture
as it is transmitted.
Double Size: Displays the TV window in double size
Full Screen: Displays the TV window in Full Screen mode, covering the entire screen
Picture
Optimization: There are four levels of picture optimisation. This option determines the quality of the
stream displayed on the screen. The higher the value, the higher the amount of
processor power required.
Overscan Mode: This option will hide the parts of the picture that are usually not seen on a TV
Aspect Ratio: Sets the aspect ratio of the picture. It’s useful when going to full screen mode with a
Widescreen monitor.
TV window always
in Front: Puts the TV window in front of all other applications. Useful if you want to watch TV while
doing other tasks with your Mac.
Page 15

MigliaTV User Guide
Page 13
5. The Controller menu contains the commands found on the onscreen remote control This menu lets you
control the timeshift (pausing live TV) feature as well as the TV channel selection.
Play: If the live TV window is in Pause mode, use this command to return to play mode
Pause: Lets you pause the live TV window
Jump
Forward: Lets you jump forward by 10 seconds. This option will only work if you have previously paused
the live TV window.
Replay: Lets you jump back by 10 seconds. You can access this option at any time, as your TV hardware
is constantly recording the live video stream. This option is only available with hardware that
supports Timeshift.
Go to Live: Jumps to the live TV stream currently received by the TV Hardware. This option is only available
with hardware that supports Timeshift.
Jump to
Beginning: Rewinds the video to the beginning of the TV buffer. This option is only available with hardware
that supports Timeshift.
Page 16
MigliaTV User Guide
Page 14
Channel up/
down: Changes TV channel
Switch back: Switches back to the channel you were previously watching
Use Channel
Name as index: Aligns the channel number with the TV station number.
Video Input: Lets you select the video input to be used by the TV hardware to receive the video stream.
Toggle Video
Input: Cycles through the video inputs (TV Tuner, Composite, S-Video)
Volume Up/Down:Increases or decreases the audio volume. This option affects only the live TV, not a
recording
Mute: Mutes the live TV window. This option affects only the live TV, not a recording.
Stereo: Enables stereo audio
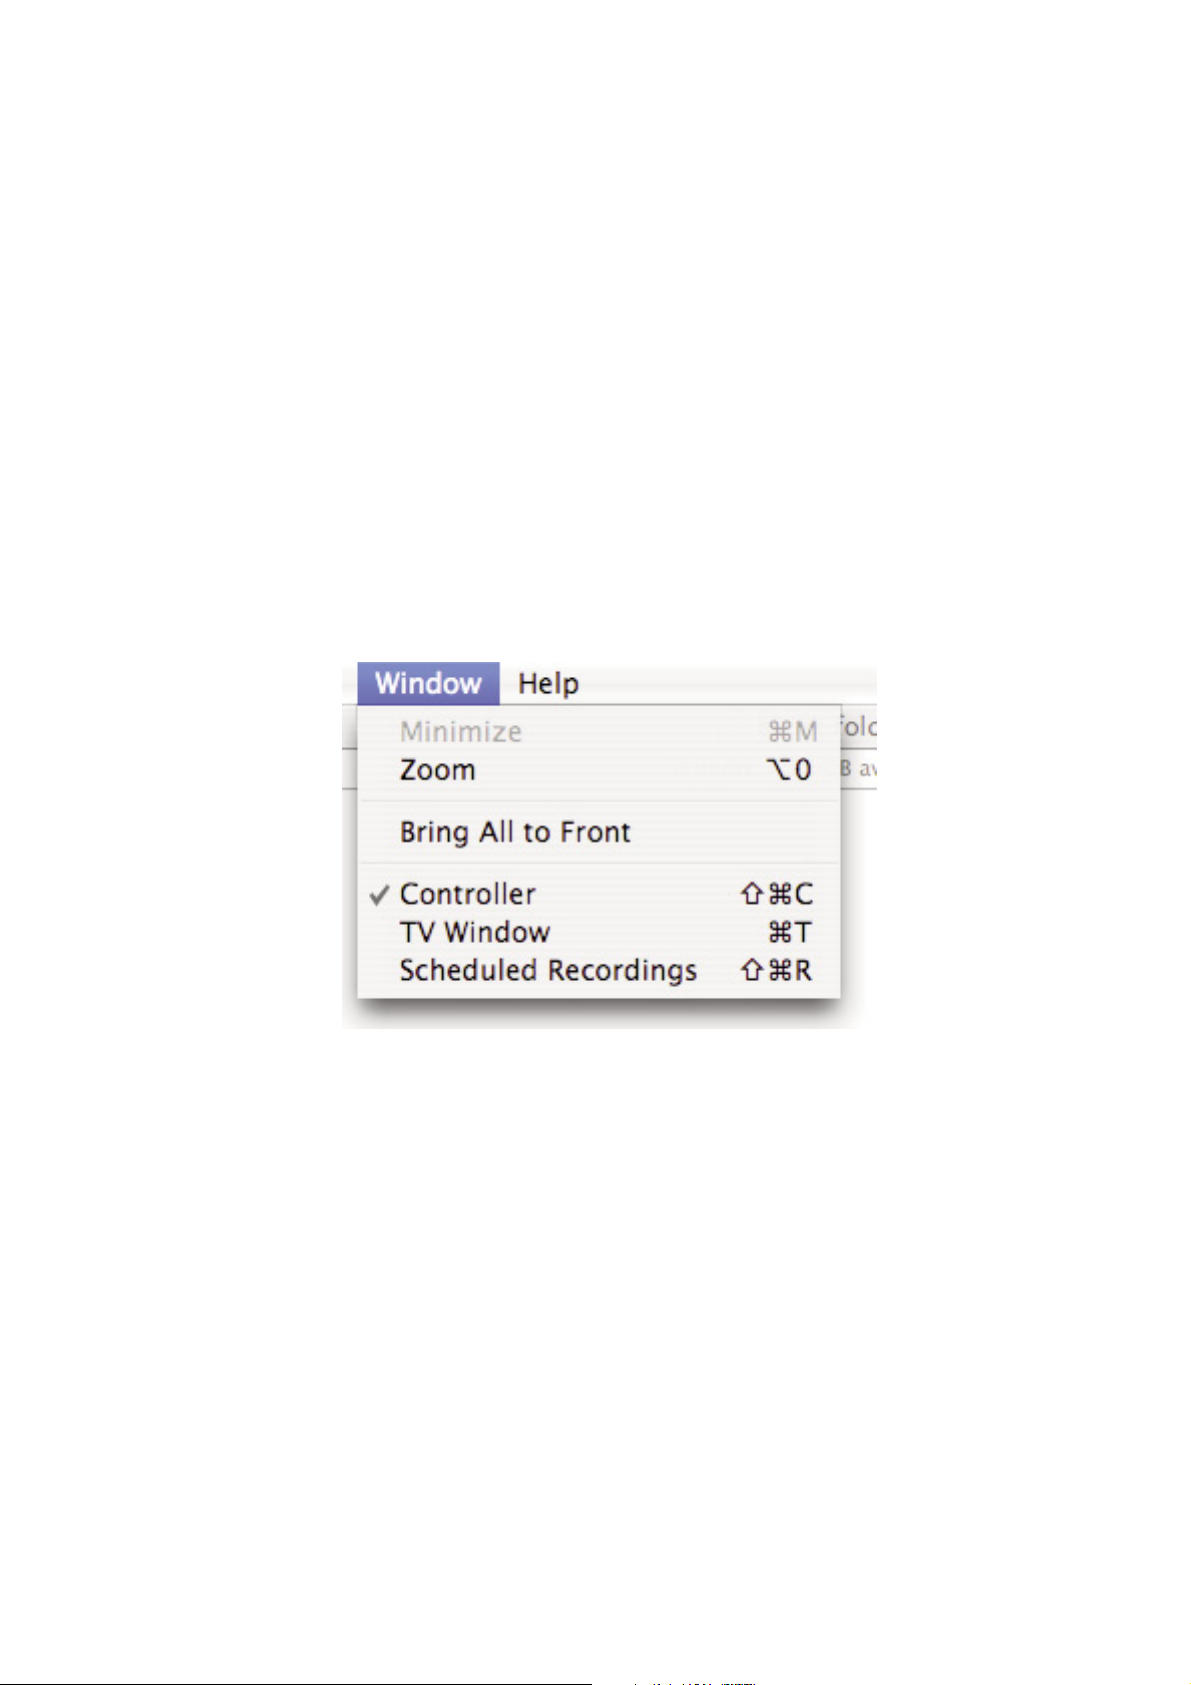
6. The Window menu contains commands for the various windows that the MigliaTV software displays.
Minimize, Zoom
Bring all to front: Standard Mac OS X commands found in any application
Controller: Shows the onscreen remote control
TV window: Shows the TV window
Scheduled
Recordings: Shows the Recordings window, which lists scheduled recordings performed with MigliaTV
6. The Help menu contains the help files and a link to online help
Page 17

MigliaTV User Guide
Page 15
Using the MigliaTV
Onscreen Remote
Page 18
MigliaTV User Guide
Page 16
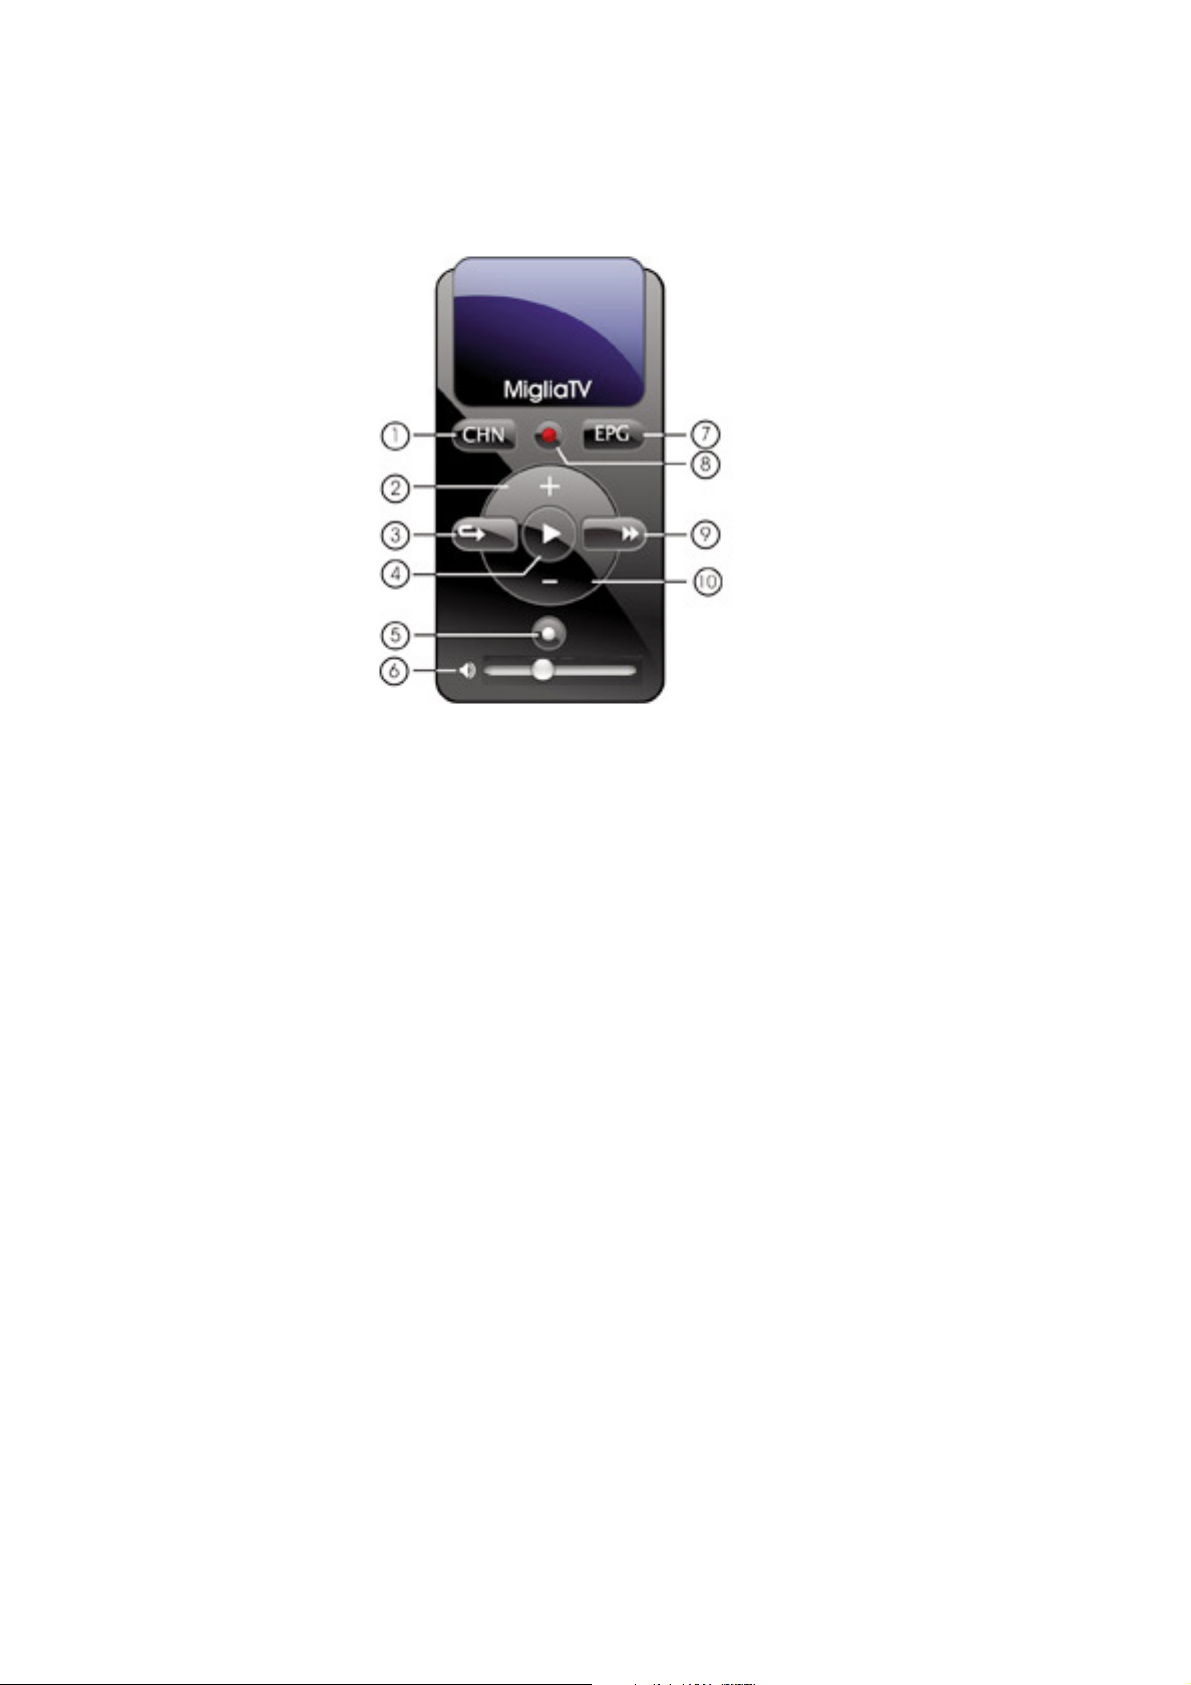
The MigliaTV Onscreen Remote
1) Channel List
2) Channel up
3) Instant Replay - Jump Backwards 10 seconds through a video and then continue playing foward. Click
repeatedly to jump back in 10 second intervals. This option is only available with hardware that supports
Timeshift.
4) Play/Pause Live TV. This option is only available with hardware that supports Timeshift.
5) Live - Go to Live TV. This option is only available with hardware that supports Timeshift.
6) Mute (click on speaker) and volume control
7) Go to EPG (tvtv or TitanTV depending on your location
8) Record
9) Jump Foward - Jump Forward in 10 second intervals
10) Channel Down
Page 19

MigliaTV User Guide
Page 17
Using the MigliaTV
Preferences
Page 20
MigliaTV User Guide
Page 18
I. MigliaTV preferences overview
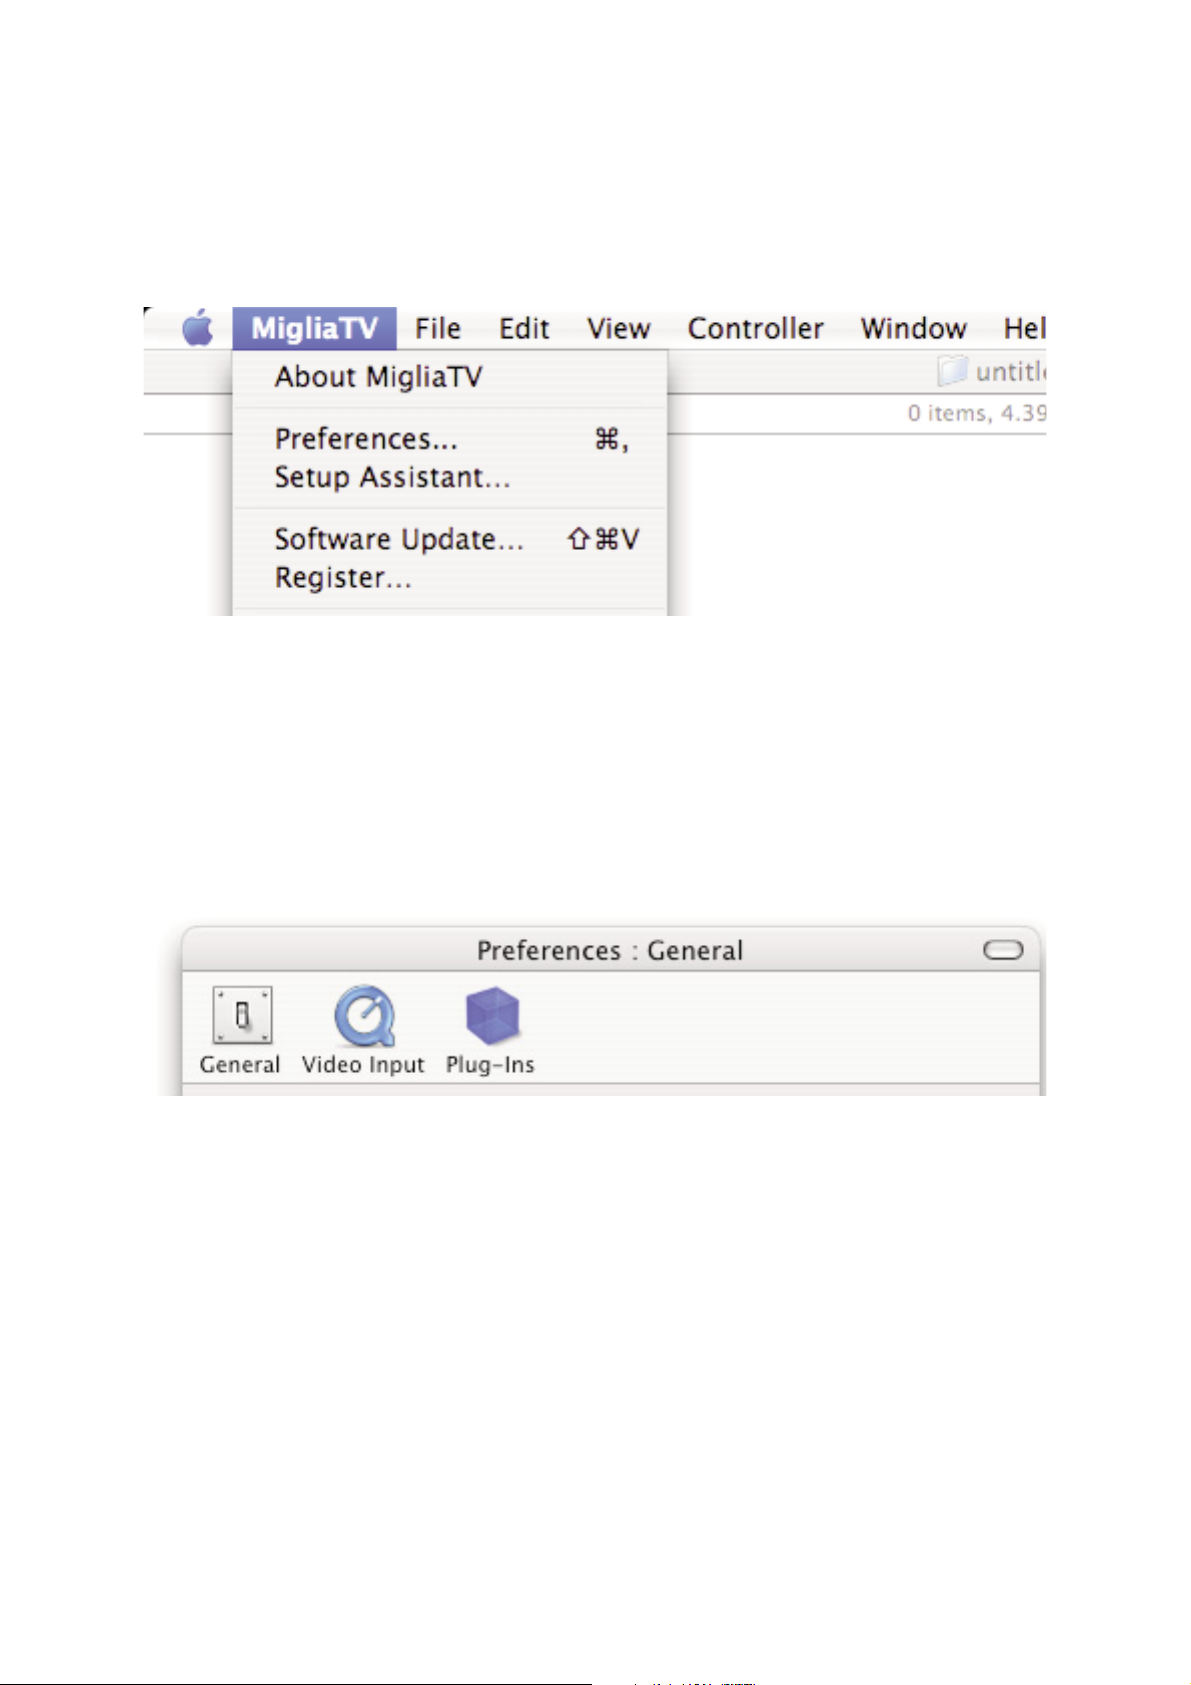
1. Select MigliaTV > Preferences
1. The preferences are divided in three categories:
General: This category allows you to set the general storage preferences
Video Input: This menu allows you to set all video and audio preferences.
Plugins: MigliaTV supports a Plugins architecture for a smooth integration
with other applications or devices. This menu lets you set options for various built-in
and third party plug-ins.
Page 21
MigliaTV User Guide
Page 19
I. The General Sub-menu
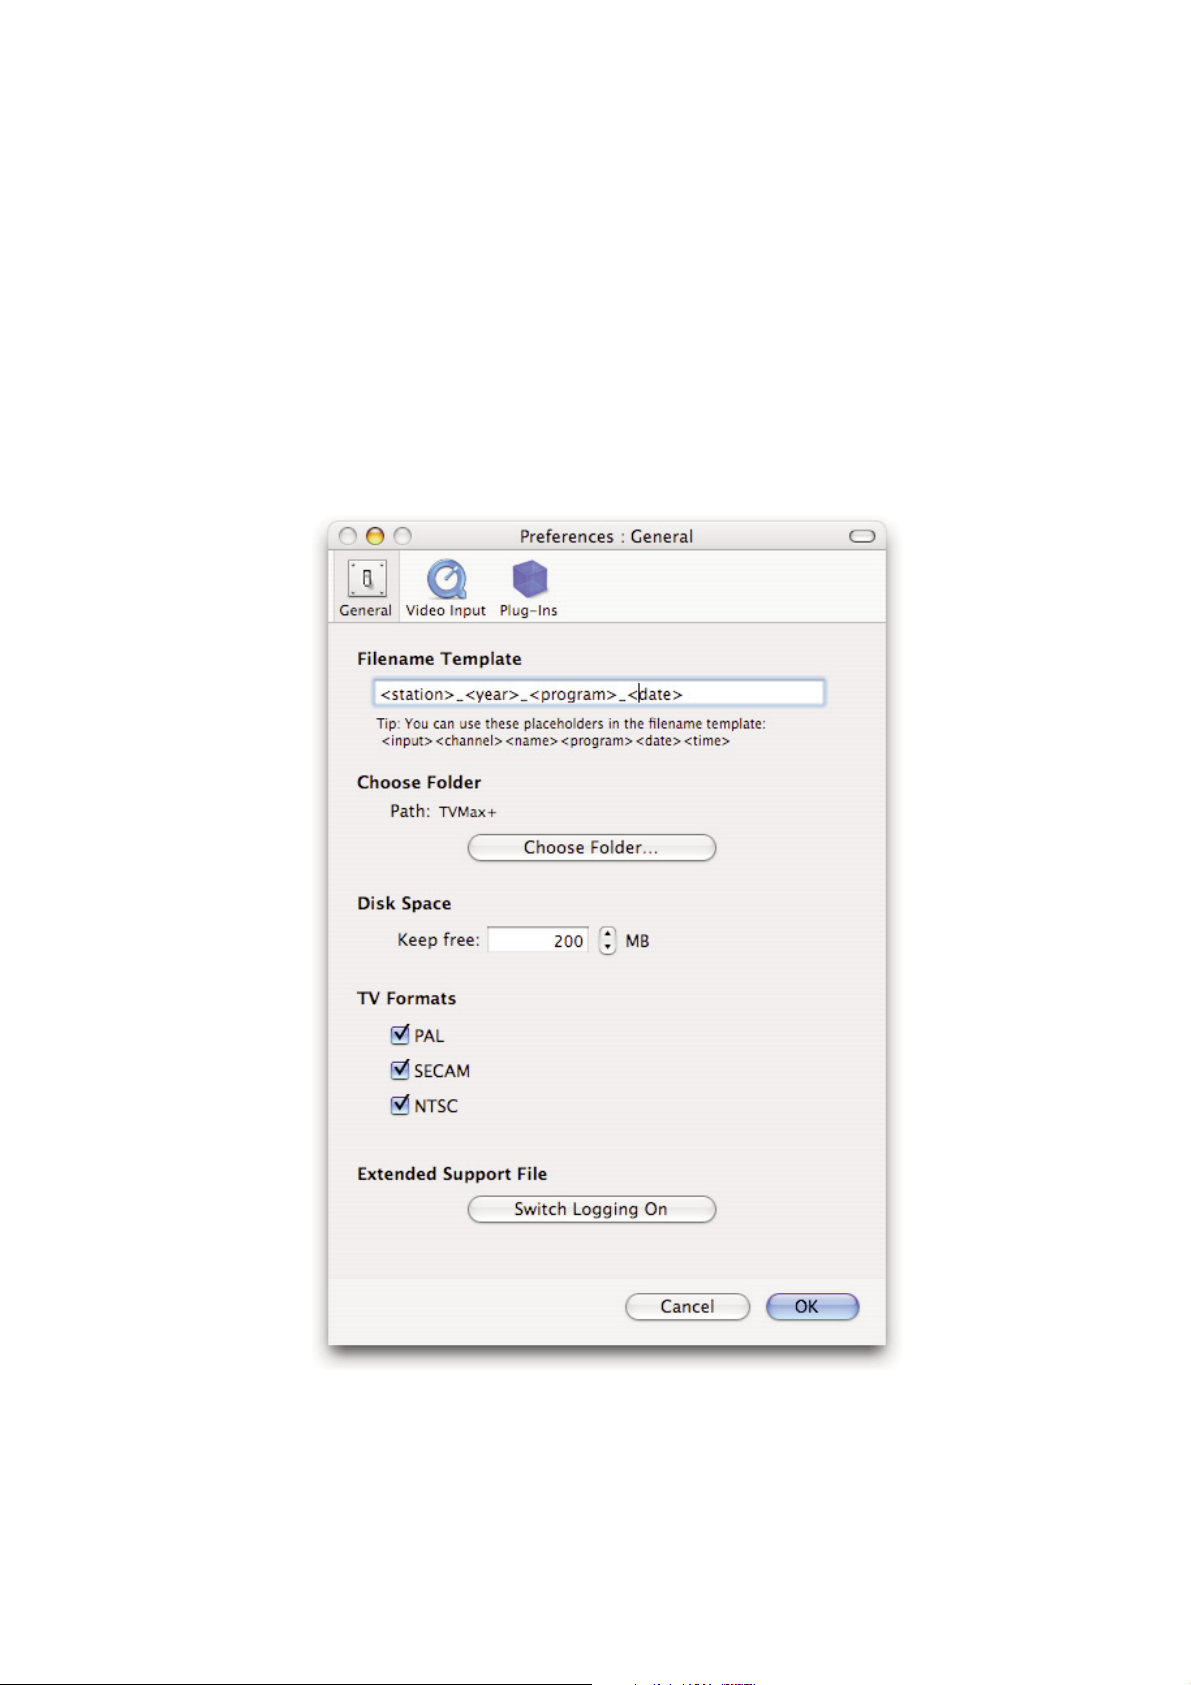
1. The Filename Template allows you to enter pre-defined values for the name of the file that will
be stored onto your hard drive when recording.
<input>: This value will add the input type (TV Hardware) to the filename
<channel>: This value will add the channel number to the filename
<name>: This will add the channel name to the filename
<program>: This will add a text string that can be chosen when creating a recording
<date>: This will add the start date of the recording
<time>: This will add the start time of the recording
Filename templates help you to easily identify the files you have recorded with MigliaTV.
2. The capture destination menu enables you to select where you wish to store your recorded video. Click the
‘Browse’ button to modifiy this location.
3. The disk space option allows you to keep a defined amount of space free on your hard drive.
4. The TV formats section lets you activate or deactivate supported TV standards.
5. The Extended Support File lets MigliaTV generate a complete activity log. This should be switched off by
default and is only required for technical support purposes.
Page 22
MigliaTV User Guide
Page 20
II. The Video Input Menu
The Video Input menu contains the most important controls you have over the video you will view or record to
your hard drive.
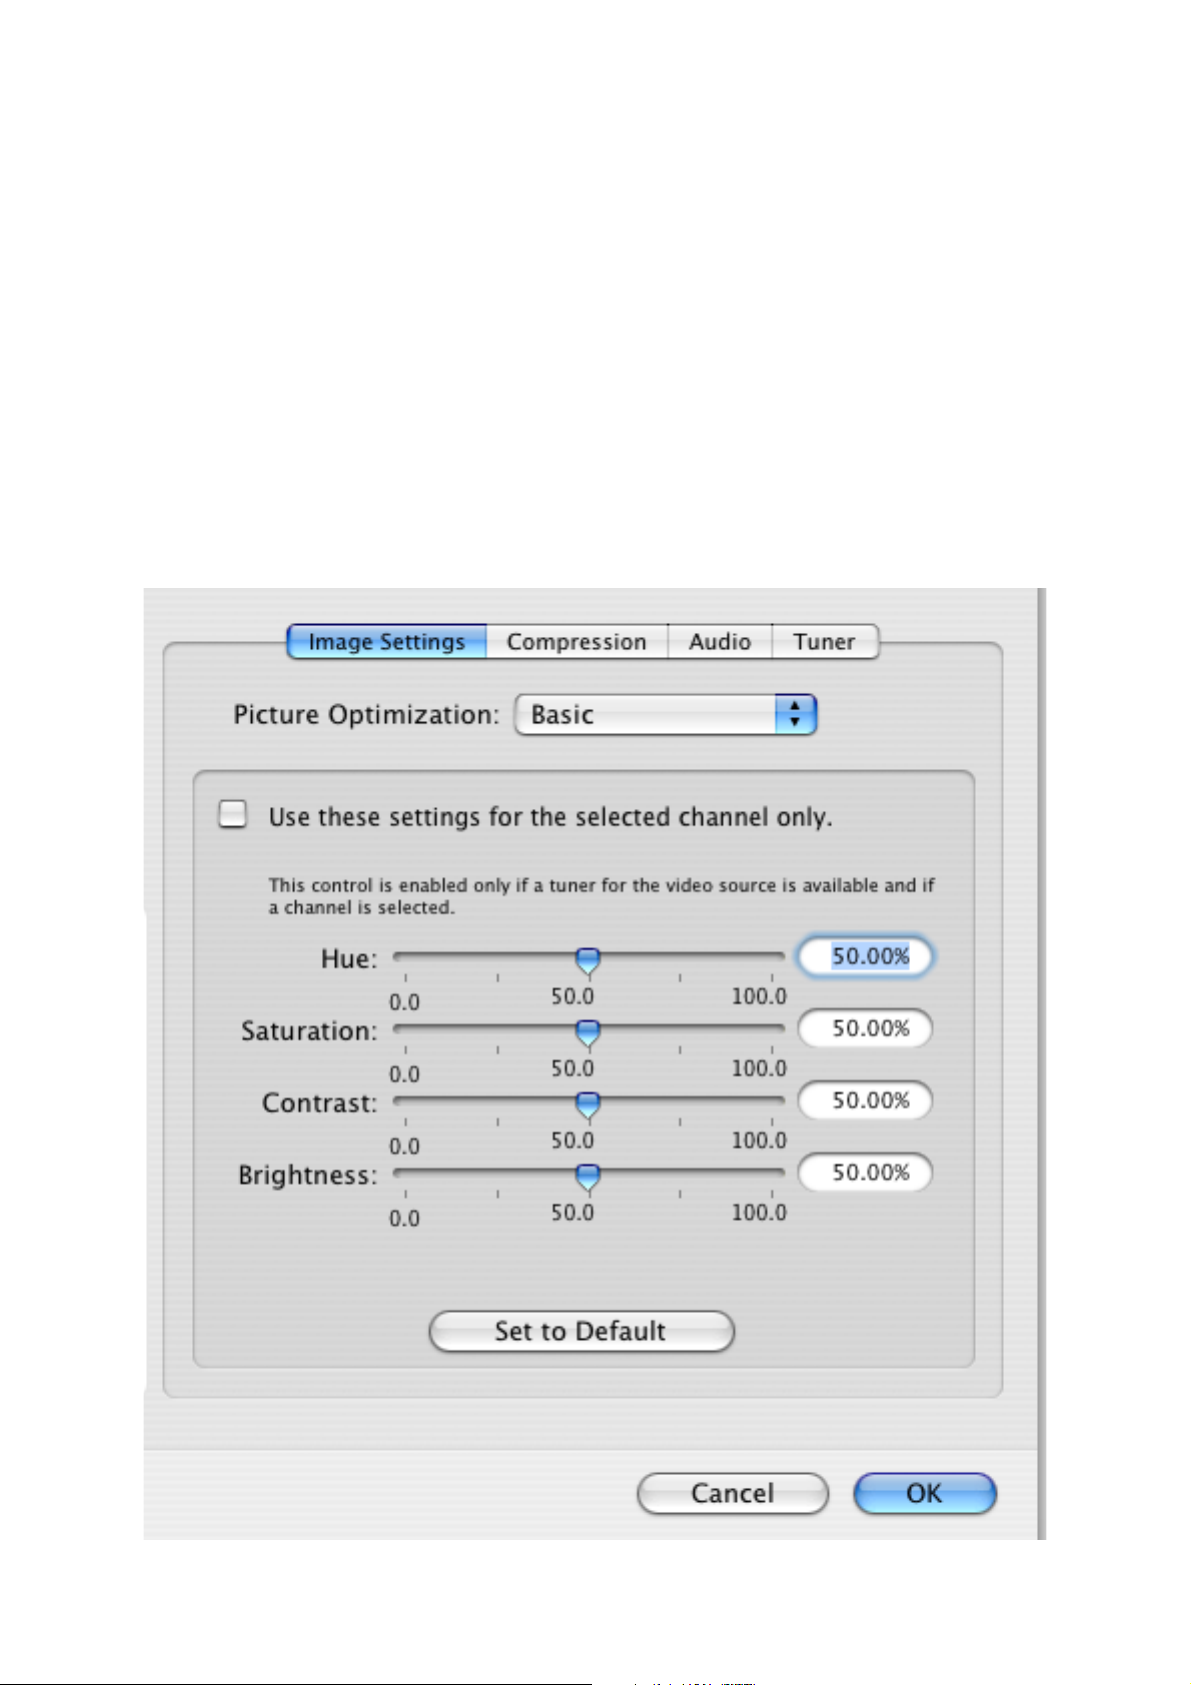
1. The image sub-menu allows you to control the brightness, lighting, saturation and hue of the video.
Adjustments can be made by moving the sliders or entering a value on the right hand side. If you wish to
perform an adjustment on a single channel, display it in the preview window by selecting it in the Tuner
sub-menu and ticking the box ‘Use these settings for the selected channel only’.
The picture optimization setting lets you adjust the display quality on screen, eg. the MPEG-2 stream
settings. The setup assistant will choose the best value automatically, depending on the processor speed of
your Mac. Note that the higher the quality value, the more CPU power will be required.
Page 23
MigliaTV User Guide
Page 21
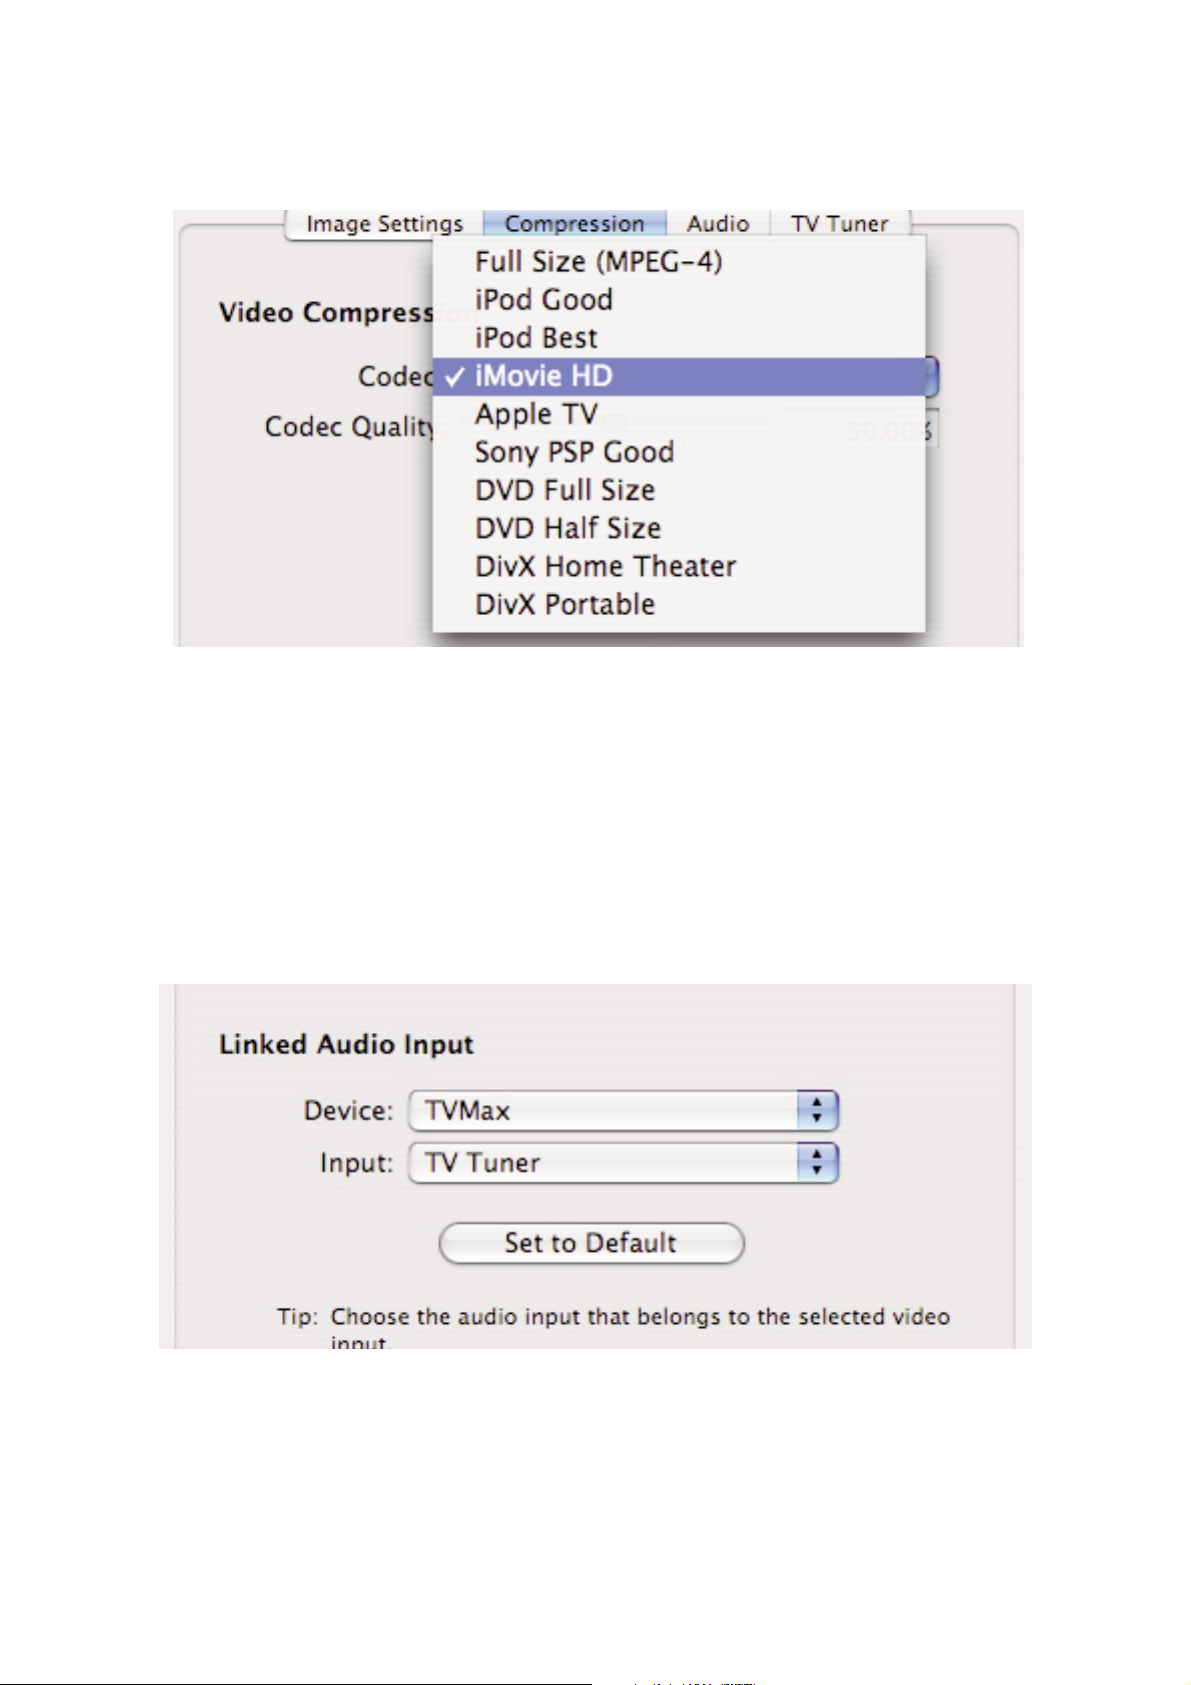
2. Video Compression will adjust the video codec and quality settings for the video you will record to your hard
drive.
The Codecs depend on the TV hardware you are using. For a full explanation of each codec, please refer to the
hardware setup guide for your specific TV product.
3. The Audio panel will adjust the audio settings for your TV hardware.
On the left side of the screen, select the TV device/hardware as well as the video input you wish to configure.
The video input is generally TV Tuner, S-Video, Composite, etc...
On the right side of the screen, under Linked Audio Input, select the Device (usually it’s going to be the same
as selected on the left side of the screen) and then the audio input.
Audio settings for capture in the video input menu.
Page 24
MigliaTV User Guide
Page 22
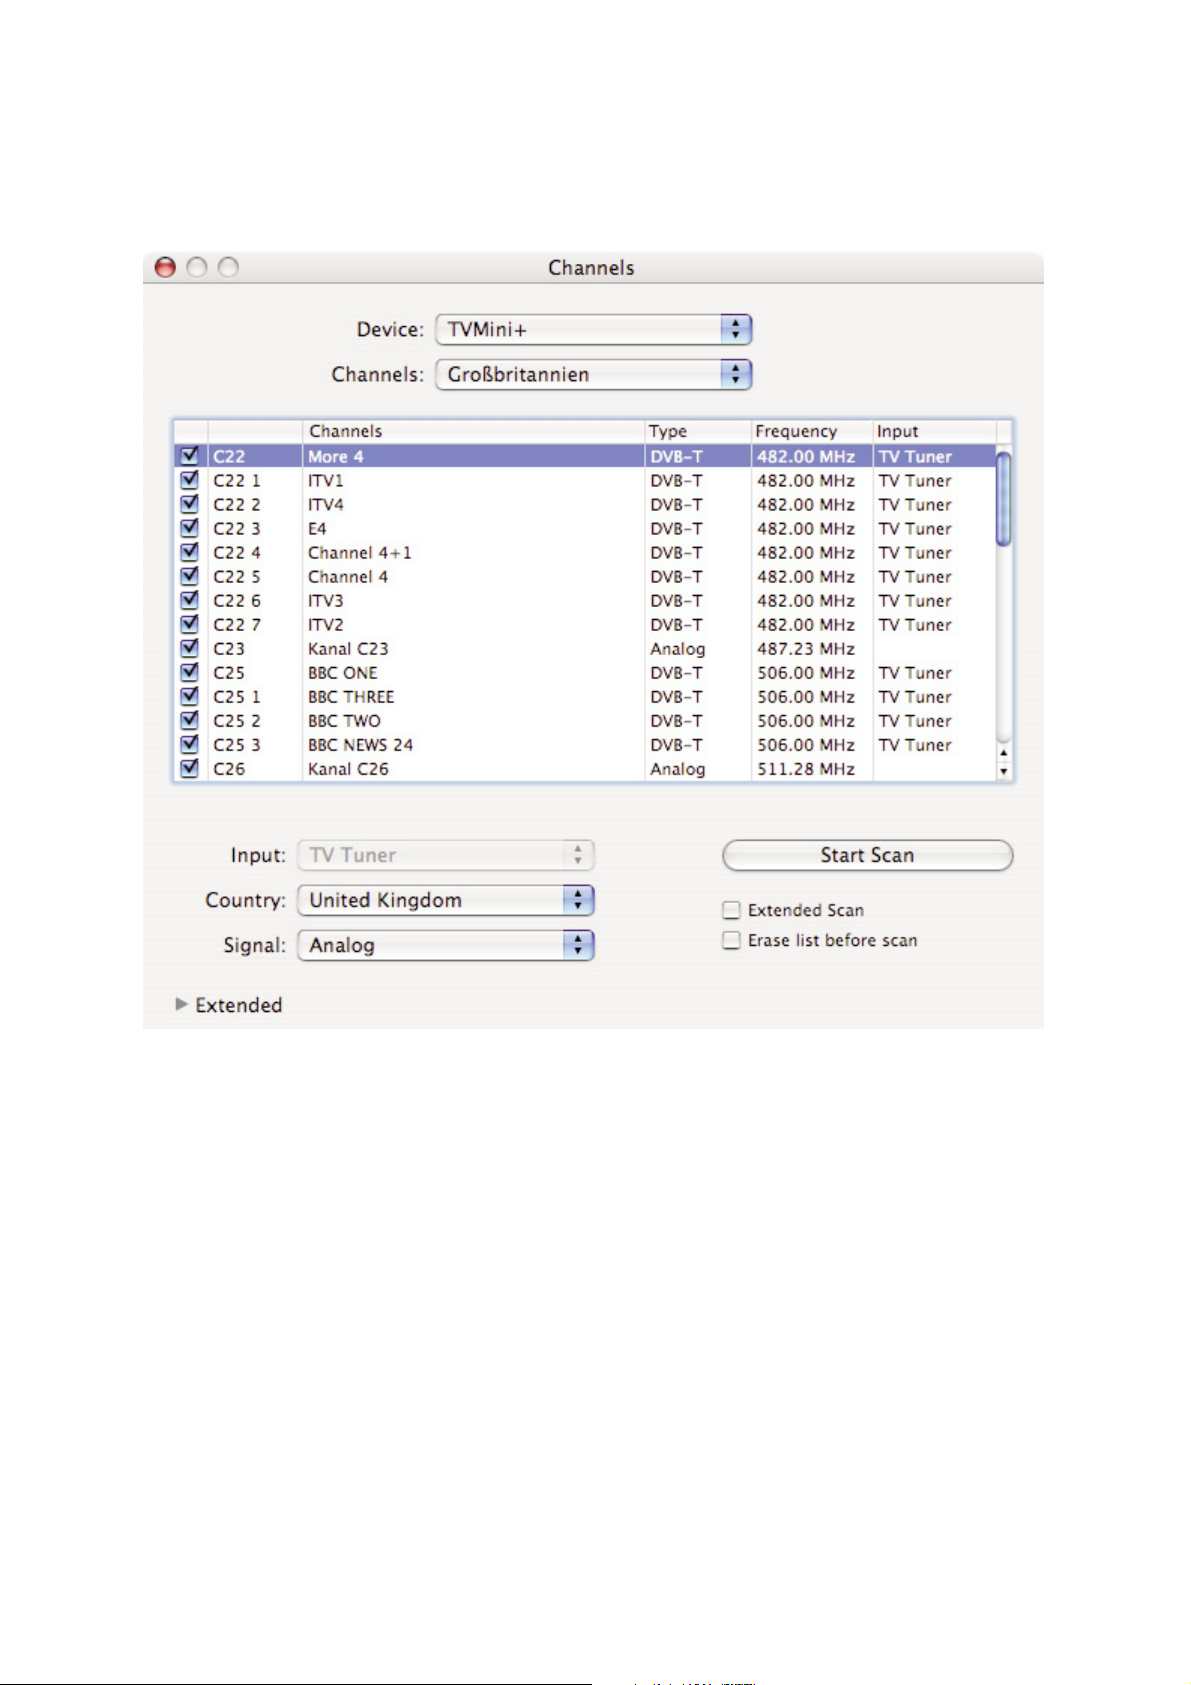
4. The Channels menu
The Channels menu allows you to create and select channel layouts. It also enables you to scan and fine-tune
channels manually, without the help of the Setup Assistant.
4.1 The Channels list & listing
MigliaTV supports Channel Lists, which lets you store specific settings according to your location. For example, if
you are travelling, you may not want to erase all your ‘home’ channels by running a channel scan in your hotel
room. In this type of situation, it is useful to be able to manage channel lists in an easy manner.
Channel Lists contain all the channels and their characteristics, such as TV station name, frequency, position, etc...
You can create a new channel list by clicking on the drop down menu located on the right side of “Channels:”
Below this, the channels listing contains all the TV stations you have scanned and stored in your Channel List. This
list offers total flexibility to configure your channels manually or automatically.
• Channels can be renamed in the by double-clicking on their name.
•Channels can be activated or deactivated by ticking the “Lock” box (far left of the list. The channel will not
be erased from the list, but will not appear on onscreen remote
• Channels can be reorganised by dragging and dropping them in the list.
• The Type column shows the kind of signal (digital, analogue) of a given channel, letting you organise
channels by type if you want.
• The Frequency of a channel can be entered manually by double-clicking on the frequency column.
• The input column shows the input used to receive the channel. This is mostly of interest for dual input
devices.
• Channel lists can mix analogue and digital channels
Page 25
MigliaTV User Guide
Page 23
4.2 Channel Scan Options
Several options that affect the way scans are done are located below the channel listings.
Input: This lets you select the type of input you are using to scan channels. This option can only be
modified if your device has 2x antenna inputs.
Country: Select your country to enable the channel scan to use the correct settings tailored for your
country. If your country is not in the list, select the TV standard in use where you live; this will
be DVB-T (Digital Terrestrial), PAL I, PAL D/K, PAL B/G, NTSC M
You can visit http://www.kropla.com/tv.htm to find out what standard is used in your country.
Signal: Type of signal you want to scan for. The options depend on the type of hardware you are using.
Extended Scan: Scans all the possible frequencies where a TV signal could be broadcast. Ticking this option will
significantly increase the time required to run a channel scan. It will however scan frequencies
that are normally left out by the normal scan. Use this option if you are missing some channels
you believe you should receive.
Erase List
before Scan: This changes the way channels are stored in a Channel List. If you tick this option, all channels
that are currently stored in the list will be erased and replaced with those the scan will find.
If this option is not ticked, channels found by the scan will be ADDED to the current list.
This added flexibility lets you decide if you want to mix analogue and digital channels in the
same list (you would run two scans and the ‘erase’ option would not be turned on) or if you live
near the border of two countries, you can mix the channels from both countries, although they
may be very different from a technical point of view.
To scan channels, follow these steps:
• Select the device at the top of the window. If you have only one TV device, it will be selected by default.
Note: Multiple Devices are not supported in v.1.2 of the software
• Select a channel list you wish to use for the scan. You can have multiple channel lists to store the TV
frequencies depending on your location (one list for home, one a hotel room, for example).
• Select the input (if required)
• Select your country
• Select the type of signal
• Click Start Scan
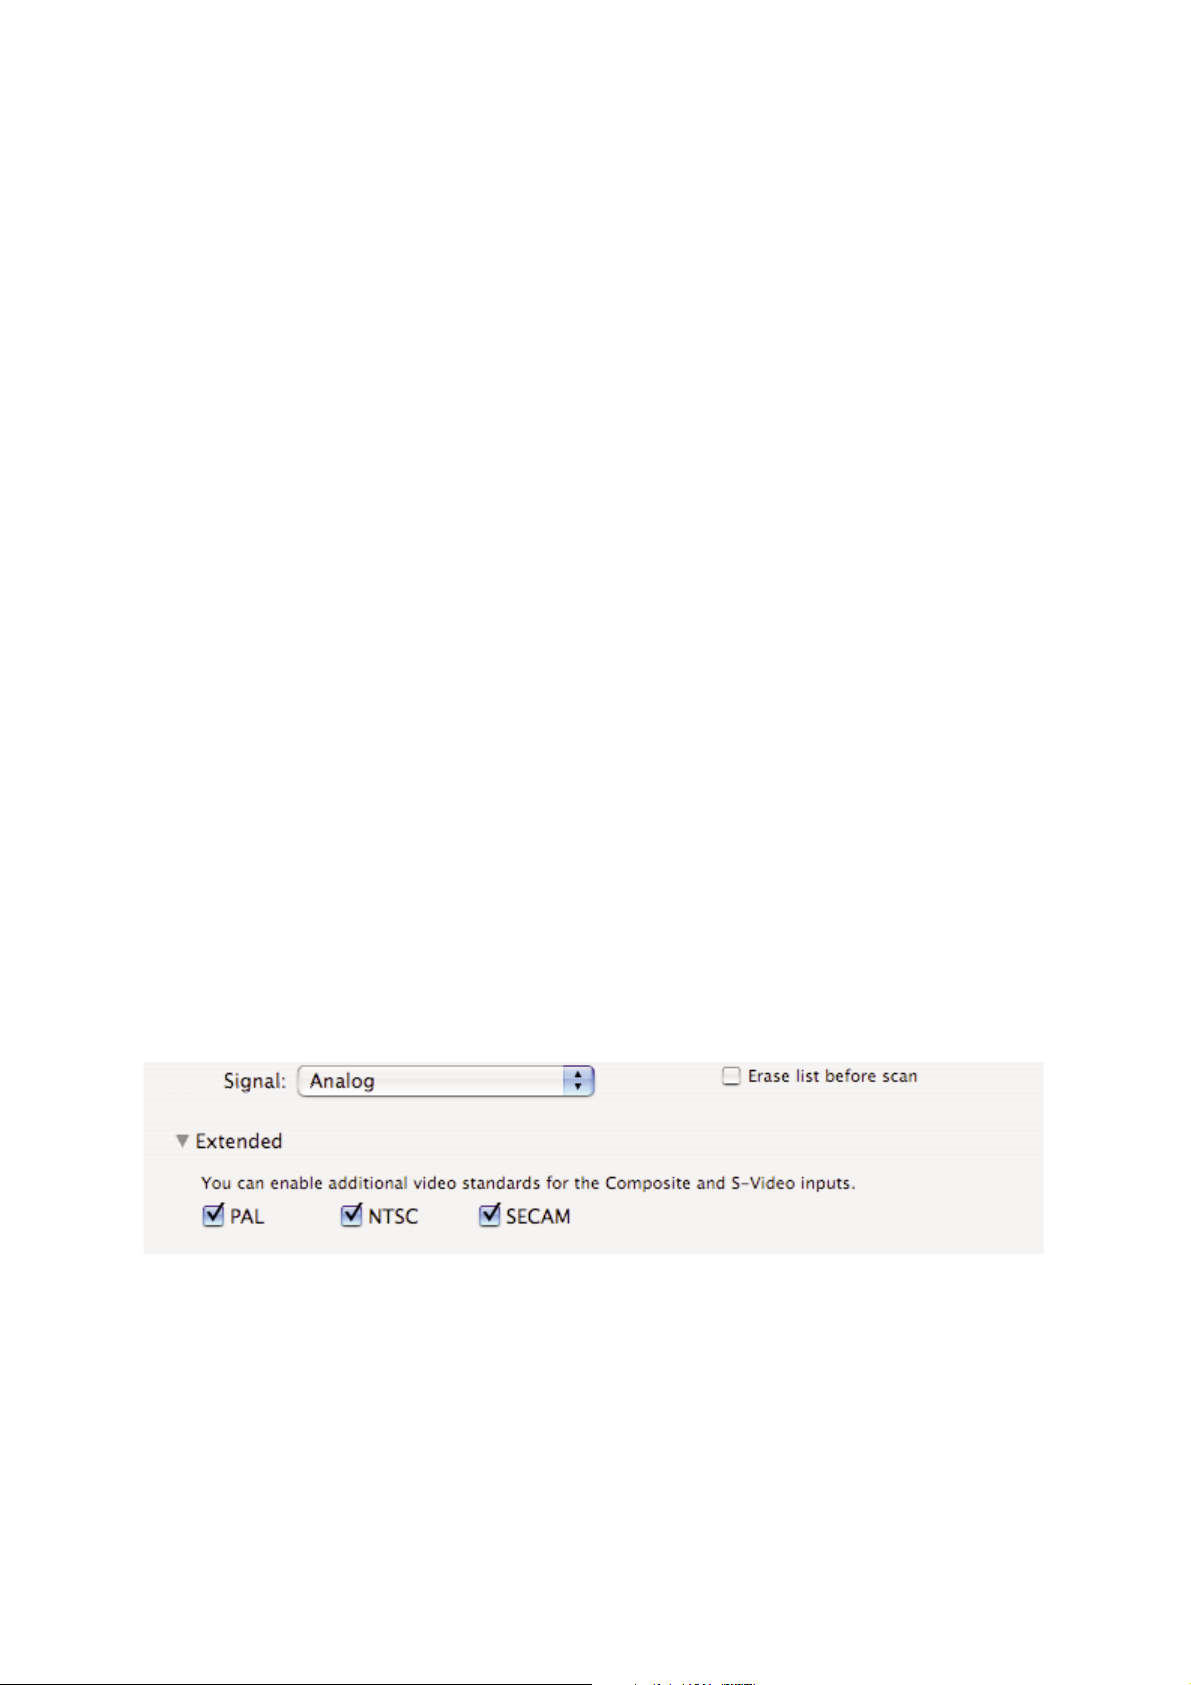
4.3 Extended options
The disclosure triangle located next to the word ‘Extended’ lets you access the video formats list.
You can activate or deactivate standards one by one.
This option is useful if you want to capture VHS tapes or DVDs that come from different parts of the world. By
disabling unneeded video standards, you will reduce the amount of items in the Controller > Video Input menu,
thus giving you a clearer interface.
Page 26
MigliaTV User Guide
Page 24
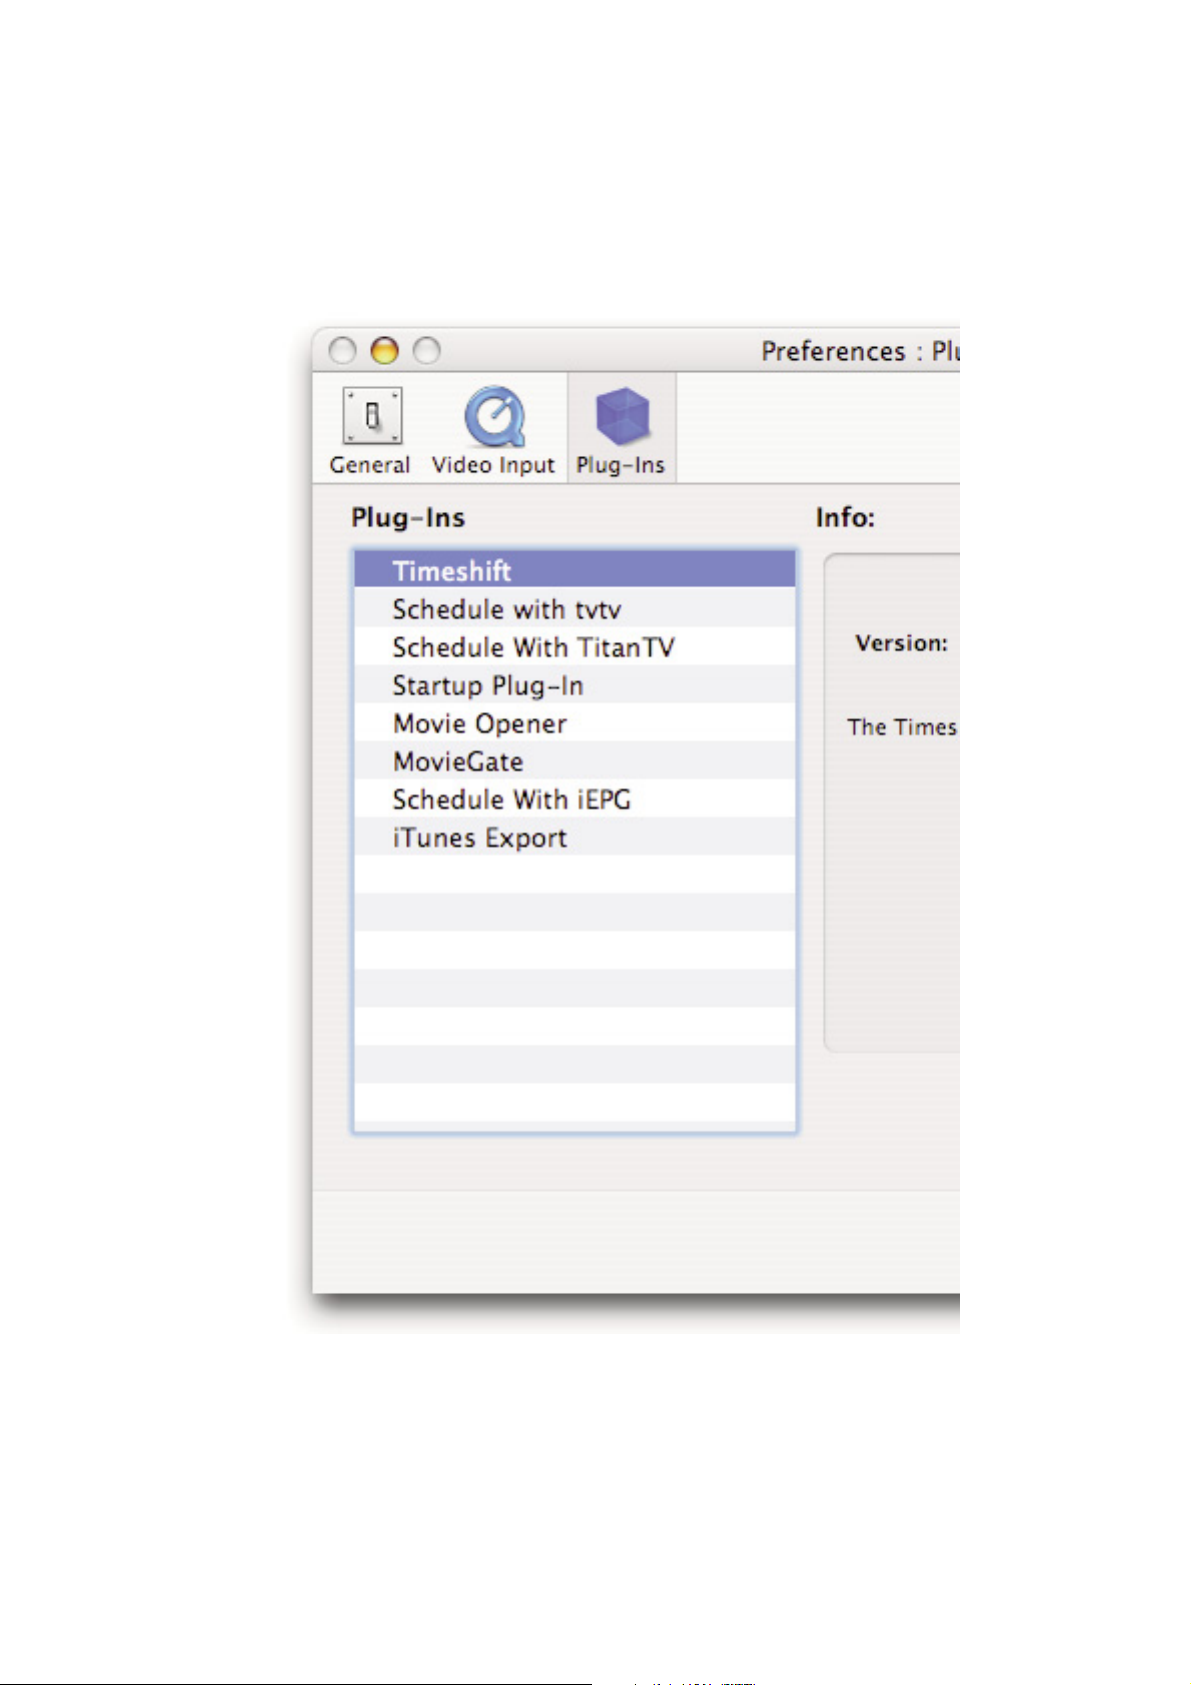
III. The Plugins Menu
MigliaTV supports a Plugins architecture allowing a smooth integration with third-party applications and devices.
You can change the settings a plug-in by highlighting it and clicking on the “Preferences...” button.
Page 27
MigliaTV User Guide
Page 25
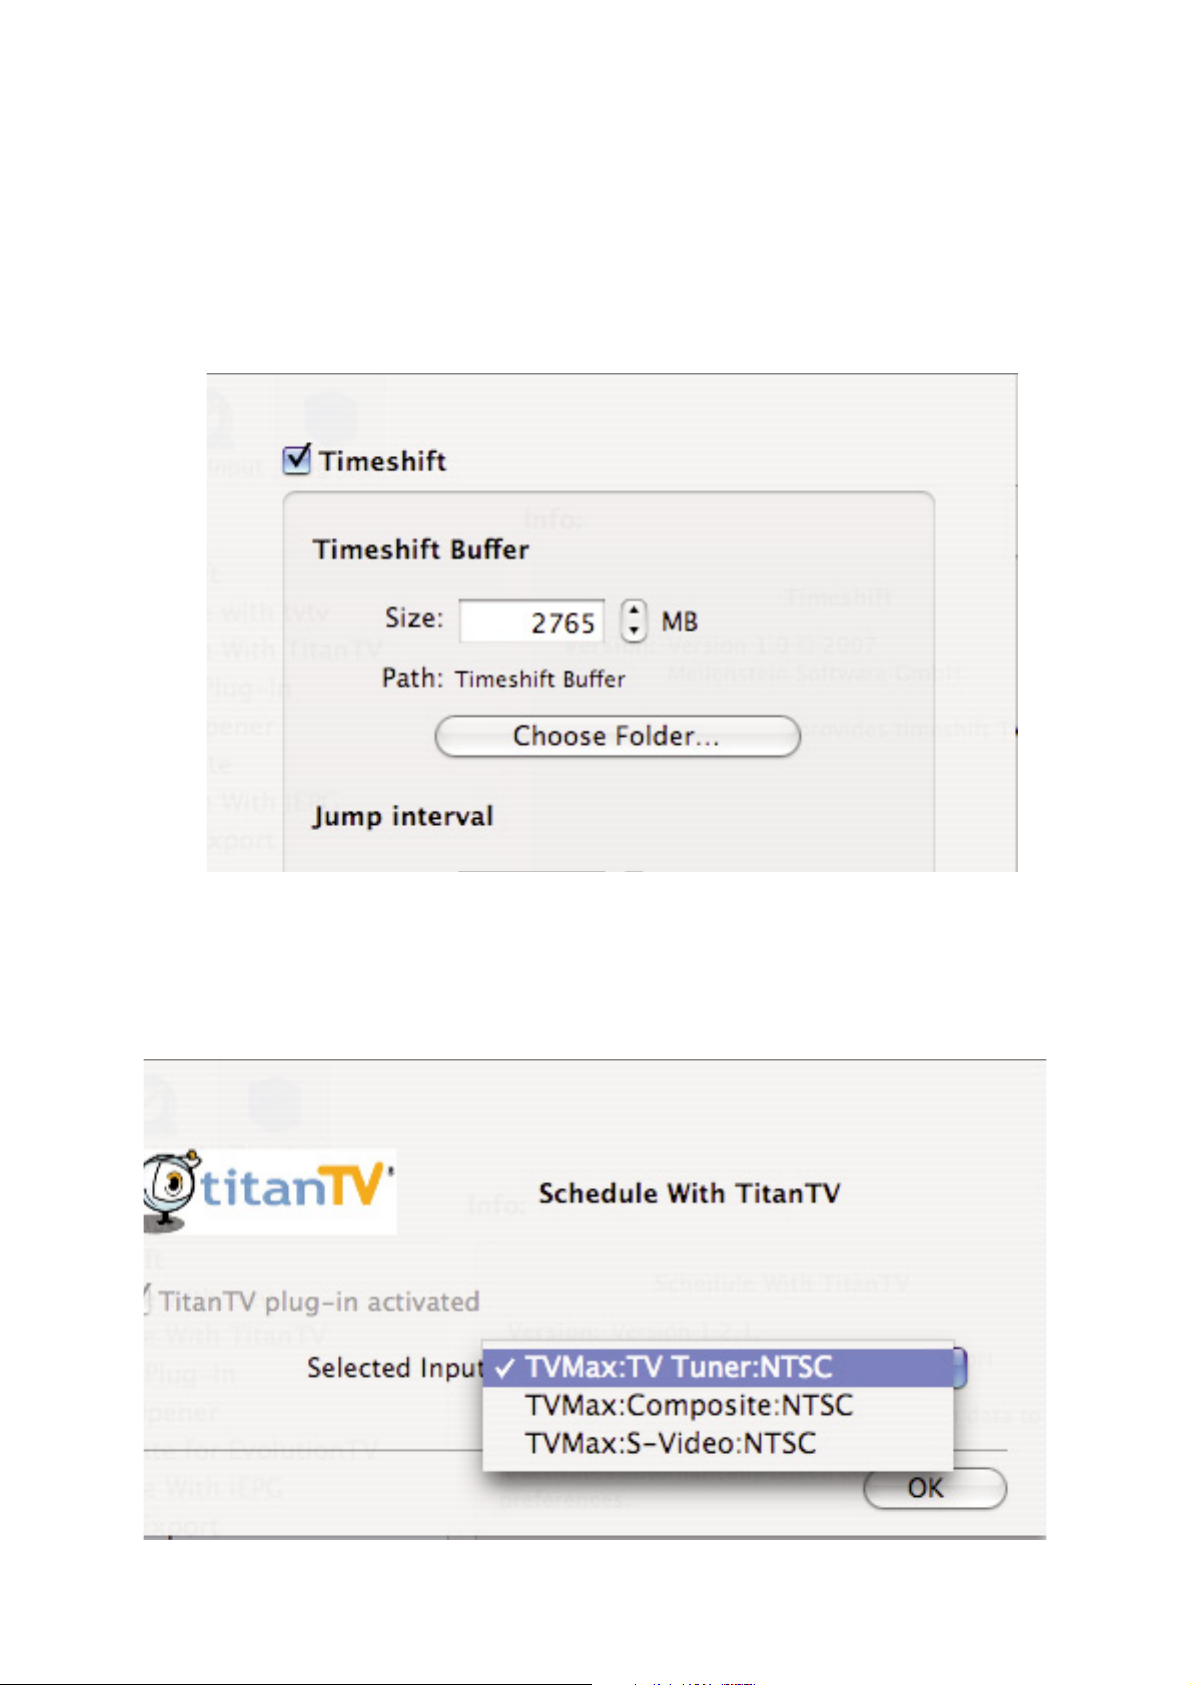
1. Timeshift
This enables Timeshift with TV hardware that supports this functionality.
User Options:
You can enable or disable Timeshift using the Tickbox (see screenshot below)
The size of the Timeshift buffer can be adjusted with the Size dialog box. 2.7 GB usually give you a buffer of one
hour.
You can also select a custom location for the Timeshift buffer by clicking on ‘Choose folder’.
The Jump interval lets you define by how much you want the video to jump forward and backward.
\
2. TitanTV
This plug-in provides the TitanTV web scheduling functionality. Note that this plug-in is activated by default if
USA is selected as a country by the Setup Assistant.
User Options:
Video Input: Lets you select the desired video input for TitanTV recordings.
Page 28
MigliaTV User Guide
Page 26
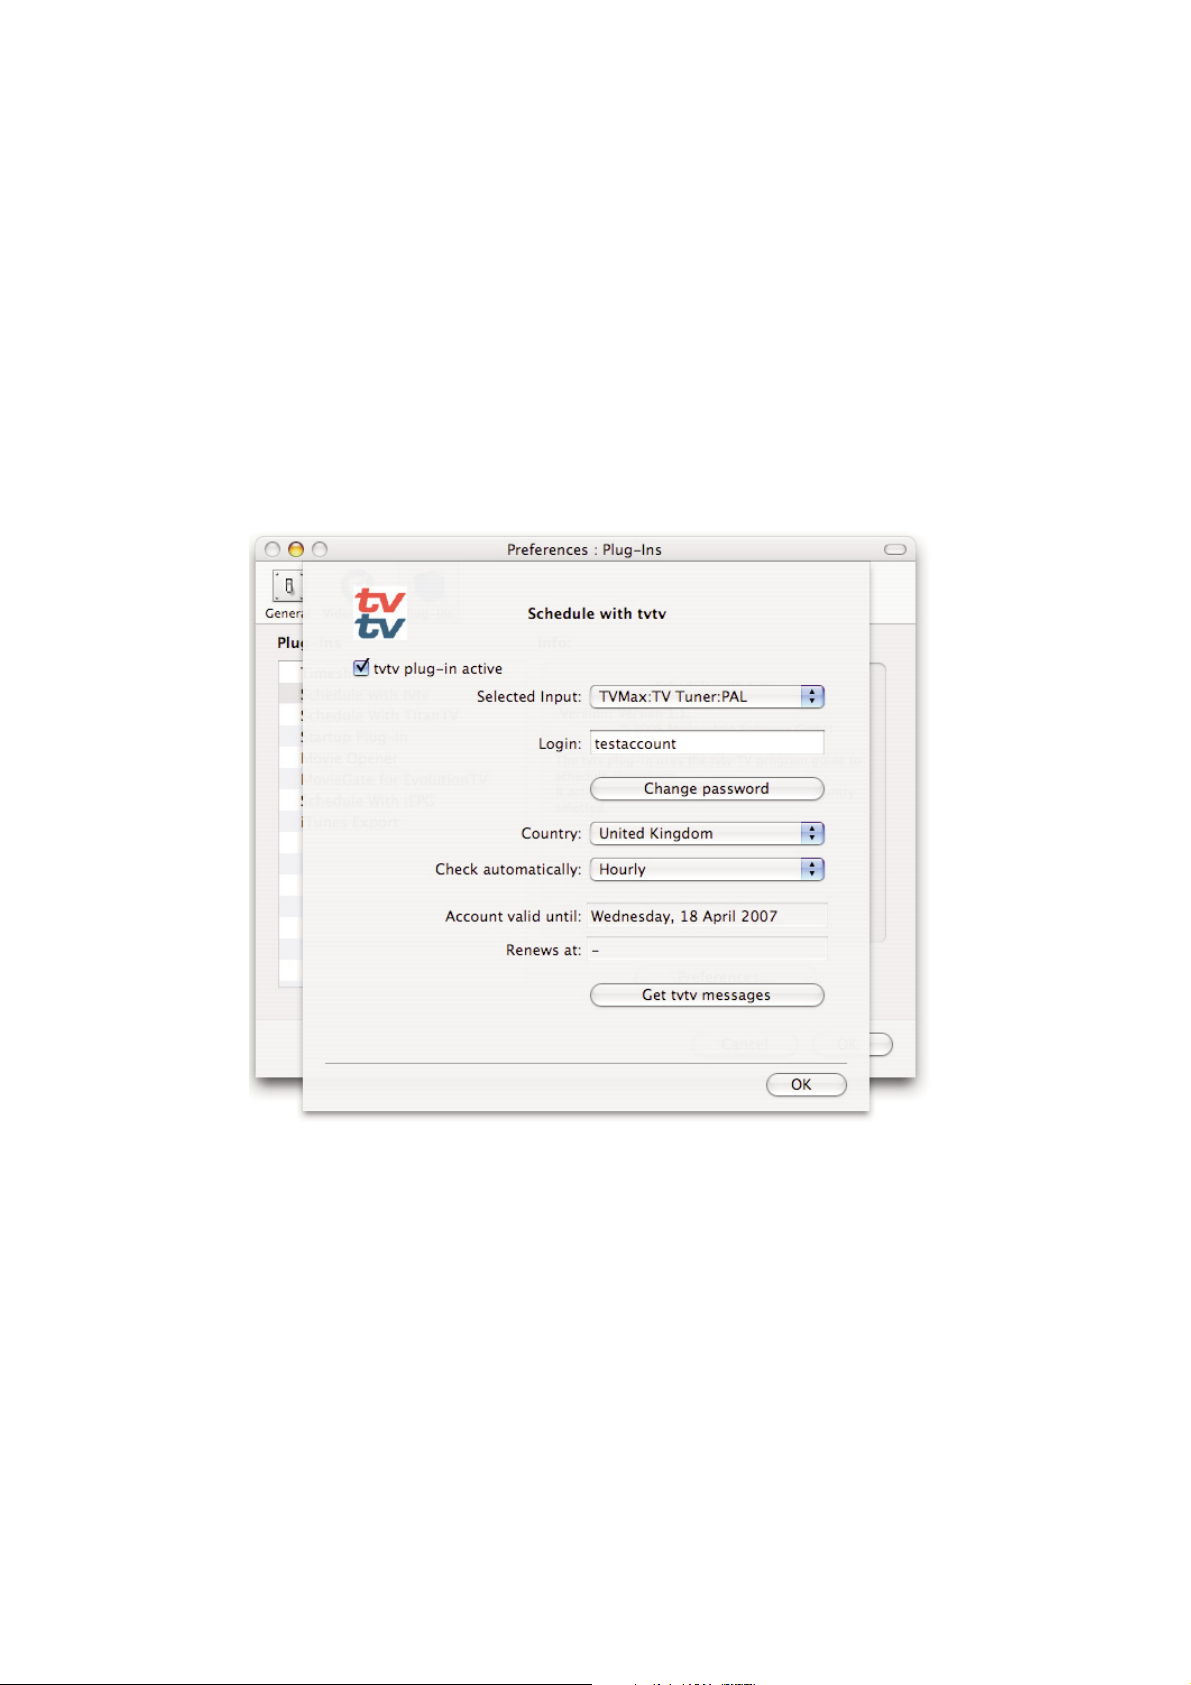
3. tvtv plug-in
This plug-in provides the tvtv web scheduling functionality. This plug-in is activated by the Setup Assistant (or
manually) and will work in several European countries.
User Options:
Selected Input: Lets you select the video input. Normally, this will be the TV tuner, but you can also use
Composite or S-Video if your TV hardware is connected to a digital TV receiver (Cable,
Satellite, Digital Terrestrial, etc...). However, the digital receiver will have to be set to the
correct channel for the recording, as your TV hardware cannot control an external device.
Login: Shows your tvtv login name
Change Pass: Enables you to change your tvtv password
Country: Country selection. Note that tvtv is not available in all European countries.
4. Startup Plug-in
Automatically wakes up or starts up your Mac when a scheduled recording is due to begin.
User Options:
Pre-record: Amount of time before the Mac starts up or wakes up from sleep before the recording
begins.
5. Movie Opener:
Enables playback of recorded Movie files in the Finder. The preferences let you chose what application should
open the movie in the Finder
Page 29
MigliaTV User Guide
Page 27
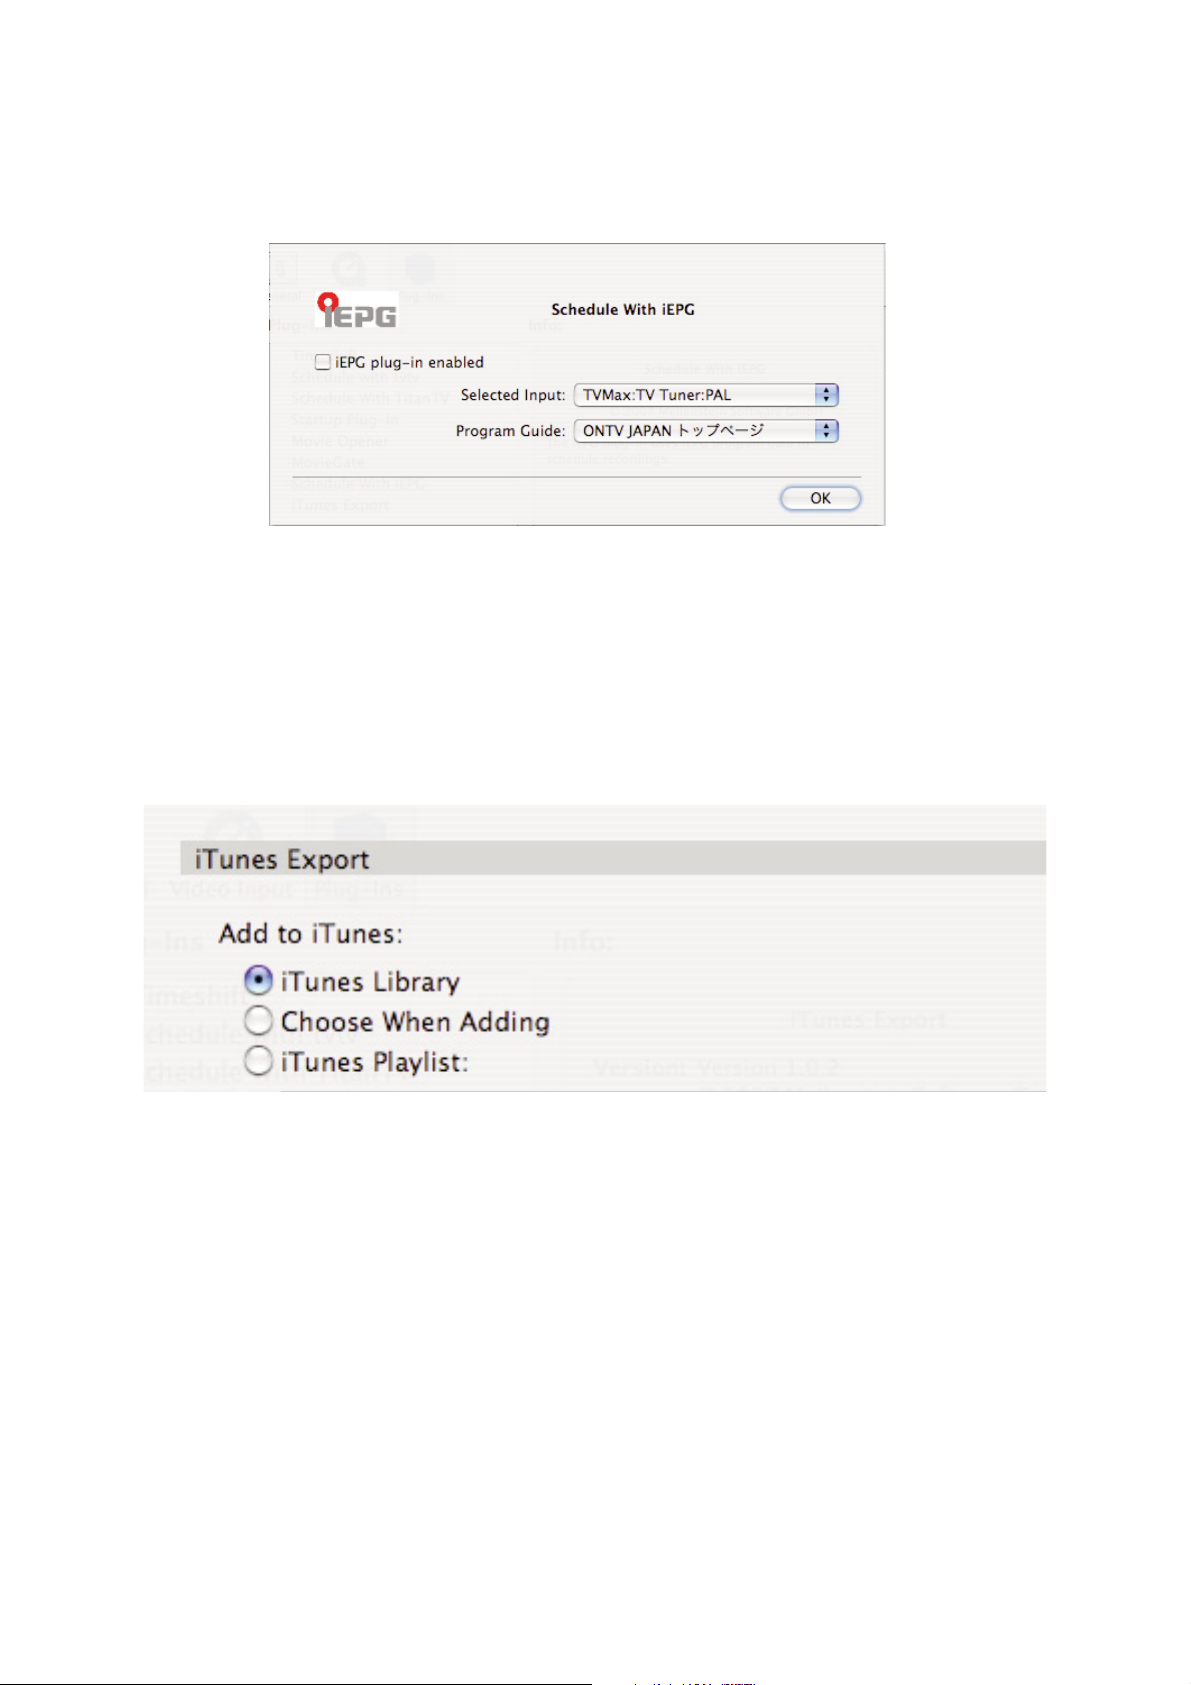
6. Schedule with iEPG
iEPG is the Electronic Programming Guide commonly used in Japan. Several services are available.
7. Add to iTunes
This plug-in lets you add a recorded file to iTunes.
User Options:
iTunes Library: Adds your file to the Library in iTunes
Choose when adding: Lets you choose what playlist to send the file to when you press the Add to iTunes button
iTunes Playlist: Lets you select a playlist in iTunes that will always be used to send the recordings to.
Page 30
MigliaTV User Guide
Page 28
8.1. The MovieGate Plug-in
The MovieGate plug-in enables you to create and burn a DVD or Mini-DVD with chapters from within the
MigliaTV application. For the sake of simplicity, MovieGate is installed by default with MigliaTV, although it is not
produced or supported by Miglia.
MovieGate for MigliaTV is based on the application MovieGate, available from Mac et Video
(http://www.macetvideo.com/
Before using the plug-in, it is best to double-check that the preferences are correctly set for your purposes.
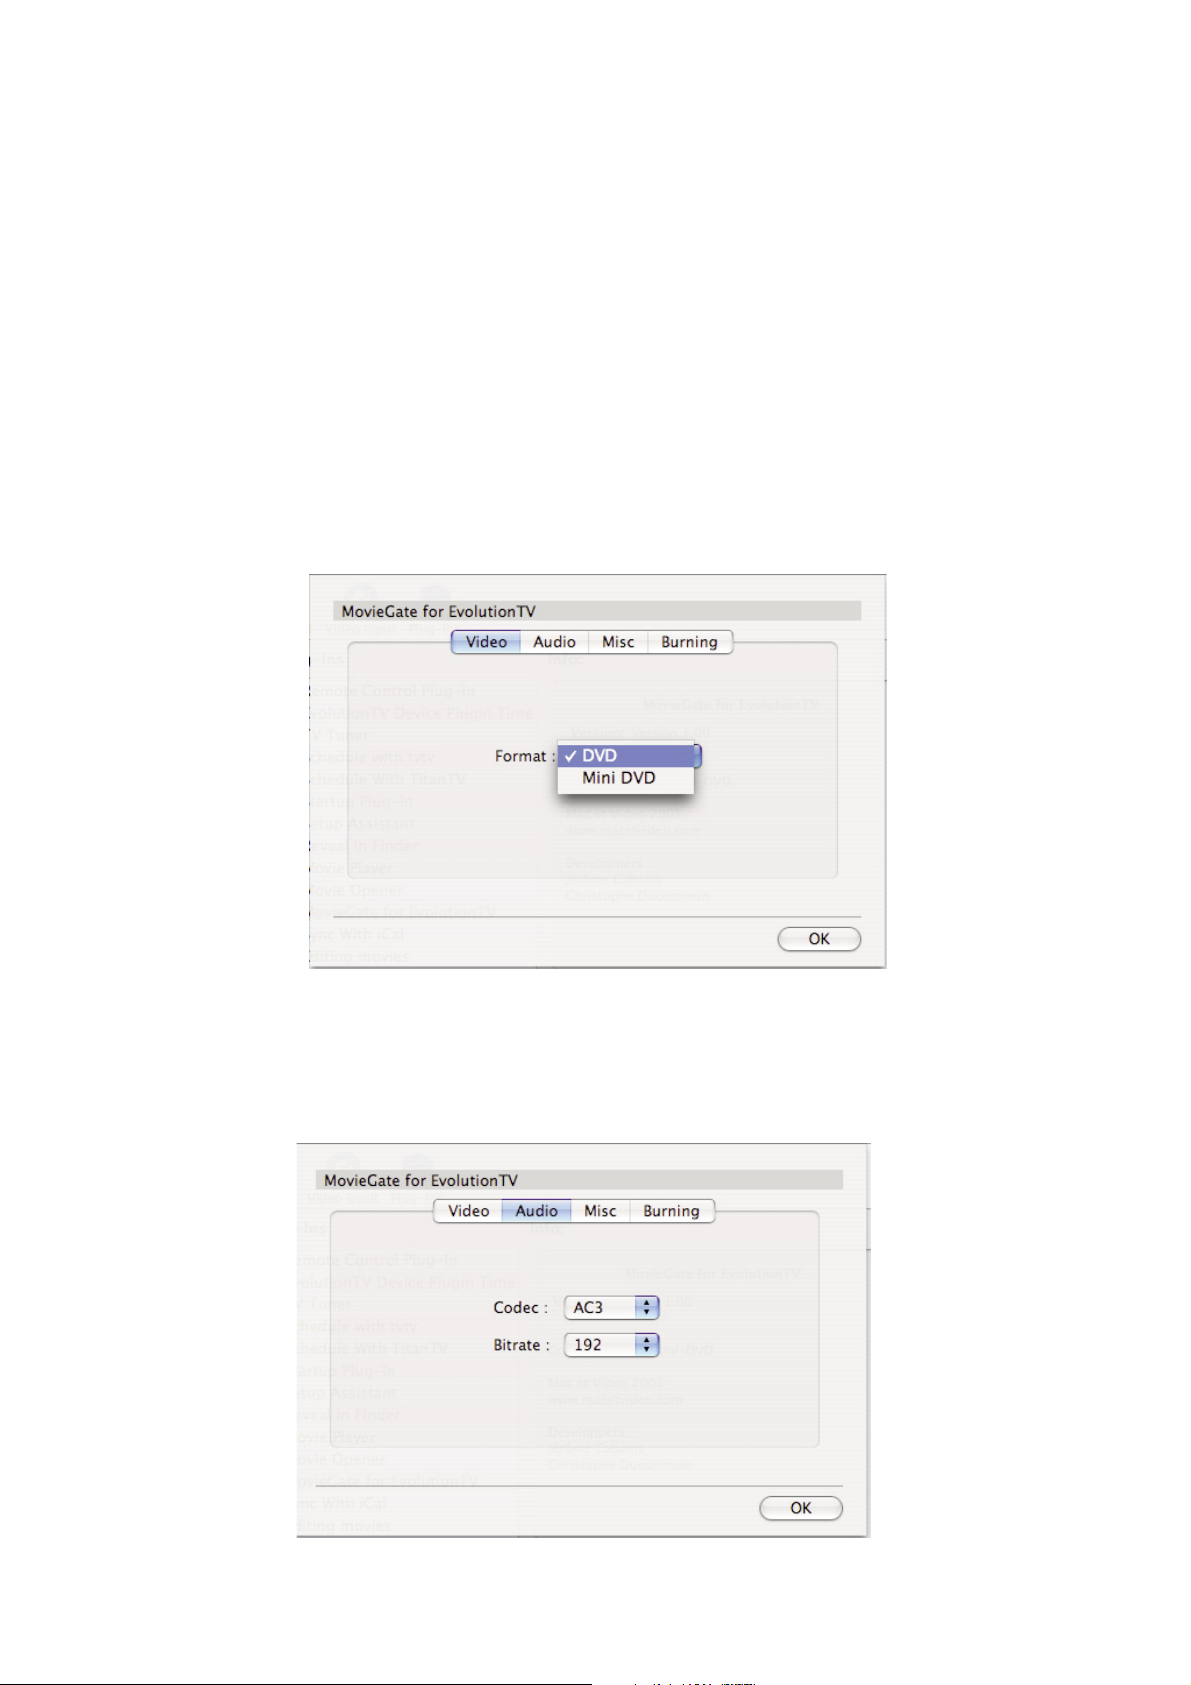
6.1. The video tab
The 'Video' tab lets you select the type of disk image you wish to create. You have the choice between DVD, a
standard video DVD, or Mini-DVD, a DVD stored on a CD-R/W with an average 20 minutes of video.
Please note the maximum bitrate for Mini-DVD's is 4200 kbits/sec.
You can modify the bitrate of the files you are going to record with the Compression sub-menu located in
Preferences > Video Input. Move the quality slider up and down to modify the bitrate; select 40% if you wish to
create a Mini-DVD.
8.2 The Audio tab
The Audio tab lets you select the audio format of the DVD you are going to burn. Usually AC3 is preferred, as it
offers a wider compatibility with home DVD players. On the other hand, the MP2 format requires less disk space.
EvolutionTV generates an MP2 audio track with 192 kbit/sec when it captures video. Select this option if you wish
to reduce the time required to create a DVD.
Page 31
MigliaTV User Guide
Page 29
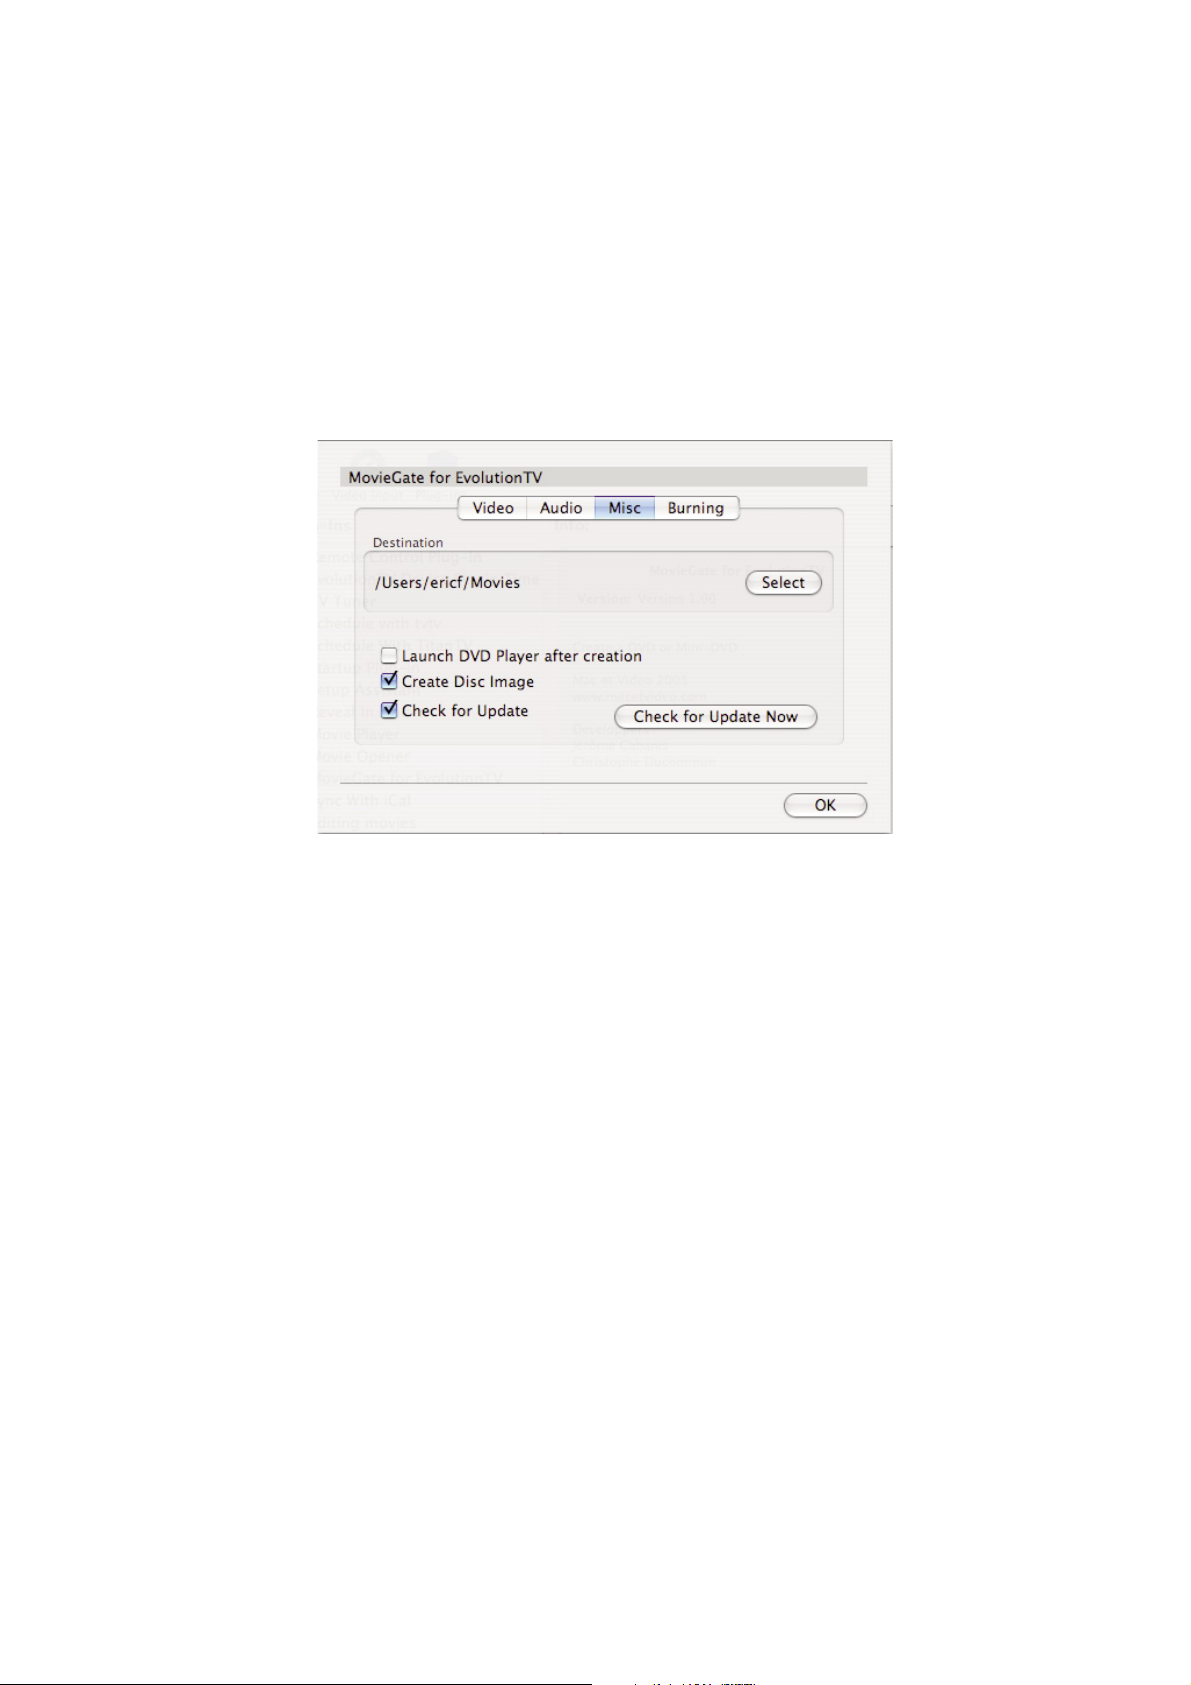
8.3. The Misc tab
The Misc tab lets you select the destination folder for the DVD files.
The option to Launch DVD Player after creation enables you to check the DVD with Apple's DVD Player before you
burn it to a disc. This is a useful option if you wish to make sure there are no errors on the DVD files.
The option to Create a Disc Image is required if you wish to burn a DVD with the MovieGate plug-in. However,
you can also burn a disc image with Disk Utility.
If you do not select the option to create a disc image, but still wish to burn the DVD files to disc, you will require
third party software like Roxio Toast.
The option 'Check for update' enables the software to regularly check for updates to the plug-in. A live internet
connection is required for this option to function properly.
8.4. The Burning tab
The 'Burning' tab offers several configuration options for the DVD you are about to burn. If you are using
rewritable DVDs, you can choose between a Quick and Full erase. the Quick option will take a few seconds, while
the Full option can take up to 30 minutes.
If you select the single layer option, the plug-in will ensure that your video data will fit onto a 4.3 GB DVD disc.
Page 32

MigliaTV User Guide
Page 30
Scheduling a recording
with MigliaTV
Page 33
MigliaTV User Guide
Page 31
I. Schedule a recording with MigliaTV
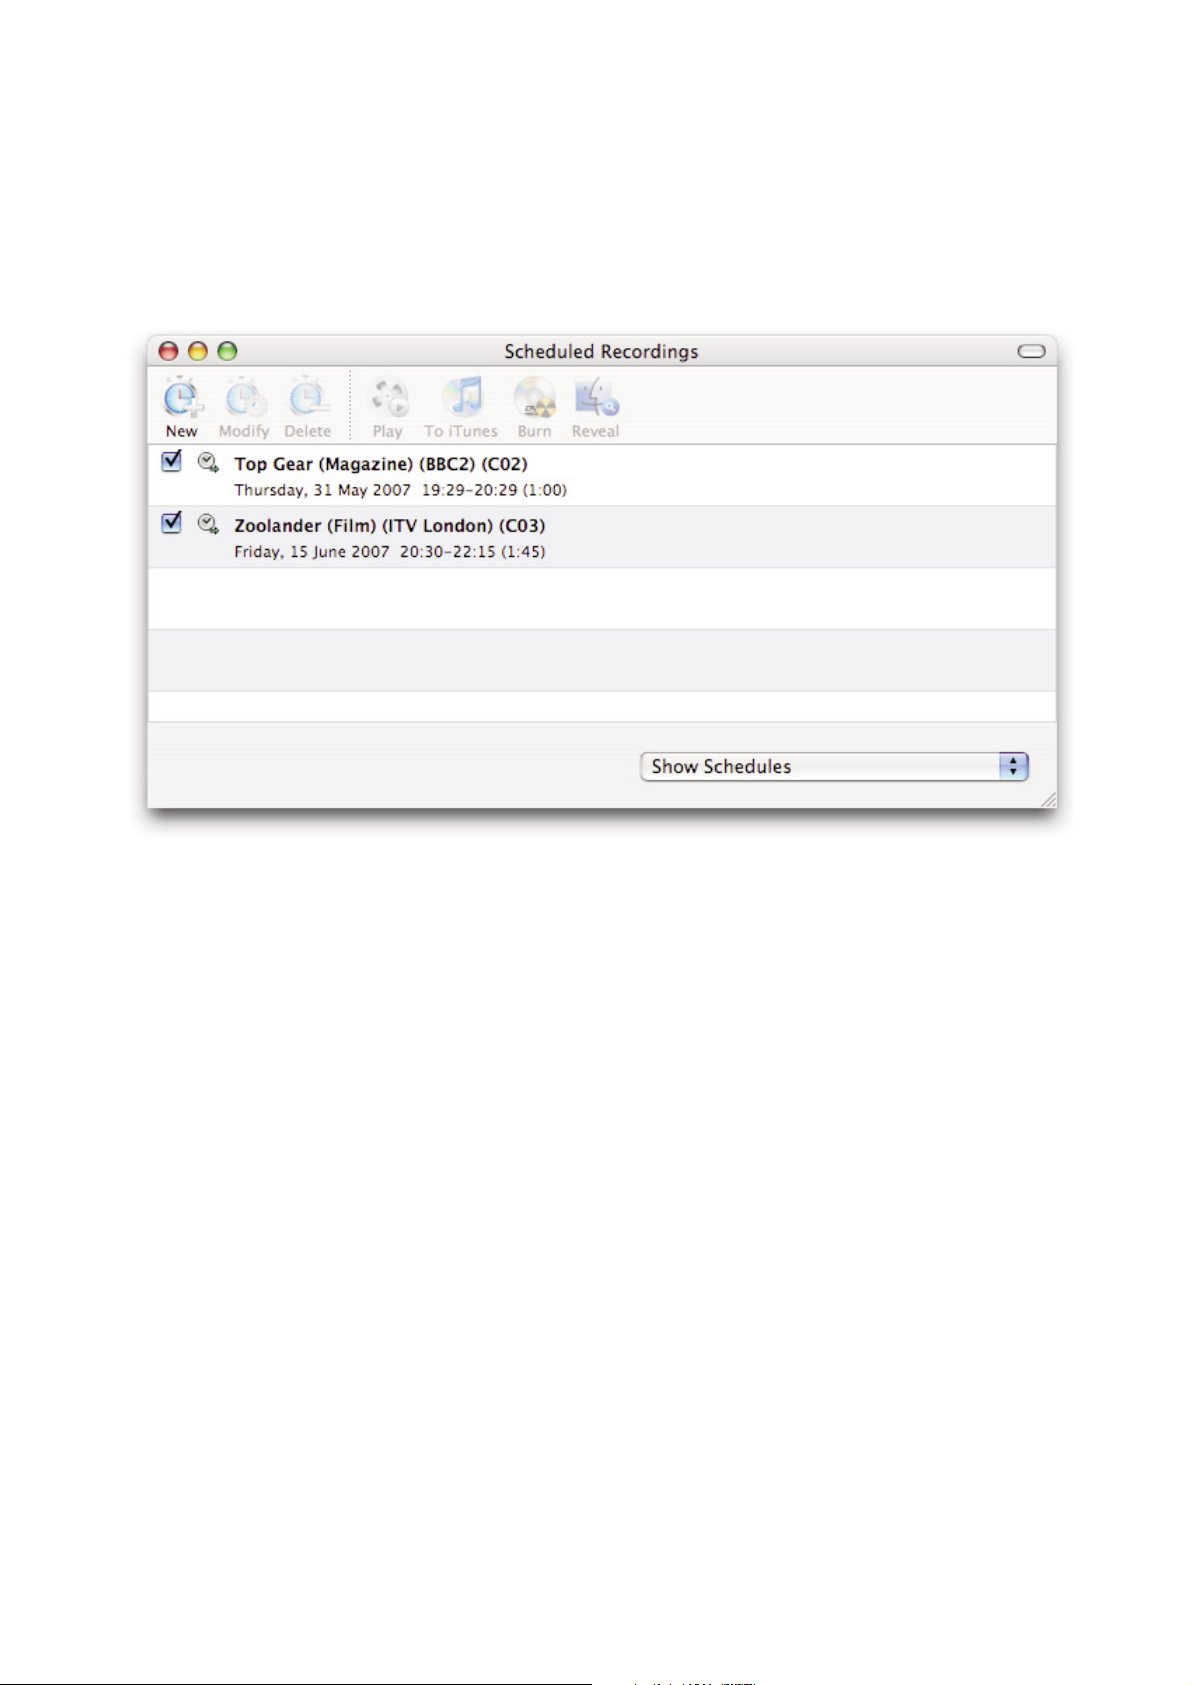
1. Click on View > Show scheduled recordings.
2. In the ‘Scheduled Recordings’ window, click ‘New’ to create a new recording.
The Scheduled Recordings window displays the various recordings you have programmed
Page 34
MigliaTV User Guide
Page 32
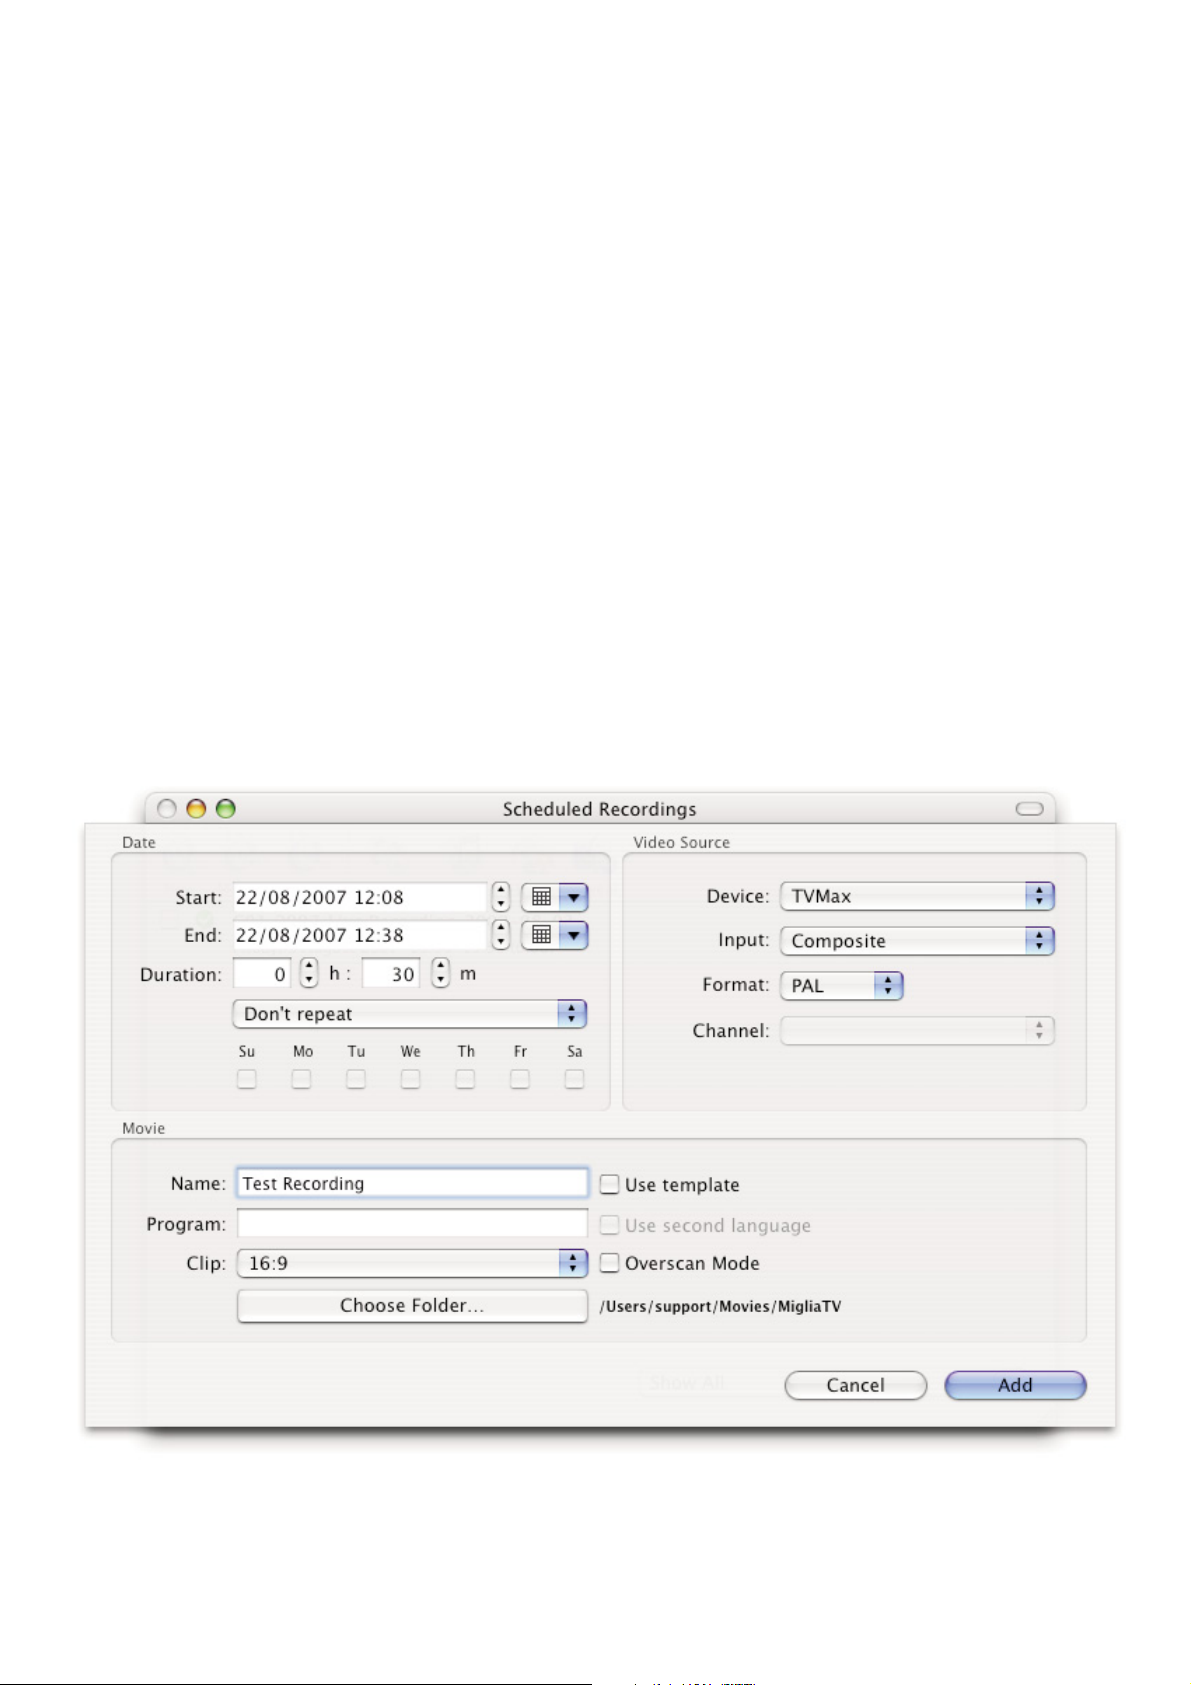
3. First, enter the date/time information.
Select the start and end times by either entering them with the keyboard or the calendar button.
You can enter several types of repetitions for the recording, which is useful if you are recording several
shows broadcasted at the same time every day/week/month.
4. Then, enter the channel in the Video Source panel.
You can also schedule a recording over the Composite and S-Video inputs if you are using a digital receiver.
In this case, make sure you have set the decoder to the correct channel as your TV hardware has no ability to
switch channels on external devices.
Select the desired channel and enter the name of the program you wish to record (the name itself does not
affect the recording. You can either use a Filename template or give a unique name to the recorded file.
5. Finally, in the Movie panel, enter the program name, which will be appended to the file name.
The template function will append other values to the file name. The values are defined in the General panel
in Preferences.
Click ‘Add record’ when you are finished.
6. You can also select a custom location for this recording, which will override the setting entered in the
General panel of the Preferences. The ‘Clip’ function lets you define the aspect ratio of your file (Recording a
DVD usually involves setting the aspect ratio to 16:9 to remove the black bars at the top and bottom).
7. Your new recording will be added to the ‘Scheduled Recordings’ list (see 2.).
Page 35
MigliaTV User Guide
Page 33
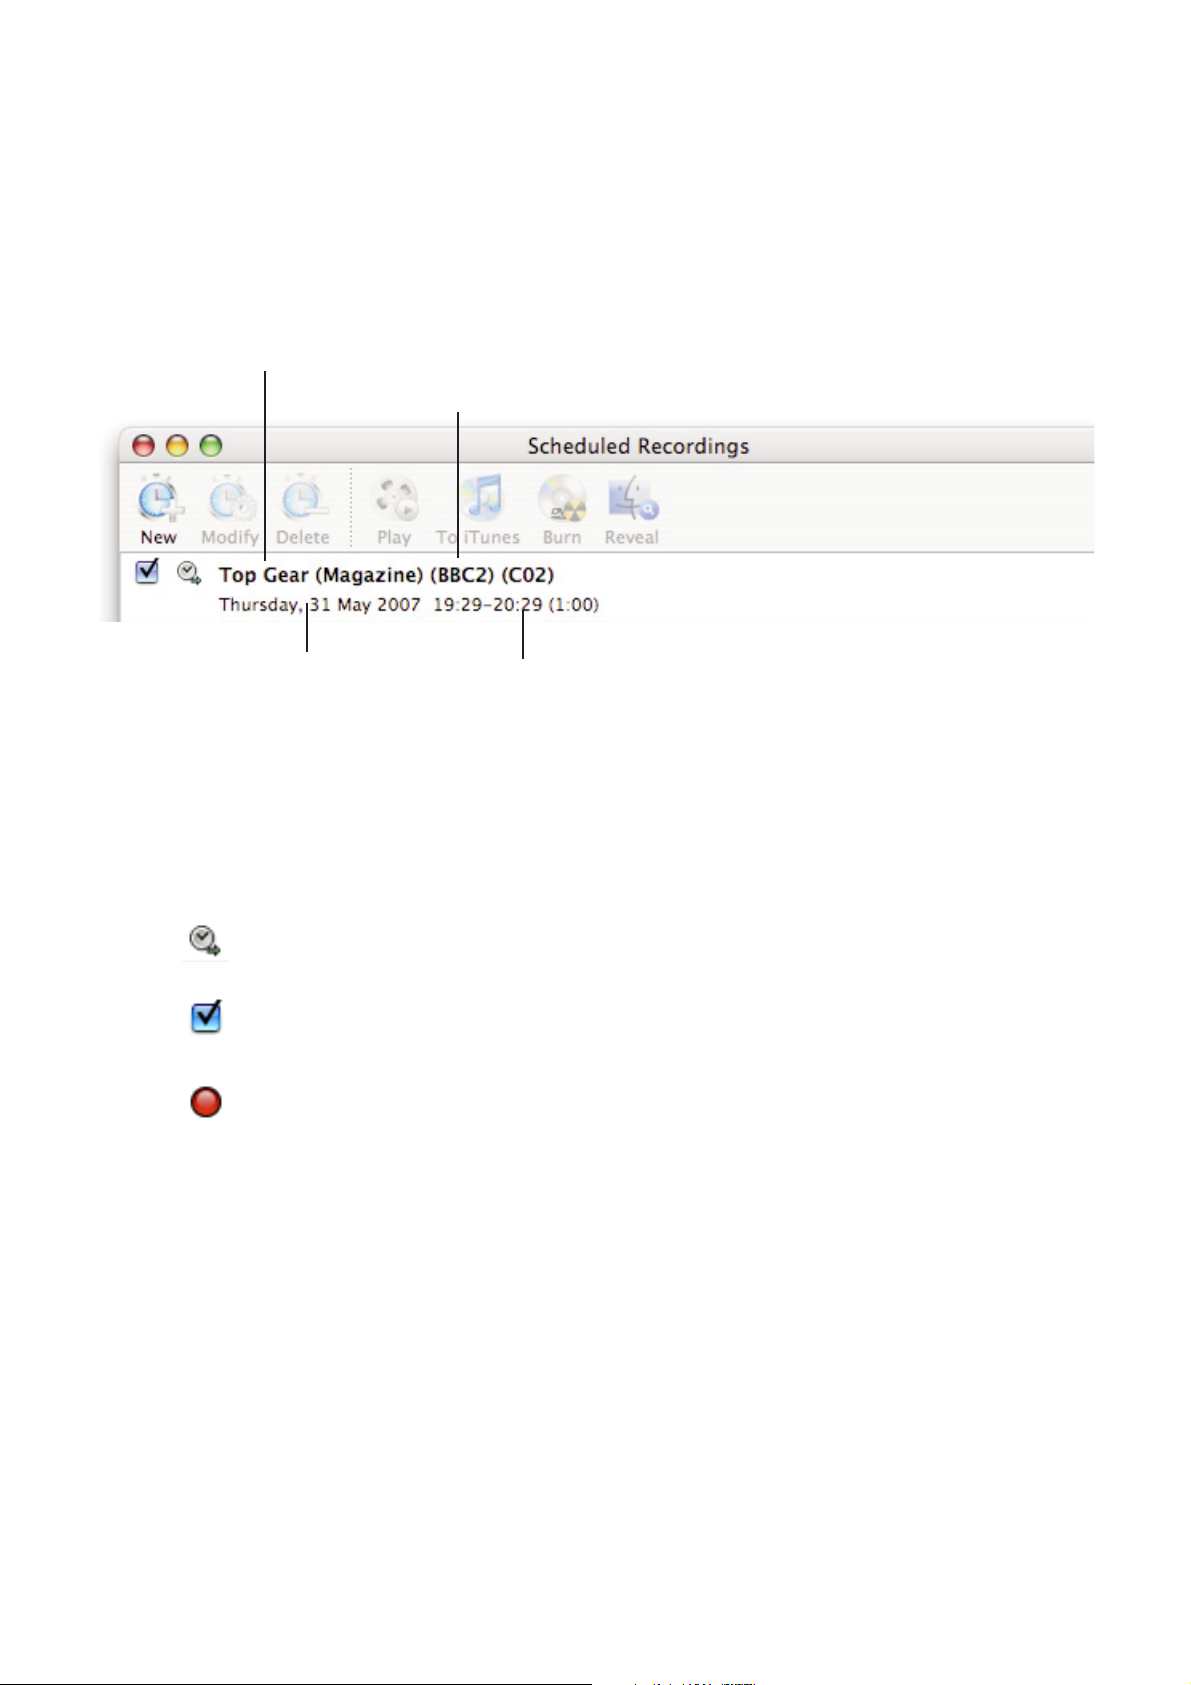
5. Scheduled recordings window list items.Displays the status of the recording via icons.
The recording is scheduled
Recording is active and will be performed.
Recording in progress
Program name
Channel name
Scheduled start
Scheduled length
Page 36

MigliaTV User Guide
Page 34
Scheduling a recording
with TitanTV
Page 37
MigliaTV User Guide
Page 35
Introduction
MigliaTV supports Decisionmark’s TitanTV EPG (Electronic Program Guide) to browse, search and schedule
recordings. Note that TitanTV is only functional in the United States.
I. Registering with TitanTV
In order to access the TitanTV program listings, you will first have to register online.
Open your web browser and enter the address http://www.titantv.com
Click on the “Sign up” button and follow the onscreen instructions to create an account.
II. TitanTV Plug-in Settings
TitanTV integration in MigliaTV is achieved via a plug-in. The Setup Assistant will automatically adjust all
the required settings for TitanTV. However, you can also configure the TitanTV plug-in manually.
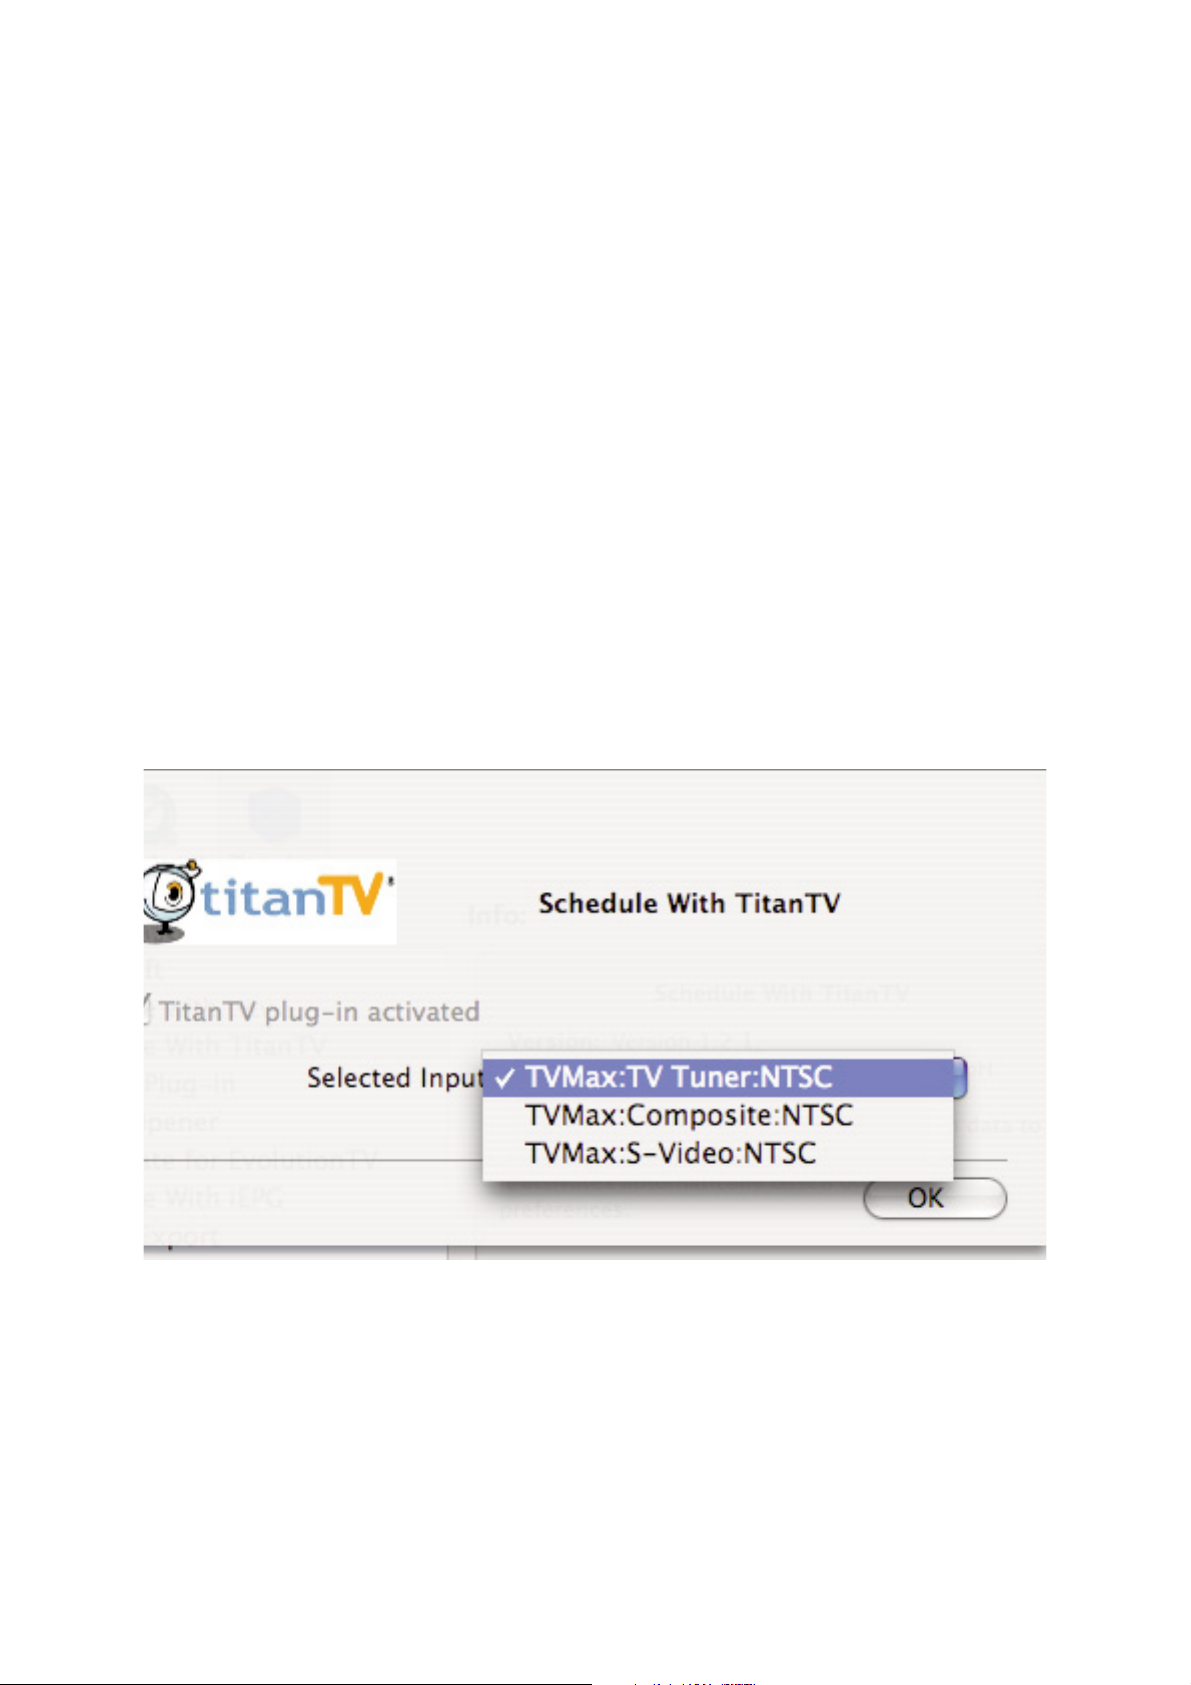
You can change the video input used by the TitanTV plug-in by clicking on ‘Show Settings’
For example, if you own a TVMax+ and receive your TV channels via the TV Tuner, select ‘TVMax+:TV
Tuner:NTSC’ as the input.
If you use a cable or satellite receiver select either Composite or S-Video.
Note: If you are using a cable or satellite receiver, you will need to select the channel you wish to record
from via the receiver’s remote.
Page 38
MigliaTV User Guide
Page 36
III. Scheduling a recording with TitanTV
1. Select ‘TitanTV TV Listings’ from the MigliaTV menu. This will launch your browser and redirect you to the
TitanTV login page
2. Enter your username and password you created during TitanTV’s sign up process.
3. You can now browse or search the local TV listings.
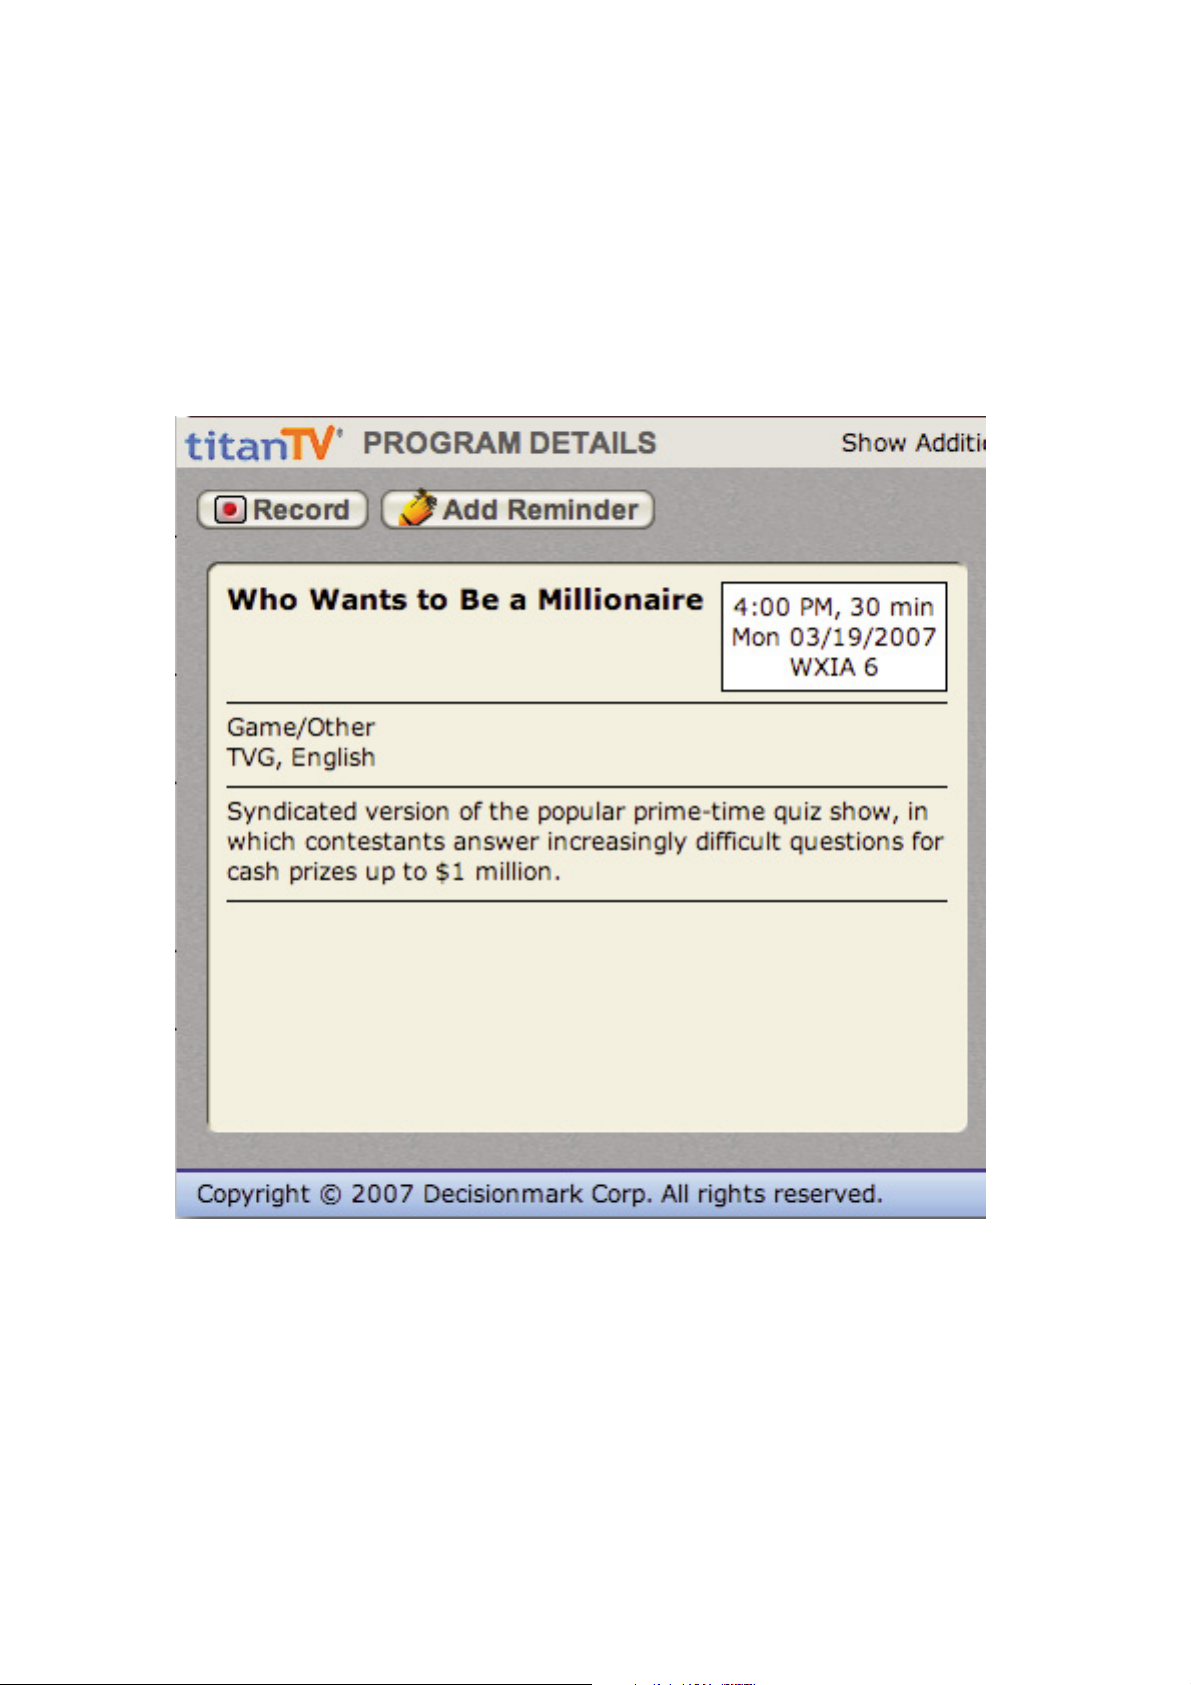
4. Each individual TV program has a detail window accessible through a hyperlink.
5. To schedule a recording, simply navigate to the detail window and click on the red record button
A file containing the scheduling information will be downloaded and opened in MigliaTV .
Page 39

MigliaTV User Guide
Page 37
Scheduling a recording
with tvtv
Page 40
MigliaTV User Guide
Page 38
Introduction
MigliaTV supports the online TV guide service “tvtv”, available in several European countries. The tvtv service
provides an overview of daily and weekly TV programmes and helps you to easily schedule recordings.
A free 30 day trial account is available for MigliaTV owners.
I. Initial tvtv setup
If you are living in a country covered by tvtv, the Setup Assistant will automatically give you the option to
register with tvtv. Follow the onscreen instructions to either create a tvtv account (you will be redirected to
the tvtv website) or enter your existing login name and password.
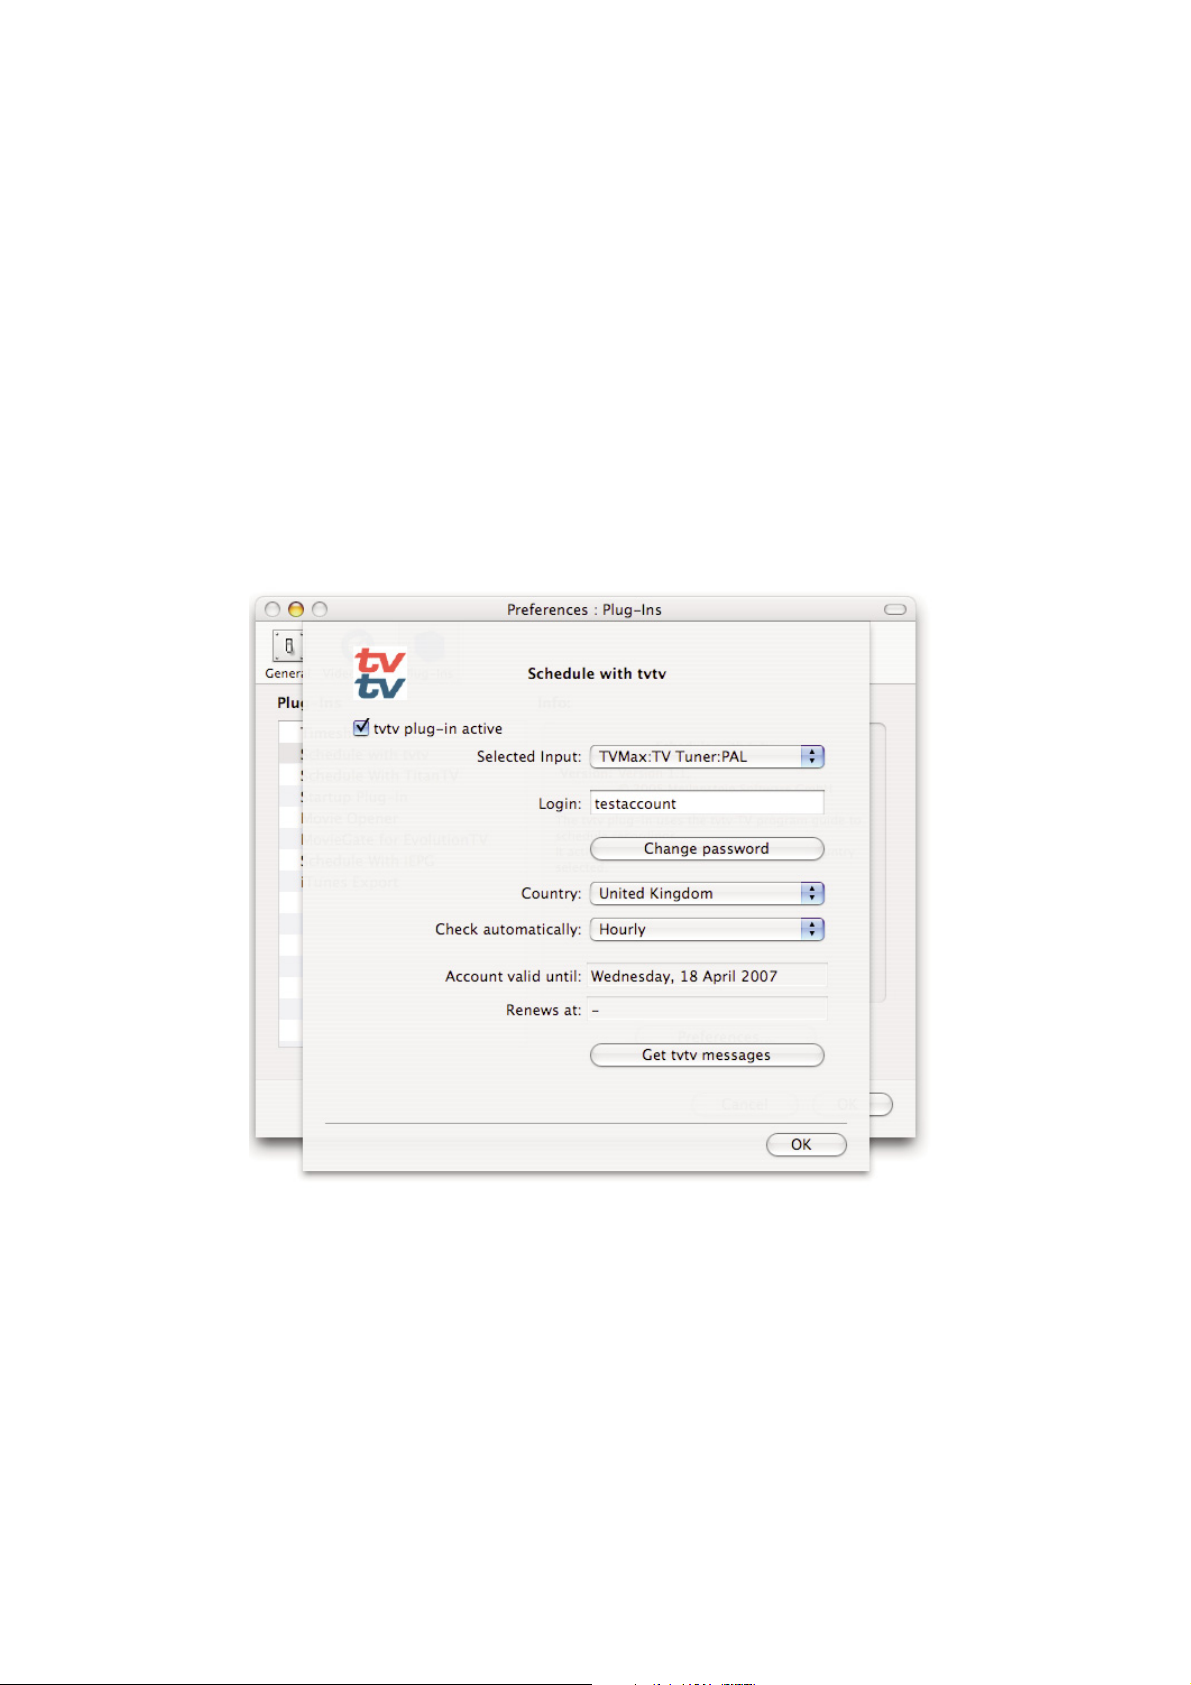
II. The tvtv plug-in
tvtv integration in MigliaTV is achieved via a plug-in. The Setup Assistant will automatically adjust
all the required settings for tvtv. However, you can also configure the tvtv plug-in manually.
Selected Input: Lets you select the video input. Normally, this will be the TV tuner, but you can also use
Composite or S-Video if your TV hardware is connected to a digital TV receiver (Cable,
Satellite, Digital Terrestrial, etc...). However, the digital receiver will have to be set to the
correct channel for the recording, as your TV hardware cannot control an external device.
Login: Shows your tvtv login name
Change Pass: Enables you to change your tvtv password
Country: Country selection. Note that tvtv is not available in all European countries.
Page 41
MigliaTV User Guide
Page 39
Check automatically: Selects the frequency with which the software should check your joblist on tvtv.
Account valid until: Shows the date when the tvtv account will expire
Get tvtv messages: Shows the latest messages sent by the tvtv service.
III. Using the tvtv service
3.1. Accessing tvtv
Once you have created your tvtv account, you can access the programme guide and schedule recordings for
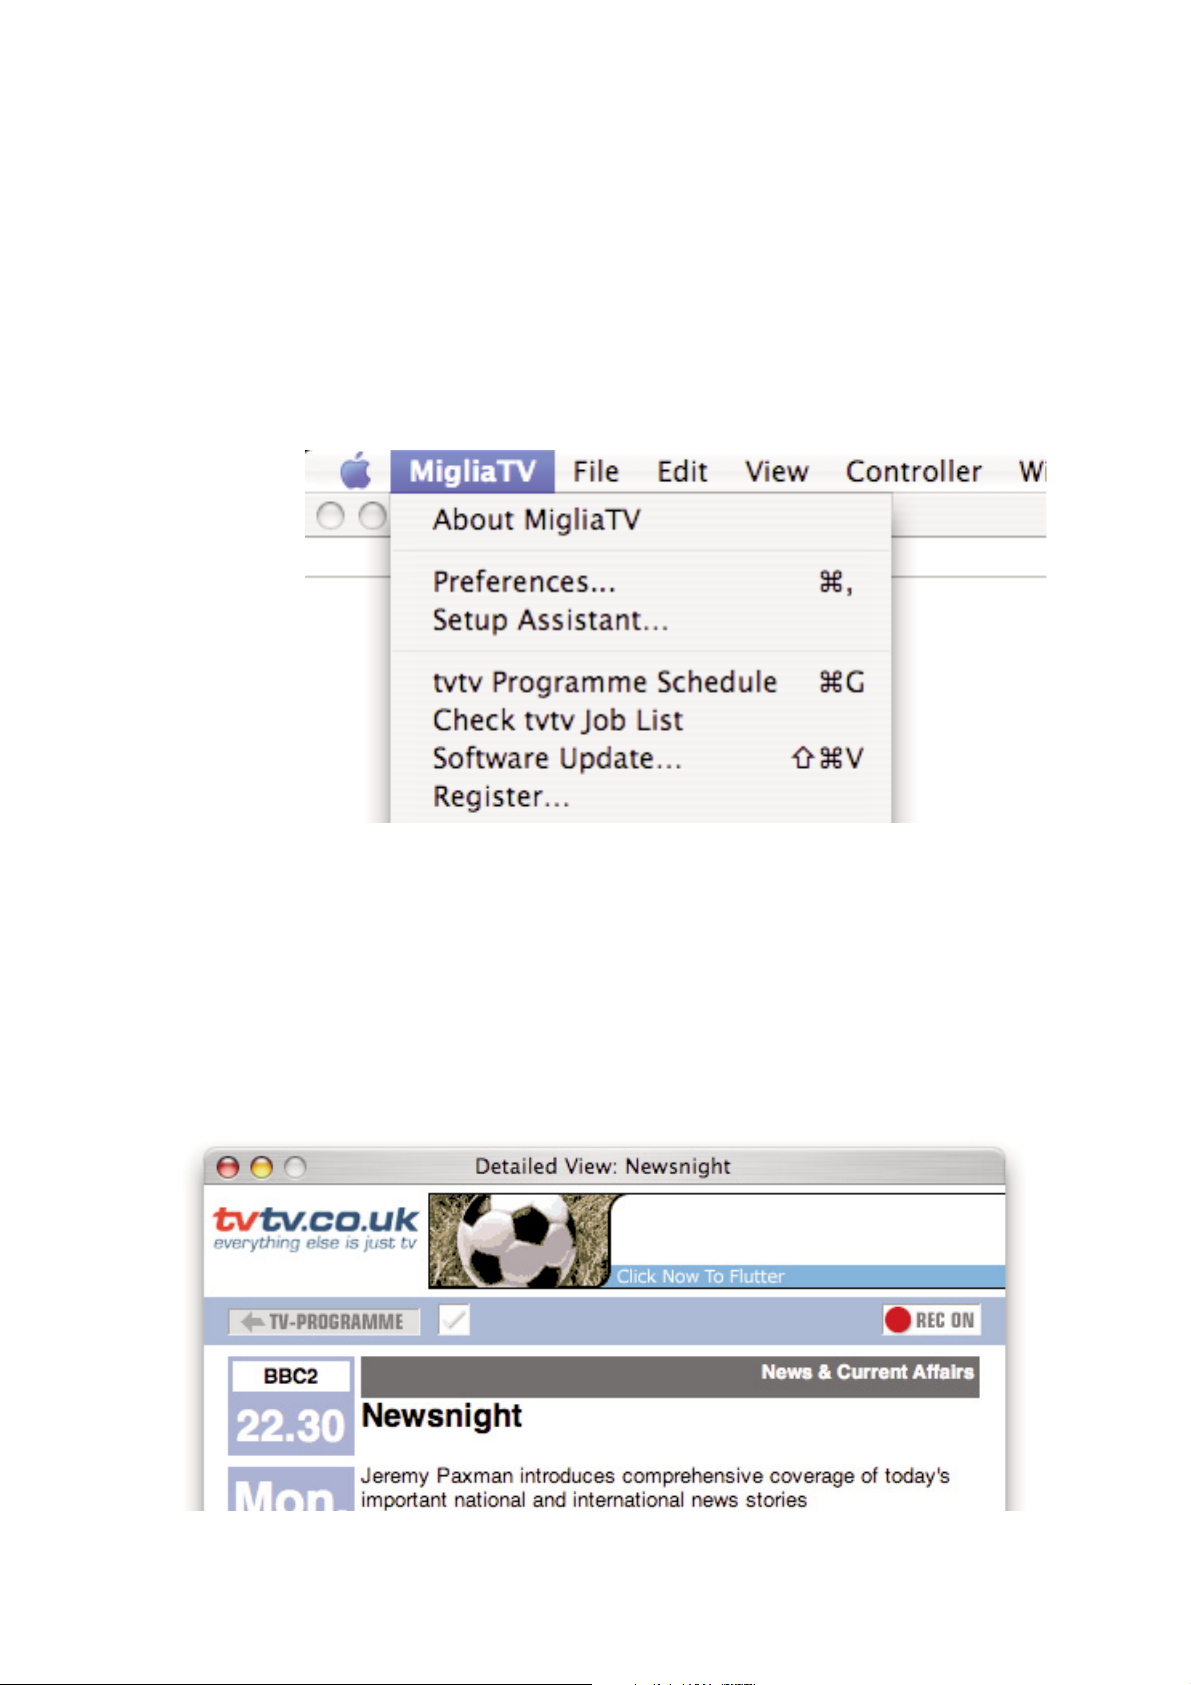
MigliaTV. When the tvtv plug-in is active and setup, the MigliaTV menu (menu bar) displays two options.
tvtv Programme Schedule: This option will launch your web browser and open the tvtv page.
Check tvtv job list: This option will synchronise MigliaTV’s scheduled recordings list with the tvtv
job list. tvtv’s job list contains the list of recordings you have selected.
3.2. The tvtv job list and scheduling a recording
The tvtv service uses a joblist, which contains the list of recordings you have selected on the tvtv page.
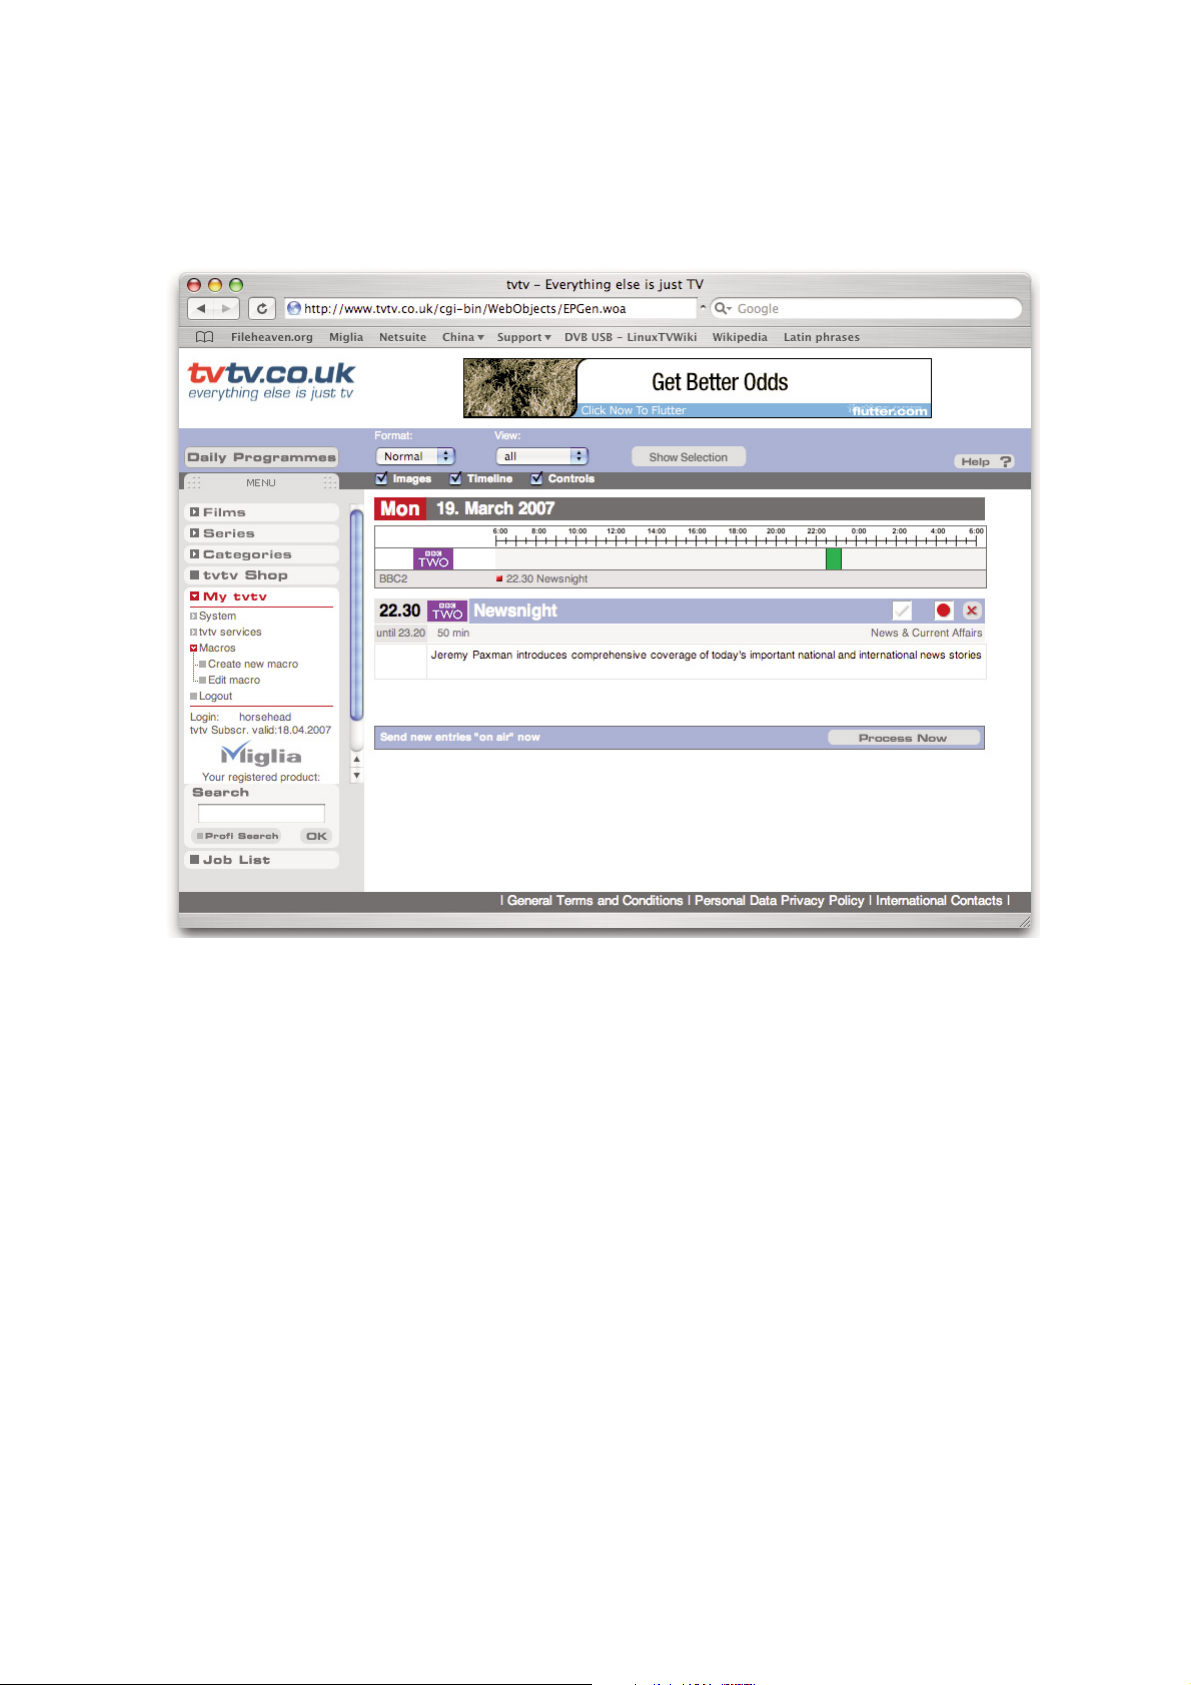
Start by getting the overview of today’s programmes and select a programme you wish to record. A new ‘details’
window will open. Press the ‘REC OFF’ button and it will switch to ‘REC ON’ signifying the programme is added to
your joblist
Page 42
MigliaTV User Guide
Page 40
Click on Joblist located in the bottom left corner of the tvtv page.
Your joblist will now show the recordings you have scheduled. Click on “Process now” to confirm the recordings.
Note: You need to click on process now, otherwise the recordings will not be confirmed and will not be
available to MigliaTV.
MigliaTV will automatically check the joblist at defined intervals. You can also manually check the joblist by using
the “Check tvtv job list” option in the MigliaTV menu.
Programmes scheduled with tvtv will then be taken over by the application.
3.3. Channel naming synchronisation
tvtv and MigliaTV compare the TV station names to schedule a recording. This requires you to name the TV
channels as they are named by the tvtv service. Should there be a discrepancy, a window asking you to rename
the channels will appear when you check the tvtv joblist.
Page 43

MigliaTV User Guide
Page 41
Using the Recording
window toolbar
Page 44
MigliaTV User Guide
Page 42
I. The Recording window toolbar
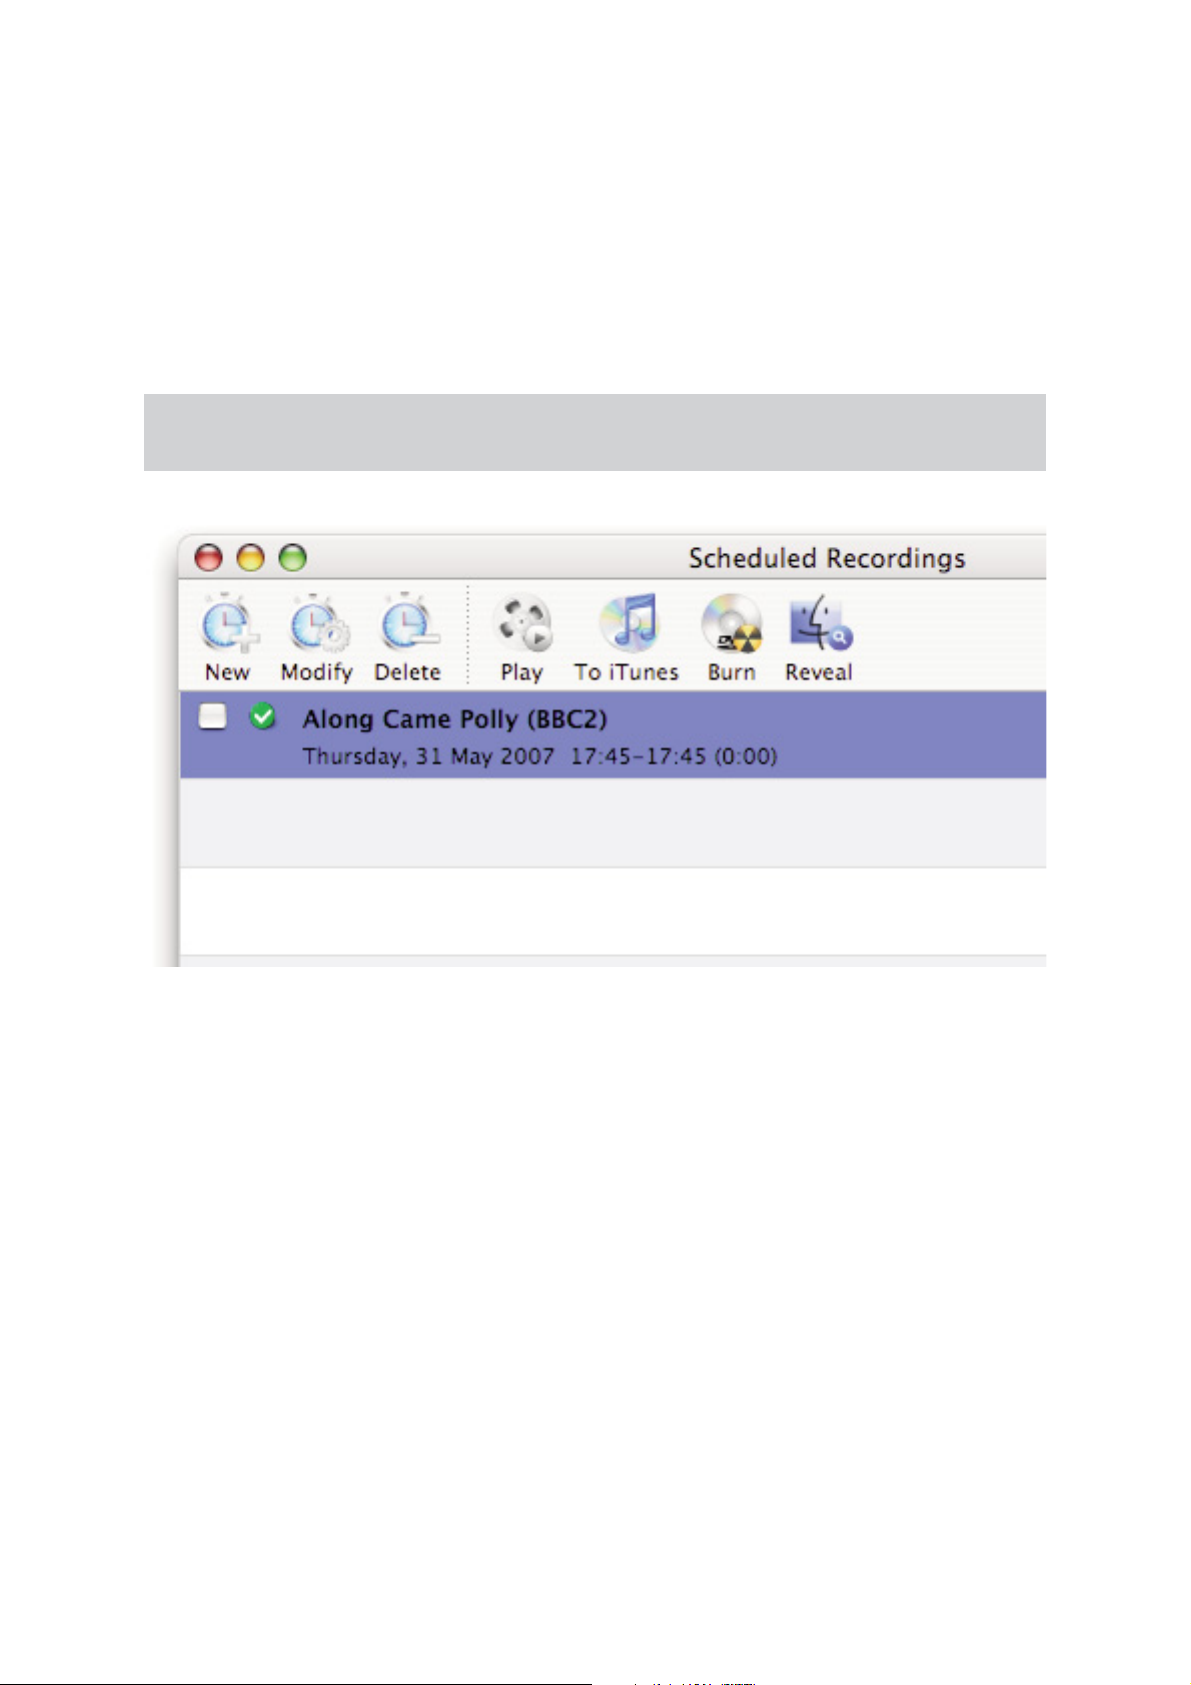
The recording window toolbar lets you perform several actions with the files you have recorded. To access the
recording window, select ‘Scheduled Recordings’ from the Window menu and select ‘Show recordings’ in the drop
menu of the Recordings window.
1. Using the toolbar
To use a plug-in, highlight a finished recording and click on an icon.
1.1 Play
Plays the selected movie file using the MigliaTV built-in Movie Player
1.2. To iTunes
Lets you add a recording to your iTunes Playlist. Settings for the iTunes plug-in are available in the ‘Add to iTunes’
plug-in preferences.
1.3. Reveal
Shows the recorded file in the Mac OS X Finder. This enables you quick access to the file to drag it onto another
application for example.
Note: the recording must have been completed before you can perform an action
Page 45
MigliaTV User Guide
Page 43
1.4. Burn
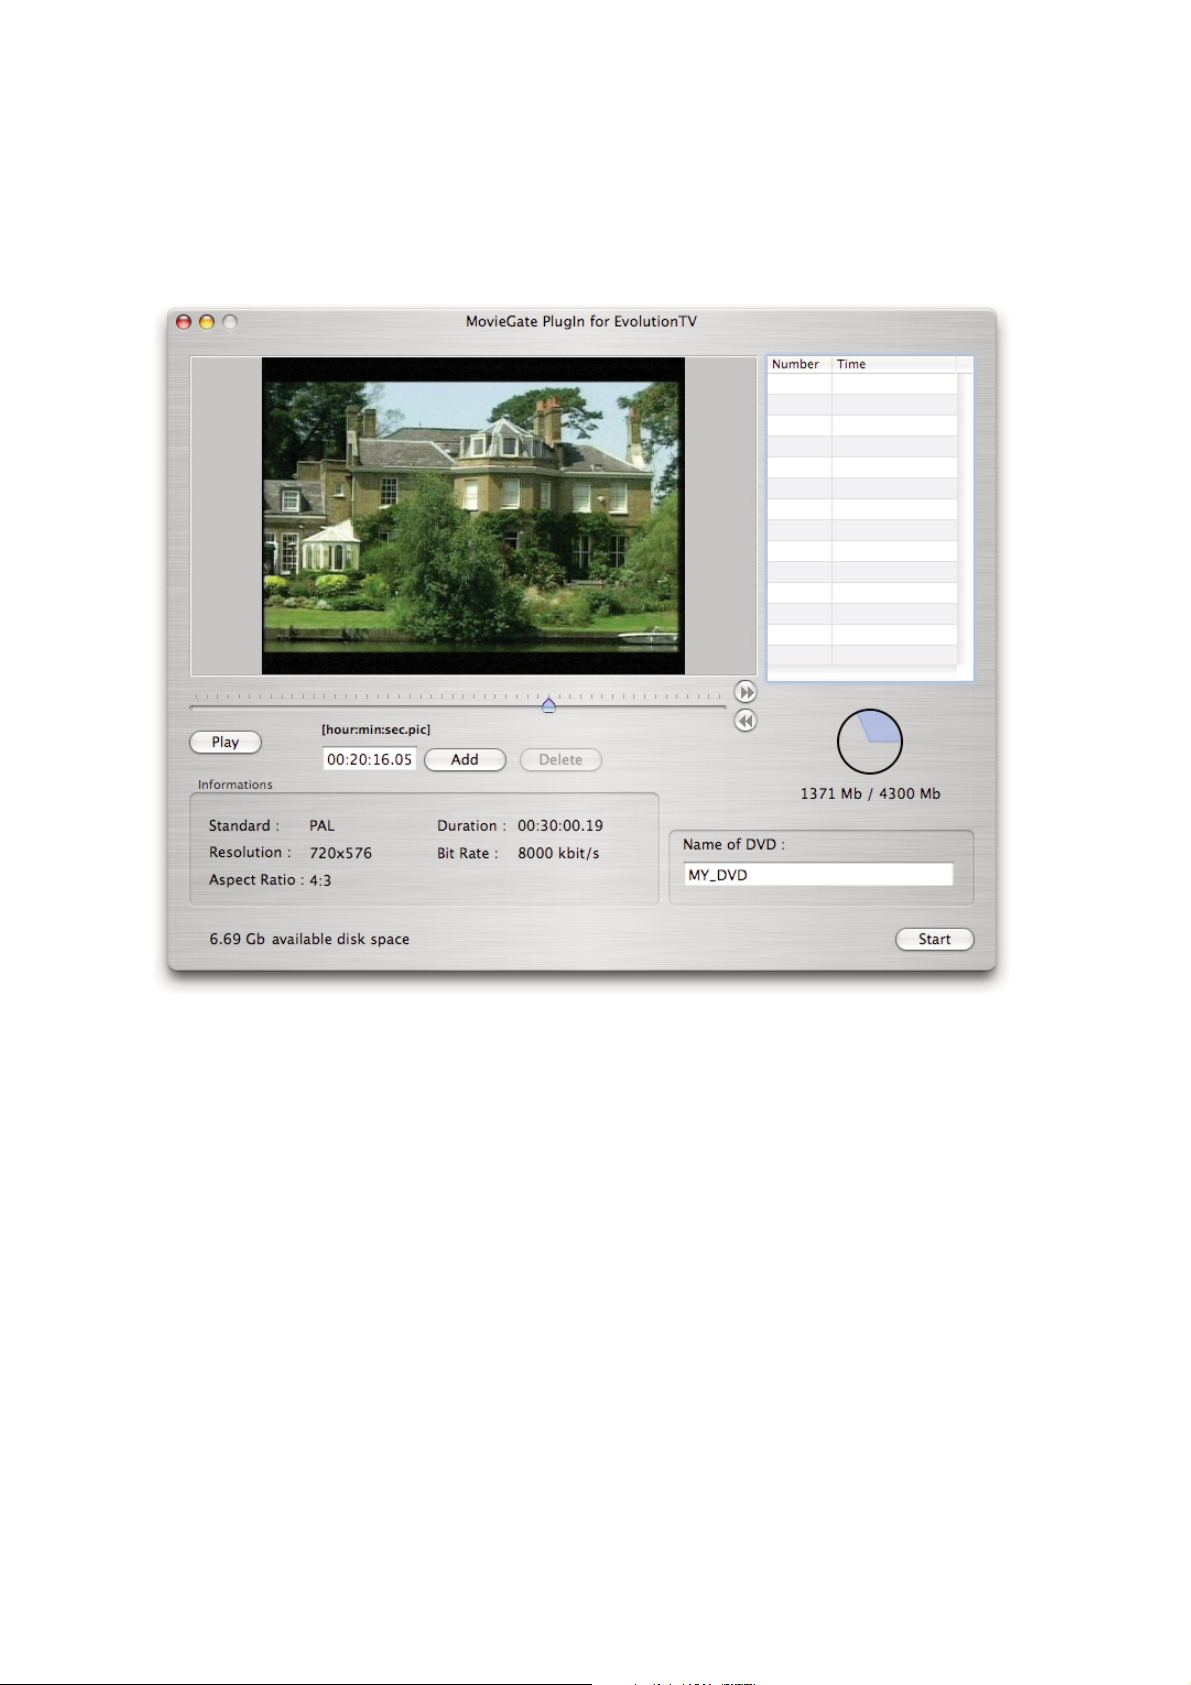
Burns the video file to DVD. This only works with files recorded in the MPEG-2 format.
Settings for the MovieGate DVD-Plugin are available in the MovieGate Plug-in Preferences
You can preview your entire video file by using the slider located below the picture.
If you wish to add a chapter, select a video frame by using the slider and click 'Add'. On the right side of the
window, you will see a new chapter appear in the list. Use the delete button if you wish to remove a chapter
marker.
The pie on the bottom right side of the window shows the estimated size required by your DVD as well as the
available amount of space on a disc (4.3 GB in the screenshot, the standard size of a single layer DVD).
The Name field lets you choose a custom name for the DVD you are creating. Note that you should use only
uppercase letters and numbers and avoid the use of special characters, as these may reduce the compatibility
with home DVD players.
The Information area displays the video standard of your captured files, the duration in
hours:minutes:seconds:frame, the resolution in pixels, the bit rate and the aspect ratio.
The available disk space value applies to the volume (eg. hard drive) you selected in the Plug-in preferences.
Once you have entered your chapter markers and given the DVD a name, click on Start to burn your DVD.
Page 46

MigliaTV User Guide
Page 44
Playing back files
created by MigliaTV
Page 47

MigliaTV User Guide
Page 45
Introduction
MigliaTV supports various capture formats, which can be played back by most if not all software video
applications. However, you may need to install additional video codecs in order to play back some formats. A
Video codec is an extenstion, which enables a software video player (like QuickTime Player) to read a video file.
Please note that the offered capture formats depend on your TV hardware.
I. Software Video Players
Miglia currently recommends two software video players:
• QuickTime Player: QT Player is part of a standard Mac OS X installation. You will find the software in the
Applications folder on your hard drive.
• FrontRow; FrontRow comes with Macs that have a built-in IR rev
• VLC Media Player: VLC (Video Lan Client) Media Player is an open source project available on several
platforms. VLC provides broad compatibility and excellent performance.
II. Required Codecs
You may need to install a video codec to playback some formats. The requirements are listed below:
• MPEG-2 (DVD): MPEG-2 playback is directly supported by VLC, without any additional software
installation. If you wish to play back an MPEG-2 file in QuickTime Player, you will need to
install the MPEG-2 Playback component available from Apple’s website (Note: The MPEG-2
Playback component is not free of charge).
• MPEG-4: No additional codecs are required to playback an MPEG-4 file. Simply open the file in
QuickTime Player, FrontRow or VLC. This applies to files recorded for iPod, iMovie HD,
AppleTV, PSP and Full size (MPEG-4).
• DivX: To playback DivX files, you will need to download the free of charge DivX component
available from http://www.divx.com
This is not required if you use VLC.
Page 48

MigliaTV User Guide
Page 46
Warranty Agreement
Hardware Products:
HDMI Ltd warrants your hardware product against any defect in material and workmanship, under normal use, for
the designated warranty period. The warranty becomes effective from the date of purchase by the end user.
If the product is found to be defective within the warranty period, HDMI Ltd will, at its sole option, repair or
replace the defective product.
HDMI Ltd will not, under any circumstances, be liable for direct, special or consequential damages such as, but
not limited to, damage or loss of property or equipment, loss of profits or revenues, cost of replacement goods, or
expense or inconvenience caused by service interruptions.
This warranty is void if:
• The product was operated or stored in abnormal use or maintenance conditions.
• The product was repaired, modified or altered or undergone attempted repair by non-authorised personel,
unless HDMI Ltd has authorised such repair, modification or alteration.
• The product was damaged, abused or misused
• The product was installed without following the supplied installation instructions.
• The serial number of the product is defaced, modified or missing.
• The “Warranty Void” seal on the casing has been modified, removed or broken.
The decision of HDMI Ltd shall be final and binding with regards to the condition of product return and eligibility
of repair or replacement.
Software Products:
Software Products are covered specifically for defective media or manuals only, for a 14 day period. The software
license you acquired cannot under any circumstance by transferred back to HDMI Ltd. HDMI Ltd does not
warrant or represent that all third-party software or hardware will function error-free when used in conjunction
with its products.
How to obtain warranty service:
To obtain warranty service, within 30 days of the date of purchase, please contact the retailer from whom you
made your purchase. To obtain warranty service, after 30 days of the date of purchase contact Miglia’s Technical
Support Service. A proof of purchase will be required to confirm that the product is still under warranty. Should
Miglia’s Technical Support diagnose a fault on your product, a Return to Manufacturer Authorisation (RMA)
number will be issued to you.
All products returned to HDMI Ltd must be securely packaged in their original box and shipped at the customer’s
cost inclusive of any requested documentation. Return shipment of repaired or replaced product will be covered
by HDMI Ltd.
Any product returned without an RMA number issued by Miglia's Technical Support Service will be refused.
 Loading...