

Migatronic FLEX 3000C, FLEX 3000 DUO Quick Manual
QUICKGUIDE
FLEX 3000C/FLEX 3000 DUO
B
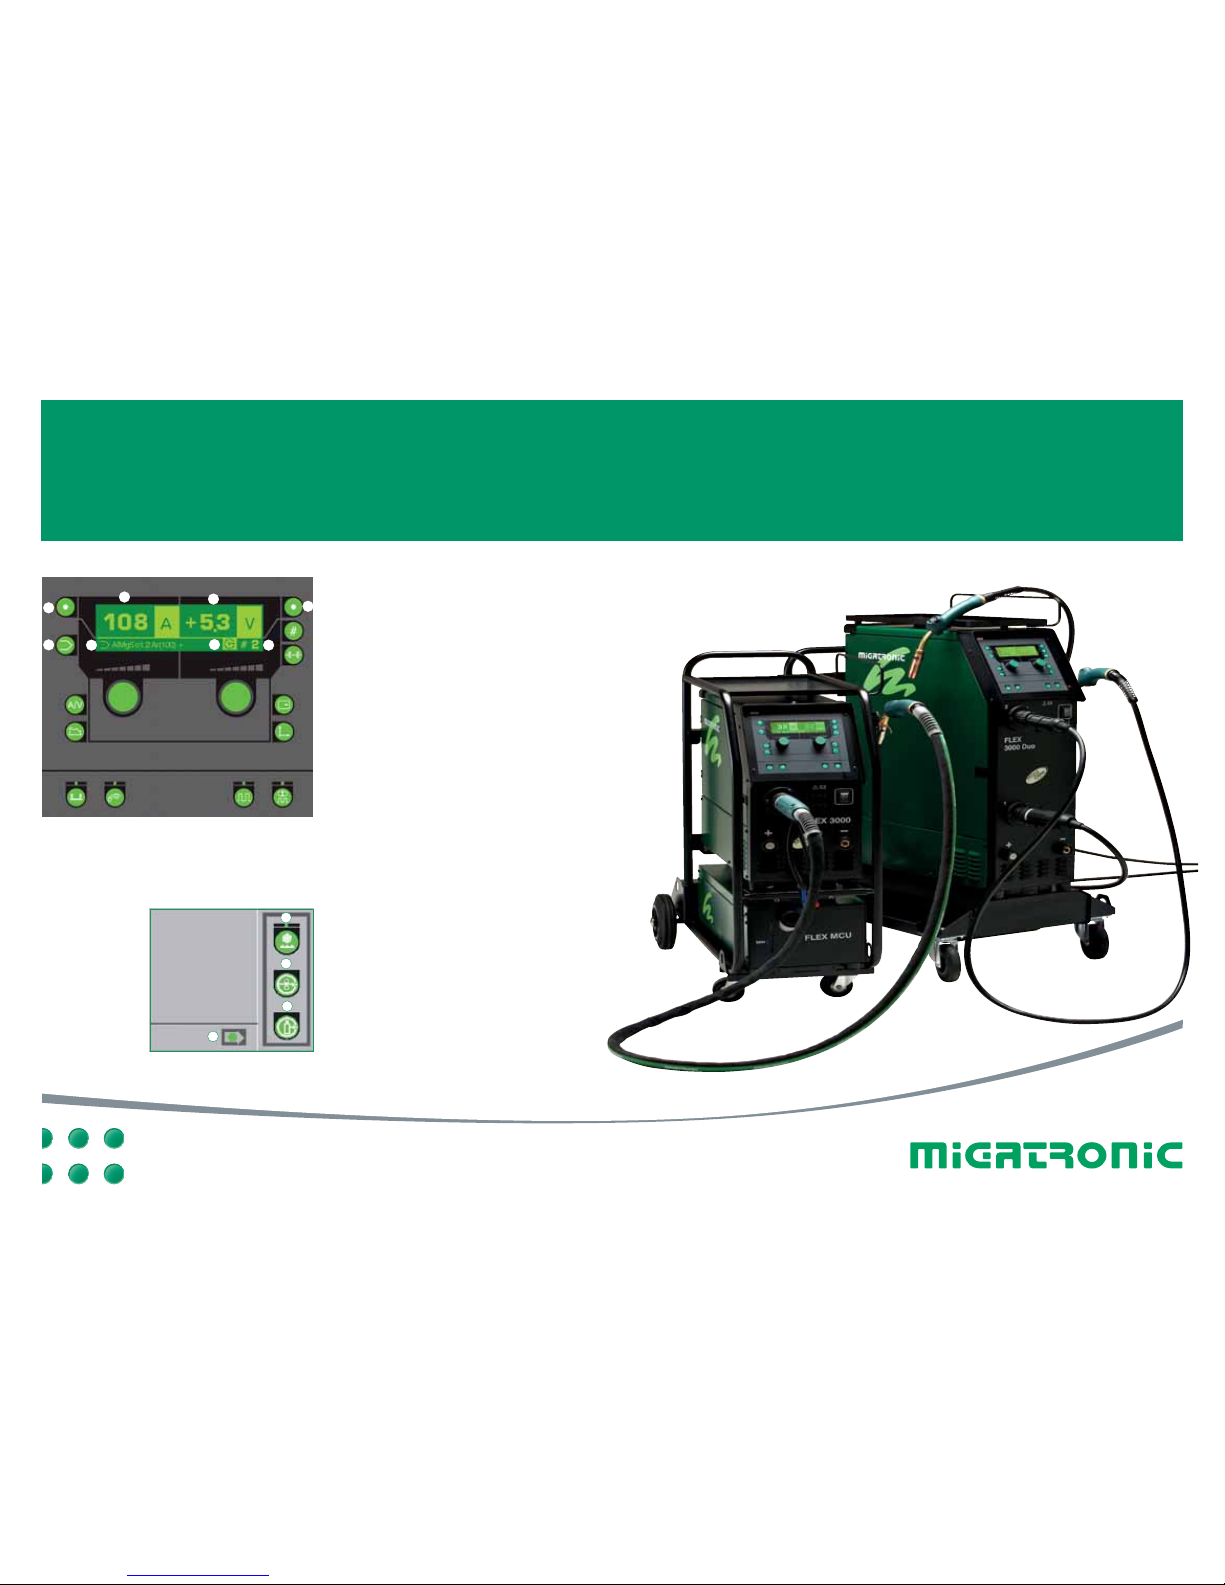
Displayvisning:
1.
Med tryk på knap A vises enten svejse strøm (A), trådhastighed (m/min) eller
materialetykkelse (mm). Når værdien
vises, justeres denne individuelt med
venstre drejeknap.
2. Med tryk på knap B vises enten trim af
svejsespænding/lysbuelængde (V), ind stillet svejsespænding (V), Arc adjust
(elektronisk drossel/lysbuekarakteristik)
eller gasflow (ekstraudstyr).
3. Visning af valgt svejseprogram.
4. Visning af fx spænding (V) på trådende,
netspændingsfejl osv.
5. Visning af antal ilagte sekvenser, aktuelle
data i det aktive sekvenspunkt samt
hæftefunktion.
Indvendig betjening på panel ved
kortlæseren:
6. Diode lyser, når kortet er korrekt sat i.
7. Vandkøling til/fra.
8.
Rangerknap, der bruges til rangering
af tråd.
9. Gastest.
50113652A
5
B
A
2
3
4
1
2
6
7
8
9

QUICKGUIDE
FLEX 3000C/FLEX 3000 DUO
Sådan begynder du
Kontroller korrekt tilslutning af 3 x 400V og
tænd maskinen.
Placér MigaCARD
®
i kortlæseren og afvent
indlæsningen. Et skrivebeskyttet kort bør efter
endt indlæsning fjernes fra kortlæseren, da
kortet altid resetter maskinen til fabriksindstilling
ved tænd/sluk.
Et ikke skrivebeskyttet kort anvendes som medie
til at flytte eller opbevare egne brugerindstillinger.
Tast én gang på knap 2, og vælg det ønskede
program med venstre drejeknap.
Når programmet er fundet, tastes endnu én
gang på knap 2, og maskinen er klar til brug.
Valg af trådrum (øverst/nederst) på FLEX DUO
foretages ved brug af omskifteren under ON/OFF
kontakten på maskinens front.
Ved skift mellem øverste/nederste trådrum
vælges nyt program. Se punkt 2 og 3.
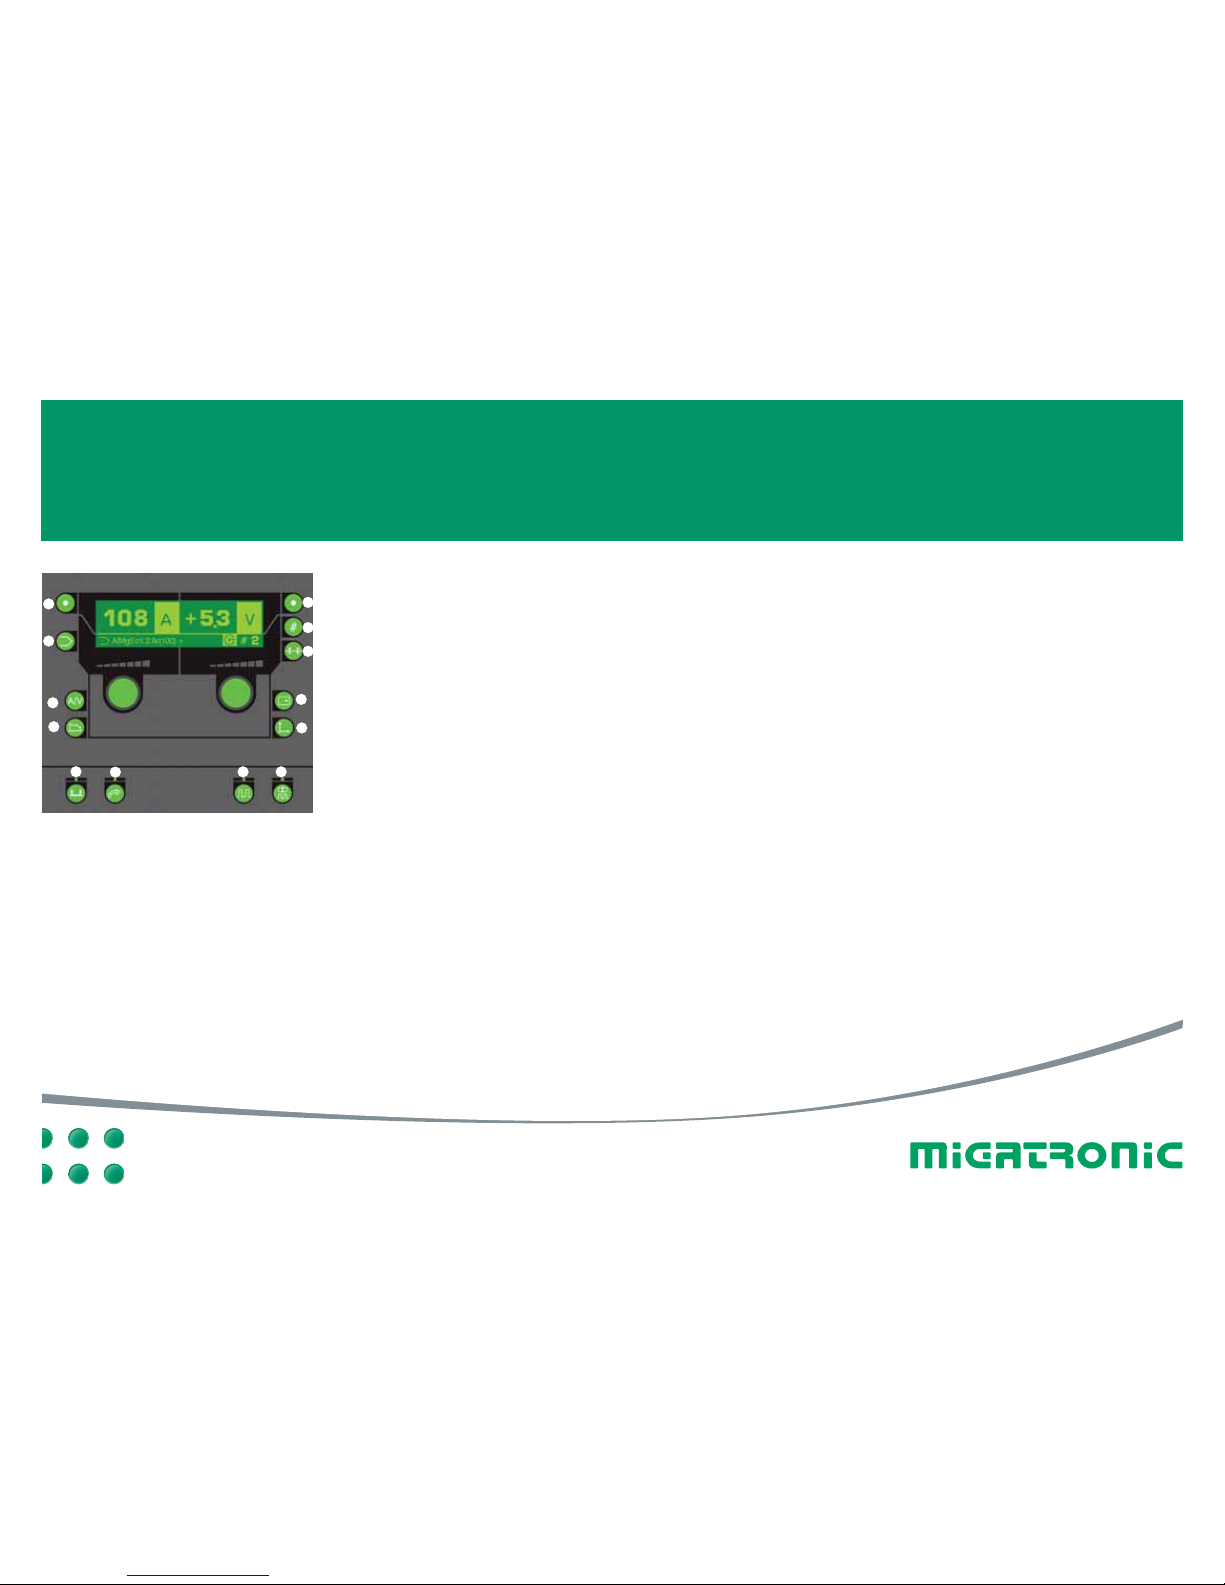
Betjeningsknapper:
Justering/trim af alle aktuelle visninger og
værdier foretages fra de to drejeknapper, der
styrer hver sin displayhalvdel.
1. Visning af: Trådhastighed (m/min), materi aletykkelse ved kantsøm (mm) eller strøm-
styrke (A).
2. Programvalg: Menuen er aktiv, når ikonet
blinker, hvorefter nye valg kan foretages.
Nyt programvalg accepteres ved endnu et
tryk på knappen.
3. Primær display: Ét enkelt tryk bringer pri mær visning frem i display (A/V). Knappen
kan altid benyttes og rydder andre display visninger.
4.
Sekundær parametervisning: Bringer
menuen for sekundære visninger frem, fx
preflow, krybestart, hotstart %, hotstarttid,
slope down, stopstrøm, burn back, postflow
5. Tastemode: Ved tændt diode er tastefunk tion 4-takt. Slukket diode indikerer 2-takt.
6. Brænderregulering: Ved tændt diode
kontrolleres svejsestrøm fra Migatronics
Dialog brænder eller flere funktioner med
MIG Manager® (begge brændere er
ekstraudstyr). Slukket diode indikerer
intern regulering.
7. Puls: Ved tændt diode er synergisk puls svejsning aktiv i det valgte program. Slukket
diode indikerer synergisk svejsning uden
puls.
8.
Quattro: Ved tændt diode er Quattro funk-
tionen aktiv. Slukket diode indikerer svejsning
uden Quattro. Kan benyttes i programmer
med og uden puls. Tastes der med
tændt
diode ved symbolet to gange på knap
4,
kaldes en speciel Quattro menu frem.
9. Statistik: Bringer statistik frem for seneste
svejsning (fx A/V, svejsetid osv.)
10. MigaCARD
®
: Unikke informationer om
MigaCARD
®
kaldes frem.
11. Hæftefunktion: Mulighed for individuel
hæfteopsætning i det valgte program.
12. Sekvenssvejsning: Antal valgte sekvenser
vises. Sekvenser benyttes til skift mellem
egne ilagte parametersæt.
13. Visning af: Spænding (V), spændingstrim
(V +/-), Arc adjust (-5 - +5) eller gasflow
(ekstraudstyr).
Med FLEX 3000 serien har du mange muligheder, og vi vil med denne Quickguide gennemgå
de mest anvendte faciliteter. Vil du vide mere,
henviser vi til vores betjeningsvejledning.
Betjening af FLEX 3000C/3000 DUO kan
foregå fra:
A) Primært betjeningspanel på fronten
B) Indvendigt panel ved kortlæseren
C) Fjernregulering via brænder (ekstraudstyr).
5
13
12
1
2
3
6
7 8
10
9
11
4

QUICKGUIDE
FLEX 3000C/FLEX 3000 DUO
Displays:
1.
Press keypad A to view either welding
current (A), wire feed speed (m/min.) or
thickness of material (mm). When the
individual value is displayed, you can ad just it on the left control knob.
2. Press keypad B to view either trim of
welding voltage/arc length (V), the set
welding voltage (V), Arc adjust (electronic
choke/arc characteristics) or gas flow
(extra equipment).
3. Display of the welding programme chosen.
4. Display of for example voltage (V) on
wire end, mains voltage error, etc.
5. Display of number of sequences chosen,
display of currently chosen sequence plus
data, or display of the tack welding function.
The inside panel at the card reader:
6. The LED shines when the card has
been inserted correctly.
7. Watercooling on/off.
8. Keypad for wire inching.
9. Keypad for gas test.
50113652A
B5B
A
2
3
4
1
2
6
7
8
9
QUICKGUIDE
FLEX 3000C/FLEX 3000 DUO
Starting your FLEX 3000C
Check that the machine is correctly connected
to 3 x 400V and switch on the machine.
Insert the MigaCARD
®
into the card reader and
wait for the input process. Remove non-editable
cards from the card reader after the input process, as the card will always reset the machine to
Migatronic standard setting when the machine
is switched on/off.
An editable card can be used for copying or saving your own settings.
Press keypad 2 and choose the desired welding
programme by means of the left control knob.
Once you have chosen a programme, press keypad 2 again. The machine is ready for use.
Choose (top/bottom) wire cabinet on the FLEX
DUO by means of the reverser under the ON/OFF
switch at the front part of the machine.
When you alternate between top/bottom wire
cabinet, choose new programme. See points 2
and 3.
Keypads:
Use the two control knobs (each controlling one
half of the display) for adjustment of relevant
displays and values.
1. Display of: wire feed speed (m/min.),
thick ness of material at fillet weld (mm)
or amperage (A).
2. Choice of programme: the menu is active
when the display icon flashes. Then it is
possible to choose new programmes.
Accept new choice of programme by
pressing the keypad again.
3. Primary display: Press the keypad to view
the primary display (A/V). The keypad can
be used anytime and clears other displays.
4. Secondary parameter display: Press the
keypad to view secondary parameter dis-
plays, such as preflow, soft start, hot start %
,
hot start time, slope down, stop amp, burn
back, postflow.
5. Trigger mode: When the LED is on = 4-
stroke. When the LED is off = 2-stroke.
6. Adjustment of torch: If the LED is on =
setting of welding current from the Miga tronic Dialog torch or setting of several pa rameters from the MIG Manager
®
torch
(both torches are extra equipment). When
the LED is off = internal adjustment.
7. Pulse: When the LED is on, synergic pulse
welding is active in the programme chosen.
When the LED is off = synergic welding
without pulse.
8. Quattro: When the LED is on, the Quattro
function is active. If the LED is off = Quattro
function is not active. The Quattro function
can be used in welding programmes with or
without pulse. If you press keypad 4 twice
when the Quattro LED is on, a special Quattro
menu is called.
9. Statistics: Press this keypad to view statistics for the latest welding operation (e.g. A/V,
welding time etc.)
10. MigaCARD
®
: Press this keypad to view
unique details about MigaCARD
®
.
11. Tack welding function: Press this keypad
for individual setting of tack welding.
12. Sequence welding: Press this keypad to
view number of sequences chosen.
Sequences are used for change between
your own parameters.
13.
Display of: Voltage (V), voltage trim (V +/-),
Arc adjust (-5 - +5) or gas flow
(extra equipment)
This is a quickguide to the most frequently used
features of the FLEX 3000 range. If you need
more information, please see our instruction
manual.
The FLEX 3000C/3000 DUO can be operated
from:
A) the primary control panel on the front cover
B) the inside panel at the card reader
C) the remote control through the torch
(extra equipment)
5
13
12
1
2
3
6
7 8
10
9
11
4
 Loading...