

Page 1

1
User Manual
This mobile phone is a perfect fruit combining scientific design of
human engineering theory and exquisite craftsmanship, its ingenious
streamlined body offers you comfortable grasp. A series of selected
functions show its extraordinary nobility , such as the perfect
combination of handwriting input and keyboard input function, brilliant
color screen, card holder type phonebook, calculator,
calendar/schedule management, clock/alarm clock,
entertainment/game, etc.
Some content in this manual may differ from the actual mobile phone
according to different software and network operators, and the mobile
phone shall prevail. In order to keep your mobile phone in its best
performance, please read this manual carefully.
Page 2

2
Contents
IMPORTANT SAFETY PRECAUTIONS .............................................. 8
1.INTRODUCTION TO USE ................................................................. 9
1.1 ILLUSTRATION OF THE MOBILE PHONE ........................................ 9
1.2.DESCRIPTION OF MAIN ICONS .................................................. 10
1.3.BACKLIGHT ............................................................................... 10
1.4.DESCRIPTION OF FUNCTION OF KEYS ...................................... 11
1.5. INSTALLATION OF THE SIM CARD AND BATTERY ...................... 14
1.6. INSTALL THE MEMORY CARD .................................................... 15
1.7.CHARGE ................................................................................... 15
1.8. PRECAUTIONS FOR BATTERY USE ........................................... 16
1.9.POWER-ON AND POWER-OFF ................................................... 18
2. OVERVIEW OF FUNCTION ........................................................... 20
2.1.CALL FUNCTION ........................................................................ 20
2.2. DOWNLOAD MUSIC, SONGS AND SHORT FILMS ........................ 22
2.3. PLAY THE MUSIC ...................................................................... 23
2.4. PLAY THE VIDEO ...................................................................... 23
2.5.TAKE DIGITAL PHOTOS .............................................................. 24
2.6. NETWORK VIDICON .................................................................. 25
Page 3

3
2.7. SPEEDY MUTE ......................................................................... 25
3. PHONEBOOK ................................................................................. 26
3.1. SPEEDY SEARCH ..................................................................... 26
3.2. OPTION.................................................................................... 26
4. MESSAGE ....................................................................................... 30
4.1. ESTABLISH MESSAGE .............................................................. 30
4.2.INBOX ....................................................................................... 31
4.3.DRAFT ...................................................................................... 31
4.4.OUTBOX ................................................................................... 31
4.5.SENT MESSAGES ...................................................................... 32
4.6. FOLDER ................................................................................... 32
4.7. DELETE MESSAGE ................................................................... 32
4.8. E-MAIL ..................................................................................... 32
4.9. CELL BROADCAST.................................................................... 33
4.10. TEMPLET ............................................................................... 34
4.11. SHORT MESSAGE BACKUP ..................................................... 34
4.12.MESSAGE SETTING ................................................................ 34
5. CAMERA ......................................................................................... 36
6. NETWORK SERVICE ..................................................................... 37
Page 4

4
6.1. NETWORK SERVICES ............................................................... 37
6.2. E-MAIL ..................................................................................... 38
7.MULTIMEDIA PLAYER .................................................................... 39
8.MSN .................................................................................................. 39
9.YAHOO!MESSENGER.................................................................. 39
10.FACEBOOK ................................................................................... 40
11.TWITTER ........................................................................................ 40
12.GAMES ........................................................................................... 40
13. MULTIMEDIA ................................................................................ 41
13.1. MUSIC PLAYER ...................................................................... 41
13.2. ALBUM ................................................................................... 42
13.3.VIDEO CAMERA ...................................................................... 42
13.4.VIDEO PLAYER ........................................................................ 43
13.5.RECORD ................................................................................. 44
13.6.FM TIMED RECORDING ........................................................... 45
14.CHAT APPLICATION .................................................................... 45
14.1.OPERA MINI............................................................................ 45
Page 5

5
15. APPLICATION............................................................................... 45
15.1 JAVA ....................................................................................... 45
15.2 JAVA SETTING ......................................................................... 45
15.3 JAVA DEFAULT SAFET .............................................................. 46
15.4 JAVA NETWORK ....................................................................... 46
16. ORGANIZER ................................................................................. 46
16.1. BLUETOOTH........................................................................... 46
16.2. CALCULATOR ......................................................................... 47
16.3. CALENDAR............................................................................. 47
16.4. TASKS .................................................................................... 48
16.5. ALARM CLOCK ....................................................................... 48
16.6. EXCHANGE RATE CONVERSION ............................................. 48
16.7. STOPWATCH .......................................................................... 49
16.8. E-BOOK ................................................................................. 49
16.9. WORLD TIME ......................................................................... 50
17. CLOCK .......................................................................................... 50
18. FM BROADCAST ......................................................................... 50
19. NETWORK SERVICE ................................................................... 51
19.1. STK SERVICE ........................................................................ 51
Page 6

6
19.2. DATA ACCOUNT ...................................................................... 51
19.3. AUTHORITY MANAGEMENT .................................................... 51
20. CALL CENTER ............................................................................. 52
20.1. CALL RECORD ....................................................................... 52
20.2.CALL SETTING ........................................................................ 53
21.FILE MANAGEMENT .................................................................... 55
22. USER PROFILES ......................................................................... 56
22.1. STANDARD MODE .................................................................. 56
22.2. CONFERENCE MODE ............................................................. 57
22.3. OUTDOOR MODE ................................................................... 57
22.4. INDOOR MODE ....................................................................... 57
22.5. EARPHONE MODE .................................................................. 57
22.6. BLUETOOTH MODE ................................................................ 57
23. SETTING ....................................................................................... 58
23.1. MODE SETTING ...................................................................... 58
23.2. MOBILE PHONE SETTING ....................................................... 58
23.3 TIMER SETTING....................................................................... 61
23.4. NETWORK SETTING ............................................................... 61
23.5. SECURITY SETTINGS ............................................................. 61
Page 7

7
23.6. OTHER SETTINGS .................................................................. 65
24. CHARACTER EDITING................................................................ 65
24.1. HANDWRITING INPUT ............................................................. 65
24.2. ENGLISH ................................................................................ 65
24.3. NUMERIC INPUT METHOD ...................................................... 66
24.4. PUNCTUATION ....................................................................... 66
24.5. SWITCH OF INPUT METHODS ................................................. 66
25. MOBILE PHONE TERMS ............................................................ 67
25.1. BASIC TERMS ........................................................................ 67
25.2. ABBREVIATIONS AND EXPLANATIONS ..................................... 68
26. MAINTENANCE AND CARE ....................................................... 69
27. SAFETY INFORMATION.............................................................. 71
28. COMMON FAULT DIAGNOSIS AND TROUBLESHOOTING ... 75
29. TOXIC MATERIAL DECLARATION OF ELECTRONIC
INFORMATION PRODUCT ................................................................ 78
30. SAR VALUE .................................................................................. 79
Page 8

8
Important safety precautions
Please carefully read the following guidance and obey these
rules for the prevention of risks or violating the law.
Keep traffic safety in mind
Be sure not to use a mobile phone without handsfree device;
please stop driving before using the mobile phone.
Safe power-on
Please obey special rules in related places. Please turn off the
mobile phone is places where the mobile phone is forbidden from
using, or where interference or danger may occur if the mobile phone
is used.
Be sure not to use the mobile phone at gas stations or near
places with combustibles and chemicals.
It may cause danger to operation of the plane, disorder the
wireless telephone network and violate the law to use the mobile
phone in the plane. Be sure not turn on the mobile phone in the
plane.
Please turn off the mobile phone in hospitals, especially near
medical devices.
Interference
Any mobile phone may be interfered by wireless radio wave,
thereby the performance of the mobile phone is affected.
Water resistance
Your mobile phone has no water resistance, please keep it dry.
Fittings and battery
Please use approved special fittings and battery.
Page 9
9
Connect with other devices
Be sure not to connect incompatible products. Please read the
related user manual of this device for detailed safety instructions.
Precautions for the use of the mobile phone display screen
Please prevent the display screen from water penetration, and
prevent the screen from being heavily loaded and being scratched by
pointed objects and other improper actions.。
Inspection service
Improper mobile phone installation or maintenance may cause
severe danger. Only qualified professionals can install or inspect your
mobile phone.
Precautions for children
Please keep the SIM, card, memory card and other small parts
out of reach for children, preventing them from swallowing or injuring
the eyes. (Children under 14 must not hang the mobile phone on the
neck)
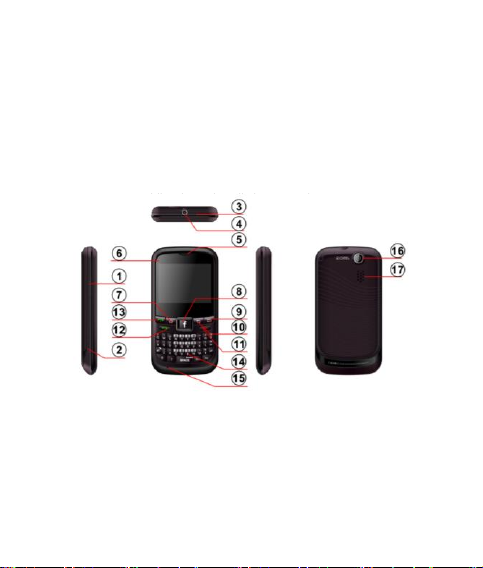
1.Introduction to use
1.1 Illustration of the mobile phone
1. Side key
2. USB socket, external
charger 2-in-1 jack
3. ON/OFF key/Lock key
4. Earphone jack
5. Receiver
6. Display screen
7. Left soft key
8. Five-direction navigation
9. SMS shortcut key
10. Right soft key
key
Page 10
10
11. End key
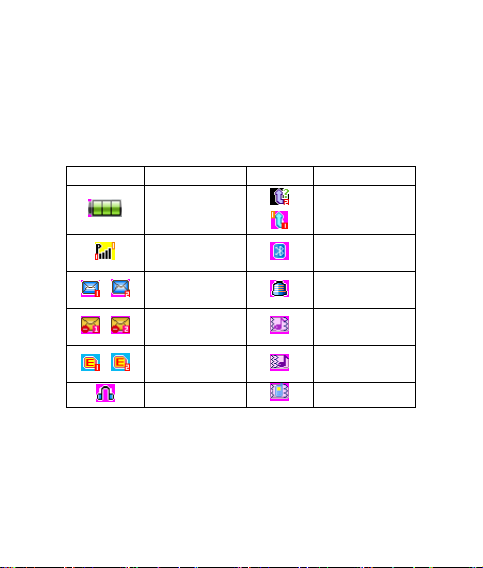
Icon
Description
Icon
Description
Battery
indicator
Missed call
Signal strength
indicator
Bluetooth
SMS
Alarm bell
(ON)
Multimedia
message
Vibration and
ring
GPRS
connected
Ring after
vibration
Earphone in
Vibration
12. Dial key of SIM card 1
13. Dial key of SIM card 2
14. Alphanumeric keyboard
1.2.Description of main icons
1.3.Backlight
The backlight is used to lighten the screen and the keyboard.
The backlight turns on automatically when you press any key.
The backlight turns off automatically if no key is pressed for a
15. Microphone
16. Camera
17. Loudspeaker
(This function takes effect when the keyboard is unlocked.)
Page 11

11
period of time, and the length of time is the time set by the
display screen backligh option.
1.4.Description of function of keys
1.4.1.Left and right soft key
In standby interface, press left softkey to menu, press right soft
key to phonebook.
In the secondary menu mode, they are used to select the
current menu and return to the previous menu.
1.4.2.Navigation key
On the standby interface, press the upper navigation key to
enter the shortcut function, press the left and right navigation
keys to roll the cursor and select the shortcut icons on the
bottom of the screen.
In the menu mode: press the upper, lower, left and right
navigation key to roll the cursor; press the middle key or the left
soft key to confirm entering this function menu or to execute
this function.
In the music playing mode:
Upper direction key: increase the volume.
Lower direction key: decrease the volume.
Left direction key: shortly press to change to the previous
music. Long press to skip backward.
Right direction key: shortly press to change to the next music.
Long press to skip forward.
Page 12

12
Middle key: pause/play the music.
In the video playing mode:
Left direction key: skip backward.
Right direction key: skip forward.
Middle key: pause/play the video.
1.4.3.Dial key
Dial key of SIM card 1 —— a call is dialed from SIM card 1after
inputting the number in the dial interface or pressing this key in
the phonebook list interface. Press this key in the standby
mode to display the call record of SIM card 1.
Dial key of SIM card 2 ——a call is dialed from SIM card 2 after
inputting the number in the dial interface or pressing this key in
the phonebook list interface. Press this key in the standby
mode to display the call record of SIM card 2.
Caution: when there is an incoming call, you can answer it by
pressing the SIM card key 1 or the SIM card key 2.
1.4.4.End key
End the call or refuse to answer an incoming call.
In other modes, press this key usually to return to the standby
interface.
1.4.5.Keyboard
1. Letter keyboard
In the text input mode, press this key to input all required letters
or to switch to the punctuations.
2. Numeric keyboard
Page 13

13
Input numbers and characters;
Numeric key “1”: if the voice mail center number is set,
long press this key on the standby interface to enter the
voice mail service center.
Numeric key “2~9”: if the speedy dial is ON, press any
key of 2~9” for above 2 seconds in the standby interface
to directly dial the preset phone number.
key;
In the text input mode, press this key to input all special
symbols and Chinese punctuations;
In the video playing mode, press this key to switch to the
display screen mode (horizontal screen or vertical screen).
# key;
On the standby interface, long press this key to switch
between the mute mode and the current mode.
1.4.6.ON/OFF key/Lock key
Long press this key to turn on or turn off the mobile phone.
Shortly press this key on the standby interface to lock the key.
1.4.7 Side key (S1, S2)
Adjust the key-press volume in the standby interface. Move
upward to increase the key-press volume; move dowanward to
decrease the key-press volume.
Adjust the ring volume during the incoming call ring. Move
upward to increase the ring volume; move dowanward to
decrease the ring volume. (Notice: this function takes effect
when the “any key” answer mode is OFF.)
Page 14

14
Adjust the call volume during a call. Move upward to increase
the call volume; move dowanward to decrease the call volume.
Adjust the volume in the music and video playing mode.
Roll the phonbook records in the menu mode.
1.5. Installation of the SIM card and battery
The SIM card contains your special information, such as the
mobile phone number, PIN (personal identification number), PUK
(unlocking password of PIN), PIN2, PUK2 (unlocking password of
PIN2) and IMSI number(international mobile subscriber identity) as
well as network messages, phonebook data and SMS data, etc.
Please consult your SIM card dealer if SIM card services and the use
methods have been provided. The SIM card dealer can be the service
provider, the network operator or other dealers.
1. Please be sure to turn off the mobile phone and disconnect
the mobile phone from the charger before taking out the
battery.
2. take out the battery; press the mobile phone battery cover
with hand and push it downward, then the battery can be
taken out.
3. Insert the SIM card into the SIM card slot and be sure that the
nook of the card is aligned with that of the card socket, and
the metal point of the SIM card contacts the mobile phone.
Reinstall the battery and lock the back cover of the mobile phone in
place.
Page 15

15
1.6. Install the memory card
If you need to extend the memory, you may extend the mobile
phone memory by installing an external memory card which is
convenient for storing more audio and video files. The memory card
capacity is generally includes: 128MB, 256MB and 512MBetc.
The methods and steps for installing the memory card are the
same as those of installing the SIM card. Insert the memory card into
the memory card slot of the mobile phone and insure that the nook of
the card is aiming to the nook of the holder, and the metal contact of
the memory contacts the mobile phone, finally lock it in place.
Notice:
1. Be careful while using, inserting or taking out the SIM card
or the memory card because the cards and their metal
contacts are quite easy to be scratched or damaged for
bending.
2. Please keep all SIM cards and memory cards out of reach
for children.
1.7.Charge
This mobile phone is charged with Li-ion standard chargeable
battery, and is equipped with a travel charger and battery charger.
Charge the battery with the charger alone:
Insert the battery into the charger, ensuring the barttery
contact is in proper contact with that of the charger.
Insert the charger into a standard AC power socket.
Please take the battery out of the charger after charging.
Page 16

16
Try to avoid using the mobile phone while charging for the
prevention of slowing down the charging time or causing other
risks:
After installing the battery into the mobile phone, insert the
charging plug of the travel charger into the mobile phone
charging jack.
Insert the charger into a standard AC power socket.
Please take dwon the travel charger from the socket and
the mobile phone after charging.
1. The rest capacity in the batery should be used up before using the
mobile phone for the first time, and the battery must be fully charged
and discharged for the first three times, namely: charge the battery for
10~12 hours every time to fully activate the battery and let its capacity
reach the maximum design value. It takes about 4 hours to fully
charge a fully discharged battery.
2. If the battery is charged when it is not in use for a long period of
time or the battery capacity is too low, the mobile phone can only
show the charging interface normally for some time after it is inserted
Notice:
into the charger.
1.8. Precautions for battery use
Do not use the mobile phone battery for other purposes.
Please use approved special battery and charger; do not use a
damaged or ineffective battery or charger.
Please charge the battery in time in case the capacity is used
Page 17

17
up, excessive discharge may damage your battery.
The battery may need to resume or approach the normal
temperature before charging. Both excessively high or low
temperature may affectr the charging performance.
The charging time of the battery relies on the rest battery
capacity as well as the types of the battery and the charger to
be used. It is necessary to cut off the power supply if the
charger is not used. The battery cannot be charged for over
continuous one week, excessive charge may shorten the
service life of the battery.
A new battery or a battery that is not in use for a long period of
time takes longer time to be charged.
The mobile phone network signal strength and parameters set
by the network operator may affect the call and the battery
standby time.
If not in use for a long period of time, the capacity of a fully
charged battery may gradually reduce.
The battery can be charged and discharged for huandreds of
times, but the battery may take a long time to be charged for
gradual wear and tear, this is normal.In case the use time (call
time and standby time) markedly shortens than the normal
case, you should purchase a new original battery or a battery
approved by this company. Fittings with inferior quality may
damage the mobile phone and be dangerous.
Do not place the battery in a too hot or cold place, it should be
kept in a room temperature as far as possible so as not to
Page 18

18
reduce the service life and the capacity of the battery. Even if
the capacity is full, the mobile phone might stop operating
temporarily due to overheat or over cold of the battery. When
the temperature is below 0℃ (32℉), the performance of lithium
battery is very limited.
Do not short the battery. For instance, if the standby battery is
placed in the pocket or the handbag, metal objects (coins or
pens) may connect the battery’s positive and negtive electrode
and result in unexpected short. Battery short may damage the
battery or the connection. In addition, any type of battery short
may cause serious results such as explosion, fire or personal
injury, etc.!
Please dispose the discarded battery in accordance with local
rules. Do not put the battery into fire for the avoidance of
danger.
1.9.Power-on and power-off
1. Power-on: long press the “ON/OFF key” un til the mobil e
phone turns on;
Power-off: in the standby mode, long press “ON/OFF
key” till the power-off picture appears.
2. If the mobile phone is ON without the SIM card inserted,
the mobile phone shall prompt you to insert the SIM card.
After it turns on with the SIM card inserted, the mobile
phone will automatically check if the current SIM card can
be used. If the SIM card cannot be identified, please
Page 19

19
check again if the SIM card is inserted into the SIM card
slot correctly.
3. When the mobile phone is ON, the display screen may
appear the following Prompt:
Input PIN code ---- if the mobile phone has opened the
SIM card lock, please input the correct PIN code and press
the “confirm” key. (Please refer to the instruction manual of
the SIM card)
Input the mobile phone password ---- if the mobile phone
has opened the password protection function, please input
the correct password and press the “confirm” key. (The
mobile phone password is preset as 1122 before delivery)
Find the network ---- the mobile phone will automatically
search the network and it will display the normal standby
screen after a suitable network is searched.
To change the language, please use the “setting→mobile phone
setting→language” menu option.
Notice:
Page 20

20
2. Overview of function
2.1.Call function
2.1.1.Make calls
Input the phone number in the mobile phone keyboard and
press the dial key.
Enter the “phonebook” menu to select the list and dial directly.
Dial from the call list directly: press the 【Dial key】on the
standby interface and it will display the recent call list, then
select the number and press the 【Dial key】once again.
Speedy dial: if the “speedy dial” function is turned on, activate
the simultaed dial keyboard of the display screen on the
standby interface and press any one of the numeric keys “2~
9” for above 2 seconds, and the phone number that has been
preset in the “speedy dial” list can be dialed directly.
Dial fixed telephone extensions: some fixed telephone
extensions cannot be dialed directly, you need to dial the
telephone exchange and then the extension number. Insert the
pause symbol “P” between the telephone exchange and the
extension and the mobile phone shall connect you to the
extension.
The use of pause symbol: area codeexchage
numberPextension numberdial key.
The input method of the symbol “P”: long press or continually shortly
press * key in the mobile pho9ne keyboard or the simultated dial
Prompt:
Page 21

21
keyboard of the screen till the symbol “P” appears.
Make international calls: you must input an international long
distance code before dialling when you make international calls
in any country. Namely you should input the international long
distance code_country code_area code_phone number in turn
and then you can dial. Specific operation: long [ress or
continually shortly press “*” key on the standby interface till “+”
symbol appears; then input the country code, the area code
and the phone number, then you can make international long
distance calls. 【+86 (China code) 755 (area code) 82720888
(fixed number)】
2.1.2 Answer calls
Incoming call display:
When there is an incoming call, the mobile phone screen will
display a corresponding message for prompt. If the call maker
can be identified, the screen will display the phone number or
name of the call maker.
Answer calls:
Answer with the key —— use the dial key or the left soft
key to “answer” an incoming call.
Answer with the earphone —— with the earphone
connected, the default st atus is “auto answer”. T he user
can also turn off the “auto answer” in the situation Dual
SIM settings and select to answer with the “answer” button
on the earphone connecting line.
Answer with any key —— in the “User profiles→personal
Page 22

22
setting→answer mode” menu, if “answer with any key” is
selected, you may press any key except the end key and
the “refuse” soft key to answer the call.
2.1.3.Use the handfree receiver
This mobile phone offers the function of handfree sound
amplification while talking. You may start this function after dialling so
that you can talk with hands free.
2.1.4 Voice mail
This mobile phone provides you with the function of voice mail.
After transferring the incoming call to the voice mail, the mobile phone
will receive a message reminding there is a voice message.
Notice: the voice mail center number must be preset!
2.2. Download music, songs and short films
This mobile phone provide the disk space with a certain capacity
and external memory card (optional), with which the user can
download and store music, songs and short video with the USB line,
the steps are as follows:
1. Connect the USB interface of the mobile phone to the
computer with the USB line attached to the unit.
2. When the mobile phone is ON, it will prompt the user to select
“storage device/network c amera/series interface”. After
selecting the “storage device”, the computer will identify th e
USB storage device. Now the computer will display two
mobile disks symbols that are respectively corresponding to
the built-in memory and the external memory of the mobile
Page 23

23
phone.
3. When the mobile phone is OFF, the mobile phone will
automatically connect with the computer and display the
connection picture with the USB connected.
4. The user can copy his/her favorite songs to My Music folder;
or copy the short video to Video folder.
5. Finally remove the mobile phone (U disk) from the computer
safely.
This mobile phone only supports music in MP3, WAV and MIDI format;
and short video in 3gp and MP4 format.
Notice:
2.3. Play the music
1. Enter the “music player”;
On the standby interface, select the shortcut icon of the “music
player”and press the confirm key to enter.
Enter the “music player”on the main menu interface.
2. Press the side key (upper, lower) or the upper/lower of the
five-direction navigation key to adjust the volume.
3. Control the music to play/pause, stop, play the previous one
and the next one with the five-direction navigation key.
2.4. Play the video
Enter the “Video player ” on the main menu interface and
select the short videos to play.
Page 24

24
2.5.Take digital photos
2.5.1 Camera
Enter the “camera” on the “Menu” interface and the mobile
phone enters the viewing mode.
Shortly press the optical mouse key in the display screen
viewing mode and the mobile phone enters the camera
photo-taking process.
Press the left soft to enter the “Option” menu to set relative
parameters of the camera.
Exit the photo-taking mode. You may press the end key or the
right soft key to exit.
The default saving path of photos is th e “photos” folder in the
mobile phone or the memory card and the default format is
“jpg”.
The photos can be downloaded to the computer with a USB
line and can be processed after being saved.
2.5.2 Video recorder
Enter the “Multimedia→video recorder” on the “Menu” interface
and the mobile phone enters the record viewing mode.
Shortly press the optical mouse key in the viewing mode to
ostart or pause recording.
Press the left soft key to enter the option menu to set relative
parameters of the video recorder.
Slide the optical mouse upward/downward/leftward/rightward
to adjust the camera focus and the viewing brightness.
Page 25

25
Press the right soft key to stop recording and select whether to
save the record.
Exit the recording mode. You may press the end key o rht
eright soft key to exit.
The default saving path of video editing is the “video” folder in
the mobile phone or the memory card and the default format is
“3gp”.
The video can be downloaded to the computer with a USB line
and can be processed after being saved.
2.6. Network vidicon
This mobile phone supports the networkk vidicon function. When
the mobile phone is ON, connect the mobile phone’s USB interface to
the computer with complimentary USB line and select the “Network
vidicon” on the mobile phone end. After PC r ecognizes the network
camera, you may acquire or transfer videos from various data
communication application software with this mobile phone. (Notice:
you may need to drive the program for this function)
2.7. Speedy mute
To switch to the mute mode speedily on the satndby interface,
long press the “#” key in the keyboard or enter the dial interface of the
touch screen to long press the “# ” key till 「mute mode」 message
appears, then the mopbile phone enters the muite mode and a
vibration icon appears on the top of the display screen.
Page 26

26
The phonebook of this mobile phone is managed using the
business card holder. You may store the mobile phone number,
family number, company phone number, e-mail, fax number and more
information with “phonebook setting”. You may directly dial, send
short messages or multimedia messages using the number directly,
and conduct a series operation for the selected phone number.
3.1. Speedy search
Input the first letter of the contact person name, and the interface
will search speedily after inputting and dsiplay the first matched
contact person, then you can roll the phonebook list with the upper
and lower direction key of the five-direction navigation key. You may
press the dial key to enter the calling mode.
3.2. Option
On the phonebook interface, when “add contact person” is
hightlighted, the “option” menu is as below:
1. Select
Set up a new contact person and set the storage path of the new
contact person.
2. Multi-mark: enter the multiple selection interface to conduct
operation such as Delete, copy, transfer, send message, etc. for
multiple files.
1. Phonebook setting
Prefered storage position——set the prefered storage posiiton
for a new contact person.
3. Phonebook
Page 27

27
Speedy dial——8 groups of speedy dial number can be set. If
the speedy dial function is ON, press any key of 2~9” for
above 2 seconds in the standby mode to directly dial the phone
numers set in the speedy dial list.
My business card——edit and send personal number details.
Other numbers——set this phone number, service number and
emergency number. The “service number” option can only
display when your SIM card supports the special dial number
(SDN). This number is provided by the network
operator,including the message mail box, telephone enquiry,
customer support and emergency service etc. (Please consult
the network operator for detail)
Storage status——check the space occupancy of the mobile
phone and the SIM card. The display format is: “used
capacity/total capacity”.
Copy contact person
From SIM card 1/ SIM card 2 to the mobile phone: copy
the phonebook data in SIM card 1/ SIM card 2 to the
mobile phone memory.
2. From the mobile phone to SIM card 1/ SIM card 2: copy the
phonebook data in the mobile phone memory to SIM card 1/
SIM card 2.
From SIM card 1 to SIM card 2: copy the phone book data
in SIM card 1 to SIM card 2.
From SIM card 2 to SIM card 1: copy the phone book data
in SIM card 2 to SIM card 1.
Page 28

28
Move contact person;
From SIM card 1/ SIM card 2 to the mobile phone: copy
the phonebook data in SIM card 1/ SIM card 2 to the
mobile phone memory.
From the mobile phone to SIM card 1/ SIM card 2: copy
the phonebook data in the mobile phone memory to SIM
card 1/ SIM card 2.
From SIM card 1 to SIM card 2: copy the phone book data
in SIM card 1 to SIM card 2.
From SIM card 2 to SIM card 1: copy the phone book data
in SIM card 2 to SIM card 1.
Delete all contact persons——delete all contact persons in the
mobile phone or the SIM card.
Phonebook import——import the phonebook data backuped in
the T card to the SIM card and the mobile phone.
Phonebook export——backup the phonebook data in the SIM
card and the mobile phone to the T card.
When “add contact p erson” is hightlighted, the “option” menu
is as below;
Check——check number details of the contact person.
Send message——send message to this contact person.
Call——dial this contact person.
IP dial—— dial thiscontact person with IP. If the “IP dial” prefix
number is set, the telephone phone will automatically add the
IP prefix number and dial; or it only makes calls as usual.
Edit——edit details of this call record.
Page 29

29
Delete——delete this call record from the phonebook.
Copy——if this call record is stored in the mobile phone, copy
this call record to the mobile phone; otherwise copy from the
SIM card to the SIM card.
Move——if this call record is stored in the mobile phone, move
thiscall record from the mobile phone to the SIM card;
otherwise move from the SIM card to the mobile phone.
Send contact person——send the number details of this
contact person in message, e-mail and Bluetooth.
Add to the blacklist——list this contact person in the blacklist.
Multi-mark: enter the multiple selection interface to conduct
operation such as Delete, copy, transfer, send message, etc.
for multiple files.
Phonebook setting.
Incoming call group
Classify the phone book data stored in the mobile phone into
different groups (family, friends…) and set the different parameters
according to the different groups (such as: group name, ring,
picture…). Enter the options and select “ Add the group” to add
members.
Page 30

30
“ “Message” is a network service. If your network supports this
service, you may send messages using the multimedia form of
“character” or “character+picture+voice+accessory”. You can send
the message to other mobile phone users or receive messages from
other mobile phone users.
4.1. Establish message
Write a short message and input the phone numer of the other
party.
Send: send the finished message.
Input method: switch the input method.
Add picture: add picture to the message edititing.
Add voice: add voice to the message edititing.
Add video: add video to the message edititing.
Add subject: add subject to the message edititing.
Page option: add a new page rearwards. Add a new page in
front.
Switch to the multimedia message: switch the message text to
the multimedia message.
Advanced option: insert a text sample. Insert an annex. Insert
the number of contact person. Insert the name of contact
person. Insert a bookmark.
Save: save the written message.
Detailed information.
4. Message
Page 31

31
4.2.Inbox
Check messages----enter the “Inbox” to display all current short
message list. Select the short message to be checked and
shortly press the optical mouse key to enter the current
message page, then scan all content of this message by sliding
the optical mouse upward and downward;
Edit the received short message——enter the “ option” m enu
and select Reply, Delete, Edit, Forward…andother operation.
When the mobile phone receives a new short message, the screen
will display the “unread message” status icon. If th e occupied space of
the short message is full, the mobile phone will not receive new
messages autopmatically. Therefore please delete unnecessary
Notice:
messages.
4.3.Draft
Enter this menu to check the saved and unsent multimedia
messages or short messages so that they can be modified and sent
for the second time.
4.4.Outbox
Enter this menu to check the unsent and saved short messages
in the SIM card and the mobile phone. You can conduct operation
such as Send, Edit and Delete, etc. for the short messages in the
outbox.
Page 32

32
4.5.Sent messages
Enter this menu to check all sent messages in the SIM card and
the mobile phone. You can conduct operation such as Send, Edit and
Delete, etc. for the short messages in the outbox.
4.6. Folder
It is used to store messages in the in box.
4.7. Delete message
It issused to delete various messages.
4.8. E-mail
This function enables the user to receive and send e-mails
through the mobile phone. (Please set the related parameters of the
e-mail in the mobile phone)
4.8.1. Send and receive
Send and receive e-mails.
4.8.2.Edit e-mails
Edit an e-mail and input the e-mail address of the other party.
4.8.3.Inbox
Enter this menu to check the received e-mails.
4.8.4.Outbox
Enter this menu to check the unsent and saved e-mails.
4.8.5.Sent e-mails
Select the “Save and sent”function after editting the e-mail, and
this e-mail shall be automatically backuped under the “Sent” menu
after being successfully sent.
Page 33

33
4.8.6 Draft
Enter this menu to check the e-mails saved in the draft box.
4.8.7 Clear the mailbox
Clear all e-mails in the mailbox.
4.8.8. Delete all marked e-mails
Delete all marked e-mails.
4.8.9. E-mail account
Set the related parameters of the e-mail, namely to edit the
setting archive, including: transfer setting, outgoing server setting,
incoming server setting, and signature archive.
4.8.10.Template
Enter this menu to directly select the preset common SMS
contents to send to the contact person. You may also edit and revise
the contents of the “common phrases”again.
The mobile phone can send, receive and read e-mails normally only
after it is correctly set and the “Setting archive”is selected.
Notice:
4.9. Cell broadcast
Cell broadcast is a service with which theh network operator
send various sorted real time and dynamic messages according to
the area and channel.With this function, your mobile phone will act as
a FM receiver and receive the channel content you are interested in
anytime andanywhere, enabling you to fully enjoy a new life of
communication. The difference is that it receives word message
whichh issued by the network operator. Please consult your local
Page 34

34
network operator for related available subject message.
Receiving mode——set the status of this mode.
Read messages——read the short messages of broadcast.
Language——set to receive the short messages of broadcast
in which language.
Channel setting——set related parameters of the channel to
broadcast short messages.
4.10. Templet
Enter this menu to directly select the preset common multimedia
message to send to the contact person, you can also edit and modify
the preset multimedia message.
4.11. Short message backup
Enter this menu to select messages which need backup.
4.12.Message setting
4.12.1 Short message
Dual SIM settings——you may set the mode name, short
message center number, short message valid period and
sending format in the submenu of each mode. The default
mode of the mobile phone is “mode 1”.
Voice mail——having applying for opening the voice mail, your
mobile phone may automatically transfer the incoming calls to
the voice mail if your mobile phone is busy or no answer or in
OFF mode. The caller can leave message according to the
prompt, and the mobile phone will receive a prompt on voice
message.You can set the voice mail number and listen to the
Page 35

35
voice message after entering the “voice mail” menu.
1. This function needs to be supported by the network operator, and it
is necessary to apply for opening this service before using.
2. The voice mail center number must be preset!
Status setting——turn on/off Send report, Reply path, Save
sent message.
Storage status——check the short message capacity in the
current SIM card and the mobile phone memory.
Prefered storage position——select the storage path of the
current message as the SIM card or the mobile phone.
Notice:
4.12.2.Multimedia message
Setting archive: Set related parameters of multimedia message
General setting: archive setting, edit setting, sending setting,
receiving setting and storage status.
The mobile phone can only normally receive and send multimedia
messages after correctly setting and selecting the “setting archive”
according to information provided by the network operator or the
Notice:
service provider.
Page 36

36
This mobile phone provides you with the function to take various
photos with “special effect”. You may set the flash parameter (50Hz or
60Hz) when you take photos indoors so as to eliminate the flash
stripes caused by AC light source.
Album: check photos in the album and make related settings
for the album or the photos.
Camera setting: shutter tone/exposure compensation/glitter
avoidance/shooting delay/continual shooting setting.
Photo setting: photo size/photo quality.
White balance: automatic / sunlight / tungsten lamp /
daylight lamp/cloudy day/incandescent light。
User profiles: automatic/night shooting mode.
Special effect setting;
Storage position: set the storage path of photos as the mobile
phone memory or the memory card.
Resume default values: restore all self-defined settings to the
system default status.
Prompt: refer to related introduction of section 2.5.1 for the above
specific operation.
5. Camera
Page 37

37
6. Network service
6.1. Network services
This mobile phone can log on all webpages compiled based on
WAP protocol with the built-in WAP browser, thus it can obtain
diversified information. (For instance: weather forecast, news, Ebooks,
games, picture rings…) Certainly, it is necessary to remind you: these
information could be chargeable, and the GPRS flow charge
produced by scanning WAP webpages needs to be paid to the
network operator.
Homepage——directly link to the set homepage. Select the
setting of the default homepage to set in the menu “set→edit
the setting archive”. W hile scanning the W AP webpages, y ou
may set your favorite webpage as the homepage via the menu
“option→set as the homepage”.
Bookmark——you may directly link to the webpage set with
bookmark. You may enter the “option” menu to s et th e
bookmark (go to, edit, delete, add new bookmark, set as the
homepage).
Webpage history——record the recently visited webpages,
enable you to directly continue scanning from the last end
position.
Saved webpages——check the saved website address.
Input address——link to a certain WAP webpage by directly
inputting the website address.
Service inbox——the WAP PUSH information received by this
Page 38

38
mobile phone.
Setting——set related parameters of WAP bowser.
6.2. E-mail
This function enables the user to receive and send e-mails
through the mobile phone. (Please set the related parameters of the
e-mail in the mobile phone)
6.2.1 Send and receive
Send and receive e-mails.
6.2.2 Edit e-mails
Edit an e-mail and input the e-mail address of the other party.
6.2.3 Inbox
Enter this menu to check the received e-mails.
6.2.4.Outbox
Enter this menu to check the unsent and saved e-mails.
6.2.5.Sent e-mails
Select the “Save and sent”function after editting the e-mail, and
this e-mail shall be automatically backuped under the “Sent” menu
after being successfully sent.
6.2.6.Draft
Enter this menu to check the e-mails saved in the draft box.
6.2.7.Clear the mailbox
Clear all e-mails in the mailbox.
6.2.8.Delete all marked e-mails
Delete all marked e-mails.
Page 39

39
6.2.9.E-mail account
Set he trelated parameters of the e-mail, namely to edit the
setting archive, including: transfer setting, outgoing server setting,
incoming server setting, and signature archive.
6.2.10.Template
Enter this menu to directly select the preset common SMS
contents to send to the contact person. You may also edit and revise
the contents of the “common phrases”again.
The mobile phone can send, receive and read e-mails normally only
after it is correctly set and the “Setting archive”is selected.
Notice:
The user can chat with friends instantly after starting MS
With this instant chat tool, you can start to chat with your friends
instantly.
7.Multimedia player
8.MSN
9.Yahoo!Messenger
Page 40

40
This is a social network service website which can be entered
directly by clicking.
11.Twitter
10.Facebook
This is a social network and micro-blog service website which
can be entered directly by clicking.
12.Games
This mobile phone provides you with intelligent and interesting
games.
Prompt: Please refer to the game instructions of the game for specific
Game setting: set the game sound effect, volume and vibration
effect.
operating methods.
Page 41

41
13. Multimedia
13.1. Music player
13.1.1.Play
Play the selected music.
13.1.2.List
Display the music files.
Play: play the currently selected music.
Detailed information;
Add to the ring bank;
Update the play list.
Setting:
Prefered list: select the read/storage path of the selected
playing material as the mobile phone or the memory card.
Automatically generated list: turn on/off the function of the
automatically generated song list.
List search directory:
1. All directories: namely search all executable music files in
the mobile phone and the memory card via the player.
2. Default directory: namely search the music files in the
defaulted designated folders in the mobile phone and the
memory card via the player.
Repeat: select the playing list as repeat single music or Repeat
all or turn off.
Random: the list that plays songs at random.
Background playing: turn on: continue playing music after
Page 42

42
exiting the music player interface. Turn off: automatically turn
off the playing music after exiting the music player interface.
Bluetooth setting: Bluetooth stereo output/Bluetooth stereo
earphone.
Lyric display: turn on/off the lyric display function.
13.2. Album
You may check photos in the album and make related settings for
the album or photos via the option menu.
1. Check: press the upper and lower side key or press the
upper and lower navigation key to scan the photos.
2. Scanning mode: list mode and matrix mode.
3. Send: send the photos to other places.
4. sed as: set the photos as wallpaper/screen saver/power-on
animation/ power-on animation/shutdown
animation/incoming picture.
5. Rename: change the photo’s name.
6. Delete: delete the currently selected photo.
7. Sort order: sort according to name, type, time and size, or
you may select “no order” to arrange at random.
8. Delete: delete all photos stored in the album.
9. Storage position: corresponding to the “Photos” directory, you
may select the mobile phone or the memory card as the
reading/storage path of the album.
13.3.Video camera
This mobile phone provides you with the function to take various
Page 43

43
short videos with “special effect”. You may set the flash parameter
(50Hz or 60Hz) when you shooting indoors so as to eliminate the
flash stripes caused by AC light source.
1. Video camera setting: set the white balance, exposure
compensation, night shooting mode, glitter avoidance and
related parameters of the video camera.
2. Video setting: set the quality parameters of the video
camera.
3. White balance: automatic / sunlight / tungsten lamp /
fluorescent lamp/cloudy/ incandescent light.
4. Special effect setting: set the menu effect of the video
camera.
5. Storage position: corresponding to the “Video” directory, you
may select the mobile phone or the memory card as the
reading/storage path of the short video.
6. Resume default values: restore all self-defined settings to
the system default statu
13.4.Video player
The “video player” can play short films shot by the user, it also
supports playing short films in MPEG-4 and 3GP format.
It is necessary to select the “mobile phone or the memory card” as the
reading path before playing short films.
Play: play this short film.
Send: send this short film with multimedia or Bluetooth mode.
Rename: change the name of the current short film.
Prompt:
Page 44

44
Delete: delete the currently selected short films.
Delete all files: delete all saved short films.
Sort order: sort according to name, type, time and size, or you
may select “no order” to arrange at random.
Storage position: corresponding to the “my video” directory, you
may select the mobile phone or the memory card as the
reading/storage path of the short video.
13.5.Record
The recording storage format of this mobile phone has two
optional formats: AMR and WAV.
The related settings are as below:
New record: start a new record.
List
Play: play the currentlty selected record.
Add: add new voice record to the currently selected record.
Rename: edit the name of the currently selected record.
Delete: delete the currently selected record.
Delete all files: delete all stored records.
Used as: send the currently selected record to the situation
Send: send the currently selected with multimedia or
•Setting: set the storage path of recording files (the mobile
phoe or the memory card), file format (format of recording
archives—AMR, WAV).
mode as prompt tone.
Bluetooth mode.
Page 45

45
13.6.FM timed recording
Enter this menu, turn on or turn off the FM timed recording
function and set the related parameter values, such as “recording
starting and ending time, channel setting, recording setting, etc…”.
The mobile phone will record FM informaiton automatically at the
preset time.
It is necessary to insert the earphone to support normal operation of
Notice:
the recording function.
14.Chat application
14.1.Opera Mini
With this free network browser, you can browse WWW and WAP
websites.
15. Application
15.1 Java
The user can achieve recreational activities through the JAVA
platform.
15.2 Java setting
Set to turn on or turn off the Java sound effect, backlight and
vibration adjustment. The setting group of SIM card.
Page 46

46
15.3 Java default safet
Set the safety property of a third party, distrust range, resume
default values and range options.
15.4 Java network
Select the setting archive for user setting, and the system
defaults value is selected by the system generally.
For the GPRS flow fee produced by accessing the internet while using
the product, the user has to pay through the operator.
Prompt:
16. Organizer
16.1. Bluetooth
This mobile phone provides the Bluetooth function. This function
enables the mobile phone to support the handfree device service,
earphone device service, serial port service, dial network service,
object transmission service, archive transmission service and
audio-visual remote control service.
It is necessary to set the function parameters before using the
Bluetooth function, and the steps are as follows:
Activate the Bluetooth.
This phone can be searched: whether to allow this phone
device to be searched by other device.
My device;
Search the Bluetooth device: search the new Bluetooth
Page 47

47
device.
Connect: enter this menu to turn on or disconnect the file
transmission service.
Equipment name: set the name of the Bluetooth device of
this phone.
Authorized setting: set inquiry connection, automatic
connection and refusing connection for the mobile phone
while connecting the Bluetooth device.
Delete: delete the selected device.
Delete all: delete all devices.
Service list: check the Bluetooth service record.
Search handfree device.
Name of the device of this phone: set the name of the device of
this phone.
Advanced options.
16.2. Calculator
Execute basic operations. Please see the software for usage
method.
16.3. Calendar
1. Check: check the current date.
2. Check all: check all proceedings (other, meeting, course).
3. Add proceeding: edit a new backlog and memo proceeding.
Add the date, time, memo and alarm clock of important
proceedings for the preparation of inquiry.
4. Delete proceeding;
Page 48

48
5. Skip to a designated date: check the calendar of the selected
designated date.
6. Skip to today;
7. Check by week: the calendar interface is displayed in week,
and you may check the schedule arrange of each week.
8. Lunar calendar: when the “lunar calendar” is ON, the calendar
will display the corresponding lunar calendar information of
each date.
16.4. Tasks
You may record backlogs and important proceedings in this
menu and set the date, time, cautions and alarm clock. You can also
set a series of prompt parameters if a prompt for memo is necessary
16.5. Alarm clock
This mobile phone provides the user to set five groups of alarm,
and the parameters are set as below:
1. Turn on/off: whether to select this alarm function.
2. Time: the start time of the alarm.
3. Alarm ring: FM broadcast, set the FM broadcast information
as the alarm ring; ring: set the built-in music as the alarm
ring.
4. Repeat: once only/everyday/self-defined.
5. Prompt type: vibration, ring, vibration and ring.
16.6. Exchange rate conversion
The conversion list for various currencies.
Page 49

49
16.7. Stopwatch
It can be used to calculate the time.
16.8. E-book
This mobil phone provides the user with the function of reading
eBooks on the mobile phone.
Open the E-book——roll pages using the upper/lower key or
the side key (eh upper/lower key) of the five-direction key after
opening the e-book; you may set the function parameters by
entering the “option” menu.
Update——update the e-book list.
System presetting——set the font, font size, page scrolling,
auto page scrolling, page scrolling speed, full screen, coding
method and reading path, etc. of the e-book.
Dletete——delete the currently selected e-book file.
Sort order——you may sort according to name, type, time and
size, or select “no order” to sort at random.
Execute the system presetting——resume each parameter
value of the e-book as the original set value of the system.
Help——application in the e-book of the shortcut function of
the numeric key 0~9.
1. This mobile phone only supports e-book files in TXT and PDB
2. The dafault reading path of the “e-book” is the “Ebook” folder in “My
document” of the mobile phone or the memory card, thereby please
Notice:
format.
Page 50

50
save the downloaded Ebook file into this folder, otherwise it can only
be used normally after entering “My document” menu.
16.9. World time
After entering this menu, you may scan each time zone city via
the world map and the date and time information of this city will be
displayed simulteneously. After entering the world time interface, you
may click the time zone or the left and right arrow of the city or press
the left and right navigation key, and the index line, time zone or city
name, time and date below will vary correspondingly with your
selection. When moving the index line, the time zone or city name will
vary correspondingly.
17. Clock
Turn on to check the current date and time.
18. FM broadcast
This mobile phone provides you with the FM broadcast
function, which enables you to listen to the broadcast any
time and anywhere.
Notice: this function can only work normally with the earphoe inserted.
Page 51

51
19. Network service
19.1. STK service
SIM Tool Kit is named “ST K” for short. It’s a network service
based on the SIM card short message service provided by each
network operator, its contents vary with different operator.
19.2. Data account
Set GMS data and GPRS account data. The mobile phone has
been internally set with the account data list of some service providers
before devilery. You may directly select them if the account data of
your service provider is included in this list; otherwise please add a
new account data to the list according to the information provided by
your service provider, then activate it from the “Edit the setting
archive” of the WAP scanner to enable the WAP browser and
multimedia function.
19.3. Authority management
DRM authority list is a place where the DRM encrypted file
authority are saved. Your mobile phone may save some DRM
encrypted pictures or rings, for encrypted files of CombinedDelivery or
SeparateDelivery type, their authority files will be placed in the
authority list uniformly.
DRM encrypted files are usually downloaded by the user through
payment. Therefore the DRM encrypted multimedia files will not be
used if they are deleted and it is necessary to buy the authority once
again. The self-contained pictures and rings of some mobile phones
are DRM encrypted for restricting forwarding.
Page 52

52
20. Call center
20.1. Call record
Enter this function menu to check all missed, dialed and
answered phone numbers and other related information in SIM card 1
and SIM card 2.
Check: display detailed information of the selcted number.
Call: dial the selcted number.
Send message: send message to the selected number.
Add to the blacklist: set the the selected number into the
blacklist.
Edit before calling: copy the current number to the dial plate.
Delete: delete the selected number.
Delete all: delete all dialed number.
Advanced options:
Call timing
Enter this menu to check the latest call time and the total
call time of all dialed/answered calls, you may also set all
total call time to zero.
Call charge
A. Last call charge: display the last call charge.
B. All call charge: display the total call charge up to now.
C. Reset the call charge: set the original record of call
charge to zero.
D. Charge limit: set the maximum limit of the total call
charge. If the current “charge limit” is exceeded while
Page 53

53
using, the mobile phone will automatically stop using
the consumption functions such as “dial out” and
“send message”, etc.
E. Price and rate: set related information of the call
charge.
Message counter
Add up the number of sent and received messages.
GPRS counter.
A.Last sent: display the number of data being sent last by
GPRS.
B.Last received: display the number of data being
received last by GPRS.
C.All sent: display the total number of data being sent by
GPRS.
D. All received: display the total number of data being
received by GPRS.
E. Clear the counter: set the total sent and received data
as zero in the counter.
20.2.Call setting
20.2.1 SIM card call setting
1. This phone number: set whether to display the number of
kjSIM card 1 while dialing.
2. call wait: turn on the call wait function, thus if there is another
incoming call while talking, teh call won’t be refucsed
immediately while the current call is remained.
Page 54

54
3. call transfer: set to transfer the incoming call to other telephone
under vrious situations.
4. call limit: set the limited incoming calls or dialed numbers.
5. Line switch: swich the used line of the call.
6. turn off the user group: edit and turn off the function of group
list.
20.2.2 Advanced setting
1. Blacklist: select to turn on or turn off this mode, and the blacklist
number can also be set.
2. White list: select to turn on or turn off this mode, and the white list
number can also be set.
3. Auto redial
After turning on this function, if the first dial is not through, the
mobile phone will automatically redial.
4. IP dial
5. Call time display
Turn on or turn off the call time display.
6. Call time prompt
Set the prompt time for call time.
7. Auto time limit
Set to turn on or turn off the time limit, the term is within (1~9999
seconds).
Page 55

55
“File management” is the storage management space of the
“mobile phone” and “external m emory card” provided for the user by
this mobile phone. It can be used to download
Music/video/picture/book and other files, or store important files using
My file.
1 .Open; Open My Music, E-book, Photos, Video and other
folders.
E.g. My Music: song folder;
Audio: recording folder;
Open——open the file;
Play: play the currently selected music file;
Send: select and send to the desitination according to the
file type; (multimedia, bluetooth)
Set up a new folder——set up a new folder under the
directory;
Rename: rename the file name;
Delete: delete the selected file;
Sort order——you may sort according to name, type, time
and size, or select “no order” to sort at random.
Multi-mark: single or multiple mark once. (E.g.: copy/delete
etc.)
Copy: copy this file to other folder;
Transfer; transfer this archive to other folder;
Delete all files: delete all sub-files in the current folder;
Detailed information: the generation time and size of the
21.File management
Page 56

56
file;
Set up a new folder——set up a new folder under the
directory;
Rename: rename the folder name;
Delete: delete this folder and all files under it;
Sort order——you may sort according to name, type, time
and size, or select “no order” to sort at random.
2. Format; clear all data in the disk and all archives in the
folder. (Remind: this function must be used carefully)
22. User profiles
The default mode of this mobile phone before delivery is the
standard mode. The user can self-define it as other mode on demand
and set related parameters of various modes.
22.1. Standard mode
Related settings are as shown below:
1. Ring setting: set the corresponding rings for incoming calls,
clarm clock, power-on, power-off, message and key.
2. Volume: volume setting for ring and key-press tone.
3. Prompt type: four modes: ring, vibration, vibration and ring
and ring after vibration.
4. Ring type: one sound, repeat or crescendo.
5. Other prompt tone: turn on or turn off the four prompt tone:
alarm tone, error, network link tone and call connection.
Page 57

57
6. Answer mode: set the answer mode for incoming calls as to
“open the cover to anwser” or press any key except the end
key and the “refuse” soft key to answer the call.
22.2. Conference mode
You may set the User profiles as the conference mode during the
conference.
22.3. Outdoor mode
You may set the User profiles as the outdoor mode.
22.4. Indoor mode
You may set the User profiles as the indoor mode.
22.5. Earphone mode
The mobile phone will utomatically enter the earphone mode
when the earphoe is inserted.
22.6. Bluetooth mode
After the mobile phone matches with other Bluetooth device
(Bluetooth handfree device such as the Bluetoothearphone) and set
up connection, the mobile phone will automatically enter the Bluetooth
mode.
1. This mobile phone supports the dual card function. Two SIM cards
can be inserted and be on standby simultaneously.
2. This mobile phone supports dual card dual standby function and
answers the incoming calls of both cards, but it can only answers the
incoming call from one SIM card at one time.
Notice:
Page 58

58
23. Setting
23.1. Mode setting
Dual mode ON: set the mobile phone to be on standby with
SIM card 1 and SIM card 2 synchronously.
SIM card 1 ON only: SIM card 1 is on standby only.
SIM card 2 ON only: SIM card 2 is on standby only.
Airplane mode: cancel the standby mode of any SIM card,
namely to cancel the conmmunication function of the mobile
phone (such as call, message……etc.) and provide the user
with other functions except the communication function while
on a plane.
1. This mobile phone supports the dual card function. Two SIM cards
can be inserted and be on standby simultaneously.
2. This mobile phone supports dual card dual standby function and
answers the incoming calls of both cards, but it can only answer the
incoming call from one SIM card at one time.
3. Due to the dual card dual standby function of this mobile phone, it
is necessary to select the corresponding SIM card from some menus
before continuing the further function operation.
Notice:
23.2. Mobile phone setting
23.2.1 Time and date
Set city; select the corresponding time zone and city of the
time and date.
Time/date setting
Page 59

59
Time: <HH:MM>, namely: <hour: minute>;
Date: <YYYY/MM/DD>, namely:<year/month/day>;
Daylight saving time: turn on/off.
Format setting;
Time format setting: include two mode: 12-hour system and
24-hour system;
Date format setting: multiple modes are optional.
Refresh time in accordance with time zone
Set time according the time zone of customer.
23.2.2 Language
The languages of the mobile phone interface, including English
and symplified Chinese. The system default is “symplified Chinese”.
23.2.3 Preferred input method
The input methods of the mobile phone are preset as “uppercsed
English, lowercased English , numeric input”, which can be selected
by the user.
23.2.4code method
Set the code method.
23.2.5 Standby menu display
Wallpaper——set the background picture of the standby
screen.
Screen saver——set the screen saver picture of the mobile
phone screen.
Power-on animation——set the power-on animation for the
mobile phone.
Page 60

60
Power-off animation——set the power-off animation for the
mobile phone.
Display of date and time——set whether the standby screen
displays time and date.
Display this phone number——set wherter the standby screen
displays the number of SIM card 1 and SIM card 2.
Clock type——set the clock type of the standby screen.
After the mobile phone turns on the funcion of “display this phone
number”, the number cannot be displayed on the standby menu;
please set your thie phone number in SIM card 1 and SIM card2!
Notice:
23.2.6 Subject
Set the subject style of the mobile phone.
23.2.7 Shortcut function
After selecting the fucntion option by entering this menu, the user
may set the shortcut function list on the option menu according to the
individual damands;
23.2.8 Auto update time
Set function of auto update time for the mobile phone. (This
function depends on whether the network operator provides this
function).
23.2.9 Other settings
LCD backlight: the backlight brightness and time of the mobile
phone display screen.
Page 61

61
23.3 Timer setting
Set the mode and time of power on/off, music and FM broadcast,
power on/off the function in the set time .
23.4. Network setting
1. Network selection
Set the mobile phone to select the network automatically
(recommended) or manually. If the auto type is selected, the
mobile phone may select preferably according to the network
in which the SIM card is located. If the manual type is
selected, the mobile phone can only work normally when the
network the same with that of the network operator which the
SIM is registered.
2. Preferred setting
Select to use the preferred network operator. The default
mode is the network in which the SIM is located currently.
Add from the list: display all PLMN lists.
Newly built: add a priority for network use.
Change priority: set the priority level of the network.
Delete: delete the curently used preferred network.
23.5. Security settings
23.5.1 Security settings of SIM card 1
1. SIM card 1 lock
This function can prevent the SIM card from being illegally
used if it is lost.
When this function is ON, it will prompt to input the SIM card
Page 62

62
password if this SIM card is used to turn on the mobile phone,
and this card can only be used when the correct passwordd is
inputted. This SIM card will be locked for three continual
wrong inputs of the password, and you will need to the
corresponding PUK code to unlock. The original password
and PUK code of the SIM card are provided by the network
operator.
2. Change password
Enter this menu to change the PIN and PIN 2 password of
SIM card 1.
23.5.2 SIM card 2 Safety setting
SIM card 2, change password, the relevant settings kee in
line with SIM card 1 safety setting.
23.5.3 Mobile phone lock
Lock the mobile phone manually. In case the mobile phone is
lost, this function will prevent the winner from using your
mobilephone. The preset password is: 1122.
23.5.4 Keyboard lock
Select to turn off the automatic keyboard lock or set the time
of the automatic keyboard lock.
23.5.5 Change password
Enter this menu to chenge the lock of the mobile phone to
unlock the password.
23.5.6 Certificate management
Authority certificate
Page 63

63
User certificate
23.5.7 Mobile phone tracker
This mobile phone has a certain business theftproof protective
function. When the theftproof tracing function of this mobile phone is
ON, the mobile phone may automatically send an alarm message to
the preset message receiver in case the mobile phone is turned on
with a replaced SIM card. The message-receiving number will restrict
a series function of this phone through remote control command, for
example “send the phonebook to the message-receiving number,
delete this phonebook, call record, short messages and other data,
turn off the function of answering incoming calls and dial and forbid
turning on the mobile phone”, so as to prevent others from stealing
the personal data in this phone and conduct some illegalities.
a) Setting
State: turn on or turn off the theftproof tracing function of this
mobile phone. After turning on the function, the mobile phone
will bind the current SIM card and the card slot.
If you need to replace other SIM card, you will have to
cancel this function before inserting a new card, or some
function of the mobile phone will be restricted.
If you haven’t cancel the theftproof function before inserting
other SIM cards, it will remind you “whether to bind the new
SIM card?” while turning on the mobile phone. If you select
“Yes” and input the correct password, the mobil ephone will
bind the current card slot and the current SIM card and the
restricted function will be released automatically; if you
Page 64

64
select “No”, some function will be restricted continually and
the menu of <Theftproof tracing>will be screend, only after
the user cancels the click and inputs the correct password
in the menu of <Business→individual privacy protection>,
will the restricted function be automatically released.
Message receiving number: set mobil ephone number that
receives the alarm prompt message.
2. Help: check detailed information of operation instrucitons
and remote control command.
1. The original password and unlock password of the theftproof
tracing function are all 1122, which is the same as the mobile
phone number. The password of theftproof tracing will change
with the change of the mobile phone password.
2. After executing the “Power-on prohibition” for this mobile
phone throough remote control command, it will display “The
system in power-on prohibition, please contact the owner!” and
remind you to “input the power-on command”. Only after
inputting the correct remote control command, will the mobile
phone be allowed to turn on; the closed function will return to
the normal use after the mobile phone is ON.
Prompt:
Protection of individual privacy
“Protection of individual privacy” is mainly a safety protection and
lock function for personal data. You may lock the data, phonebook,
my file, call record and the sandby interface with password. You may
select the data, phonebook, my file, call record to be locked with
Page 65

65
password at the same time, or separately select the standby interface
to be locked. The preset password is: 1122.
23.6. Other settings
LCD backlight: the backlight brightness and time of the mobile
phone display screen.
24. Character editing
24.1. Handwriting input
“Handwriting input” adopts advanced technology of
character identification which enables you to input English
and numeric information conveniently in full screen. You may
directly input by handwriting in any status that needs to edit
characters. Before inputting characters, it is necessary to set
the type of characters to be inputted by click “ABC”, “abc” or
“123” on the screen to switch the character type. The curs or
indicates the current input position. After inputting characters
in thehandwriting area, the screen will automatically display
the identified characters after a few seconds and display the
characters to be selected in the candidate zone.
24.2. English
“ABC”——uppercased letter input m ethod. “abc” ——lowercased
letter input method. Input lowercased English letters.
Page 66

66
24.3. Numeric input method
This input method ismainly used in the number input status. After
selecting the “numeric input method”,you may inp ut numbers at the
cursor. In other hand written Chinese input status, you may directly
repss the navigation key ater inputting characters to quickly input the
corresponding number of the pressed character to the cursor.
24.4. Punctuation
The symbol input is provided in each above input method; in the
character editing status, you may switch the character input and
symbol input with the “input method” in the simulated keyboard and
directly select the required symbol when the symbol interface appears;
press the “ ” key in the mobile phone keyboard t o enter the
symbol interface and seelct the required symbol.
24.5. Switch of input methods
In the character editing status, you may switch among all input
methods using thekfollowing methods.
Repeatedly press the “aA” key in the mobile phone keyboard till
the screen displays the indicating symbol of the required input
method;
i. Enter the “option” menu and select the required input method
from the input methos list
Page 67

67
25. Mobile phone terms
25.1. Basic terms
The following brief description of terms can help you understand
the main technical terms and abbreviations in this manual, so that you
can master each function of the mobile phone easily.
Network operator
Network operator is the company such as China Mobile or
China Unicom and the like.
Service provider
Service provider is the content provider, namely the
businesses which provide you with services relying on the network
operator’s channel. There are numerous ompanies like this, you can
inquire using numbers (or consult 10086), or consult with thenetworkk
services.
GPRS (General packet radio service)
This is a new non-voice addtion service that can send and
receive messages through the mobile phone network. GPRS can
ensure the subscribers of the mobile phone and the computer to link
to the internet any time and anywhere. This technology switches
mobile phone conenction and short message service (SMS) based on
the Global System for Mobile Communications (GSM) circuit.
GSM (Global System for Mobile Communications)
The internation standard mobile communicaiton system, it
ensures different network operators to be compatiable with each
other.
Page 68

68
SIM card (subscriber identity module card)
SMS
Short Message Service
MMS
Multimedia Message service
EMS
Enhanced Message Service
SIM
Subscriber Identity Module
The card is internally installed with a chip which is used to
memorize the required information for operating the mobile phone
(network, memory information and personal data of subscribers).
SDN (special service number)
This number is provided by the network operator, which is
mainly used in special services such as message inbox/call
enquiry/subscriber support as well as emergency services, etc.
Multi-party call
It provides the mobile phone user with the conference function
of talking with multiple parties at the same time.
Voice mail
This is a computerized telephone voice service, which enables
the mobile phone to automatically transfer an incoming call to the
voice mail when you cannot answer or you are not covinient to
answer the call.
Roam
Use the mobile phone in places other than the local service
area.
25.2. Abbreviations and explanations
Page 69

69
GSM
Global System for Mobile Communication
PIN
Personal Identity Number
PUK
PIN Unlocking Key
IMEI
International Mobile Equipment Identity
CB
Cell Broadcast
GPRS
General Packet Radio Service
26. Maintenance and care
This mobile phone is a product with excellent design and
craftmanship, please use it with care. The following suggestions will
helpp you use the warranty services effectively.
Keep the mobile phone dry. Rain, moisture and various liquids
may contain mineral substances that may erode the electronic
circuit. If the mobile phone is wet, please take off the battery
and reinstall it after the mobile phone is dried up completely.
Do not place the mobile phone is an extremely cold place,
otherwitse moisture may be produced inside the mobile phone
and damage the circuit board when its temperature raises to a
normal temperature.
Do not place the mobile phone is an extremely hot place, for
high temperature may shorten the service life of electronic
devices, damage the battery , deform or melt some plastic
parts and even cause explosion of the mobile phone.
Page 70

70
Try to avoid using or placing the mobile phone in dusty and
dirty environment for theprevention of damaging the removable
parts and electronic components of the mobile phone.
Avoid throwing, striking or vibrating the mobile phone. Treating
the mobiel phone rudely may damage the internal circuit board
and electronic components.
Do not clean the mobile phone with strong chemicals, abluent
or strong detergent.
Do not paint the mobile phone with pigments preventing the
pigments from shaping blocks in removable parts and affecting
normal operation.
Please clean the lens with a clean and dry soft cloth (e.g. the
display screen and the camera lens, etc.).
Only supportive or approved antenna can be used in
replacement. Unapproved antenna, remodified parts or fittings
may damage the mobil ephone and disobey related rules of
wireless device.
Please use the charger indoors.
Please backup necessary data (such as the memo and the
address book) before send your mobile phone to the authrized
maintenance agency for repair.
The above suggestions are identically applicable to your mobile
phone, battery, charger and various parts. In case any device
fails to work normally, please ask for maintenance in the
nearest authorized maintenance agency.
Page 71

71
Operating environment
Remember to obey the soecial rules in any place. Be sure to
turn off the mobiel phone in places where the mobile phone is
forbidden from using or it may cause interference or danger.
The same as other mobile wireless transmission device, it is
recommended to use the mobile phone only in normal
operating posiiton for the sakle of effective operation and
personal safety.
Some parts of the mobile phoone are magnetic. Metal objects
might be absorbed to the mobile phone. Please do not close
credit cards or other magnetic storage medium to the mobile
phone for the prevention of loss of the stored data due to
demagnetization.
Medical equipment
The operation for any wireless transmission equipment
(including the mobile phone) may interfere with improperly
protected medical equipment. If you have any question or
your are not sure if the mediacal equipment can screen
external radio frequency energy, please consult with the
doctor or the equipment manufacturer. Please turn off the
mobile phone in any place where it is stipulated expressly to
turn off the mobile phone. Hospitals or healthcare services
are probably using equipment sensitive to external radio
frequency energy.
1. Pacemaker
27. Safety information
Page 72

72
The manufacturer of pacemaker suggests keeping the
distance between the mobile phone and the pacemaker within
at least 15cm (6 inch), preventing the mobile phone from
interfering the pacemaker insidiously.
People using pacemaker:
Keep the distance between the mobile phone and the
pacemaker within at least 15cm (6 inch).
Avoid put the mobile phone in the pocket near the breast when
the mobile phone is carried;
Listen to the mobile phone with the ear that is not on the same
side with the pacemaker so as to reduce poential interference;
In case that you are suspiocious of potential interference,
please turn off the mobile phone immediately and move it far
away.
2. Audiphones
Some digital wireless telephones may interfere with some
audiphones. If interference occurs, you might need to consult
with your audiphoe manufacturer for resolution.
Automobile
The radio frequency signals may interfere with the improperly
installed or screened electronic systems in the automobile, for
instance: the electronic injection system, electronic anti-slip
(anti-lock) brake system, electronic speed control system and
the airbag system. For further information, please consult with
the manufacturer or the dealer of the automobile or any
additionally installed equipment.
Page 73

73
Only professionals can repair the mobile phone or install it in
the automobile. Improper installation or repair is dangerous
and might cause ineffective warranty of the mobile phone.
Please regularly check if all mobile phone devices in the
automobile are properly installed or work normally.
Do not store or transport the mobile phone and its parts or
fittings with flammable liquid, gas or explosives in the same
hold.
As for automobiles equipped with air bags, do remember that
great pressure may be above the air bag or in places where
may be occupied when the air bag expands. If the vehicle
wireless equipment is improperly installed, it may cause
serious damage when the air bag expands.
Places where explosion may occur
Please turn off the mobile phone in places where explosion
may occur, and obey all literal or graphic instrucitons.
The following situations are generally included:
1. Places in where the automobile engine is advised to
turn off.
2. Please turn off the mobile phone is gas stations.
3. Please obey the rules of restriction of the use of
wireless equipment in fuel depots, chemical plants or
places with explosion.
4. Clear markings are often (but not always) given in
regions with potential explosion, including: the
underside of the ship deck, chemical transport or
Page 74

74
storage facilities, automobiles powered by LPG
(propane or butane) and areas with chemical
substances or particles (such as granules, dust or
metal powder) in the air.
Emergency call
Important notice: the same as other mobile phones, this
mobile phone is operated using wireless signals, wireless and
ground network as well as the user-programmable function. In
view of this, there is no guarantee that the mobile phone can
be put through in all cases. Therefore the mobile phone
should not be relied on in realizing important communication
such as medical services. Most networks allow the user to
make emergency calls without the SIM card inserted.
Emergency calls should be made as below:
1. Please turn on the mobile phone first if it is OFF, and
check if the signal strength is enough.
2. Input the official emergency number of your country or
local place. (For instance: 110 or other official
emergency numbers), different countries may have
different emergency numbers.
3. If some functions are being used (such as bar dial etc.),
you must turn off these functions before making the
emergency call. Please refer to this document or the
local wireless service operator for details.
4. Remember to offer all necessary information as
accurate as possible while making an emergency call.
Page 75

75
At the scene of the accident, the mobile phone is the
Faults
Possible causes
Unable to
turn on
normally
1. The battery capacity is used up;(please
charge)
2. The battery is improperly installed;(please
reinstall)
Unable to
charge the
battery
normally
a) The battery is excessively discharged, it
can be charged after being connected with
the charger for a while;
b) The voltage differs from the marked range
of the charger;
c) A non-standard charger is being used;
(please use a supportive charger of this mobile
phone)
d) The battery is damaged or the battery is
out of service;(please replace the battery)
only communication tool, so it cannot be hanged up
randomly.
28. Common fault diagnosis and
troubleshooting
In case that some faults occur while using the mobile phone,
please refer to the following introduction firstly. If the problem still
cannot be solved, please resume the factory setting of the mobile
phone, or even contact the dealer or the service provider.
Page 76

76
Unable to
read the
SIM card
1. The metal surface of the SIM card is dirty;
(please wipe the SIM card clean with clean
cloth)
2. The SIM card is improperly installed; (please
reinstall the SIM card)
3. The SIM card is damaged; (please replace
the SIM card)
Bad
reception
a) Check the signal strength indication symbol
on the display screen. Five grids of this symbol
denotes a strong signal, and grids below 7
denotes a weak signal;
b) the wireless wave is unable to transmit to the
mobile phone in areas with bad signal
reception; (please move the mobile phone to
areas with good reception)
Unable to
make calls
1. This phone might be set as hidden, but your
network operator doesn’t offer this service;
(please cancel the setting of “hide the
number”)
2. Strong signal interference may exist
peripherally; or the mobile phone is being
used in high density time of call, and the
mobile phone cannot make calls normally
due to line jam;
3. The bar dial function is activated;
4. “Li ne 2” is activated, but your network
operator doesn’t offer this service; (please
turn off “line 2”)
Page 77

77
Unable to
link to the
network
1. The signals are too weak, or there is radio
interference peripherally;
2. If the SIM card is properly installed? Or is it in
bad contact or the SIM card is damaged?
Unable to
enter a
certain
service
menu
1. If the SIM card supports this service function;
(please consult your network operator for
details)
Only partial
standby
pictures can
be seen
The picture format is probably too large; (please
adopt pictures with the same recommended size
as the standby pictures of this mobile phone)
Unable to
open
multimedia
files
If this mobile phone supports the multimedia file
formats of books, music and short films?
Page 78

78
29. Toxic material declaration of electronic
Part
name
Hazardous substances or elements
Lead
(Pb)
Merc
ury
(Hg)
Cad
mium
(Cd)
Hexa
valen
t
chro
me
(Cr6
+)
Polyb
romin
ated
biphe
nyl
(PBB
)
Polyb
romin
ated
Diph
enyl
Ether
s
(PBD
E)
Mai
n unit
○ ○ ○ ○ ○
○
Batt
ery
○ ○ ○ ○ ○
○
Cha
rger
○ ○ ○ ○ ○
○
Fitti
ng
○ ○ ○ ○ ○
○
○:denote the concentration of this hazardous substance in all
homogeneous materials of this part is below the concentration
limit specified in SJ/T 11363-2006 “Requirements for
concentration limits for certain hazardous substances in
electronic information products”.
information product
Page 79

79
×:denote the concentration of this hazardous substance in at
least a certain homogeneous material of this part is beyond the
concentration limit specified in SJ/T 11363-2006, but this does
not indicate harm to people.
30. SAR value
The maximum of the electromagnetic radiation specific
absorption rate (SAR) of this product is 0.358W/kg, according with the
requirements of national standard GB21288-2007.
Note: the packing list shall prevail in the part number of the
mobile phone! Furthermore, if any difference between the standard
configuration in the instruction manual and the real product occurs
due to product upgrade of the manufacturer or other reasons, the
actual fucntion of the mobile phone shall prevail!
In terms of the GPRS flow charge produced by accessing the internet
in the use of the product, the user needs to pay to the operator.
This company reserves the right to upgrade the technology and the
product and to modify this manual without further notice.
This company reserves the sole right to the interpretation of this
manual.
 Loading...