

Page 1

user manual
Mi-Cam
It is important to read this user manual prior to using your new product for the time.
Page 2

Contents
Safety information
Important battery information ................................................... 3
Precautions for the player .............................................................3
Getting started
1. Content of the box ......................................................................4
2. Charging the battery ..................................................................4
3. Inserting microSD memory card ............................................4
4. Turning on the camcorder ......................................................4
General controls
Panel controls ....................................................................................5
Operation modes .............................................................................6
Video mode
Recording videos ..............................................................................7
Recording quality .............................................................................7
Quality settings ................................................................................. 7
Photo mode
Taking photos ....................................................................................8
Playback mode
Playing back recordings .................................................................9
Deleting
Deleting recordings .........................................................................10
Menu settings
Using the camcorder menu ..........................................................10
Menu options and settings .......................................................... 10
Connecting to external devices
Viewing videos on TV .....................................................................11
Recording videos to VHS tape or DVD ....................................11
Managing videos on your computer
Computer system requirements .................................................12
Connecting to a PC ..........................................................................12
Additional information
Tips and troubleshooting ..............................................................13
For your re
Service Information .........................................................................13
Technical
Copyright warning ...........................................................................13
cords ...............................................................................13
.................................................................13
2
Page 3

Safety information
CAUTION
RISK OF ELECTRIC SHOCK
THE LIGHTNING FLASH
AND ARROWHEAD
WITHIN THE TRIANGLE
IS A WARNING SIGN
ALERTING YOU OF
"DANGEROUS
VOLTAGE" INSIDE THE
PRODUCT.
SEE MARKING ON BOTTOM / BACK OF PRODUCT
WARNING: TO PREVENT FIRE OR
ELECTRICAL SHOCK HAZARD, DO NOT EXPOSE
THIS PRODUCT TO RAIN OR MOISTURE.
Important battery information
Warning: Your product contains a battery and
charging system which is designed to work in
temperatures that do not exceed 50
Leaving this product in a closed automobile or the
trunk of an automobile where temperatures may
exceed 50
damage, re, or explosion. Please remove your
product from the automobile when you exit, do not
place your product in the trunk of your automobile,
and do not leave your product in any location where
temperatures may exceed 50
°C may result in permanent battery
DO NOT OPEN
CAUTION: TO REDUCE THE
RISK OF ELECTRIC SHOCK,
DO NOT REMOVE COVER (OR
BACK). NO
USER-SERVICEABLE PARTS
INSIDE. REFER SERVICING TO
QUALIFIED SERVICE
PERSONNEL.
°C.
THE EXCLAMATION
POINT WITHIN THE
TRIANGLE IS A
WARNING SIGN
ALERTING YOU OF
IMPORTANT
INSTRUCTIONS
ACCOMPANYING
THE PRODUCT.
°C (122°F).
Use only the specic chargers which were
packaged with the product. Use of another
charger may present a risk of re or explosion.
Precautions for the player
• Do not use the unit immediately after
transportation from a cold pla
condensation problems may result.
• Avoid shock to the unit.
• Do not store the unit near re, places with high
temperature or in direct sunlight. Exposure to
direct sunlight or extreme heat (such as inside a
parked car) may cause damage or malfunction.
• Do not expose to rain or moisture.
• Do not operate or store unit in places with
frequent static electricity or electrical noise (e.g.
speaker, TV set).
• Clean the unit with a soft cloth or a damp
chamois leather. Never use solvents.
• The unit must only be opened by qualied
personnel.
ce to a warm place;
3
Page 4
Getting started
To start using your camcorder, please follow the
setup instructions in the following pages.
1. Content of the box
• MI Camcorder
• AC/DC adapter
• USB cable
• AV cable
• Carrying case
• Wrist strap
2. Charging the battery
• Please charge the battery for at least 3 hours
before
• Charging is faster when the camcorder is
switched
• The battery can also be charged by connecting
to a PC with a USB cable. Refer to page 12 for
more information.
use.
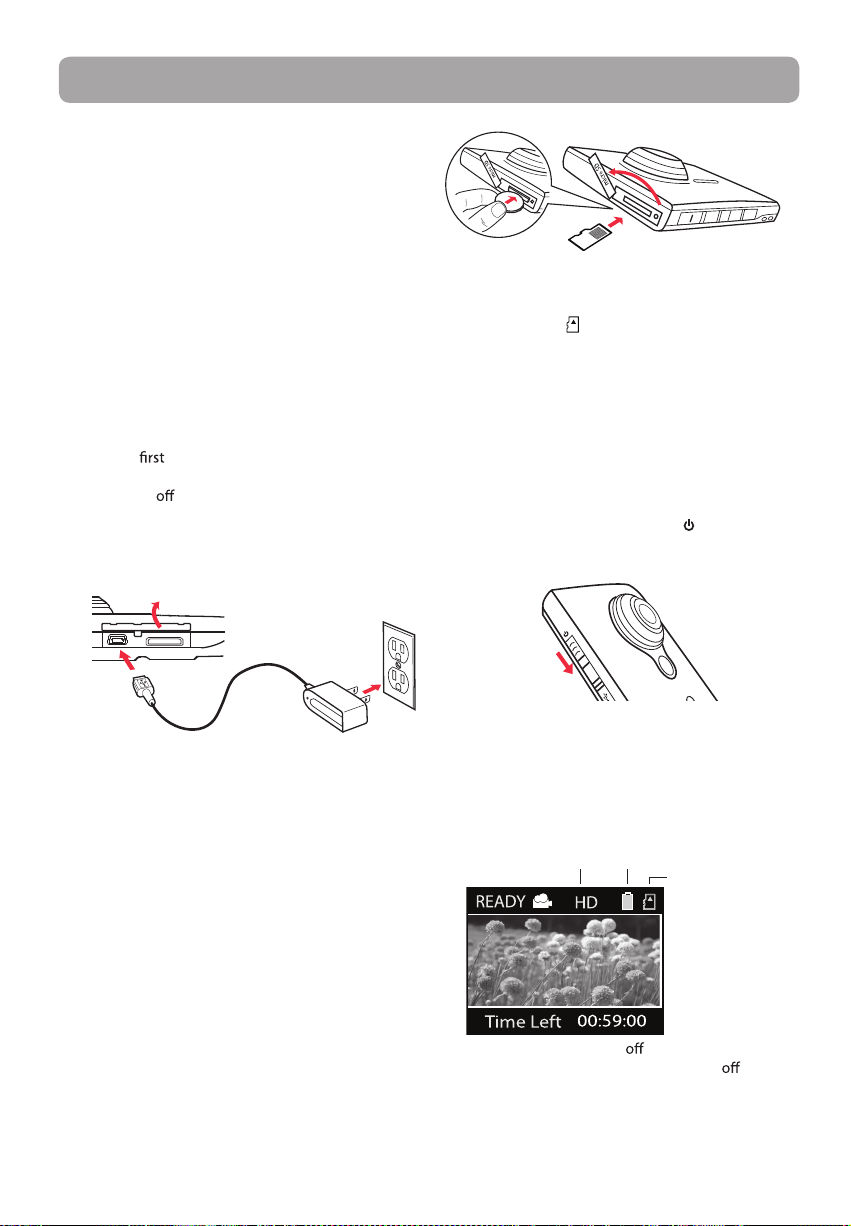
.
Lift up the cover
Lift up the cover
Push the card in
As the memory card is small in size,
it is recommended to use a small
coin to help insert or remove it.
until a click is heard
• The card icon ( ) appears on the screen with
memory card inserted.
• To remove card, push card in until a click is
heard, then slowly release the card. As card is
under minimal tension when locked in memory
slot, please use care when removing.
• Once microSD memory card is inserted, new
recordings will be saved on the memory card.
4. Turning on the camcorder
• Slide and hold the power switch until the
camcorder turns on.
Slide and
hold
Use only the provided AC/DC charger
3. Inserting microSD memory card
• A microSD memory card (not supplied) is
recommended for recording as the camcorder
internal memory will only permit minutes of
recording time.
4
• It is recommended to set the date and time
before using the camcorder. Refer to "Menu
settings" on page 13 for more information.
• "Ready" shows on the LCD screen when the
camcorder is ready for recording.
Recording quality
Battery indicator (recharge
when the icon is empty)
Memory card
indicator
• Repeat this step to turn the camcorder.
• The camcorder will automatically turn
after 2
minutes if not in use.
• Refer to the following pages for more
information on recording and other operations.
Page 5

General controls
Panel controls
microSD card slot (Lift up the cover to show the card slot)
Recording indicator
Microphone
Lens
switch*
USB and HDMI video output
(Lift up the cover to access
the connectors)
Camcorder strap hole
AV output
Video quality
selector
* To reset the camcorder (if it is not functioning properly):
Slide and hold the On/O
switch for more than 10 seconds.
Playback/pause
Setup menu
Recording
Audio speaker
LCD screen
Delete
recordings
Take photo
+/– – Volume (during playback) or zoom
/ – Previous or next recording; fast
rewind or forward
5
Page 6

General controls
Operation modes
There are three basic modes for operating the camcorder: Video, Photo and Playback. The camcorder will
always enter into Video mode after switched on. Refer to the diagram below for switching between modes
and read relevant sections in the user manual for detailed operations.
Switch on
Press
PHOTO
Video mode
(read page 7)
Press RECORD
stop video recording
Press RECORD
RECORD
to start/
Press PLAY/PAUSE
Playback mode
(read page 9)
Photo mode
(read page 8)
Press
Press PHOTO to
take photos
Press PHOTO
6
Page 7

Video mode
Recording videos
1. In Video mode ( ), press the red RECORD
button to begin recording.
Video mode
• If you are not in Video mode, press the red
RECORD
and then press the button again to begin video
recording.
• While recording, the red recording light on the
camcorder front turns on.
2. Press PLAY/PAUSE to pause a recording.
button once to enter Video mode ( )
Video recording indicator
Elapsed time
• A pause indicator II replaces the red
left corner of the screen.
• To resume recording, press PLAY/PAUSE.
3. Press + or – to zoom in or out before or during
recording.
4. Press the red RECORD
recording.
button to stop
at the top
Recording quality
• Slide the Video Quality selector to select the
recording quality. The selected setting (HD,
Sports or webQ) appears on the display screen
during recording.
• Refer to the table below for more information on
quality settings.
Light conditions can greatly aect the
quality of your videos. You can set to
optimize the performance of the
camcorder under dierent light sources.
Refer to "Menu settings" for more information.
Quality settings
Settings Recommended for: Resolutions (pixel) and
HD (High
nition mode)
Sports (Sports
mode)
webQ (Web
Quality mode)
* Actual recording time and capacity will vary depending on type of video content being recorded, system
requirements, and other factors.
Viewing on TV & Best video
quality
Viewing on TV & Capturing
fast movements
Uploading to and viewing
on the web
Fram Rate (FPS)
1280 x 720 @ 30fps 8 hours
848 x 480 @ 60fps 8 hours
320 x 240 @ 30fps 40 hours
Approx. recording
durations on a 16GB
memory card*
7
Page 8

Photo mode
Taking photos
1. In Photo mode ( ), press PHOTO to take photos.
Photo mode
• The resolution of the photos is 8.0 mega pixel*.
• If you are not in Photo mode, press PHOTO once
to enter Photo mode (
button again to take photos.
2. After taking photos, press the red RECORD
button to exit Photo mode (
Video mode (
* 8 mega pixel is extrapolated from 5 mega pixel
sensor.
) and then press the
) and return to
).
You must return to Video mode ( )
before recording videos.
8
Page 9

Playback mode
Playing back recordings
1. Press PLAY/PAUSE to enter Playback mode and
start playback of the most recent recording
(video/photo).
Playback indicator
Press and hold PLAY/PAUSE for three
seconds to play all recordings.
2. Press + or – during playback to adjust volume
(video only).
3. Hold down
selected video during playback.
Fast forward indicator
Current le number/Total number of les
Elapsed
playback time
or to fast rewind or forward the
Elapsed
playback time
4. Press PLAY/PAUSE to pause playback.
• Press PLAY/PAUSE again to resume playback.
Pause indicator
Remaining
playback time
5. To select another video, press or to cue the
previous or next video.
Type of le
(Video/Photo)
Current le number/Total number of les
Duration of
current le
6. Press the red RECORD button to return to
Video mode (
playback has nished, Video mode (
) or if no video is selected after
) will
resume after 5 seconds.
• You may also press PHOTO to go to Photo mode
) after playback.
(
9
Page 10

Deleting
Deleting recordings
1. Press DELETE and the last recording and
“DELETE ?” appear on the screen.
• To select another video, press or to cue the
previous or next video.
2. Press and hold DELETE until the selected video
is deleted.
Menu settings
Using the camcorder menu
1. Press MENU to show the camcorder menu on
the screen.
2. Press + or – to highlight a menu option.
LIGHTING
TV OUTOUT
DATE
TIME
Press Menu
to Save and Exit
AUTO
NTSC (US)
2009-01-01
12:00 PM
To delete all videos, press & hold
DELETE for 3 seconds and then repeat
step 2.
Menu options and settings
Menu options Available settings
Lighting Auto, Outdoor, Indoor, Low light
TV Output NTSC (US), PAL
Date YYYY - MM - DD
Time HR : MM
Language English, Spanish, French
3. Press to enter the highlighted menu option.
4. Press + or – to change the setting.
LIGHTING
TV OUTOUT
DATE
TIME
to Save and Exit
Press Menu
AUTO
2009-01-01
12:00 PM
5. Press to exit the current menu option.
6. Press MENU to save settings and exit the
camcorder menu.
10
version
rmware
Page 11

Connecting to external devices
Viewing videos on TV
1. Plug in the AV cable (provided) – Insert the single
connector end into the camcorder (AV jack) and
connect the double connector ends to the
corresponding video (yellow) and audio (white)
input jacks on the TV.
2. Turn on the TV and the camcorder.
3. Switch the TV to the selected video input.
• Refer to your TV manual for instructions.
4. You may play and delete videos viewed on the
TV by using the camcorder buttons.
The default TV output standard is NTSC.
You can switch it to PAL standard by
going to the camcorder menu. Refer to
"Menu settings" for more information.
Recording videos to VHS tape or DVD
1. Plug in the AV cable (provided) – Insert the
single connector end into the camcorder and
connect the double connector ends to
corresponding video (yellow) and audio (white)
inputs of the recording device ( VHS or DVD
recorder).
2. Turn on the camcorder and the recording device.
3. Switch recording device to the video input
connected to the camcorder.
• Refer to your user manual of the recording
device for instructions.
4. Start recording of your recording device and
press and hold PLAY/PAUSE on the camcorder
for 3 seconds to play all videos on the camcorder.
For best viewing or recording quality,
use the HDMI connector on the left
panel of the camcorder with an HDMI
cable (not included).
11
Page 12

Managing videos on your computer
Computer system requirements
• Windows® XP with Service Pack 2 or Windows
Vista™
• USB Port (2.0 recommended)
• Internet Access (broadband recommended)
• 16-bit color video card
• Mac®: Mac OS® X version 10.4.11 or later. To view
videos on your Mac, copy the video
computer and use Quicktime® for viewing
(plugin may be required)
PC Hardware:
• Pentium 4, 800 MHz or better
• At least 512MB system RAM
• Video card with 64 MB of RAM (128 MB
recommended)
to your
Connecting to a PC
1. Open the USB cover.
2. Connect the supplied USB cable to the
connection jack.
• USB connector standard: mini-B
3. Connect the other end of the cable to the
computer.
Lift up the cover
USB port of
your computer
• Certain video codecs required to
view videos on a PC are licensed
under GPL Version 2. Please refer
to www.gnu.org/licenses/oldlicenses/gpl-2.0.txt
The AVI recorded by the camcorder
complies to the H.264 standard.
USB cable
* Available for free download at www.microsoft.com
Windows is a registered trademark of Microsoft Corporation in the United States and other countries.
12
Page 13

Additional information
Tips and troubleshooting
Cannot turn on the camcorder.
• Make sure the battery is not empty. Refer to the
user manual to properly charge the camcorder
before use.
MicroSD card cannot be detected by camcorder.
• Make sure the microSD card is inserted properly.
Remove and insert the card from the card slot
again when the camcorder is powered
Camcorder not turned on after connected to PC
or AC/DC adapter.
• The camcorder battery may be very low. Slide
the power button to turn on the camcorder after
connected to PC or AC/DC adapter.
Cannot record videos.
• Make sure the memory space is not full for
recording.
Available time for recording has
reduced.
• Make sure you have properly selected the video
recording quality before recording.
The recording time and date are incorrect.
• Make sure you have properly set the date and
time in the setting menu. Refer to "Menu
settings" for more information.
The keytone is annoying. Can it be switched
• Yes. Refer to "Menu settings" for more
information.
No sound when playing back recordings.
• Adjust the volume by pressing + or – during
playback.
.
ntly
Cannot view recorded video on PC
Intall the H.264 driver from the memory of the
camcorder to your computer.
For your records
Keep your sales receipt for proof of purchase to
obtain warranty parts and service.
In the event that service should be required, you
may need both the model number and the serial
number. In the space below, record the date and
place of purchase, and the serial number:
Model No.
Date of Purchase
Place of Purchase
Serial No.
Service Information
This product should be serviced only by those
specially trained in appropriate servicing
techniques. For instructions on how to obtain
service, refer to the warranty included in this Guide.
Technical
Product: Digital Camera Recorder
Brand: MI
Model: MI-Cam
Electrical Consumption: 3.7V Lithium battery
Copyright warning
This player is for your personal use only.
Unauthorized recording or duplication of
copyrighted material may
of third parties and may be contrary to copyright
laws.
infringe upon the rights
Pictures are distorted when videos are played
back via connected TV set.
• Make sure you have correctly selected the TV
output system (PAL or NTSC) from the setting
menu. Refer to "Menu settings" for more
information.
Can I retrieve deleted videos?
• Unfortunately, deleted videos cannot be
retrieved.
The camcorder is not functioning properly.
• Slide and hold the On/O
10 seconds to reset the camcorder.
switch for more than
13
 Loading...