

Operating instructions
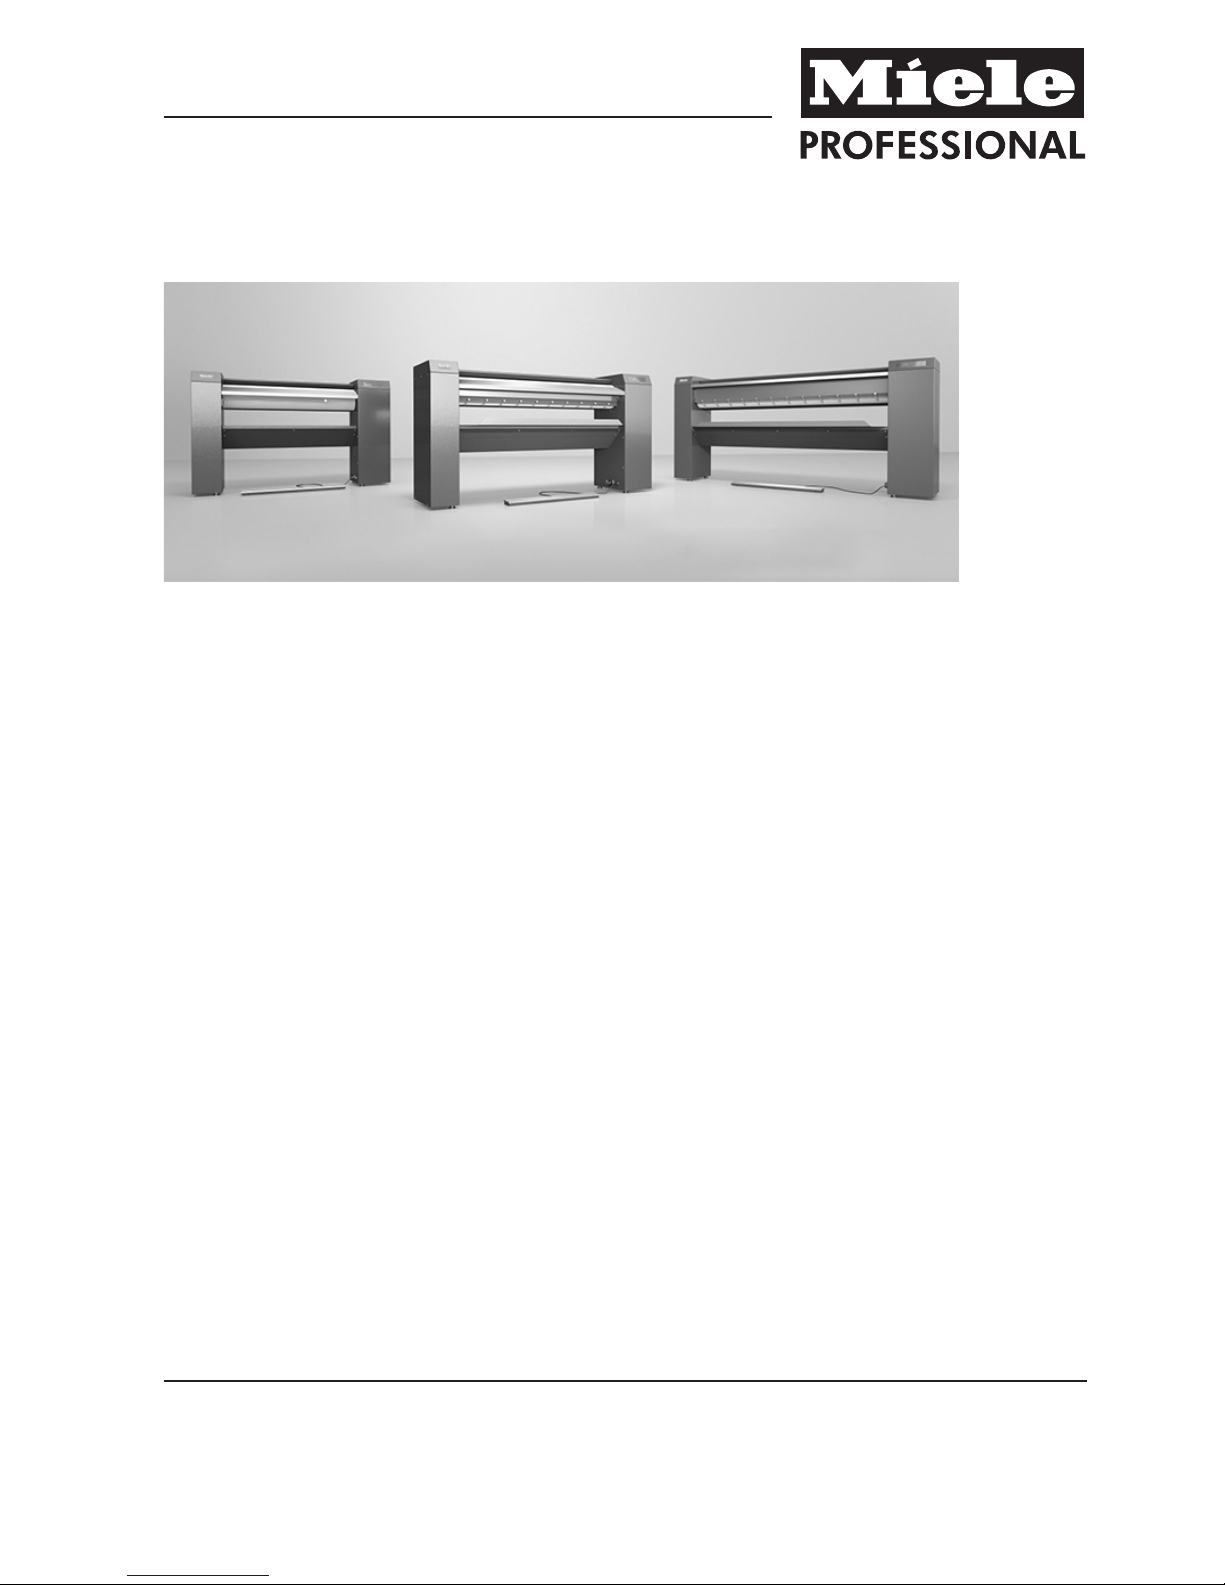
Commercial flatwork ironer
PM 1210
PM 1214
PM 1217
To avoid the risk of accidents or damage to the
appliance, it is essential to read these
instructions before it is installed and used for the
first time.
en-AU, NZ
M.-Nr. 10 026 131

Contents
2
Caring for the environment ................................................................................................4
Warning and Safety instructions........................................................................................5
Correct application................................................................................................................ 5
Technical and electrical safety ............................................................................................. 5
Operation............................................................................................................................... 6
Using accessories ................................................................................................................ 6
Notes on the use of this flatwork ironer ............................................................................... 6
Guide to the appliance........................................................................................................8
Touch display ........................................................................................................................ 9
Display symbols .................................................................................................................. 11
Finger guard ........................................................................................................................ 12
Swing out bar ...................................................................................................................... 13
Flexible laundry feed for throughfeed or return feed........................................................... 13
Using for the first time ......................................................................................................14
Cleaning and waxing the heater plate before first use........................................................ 14
Operation............................................................................................................................15
Preparing the laundry .......................................................................................................... 15
Residual moisture........................................................................................................... 15
Preparing for use................................................................................................................. 15
Ironing.................................................................................................................................. 15
Ironing temperature ........................................................................................................ 16
Setting the temperature.................................................................................................. 16
Changing the preset temperature for a temperature selection button........................... 16
Selecting the ironer speed ............................................................................................. 16
Setting the ironer speed ................................................................................................. 17
Changing the preset roller speed for a roller speed selection button ............................ 18
Laundry feed .................................................................................................................. 18
Pauses in ironing ............................................................................................................ 19
Standby mode................................................................................................................ 19
FlexControl foot switch .................................................................................................. 19
Pick-off bands ................................................................................................................ 19
After ironing......................................................................................................................... 20
Ironing with a coin-operated payment system .................................................................... 20
Notes ..................................................................................................................................21
Changing the temperature unit (°C / °F).............................................................................. 21
Favourites setting ................................................................................................................ 21
Avoiding no-load operation ................................................................................................. 21
Power failure during ironing................................................................................................. 21
Peak load / Energy management (optional) ........................................................................ 21
Fault messages ................................................................................................................... 22
Cleaning and care .............................................................................................................23
Cleaning the heater plate .................................................................................................... 23
Starting the cleaning programme................................................................................... 23
Cleaning with the cleaning cloth .................................................................................... 24
Waxing the heater plate....................................................................................................... 25
Waxing using the waxing cloth....................................................................................... 25
Roller padding ..................................................................................................................... 26

Contents
3
Removing the roller cover .............................................................................................. 26
Fitting the roller cover..................................................................................................... 27
Miele Professional Service .................................................................................................. 27
Caring for the environment
4
Disposal of the packing material
The transport and protective packaging has been selected from materials which are
environmentally friendly for disposal, and can normally be recycled.
Recycling the packaging reduces the use of raw materials in the manufacturing process
and also reduces the amount of waste in landfill sites. Ensure that any plastic wrappings,
bags etc. are disposed of safely and kept out of the reach of babies and young children.
Danger of suffocation.
Disposing of your old appliance
Electrical and electronic appliances often contain valuable materials. They also contain
specific materials, compounds and components, which were essential for their correct
function and safety. These could be hazardous to human health and to the environment if
disposed of with your domestic waste or if handled incorrectly. Please do not, therefore,
dispose of your old appliance with your household waste.
Please dispose of it at your local community waste collection / recycling centre for
electrical and electronic appliances. You are also responsible for deleting any personal
data that may be stored on the appliance prior to disposal. Please ensure that your old
appliance poses no risk to children while being stored prior to disposal.

Warning and Safety instructions
5
Please read these instructions carefully before using the flatwork ironer for the first time.
They contain important information on the safety, use and maintenance of the flatwork
ironer.
This prevents both personal injury and damage to the appliance.
If other persons are being shown how to operate the flatwork ironer, they must be given
these important safety instructions and/or be made aware of them.
Keep these instructions in a safe place and pass them on to any future owner.
Correct application
This flatwork ironer must be used as described in these instructions and must be checked
on a regular basis to make sure it is functioning correctly. Maintenance must be carried out
when necessary.
This flatwork ironer must only be used for ironing articles which were washed in water
and which have a care label stating that they are suitable for machine ironing.
This flatwork ironer is intended for use in commercial settings. This appliance is not
designed for domestic use. If the flatwork ironer is operated in a publically accessible
place, it is the operator's responsibility to ensure suitable measures are in place to protect
users from any source of risk or danger.
This flatwork ironer is not suitable for outdoor use.
Technical and electrical safety
This flatwork ironer should not be operated in the same room as dry-cleaning equipment
using perchloroethylene or solvents containing CFCs.
This flatwork ironer should only be operated in a suitably dry room.
Only operate this flatwork ironer when all removable outer panels are in place so that it
is impossible to touch an electrical component or moving part.
Do not damage, remove or bypass the safety components or control elements of this
flatwork ironer.
Do not make any alterations to the flatwork ironer unless authorised to do so by Miele.
If the controls or the electrical cabling insulation have been damaged, this flatwork
ironer must not be used until it has been repaired.
Repairs and other work by unqualified persons could be dangerous. The manufacturer
cannot be held liable for unauthorised work. Repairs may only be carried out by a Miele
authorised service technician.
Faulty components must only be replaced by genuine Miele Original spare parts. The
manufacturer can only guarantee that the machine fully complies with safety requirements
when Miele replacement parts are used.
The electrical safety of this flatwork ironer can only be guaranteed if connected to a
correctly installed earthing system on site. It is most important that this standard safety
requirement is present and tested regularly and, where there is any doubt, the on-site
electrical system should be tested by a qualified electrician. Miele cannot be held liable for
damage or injury caused by the lack of or inadequacy of an effective earthing system.

Warning and Safety instructions
6
This flatwork ironer is only completely isolated from the electricity supply when switched
off at the mains circuit breaker or it is switched off at the wall socket and the plug is
withdrawn from the socket (if applicable).
Operation
This flatwork ironer must not be operated unsupervised.
This flatwork ironer is not intended for use by persons (including children) with reduced
physical, sensory or mental capabilities, or lack of experience or knowledge, unless they
are supervised whilst using it or have been shown how to use it in a safe way and
understand and recognise the consequences of incorrect operation.
Please supervise children in the vicinity of the flatwork ironer and do not let them play
with it.
In the heated state and with the heater plate contacting the roller, there is a serious risk
of burning if the edge of the heater plate on the laundry output side is touched.
Do not set the ironing temperature higher than the temperature given on the care label of
the item you intend to iron. The laundry could ignite if the ironing temperature is set too
high.
When ironing double layered items, do not reach in between the layers to straighten out
the fabric. This is extremely dangerous as you may not be able to extract your hands in
time. The same applies when ironing garments with pockets.
The flexible laundry feed mechanism (depending on model) must only be operated from
the front.
Ensure the room in which the flatwork ironer is being used is sufficiently lit.
Keep the working area around the flatwork ironer free from clutter.
Always keep a fire extinguisher accessible in the rare event of textiles igniting. Items
which are unsuitable for ironing or which have not been washed in water can catch fire.
Using accessories
Accessory parts may only be fitted when expressly approved by Miele. If other parts are
used, warranty, performance and product liability claims will be invalidated.
Coin operated ironers must be anchored to the floor by the supporting feet to prevent
the risk of the machine tipping.
Notes on the use of this flatwork ironer
Only responsible people over the age of 16 years who have been fully trained in the use
of the flatwork ironer should use the infeed table.
When working with the flatwork ironer, always wear close fitting clothes and keep long
hair tied back. Wide sleeves, apron straps, scarves and ties etc. could be taken in by the
roller.
Remove rings and bracelets before ironing.

Warning and Safety instructions
7
Smooth out folds as far away from the infeed on the infeed table as possible. Feed
pillow cases and duvet covers into the ironer with the open end first. Do not take hold of
the corners from the inside. Do not take hold of straps or ties etc. from the inside of
garments.
Check daily that safety devices are correctly set. This flatwork ironer must only be used
if all safety features are functioning correctly. This way you will avoid the danger of burns,
squashed fingers and even loss of hands.
Before switching to reverse, make sure that nobody is endangered.
If other persons are being shown how to operate the flatwork ironer, they must be given
or made aware of these important safety instructions.
Pass these instructions on to any future users/owners of the flatwork ironer.
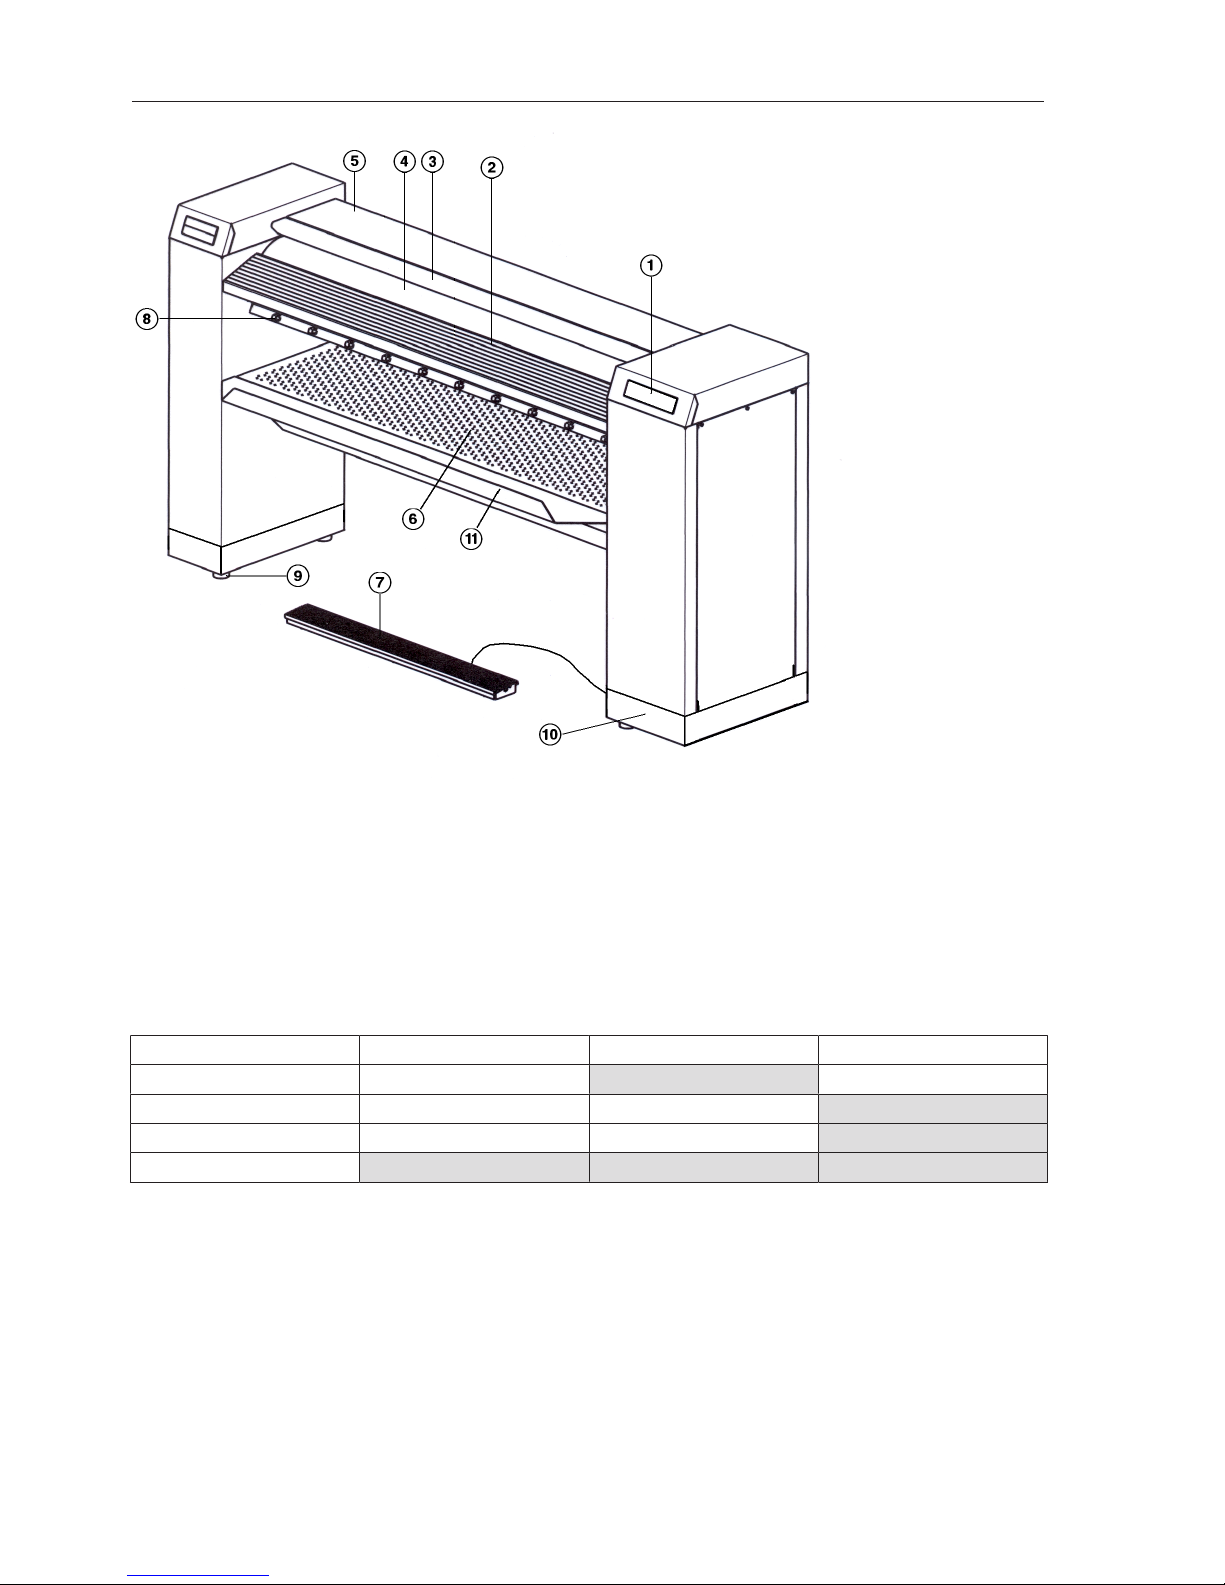
Guide to the appliance
8
a
Control panel (touch display)
b
Infeed table
c
Finger guard
d
Roller
e
Heater plate with cover
f
Laundry outfeed table
g
FlexControl foot switch
h
Pick-off bands
i
Height-adjustable screw feet
j
Plinth (optional)
k
Laundry box
Option PM 1210 PM 1214 PM 1217
Swing out bar X
Flexible laundry feed X
Leaf-spring padding X
Plinth X X X
Guide to the appliance
9
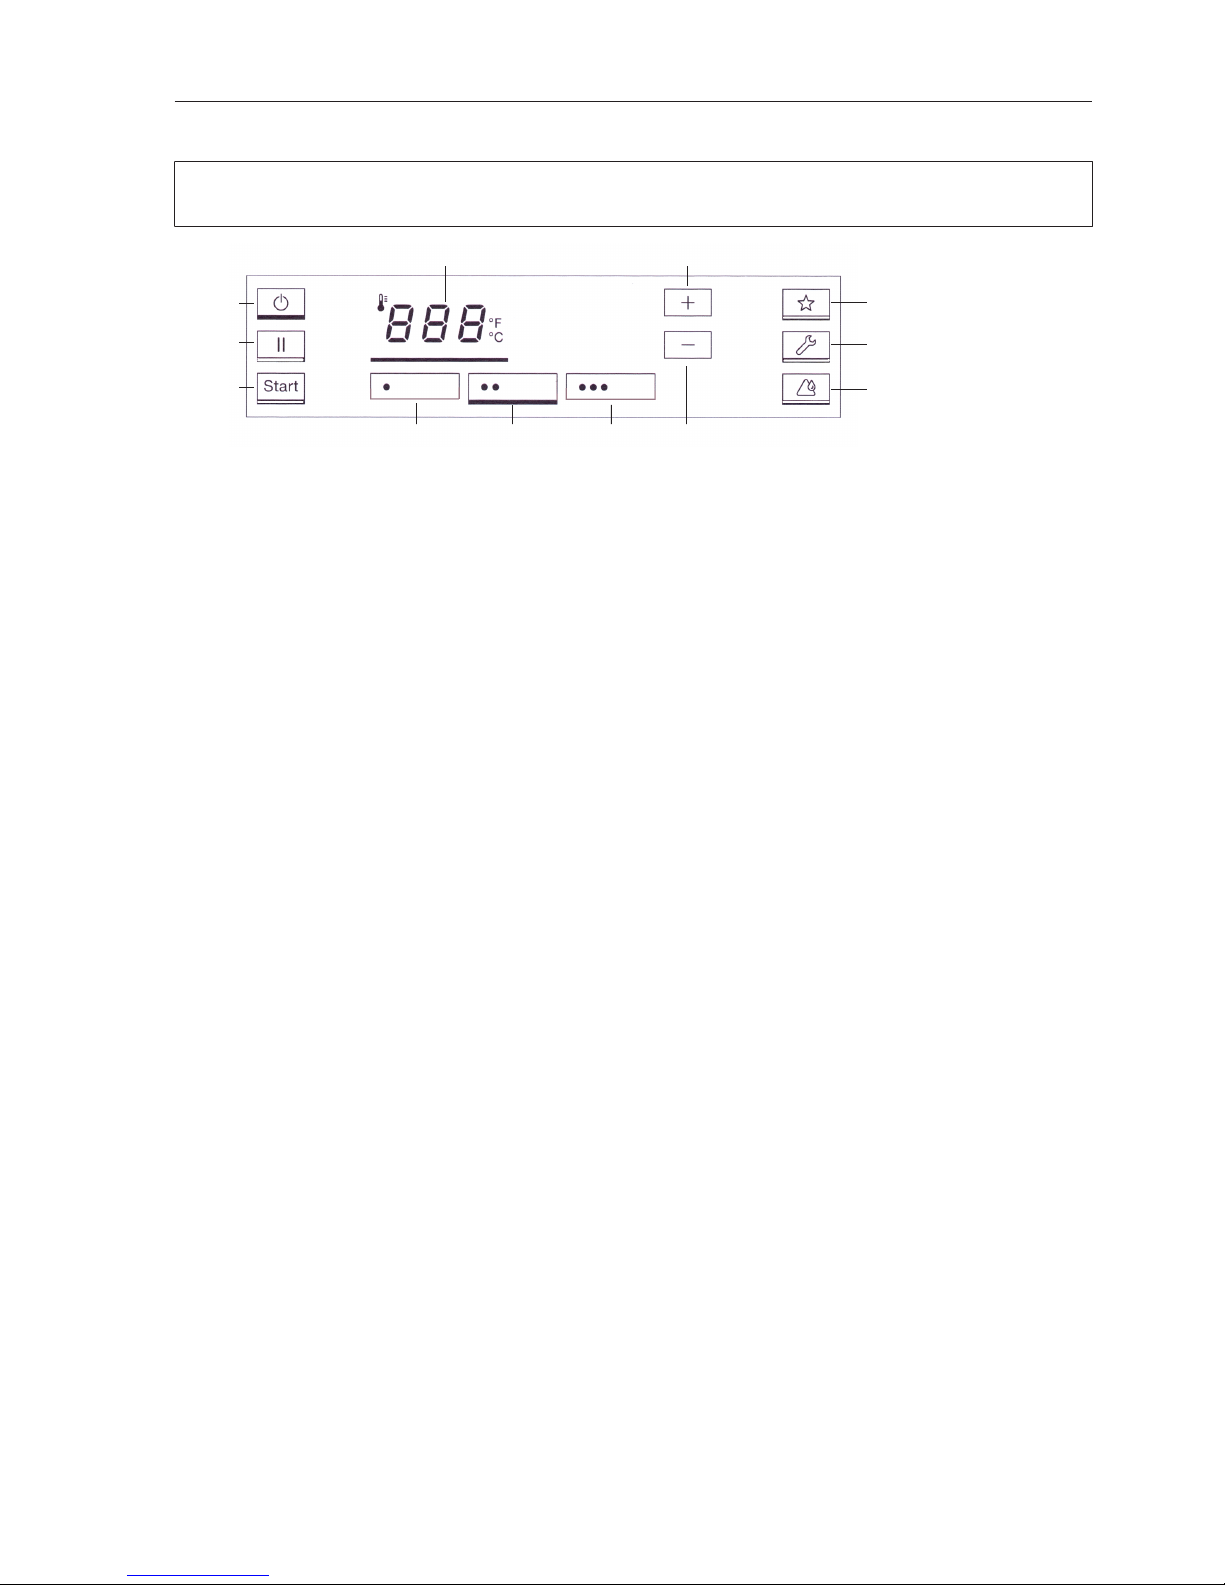
Touch display
The buttons on the touch display can be activated by a light touch with the finger. When a
button is pressed, it is highlighted with a bar underneath.
Display in temperature selection mode
a
Button
For switching the flatwork ironer on and
off.
b
Button
For pausing the ironing process.
c
Button
For starting the ironing process. Button
flashes when the ironing process can be
started.
d
Button
Temperature selection mode
e
Temperature selection button
For nylon and rayon fabrics.
f
Temperature selection button
For woollen and silk fabrics.
g
Temperature selection button
For cotton and linen fabrics.
h
Button
For increasing the ironing temperature.
i
Button
For decreasing the ironing temperature.
j
Button
Favourites setting
k
Button *
Maintenance position for carrying out
maintenance work. Press and hold the
button for at least 3 seconds to activate
or deactivate.
*depending on the model, this button is
displayed or hidden
l
Button
Function for cleaning and waxing the
heater plate. Press and hold the button for
at least 3 seconds to activate or
deactivate.

Guide to the appliance
10
Display in roller speed selection mode
a
Button
For switching the flatwork ironer on and
off.
b
Button
For pausing the ironing process.
c
Button
For starting the ironing process. Button
flashes when the ironing process can be
started.
d
Button .
For switching to roller speed selection
mode.
e
Roller speed selection button
Low speed range
f
Roller speed selection button
Medium speed range
g
Roller speed selection button
High speed range
h
Button
For increasing the roller speed.
i
Button
For decreasing the roller speed.
j
Button
Favourites setting
k
Button *
Maintenance position for carrying out
maintenance work. Press and hold the
button for at least 3 seconds to activate
or deactivate.
*depending on the model, this button is
displayed or hidden
l
Button
Function for cleaning and waxing the
heater plate. Press and hold the button for
at least 3 seconds to activate or
deactivate.

Guide to the appliance
11
Display symbols
1
Prompt to activate the finger guard
2
Heating on / temperature increasing
3
Service indicator for cleaning and waxing
4
Heating off / temperature decreasing
5
General fault
6
or
Constant laundry feed on left or right side
7
Pre-selection and temperature display in
°C/°F
8
Pre-selection and roller speed display
9
//
Roller speed range
10
Coin operation mode
11
°C/°F
For switching between temperature
units °C or °F.

Guide to the appliance
12
Finger guard
The finger guard is a safety feature which must be checked daily for proper functioning
before the machine is used.
Risk of injury due to lack of finger guard function!
A malfunctioning finger guard function can lead to serious injury.
Shut down the flatwork ironer immediately.
Contact Miele without delay.
Ensure that the flatwork ironer is not put into operation by other persons and draw
attention to the potential hazard.
The ironer will only switch to the normal operating mode if the finger guard has been
activated properly after switching on the ironer. Otherwise, the ironer will switch off again
after a short period of time.
Activate the finger guard once when the symbol flashes in the display.
If finger tips get between the roller and the finger guard, the roller is stopped immediately
and the heater plate is withdrawn. If this happens, the symbol will light up constantly.
The ironer can be turned on again by pressing the button.
While the ironer is operating, do not use the finger guard intentionally to interrupt the
ironing process.
Always interrupt the ironing process by pressing the button.

Guide to the appliance
13
Swing out bar
(Optional accessory for PM 1214)
Ironed laundry can be placed over the swing out bar to prevent creasing.
Flexible laundry feed for throughfeed or return feed
(Optional accessory for PM 1217)
The flexible laundry feed mechanism enables laundry to be fed through to the back of the
ironer for removal. It is particularly suitable for larger items of laundry such as sheets/duvet
covers or table cloths.
The flexible laundry feed for the reverse removal of laundry should be applied only
from the front.
Do not touch the edge of the heater plate. Danger of burning!

Using for the first time
14
Cleaning and waxing the heater plate before first use
Before using for the first time, the heater plate must be cleaned and
waxed (see “Cleaning and care”).
Clean the heater plate by passing through a Miele cleaning cloth
along the entire width of the roller.
Then wax the heater plate with an ironer waxing cloth and ironer
wax. Use the wax sparingly.

Operation
15
Preparing the laundry
Residual moisture
For a good result and optimum ironing performance the laundry
should have the following residual moisture levels, depending on
model:
PM 1214, PM 1217: 15-25% residual moisture
PM 1210: 15% residual moisture
The ideal residual moisture level depends on the composition of the
fabric.
Preparing for use
Switch on the on-site mains switch.
Press the button to switch on the flatwork ironer.
The red symbol will flash in the display.
Activate the finger guard by lifting it.
The ironer switches to the normal operating mode.
The ironer is only ready to use if the finger guard has been activated
properly. Otherwise, the ironer will switch off again after a short
period of time.
The red symbol will appear in the display and the flatwork ironer
will heat up.
Ironing
After switching the flatwork ironer on, wait until it has reached the
minimum ironing temperature.
The button begins to flash as soon as the minimum temperature
has been reached.
The flatwork ironer is ready for operation when the set temperature
is reached and the symbol no longer appears in the display.
Now press the flashing button to start up the flatwork ironer.
The ironing process can begin.
Useful tip: Allow the roller to rotate for about 5 minutes to enable the
heat to equalise between the heater plate and the roller.
Danger of burning on the edge of the hot heater plate!
There is a warning sticker on the heater plate housing to warn of
the danger of burning.

Operation
16
Ironing
temperature
Select the temperature according to the type of fabric.
Fabric Symbol Temperature Preset value
Nylon/rayon
100 - 110 °C 110°C
Silks/woollens
111 - 150 °C 125°C
Cottons/linens
151 - 185 °C 180°C
Temperature selection buttons
The temperature can be selected either by using the temperature
selection buttons or the and – buttons.
If a higher ironing temperature is reduced to a lower temperature, the
flatwork ironer must be allowed to cool down first. This will turn off
the heating of the ironer. The red display symbol will indicate that
the current ironing temperature is still too high. As soon as the
display symbol goes out, the selected temperature has been reached.
Setting the
temperature
Press the button on the control panel to call up the
temperature selection mode.
The button will be highlighted with a bar underneath.
Press one of the three temperature selection buttons.
(e.g. temperature selection button )
The button is highlighted with a bar underneath and the ironer is
heated up or cooled down to the selected temperature.
Changing the
preset
temperature for a
temperature
selection button
Press the temperature selection button you want to change the
value for.
Keep it pressed in. The bar will light up underneath it and the current
temperature value will appear in the display.
Press the or – button to set the temperature you want to save for
that button.
Then press and hold the selected temperature selection button until
it flashes once.
The temperature value is now saved for that temperature selection
button.
Useful tip: Allow the roller to rotate for about 5minutes to enable the
heat to equalise between the heater plate and the roller.

Operation
17
Selecting the
ironer speed
PM 1210/PM 1214:
Symbol Speed range
m
/
min
Low speed range 1.5 - 2.2
Medium speed range 2.3 - 3.2
High speed range 3.3 - 4
PM 1217
Symbol Speed range
m
/
min
Low speed range 1.5 - 2.4
Medium speed range 2.5 - 3.4
High speed range 3.5 - 4.5
Speed selection buttons
The roller speed can be set either by using the speed selection
buttons or the and – buttons.
Setting the ironer
speed
Press the . button to call up the roller speed selection mode.
The button will be highlighted with a bar underneath.
Press one of the three roller speed buttons.
(e.g. button )
The selected roller speed button will be highlighted with a bar
underneath, and the flatwork ironer will operate at the preset roller
speed for this button.

Operation
18
Changing the
preset roller
speed for a roller
speed selection
button
Press the roller speed button that you want to change the speed
for.
Keep it pressed in. The bar will light up underneath it and the current
speed will appear in the display.
Press the or – button to set the roller speed you want to save for
that button.
Then press and hold the selected roller speed button until it flashes
once.
The roller speed is now saved for that roller speed button.
Laundry feed
Press the button to start the ironing process.
The heater plate engages and the roller starts to turn.
Items with buttons should be passed through the ironer with the
buttons facing in to the roller padding.
If they face upwards, they could be damaged or torn off when the
item is passed through the ironer.
A cloth should be placed over zips, metal buttons and hooks to
protect the heater plate during ironing.
Metal and plastic buckles and very bulky buttons should not be
passed through the flatwork ironer.
Lay the item parallel to the roller at the start of the laundry infeed ta-
ble.
Smooth the item.
Feed the item evenly into the machine.
Do not restrict ironing of smaller articles to any one part of the
roller.
Otherwise heat is transferred on one side only, and the roller cover
is worn down unevenly. If laundry is continuously fed in from one
and the same side of the roller, the red symbol or will light
up in the display and an alarm will sound.
Make use of the whole roller width and distribute smaller items
evenly on the infeed table.

Operation
19
Pauses in ironing
Press the button to go into Pause mode.
The heater plate is disengaged and the roller comes to a standstill.
The heating will remain switched on.
Press the button to start ironing again.
The flatwork ironer remains on and ready to operate in Pause mode.
After an adjustable period of non-use (factory default setting =
10minutes), the temperature can be reduced to a value between
50–70°C (factory default setting = 60°C).
The values must be set at the service level by Miele Professional
Service.
After a period of inactivity which can be preset, the ironer will
switch to standby mode.
Standby mode
Standby mode is switched off at the factory. It can be reactivated by
Miele Professional Service. The time interval after which the flatwork
ironer switches to Standby mode can be set between 1minute and
30minutes of inactivity. The ironer can be switched on again by
pressing the button.
In Standby mode the roller stops turning and the heater plate is
disengaged. The heating is switched off.
FlexControl foot
switch
Activating the moveable foot switch stops the roller. This helps to
avoid input mistakes.
Stopping the roller
During ironing, press down the FlexControl foot switch with your
foot.
The roller will stop. The heater plate remains engaged.
Remove your foot from the foot switch to continue ironing.
When the foot switch is released, the roller starts to turn again
automatically. The ironing process can continue.
The foot switch can also be configured by Miele Professional
Service so that operating the foot switch ends Pause mode,
engages the heater plate and makes the roller start turning.
Pick-off bands
The pick-off bands are used for picking laundry off the roller.
The ironed laundry can be very hot when it comes out of the
heater plate.
Danger of burning!
Wear gloves to protect your hands if necessary.

Operation
20
After ironing
After ironing, let the roller run for approx. 5 minutes on the minimum
temperature to let the roller covering dry out.
Switch the flatwork ironer off by pressing the button.
The heater plate will disengage and the fan will run for 10 minutes to
cool down. The button will flash during this time.
Switch off the on-site main switch.
Allow the ironed laundry to cool down before packing or
stacking it.
Hot laundry could self-ignite and cause a fire.
Ironing with a coin-operated payment system
Press the button to switch on the flatwork ironer.
The symbol will flash in the display.
Insert the coin or token.
The symbol will go out in the display.
Select the temperature range according to the type of laundry.
Select the roller speed you want.
When the symbol goes out in the display, the flatwork ironer is
ready to operate and the ironing time purchased will begin to count
down.
Press the button to start the ironing process.
The heater plate engages and the roller starts to turn.
After the purchased ironing time has expired, the ironer emits an
audible signal to indicate that the run-on time has started.
You can now finish ironing the item that has been fed in.
If the ironing process is paused during the run-on time, you must
purchase more ironing time to restart the flatwork ironer.
Miele ProfessionalService can change the duration of the run-on
time to a value between 0–5minutes.
At the end of the run-on time, the heater plate disengages and the
roller comes to a standstill.
The symbol flashes in the display. More ironing time can be
purchased at any time.

Notes
21
Changing the temperature unit (°C / °F)
The temperature unit can be changed from °C to °F by Miele
Professional Service.
Favourites setting
Using the Favourites button, the most used combination of
temperature and roller speed can be saved so that they can be
accessed quickly and easily.
To save the desired parameters, press the button until it flashes
once. The saved values are then accessed by pressing the button
briefly. When you leave the Favourites setting, the previously saved
values are restored again.
Avoiding no-load operation
During longer interruptions to ironing, press the button to pause the
machine, or switch the ironer off with the button. This avoids
running the flatwork ironer without laundry and considerably relieves
the burden on the roller cover and the drive motor.
If the ironer is operated empty for a longer period of time, the roller
cover will dry out.
This will substantially reduce the lifespan of the roller cover.
Power failure during ironing
If there is a power outage, the flatwork ironer must be switched on
again by pressing thebutton, activating the finger guard and
pressing thebutton.
Peak load / Energy management (optional)
The flatwork ironer can be connected to a peak load/energy
management system using a kit which is available as an optional
accessory. If the peak load/energy management system is active, the
heater plate is switched off and or . flash in the display. The
residual heat in the heater plate means that ironing can continue until
the ironer goes into Pause mode().

Notes
22
Fault messages
When a fault occurs, ironing is paused, the button flashes, and a
four-digit code appears in the display. Pressing the flashing button
cancels the fault (the fault is stored in the fault memory). The
button flashes and ironing can be restarted.
Fault code Fault
F 0
Heater fault
F 1
F 2
F 8
F 20
F 24
F 25
F 39
Electronic fault
F 40
F 41
F 42
F 43
F 45
F 47
F 49
F 50
Drive fault
F 53
F 57 Fan fault
F 61 Electronic fault
F 99 Appliance locked
F 104 Drive voltage too low
F 108 General compressor fault
F 120 Low voltage
F4500–4512 Control system fault
If the fault message appears again, repeat the procedure or switch
the ironer off and back on. If the fault persists, please call Miele
Professional Service.
In the event of a malfunction, please call Miele Professional
Service.

Cleaning and care
23
Cleaning the heater plate
Regular cleaning and maintenance of the heater plate is essential for
the protection of the drive motor and the roller cover. Please follow
the notes in the Miele Ironing Handbook on ironing and cleaning and
care. The heater plate must be waxed every time it is cleaned. Failure
to do so can result in a considerable reduction of the lifespan of the
flatwork ironer.
The heater plate is made of aluminium.
For this reason, do not use coarse scouring agents or abrasive
cleaning cloths.
Only use the Miele cleaning set for cleaning. It includes a cleaning
cloth, waxing cloth, and ironer wax. The set is available to order as
an optional accessory.
Detergent and starch deposits can stick to the heater plate. It should
therefore be cleaned before starting work, depending on the degree
of soiling.
The ironers PM 1210, PM 1214 (from serial No. 120610687 onwards)
and PM 1217 (from serial No. 120610797 onwards) all come with a
cleaning and waxing indicator (red indicator symbol ).
When the red indicator symbol lights up, it is necessary to run
the cleaning programme to clean and wax the heater plate.
Starting the
cleaning
programme
Press and hold the button for more than 3 seconds.
The cleaning programme is started. 80 °C is shown in the display.
If the current temperature of the ironer is higher than 80 °C, the
symbol appears and the ironer is cooled down. You can start cleaning
as soon as the symbol has gone out and a temperature of 80 °C is
displayed.

Cleaning and care
24
Cleaning with the
cleaning cloth
Use the Miele cleaning cloth for cleaning the heater plate.
As the cleaning cloth is narrower than the heater plate, the entire
plate cannot be cleaned in one go. It is necessary to feed the
cleaning cloth through the ironer several times, gradually moving it
down the width of the heater plate.
Useful tip: Stubborn soiling such as starch deposits can be removed
by passing a cloth soaked in lukewarm water through the ironer.
①
②
③
a
Pocket
b
Cleaning strip
c
Cotton strip
Place the cleaning cloth on the left side of the infeed table so that
the cleaning strip faces towards the heater plate.
Feed the cleaning cloth evenly into the ironer from the left side of
the infeed table until it has passed all the way through the ironer.
The cleaning strip helps to lift the soiling. The softer cotton strip
removes the soiling and polishes the heater plate.
1.
2.
3.
Feeding the cleaning cloth through the ironer from left to right
Place the cleaning cloth on the infeed table again, this time slightly
further to the right. The cleaning strip must face the heater plate.

Cleaning and care
25
Feed the cleaning cloth through the ironer again.
Repeat the process until you have arrived at the right side of the
infeed table and have cleaned the entire width of the heater plate.
The heater plate must be waxed after every cleaning process.
Waxing the heater plate
To start the waxing function, first press the button for a minimum
of 3 seconds and then the temperature selection button .
As soon as the flatwork ironer has reached the temperature range,
the button starts flashing.
To deactivate the waxing function, press the button again and
hold it for a minimum of 3 seconds.
When waxing has been completed for at least 40 seconds in the
waxing function, the timer for the prompt to clean and wax the heater
plate (red indicator symbol ) is reset.
Waxing using the
waxing cloth
Sprinkle some wax into the pocket of the waxing cloth.
Use the wax sparingly to prevent the roller cover becoming too
smooth.
Close the pocket.
Press the button to start the waxing process.
Lay the pocket with the rubberised side facing downwards (i.e.
towards the roller) and feed it into the flatwork ironer when hot
(heater plate temperature approx. 180 °C).
Do not feed the waxing cloth with the rubberised side facing
upwards (i.e. towards the heater plate).

Cleaning and care
26
1.
2.
3.
Feed the waxing cloth into the ironer from the left or right side at
intervals across the entire working width of the roller.
When finished, press and hold the button for a minimum of 3
seconds.
The waxing mode is deactivated.
Useful tip: To maintain the smooth surface of the heater plate, it
should be waxed after every working day.
Always carry out cleaning in the cleaning programme and waxing in
waxing mode, as otherwise the ironer's maintenance interval will not
be reset. The maintenance interval is only reset once cleaning and
waxing have been carried out completely in the corresponding
mode.
Roller padding
Before removing the roller cover for cleaning or replacing, switch off
the flatwork ironer and allow the heater plate to cool down.
Removing the
roller cover
The roller cover on the PM 1217 with leaf-spring padding
must only be removed or replaced by Miele Professional Service.
Otherwise there is the risk of damage to the leaf-spring padding.
Please note that the laundry pick-off bands on the roller need to be
fully retracted one after the other before removing the roller cover.
Switch on the flatwork ironer by pressing the button.
Press the button for more than 3 seconds.
The heater plate disengages and is locked into this position.
By repeatedly pressing the - button, incrementally rotate the roller in
reverse (jogging mode).
Take hold of the edge of the roller cover and lay it on the laundry
infeed table.
With the roller in reverse, fully remove the roller cover.
After that, press the button for longer than 3 seconds to
deactivate the maintenance position.

Cleaning and care
27
Wire wool residues may fall onto the laundry table whilst the roller
cover is being removed. These must be removed.
Fitting the roller
cover
Switch on the flatwork ironer by pressing the button.
Select the lowest temperature () and the lowest roller speed ().
While operating the ironer normally, place the roller cover on the
ironer parallel to the roller and feed the roller cover over the roller.
The roller cover needs to be changed if there is a visible gap at the
lower edge of the heater plate and roller (laundry outfeed) due to
prolonged use.
Recovering the roller with wire wool must only be carried out by
Miele Professional Service.
The diameter of a new or re-upholstered roller must not exceed the
following dimensions (including the roller cover).
PM 1210, PM 1214 PM 1217
210-215 mm 250-255 mm
Within this range the roller cover should be wound cylindrically over
the entire length of the roller.
During the replacement of the roller padding, Miele Professional
Service should check whether the carbon brushes in the drive
motor need to be replaced as well.
Miele Professional Service
In the event of a malfunction, please call Miele Professional Service.
Miele will require the model and serial number [SN] of the flatwork
ironer.
Both can be found on the data plate which is on the inside of the right
side stand.
Position of the data plate

Miele Australia Pty. Ltd.
ACN 005 635 398
ABN 96 005 635 398
1 Gilbert Park Drive
Knoxfield, VIC 3180
Telephone: 1300 731 411
service.prof@miele.com.au
Melbourne:
www.miele-professional.com.au
info@miele-professional.com.au
Miele New Zealand Limited
IRD 98 463 631
Level 2, 10 College Hill
Freemans Bay
Auckland 1011
New Zealand
Telephone:
www.miele-professional.com.au
info@miele-professional.com.au
Miele Global Headquarters
Germany
Miele & Cie. KG
Carl-Miele-Straße 29
33332 Gütersloh
Federal Republic of Germany
0800 4 MIELE
(0800 464 353)
Alteration rights reserved / Publication date: 47.18 M.-Nr. 10 026 131 / 01
 Loading...