

Miele professional PLW 8617 Operating Instructions Manual

Operating instructions
Washer-disinfector
PLW 8617
To avoid the risk of accidents or damage to the
machine, it is essential to read these instructions
before it is installed and used for the first time.
en-GB
M.-Nr. 11 234 680

2

Contents
Notes about these instructions..........................................................................................6
Intended use ........................................................................................................................7
User profiles.........................................................................................................................8
User administration ............................................................................................................... 8
User profiles .......................................................................................................................... 8
Product description.............................................................................................................9
Appliance overview ............................................................................................................... 9
Infeed and outfeed side.................................................................................................... 9
Infeed and outfeed side without service panel .............................................................. 10
Control elements on the display.......................................................................................... 11
Main menu...................................................................................................................... 11
Programme start display ................................................................................................ 13
Warning and Safety instructions......................................................................................16
Symbols on the machine..................................................................................................... 21
Main menu..........................................................................................................................22
Main menu........................................................................................................................... 22
Actions in theMain menu............................................................................................... 22
Changing the display language .................................................................................. 22
Login ............................................................................................................................ 23
Logout ............................................................................................................................ 24
Printing documentation .................................................................................................. 24
Opening and closing the door........................................................................................ 24
Areas of application ..........................................................................................................25
General information............................................................................................................. 25
Load carriers .................................................................................................................. 25
Preparing the load.......................................................................................................... 26
Preparing the load.......................................................................................................... 27
Before starting a programme ......................................................................................... 29
After the end of a programme ........................................................................................ 29
Laboratory glassware and utensils ...................................................................................... 30
Programme chart................................................................................................................. 31
General programmes ........................................................................................................... 32
Programmes for specific soiling .......................................................................................... 33
Programmes for specific loads............................................................................................ 34
Additional programmes....................................................................................................... 35
Service programme............................................................................................................. 35
Chemical processes and technology ..............................................................................36
Dispensing liquid chemical agents..................................................................................40
Dispensing systems ............................................................................................................ 40
Containers for process chemicals.................................................................................. 41
Filling containers with process chemicals...................................................................... 42
Filling the dispensing system ......................................................................................... 43
Operation............................................................................................................................44
Switching the machine on and off....................................................................................... 44
3

Contents
Selecting a programme ....................................................................................................... 44
Selecting a load carrier................................................................................................... 44
Selecting programmes from Favourites ......................................................................... 45
Starting the programme ...................................................................................................... 46
Programme sequence ......................................................................................................... 47
End of programme............................................................................................................... 47
Cancelling a programme ..................................................................................................... 47
Delay start ........................................................................................................................... 48
Network connection..........................................................................................................49
Network connection ............................................................................................................ 49
Network protocols............................................................................................................... 50
Process documentation ...................................................................................................... 50
System settings .................................................................................................................51
System ................................................................................................................................ 51
Network connections .......................................................................................................... 51
Changing the PIN ........................................................................................................... 52
Pairing ............................................................................................................................ 52
Configuring the printer ................................................................................................... 53
Setting the network ........................................................................................................ 54
Machine functions ............................................................................................................... 55
Carrying out self-disinfection (optional).......................................................................... 55
Starting the continuous programme............................................................................... 55
Filling the dispensing system ......................................................................................... 57
Dispensing system setup ............................................................................................... 57
Calibrating the conductivity meter ................................................................................. 57
Carrying out a programme test ...................................................................................... 58
Restarting ............................................................................................................................ 60
Opening the data plate........................................................................................................ 60
Managing favourites............................................................................................................ 61
Maintenance ......................................................................................................................62
Periodic checks................................................................................................................... 62
Routine checks.................................................................................................................... 63
Cleaning the filters in the wash cabinet .............................................................................. 64
Cleaning the spray arms...................................................................................................... 65
Machine spray arms....................................................................................................... 66
Spray arms on mobile units and modules...................................................................... 66
Cleaning the machine.......................................................................................................... 67
Locking the display ........................................................................................................ 67
Cleaning control elements and the glass door............................................................... 67
Cleaning the front of the machine .................................................................................. 68
Cleaning the wash chamber........................................................................................... 68
Cleaning the door seal ................................................................................................... 68
Built-in printer (optional) ...................................................................................................... 69
Replacing the paper roll ................................................................................................. 69
Thermal paper ................................................................................................................ 70
Error messages and instructions.....................................................................................71
Representation of faults on the display............................................................................... 71
4

Contents
Technical faults on the cleaning machine ........................................................................... 71
List with active messages .............................................................................................. 71
Troubleshooting.............................................................................................................. 72
Technical faults without fault number............................................................................. 72
After sales service.............................................................................................................73
Electrical connection ........................................................................................................74
Electromagnetic compatibility (EMC) .................................................................................. 75
Plumbing ............................................................................................................................76
Technical data....................................................................................................................77
Disposing of your old machine ........................................................................................78
Appendix ............................................................................................................................80
User rights in the Main menu .............................................................................................. 80
User rights in the System menu .......................................................................................... 81
Power levels of the programmes/mobile units/module combinations ................................ 82
Optional extras .................................................................................................................... 85
5

Notes about these instructions
Important warnings
Information which is important for safety is highlighted in a thick
framed box with a warning symbol. This alerts you to the potential
danger of injury to people or damage to property.
Read these warning notes carefully and observe the procedural
instructions and codes of practice they describe.
Notes
Information of particular importance that must be observed is
highlighted in a thick framed box.
Additional information and comments
Additional information and comments are contained in a simple
frame.
Operating steps
Operating steps are indicated by a black square bullet point.
Example:
Select an option using the arrow buttons and save your choice with
OK.
Display
Certain functions are shown in display messages using the same font
as that used for the function itself in the display.
Example:
Settings menu.
6

Intended use
The PLW 8617washer-disinfector is designed to reprocess laboratory
glassware, utensils and similarly categorised components using water-based media.
Appropriate use
Reprocessing encompasses the cleaning, rinsing, and – where necessary – thermal disinfection and drying of the following load:
– Vessels such as beakers, flasks, cylinders and test tubes
– Measuring vessels such as measuring cylinders, volumetric flasks
and pipettes
– Dishes such as petri dishes and watch glasses
– Plates such as slides and sequencing plates
– Small items such as lids, magnetic stirring rods, spatulas and stop-
pers
– Other items such as boxes, plastic flasks and containers, metal
parts, pipe and hose pieces and funnels
The washer-disinfector is generally referred to as “the machine” in
these operating instructions. The term “load” is used wherever the
items to be processed are not defined in any further detail. The term
“wash water” is used for the mixture of water and process chemicals.
Reprocessing is carried out in conjunction with:
– Process chemicals which are tailored to the result of the repro-
cessing
– Load carriers which are tailored to the load
Observe the information issued by the manufacturer of the load.
Inappropriate use
The PLW 8617washer-disinfector may not be used for any purposes
other than the appropriate use described. This applies in particular to:
– Reprocessing of reprocessable medical devices
– Use in the catering industry
– Domestic use
7

User profiles
User administration
Access to the machine is restricted to a certain group of people. Authorised users are entered inUser management via the machine’s
web interface. User managementis described in the programming
manual.
A User IDandPIN are required for the userLogin on the machine.
User actions such as starting a reprocessing programme are saved.
User data is read out on theReprocessing report, for example.
User profiles
Day-to-day use
Service work
Administration
For day-to-day use, operators must be instructed on the basic functions and how to load the machine and must also be trained regularly.
They must have a basic knowledge of machine reprocessing of laboratory glassware and utensils.
Day-to-day work is carried out using the following user levels:
– Without message
– Automatic
– Operator
Adaptations of the machine, e.g. to accessories used or on-site conditions, require additional specific knowledge of the machine.
It is carried out using the following user levels:
– Technician
– Administrator
Changes to the reprocessing process and performance testing also
require specialist knowledge about machine reprocessing of laboratory glassware and utensils and about process technology.
It is carried out using the following user level:
– Administrator
8
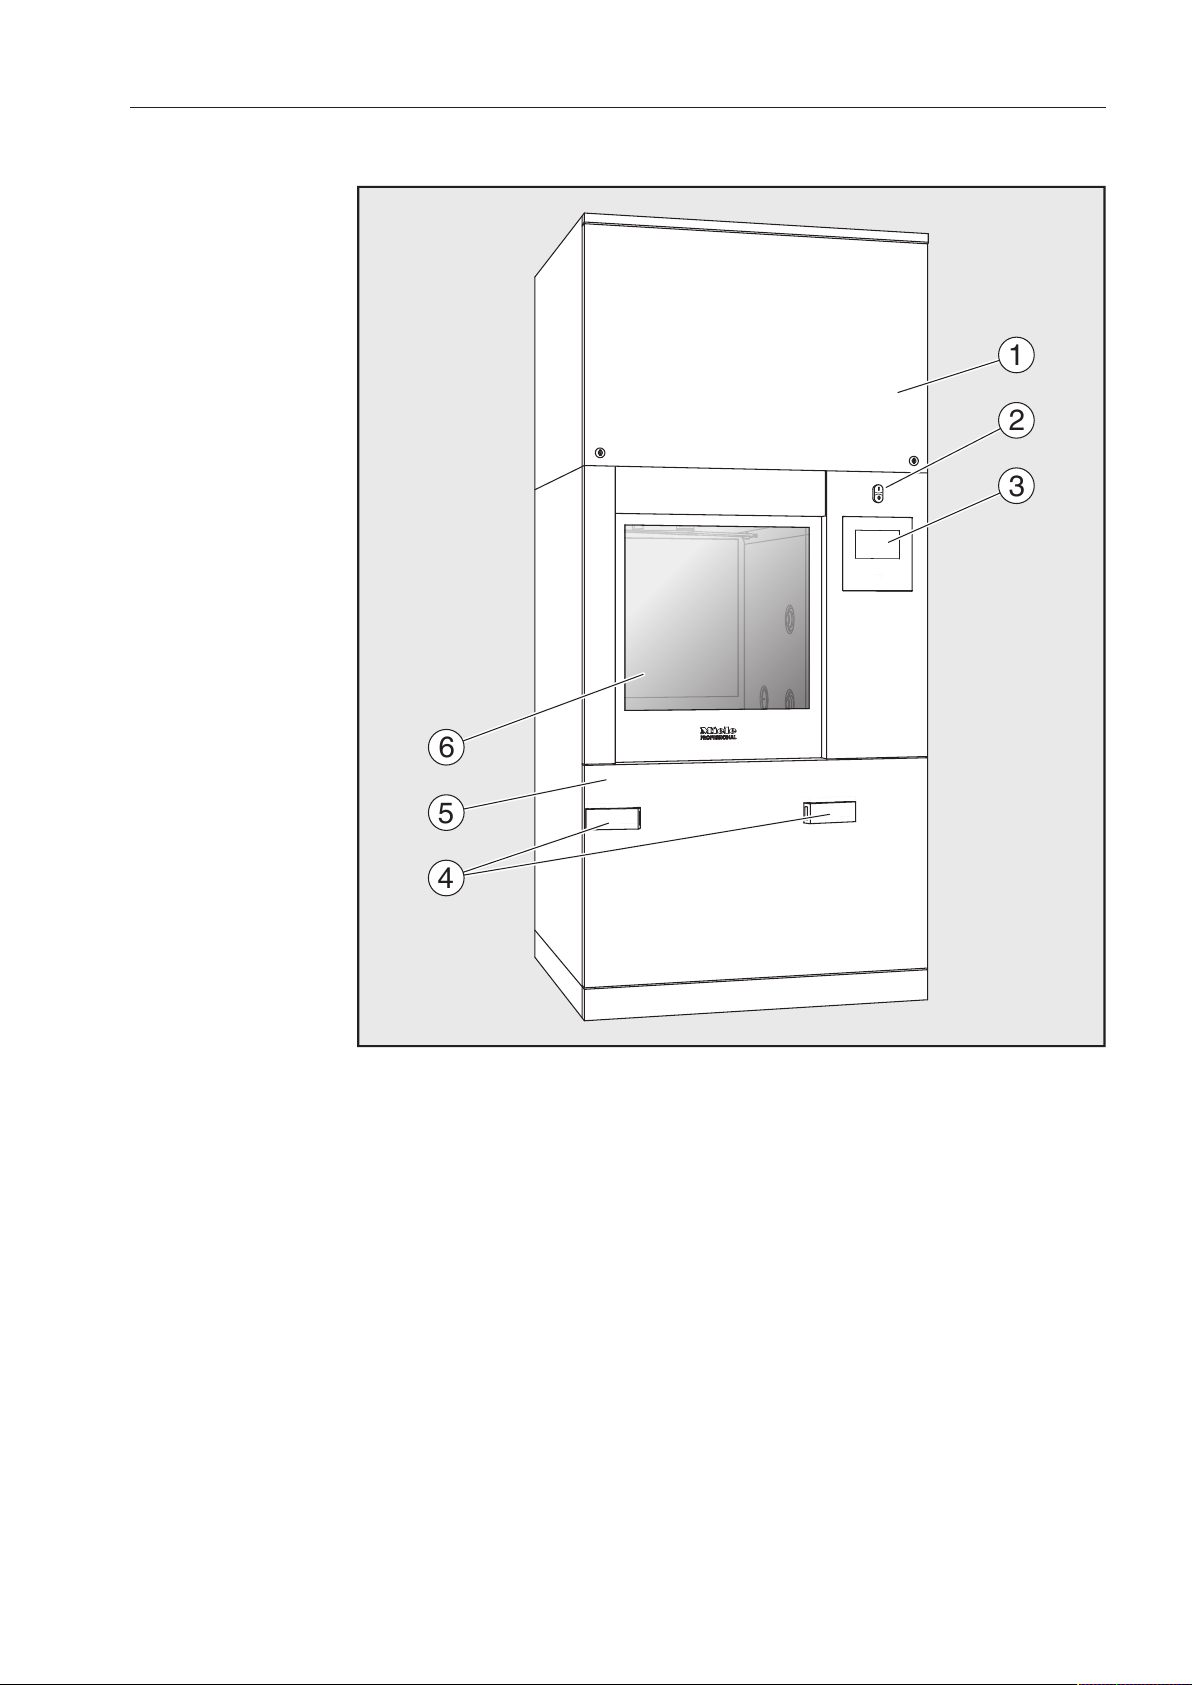
Infeed and out-
1
2
3
5
6
4
feed side
Product description
Appliance overview
a
Service panel for the Customer Service Department
b
I/0 power switch
c
Display
d
Docking system for transfer trolleys,
service panel lock
e
Service panel
f
Door closed
9
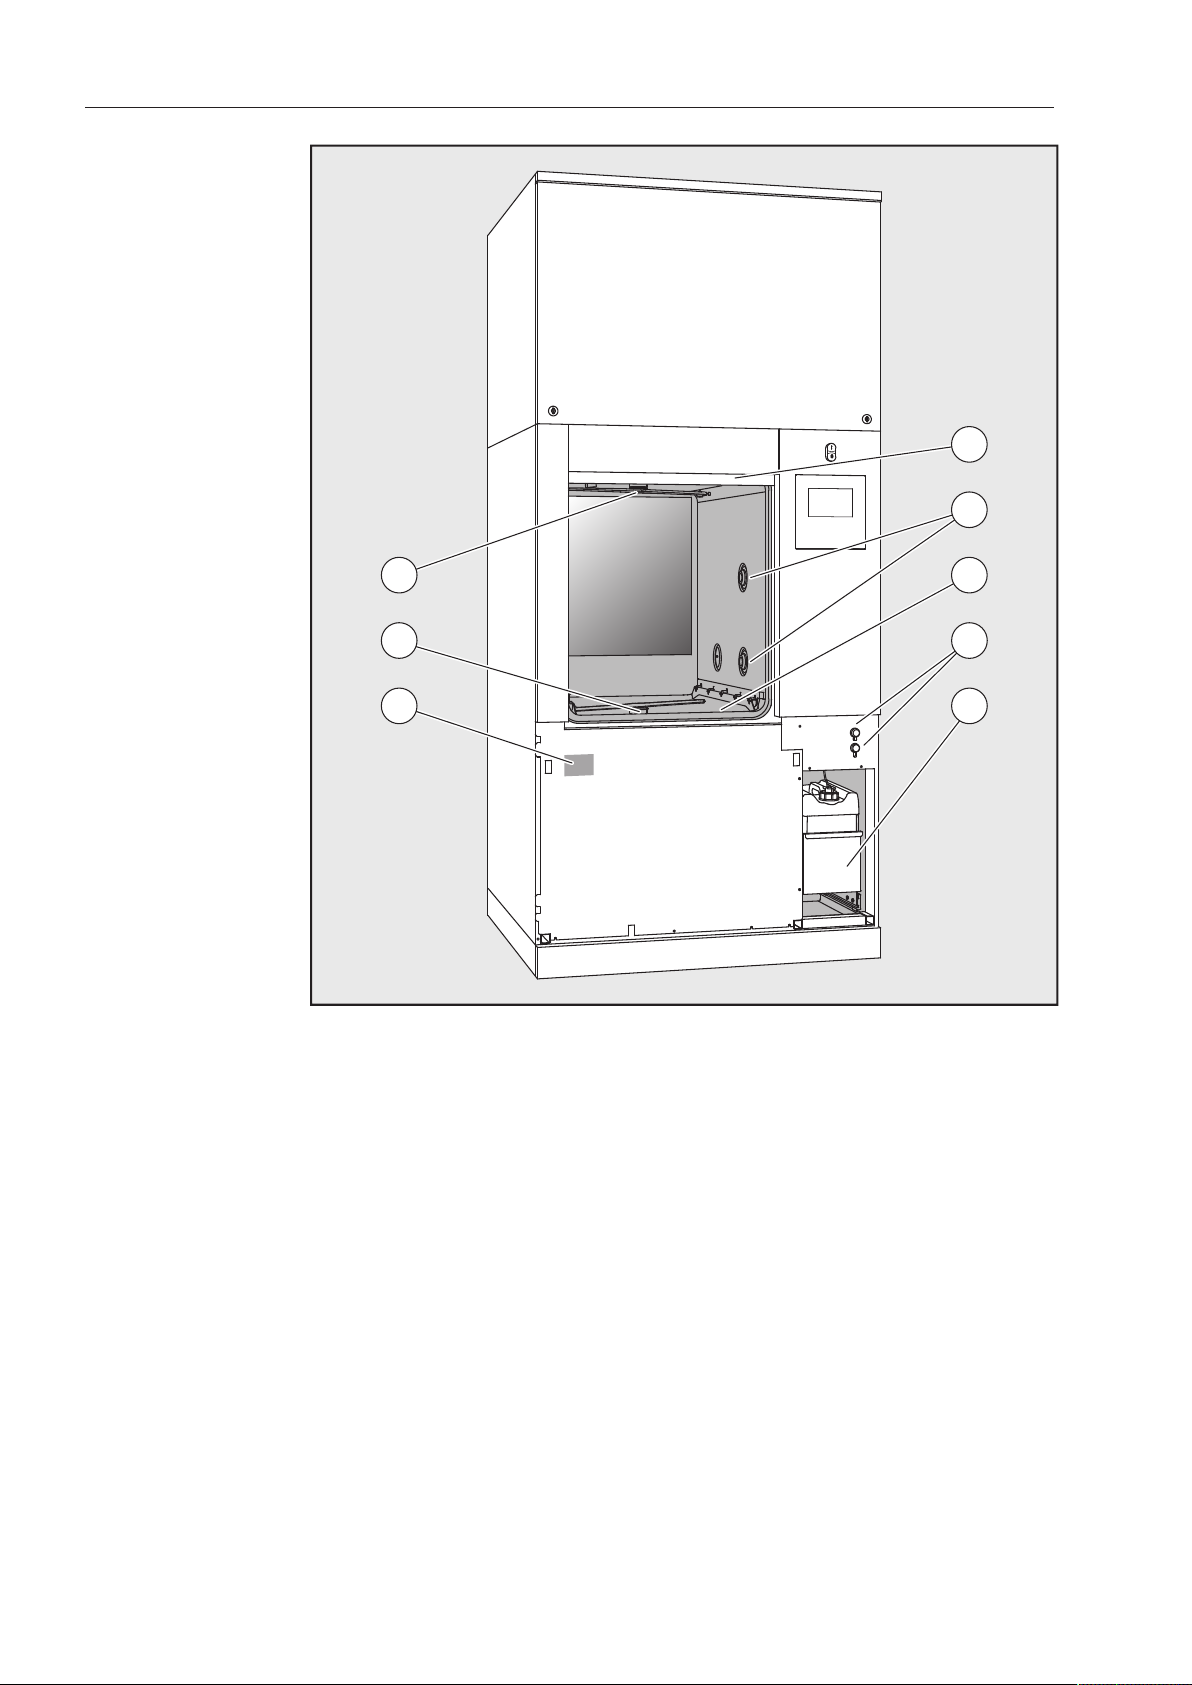
Product description
1
2
3
4
7
8
56
Infeed and outfeed side without
service panel
a
Door open
b
Water supply for load carriers
c
Filter combination
d
Connections for the Customer Service Department
e
Drawer with containers and connections for process chemicals
f
Data plate
g
Lower machine spray arm
h
Upper machine spray arm
10

Control elements on the display
Reprocessing
Favourites
Documentation
System
Main menu
GB
Login
18.06.2018 15:05
Product description
Main menu
The machine display shows the control elements light on a black
background. In these operating instructions, the display is shown as
black on a light background in order to improve legibility.
a
Header
b
Display language selected
c
Current user
d
Buttons to call up sub-menus
e
Footer
Buttons in the main menu/ header
Buttons for all enabled actions are displayed in the footer.
If a menu is split across several pages, a scroll bar will be displayed
above the footer. Swipe the display or tap the scroll bar to scroll
between the pages.
Symbol Description/function of the button
Locks the display, e.g. for surface disinfection
Opens the Select display language menu.
Opens the login or logout dialog, e.g. to switch users
The language currently set is indicated behind the symbol,
e.g. GB
11
Product description
Symbols in the
main menu
Buttons in the main menu/ footer
Symbol Description/function of the button
Opens the list of reprocessing pro-
Reprocessing
Favourites Opens the list of favourites
Documentation
System
Information
Please wait, the controls are busy
Symbol Description/function of the button
Warning present, opens the Messages list
Fault present, opens the Messages list
Opens the door
Closes the door
The door is locked
grammes which are assigned to the load
carrier
Opens the list of available reprocessing
reports
Opens the configuration menu, e.g. for
network settings or to change the PIN
Buttons in the submenus/
footer
Symbol Description/function of the button
OK Confirm entries
Leave menu, go back to previous menu level, do not save
entries
12

Product description
0:00
user/
18.06.2018 15:05
GB
USER
Universal
Duration
Programme start display
Once the Reprocessingload carrier, for example, has been selected
in the A 500menu and the associated Universalreprocessing programme has been confirmed, the following is displayed:
The pictogram of the load carrier and the selected reprocessing programme are displayed in the header.
The duration and a progress bar are shown on the display.
The colour of the progress bar corresponds to the current machine
status:
– Black for ready for use
– White for an ongoing reprocessing programme
– Green for a reprocessing programme that has been successfully
completed
– Yellow for warnings
– Red for faults
13
Product description
Programme start/
programme sequence buttons/
symbols
Symbol Description/function of the button
Programme start
Programme cancellation
Opens the input screen for selecting the start time
Door locked
In/Out
Displays the programme sequence as a diagram
Selects the steam heating method
Selects the electric heating method
+ Selects the electric and steam heating method
(next to
the pro-
gress
bar)
Shows the programme sequence display in the default
view
Schematic programme sequence display, contains information for the Customer Service Department
Displays the current faults and warnings in the progress
bar
Heat-up
context menu (optional)
This context menu is only available in machines where it is possible
to switch the energy supply from electric to steam.
The energy source for heating can be changed before and during the
programme sequence. The selected setting is used for heating up the
wash water and the demineralised water in the demineralised water
tank.
The selected setting is applied permanently in the machine controls.
Press the button to open the context menu.
14

Product description
0:25
°C
75 °C
Duration
Universal
user/
18.06.2018 15:05
USER
GB
Programme phase
Temperature
Main wash 1
In/Out
Example of a programme sequence
display
After the programme has started, the following display is shown:
The current programme phase and the temperature reached are also
shown on the display.
The progress bar indicates the ratio between the duration and the
time left.
Programme sequence display
context menu
During the programme sequence, you can choose between 3 views:
– Standard
– In/Out chart – In/Out
– Graphical
The In/Out chart contains information for the Customer Service Department and is not explained in these operating instructions.
Press the button to open the context menu.
Once you have switched to the graphical display using the but-
ton, the following values are displayed as curves:
– Temperature of the wash water [W]
– Temperature of the external drying [EA]
– Temperature of the internal drying [IA]
– Internal wash pressure [P]
15

Warning and Safety instructions
Risk to health and risk of damage if the operating instructions
are not followed.
Failure to follow the operating instructions – and in particular the
safety instructions and warnings they contain – may result in persons being seriously injured or property being seriously damaged.
Read these operating instructions carefully before using the machine. This will prevent both personal injury and damage to the machine.
Keep the operating instructions in a safe place.
Correct application
Use of the machine is only permitted for the applications expressly
approved in the operating instructions. Alterations or conversion of
the machine, or using it for purposes other than those for which it
was intended, are not permitted and could be dangerous.
The cleaning and disinfection processes are only designed for laboratory glassware and utensils which are designated as reprocessable
by the manufacturer. The information provided by the manufacturer of
the load items must be observed.
This washer-disinfector is intended for indoor use only.
The machine is equipped with a special lamp to cope with particu-
lar conditions (e.g. temperature, moisture, chemical resistance, abrasion resistance and vibration). This special lamp must only be used
for the purpose for which it is intended. It is not suitable for room
lighting. Replacement lamps may only be fitted by the Miele Customer Service Department.
Risk of injury
Please pay attention to the following notes to avoid injury
This machine must be commissioned, serviced and repaired by a
Miele authorised and trained service technician only. To ensure compliance with Good Laboratory Practice guidelines, Miele repair and
maintenance contracts are recommended. Unauthorised repairs can
pose considerable risks to the user.
Do not install the machine in an area where there is any risk of ex-
plosion or of freezing conditions.
The electrical safety of the machine can only be guaranteed when
it is correctly earthed. It is essential that this standard safety requirement is observed and regularly tested. If in any doubt, please have
the electrical installation inspected by a qualified electrician.
16
A damaged or leaking machine could be dangerous and comprom-
ise your safety. Disconnect the machine from the mains immediately
and call the Miele Service Department.

Warning and Safety instructions
Label machines which have been taken out of operation and se-
cure them from being switched on again without authorisation. The
machine may only be put back into operation once it has been successfully repaired by the Miele Customer Service Department.
Personnel operating the machine should be trained regularly. Un-
trained personnel must not be allowed access to the machine or its
controls.
Take care when handling chemical agents. These may contain irrit-
ant, corrosive or toxic ingredients.
Please observe the chemical agent manufacturer's safety instructions
and safety data sheets.
Wear protective gloves and goggles.
Only use process chemicals which have been approved by their
manufacturer for the relevant application. The manufacturer of the
process chemicals is liable for any negative influences on the material
of the load and the machine.
The machine is designed for operation with water and recommen-
ded additive chemical agents only. Organic solvents and flammable
liquid agents must not be used in it.
This could cause an explosion, damage rubber or plastic components
in the machine and cause liquids to leak out of it.
The water in the cabinet must not be used as drinking water.
Be careful when sorting items with pointed ends. Position them in
the machine so that you will not hurt yourself or create a danger for
others.
Broken glass can result in serious injury when loading or unload-
ing. Damaged glass items must not be reprocessed in the machine.
When using this machine in the higher temperature ranges, be es-
pecially careful not to scald or burn yourself or come into contact with
irritant substances when opening the door. Where disinfecting agents
are used there is a danger of inhaling toxic fumes.
Where there is a risk of toxic or chemical substances occurring in
or leaking into the suds solution (e.g. aldehyde in the disinfecting
agent), it is essential to regularly check door seals and make sure that
the steam condenser is functioning correctly. Opening the machine
door during a programme interruption carries particular risks in such
circumstances.
Should personnel accidentally come into contact with toxic va-
pours or chemical agents, follow the emergency instructions given in
the manufacturer's safety data sheets.
After using the hot air drying unit, open the door to allow the
everything in the cabinet from the load itself to the mobile units, modules and inserts to cool down.
17

Warning and Safety instructions
Mobile units, modules, inserts and the load must be allowed to
cool down before they are unloaded. Any water remaining in containers could still be very hot. Empty them into the wash cabinet before
taking them out.
Steam heating is permissible up to a pressure of 1000kPa. This
corresponds to a water steam temperature of 180°C.
Never clean the machine or near vicinity with a water hose or a
pressure washer.
The machine must be disconnected from the mains electricity sup-
ply before any maintenance or repair work is carried out.
Quality assurance
The following points should be observed to assist in maintaining
quality standards when processing laboratory glassware and
utensils to avoid damage to the loads being cleaned.
If it is necessary to interrupt a programme in exceptional circum-
stances, this may only be done by authorised personnel.
The standard of cleaning and disinfection must be routinely con-
firmed by the user. The process should be validated on a regular
basis, and checked against documented control results.
For thermal disinfection, use temperatures and temperature holding
times to achieve the required infection prophylaxis in accordance with
current health and safety regulations.
Make sure items being washed are suitable for machine repro-
cessing and are in good condition. Plastic items must be thermally
stable. Nickel plated items and aluminium items can be machine processed using special procedures only.
Items containing iron, and soiling containing residual rust must not be
placed in the cabinet.
Chemical agents can, in certain circumstances, cause damage to
the machine. Always follow the recommendations of the chemical
agent manufacturer.
In case of damage or doubt about compatibility, please contact
Miele.
Cleaning agents containing chlorine can damage the elastomers of
the machine.
If the use of cleaning agents containing chlorine is required, a maximum temperature of 75°C in the “Main wash” programme phases is
recommended (see programme chart).
Cleaning agents containing chlorine must not be used in machines
supplied (ex works) with special oil-resistant elastomers for oil and
grease applications.
18

Warning and Safety instructions
Pre-treatments with cleaning or disinfecting agents can create
foam, as can certain types of soiling and chemical agents. Foam can
have an adverse effect on the cleaning and disinfection result.
Processes must be set up such that foam cannot escape from the
wash cabinet. It would hinder the correct functioning of the machine.
The process used must be monitored on a regular basis by the su-
pervisor to check foaming levels.
To avoid the risk of damage to the machine and any accessories
used with it caused by chemical agents, soiling and any reaction
between the two please read the notes in “Chemical processes and
technology”.
Even when a process chemical, e.g. cleaning agent, is recommen-
ded, the machine manufacturer takes no responsibility for the effect
of such process chemicals on the load.
Please note that changes in product formulation, storage conditions,
etc. which are not announced by manufacturers of process chemicals
may impair the quality of cleaning results.
When using process chemicals, always consult the instructions is-
sued by individual manufacturers. Process chemicals must only be
used for the purpose they are designed for by the manufacturer to
avoid any material damage or the occurrence of very strong chemical
reactions (e.g. oxyhydrogen explosion).
Always follow the relevant manufacturer's instructions on storage
and disposal of chemical agents.
Particles≥200μm are removed by the filters in the wash chamber.
Smaller particles may find their way into the circulation system.
In critical applications where very stringent requirements have to
be met, it is strongly recommended that all the relevant factors for the
process, such as chemical agents, water quality etc. are discussed
with the Miele Application Technology specialists.
If the cleaning result is subject to particularly stringent require-
ments, e.g. in chemical analysis, the operator must carry out regular
quality control to ensure that required standards of cleanliness are
being achieved.
Mobile units, modules and inserts should only be used for the pur-
pose they are designed for.
Hollow instruments must be thoroughly cleaned, internally and externally.
Secure small and light items with cover nets or place in a mesh
tray for small items, so that they do not block the spray arms.
Empty any containers or utensils before loading them.
19

Warning and Safety instructions
The amount of residual solvents and acids on items going into the
cabinet should be minimal.
There should be no more than a trace of any solvents with a flash
point of below 21°C.
Chlorous solutions, in particular hydrochloric acid, must not be
placed in the cabinet.
Ensure that solutions or steam containing chlorides or hydrochloric
acid do not come into contact with the stainless steel outer casing of
the machine in order to avoid any damage through corrosion.
After any plumbing work the water pipework to the machine will
need to be vented. If this is not done, components can be damaged.
Follow the installation instructions in the operating and installation
instructions.
Using accessories
Only Miele accessories should be connected to this machine. They
must be suitable for the application they are required for. Consult
Miele for details on the type of accessories that can be used.
Only use Miele mobile units, baskets and inserts with this washer-
disinfector. Using mobile units and inserts made by other manufacturers, or making modifications to Miele accessories can cause unsatisfactory cleaning results, for which Miele cannot be held liable.
Any resultant damage would not be covered by the guarantee.
Only use process chemicals which have been approved by their
manufacturer for the relevant application. The manufacturer of the
process chemicals is liable for any negative influences on the material
of the load and the machine.
20
Warning and Safety instructions
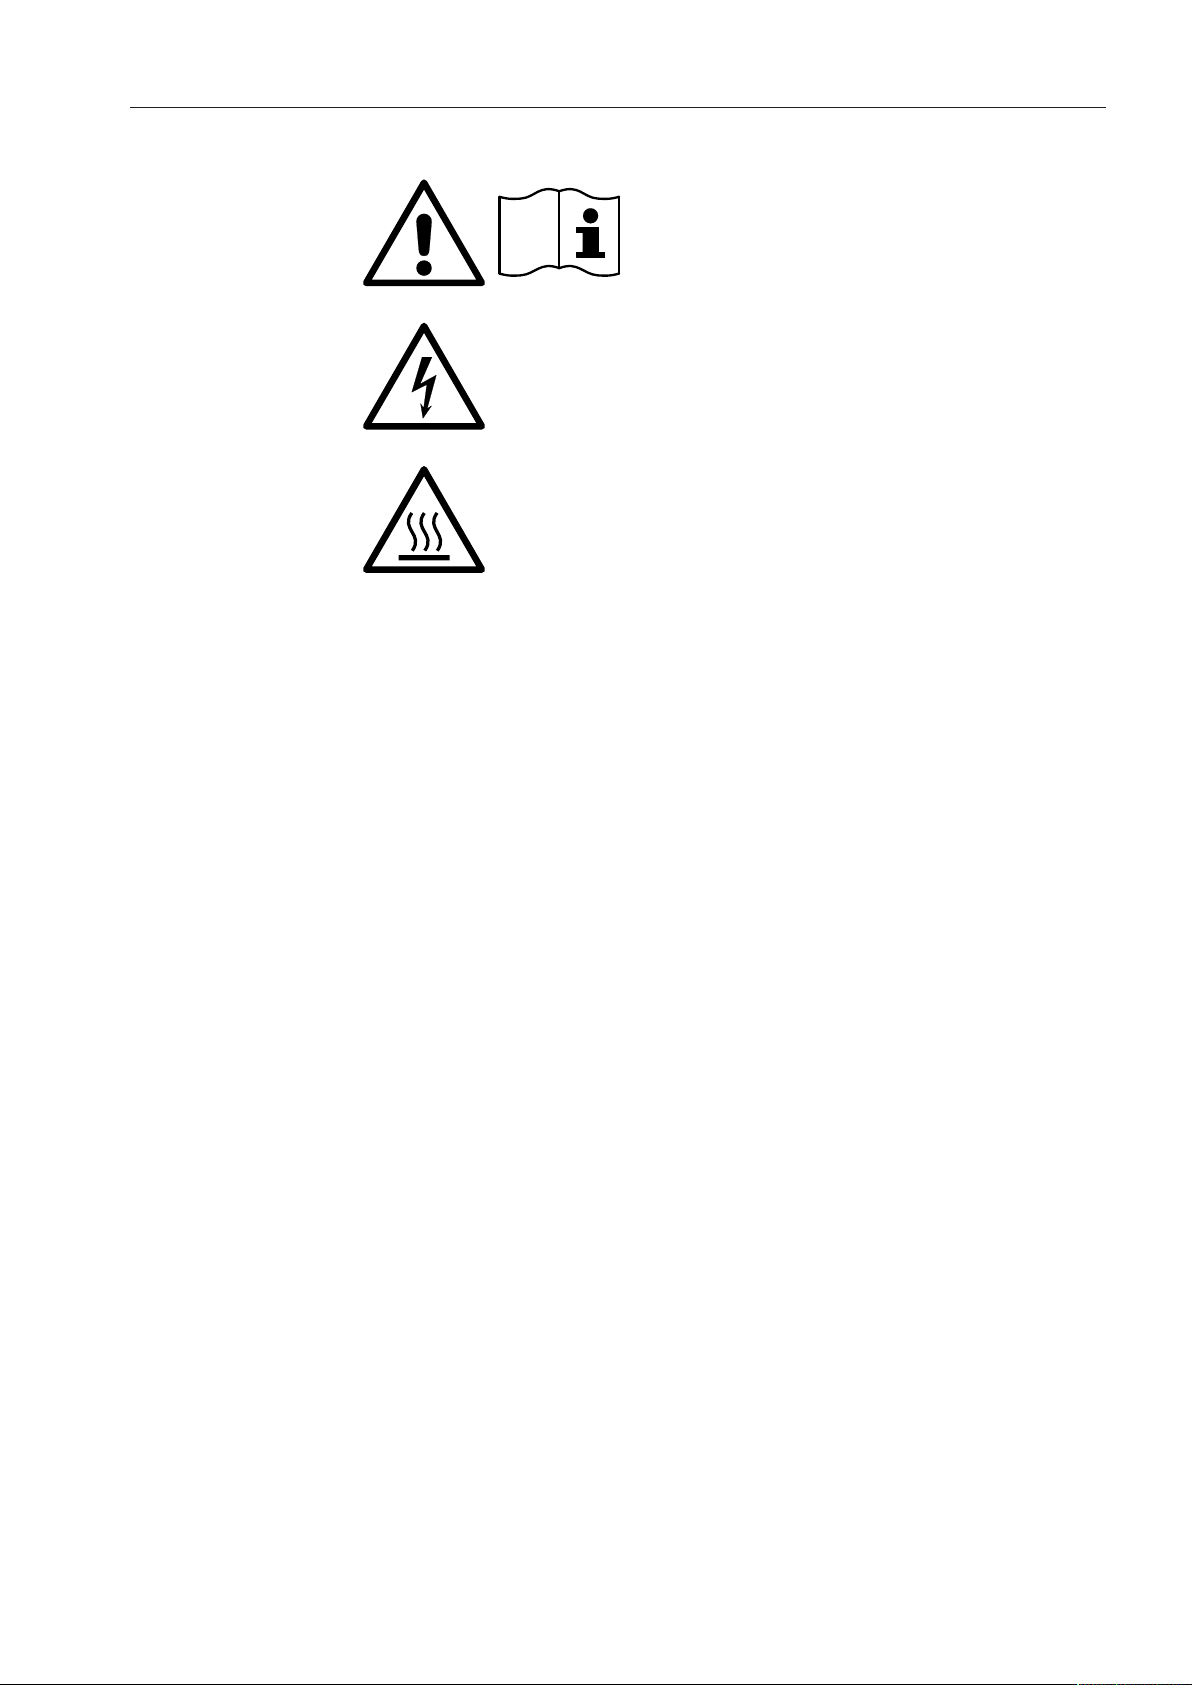
Symbols on the machine
Warning:
Observe the operating instructions!
Warning:
Danger of electric shock!
Warning: Hot surfaces:
It can be very hot inside the wash cabinet
when the door is opened!
Disposing of your old machine
Please note that, depending on the application, the old machine
may be contaminated with blood and other bodily fluids, pathogens,
facultative pathogens or genetically modified material, etc., and must
be decontaminated before disposal.
For environmental and safety reasons, dispose of all process chemical residues in accordance with safety regulations and the manufacturer’s safety data sheets (wear safety goggles and gloves).
Remove or disable the door so that children cannot become trapped
inside. Then make appropriate arrangements for safe disposal of the
machine.
For machines with a tank system, the water in the tank must be removed beforehand.
Before disposal, all personal data saved in the machine must be
deleted, e.g. user names.
21
Main menu
Reprocessing
Favourites
Documentation
System
Main menu
GB
Login
18.06.2018 15:05
Main menu
Actions in
theMain menu
The main menu of the machine is split into headers and footers and
4menus. The following actions can be performed using the buttons:
– Lock the display, e.g. for surface disinfection (see “Maintenance,
locking machines”)
– Change the display language
– Log a user in and out
– Close popups with messages depending on the user level and the
type of message, warning or error message (see “Error messages
and instructions”)
– Open the list of active messages (see “Error messages and instruc-
tions”)
– Select and start a reprocessing programme depending on the set-
tings in theProgramme management menu in the web interface
(see “Operation”)
– Call up and start reprocessing programmes stored asFavourites
depending on the settings in theSystem, Manage favouritesmenu
(see “Operation”)
– Print outReprocessing reports
– Open theSystem menu to adjust the machine settings depending
on theUser level (see “System settings”)
22
– Open and close the infeed door
– Open and close the outfeed door after the end of a programme de-
pending on the Authentification - End of programmesetting in the
web interface
Main menu
Changing the display language
Login
Manual login
Changing the display language has no impact on the set system language. Reports and printouts are issued in the system language.
Press the button in the header of the display.
The Select display language menu is displayed.
Press the button for the language you want.
The machine controls return to the previous menu; the selected language is set.
Press the button to exit the language selection menu if you do
not want to change the set language.
Access to the machine display is restricted to a certain group of
users. Every user must be entered in the User management in the
web interface (see programming handbook, “User administration”).
Press the button in the header to open the entry window for user
login.
Enter the user ID and press OK to confirm.
Enter the PIN and press OK to confirm.
The functions on the machine display are enabled.
When a user logs in for the first time, they will be prompted to assign
a new PIN.
If the PIN has expired, this prompt will be displayed for the user. The
validity of the PIN can be set in the web interface under “System,
Identification”.
23

Main menu
Logout
Manual logout
Printing documentation
The logged-in user is automatically logged out after 24hours if no
button has been pressed on the display in that time, or if the machine
carries out an automatic restart.
The automatic restart can be set in the web interface under “System,
Automatic restart”.
A user who is logged in can log out manually, e.g. to protect the machine from access without authorisation.
Press the button in the header to log out.
Confirm the confirmation prompt with Yes.
The functions on the machine display are disabled.
The last 200 reprocessing reports saved in the machine controls are
shown on the display. The most recent reprocessing report is the first
on the list. When the number of saved reprocessing reports exceeds
200, the oldest from the list is deleted.
If no external software for process documentation is connected to the
machine, the reprocessing reports can be printed out via an external
printer connected via the network.
Opening and closing the door
Press the Documentation button.
A list of the reprocessing reports is displayed.
Press the button in the Print column to activate the required repro-
cessing reports.
Press the OK button in the footer to start printing.
Press the button in the Print column again to deactivate the selec-
tion.
The reprocessing report is printed out on the external printer.
The status of the machine door is shown in the footer of the display.
– The door has been released and can be opened.
– The door is open and can be closed.
– The door is locked.
Press the button with the symbol to open the door.
24
The door will move up.
Press the button with the symbol to close the door.
The door will move down.

General information
Areas of application
Load carriers
E9xx load carriers
from older model
ranges
Pictograms for manual programme selection
The machine can be fitted with a variety of load carriers, which can
be combined with a variety of modules and inserts depending on the
type and shape of load items requiring cleaning and disinfection.
Select load carriers and other equipment, e.g. irrigation connectors, which are appropriate for the application.
Information on the individual areas of application can be found on the
following pages, as well as in the operating instructions for the load
carriers.
Miele offers suitable load carriers for all areas of application defined
in “Appropriate use”, such as mobile units, modules, inserts and special irrigation connectors. More information can be obtained from
Miele.
Load carriers from older model ranges with the designation E9xx can
be used in the machine.
A857 retrofit kits for the mobile units are available from Miele.
When you select a programme manually on the machine, you must
select the relevant mobile unit first. Pictograms representing the mobile units are shown on the display. The pictograms assigned to the
mobile units in the A5xx model range are listed in the operating instructions for the mobile units.
Mobile unit/module combinations from the A5xx model range
The pictogram and name of the mobile unit can be found on a strut
on the front of the mobile unit. The model shown is the mobile unit
without modules inserted.
For different module combinations in the A500 and A503 mobile
units, several pictograms can be displayed (see operating instructions
for the mobile unit).
Fixed mobile units from the A5xx model range
The pictogram and name of the mobile unit can be found on the front
of the mobile unit.
25

Areas of application
Preparing the load
Only load items which have been declared by their manufacturer as
suitable for machine reprocessing may be processed. The manufacturer’s specific reprocessing instructions must be observed.
Contaminated load items pose a health risk.
Contaminated load items can result in various hazards to the
health, which can lead to infections, poisoning, injuries and more
depending on the type of contamination.
When working with contaminated load items, ensure that all necessary measures are taken to protect personnel.
Wear protective gloves and use suitable aids.
– Arrange the load so that wash water can access all surfaces. This
ensures thorough and proper cleaning.
– Do not place load items inside other items where they may be con-
cealed.
– Do not place load items so close together that cleaning is
hampered.
– Lumened load items must be thoroughly cleaned, internally and ex-
ternally, by the wash water. Depending on the load, special irrigation connectors may be required here, e.g. nozzles, irrigation
sleeves or adapters.
– Ensure that load items with long, narrow, hollow sections can be
flushed through properly before placing them in inserts or connecting them to an irrigation connector.
– Lumened instruments should be inverted and placed in the correct
mobile units, modules and inserts to ensure that wash water can
flow in and out of them unrestricted.
– Deep-sided load items should be placed at an angle to make sure
the wash water runs off them freely.
– Tall, narrow lumened instruments should be placed in the centre of
the mobile units if they are not going to be sprayed directly. This
ensures the insides of the lumened instruments are more easily accessed by the water jets.
– Take apart any load items which can be dismantled according to
the manufacturer’s instructions and reprocess the individual parts
separately from each other.
– Lightweight load items should be secured with a cover net such as
theA 6 to prevent them from spinning around in the wash chamber
and blocking the spray arms.
26
– Only reprocess small items and micro components in special in-
serts, mesh trays with lids or mesh inserts.
– The spray arms must not be blocked by load items which are too
tall or which hang down in their path.

Areas of application
– Broken glass can result in serious injury when loading or unloading.
Damaged glass load items must not be reprocessed in the machine.
– Nickel and chrome-plated load items, and load items made of alu-
minium, require special procedures and are not generally suitable
for machine reprocessing. Special process conditions are required
for these load items.
– With items which are made entirely or partly of plastic, observe the
maximum thermal stability for the items and select an appropriate
programme or adjust the temperature of the programme.
Preparing the load
Danger of explosion due to flammable gases.
Flammable solvents with a flash point below 21°C outgas and can
generate a flammable mix of gases.
Only load the machine with load items which are wetted with traces
of solvents at most.
Start the reprocessing programme as soon as the machine has
been loaded with the wetted load items.
Risk of damage due to solvents.
Solvents with a flash point above 21°C can damage elastomers
and plastics. The machine could leak as a result of this.
Only load the machine with load items which are wetted with traces
of solvents at most.
Start the reprocessing programme as soon as the machine has
been loaded with the wetted load items.
Risk of damage due to corrosion.
Chloride solutions, particularly hydrochloric acid, and ferrous ma-
terials that can rust or corrode cause corrosion on the stainless
steel of the machine and the load carrier.
Do not introduce any chloride solutions into the machine.
Do not introduce any ferrous materials that can rust or corrode into
the machine.
Risk of infection.
Microbiological material, pathogens and facultative pathogens, and
genetically modified material can cause infections or environmental
damage.
Before reprocessing by machine, decide whether the load contaminated in this way needs to be sterilised.
27
 Loading...