

Miele TCD 660 WP Brief operating instructions
Using for the first time Operation Drying
Changing
Fragrance flacon
ɑBefore using the tumble dryer for the
first time, ensure that it is correctly
installed and connected.
Please read the separate operating
instructions supplied with the appliance.
ɑRisk of damage due to incorrect use
or operation.
This tumble dryer contains a refrigerant
that is flammable and explosive.
It is essential to read the separate
operating instructions.
ɑDamage caused by switching the
appliance on too soon.
The heat pump can be damaged.
After setting up the tumble dryer, wait for
at least one hour before starting a drying
programme.
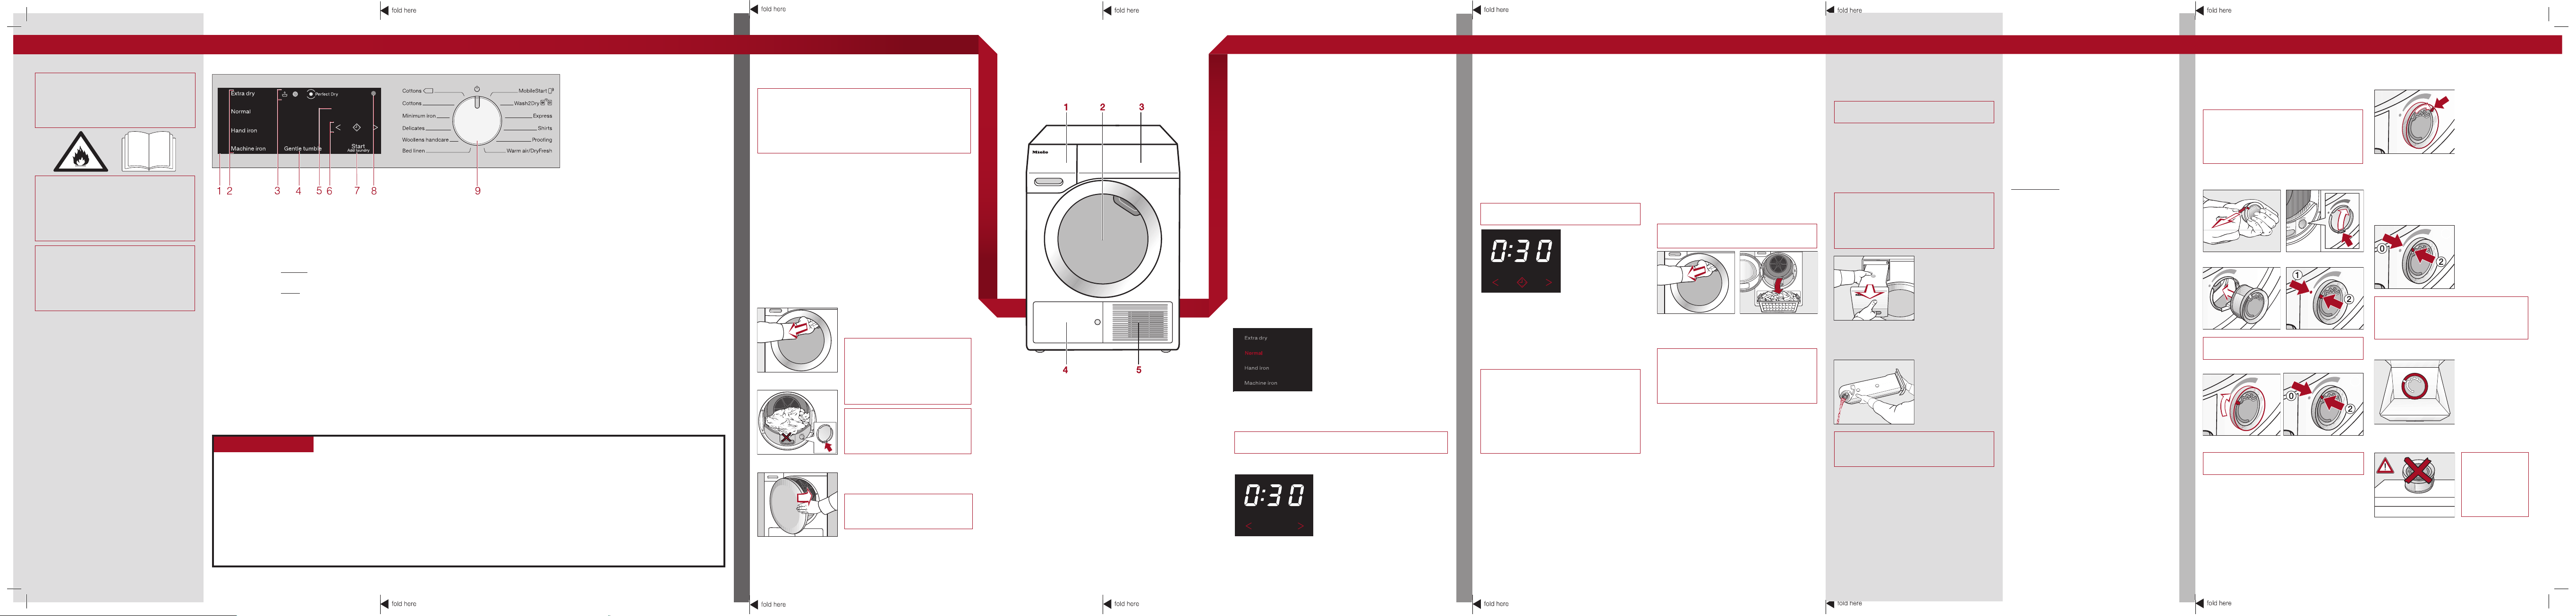
1 Control panel
The 2, 4, 6 and 7 sensors react to
fingertip contact.
Selection is possible as long as the
respective sensor is illuminated.
– If a sensor is brightly lit, this means:
currently selected.
– If a sensor is dimly lit, this means:
selection possible.
2 Sensors for the drying levels
After selecting a drying level programme
with the programme selector: touch one
of the sensors to select a drying level.
Energy saving tips
To avoid unnecessarily long drying times
and high consumption of energy:
– Spin the laundry at the maximum spin
speed in the washing machine.
– Load according to the optimum
amount of laundry recommended for
the programme being used. This will
mean that the energy consumption for
the amount of laundry is at its most
economical.
3 Indicator lights
– light up if necessary: see
"Problem solving guide".
– Perfect Dry:
The Perfect Dry system measures
the residual moisture present in the
laundry and provides a more precise
drying result.
This indicator ...
... will flash until the programme
duration has been determined, and
then go out.
... will light up when the selected
drying level is reached near the end of
the programme.
... will remain dark with the following
programmes: Woollens handcare,
Warm air/DryFresh.
4 Gentle tumble sensor
For drying temperature-sensitive textiles
with the symbol.
– Make sure the room temperature is not
too high.
If there are other heat producing
appliances in the room in which the
tumble dryer is located, make sure the
room is well-ventilated and switch the
other appliances off, if possible.
5 Time display
The remaining programme duration will
be displayed in hours and minutes.
6 sensors
– After touching the sensor, a later
start time for the programme can be
selected.
– The and sensors are used for
selecting the duration of the Delay
start period or the duration of the
Warm air programme.
7
Start/Add laundry sensor
Touching the Start/Add laundry
sensor starts the selected programme.
The current programme can be
interrupted to add laundry. The sensor
flashes slowly as soon as it is possible
for a programme to be started and then
lights up constantly after the programme
has started.
8 Optical interface
For service technicians.
9 Programme selector
The programme selector can be turned
clockwise or anti-clockwise.
The dryer is switched on by selecting a
programme, and switched off by turning
the programme selector to the
position.
- MobileStart : Remote control via
the App.
- Wash2Dry : Programme
selection based on a connected
washing machine.
– Clean the fluff filters in the door and
in the door opening after every drying
cycle.
1. Notes on correct laundry care
ɑDamage due to foreign objects.
Foreign objects left in the laundry can melt, burn, or
explode.
Ensure that any foreign objects (e.g. detergent
dispensing balls, lighters, etc.) have been removed from
the laundry.
ĺ Sort the laundry according to the type of fibre and
weave, size, garment care label symbol and the drying
level required.
ĺ Untangle the laundry.
ĺ Check seams and stitching to ensure that padding and
linings are intact.
ĺ Fasten duvet covers and pillow cases to prevent small
items from being rolled up inside them.
ĺ Fasten hooks and eyes.
ĺ Tie together textile belts and apron ties.
ĺ Sew in or remove loosened underwiring from bras.
2. Loading the tumble dryer
ĺ Open the door.
ĺ Unfold the laundry and load
loosely into the drum.
Do not overload the drum.
Overloading can cause
unnecessary wear and tear of
the laundry, give a
disappointing drying result and
cause more creasing.
If you are not using a fragrance
flacon: push the tab down
completely (see arrow) so that
the socket is closed.
ĺ Shut the door with a gentle
swing.
When closing the door, make
sure that laundry does not get
trapped in the door opening.
OPERATION
1 Condensed water container
– empty after every drying programme
2 Door
3 Control panel
4 Access panel for the heat exchanger and plinth filter
– Do not open during drying
5 Cool air intake grille
– Do not obstruct with a laundry basket or other objects
3. Selecting a programme and starting it
There are 3 possible ways to select a programme:
ĺ Turn the programme selector.
1. Selecting a programme using the programme selector
– A drying level may light up and durations will appear in
the time display.
ĺ Select programme settings
2. MobileStart programme selector position
– The tumble dryer is operated via the App.
3. Wash2Dry programme selector position
– Programme selection is determined by the washing
machine. No further programme setting is necessary.
– Once the washing machine programme has finished,
the drying time will be displayed in the tumble dryer time
display.
ĺ Once the wash programme has ended, place the clean
laundry in the tumble dryer and start the drying
programme.
Selecting programme settings
Programmes with drying levels
– Cottons, Minimum iron, Delicates, Shirts, Express, Bed
linen
ĺ Touch the sensor for the drying
level you want. It then lights up
brightly.
Any drying level can be selected
for the Cottons, Express, and
Bed linen programmes.
A limited range is available with
the other programmes.
Other programmes
– Cottons , Woollens handcare, Proofing
The drying level⁄duration is preset by the dryer
automatically and cannot be altered.
– Warm air/DryFresh
ĺ Touch the sensor repeatedly
until the required programme
duration appears in the display.
You can set the duration in
10-minute increments from 0:20
minutes up to 2:00 hours.
ĺ You can reduce the duration with the sensor.
Selecting Gentle tumble (if required)
Delicate fabrics (with the symbol on the
care label, e.g. acrylic garments) are dried
at a lower temperature and with a longer
programme duration.
ĺ Touch the Gentle tumble sensor. It then
lights up brightly.
Selecting Delay start (if required)
With Delay start you can delay the start of
the programme by up to a maximum of
24hours.
Delay start cannot be used with the Warm
air/DryFresh programme.
ĺ Touch the .
It then lights up
brightly.
ĺ Touch the or sensor repeatedly until
the required Delay start time appears in
the display.
Starting a programme
ĺ Touch the flashing Start/Add laundry
sensor. It will light up.
Energy saving:
After 10 minutes the indicators dim and
the Start/Add laundry sensor starts
flashing.
ĺ Touch the Start/Add laundry sensor to
switch the indicators on again (this does
not have any effect on a running
programme).
Adding laundry
You can add laundry.
ĺ Follow the instructions in "Changing the
programme sequence".
DRYING
4. Removing the laundry at the
end of the programme
End of programme: lights up in the
time display and the Start/Add laundry
sensor goes out.
– Energy saving: After 10 minutes the
indicators dim and the Start/Add laundry
sensor starts flashing.
– The dryer will switch off automatically
15minutes after the end of the
Anti-crease phase (with programmes
without an Anti-crease phase it will switch
off 15minutes after the end of the
programme).
ɑDo not open the door before the end
of the programme.
ĺ Open the door.
ĺ Remove the laundry.
ɑCheck that all items have been
removed from the drum. If items are left
in the dryer, they could be damaged by
overdrying when the dryer is used the
next time.
If the dryer is switched on at the mains and
the door is opened, the drum lighting will
come on. It will go out after a few minutes
to save energy.
ĺ Turn the programme selector to .
ĺ Clean the fluff filters.
ĺ Shut the door with a gentle swing.
ĺ Empty the condensed water container.
Emptying the condensed water
container
Empty the condensed water container
after every drying programme.
The indicator will light up when the
maximum level in the condensed water
container is reached.
To switch the indicator light off: Open
and close the door while the dryer is
switched on.
Damage to the door and fascia panel.
The door and the fascia panel can be
damaged when removing the condensed
water container.
Always close the door completely.
ĺ Pull out the
condensed water
container.
ĺ To prevent water running out, keep it in a
horizontal position when carrying it. Hold
it at the front and at the back.
ĺ Empty the
condensed water
container.
ĺ Replace the
container in the
dryer.
Do not drink condensed water. It can
cause health problems in people and
animals.
Adding or removing laundry
You have forgotten an item of laundry, but
the programme has already started.
ĺ Touch the Start/Add laundrysensor.
Add* will light up in the time display.
ĺ Open the door.
ĺ Add or remove laundry.
ĺ Close the door.
ĺ Touch the Start/Add laundrysensor.
The programme will start.
* Exceptions:
In some cases, e.g. during the cooling
phase or in the Proofing programme, you
cannot add laundry.
– In these cases Add will not light up.
Cancelling or changing the current
programme
It is no longer possible to change the
selected programme. This prevents the
appliance being operated unintentionally,
e.g. by children.
If you adjust the programme selector,
will light up in the time display.
goes out when you select the original
programme again.
ĺ Turn the programme selector to the
position.
The programme is cancelled.
ĺ Select a new programme.
ĺ Touch the Start/Add laundrysensor.
Tip: Using a fragrance flacon (optional
accessory) will add a pleasant fragrance
to your laundry.
Before using a fragrance flacon, please
read "Warning and Safety instructions Using a fragrance flacon (optional
accessory)" and "Fragrance flacon" in the
operating instructions.
Inserting a fragrance flacon
1. 2.
3. 4.
Markers and must line up with each
other.
5. 6.
ĺ Turn the outer ring clockwise a little.
Markers und must line up with each
other.
Before drying
The further you open the flacon, the more
intense the fragrance.
After drying
To avoid the fragrance escaping needlessly:
When not in use, you can store the
fragrance flacon in its original
packaging. Ensure that it is positioned
so that it does not leak.
Before cleaning the fluff filters
CHANGING THE PROGRAMME SEQUENCE
ĺ Turn the outer
ring clockwise.
ĺ Turn the outer
ring anticlockwise until
marker is in
position .
ĺ Remove the
fragrance
flacon.
ĺ Only store the
fragrance
flacon in its
original
packaging.
Never lay the
fragrance
flacon down.
Otherwise, the
fragrance will
leak out.
M.-Nr. 11 631 460/00
T1 en - AU, NZ
Programme overview
Cleaning and care Problem solving guide
Gentle tumble
Machine iron
Hand iron
Normal
Extra dry
Programme Load* Items
X –
X X X X X
residual moisture.
covers, jackets, bathrobes, and flannelette bed linen
Cottons 8 kg Cotton items such as those described under Cottons Normal with normal
Cottons 8 kg Towelling, jersey wear, T-shirts, underwear, baby clothes, workwear,
Warning: Do not use Extra dry for jersey fabrics (e.g. T-shirts, underwear,
baby clothes), as they have a tendency to shrink.
Minimum iron 4 kg Workwear, overalls, pullovers, dresses, trousers, leggings and table linen. – X X – X
Delicates 2.5 kg Shirts, blouses, lingerie, appliquéd garments. – X X – Always active
Fluff filters
Removing visible fluff
Clean the 2 fluff filters in the door opening
after every drying cycle.
Remove the fragrance flacon first (if fitted).
ĺ Pull the upper
fluff filter forwards
– X – – –
2 kg Pullovers, cardigans, socks, stockings. – – – – –
The Miele@mobile App is used for selecting programmes and operating the machine.
The programme is selected automatically in conjunction with the programme selection on the connected washing machine.
Woollens
handcare
Bed linen 4 kg Bed linen X X X X –
MobileStart
Wash2Dry
Express 4 kg Garments suitable for the Cottons programme. X X X X –
Shirts 2 kg Shirts and blouses. – X X – X
Proofing 2.5 kg Microfibre fabric, skiwear, outerwear, fine close weave cotton garments
– – – – X
(poplin), tablecloths.
Fire hazard! Do not use proofing agents containing paraffin.
bags, blankets.
DryFresh (for freshening up): All fabrics. Use the DryFresh flacon and
select a programme duration of 60 minutes.
8 kg Warm air (for drying): Thick and multi-layered jackets, pillows, sleeping
Warm air /
DryFresh
– Always observe the maximum recommended loads given in the
Tips on drying
Garment care label symbols
* Weight of dry laundry X = Yes, – = No
Drying
Programme chart.
Overloading can cause unnecessary wear
and tear to the laundry. It can give a
Normal ⁄ Higher temperatureReduced temperature: select Gentle
sure your laundry is spun at the maximum spin speed in the
– Do not load the drum with items that are still soaking wet. Make
disappointing drying result and cause
more creasing.
tumble (for delicate fabrics).
Do not tumble dry
Very hotHotWarmDo not iron
Ironing
washing machine before drying.
This is particularly the case for garments made from very fine
– Minimum iron fabric tends to crease more, the larger the load.
weave fabric, such as shirts or blouses.
ĺ Push the upper fluff filter back in until it
clicks into position.
ĺ Close the door.
PROGRAMME CHART
to remove it.
ĺ Use your fin-
gers or a vacuum cleaner to
remove the fluff
from the surface
of the filter.
Cleaning the fluff filters and air flow
openings thoroughly
If the drying duration has become longer
or the surface of the filters is visibly
compacted with fluff, you should carry out
the following cleaning procedure.
ĺ Pull the upper fluff filter forwards to
remove it.
ĺ Turn the yellow
dial on the lower
fluff filter in the
direction of the
arrow (until you
hear it click).
ĺ Hold the dial and
pull the fluff
filter forwards to
remove it.
ĺ Use a vacuum
cleaner with a
long crevice
nozzle attached
to remove any
visible fluff from
the upper air flow
openings.
ĺ Flush the fluff filters through with warm
running water.
ĺ Shake the fluff filters thoroughly and then
dry them carefully.
Ensure the filters are dry before
replacing them. Wet filters could cause
operational faults.
ĺ Refit all of the fluff filters and close the
door.
Plinth filter
Clean the plinth filter whenever the
indicator light comes on or when the
programme duration is longer than usual.
Switch the indicator light off: Open and
close the door while the dryer is switched
on.
ĺ Press the round,
indented area
on the heat
exchanger access
panel to open it.
ĺ Pull the plinth filter
out by the handle.
Removing the plinth filter will cause a
guide pin in the dryer to come out. This pin
ensures that the heat exchanger access
panel can only be closed if the plinth filter is
fitted.
ĺ Pull the handle
out of the plinth
filter.
ĺ Clean the plinth
filter thoroughly
under running
water.
ĺ Carefully squeeze the water out of the
plinth filter.
The plinth filter must not be refitted
dripping wet.
ĺ Use a damp
cloth to remove
any fluff from the
access panel.
Refitting the plinth filter
ĺ Fit the filter back
on the handle the
right way.
ĺ Insert the handle
with the plinth
filter attached
over the two
guide pins.
ĺ Close the heat exchanger access panel.
Problem/Fault message Possible cause and remedy
lights up after a programme is cancelled
lights up at the end
of a programme
lights up
Bars flash in the display at the end of a programme: ……
…
flashes/lights up
after the tumble dryer
is switched on and a
programme cannot be
selected
The display is dark
and only the Start/Add
laundry sensor is flashing
The condensed water container is full or there is a kink in the
drain hose.
ĺ Empty the condensed water container.
ĺ Check the drain hose.
To switch off :
ĺ Open and close the door (with the dryer switched on).
There is a build-up of fluff (see "Cleaning and Care").
ĺ Clean the fluff filters.
ĺ Clean the plinth filter.
To switch off :
ĺ Open and close the door (with the dryer switched on).
The programme selector has been moved.
ĺ Select the original programme again. The time remaining
will appear in the display.
The programme has finished but the laundry has not yet
cooled down.
ĺ Either remove the laundry and spread it out to cool down
or leave it in the tumble dryer to cool down during the
cooling phase.
Access via a code has been activated.
ĺ You must enter the correct code to use the tumble dryer.
See "Programmable functions - PIN Code" in the
operating instructions.
This is not a fault, but a normal function.
ĺ Touch a sensor to switch on the indicators.
See "Programmable functions - Control panel switch-off
status" in the operating instructions.
The drum will turn at intervals in the Anti-crease phase.
CLEANING AND CARE
Problem/Fault message Possible cause and remedy
The dryer is switched
off at the end of the
programme
The laundry is not sufficiently dry
Items made of synthetic
fibres are charged with
static electricity after
drying
There is a build-up of
fluff
There are humming noises
The tumble dryer switches off automatically. This is not a
fault, but a normal function.
The load consisted of different types of fabric.
ĺ Finish drying using the Warm air timed drying programme.
ĺ Select a more suitable programme next time.
Tip: You can alter the drying levels for some programmes.
See "Programmable functions - Cotton drying levels" and
" Minimum iron drying levels" in the operating
instructions.
Synthetic fibres tend to attract static charge.
Static charge can be reduced by adding fabric softener to
the final rinse in the washing programme.
Fluff is principally the result of friction when garments are
being worn and to some extent when they are being washed.
Machine drying hardly causes any fluff to form.
Fluff is collected by the fluff filters and the plinth filter and can
be removed easily.
See "Cleaning and care".
This is not a fault. The compressor is operating.
These noises are normal and caused by the operation of the
compressor.
Quick Start Guide
Heat pump tumble dryer
These short instructions are not a substitute for the operating instructions supplied with
the appliance. Please read the operating instructions supplied with your tumble dryer
before using it for the first time.
Take note of the Warning and Safety instructions, as well as the full descriptions on how to
use your appliance.
en - AU, NZ M.-Nr. 11 631 460
PROBLEM SOLVING GUIDE
 Loading...