

Page 1
Operating and installation instructions
Refrigerator with DynamicCooling
K 14820 SD
K 14820 SD ed/cs
To avoid the risk of accidents or
damage to the appliance, it is
essential to read these instructions
before it is installed and used for the
first time.
en-AU
M.-Nr. 09 029 530
Page 2

Contents
Guide to the appliance .............................................4
Caring for the environment..........................................6
Warning and Safety instructions .....................................7
How to save energy ...............................................12
Switching on and off ..............................................13
Before using for the first time.........................................13
Cleaning and care ..............................................13
Operating the appliance ............................................13
Switching on .....................................................13
Switching off .....................................................14
Settings mode ....................................................14
Switching the sensor tones on/off...................................15
Activating or de-activating the safety lock ............................15
Switching off for longer periods of time .................................16
The correct temperature ...........................................17
. . . temperature in the refrigerator.....................................17
Setting the temperature .............................................17
Temperature range ..............................................18
Temperature display ...............................................18
Changing the temperature display brightness .........................18
Alarm...........................................................19
To switch off the door alarm whilst the door is still open ....................19
To switch on the door alarm .........................................19
SuperCool and DynamicCooling ....................................20
SuperCool .......................................................20
DynamicCooling m................................................20
Using the refrigerator efficiently ....................................22
Different storage zones .............................................22
Food which should not be stored in a refrigerator.........................23
When shopping for food ............................................23
Storing food correctly ..............................................23
Fruit and vegetables .............................................23
Unpacked meat and vegetables ...................................24
Protein rich foods ...............................................24
Meat .........................................................24
2
Page 3

Contents
Adjusting the interior fittings .......................................25
Moving the shelves ................................................25
Split shelf ........................................................25
Adjusting the condiment tray/bottle shelf ...............................26
Moving the bottle divider ............................................27
Automatic defrost ................................................28
Cleaning and care ................................................29
Cleaning the interior and accessories ..................................30
Cleaning the door and side panels ....................................31
Ventilation gaps ...................................................32
Door seal ........................................................32
Rear of appliance - metal grille .......................................32
Active charcoal filters .............................................33
To change the active charcoal filters...................................33
Problem solving guide ............................................35
Noises ..........................................................37
After Sales ......................................................38
Electrical connection..............................................39
Electrical connection ...............................................39
Installation ......................................................40
Side-by-side installation.............................................40
Location .........................................................40
Climate range ..................................................40
Ventilation .......................................................41
Installation .......................................................41
Aligning the appliance..............................................41
Supporting the appliance door .......................................41
Appliance dimensions ..............................................42
Changing the door hinging .........................................43
Aligning the appliance door ........................................50
Building in the appliance ..........................................51
3
Page 4

Guide to the appliance
a On/Off sensor
b DynamicCooling sensor
c SuperCool sensor
d Sensor for setting a lower
temperature (X)
e Safety lock indicator light
(only visible when Safety lock is
activated)
f Temperature display
g "Cooling" symbol
h Sensor for setting a higher
temperature (Y)
i Alarm off sensor
(only visible when the door alarm
sounds)
j Change active charcoal filter
indicator
(only visible when the active
charcoal filter needs to be changed)
4
Page 5
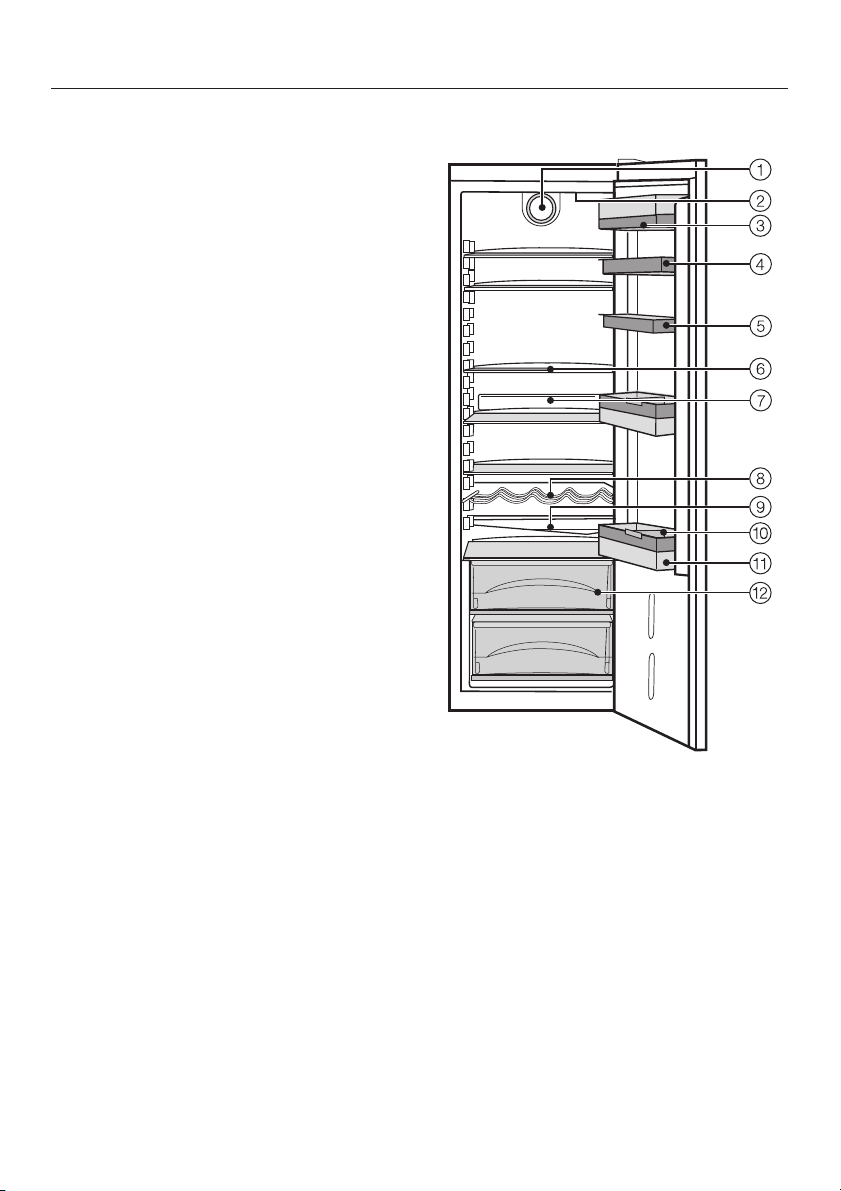
a DynamicCooling fan
b Ceiling lighting
c Butter and cheese compartment
d Egg tray/Condiment tray
e Universal container
f Adjustable shelves
g Active charcoal filter holder
h Bottle rack
i Condensate channel and
drain hole
j Bottle divider
k Bottle shelf
l Fruit and vegetable containers
Guide to the appliance
5
Page 6
Caring for the environment
Disposal of the packing
material
The transport and protective packing
has been selected from materials which
are environmentally friendly for disposal
and can normally be recycled.
Ensure that any plastic wrappings,
bags, etc. are disposed of safely and
kept out of the reach of babies and
young children. Danger of suffocation.
Rather than just throwing these
materials away, please ensure they are
offered for recycling.
Disposing of your old
appliance
Electrical and electronic appliances
often contain materials which, if
handled or disposed of incorrectly,
could be potentially hazardous to
human health and to the environment.
They are, however, essential for the
correct functioning of your appliance.
Please do not therefore dispose of it
with your household waste.
Please dispose of it at your local
community waste collection / recycling
centre and ensure that it presents no
danger to children while being stored
for disposal.
The plug must be rendered useless
and the cable cut off directly behind the
appliance or the machine to prevent
misuse. Take care not to damage the
pipework at the back of it before or
during transportation to an authorised
collection depot.
In this way, refrigerant in the pipework
and oil in the compressor will be
contained, and will not leak out into the
environment.
6
Page 7
Warning and Safety instructions
This appliance complies with all
relevant local and national safety
requirements. Improper use can,
however, present a risk of both
personal injury and material
damage.
To avoid the risk of accidents and
damage to the appliance, please
read these instructions carefully
before installation and before using
it for the first time. They contain
important notes on the installation,
safety, operation and care of the
appliance.
Keep these instructions in a safe
place and pass them on to any
future user.
Correct application
This appliance is intended for
~
domestic use only for the cool storage
of food and drink.
Any other usage is not supported by
the manufacturer and could be
dangerous. The manufacturer cannot
be held liable for damage resulting
from the incorrect or improper use of
the appliance.
This appliance is not intended for
~
use by persons (including children)
with reduced physical, sensory or
mental capabilities, or lack of
experience and knowledge, unless they
are supervised whilst using it, or have
been shown how to use it by a person
responsible for their safety.
Safety with children
This appliance is not a toy! To avoid
~
the risk of injury, do not allow children
to play with it or near it, or to play with
the controls. Neither should they be
allowed to swing on the door. Please
supervise young children whilst you are
using it. Older children may only use
the appliance when its operation has
been clearly explained to them and
they are able to use it safely,
recognising the dangers of misuse.
7
Page 8

Warning and Safety instructions
Technical safety
Before setting up the appliance,
~
check it for any externally visible
damage. Do not install and use a
damaged appliance.
A damaged appliance is dangerous.
If the connection cable is faulty it
~
must only be replaced by a service
technician authorised by the
manufacturer to protect the user from
danger.
This appliance contains the coolant
~
Isobutane (R600a), a natural gas which
is environmentally friendly. Although it
is flammable, it does not damage the
ozone layer and does not increase the
greenhouse effect. The use of this
coolant has, however, led to a slight
increase in the noise level of the
appliance. In addition to the noise of
the compressor, you might be able to
hear the coolant flowing around the
system. This is unavoidable, but does
not have any adverse effect on the
performance of the appliance. Care
must be taken during transportation
and setting up of the appliance that no
parts of the cooling system are
damaged. Leaking coolant can
damage the eyes.
In the event of any damage:
- avoid open flames and anything
which creates a spark,
- disconnect from the mains,
- air the room in which the appliance is
located for several minutes and
- contact Miele for advice.
The more coolant there is in an
~
appliance, the larger the room it should
be installed in. In the event of a
leakage, if the appliance is in a small
room, there is the danger of
combustible gases building up.
For every8gofcoolant at least 1 m
room space is required. The amount of
coolant in the appliance is stated on the
data plate inside the appliance.
Safe operation of the appliance is
~
only assured if it has been installed and
connected in accordance with these
operating and installation instructions.
Before connecting the appliance,
~
make sure that the connection data on
the data plate (voltage and rated load)
match the mains electricity supply.
This data must correspond in order to
avoid the risk of damage to the
appliance. Consult a qualified
electrician if in any doubt.
Do not connect the appliance to the
~
mains electricity supply by a
multi-socket unit or an extension lead.
These do not guarantee the required
safety of the appliance (e.g. danger of
overheating).
3
of
8
Page 9

Warning and Safety instructions
The electrical safety of this
~
appliance can only be guaranteed
when continuity is complete between it
and an effective earthing system which
complies with current local and national
safety regulations. It is most important
that this basic safety requirement is
present and tested regularly, and
where there is any doubt, the
household wiring system should be
inspected by a qualified electrician.
The manufacturer cannot be held liable
for damage or injury caused by the lack
of or inadequacy of an effective
earthing system (e.g. electric shock).
Installation, maintenance and
~
repairs may only be carried out by a
suitably qualified and competent
person in strict accordance with current
national and local safety regulations.
Repairs and other work by unqualified
persons could be dangerous. The
manufacturer cannot be held liable for
unauthorised work.
While the appliance is under
~
warranty, repairs should only be
undertaken by a service technician
authorised by the manufacturer.
Otherwise the warranty will be
invalidated.
The appliance must be isolated from
~
the electricity supply during installation,
maintenance and repair work.
The appliance is only completely
isolated from the electricity supply
when:
it has been switched off at the wall
–
socket and the plug has been
withdrawn, or
the fuse from the fused spur
–
connection unit has been withdrawn,
or
the mains fuse has been
–
disconnected, or
– the screw-out fuse has been
removed (in countries where this is
applicable).
Faulty components must only be
~
replaced by genuine Miele original
spare parts. The manufacturer can only
guarantee the safety of the appliance
when Miele replacement parts are
used.
This appliance may only be used in
~
mobile installations if a risk assessment
of the installation has been carried out
by a suitably qualified engineer.
In areas which may be subject to
~
infestation by cockroaches or other
vermin, pay particular attention to
keeping the appliance and its
surroundings in a clean condition at all
times. Any damage which may be
caused by cockroaches or other vermin
will not be covered by the warranty.
9
Page 10

Warning and Safety instructions
Correct use
Never store explosive materials in
~
the appliance or any products
containing propellants (e.g. spray
cans). Thermostats switching on may
produce sparks which could present a
fire hazard. Flammable compounds
could explode.
Do not operate any electrical
~
equipment (e.g. an electric ice-cream
maker) inside the appliance. Danger of
sparking and explosion.
If storing alcohol with a high
~
percentage proof, make sure it is tightly
closed and stored upright.
Danger of explosion.
Observe the "use by" dates given on
~
food to avoid the risk of food poisoning.
Storage times will depend on several
factors, including the freshness and
quality of the food as well as the
temperature at which it is stored. Follow
the instructions given on food
manufacturer's packaging on storage
conditions required, as well as the "use
by" date.
Do not use sharp edged objects to
~
–
remove frost and ice,
–
separate food which has become
frozen.
They will damage the evaporator,
causing irreversible damage to the
appliance.
Do not use defrosting sprays or
~
de-icers, as they might contain
substances which could damage the
plastic parts or which could cause a
build-up of gases and pose a danger to
health.
Do not use mechanical devices or
~
other means to accelerate the
defrosting process, other than those
recommended by the manufacturer.
Do not use any oils or grease on the
~
door seal, as these will cause the seal
to deteriorate and become porous with
time.
Do not store cooking oil in the
~
refrigerator door. Traces of oil can
cause stress cracks to occur in the
plastic components in the door.
Do not block the ventilation gaps in
~
the appliance as this would impair the
efficiency of the appliance, increase the
electricity consumption and could
cause damage to the appliance.
The appliance is designed for use
~
within certain climate ranges (ambient
temperatures), and should not be used
outside this range. The climate range
for your appliance is stated on the data
plate inside the appliance.
Installing it in a room with too low an
ambient temperature, e.g. a garage,
will lead to the appliance switching off
for longer periods so that it cannot
maintain the required temperature.
Do not use a steam-cleaning
~
appliance to clean this appliance.
Steam could reach the electrical
components and cause a short circuit.
10
Page 11

Warning and Safety instructions
The following applies to stainless
steel appliances:
Do not place sticky notes, adhesive
~
tape, masking tape or any other
adhesive agent on the treated surface
of the door.
The coating will become damaged and
lose its protective properties against
soiling.
The high quality treated surface of
~
the door is susceptible to scratching.
Even fridge magnets can cause
scratching.
Disposal of your old appliance
Before disposing of an old
~
appliance, first make the door latch or
lock unusable.
This way you will prevent children from
accidentally locking themselves in and
endangering their lives.
Be careful not to damage any part of
~
the pipework whilst awaiting disposal,
e.g. by
–
puncturing the refrigerant channels
in the evaporator.
–
bending any pipework.
–
scratching the surface coating.
Splashes of refrigerant can damage the
eyes.
The manufacturer cannot be held
liable for damage caused by
non-compliance with these Warning
and safety instructions.
11
Page 12

How to save energy
Normal energy consumption Increased energy consumption
Installation In a ventilated room. In an enclosed, unventilated room.
Protected from direct sunlight. In direct sunlight.
Not situated near a heat source
(radiator, oven).
Where the ideal ambient room
temperature is approx. 20 °C.
Do not cover the cross-section of
the air inlet and outlet and keep free
of dust.
Temperature setting
with a thermostat which
is approximate
(set in stages).
Temperature setting
with a thermostat which
is exact to the degree
(digital display).
Use Do not change the arrangement of
Defrosting Defrost the freezer compartment
With a medium setting of 2 to 3. With a high setting: the lower the
Storage section 8 to 12 °C On appliances with winter setting,
Refrigerator section 4 to 5 °C
-
PerfectFresh zone just above 0 °C
Freezer section -18 °C
Wine storage section 10 to 12 °C
the drawers and shelves.
Only open the doors when
necessary and for as short a time as
possible.
Store food in an organised way. If food is not stored in an organised
Allow hot food and drinks to cool
down before placing them in the
appliance.
Store food covered or packaged. The evaporation or condensation of
Place frozen food in the refrigerator
to defrost.
Do not overfill the appliance to allow
air to circulate.
when a layer of ice 0.5 cm thick has
built up.
Situated near a heat source
(radiator, oven).
Where there is a high ambient room
temperature.
temperature in the compartment, the
higher the energy consumption.
please make sure that the winter
setting is switched off when the
ambient temperature is warmer than
16 °C.
Frequent opening of the doors for
long periods will cause a loss of
coldness.
way, searching for an item will mean
the door is open for longer.
Placing hot food in the appliance
will cause the compressor to run for
a long time, as the appliance will
have to work harder to lower the
temperature.
liquids will cause a loss of coldness
in the refrigerator.
A layer of ice hinders the cold from
reaching the frozen food, and
causes an increase in energy
consumption.
12
Page 13
Switching on and off
Before using for the first time
To ensure the correct functioning of
the appliance, let it stand for between
½ and 1 hour after transporting it to its
final location before connecting it to
the mains.
Protective foil
The stainless steel strips and frames
have a layer of protective foil to prevent
scratching during transportation.
The external surfaces of stainless steel
appliances are also covered with a
protective foil.
^ Remove the protective foil only after the
appliance has been installed in its
intended location.
Cleaning and care
^ Immediately after removing the
protective foil, apply the Original
Miele Care product for stainless steel
(availabe from Miele or at
www.miele.com.au) to stainless steel
strips and frames.
^
Also apply the Original Miele Care
product for stainless steel to the side
panels after removing the protective
foil.
Appliance doors have a special
coating that is not susceptible to
soiling. Do not apply this product to
doors.
Clean the inside of the appliance and
^
the accessories with lukewarm water
and then dry with a soft cloth.
Active charcoal filters
(Active AirClean filters)
Place the active charcoal filters
^
supplied inside the holder, and place
the holder on one of the shelves
inside the refrigerator (see "Active
charcoal filters").
Operating the appliance
A light touch of the finger on the
sensors is all that is required to operate
this appliance.
Switching on
^ Touch the On/Off sensor until the
temperature display comes on.
The appliance will start to cool, and the
interior lighting will come on when the
door is opened.
To enable the temperature to get
sufficiently cold inside the appliance,
allow the appliance to run for a few
hours before placing food in it.
Important! Each time the Original
Miele Care product for stainless steel
is used, it forms a protective film
against dirt and water.
13
Page 14

Switching on and off
Switching off
Touch the On/Off sensor until all of
^
the indicators go out.
The interior light will not come on when
you open the door and the cooling
process will be switched off. (If this
does not happen, the safety lock is still
activated).
Settings mode
Certain settings on the appliance can
only be selected in the settings mode.
How to select the settings mode and
how to change the settings is
described in the relevant section of
these instructions.
Overview of functions that can be
selected in the settings mode:
To enter or leave the settings
mode
To switch the sensor tones
on/off
(see "Switching on and off")
To confirm that the active
charcoal filters have been
changed (see "Active charcoal
filters")
To switch the safety lock on/off
(see "Switching on and off")
c
b
^
u
14
To change the brightness of
the temperature display
(see "The correct
temperature")
The door alarm is automatically
disabled when the appliance is in
the settings mode. As soon as the
door is closed, the door alarm is
activated again.
d
Page 15
Switching on and off
Switching the sensor tones on/off
The sensor tone which sounds each
time a sensor is touched can be
deactivated.
Touch and leave your finger on the X
^
sensor.
^ At the same time, briefly touch the
On/Off sensor (without letting go of
the X sensor).
^ Leave your finger on the X sensor for
another 5 seconds until c appears in
the display.
^ Touch the X sensor repeatedly until b
appears in the display.
^ Touch the On/Off sensor.
^
By touching the X sensor, you can
now select whether the sensor tones
are switched on or off:
b0: Sensor tones are switched off
b1: Sensor tones are switched on
b –: Return to menu.
The old setting lights up, and your
newly selected setting flashes.
^
Touch the On/Off sensor to confirm a
new setting.
^
Touch the X sensor repeatedly until c
appears in the display.
^
Touch the On/Off sensor.
You have now left the settings mode.
Activating or de-activating the safety
lock
The safety lock can be activated to
prevent the appliance being switched
off inadvertently.
Touch and leave your finger on the X
^
sensor.
^ At the same time, briefly touch the
On/Off sensor (without letting go of
the X sensor).
^ Leave your finger on the X sensor for
another 5 seconds until c appears in
the display.
^ Touch the X sensor repeatedly until u
appears in the display.
^
Touch the On/Off sensor.
^
By touching the X sensor, you can
now select whether the safety lock is
switched on or off:
u0: The safety lock is deactivated
u1: The safety lock is activated
u –: Return to menu.
The old setting lights up, and your
newly selected setting flashes.
^
Touch the On/Off sensor to confirm a
new setting.
^
Touch the X sensor repeatedly until c
appears in the display.
^
Touch the On/Off sensor.
15
Page 16
Switching on and off
You have now left the settings mode.
The safety lock indicator
in the temperature display when the
safety lock has been activated.
X will light up
Switching off for longer
periods of time
If the appliance is not going to be used
for a longer period of time, e.g. whilst
on holiday:
switch the appliance off,
^
switch off at the wall and withdraw
^
the plug from the socket, or
disconnect the mains fuse or remove
the screw-out fuse in countries where
this is applicable,
clean the appliance out and
^
^ leave the door ajar to air the
appliance.
If, during a long absence, the
appliance is switched off but not
cleaned out and the door is left shut,
there is a danger of mould and
odours building up inside the
appliance.
16
Page 17
The correct temperature
It is very important to set the correct
temperature for storing food in the
appliance. Micro-organisms will cause
food which is not stored at the correct
temperature to deteriorate rapidly.
Temperature influences the growth rate
of these micro-organisms. Reducing
the temperature reduces their growth
rate.
The temperature in the appliance will
rise:
the more often the door is opened
–
and the longer it is kept open,
– the more food that is stored in it,
– the warmer the food is which is being
put into it,
– the higher the ambient temperature
surrounding the appliance.
The appliance is designed for use in
specific ambient temperatures
(climate ranges). Do not use in
ambient temperatures for which it is
not designed.
. . . temperature in the
refrigerator
We recommend a temperature of 4°C
in the middle of the refrigerator.
Setting the temperature
The temperature inside the appliance
can be selected by touching the arrow
sensors on either side of the
temperature display.
By touching the
X sensor: the temperature will get
colder
Y sensor: the temperature will get
warmer.
The temperature being set will flash in
the display.
When touching the sensors, the
following information shows in the
display:
– Touching a sensor once: the last
temperature selected flashes.
– Each subsequent touch of a sensor:
adjusts the temperature shown in
1 °C steps.
–
Leaving a finger on the sensor:
changes the temperature
continuously.
When the highest or lowest
temperature in the range is reached,
the X or Y sensor disappears.
Approx. 5 seconds after taking your
finger off the sensor, the average,
current temperature inside the
appliance is automatically shown.
17
Page 18
The correct temperature
If you have adjusted the temperature,
wait for approx. 6 hours if the
appliance is not very full and for
approx. 24 hours if the appliance is
full before checking the temperature
display, as it will take this long for the
display to give an accurate reading. If,
after this time, the temperature is still
too high or too low, you will need to
adjust it again.
Temperature range
The temperature can be adjusted from
2°Cto9°C.
The ambient temperature in the room
and the installation location can affect
the time it takes for the appliance to
reach the lowest temperature. If the
ambient temperature is too high, the
appliance may not reach the lowest
temperature.
Temperature display
During normal operation, the
temperature display on the control
panel shows the average temperature
in the refrigerator.
The temperature display will flash if
–
the temperature is not within the
possible temperature range (0 °C to
19 °C),
–
a different temperature is being set.
Changing the temperature display
brightness
The temperature display brightness can
be adjusted to suit the lighting
conditions of the room.
Touch and leave your finger on the X
^
sensor.
^ At the same time, briefly touch the
On/Off sensor (without letting go of
the X sensor).
^ Leave your finger on the X sensor for
another 5 seconds until c appears in
the display.
^ Touch the X sensor repeatedly until d
appears in the display.
^
Touch the On/Off sensor again.
^
The temperature display brightness
can now be changed by touching the
X sensor:
d0: Maximum brightness
d1: Reduced brightness
d –: Return to menu.
The old setting lights up, and your
newly selected setting flashes.
18
^
Touch the On/Off sensor to confirm a
new setting.
^
Touch the X sensor repeatedly until c
appears in the display.
^
Touch the On/Off sensor.
You have now left the settings mode.
Page 19
Alarm
Your appliance has been fitted with an
alarm to avoid energy being wasted if
the door is left open and to prevent
stored food becoming too warm.
The alarm will sound if the door is left
open for more than approx. 2 minutes.
The Alarm off sensor will light up red
and the "Cooling" symbol will flash.
The alarm will stop and the indicators
will go out as soon as the door is
closed.
To switch off the door alarm
whilst the door is still open
If you want to keep the door open
intentionally for more than approx.
2 minutes, you can switch the alarm off.
Touch the Alarm off sensor.
^
The alarm will stop.
The Alarm off sensor will light up
constantly and the "Cooling" symbol
will continue to flash until the door
has been closed.
To switch on the door alarm
The alarm system switches back on
automatically as soon as the door is
closed. It does not have to be switched
on manually.
19
Page 20
SuperCool and DynamicCooling
SuperCool
The SuperCool function can be used to
rapidly reduce the temperature in the
refrigerator to its lowest setting
(depending on the room temperature).
Switching on SuperCool
SuperCool is particularly recommended
for the faster chilling of large amounts
of fresh food or drink.
^ Touch the SuperCool sensor. It will
light up yellow.
The appliance will then work at full
power to lower the temperature.
Switching off SuperCool
The SuperCool function will switch itself
off automatically after approx. 6 hours.
The appliance will then continue to
work at normal power.
DynamicCooling m
When the DynamicCooling function is
not switched on, the natural circulation
of air in the appliance will cause
different temperature zones in the
refrigerator as the cold, heavy air will
sink to the lowest section of the
appliance. You should bear this in mind
when placing food in the appliance
(see "Using the refrigerator efficiently").
However, if you are placing a large
amount of food in the refrigerator at any
one time, it is a good idea to switch on
DynamicCooling. This way you can
distribute the temperature inside the
appliance to all areas more evenly so
that all the food will be chilled to about
the same degree.
The temperature is set as normal with
the temperature control.
DynamicCooling should also be
selected when:
– the ambient temperature in the room
is high (above approx. 33 °C), and
–
the room humidity level is high.
To save energy, the SuperCool function
can be switched off once food and
drinks are sufficiently chilled.
^
Touch the SuperCool sensor so that
the yellow indicator is dimmed.
The appliance will continue running at
normal power.
20
Switching on DynamicCooling
^
Touch the DynamicCooling sensor. It
will light up yellow.
Page 21
Switching off DynamicCooling
Touch the DynamicCooling sensor so
^
that the yellow indicator is dimmed
The fan automatically switches off
when the door is open.
SuperCool and DynamicCooling
21
Page 22
Using the refrigerator efficiently
pre-packed vegetables and other
Different storage zones
Due to the natural circulation of the air
in the appliance, there are different
temperature zones in the refrigerator.
Cold, heavy air sinks to the lowest
section of the appliance. Make use of
the different zones when placing food
in the appliance.
This appliance has DynamicCooling,
which helps to keep an even
temperature when the fan is running.
When DynamicCooling is switched
on, the difference between the
various zones is less pronounced.
Warmest area
The warmest area is in the top section
of the door. Use this for storing butter
and cheese.
Coldest area
The coldest area in a refrigerator is
directly above the vegetable
containers.
Use this for all delicate and highly
perishable food, e.g.
–
fish, meat, poultry,
–
sausage products, ready meals,
–
fresh food with a label stating it
should be kept at a temperature of
approx. 4 °C.
Do not store explosive materials in
the appliance or any products
containing propellants (e.g. spray
cans). Danger of explosion.
If storing alcohol with a high
percentage proof, make sure it is
tightly closed, and store upright.
Do not store cooking oil in the
refrigerator door. Traces of oil can
cause stress cracks to occur in the
plastic components in the door.
Food must not touch the back wall of
the refrigerator as it may freeze to
the back wall.
To allow air to circulate efficiently,
do not pack food too closely
together in the refrigerator. Do not
cover the fan in the rear wall of the
refrigerator as this is essential for
keeping the appliance cool.
–
dishes or baked goods containing
eggs or cream,
–
fresh dough, cake mixtures, pizza or
quiche dough,
–
soft cheese and other dairy
products,
22
Page 23

Using the refrigerator efficiently
Food which should not be
stored in a refrigerator
Not all food is suitable for refrigeration,
as some food is sensitive to cold.
Cucumbers, for example, become
glassy, eggplants bitter and potatoes
sweet. Tomatoes and oranges lose their
aroma, and the peel on citrus fruit
hardens.
Food which should not be stored in a
refrigerator includes:
pineapple, pomegranate, bananas,
–
avocado, mangos, papaya,
passionfruit, citrus fruit
– fruit which is not yet ripe
– eggplants, cucumbers, potatoes,
capsicum, tomatoes, zucchinis
– some hard cheeses, e.g. Parmesan
When shopping for food
The freshness of food when first placed
in the appliance is an important factor
in determining how long it stays fresh,
and how long it can be kept in the
refrigerator. Time out of the refrigerator,
e.g. during transportation, should be
kept to a minimum. For example, do not
allow food to stay in a hot car for too
long. Once food has started to
deteriorate, this process cannot be
reversed. As little as two hours outside
the refrigerator can cause food to start
deteriorating.
Storing food correctly
Food should generally be stored
covered or packaged. This will prevent
food smells from affecting other foods,
food from drying out, and also any
cross-contamination of bacteria. The
growth of bacteria, such as salmonella,
can be avoided by setting the correct
temperature and maintaining good
standards of hygiene.
Fruit and vegetables
Fruit and vegetables may be stored
loose in the vegetable containers.
Please be aware that not all types of
fruit and vegetables are suitable for
storing in the same container. Aromas
and flavours can transfer from one type
of food to another (e.g. carrots absorb
the smell and flavour of onions very
easily). Some food also gives off a
natural gas (ethylene) which speeds up
the rate at which other food perishes.
– Examples of fruit and vegetables
which produce a large amount of
this natural gas are:
Apples, apricots, pears, nectarines,
peaches, plums, avocado, figs,
blueberries, melons and beans.
23
Page 24

Using the refrigerator efficiently
Examples of fruit and vegetables
–
which react strongly to the natural
gases given off by other types of
fruit and vegetables are:
Kiwis, broccoli, cauliflower, Brussels
sprouts, mangos, honeydew melons,
apples, apricots, cucumbers,
tomatoes, pears, nectarines and
peaches.
Example: Broccoli should not be
stored with apples, as apples
produce a large amount of natural
gas to which broccoli is very
sensitive. The result is a shorter than
expected storage time for the
broccoli.
Unpacked meat and vegetables
Unpackaged meat and vegetables
should be stored separately. To avoid
any microbiological crosscontamination, these foods may only be
stored together if they are wrapped.
Meat
Meat should be stored unwrapped.
(Undo wrappings slightly to leave meat
loosely covered, and leave containers
open). This permits air to circulate
around the meat, allowing the surface
to dry slightly, which helps prevent the
growth of bacteria. To prevent the risk
of bacterial cross-contamination and
meat deteriorating, do not let one type
of meat come into direct contact with
another type.
Protein rich foods
Please note that foods rich in protein
deteriorate faster than others.
Shellfish, for example, deteriorates
faster than fish, and fish deteriorates
faster than meat.
24
Page 25
Adjusting the interior fittings
Moving the shelves
The shelves can be adjusted according
to the height of the food.
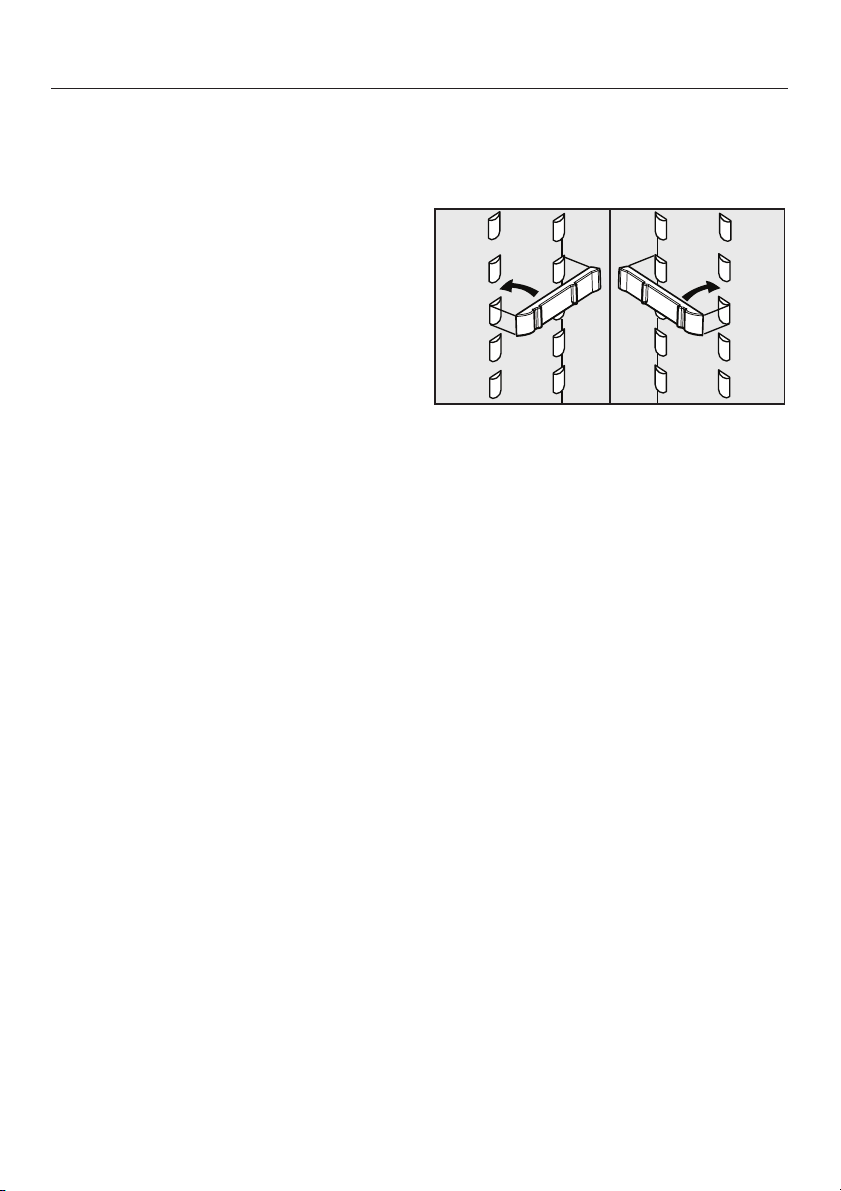
Raise the shelf, and pull it forwards
^
slightly until the notch at the side is in
line with the shelf support. It can then
be raised or lowered to the required
level.
The raised edge at the back must face
upwards to prevent food from touching
the back of the appliance and freezing
to it.
Stoppers prevent the shelves from
being dislodged by mistake.
Split shelf
In order to accommodate tall items in
the appliance, one of the shelves is
divided. The front section can be
pushed under the rear section.
^ Lightly push the rear glass shelf from
underneath.
To move the split shelf:
Take both halves of the split glass
^
shelf out,
fit the two brackets onto the supports
^
on either side at the required height,
^ and push the glass shelves in one
after the other.
The shelf with the raised edge must
be at the back.
^
Pull the front half of the glass shelf
forwards slightly and then push it
carefully under the rear half.
25
Page 26
Adjusting the interior fittings
Fruit and vegetable containers
on telescopic runners
The fruit and vegetable containers are
pushed in and out on telescopic
runners, and can be completely
removed if necessary.
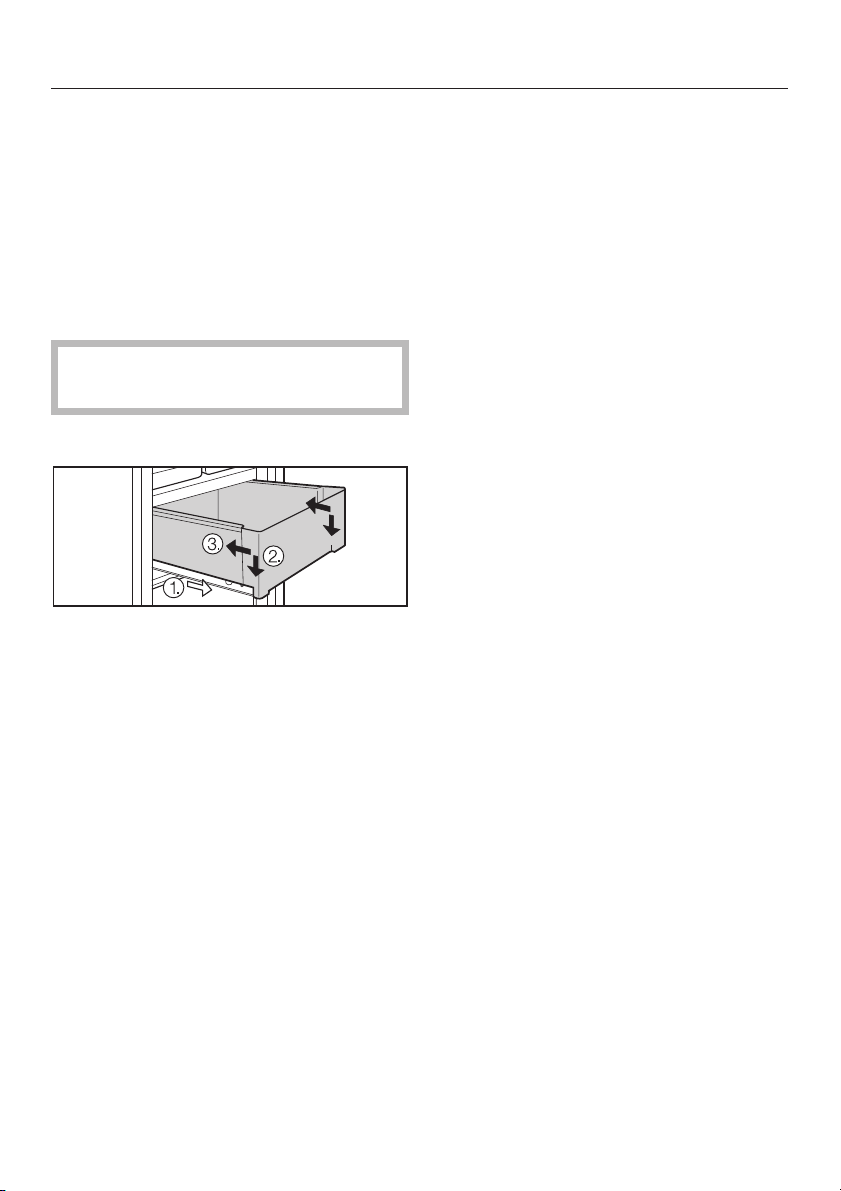
Pull the container right out and then
^
lift it up and off.
Push the runners back in again to
avoid injury or damage.
To replace a container,
^ place it back on the fully extended
runners a. The front of the runners
must be right up against the front of
the container b.
Adjusting the condiment
tray/bottle shelf
Lift the tray/shelf up and out of the
^
stainless steel frame to remove.
Push up the stainless steel frame,
^
and remove.
Replace the frame at the required
^
height. Ensure that it is securely
pushed back into position.
Replace the tray/shelf in the frame.
^
The tray/shelf can be removed
completely and used as a serving tray
at the table.
^
Then push the container back in c.
26
Page 27
Adjusting the interior fittings
Universal container
The universal container can be used
both to store and serve food.
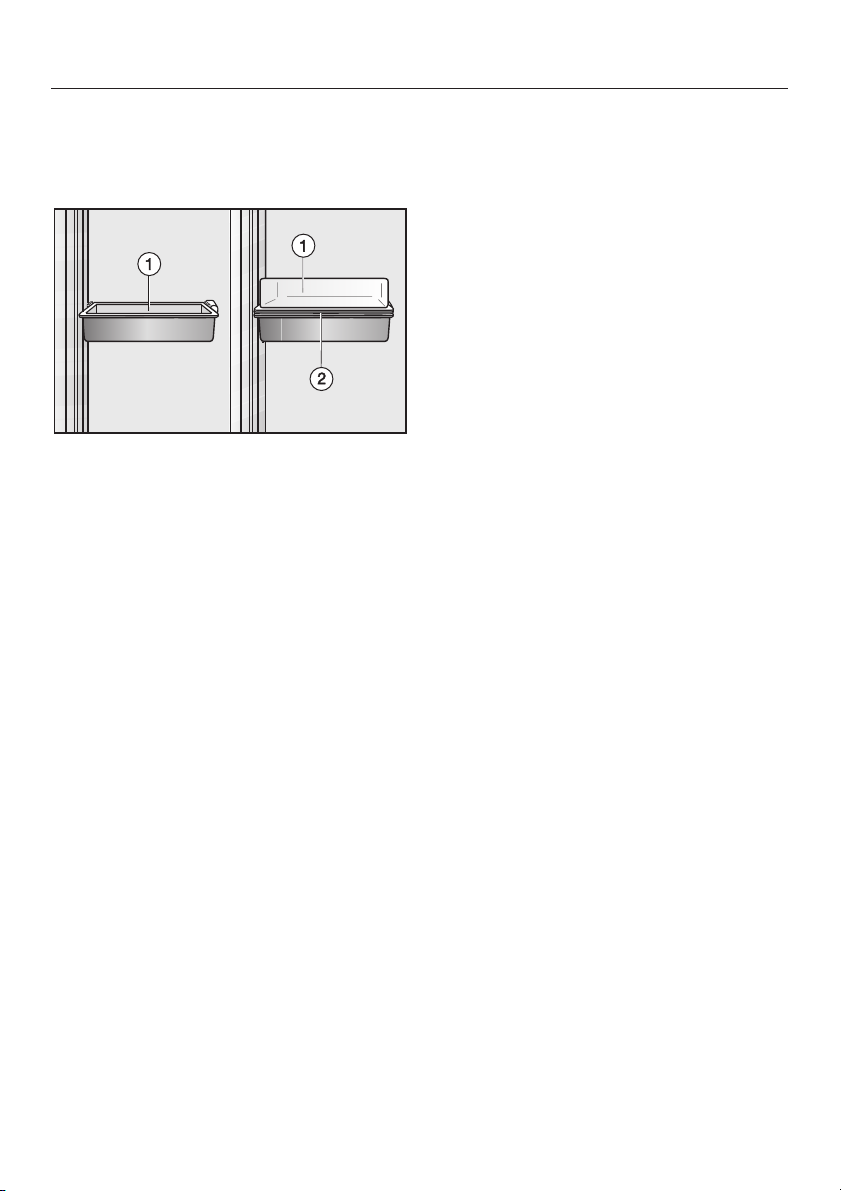
It consists of a deep tray a and a
shallow tray b. Both trays fit the
stainless steel frame.
If you wish to use the universal
container to serve food,
^ place the shallow tray b in the
stainless steel frame, and use the
deep tray as a lid a.
You can lift the universal container,
including contents, out of the frame and
take it to the table.
Moving the bottle divider
The bottle divider can be moved to the
left or right to ensure that bottles are
held securely in position when the door
is opened and shut.
The bottle divider can be removed
completely (e.g. for cleaning).
To do this, push up the front edge of
^
the bottle divider, and disengage it.
27
Page 28
Automatic defrost
The refrigerator defrosts automatically.
Condensate and frost can build up on
the back wall of the refrigerator whilst it
is in use. You do not need to remove
this, as it will defrost and evaporate
automatically with the warmth
generated by the appliance.
The condensate is drained away via a
channel and drain hole into an
evaporation system at the back of the
appliance.
Ensure that the condensate channel
and drain hole are kept clean and
are never blocked so that
condensate can flow away without
hindrance.
28
Page 29
Make sure that water cannot get into
the electronic unit or into the
lighting.
Do not let water get into the
drainage channel and drain hole
when cleaning.
Do not use a steam cleaning
apparatus to clean the appliance.
Steam could reach the electrical
components and cause a short
circuit.
Cleaning and care
To avoid damaging the outer
surfaces of your appliance, do not
use:
cleaning agents containing soda,
–
ammonia, acids or chlorides,
cleaning agents containing
–
descaling agents,
abrasive cleaning agents, e.g.
–
powder cleaners and cream
cleaners,
solvent-based cleaning agents,
–
stainless steel cleaners,
–
The data plate located inside the
appliance must not be removed.
It contains information which is
required in the event of a service call.
The stainless steel doors have a
special coating that is not
susceptible to soiling.
Do not apply the Original Miele Care
product for stainless steel to the
doors as visible smearing will occur.
The Original Miele Care product for
stainless steel can, however, be
used on other stainless steel
surfaces on the appliance (available
from Miele or at www.miele.com.au).
This product contains substances
that are gentle to stainless steel
surfaces and, unlike stainless steel
cleaners, it does not contain
polishing agents. Soiling is gently
removed and each time the Original
Miele Care product for stainless
steel is used, it forms a protective
film against dirt and water.
– dishwasher cleaners,
– oven sprays,
– glass cleaning agents,
– hard, abrasive sponges and
brushes, e.g. pot scourers,
– dirt erasers,
– sharp metal scrapers.
Before cleaning
^
Switch off the appliance.
^
Disconnect the appliance from the
mains. Switch off at the wall and
withdraw the plug from the socket, or
disconnect the mains fuse.
^
Take any food out of the appliance
and store it in a cool place.
^
Take out any removable parts, e.g.
shelves, for cleaning.
29
Page 30
Cleaning and care
The serving trays and containers in
^
the door can be removed from their
stainless steel frames for cleaning.
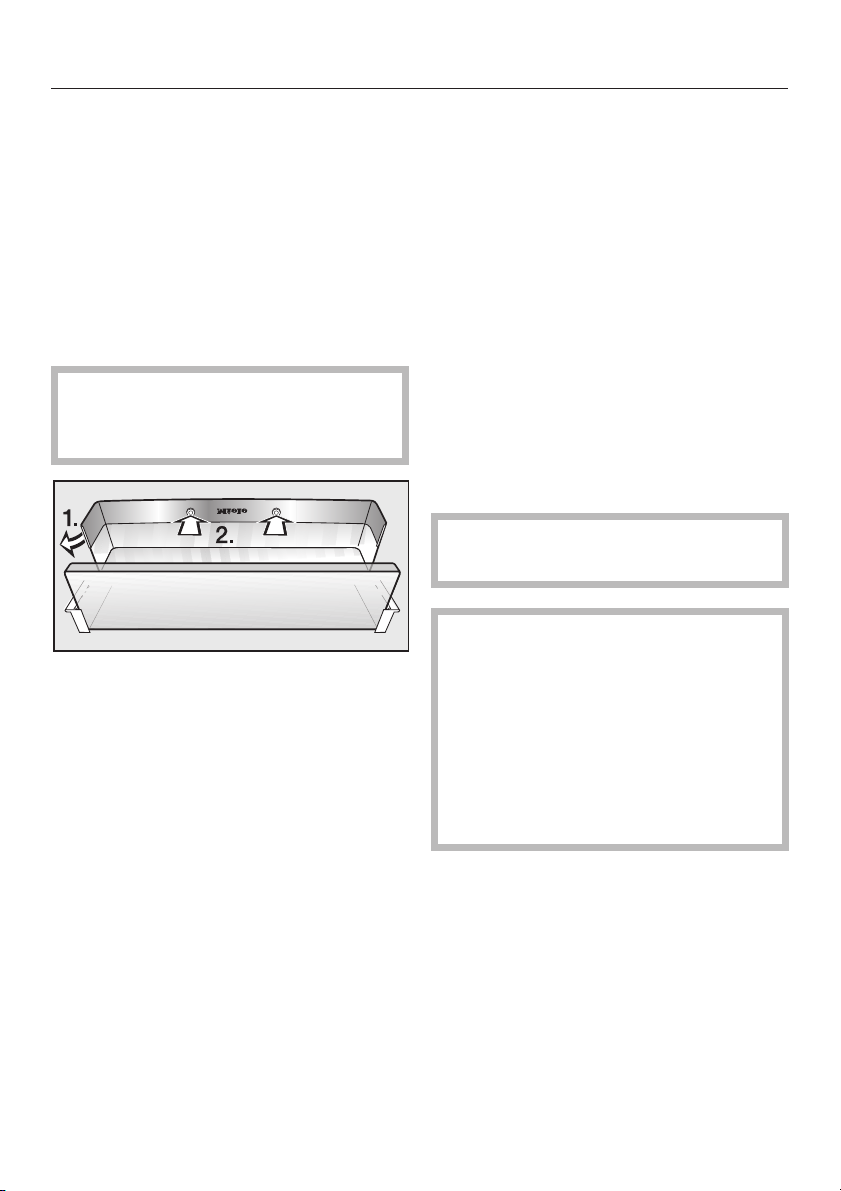
To remove the stainless steel panel
from the lid of the butter and cheese
compartment, proceed as follows:
Take out the entire butter and cheese
^
compartment.
Open the lid.
^
The stainless steel panel is firmly
attached to the lid and needs to be
removed with appropriate force.
^ Disconnect the stainless steel panel
from the edge of one side of the lid
(1.) first.
^
Push the white plastic locating pins
out of the holes (2.).
^
Reconnect the stainless steel panel to
the butter and cheese compartment in
the reverse order after cleaning.
Cleaning the interior and
accessories
Clean the appliance at least once a
^
month.
Use lukewarm water with a little
washing-up liquid.
The following components are all
dishwasher safe:
butter dish, egg tray
–
(available depending on model)
serving trays and containers in the
–
door (without stainless steel frame)
– butter and cheese compartment
(without stainless steel panel)
The stainless steel frames and panel
in the door are not dishwasher safe.
The temperature of the dishwasher
programme must not exceed 55 °C.
Plastic components may discolour in
the dishwasher if they come into
contact with natural dyes from foods
such as carrots, tomatoes and
tomato sauce.
This discolouration will not affect the
stability of the components.
^
Clean the shelves and drawers by
hand as they are not dishwasher
safe.
30
^
Clean the condensate channel and
drain hole frequently, so that
condensate can drain away
unhindered. Use a straw or similar to
clear the drain if necessary.
Page 31
Cleaning and care
^ After cleaning, wipe the interior and
accessories with a damp cloth and
dry with a soft cloth.
Leave the door open to air the
appliance for a short while.
^ Stainless steel components can be
cleaned with the Original Miele Care
product for stainless steel.
^ Apply the Original Miele Care
product for stainless steel to stainless
steel panels and frames each time
you clean the appliance.
This will help to protect stainless steel
surfaces and prevent resoiling for a
period of time.
Cleaning the door and side
panels
Remove any soiling immediately.
If not, it might become impossible to
remove and could cause the surface
to alter or discolour.
The external surfaces of this
appliance are all susceptible to
scratching.
Contact with unsuitable cleaning
agents can also alter or discolour
the outer surfaces.
The following also applies to
stainless steel appliances:
– Appliance door
The appliance door is treated with a
high quality surface coating. It protects
against soiling and facilitates cleaning
and care.
Do not use the following on the
appliance doors:
– Stainless steel cleaners:
The coating will be damaged.
– Miele Original Care product for
stainless steel:
Visible smearing will form on the
door.
– Side panels
^ Remove soiling with the Original
Miele Care product for stainless
steel.
^ Apply the Original Miele Care
product for stainless steel to the side
panels each time after cleaning.
Each time this product is used it
forms a protective film against dirt
and water. The stainless steel surface
will be protected against resoiling for
a period of time.
^ Clean surfaces using a damp
microfibre cloth or with a solution of
warm water and a little washing-up
liquid applied with a soft sponge.
^ After cleaning, wipe the outer
surfaces with a damp cloth and dry
with a soft cloth.
31
Page 32
Cleaning and care
Ventilation gaps
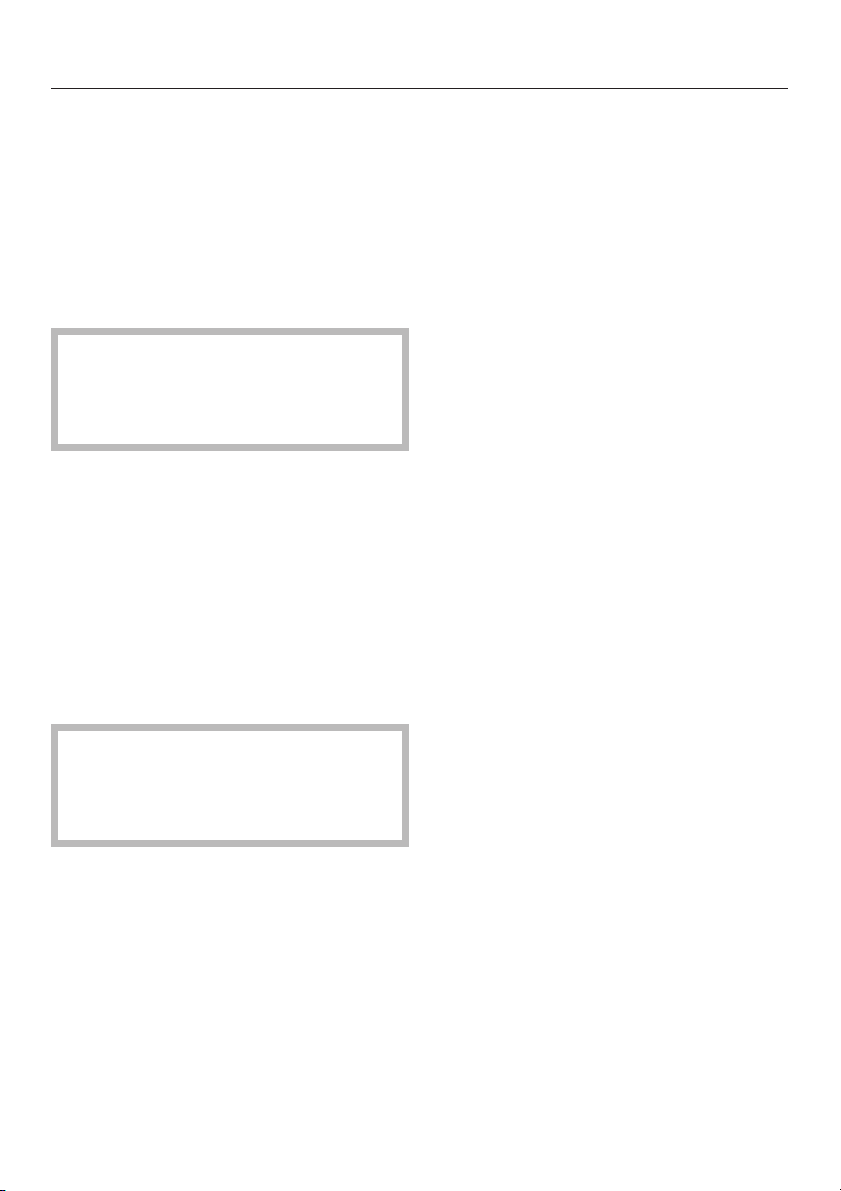
The ventilation gaps should be
^
cleaned regularly with a brush or
vacuum cleaner. A build-up of dust
will increase the energy consumption
of the appliance.
Door seal
Do not use any oils or grease on the
door seal as these will cause the
seal to deteriorate and become
porous over time.
^ The door seal should be cleaned
regularly with clean water, and then
wiped dry with a soft cloth.
Rear of appliance - metal grille
The metal grille at the back of the
appliance (heat exchanger) should be
dusted at least once a year. A build-up
of dust will increase the energy
consumption of the appliance.
After cleaning
Replace all shelves and accessories
^
back in the appliance.
Reconnect the appliance to the
^
electricity supply and switch it on.
Switch on the SuperCool function for
^
a short time so that the appliance can
cool down quickly.
Place the food back in the appliance
^
and close the door.
When cleaning the grille, make sure
that the pipework and other
components do not get broken or
damaged in any way.
32
Page 33
Active charcoal filters
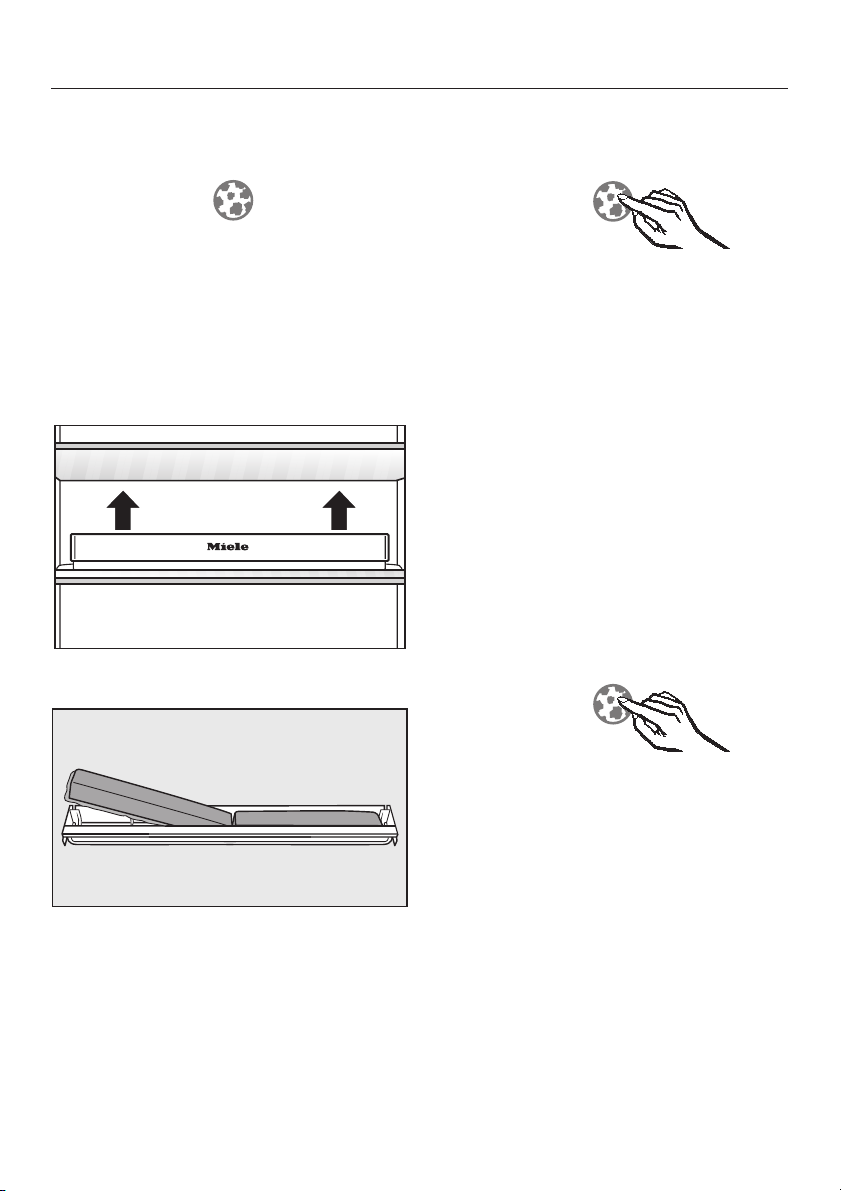
The active charcoal filters should be
changed approx. every 6 months.
When the Change active charcoal filter
indicator lights up red, the active
charcoal filters need to be changed.
To change the active charcoal
filters
^ Pull the active charcoal filter holder
upwards to remove it from the shelf.
To confirm the filters have been
changed
Touch the Change active charcoal
^
filter indicator for approx. 2 seconds.
The indicator light will go out, and the
counter will be reset.
To delay changing the active
charcoal filters
If you do not have new active charcoal
filters, you can order them from your
Miele Chartered Agent or from the
Miele Spare Parts Department.
You can switch off the Change active
charcoal filter indicator early if you
would prefer not to have the red
indicator showing.
^
Take out the two filters and fit the new
filters into the holder with the
protruding cloth edge facing
downwards.
^
Place the holder in the middle of the
raised edge at the back of the shelf,
so that it clicks into position.
^
Touch the Change active charcoal
filter indicator for approx. 2 seconds.
The Change active charcoal filter
indicator will go out.
33
Page 34
Active charcoal filters
If you have delayed changing the
active charcoal filters and the indicator
is not lit up, you will need to reset the
counter when you replace the active
charcoal filters via the settings mode.
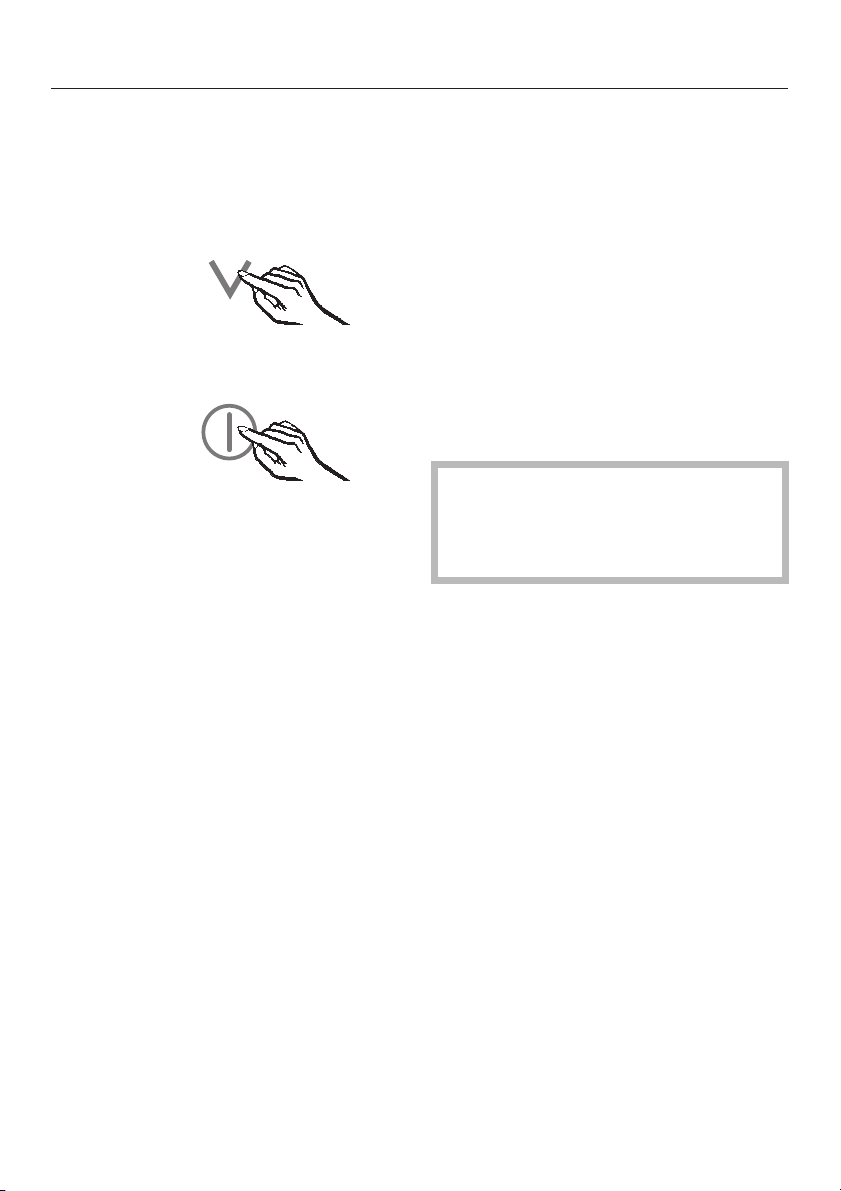
Touch and leave your finger on the X
^
sensor.
^ At the same time, briefly touch the
On/Off sensor (without letting go of
the X sensor).
^ Leave your finger on the X sensor for
another 5 seconds until c appears in
the display.
^ Touch the X sensor repeatedly until
^ appears in the display.
Useful tip:
When you are storing foods with a
strong smell (such as ripe cheeses),
place the holder containing the
–
active charcoal filters on the shelf
where the food is going to be stored,
change the active charcoal filters
–
early if required (remembering to
reset the counter),
and place more active charcoal
–
filters (in holders) in the appliance.
Active charcoal filters and holders
can be obtained from your Miele
Chartered Agent or from the Miele
Spare Parts Department.
^
Touch the On/Off sensor.
^
Touch the X sensor repeatedly until
^2appears in the display.
^
Touch the On/Off sensor for approx.
2 seconds to confirm.
The counter is now reset.
^
Touch the X sensor repeatedly until
c appears in the display.
^
Touch the On/Off sensor.
You have now left the settings mode.
34
Page 35
Repairs to electrical appliances
should only be carried out by a
suitably qualified and competent
person in strict accordance with
current local and national safety
regulations. Repairs and other work
by unqualified persons could be
dangerous. The manufacturer cannot
be held liable for unauthorised work.
What to do if...
. . . the appliance does not get cool.
^ Check whether the appliance has
been switched on. The temperature
display must be lit up.
^ Check that the plug is correctly
inserted into the socket and switched
on.
^ Check that the fuse is not defective
and that the mains fuse has not
tripped. If it has, contact the Miele
Service Department.
. . . the temperature in the refrigerator
is too low.
^
Select a warmer temperature.
^
The SuperCool function is still
switched on. SuperCool only
switches itself off after 6 hours.
. . the alarm sounds.
Has the appliance door been open for
longer than 2 minutes?
Problem solving guide
. . . the compressor is switching in
too frequently and for too long.
Check whether the ventilation gaps
^
have been covered over or become
dusty.
Check whether the metal grille (heat
^
exchanger) at the back of the
appliance has become too dusty.
The door has been opened too
^
frequently, or a large amount of food
has been put in at once.
Check that the door has been closed
^
properly.
. . . the compressor runs
continuously.
To save energy, the compressor runs at
a lower speed, but for longer, when
less cooling is required.
. . . the interior lighting is not
working.
^
Was the door left open for too long?
The lighting switches itself off
automatically after approx.
15 minutes.
If this is not the case, then the LED
lighting is defective.
^
Call the Service Department.
The LED lighting may only be repaired
or changed by a service technician
because there are live parts under the
cover. Danger of injury and damage!
^
Close the door.
35
Page 36
Problem solving guide
The cover must not be removed.
Should the cover be damaged or
removed due to damage, exercise
caution. Never look at the lighting
with optical instruments (magnifying
glass or similar).
. . . the change the active charcoal
filter indicator is red.
Replace the active charcoal filters.
^
You can order replacement filters via
your Miele Chartered Agent or the Miele
Spare Parts Department.
..."_F" shows in the temperature
display.
There is a fault. Call the Service
Department.
..."dn" appears in the temperature
display.
The demonstration function is activated.
If you still cannot remedy the fault
having followed these suggestions,
please contact the Miele Service
Department.
To prevent unnecessary loss of
temperature it is advisable not to
open the door while waiting for the
appliance to be serviced.
^
Call the Service Department.
. . . you cannot switch the appliance
off.
The safety lock has been activated.
. . . the floor of the refrigerator is wet.
The drain hole is blocked.
^
Clean the condensate channel and
drain hole.
36
Page 37
Noises
Normal noises What causes them
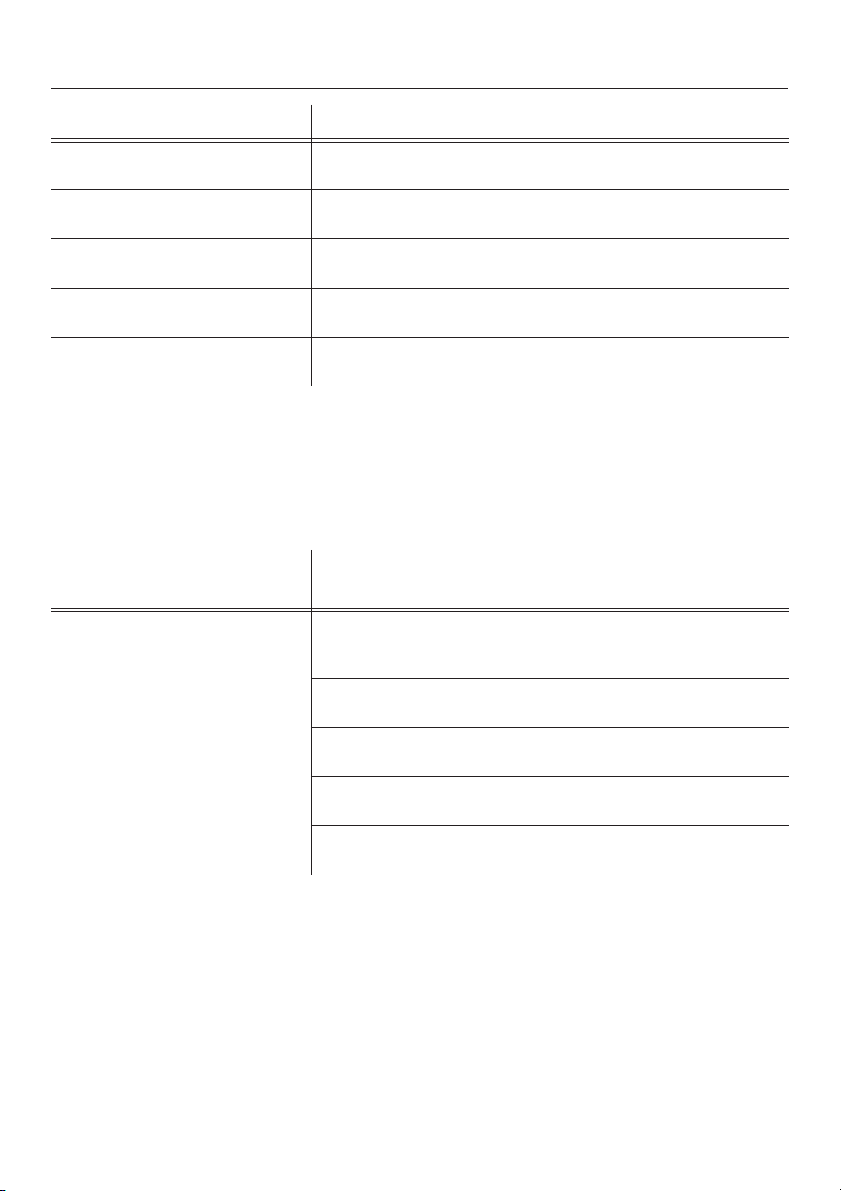
Brrrrr ... Humming noise made by the motor (compressor). This noise can
Blubb, blubb.... A gurgling noise can be heard when coolant is circulating
Click ... Clicking sounds are made when the thermostat switches the
Sssrrrrr ... On multi-zone and frost-free appliances you can sometimes just
Crack ... A cracking sound can be heard when materials expand inside
Remember that the noise of the compressor and the coolant circulating in the
system is unavoidable.
get louder for brief periods when the motor is switching on.
through the pipes.
motor on and off.
hear the movement of the fan inside the appliance.
the appliance.
Noises that you can
easily rectify
Rattling, vibrating The appliance is uneven: Realign the appliance using a spirit
What causes them, and what can you do about
them?
level, by raising or lowering the screw feet underneath the
appliance.
The appliance is touching another appliance or piece of
furniture: Move it away.
Drawers, baskets or shelves are unstable or sticking: Check
all removable items and refit them correctly.
Are any bottles or containers unstable or knocking against
each other? Separate them.
The transport cable clips are hanging loose at the back of
the appliance: Remove the clips.
37
Page 38
After Sales
In the event of a fault which you cannot
correct yourself, or if the appliance is
under warranty, please contact:
your Miele Chartered Agent
–
or
Miele.
–
You will find the address and
telephone number of Miele on the
back cover of the manual.
When contacting your Chartered Agent
or Miele, please quote the model and
serial number of your appliance. This
information is given on the data plate
inside your appliance.
38
Page 39

Electrical connection
Electrical connection
All electrical work should be carried out
by a suitably qualified and competent
person in strict accordance with current
local and national safety regulations.
The appliance is supplied with a mains
cable and moulded plug ready for
connection to an AC single phase
220-240 V 50 Hz supply.
The voltage and frequency are given on
the data plate. Please ensure that these
match the household mains supply. The
fuse rating is quoted on the plug.
Connection should be made via a
suitable switched socket which is easily
accessible. For extra safety it is
advisable to install a suitable residual
current device (RCD).
Do not connect the appliance to the
mains electricity supply by an extension
lead or a plug adapter. Extension leads
do not guarantee the required safety of
the appliance (e.g. danger of
overheating).
WARNING
THIS APPLIANCE MUST BE
EARTHED
Do not connect the machine to an
inverter such as those used with an
autonomous energy source e.g. Solar
power.
When switched on, peak loads in the
system can cause the safety switch off
mechanism to be triggered. This can
damage the electronic unit.
The machine must not be used with
so-called Energy saving devices
either. These reduce the amount of
energy supplied to the machine,
causing it to overheat.
39
Page 40
Installation
Do not place any appliance which
gives off heat, such as a toaster or
microwave oven, on top of this
appliance, as this would increase
the appliance's energy
consumption.
Side-by-side installation
To avoid a build-up of condensation
and resultant damage, refrigerators and
freezers should not generally be
installed side-by-side next to each
other.
However, some appliances have
side-wall heating making them suitable
for side-by-side installation.
Your Chartered Agent will be able to
advise you on which models are
suitable.
^ Follow the instructions for the other
appliance on how to install the two
appliances side-by-side.
Location
This appliance should be installed in a
dry, well-ventilated room. It should not
be installed where it is exposed to
direct sunlight or directly adjacent to a
heat-producing appliance such as an
oven or a radiator. The room
temperature should not go above or
below the climate range for which the
appliance is designed. The higher the
ambient temperature of the room, the
more energy the appliance requires to
operate.
40
Important: tropical / humid
environments
During periods of high humidity,
some condensation may appear on
outside surfaces of cooling
appliances. This condensation will
disappear when humidity levels
drop. For prevention, it is advisable
to install the appliance with sufficient
ventilation in a dry and/or an
air-conditioned room.
Please ensure that doors are closing
and sealing properly.
Please ensure that the appliance is
installed in accordance with these
installation instructions and that the
handle is fitted correctly. Should you
require further assistance please
contact your Miele customer service
centre.
Climate range
The appliance is designed for use
within certain climate ranges (ambient
temperatures), and should not be used
outside this range. The climate range of
this appliance is stated on the data
plate inside the appliance.
Climate range Ambient room
SN
N
ST
T
SN-ST
SN-T
temperature
+10 °C to +32 °C
+16 °C to +32 °C
+16 °C to +38 °C
+16 °C to +43 °C
+10 °C to +38 °C
+10 °C to +43 °C
Operating in a room which is too cold will
cause the cooling system to switch off for
too long, causing the internal temperature
in the appliance to rise with the risk of
food deteriorating and going off.
Page 41
Installation
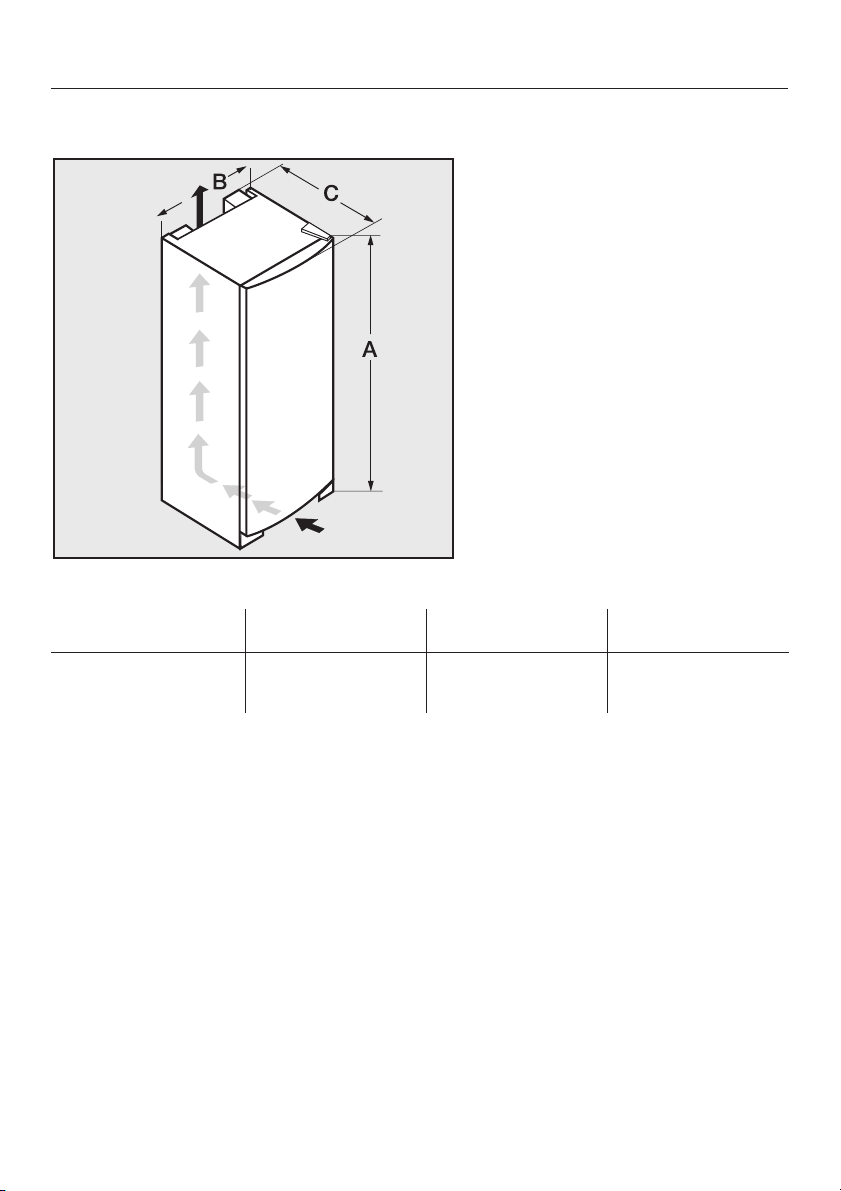
Ventilation
Air at the back of the appliance gets
warm. To ensure sufficient ventilation,
the ventilation gaps must not be
covered over. The air inlet and outlet
must not be covered or blocked in any
way. They should be dusted on a
regular basis.
Installation
Remove any cable clips from the
^
back of the appliance.
Check that all parts at the back of the
^
appliance are unhindered. Remove
any hindrance.
^ Carefully push the appliance into
position. The appliance can be
placed directly against a wall.
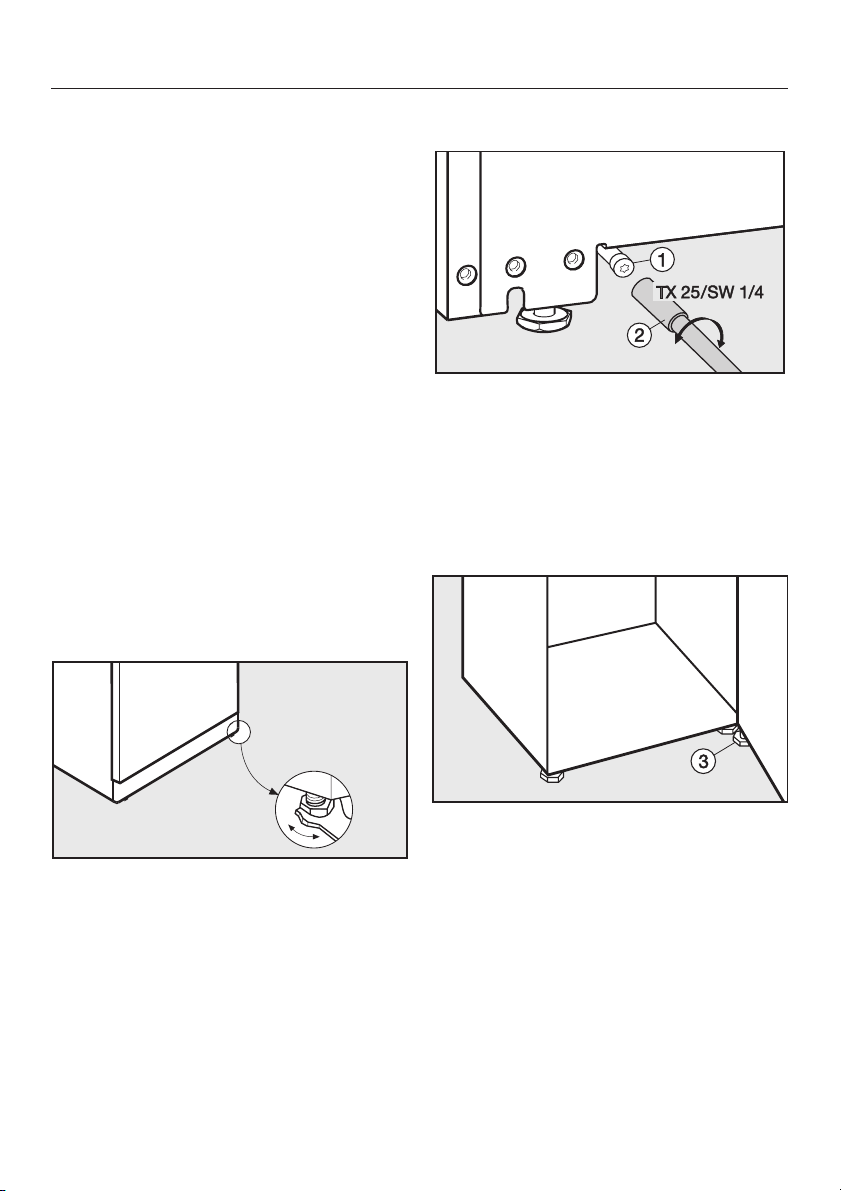
Aligning the appliance
On stainless steel appliances
If necessary, also align the two rear
^
adjusting devices a using socket
wrench b.
Turn the adjusting device clockwise
to raise the appliance up at the back.
Supporting the appliance door
^
To align the appliance adjust the feet
using the spanner supplied.
^
The foot c should definitely be
unscrewed until it rests on the floor.
Then turn it a further 90°.
41
Page 42
Installation
Appliance dimensions
ABC
K 14820 SD
K 14820 SD ed/cs
^
42
1850 mm 600 mm 630 mm
Page 43
The appliance is supplied with
right-hand door hinging. If left-hand
door hinging is required, the hinging
must be changed.
To change the door hinging, you will
need the following tools:
a Phillips head screwdriver,
–
a flat-bladed screwdriver,
–
a selection of Torx screwdrivers,
–
a spanner.
–
Two people are needed to change
the door hinging.
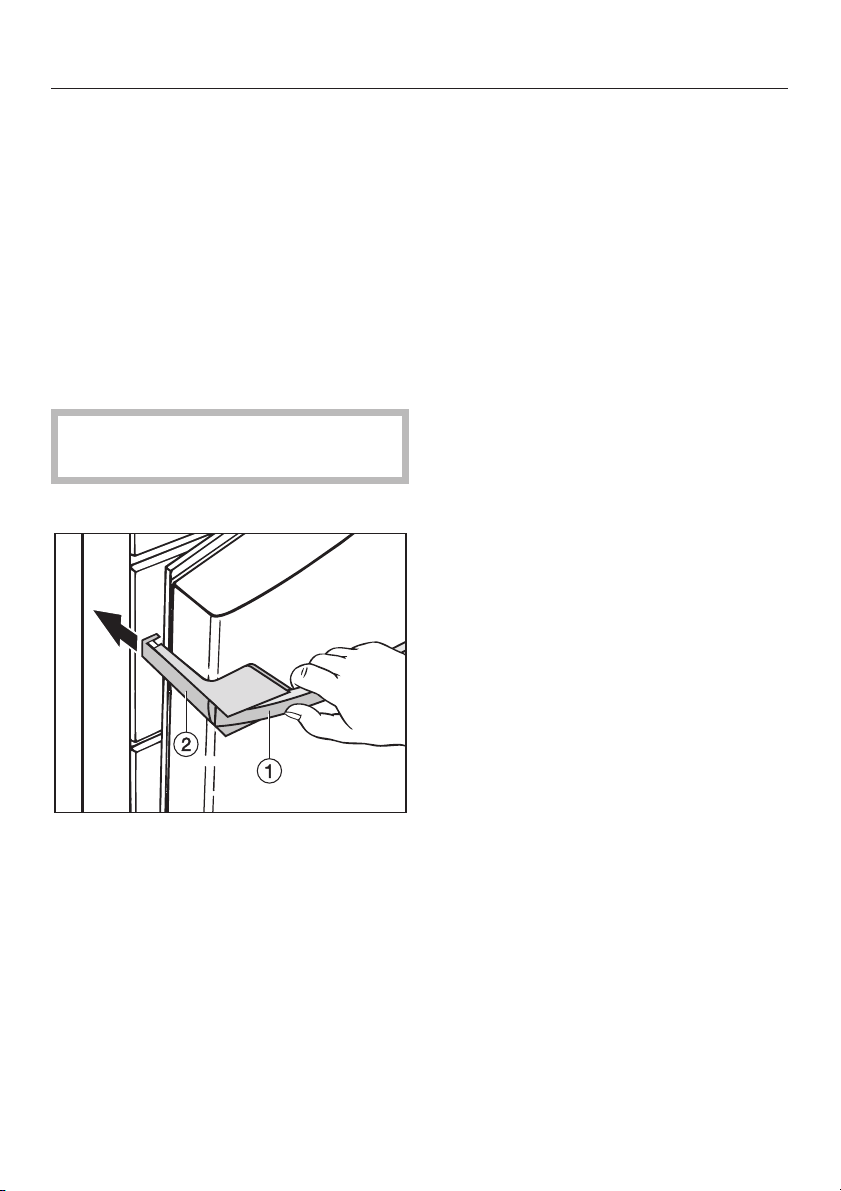
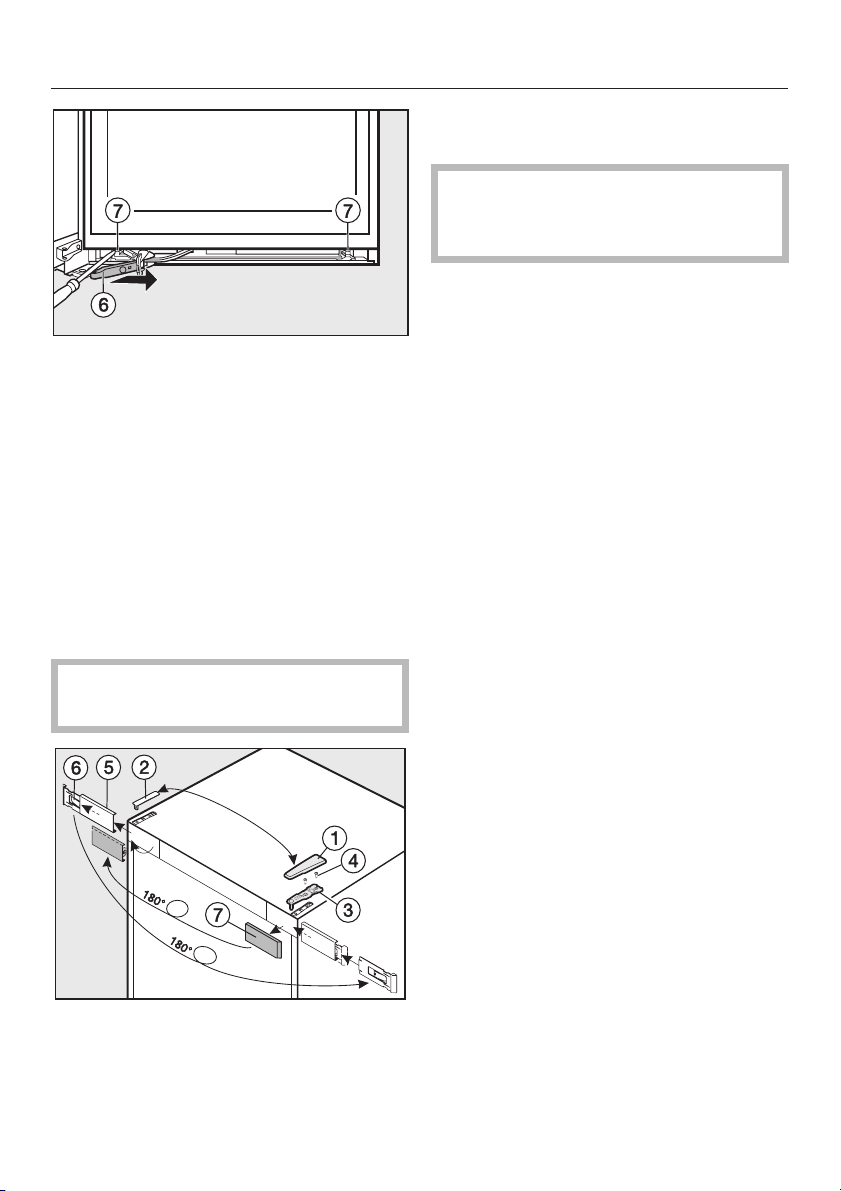
Removing the door handle
Changing the door hinging
^
Pull door handle a towards you. Side
section b slides back.
^
Pull side section b firmly back out of
the guides on the mounting plate
(see arrow).
^
Undo the 4 (Torx 15) screws in the
mounting plate, and remove the
handle.
^
Remove the cover caps from the
opposite side, and fit them into the
empty holes.
43
Page 44
Changing the door hinging
Removing the SoftClose door
mechanism
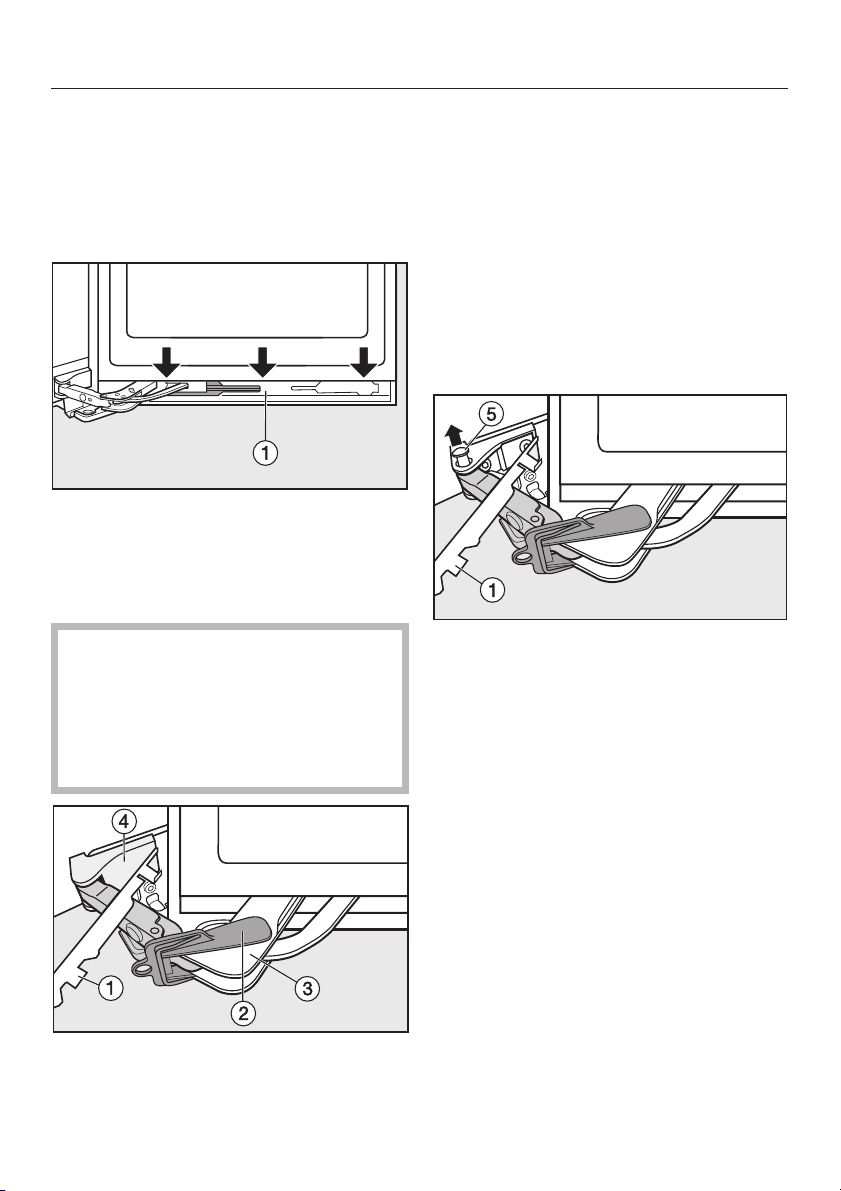
The SoftClose door mechanism is at the
bottom of the door.
Open the appliance door.
^
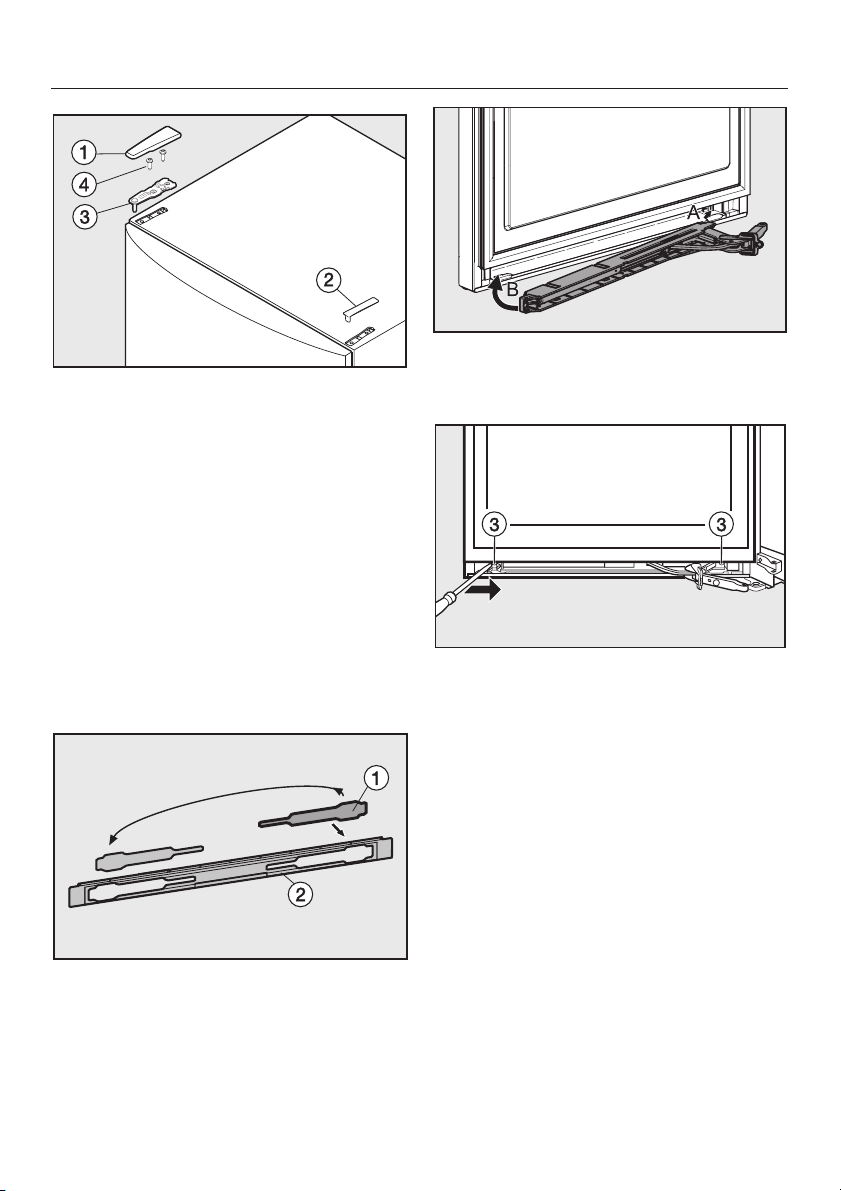
^ Prise open panel a from the
SoftClose mechanism: Insert a
flat-bladed screwdriver into the gap
from below and ease off the panel bit
by bit.
Take care not to damage the door
seal.
If the door seal becomes damaged,
the door will no longer close
properly and cooling will be
impaired.
Fit restraining clip b (supplied with
^
the appliance) onto SoftClose
mechanism c.
The restraining clip stops the hinge
from snapping shut. Do not remove the
clip until told to do so.
Carefully remove cover d from the
^
side using a flat-bladed screwdriver.
With the help of another person, tip
^
the appliance back slightly.
^ Push hinge pin e up and out from
underneath.
The SoftClose mechanism is now no
longer fixed to the appliance.
^
Remove panel a.
^
Slide panel a towards the appliance,
and leave it hanging between the
door and the appliance.
44
Page 45
Slide SoftClose mechanism bracket
^
f as far as it will go towards the
handle side of the door, and undo
screws g on the SoftClose
mechanism.
^ Using a flat-bladed screwdriver, slide
the SoftClose mechanism towards
the handle side of the door, and lever
it out at the side.
^ Then place it to one side.
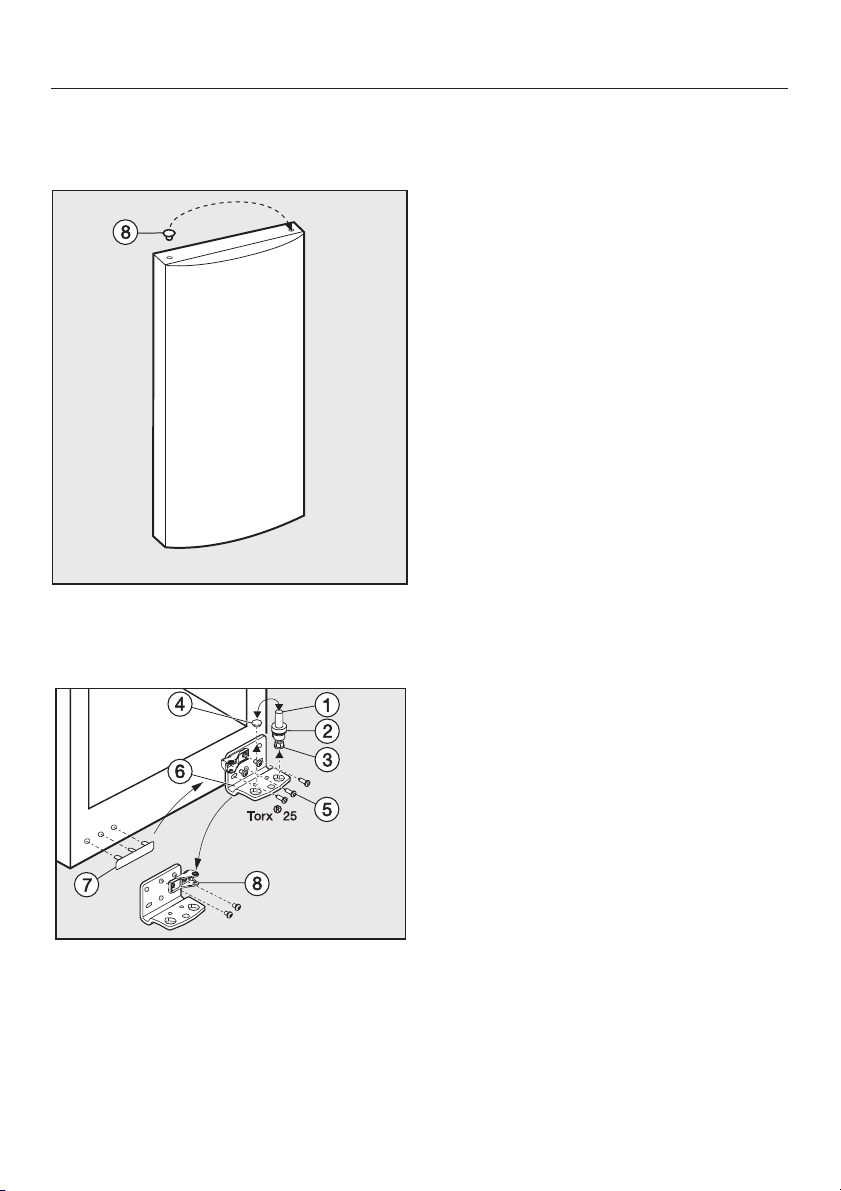
Changing over the door
Remove any food from the door
shelves.
Changing the door hinging
Remove cover b by pulling it
^
upwards.
Caution! The appliance door is not
secure once the hinge plate has
been removed.
Loosen screws d in upper hinge
^
plate c and pull it upwards and off.
Carefully lift the door off and place it
^
to one side.
Gently loosen cover e by carefully
^
inserting a flat-bladed screwdriver
into the gap.
^ Remove cover e together with
retaining plate f.
^ Then separate retaining plate f from
cover e by pushing it slightly to the
left. Then pull the cover forwards and
off.
^ Rotate retaining plate f by 180°.
^ Then fit cover e from the front over
retaining plate f, and slide it over to
the right. The writing must be visible.
^
Close the appliance door.
^
Remove cover a by sliding it
forwards from the back and then
lifting it off.
^
Remove cover g, then rotate it by
180° and fit it on the opposite side.
45
Page 46
Changing the door hinging
Then fit cover e together with
^
retaining plate f on the opposite
side.
^ Remove cap h from the bearing
bush in the door and refit on the
opposite side.
Unscrew bearing h from hinge plate
^
f, rotate it by 180° and refit into the
hole on the opposite side of the hinge
plate.
Place cap d in the other hole.
^
Remove cover g and fit it into the
^
holes on the opposite side.
Screw hinge plate f into position on
^
the opposite side using the two outer
long slots only. Do not use the
middle screw because you will not
be able to align the door over the
outer long slots later on.
^ Important! Screw foot c into hinge
pin a as far as it will go.
^ Reinsert hinge pin a with disc b and
foot c. Important! The lug on the
hinge pin must face backwards.
^ Place the door onto hinge pin a.
^ Close the appliance door.
^
Pull hinge pin a with disc b and foot
c upwards to remove them.
^
Remove cover d.
^
Undo screws e and take hinge plate
f off.
46
Page 47
Fit hinge plate c onto the opposite
^
side and secure it with screws d.
If necessary, drill pilot holes for the
screws.
^ Fit covers a and b to their opposite
sides.
^ Realign the door with the appliance
housing again using the long slots in
the lower hinge plate. Then tighten
the screws.
Replacing the SoftClose door
mechanism
Changing the door hinging
Insert the SoftClose mechanism back
^
into the door, starting at the
right-hand side.
^ Using a flat-bladed screwdriver, slide
the SoftClose mechanism towards
the appliance side of the door.
^
Remove cover a from panel b,
rotate it by 180° and refit it on the
other side.
The screw holes on the left and right
must line up perfectly.
^
First screw the SoftClose mechanism
onto the appliance side, then onto
the handle side c, pushing it firmly
towards the appliance.
47
Page 48
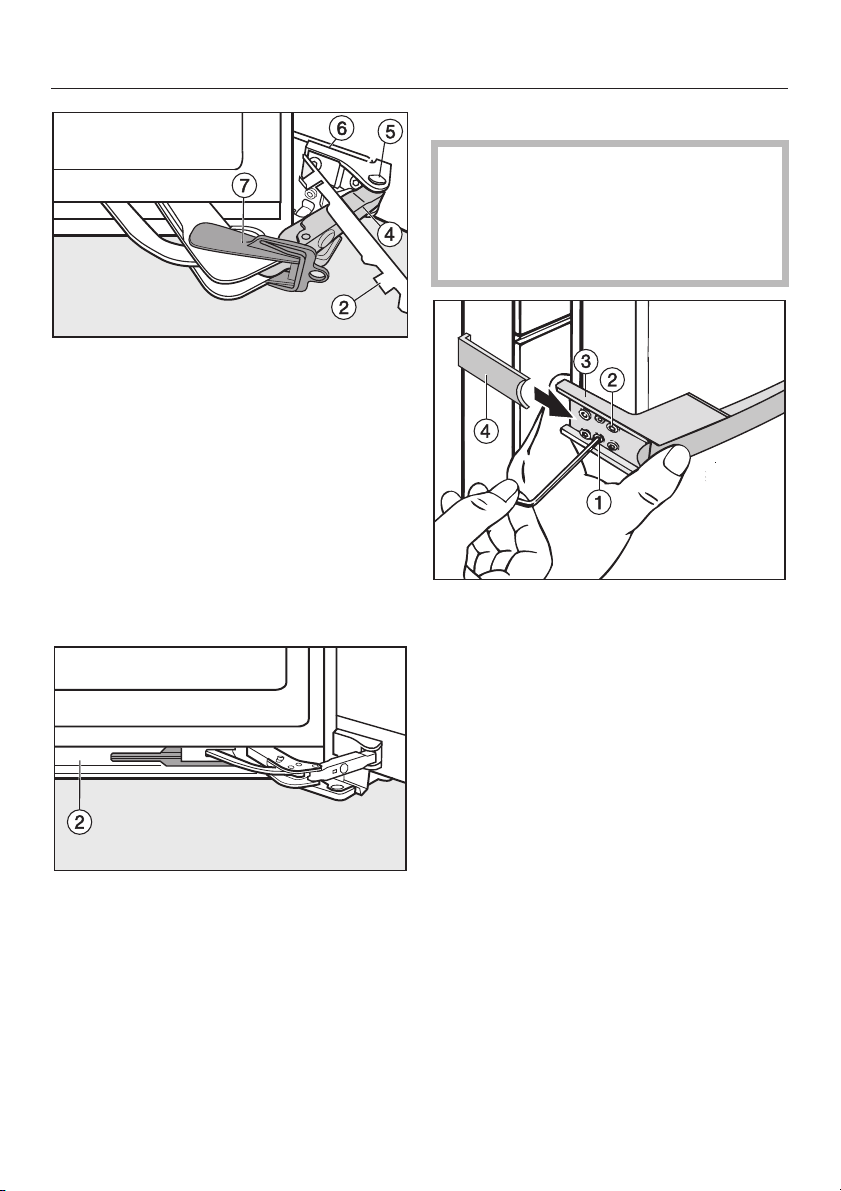
Changing the door hinging
Attach panel b to SoftClose
^
mechanism bracket d.
Align bracket d to the hinge plate,
^
and insert pin e from above so that
the right angle fits into the recess.
^ Click cover f back into place.
Make sure that cover f fits properly so
that the door can be closed without
hindrance and the pin is secured.
^ Remove retaining clip g.
Refitting the handle
Please make sure you follow the
instructions below carefully when
you refit the handle. The door seal
will be damaged if the handle is
fitted incorrectly.
^ Loosely attach the handle to the
opposite side of the door with the two
front screws b.
^
Replace panel b onto the SoftClose
mechanism from above, clicking it
back into place first at the bottom
and then at the top.
^
Close the appliance door.
48
Mounting plate c must be positioned
on the side of the door so that when the
door is closed, it is flush with the side
of the appliance.
If this is not the case,
^
tighten both grub screws a with an
Allen key until mounting plate c lines
up correctly.
^
Then tighten all 4 fixing screws b.
^
Slide the side section of the handle
d into the guides on the mounting
plate until it clicks into place.
Page 49
It is important to check that the side
section of the handle d does not
come into contact with the door seal
when opening the door as this would
damage the door seal permanently.
If, after you have refitted the handle,
you find that the side section does
touch the door seal when the door is
opened:
Realign mounting plate c with grub
^
screws a until the mounting plate
and the side section of the handle d
are at the correct angle and the side
section does not touch the door seal
when the door is opened.
Changing the door hinging
49
Page 50
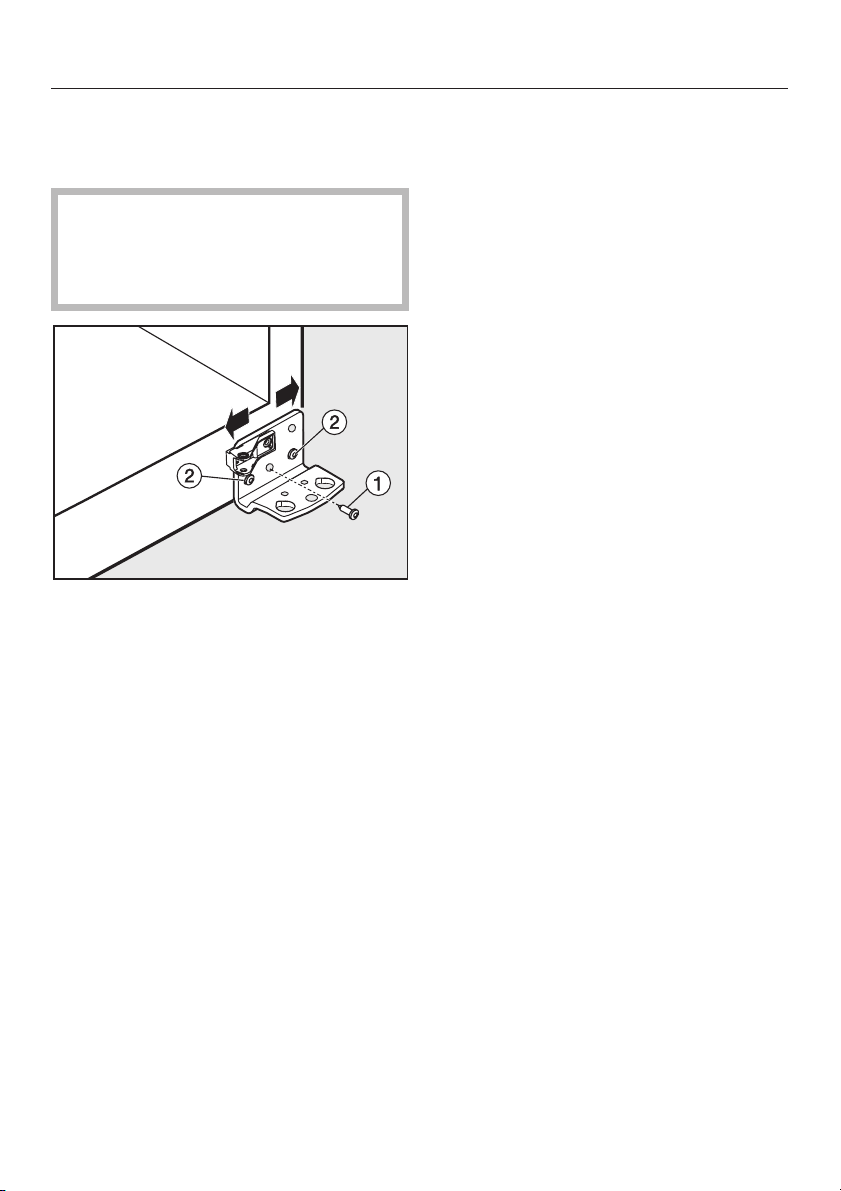
Aligning the appliance door
The appliance door can be aligned to
the housing using the outer long slots in
the lower hinge plate.
In the following illustration the door
is not shown in the closed position to
make it easier to see what happens
next.
^ Remove centre screw a from the
hinge plate.
^ Slightly loosen both outer screws b.
^ Align the door by sliding the hinge
plate to the left or right.
^
Then tighten screws b again. Screw
a does not need to be refitted.
50
Page 51
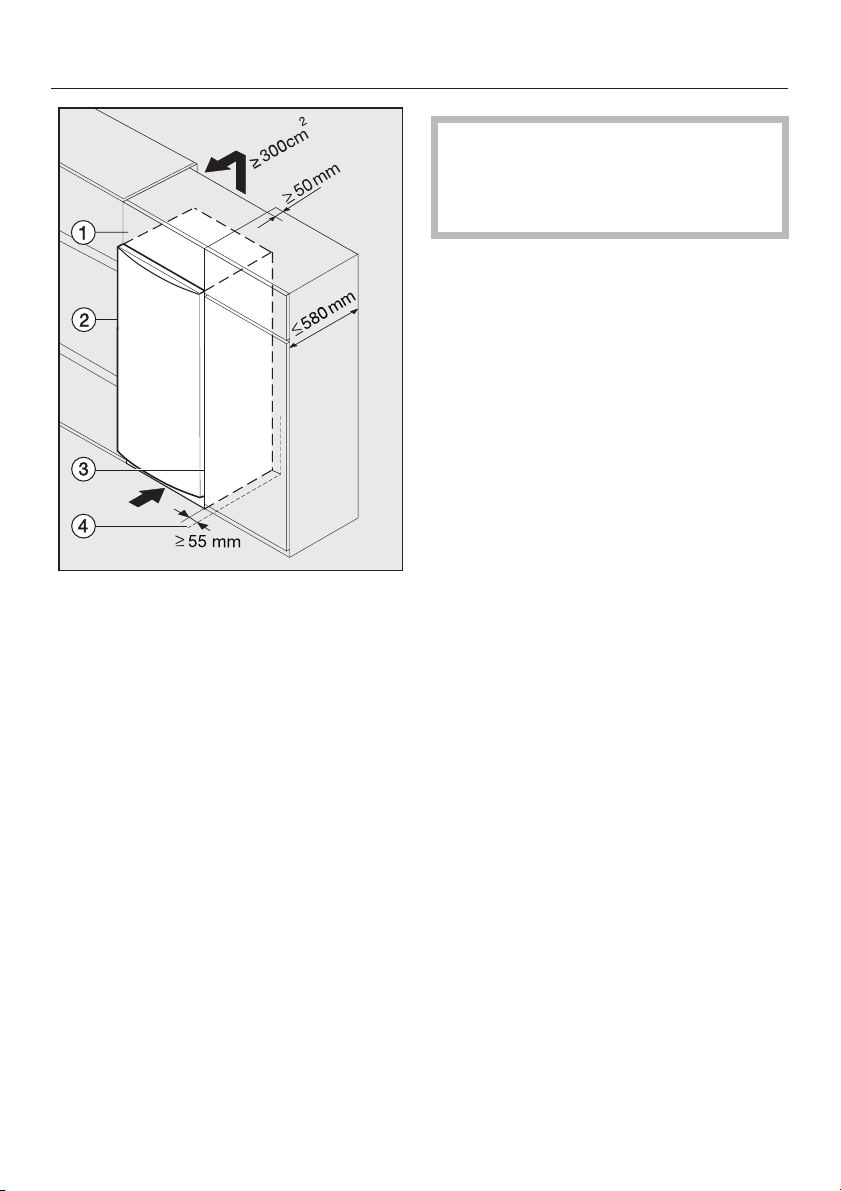
a Top box
b Appliance
Building in the appliance
The air inlet and outlet must not be
covered or blocked in any way.
They should be dusted on a regular
basis.
When built into a kitchen run (max.
depth 580 mm), the appliance can be
installed directly next to a kitchen
furniture housing unit. The appliance
door will protrude in front of furniture
fronts at the sides by 34 mm and by
55 mm in the middle of the door. This
enables the doors to be opened and
shut without being obstructed.
When installed next to a wall d,a
distance of approx. 55 mm must be
maintained on the hinge side between
the wall d and the appliance b so that
the doors and the handles have
sufficient space for opening.
c Housing unit
d Wall
The appliance can be installed in a
kitchen run. To match the height of the
rest of the kitchen, the appliance can
be fitted with a suitable top box a.
A ventilation gap of at least 50 mm
depth must be allowed for behind the
appliance across the entire width of the
top box for air to circulate.
The cross section of the air outlet under
the room ceiling must be at least
300 cm
2
to ensure that air can circulate
without hindrance. Otherwise the
appliance has to work harder, resulting
in an increase in electricity
consumption.
51
Page 52

Alteration rights reserved / xx10
K 14820 SD, K 14820 SD ed/cs
M.-Nr. 09 029 530 / 00
 Loading...