

Miele GDU 45, GDU60, GDU 65, GDU 45/60, GDU 60/60 Fitting Instructions Manual [en, fi, de, no, da]
Page 1
GDU 45/60, GDU 60/60
P
Montageanweisung Dekorset
Q
Fitting instructions Decor Set
ö
Installation instructions for the GDU Decor Set
X
Monteringsveiledning dekorsett
W
Monteringsanvisning Dekor-sæt
Z
GDU-muuntosarjan asennusohje
M.-Nr. 04 523 291
Page 2

P
Montageanweisung Dekorset . . . . . . . . . . . . . . . . . . . . . . . . . . . . . . . . . . . . 3
Q
Fitting instructions Decor Set . . . . . . . . . . . . . . . . . . . . . . . . . . . . . . . . . . . 10
ö
Installation instructions for the GDU Decor Set. . . . . . . . . . . . . . . . . . . . . . 17
X
Monteringsveiledning dekorsett . . . . . . . . . . . . . . . . . . . . . . . . . . . . . . . . . 25
W
Monteringsanvisning Dekor-sæt . . . . . . . . . . . . . . . . . . . . . . . . . . . . . . . . . 32
Z
GDU-muuntosarjan asennusohje . . . . . . . . . . . . . . . . . . . . . . . . . . . . . . . . 39
2
Page 3
P
Diese Montageanweisung beschreibt
alle Arbeitsschritte, die sich auf das Anbringen des Dekorsets GDU beziehen.
In der Gebrauchsanweisung des Geschirrspülers finden Sie alle weiteren Installations- und Montagehinweise.
Dekorset GDU für Unterbau (U)-Geschirrspüler
Mit dem Dekorset (GDU) kann ein i-Geschirrspüler zu einem U-Geschirrspüler
umgerüstet werden.
Basisgerät für einen Unterbau (U)-Geschirrspüler ist ein integrierbarer (i)-Geschirrspüler.
Das Dekorset GDU besteht aus:
1. Frontblende mit eingesetzter
Dekorplatte,
2. Sockelblende mit Haltewinkeln.
Das Dekorset GDU ist serienmäßig gefertigt für Küchen mit einer Sockelhöhe
(Unterkante Küchenschranktür bis zum
Fußboden) von:
1. 100 mm (= 820 mm Einbauhöhe)
2. 150 mm (= 870 mm Einbauhöhe).
Zur farblichen und maßlichen Anpassung an die Front Ihrer Küche kann die
werkseitig eingesetzte Dekorplatte gegen eine zur Küche passende Platte ausgetauscht werden (siehe ,,Sonderfälle“).
Führen Sie zunächst die Arbeitsschritte 1 - 3 durch!
Diese Arbeitsschritte finden Sie in
der Gebrauchsanweisung im Kapitel ,,i-Geschirrspüler aufstellen“.
1. Arbeitsplattenschutz anbringen
2. Geschirrspüler in eine Nische
einbauen
3. Bedienungsb lende anbringen
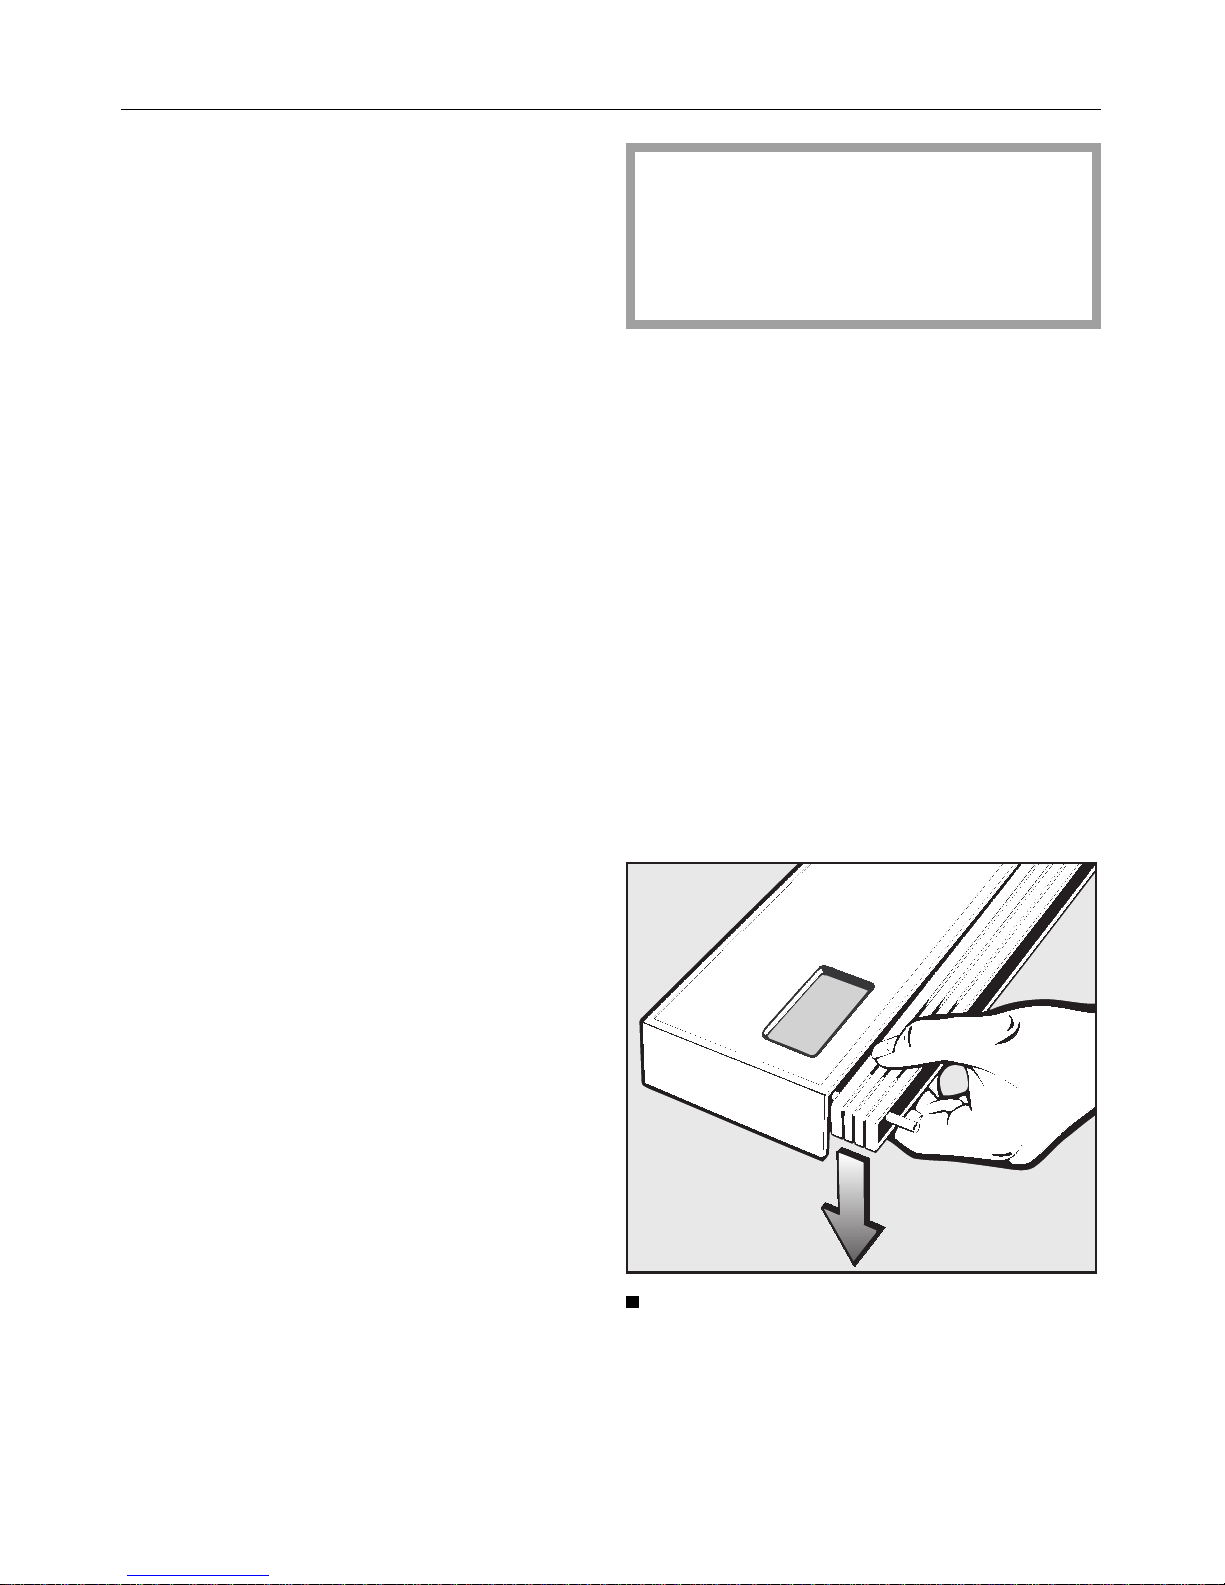
Bevor Sie die Bedienungsblende anbringen, müssen die Adapterleisten entfernt
werden (siehe Abbildung).
Dem Geschirrspüler liegen ein H-förmiges Blech und zwei Schablonen bei.
Bewahren Sie diese Teile und die Adapterleisten auf, um den Geschirrspüler
z. B. beim Kauf einer neuen Küche wieder in ein i-Gerät umrüsten zu können.
Adapterleisten als ganzes Paket aus
den Steckschlitzen der Bedienungsblende drücken.
P
3
Page 4
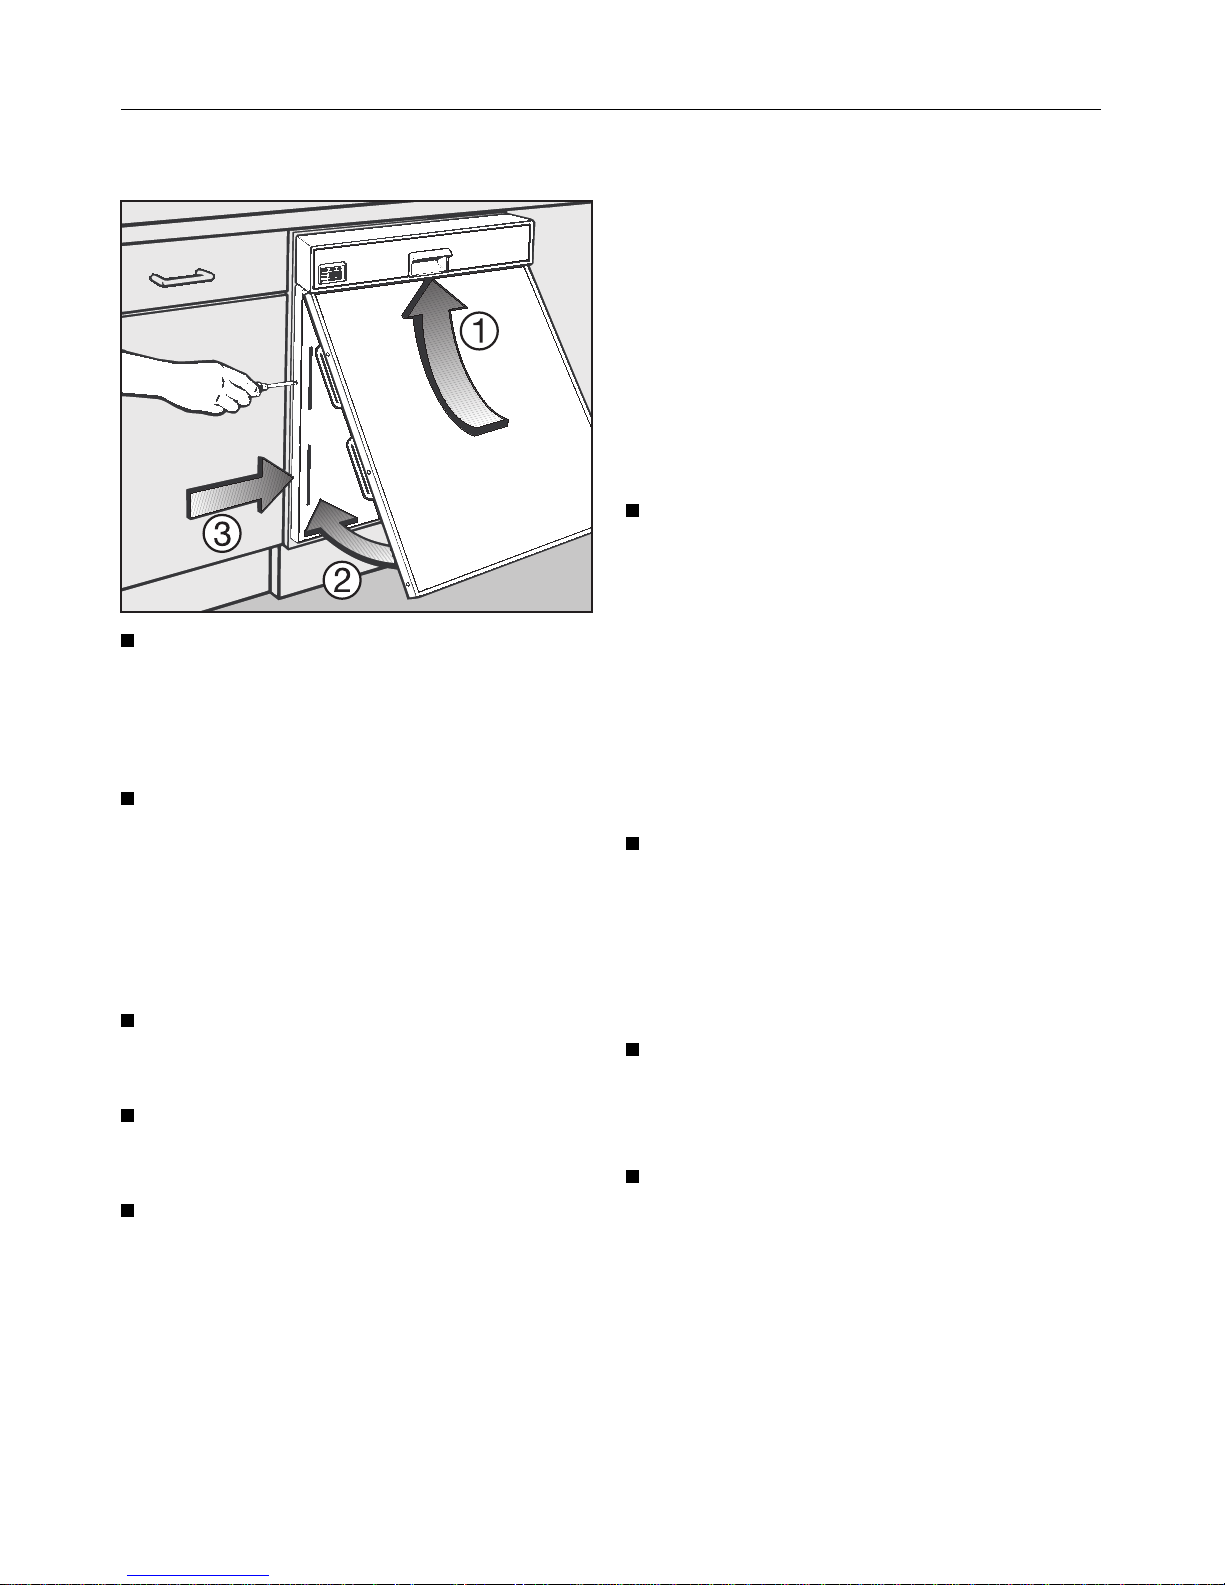
4.Frontblende anbringen
Geschirrspüler so weit aus der
Nische ziehen, daß die seitlichen
Befestigungsschrauben
d für die
Frontblende problemlos zugänglich
sind.
Frontblende schräg unter der Bedienungsblende ansetzen
b und in die
Schlitze des Türaußenblechs einschwenken
c.
Darauf achten, daß die Oberkanten
der Frontblende sauber von unten in
die Bedienungsblende eintauchen.
Befestigungsschrauben d an bei-
den Seiten des Türaußenblechs festziehen.
Mit beiliegenden Kunststoffstopfen
die Öffnungen der Befestigungsmechanik verschließen.
Geschirrspüler wieder in die Nische
schieben.
In den meisten Fällen paßt die Frontblende farblich und maßlich zur Küche.
Dann mit Arbeitsschritt 7 fortfahren.
Sollte jedoch eine farbliche oder maßliche Anpassung erforderlich sein, siehe
Abschnitt ,,Sonderfälle“.
Sonderfälle
Die Frontblende kann wie folgt an die
Front der Küche angepaßt werden:
Fall A / Farbanpassung:
Die Frontblende paßt in der Höhe zu
den nebenstehenden Küchenschränken. Die serienmäßige Dekorplatte soll
jedoch durch eine farblich zur Küche
passende Platte ausgetauscht werden.
Für den Zuschnitt einer neuen Dekorplatte werksseitige Maße entsprechend der Breite des Geschirrspülers verwenden.
Dann mit Arbeitsschritt 6 fortfahren.
Fall B / Maßanpassung:
Die Frontblende soll in der Höhe den
nebenstehenden Küchenschränken angepaßt werden.
Mit Arbeitsschritt 5 fortfahren.
Fall C / Farb- und Maßanpassung:
Die Frontblende soll in der Höhe und in
der Farbe den nebenstehenden Küchenschränken angepaßt werden.
Mit Arbeitsschritt 5 fortfahren, um
das erforderliche Maß für den Zuschnitt der neuen Dekorplatte zu ermitteln.
Entsprechende Dekorplatte beschaffen und danach mit Arbeitsschritt 6
fortfahren.
Werkseitige Zuschnittmaße der Dekorplatte:
H 603 x B 587 mm (bei 60 cm breiten
Geschirrspüler)
H 603 x B 437 mm (bei 45 cm breiten
Geschirrspüler)
P
4
Page 5
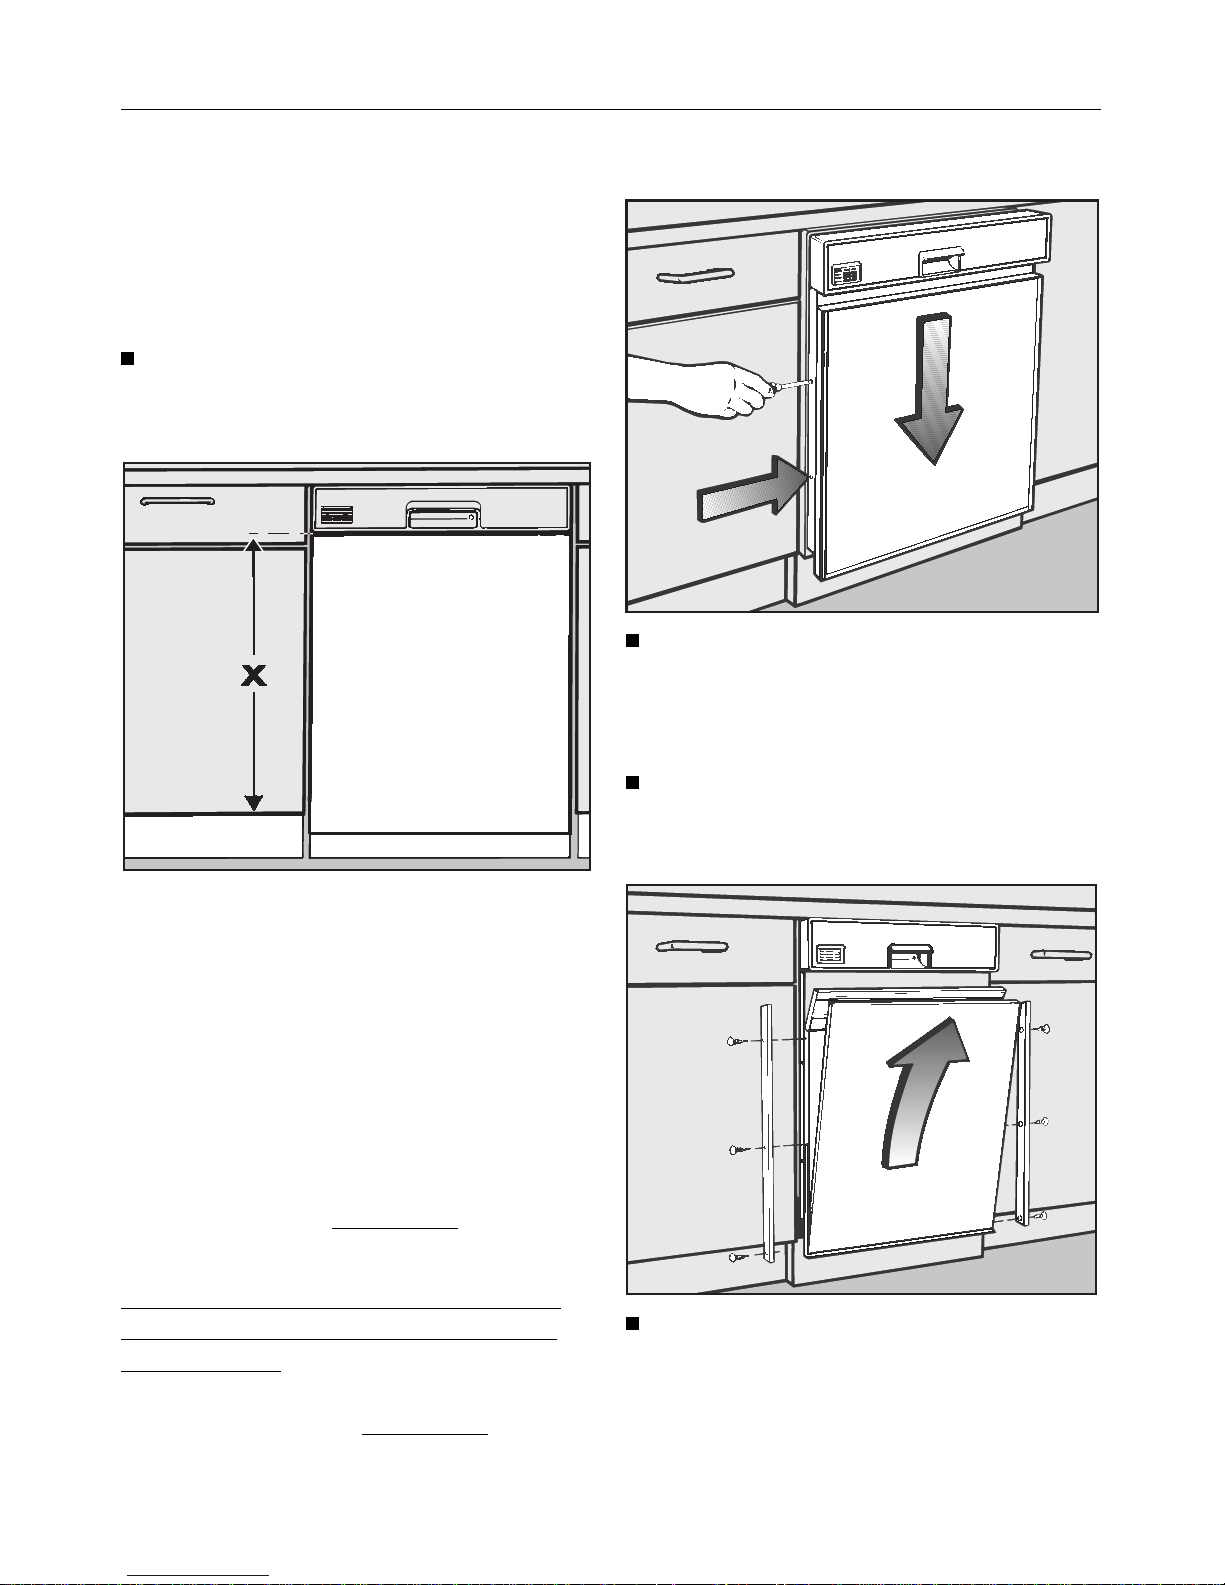
5.Höhe der Dekorplatte
ermitteln
Bevor Sie das Maß X ausmessen, muß
die Höhe des Geschirrspülers der Nischenhöhe angepaßt werden.
Die Füße des Geschirrspülers so
weit herausdrehen, daß er unter die
Arbeitsplatte stößt.
Maß X:
Unterkante der Bedienungsblende bis
Unterkante der Küchenschranktür.
Höhe der Dekorplatte: Maß X + 2 mm.
Die Zugabe von 2 mm ist erforderlich,
damit die Frontplatte in die Bedienungsblende eintaucht (sicherer Halt).
Beispiel:
Maß X =575 mm
+ 2 mm
Höhe Dekorplatte= 577 mm
In diesem Beispiel gilt für das Kürzen
der ensprechenden Teile (Fall B oder
C) folgendes:
werkseitige Höhe 603 mm
ermittelte Höhe
– 577 mm
zu kürzendes Maß = 26 mm.
6.Frontblende anpassen
Geschirrspüler so weit aus der
Nische ziehen, daß die seitlichen
Befestigungsschrauben für die Frontblende problemlos zugänglich sind.
Befestigungsschrauben an beiden
Seiten des Türaußenblechs lösen
und Frontblende absenken.
Dekorleisten abschrauben.
P
5
Page 6
Fall A / Farbanpassung:
Dekorplatte austauschen.
Fall B / Maßanpassung:
Dekorleisten, Dekorplatte, Ausgleichspappe und Styropor-Distanzstück
entnehmen und
jeweils oben um das
zuvor ermittelte Maß kürzen
(im vorherigen Beispiel 26 mm).
Bitte beachten:
Dekorplatte und -leisten abkleben, um
beim Kürzen Kratzer zu vermeiden.
Dem Material entsprechendes Werkzeug benutzen! Eventuell einen Fachmann um Rat fragen.
Fall C / Farb- und Maßanpassung:
Wie Fall B, jedoch Dekorplatte nicht
kürzen, sondern gegen eine passend zugeschnittene Platte austauschen.
Für den Zuschnitt verwenden Sie die
ermittelte Höhe (X+2 mm) und für
die Breite das werksseitige Zuschnittmaß entsprechend der Breite Ihres
Geschirrspülers (siehe Seite 4).
Wenn die neu eingesetzte Dekorplatte
stärker als 2 mm (max. 4 mm) ist, muß
die Ausgleichspappe aus der Frontblende entfernt werden.
In allen oben genannten Fällen:
Frontblende wieder zusammensetzen und wie unter Punkt 4 beschrieben an die Geschirrspülerfront anbringen.
Geschirrspüler in die Nische schieben und ausrichten. Danach mit Arbeitsschritt 7 fortfahren.
7. Türfederung einstellen
Die Türfedern sind richtig eingestellt,
wenn die halb geöffnete Tür (ca. 45 °
Öffnungswinkel) beim Loslassen in
dieser Stellung stehen bleibt.
Wenn die Tür in die waagerechte Stellung absinkt, müssen die Türfedern gespannt werden.
Wenn sie dagegen wieder hochfedert,
müssen die Federn entspannt werden.
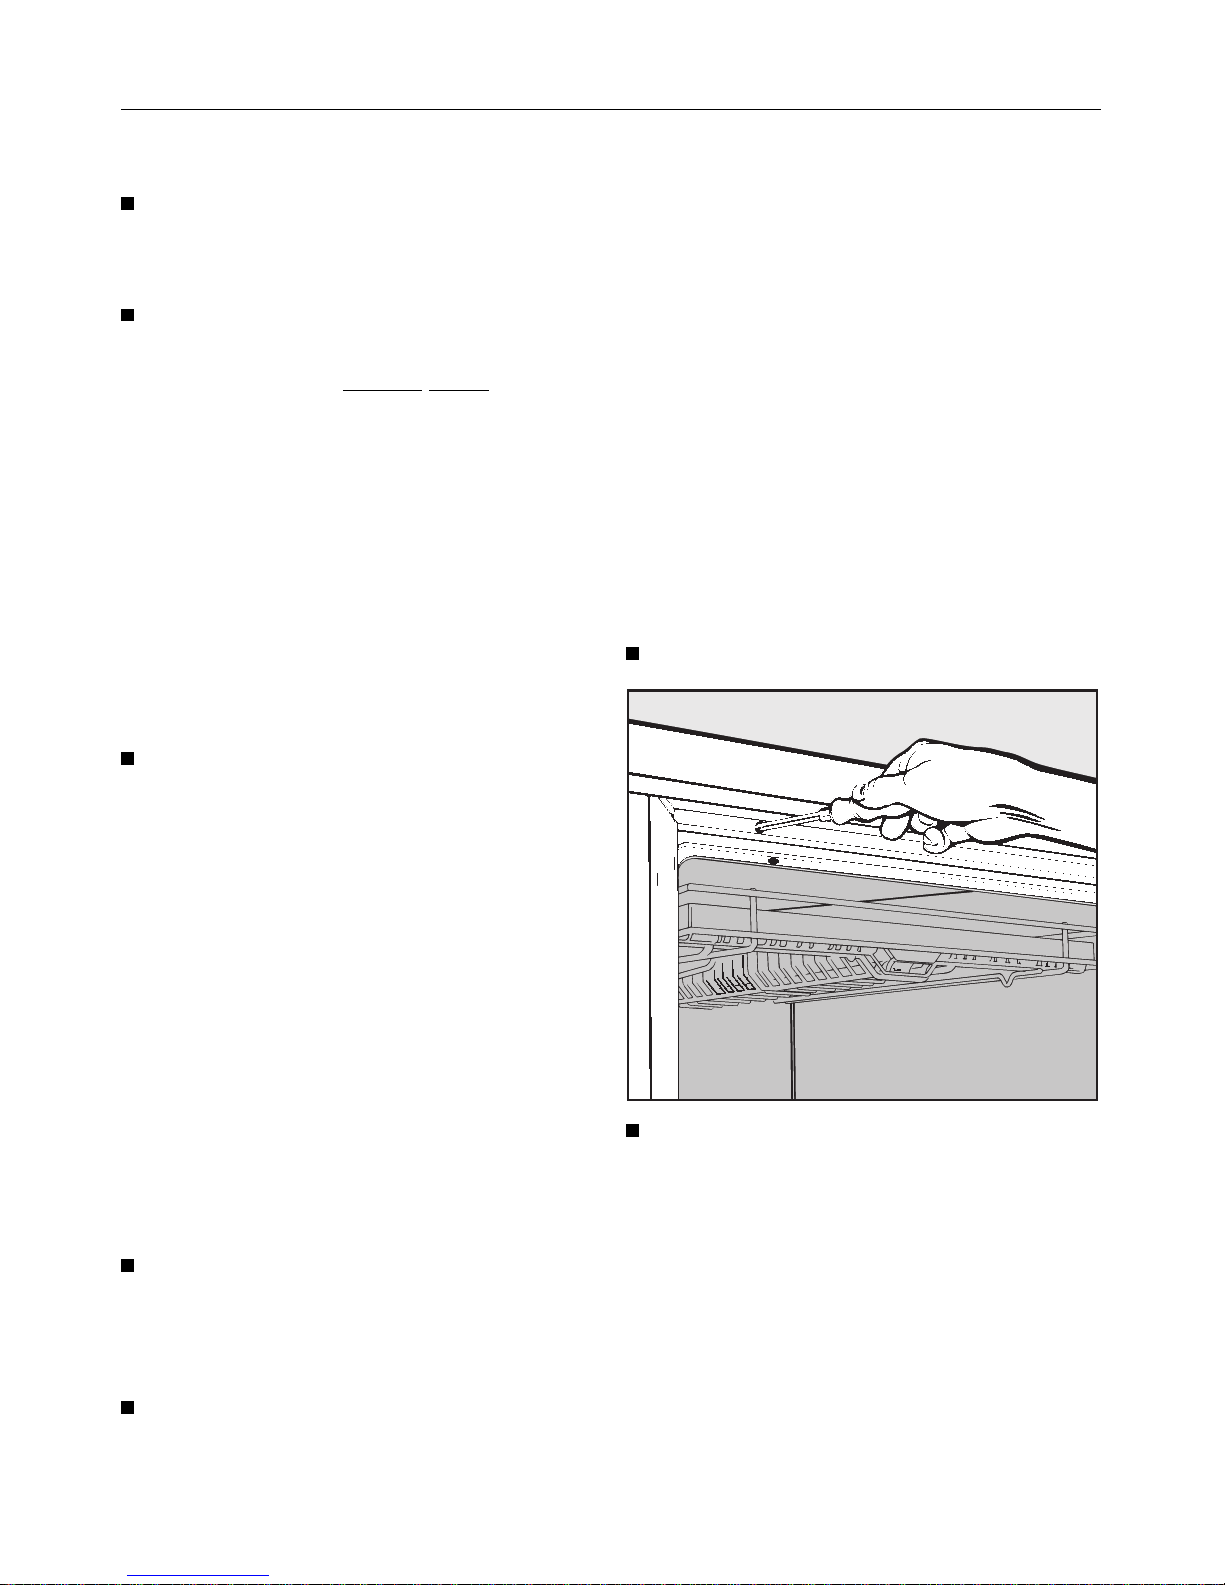
Die Einstellschraube befindet sich in
der oberen Leiste vorne auf der linken
Seite des Geschirrspülers.
Tür des Geschirrspülers öffnen.
Die Türfederung mit einem Schraubendreher (TORX T20) ausbalancieren:
– Rechtsdrehung = spannen
– Linksdrehung = entspannen.
P
6
Page 7
8.Geschirrspüler ausrichten
und festschrauben.
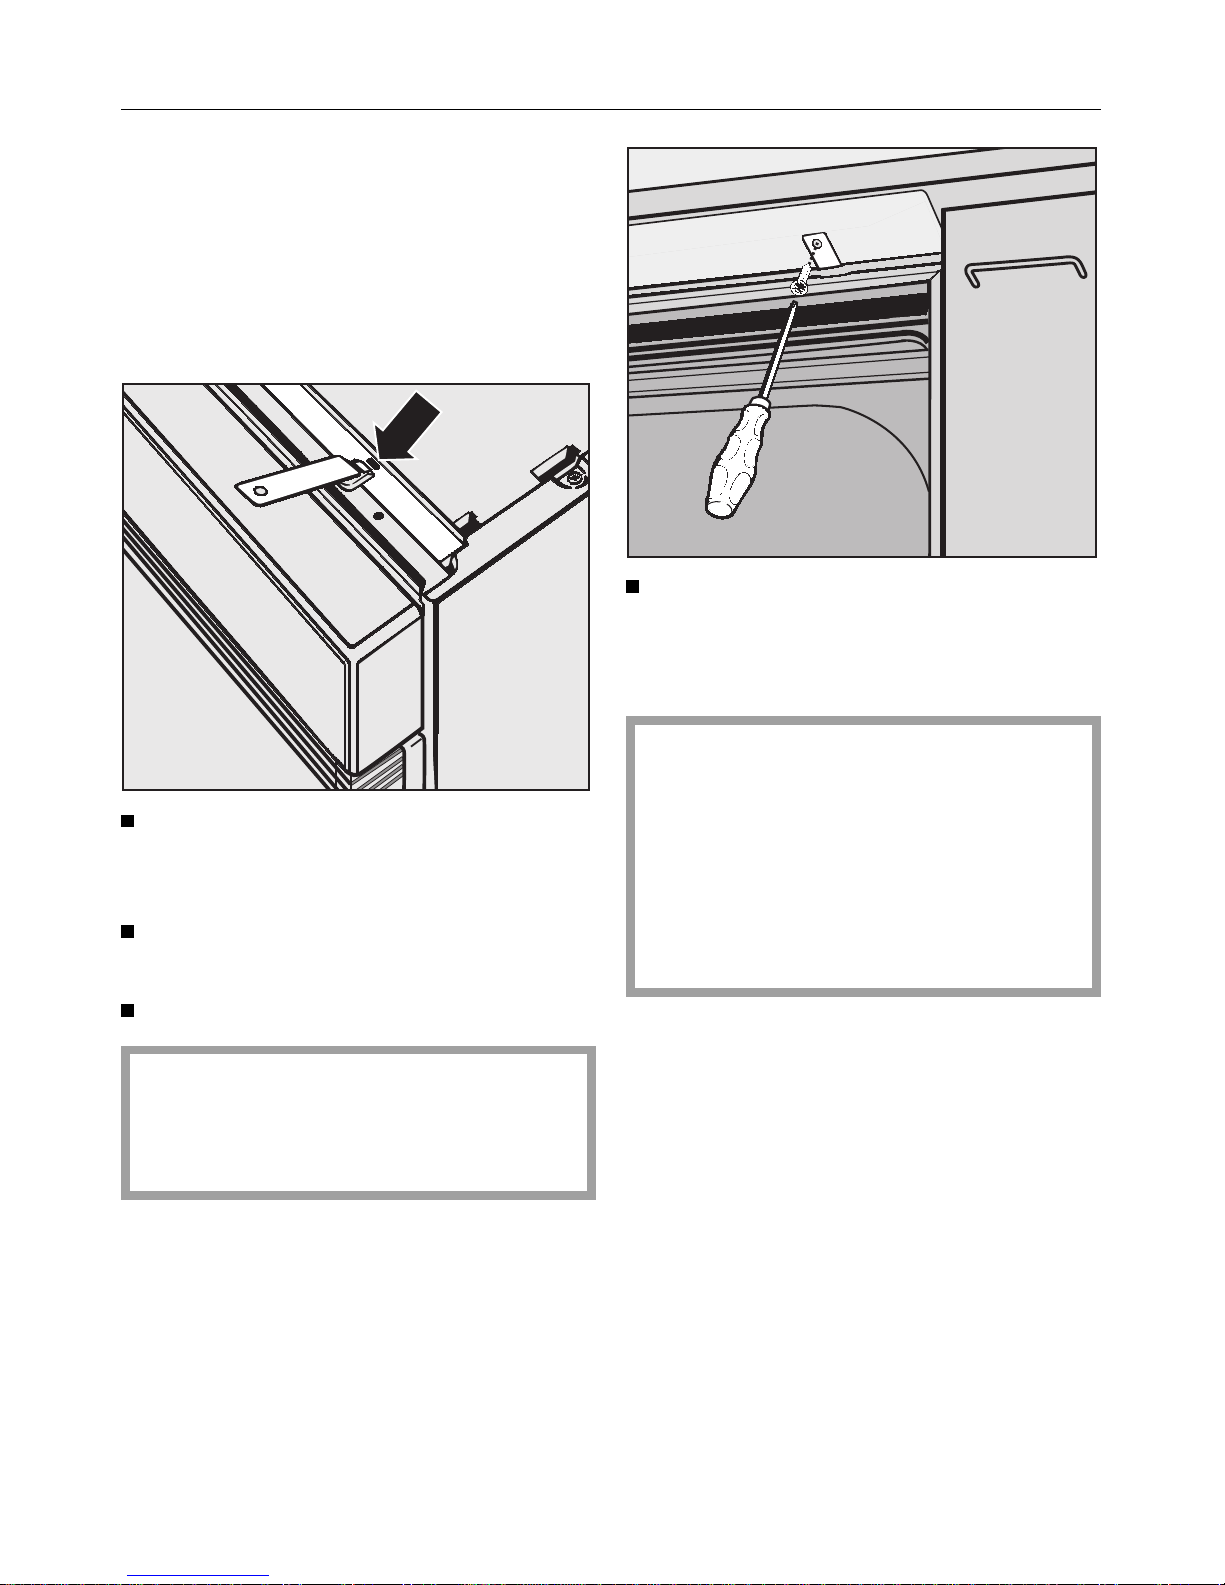
Um die Standfestigkeit zu gewährleisten, muß der Geschirrspüler – nachdem er ausgerichtet ist – mit der Arbeitsplatte verschraubt werden.
Befestigungsbleche jeweils rechts
und links in die Schlitze stecken (siehe Pfeil).
Geschirrspüler in die Nische schieben.
Tür des Geschirrspülers öffnen.
Das Loch im Befestigungsblech
und das Langloch im Arbeitsplattenschutz (Niroblech) müssen übereinanderliegen.
Geschirrspüler rechts und links mit
den beiliegenden Senkkopfschrauben (3,9 x 22) von unten an der Arbeitsplatte festschrauben.
Darauf achten, daß die Dichtung an
der Oberkante des Geschirrspülers
an der Arbeitsplatte anliegt.
Falls das nicht der Fall ist, den Geschirrspüler weiter herausdrehen
(siehe Arbeitsschritt 2 in der Gebrauchsanweisung des Geschirrspülers).
Zum Vorgehen bei ,,Corian“- oder ,,Granit“-Arbeitsplatten die Gebrauchsanweisung (Kapitel ,,i-Geschirrspüler aufstellen“) beachten.
P
7
Page 8
9.Sockelblende anbringen
Wenn der Geschirrspüler in einer Küchenzeile mit einer durchgehenden Küchen-Sockelblende eingebaut wird, entfällt dieser Arbeitsschritt.
Die Anpassung der Sockelblende erfolgt dann wie beim i-Geschirrspüler
(siehe Gebrauchsanweisung).
Die Höhe der mitgelieferten Sockelblende ist ausgelegt für:
– einen maximalen Sockelrücksprung
(100 mm)
– eine maximale Einbauhöhe des Ge-
schirrspülers, welche durch das Herausdrehen der Maschinenfüße
(max. 5 cm) erreicht wird.
Bei niedrigeren Einstellungen können
sich Tür und Sockelblende berühren,
wenn die Geschirrspülertür geöffnet
wird. Dann muß die Sockelblende in
der Höhe entsprechend gekürzt werden.
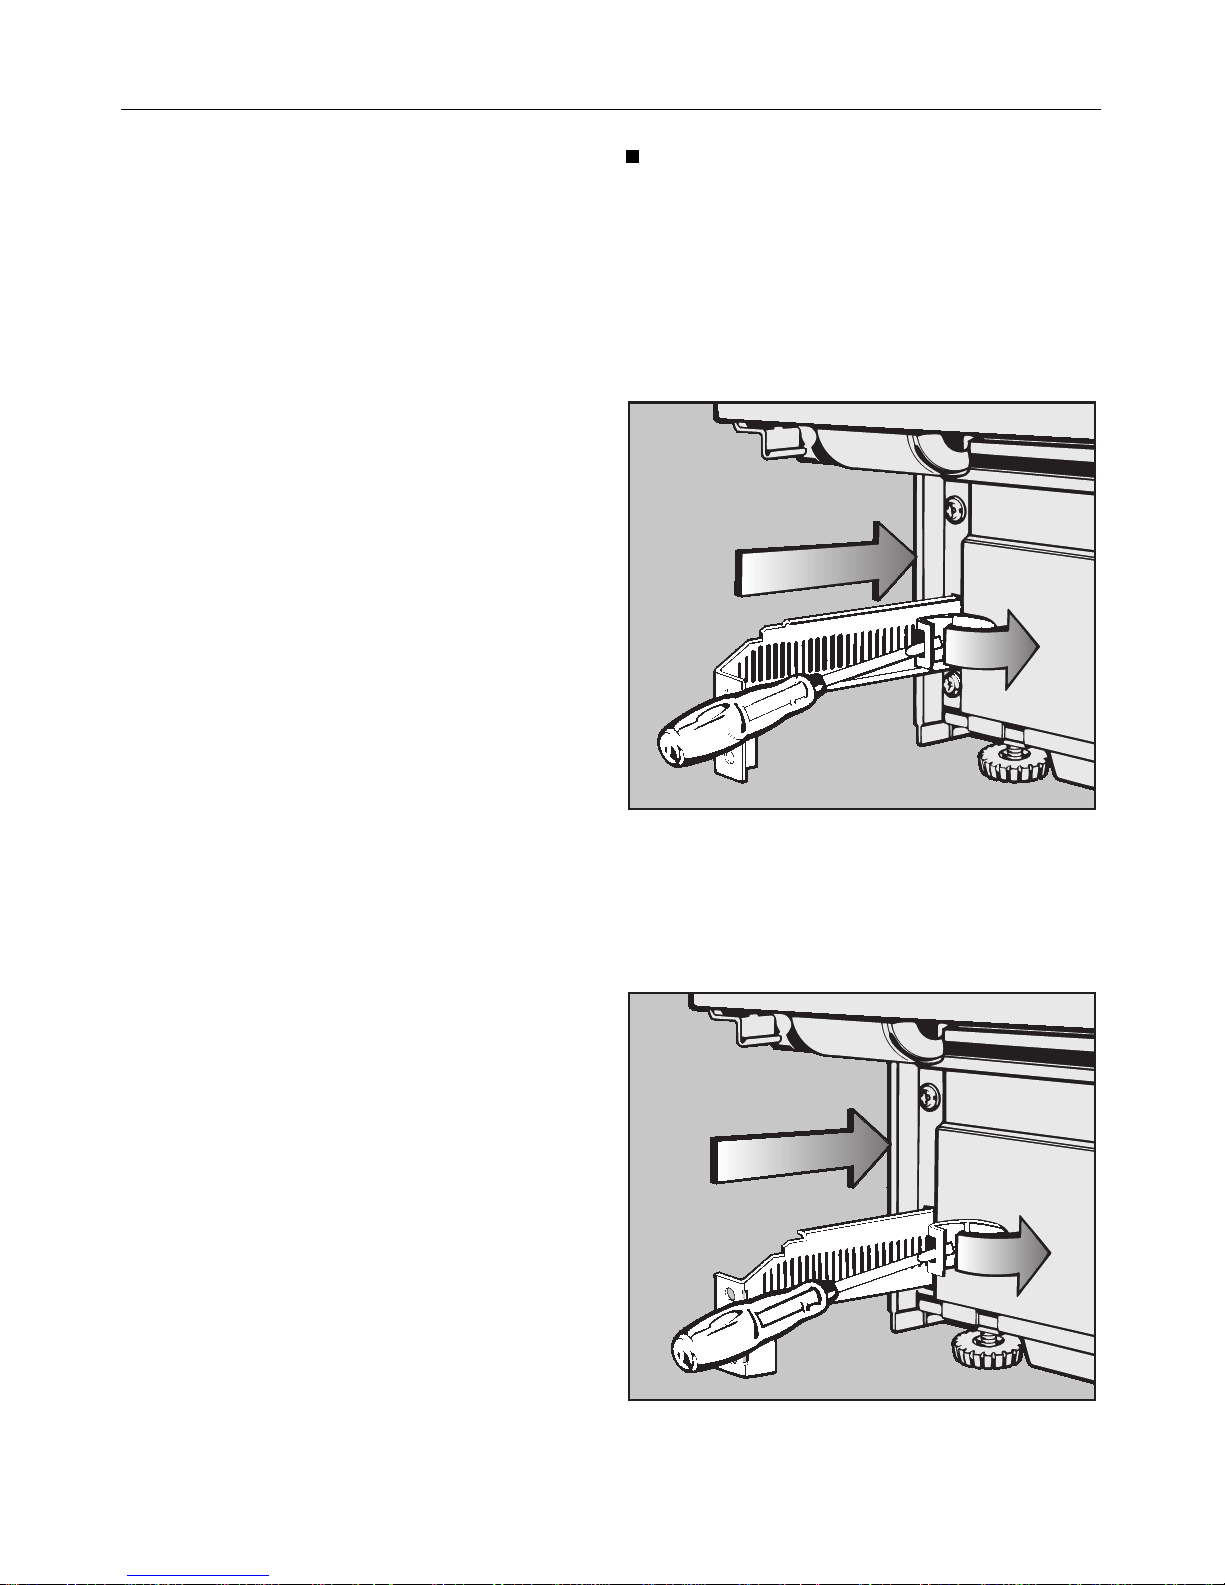
Auf beiden Seiten Arretierungsfeder
zur Seite drücken und Haltewinkel
zunächst ganz einschieben.
Geschirrspüler des T y ps G 6XX:
(Gerätetyp siehe Typenschild)
Die Haltewinkel weisen nach innen.
Geschirrspüler des T y ps G 8XX:
(Gerätetyp siehe Typenschild)
Die Haltewinkel weisen nach außen.
P
8
Page 9
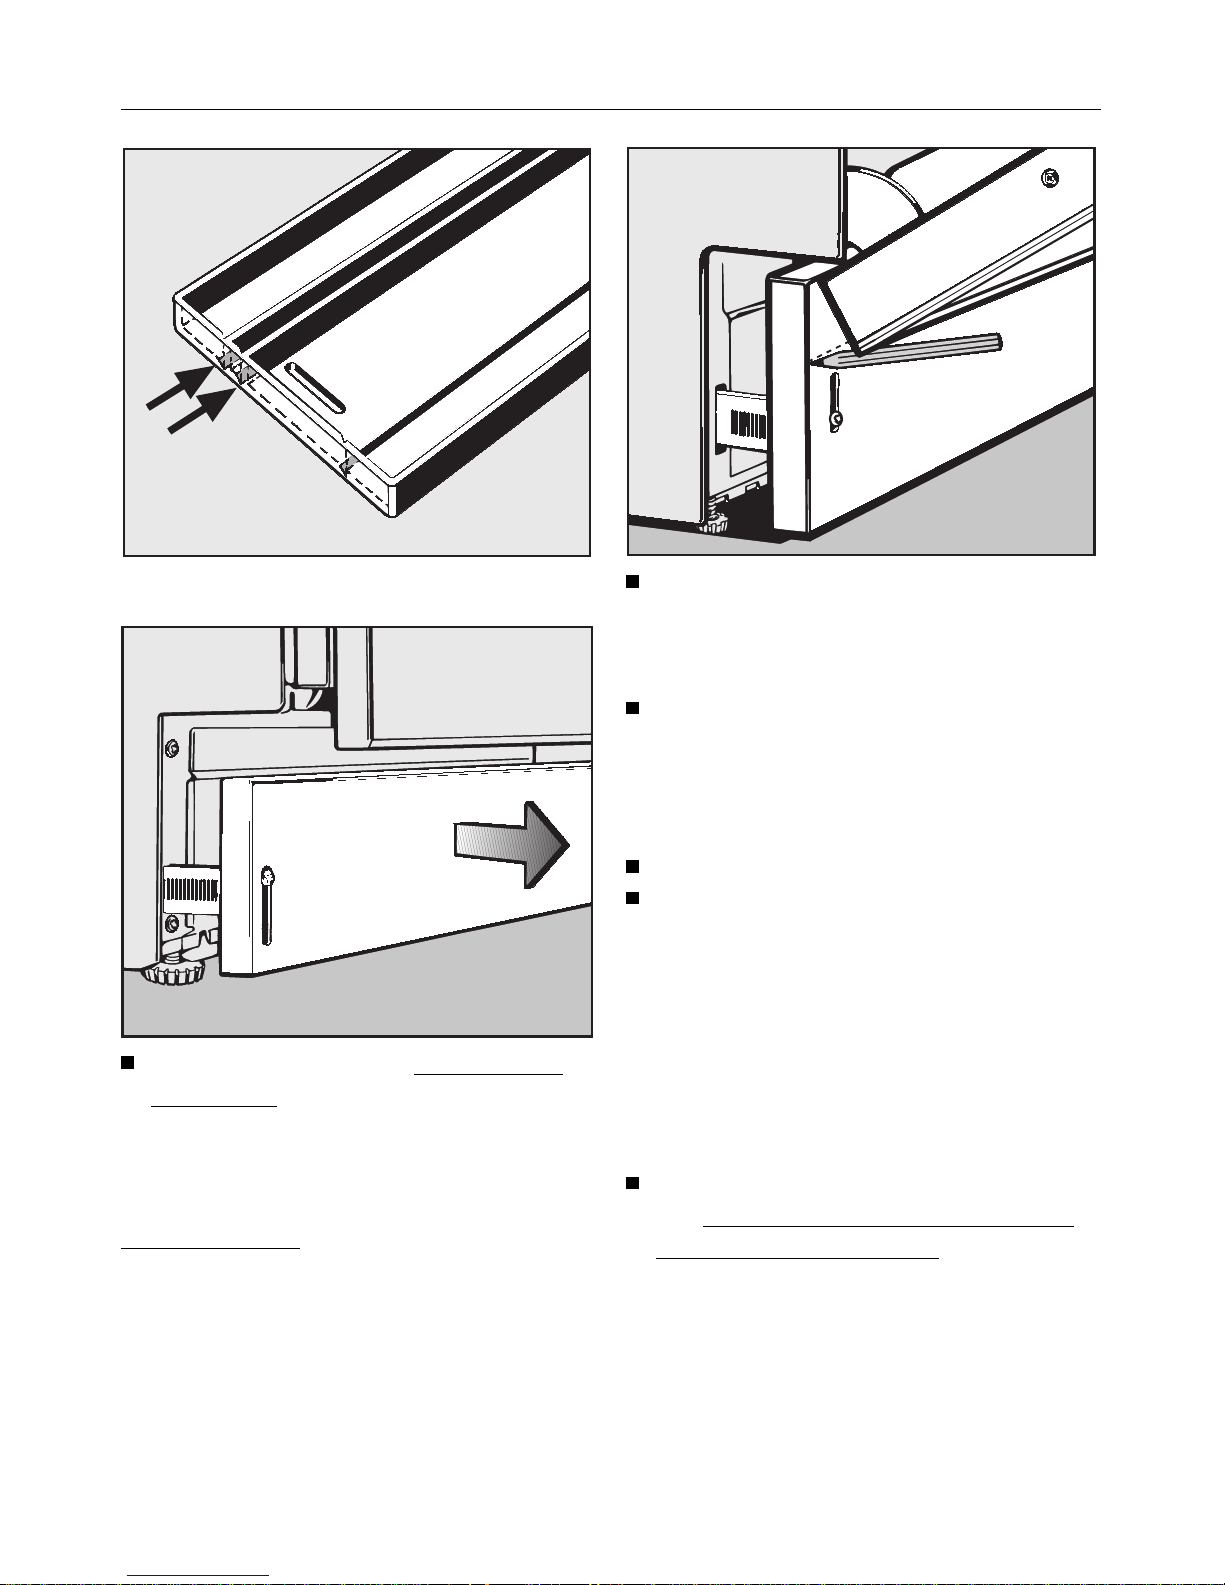
Die Sockelblende hat zwei Schnittfugen
Sockelblende mit den Schnittfugen
nach oben anschrauben und durch
gleichmäßiges Herausziehen dem
Sockelrücksprung der Küche anpassen.
Bitte beachten:
Die Sockelblende läßt sich nicht zurückschieben. Sie muß abgeschraubt werden, damit die Arretierungsfedern zur
Seite gedrückt und die Haltewinkel eingeschoben werden können.
Öffnen Sie die Tür des Geschirrspülers vorsichtig so weit, bis die hintere
Unterkante der Geschirrspülertür an
die Sockelblende stößt.
Legen Sie einen Bleistift waagerecht
an die vordere Unterkante der Geschirrspülertür an, und ziehen Sie damit eine waagerechte Linie auf der
Sockelblende entlang.
Schrauben Sie die Sockelblende ab
Kürzen Sie die Sockelblende:
– entweder an dieser Linie mit einer
Säge;
oder besser
– an einer der vorhandenen Schnitt-
fugen, falls diese dicht an der ange-
zeichneten Linie liegt.
Die Sockelblende dann seitlich an
der Fuge anschneiden und brechen.
Schrauben Sie die Sockelblende mit
der
Schnittkante nach unten wieder
an den Haltewinkeln an.
Falls die Tür des Geschirrspülers sich
jetzt nicht ohne weiteres öffnen läßt,
müssen Sie die Sockelblende noch etwas kürzen.
P
9
Page 10

Q
These instructions describe all the
steps necessary for fitting the GDU
decor set.
Please consult the separate dishwasher Operating Instructions for all further instructions on installation and fitting.
Decor set GDU for a built-under (U)
dishwasher
With the GDU Decor set an integrated
(i) dishwasher can be converted to a
built-under (U) dishwasher.
The (i) model dishwasher is used as a
basis for this conversion to a (U) model.
The Decor set GDU consists of:
1. Front panel with
Decor panel (inset),
2. Plinth facia with fixing brackets
The Decor set GDU is produced as
standard for kitchens with a plinth
height (lower edge of kitchen unit door
to floor) of:
1. 100 mm (= 820 mm building-in height)
2. 150 mm (= 870 mm building-in
height).
To match the dishwasher decor to the
colour and dimensions of your kitchen
furniture another decor panel can be
fitted in place of the one originally provided. See “Special situations”).
Carry out steps 1 - 3 .
The instructions for these steps are
given in the section on “Installation”
for integrated (i) dishwashers in the
Operating Instructions.
1. Attach the worktop protection
2. Install dishwasher into its niche.
3. Prepare and attach the control
panel.
Before fitting the control panel the adapter strips (spacer bars) must be removed,
(see illustration).
An H-shaped bracket and two templates
are supplied with the dishwasher. Keep
these parts and the adapter strips in a
safe place, to use if you ever need to
convert the machine back to an integrated one, for example in a new kitchen.
To remove the complete adapter
strip unit press out from the insertion
slots in the control panel. Then attach the control panel.
Q
10
Page 11
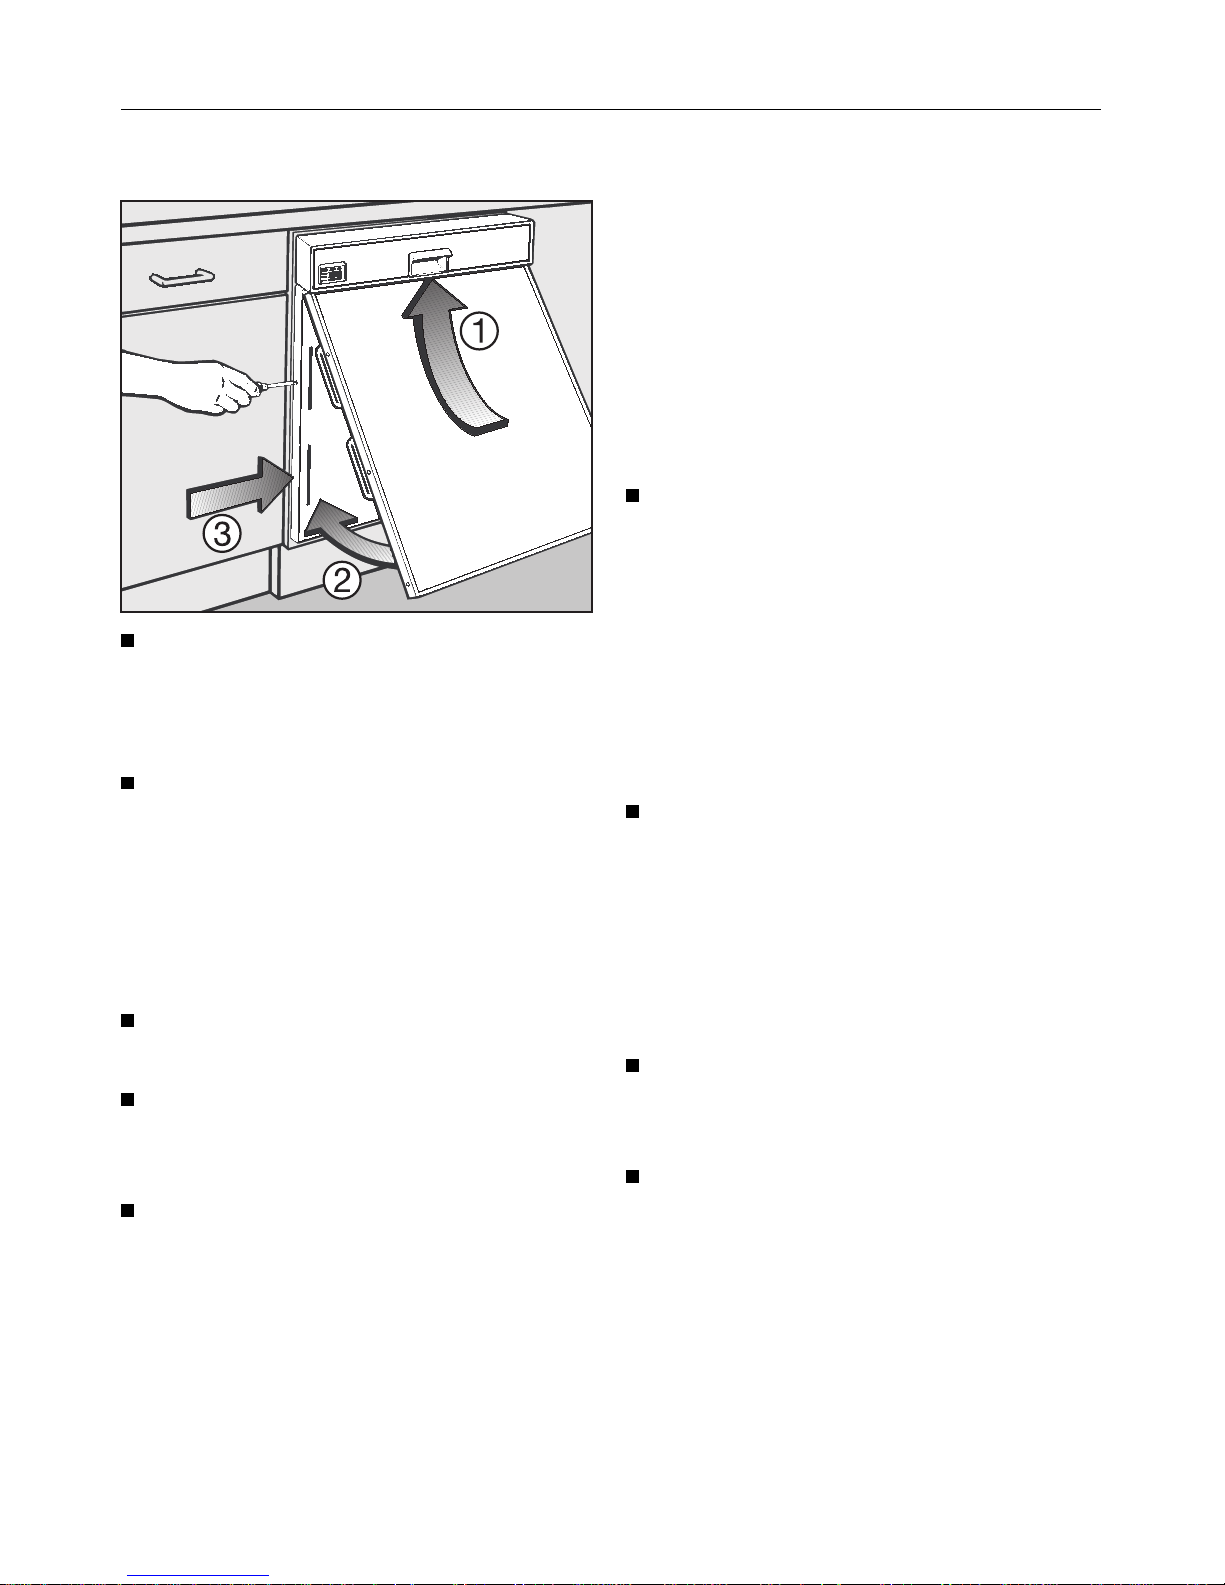
4.To fit the front panel
Pull the dishwasher out of its recess
enough to allow easy access to the
front panel fixing screws
d at the
side.
Push the front panel at an angle
under the control panel
b and flap
down into the slits of the door front
outer panel
c.
Make sure that the top edge of the
front panel slides up and sits neatly
in place under the control panel.
Tighten the screws d on each side
of the door front outer panel.
Use the stoppers provided to blank
off the openings in the fixing mechanism.
Push the dishwasher back into its
niche.
Usually the front panel will match the kitchen furniture in dimensions and colour. In this case proceed with Step 7.
However if the colour or measurements
do not match, see the Section “Special
situations”.
Special situations
The front panel can be matched to the
kitchen furniture fronts as follows:
Case A / Matching colour:
The front panel matches the neighbouring kitchen units for height, but the
decor panel needs to be replaced by
one of a different colour.
To cut a new decor panel to size use
the dimensions set ex works, according to the width of the dishwasher.
Then continue with Step 6.
Case B / Matching dimensions:
The front panel dimensions need to be
matched to those of the neighbouring
kitchen units.
Continue with step 5.
Case C / Matching colour and dimensions:
The front panel needs to be matched in
height and colour to the neighbouring
kitchen units.
Continue with Step 5, to find out the
necessary dimensions for cutting the
new decor panel.
Obtain the appropriate decor panel
and then continue with Step 6.
Dimensions set ex-works for decor
panels:
H 603 x W 587 mm (for 60 cm wide
dishwashers)
H 603 x W 437 mm (for 45 cm wide
dishwashers)
Q
11
Page 12
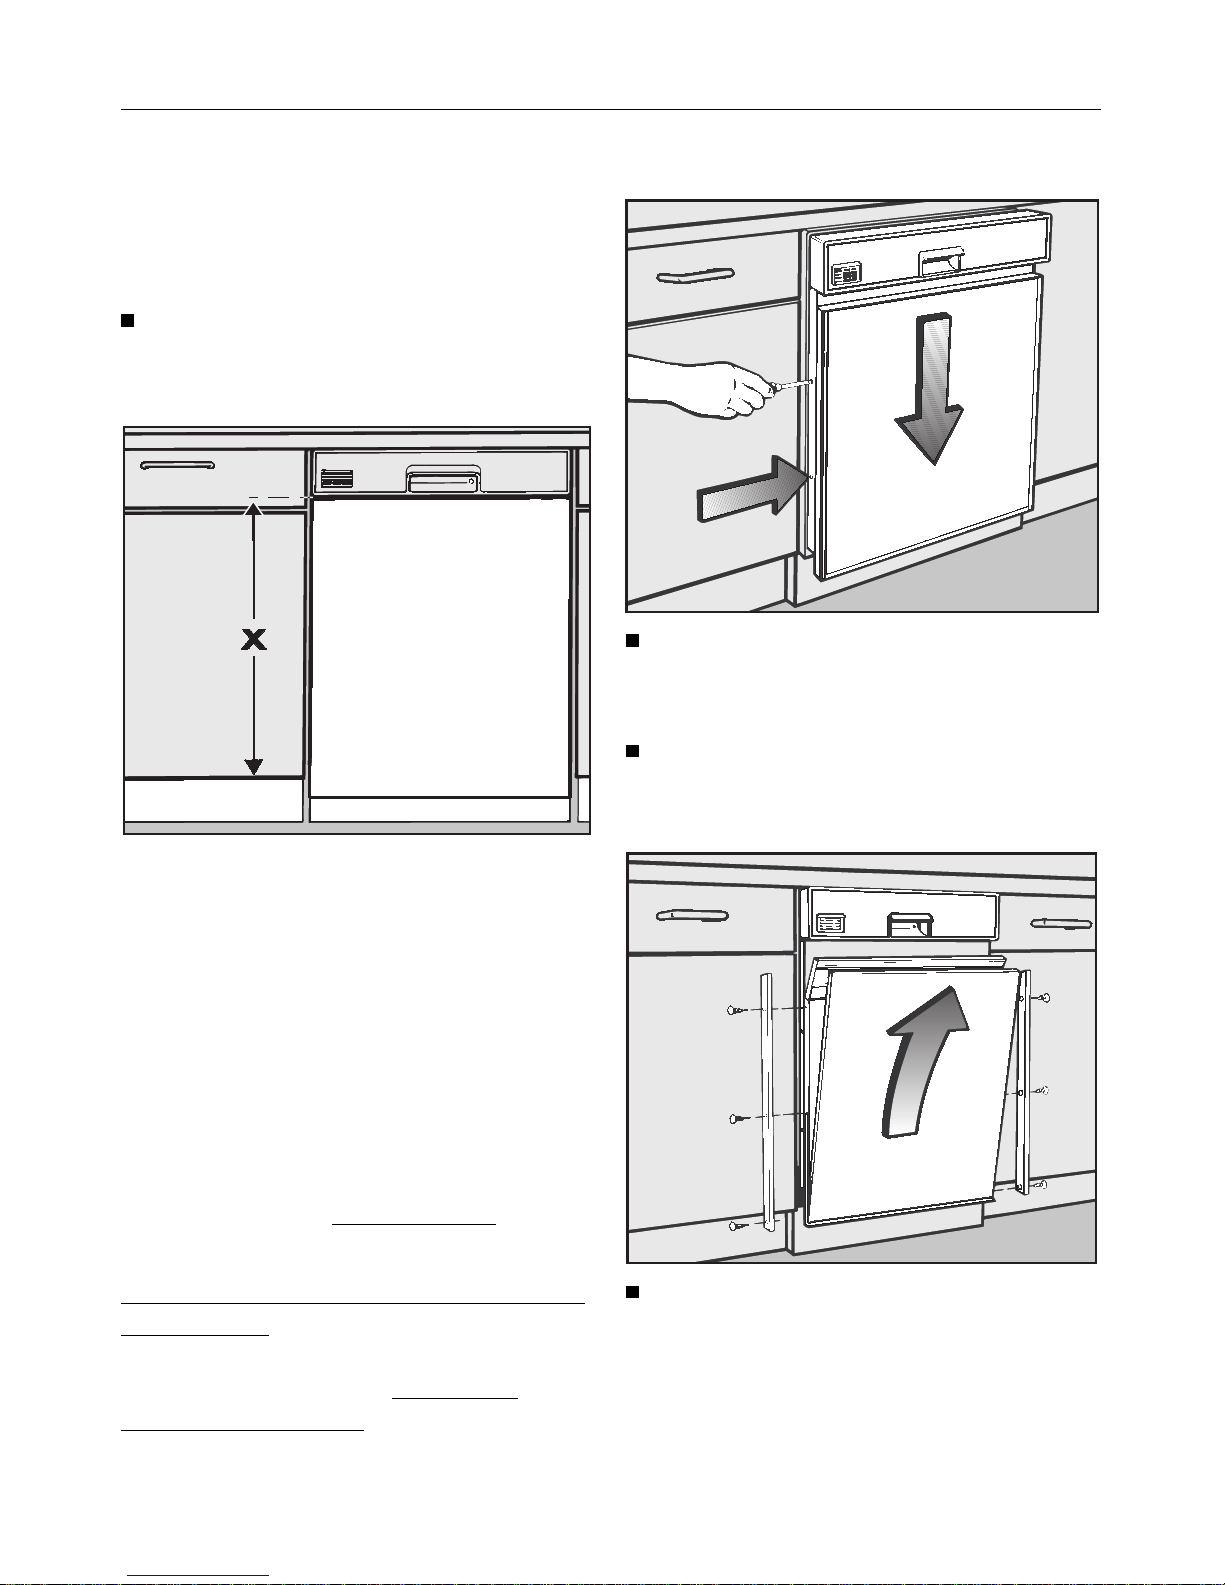
5.Define height of decor panel
Before taking measurement X the
height of the dishwasher must be adjusted to that of the recess.
Screw out the dishwasher feet until it
touches the underside of the worktop.
Measurement X:
Measure the height, X, from the lower
edge of the control panel to the bottom
of the kitchen cabinet door.
Height of decor panel: Dimension X +
2 mm. The additional 2 mm are necess-
ary to enable the front panel to slide
into the control panel for a secure hold.
Example:
Dimension X =575 mm
+ 2 mm
Decor panel height = 577 mm
Example, for Case B or Case C amount
to be cut off:
height ex works: 603 mm
required height
– 577 mm
amount to be cut off: = 26 mm.
6.Aligning the front panel
Pull the dishwasher out of its recess
enough to allow easy access to the
fixing screws at the side.
Loosen the screws on each side of
the door front outer panel, and lower
the front panel.
Unscrew the decor strips.
Q
12
Page 13
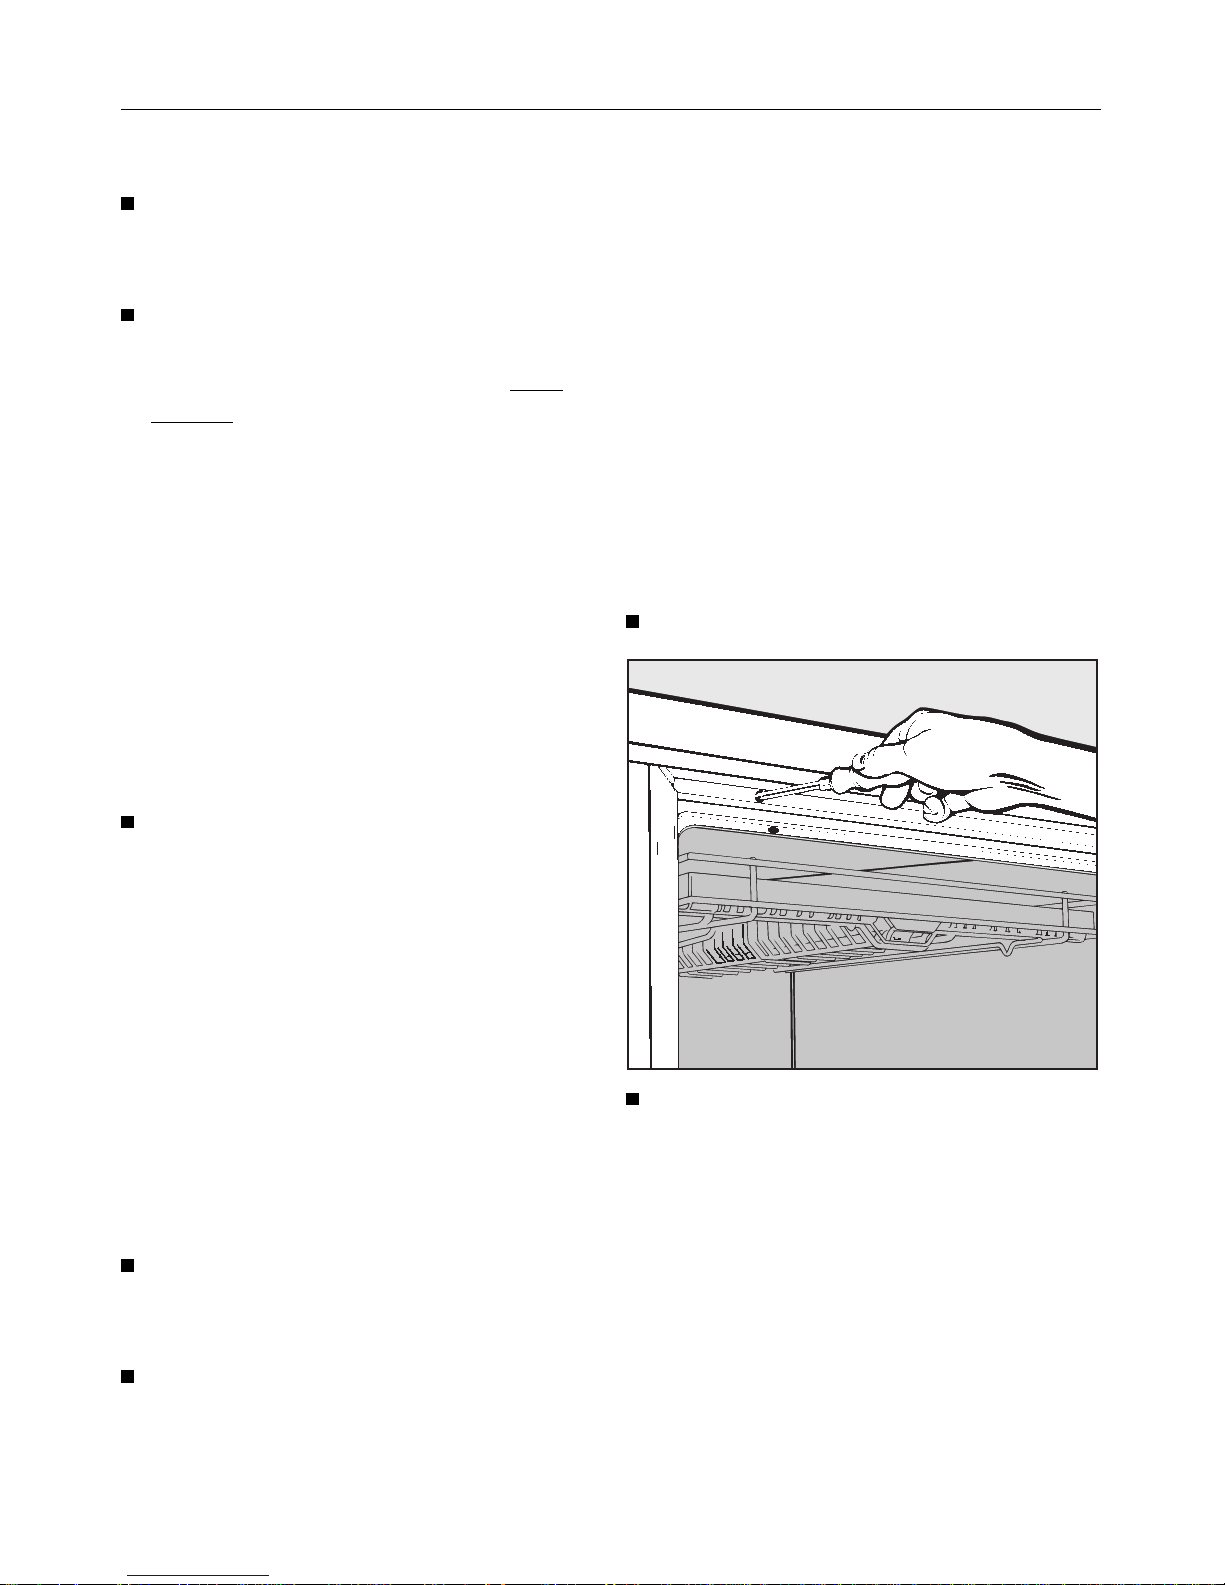
Case A / matching colour:
Exchange the decor panel.
Case B / matching dimensions:
Remove decor strips, decor panel,
filler card and polystyrene spacer
pieces, and shorten the panel
from
the top by the amount calculated
(26 mm in the example given above).
Please note:
Use masking tape to protect the decor
panel and strips from scratches when
cutting the panel.
Use a cutting tool suitable for the material. If necessary take advice from a
suitably competent person.
Case C / Matching colour and dimensions:
As Case B, but do not shorten the
decor panel, replace it with a panel
already cut to size.
When cutting to size, use the height
dimension calculated (X+2 mm) and
the ex-works width dimension given
on page 11, according to your dishwasher model.
If the new decor panel is thicker than
2 mm (max. 4 mm), remove the filler
card from the front panel.
In all the above-mentioned cases:
Reassemble the front panel and fit to
the machine as described under
Point 4.
Push the dishwasher back into the
niche and align.
Then continue with Step 7.
7.Adjusting the door springs
The door springs are correctly adjusted
when a half opened door (approx. 45°
opening angle) remains in that position
when released.
If the door drops down then the door
springs need to be tightened.
If however it rises up, then the springs
need to be released more.
The adjusting screw is located in the
upper front strip at the left hand side of
the dishwasher.
Open the dishwasher door.
Adjust the door springs using a Torx
screwdriver until it is correctly balanced:
– turn clockwise = tighten
– turn anti-clockwise = loosen.
Q
13
Page 14
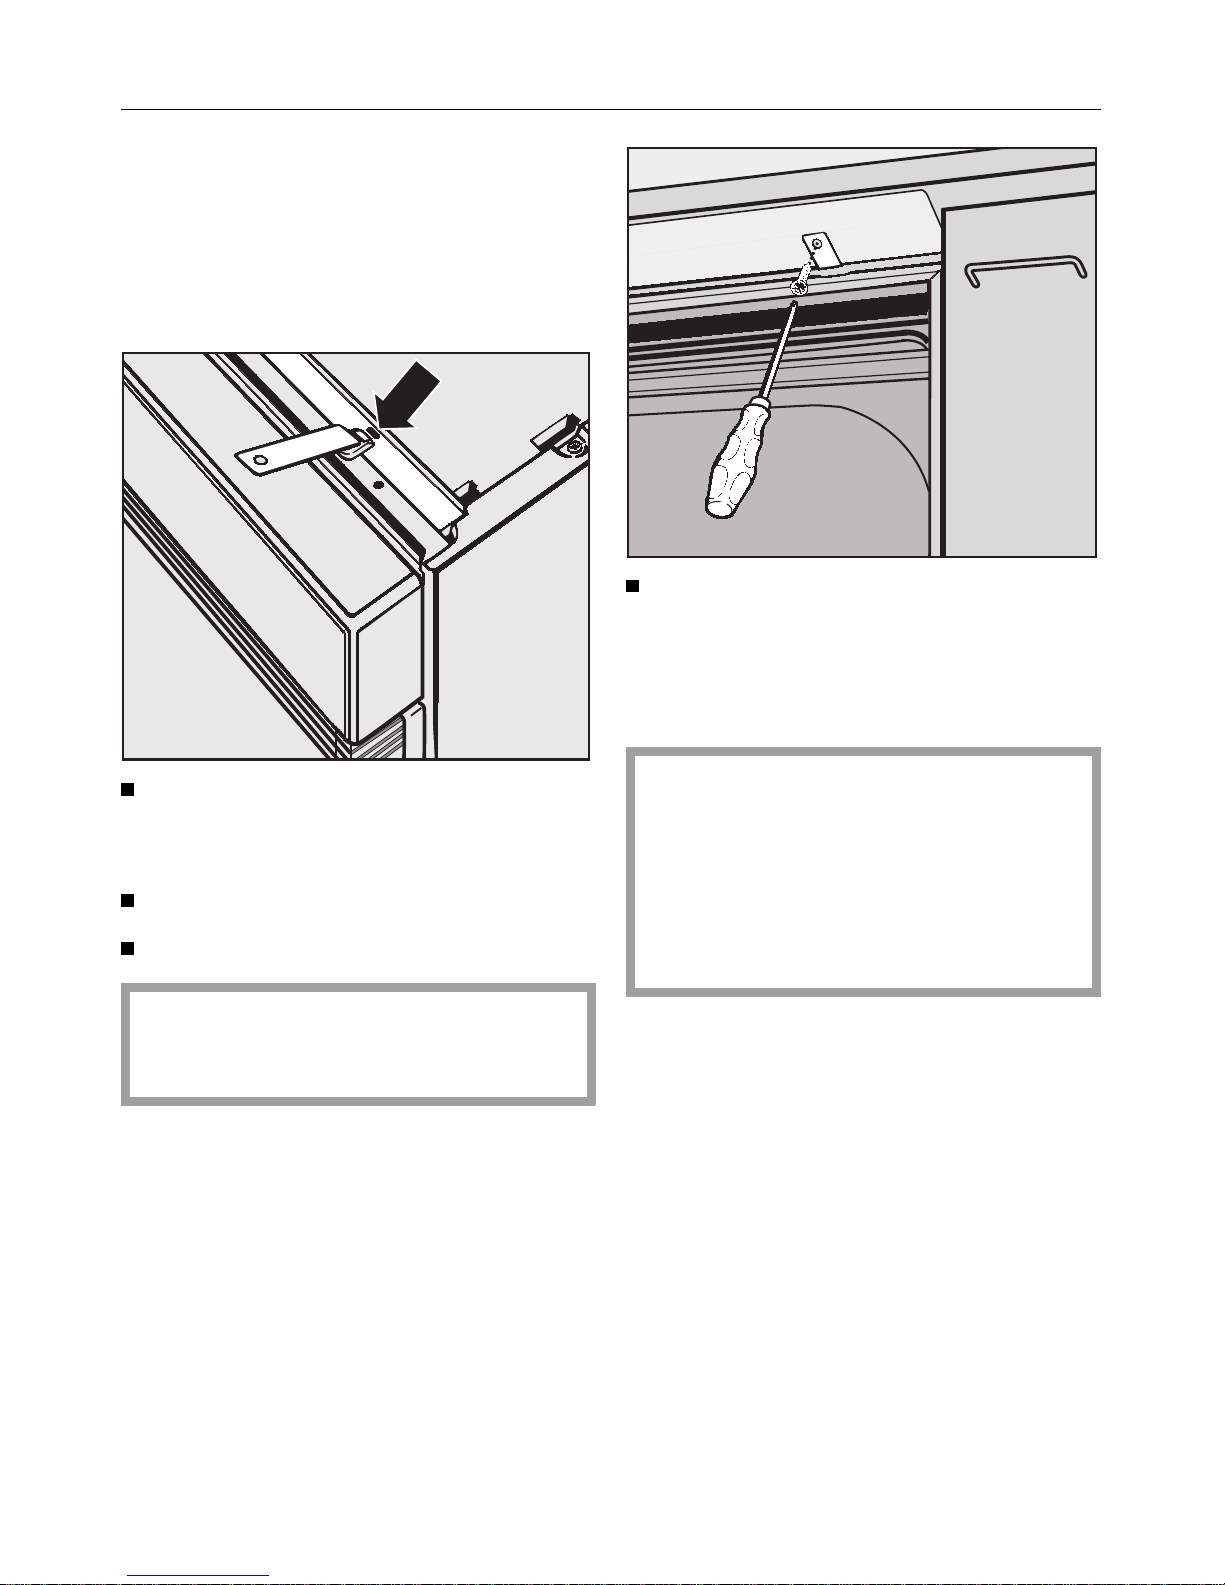
8.Level and secure the
dishwasher
To ensure the stability of the dishwasher,
it must be screwed to the continuous
worktop after it has been positioned.
Fit the securing pieces into the slots
on both the left and right hand sides,
(see arrow).
Push the dishwasher into the recess.
Open the dishwasher door.
The hole in the securing piece must
line up with the oval hole in the niro
steel plate.
Screw the countersunk screws
(3.9 x 22) upwards through the securing pieces on the left and right
hand sides into the work surface to
secure the dishwasher.
Ensure that the seal on the top
edge of the dishwasher fits directly
against the worktop. If this is not the
case, adjust the height-adjustable
screw feet more, (see Step 2 in the
Installation section of the Operating
Instructions).
With ’Corian’ or granite-type worktops
consult the Section on installing integrated ’i’ dishwashers in the Operating
Instructions booklet.
Q
14
Page 15
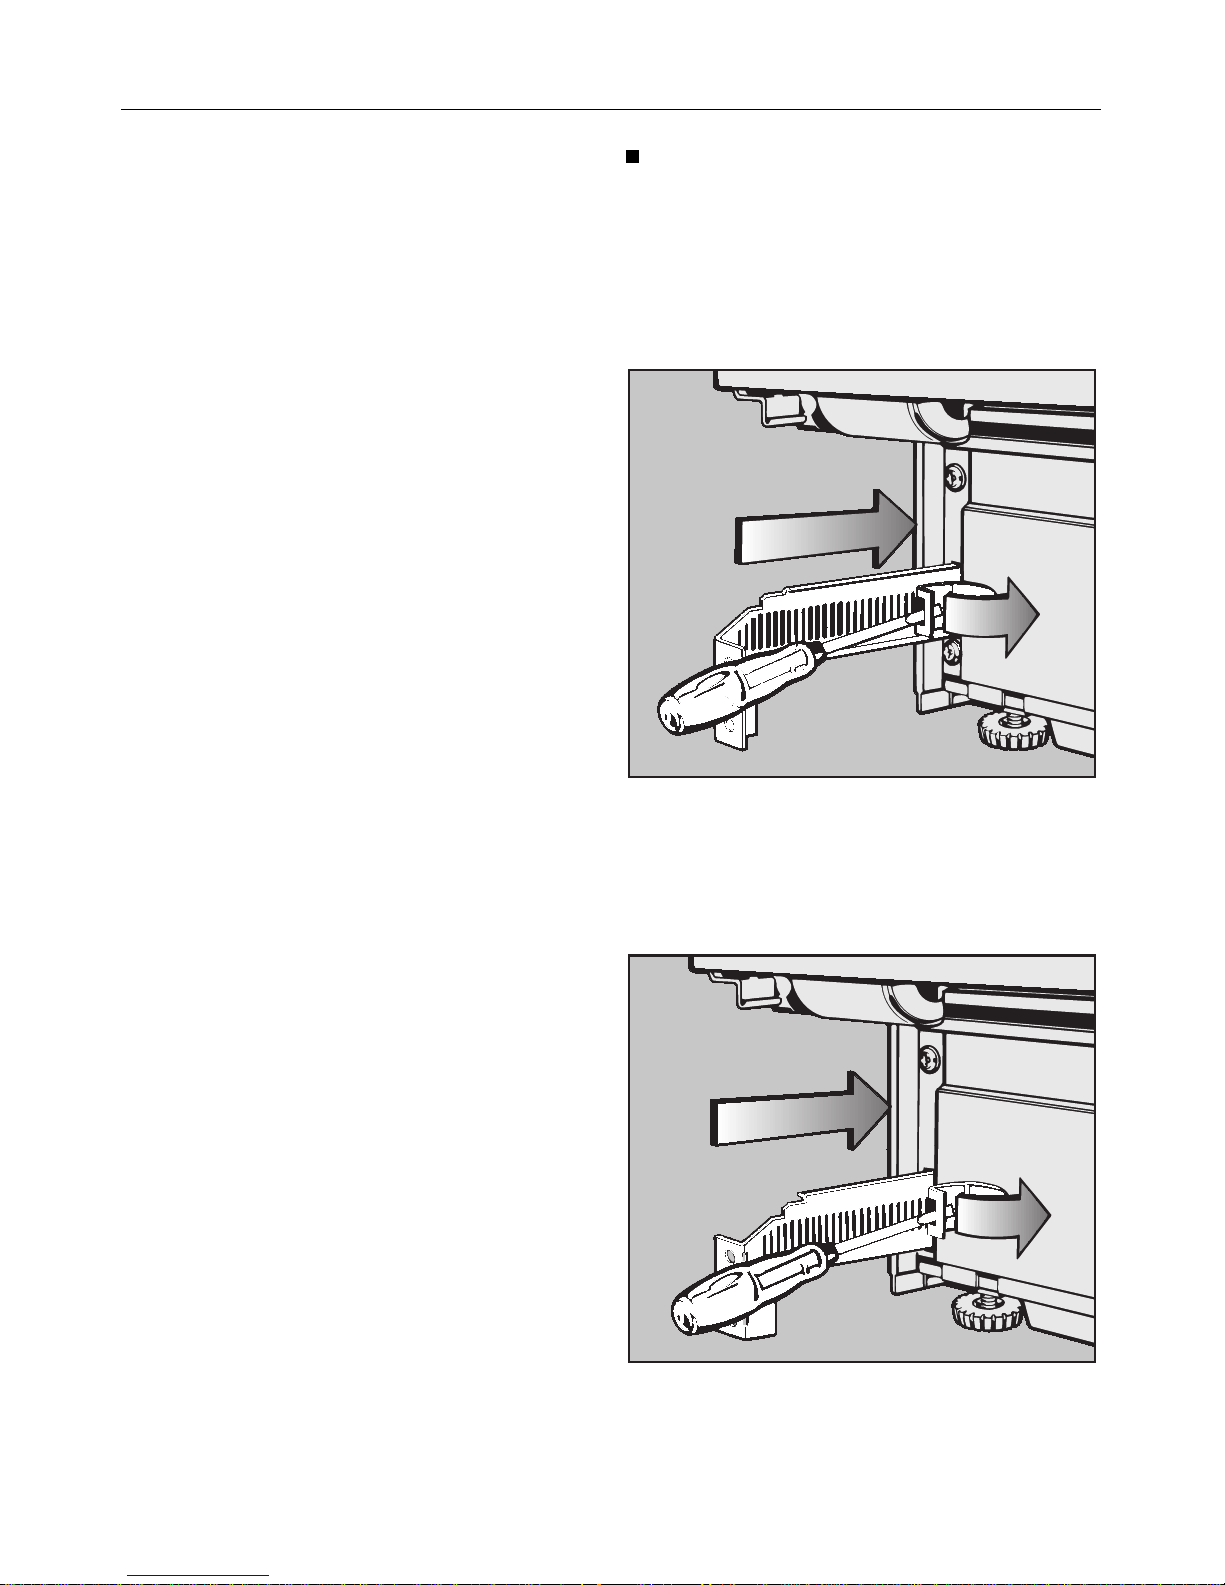
9.Fitting a plinth facia
This step is not carried out for dishwashers installed in a kitchen with a
continuous kitchen plinth facia.
In that case align the plinth facia as described for the integrated ’i’ dishwashers in the Operating Instructions
booklet.
The height of the plinth facia supplied
is set for:
– A maximum plinth rebate of 100 mm.
– A maximum building-in height of the
machine, with the feet fully (5 cm) extended.
If these measurements are less than
the maximum, the door may hit the
plinth facia. If it does, trim the height of
the plinth facia accordingly.
On each side push the spring clips
aside and push the brackets right in.
G 6XX type dishwasher:
(See data plate for machine type)
The brackets point inwards.
G 8XX type dishwasher:
(See data plate for machine type)
The brackets point outwards.
Q
15
Page 16

The plinth facia has two cutting lines.
Screw the plinth facia on with the cutting lines towards the top, and pull
out evenly to adjust to the kitchen
plinth rebate.
Please note:
The plinth facia cannot be pushed
back. It must be unscrewed, so that
both spring clips can be pushed to the
sides and the brackets pushed in.
Carefully open the dishwasher door
until the rear bottom edge of the dishwasher door hits against the plinth
facia.
Place a pencil horizontally at the
front lower edge of the dishwasher
door and draw a horizontal line
across the plinth facia.
Unscrew the plinth facia.
To shorten the plinth facia:
– Trim with the saw along this line,
or better
– cut along one of the cutting lines
provided if this is close enough.
Score the cutting line along the
plinth facia and then break off.
Screw the plinth facia back on to the
brackets, with
the cutting line at the
bottom.
If the door does not open smoothly the
plinth facia may need further trimming.
Q
16
Page 17

ö
These instructions describe the steps
necessary for installing the GDU decor
set.
Please consult the dishwasher Operations Manual for further information on
installing and operating the dishwasher.
GDU Decor set for a built-under (U)
dishwasher
With the GDU Decor set, an integrated
(i) dishwasher can be converted to a
built-under (U) dishwasher.
The GDU Decor set consists of:
1. A front panel with a insert Decor,
and
2. A toekick with mounting brackets
The GDU Decor set is made to fit kitchen
cabinets with a toekick height (lower
edge of cabinet door to floor) of
4 to 6 inches (100 - 150 mm).
The included decor insert can be
replaced with any 1/16” (1.5 - 2 mm)
thick material (plastic laminate,
melamine, veneer, etc.) to match your
cabinetry, if you so desire. (See
“Custom panels” on page 18).
Install the dishwasher as instructed in
its Operations Manual, making sure to
remove the adapter strip (spacer bars)
(see illustration). Store the adapter strips,
the H-shaped bracket and the two templates that came with the dishwasher in
a safe place.These will be used if you
decide to convert the dishwasher back
to an (i) model in the future.
To remove the adapter strip from the
control panel, place the panel on a
table, printed side up, and gently
push down on the adapter strip near
the bottom of the control panel. This
will release the mounting bolts from
their slots.
Before proceeding, make sure the
following steps have been performed.
1. The steam deflector has been installed (if necessary).
2. The dishwasher has been placed
in position under the counter and
correctly levelled.
3. The adapter strip has been
removed.
ö
17
Page 18

If you are installing the front panel from
the GDU Decor set as is, proceed as
follows. If you will be using a custom
front panel of different dimensions or
color, proceed to “Custom panels” in
the next column.
Step 4. Installing the front panel
Pull the dishwasher out from under
the countertop as far as necessary
to reach the locking screws located
on the side of the door,
d.
Angle the top of the front panel under
the control panel,
b, and align the
tabs with the slots on the door as you
position the panel in place,
c. Make
sure that the top edges of the decor insert and frame are completely seated
under the control panel.
Tighten the 4 screws, d, 2 on each
side of the door.
Use the provided caps to plug the
locking screw access holes.
Push the dishwasher back under the
countertop, and proceed to Step 7,
“Adjusting the door springs”.
Custom panels
A front panel can be made to match
the kitchen cabinets, depending on the
situation, as follows:
Situation A - Panel color n ee ds
changing:
The front panel matches the neighboring cabinets in height, but the decor insert needs to be replaced by one of a
different color.
Proceed to Step 6, “Removing the
front panel”.
Situation B - Panel needs to be shortened:
The front panel is too long and needs
to be shortened to match the neighboring cabinets.
Proceed to Step 5, “Calculating the
height of the decor insert”.
Situation C - The Decor insert is too
long and the wrong color:
The front panel needs to be shortened
and replaced by one of a different color.
Proceed to Step 5, “Calculating the
height of the decor insert”, to find the
dimensions needed for the new
decor insert.
After obtaining the decor insert, proceed to Step 6, “Removing the front
panel”.
For detailed instructions on removing
and installing the decor insert, see
Step 6, “Removing the front panel”.
ö
18
Page 19

Step 5.
Calculating the height of the
decor insert
The dishwasher should be level and adjusted (by screwing the feet in or out as
necessary) so that the upper edge of the
control panel is aligned with the upper
edge of the neighboring cabinet.
Measure the height, X, from the
lower edge of the control panel to
the bottom of the kitchen cabinet
door.
The decor insert should be cut to a
height of X + 1/16” (2 mm).
The additional 1/16” (2 mm) is necessary to enable the panel to slide under
the control panel for a secure fit.
Example:
Dimension X 22 11/16” (576 mm)
additional
+ 1/16” (2 mm)
Decor panel
height = 22 3/4” (578 mm)
A new panel, 22 3/4” (578 mm) can
now be made, or 1” (25 mm) can be
removed from the supplied decor insert.
Height of supplied
decor insert: 23 3/4” (603 mm)
Required height
– 22 3/4” (578 mm)
= Amount to be
cut off: = 1” (25 mm)
ö
19
Page 20

Step 6.
Removing the front panel
Pull the dishwasher out from under the
countertop as far as is necessary to
reach the 2 locking screws located on
each side of the door.
Loosen the screws on each side of
the door, and remove the front panel.
Unscrew and remove the decor
strips on the edges of the front panel.
Remove the insert and proceed to
the next step.
Situation A - Changing the color of
the decor insert:
Use the existing decor insert as a
template, or cut the new insert to the
dimensions shown below, that correspond to your machine.
Dimensions for custom decor inserts:
for use when changing colors only
H 23 3/4” x W 23 1/8” (H 603 mm x
W 587 mm) (for 23 1/2” (60 cm) wide
dishwashers)
H 23 3/4” x W 17 3/16” (H 603 mm x
W 437 mm) (for 17 1/2” (45 cm) wide
dishwashers).
Situation B - shortening the existing
decor insert:
Remove the decor strips, decor insert,
backing panel and polystyrene
spacers. Shorten the decor insert,
backing panel, and decor strips,
from the top, by the amount calculated in Step 5.
(1” (25 mm) in the previous example).
Please note:
Use masking tape along the cutting
line to protect the decor insert and
strips from scratches while cutting
them to length.
Use a cutting tool suitable for the material. If necessary have the decor insert cut by a qualified professional.
ö
20
Page 21

Situation C - Chan g in g the color of,
and shortening the decor insert:
Remove the decor strips, decor insert,
backing panel and polystyrene
spacers. Replace the existing insert
with the one that was cut to the
dimensions calculated in Step 5. If
the new decor insert is thicker than
1/16” (2 mm), the cardboard spacer
can be removed. (The maximum
thickness of any panel cannot exceed 5/32” (4 mm).)
Re-installation:
Re-install the front panel by reversing the procedures outlined in Step 6
and Step 4.
Push the dishwasher back under the
countertop and proceed to Step 7,
“Adjusting the door springs.”
Step 7.
Adjusting the door springs
The door springs are correctly adjusted
when a half opened door remains in
that position when released.
If the door drops down, the springs
need to be tightened.
If the door closes, the springs need to
be loosened.
The adjusting screw is located in the
upper front strip on the left hand side of
the dishwasher.
Open the dishwasher door.
Adjust the door springs to the correct balance by using a Torx screwdriver:
– turn clockwise to tighten
– turn counterclockwise to loosen.
ö
21
Page 22

Step 8.
Level and secure the dishwasher
To ensure the stability of the dishwasher, it must be attached to the
countertop after it has been positioned.
Insert one mounting bracket into
each of the slots located at the left
and right side of the machine top.
Push the machine into its recess and
if necessary, raise the dishwasher by
extending the feet until it just
touches the underside of the countertop.
If a steam deflector is installed
under the countertop, the bracket
holes must align with the slots in the
deflector.
Open the dishwasher door and
using flat head screws, secure the
dishwasher to the countertop by
screwing through both the mounting
brackets and the steam deflector.
Make certain that the white rubber
seal located along the top, outer
edge of the dishwasher is secure
against the countertop.
Do not drill any additional holes
through any portion of the wash
cabinet. If in doubt as to how to secure the dishwasher, please call the
Miele Service Department.
When using Corian®, granite, or other
countertops made of dense material,
consult the Installation section of the
dishwasher Operations manual for installation procedures.
ö
22
Page 23

Step 9.
Installing the toekick
In kitchens utilizing one continuous toekick, this step is not necessary. In this
case install the toekick as instructed in
the Installation section of the dishwasher Operations manual.
The included toekick will fit without
modification when:
– The machine is set to its maximum
height (legs fully extended), and
– the toekick is recessed as far as
possible (4 ").
If the machine height is less than maximum, or if the toekick is recessed less
than 4 ", the toekick must be shortened
(see following page).
After installation, carefully open the
dishwasher door to check that the
front panel does not hit the toekick.
If it does, remove the toekick and trim
it accordingly.
Step 10.
Adjusting the toekick
To adjust the depth (recess) of the
toekick, release the tension on the
spring clips as shown, and push the
mounting brackets in as far as
possible.
ö
23
Page 24

Trimming the toeckick
The rear of the toekick has two cutting
lines.
Screw the toekick onto the brackets,
with the cutting lines toward the top,
and pull out evenly until it aligns with
the toekick of the adjoining cabinets.
The toekick cannot be pushed back
in. It must be unscrewed, so that the
tension on the spring clips can be released. The brackets can then be
pushed in, and the toekick re-attached.
Carefully open the dishwasher door
until it hits the toekick.
Using the front lower edge of the
door panel as a guide, draw a line
across the toekick.
Unscrew and remove the toekick.
If one of the cutting lines is close to
the line just drawn, score the front of
the toekick and snap off the excess,
or trim the toekick along the line
using a saw.
Screw the toekick back onto the
brackets, with
the cut edge at the
bottom.
If the dishwasher door does not open
completely, the toekick may need further trimming.
ö
24
Page 25

X
Denne monteringsveiledningen beskriver alle arbeidsskritt angående plassering av dekorsettet GDU.
I bruksanvisningen for oppvaskmaskinen finner De alle ytterligere råd angående installasjon og montering.
Dekorsett GDU for innbyggings-oppvaskmaskine r (U)
Med dekorsettet (GDU) kan en i-oppvaskmaskin bygges om til en U-oppvaskmaskin.
Basismaskin for en innbyggings-oppvaskmaskin (U) er en integrerings-oppvaskmaskin (i).
Dekorsettet GDU består av:
1. Frontpanel med innsatt dekorplate,
2. Sokkelforblending med vinkelbeslag.
Dekorsettet GDU er seriemessig frem-
stilt for kjøkken med sokkelhøyde (fra
underkanten av kjøkkenskapsdøren til
gulvet):
1. 100 mm (= 820 mm innbyggingshøyde)
2. 150 mm (= 870 mm innbyggingshøyde).
For tilpassing av farge og mål til frontene
i Deres kjøkken kan den originale dekorplaten skiftes ut med en plate som passer til kjøkkenet (se ,,Spesialtilfeller“).
Utfør først arbeidsskritt 1 - 3!
Disse arbeidsskrittene finner De i
bruksanvisningen i kapitlet ,,Oppstilling i-oppvaskmaskin“.
1. Påsetting av beskyttel sesplate
2. Innbygging av oppvaskmaskinen
i en nisje
3. Påsetting av betjeningspanel
Før De setter på betjeningspanelet, må
adapterlistene tas av (se tegningen).
En H-formet plate og to sjabloner følger
med oppvaskmaskinen. Oppbevar disse
delene og adapterlistene, for å kunne
bygge om oppvaskmaskinen til “i”-maskin igjen, f. eks. ved kjøp av nytt kjøkken.
Trykk adapterlistene komplett ut av
spaltene på betjeningspanelet.
X
25
Page 26

4.Påsetting av frontpanel
Trekk oppvaskmaskinen så langt ut
av nisjen at festeskruene
d på siden
for frontpanelet er lett tilgjengelige.
Sett frontpanelet skrått under betje-
ningspanelet
b og sving det inn i
spaltene på dørytterpanelet
c.
Pass på at overkantene på frontpanelet glir ordentlig inn i betjeningspanelet nedenfra.
Trekk til festeskruene d på begge sider av dørytterpanelet.
Tett åpningene i festemekanismen
med vedlagte kunststoffplugger.
Skyv oppvaskmaskinen inn i nisjen
igjen.
I de fleste tilfeller passer frontpanelet til
farger og mål i kjøkkenet. Fortsett med
arbeidsskritt 7.
Hvis farge- eller mål-tilpassing skulle
være nødvendig, se avsnitt ,,Spesialtilfeller“.
Spesialtilfeller
Frontpanelet kan tilpasses kjøkkenfronten slik:
Tilfelle A / farge-tilpassing:
Frontpanelets høyde passer til kjøkkenskapene ved siden av. Standard-dekorplaten skal likevel skiftes ut med en plate som passer til fargene i kjøkkenet.
For tilskjæring av en ny dekorplate:
bruk fabrikkmålene som svarer til
bredden på oppvaskmaskinen.
Fortsett så med arbeidsskritt 6.
Tilfelle B / mål-tilpassing:
Frontpanelets høyde skal tilpasses til
kjøkkenskapene ved siden av.
Fortsett med arbeidsskritt 5.
Tilfelle C / farge- og mål-tilpassing:
Frontpanelets mål og farge skal tilpasses til kjøkkenskapene ved siden av.
Fortsett med arbeidsskritt 5, for å finne ut nødvendig mål for tilskjæring
av den nye dekorplaten.
Anskaff tilsvarende dekorplate og
fortsett så med arbeidsskritt 6.
Tilskjæringsmål fra fabrikken for dekorplaten:
H 603 x B 587 mm (for 60 cm bred oppvaskmaskin)
H 603 x B 437 mm (for 45 cm bred oppvaskmaskin)
X
26
Page 27

5.Fastsettelse av høyden på
dekorplaten
Før De måler opp målet X, må høyden
på oppvaskmaskinen tilpasses nisjehøyden.
Skru ut føttene på oppvaskmaskinen
så langt at maskinen støter mot undersiden av benkeplaten.
Mål X:
Underkanten på betjeningspanelet til
underkanten på kjøkkenskapsdøren.
Høyde på dekorplaten: Mål X + 2 mm.
Tillegget på 2 mm er nødvendig for at
frontplaten skal komme helt inn i betjeningspanelet (sikkert feste).
Eksempel:
Mål X =575 mm
+ 2 mm
Høyde dekorplate = 577 mm
I dette eksempelet gjelder følgende for
forkorting av de aktuelle delene (tilfelle
B eller C):
Høyde fra fabrikken 603 mm
Målt høyde
– 577 mm
Forkorting = 26 mm.
6.Tilpassing av frontpanelet
Trekk oppvaskmaskinen så langt ut
av nisjen at festeskruene på siden
for frontpanelet er lett tilgjengelige.
Løsne festeskruene på begge sider
av dørytterpanelet og senk frontpanelet.
Skru av dekorlistene.
X
27
Page 28

Tilfelle A / farge-tilpassing:
Skift ut dekorplaten.
Tilfelle B / mål-tilpassing:
Ta av dekorlister, dekorplate,
justeringspapp og styropor-avstandsstykke og forkort
alltid øverst med
målet som De fant ut tidligere
(i forrige eksempel 26 mm).
NB:
Bruk maskeringstape på dekorplate og
dekorlister, for å unngå riper ved forkortingen.
Bruk verktøy som passer til materialet!
Spør eventuelt en fagmann om råd.
Tilfelle C / farge- og mål-tilpassing:
Som tilfelle B, men ikke forkort dekorplaten. Bytt den ut med en passe tilskåret plate.
For tilskjæringen brukes (X+2 mm)
for høyden og tilskjæringsmålet fra
fabrikken for bredden tilsvarende
bredden på Deres oppvaskmaskin
(se side 26).
Hvis den nye dekorplaten er tykkere
enn 2 mm (maks. 4 mm), må justeringspappen tas ut av frontpanelet.
I alle ovennevnte tilfeller:
Sett sammen frontpanelet igjen som
beskrevet under punkt 4 og plasser
det på oppvaskmaskinens front.
Skyv oppvaskmaskinen inn i nisjen
og rett den opp.
Gå videre med arbeidsskritt 7.
7.Innstilling av dørfjæring
Dørfjærene er riktig innstilt hvis den
halvåpne døren (ca. 45 ° åpningsvinkel)
blir stående i denne stillingen når De
slipper den.
Hvis døren synker til vannrett stilling,
må dørfjærene strammes.
Hvis døren fjærer opp igjen, må fjærene slakkes.
Justeringsskruen befinner seg i den
øvre listen foran på venstre siden av
maskinen.
Åpne maskindøren.
Balanser dørfjæringen med en skrutrekker (TORX T20):
– Mot høyre = strammere
– Mot venstre = slakkere.
X
28
Page 29

8.Oppretting og fastskruing av
maskinen
For å sikre at maskinen står støtt må
den - etter at den er justert - skrus fast
til benkeplaten.
Stikk festebeslaget til høyre
og venstre inn i spalten (se pilen).
Skyv oppvaskmaskinen inn i nisjen.
Åpne maskindøren.
Hullet i festebeslaget og det avlange hullet i beskyttelsesplaten må ligge over hverandre.
Skru oppvaskmaskinen fast til benkeplaten på høyre og venstre side med
vedlagte senkskruer (3,9 x 22).
Pass på at pakningen på oversiden
av oppvaskmaskinen ligger inntil
benkeplaten.
Hvis ikke, trekk oppvaskmaskinen
lenger ut (se arbeidsskritt 2 i bruksanvisningen for oppvaskmaskinen).
For fremgangsmåte ved ,,Corian“- hhv.
,,Granit“-benkeplater, se bruksanvisningen (kapittel ,,Oppstilling i-oppvaskmaskin“).
X
29
Page 30

9.Påsetting av sokkelforblending
Hvis oppvaskmaskinen bygges inn i en
benkerekke med gjennomgående sokkelforblending, bortfaller dette arbeidsskrittet.
Tilpassing av sokkelforblendingen skjer
da som for i-oppvaskmaskin (se bruksanvisningen).
Høyden på den medfølgende sokkelforblendingen er beregnet for:
– maksimal sokkeldybde (100 mm)
– maksimal innbyggingshøyde for opp-
vaskmaskinen, som oppnås ved å
skru ut maskinføttene (maks. 5 cm).
Ved lavere innstillinger kan døren og
sokkelforblendingen berøre hverandre
når maskindøren åpnes. Da må sokkelforblendingen forkortes i høyden.
Trykk låsefjærene på begge sider til
siden og skyv beslagene helt inn.
Oppvaskmaskin type G 6XX :
(maskintype; se typeskiltet)
Festebrakettene peker innover.
Oppvaskmaskin type G 8XX :
(maskintype; se typeskiltet)
Festebrakettene peker utover.
X
30
Page 31

Sokkelforblendingen har to snittfuger.
Skru på sokkelforblendingen med
snittfugene oppover og trekk den
jevnt ut slik at den tilpasses sokkeldybden i kjøkkenet.
NB:
Sokkelforblendingen kan ikke skyves tilbake. Den må skrus av for at låsefjærene skal kunne trykkes til siden og beslagene skyves inn.
Åpne maskindøren forsiktig til bakre
underkant av døren støter mot sokkelforblendingen.
Legg en blyant vannrett inntil fremre
underkant av maskindøren og trekk
en vannrett linje langsetter på sokkelforblendingen.
Skru av sokkelforblendingen.
Forkort sokkelforblendingen:
– enten på denne linjen med en sag;
eller bedre
– på en av de eksisterende snittfuge ne, hvis denne ligger tett inntil den
avmerkede linjen.
Skjær til sokkelforblendingen på si den og brekk av.
Skru sokkelforblendingen på festebrakettene igjen med
snittkanten
nedover.
Hvis døren på oppvaskmaskinen nå
ikke lar seg åpne uten videre, må sokkelforblendingen forkortes litt til.
X
31
Page 32

W
I opvaskemaskinens brugsanvisning finder De de øvrige installations- og monteringsvejledninger.
Dekor-sæt GDU til opvask emaskiner
til indbygning (U-modeller)
Ved at anvende Dekor-sæt (GDU) ændres en I-model til en U-model.
En integreret opvaskemaskine (I) er basismodel for opvaskemaskine til indbygning (U).
Dekor-sæt GDU består af:
1. Front med hvid frontplade
2. Fodspark med monteringsbeslag
Som standard er Dekor-sæt GDU fremstillet til et køkken med en sokkelhøjde
(underkanten af køkkenskabsdøren til
gulvet) på:
1. 100 mm (= 820 mm indbygningshøjde)
2. 150 mm (= 870 mm indbygningshøjde).
Frontpladen kan udskiftes, så den passer til Deres køkken (se "Særtilfælde").
Følg først punkt 1-3!
Punkt 1-3 er beskrevet i brugsanvisningen i afsnittet "I-modeller opstilles".
1. Beskyttelsespladen påsættes
2. Opvaskemaskinen indbygges i
en niche
3. Betjeningspanel påsættes
Inden betjeningspanelet påsættes, må
adapterlisten tages af (se ill.).
Med opvaskemaskinen følger en H-formet plade og to skabeloner. Opbevar
venligst disse dele og adapterlisterne,
så maskinen f.eks. ved køb af nyt køkken igen kan ændres til en I-model.
Hele adapterlisten trykkes ud af slidsen i betjeningspanelet.
W
32
Page 33

4.Frontpladen påsættes
Opvaskemaskinen trækkes så langt
ud af nichen, at monteringsskruerne
d til frontpladen i siderne er let
tilgængelige.
Frontpladen anbringes skråt under
betjeningspanelet
b og svinges ind i
døryderpladens slids
c.
Vær opmærksom på, at frontpladens
overkant anbringes korrekt i betjeningspanelet.
Skruerne d på begge sider af døryderpladen skrues fast.
Åbningen i beslagene dækkes med
de medfølgende propper.
Opvaskemaskinen skubbes ind i nichen igen.
I de fleste tilfælde passer frontpladens
farve og størrelse til køkkenet. Fortsæt
derefter med punkt 7.
Hvis der kræves en farve- eller størrelsesmæssig tilpasning, se afsnittet "Særtilfælde".
Særtilfælde
Frontpladen tilpasses køkkenfronten på
følgende måde:
A / Farve tilpasses:
Frontpladen passer i højden til køkkenskabene ved siden af. Den seriemonterede frontplade skal imidlertid udskiftes
med en plade, der passer i farven til
køkkenet.
Den nye frontplades mål tilpasses efter opvaskemaskinens bredde.
Fortsæt derefter med punkt 6.
B / Mål tilpasses:
Frontpladen tilpasses i højden efter køkkenskabene ved siden af.
Fortsæt med punkt 5.
C / Farve og mål tilpasses:
Frontpladens højde og farve tilpasses
køkkenskabene.
Fortsæt med punkt 5, for at finde målene til den nye frontplade.
Efter fremskaffelse af frontpladen fortsættes med punkt 6.
Frontpladens standardmål:
H 603 x B 587 mm (60 cm bred opvaskemaskine)
H 603 x B 437 mm (45 cm bred opvaskemaskine)
W
33
Page 34

5.Frontpladens højde beregnes
Inden De udregner målet X, skal opvaskemaskinens højde tilpasses nichehøjden.
De regulerbare ben skrues så langt
ud, at maskinen støder op til køkkenbordspladen.
Mål X:
Fra betjeningspanelets underkant til
køkkenskabsdørens underkant.
Frontpladens højde: Mål X + 2 mm.
De ekstra 2 mm er nødvendige, for at
frontpladen kan gribe ind i betjeningspanelet (sikrere fæste).
Eksempel
Mål X =575 mm
+ 2 mm
Frontpladens højde = 577 mm
I dette eksempel gælder for afkortning
af delene (B eller C) følgende:
standard højde 603 mm
udmålte højde
– 577 mm
overskydende mål = 26 mm.
6.Frontpladen tilpasses
Opvaskemaskinen trækkes så langt
ud af nichen, at monteringsskruerne
til frontpladen i siderne er let tilgængelige.
Skruerne på begge sider af døryderpladen løsnes og frontpladen trækkes nedad.
Listerne skrues af.
W
34
Page 35

A / Farve tilpasses:
Frontpladen udskiftes.
B / Mål tilpasses:
Lister, frontplade,
udligningspap og styropor-afstandsstykke tages ud og afkortes foroven
med det overskydende mål
(i foranstående eksempel 26 mm).
Bemærk:
Frontpladen og listerne klæbes til, for at
undgå ridser.
Anvend egnet værktøj! Kontakt eventuelt en fagmand.
C / Farve og mål tilpasses:
Som under B, frontpladen afkortes
dog ikke, men udskiftes med en passende plade.
Anvend den beregnede højde
(X+2 mm) til udskæring og til bredden standardmålet, som svarer til opvaskemaskinens bredde (se side 33).
Hvis den nye frontplade er tykkere end
2 mm (max. 4 mm), fjernes udligningspappet fra frontpladen.
I alle nævnte tilfælde:
Frontpladen samles igen og anbringes på opvaskemaskinens front som
beskrevet under punkt 4.
Opvaskemaskinen skubbes ind i nichen og justeres.
Fortsæt derefter med punkt 7.
7.Dørfjedrene indstilles
Dørfjedrene er korrekt indstillet, når den
halvåbne dør (ca. 45 ° åbnet) bliver stående i denne stilling, når døren slippes.
Hvis døren falder ned i vandret stilling,
skal dørfjedrene spændes.
Hvis den derimod springer op igen,
skal fjedrene løsnes.
Justeringsskruerne er anbragt i øverste
liste foran i venstre side af opvaskemaskinen.
Opvaskemaskinens dør åbnes.
Med en skruetrækker (TORX T20) afbalanceres døren:
– højredrejning = fjederen spændes
– venstredrejning = fjederen løsnes.
W
35
Page 36

8.Opvaskemaskinen rettes ind
og skrues fast
For at opvaskemaskinen skal stå stabilt, skal den - efter den er rettet ind spændes fast til køkkenbordspladen.
Monteringsstykket anbringes i slidsen i hhv. højre og venstre side (se
pilen).
Opvaskemaskinen skubbes ind i nichen igen.
Maskindøren åbnes.
Hullet i monteringsstykket og langhullet i køkkenbordspladen (metal)
skal ligge over hinanden.
Opvaskemaskinen skrues fast på
bordpladen nedefra med de medfølgende skruer 3,9 x 22 (undersænkede).
Sørg for, at tætningslisten foroven
på maskinen støder op til køkkenbordpladen.
Hvis dette ikke er tilfældet, skrues
maskinen igen løs ( se punkt 2).
Hvis bordpladen f.eks. er af "Corian" eller granit, følges fremgangsmåden beskrevet i brugsanvisningen (afsnit "Opstilling af integretet opvaskemaskine
(I-model)").
W
36
Page 37

9.Sokkelafblænding tilpasses
Hvis opvaskemaskinen skal anbringes i
et køkken med gennemgående fodspark, kan De se bort fra dette punkt.
Tilpasning foretages da som ved I-modellerne (se brugsanvisningen).
Højden på den medfølgende sokkelafblænding er beregnet til:
– et maksimalt fodspark (100 mm).
– en maskimal indbygningshøjde, som
opnås ved at dreje de regulerbare
ben ud (max. 5 cm).
Ved lavere maskinhøjde kan døren og
sokkelafblændingen støde på hinanden. I et sådant tilfælde skal sokkelafblændingen afkortes tilsvarende i højden.
Fjederen trykkes til siden i begge sider og beslaget skubbes helt ind.
Opvaskemaskiner af typen G 6XX:
(Maskintypen er angivet på typeskiltet)
Monteringsvinklerne vender indad.
Opvaskemaskiner af typen G 8XX:
(Maskintypen er angivet på typeskiltet)
Monteringsvinklerne vender udad.
W
37
Page 38

Sokkelafblændingen har to skæreriller.
Sokkelafblændingen skrues på med
skærerillerne opad og trækkes jævnt
ud for at tilpasses køkkenets sokkel.
Bemærk:
Sokkelafblændingen kan ikke skubbes
ind, men må først skrues af, således at
fjedrene kan trykkes til siden og beslaget kan skubbes helt ind.
Døren åbnes forsigtigt så meget, at
den bageste underkant på døren støder på sokkelafblændingen.
Sæt en blyant vandret til den forreste
underkant og træk en vandret streg
på hele sokkelafblændingen.
Sokkelafblændingen skrues af.
Sokkelafblændingen afkortes:
– enten på denne streg med en sav,
eller endnu bedre
– på en af de eksisterende skæreriller,
hvis denne ligger tæt på den afteg nede streg.
Sokkelafblændingen skæres heref ter af i denne rille og brækkes af.
Sokkelafblændingen skrues igen på
vinklen –
med skærekanten nedad.
Hvis døren stadig ikke kan åbnes uhindret, skal sokkelafblændingen afkortes
yderligere.
W
38
Page 39

Z
Tässä asennusohjeessa kerrotaan, miten asennat GDU-muuntosarjan.
Muut ohjeet astianpesukoneen sijoittamiseksi työtason alle löydät astianpesukoneen omasta käyttöohjeesta.
Muuntosarja kalusteisiin integroitavan astianpesukoneen muuttamiseksi kalusteisiin sijoitettavaksi
Kun et halua varustaa kalusteisiin integroitavaa astianpesukonettasi keittiökaapistosarjaan kuuluvalla kalusteovella, GDU-muuntosarjan avulla voit
muuttaa astianpesukoneesi peitelevyllä
varustetuksi, kalusteisiin sijoitettavaksi
koneeksi.
Muuntosarjaan kuuluu
1. Etuseinä, jossa valkoinen pinnoitelevy.
2. Jalustan etulevy ja sen kiinnitysraudat.
GDU-muuntosarja on tarkoitettu keittiöihin, joissa jalustalistan korkeus (keittiökaappien ovien alareunan etäisyys
lattiapinnasta) on:
1. 100 mm (= sijoituskorkeus 820 mm)
2. 150 mm (= sijoituskorkeus 870 mm).
Voit halutessasi vaihtaa valkoisen peitelevyn tilalle keittiökalusteisiin sopivan levyn
(ks. tarkemmin kohta ,,Erityistapauksia“).
Suorita ensin työvaiheet 1 - 3!
Katso tarkemmat ohjeet astianpesukoneen käyttöohjeen kohdasta
,,Asennus — kalusteisiin integroitava malli“.
1. Asenna suojapelti ja äänieriste
2. Upota astianpesukone kalusteriviin
3. Asenna ohjaustaulu.
Ennen ohjaustaulun asentamista sovitelistat on irrotettava (ks. kuvaa).
Astianpesukoneen mukana toimitetaan
H-muotoinen kiinnityslevy ja kaksi kaavainta.
Säilytä kaikki osat ja sovitelistat myöhempää tarvetta varten, jos esimerkiksi
keittiöremontin yhteydessä haluat asentaa astianpesukoneeseen kalusteoven.
Irrota sovitelistat yhtenä kappaleena
painamalla ne irti ohjaustaulun kiinnitysurista.
Z
39
Page 40

4.Asenna etuseinä
Vedä astianpesukonetta niin paljon
ulos upotusaukosta, että pääset helposti käsiksi luukun reunoissa oleviin
kiinnitysruuveihin
d.
Työnnä etuseinä vinosti ohjaustaulun
alle
b ja pujota etuseinä luukussa
oleviin aukkoihin
c.
Tarkista samalla, että etuseinän yläreuna painuu kunnolla ohjaustaulun
sisään.
Kiristä luukun kummassakin reunassa olevan kiinnitysruuvit
d.
Peitä kiinnityskohdat pakkauksessa
olevilla muovitulpilla.
Työnnä astianpesukone takaisin paikalleen.
Useimmiten etuseinä sopii sellaisenaan
keittiökalusteriviin, niin väriltään kuin mitoiltaan. Jos näin on, jatka suoraan työvaiheesta 7.
Jos kuitenkin haluat muuttaa etuseinää
joko väärän värin tai väärien mittojen
vuoksi, siirry kohtaan ,,Erityistapauksia“.
Erityistapauksia
Etuseinää voidaan yhtenäistää keittöön
seuraavissa tapauksissa:
Tapaus A / värien yhte en sopi vu us:
Etuseinä sopii mitoiltaan keittiökalusteriviin, mutta haluat muuttaa pinnoitelevyn
väriltään muihin keittiökalusteisiin sopivaksi.
Hanki toinen pinnoitelevy ja leikkaa
se tehdasmittojen mukaisesti astianpesukoneen leveyden mukaan. Jatka sitten työvaiheesta 6.
Tapaus B / mittojen yhdenmukaistaminen:
Etuseinä on sovitettava samankorkuiseksi viereisten keittiökalusteiden mukaan.
Jatka työvaiheesta 5.
Tapaus C / värin ja mittojen yhdenmukaistaminen:
Etuseinä on vaihdettava väriltään ja mitoiltaan viereisiin keittiökalusteisiin sopivaksi.
Jatka työvaiheesta 5, jotta voit leikata
uuden pinnoitelevyn keittiökalusteiden mukaisten mittojen mukaan.
Hanki uusi pinnoitelevy, leikkaa se oikean kokoiseksi ja jatka sitten työvaiheesta 6.
Pinnoiteleyn tehdasmitat:
K 603 x L 587 mm (60 cm leveä astianpesukone)
K 603 x L 437 mm (45 cm leveä astianpesukone)
Z
40
Page 41

5.Mittaa pinnoitelevyn korkeus
Ennen kuin otat mitan X, astianpesukone on suoristettava oikeaan korkeuteen.
Kierrä astianpesukoneen säätöjalkoja niin pitkälle, että astianpesukone
ottaa kiinni työtason alareunaan.
Mitta X:
Etäisyys ohjaustaulun alareunasta alakaapin oven alareunan tasalle.
Pinnoitelevyn korkeus:
Mitta X + 2 mm
2 mm:n lisäkorkeus tarvitaan, jotta pinnoitelevy voidaan työntää ohjaustaulun
alareunan alle (pitävyyden varmistamiseksi).
Esimerkki:
mitta X =575 mm
+ 2 mm
Pinnoitelevyn kork. = 577 mm
Tämän esimerkin pohjalta voidaan
laskea, miten paljon asennusosia tulee
lyhentää (tapaukset B ja C):
tehdasmitta: korkeus 603 mm
laskettu korkeus
– 577 mm
lyhennetään = 26 mm.
6.Pinnoitelevyn vaihtaminen
Vedä astianpesukonetta niin paljon
ulos upotusaukosta, että pääset helposti käsiksi luukun reunoissa oleviin
kiinnitysruuveihin.
Löysää luukun kummassakin reunassa olevat kiinnitysruuvit ja laske etuseinä alas.
Irrota pinnoitekehykset.
Z
41
Page 42

Tapaus A / värien yhteensopivuus:
Vaihda pinnoitelevy.
Tapaus B / mittojen yhdenmukaistaminen:
Irrota pinnoitekehykset, pinnoitelevy,
välipahvi ja styroksinen välikappale
ja lyhennä kaikki osat
aina ylhäältäpäin aiemmin ottamiesi mittojen mukaan (edellisessä esimerkissämme
26 mm).
Huomaa:
Peitä pinnoitelevy ja -kehykset esimerkiksi maalarinteipillä, jotteivät ne naarmuunnu työskentelyn aikana.
Käytä ainoastaan juuri kyseiseen materiaaliin sopivaa sahaa ym. työkalua!
Tapaus C / värin ja mittojen yhdenmukaistaminen:
Kuten tapaus B, mutta tällöin pinnoitelevyä ei lyhennetä, vaan se vaihdetaan kokonaan aiemmin otettujen mittojen mukaisesti leikattuun
pinnoitelevyyn.
Leikkaa pinnoitelevy korkeudeltaan
ottamasi mitan (X+2 mm) mukaiseksi, ja leveydeltään astianpesukoneen
leveyden mukaan laskettujen tehdasmittojen mukaiseksi (ks. kohta “Erityistapauksia”).
Jos uusi pinnoitelevy on paksumpi kuin
2 mm (kuitenkin enintään 4 mm), etuseinän välipahvi on irrotettava kokonaan.
Kaikissa edellämainituis sa ta pauksis sa:
Kokoa etuseinän osat uudelleen ja
kiinnitä osat kuten työvaiheessa 4 on
neuvottu.
Työnnä astianpesukone takaisin paikalleen.
Jatka sitten työvaiheesta 7.
Z
42
Page 43

7.Säädä luukun jousitus
Luukun jousitus on oikein säädetty, kun
puoliksi (n. 45 °) avattu luukku pysyy
paikallaan tässä asennossa.
Jos luukku avautuu itsekseen hitaasti
vaakasuoraan asentoon, kiristä jousitusta.
Jos luukku puolestaan painuu takaisin
kiinni, löysää jousitusta.
Jousituksen säätöruuvi sijaitsee astianpesukoneen ylälistan vasemmalla puolella (ks. kuva).
Avaa astianpesukoneen luukku.
Säädä luukun jousitus ristipääruuvimeisselin (TORX T20) avulla:
– kun haluat kiristää jousitusta,
kierrä ruuvia myötäpäivään
– kun haluat löysätä jousitusta,
kierrä ruuvia vastapäivään.
Z
43
Page 44

8.Suorista astianpesukone ja
kiinnitä se.
Jotta astianpesukone pysyisi paikallaan, kiinnitä se suoristamisen jälkeen
työtasoon.
Työnnä kiinnitysraudat oikealla ja vasemmalla puolella oleviin rakoihin
(ks. kuvan nuoli).
Työnnä astianpesukone sijoitusaukkoon.
Avaa astianpesukoneen luukku.
Kiinnitysraudan ja ruostumattoman
suojapellin (ks. työvaihe 1) pitkittäisreiän on osuttava kohdakkain.
Kiinnitä astianpesukone alakautta
vasemmalta ja oikealta puolelta työtasoon mukana toimitettujen uppokantaruuvien (3,9 x 22) avulla.
Kun kiinnität ruuveja, tarkista että astianpesukoneen yläreunan tiiviste tulee työtasoa vasten.
Jos näin ei käy, kierrä
astianpesukoneen säätöjalkoja vastaavasti pitemmälle (ks. työvaihe 2).
Jos työtaso on coriania tai graniittia,
kiinnitä astianpesukone erillisellä kulmaraudalla viereisiin kalusteisiin
(ks. tarkemmin astianpesukoneen oma
käyttöohje).
Z
44
Page 45

9.Jalustan etulevyn asennus
Mikäli sijoitat astianpesukoneen kalusteriviin yhtenäisen jalustalistan taakse,
tämä työvaihe jää pois.
Madalla tarvittaessa jalustalistaa, ks.
tarkemmin astianpesukoneen käyttöohjeen kohdasta ,,Asennus“.
Astianpesukoneen mukana toimitettava
jalustan etulevyn korkeus on mitoitettu
seuraavaa tilannetta varten:
– jalusta on syvyydeltään ääriasennos-
sa ulkona (100 mm)
– koneen jalat on säädetty enimmäis-
korkeuteensa (5 cm).
Mikäli näitä mittoja säädetään pienemmiksi, astiapesukoneen luukun alareuna voi ottaa kiinni jalustaan, kun luukkua avataan. Tällöin jalustan etulevyä
on madallettava.
Paina jalustan kummassakin reunassa olevia pysäytysjousia sivulle ja
paina etulevyn kiinnitysraudat niin
syvään kuin ne menevät.
Astianpesukoneet, G 600-sarja
(tarkista tyyppinumero arvokilvestä)
Kiinnitysraudat osoittavat sisäänpäin.
Astianpesukoneet, G 800-sarja
(tarkista tyyppinumero arvokilvestä)
Kiinnitysraudat osoittavat ulospäin.
Etulevyyn on merkitty valmiiksi kaksi
mahdollista katkaisu-uraa.
Z
45
Page 46

Ruuvaa jalustan etulevy paikalleen siten, että
katkaisu-urat tulevat ylöspäin.
Vedä sitten etulevyä ulospäin tasaisesti kummastakin reunasta, kunnes
se on samassa rivissä viereisten
kaappien jalustan kanssa.
Huomaa:
Jalustan etulevyä ei voi työntää takaisin
sisäänpäin. Jos kuitenkin vedät etulevyä liikaa ulospäin, etulevy on ensin irrotettava kiinnitysraudoista. Vasta tämän
jälkeen voit painaa jalustan kummassakin reunassa olevia pysäytysjousia sivulle ja työntää etulevyn kiinnitysrautoja sisäänpäin.
Avaa astianpesukoneen luukkua varovasti, kunnes luukun alareuna ottaa kiinni jalustalevyyn.
Aseta lyijykynä astiapesukoneen luukun alareunaa vasten ja vedä etulevyyn vaakasuora viiva luukun alareunan myötäisesti.
Ruuvaa jalustalevy vielä irti.
Lyhennä jalustalevyä seuraavasti:
– sahaa sahalla etulevy poikki merkit semääsi viivaa pitkin;
tai, helpommin,
– käytä jompaa kumpaa valmiiksi
merkittyä katkaisu-uraa, jos merkit semäsi viiva kulkee täysin samalla
tasolla niiden kanssa.
Tällöin sinun tarvitsee vain avata
katkaisu-uran pää leikkaamalla ja
sitten murtaa etulevy kahtia
katkaisu-uraa pitkin.
Ruuvaa lopuksi jalustan etulevy (katkaisupinta alaspäin) takaisin paikalleen edellä mainitulla tavalla.
Jos astianpesukoneen luukku ottaa vieläkin kiinni jalustalevyyn, madalla jalustalevyä vielä hieman.
Z
46
Page 47

47
Page 48

Änderungen vorbehalten (GDU 45/60 und 60/60) / 000 3998
 Loading...