

Page 1

Operating instructions
for dishwashers
It is essential to read these
operating instructions before
installing or using the machine,
to avoid risk of accident
or damage to the machine. M.-Nr. 04 913 260
Q
Page 2

Contents
Contents
Guide to the appliance. . . . . . . . . . . . . . . . . . . . . . . . . . . . . . . . . . . . . . . . . . . . . . 3
Warning and safety instructions. . . . . . . . . . . . . . . . . . . . . . . . . . . . . . . . . . . . . . 6
Caring for the environment. . . . . . . . . . . . . . . . . . . . . . . . . . . . . . . . . . . . . . . . . . 9
Before using for the first time. . . . . . . . . . . . . . . . . . . . . . . . . . . . . . . . . . . . . . . 10
Opening and closing the door . . . . . . . . . . . . . . . . . . . . . . . . . . . . . . . . . . . . . . 11
Water softener (reactivation). . . . . . . . . . . . . . . . . . . . . . . . . . . . . . . . . . . . . . . . 12
Setting the water hardness level/Filling the salt reservoir . . . . . . . . . . . . . . . . 12/13
Add salt indicator light. . . . . . . . . . . . . . . . . . . . . . . . . . . . . . . . . . . . . . . . . . . . . . 14
Adding rinse aid. . . . . . . . . . . . . . . . . . . . . . . . . . . . . . . . . . . . . . . . . . . . . . . . . . 15
Rinse aid dosage setting . . . . . . . . . . . . . . . . . . . . . . . . . . . . . . . . . . . . . . . . . . . . 16
Loading the dishwasher . . . . . . . . . . . . . . . . . . . . . . . . . . . . . . . . . . . . . . . . . . . 17
Loading examples . . . . . . . . . . . . . . . . . . . . . . . . . . . . . . . . . . . . . . . . . . . . . . . . . 18
Cutlery . . . . . . . . . . . . . . . . . . . . . . . . . . . . . . . . . . . . . . . . . . . . . . . . . . . . . . . . . . 19
Flap up racks, positioning rail . . . . . . . . . . . . . . . . . . . . . . . . . . . . . . . . . . . . . . . . 22
Adjusting the upper basket . . . . . . . . . . . . . . . . . . . . . . . . . . . . . . . . . . . . . . . . . . 23
Not suitable for dishwashers . . . . . . . . . . . . . . . . . . . . . . . . . . . . . . . . . . . . . . . 24
Adding detergent . . . . . . . . . . . . . . . . . . . . . . . . . . . . . . . . . . . . . . . . . . . . . . . . . 27
Programme selection. . . . . . . . . . . . . . . . . . . . . . . . . . . . . . . . . . . . . . . . . . . . . . 29
Programme chart . . . . . . . . . . . . . . . . . . . . . . . . . . . . . . . . . . . . . . . . . . . . . . . . . 30
Switching on and off . . . . . . . . . . . . . . . . . . . . . . . . . . . . . . . . . . . . . . . . . . . . . . 32
Programme change; interrupting a programme; programme sequence display. 32/33
Removing load . . . . . . . . . . . . . . . . . . . . . . . . . . . . . . . . . . . . . . . . . . . . . . . . . . . 34
Cleaning and care . . . . . . . . . . . . . . . . . . . . . . . . . . . . . . . . . . . . . . . . . . . . . . . . 35
Checking the water level/Increasing the water intake time . . . . . . . . . . . . . . . . . 39
Problem solving guide. . . . . . . . . . . . . . . . . . . . . . . . . . . . . . . . . . . . . . . . . . . . . 41
After sales service . . . . . . . . . . . . . . . . . . . . . . . . . . . . . . . . . . . . . . . . . . . . . . . . 41
Special accessories. . . . . . . . . . . . . . . . . . . . . . . . . . . . . . . . . . . . . . . . . . . . . . . 42
Comparison tests. . . . . . . . . . . . . . . . . . . . . . . . . . . . . . . . . . . . . . . . . . . . . . . . . 43
Installation Instructions. . . . . . . . . . . . . . . . . . . . . . . . . . . . . . . . . . . . . . . . . . . . 45
Technical da t a. . . . . . . . . . . . . . . . . . . . . . . . . . . . . . . . . . . . . . . . . . . . . . . . . . . . 69
2
Page 3

Guide to the appliance
Dishwasher for building-in to a tall
unit.
This dishwasher is specially designed
for building-in to a tall unit.
Essential further accessories are: a control panel, a decor front and a buildingin frame.
See section on "Installation" to build-in
the dishwasher.
Guide to the appliance
3
Page 4
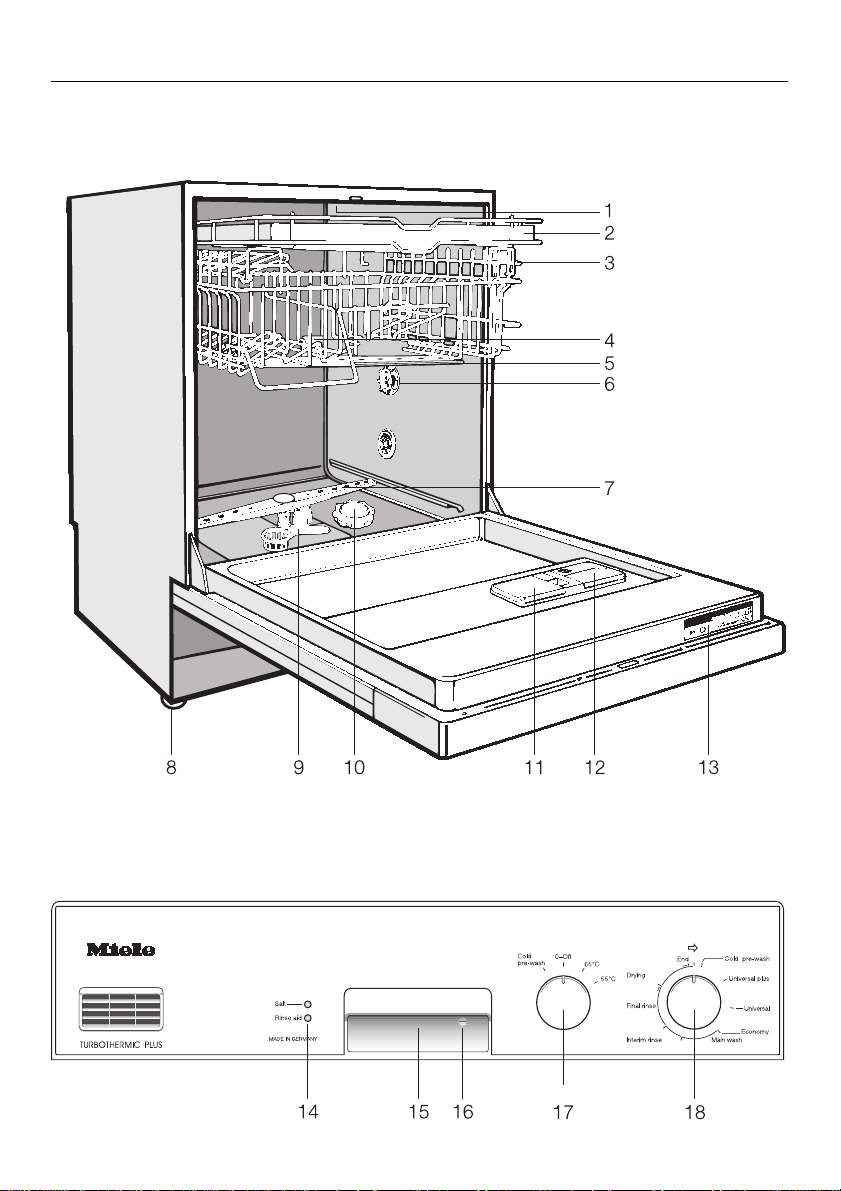
Guide to the appliance
View of the machine
Control panel (Facia)
4
Page 5

1 Upper spray arm (not visible)
2 Cutlery tray
(standard depending on model)
3 Upper basket. (Design varies
according to model, and may not
match the one shown)
4 Water guide duct for the middle
spray arm
5 Middle spray arm
6 Water hardness selector
7 Lower spray arm
8 Four height adjustable screw feet
9 Filter combination
10 Salt reservoir
11 Dual compartment detergent
dispenser
12 Rinse aid reservoir
(with dosage selector)
Guide to the appliance
13 Data plate
14 Indicator lights
15 Door opener
16 Child safety lock
17 Temperature selector
18 Programme selector switch
5
Page 6
Warning and safety instructions
Warning and safety instructions
This appliance conforms to current
safety requirements. Inappropriate
use can however lead to personal
injury and damage to property.
Read the operating instructions
carefully before starting to use this
machine. This way you will avoid
the risk of accidents, and damage
to the machine. Keep these instructions in a safe place for reference,
and pass them on to any future user.
Appropriate usage
This dishwasher is intended exclu-
sively for cleaning domestic crockery and cutlery in a domestic household. Do not use for purposes other
than those for which it was designed.
Any other applications may be dangerous.
The manufacturer cannot be held
responsible for any damage
caused by improper use or uses other
than those for which the appliance is
intended.
The following notes are to help avoid
personal injury
To ensure stability this dishwasher
must only be built into a tall unit. It
must not be set up as a freestanding
machine.
The electrical safety of this ap-
pliance can only be guaranteed
when continuity is complete between
the appliance and an effective earthing
system. It is imperative that this basic
safety requirement is tested and where
there is any doubt the electrical system
in the house is checked out by a quali-
fied electrician. The manufacturer cannot be held responsible for damage
caused by the lack or inadequacy of
an effective earthing system, (electric
shock for example).
For safety reasons do not operate
this appliance on an extension
cable. Danger of overheating.
A damaged appliance is dangerous.
Switch off at the mains and call the
Service Department for assistance.
Repairs may only be carried out by
suitably qualified and competent
engineers to ensure safety. Repairs by
unqualified persons could be dangerous.
The plastic housing of the water
inlet connection contains an electrical component. It must not be dipped
in water.
Do not let small children play with
the dishwasher and its controls or
operate it.
There is a danger that children playing
might shut themselves in the dishwasher. Please supervise its use by the
elderly or infirm.
Do not use solvents in the dish-
washer. Danger of explosion!
Avoid inhalation of powder deter-
gents.
6
Page 7

Warning and safety instructions
Dishwasher detergents contain irri-
tant or corrosive ingredients. They
can cause burning in the mouth and
throat if swallowed, or inhibit breathing.
Keep children away from detergents
and from the dishwasher when the
door is open. There could be detergent residues in the appliance.
To avoid the danger of children
coming into contact with the dishwasher detergent: Only put it into the
detergent dispenser
the programme, and then secure the
door with the child safety lock.
For models with "Delay Start" option
make sure the detergent dispenser is
dry before putting in detergent. Wipe
dry if necessary. Detergent will clog if
poured into a damp dispenser and may
not be thoroughly dispensed. If the
door is open at the end of a programme, children may come into contact with this residue.
Water in the dishwasher must not
be used as drinking water.
Appliances with a cutlery basket
(depending on model): items of
cutlery are cleaned and dried more efficiently if placed in the basket with the
handles downwards. You may however,
prefer to place cutlery with sharp
points with the handles upwards.
Always disconnect the appliance
from the electrical supply for maintenance work (switch off at wall socket
and remove plug, screw out fuse in
countries where this is applicable).
just before starting
The following notes should help to
avoid material damage
The voltage and frequency shown
on the data plate must match the
mains supply in the house.
Only use detergents formulated for
domestic dishwashers. Do not use
washing-up liquid.
Do not use commercial or indus-
trial detergents as these may damage material and there is a risk of
severe chemical reaction.
Inadvertently filling the salt reser-
voir with dishwasher detergent always leads to serious damage to the
water softener.
Make sure that you have picked
up the right packet of dishwasher
salt before filling the salt reservoir.
Inadvertently filling the rinse aid
reservoir with powder or liquid
detergent always leads to serious damage to the reservoir. Only use rinse aid
formulated for domestic dishwashers.
Do not sit or lean on the opened
door. This could cause the dishwasher to tip and be damaged.
Plastic items which cannot with-
stand being washed in hot water,
e.g. disposable plastic containers, or
plastic cutlery should not be cleaned in
the dishwasher. The high temperatures
could cause the material to distort.
7
Page 8
Warning and safety instructions
The Miele Waterproof System of-
fers protection from water damage,
provided the following conditions are
met:
– the dishwasher is correctly installed
and plumbed in
– the dishwasher is properly main-
tained and parts are replaced where
it can be seen that this is necessary
– the stopcock has been turned off
when the machine is not used for a
longer period of time (e.g. during
holidays).
In countries where there are areas
which may be subject to infestation by cockroaches or other vermin,
pay particular attention to keeping the
appliance and its surroundings in a
clean condition at all times. Any damage which may be caused by cockroaches or other vermin will not be
covered by the appliance guarantee.
Disposal of your old machine
When disposing of an old dish-
washer first make it unusable. Disconnect, cut off the cable and the plug
from the cable.
Make the door lock inoperative, so that
children cannot accidentally shut themselves in. Make appropriate arrangements for the safe disposal of the appliance.
The manufacturer can not be held
responsible for any damage caused
by non-observance of the Warning
and Safety instructions.
Dishwashers with visible heating
elements
For appliances with the heating
element in the wash cabinet do not
touch the element during or directly
after the end of a programme, you
could burn yourself.
Some plastic items could melt or
catch fire if they were to come into
contact with the heating element. Therefore always place plastic items or any
other items which may not be completely
heat resistant in the upper basket and ensure they cannot drop through. Any
items which are too small to be lodged
securely in the upper basket should not
be cleaned in the dishwasher.
8
Page 9

Caring for the environment
Disposal of the packing material
The transport and protective packing
has been selected from materials
which are environmentally friendly for
disposal and can normally be recycled.
Caring for the environment
Energy saving washing
These dishwashers are exceptionally efficient in their use of water and electricity. You can make the most of your
appliance by following these tips:
Rather than just throwing these materials away, please ensure they are offered for recycling.
Disposal of your old machine
Old machines contain materials which
can be re-cycled. Please contact your
local authorities or scrap merchant
about potential recycling schemes, before disposing of the appliance.
Ensure that the machine presents no
danger to children while being stored
for disposal. See the appropriate section in the Warning and Safety instructions.
If your household water system is
suitable, this dishwasher can be connected to a hot water supply, for further economies.
However, if your water is heated by
electricity we would still recommend
connection to cold water.
In the UNIVERSAL 55° programme,
depending on the capacity of the
dishwasher, when connected to hot
water at 55°C up to 0.7 kWh of electrical energy is saved. The hot water
provides this energy, and the approx. 0.13 l oil or 0.14 m
needed to heat the water might be
considerably more cost effective.
Although all stages of the wash then
take place with hot water, savings
are made in cost, time and energy.
Make full use of the baskets without
overloading the dishwasher for most
economical washing.
Choose the programme to suit the
type of crockery being washed and
the degree of soiling.
3
natural gas
If baskets are only half full use the
ECONOMY programme.
Use the correct dosages of detergent.
9
Page 10
Before using for the first time
Before using for the first time
Before using for the first time please
note the following points:
See the relevant chapters for detailed
information on the points below.
Load the crockery correctly
Load the crockery so that water will
come into contact with all surfaces.
This ensures that they will be properly
cleaned.
Setting the water softener
The water softener unit must be set to
deal with the water hardness level in
your area.
The salt reservoir must also
filled with water and then with dishwasher salt. Never fill with dishwasher
powder detergent.
Filling the salt reservoir with detergent by mistake will cause serious
damage to the water softener.
Please check every time before refilling that the package contains
dishwasher salt.
Add rinse aid
Only use rinse aid formulated for domestic dishwashers.
Inadvertently filling the rinse aid reservoir with powder or liquid detergent, or
washing up liquid, will cause serious
damage to the reservoir.
Do not use washing up liquid
Only use detergent formulated for domestic dishwashers.
first be
The spray arms must not be blocked
by items which are too tall for the basket or which hang through. If necessary
manually rotate the spray arms to test.
Add the correct amount of detergent
Follow the detergent manufacturer’s
recommendations on how much detergent to use. Not using enough will lead
to poor wash results. The amount to dispense will depend on the type of detergent and programme selected.
Read the notes on dosage given in the
programme chart.
Cleaning results may vary from brand
to brand. If you are not satisfied with
the results from one brand try another
quality brand before contacting the
Customer Service department for advice.
It is important to choose the correct
programme
The UNIVERSAL programmes are
ideally suited to everyday loads. See
the programme chart for descriptions
of other programmes.
10
The filter combination in the base of
the wash cabinet and the spray arms
must be kept clean.
These should be regularly inspected
and cleaned if necessary.
Page 11
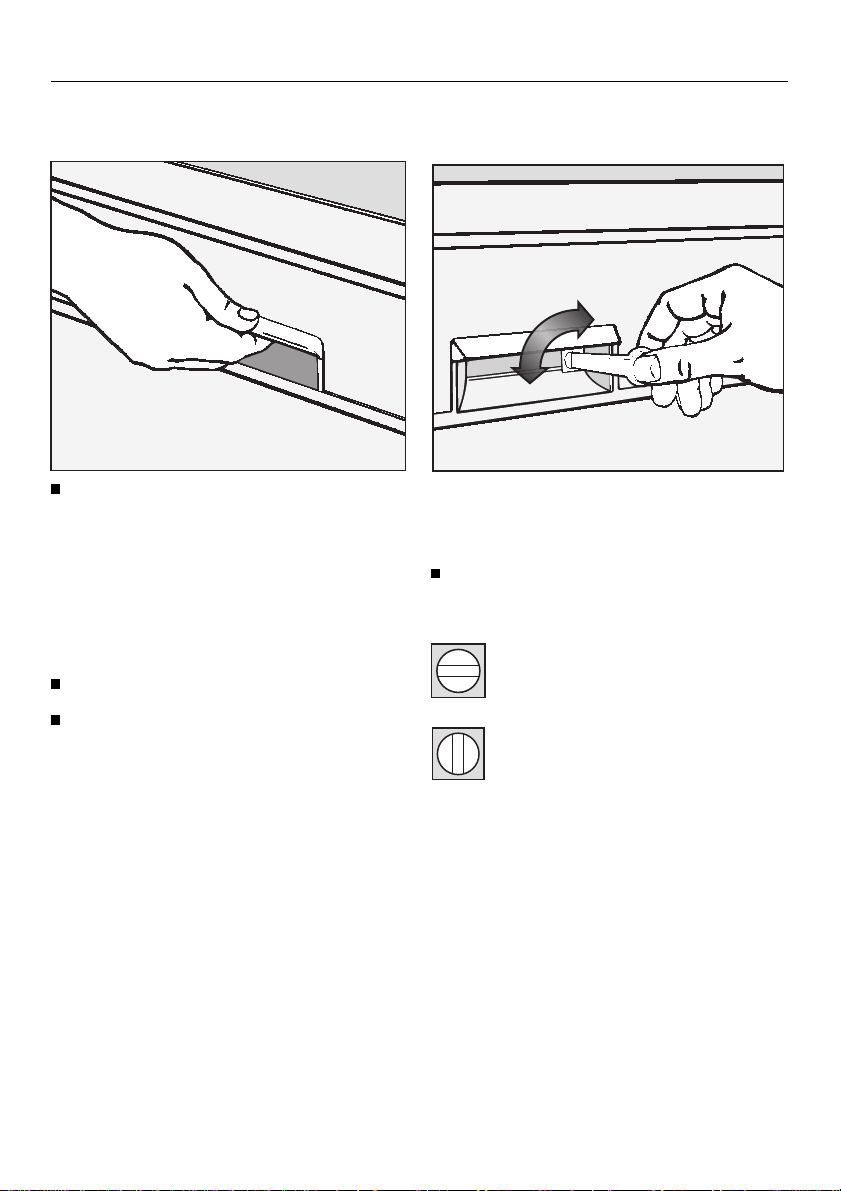
Opening and closing the door
To open the door
Opening and closing the door
Child safety lock
Press the release catch inside the
door grip.
If the door is opened during operation
all functions are automatically interrupted.
To close the door
Push the baskets right in
Lift the door upwards and push until
it clicks into position
The child safety lock is designed to
deter children from opening the dishwasher door.
Use the key provided to turn the
child safety lock to the required setting.
Horizontal setting = The door is
locked.
Vertical setting = The door can
be opened.
11
Page 12
Water softener
Water softener
It is not necessary to reactivate with
salt if the degree of hardness in the
local supply is permanently under
70 mg/l, (0.7 mmol/l, or 4 °d German
scale).
Your local water supplier will advise
you on the water hardness of your area.
Above 70 mg/l (0.7 mmol/l, or 4 °d German scale) water must be softened.
This is to avoid the build-up of calcium
deposits on crockery and cutlery, and
in the dishwasher, and also to increase
the effectiveness of the detergent.
To ensure a steady supply of soft water
the built-in water softener must be:
1. correctly set and
2. the salt reservoir must be filled with
dishwasher salt for reactivation.
The dishwasher is set at the factory to
operate to a hardness level of
400 - 630 mg/l (4.0 - 6.3 mmol/l, or 22 35 °d German scale).
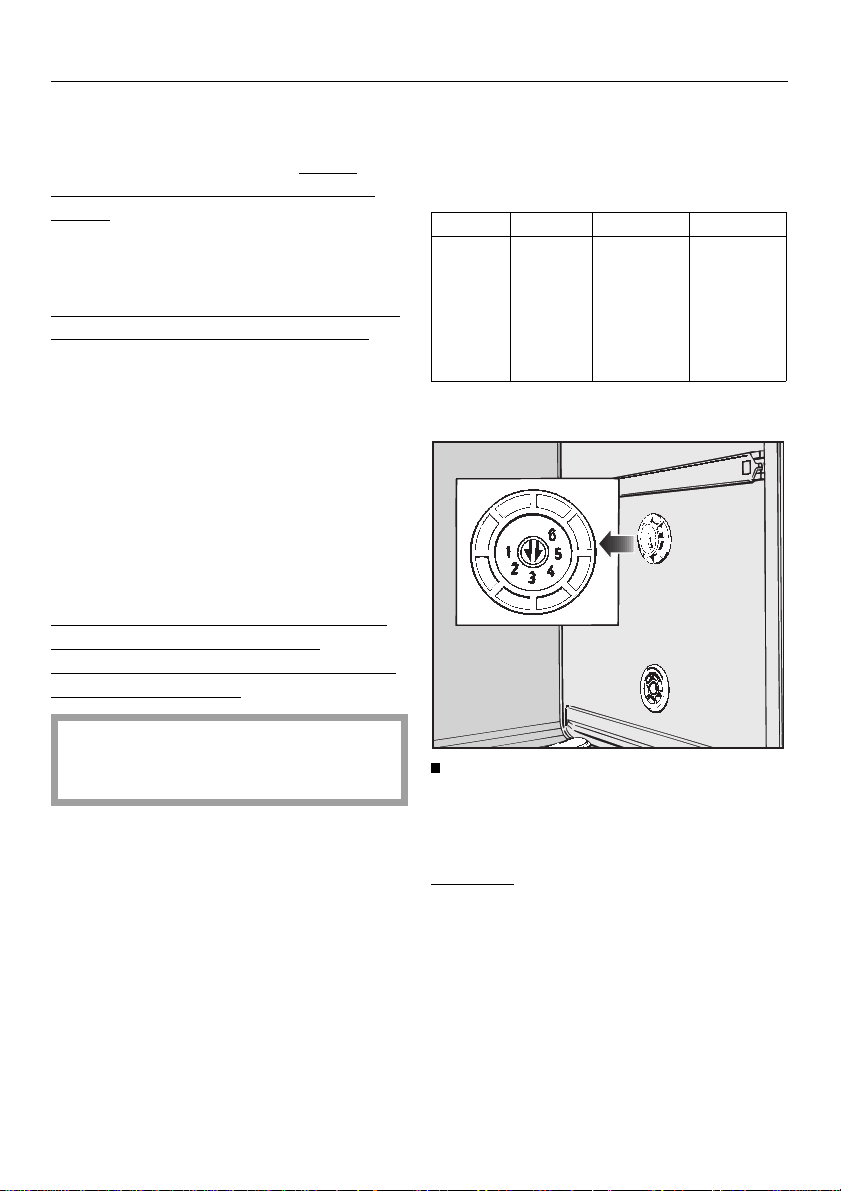
Setting the water hardness level
selector in the wash cabinet
There are six settings on the selector.
Setting °d mg/l °f
1 4-14 70-250 7-25
2 15-21 270-380 27-38
3* 22-35 400-630 40-63
4 36-47 650-850 65-85
5 48-65 860-1170 86-117
6 66-70 1190-1260 119-126
* factory setting
If your water is harder or softer than
this the factory setting will need to
be adjusted.
12
Use a coin or screwdriver to adjust
the water hardness level selector in
the wash cabinet. There is a click as
each setting is reached.
Example:
The water hardness level is 320 mg/l.
The water hardness level selector must
be set to setting 2, 270 - 380 mg/l
(15 - 21 °d German scale).
Page 13
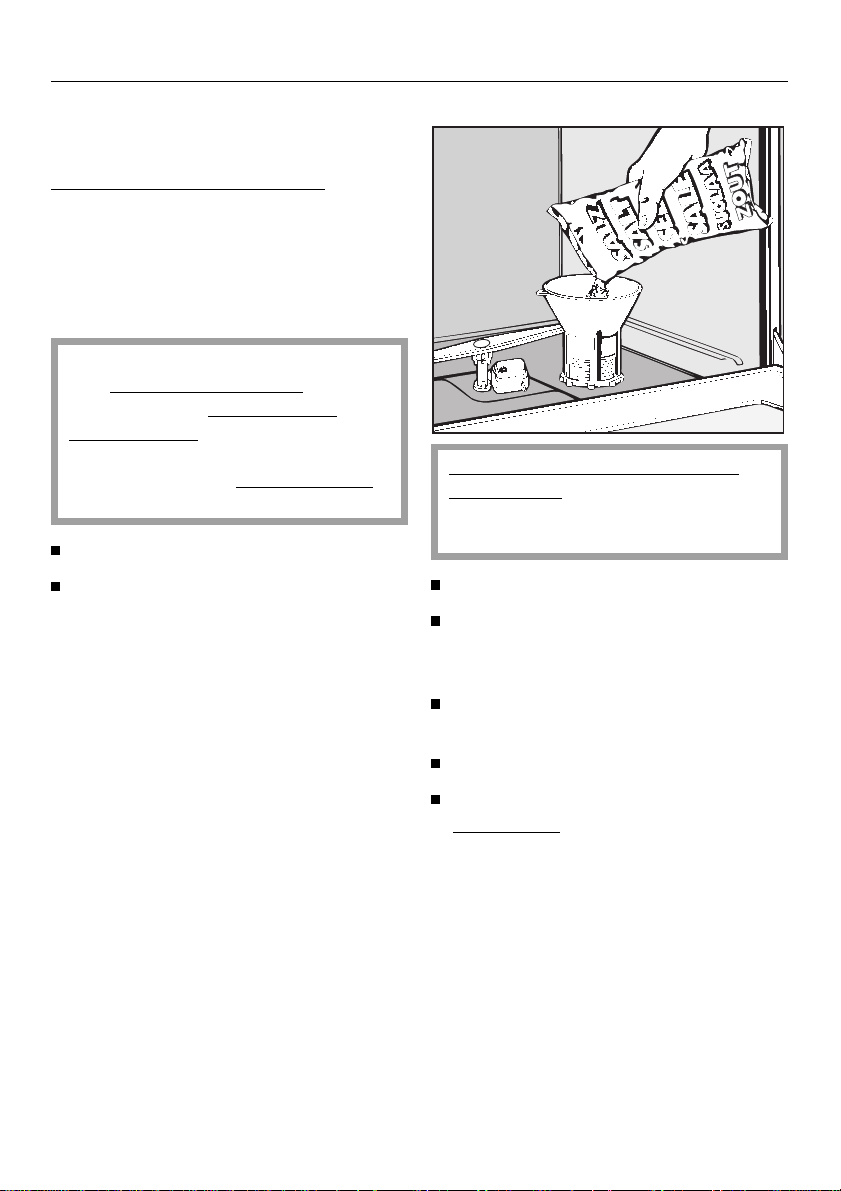
Filling the salt reservoir
Please only use special coarse grained
dishwasher salt for reactivation, as
other salts may contain insoluble additives which can impair the functioning
of the softener.
The salt reservoir holds approx. 2 kg of
salt.
Inadvertently filling the salt reservoir
with dishwasher detergent always
causes serious
water softener.
Make sure that you have picked up
the right packet of
before filling the salt reservoir.
Remove the bottom basket.
damage to the
dishwasher salt
Water softener
Before filling the salt reservoir for
the first time:
Fill the salt reservoir with approx.
2 litres of water.
Unscrew the salt reservoir cap.
Place the funnel (provided) in place.
Fill carefully with salt
(As it is filled displaced water will run
out).
Clean salt from the screw threads of
the socket.
Screw the cap on firmly.
Run the “PRE-WASH” programme
immediately to remove any traces of
salt water from the cabinet. This is
not necessary if a “UNIVERSAL” or
“UNIVERSAL PLUS” programme is
run straight away.
13
Page 14
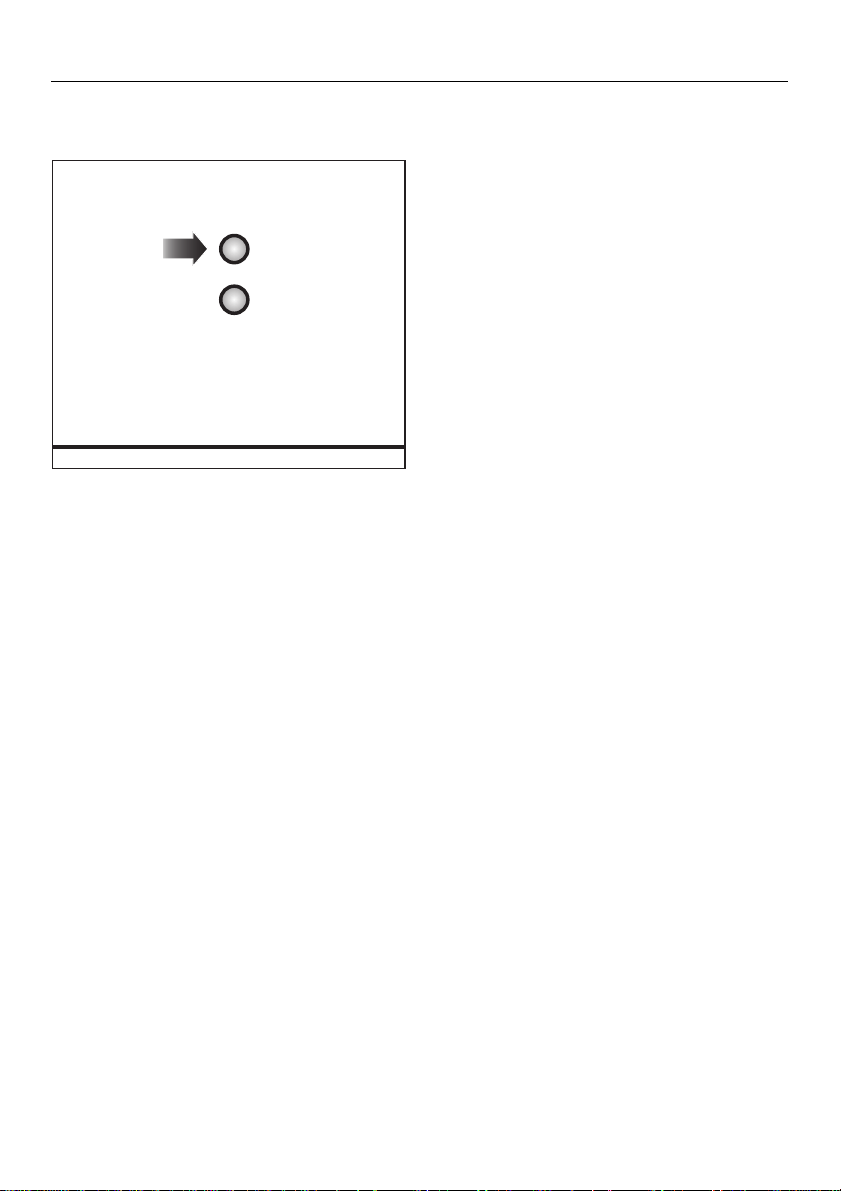
Water softener
Salt indicator
When the salt reservoir is empty the
“Salt” indicator light comes on. The
reservoir should be refilled with dishwasher salt for reactivation.
Note
With very soft water, i.e. constantly at a
level below 70 mg/l (4 °d), the reservoir
does not have to be filled with salt and
although the salt light does come on,
this can be disregarded.
14
Page 15
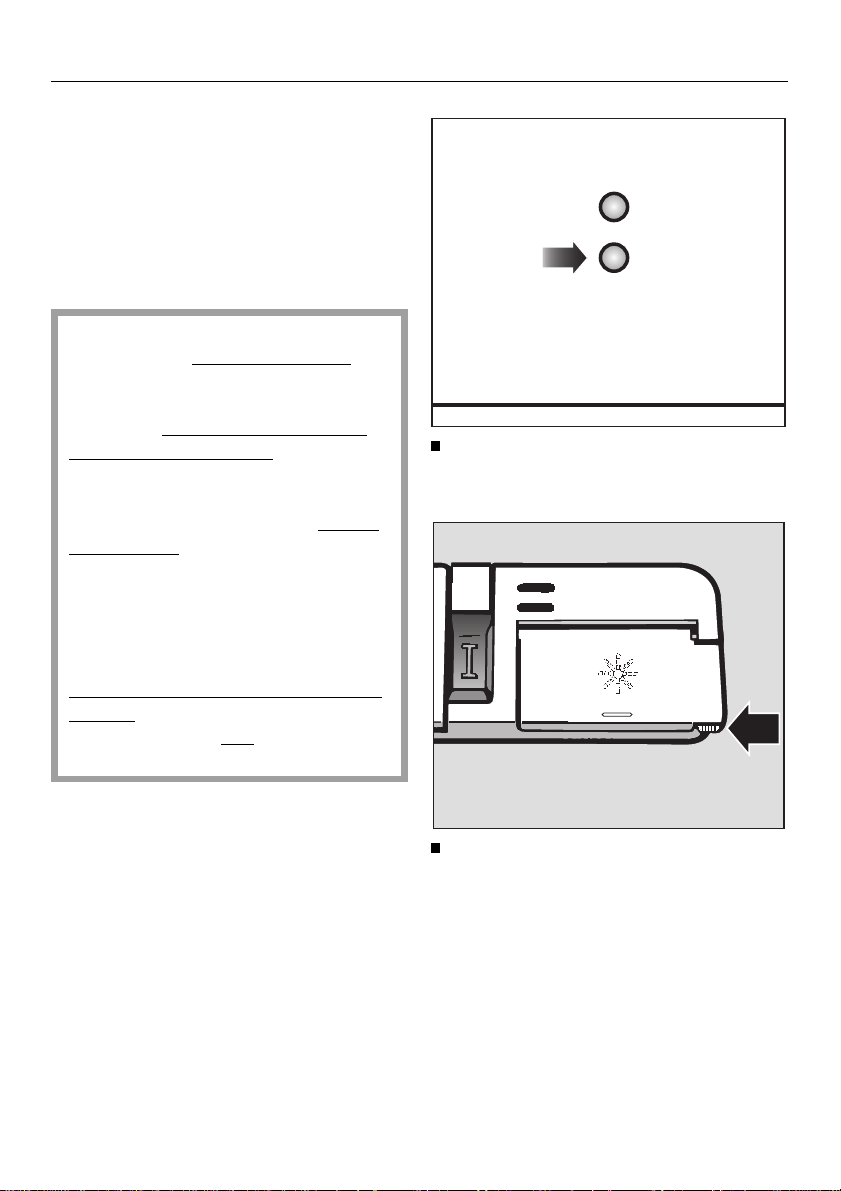
Adding rinse aid
Rinse aid is necessary to ensure that
water does not cling and leave marks
on crockery during the drying phase.
Rinse aid is poured into the storage
reservoir and the amount set is dispensed automatically.
The rinse aid reservoir holds approx.
130 cm
3
.
Inadvertently filling the rinse aid
reservoir with powder detergent (or
liquid detergent) always causes
serious damage to the reservoir.
Only pour
domestic dishwashers into the reservoir.
Although it is possible to use
hold vinegar with a max. 5% acid
content, or liquid citric acid up to
50% acid as an alternative, the resulting rinsing and drying quality
will not be as good as when rinse
aid is used.
Do not use vinegar with a high acid
content (e.g. vinegar essence 25%
acid). This must
use would damage the dishwasher.
rinse aid formulated for
house-
not be used as its
Adding rinse aid
Add rinse aid when the indicator
light “Rinse aid” on the control panel
comes on.
Press the button (in the direction of
the arrow) until the flap springs open.
15
Page 16
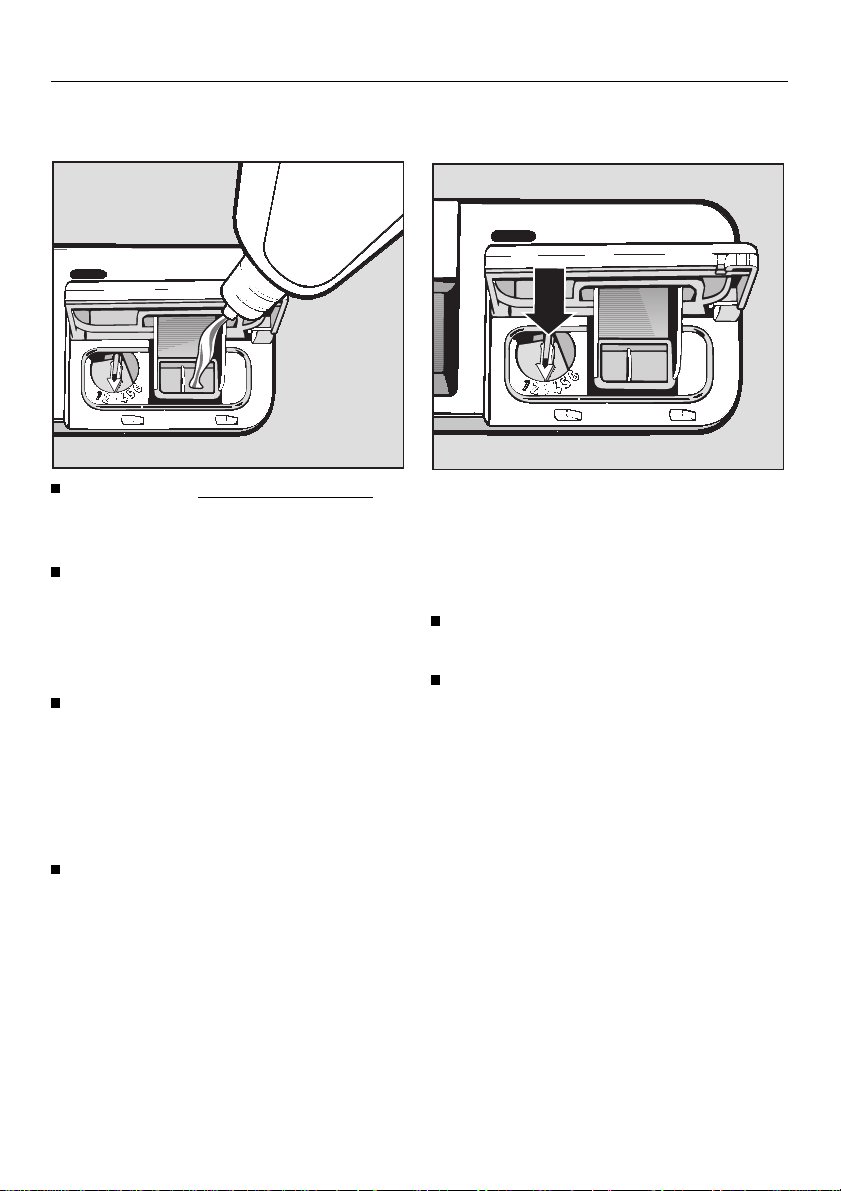
Adding rinse aid
Setting the dosage
Add rinse aid only until it is visible on
the surface of the filter in the opening.
Close the flap firmly.
The flap must audibly engage, otherwise water could get into the rinse
aid storage container during the programme.
Mop up any split rinse aid. This prevents over-forming occuring during
the next programme.
The flap should normally remain
closed. Only open it for adding more
rinse aid!
Wait until the ”Rinse aid” indicator on
the control panel lights up before adding more rinse aid.
The dosage adjuster (see arrow) in the
opening has settings from 1 to 6. It is
set to 3 at the factory, as the recommended dose.This setting dispenses
approx. 3 ml rinse aid per programme.
If there are flecks on glasses after
drying use a higher setting.
If smearing appears on crockery use
a lower setting.
16
Page 17

Loading the dishwasher
Loading the dishwasher
Note
Load the crockery so that water will
come into contact with all surfaces.
This ensures that they will be
properly cleaned.
Do not place crockery and cutlery inside other pieces where they may be
concealed.
Hollow items e.g. cups, glasses etc.
must be inverted in the basket.
Deep based items should be placed
at an angle such that water runs off
them freely.
Tall narrow hollow pieces should be
placed in the centre of the basket,
rather than in the corners, to ensure
good coverage of water.
Small pieces should be placed on the
cup racks. Cups should be on the
lower rack and bowls on the top rack
so that water reaches all pieces.
Some foodstuffs may contain natural
dyes, e.g. carrots, tomatoes or ket-
chup. Plastic items in the dish-
washer may discolour if large quan-
tities of these foodstuffs find their
way into the appliance on the croc-
kery.
The stability of the plastic items is
not affected by this discolouration.
The spray arms must not be blocked
by items which are too tall for the
basket or which hang through .
If necessary manually rotate the
arms to test.
17
Page 18
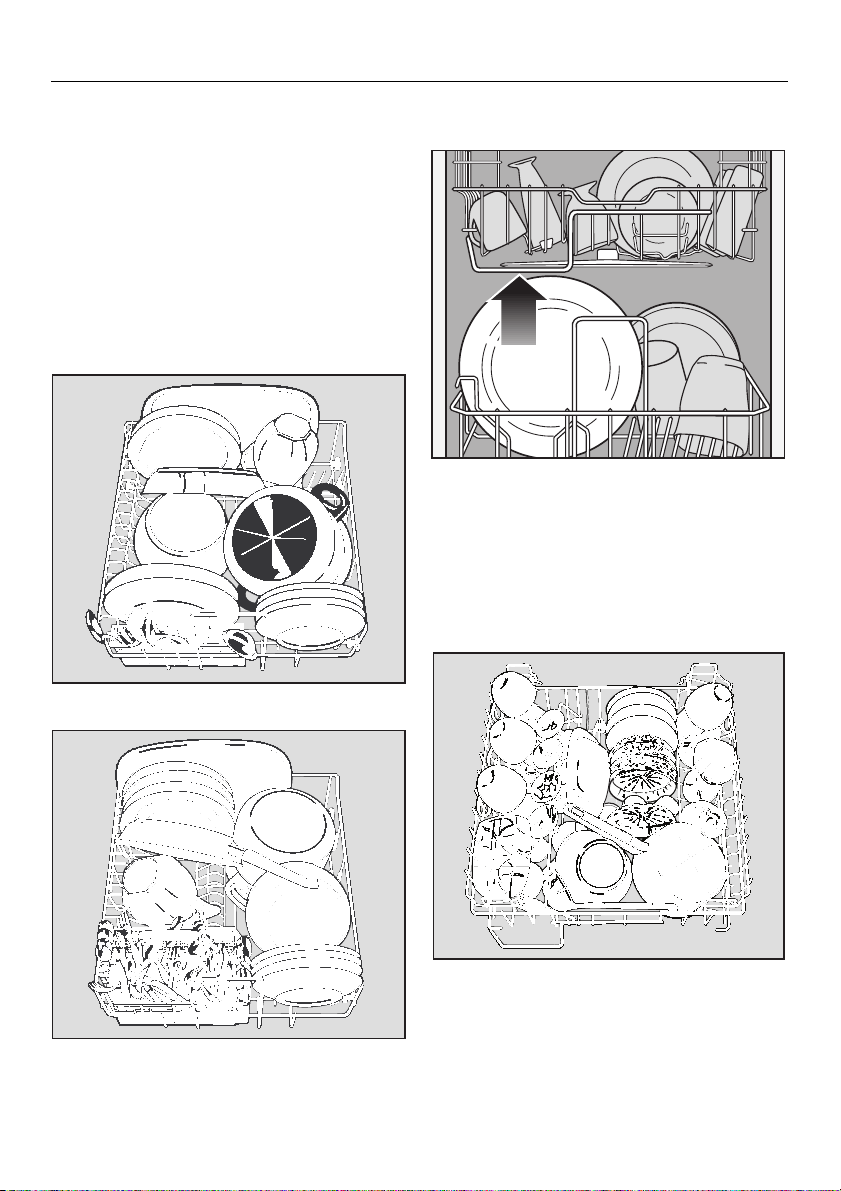
Loading the dishwasher
Loading examples
Lower basket
Larger and heavier items such as
plates, serving platters, saucepans,
bowls. Depending on the dishwasher
model, glasses may only be cleaned in
the bottom basket if it is fitted with a
special glassware insert or if there is a
special bottom basket.
Height limit
The height guard at the base of the
upper basket is there to protect the
middle spray arm. No object placed in
the lower basket should stand higher
than this guard.
Upper basket
Dishwashers with cutlery tray
Dishwashers with cutlery basket
18
Small, lightweight, delicate items such
as cups, saucers, glasses, dessert
bowls, etc.
Page 19
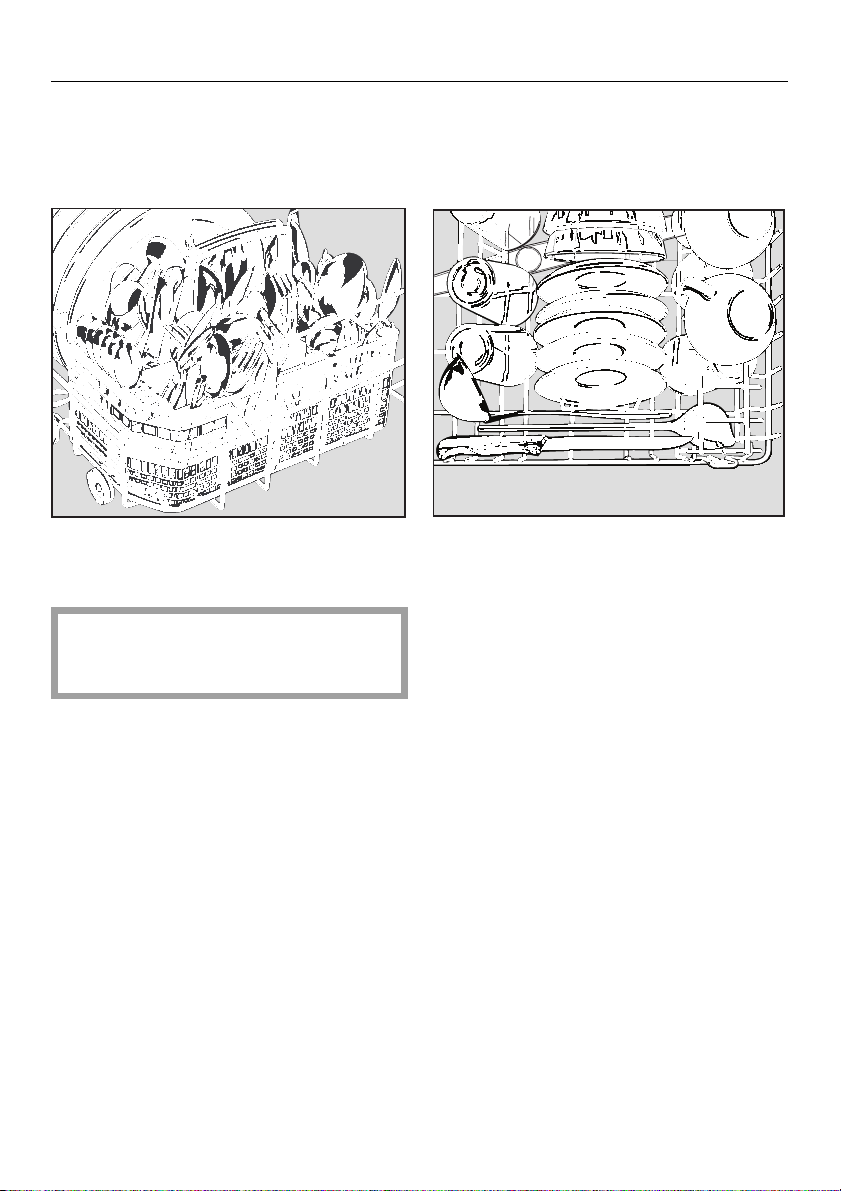
Cutlery
Dishwashers with cutlery basket:
Loading the dishwasher
Unsorted cutlery should be placed in
the cutlery basket, handles facing
downwards.
You may, however, prefer to place
cutlery with sharp points with the
handles upwards.
Place small spoons in the individual
slots to either side of the cutlery basket.
Larger items like soup ladles, long
knives and mixing spoons should be
placed lying down across the front of
the upper basket.
19
Page 20
Loading the dishwasher
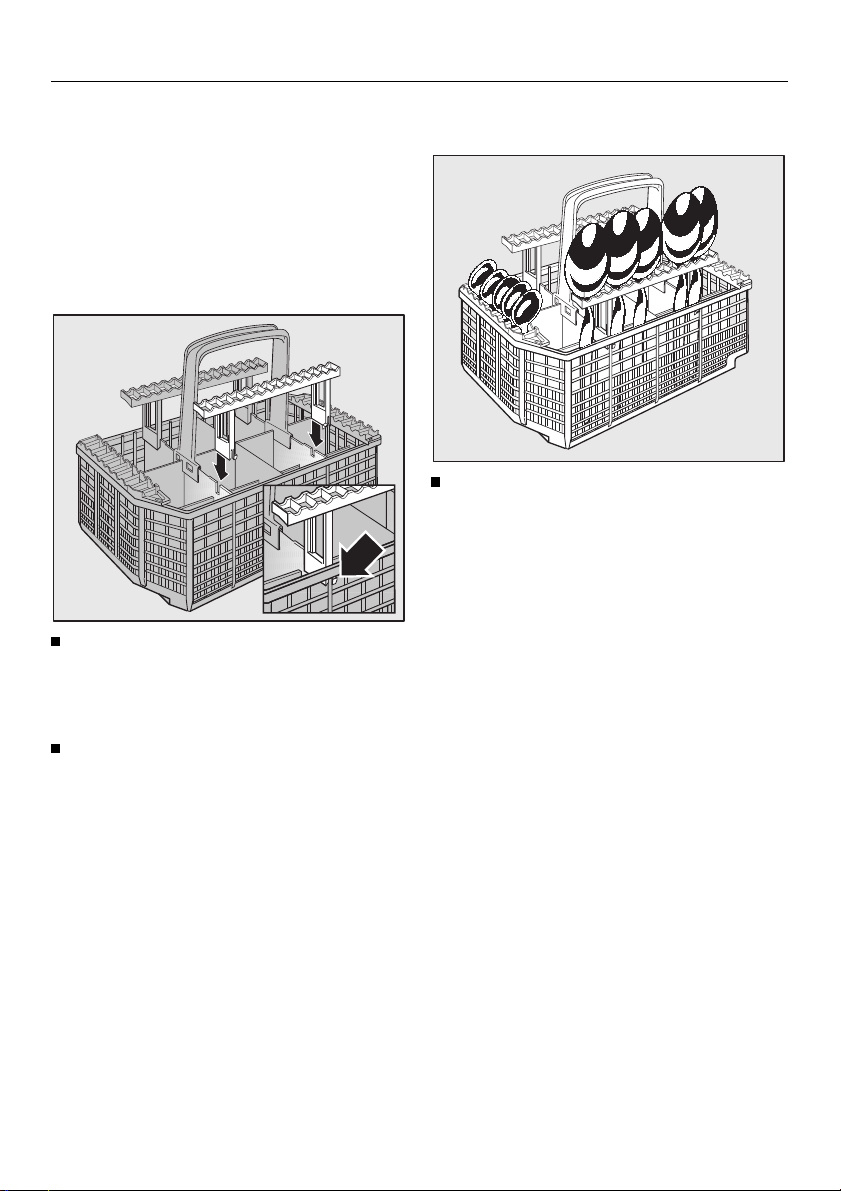
Spoon inserts for cutlery basket
Use the inserts supplied when washing
heavily soiled spoons, e.g. tablespoons
and serving spoons.
The inserts separate the spoons to
allow a space between them, for the
water jets to reach the entire surface.
Place the spoons into the inserts with
the handles facing downwards. Only
use alternate slots.
When needed place one insert at the
front and one at the back of the cutlery basket.
Removing the inserts:
Press the catches (which are already
clicked in) inwards (if necessary use
a spoon handle) and pull the inserts
upwards and out.
20
Page 21
Dishwasher with cutlery tray
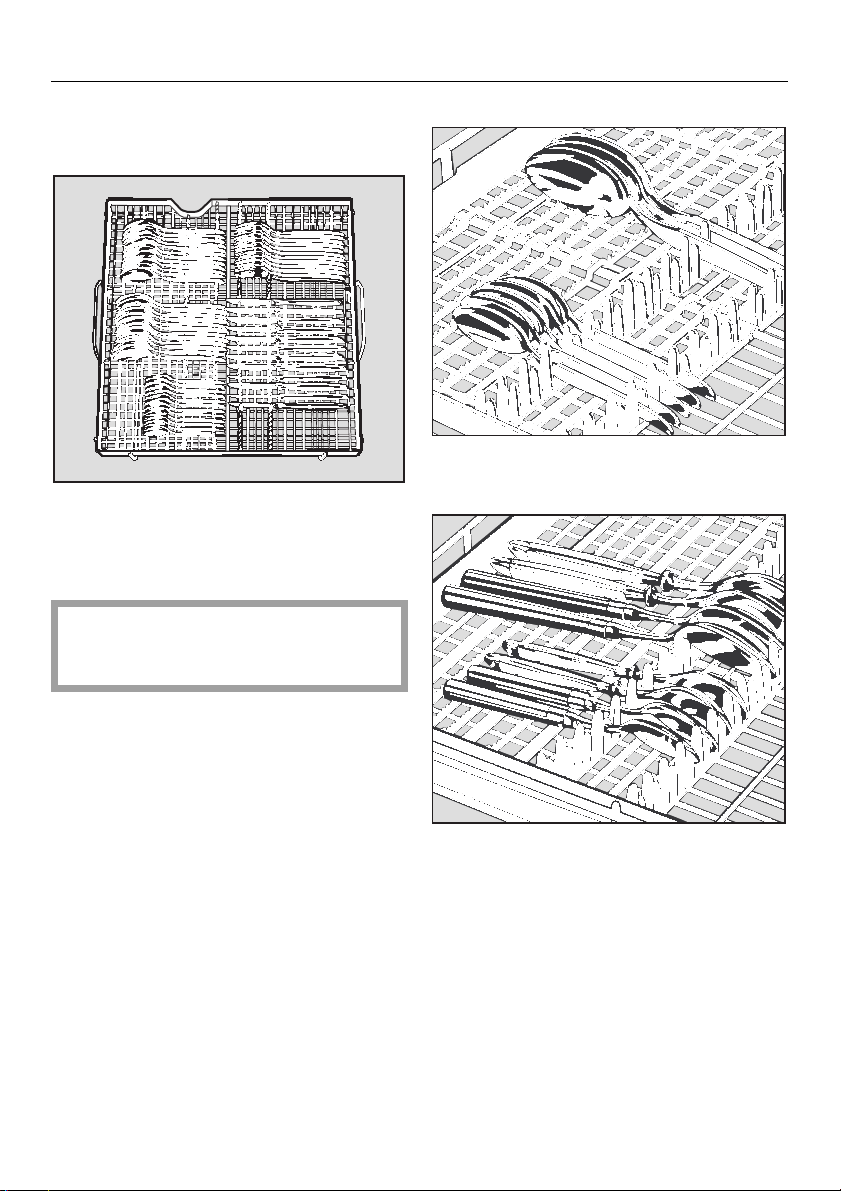
(SC models):
For best results cutlery should be
grouped in zones, one for knives, one
for forks, one for spoons etc. This
makes unloading much easier.
The upper spray arm must not be
blocked by items which are too big,
e.g. cake slices.
Loading the dishwasher
Spoon heads should be placed in such
a way that water runs off them freely.
The cutlery tray insert is removable
(depending on model).
Cutlery with round or oval handles
should be placed with the heads in the
grips as this prevents them slipping.
Ensure that spoon heads are in contact
with at least one of the grips in the cutlery tray. This way they cannot collect
water.
21
Page 22
Loading the dishwasher
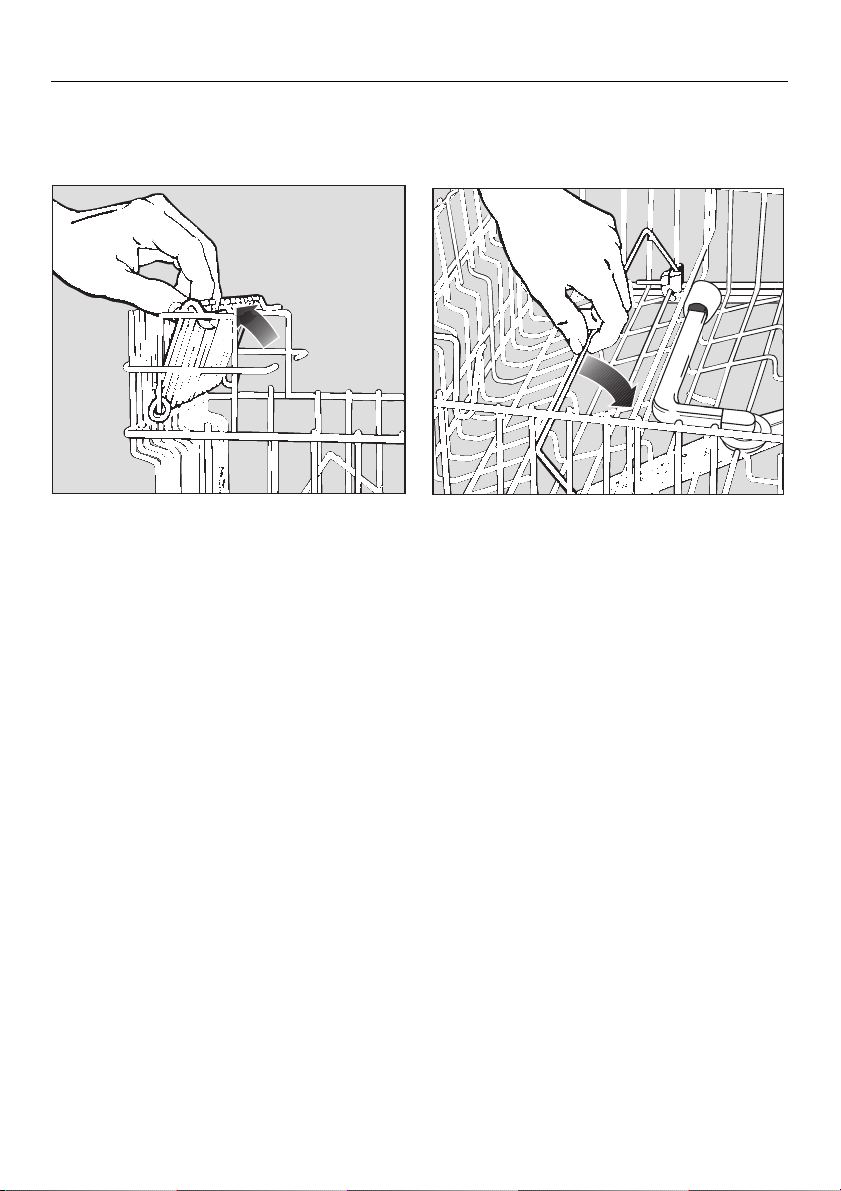
Flap up racks
To make room for tall pieces raise the
racks upwards.
Positioning rail
(standard feature depending on model)
For easy sorting and removing of crockery the positioning rail can be rested to
one side.
Raise it again afterwards so that crockery can rest against it in the basket.
22
Page 23
Loading the dishwasher
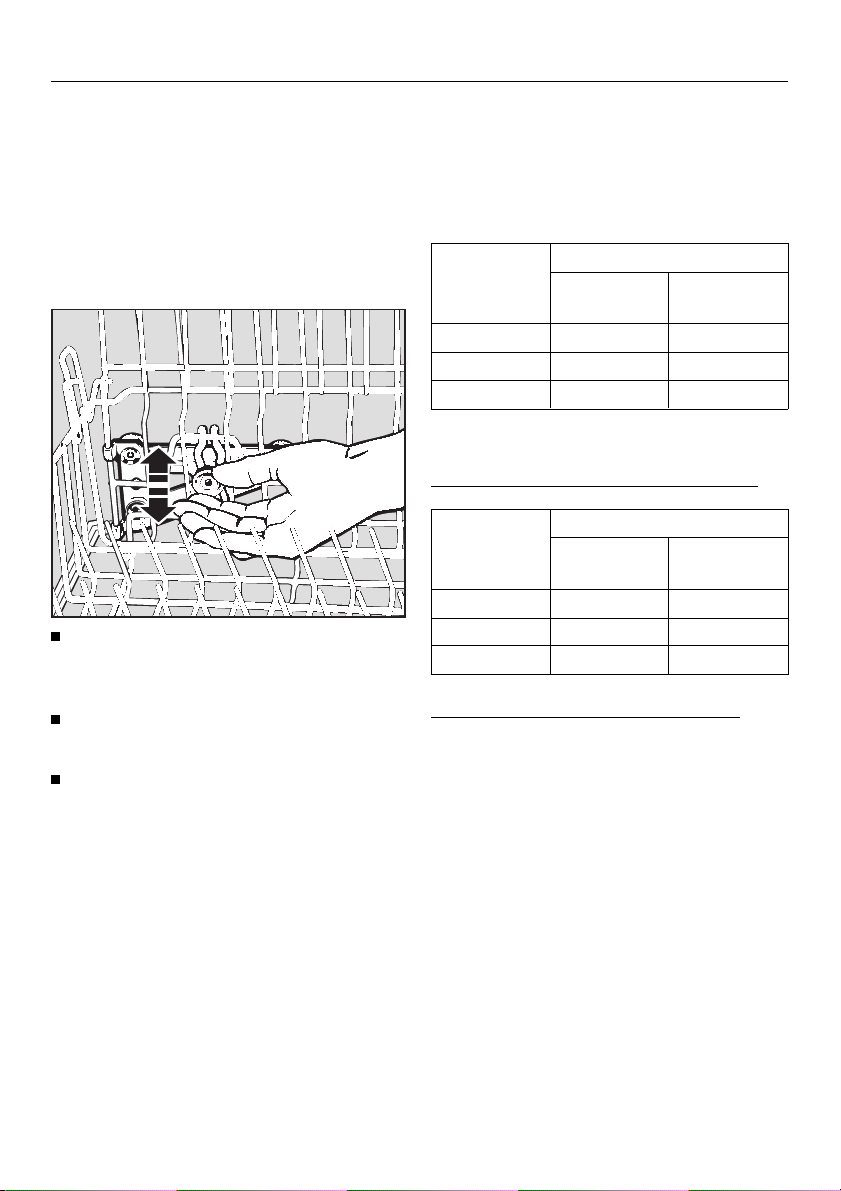
Adjusting the upper basket
(depending on model)
In order to win more space for taller
pieces of crockery in the bottom or
upper basket, the upper basket can be
adjusted in three steps with 2 cm between each step.
Pull out the upper basket and loosen
the two locknuts on either side of the
basket.
Adjust the basket up or down to the
right height.
Tighten the locknuts.
Depending on the setting of the upper
basket the following dimensions can be
accommodated:
Dishwashers with cutlery tray
Upper
basket
position
To p 2 0. 5 30
Middle 22.5 28
Bottom 24.5 26
Dishwashers with cutlery basket
models with adjustable upper basket
Upper
basket
position
To p 2 6 30
Middle 28 28
Bottom 30 26
models with non-adjustable basket
Plate Ø in upper basket: 28 cm
Plate Ø in lower basket: 28 cm
plates Ø in cm
Upper
basket
plates Ø in cm
Upper
basket
Lower
basket
Lower
basket
The upper basket can also be set to an
angle, with one side high, and the other
side low. Ensure however that the basket can be inserted smoothly into the
cabinet.
23
Page 24

Items not suitable for dishwashers
Items not suitable for dishwashers
– cutlery with wooden or horn handles,
– wooden or plastic chopping boards,
– glued items, e.g. old knives with
handles which have been glued on,
– hand-made craft items,
– copper or tin items,
– plastic items which are not heat resis-
tant.
Please note
Silver- and aluminium items can suf-
–
fer some discolouration.
– Aluminium components (e.g. grease
filter) must not be cleaned with caustic alkaline commercial or industrial
detergents. This may damage material or, in extreme cases, cause
severe chemical reaction.
Silver, treated with a silver polish
–
may still be damp or spotted at the
end of a programme, where water
has not run off smoothly. It may need
rubbing dry with a soft cloth.
treated in a
usually dry at the end of a programme but may discolour.
Colours painted over a glaze may
–
fade after many washes.
Silver,
silver immersion dip is
24
– Clouding may occur on
frequent washing.
We recommend:
Wash delicate glassware in the
ECONOMY 55 ° - programme, (or for
models where the programme is
available, GENTLE 45°C). This will reduce the risk of clouding.
There are no standard guidelines for
washing glassware. When in doubt
wash by hand.
When purchasing new crockery and
cutlery, make sure they are dishwasher safe.
glasses after
Page 25
Adding detergent
Only use detergents formulated for
domestic dishwashers. Do not use
washing up liquid.
Adding detergent
Selecting detergent
Recently almost all detergent manufacturers have launched
with a different composition, in addition
to standard types.
new detergents
Please note
Dishwasher detergents contain irritant or corrosive ingredients. They
can cause burning in the mouth
and throat if swallowed, or inhibit
breathing. Keep children away from
detergent and from the dishwasher
when the door is open. There could
still be detergent residues in the
cabinet.
To avoid the danger of children coming into contact with the dishwasher
detergent:
only put it into the detergent dispenser just before starting the programme.
Should you experience difficulties when
using these types of products, please
contact Miele Customer and Technical
Services Department, or the detergent
manufacturer’s own Advisory Service.
new dishwashing detergents, al-
These
though welcome from an ecological
point of view, react to a different degree
from conventional products to water
hardness. The drawbacks may only
become apparent after a prolonged
period of use.
The following problems may occur:
– White deposits on crockery and
inner cabinet.
– Increased etching in the form of a
bluish sheen on the surface of glassware.
– Discolouration of silverware.
Appearances of this nature are
generally caused by the detergent
used and are not attributable to any
malfunctioning of the dishwasher itself.
25
Page 26

Adding detergent
Preventive measures:
1. If you wish to continue using the new
chlorine and phosphate-free pro-
ducts, the following is recommended:
– Set the water hardness selector one
setting higher than recommended in
the “Water softener” chapter, if the
water hardness is at the top of the
scale (except with setting 6).
Example:
above 610 mg/l (34 °d ) set the
water hardness selector to setting 4.
– Try out an environmentally friendly
detergent of the same type from an-
other manufacturer.
2. If you are still dissatisfied with the re-
sults, we recommend the use of
chlorine-free but not phosphate-free
detergent.
– Set the water softener and dispense
detergent according to instructions
given in this instruction booklet.
3. If results are still not to your satisfaction, you should revert back to using
conventional
both chlorine and phosphate.
– Set the water softener and dispense
detergent according to instructions
given in this instruction booklet.
Should you experience difficulties when
using these types of products, please
contact the detergent manufacturer’s
own Advisory Service.
detergents containing
26
Page 27

Adding detergent
Dishwasher detergent must be added
before each programme (except COLD
PRE-WASH).
– Pour powder or liquid detergent into
the dispenser.
– Dishwasher detergent tablets can be
put at various places in the wash
cabinet, (follow the manufacturer’s
advice on the packet).
Detergent manufacturers give the required amount of detergent in ml (or g)
on the packaging.
For UNIVERSAL programmes use at
least 30 ml (or g) detergent unless advised to use more by the manufacturer,
then use what they advise.
The amount to dispense will depend on
the type of load and the programme selected.
See the programme chart on the next
pages for advice on amounts to dispense.
If you buy detergent in bulk please
ensure that the container is always
properly sealed after use. Otherwise
the detergent can lose its effectiveness.
27
Page 28
Adding detergent
For information:
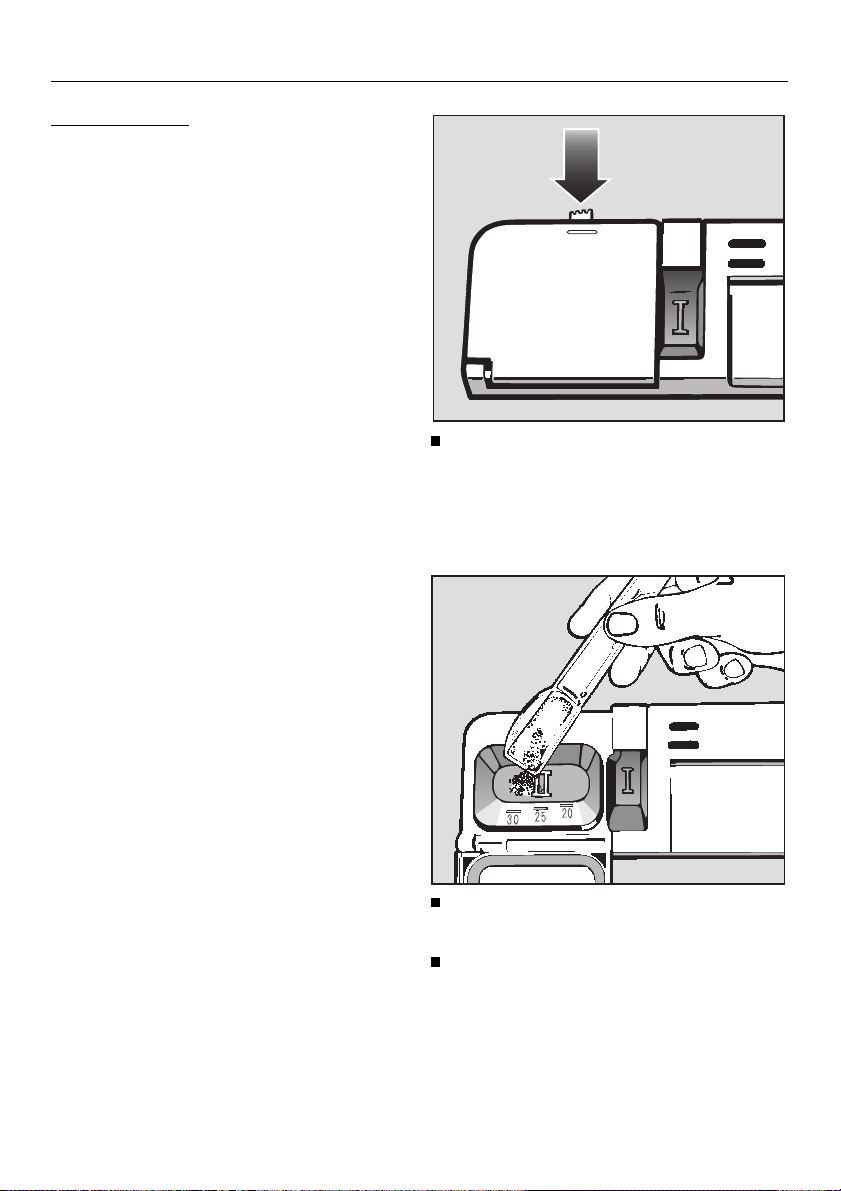
Compartment I takes max. 25 ml, Compartment II max. 80 ml. There are horizontal markers to assist with
dispensing in compartment II, indicating the level in ml.
Press the opening catch on the container flap.
The flap will spring open.
The flap is always open at the end of a
programme.
28
Pour in the required amount of detergent.
Shut the flap.
Page 29

Programme selection
Choose your programme according to
the type of load and how dirty it is.
In most cases this will be a UNIVERSAL - programme.
UNIVERSAL 55 ° or 65 °
(with one pre-wash) or
UNIVERSAL PLUS 55 ° or 65 °
(with two pre-washes).
These programmes are ideally suited to
everyday loads, mixed loads with varying degrees of soiling.
For particular needs there are special
programmes:
The different programmes and their
uses are described on the next two
pages in the Programme chart.
Programme selection
29
Page 30
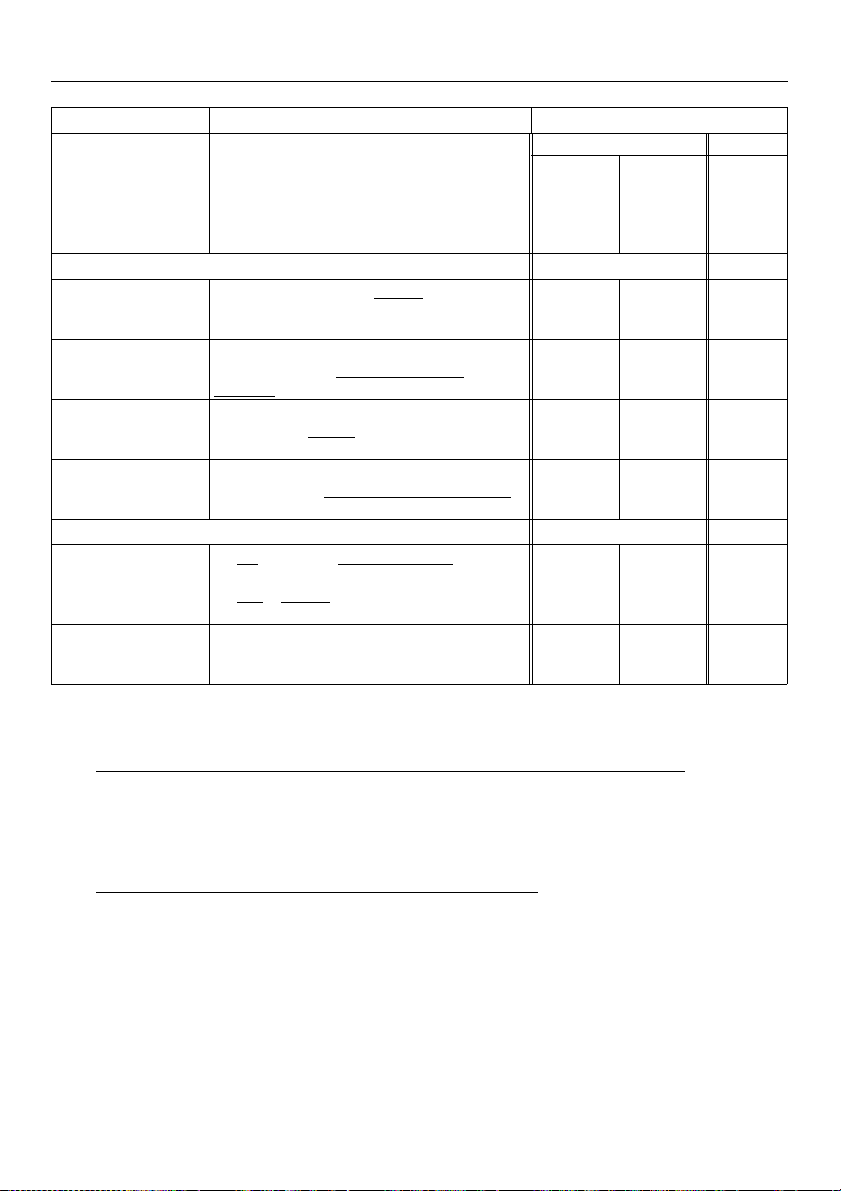
Programme chart
Programme chart
Programme When to use Detergent
Compart-
ment
(Pre-wash)
Universal Programmes
UNIVERSAL
3)
55 °
UNIVERSAL
65 °
UNIVERSAL
PLUS 55 °
UNIVERSAL
PLUS 65 °
This programme is for
loads
as UNIVERSAL 55 °, but higher
temperatures for
particles
as UNIVERSAL 55 °, but with preliminary
pre-wash for
as UNIVERSAL PLUS 55 °, but higher wash
temperature for
and lightly soiled pots and pans
heavy soiling
normal everyday
stubborn dried on
stubborn dried on particles
20 % 80% 100 %
20 % 80 % 100 %
20 % 80 % 100 %
20 % 80 % 100 %
Special programmes
ECONOMY
55 °
for full loads with very light soiling, e.g.
coffee cups, or:
for
half a normal everyday load
1)
A
Compart-
I
ment
II
(Wash
cycle)
50 % 50 %
2)
B
Compart-
ment
II
(Wash
cycle)
COLD
4)
PRE-WASH
The amount dispensed will depend on the type of detergent being used:
1)
A
Use this method for:
– detergents which contain phosphates and chlorine (except liquid detergent)
Divide the total amount proportionally between compartment I and compartment II.
2)
B
Use this method for:
– detergent which is chlorine and phosphate free
– detergent which is chlorine free but contains phosphates
– liquid detergent
In this instance the whole amount is placed in compartment II.
For UNIVERSAL programmes use at least 30 ml (or g) detergent unless advised to use more by the
manufacturer, then use what they advise.
3) Standard programme according to IEC 436 (see chapter “Comparison tests”)
4) See chapter "Plumbing" (Water inlet)
for rinsing crockery to avoid smells if a
complete cycle is not needed
30
Page 31
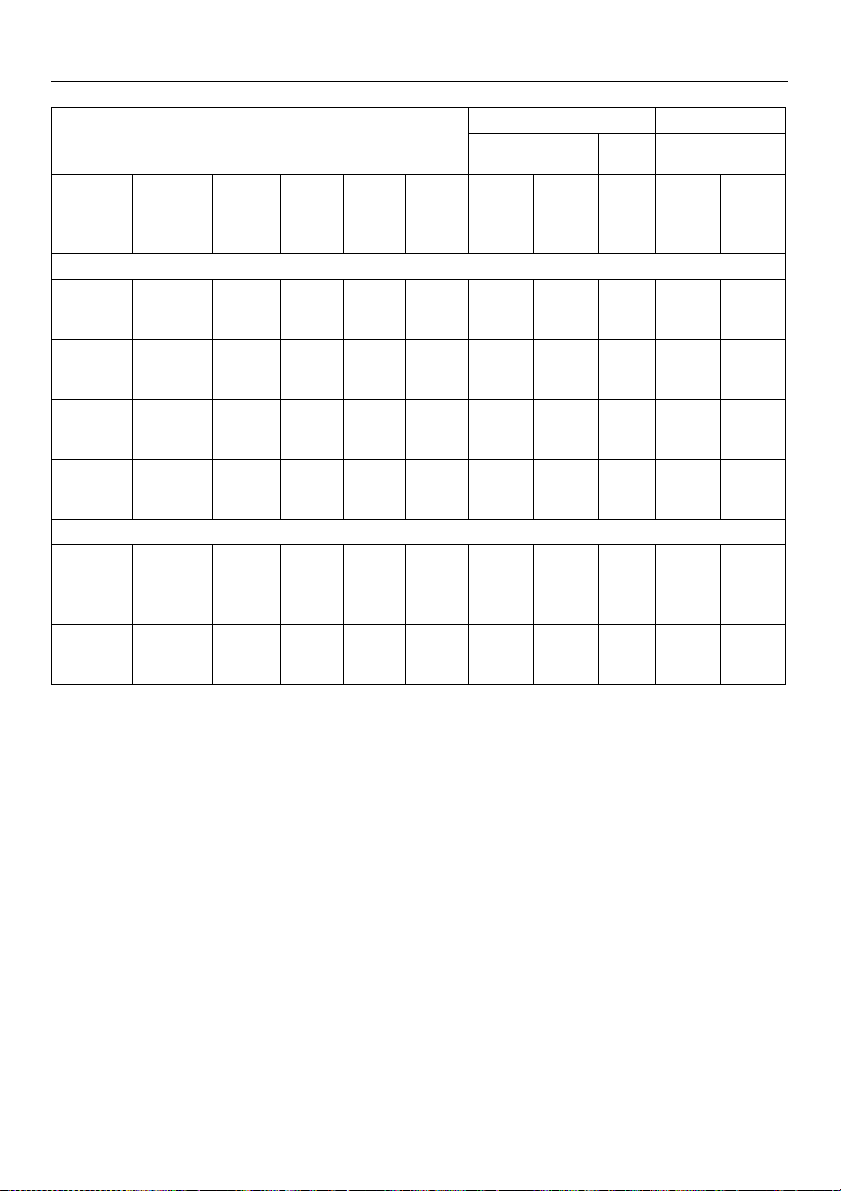
1.
Preliminary
pre-wash
Programme cycle Consumption Time
Energy kWh Water Minutes
2.
Pre-wash
Main
wash
Interimr
inse
Final
rinse
Drying-
phase
Water
cold
(15 °C)
Water
hot
(55 °C)
Litres Water
(approx.)
cold
(15 °C)
Water
hot
(55 °C)
XX
55 °
XX
65 °
X
XX
55 °
X
XX
65 °
X
55 °
X
5) with half loads (6 place settings)
XX
65 °
XX
65 °
XX
65 °
XX
65 °
XX
65 °
X 1.3 0.6 20 83 70
X 1.4 0.7 20 86 72
X 1.5 0.5 25 90 75
X 1.6 0.7 25 94 78
X 1.2
5)
0.4
5)
16 68
5)
58
0.06 0.06 5 8 8
5)
31
Page 32
Switching on and off
Switching on and off
Switching on
Close the door
Open the stopcock (if it is closed).
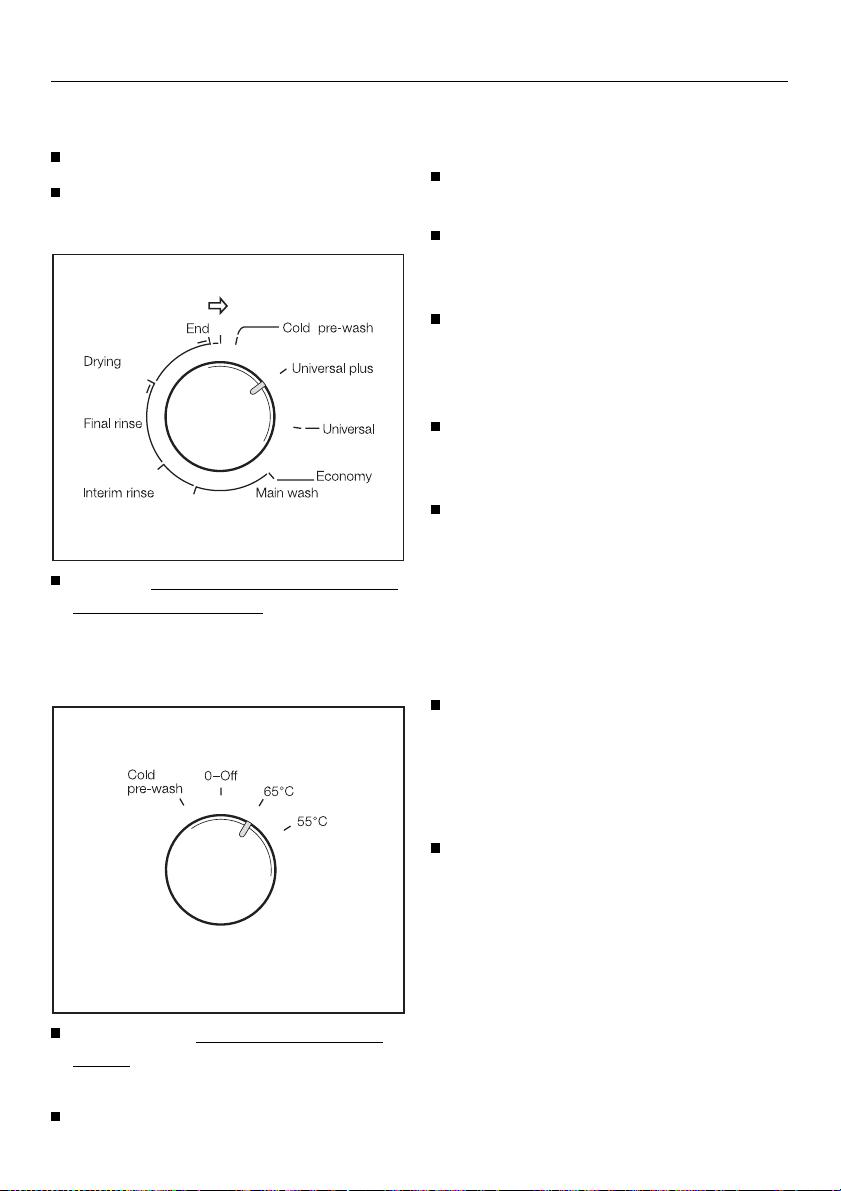
Turn the Programme (sequence indicator) selector switch in a clockwise
direction to the “start point” (a click)
of the required programme, e.g.
UNIVERSAL PLUS.
If you turn the selector past the
“start point” by mistake:
Turn the temperature selector switch
to “0-Off”.
Turn the programme selector switch
in a clockwise direction to the required start point.
Re-set the temperature with the temperature selector switch.
Programme change
It is possible to change temperature
within a programme, e.g. UNIVERSAL 55 ° to UNIVERSAL 65 °.
If changing a programme, e.g.
UNIVERSAL PLUS to UNIVERSAL it
is advisable to first turn the dishwasher off.
Switching off
On completion of a programme:
Turn the temperature selector to
“0-Off”.
Then turn the Temperature selector
switch to the required temperature
e.g. “65 °”.
The programme cycle begins.
32
If the dishwasher is not to be used for a
longer period of time, e.g. whilst on holiday:
Turn off the stopcock.
Page 33
Switching on and off
Programme sequence indication
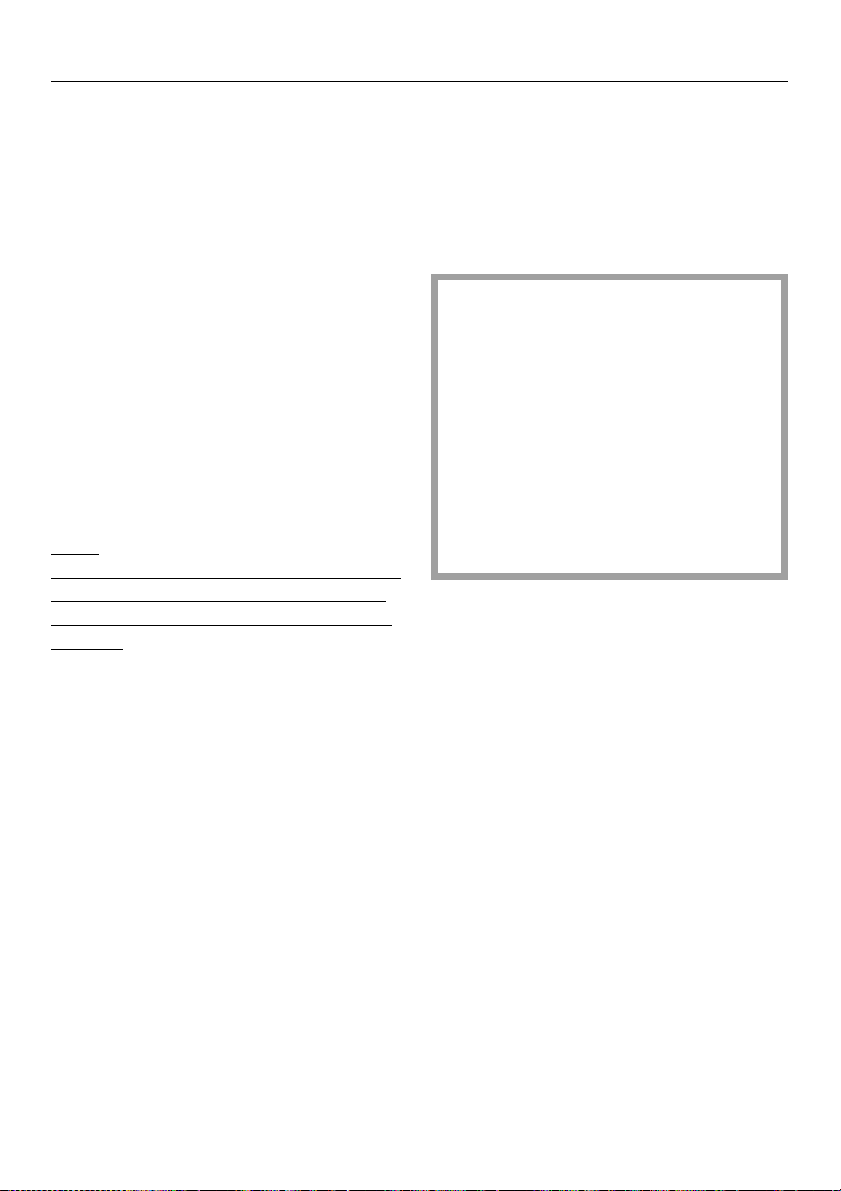
During the programme the programme
selector switch moves around the dial
to show which stage has been reached:
– Pre-wash (not shown)
– Wash cycle
– Interim rinse
– Final rinse
– Drying phase
The programme selector switch re-
mains stationary during the warm-up
phases of the wash and rinse cycle
until the required temperature has been
reached.
Note!
Do not finish a programme prematurely.
Important programme stages (e.g. reactivating the water softener) could be
omitted.
A programme is complete only when
the programme selector switch is at the
“End” position.
Programme interruption
A programme is interrupted as soon as
the door is opened.
If the door is closed again the programme will continue from the position
it was at when it was interrupted.
Warning
Water in the dishwasher may be
hot. Danger of scalding!
Only open the door if absolutely
necessary and exercise caution
when doing so.
Before closing the door leave it ajar
for approx. 20 secs. This will enable the temperature in the wash
cabinet to settle. Close the door
firmly making sure that it clicks into
place.
The dishwasher can be opened and
crockery unloaded. If it is left closed,
the fan will continue for a few more
minutes to diminish any remaining moisture.
This is recommended if the crockery is
not required immediately. This process
is extra to the wash programme.
The COLD PRE-WASH programme is
complete only when the programme selector switch stops just before the start
point of the “UNIVERSAL PLUS” programme.
33
Page 34

Removing load
Removing load
Hot crockery will chip and break
more easily.
After switching off let it cool down in
the dishwasher until it is comfortable
enough to handle, before you unload
it.
If you open the door fully after switching off, the crockery will cool down
much faster.
First unload the lower basket, then
the upper basket and then the cutlery tray (if you have one) at the very
end.
This way you avoid water droplets
from the upper basket or the cutlery
tray falling on to crockery in the bottom basket.
34
Page 35
Cleaning and care
Cleaning the filters in th e wash
cabinet
The dishwasher must not be used
without all the filters in place!
The filter combination in the base of the
wash cabinet should be regularly inspected and cleaned if necessary.
Cleaning and care
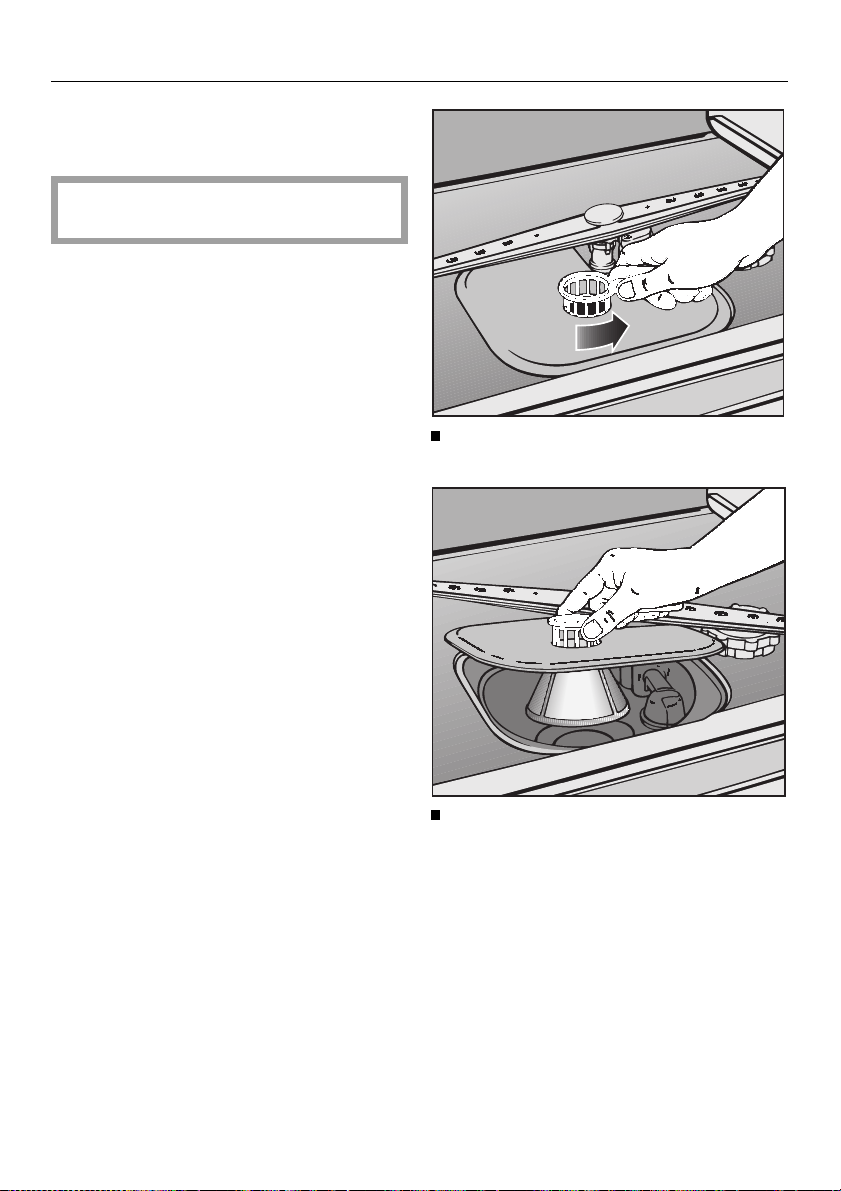
Turn the handle anti-clockwise to release the filters.
Lift and take the filter combination out
of the machine. Remove coarse particles and rinse under running water.
Use a nylon brush if necessary.
35
Page 36
Cleaning and care
Cleaning and care
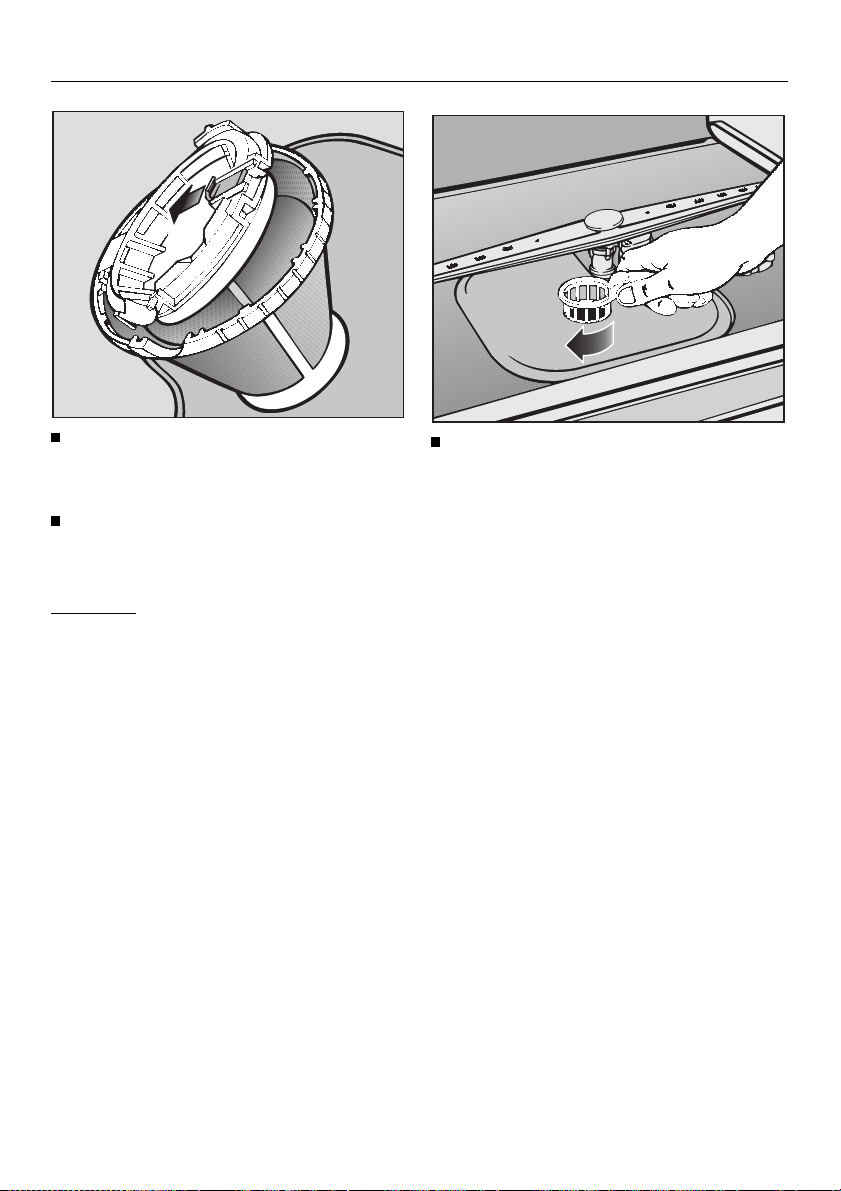
Turn the filter combination over and
open the coarse filter by pulling
back on the locking device.
Clean the coarse filter under running
water, using a brush if necessary,
and press the locking device back in.
Important:
After cleaning make sure that the locking device is properly locked.
Replace the filter combination so
that it lies flat in the base of the wash
cabinet. Secure the filter by turning
the handle in a clockwise direction.
36
Page 37
Cleaning and care
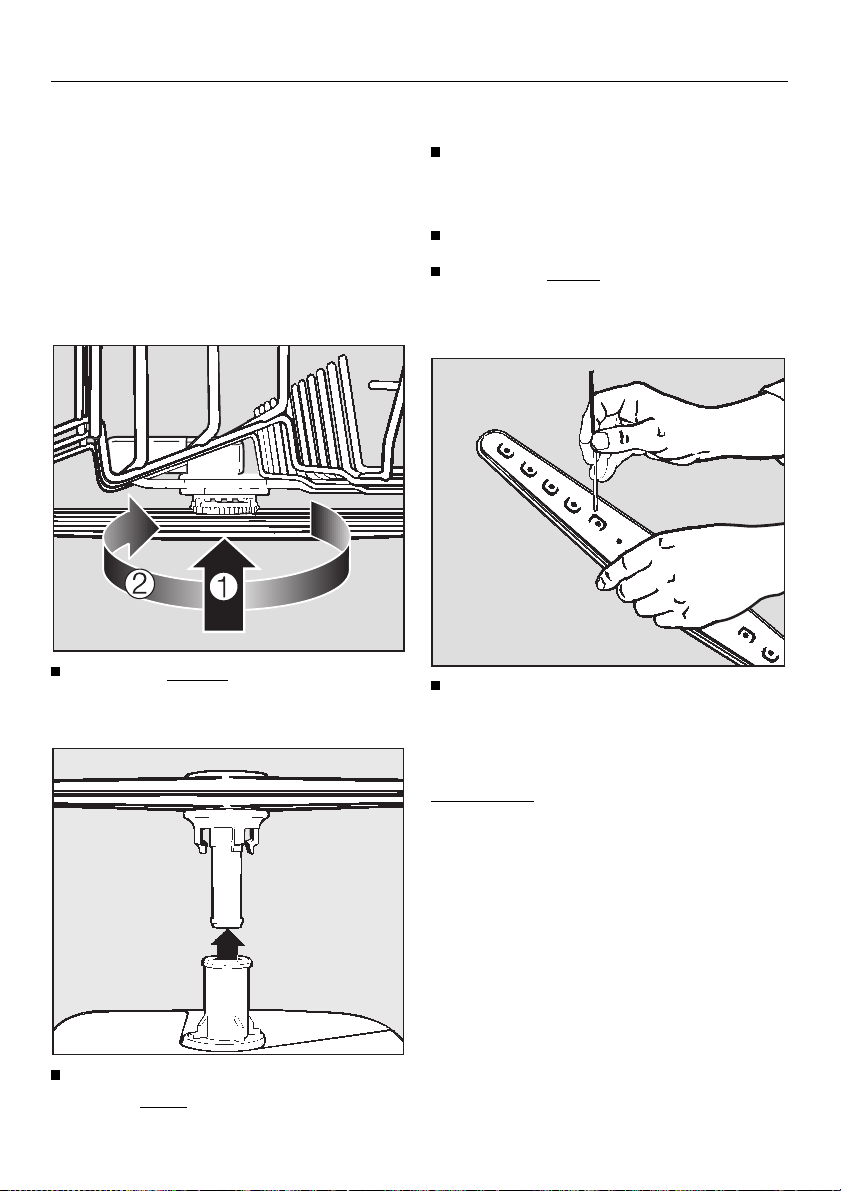
Cleaning the spray arms
Particles of food can lodge in the spray
arm jets.
The spray arms should be inspected
and cleaned regularly (approx. every 6
months).
To do this remove the spray arms as follows.
Cleaning and care
Dishwashers with cutlery basket:
Unscrew the upper spray arm.
Dishwashers with cutlery tray:
Pull out the cutlery tray.
Lift up the upper spray arm to en-
gage the tooth-wheel mechanism
and then unscrew the spray arm.
Lift up the middle spray arm b to engage the tooth-wheel mechanism.
Then unscrew the spray arm
Remove the lower basket and take
out the
lower spray arm.
c.
Using a sharp pointed object push
the food particles into the spray arm
jets and rinse well under running
water.
Please note:
After replacing the spray arms check
that they move freely.
37
Page 38
Cleaning and care
Cleaning and care
Cleaning the drain pump and
non-return valve
If water has not been pumped away at
the end of a programme the drain
pump or the non-return valve might be
blocked. They are, however, easy to
clean. Watch out for glass splinters,
which could cause injury.
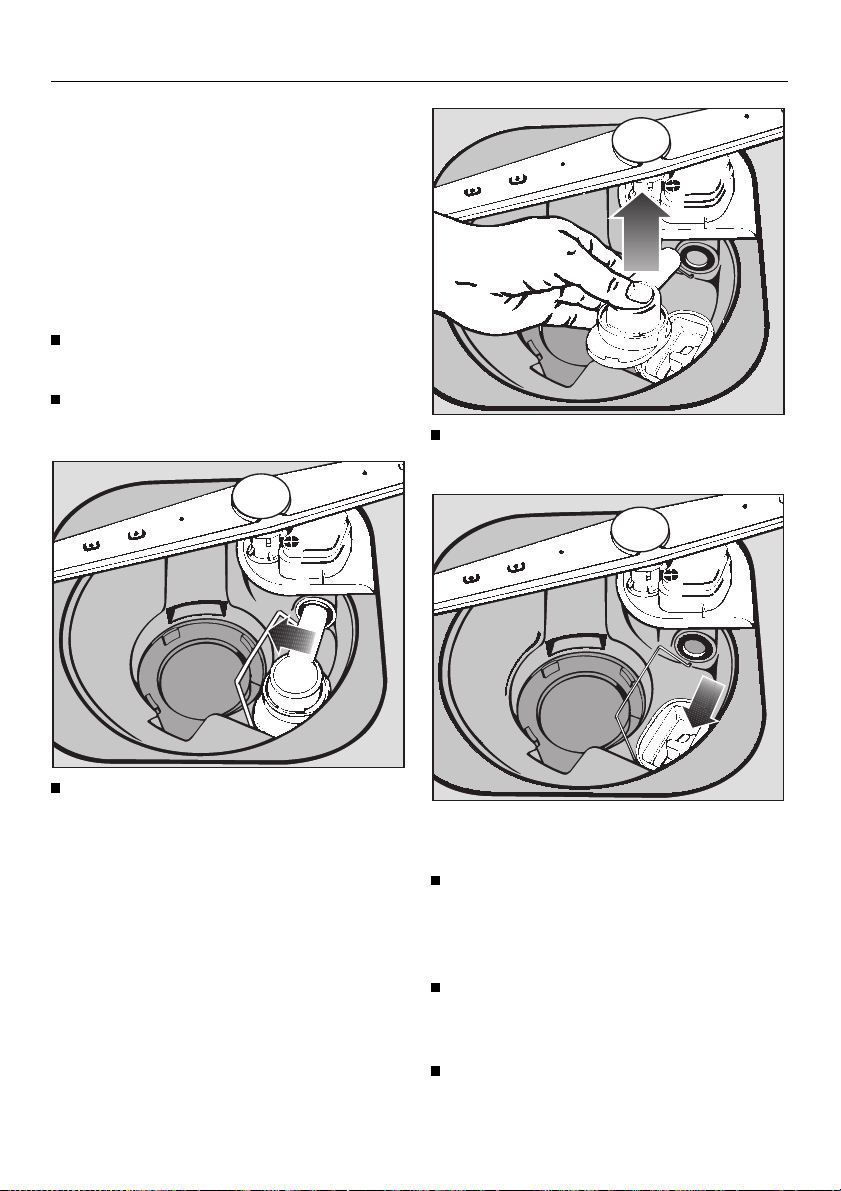
Take the filter combination out of the
wash cabinet.
Use a jug or bowl to scoop water out
of the wash cabinet.
Lift up the non-return valve and rinse
under running water.
Raise the locking clamp.
38
The drain pump is situated under the
non-return valve (see arrow).
Before replacing the non-return valve
check that the drain pump impeller
turns with only slight resistance, and
that there is no obstruction.
Carefully replace the non-return
valve and secure with the locking
clamp.
Replace and secure the filter combination.
Page 39
Cleaning and care
Cleaning the filter in the water
inlet
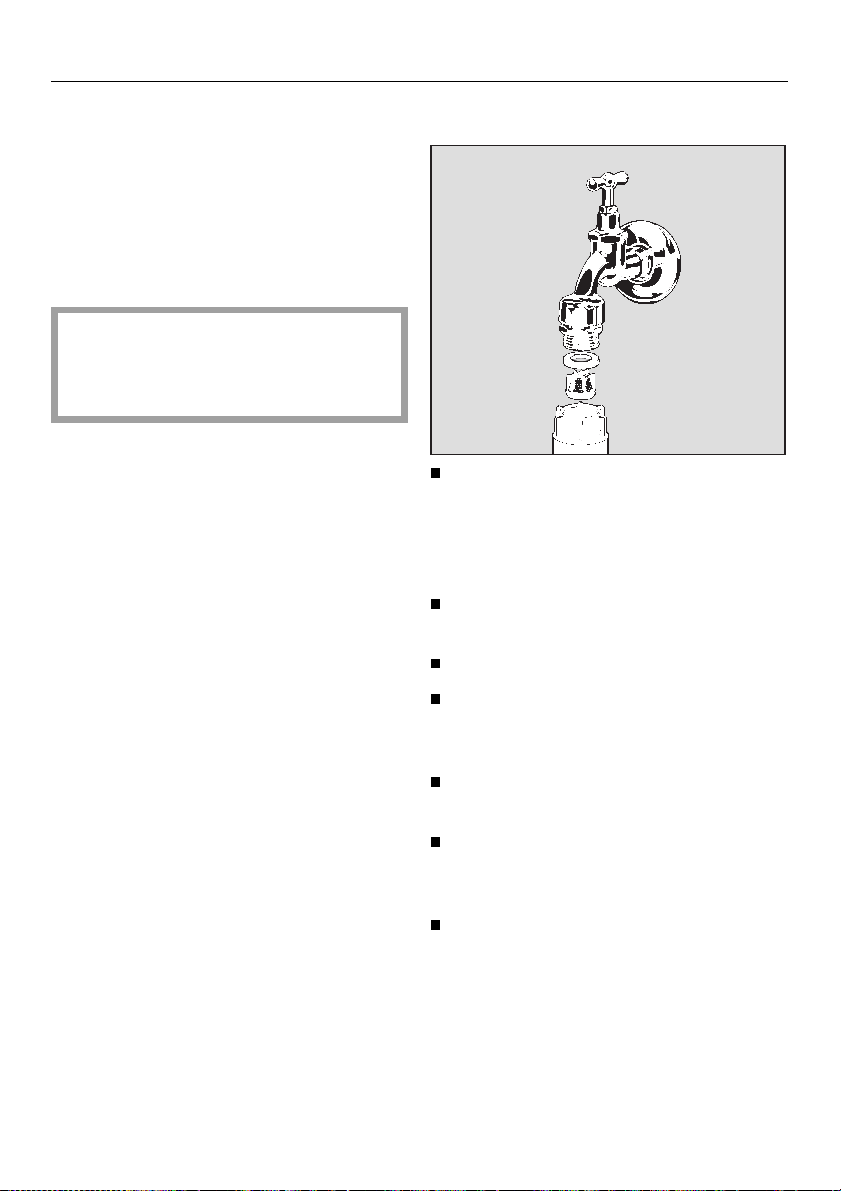
A filter is incorporated in the screw connection of the valve on the water inlet
hose. The filter must be cleaned when
dirty, otherwise insufficient water flows
into the wash cabinet.
The plastic housing of the water
connection contains an electrical
component. It must not be dipped
in water.
Fitting an in-line water filter
If the mains water contains a large number of insoluble substances, we recommend fitting a large area filter in the
connection between the stopcock and
the water inlet hose threaded union.
These filters can be obtained from the
Miele Spares Department (Part No.:
75577).
Cleaning and care
To clean the filter
Disconnect the appliance from the
mains supply (switch off at the main
socket and pull out the plug, switch
off the appropriate circuit at the fusebox or withdraw the mains fuse).
Turn off the stopcock and unscrew
the inlet hose.
Carefully remove the rubber seal.
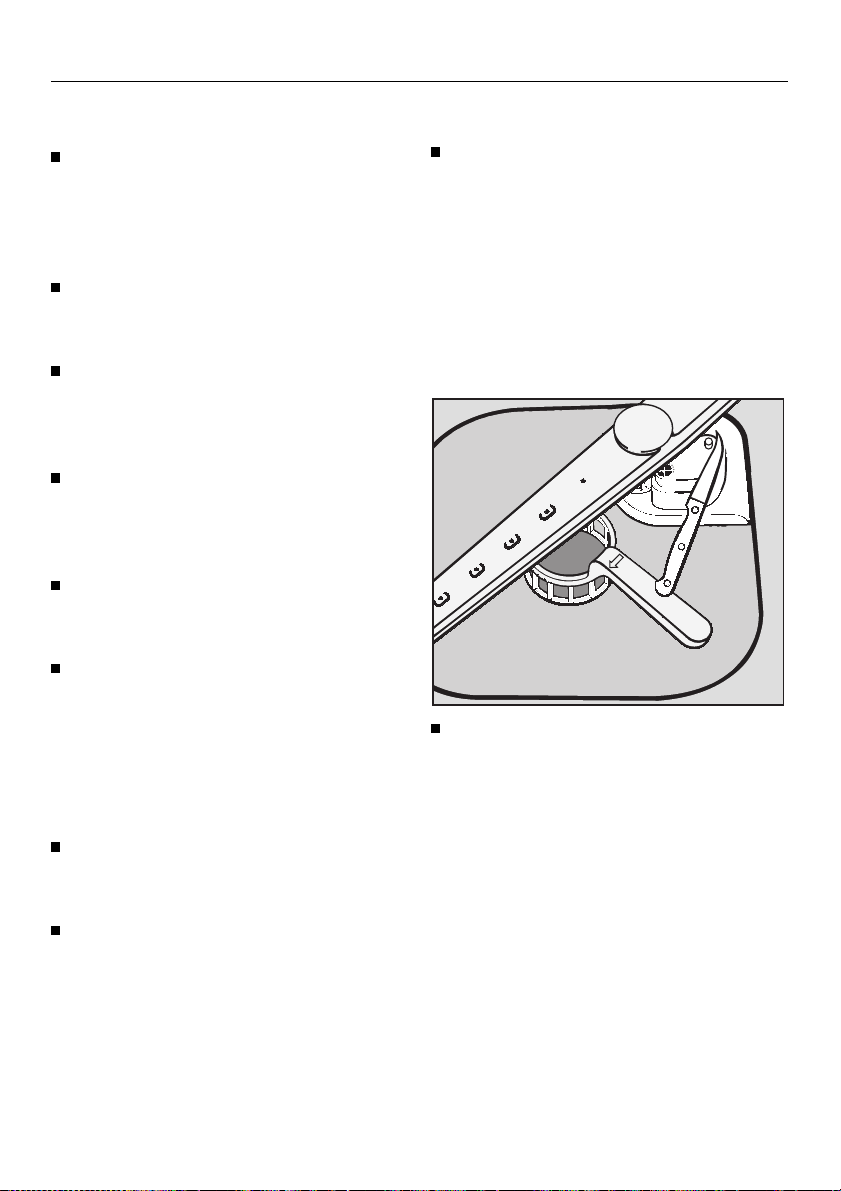
Withdraw the filter using pointed
pliers and clean by rinsing under running water.
Replace filter and seal. Make sure
they are sitting correctly!
Screw back into place on the water
inlet, taking care that it goes back on
straight.
Turn on the stopcock gradually to
test for leaks.
If there is a leak:
Screw the connections on more
tightly.
39
Page 40
Cleaning and care
Cleaning and care
Cleaning the wash cabinet
In general the wash cabinet is selfcleaning, provided that the correct
amount of dishwasher detergent is
used.
If however there are lime scale or
grease deposits these can be removed
with a proprietary dishwasher cleaner.
Cleaning the door and the
door seal
Wipe the door seal regularly with a
damp cloth and remove any particles of food.
Wipe away any residue of food and
drink spillage from the sides of the
dishwasher door. These are not part
of the wash cabinet and are not
reached by water from the spray
arms.
The facia panel
This should only be wiped with a
damp cloth, or a suitable plastic
cleaner.
Do not use an abrasive cleaner, a
glass cleaner or an all-purpose
cleaner. Because of their chemical
composition they could cause
serious damage to plastic surfaces.
The front of the dishwasher
Clean using a suitable proprietary
cleaning agent.
Do not use any cleaner containing
ammonia or thinners.
40
Page 41
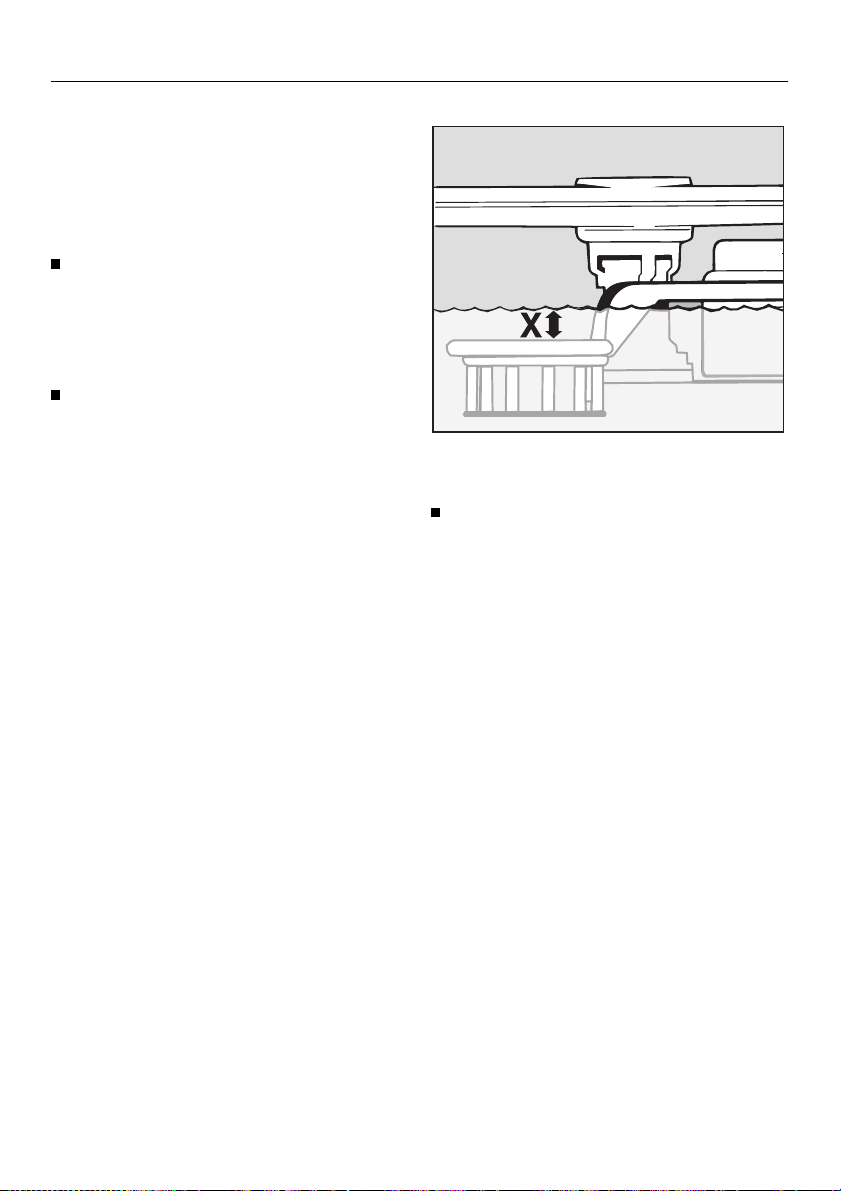
Checking the water level
Checking the water level
If the water pressure (flow rate at the
take-off point) is too low, i.e. less than
1,0 bar, too little water will flow into the
wash cabinet.
To ensure an accurate assessment
open the stopcock fully and run the
PRE-WASH programme once (without crockery) to bring water into the
system.
Run the PRE-WASH programme
again. After approx. 3 minutes open
the door and remove the bottom basket from the machine.
Checking the water level
The water level is correct when dimension “X” is at least 4 mm.
If it measures less, then the water intake time must be increased.
41
Page 42
Checking the water level
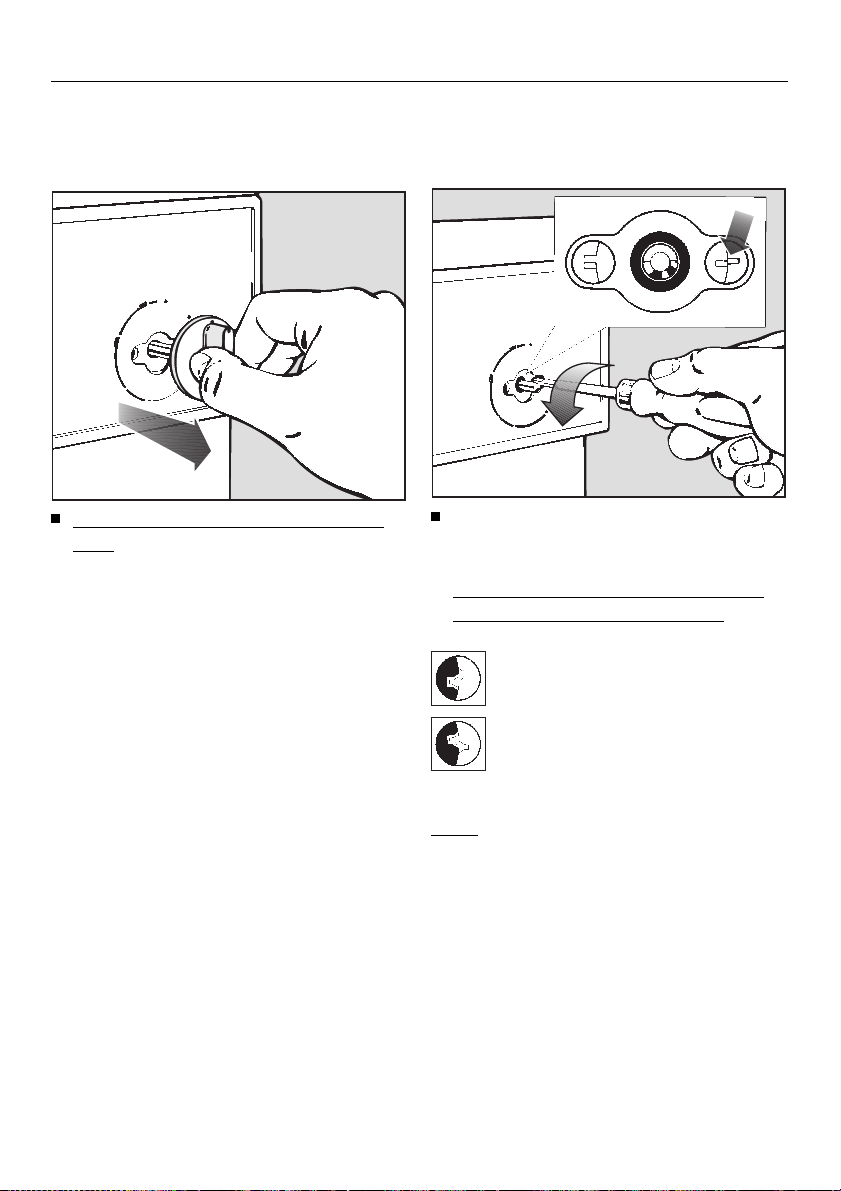
Increasing the water intake
time
Position the right hand switch vertically and then pull it off.
Using a 4-5 mm wide screwdriver
turn the adjuster mechanism to the
right hand side of the spindle
carefully in an anti-clockwise direction until it checks into position.
= Anti-clockwise turn (increases
water intake – 2 min.)
= Clockwise turn (factory
setting – 1 min.)
Note:
If the water intake time has been increased, then the water hardness selector must be reset at one grade higher
than that stated in chapter “Water softener” (except with setting 6).
42
Page 43
Problem solving guide
With the aid of the following explanatory notes, minor faults can be corrected without contacting the Miele Service Department.
Any work on the electrical components of the appliance should only
be carried out by a suitably qualified and competent person in accordance with local and national
regulations. Unauthorised repairs
could be dangerous.
Problem solving guide
White residue on cutlery and
crockery
– Not enough rinse aid.
– No salt in the salt reservoir.
– Salt reservoir lid has not been
screwed on properly.
Water in the wash cabinet at the end
of a programme
– The drain hose is kinked.
Faults/possible causes
The dishwasher does not start
– The door is not properly closed.
– The plug is not properly inserted.
– The fuse is defective/has blown.
The dishes are not clean
– The dishes are incorrectly loaded.
– The wrong amount of detergent was
used.
– The stopcock was not fully opened.
– The water pressure is too low (too
little water in the wash cabinet) – see
chapter “Checking the water level”.
– The filter in the water inlet screw con-
nection is blocked - see “Cleaning
and care”.
– The filters in the wash cabinet are
not clean - see “Cleaning and care”.
– The drain pump or non-return valve
may be blocked. See “Cleaning and
care”.
After Sales Service
Should you still have any difficulties,
or if the appliance is under guaran-
tee please contact:
– your Miele Dealer or
– the Miele Service Department
See back cover for addresses.
Please quote the model type and
number of your appliance. This infor-
mation can be found on the data
plate inside the door.
– Spray arm jets are blocked - see
“Cleaning and care”.
– The spray arms are obstructed by
items in the baskets.
43
Page 44
Special accessories
Special accessories
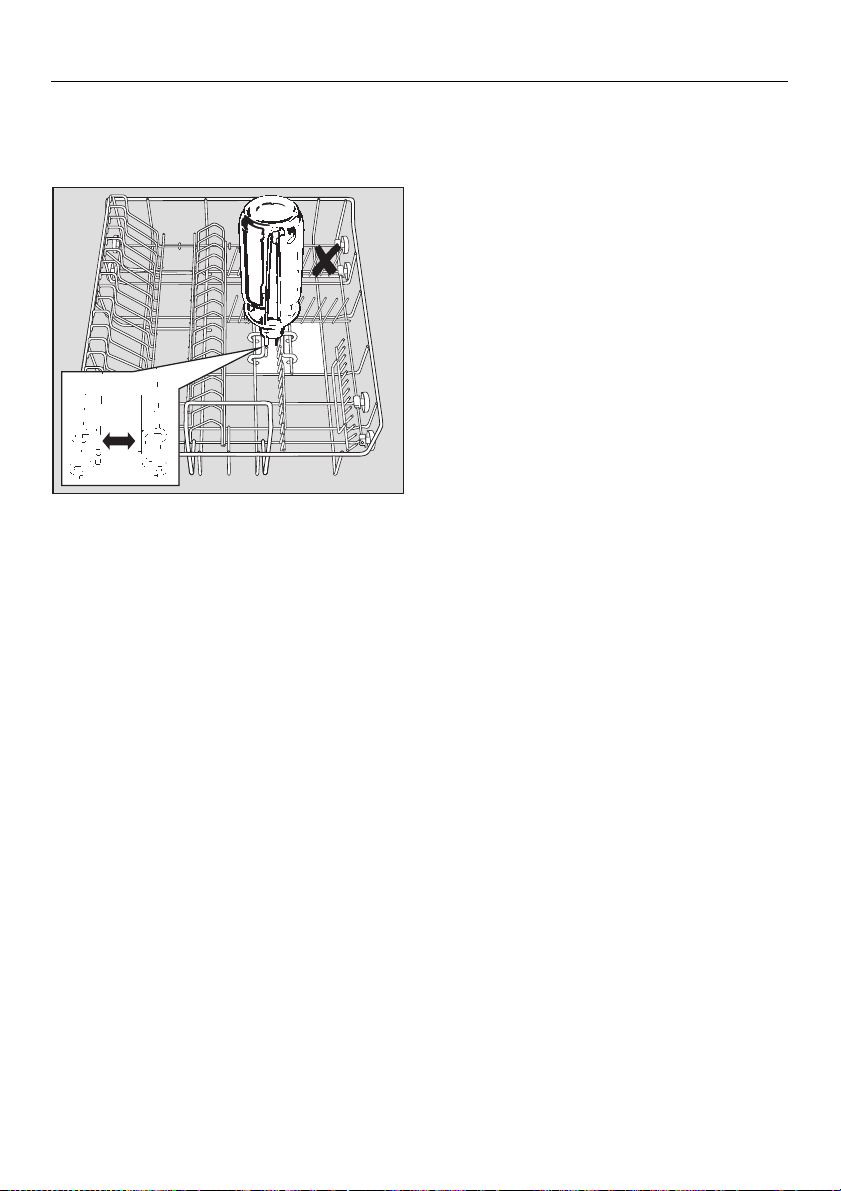
Bottle holder
(depending on model)
The bottle holder (e.g. for milk or baby
bottles) can be used in the bottom basket.
To achieve good cleaning results the
bottle holder should only be placed in
the positions marked white – and on no
account in the positions marked with
an X.
Installation - special situations
Adapter strips to adapt the dish-
washer front where the height of the
wall unit recess is more than 882 mm.
Inserts
Glass inserts for the bottom basket,
(only available for models with removable inserts in the bottom basket).
Glass inserts for the upper basket,
especially for glasses which need a
special support.
Other special accessories e.g. special
inserts for glasses or plates, etc. are
available through your Dealer or the
Spare Parts Department.
See the following list.
44
Page 45
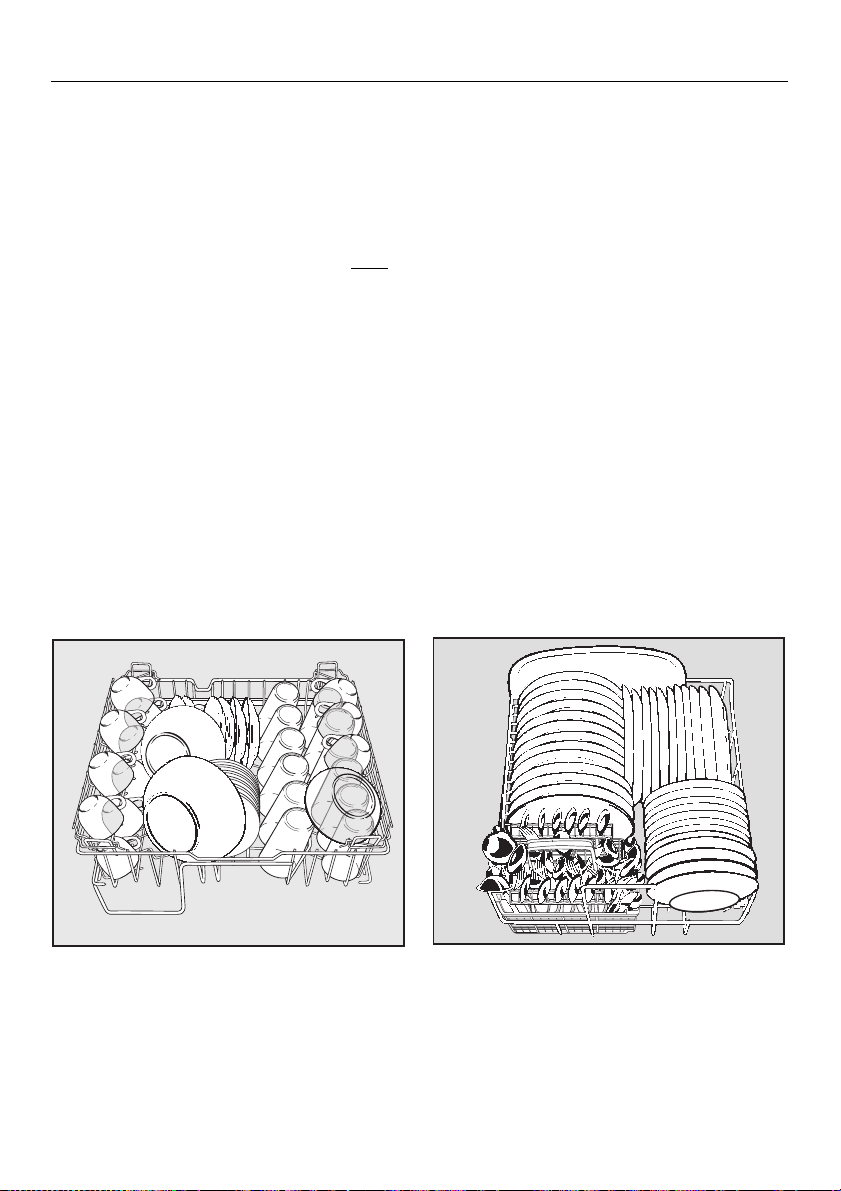
Comparison tests
Comparison tests
Test standar d: IEC 436 / DIN 44990 / IEC 704 / prEN 50242
Programme tested: UNIVERSAL 55 °
Amount of detergent: If using a detergent containing chlorine:
5 g in compartment I, 25 g in compartment II.
If using a chlorine-free detergent:
only in compartment II.
30 g
Rinse aid dispensing: Setting 3, (approx. 3 ml, set at factory)
Noise measurement: Before starting a programme to measure noise, the
dishwasher door must first be opened completely.
Doing this will automatically close the vent exit for
the turbothermic drying process as in daily use.
Amount washed: 12 place settings
Dishwasher with cutlery basket
Spoon inserts: Fit the two inserts on top of the cutlery basket, (see
Section on loading the dishwasher, spoon inserts).
Place six spoons at intervals in each insert.
Upper basket
Lower basket
45
Page 46
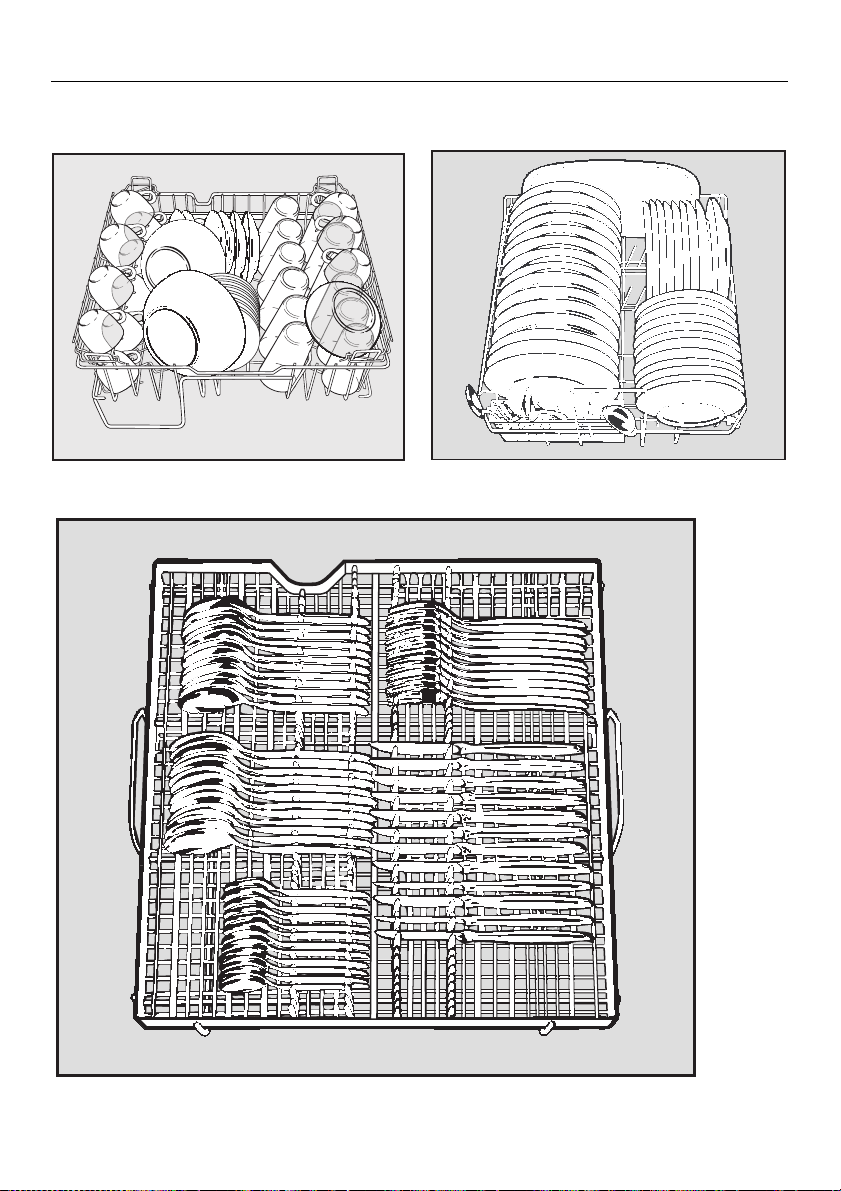
Comparison tests
Dishwasher with cutlery tray
Upper basket
Lower basket
Cutlery tray
46
Page 47

Installation instructions
47
Page 48

48
Page 49

Contents
Contents
Building in the dishwasher . . . . . . . . . . . . . . . . . . . . . . . . . . . . . . . . . . . . . . . . . 50
1. Measurements . . . . . . . . . . . . . . . . . . . . . . . . . . . . . . . . . . . . . . . . . . . . . . . . . . 50
2. Fitting the control facia panel. . . . . . . . . . . . . . . . . . . . . . . . . . . . . . . . . . . . . . . 51
3. Fitting the panel front . . . . . . . . . . . . . . . . . . . . . . . . . . . . . . . . . . . . . . . . . . . . . 52
4. Adjusting dishwasher height . . . . . . . . . . . . . . . . . . . . . . . . . . . . . . . . . . . . . . . 52
5. Fitting the drain hose . . . . . . . . . . . . . . . . . . . . . . . . . . . . . . . . . . . . . . . . . . . . . 53
6. Building in kit . . . . . . . . . . . . . . . . . . . . . . . . . . . . . . . . . . . . . . . . . . . . . . . . . . . 54
7. Fitting building in frame and installing the dishwasher . . . . . . . . . . . . . . . . . . . 56
Electrical connection. . . . . . . . . . . . . . . . . . . . . . . . . . . . . . . . . . . . . . . . . . . . . . 63
Plumbing. . . . . . . . . . . . . . . . . . . . . . . . . . . . . . . . . . . . . . . . . . . . . . . . . . . . . . . . 65
Connection to the water inlet . . . . . . . . . . . . . . . . . . . . . . . . . . . . . . . . . . . . . . . . . 66
Drainage . . . . . . . . . . . . . . . . . . . . . . . . . . . . . . . . . . . . . . . . . . . . . . . . . . . . . . . . 68
Technical da t a. . . . . . . . . . . . . . . . . . . . . . . . . . . . . . . . . . . . . . . . . . . . . . . . . . . . 69
49
Page 50
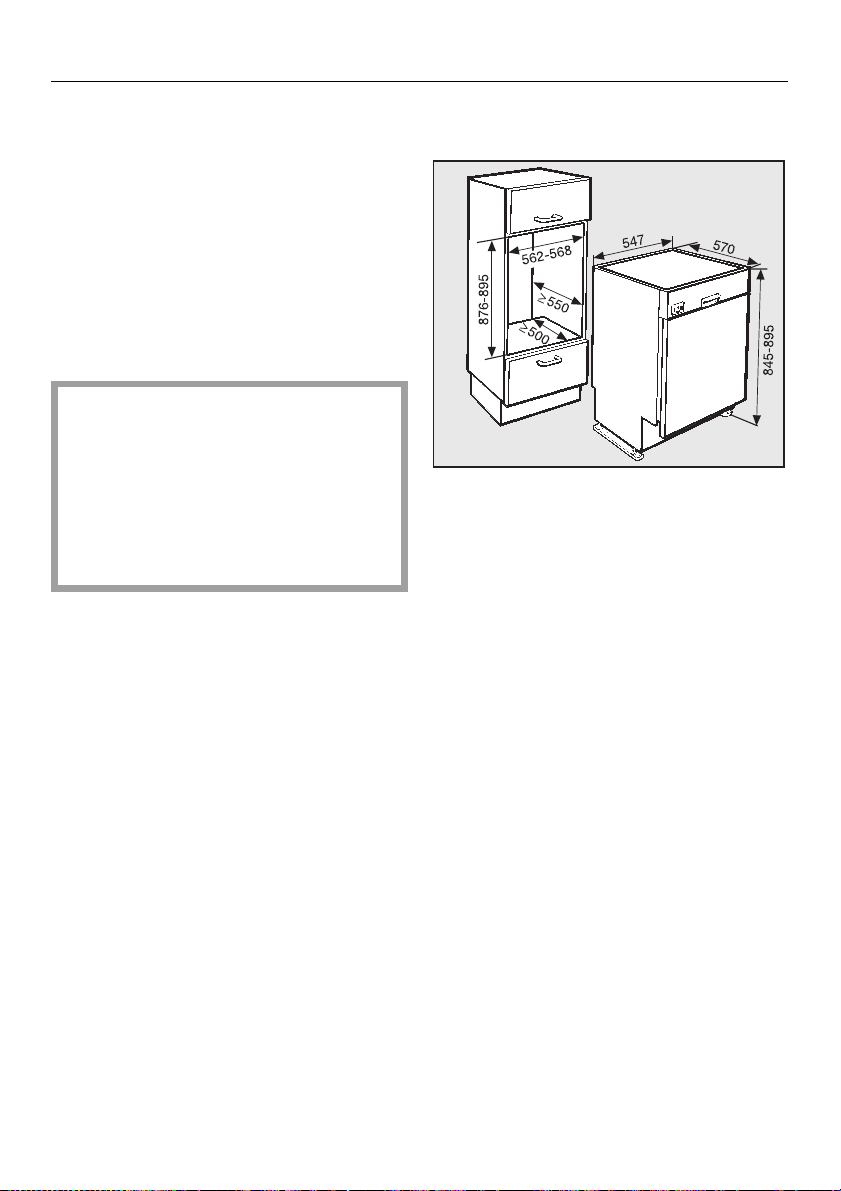
Installation
Installation
This dishwasher is intended to be built
into a tall unit.
The following are needed:
– A facia panel (GW...)
– A dishwasher front, consisting of
panel front and plinth facia (GFH 55)
– A building in frame (GER 60).
The facia panel and the front panel must
be fitted before the dishwasher is built
into the tall unit .
To ensure stability this dishwasher
must only be built into a tall unit. It
must not be set up as a freestanding machine.
1. Measurements for building in
The tall unit should be secured to
the wall for stability with the bracket
supplied.
The following conditions must be met:
– The recess floor must be capable of
bearing a load of at least 80 kg
– The height of the dishwasher from
the base of the floor will depend on
the onsite water inlet connection
(see section on “Plumbing”).
– The cabinet / space into which the
dishwasher is being built must be at
least 550 mm deep.
– An installation opening (from base of
the recess to floor) must be a mini-
mum of 50 mm deep and 100 mm
wide.
.
50
Page 51
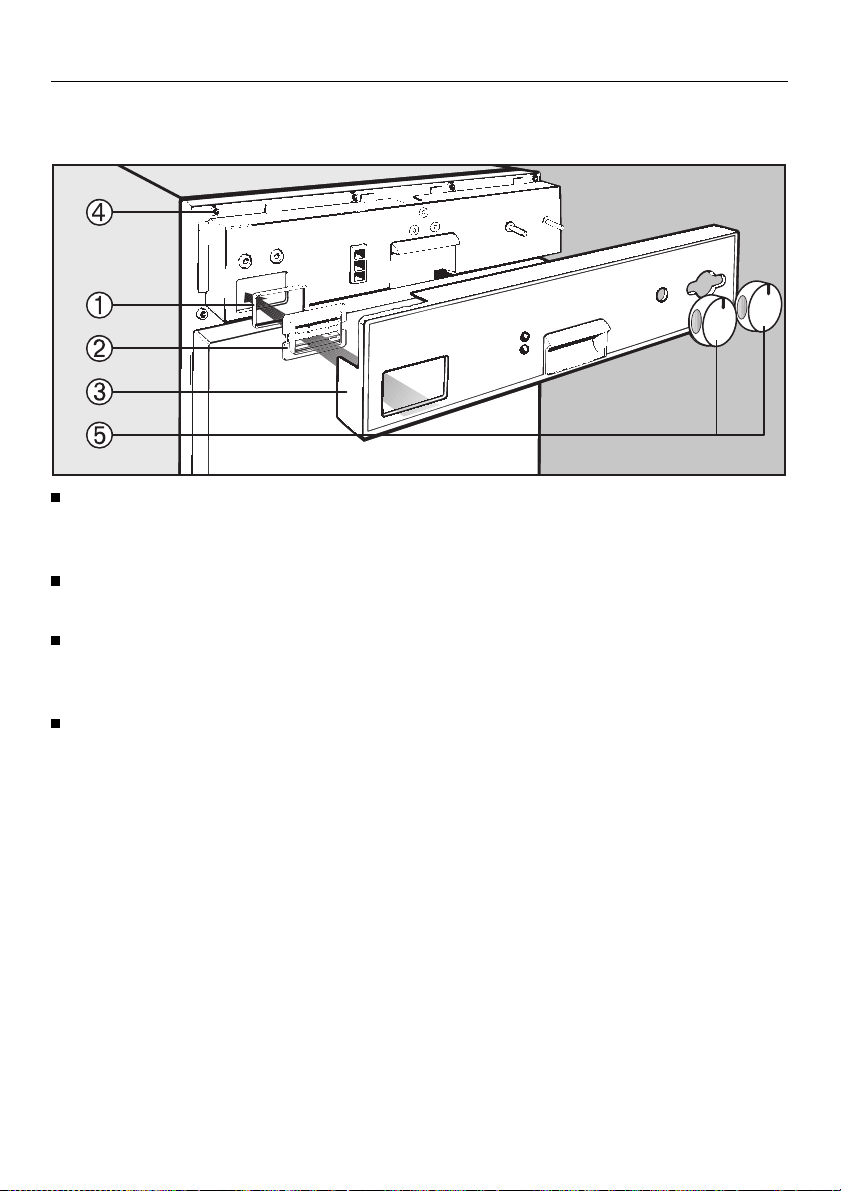
2. Fitting the contr ol faci a pane l
Fit the seal supplied b into the
groove surrounding the ventilation
c.
grille
Push the ventilation grille c into posi-
tion.
Installation
Place the facia panel d in position
and screw into place from the inside
of the door using the six screws
Attach the switch knobs f.
e.
51
Page 52
Installation
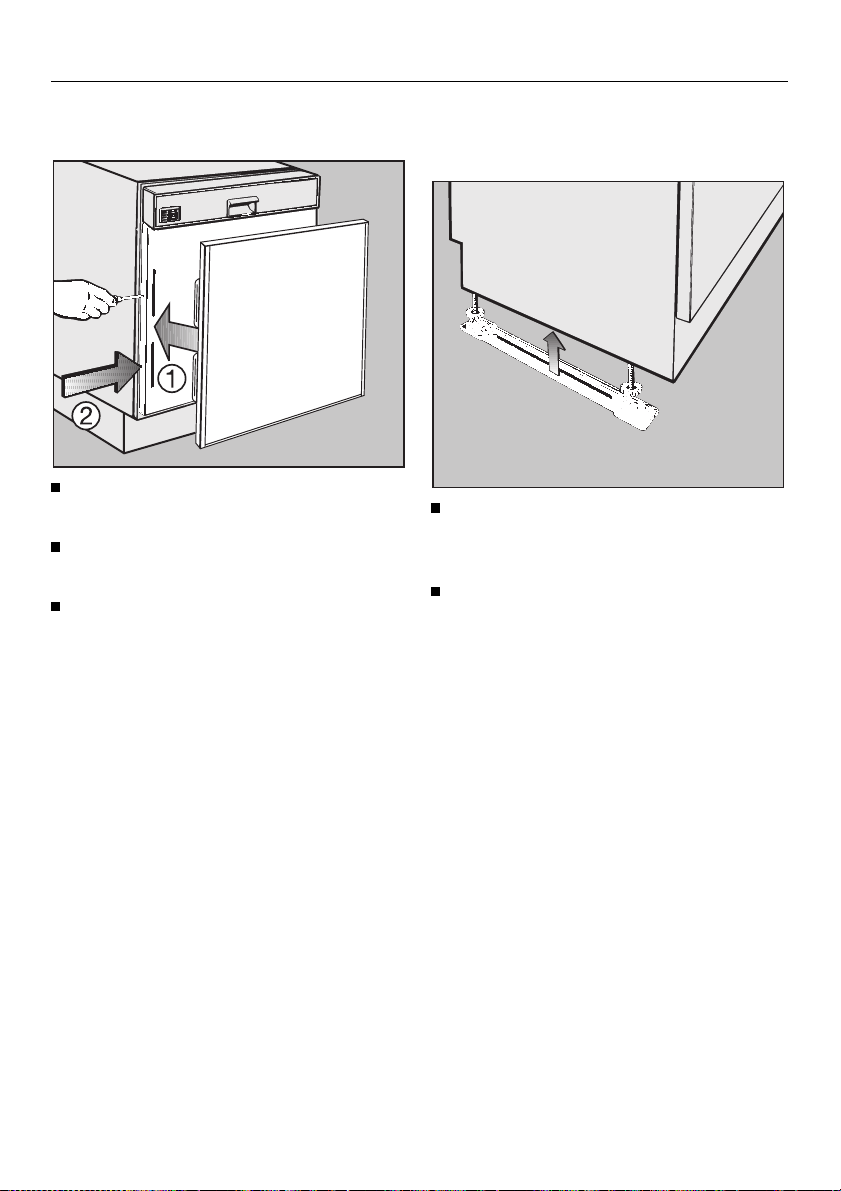
3. Fitting the panel front
Hang the panel front into the slits of
the machine door outer panel
Tighten the fixing screws c on both
sides of the door outer panel.
Plug the openings c for the fixing
screws using the plastic stoppers
provided.
b.
4. Adjusting the dishwasher
height
Adjust the machine feet evenly until
the height of the dishwasher just
reaches the height of the recess.
Press the slides – with the ratchet at
the rear – under the screw feet.
52
Page 53

5. Fitting the drain hose
The drain hose is in the wash cabinet.
The connection stub is located low
down on the rear side of the dishwasher.
Connect the drain hose using the
hose clips supplied.
The connection stub can be turned.
The hose can thus be laid to the right
or left without needing to loosen the
hose clip.
Installation
53
Page 54
Installation
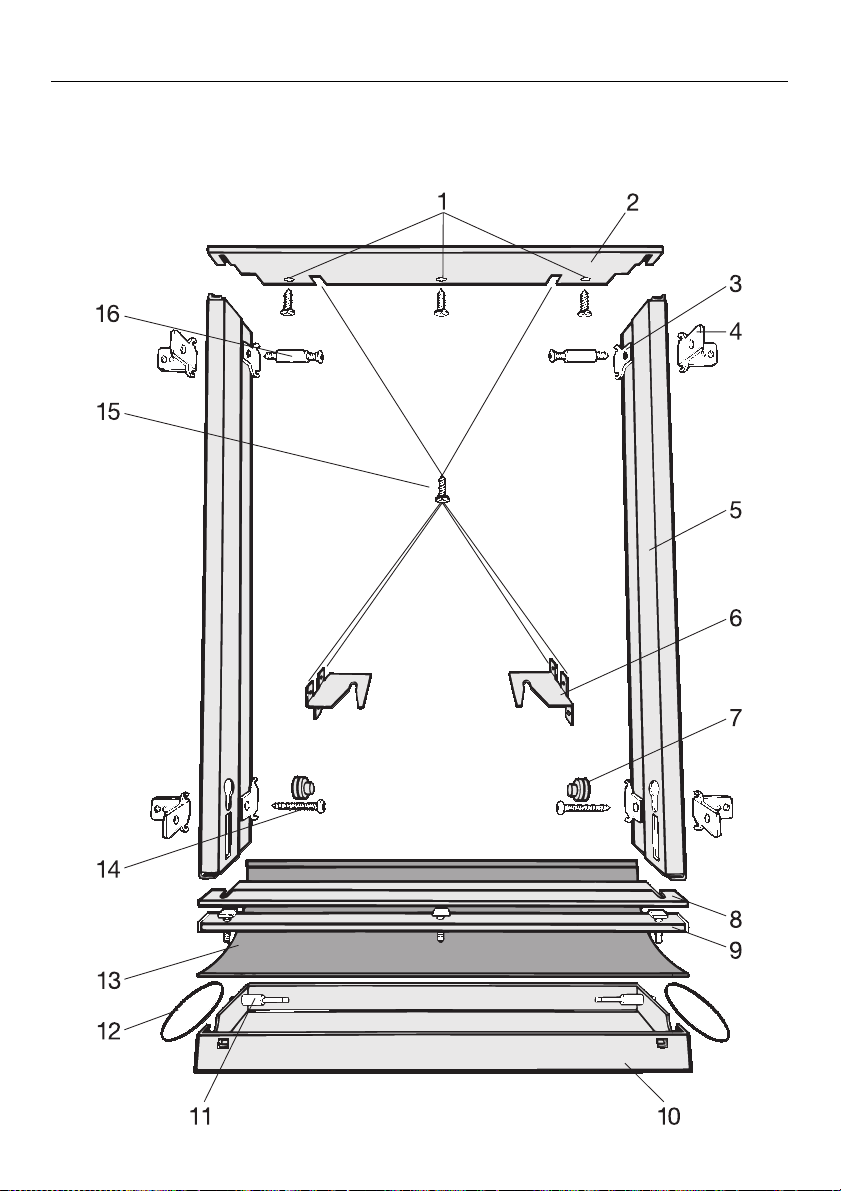
6. Building in kit
54
Page 55

Position Description Quantity
1 flat head screws 4 x 15 3
2 top frame strip 1
3 spacer for wall thickness 16 mm 4
4 spacer for wall thickness 19 mm 4
5 side frame strips 2
6 foot holds 2
7 stoppers 2
8 bottom frame strip 1
9 spacer bar 1
10 plinth facia 1
11 plinth facia retainer 2
12 rubber rings 2
Installation
13 protective sheet 1
14 wood screws 4 x 20 2
15 wood screws 4 x 15 6
16 wood screws 4 x 30 with sleeve 2
55
Page 56
Installation
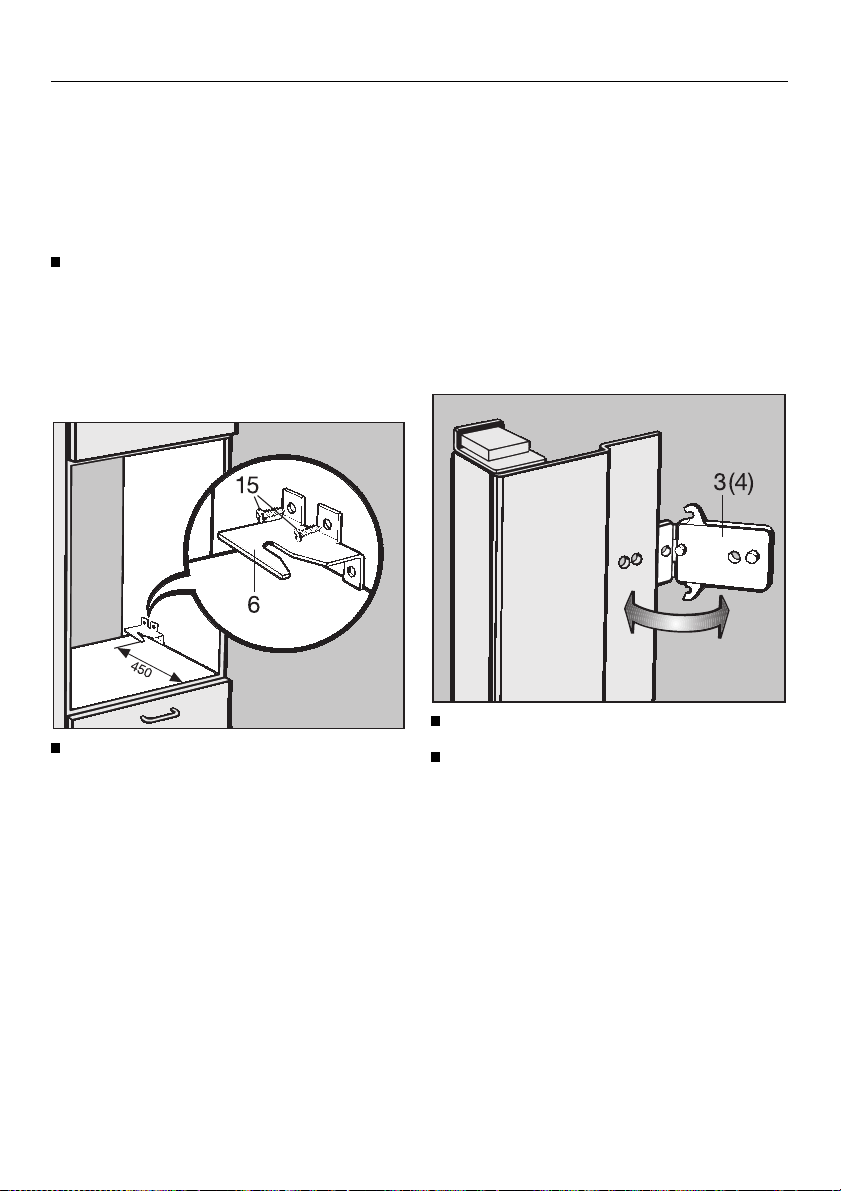
7.Fitting the building-in
frame and installing the
dishwasher
Apply moisture protector
Seal the cracks between the side
walls and the recess floor and any
unprotected cut surfaces with the silicon sealant provided.
To screw the foot holds in place.
Secure the foot holds (6) each with
two wood screws 4 x 15 (15) to the
side walls of the tall unit recess.
The distance from the front edge of
the unit to the front edge of the foot
holds must measure 450 mm.
The bottom bracket lug must rest on
the recess floor.
Fitting the side and top frame strips.
When the recess width measures 562 mm
(wall thickness 16 mm) the spacer (3)
fitted to the side frame strips should be
replaced by the thinner spacers (4)
suppied.
Flap out spacer (3) and remove.
Fit spacers (4) and fold in.
56
Page 57
Installation
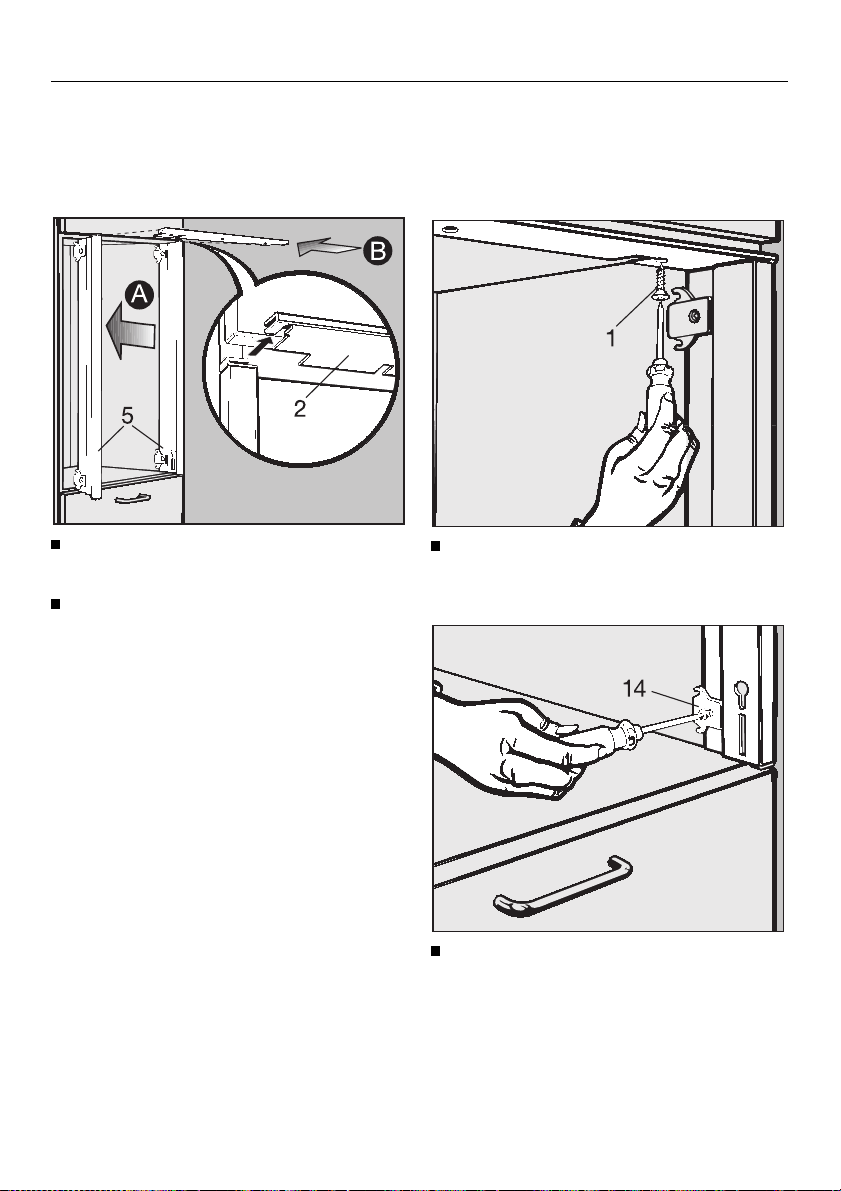
Put the side frame strips (5) into the
unit recess
Push the top frame strip (2) into
place
B.
A
.
Screw the top frame strip to the recess ceiling with 4 x 15 (1) flat head
screws.
Screw the side frame strips at the
bottom to the side walls with 4 x 20
(14) wood screws.
57
Page 58
Installation
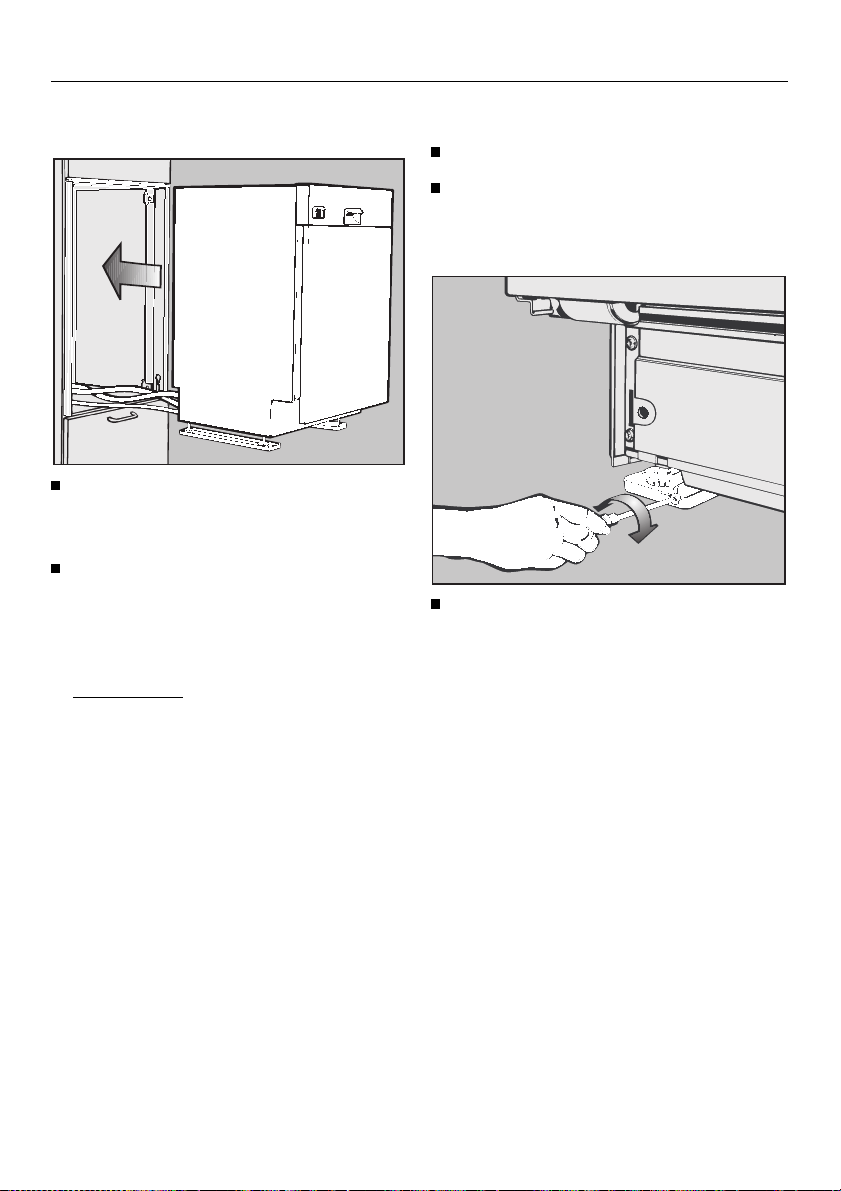
Fitting the dishwasher into the recess
Lay the hoses and cable into the unit
and down through the installation
duct.
Push the dishwasher into the unit recess
The back feet should rest in the
openings of the footholds.
Please note:
Ensure the hoses and cable are not
kinked or squashed.
Adjusting the dishwasher
Shut the dishwasher door
Screw the machine feet out until the
dishwasher is touching the recess
ceiling.
Screw out the rear feet.
higher = turn clockwise
lower = turn anti-clockwise
Several turns are needed to adjust 1
mm in height.
58
Page 59
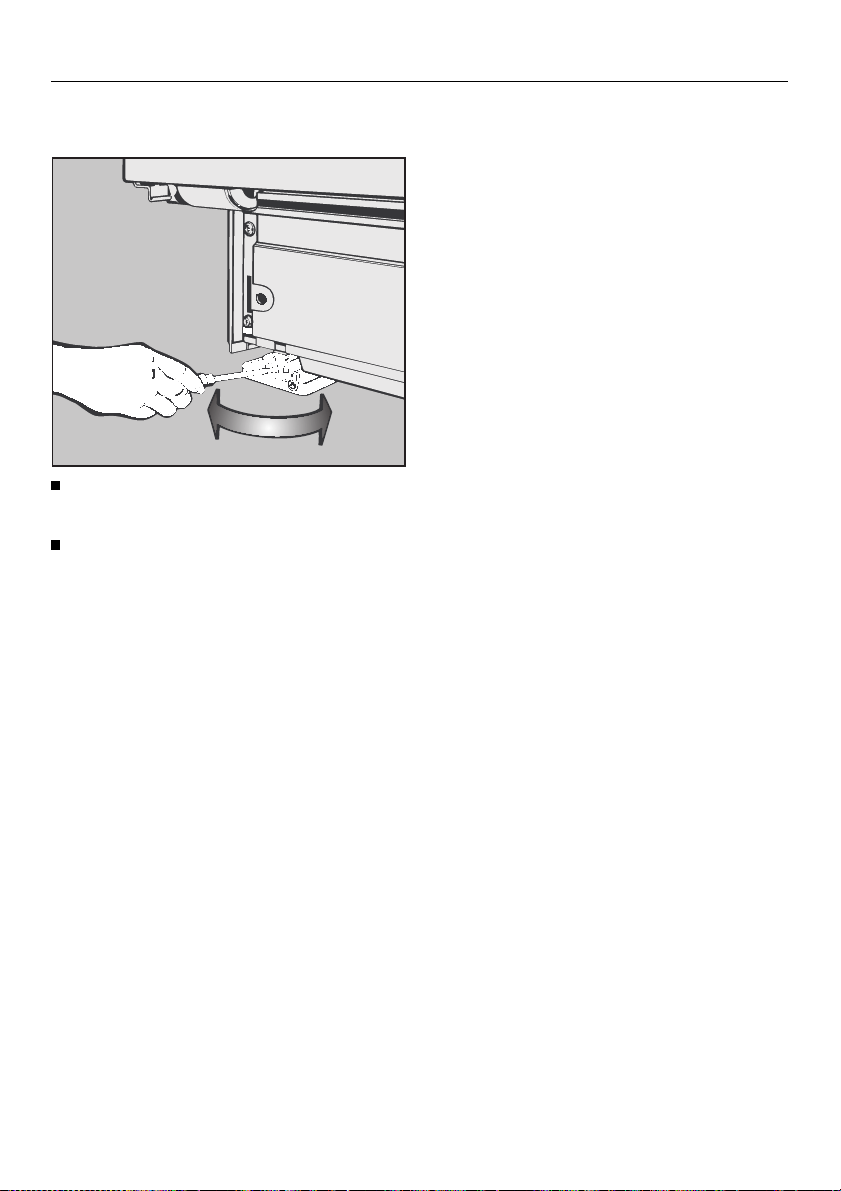
Adjust the front screw feet manually
or with a flat blade screwdriver.
Align the dishwasher:
– the gap between the panel front and
the side frame strips must match,
and
- the facia control panel and the
panel front must sit flush with
the building in frame.
Installation
59
Page 60
Installation
To secure the dishwasher
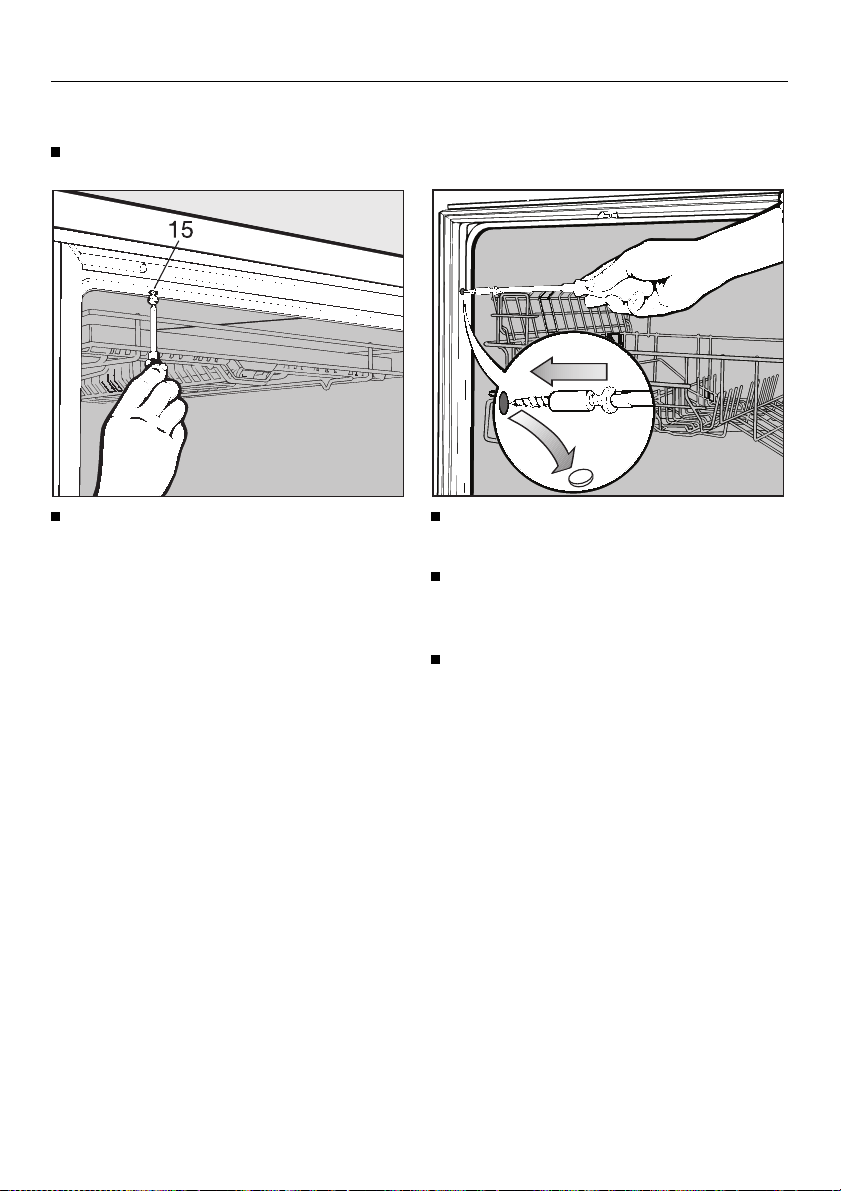
Open the dishwasher door.
Screw one of the 4 x 15 (15) screws
supplied from below into the holes in
the right and left hand side of the
upper strip.
Remove the cover caps from the
side openings, left and right.
Secure the dishwasher on both sides
with the 4 x 30 wood screws with
sleeves (16).
Put the cover caps back in the openings. Use the extra ones supplied if
necessary.
60
Page 61
Installation
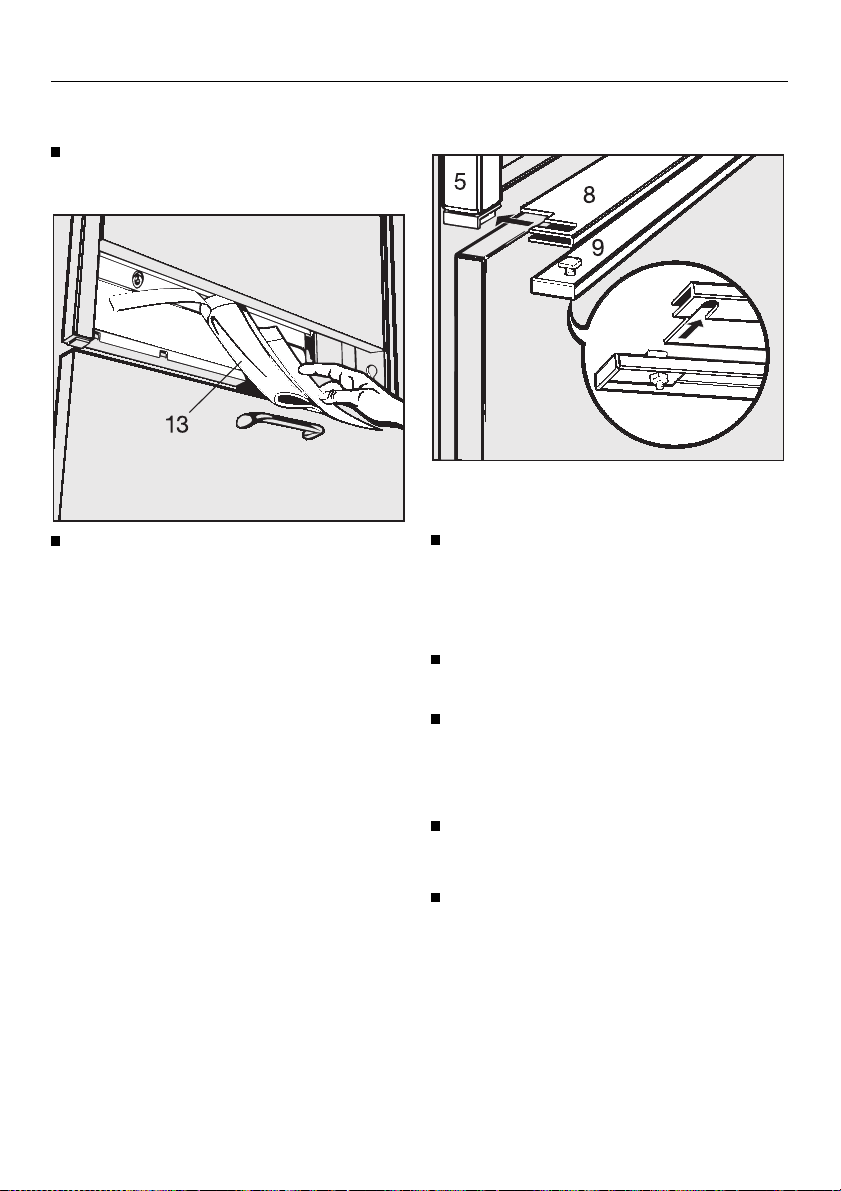
To fix the protective sheet.
Remove the backing from the adhesive strip.
Stick the protective sheet (13) on the
plinth along the edge below the
screws.
To fit the bottom frame strip.
Recess height 876 mm:
Push the bottom frame strip (8) over
the lower ends of the side frame
strips (5).
Recess height 882 mm:
First push the spacer bar (9) from
below onto the bottom frame strip.
To do this loosen the nuts in the
spacer strip push the spacer strip
onto the bottom frame strip and
tighten the nuts again.
File off any protruding screw ends.
Recess height larger than 882 mm:
In this case a package must be put
together of spacer bars (special accessory) according to the recess
height and pushed under the bottom
frame strip.
61
Page 62
Installation
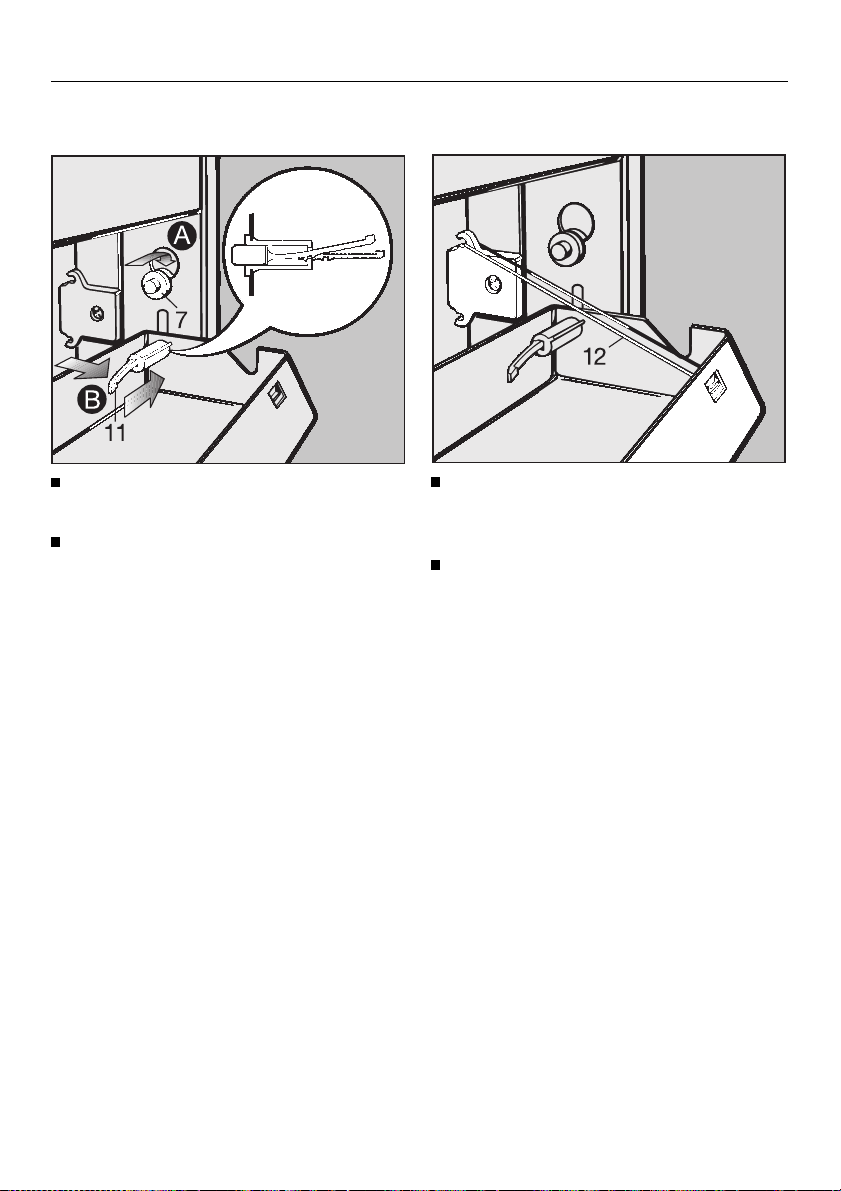
To fit the plinth facia
Fit the spring clip (7) into the "Keyholes" in the side frame strips
Pull the handle for the plinth facia (11)
forward and push outward until it engages
B.
A.
Fit the rubber bands (12) over the
spacer pieces and into the plinth
facia.
Flap up the plinth facia.
62
Page 63
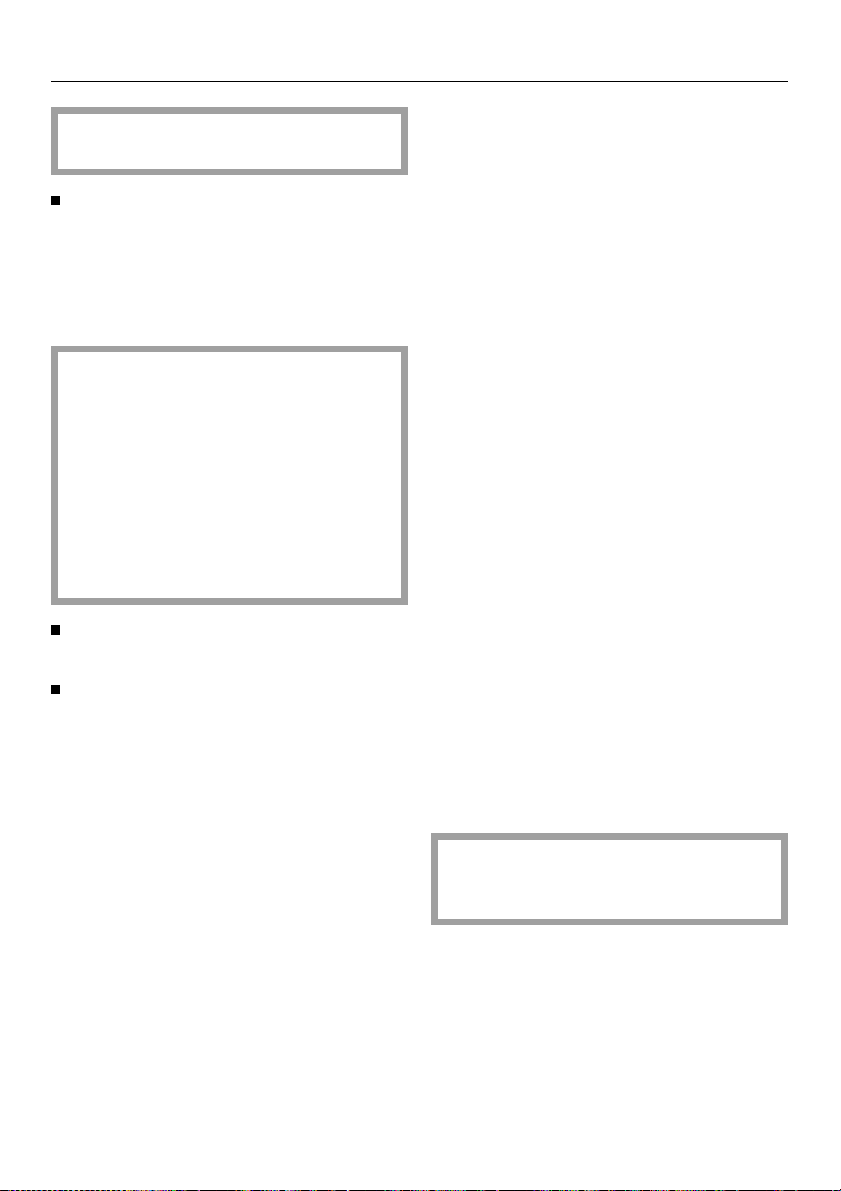
Electrical connection
Please follow the installation instructions carefully.
This dishwasher is supplied ready
for connection to an a.c. single
phase supply, (230 - 240 V 50 Hz for
the UK and Australia). It is supplied
with a mains cable and moulded
plug.
All electrical work should be carried
out by a competent person in accordance with national and local
regulations. Connection should be
made via a fused plug and suitable
switched socket which is easily accessible.
For extra safety it is advisable to install a residual current device (RCD)
with a trip current of 30 mA.
The voltage, rated load and fuse
rating are given on the data plate.
Please ensure that these match the
household mains supply.
Electrical connection
Important
The wires in the mains lead are coloured in accordance with the following
code:
Green/yellow = earth
Blue = neutral
Brown = live
As the colours of the wires in the mains
lead of this appliance may not correspond with the coloured markings identifying the terminals in your plug, proceed as follows:
The wire which is coloured green and
yellow must be connected to the terminal in the plug which is marked with the
letter E or by the earth symbol
coloured green or green and yellow.
The wire which is coloured blue must
be connected to the terminal which is
marked with the letter N or coloured
black.
The wire which is coloured brown must
be connected to the terminal which is
marked with the letter L or coloured red
(UK), or marked with the letter A for
(AUSTRALIA).
z or
WARNING
THIS APPLIANCE MUST
BE EARTHED
63
Page 64

Electrical connection
Non rewireable pl ugs BS 136 3
If this machine or appliance is fitted
with a non-rewireable plug, the following information applies:
If the socket outlets are not suitable for
the plug supplied with this product, it
must be cut off and an appropriate
plug fitted.
The plug cut from the flexible cord
should be disposed of and on no account be inserted into a socket elsewhere in the house (electric shock hazard).
The fuse cover must be refitted when
changing the fuse, and if the fuse
cover is lost, the plug must not be used
until a suitable replacement is obtained. The colour of the correct replacement cover is that of the coloured
insert in the base of the plug, or the colour that is embossed in words in the
base of the plug (as applicable to the
design of plug fitted).
The correct fuse rating of the replacement fuses that are ASTA approved to
BS 1362 should be fitted. Replacement fuse covers may be purchased
from your local electrical suppliers, or
Miele Service Agent.
(The German standard version is supplied with a cable and moulded plug
for connection to a 230 V single phase
supply. It must only be connected via
a fused 16 A socket).
64
Page 65
Plumbing
Normally connection to water is sited
near the dishwasher, for example in the
area under the sink. A Miele sink base
unit already has a suitable cut-out for installation. If the base unit and plinth
have no cut-out, one must be made,
suggested dimensions: 60 x 110 mm.
The same applies to the wall unit in
which this dishwasher is to be installed.
Plumbing
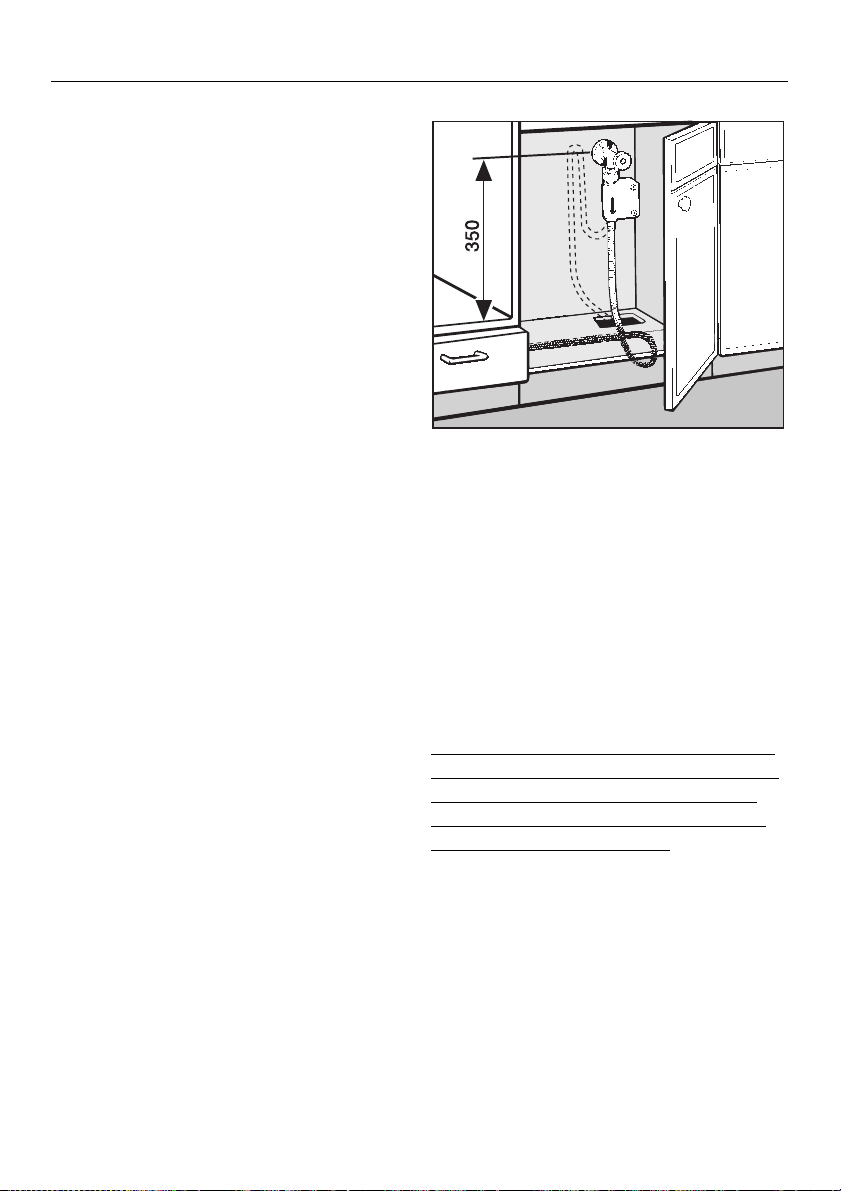
Important:
For the leak protection feature of the
“Waterproof system” to work, the water
connection must be sited at least
350 mm higher than the base board on
which this dishwasher is installed.
If this is not possible, the inlet hose can
be laid in a bend or loop. The highest
point of this bend or loop must be at
least 350 mm above the base board.
When the inlet hose is laid in a bend or
loop, however, the “Waterproof system”
will not provide protection from water
damage, should any leakage occur in
the “waterproof valve” box.
Site conditions may vary. Please consult the Miele Customer and Technical
Services department for further advice.
65
Page 66
Plumbing
Connection to the water inlet
Water in the dishwasher must not
be used as drinking water.
The dishwasher may be connected
to a cold or hot water supply, max.
60 °C.
Connection to a hot water supply
would save energy costs and time.
When connected to a hot water supply all programme stages which
would otherwise be carried out with
cold water (pre-wash and interim
rinse) as well as the COLD PREWASH will be carried out with hot
water.
The inlet hose is approx. 4.5 m long.
A stopcock with a 3/4" male thread
must be provided on site.
The dishwasher is constructed to
comply with DVGW regulations, and
may be connected to a suitable supply without an extra non-return valve
provided that national regulations
allow this.
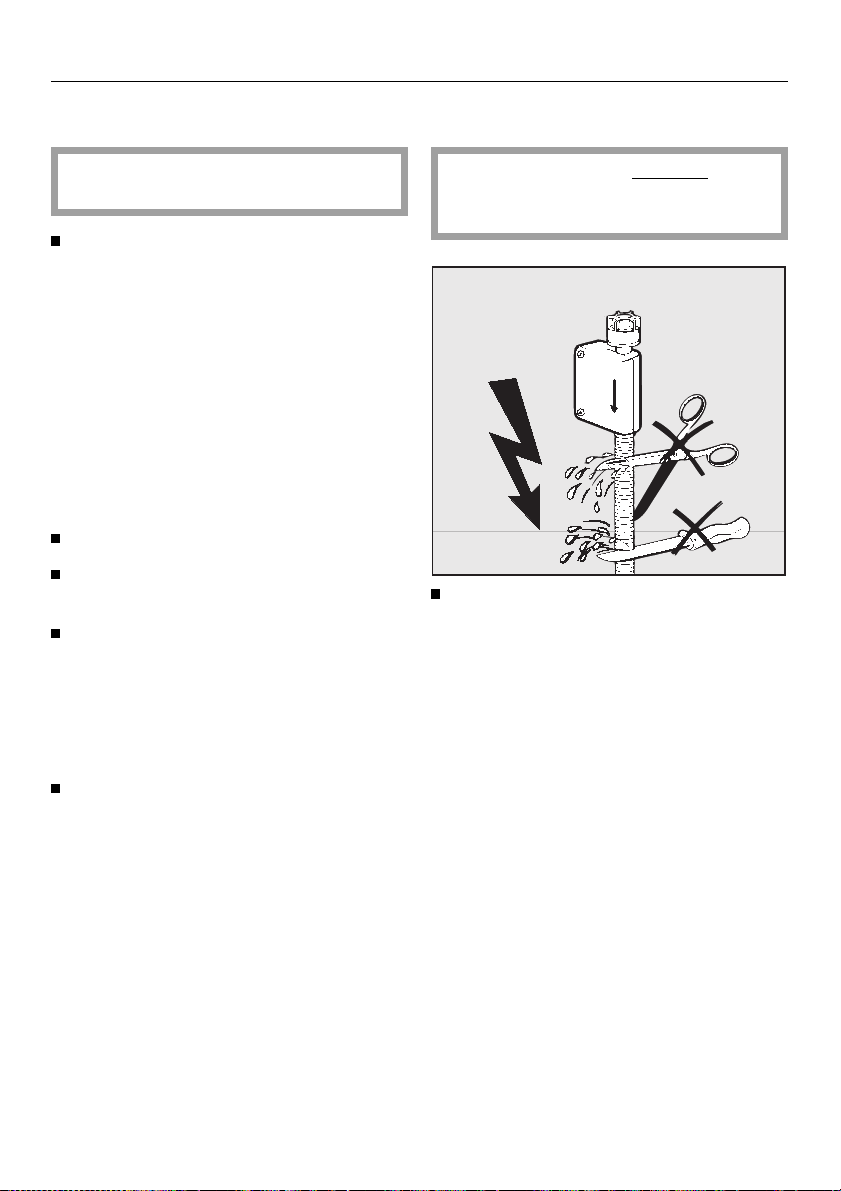
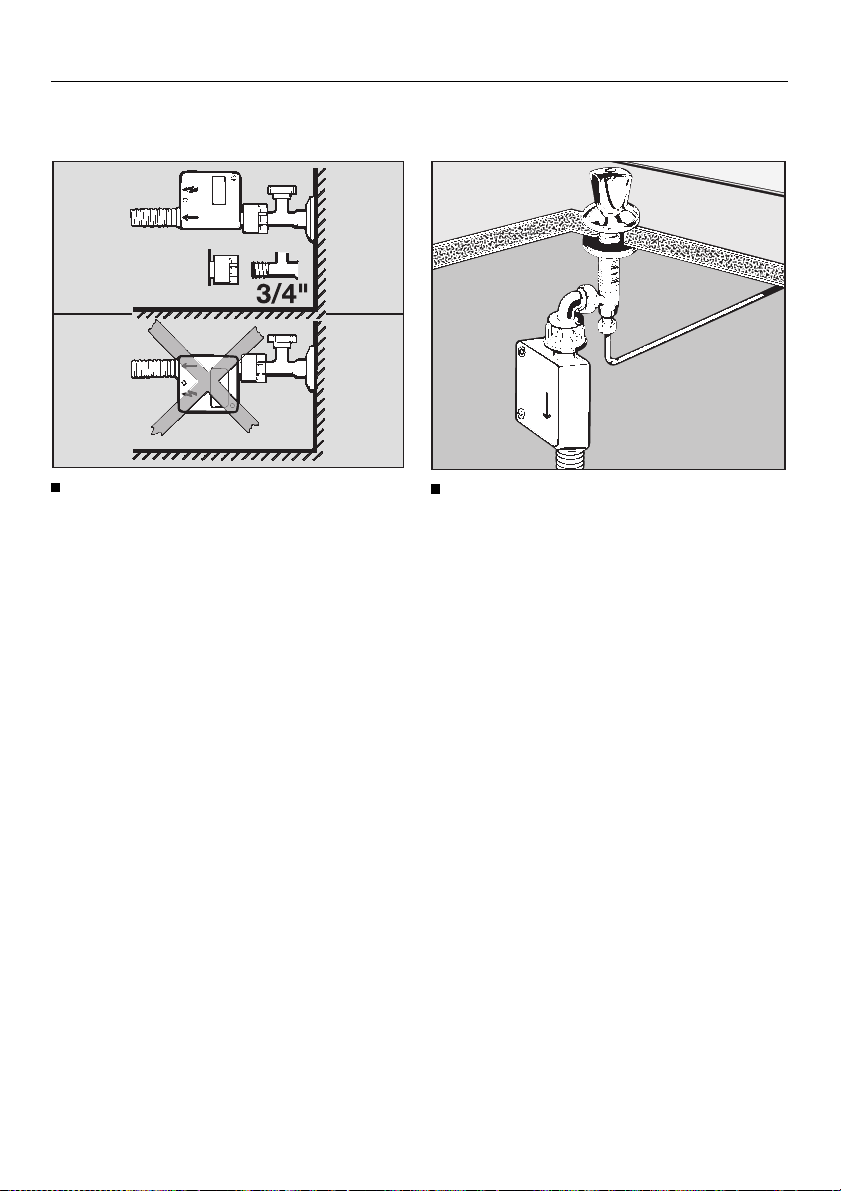
The water inlet hose must not be
shortened or damaged in any way
(see illustration).
Connect the inlet hose with the
“Waterproof-System” preferably vertically so that the hose exits from the
bottom of the “waterproof valve” box
(use an angle connector if necessary).
The water pressure (flow rate at the
take-off point) must be between 1.0
and 10 bar pressure.
If the water pressure is too low the
water intake time must be increased
(see chapter “Checking the water
level”).
If the water pressure is too high, a
pressure reducer valve must be fitted.
66
Page 67
Plumbing
If this is not possible, it can be installed horizontally, but it is essen-
tial that the main body of the “Waterproof valve” box is above the hose
exit (see illustration). The “lightning”
power symbol should be above the
water flow “arrow”.
If the stopcock is situated in the
worktop, a special angle connector
can be ordered from the Miele Spare
Patrs Dept. (Part No. 2078910).
67
Page 68
Plumbing
Drainage
The machine drainage system is
fitted with a non-return valve, which
prevents dirty water from flowing
back into the machine via the drain
hose.
The dishwasher is supplied with approx. 1.5 m of flexible drain hose
with an internal diameter of 22 mm.
The drain hose can be extended
using a connection piece and an
extra drain hose, (up to max. 4
metres).
The connection socket on the dishwasher can be turned. The hose can
thus be laid to the right or left without
needing to loosen the hose clip.
Use the two hose clips supplied to fit
the drain hose to the dishwasher and
to the on-site drainage system.
The on-site water pipe connection
for the drain hose may be designed
to fit more than one diameter of
hose. The connection socket must
be shortened if it juts too far into the
drain hose. Otherwise the drain hose
can become blocked.
Venting the drainage system
Open the dishwasher door fully.
If the site drain connection is situated
lower than the guide path for the bottom basket rollers in the open door the
drainage system must be vented.
Otherwise a siphoning effect during a
programme can cause the machine to
empty itself of water.
To vent:
Cut off the top of the vent valve in
the wash cabinet.
The drain system must not exceed
4 metres. The drain pump has a
maximum delivery head of 1 metre.
The drain hose must not be shortened.
68
Page 69

Technical Data
Technical Data
Height 84.5 cm (adjustable + 5.0 cm)
Width 54.7 cm
Depth ‘ 57 cm
Depth with door open 120.5 cm
Height of recess for building-in 87.6 - 89.5 cm
Width of recess for building-in 56.2 - 56.8 cm
Weight approx. 53 kg
Voltage
Rated load see data plate
}
Fuse rating
Test marks VDE, Radio and Television suppressed
Water pressure (flow rate) 1.0 - 10 bar pressure
Hot water connection max. 60 °C
Delivery head max. 1 m
Drainage length max. 4 m
Connection cable approx. 2.65 m
Capacity 12 place settings
697071
Page 70

Page 71

Page 72
Alteration rights reserved (G307) /000 4397
This paper consists of cellulose which has been bleached without the use of chlorine.
 Loading...