

Page 1
Installation Instructions
EGW 2060 en-CA
Installation, repair and maintenance work should be performed by
a Miele authorized service technician in accordance with national
and local safety regulations and the provided installation instructions.
Page 2

Installation
Installation Safety Instructions
Before installation make sure that
the voltage and frequency listed on
the data plate correspond with the
household electrical supply. This data
must correspond in order to avoid risk
of damage to the appliance. If in doubt,
consult a qualified technician.
The electrical outlet should be
easily accessible after the unit is
installed.
Only install the plate warmer in
combination with other built-in
appliances recommended by the
manufacturer. If installed with
appliances not recommended, the
warranty is void since the manufacturer
cannot guarantee its safety.
To install the plate warmer in
combination with another
appliance, a built-in shelf must exist in
the cabinet to support the weight of
both appliances.
When installed in combination with
another appliance, the plate
warmer must always be installed
beneath the other appliance. The
combination appliance can be set
without a base directly onto the plate
warmer. A shelf between the
appliances is not necessary.
To install the combination
appliance please read the manual
supplied with that machine.
This appliance is not designed for
maritime use or for use in mobile
installations such as recreational
vehicles or aircraft. However, under
certain conditions it may be possible for
an installation in these applications.
Please contact the Miele Technical
Service Department with specific
requirements.
15
Page 3
Installation
Combination possibilities
Coffee system
Miele appliances can be installed flush or proud. Discuss your installation
requirements with you architect, designer and installer.
16
Page 4

Steam oven
Installation
17
Page 5

Installation
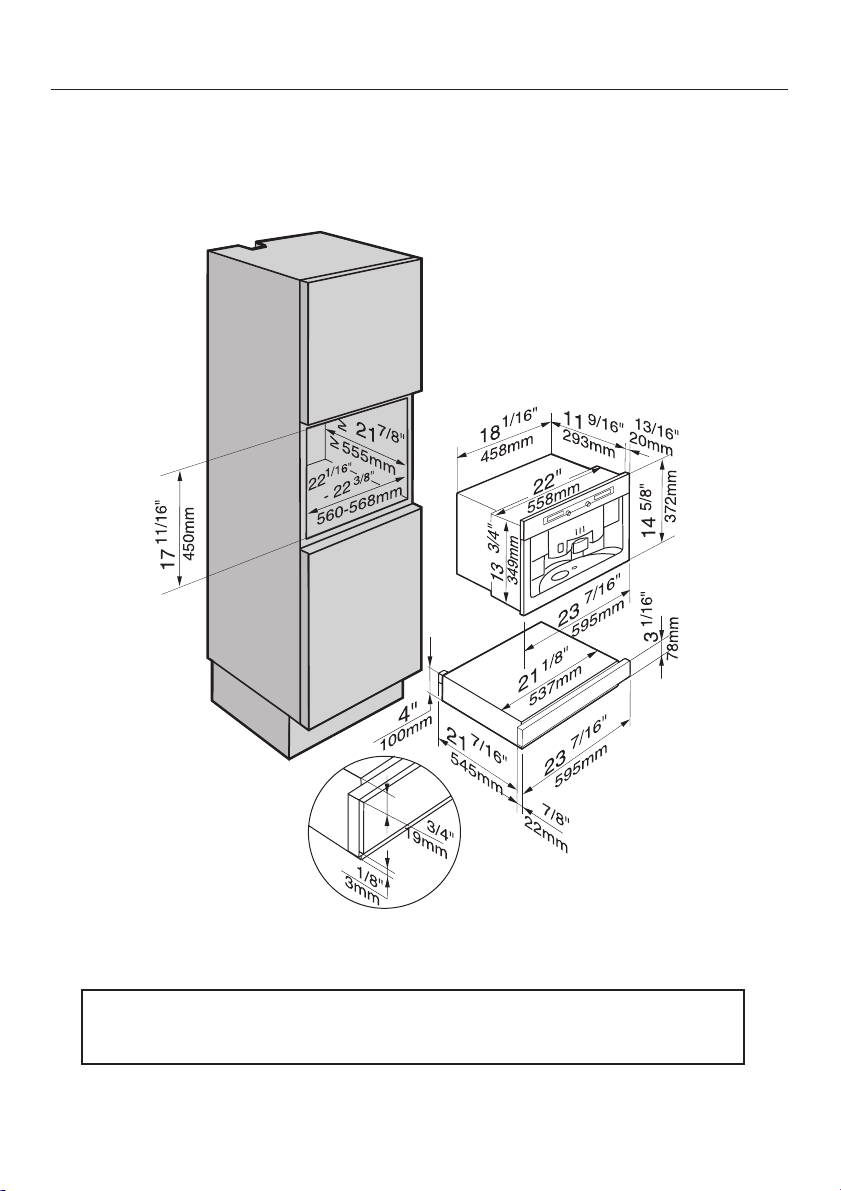
Installing the appliance
^ Set the plate warmer into the niche,
push is all the way in and align it at a
right angle.
^ Open the drawer and fix the
appliance with the two supplied
screws at the side panels of the
cabinet.
^ Install the combination appliance
regarding the manual supplied with
that machine.
Aligning the appliance front
After installing the combination
appliance it may be necessary to align
the appliance front and/or even the gap
between the plate warmer and the
combination machine.
Flat washers are supplied beneath the
knurled nuts, which fix the drawer to the
telescopic runners.
^ Loosen the knurled nuts and take the
drawer out.
^ Align and even the gap with the flat
washers by changing their position
(above or below the drawer), on both
sides.
18
Page 6

Electrical connection
The electrical installation instructions
for any appliance installed in
combination with the plate warmer
must be observed.
Installation
Note to the installer
Please leave these instructions with
the consumer.
Power supply
When another appliance is installed
in combination with the plate warmer
to the same circuit breaker,
operating both appliances at the
same time may cause an overload. If
in doubt consult a qualified
electrician.
All electrical work should be done
by a qualified technician, in strict
accordance with national and local
safety regulations.
Installation, repairs and other work
by unqualified persons could be
dangerous and may void the
warranty.
Make sure power is not supplied to
the appliance while installation or
repair work is being performed.
WARNING:
THIS APPLIANCE MUST BE
GROUNDED
This appliance is equipped with an
approx. 6 ft (approx. 1.8 m) long power
cord with plug ready for connection to a
120 V, 15 A, 60 Hz power supply.
19
Page 7

All rights reserved/1605
M.-Nr. 06 405 620 / 01
en-US
 Loading...