

Miele 10 102 470 User Manual
Operating and installation instructions
Ovens and cookers
To prevent the risk of accidents or damage to the appliance, it is
essential to read these instructions before it is installed and used for the
first time.
M.-Nr. 10 102 470en-GB

Contents
Warning and Safety instructions .....................................5
Caring for the environment.........................................17
Guide to the cooker ...............................................18
Oven overview ...................................................19
Oven controls....................................................20
Function selector ..................................................20
Oven functions .................................................20
Clock/timer.......................................................21
Display .......................................................21
Buttons .......................................................21
Temperature selector ..............................................21
Temperature indicator light 6 ......................................21
Features ........................................................22
Model numbers ...................................................22
Data plate .......................................................22
Items supplied ....................................................22
Accessories supplied and available to order ............................22
Side runners ...................................................23
Baking tray, universal tray and rack with non-tip notches ................23
FlexiClip telescopic runners HFC50 .................................24
Fitting the FlexiClip runners .......................................26
Removing the FlexiClip runners ....................................27
Oven controls.....................................................30
Safety features ....................................................30
System lock 0 for the oven........................................30
Cooling fan ....................................................30
Vented oven door ...............................................30
PerfectClean treated surfaces ........................................31
Catalytic enamelled surfaces ........................................31
Hob controls .....................................................31
Using for the first time.............................................32
Before using for the first time.........................................32
Setting the time of day for the first time .................................32
Heating up the oven for the first time...................................33
Overview of functions .............................................34
Tips on saving energy .............................................36
2

Contents
Operation .......................................................38
Using the oven....................................................38
Cooling fan.......................................................38
Pre-heating ......................................................39
Clock/timer ......................................................40
Display ..........................................................40
Symbols in the display ...........................................40
Buttons..........................................................40
How to set the time or a duration......................................41
Displaying times/durations ........................................41
When the time/duration has elapsed ................................41
Using the minute minder N ..........................................42
To set the minute minder .........................................42
To change the time set for the minute minder .........................43
To cancel the time set for the minute minder ..........................43
Switching on and off automatically ....................................44
Setting a cooking duration ........................................44
At the end of the cooking duration ..................................45
Setting a cooking duration and finish time ............................46
Altering the cooking duration ......................................47
Deleting a cooking duration .......................................48
Deleting a finish time ............................................48
Altering the time of day .............................................49
Altering settings ...................................................50
Baking ..........................................................52
Notes on the baking chart ...........................................53
Baking chart......................................................54
Roasting ........................................................58
Notes on the roasting chart ..........................................58
Roasting chart ....................................................60
Low temperature cooking ..........................................62
Grilling .........................................................64
Notes on the grilling chart ...........................................65
Grilling chart .....................................................67
Defrosting .......................................................68
Drying food......................................................69
3

Contents
Frozen food/Ready meals ..........................................70
Gentle bake......................................................71
Cleaning and care ................................................72
Unsuitable cleaning agents ..........................................72
Useful tips .......................................................73
Normal soiling ....................................................73
Cleaning the seal ...............................................73
Stubborn soiling (does not apply to the FlexiClip runners) ..................74
Stubborn soiling on the FlexiClip runners ...............................75
Cleaning the catalytic enamelled back panel ............................75
Removing spice, sugar and similar deposits ..........................75
Removing oil and grease splashes .................................76
Removing the door ................................................77
Dismantling the door.............................................78
Refitting the door ..................................................81
Removing the side runners with FlexiClip runners ........................82
Removing the back panel ...........................................83
Removing the roof liner .............................................84
Problem solving guide ............................................85
After Sales / Guarantee ............................................89
Electrical connection..............................................90
Building-in diagrams ..............................................92
Appliance and niche dimensions .....................................92
Built-in cooker ...................................................94
Installing the oven ................................................95
Note for test institutes.............................................96
Test food acc. to EN 60350 .......................................96
Energy efficiency class .............................................97
Product data sheets .............................................97
Addresses......................................................103
4

Warning and Safety instructions
These Warning and Safety instructions apply to Ovens and Cookers.
They are referred to as ovens in the general text throughout this
manual.
This appliance complies with statutory safety requirements.
Inappropriate use can, however, lead to personal injury and
damage to property.
To avoid the risk of accidents and damage to the appliance,
please read these instructions carefully before using it for the first
time. They contain important notes on installation, safety, use and
maintenance.
Miele cannot be held liable for non-compliance with these
instructions.
Keep these instructions in a safe place and ensure that new users
are familiar with the contents. Pass them on to any future owner.
5

Warning and Safety instructions
Correct application
This oven is intended for use in domestic households and similar
~
working and residential environments.
The oven is not intended for outdoor use.
~
It is intended for domestic use only to cook food, and in particular
~
to bake, roast, grill, cook, defrost and dry food. Any other use is not
supported by the manufacturer and could be dangerous.
People with reduced physical, sensory or mental capabilities, or
~
lack of experience or knowledge who are not able to use the
appliance safely on their own must be supervised whilst using it.
They may only use it unsupervised if they have been shown how to
use it safely and recognise and understand the consequences of
incorrect operation.
6

Warning and Safety instructions
Safety with children
Children under 8 years of age must be kept away from the
~
appliance unless they are constantly supervised.
Children 8 years and older may only use the oven unsupervised if
~
they have been shown how to use it safely and recognise and
understand the consequences of incorrect operation.
Children must not be allowed to clean or maintain the appliance
~
unsupervised.
Please supervise children in the vicinity of the oven and do not let
~
them play with it.
Danger of suffocation. Packaging, e.g. plastic wrappings, must
~
be kept out of the reach of babies and children. Whilst playing,
children could become entangled in packaging or pull it over their
head and suffocate.
7

Warning and Safety instructions
Danger of burning.
~
Children's skin is far more sensitive to high temperatures than that of
adults. External parts of the oven such as the door glass, control
panel and the vents become quite hot during use. Do not let
children touch the oven whilst it is in use.
With cookers the cooking zones will also get hot. Place pots and
pans on the hob in such a way that children cannot reach them and
burn themselves.
Danger of injury.
~
The oven door can support a maximum weight of 15 kg. Do not let
children sit on the door, lean against it or swing on it.
8

Warning and Safety instructions
Technical safety
Unauthorised installation, maintenance and repairs can cause
~
considerable danger for the user. Installation, maintenance and
repairs must only be carried out by a Miele authorised technician.
Never use a damaged oven. It could be dangerous. Check it for
~
visible signs of damage before using it.
Reliable and safe operation of this oven can only be assured if it
~
has been connected to the mains electricity supply.
The electrical safety of this appliance can only be guaranteed
~
when correctly earthed. It is essential that this standard safety
requirement is met. If in any doubt please have the electrical
installation tested by a qualified electrician.
To avoid the risk of damage to the oven, make sure that the
~
connection data on the data plate (voltage and frequency) match
the mains electricity supply before connecting the oven to the
mains. Consult a qualified electrician if in doubt.
Do not connect the appliance to the mains electricity supply by a
~
multi-socket unit or an extension lead. These do not guarantee the
required safety of the appliance (fire hazard).
For safety reasons, this appliance may only be used after it has
~
been built in.
The oven must not be used in a non-stationary location (e.g. on a
~
ship).
9

Warning and Safety instructions
Tampering with electrical connections or components and
~
mechanical parts is highly dangerous to the user and can cause
operational faults.
Never open the casing of the appliance.
While the appliance is under guarantee, repairs should only be
~
undertaken by a Miele authorised service technician. Otherwise the
guarantee is invalidated.
Miele can only guarantee the safety of the appliance when
~
genuine original Miele replacement parts are used. Faulty
components must only be replaced by Miele spare parts.
If the connection cable is damaged or if the oven is supplied
~
without a cable, it must be replaced or fitted with a special
connection cable by a Miele authorised technician (see "Electrical
connection").
During installation, maintenance and repair work, the appliance
~
must be disconnected from the mains electricity supply, e.g. if the
oven lighting is faulty (see "Problem solving guide" and "Electrical
connection").
10

Warning and Safety instructions
In order to function correctly, the oven requires an adequate
~
supply of cool air. Ensure that the supply of cool air is not impaired
(e.g. by heat insulation strips in the housing unit). Please also ensure
that the cool air supply is not unduly heated by other heat sources
such as a solid fuel stove.
If the oven is installed behind a furniture panel (e.g. a door),
~
ensure that the door is never closed whilst the oven is in use. Heat
and moisture can build up behind a closed furniture panel and
cause subsequent damage to the oven, the housing unit and the
floor. Do not close the door until the oven has cooled down
completely.
11

Warning and Safety instructions
Correct use
Danger of burning.
,
The oven becomes hot when in use.
You could burn yourself on the heating elements, oven interior,
cooked food or oven accessories.
Wear oven gloves when placing food in the oven, turning or
removing it and when adjusting oven shelves etc. in a hot oven.
Due to the high temperatures radiated, objects left near the oven
~
when it is in use could catch fire.
Do not use the oven to heat up the room.
Do not store items on the hob. Items could melt or catch fire from
~
residual heat or if the appliance is turned on inadvertently.
With cookers never use the hob as a resting place for other objects.
Oil and fat can ignite if overheated. Never leave the oven
~
unattended when cooking with oil and fat.
If it does ignite do not put the flames out with water. Switch the oven
off immediately and switch the hob off on cookers.
Then suffocate the flames in the oven by keeping the oven door
closed.
With cookers suffocate the flames on the hob using a suitable lid or
a fire blanket.
Grilling food for an excessively long time can cause it to dry out
~
with the risk of catching fire.
Do not exceed recommended grilling times.
12

Warning and Safety instructions
Some types of food dry out quickly and can self-ignite if high grill
~
temperatures are used. Never use the grill to finish baking
part-cooked rolls or bread or to dry flowers or herbs. Use Fan
plus U or Conventional heat V for this type of procedure.
If using alcohol in your recipes, please be aware that high
~
temperatures can cause the alcohol to vaporise. The vapour can
catch fire on hot heating elements.
When using residual heat to keep food in the oven warm, the high
~
moisture content and amount of condensation in the oven can cause
corrosion damage. The control panel, the worktop or the housing
unit can also suffer damage.
When using residual heat do not switch the oven off. Instead set the
temperature to the lowest setting and leave the oven on the selected
function. The fan will then remain on automatically and dissipate the
moisture.
Cover any food which is left in the oven to be kept hot, as
~
moisture in the food could lead to corrosion damage in the oven.
This also prevents the food from drying out.
A build-up of heat can cause the enamel on the floor of the oven
~
to crack or shatter.
Do not line the floor of the oven with anything, e.g. aluminium foil. Do
not place roasting pans, pots or baking trays directly on the oven
floor.
The enamelling on the oven floor can become damaged by items
~
being pushed around on it. If using the oven to store pots and pans,
ensure that you avoid pushing them around on the oven floor.
13

Warning and Safety instructions
If cold liquid is poured onto a hot surface steam will occur, which
~
can cause scalding. The sudden change in temperature can also
damage enamel surfaces.
Do not pour cold liquid directly onto hot enamelled surfaces.
It is important that the temperature in the food being cooked is
~
evenly distributed and sufficiently high. Stir and / or turn it to ensure
even heat distribution.
Plastic containers which are not suitable for use in an oven can
~
melt at high temperatures and can even damage the oven or catch
fire.
Only use plastic containers which are declared by the manufacturer
as being suitable for use in an oven. Follow the manufacturer's
instructions on use.
Do not heat up food in closed containers e.g. tins or sealed jars in
~
the oven, as pressure can build up in the container, causing it to
explode.
You could injure yourself on the open oven door or trip over it.
~
Avoid leaving the door open unnecessarily.
The door can support a maximum weight of 15 kg.
~
Do not sit on or lean against an open door, and do not place heavy
objects on it. Also make sure that nothing can get trapped between
the door and the oven cavity. The oven could get damaged.
14

Warning and Safety instructions
Cleaning and care
Do not use a steam cleaning appliance to clean this appliance.
~
The steam could reach electrical components and cause a short
circuit.
Scratches on the door glass can result in the glass breaking. Do
~
not use abrasive cleaners, hard sponges, brushes or sharp metal
tools to clean the door glass.
The side runners can be removed for cleaning purposes (see
~
"Cleaning and care"). Ensure that they are replaced correctly and do
not use the oven without them fitted.
The catalytic enamelled back panel can be removed for cleaning
~
purposes (see "Cleaning and care").
Ensure that the back panel is replaced correctly and do not use the
oven without it fitted.
15

Warning and Safety instructions
Accessories
Miele cookers with integrated hob controls may only be combined
~
with hobs specified by Miele as suitable for use with that appliance
(see "Electrical connection").
Only use genuine original Miele accessories and spare parts with
~
this appliance. Using accessories or spare parts from other
manufacturers will invalidate the guarantee, and Miele cannot
accept liability.
16
Caring for the environment
Disposal of the packing
material
The packaging is designed to protect
the appliance from damage during
transportation. The packaging materials
used are selected from materials which
are environmentally friendly for disposal
and should be recycled.
Recycling the packaging reduces the
use of raw materials in the
manufacturing process and also
reduces the amount of waste in landfill
sites.
Disposing of your old
appliance
Electrical and electronic appliances
often contain valuable materials. They
also contain materials which, if handled
or disposed of incorrectly, could be
potentially hazardous to human health
and to the environment. They are,
however, essential for the correct
functioning of your appliance. Please
do not therefore dispose of it with your
household waste.
Please dispose of it at your local
community waste collection / recycling
centre or contact your Dealer for
advice.
Ensure that it presents no danger to
children while being stored for
disposal.
17
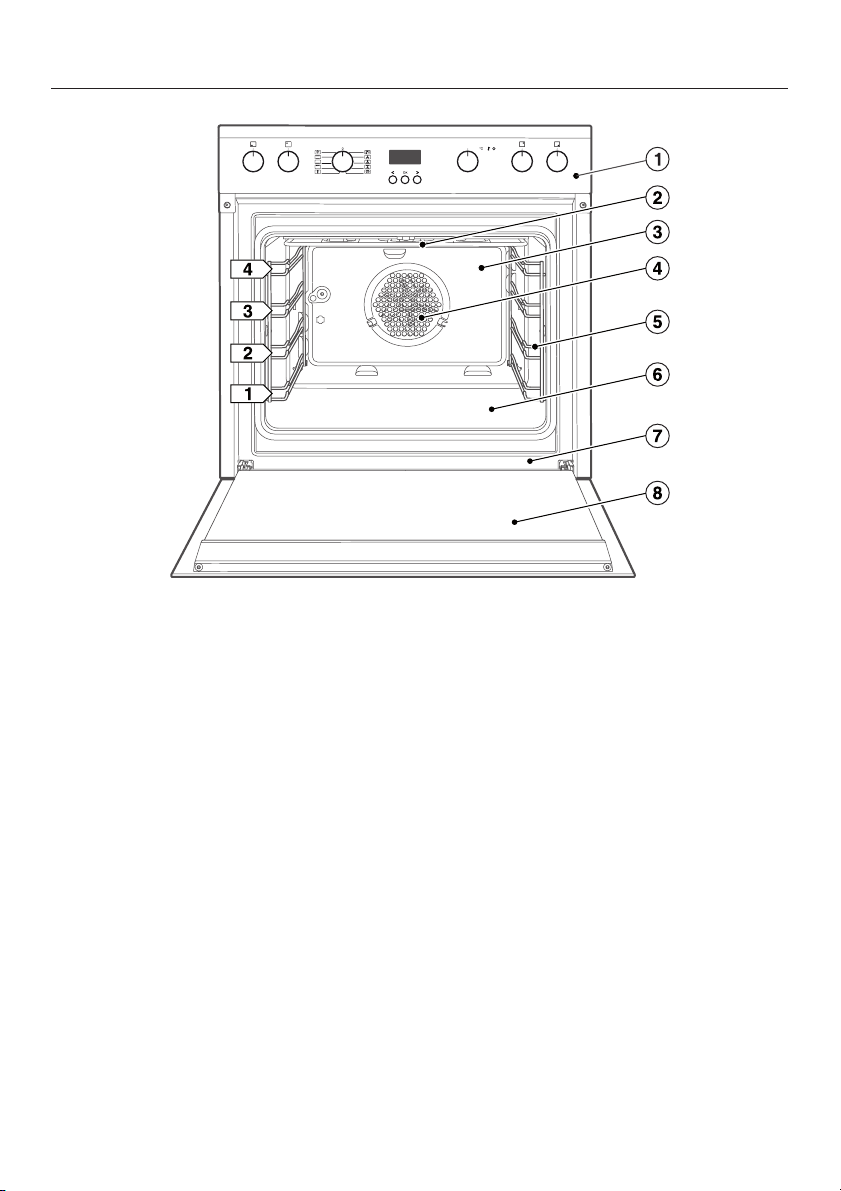
Guide to the cooker
a Oven controls*, cooking zone dials
b Top heat/grill element
c Catalytic enamelled back panel
d Air inlet for the fan with ring heating element behind it
e Side runners with 4 shelf levels
f Oven floor with bottom heat element underneath it
g Front frame with data plate
h Door
* features will vary depending on model
18

a Oven controls*
Oven overview
b Top heat/grill element
c Catalytic enamelled back panel
d Air inlet for the fan with ring heating element behind it
e Side runners with 4 shelf levels
g Oven floor with bottom heat element underneath it
g Front frame with data plate
h Door
* depending on model
19
Oven controls
a Function selector
b Clock/timer
c Temperature selector
d Temperature indicator light
Function selector
Use the function selector to select the
required function and switch on the
oven lighting independently.
It can be turned clockwise or
anti-clockwise.
In the 0 position it can be retracted by
pressing it in.
20
Oven functions
T Lighting
V Conventional heat
X Bottom heat
Y Grill
P Defrost
S Rapid heat-up
U Fan plus
O Intensive bake
\ Fan grill
K Gentle bake

Oven controls
Clock/timer
(features will vary depending on model)
The clock/timer is operated via the
display and the V,OKandW buttons.
Display
The display shows the time of day or
your settings.
It goes dark if settings are not being
entered.
Please refer to "Clock/Timer" for more
information.
Buttons
These ovens have push buttons.
Temperature selector
Use the temperature selector to select
the temperature for the cooking
processes.
It can be turned clockwise until a
resistance is felt and then back again.
The temperature selector can be
retracted when it is in the ß position by
pressing it in.
The temperature settings are marked
on the temperature selector and on the
control panel with ovens.
Temperature indicator light 6
The temperature indicator light 6 lights
up whenever the oven heating is
switched on.
As soon as the set temperature is
reached,
– the oven heating switches off
– and the temperature indicator light
goes out.
The temperature control unit ensures
that the oven heating and the
temperature indicator light switch back
on if the temperature in the oven
temperature falls bellow the level set.
21
Features
Model numbers
A list of the ovens described in these
operating instructions can be found on
the back page.
H2x6xE Cooker = Oven +
integrated hob controls
H2x6xB Oven
The descriptions of the oven
functions apply to ovens and also
cookers with integrated hob controls.
However, both types of appliance are
generally referred to as "oven"
throughout.
Data plate
The data plate is located on the front
frame, visible when the door is open.
The data plate states the model number
of your oven, the serial number as well
as connection data (voltage, frequency
and maximum connected load).
Please have this information to hand,
should you need to contact Miele
regarding any questions or problems.
Items supplied
The oven is supplied with:
the operating and installation
–
instructions for using the oven,
screws for securing your cooker or
–
oven in the housing unit,
various accessories.
–
With H2x6xE an additional operating
and installation instruction booklet is
supplied for the hob.
Accessories supplied and
available to order
Accessories will vary depending on
model.
Your oven will be supplied with side
runners, a universal tray and a rack.
Depending on model, your oven may
also come supplied with some or
several of the accessories listed
here.
All the accessories listed as well as the
cleaning and care products are
designed for Miele appliances.
22
These can be ordered via the internet
at www.miele-shop.com, from Miele
(see back cover for contact details) or
from your Miele dealer.
When ordering, please quote the model
number of your oven and the reference
number of the accessories required.
Features
Side runners
Side runners for trays, racks and
accessory dishes are fitted on either
side of the oven cavity for shelf levels
µ.
Each level consists of two rails, one
above the other.
The accessories (e.g. the rack) are
–
pushed into the oven between the
rails,
FlexiClip telescopic runners
–
(depending on model) are fitted on
the top rail.
If necessary, the side runners can be
removed for cleaning (see "Cleaning
and care").
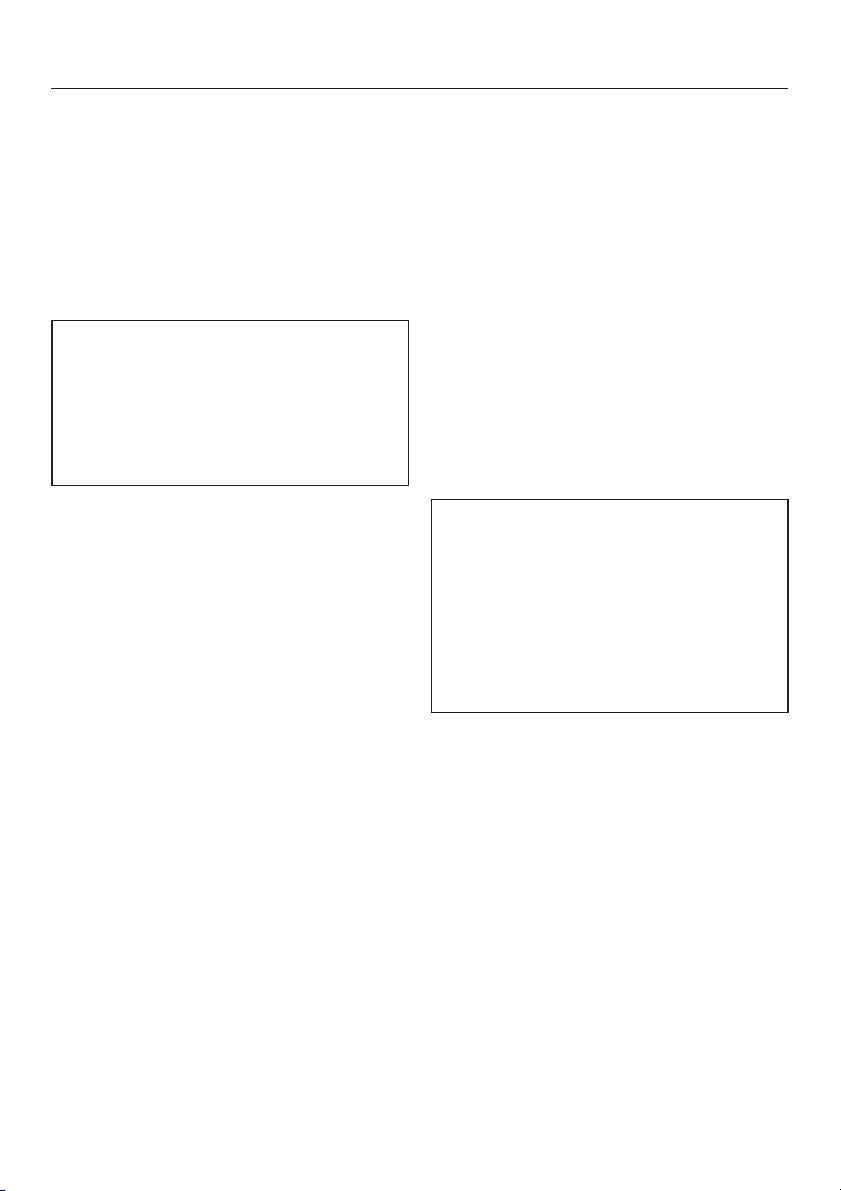
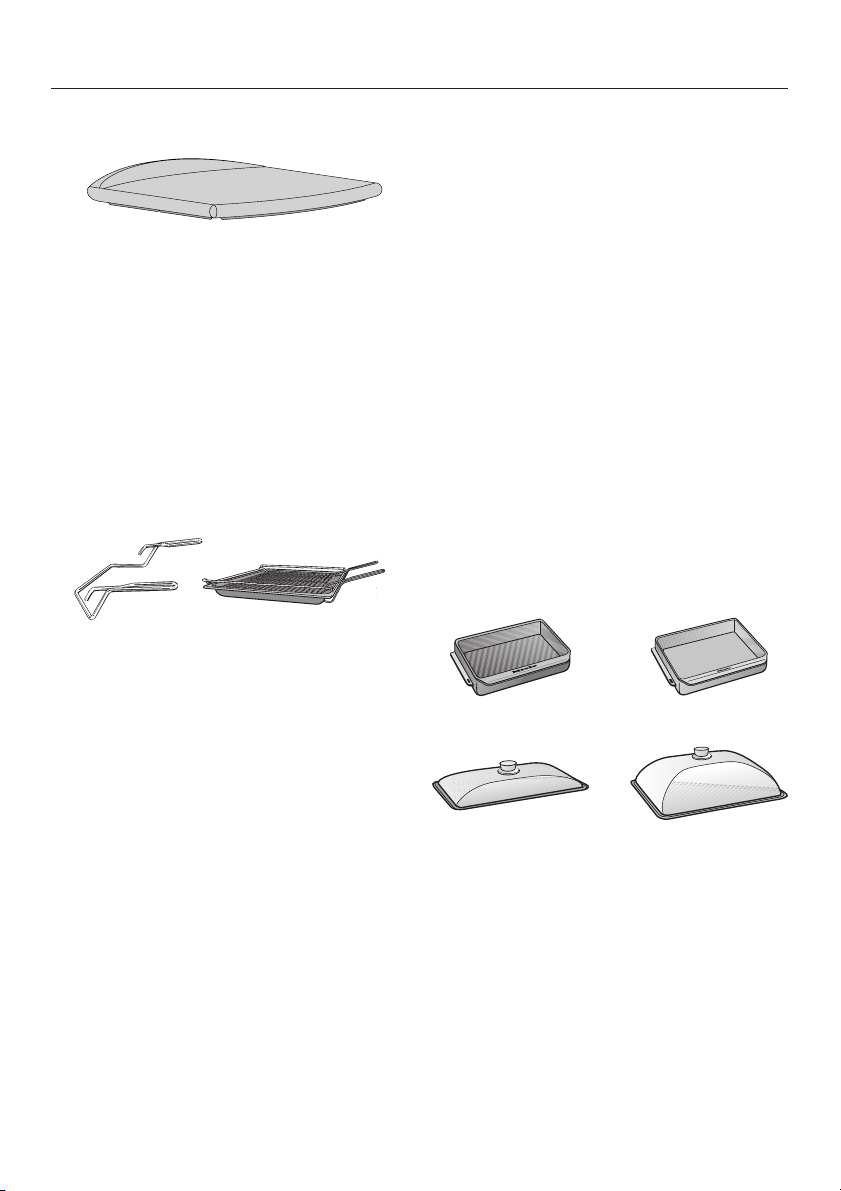
Baking tray, universal tray and rack
with non-tip notches
Baking tray HBB51:
Universal tray HUBB51:
Rack HBBR50:
These accessories are inserted into the
oven between the two rails of a side
runner.
Always position the rack as illustrated
above.
The accessories have non-tip safety
notches half way along the short edges
which prevent them from being pulled
right out when they only need to be
pulled partially out.
If you are using the universal tray with
the rack on top, insert the tray between
the rails of the side runners and the
rack will automatically slide in above
them.
The enamelled surfaces have been
treated with PerfectClean.
23
Features
FlexiClip telescopic runners HFC50
(optional accessory)
The FlexiClip telescopic runners can be
used on the three lower shelf levels.
Each shelf level can be drawn right out
of the oven individually to give a good
overview of cooking in progress.
Push the FlexiClip telescopic
runners right into the oven
compartment before placing
accessories on them.
To prevent the risk of accessories
sliding off the telescopic runners:
– make sure that they are sitting
securely on their runners in between
the stoppers at either end of each
runner,
– always place the rack with the
loading surface in the lower position
on the FlexiClip telescopic runners.
The FlexiClip runners can support a
maximum load of 15 kg.
24
Because the FlexiClip runners sit on
the top rail of the side runners the
gap between the level the FlexiClip
runners are on and the one above is
smaller than if, for instance, racks
were fitted on each level. Cooking
results will be affected if the gap is
too small.
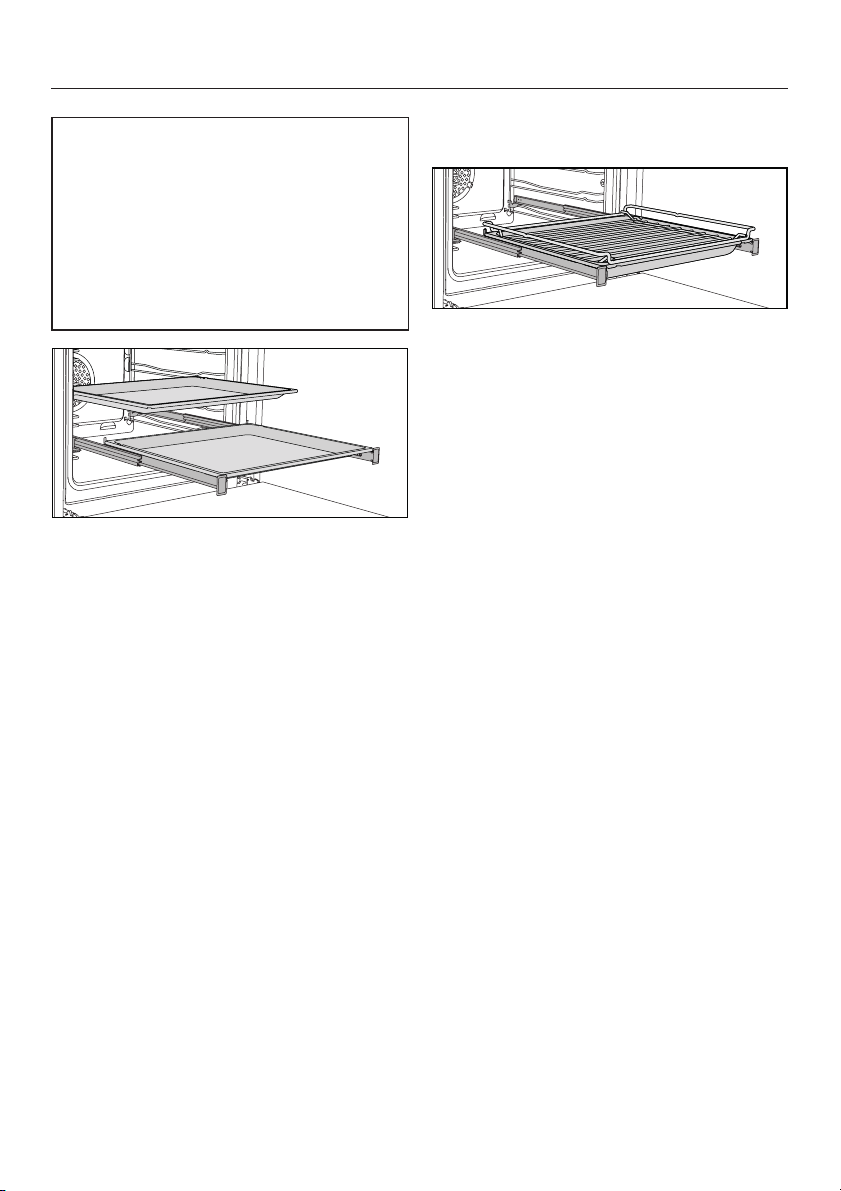
If you need to cook using more than
one baking tray, universal tray or rack:
^ Place the baking tray, universal tray
or rack on the FlexiClip runners.
Features
If you are using the universal tray with a
rack on top of it:
Slide the universal tray together with
^
the rack onto the FlexiClip runners.
The rack will automatically slide
between the rails of the shelf level
above the FlexiClip runners.
^ Leave at least one shelf level free
between it and any baking tray,
universal tray or rack above it.
^ Leave at least one shelf level free
between it and any baking tray,
universal tray or rack above it.
25
Features
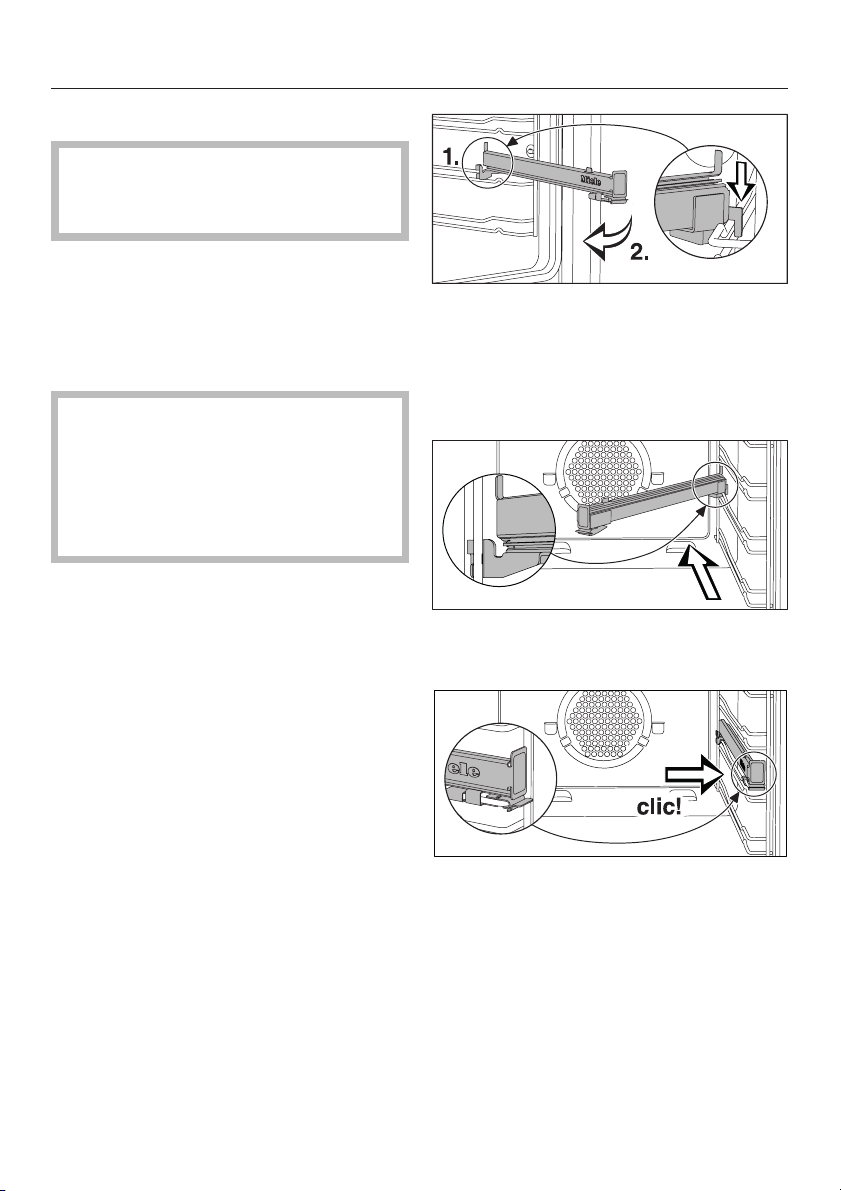
Fitting the FlexiClip runners
Danger of burning.
,
Make sure the oven heating
elements are switched off and cool.
Each level is made up of two rails.
The FlexiClip telescopic runners fit on
the top rail of these two rails.
The FlexiClip runner with the Miele logo
is fitted on the right.
Do not extend the FlexiClip runners
when fitting them or taking them out.
If the FlexiClip runners are difficult to
pull out after fitting, you may need to
pull firmly on them once to release
them.
Hook the FlexiClip runner onto the
^
front of the top rail of a side runner
(1.) and then hold it at an angle in
towards the middle of the oven
compartment (2.).
^ Slide the FlexiClip runner at an angle
along the top rail as far as it will go.
26
^
Then swing it back to the side of the
oven cavity and secure it to the top
rail with an audible click.
Features
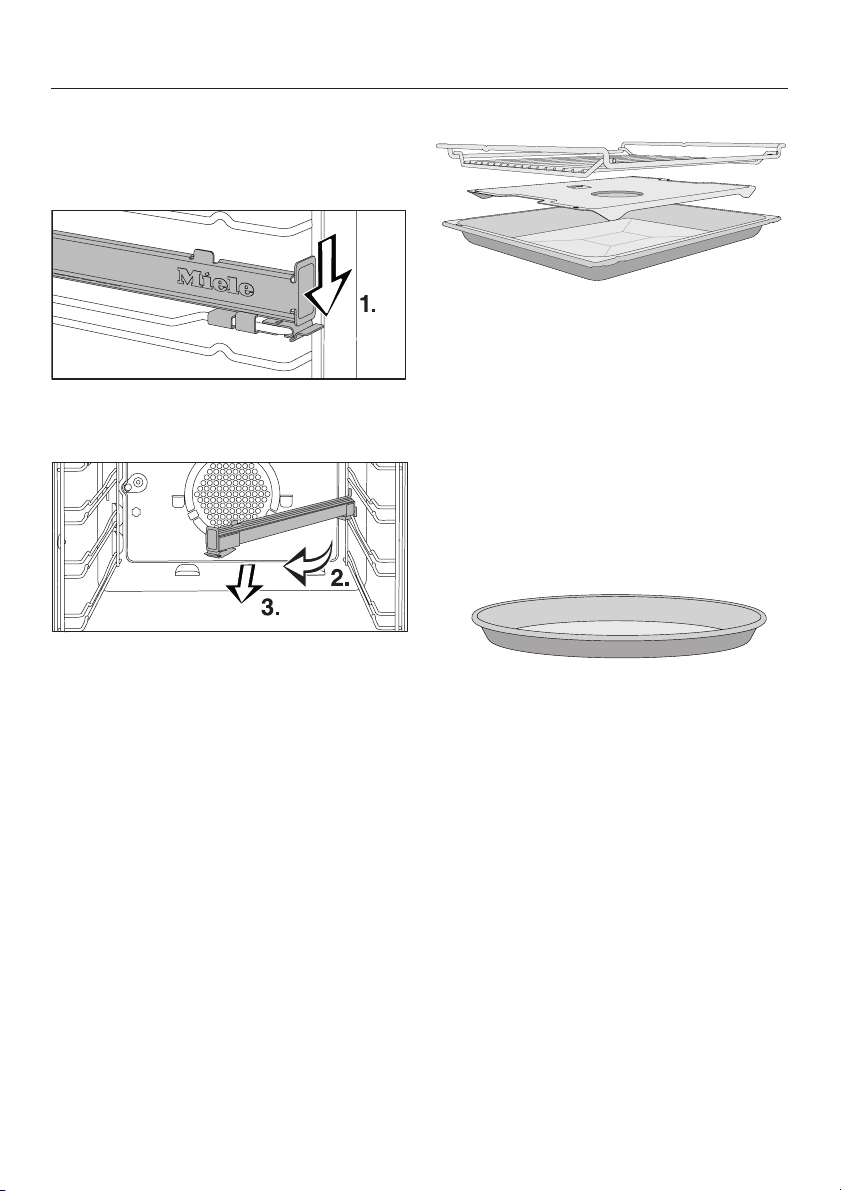
Removing the FlexiClip runners
Push the FlexiClip runner in all the
^
way.
Push down on the tab at the front of
^
the FlexiClip runner (1.).
^ Swing the FlexiClip runner towards
the middle of the oven cavity (2.) and
pull it forwards along the top rail (3.).
^
Lift the FlexiClip runner off the rail
and take it out of the oven.
Anti-splash insert HGBB51
The anti-splash insert fits in the
universal tray below the rack.
The juices from the food being grilled or
roasted collect under the insert. This
prevents them from spitting and making
the oven dirty. The juices can then be
used for making gravy and sauces.
The enamelled surface has been
treated with PerfectClean.
Round baking tray HBF27-1
The round baking tray is suitable for
cooking pizza, shallow cakes made
with yeast or whisked mixtures, sweet
and savoury tarts, baked desserts, flat
bread, and can also be used for frozen
cakes and pizzas.
The enamelled surface has been
treated with PerfectClean.
27
Features
Baking stone HBS60
The baking stone is ideal for items
which need a well baked base such as
pizza, quiche, bread, bread rolls and
savoury snacks.
The baking stone is made from heat
retaining fire brick and is glazed.
Place it directly on the rack.
A paddle made of untreated wood is
supplied with it for placing food on the
baking stone and taking it off.
Handle HEG
The handle makes it easier to take the
universal tray, baking tray and rack out
of the oven, or to put them into it. The
two prongs at the top go inside the tray
or above the rack, and the U-shape
supports underneath.
HUB oven dish and HBD oven dish
lid
The Miele oven dish, unlike other oven
dishes, slides into the oven on the side
runners. It has non-tip safety notches
like the universal tray to prevent it being
pulled out too far.
It also has a non-stick coating.
The Miele oven dishes are either 22 cm
or 35 cm deep. The width and height
are the same.
Lids are also available. These are
ordered separately.
Please quote the model number of your
Miele oven dish when ordering.
Depth: 22 cm Depth: 35 cm
HUB61-22
HUB62-22*
HBD 60-22 HBD 60-35
HUB61-35
28
* suitable for use on induction hobs

Features
Catalytic enamelled liners
Side liners
–
These are fitted behind the side
runners in the sides of the oven and
help keep the oven walls clean.
Roof liner
–
This is fitted above the top heat/grill
element and helps keep the roof of
the oven clean.
Back panel
–
This should be replaced if the
catalytic enamel has become
ineffective due to incorrect use or
very heavy soiling.
When ordering, please quote the model
number of your oven.
Miele microfibre cloth
Light soiling and fingerprints can be
easily removed with the microfibre
cloth.
Miele oven cleaner
Miele oven cleaner is suitable for
removing very stubborn soiling. It is not
necessary to pre-heat the oven
beforehand.
29

Features
Oven controls
(features will vary depending on model)
The oven controls are used to operate
the various cooking functions for
baking, roasting and grilling.
Ovens with a clock/timer also offer the
following:
a time of day display,
–
a minute minder,
–
a timer to automatically switch
–
cooking programmes on and off,
– settings that can be customised.
Safety features
System lock 0 for the oven
The system lock prevents the oven from
being used unintentionally (see
"Clock/timer - Changing settings – P3").
When the system lock is engaged 0
will appear in the display.
Cooling fan
The cooling fan will come on
automatically when a cooking
programme is started. The cooling fan
mixes hot air from the oven cavity with
cool room air before venting it out into
the kitchen through vents located
between the appliance door and the
control panel.
The cooling fan will continue to run for a
while after a programme to prevent
moisture building up in the oven, on the
control panel or in the oven housing
unit.
When the temperature in the oven has
fallen sufficiently, the cooling fan will
switch off automatically.
Vented oven door
The oven door glass panes have a
heat-reflecting coating.
The door can be removed and
dismantled for cleaning (see "Cleaning
and care").
30
 Loading...