

Miele 09 645 440 User Manual
Operating instructions
for dishwashers
To avoid the risk of accidents or damage to the appliance, it is essential
o read these instructions as well as the installation plan before it is in‐
t
stalled and used for the first time.
en-GB M.-Nr. 09 645 440HG06

Contents
Guide to the appliance........................................................................................... 5
Appliance overview.................................................................................................. 5
Control panel............................................................................................................ 6
Warning and Safety instructions .......................................................................... 7
Caring for the environment.................................................................................
16
Disposal of the packing material............................................................................ 16
Disposing of your old appliance ............................................................................ 16
Energy saving washing .......................................................................................... 17
Before using for the first time.............................................................................
18
Opening the door................................................................................................... 18
Closing the door .................................................................................................... 18
Water softener........................................................................................................ 19
Displaying and setting the water hardness....................................................... 20
Before using the appliance for the first time, you require:..................................... 22
Dishwasher salt...................................................................................................... 22
Adding salt........................................................................................................ 23
Add salt reminder.............................................................................................. 24
Rinse aid ................................................................................................................ 25
Adding rinse aid................................................................................................ 25
Rinse aid refill reminder .................................................................................... 26
Setting the rinse aid dosage............................................................................. 27
Loading the dishwasher ......................................................................................
28
Notes...................................................................................................................... 28
Upper basket ......................................................................................................... 30
Adjusting the upper basket............................................................................... 31
Lower basket ......................................................................................................... 32
Cutlery.................................................................................................................... 34
Cutlery tray........................................................................................................ 34
Loading examples.................................................................................................. 35
Dishwashers with cutlery tray........................................................................... 35
Operation ..............................................................................................................
37
Detergent ............................................................................................................... 37
Adding detergent .............................................................................................. 39
Switching on .......................................................................................................... 40
Selecting a programme.......................................................................................... 40
Starting the programme......................................................................................... 41
Time display........................................................................................................... 41
Energy management.............................................................................................. 42
At the end of a programme.................................................................................... 42
2

Contents
Switching off .......................................................................................................... 43
Unloading the dishwasher ..................................................................................... 43
Interrupting a programme...................................................................................... 44
Changing a programme ......................................................................................... 44
Programme options.............................................................................................
Short ...................................................................................................................... 45
DetergentAgent...................................................................................................... 45
Refill reminders ...................................................................................................... 46
Delay start.............................................................................................................. 47
Buzzer tones .......................................................................................................... 49
Adjust Sensor wash ............................................................................................... 50
Memory.................................................................................................................. 51
Optimise standby................................................................................................... 52
Factory default....................................................................................................... 53
Programme chart.................................................................................................
Cleaning and care................................................................................................
Cleaning the wash cabinet..................................................................................... 58
Cleaning the door and the door seal ..................................................................... 58
Cleaning the control panel..................................................................................... 58
Cleaning the reflector panel................................................................................... 58
Cleaning the door front.......................................................................................... 59
Checking the filters in the wash cabinet................................................................ 60
Cleaning the filters ................................................................................................. 60
Cleaning the spray arms ........................................................................................ 62
Problem solving guide.........................................................................................
Technical problems................................................................................................ 63
Water inlet fault...................................................................................................... 65
Water drainage fault............................................................................................... 66
General problems................................................................................................... 67
Noises .................................................................................................................... 68
Unsatisfactory washing result................................................................................ 69
45
54
58
63
Maintenance.........................................................................................................
Cleaning the water inlet filter ................................................................................. 72
Cleaning the drain pump and non-return valve ..................................................... 73
After sales service ...............................................................................................
Repairs................................................................................................................... 74
Guarantee .............................................................................................................. 74
Note for test institutes............................................................................................ 74
72
74
3

Contents
Optional accessories...........................................................................................
Electrical connection...........................................................................................
Electrical connection U.K....................................................................................... 77
Plumbing............................................................................................................... 78
The Miele waterproof anti-leak system.................................................................. 78
Connection to the water supply............................................................................. 78
Drainage................................................................................................................. 79
Technical data ......................................................................................................
75
77
80
4
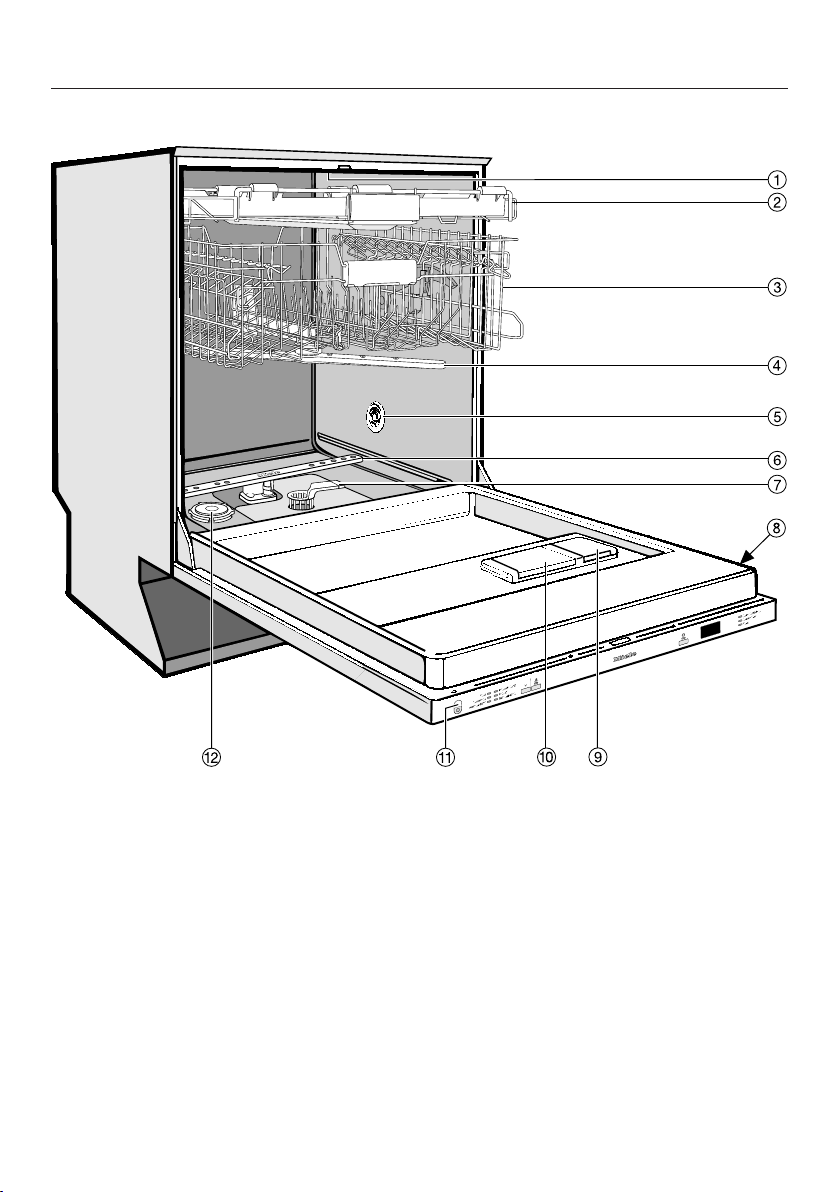
Appliance overview
Guide to the appliance
a
Upper spray arm (not visible)
b
Cutlery tray (depending on model)
c
Upper basket
d
Middle spray arm
e
Air inlet for drying (depending on
model)
f
Lower spray arm
g
Filter combination
h
Data plate
i
Rinse aid reservoir
j
Dual compartment detergent dis‐
penser
k
In-operation indicator light
l
Salt reservoir
5
Guide to the appliance
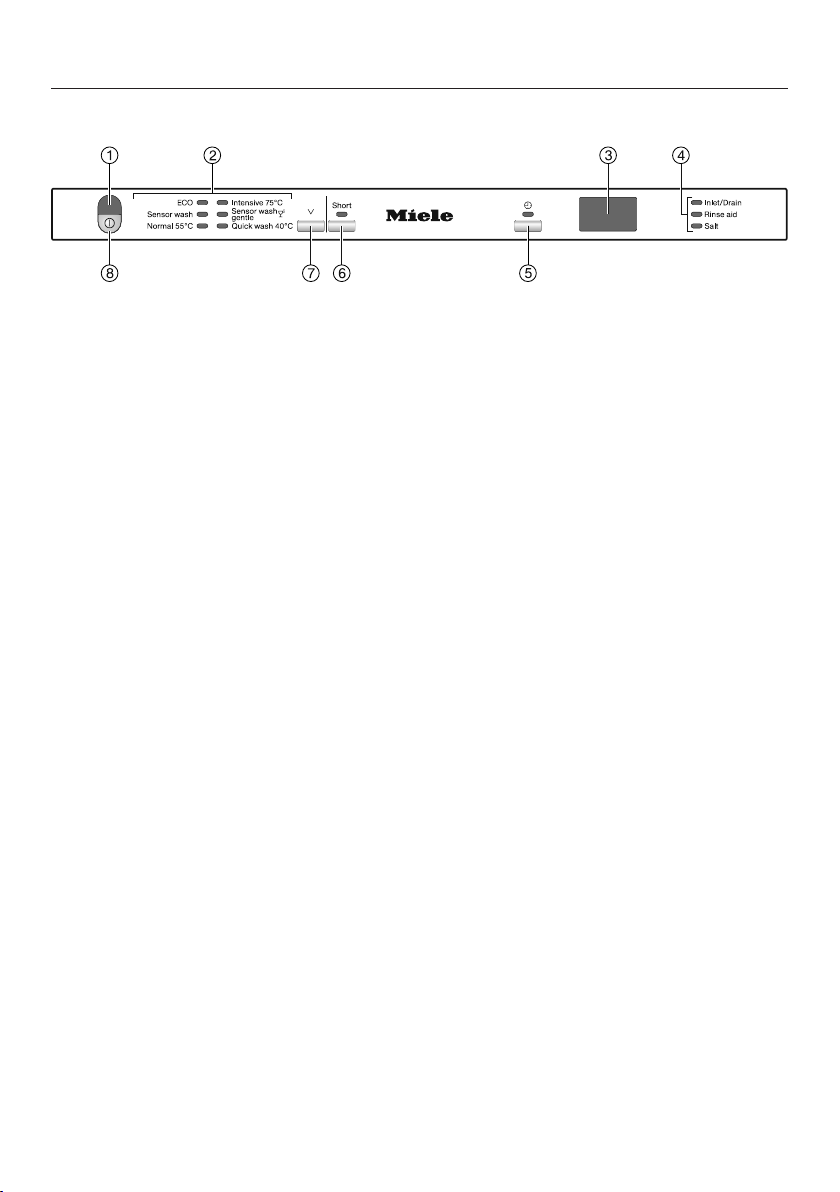
Control panel
a
In-operation indicator light
b
Programmes
c
Display
d
Check / Refill indicators
e
Delay start button with indicat
light
f
Short butt
g
Programme selector button
h
On/Off button
on with indicator light
or
6

Warning and Safety instructions
This dishwasher complies with current safety requirements. Inap‐
opriate use can, however, lead to personal injury and damage to
pr
property.
To avoid the risk of accidents and damage to the dishwasher,
please
carefully before it is installed and used for the first time. They con‐
tain important information on its installation, safety, use and main‐
tenance.
Keep the installation plan and the operating instructions in a safe
place and pass them on to any future owner.
Miele cannot be held liable for damage caused by non-compli‐
ance with this information.
read the installation plan and the operating instructions
7

Warning and Safety instructions
Correct application
This dishwashe
similar working and residential environments.
The dishwasher is no
r is intended for use in domestic households and
t intended for outdoor use.
It must only be used as a domestic appliance as specified in
these operating instructions, for cleaning domestic crockery and
cutlery. Any other usage is not supported by the manufacturer and
could be dangerous.
The applianc
sensory or mental capabilities, or lack of experience and knowledge,
if they are supervised whilst using it, or have been shown how to use
it in a safe way and recognise and understand the consequences of
incorrect operation.
e can only be used by people with reduced physical,
8

Safety with children
Warning and Safety instructions
Chil
ance unless they are constantly supervised.
Chil
vised if they have been shown how to use it safely and recognise
and understand the consequences of incorrect operation.
Chil
unsupervised.
Please super
not let them play with it. There is a danger that children playing
might shut themselves in the dishwasher.
If
is active keep young children away from the area in which the door
opens. Danger of injury in the unlikely event of a fault with the open‐
ing mechanism.
Dange
kept out of the reach of babies and children. Whilst playing, children
could become entangled in packaging or pull it over their head and
suffocate.
dren under 8 years of age must be kept away from the appli‐
dren 8 years and older may only use the dishwasher unsuper‐
dren must not be allowed to clean or maintain the appliance
vise children in the vicinity of the dishwasher and do
the automatic door opening mechanism (depending on model)
r of suffocation. Packaging, e.g. plastic wrappings, must be
Keep children away from detergents. Dishwasher detergents can
cause burning in the mouth, nose and throat if swallowed, or inhibit
breathing. Keep children away from the dishwasher when the door is
open. There could still be detergent residues in the cabinet. Seek
medical attention immediately if your child has swallowed or inhaled
detergent.
9

Warning and Safety instructions
Technical safety
Unauth
considerable danger for the user. Installation, maintenance and re‐
pairs must only be carried out by a Miele authorised technician.
A d
ble damage. Never install or attempt to use a damaged appliance.
The ele
when correctly earthed. It is essential that this standard safety re‐
quirement is met. If in any doubt, please have the electrical installa‐
tion tested by a qualified electrician.
Miele cannot be held liable for the consequences of an inadequate
earthing system (e.g. electric shock).
orised installation, maintenance and repairs can cause
amaged dishwasher is dangerous. Check it for any recognisa‐
ctrical safety of this appliance can only be guaranteed
Reliable and safe operation of this dishwasher can only be assur‐
ed if it has been connected to the mains electricity supply.
The dishwasher must on
via a suitable switched socket using a suitable fused plug (it must
not be hard-wired). The electrical socket must be easily accessible
after the dishwasher is installed so that it can be disconnected from
the electricity supply at any time.
ly be plugged into the electricity supply
Ther
ger of overheating and fire risk if the dishwasher were to be pushed
up against a plug.
The dishwasher must no
ant temperatures which are sometimes generated by a hob could
damage the dishwasher. For the same reason it should not be instal‐
led next to open fires or other appliances which give off heat, such
as heaters etc.
e must be no electrical sockets behind the dishwasher. Dan‐
t be installed under a hob. The high radi‐
To avoid the risk of damage to the dishwasher, make sure that the
connection data on the data plate (fuse rating, voltage and frequen‐
cy) match the mains electricity supply before connecting the dish‐
washer to the mains. Consult a qualified electrician if in doubt.
10

Warning and Safety instructions
Do not con
been fully installed and any adjustment has been made to the door
springs.
The dishwasher may on
nism is working correctly. Otherwise there could be a risk of danger
whilst the automatic door opening mechanism (depending on model)
is active.
To check that the door opening mechanism is working correctly:
– the door springs must be adjusted equally on both sides. They
ar
e correctly adjusted when the door remains stationary when left
half open (approx. 45° opening angle). It is also important that the
door cannot fall open.
– the door locking pins automatically retract when the door opens
at the end of the drying phase.
Do not con
multi-socket adapter or an extension lead. These do not guarantee
the required safety of the appliance (fire hazard).
The applianc
on a ship).
nect the dishwasher to the mains supply until it has
ly be operated if the door opening mecha‐
nect the appliance to the mains electricity supply by a
e must not be used in a non-stationary location (e.g.
Do not insta
frost. Frozen hoses may burst or split. The reliability of the electronic
control unit may be impaired at temperatures below freezing point.
ll the dishwasher in a room where there is a risk of
To avoid any damage to the appliance, the dishwasher must only
be operated when it is connected to a fully vented plumbing system.
The plastic ho
component. It must not be dipped in water.
using of the water connection contains an electrical
There are electrical wires in the water inlet hose. Do not cut the
water inlet hose, even if it is too long.
11

Warning and Safety instructions
The int
damage, provided the following conditions are met:
– The dishwasher is correctly installed and plumbed in.
– The dishwasher is properly maintained and parts are replaced
wher
– the stopcock is turned off during longer absences from the home
(e.g. whilst on holiday).
The Waterproof system will work even if the appliance is switched
off. However
supply.
The wat
between 30 and 1000 kPa (0.3 and 10 bar).
egrated Waterproof system offers protection from water
e it can be seen that this is necessary.
, the appliance must remain connected to the electricity
er pressure (flow pressure at the take-off point) must be
If the dishwasher gets damaged, switch it off at the mains imme‐
diat
ely and call your Miele Dealer or the Miele Service Department.
While the appliance
dertaken by a Miele authorised service technician. Otherwise the
guarantee is invalidated.
Miele
ine original Miele replacement parts are used. Faulty components
must only be replaced by Miele spare parts.
can only guarantee the safety of the appliance when genu‐
is under guarantee, repairs should only be un‐
During
must be disconnected from the mains electricity supply (switch it off
and withdraw the plug from the socket).
If
special cable of the same type (available from Miele) by a Miele au‐
thorised service technician only.
12
installation, maintenance and repair work, the appliance
the connection cable is damaged it must be replaced with a

Correct installation
Warning and Safety instructions
The dishwasher must be install
with the installation diagram supplied.
ake care, both before and during installation of the dish‐
T
washer, not to cut yourself on the metal parts. Danger of in‐
jury. Wear protective gloves.
The dishwasher must be corr
operation.
In or
ers must only be installed under a continuous worktop which is se‐
cured to adjacent cabinetry.
If
der ("U") model, you will need to order the appropriate conversion
kit. If you remove the existing plinth, you must replace it with a Umodel plinth. This is necessary to avoid the risk of injury caused by
protruding metal parts.
The door spring
are correctly adjusted when the door remains stationary when left
half open (approx. 45° opening angle). It is also important that the
door cannot fall open.
The appliance may only be used with correctly adjusted door
springs.
der to ensure stability, built-under and integrated dishwash‐
you want to convert your freestanding dishwasher to a built-un‐
s must be adjusted equally on both sides. They
ed and connected in compliance
ectly aligned to ensure problem-free
13

Warning and Safety instructions
Correct use
Do not use sol
Do not inh
gents can cause burning in the nose, mouth and throat if swallowed,
or inhibit breathing. Seek medical attention immediately if detergent
has been swallowed or inhaled.
ou could injure yourself on the open dishwasher door or trip over
Y
it. Avoid leaving the door open unnecessarily.
Do not sit or lea
washer to tip and be damaged, and you could get injured.
Dishes can
to cool until they are comfortable enough to handle before unload‐
ing.
Only use det
washers. Do not use washing-up liquid.
Do not use co
cause damage, and there is a risk of a severe explosive chemical re‐
action (such as an explosive oxyhydrogen gas reaction).
vents in the dishwasher. Danger of explosion.
ale or ingest dishwasher detergent. Dishwasher deter‐
n on the opened door. This could cause the dish‐
be very hot at the end of the programme. Allow them
ergent and rinse aid formulated for domestic dish‐
mmercial or industrial detergents as these may
Do not fill
This will cause serious damage to the reservoir.
Inadver
washer detergent will damage the water softener. Make sure you
have picked up the correct packet of dishwasher salt before filling
the salt reservoir!
Only use special coa
Do not use other salts such as cooking salt, agricultural grade or
gritting salt. These may contain insoluble additives which can impair
the functioning of the water softener.
14
the rinse aid reservoir with powder or liquid detergent.
tently filling the salt reservoir with powder or liquid dish‐
rse grained dishwasher salt for reactivation.

Warning and Safety instructions
In an app
lery is cleaned and dried more efficiently if placed in the basket with
the handles downwards. However, to avoid the risk of injury, place
knives and forks etc. with the handles upwards.
Plastic it
such as disposable plastic containers or plastic cutlery should not
be cleaned in the dishwasher. The high temperatures in the dish‐
washer may cause them to melt or lose shape.
you use the "FlexiTimer/Delay start" option (depending on mod‐
If
el), make sure that the dispenser is dry before adding detergent.
Wipe dry if necessary. Detergent will clog if poured into a damp dis‐
penser and may not be thoroughly dispersed.
liance with a cutlery basket (depending on model), cut‐
ems which cannot withstand being washed in hot water,
Please observe the information given in "Technical data" regard‐
ing the capacity of the dishwasher.
Accessories
Only use genui
this appliance. Using accessories or spare parts from other manu‐
facturers will invalidate the guarantee, and Miele cannot accept lia‐
bility.
ne original Miele accessories and spare parts with
Disposal of your old dishwasher
Mak
tally shut themselves in. Make appropriate arrangements for the dis‐
posal of the appliance.
e the door lock inoperative so that children cannot acciden‐
15
Caring for the environment
Disposal of the packing mate‐
rial
The packaging is designed to protect
the appliance fr
transportation. The packaging materials
used are selected from materials which
are environmentally friendly for disposal
and should be recycled.
The packaging consists of the following
erials:
mat
Outer packaging:
– Corrugated cardboard made from up
o 100% recyclable material:
t
or: Polyethylene (PE) shrink wrap
– Polypropylene (PP) strapping
Inner packaging:
– Chlorine and fluorine free expanded
polystyr
– Base, lid frame and support battens
made fr
from renewable forests
– Polyethylene (PE) protective wrap
om damage during
ene (EPS)
om untreated natural wood
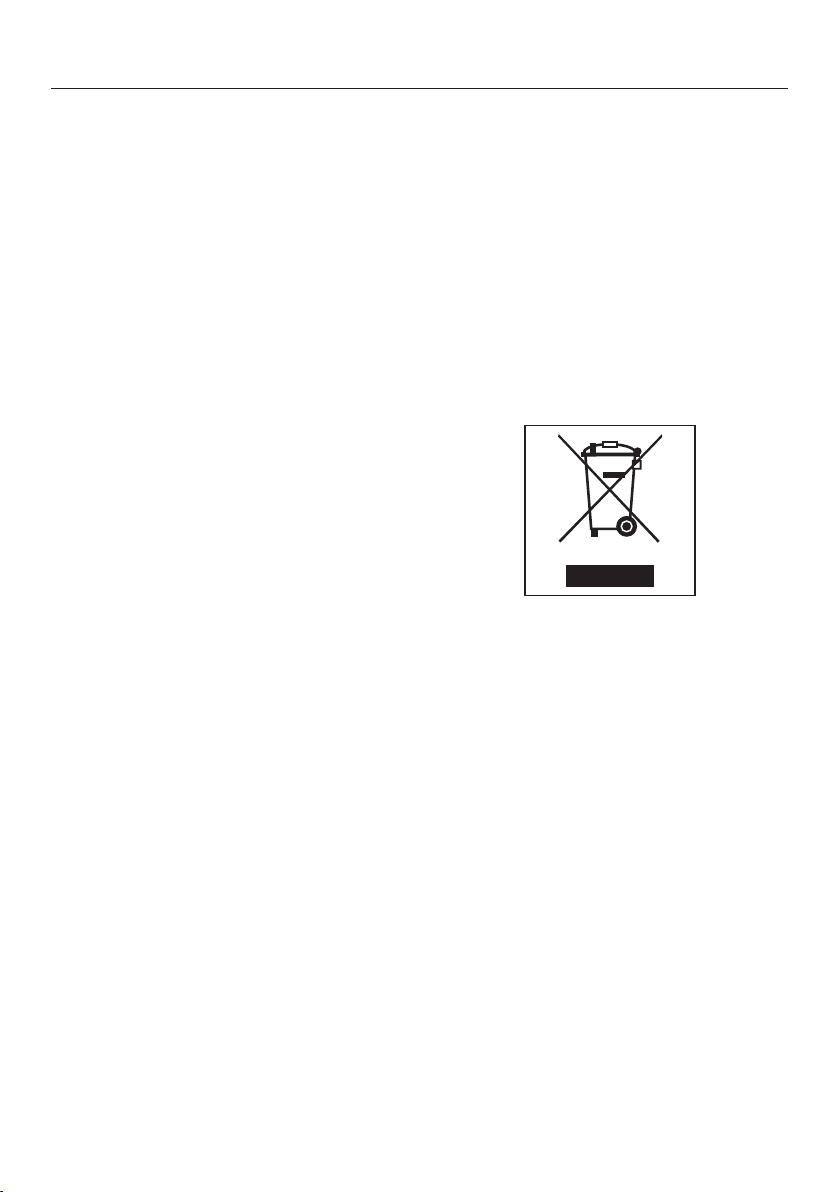
Disposing of your old appli‐
ance
Electrical and electronic appliances of‐
en contain valuable materials. They al‐
t
so contain materials which, if handled
or disposed of incorrectly, could be po‐
tentially hazardous to human health and
to the environment. They are, however,
essential for the correct functioning of
your appliance. Please do not therefore
dispose of it with your household
waste.
Please dispose of it at your local com‐
muni
ty waste collection / recycling cen‐
tre or contact your dealer for advice.
Ensure that it presents no danger to
chil
dren while being stored for disposal.
Recycling the packaging reduces the
use of r
ing process and also reduces the
amount of waste in landfill sites.
16
aw materials in the manufactur‐
To enable sorting by type of plastic for
r
ecycling, all plastic parts of the appli‐
ance are labelled with international
standard symbols.

Energy saving washing
This dishwasher is exceptionally eco‐
cal in its use of water and electrici‐
nomi
ty.
You can make the most of your appli‐
ance by following these tips:
– For most economical dishwashing,
e full use of the baskets without
mak
overloading the dishwasher.
– Choose the programme to suit the
type of cr
the degree of soiling.
ockery being washed and
Caring for the environment
– Select the ECO pr
ing on model) for energy-saving dish‐
washing. This programme is the most
efficient in terms of its combined en‐
ergy and water consumption at
cleaning normally soiled crockery.
– Follow the detergent manufacturer's
recommendations on detergent dos‐
age.
– When using powder or liquid deter‐
gent you can use 1/3 less det
baskets are only half full.
– If your household water system is
suitable, this dishwasher can be con‐
nect
ed to a hot water supply for fur‐
ther economies. If the water is heated
by for example, solar panels, this
would be energy efficient.
However, if your water is heated by
electricity we would recommend con‐
nection to cold water.
ogramme (depend‐
ergent if
17

Before using for the first time
Opening the door
ull the handle.
P
If the door is opened during operation
a
ll functions are automatically interrup‐
ted.
W
ater in the dishwasher may be
hot. Danger of scalding.
Only open the door during operation
if absolu
extreme caution when doing so.
tely necessary and exercise
Closing the door
ush the baskets right in.
P
T
hen raise the door up, and push un‐
til it clicks into position.
Dang
Do not put your hand inside the door
as it is closing.
er of injury.
18

Before using for the first time
Water softener
In order to achieve good cleaning re‐
sults, the dishwasher needs t
with soft water. Hard water results in a
build-up of calcium deposits on crock‐
ery and in the dishwasher.
Mains water with a hardness level high‐
er than 0.7 mmol/l (4 °d - German
scale) needs to be softened. This takes
place automatically in the integrated
water softener. The water softener in
the dishwasher is suitable for a water
hardness level of up to 12.6 mmol/l (70
°d - German scale).
– The water softener requires dish‐
washer salt.
Dependin
level (< 3.8 mmol/l, or 21 °d - Ger‐
man scale), dishwasher salt is not re‐
quired if combination tablets are be‐
ing used (see "Operation, Deter‐
gent").
– The dishwasher must be program‐
med t
for your area.
g on the water hardness
o the correct water hardness
o operate
Enter the water hardness below:
____________mmol/l or °d
The dishwasher is programmed at the
ory for a water hardness level of 2.7
fact
mmol/l (15 °d - German scale).
If this setting corresponds to the hard‐
ness of your water you do not need to
do anything more.
However, if you have a different water
har
dness you must adjust the water
softener to match your water hardness.
– Your local water authority will be able
t
o advise you of the water hardness
level in your area.
– Where the water hardness fluctuates
e.g. between 1.8 and 2.7 mmol/l (10 15 °d - German scale) always pr
gramme the dishwasher to the higher
value (2.7 mmol/l or 15 °d in this ex‐
ample).
In the event of a fault, it will help the
vice technician if you know the hard‐
ser
ness of your local water supply.
o‐
19

Before using for the first time
Displaying and setting the water
dness
har
Open the door
Switch the dishwasher off with the
butt
on, if it is switched on.
Press the programme selector button
in, and whilst holding it in switch
the dishwasher on using the but‐
ton.
Keep the programme selector button
pressed in for at least four sec‐
onds until the lower right hand pro‐
gramme indicator comes on.
If this does not happen, start the proce‐
dur
e from the beginning again.
.
P
ress the
The Short
twice at intervals.
The value set for the water hardness is
shown as a figur
(see chart).
will star
This is the factory default setting of
15 °d.
Use the pr
to select the value which equates
to your water hardness level.
Each press on the button moves you
up a level. When the highest water
hardness level is reached, the setting
starts from the beginning again.
The setting is now stored in memory.
Switch the dishwasher off with the
butt
Short butt
indicator will flash rapidly
t flashing in the display.
ogramme selector button
on.
on twice.
e after in the display
20
Before using for the first time
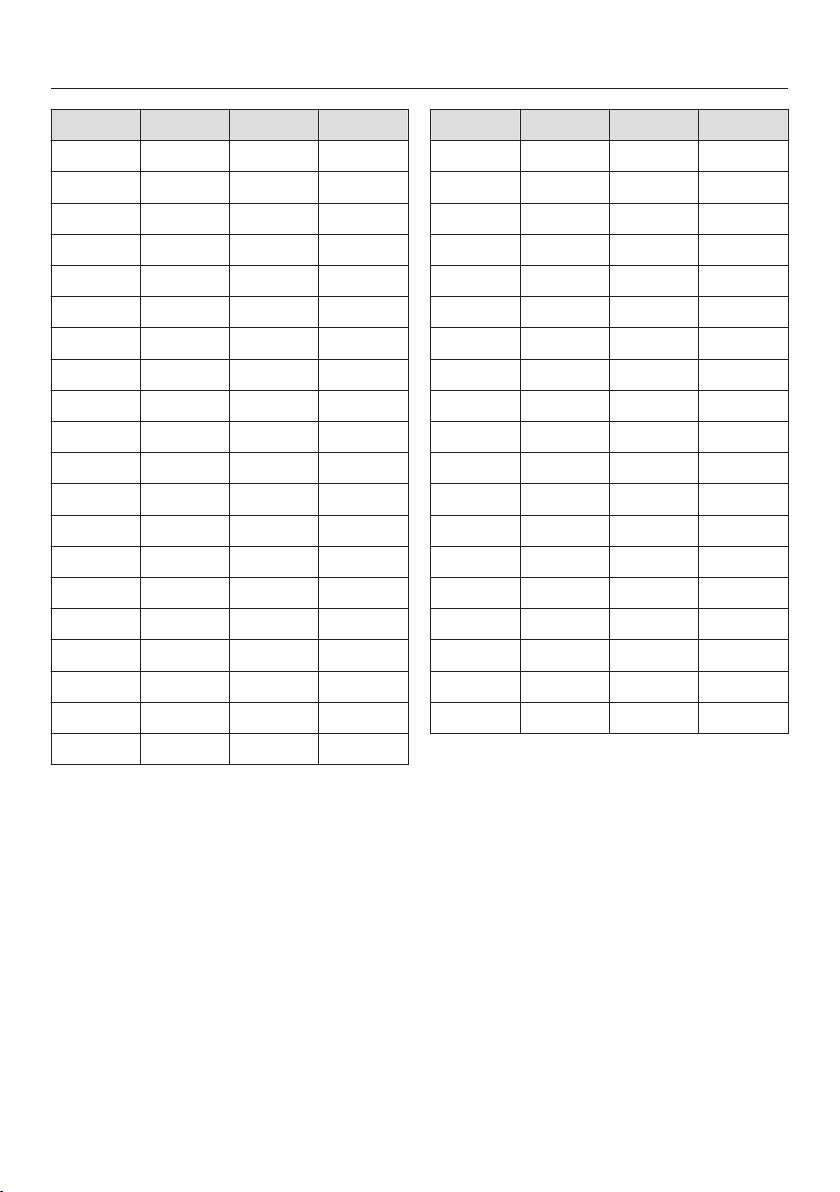
°d mmol/l °f Display
1 0.2 2 1
2 0.4 4 2
3 0.5 5 3
4 0.7 7 4
5 0.9 9 5
6 1.1 11 6
7 1.3 13 7
8 1.4 14 8
9 1.6 16 9
10 1.8 18 10
11 2.0 20 11
12 2.2 22 12
13 2.3 23 13
14 2.5 25 14
15 2.7 27 15
16 2.9 29 16
17 3.1 31 17
18 3.2 32 18
19 3.4 34 19
20 3.6 36 20
°d mmol/l °f Display
21 3.8 38 21
22 4.0 40 22
23 4.1 41 23
24 4.3 43 24
25 4.5 45 25
26 4.7 47 26
27 4.9 49 27
28 5.0 50 28
29 5.2 52 29
30 5.4 54 30
31 5.6 56 31
32 5.8 58 32
33 5.9 59 33
34 6.1 61 34
35 6.3 63 35
36 6.5 65 36
37-45 6.6-8.0 66-80 45
46-60 8.2-10.7 82-107 60
61-70 10.9-12.5 109-125 70
21

Before using for the first time
Before using the appliance for
the first tim
– approx. 1 litre of water,
– approx. 1 kg dishwasher salt,
– domestic dishwasher detergent,
– rinse aid formulated for domestic
dishwashers.
Every dishwasher is tested at the fac‐
t
ory. There will be residual water in the
appliance from this test. It is not an in‐
dication that it has been used previ‐
ously.
e, you require:
Dishwasher salt
In order to achieve good cleaning re‐
sults, the d
with soft water. Hard water results in a
build-up of calcium deposits on crock‐
ery and in the dishwasher.
Mains water with a hardness level high‐
er than 0.7 mmol/l (4 °d - German
scale) needs to be softened. This takes
place automatically in the integrated
water softener. The water softener in
the dishwasher is suitable for a water
hardness level of up to 12.6 mmol/l (70
°d - German scale).
ishwasher needs to operate
If the water in your area is very soft
and constantly lower than 0.9 mmol/l
(5 °d - German scale) you do not
ha
ve to add dishwasher salt. The
prompt to add salt will be switched off
automatically.
Dish
age the water softener.
Do not fill the salt reservoir with
powder o
Only us
dishwasher salt for reactivation,
as other salts may contain insoluble
additives which can impair the func‐
tio
washer detergent will dam‐
r liquid detergent.
e special coarse grained
ning of the water softener.
The water softener requires dishwasher
salt.
Depending
(< 3.8 mmol/l, or 21 °d - German scale),
dishwasher salt is not required if combi‐
nation tablets are being used (see "Op‐
eration, Detergent").
22
on the water hardness level
Adding salt
Before filling the salt reservoir with
dishwasher salt for the first time, you
must fill it with appr
ter to enable the salt to dissolve.
Once the dishwasher has been used,
ther
e is always sufficient water in the
reservoir.
ox. 1 litre of wa‐
Before using for the first time
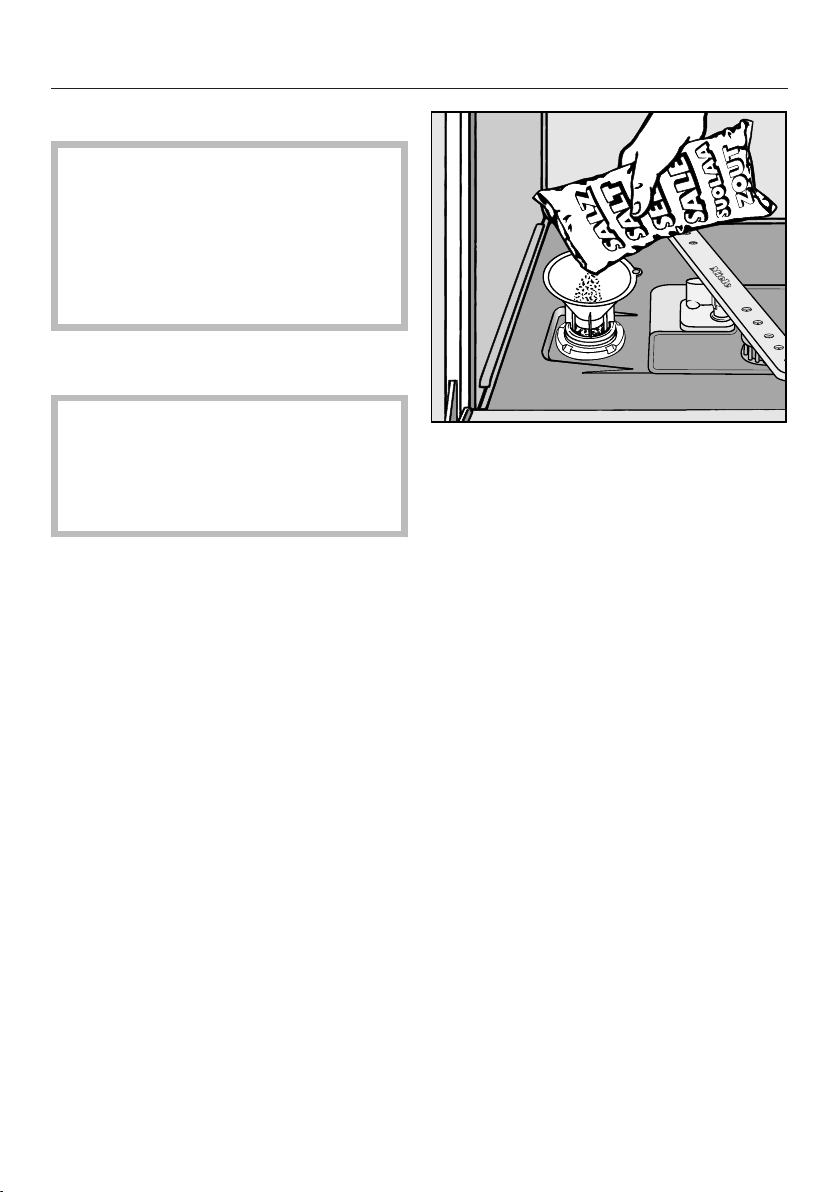
Remo
Fi
ve the lower basket and un‐
screw the salt reservoir cap.
Water or saline solution will run out
of the r
moved.
It should therefore only be removed
in
eservoir when the cap is re‐
order to refill the salt reservoir.
ll the reservoir with approx. 1 litre of
water (first use only).
Place the funnel provided over the
salt reservoir and carefully fill with
salt until the reservoir is full. The salt
reservoir holds approx. 1 kg of salt
depending on the brand used.
an any excess salt from around
Cle
the reservoir opening and then screw
the cap on again firmly.
Immediat
voir, run the
with the
lected and without any crockery in
the dishwasher, to remove any traces
of salt from the cabinet.
ely after filling the salt reser‐
Quick wash pr
Short pr
ogramme option se‐
ogramme
23

Before using for the first time
Add salt reminder
Fi
ll the salt reservoir with dishwasher
salt when the
comes on. (If it comes on during a
programme, wait until the end of the
programme).
Risk of corr
Immediately after filling the salt res‐
ervoir, run the
gramme with the
option selected and without any
crockery in the dishwasher to re‐
move any traces of salt from the
cabinet.
After the salt reservoir has been filled,
the r
efill indicator may still be lit up if
the salt concentration has not yet
reached the correct level. It will go out
when the correct concentration is
reached.
The refill reminder will not come on if
you have
for a water hardness below 0.9 mmol/l
(5 °d - German scale).
programmed the dishwasher
salt indica
osion.
Quick wash p
Short pr
tor light
ro‐
ogramme
If you only ever use combination prod‐
ucts in you
switch both refill reminders for salt
and rinse aid off if you wish (see "Pro‐
gramme options - Refill reminders").
If you switch to using detergent that
does not contain salt or rinse aid, it
is impor
and rinse aid and to switch the re‐
minders back on.
r dishwasher, you can
tant to remember to add salt
24
Before using for the first time
Rinse aid
Rinse aid is necessary to ensure water
does not cling and leave marks on
cr
ockery during the drying phase and
helps crockery dry faster after it has
been washed.
Rinse aid is poured into the storage res‐
ervoir and the amount set is dispensed
automatically.
nadvertently filling the rinse aid
I
reservoir with washing-up liquid or
powder or liquid detergent will dam‐
age the reservoir. Only pour rinse aid
formulated for domestic dishwashers
into the reservoir.
Alternatively, it is possible to use
– Household vinegar with a max. 5%
aci
d content
or
– Liquid citric acid up to 10% acid
tent
con
If you only ever use combination
products containing rinse aid in your
dishwasher, you do not need to add
rinse aid.
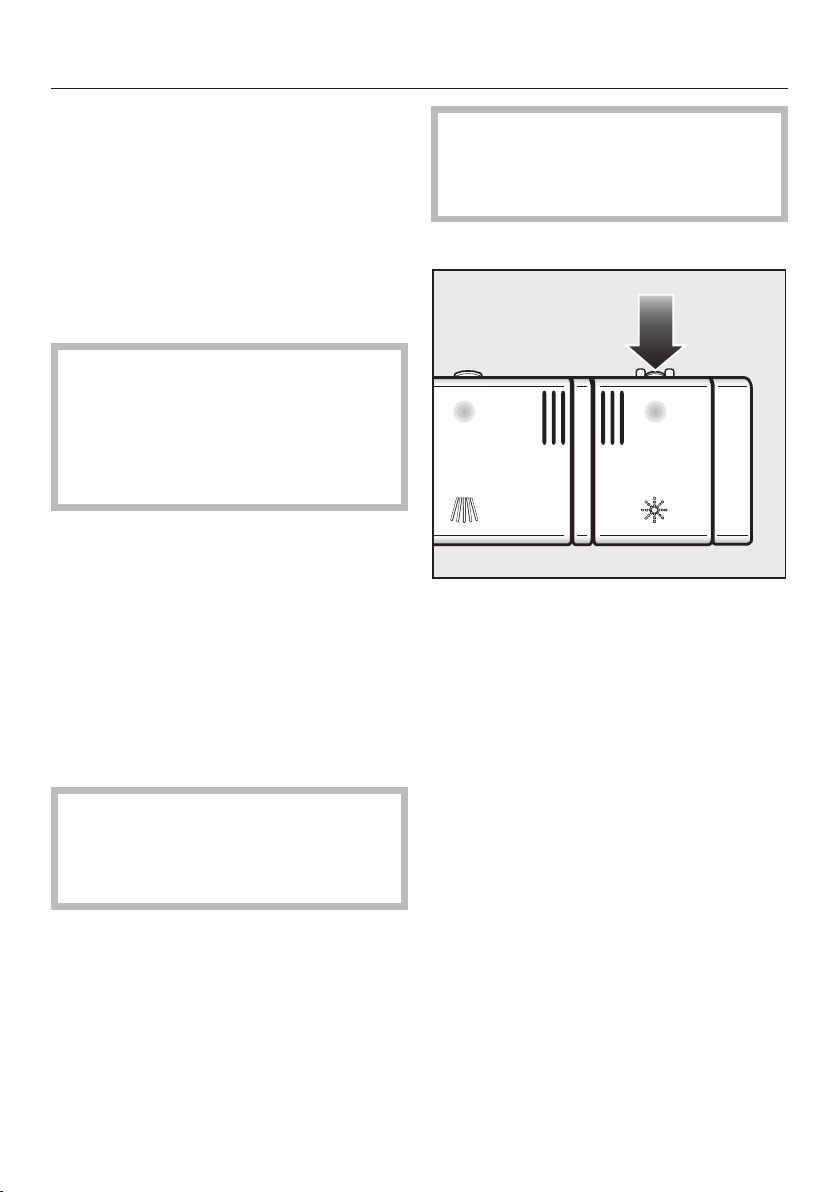
Adding rinse aid
ress the button on the lid of the
P
rinse aid reservoir in the direction of
the arrow until the flap springs open.
The resulting rinsing and drying quality
will no
t, however, be as good as when
rinse aid is used.
Do not use vinegar with a higher
a
cid content (e.g. vinegar essence
25% acid).
This would damage the dishwasher.
25
Before using for the first time
Rinse aid refill reminder
When the Rinse aid indicat
the rinse aid reservoir contains suffi‐
cient rinse aid for 2 - 3 programmes on‐
ly.
Add rinse aid in plenty of time.
If you only ever use combination prod‐
ucts in your dishwasher, you can
switch both refill reminders for salt
and rinse aid off if you wish (see "Pro‐
gramme options - Refill reminders").
or lights up,
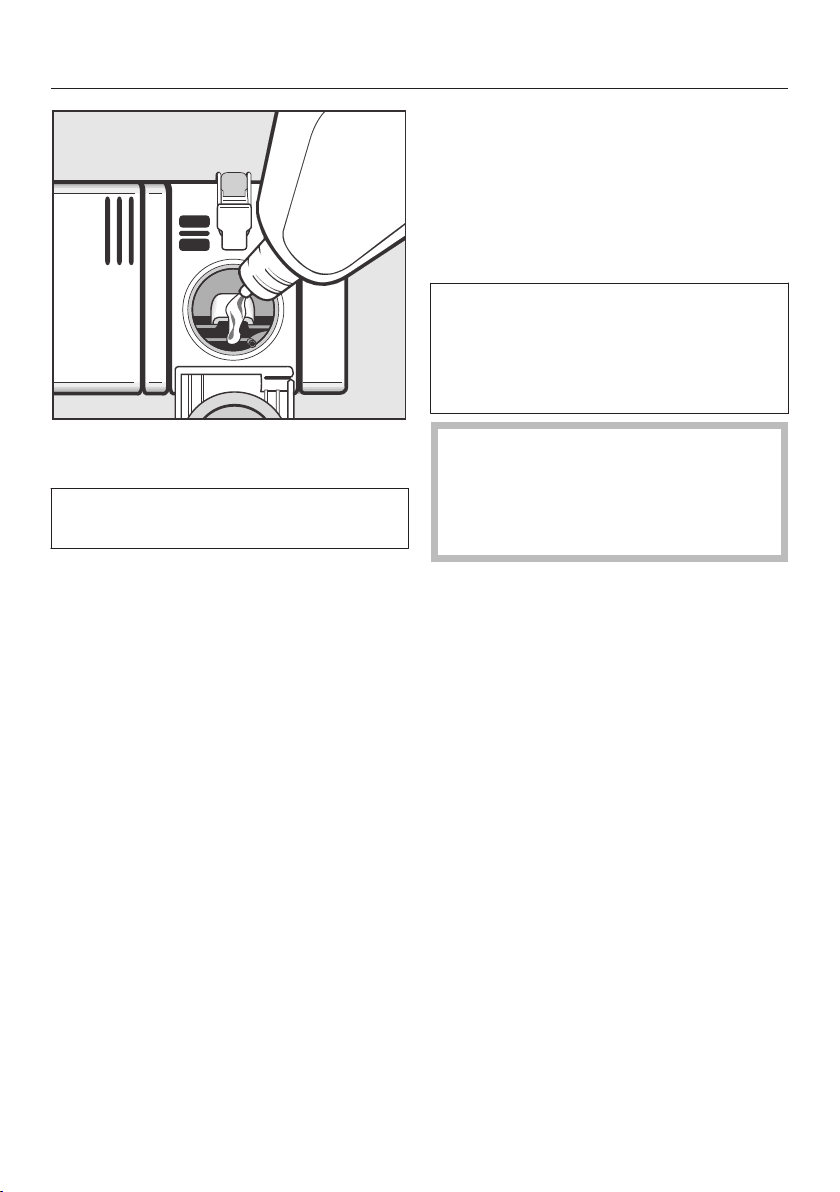
Add rinse aid only until it is visible in
the opening.
The rinse aid reservoir holds ap‐
pr
ox. 110 ml.
Close the flap firmly so that it clicks
o place. Otherwise water can enter
int
the rinse aid reservoir during a pro‐
gramme.
W
ipe up any spilled rinse aid. This
prevents over-foaming occurring dur‐
ing the next programme.
If you switch to using detergent that
does not contain salt or rinse aid, it
is impor
and rinse aid and to switch the re‐
minders back on.
tant to remember to add salt
26
 Loading...