

Page 1

Operating instructions
for Washing machine
PREMIER NOVO
It is essential to read these
operating instructions before
installing or using the machine, to
avoid the risk of accidents, or damage
to the machine.
G
M.-Nr. 05 536 980
Page 2

Caring for our environment
Disposal of the packing
material
The transport and protective packing
has been selected from materials which
are environmentally friendly for disposal
and can normally be recycled.
Ensure that any plastic wrappings,
bags etc. are disposed safely and kept
out of the reach of babies and young
children. Danger suffocation!
Rather than just throwing these materi
als away, please ensure they are of
fered for recycling.
-
-
Disposal of your old appliance
Old appliances contain materials which
can be recycled. Please contact your
dealer, your local waste collection cen
tre or scrap merchant about potential
recycling schemes.
Ensure that the appliance presents no
danger to children while being stored
for disposal. See the appropriate ad
vice in the "Warning and safety instruc
tions".
-
-
-
2
Page 3

Contents
Caring for our environment. . . . . . . . . . . . . . . . . . . . . . . . . . . . . . . . . . . . . . . . . . 2
Disposal of the packing material . . . . . . . . . . . . . . . . . . . . . . . . . . . . . . . . . . . . . . . 2
Disposal of your old appliance . . . . . . . . . . . . . . . . . . . . . . . . . . . . . . . . . . . . . . . . 2
Guide to the machine. . . . . . . . . . . . . . . . . . . . . . . . . . . . . . . . . . . . . . . . . . . . . . . 6
Front view. . . . . . . . . . . . . . . . . . . . . . . . . . . . . . . . . . . . . . . . . . . . . . . . . . . . . . . . . 6
Control panel . . . . . . . . . . . . . . . . . . . . . . . . . . . . . . . . . . . . . . . . . . . . . . . . . . . . . . 7
Warning and safety instructions . . . . . . . . . . . . . . . . . . . . . . . . . . . . . . . . . . . . . 8
Washing environmentally and economically. . . . . . . . . . . . . . . . . . . . . . . . . . . 11
Before using for the first time. . . . . . . . . . . . . . . . . . . . . . . . . . . . . . . . . . . . . . . 12
Flushing out the machine. . . . . . . . . . . . . . . . . . . . . . . . . . . . . . . . . . . . . . . . . . . . 12
Water hardness reminder dial . . . . . . . . . . . . . . . . . . . . . . . . . . . . . . . . . . . . . . . . 12
How to wash correctly. . . . . . . . . . . . . . . . . . . . . . . . . . . . . . . . . . . . . . . . . . . . . 13
Brief guide . . . . . . . . . . . . . . . . . . . . . . . . . . . . . . . . . . . . . . . . . . . . . . . . . . . . . . . 13
Before washing. . . . . . . . . . . . . . . . . . . . . . . . . . . . . . . . . . . . . . . . . . . . . . . . . 13
To start a programme . . . . . . . . . . . . . . . . . . . . . . . . . . . . . . . . . . . . . . . . . . . . 14
At the end of a programme. . . . . . . . . . . . . . . . . . . . . . . . . . . . . . . . . . . . . . . . 16
Adding or removing washing after programme start. . . . . . . . . . . . . . . . . . . . . . . 17
Programme . . . . . . . . . . . . . . . . . . . . . . . . . . . . . . . . . . . . . . . . . . . . . . . . . . . . . . 18
. . . interruption . . . . . . . . . . . . . . . . . . . . . . . . . . . . . . . . . . . . . . . . . . . . . . . . . 18
. . . alteration . . . . . . . . . . . . . . . . . . . . . . . . . . . . . . . . . . . . . . . . . . . . . . . . . . . 18
. . . Skipping a programme stage. . . . . . . . . . . . . . . . . . . . . . . . . . . . . . . . . . . 18
Adding detergent . . . . . . . . . . . . . . . . . . . . . . . . . . . . . . . . . . . . . . . . . . . . . . . . . 19
It is important to dispense the correct amount, because . . . . . . . . . . . . . . . . . . . 19
Adding detergent. . . . . . . . . . . . . . . . . . . . . . . . . . . . . . . . . . . . . . . . . . . . . . . . . . 20
Water softeners . . . . . . . . . . . . . . . . . . . . . . . . . . . . . . . . . . . . . . . . . . . . . . . . . . . 20
Fabric conditioners, texturisers, liquid starch . . . . . . . . . . . . . . . . . . . . . . . . . . . . 20
Automatic fabric conditioners, texturisers, or liquid starch . . . . . . . . . . . . . . . 21
Separate fabric conditioner or texturiser . . . . . . . . . . . . . . . . . . . . . . . . . . . . . 21
Starching separately. . . . . . . . . . . . . . . . . . . . . . . . . . . . . . . . . . . . . . . . . . . . . 21
3
Page 4

Contents
Programmes . . . . . . . . . . . . . . . . . . . . . . . . . . . . . . . . . . . . . . . . . . . . . . . . . . . . . 22
Programme selection. . . . . . . . . . . . . . . . . . . . . . . . . . . . . . . . . . . . . . . . . . . . . . . 22
Sequence. . . . . . . . . . . . . . . . . . . . . . . . . . . . . . . . . . . . . . . . . . . . . . . . . . . . . . . . 24
Care symbols - washing . . . . . . . . . . . . . . . . . . . . . . . . . . . . . . . . . . . . . . . . . . 26
Additional options . . . . . . . . . . . . . . . . . . . . . . . . . . . . . . . . . . . . . . . . . . . . . . . . 28
Soak . . . . . . . . . . . . . . . . . . . . . . . . . . . . . . . . . . . . . . . . . . . . . . . . . . . . . . . . . . . . 28
Pre-wash . . . . . . . . . . . . . . . . . . . . . . . . . . . . . . . . . . . . . . . . . . . . . . . . . . . . . . . . 28
Short. . . . . . . . . . . . . . . . . . . . . . . . . . . . . . . . . . . . . . . . . . . . . . . . . . . . . . . . . . . . 28
Water plus . . . . . . . . . . . . . . . . . . . . . . . . . . . . . . . . . . . . . . . . . . . . . . . . . . . . . . . 29
Spin . . . . . . . . . . . . . . . . . . . . . . . . . . . . . . . . . . . . . . . . . . . . . . . . . . . . . . . . . . . . 29
. . . . . . . . . . . . . . . . . . . . . . . . . . . . . . . . . . . . . . . . . . . . . . . . 29
. . . . . . . . . . . . . . . . . . . . . . . . . . . . . . . . . . . . . . . . . . . . . . . . . . . . . 29
Electronic programme locking. . . . . . . . . . . . . . . . . . . . . . . . . . . . . . . . . . . . . . . . 30
Programmable functions. . . . . . . . . . . . . . . . . . . . . . . . . . . . . . . . . . . . . . . . . . . 31
Maximum water level . . . . . . . . . . . . . . . . . . . . . . . . . . . . . . . . . . . . . . . . . . . . . . . 31
Water plus system . . . . . . . . . . . . . . . . . . . . . . . . . . . . . . . . . . . . . . . . . . . . . . . . . 32
Activating the i compartment. . . . . . . . . . . . . . . . . . . . . . . . . . . . . . . . . . . . . . . 34
Soak time . . . . . . . . . . . . . . . . . . . . . . . . . . . . . . . . . . . . . . . . . . . . . . . . . . . . . . . . 35
Gentle action . . . . . . . . . . . . . . . . . . . . . . . . . . . . . . . . . . . . . . . . . . . . . . . . . . . . . 36
Top-up rinse for Cottons . . . . . . . . . . . . . . . . . . . . . . . . . . . . . . . . . . . . . . . . . . . . 37
Memory function . . . . . . . . . . . . . . . . . . . . . . . . . . . . . . . . . . . . . . . . . . . . . . . . . . 38
Cleaning and care . . . . . . . . . . . . . . . . . . . . . . . . . . . . . . . . . . . . . . . . . . . . . . . . 39
Cleaning the washing machine . . . . . . . . . . . . . . . . . . . . . . . . . . . . . . . . . . . . . . . 39
Extra cleaning . . . . . . . . . . . . . . . . . . . . . . . . . . . . . . . . . . . . . . . . . . . . . . . . . . . . 39
Cleaning the detergent dispenser drawer. . . . . . . . . . . . . . . . . . . . . . . . . . . . . . . 40
Cleaning the fluff (drain) filter and pump. . . . . . . . . . . . . . . . . . . . . . . . . . . . . . . . 41
To clean the water inlet filters. . . . . . . . . . . . . . . . . . . . . . . . . . . . . . . . . . . . . . . . . 43
To clean the filter in the union in the open end of the inlet hose: . . . . . . . . . . . 43
To clean the filter in the water inlet valve: . . . . . . . . . . . . . . . . . . . . . . . . . . . . . 43
4
Page 5

Contents
Problem solving guide. . . . . . . . . . . . . . . . . . . . . . . . . . . . . . . . . . . . . . . . . . . . . 44
The programme does not start. . . . . . . . . . . . . . . . . . . . . . . . . . . . . . . . . . . . . . . . 44
The wash programme stops and a fault indicator light comes on. . . . . . . . . . . . . 45
A fault indicator light comes on but the wash programme continues as normal. . 46
General problems or an unsatisfactory wash result . . . . . . . . . . . . . . . . . . . . . . . 47
Opening the drum door in the event of a power failure. . . . . . . . . . . . . . . . . . . . . 50
After sales service . . . . . . . . . . . . . . . . . . . . . . . . . . . . . . . . . . . . . . . . . . . . . . . . 51
Customer contact . . . . . . . . . . . . . . . . . . . . . . . . . . . . . . . . . . . . . . . . . . . . . . . . . 51
Appliance guarantee . . . . . . . . . . . . . . . . . . . . . . . . . . . . . . . . . . . . . . . . . . . . 51
Future updates (PC). . . . . . . . . . . . . . . . . . . . . . . . . . . . . . . . . . . . . . . . . . . . . . . . 51
Installation . . . . . . . . . . . . . . . . . . . . . . . . . . . . . . . . . . . . . . . . . . . . . . . . . . . . . . 52
Installation surface. . . . . . . . . . . . . . . . . . . . . . . . . . . . . . . . . . . . . . . . . . . . . . . . . 52
Installation . . . . . . . . . . . . . . . . . . . . . . . . . . . . . . . . . . . . . . . . . . . . . . . . . . . . . . . 52
Removing the transit fitting . . . . . . . . . . . . . . . . . . . . . . . . . . . . . . . . . . . . . . . . . . 52
Re-fitting the transit bars . . . . . . . . . . . . . . . . . . . . . . . . . . . . . . . . . . . . . . . . . . . . 53
Levelling the machine . . . . . . . . . . . . . . . . . . . . . . . . . . . . . . . . . . . . . . . . . . . . . . 54
Screwing out and adjusting the feet. . . . . . . . . . . . . . . . . . . . . . . . . . . . . . . . . 54
Building under a worktop. . . . . . . . . . . . . . . . . . . . . . . . . . . . . . . . . . . . . . . . . . . . 55
Washer and Dryer stack . . . . . . . . . . . . . . . . . . . . . . . . . . . . . . . . . . . . . . . . . . 55
Connection to water supply . . . . . . . . . . . . . . . . . . . . . . . . . . . . . . . . . . . . . . . . . . 56
Connection to the drainage system. . . . . . . . . . . . . . . . . . . . . . . . . . . . . . . . . . . . 57
Electrical connection U.K. . . . . . . . . . . . . . . . . . . . . . . . . . . . . . . . . . . . . . . . . . . . 58
Consumption data . . . . . . . . . . . . . . . . . . . . . . . . . . . . . . . . . . . . . . . . . . . . . . . . 60
Technical Data . . . . . . . . . . . . . . . . . . . . . . . . . . . . . . . . . . . . . . . . . . . . . . . . . . . 61
5
Page 6

Guide to the machine
Front view
a Electric supply cable
b Inlet hose (able to withstand pres
sures of at least 70 bar)
c Flexible drain hose (with detachable
swivel elbow)
d Detergent dispenser drawer
6
-
e Facia panel with controls
f Door
g Access panel for drain pump, drain
filter and emergency door release
h Four height adjustable feet
Page 7
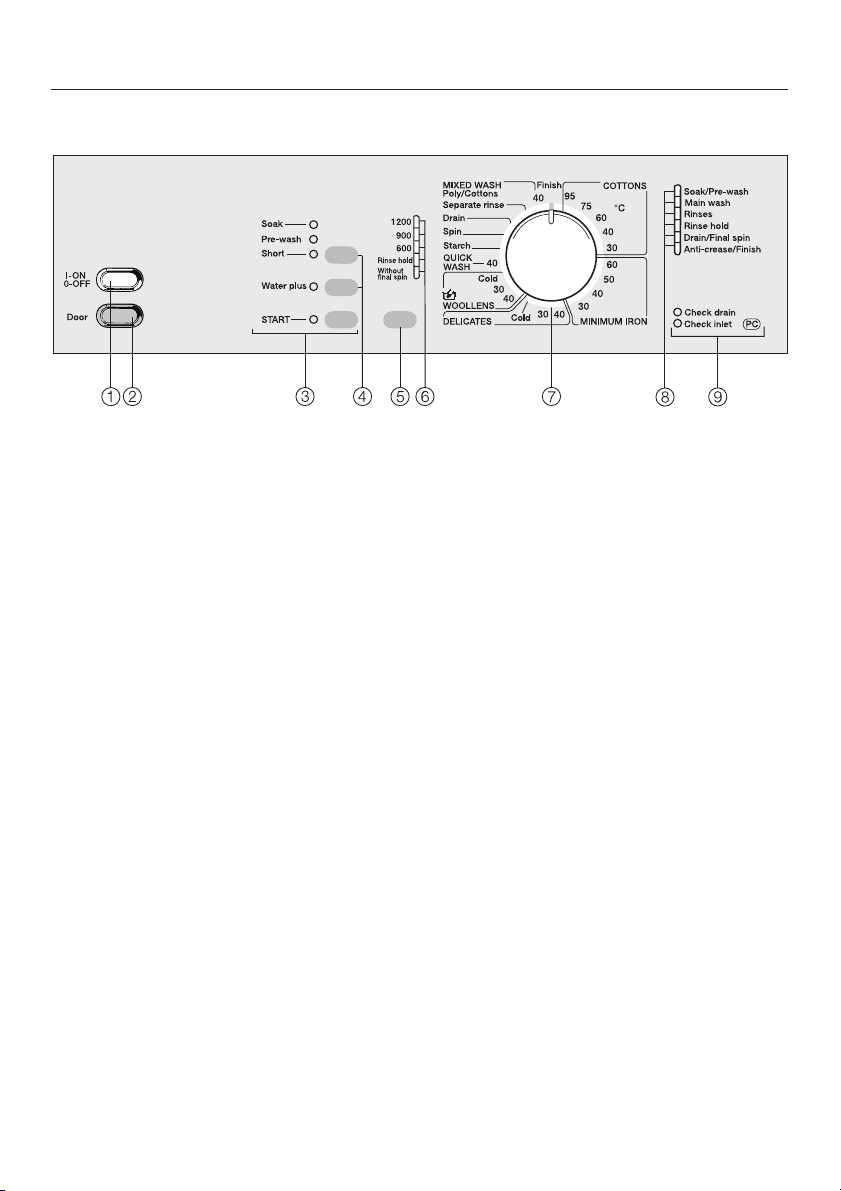
Control panel
Guide to the machine
a I-ON/0-OFF button
To switch the machine ON or OFF or
to interrupt a programme.
b Door button
Opens the machine door.
c START button
Starts the wash programme
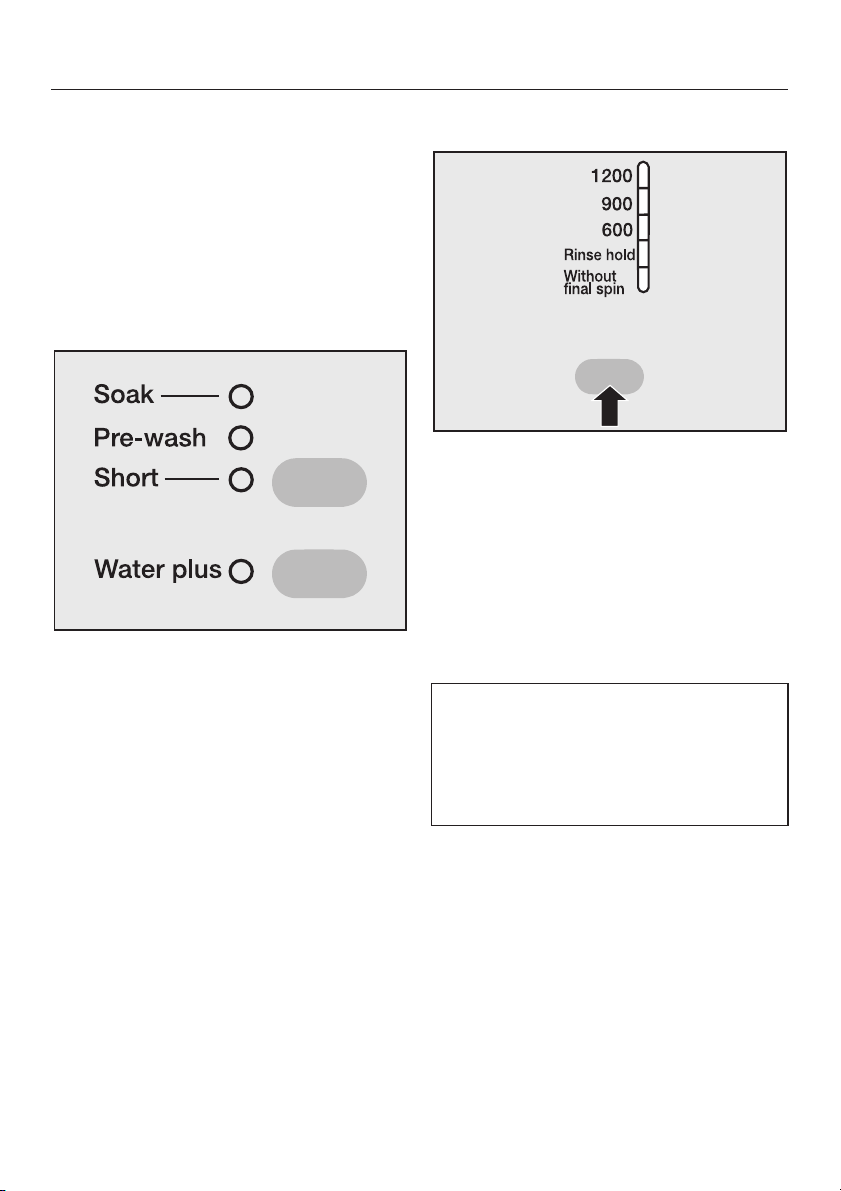
d Buttons for additional functions
The upper button is used to select either the
wash
The lower button is used to select the
additional option
Indicator light on = selected
Indicator light off = not selected
Soak,pre-washorShort
additional option.
Water plus
.
e "Spin" button
For spin speed,
Rinse hold
and
out final spin
f Indicator lights
Showing the selected spin speed.
g Programme selector
Can be turned clockwise and
anti-clockwise.
h Programme sequence indicator
lights
i Check lights
With
-
7
Page 8

Warning and safety instructions
Read the operating instructions be
fore using this machine for the first
time. They contain important infor
mation about the safety, use and
maintenance of the machine. This
way you will avoid the risk of acci
dents and damage to the machine.
Keep these operating instructions in
a safe place and ensure that new
users are familiar with the content.
Pass them on to any future owner of
the machine.
-
-
-
Correct usage
Only use the washing machine to
wash items which are specified by
the manufacturer to be machine-washable on the wash-care label, and textiles composed of hand-washable wool
or wool blend fabrics as well as satin,
lace, silk and other hand-washable garments.
Any other applications may be dangerous. The manufacturer is not liable for
damage resulting from improper use or
operation.
This appliance should not be oper
ated by children. Supervise its use
by the elderly or infirm.
supply. If in any doubt, consult a quali
fied electrician.
The electrical safety of this appli
ance can only be guaranteed when
continuity is complete between the ma
chine and an effective earthing system
which complies with local and national
regulations. It is most important that this
basic safety requirement is regularly
tested by a qualified electrician.
The manufacturer cannot be held re
sponsible for the consequences of an
inadequate earthing system (e.g. elec
tric shock).
Do not connect the appliance to
the mains electricity supply by an
extension lead. Extension leads do not
guarantee the required safety of the
appliance (e.g. danger of overheating).
The machine is built in accordance
with current safety requirements.
Unauthorised repairs could result in unforeseen dangers for the user, for which
the manufacturer cannot accept responsibility. Repairs should only be un
dertaken by a Miele approved
engineer.
-
Ensure current is not supplied to the
appliance while maintenance or repair
work is being carried out.
-
-
-
-
-
-
Technical safety
Before setting up the machine,
check it for any externally visible
damage. Do not install and use a dam
aged machine.
Before connecting the machine,
ensure that the connection data on
the data plate (fusing, voltage and fre
quency) match the mains electricity
8
The machine is only completely
isolated from the electricity supply
when:
–
-
-
it is switched off at the wall socket
and the plug is withdrawn, or
–
it is switched off at the mains, or
–
the mains fuse is withdrawn.
Page 9

Warning and safety instructions
This machine must only be con
nected to the on-site water supply
using a new hose kit. Old hoses must
not be re-used. Check the hose regu
larly for signs of wear and tear. Change
in good time to avoid the risk of leaks
and subsequent damage.
Faulty components must only be
exchanged for Miele original spare
parts. Only when these parts are fitted
can the safety standards of the ma
chine be guaranteed.
In countries where there are areas
which may be subject to infestation
by cockroaches or other vermin, pay
particular attention to keeping the appliance and its surroundings in a clean
condition at all times. Any damage
which may be caused by cockroaches
or other vermin will not be covered by
the appliance guarantee.
-
-
-
Use
This equipment is not designed for
maritime use or for use in mobile
installations such as caravans, aircraft
etc. However it may be suitable for
such usage subject to a risk assess
ment of the installation being carried
out by a suitably qualified engineer.
-
Before using the machine for the
first time, check that the transit fit
ting at the rear of the machine has been
removed (see section on "Installation").
During spinning, a transit fitting which is
still in place may result in damage to
both the machine and adjacent furni
ture or appliances.
Turn off the stopcock if the ma
chine is to be left for any length of
time (e.g. holiday), especially if there is
no floor drain (gully) in the immediate
vicinity.
Flooding danger.
If hooking the drain hose into a
wash basin, check that the water can
drain off quickly enough to prevent the
sink from overflowing.
Make sure the drain hose is secure, so
that the force of the water flowing out of
the hose does not dislodge it. Otherwise this will result in flooding.
Take care to ensure that foreign ob-
jects (e.g. nails, needles, coins,
paper clips, etc.) do not find their way
into the machine with the washing (e.g.
in pockets). Foreign objects can dam
age components of the machine, which
in turn can result in damage to the
washing.
-
-
-
-
Do not install your washing ma
chine in rooms where temperatures
below freezing may occur. Frozen
hoses may burst under pressure. The
reliability of the electronic control sys
tem may be impaired at temperatures
below freezing point.
-
-
9
Page 10

Warning and safety instructions
If the correct amount of detergent
is dispensed, the machine should
not need to be descaled. If, however,
you do wish to descale the machine
only use proprietary non-corrosive
descaling agents and strictly observe
the instructions on the packaging. If in
doubt, contact the Miele Customer Ser
vice Dept. or your Miele Dealer.
Textiles which have been
pre-treated in solvent based clean
ing agents must be thoroughly rinsed in
clean water before being washed in the
machine.
Never use solvent based cleaning
agents in this machine, as this may
result in damage to component parts
and create toxic fumes. Such detergents also pose a fire and explosion
hazard.
Only use dyes specified by the
manufacturer as being suitable for
use in a domestic washing machine. Always observe the manufacturer's instructions carefully.
Always make sure the drum is sta
tionary before reaching in to re
move washing. Reaching into a moving
drum is extremely dangerous.
Accessories
-
-
Accessory parts may only be fitted
when expressly approved by Miele.
If other parts are used, guarantee, per
formance and product liability claims
will be invalidated.
Disposal of your old machine
Before discarding an old machine
unplug it. Render the plug useless.
Cut off the cable directly behind the appliance to prevent misuse. This should
be done by a competent person.
-
-
-
Colour run and dye removers con
tain sulphur compounds which can
cause damage such as corrosion. Do
not use these products in this machine.
For machines with a ‘porthole’
door, remember that the porthole
glass will be hot when washing at very
high temperatures. Do not let children
touch it.
10
-
Page 11

Washing environmentally and economically
Water consumption and energy us
–
age are determined by the size of the
load. Load to the maximum recom
mended for the programme selected.
The washing times can vary consid
–
erably due to the automatic load ad
justment feature. Depending on the
amount of the load, the main wash
may be shortened and one rinse
omitted.
Use the
–
programme or the
programme for smaller amounts of
laundry.
– To save energy wash normally and
lightly soiled laundry at lower temperatures. The 95°C Cottons
programme is probably only needed
in exceptional circumstances, e.g.
for oil based stains or where a very
hot wash is required.
– A main wash (programme without
pre-wash) is sufficient to clean normally soiled laundry.
Mixed Wash poly/cottons
Quick Wash
Use the
–
mally or very lightly soiled laundry.
-
-
-
Do not exceed the amounts of deter
–
gent which may be recommended by
the manufacturer on the packaging.
Reduce the amounts of detergent
–
with smaller loads, (e.g. with a half
load, approx. one third less deter
gent).
Select the highest suitable spin
–
speed in the wash programme when
tumble drying afterwards.
Short
wash option for nor
-
-
-
–
By using the additional option
for heavily soiled laundry you can se
lect a lower temperature in the main
wash.
–
Use the additional option
stead of
laundry.
If
Soak
main wash the same suds are used.
Pre-wash
is followed immediately by a
with heavily soiled
Soak
Soak
-
in
-
11
Page 12
Before using for the first time
Before using the machine for the first
time ensure that it is correctly in
stalled and connected. See the rele
vant section under "Installation".
Also check that the fluff filter is se
curely tightened. Otherwise there is
a risk of water leakage during use.
Flushing out the machine
Any residual lubricants and water from
testing still in the machine should be
flushed out as follows:
Turn on the stopcock.
^
^ Do not load any laundry.
^ Add detergent to compartment j,
however
amount recommended on the packaging for a full load.
^ Press the I-ON/0-OFF button in.
^ Turn the programme selector to COT-
TONS 60°C.
only add max.1/4of the
-
-
-
Water hardness reminder dial
Several factors including the water
hardness level in your area will affect
how much detergent you should use.
The small dial in the detergent dis
penser drawer can be set purely as a
reminder of the hardness level.
^ Remove the yellow spatula from in-
side the dispenser drawer.
-
Important!
This programme must be selected in or
der to prepare the machine for spinning
and to activate the ball valve.
^
Press the
indicator light next to it will come on.
^
Press the "Spin" button repeatedly un
til the
comes on.
^
Press the START button.
^
When this programme has finished
your washing machine is ready for
using for the first time.
12
Water plus
button in. The
Without final spin
indicator light
-
-
^
Adjust the dial to the appropriate set
ting (1 = soft, 4 = very hard).
-
Page 13

How to wash correctly
Brief guide
The headings numbered (A,B,C,...)
show the operating sequence and can
be used as a brief guide.
Before washing
A Sort the laundry.
^ Empty all pockets.
Foreign objects (e.g. nails, coins,
paper clips, etc.) can cause dam
age to textiles and components in
the machine.
-
Dark textiles often contain excess dye
and should be washed separately sev
eral times before being included in a
mixed load. Always wash whites and
coloureds separately.
Delicate textiles should be washed sep
arately in a delicates programme (use a
washing bag where appropriate).
Do not wash any items in this machine
which are specified by the manufac
turer as non-machine washable on the
care label. (h symbol)
Pre-treat the laundry
Badly soiled areas, e.g. collars and
cuffs, and water soluble stains can be
pre-treated with bar soap, liquid detergent or detergent mixed into a solution
or paste.
With particularly stubborn stains ask
your dry cleaner for advice. Do not
used solvent-based cleaning agents in
this machine.
–
Curtains:
Remove lead weights and strips or
place in a laundry bag.
-
-
-
Most garments have a textile care label
in the collar or side seam. Sort the
washing by care label symbols. (See
"Programmes - Care symbols" for their
explanation).
–
Underwiring and collar stiffeners:
Any loose wiring in bras, shirt collar
stiffeners, etc. should be removed or
sewn in.
–
Knitted garments, trousers and
jeans, T-shirts and sweat shirts:
Turn inside out, if recommended by
the manufacturer.
–
Close any zips, fasten hooks and
eyes etc. before washing.
–
Fasten duvet covers to prevent
smaller items rolling up inside them.
13
Page 14
How to wash correctly
B Press the Door button.
C Load the drum.
Unfold washing and load loosely in the
drum. To achieve best results it is ad
visable to make up mixed loads con
sisting of both large and small items.
This improves the washing effect and
helps distribute the load evenly to keep
the machine stable and reduce the
noise level during spinning.
Overloading reduces the wash result
and causes more creasing.
Maximum load weights are noted below:
COTTONS . . . . . . . . . . . . . . . . . . 5.0 kg
MINIMUM IRON. . . . . . . . . . . . . . 2.5 kg
DELICATES/SYNTHETICS . . . . . . 1.0 kg
WOOLLENS / . . . . . . . . . . . . . . 2.0 kg
QUICK WASH . . . . . . . . . . . . . . . 2.5 kg
MIXED WASH (Poly/Cottons). . . . 3.0 kg
-
-
To start a programme
G Press in the I-ON/0-OFF button.
The programme selector should be
–
pointing to Finish, the indicator light
Anti crease/Finish
sequence display.
H Turn the programme selector to
the programme required
See section "Programmes, Programme
survey".
is lit up in the
D Shut the door with a light swing
but do not slam it. Do not push on
the door to shut it.
Make sure that there is no obstruction
between the drum door and seal.
E Open the stopcock.
F Add detergent.
See section on "detergent" for details.
14
Page 15
How to wash correctly
I Select any additional option re
quired.
A maximum of two additional options
can be chosen, provided they are com
patible with the programme selected,
(see the Programme survey in the Sec
tion on programmes). Only one option
out of
Soak,Pre-wash
can be selected.
^ Press the button for the
Pre-washorShort wash
options, until the indicator for the
chosen option lights up.
^
Press the button for the
option, if required.
An additional option that has been se
lected can be de-selected by pressing
the button.
and
Short wash
Soak
additional
Water plus
-
,
J Select a spin speed.
-
-
Press the "Spin" button enough times
^
until the indicator light for the required final spin speed lights up.
In some programmes the maximum
spin speed is limited. The machine will
not allow a higher spin speed to be selected (see section on "programmes").
Memory-Function
If the last time a programme was run
an additional option or different spin
speed was selected,the machine will
have stored this information in its
memory.
The next time that programme is se
lected the machine offers the additional
option and / or spin already stored in
memory (see "Programmable func
tions").
-
-
K Press the START button.
The programme now starts.
15
Page 16

How to wash correctly
At the end of a programme
When the
on the laundry can be removed from
the drum:
L Press the Door button.
M Press and release the I-ON/0-OFF
button and turn the programme se
lector to the Finish position.
N Remove the washing.
,
machine once the drum has
stopped turning, otherwise you may
seriously injure yourself.
Finish
indicator light comes
Only remove washing from the
P Close the stopcock.
Q Close the drum door.
Otherwise there is a danger of objects
being placed inadvertently in the drum.
If these remained unnoticed and were
washed in the next load, they could
damage the washing.
-
O Check the folds in the door seal for
any small articles e.g. buttons
which might be lodged there.
16
Page 17

How to wash correctly
Adding or removing washing
after programme start
Washing can be added or removed af
ter the programme has already started,
when using the following programmes.
COTTONS
–
MINIMUM IRON
–
WOOLLENS /
–
QUICK WASH
–
Starch
–
MIXED WASH
–
Door
^ Press the
the door springs open.
^ Add or remove items
^ Shut the door.
The programme will automatically continue.
– Apart from some exceptional cases
the door can be opened during all
sections of COTTONS, WOOLLENS,
QUICK WASH,
WASH percentage) programmes.
Poly/Cottons
button and hold it until
Starch
and MIXED
(high cotton
General exceptions:
The door cannot be opened when:
-
the suds temperature is above 55°C.
–
the additional option
–
been selected,
programme locking is switched on,
–
the programme has reached the
–
nal spin
stage.
Water plus
has
Fi
-
–
With MINIMUM IRON and
MIXED WASH polyester percentage) the door can
be opened during the main wash
with some exceptions.
Poly/Cottons
(high
17
Page 18

How to wash correctly
Programme . . .
. . . interruption
Press the I-ON/0-OFF button.
^
To continue with the same
^
programme press the I-ON/0-OFF
button again.
. . . alteration
The machine will accept the following
changes after the START button has
been pressed,
– selection of a different temperature,
extra selection or de-selection of the
Water plus
up to 6 minutes after start.
– the spin speed for final spin can be
changed if the programme permits.
After start it is no longer possible to select a different programme.
If a different programme or 6 minutes
after start another temperature is selected the indicator light
Anti-crease/Finish
not affect the programme sequence.
The indicator light goes out when the
programme selector is set back to the
programme or temperature previously
chosen.
option can be carried out
flashes. This does
To select a different programme pro
ceed as follows:
With the I-ON/0-OFF button switch off
^
the appliance.
Turn the programme selector to
^
.
ish
Switch the machine on with the
^
I-ON/0-OFF button.
Select a new programme.
^
Press the START button.
^
. . . Skipping a programme stage
^ Turn the programme selector to
ish
.
As soon as the programme sequence
light for the stage at which the
programme should continue starts
flashing:
^ Turn the programme selector switch
to the appropriate programme within
4 seconds.
When programme locking has been
activated the programme cannot be
changed nor can a programme
stage be repeated or left out.
-
Fin
Fin-
-
18
Page 19

Adding detergent
All modern detergents produced for
automatic washing machines are suit
able, including liquid, compact (con
-
centrated), tablets, liquid tablets and
special application detergents. Use dis
pensing aids, e.g. balls, if these are
supplied with the detergent. Tablets are
suitable for full loads, but note that it
may be impractical to reduce tablets by
proportion to suit smaller loads.
Woollens and knitwear containing wool
mixtures and hand-washable garments
should be washed using a detergent
specifically designed for washing
woollens.
Silk should be washed using a liquid
detergent specifically designed for
washing woollens. Do not use biological detergents on silk as the enzymes
may damage the silk!
Add detergent according to the amount
recommended on the packaging. The
right amount to dispense will depend
on the following:
–
The quantity of laundry.
–
The soiling level of the laundry.
Lightly soiled
No visible dirt or stains. Possibly
slight body odour.
Normally soiled
Visibly dirty and/or just a few slight
stains.
Water Hardness
-
Hardness
range
I soft 0 - 1.3 0 - 7
II medium 1.3 - 2.5 7 - 14
III hard 2.5 - 3.8 14 - 21
IV very hard over 3.8 over 21
Type of
water
(hardness)
Hardness
level in
mmol / l
It is important to dispense the
correct amount, because . . .
. . . too little has the following results:
– Laundry will not be properly clean
and will in time become grey and
hard to the touch.
– Greasy particles cling to the laundry.
– Limescale deposits on the heater el-
ements.
. . . too much results in the following:
– Excessive foam.
–
Low level of agitation.
–
Poor washing, rinsing and spinning
results.
–
High water consumption (an addi
tional rinse cycle will automatically
switch in).
–
Burdening the environment.
°dH
German
-
Heavily soiled
Stains and soiling clearly visible.
–
The water hardness level
Check with your local water supplier
if you do not know the water hard
ness level.
-
19
Page 20

Adding detergent
Adding detergent
i = Compartment soak/pre-wash.
This compartment is also used
for starch formulations when
starching separately.
j = Compartment main wash
p = Compartment fabric conditioner
Water is taken in through compartment
i in the pre-wash.
Water is taken in through compartment
j in the main wash. If the capacity of
compartment j is insufficient for the
amount of detergent needed for a
COTTONS programme (e.g. in very
hard water areas), the machine can be
programmed so that water and deter
gent can also be taken into the main
wash through compartment i , see
"Programmable functions", "Activating
compartment i".
-
Water softeners
A water softener can be used to cut
down on the use of detergents in ex
tremely hard water areas. Dispense ac
cording to the amount specified on the
packaging. First add detergent and
then the water softener.
Use a quantity of detergent as for soft
water.
Miele do not recommend connecting
the machine to a household water soft
ener.
If you wash using several components
(e.g. special application detergents),
we recommend always dispensing the
agents into compartment j in the following order:
1. Detergent
2. Water softener
3. Stain remover
This way the agents are distributed
more efficiently.
-
Fabric conditioners,
texturisers, liquid starch
Fabric conditioners make garments soft
and fluffy to handle and help prevent
static cling when tumble drying.
Texturisers are synthetic starch formula
tions and give body to items e.g. shirts,
tablecloths and bed linen.
-
-
-
20
Starch gives body to items of washing.
^
Dispense according to the amount
specified on the packaging.
Page 21

Adding detergent
Automatic fabric conditioners,
texturisers, or liquid starch
Open the lid of compartment p.
^
^ Add the fabric conditioner, texturiser
or liquid starch. Do not exceed the
maximum level mark.
^ Close the compartment lid.
^ Push the drawer back in.
Separate fabric conditioner or
texturiser
Add fabric conditioner or texturiser to
^
the compartment p.
Turn the programme selector to
^
Starch
.
Select a spin speed.
^
Press the START button.
^
Starching separately
Measure and prepare starch in ac
^
cordance with the manufacturer’s in
structions.
^ Add the starch to compartment i.
^ Turn the programme selector to
Starch
.
^ Select a spin speed.
^ Press the START button.
-
-
The conditioner, texturiser or liquid
starch is automatically dispensed in the
last rinse. At the end of the programme
a small amount of water remains in the
fabric conditioner compartment p.
If starching frequently, clean the dis
penser compartment and especially
the siphon tube and conditioner
channel. (See section on the deter
gent dispenser drawer in "Cleaning
and Care") .
-
-
21
Page 22

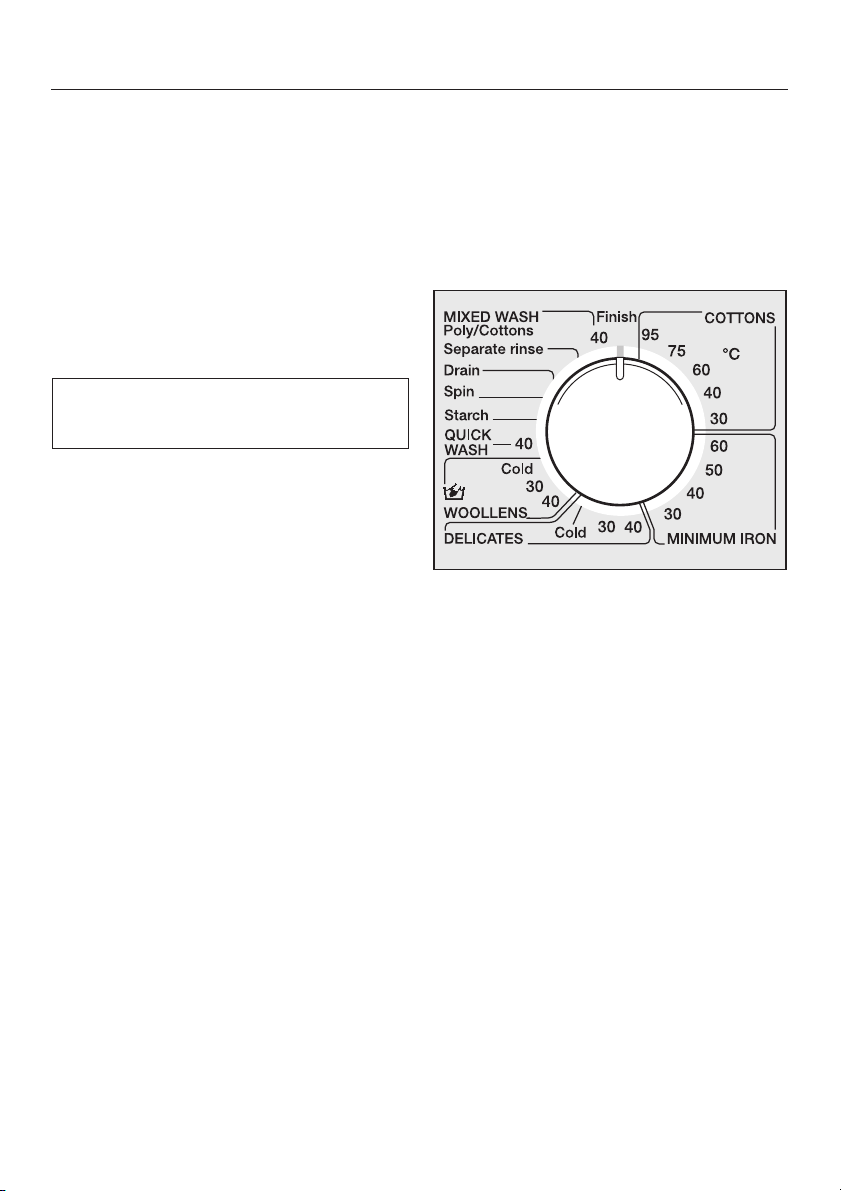
Programmes
Programme selection
Programme Fabric Temperature max.
COTTONS
e
Cottons and linen fabrics, e.g. bed linen, table
linen, towelling, jeans, underwear, T-shirts, nap
pies.
95°C to 30°C 1200
-
spin speed
COTTONS
e
MINIMUM IRON
ef
DELICATES
f
WOOLLENS
/g
QUICK WASHeVery lightly soiled fabrics, which can be washed in
Starch Table cloths, napkins, overalls, uniforms. cold 1200
Spin Articles which can be spun, e.g. handwashed
Drain
Separate rinsefArticles which should be washed by hand and
MIXED WASH
Poly/Cottons
Wash load as for standard tests 60°C 1200
(60°C) white nylon, white polyester fabrics (50°C),
coloured nylon, polyester, cotton and viscose fab
rics with special finishes, acrylic, cotton fabrics,
coloured polyester / cotton fabrics, (40°/30°C) min
imum iron fabrics not washable at higher tempera
tures
Acrylics, acetate and triacetate, socks and stock
ings in man-made fibres, (not wool or wool blends)
Curtains, specified machine-washable by the
manufacturer (pre-wash probably advisable).
Programme for machine-washable or hand-washable wool or wool blend fabrics.
Also suitable for satin, lace, silk and other
hand-washable garments*.
the Cottons programme.
items, max weight according to fabric.
only rinsed and spun in the machine.
Suitable for small loads of garments made from
man-made fibres and cotton garments which can
be washed together. Sort according to colour.
60°C to 30°C 900
-
-
-
40°C to cold 600
-
30°C to cold 600
40°C to cold 1200
40°C 1200
cold 1200
40°C 900
*
1200
cold:
Cold
is selected for the temperature, the water is warmed to 24°C. This uniform temperature helps
If
the effect of the detergent.
22
Page 23

max. load Additional options Notes
Programmes
5 kg
5 kg For test institutes:
2.5 kg
1 kg
Fill the drum
1
loosely
Do not overload
/2to3/
full
2 kg
2.5 kg
5 kg The washing should be washed, but not treated with fabric
5 kg
Soak
–
Pre-wash
–
Short
–
Water plus
–
(Option 1,2,3,4)
Soak
–
Pre-wash
–
Short
–
Water plus
–
(Option 1,2,4)
Soak
–
Pre-wash
–
Short
–
Soak
–
Pre-wash
–
4
– Short
–
Water plus
(Option 1,2,4)
With heavily soiled items select
dark colours in liquid detergent.
For normally soiled items select
Programme setting for tests according to EN 60456 Stan
dard Programme
With heavily soiled items select
For normally soiled items select
f If fabrics have a high proportion of man-made fibres
it is advisable to programme the machine for
Action
. see "Programmable functions"
Use the Wool programme for textiles with wool content
Dust in curtains usually makes pre-wash advisable.
Use liquid wool detergent.
Hand washable garments will not shrink, stretch, matt or felt
beyond the accepted tolerance.
*For satin, lace, silk and other hand washable garments
manually reduce the spin speed or select without final spin.
Add less detergent (half load)
conditioner.
SoakorPre-wash
Short
.
SoakorPre-wash
Short
. Wash
-
Gentle
5 kg
3 kg
See Section on Additional options for more details.
–
Soak
–
Pre-wash
–
Short
–
Water plus
(Option 1,2,3*,4*)
The water level, number of rinses and programme time are
set automatically in relation to composition of the washing
(see "Programmes" Sequence).
*Option is only carried out with a high proportion of cotton.
23
Page 24

Programmes
Sequence
3 or 4
2
2
low
low
1)
MINIMUM
1)
IRON
2)
3
2
2
low
medium
DELICATES WOOLLENS
3
3
3
high
high
/
2
2
–
medium
medium
COTTONS
Soak optional optional optional –
Pre-wash optional optional optional –
Main wash ßßßß
Top-up rinse from 75°C programmable – – –
Graduated rinsing – from 50°C – –
No. of rinses
normal
–
part load
–
short
–
Rinse and interim spin (rpm) max. 1000 max. 500 – max. 600
Final spin (rpm) max. 1200 max. 900 max. 600 max. 1200
Anti-crease, loosen max. 30 mins max. 30 mins max. 30 mins –
Rinse hold optional optional optional optional
Without final spin optional optional optional optional
Wash rhythm normal normal gentle action Wool
Water level – Wash
– Rinse
Explanations:
ß Programme section included
– Programme section not included
1)
Load recognition:
The programme sequence is modified in these programmes according to the absorbency of the load.
2)
A 4th rinse automatically switches in if there is too much foam in the drum, or if a spin speed lower
than 700 rpm has been selected.
Wool:
Wool is susceptible to damage from movement when it is wet. The wash action during the course of
the programme is low.
24
Page 25

Programmes
Quick Wash Starch Spin Separate rinse MIXED WASH
high cotton
content
––––optional optional
– ß – – optional optional
ß –––ßß
––––––
–––––ß
2)
2
2
–
max. 500 – – – max. 900 max. 500
max. 1200 max. 1200 max. 1200 max. 1200 max. 900 max. 900
max. 30 mins max. 30 mins max. 30 mins – max. 30 mins max. 30 mins
optional optional – optional optional optional
optional optional 2 optional optional optional
normal normal – gentle action normal normal
low
medium
Top-up rinse (programmable):
At the end of the main wash additional water flows into the drum, and the suds are cooled slightly. Hot
water might damage plastic drain pipes.
Graduated rinsing:
The suds are cooled at the end of the wash cycle by water flowing in and being pumped away at inter
vals thereby minimising crease formation.
Rinse and interim spin:
There is a spin between the rinses.
Final spin:
The maximum spin speed according to the programme can be selected with the Spin button. In the
programmes MINIMUM IRON, DELICATES, and MIXED WASH, the spin speed is automatically limited
to the above stated maximum spin speed.
Anti-crease, loosen:
The anti-crease action guards against the tendency for creases to set in if laundry is not removed from
the drum as soon as a programme has finished. There is drum movement twice a minute. The door
can be opened and laundry removed at any time during the anticrease phase.
–
–
–
low
–
–
–
–
–
–
2
–
–
–
high
3 or 4
2
2
low
low
1)
high polyester
content
3
2
2
low
medium
-
25
Page 26

Programmes
Care symbols - washing
Care
symbols
e
no bar
f*
single bar
g
broken
bar
Fabric
types
Cottons Normal (maxi
Synthetics Reduced (me
Woollens Much reduced
Description of
process
mum) machine
action and nor
mal spinning
dium) machine
action and re
duced spinning
(minimum) machine action but
with normal
spinning
Programme:
(select the appropriate temperature ac
cording to the temperature on the care
label symbol)
Cottons, Minimum iron, Quick wash
-
-
Delicates
-
-
*If the gentle action option has been
programmed into your machine via the
programmable functions, garments
with a single bar under the care label
f can also be processed using a
Cottons, Minimum Iron, Quick wash,
Mixed Wash or Starch programme.
Hand Wash Woollens programmes.
-
26
Page 27

Important - other care symbols
/ Hand wash (if a temperature
is not specified, use the low
est temperature or cold)
h Do not wash
apf Dry clean
D Do not dry clean
y Suitable for chlorine bleach
ing
z Do not use chlorine bleach
Tumble dry
q At normal temperature
r At low temperature
s Do not tumble dry
Ironing
Programmes
-
-
I Hot iron
H Medium hot iron
G Cool iron
J Do not iron
N.B. If you have any textiles with the
older wash care labels, select a
programme according to the label be
low:
[:\] Cottons
?;\ Minimum iron
={ Delicates
# Woollens
-
27
Page 28

Additional options
To select an additional option to the ba
sic programme press the button for that
option. The indicator light for the option
comes on.
If an additional option is chosen which
is incompatible with the basic
programme, (see Programme selection
chart), the indicator light goes out when
the button is released.
If a spin speed is chosen which is un
suitable for the programme (see
Programme selection chart), pressing
the button has no effect.
-
Soak
For heavily soiled and stained items
with protein stains (e.g. blood, fats
and oils, cocoa).
– A length of time of between 30 min-
utes and 2 hours can be chosen, in
Soak
30 minute periods, for the
cess.
pro-
Adding detergent for the Soak op
-
tion:
Add the total amount into compart
ment j or directly on to the laundry
in the drum.
Pre-wash
For heavily soiled and stained items
Short
This shortens the programme running
time. For normally soiled items.
In the COTTONS, MINIMUM IRON and
MIXED WASH
programmes only two rinse cycles are
carried out with a higher water level.
Poly/Cottons
-
-
–
The machine is set as standard to
two hours soak time.
See the section "Programmable func
tions" for reprogramming to a differ
ent time.
28
-
-
Page 29

Additional options
Water plus
The water level increases in
pre-wash,main wash
and / or an extra rinse can be carried
out.
You can choose between four options
for the
The options can be called up through
one of the programmable functions,
(see Water plus system in the Section
on programmable functions).
Switching off the additional options
If an additional option is switched on
(and the indicator light in the button is
lit up), the option can be switched off
by pressing the button. The indicator
light goes out.
Water plus
button.
and / or
soak
rinses
,
Spin
A final spin is carried out at the end
of each of the basic programmes, if a
,
spin speed had been selected.
Without final spin
Interim rinse and spin is carried out in
the relevant programmes.
Washing is not spun after the final rinse,
but the water is drained away, and the
machine goes straight into the
anti-crease stage.
Rinse hold
Interim rinse and spin is carried out
during the programme cycle.
The washing remains suspended in water after the final rinse.
This helps to reduce the possibility of
creasing if the washing is left for some
time before being taken out of the machine.
To continue the programme:
Select the required spin speed with the
Spin button.
The maximum spin speed is automati
cally limited according to the basic
wash programme chosen, (See
Programme Survey section).
-
29
Page 30

Additional options
Electronic programme locking
Programme locking prevents the ma
chine from being opened or the
programme cancelled during a wash
programme.
Switching on programme locking
Select a programme, (see Brief guide
^
to washing correctly).
Press the START button for at least 5
^
seconds.
Programme locking is now activated.
The machine will now not accept any
changes, and the wash programme
proceeds through to the end.
At the end of the wash programme, the
programme locking is discontinued, so
that a new wash programme can be
chosen.
Switching off programme locking
early
Press the START button for at least 5
^
seconds.
Exception:
The indicator light
the Sequence display flashes.
Turn the programme selector to the
^
programme previously chosen. The
Anti-crease/Finish
Press the START button for at least 5
^
seconds.
To check if programme locking is
switched on
^ - Press the ‘Spin’ button.
– If the spin speed indicator light does
not change:
Programme locking is activated.
– If the spin speed indicator light
changes:
Anti-crease/Finish
light goes out.
in
30
Programme locking is not activated.
Page 31

Programmable functions enable the
user to introduce further features as
required. They remain stored in
memory until they are cancelled by
the user.
Programmable functions
Selecting the programmable function
To select the "Maximum water level"
programmable function: turn the
programme selector to -
MIXED WASH Poly/Cottons***.
Maximum water level
The water level for rinsing is automat
ically raised to the maximum level
where rinse results are particularly
important.
It is effective for the rinses in the follow
ing programmes:
- COTTONS
- MINIMUM IRON
- QUICK WASH
- MIXED WASH Before the "Maximum water level" pro-
grammable function can be selected
you must first select programming
mode.
Selecting programming mode
A The machine must be switched off
and the drum door closed. The
programme selector must point to
Finish
.
B Press the additional option buttons
Short
and
time and hold pressed in and:
Poly/Cottons
Water plus
at the same
Activating
To activate "Maximum water level"
press the START button once.
The
Rinses
quence display.
Storing in memory
To store the "Maximum water level" pro-
grammable function in the memory
SWITCH the machine OFF with the
I-ON/0-OFF button.
The "Maximum water level" programmable function is now stored in the machine’s memory and is effective in the
programmes described above until
such time as you may wish to deactivate it.
Deactivating
To deactivate the use of a maximum
water level in the rinses repeat the pro
cedure given above from point A as far
as the *** shown above. Press the
START button and the
light will go out. The function is now de
activated. Store in memory by pressing
the I-ON/0-OFF button.
light comes on in the se
Rinses
-
-
indicator
-
C . . . switch the machine on with the
I-ON/0-OFF-button.
D Let go of all these buttons.
The indicator light
the sequence display.
Main wash
flashes in
31
Page 32

Programmable functions
Water plus system
The
Water plus
tions, increasing water level and / or
bringing in an extra rinse cycle. To
activate the option press the
plus
button when selecting your wash
programme before pressing the
START button.
Option 1
Increase in the rinse water level in the
COTTONS, MINIMUM IRON, QUICK
WASH and MIXED WASH -
Poly/Cottons
ample rinse results are particularly important.
Option 2
Increase in the water level in all stages
of the COTTONS, MINIMUM IRON,
QUICK WASH and MIXED WASH -
Poly/Cottons
larly suitable for fabrics that need special care, or where extra attention must
be given to dissolving detergent. This
option is already set when the machine
is delivered from the factory.
Option 3
An extra rinse cycle is introduced to the
Cottons programme, e.g. when rinse re
sults are particularly important.
Option 4
button offers four op
-
Water
programmes, where for ex-
programmes. It is particu-
programme, e.g. when rinse results are
particularly important.
Before the "Water plus system" pro
grammable function can be selected
you must first select programming
mode.
Selecting programming mode
A The machine must be switched off
and the drum door closed. The
programme selector must point to
Finish
.
B Press the additional option buttons
Short
and
Water plus
time and hold pressed in and:
C . . . switch the machine on with the
I-ON/0-OFF-button.
D Let go of all these buttons.
The indicator light
the sequence display.
Selecting the programmable function
To select the "Water plus system" pro
grammable function turn the
programme selector to - Separate
rinse. The indicator lights in the se
quence display correspond to the four
options available. As Option 2 has been
set at the factory, when the programme
-
selector is turned
dicator light for Option 2
come on.
at the same
Main wash
flashes in
Separate rinse
Rinse hold
-
-
-
, the in
will
-
Increase in the water level in all stages
of the COTTONS, MINIMUM IRON,
QUICK WASH and MIXED WASH -
Poly/Cottons
extra rinse cycle to the COTTONS
32
programmes and adds an
Page 33

Programmable functions
Selecting the Options
By pressing the START button you can
select the other options. To confirm a
new selection another indicator light co
mes on and the previous one goes out.
Each time START is pressed a different
indicator light comes on. The indicator
lights correspond the the four options
as follows:
Option 1 =
Option 2 =
Option 3 =
Option 4 =
Rinse
Rinse hold
Drain / Spin
Anti crease / Finish
Storing in memory
When you have selected the Option you
require, SWITCH the machine OFF with
the I-ON/0-OFF button. The Option is
stored in the machine’s memory.
33
Page 34

Programmable functions
Activating the i
compartment
This function should be activated if
traditional "big box" detergents are
used. For the first 10 seconds of the
Cottons main wash cycle water flows
in through compartment i.
Compartment j may sometimes not
be able to hold the total amount of de
tergent required when:
- the water is very hard (over 3.8
mmol/l, water hardness level IV) and
- the washing is heavily soiled.
In this case compartment i can be
used to flush in the extra detergent for
the main wash.
Before the "Activating the i compartment" programmable function can be
selected you must first select programming mode.
Selecting programming mode
A The machine must be switched off
and the drum door closed. The
programme selector must point to
Finish
.
Selecting the programmable function
To select the "Activating the i com
partment" programmable function turn
the programme selector to - Spin ***.
Activating
To activate "Activating the i compart
ment" press the START button once.
The
Rinses
-
quence display.
Storing in memory
To store the "Activating the i compart
ment" programmable function in the
memory SWITCH the machine OFF with
the I-ON/0-OFF button.
The "Activating the i compartment"
programmable function is now stored in
the machine’s memory.
Deactivating
To deactivate the use of Compartment
i repeat the procedure given above
from point A as far as the *** shown
above. Press the START button and the
Rinses
function is deactivated. Store in mem
ory by pressing the I-ON/0-OFF button.
light comes on in the se
indicator light will go out. The
-
-
-
-
-
B Press the additional option buttons
Short
and
Water plus
time and hold pressed in and:
C . . . switch the machine on with the
I-ON/0-OFF-button.
D Let go of all these buttons.
The indicator light
the sequence display.
34
at the same
Main wash
flashes in
Page 35

Programmable functions
Soak time
This is accessed for a programme by
pressing the SOAK button on the fa
cia.
You can programme a soak time of:
- 2 hours (factory setting) or
- 1 hour 30 mins or
- 1 hour or
- 30 mins.
A "Soak time" of 2 hours is set at the
factory. If you wish to change this standard setting to one of the times listed
above, you must first select programming mode.
Selecting programming mode
A The machine must be switched off
and the drum door closed. The
programme selector must point to
Finish
.
B Press the additional option buttons
Short
and
Water plus
time and hold pressed in and:
C . . . switch the machine on with the
I-ON/0-OFF-button.
D Let go of all these buttons.
The indicator light
the sequence display.
at the same
Main wash
flashes in
-
Selecting the programmable function
To select the "Soak time" programmable
function turn the programme selector to
- WOOLLENS Cold.
The
Rinse
indicator light comes on in
the sequence display. This shows that
a "Soak time" of 2 hours is currently se
lected (factory setting).
Selecting a different "Soak time"
By pressing the START button a various
number of times you can select differ
ent soak times. To confirm that a differ
ent soak time has been selected, the
previous indicator light goes out and a
new indicator light comes on.
Each time START is pressed a different
indicator light will come on. The indicator lights correspond to the 4 soak
times available as follows:
2 hours =
1 hour 30 mins =
1 hour =
30 mins =
Storing in memory
When you have selected the soak time
you require, SWITCH the machine OFF
with the I-ON/0-OFF button.
The "Soak time" you have selected is
now stored in the machine’s memory.
Rinse
Rinse hold
Drain\Spin
Anti crease\Finish
-
-
-
35
Page 36

Programmable functions
Gentle action
For gentle washing of slightly soiled
items. Drum action is reduced.
Gentle action can be used with the
COTTONS, MINIMUM IRON, QUICK
WASCH, MIXED WASH and
Starch
If "Gentle action" has been pro
grammed, every wash cycle in these
programmes is carried out with gentle
action rhythm.
Before the "Gentle action" programma
ble function can be selected you must
first select programming mode.
Selecting programming mode
A The machine must be switched off
and the drum door closed. The
programme selector must point to
Finish
B Press the additional option buttons
Short
time and hold pressed in and:
C . . . switch the machine on with the
I-ON/0-OFF-button.
D Let go of all these buttons.
The indicator light
the sequence display.
programmes.
.
and
Water plus
Poly/Cottons
at the same
Main wash
-
flashes in
Selecting the programmable function
To select the "Gentle action" program
mable function turn the programme se
lector to -
WOOLLENS 40 °C ***.
Activating
To activate "Gentle action" press the
START button once.
The
Rinses
quence display.
Storing the programmable function
-
in memory
To store the "Gentle action" programmable function in the memory SWITCH the
machine OFF with the I-ON/0-OFF button.
The "Gentle action" programmable
function is now stored in the machine’s
memory.
Deactivating
If the "Gentle action" programmable
function is no longer required it can be
deactivated. To do so repeat the proce
dure given above from point A as far
as the *** shown above. Press the
START button and the
light will go out. The function is now de
activated. Store in memory by pressing
the I-ON/0-OFF button.
light comes on in the se
Rinses
-
-
-
-
indicator
-
36
Page 37

Programmable functions
Top-up rinse for Cottons
At the end of the main wash addi
tional water flows into the drum to
cool the suds down.
Hot suds can damage plastic drainage
pipes.
Top-up rinse takes place when temper
atures of 95°C and 75°C are selected.
Top-up rinse should be activated:
to prevent the danger of scalding if
–
the drain hose is hooked over the
edge of a sink or basin.
– where the drainage pipes do not
comply with DIN 1986.
The washing machine is delivered with
the "Top-up rinse for Cottons" deactivated.
Before the "Top-up rinse for Cottons"
programmable function can be selected you must first select programming mode.
Selecting programming mode
A The machine must be switched off
and the drum door closed. The
programme selector must point to
Finish
.
B Press the additional option buttons
Short
and
Water plus
time and hold pressed in and:
at the same
-
Selecting the programmable function
To select the "Top-up rinse for Cottons"
programmable function turn the
programme selector to -
DELICATES cold ***.
Activating
To activate "Top-up rinse for Cottons"
press the START button once.
The
Rinses
quence display.
Storing in memory
To store the "Top-up rinse for Cottons"
programmable function in the memory
SWITCH the machine OFF with the
I-ON/0-OFF button.
The "Top-up rinse for Cottons" programmable function is now stored in the machine’s memory.
Deactivating
If the "Top-up rinse for Cottons" programmable function is no longer re
quired it can be deactivated. To do so
repeat the procedure given above from
point A as far as the *** shown above.
Press the START button and the
indicator light will go out. The function
is now deactivated. Store in memory by
pressing the I-ON/0-OFF button.
light comes on in the se
-
-
Rinses
C . . . switch the machine on with the
I-ON/0-OFF-button.
D Let go of all these buttons.
The indicator light
the sequence display.
Main wash
flashes in
37
Page 38

Programmable functions
Memory function
If an additional option is selected for
a programme, and / or the spin op
tion is altered, the machine stores
these changes in memory at the start
of a programme.
The memory function is active when the
machine is first delivered but can be
programmed to be switched off.
Deactivating
First select programming mode.
Selecting programming mode
A The machine must be switched off
and the drum door closed. The
programme selector must point to
Finish
.
B Press the additional option buttons
Short
and
Water plus
time and hold pressed in and:
C . . . switch the machine on with the
I-ON/0-OFF-button.
D Let go of all these buttons.
at the same
-
As this programmable function is active
when the machine is first delivered, the
Rinses
the sequence display as soon as the
programme selector is turned to
DELICATES 30°C.
To deactivate the "Memory" function
press the START button and the light
will go out. The memory function is now
deactivated.
Storing in memory
To store this setting in memory SWITCH
the machine OFF with the I-ON/0-OFF
button.
Reactivating
To reactivate the memory function repeat the procedure given above from
point A as far as the *** shown above.
Pressing the START button again will reactivate the "Memory" function and the
Rinses
again. The function is now reactivated.
Store in memory by pressing the
I-ON/0-OFF button.
indicator light will come on in
indicator light will come on
The indicator light
the sequence display.
Deactivating the programmable func
tion
To de-select the "Memory" programma
ble function turn the programme selec
tor to
DELICATES 30°C ***.
38
Main wash
flashes in
-
-
-
Page 39

Cleaning and care
Cleaning the washing machine
Clean the casing with a mild
^
non-abrasive detergent or soap and
water. Wipe dry with a soft cloth.
Clean the facia panel and lid with a
^
damp cloth and dry with a soft cloth.
The drum can be cleaned using a
^
suitable proprietary stainless steel
cleaner.
Do not use abrasive cleaners, glass
cleaners or all-purpose cleaners.
These might cause damage to the
plastic surfaces because of the
chemicals they contain.
E-cloth
A microfibre "E-Cloth" is available from
the Miele UK Spare Parts Department,
Part Number 98013530, which is suitable for cleaning surfaces such as
stainless steel, glass, plastic and
chrome without the use of chemicals.
Extra cleaning
Carrying out a hot wash (70°C or
above) with powder detergent approx.
once every six weeks will help to en
sure that no deposits build up in the
machine. These can occur when wash
ing is mainly done at low temperatures,
and also lead to unpleasant smells. If
you have no reason to wash laundry oc
casionally at this high temperature, then
carry out a 95°C COTTONS programme
as a cleaning cycle with powder deter
gent and no washing, at regular inter
vals.
-
-
-
-
-
39
Page 40

Cleaning and care
Cleaning the detergent
dispenser drawer
Pull out the detergent dispenser
^
drawer until a resistance is felt.
^ Press down the red release catch
and at the same time pull the drawer
right out of the machine.
Clean the dispenser compartments
^
and conditioner channel.
Regularly remove any detergent residues.
40
^
Remove the siphon tube from com
partment p.
Wash under running warm water and
put back.
-
Page 41

Cleaning the fluff (drain) filter
and pump
Check the fluff (drain) filter initially after
3-4 washes to ascertain how often it is
likely to require cleaning.
With normal cleaning approx. 2 litres of
water run out.
Cleaning and care
If the drain outlet is clogged, more wa
ter will be retained in the machine (up
to 25 litres).
Caution: If laundry has been washed
at a high temperature, water drain
ing out of the machine will still be
hot.
Take the (yellow) filter flap opener from
behind the detergent drawer facia
panel, (see illustration above).
-
-
Open the flap.
^
^ Place a dish under the drain fixture.
^
Turn the fluff filter lid round 2-3 times.
Do not take it right out.
With large volumes of water, when the
dish is full screw the fluff filter back into
position, and empty the dish before re
peating the procedure.
-
41
Page 42

Cleaning and care
Once the flow of water ceases, re
^
move the fluff filter completely.
^ Clean the fluff filter thoroughly.
^ Remove any foreign objects (e.g.
buttons, coins, etc.) and fluff.
^ Turn the impeller by hand to check
that it is free to rotate. Any foreign objects causing an obstruction should
be removed.
-
Clean the inside of the fluff filter hous
^
ing.
Remove any deposits of limescale and
detergent or foreign objects from the
thread of the filter housing and filter unit
(as these objects can cause a leakage
of water). Deposits of limescale are often a sign of underdosage of powder.
^ Put the fluff filter back in place and
secure it.
Make sure the fluff filter is securely
tightened. Otherwise there is a risk
of water leakage during use.
After cleaning
^
Pour approx. 2 litres of water into the
detergent dispenser compartment
j to reactivate the ball valve which
keeps detergent in circulation in the
suds.
-
42
Page 43

Cleaning and care
To clean the water inlet filters
The washing machine has two filters to
protect the inlet valves.These filters
should be checked every 6 months or
so, or more often if there are frequent
interruptions to the water supply.
To clean the filter in the union in the
open end of the inlet hose:
First turn off the stopcock.
^
Unscrew the threaded union connect
^
ing the free end of the inlet hose to
the stopcock.
Inspect the inlet hose which is sub
jected to high pressure while the ma
chine is in operation. The hose should
be replaced if there are small cracks in
the surface, or if it has been otherwise
damaged.
If replacing the inlet hose only use a
hose able to withstand pressure of at
least 70 bar. Miele’s own hoses meet
this requirement.
To clean the filter in the water inlet
-
valve:
Using pliers, carefully loosen the
^
ribbed plastic nut on the inlet valve,
and unscrew.
-
-
^
Remove the rubber seal from the re
cess.
^
Using pointed pliers, take hold
of the plastic filter bar, remove the fil
ter and clean.
^
Put the filter and seal back in the re
verse order and reconnect the hose.
Turn on the stopcock and check the
connection is watertight.
-
^
Use water pump pliers to withdraw
the plastic filter by the bar (see illus
tration). Clean, put back and secure.
The two filters must be put back in
place after cleaning.
-
43
Page 44

Problem solving guide
With the help of the following notes minor faults in the performance of the appli
ance, some of which may result from incorrect operation, can be put right without
contacting the Service Department.
Repair work to electrical appliances should only be carried out by a suit
,
ably qualified person in accordance with local and national safety regulations.
Unauthorised repairs could be dangerous.
The chart is divided into the following sections to help you:
The programme does not start.
–
The wash programme stops and a fault indicator light comes on.
–
A fault indicator light comes on but the wash programme continues as normal.
–
General problems or an unsatisfactory wash result.
–
-
-
The programme does not start.
What to do if ... Possible cause Remedy
The Anti-crease/Fin-
ish indicator light is
not on, or the START
indicator light is not
flashing.
The programme does
not start when Spin
has been selected.
At the end of one
programme you can
not start the next
programme.
There is no power. Check that
– the door is properly closed.
– the mains plug is plugged in.
– the fuse or circuit breaker has
The washing ma
chine has not been
prepared for using
for the first time.
The programme se
-
lector has not been
turned past the
Finish
postion.
-
Prepare the machine as de
scribed in "Before using for the
first time".
-
Turn the programme selector to
the
programme you want to run.
not tripped.
Finish
postion and then to the
-
44
Page 45

Problem solving guide
The wash programme stops and a fault indicator light comes
on.
What to do if ... Possible cause Remedy
The Check drain indica
tor light is flashing.
The Check inlet indicator
light is flashing.
One of the following indicator lights is flashing:
– Soak/Pre-wash
– Main wash
– Rinses
– Rinse hold
The water outlet is
-
blocked.
The drain hose has
been fixed too high.
The water inlet is
blocked
There is a fault. – Press I-ON/0-OFF button
Clean the fluff (drain) filter
and drain pump.
The maximum drain height
is 1 m.
Open the stopcock.
–
Start the programme
–
again.
to release it.
– Turn the programme se-
Finish
lector to
– Press I-ON/0-OFF button
in.
– Re-start the programme.
– If the fault indicators oc-
cur again, contact the
Service Department.
.
45
Page 46

Problem solving guide
A fault indicator light comes on but the wash programme
continues as normal.
What to do if ... Possible cause Remedy
The Check drain light
flashes.
The Check inlet light
flashes.
The Drain/Final spin indicator light flashes in the
programme sequence display.
The Anti-crease/Finish indicator light flashes in the
programme sequence dis
play.
The drain outlet is
restricted.
The water inlet is re
stricted or the water
pressure is too low.
The filter in the inlet
hose is dirty.
The final spin has
not taken place. The
machine detected
an imbalance.
The position of the programme selector was altered after the start of the programme. Turn the
-
programme selector back to the programme previ
ously chosen.
Clean the fluff (drain) filter
and drain pump.
make sure the stopcock is
-
–
opened wide enough.
make sure the inlet hose is
–
not kinked.
Clean the filter.
– Loosen and re-distribute
the washing.
– Select the programme
SpinorDrain
– Take into account the spin
speed of the relevant
programme.
.
-
46
Page 47

Problem solving guide
General problems or an unsatisfactory wash result
What to do if . . . Possible cause Remedy
The machine shakes
during the spin cycle.
The laundry has not
been spun satisfacto
rily.
The drum door cannot
be opened by press
ing the Door button.
The four feet are not
resting evenly on the
floor.
The spin speed se
lected was too low.
-
The machine is not
connected to the elec
-
tricity supply.
Power cut. Open the drum door as de-
The door was not correctly engaged.
There is still water in
the drum and the machine is unable to
drain.
For safety reasons the drum door cannot be opened
when the suds temperature is higher than 55°C.
Level the machine. See advice
on installation.
Select a higher spin speed
next time.
Put the plug in the socket and
switch on.
-
scribed in the section "Opening the door in the event of a
power failure".
Press hard against the lock
side of the drum door and then
press the
Clean the fluff (drain) filter and
the drain pump.
Door
button.
47
Page 48

Problem solving guide
What to do if ... Possible cause Remedy
The pump makes
strange noises.
Large residues of de
tergent remain in the
dispenser drawer.
Fabric conditioner is
not completely dis
pensed or too much
water remains in the
p compartment.
Liquid detergent does
not give the required
result.
These do not indicate a fault. They occur at the end of a
pump sequence as a normal part of the operation.
The water supply pres
-
sure is too low.
Washing powder used
with water softener
tends to become
sticky.
The siphon is either in
correctly positioned or
-
clogged.
The fabric conditioner
channel is clogged.
Liquid detergents do
not contain bleaching
agents. They do not
remove fruit, coffee
and tea stains.
Clean the filter in the water
-
–
inlet system.
It may be useful to press the
–
Water plus button.
Pour washing powder into the
dispenser before adding any
water softener.
Clean the siphon, see
"Cleaning and care - Cleaning
the detergent drawer".
Clean the fabric conditioner
channel.
– Use a general purpose
washing machine powder
containing a bleaching
agent.
– Pour stain removers into
compartment j of the dispenser drawer and liquid
detergent into a dispenser
ball.
–
Never put stain removers
and liquid detergent to
gether in the dispenser
drawer.
-
48
Page 49

Problem solving guide
What to do if . . . Possible cause Remedy
Grey, greasy parti
cles cling to
washed laundry.
There are white res
idues which look
like powder deter
gent on dark col
oured laundry.
Insufficient amounts of
-
detergent were used to
break down the particles
of grease in heavily
soiled laundry.
The detergent contained
-
compounds (zeolites) to
aid water softening
-
which are not soluble in
-
water. These have
ended up on the laundry.
Add more detergent.
–
Before washing the next load
–
run a COTTONS 95°C
programme with powder de
tergent but without a load.
(See also "Extra cleaning" in
Cleaning and Care).
Try and brush off the resi
–
dues with a soft brush once
the laundry is dry.
Use a liquid detergent to
–
wash dark coloured textiles.
Liquid detergents usually
contain no zeolites.
-
-
49
Page 50

Problem solving guide
Opening the drum door in the
event of a power failure
Switch off the washing machine.
^
Open the fluff (drain) filter flap and
^
drain the water as described in
"Cleaning and care", (fluff (drain) filter
and pump).
Caution: if laundry has been washed
at a high temperature, water drain
ing out of the machine will still be
hot.
Always make sure the drum is stationary before reaching in to the machine to remove washing. Reaching
into a moving drum is extremely
dangerous.
-
To check water pressure
Place a bucket under the stopcock.
^
Turn on the stopcock.
^
If 5 litres of water flow into the bucket in
15 seconds the water pressure is cor
rect.
-
^
Pull the emergency door latch down
wards (see illustration). The machine
door will then open.
50
-
Page 51

After sales service
Customer contact
In the event of any faults which you
cannot remedy yourself please contact
Your Miele Dealer or
–
Your nearest Miele Service depart
–
ment (see back cover for the ad
dress).
When contacting the Service Depart
ment, please quote the Model and Se
rial nos. of your appliance, both of
which are shown on the data plate visi
ble above the porthole glass when the
door is opened.
Please note that telephone calls may
be monitored and recorded to improve our service.
-
-
-
Appliance guarantee
The appliance is guaranteed for a pe
riod of 1 year.
See the guarantee card supplied with
the machine for further details.
Future updates (PC)
The indicator light or check light
marked PC is reserved for the service
engineer, for updates to your machine
in future years.
When for example technological devel
opments offer advanced modifications
to your existing programme cycles, a
service engineer will be able to input
these into your machine controls.
Miele will provide information when
such possibilities become available.
-
-
51
Page 52

Installation
Installation surface
A concrete floor is the most suitable in
stallation surface for a washing ma
chine, being far less prone to vibration
during the spin cycle than wooden
floorboards or a surface with "soft"
properties.
Please note the following points:
The machine must be level and se
^
curely positioned.
To avoid vibrations during spinning,
^
the machine should not be installed
on soft floor coverings.
^ If installing on a wooden joist floor, we
recommend a plywood base at least
30 mm thick, 590 x 520 mm wide.
The base should span several joists
and be bolted to the joists, not only to
the floorboards. Check for the presence of pipes and cables first.
The most stable part of the floor is
usually in the corner.
-
-
Installation
Lift the machine from its packaging
base and move it to its site. Please
note:
Do not lift the machine by the
^
drum door.
Ensure that the machine feet and the
^
floor are dry to prevent the machine
from slipping during the spin cycle.
Removing the transit fitting
,
If the machine is installed on a
raised plinth, it has to be secured
against slippage during spin using
retaining clips (available from the
Miele Spare Parts Dept).
52
A Turn the left-hand transit bar 90°.
Page 53

Installation
B Turn the right-hand transit bar 90°.
C Withdraw the two bars together with
the support plate.
D Plug the two holes with the plastic
caps supplied.
The washing machine must not
,
be moved without the transit bars in
place.
Store the transit bars in a safe place
for future use. They must be re-fitted
if the machine is to be moved again
(e.g.when moving house).
Re-fitting the transit bars
Re-fitting is carried out by reversing the
procedure.
53
Page 54

Installation
Levelling the machine
The machine must stand perfectly level
on all four feet to ensure safe and
proper operation.
With a screwdriver loosen and turn
^
the foot 1 together with the
counternut 2 to the left, (see illustration below) and screw out.
^ Put the machine back on all four feet.
Incorrect installation may increase electricity and water consumption and may
cause the machine to move about.
The four adjustable screw feet are used
to level the machine. All four feet are
screwed in when the machine is deliv
ered.
Screwing out and adjusting the feet
^
Gently tip the machine and prop it up
using a solid wooden wedge for ex
ample, to ensure stability.
Make sure the machine does not slip
as this could cause injury.
-
-
^ Use a spirit level to check the ma-
chine is standing level.
^ Hold the foot 1 firm using a pipe
wrench and turn the counternut 2 to
the right firmly up against the housing
with a screwdriver.
All four counternuts must be firmly
up against the housing. Please also
check this for the feet which did not
need adjustment. Otherwise there is
the danger of the machine moving
about.
54
Page 55

Installation
Building under a worktop
A special building under conversion
^
kit* is required which includes a
cover plate to replace the machine’s
lid.
Fitting instructions are supplied with
^
the conversion kit.
N.B. Cover plate
The cover plate must be fitted in place
of the machine’s lid to ensure electrical
safety . However, if you wish to push
your machine under a worktop and
there is space to do this without re
moving the lid, the conversion kit is not
necessary. Otherwise the conversion kit
is essential.
^ For installation under a work surface
900/910 mm from the floor, a raising
kit* is also required.
^ To ensure electrical safety the con-
version kit and raising kit must be fit-
ted by a suitably qualified installer.
-
Washer and Dryer stack
A Miele tumble dryer can be stacked
with the washing machine. A WTV
stacking kit* is necessary and can be
purchased from the Miele Spare Parts
Department.
* All parts marked with a * are available
from the Miele Spare Parts or Sales De
partment, and must be fitted by a suit
ably competent person according to
the instructions supplied with the kit.
-
-
^
Connections for electricity, water and
drainage should be installed in such
a way that they remain accessible
when the machine is in place.
55
Page 56

Installation
Connection to water supply
The machine should be connected to a
mains water supply in accordance with
standard regulations. In Germany the
washing machine is not required to
have a non-return valve as it has been
designed to comply with the relevant
German DIN standard.
Connection to the mains water supply
should incorporate a mains stopcock
3
with
/4’’ thread. The stopcock should
be fitted by a qualified plumber.
The approx. 1.5 m long
hose should be connected to the stopcock via the
3
/4" threaded union.
This pressure hose is not suitable for
connection to a hot water supply.
Please make sure the washer sits correctly in the union.
The connection point is subject to
mains water pressure. Turn on the stopcock slowly and check for leaks.
3
/8" pressure
Longer hoses 2.5 or 4 metres in length
are available as optional extras.
The machine is designed to operate
with a water flow pressure of 1 bar mini
mum up to 10 bar maximum. The static
water pressure must not exceed 10 bar.
If it is higher than 10 bar it is essential
to fit a reducer valve.
There is a minimum flow pressure of 1
bar pressure if 5 litres of water flow into
a suitable container in 15 seconds.
The two dirt filters - one in the open end
of the inlet hose, one at the inlet point in
the solenoid valve must not be removed.
-
If replacing the inlet hose only use a
hose able to withstand pressure of at
least 70 bar. This also applies to all
fixtures and fittings used. Miele origi
nal parts fulfil this condition.
56
-
Page 57

Installation
Connection to the drainage
system
The machine drains via a drain pump
with a delivery head of 1 metre.
The drain hose is 1.5 m long. It must
not be kinked as this restricts drainage.
The swivel elbow at the end of the hose
can be turned in either direction, or can
be detached if required, with a sharp
twist and pull.
Drain hose connection:
1. Direct into a sink or basin:
Please note the following
Hook the hose over the edge and se
–
cure.
Make sure that the water can drain
–
away freely without hindrance. Other
wise there is a risk of water overflow
ing or of some of the drained water
being sucked back into the machine.
2. Connected securely to a plastic drain
pipe with a rubber nipple. There is no
need to use a non-return valve.
3. Connected securely to a standpipe.
. Connected securely to a floor gully.
4
If required, the drain hose can be extended to a length of 5 m. The necessary parts can be purchased from the
Miele Spare Parts Department, or your
Miele dealer.
-
-
-
For a delivery head of more than 1 m
(up to a maximum of 1.8 m) a second
Duo-drain pump is available with the
corresponding conversion kit from the
Miele Spare Parts Department or your
Miele dealer.
57
Page 58

Installation
Electrical connection U.K.
All electrical work should be carried out
only by a suitably qualified and compe
tent person, in strict accordance with
national and local safety regulations.
The appliance is supplied with a mains
cable with moulded plug for connection
to a 230-240V mains supply. The volt
age, rated load and fuse rating are
given on the data plate. Please ensure
these match the household mains sup
ply.
Connection should be made via a fused
plug and suitable switched socket
which is easily accessible after installation. For extra safety it is advisable to
install a residual current device (RCD),
with a trip current of 30 mA (in accordance with DIN VDE 0664, VDE 0100,
section 739). Do not connect via an extension lead.
Ensure power is not supplied to the appliance while installation work is being
carried out.
-
-
Where it is necessary to change plugs,
if the colours of the wires in the mains
lead of this appliance do not corre
spond with the coloured markings iden
tifying the terminals of your plug, pro
ceed as follows:
The wire which is coloured green and
^
yellow must be connected to the ter
minal in the plug which is marked
with the letter E or by the earth sym
bol z or coloured green, or green
and yellow.
The wire which is coloured blue must
^
be connected to the terminal in the
plug which is marked with the letter N
or coloured black.
^ The wire which is coloured brown
must be connected to the terminal in
the plug which is marked with the letter L or coloured red.
WARNING: THIS APPLIANCE
MUST BE EARTHED
-
-
-
-
-
Important
The wires in the mains lead are col
oured in accordance with the following
code:
Green/yellow = earth
Blue = neutral
Brown = live
58
-
Page 59

Electrical connection U.K.
Non-rewireable plugs BS 1363
If this machine is fitted with a
non-rewireable plug, the following infor
mation applies:
If the socket outlets are not suitable for
the plug supplied with the product, it
must be cut off and an appropriate plug
fitted. The fuse carrier and fuse should
be removed from the old plug and dis
posed of.
The plug cut from the flexible cord
should then be disposed of and on no
account be inserted into any socket
elsewhere in the house (electric shock
hazard).
The fuse cover must be refitted when
changing the fuse, and if the fuse cover
is lost, the plug must not be used until a
suitable replacement is obtained. The
colour of the correct replacement cover
is that of the coloured insert in the base
of the plug, or the colour that is embossed in words on the base of the
plug (as applicable to the design of
plug fitted).
-
Installation
-
Replacement fuses should be ASTA ap
proved to BS 1362 and have the cor
rect rating. Replacement fuse covers
may be purchased from your local elec
trical supplier or Service agent.
-
-
-
59
Page 60

Consumption data
Programme
(without any additional op
tions or
programmable functions)
COTTONS
95°C 5.0 kg 1.70 52 1 h 54 mins 1 h 26 mins
60°C* 5.0 kg 0.95 52 1 h 58 mins 1 h 16 mins
40°C 5.0 kg 0.55 52 1 h 58 mins 1 h 06 mins
MINIMUM IRON
40°C 2.5 kg 0.45 58 1 h 15 mins 49 mins
DELICATES
30°C 1.0 kg 0.40 75 58 mins 49 mins
WOOLLENS
30°C 2.0 kg 0.23 35 35 mins –
-
Load Consumption data
Energy Water Programme time
in kWh litres normal short
* EN 60456
Consumption data can vary from the nominal values given depending on water
pressure, water hardness, water inlet temperature, room temperature, type and
volume of load, fluctuations in the electricity supply and any additional functions selected.
N.B.
Consumption data obtained from a machine designed for the German market.
60
Page 61

Technical Data
Height 85.0 cm
Width 59.5 cm
Depth 60.0 cm
Depth with door open 97.0 cm
Weight 92 kg
Max. floor load 1600 Newton (ca. 160 kg)
Capacity 5 kg Dry laundry
Voltage see Data plate
Rated load see Data plate
Fuse rating see Data plate
Water flow pressure min. 1 bar (100 kPa)
Static water pressure max. 10 bar (1000 kPa)
Drain pump head max. 1.00 m
Drain pump length max. 5.00 m
Test certificates awarded Radio/TV suppression, VDE
616263
Page 62

Page 63

Page 64

Alteration rights reserved/3002
M.-Nr. 05 536 980 / V02
This paper consists of cellulose which has been bleached without the use of chlorine.
 Loading...