

MID WEST PRODUCTS HDT-38B Owner's Manual

38” Commercial Trailing Pavement/Leaf/Lawn Sweeper
Model HDT-38B
Owner’s Manual and Parts List
SAVE THIS MANUAL
You will need this manual for the safety instructions, assembly instructions and parts list. Put it in a
safe, dry place for future reference.
Additional Information/Link to PDF Copy of this Manual:
©2017 Mid West Products, Inc. -1- Form No. M1-1603

CONTENTS
ASSEMBLY
2-3
OPERATION
4
GENERAL MAINTENANCE 4
PART LISTING & DRAWINGS
5-7
LONG-TERM STORAGE 8
ORDERING PARTS
8
Key No.
Part No.
Description
Qty.
9
X-1107
5/16-18 Lock Nut
26
15
1-A2936
Dump Rope
1
16
1-A2953
Dump Rope Handle
1
30
L-99
5/16 Flat Washer
2
41
L-80
5/16-18 X 1 HHCS
4
42
L-127
5/16-18 X 1 ½ HHCS
6
43
1-B2829
Hitch Bracket - Center
1
44
1-A2828
Hitch Bracket - Flat
1
63
L-81
5/16-18 X 1 ¼ HHCS
12
65
1-A2901
Hamper Pivot Sleeve
2
67
X-1199
3/8-16 Lock Nut
2
85
X-1358
5/16-18 X 1 ¼ Tube Bolt
2
88
X-1026
3/8-16 X 1 ½ HHCS
2
Assemble Hamper Support Tube and Caster Tubing
to Lawn Sweeper as follows and shown in Figure 1.
A) Take right and left Caster Tube Assemblies and
attach two Gusset Plates (64) to them using four
Bolts (63) and four Lock Nuts (9). Position
these assemblies on Hamper Support Tube (66)
and attach through holes in Gusset Plates (64)
with four Bolts (63) and four lock Nuts (9). Do
not tighten these Bolts at this time.
B) Position above assembly behind Lawn Sweeper
and attach to Mounting Brackets (75) already
mounted on Lawn Sweeper using four Bolts (42)
and four Lock Nuts (9). Securely tighten all Nuts
in this assembly at this time.
Assemble Debris Hamper and Wind Apron as
follows:
A) Take Hamper Sub-Assembly and place on a flat
surface. Locate five pieces of ¾” diameter
tubing and two Hamper Pivot Brackets (89) as
illustrated in Figure 2 (on the next page).
B) Insert ends of Rear Tube (91) onto ends of Front
Tube (83) and align holes. Place Hamper Pivot
Brackets (89) with welded brace to the rear over
holes. Insert two Bolts (63) and secure with two
Lock Nuts (9) on each side.
Figure 1
UNPACKING INSTRUCTIONS:
Remove all Lawn Sweeper Parts, Literature, and
Parts Bag from carton. Open Parts Bag and identify
contents as listed to the right.
Right-hand (R.H.) and Left-hand (L.H.) references
are determined by standing at the rear of the Tractor
or Lawn Sweeper and facing the direction of forward
travel.
Read this Operator's Manual before using the Lawn
Sweeper. You will be able to do a better, safer job.
©2017 Mid West Products, Inc. -2- Form No. M1-1603
ASSEMBLY
C) Place Tie Rod (82) through lip on front of
Hamper and put a Flat Washer (30) on each end.
Place two Front Lower Hamper Tubes (84)
inside Hamper and onto ends of the Rod.
Secure with two Lock Nuts (9) on each end. With
flat end of Front Hamper Tubes (84) on the
outside of Tube (83), align holes and fasten with
two Bolts (41) and two Lock Nuts (9). Do not
tighten at this time.
D) Take Lower Rear Tube (86) and place it over the
ends of Tubes (84) and align holes. Then
position the Rear Corner Tubes (90) over holes
and insert a Tube Bolt (85) through each side
and secure with two Lock Nuts (9).
E) Pulling back of Hamper up with Tube (91), align
holes in Corner Tubes (90) and insert two Bolts
(41) and secure with two Lock Nuts (9). At this
time securely tighten all Bolts in this assembly.
F) Pulling up and back on Wind Apron (80), align its
velcro tabs to tabs on side panels of Hamper
(87).
Place Hamper Assembly from Figure 1 onto Hamper
Support Assembly from Figure 2.
A) With Sleeves (65) in holes in Hamper Support
Tube (66), place Hamper Assembly in position
with Pivot Brackets (89), straddle ends of
Support Tube (66). Align hoIes and insert two
Bolts (88) and secure with two Lock Nuts (67).
B) Securely tie Dump Rope (15) to center of Rear
Upper Tube (91). Run Rope under Hamper,
then up between Hamper and Tube (66) and
through Grommet in top of Lawn sweeper.
Locate Dump Handle (16) on Rope where it can
be reached from your Tractor seat and secure by
tying a knot on both sides of it.
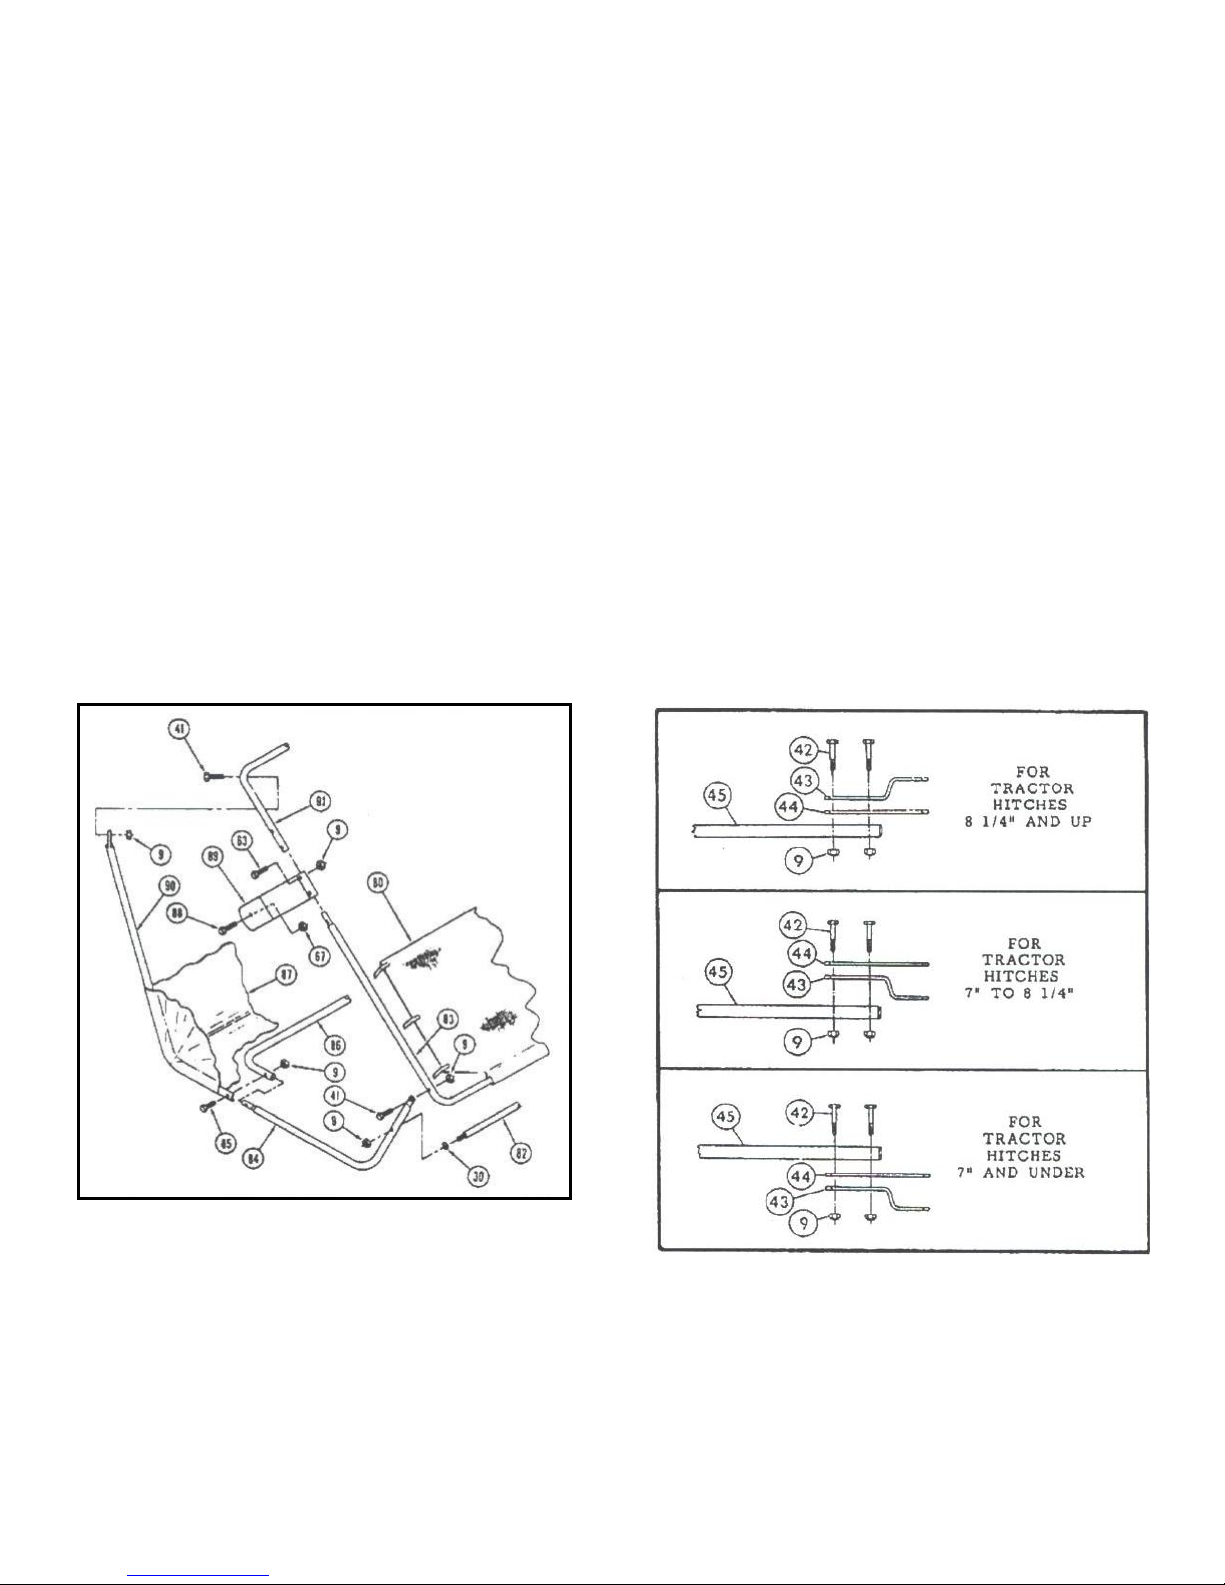
Attach Hitch Brackets to Lawn sweeper Tongue as
follows and as shown in Figure 3.
A) Due to the wide range of Tractor sizes and
drawbar heights, mounting of the Hitch Brackets
may vary, depending on your particular Tractor.
Top of Lawn Sweeper Tongue (45) should be
level or approximately 8” off the ground with the
Lawn Sweeper in the Iowest setting.
B) See Figure 3 and select the recommended
mounting to suit your particular Tractor hitch
height. Then attach Hitch Brackets (43 and 44)
with two Bolts (42) and secure with two Lock
Nuts (9).
Figure 2
Figure 3
©2017 Mid West Products, Inc. -3- Form No. M1-1603
 Loading...