

Midwest Ferret Nation 182 Assembly Instructions Manual

IMPORTANT INFORMATION
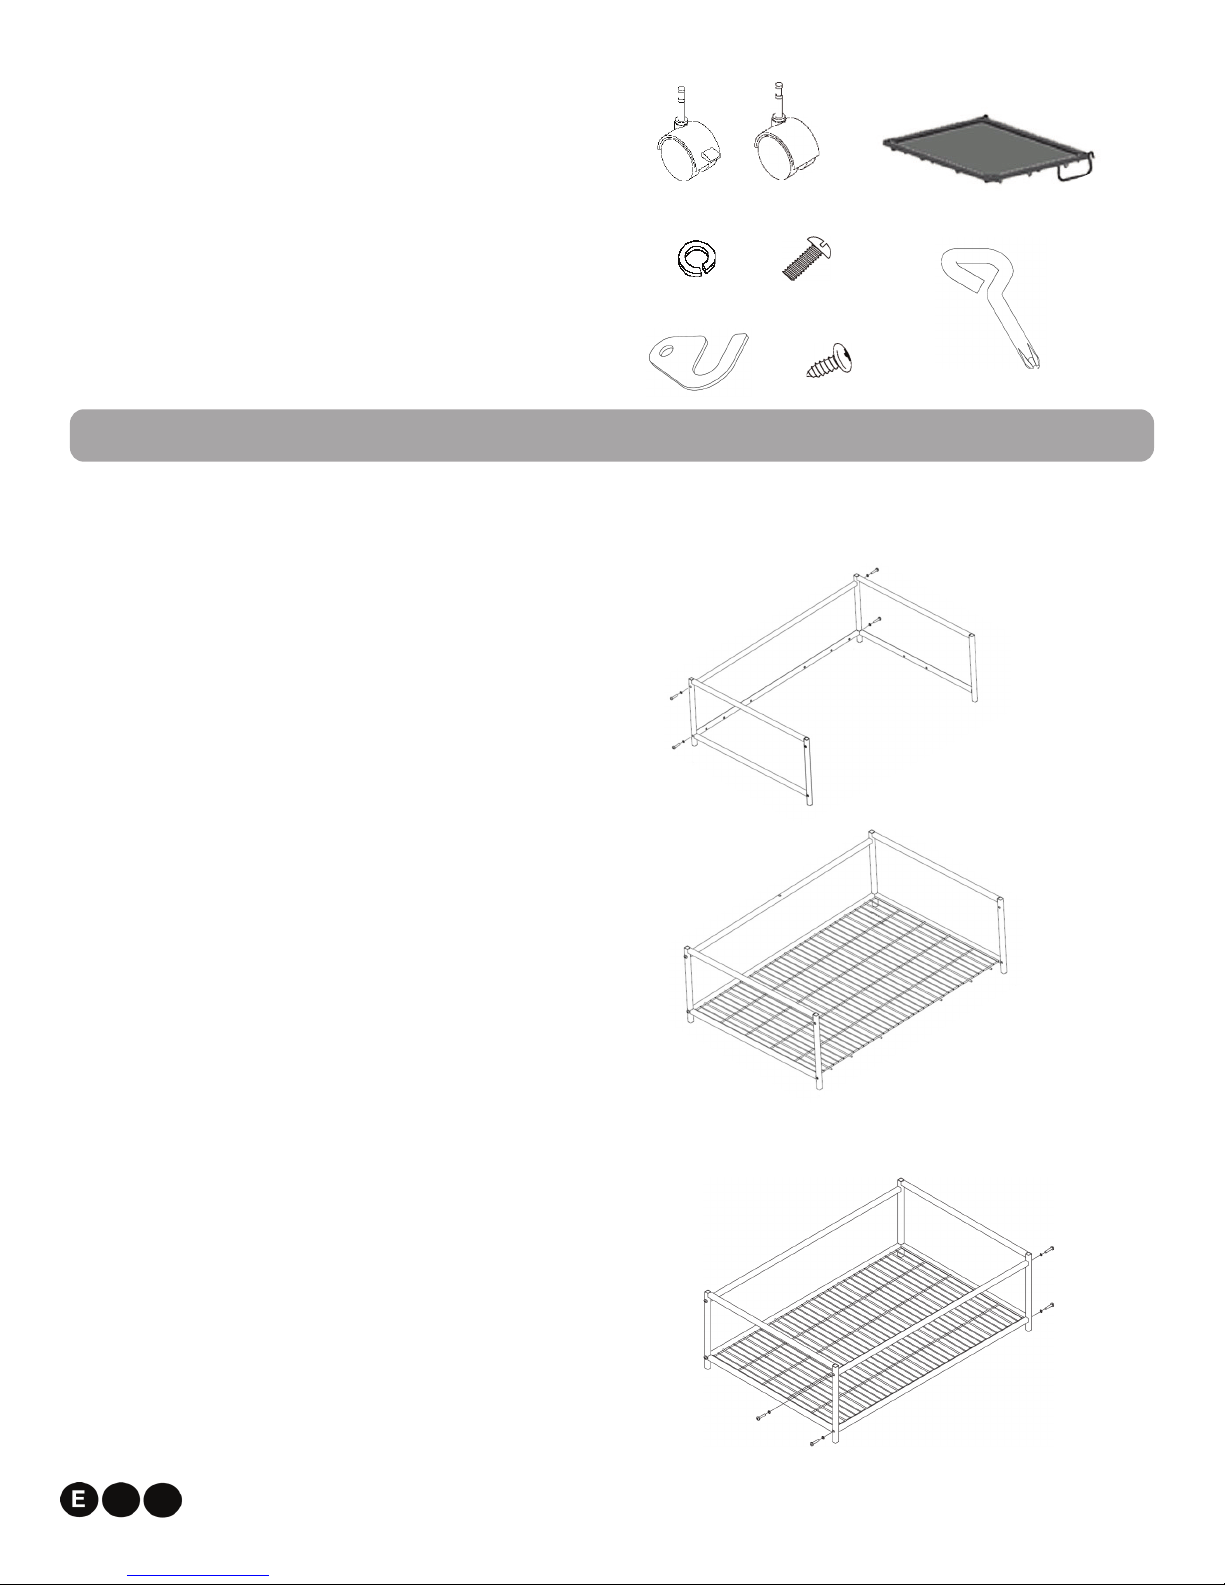
PARTS IDENTIFICATION
Assembly Instructions for Model Number
182
A Door Panel (2) - Large rectangular panel with (2) doors
and latch knobs
B Back Panel (2) -
Large rectangular panel without doors
C Side Panel (4) - Smaller rectangular panel with
protruding locking tabs at the top
D Top Panel Grid - Large rectangular panel with cone
shape connecting pins on all 4 corners
E Bottom Shelf Grid - Large rectangular mesh panel with
wider spacing between the wires
F Bottom Floor Panel Grid - Large rectangular mesh
panel
G Middle Floor Panel Grid - Large rectangular mesh
panel with a cut-out opening in corner
H Bottom Pan - Plastic tray that fits in the bottom of the
cage
I Middle Pan - Plastic tray that fits in the middle of the
cage
J Ramp (3), Clips (4), and Cover (3) - Wire ramp for
access from one level to the other. (Note: There is a slight
bend in the middle. This is intentional.) Clips attach Ramp
to Shelf and reversible Cover slips over the ramp
K Base: Side Supports (2) -
Main structural components
for the base
L Base: Base Supports (4) - Two with multiple holes,
Two without holes
E
F
G
H
L
K
J
Ramp, with Cover,
Shown in Cage
Ramp Clips
I
A
B
C
D
Unwrap and remove all parts from the box. Keep the box and packing material until the product is assembled. In case of return
or exchange, failure to return product in similar condition as received could result in limited reimbursement. Please save sales
receipt as proof of purchase for warranty purposes. Check to ensure you have all the parts below. If you discover any parts
are missing, immediately call our toll-free service helpline at 1-800-428-8560 (Monday - Friday 9 a.m. to 4 p.m. EST) or at
info@midwesthomes4pets.com.
To protect the finish of your Pet Home and the bottom pan, use only mild, non-abrasive
cleaners and water. Any course scrubbing or abrasive materials could damage the finish.
8
00-428-8560
midwesthomes4pets.com
P.O. Box 1031
M
uncie, Indiana 47308
Holes
No Hol
es
M Casters (4) - Two locking, two non-locking. Inserted
into sleeves in the base
N Shelf (2) - Wire structure with plastic sheet insert
O Phillips Head Bolts (8) with (8) Washers
P Flat Head Screws (2)
Q Swivel Locks (2)
R Phillips Head
ASSEMBLY INSTRUCTIONS
Locate the Side Supports for the Base (K), two Base
Supports, one with multiple holes and one without
holes (L), and four Phillips Head Bolts with four
washers (O). Orientate the Side Supports so the
side with the holes in the tubes face inward and are
at the bottom. Attach the Base Support with multiple
holes to the bottom of the Side Supports and attach
the Base Support without holes to the top by
screwing a Phillips Head Bolt with Washer to outside
of each Side Support.
Slightly separate the open ends of the base to allow
the Bottom Shelf Grid (E) to fit in. Align the
protruding wires with the holes in the base. Pull
sides back together.
Attach the remaining Base Supports (L) to the Side
Supports by screwing a Phillips Head Bolt with
Washer to the outside of each Side Support. The
Base Support with multiple holes aligns with Bottom
Shelf Grid.
**NOTE: Although the Ferret Nation can be
assembled by one person, due to size, you may
find it easier assembled with two people. A
rubber mallet is also recommended.
1.
2.
3.
Non-Locking
O
Washer
Bolt
P
Q
O
N
M
2
1
R
Locking
3
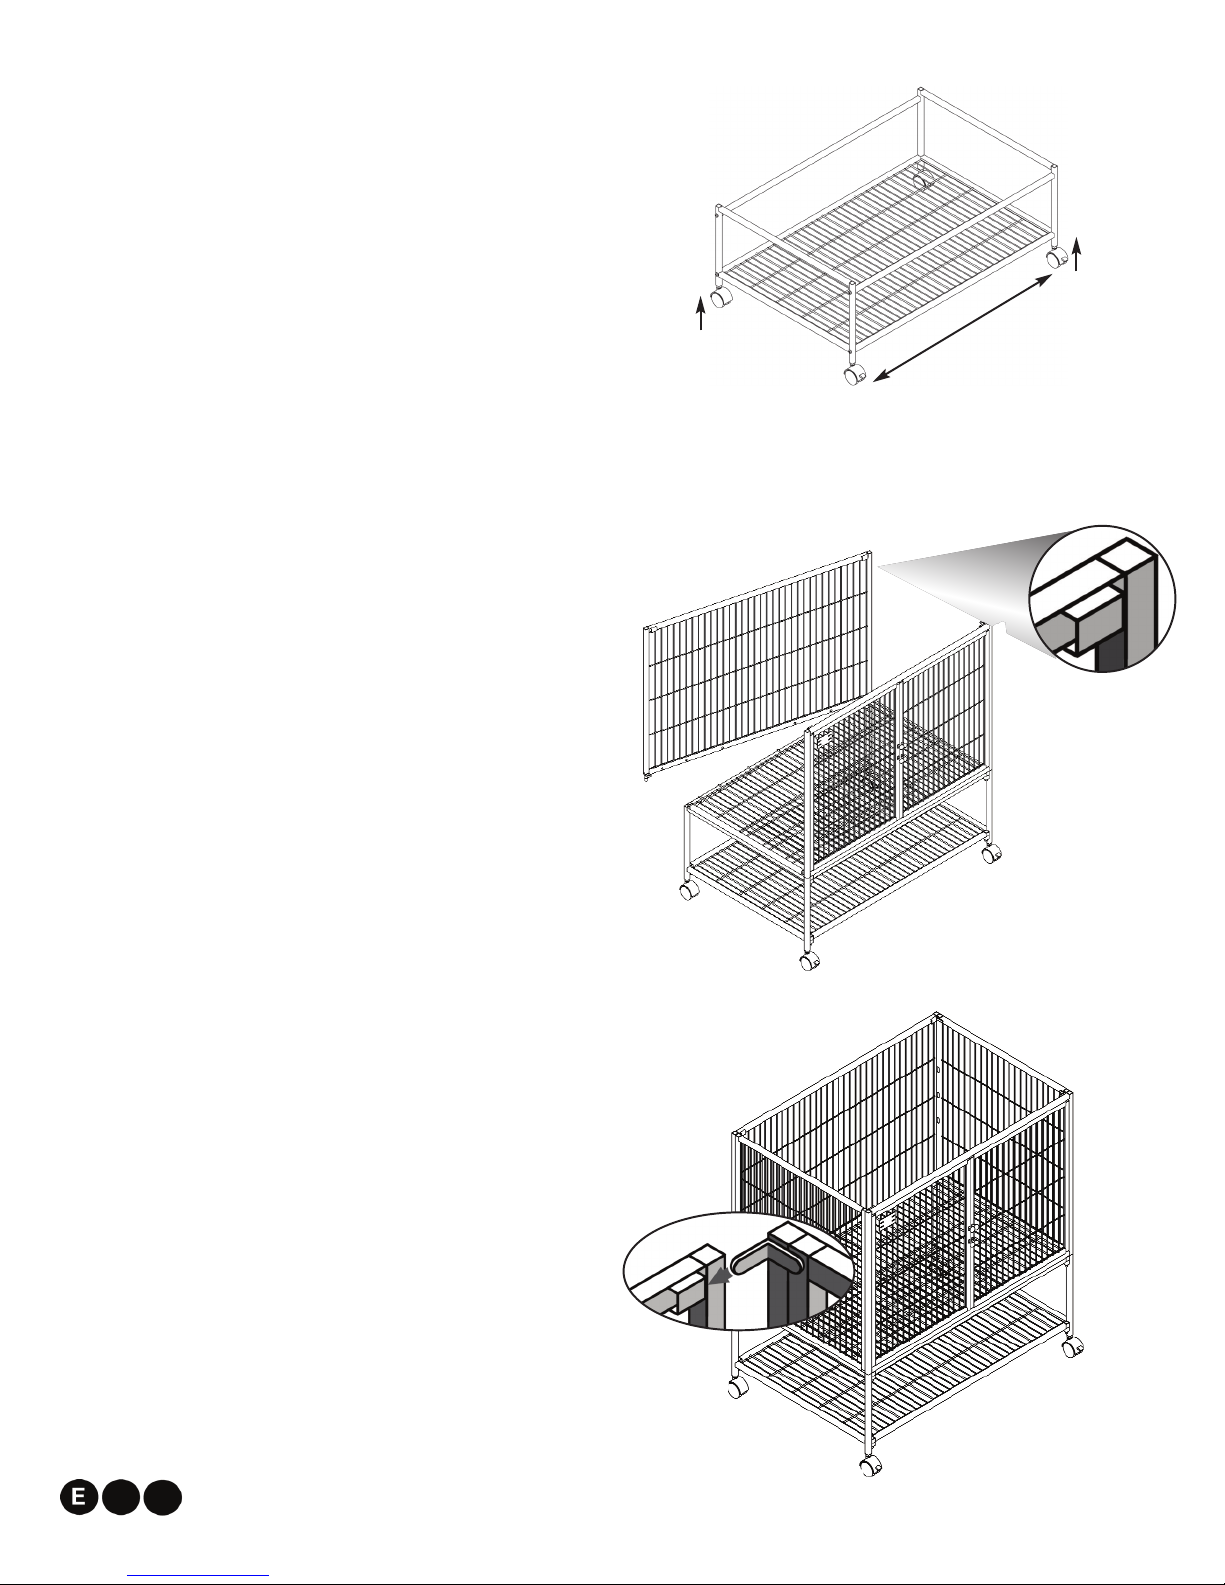
Locate the 4 Casters (M- 2 locking, 2 non-locking).
Insert the post of the caster into the pre-inserted
sleeve in the bottom of the Base. Be sure that the 2
locking casters are on one long side, and the 2
non-locking casters are on the opposite side. To fully
secure the casters in the sleeves, push the caster in
by hand or push down on the frame of the stand with
your hand or foot. (Note: The side with both locking
casters will now become the “front” of the cage.)
Locate the Door Panel (A) and insert the pegs into the
outer-most holes of the Base Assembly. The Door
Panel should be inserted on the side of the stand that
has the two locking casters. Be sure the door locking
knobs face outward.
Locate the Bottom Floor Panel Grid (F) and insert the
protruding wires into the corresponding holes of the
Door Panel. Be sure the wires that run front to back
on the grid are on the top.
Locate the Back Panel (B) and insert one peg in one
of the back, outer-most holes. Be sure the protruding
rectangular openings are facing inward. While slightly
lifting the Bottom Floor Panel Grid, swing the other
end of the back panel around, aligning the protruding
wires of the Grid with the holes in the Back Panel.
When they are all lined up and inserted, put the peg
in the outer-most hole.
Locate two of the Side Panels (C). Insert the pegs into
the holes between the Door and Back Panels. Be sure
the cut-outs on the bottom go around the protruding
wires of the Bottom Floor Panel Grid. Insert the
protruding tabs at the top of the panels into the
protruding openings in the Door and Back Panels to
lock the panels together.
4.
5.
6.
7.
8.
8
5
6
7
Back
Front
L
oc
k
i
n
g
4

Locate the remaining Door Panel (A) and insert the pegs
into the outer-most holes of the Base Assembly. The
Door Panel should be inserted on the side of the stand
that has the two locking casters. Be sure the door
locking knobs face outward.
Locate the Middle Floor Panel Grid (G) and insert the
protruding wires into the corresponding holes of the
Door Panel. Orientate the panel so the opening is either
in the back-right or front left of the cage.
Locate the remaining Back Panel (B) and insert one peg
in one of the back, outer-most holes. Be sure the
protruding rectangular openings are facing inward.
While slightly lifting the Middle Floor Panel Grid, swing
the other end of the back panel around, aligning the
protruding wires of the Grid with the holes in the Back
Panel. When they are all lined up and inserted, put the
peg in the outer-most hole.
Locate the remaining two Side Panels (C), two Swivel
Locks (Q), and two Flat Head Screws (P). Using the
Phillips Head Screwdriver (R) and flat head screws
attach one Swivel Lock to each of the Side Panels. (Do
not tighten all the way).
Attach the Side Panels by inserting the pegs into the
holes between the Door and Back Panels. Be sure the
cut-outs on the bottom go around the protruding wires
of the Bottom Floor Panel Grid. Insert the protruding
tabs at the top of the panels into the protruding openings
in the Door and Back Panels to lock the panels together.
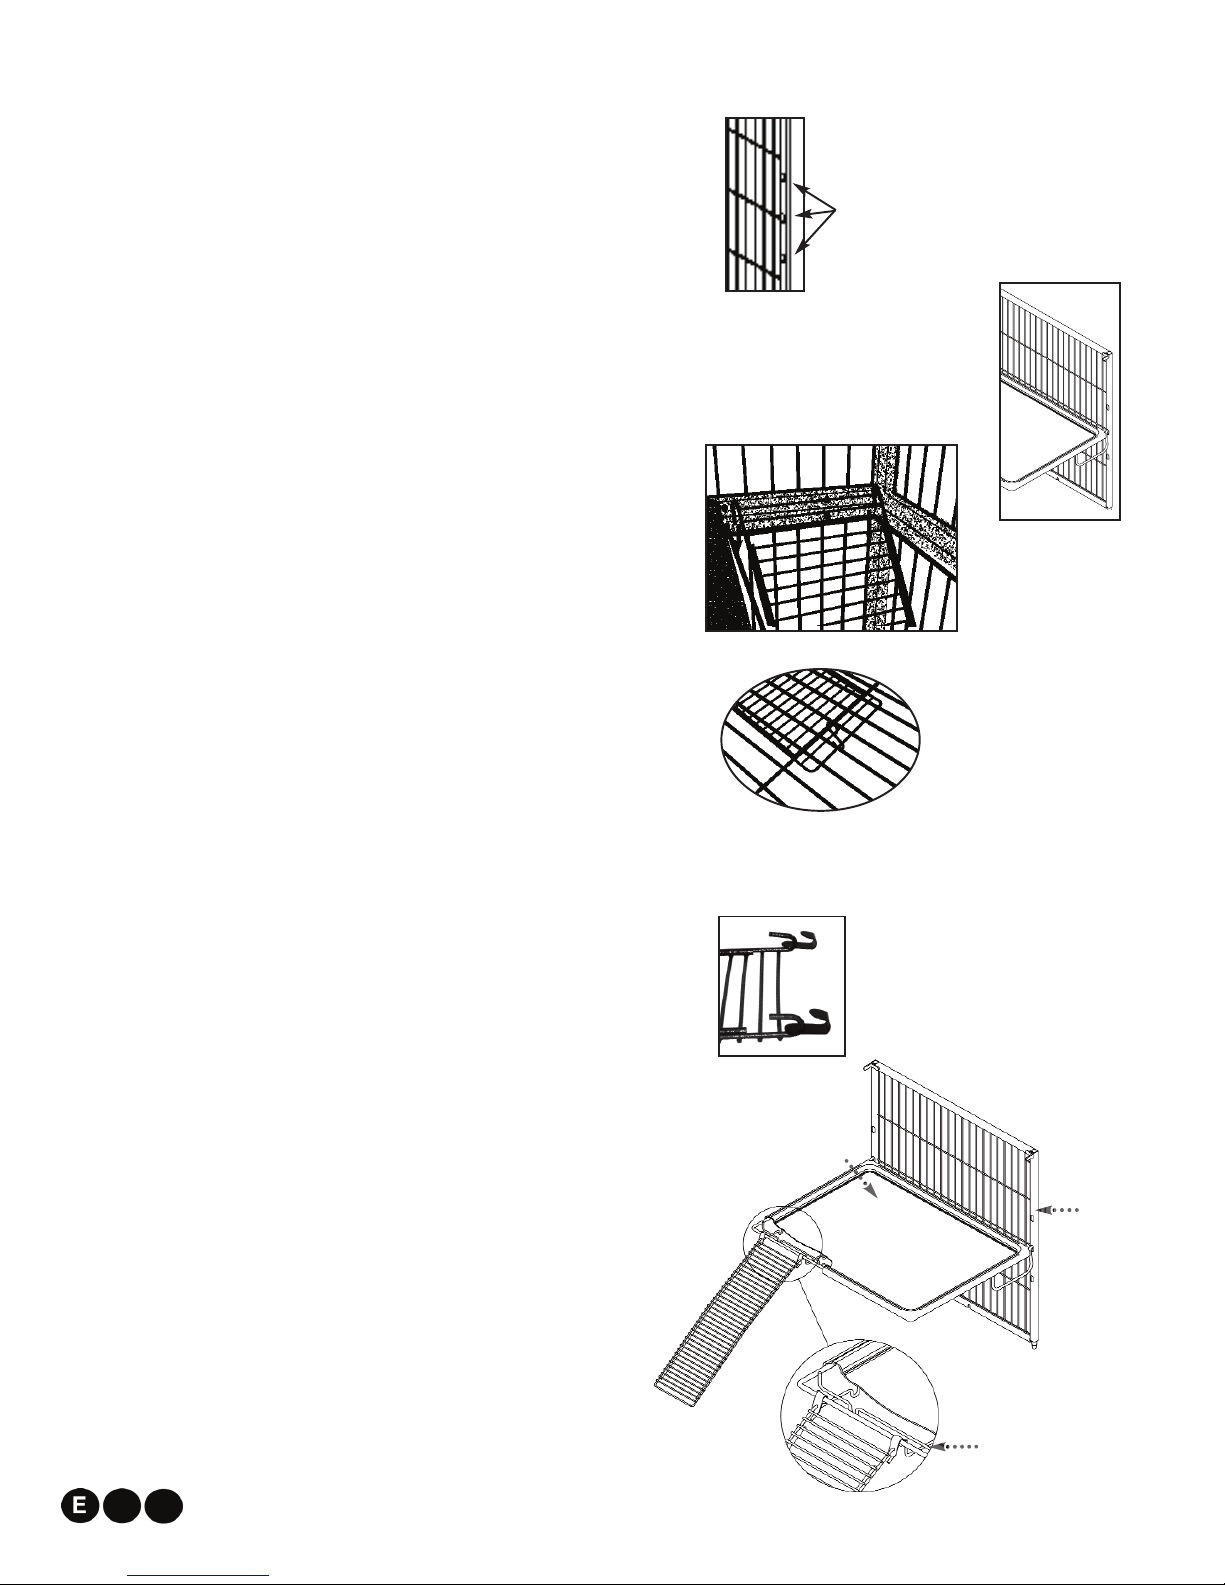
Locate the Top Panel Grid (D). Lay the Top Panel Grid
on the top of the assembled Cage. Line up the panel
so the pegs in the corner line up with the openings in
the corners of the assembled cage. To secure the Top
Panel, swing the Swivel Lock around the wire of the Top
Panel till tight in place. It may be easier to open doors
and swing Swivel Lock from side of cage. Open the
doors by pinching the knobs on the doors together.
Once Swivel Lock is in place, tighten Flat Head Screw.
9.
10.
11.
12.
13.
14.
10
11
9
12
14
13
14
16
Insert the Bottom Pan (H) in the bottom unit, and the
Middle Pan (I) in the upper unit. Be sure the cut-out is
positioned to match the opening in the Middle Panel
Grid Floor.
Note: The Shelves, in conjunction with the Side
P
anels, can be positioned at 3 different levels on
either side of the cage.
Locate one Shelf (N). With the doors in the top unit
open, tilt the Shelf down and insert the end of the hook
in the middle holes on the right side of the top unit. Lift
the Shelf up and let hook fall into place.
Before inserting the Shelf in the bottom unit, install the
Ramp (J) that will allows access from one level to the
next. Attach the hooks on the end of the ramp to the
back wire in the opening of the Middle Panel Grid.
This ramp has the ability to be secured in the “up”
position to section off the top level from the bottom
level. Before inserting the Shelf in the bottom unit,
swing this ramp up and hook it with the attached “S”
hook.
Install Shelf in bottom unit as in Step 16.
Attatch the Ramp Clips to each ramp by inserting the
two hooks on the ramp into the holes on the Ramp
Clips. The hooks on the ramp and the hooks on the
Ramp Clips should be facing the same direction.
Attach the Ramps to the Shelves by hooking the Ramp
Clips to the wire on the Shelf as illustrated. The lip of
the plastic Shelf pan will cover the Ramp Clips.
15.
16.
17.
18.
19.
20.
21.
18
17
Side
Panel
Attach Ramp Clips
to Shelf Wire
Shelf
20
21
15
3 Levels

FN_182-INST(136)
There are many unique features of this cage.
Listed below are explanations of these features.
Removable, Plastic Less-Mess Shelf pan can easily be lifted off for cleaning.
Reversible, Washable, “Happy Feet” Ramp Cover is included. It slips easily, but securely,
over the ramp. Be sure to slip on each cover starting from the bottom of the ramp so the ramp
hooks are exposed at the top.
No-Doubt Door Latches The squeeze point latches are easy for humans to operate, but
impossible for pets! When closing and latching the doors, be sure the spring-loaded rods have
been fully inserted into the holes in the door frame. To help make this easier, there is a plate
at the top and the bottom in the middle of the door frame. This will line up the door so the rod
will fit right into the holes.
Accessory Hangers You’ll notice a number of loops on the underside of the shelves.
These convenient loops are for attaching toys, hammocks, tubes, etc.
Another Full Level Floor? Install 2 shelves directly across from each other, and it will create
another full level.
Locking Casters The front casters can be locked to prevent any unwanted
movement of the cage.
Out Of The Way The ramp which allows access between the top level and the bottom
level can be secured in the up position to separate pets, or to keep them out of the way
while cleaning and feeding.
Removable Doors The Critter Nation cage allows you the option of totally removing each door.
Open the door and lift the door straight up.
LIMITED MANUFACTURERS WARRANTY
1. For one (1) year from the date of original purchase, MIDWEST Homes For Pets (“MIDWEST”) warrants to the purchaser of this Ferret Nation that, should it
prove defective by reason of improper workmanship and/or material, MIDWEST will repair or replace, at its option, any defective part of the Ferret Nation ,
without charge for the part or for shipping. Replacement parts are warranted for the remainder of the original period.
2. THIS WARRANTY DOES NOT COVER defects in the furniture caused by any animal, any physical abuse to or misuse of the pet cage, any damage caused
by the original purchaser or any third party, or any defects arising or discovered more than one (1) year from the original retail purchase date.
3. STEPS TO OBTAIN WARRANTY SERVICE:
A. The purchaser must call MIDWEST’s HELPLINE, 800-428-8560, to report the alleged defect to a customer service representative or obtain missing parts.
B. The customer service representative will determine if the defect is covered by this warranty, and if it is, will authorize and instruct the purchaser in how to
obtain corrective action.
C. MIDWEST may require the purchaser to present the sales receipt or other proof of purchase prior to authorizing any return or replacement. No returns or
replacements will be permitted without proper authorization. If a return or replacement is authorized, you may be requested to return the item to MIDWEST
or to make the item available for pick-up by MIDWEST.
4. ANY EXPRESS WARRANTY NOT PROVIDED IN THIS WARRANTY DOCUMENT, AND ANY REMEDY FOR BREACH OF CONTRACT THAT, BUT
FOR THIS PROVISION, MIGHT ARISE BY IMPLICATION OR OPERATION OF LAW, IS HEREBY EXCLUDED AND DISCLAIMED. THE IMPLIED
WARRANTIES OF MERCHANTABILITY AND OF FITNESS FOR ANY PARTICULAR PURPOSE ARE EXPRESSLY LIMITED TO A TERM OF ONE
(1) YEAR. SOME STATES DO NOT ALLOW LIMITATIONS ON HOW LONG AN IMPLIED WARRANTY LASTS, SO THE ABOVE LIMITATIONS
MAY NOT APPLY TO YOU.
5. UNDER NO CIRCUMSTANCES SHALL MIDWEST BE LIABLE TO PURCHASER OR ANY OTHER PERSON OR ANY SPECIAL, INCIDENTAL OR
CONSEQUENTIAL DAMAGES, WHETHER ARISING OUT OF BREACH OF WARRANTY, BREACH OF CONTRACT OR OTHERWISE, SOME
STATES DO NOT ALLOW THE EXCLUSION OR LIMITATIONS OF INCIDENTAL OR CONSEQUENTIAL DAMAGES, SO THE ABOVE LIMITATIONS
OR EXCLUSION MAY NOT APPLY TO YOU.
6. This warranty gives you specific legal rights, and you may also have other rights which vary from state to state.
 Loading...