

Page 1

WARNINGS AND NOTICES
MAY 2000
WARNING.
Federal copyright, trademark and patent laws protect this game. Unauthorized modifications may be illegal
under Federal law. The modification ban also applies to Midway Games Incorporated and game logos,
designs, publications and assemblies. Moreover, facsimiles of Midway equipment (or any feature thereof)
may be illegal under federal law, regardless of whether or not such facsimiles are manufactured with Midway components.
WARNING.
grounded outlet. Do not use a cheater plug to defeat the power cord's grounding pin. Do not cut off the
ground pin.
CAUTION.
momentary loss of consciousness when viewing certain kinds of flashing lights or patterns that are present in
our daily environment. These pers ons may exper i ence sei zur es w hil e watc h ing so me ki nds of te le visi o n pi ctures or playing certain video games. People who have not had any previous seizures may nonetheless have
an undetected epileptic condition.
If you or anyone in your family has experienced symptoms linked to an epileptic condition (e.g. seizures or
loss of awareness), immediately consult your physician before using any video games.
We recommend that parents observe their children while they play video games. If you or your child experience the following symptoms: dizziness, altered vision, eye or muscle twitching, involuntary movements,
loss of awareness, disorientation, or convulsions, DISCONTINUE USE IMMEDIATELY and consult your
physician.
CAUTION.
make improvements in equipment function, design, or components as progress in engineering or manufacturing methods warrants.
Use of non-Midway parts or circuit modifications may cause serious injury or equipment damage!
Prevent shock hazard and assure proper game operation. Plug this game into a properly
A very small portion of the population has a condition which may cause epileptic seizures or
Information in this manual is subject to change without notice. Midway reserves the r ight to
16-60068.3-101
COUNTERTOP
STYLE
CABINET
COPYRIGHT & TRADEMARK NOTICE.
mechanical, photographic, or electronic means. You may not produce phonograph recordings of this document. You may not transmit this publication or otherwise copy it for public or private use, without permission from the publisher.
For Service: Call your Authorized Midway Amusement Games, LLC Distributor.
© 1996-2000 MIDWAY AMUSEMENT GAMES, LLC, MIDWAY, and TOUCHMASTER are registered
trademarks of MIDWAY AMUSEMENT GAMES, LLC. all rights reserved. refer to the individual software
upgrade kit installation instructions for game and logo trademarks.
You may not reproduce any part of this publication by
midway amusement games, llc
3401 n. california ave.
chicago, illinois 60618-5899
http://www.midway.com
Entire contents of this manual copyright © Midway Amusement Games, LLC. All rights reserved
397945
397945
86
/,67('
Operations Manual Includes
Setup • Service • System • Parts • Wiring • Troubleshooting
The manufacturer inte nds t hat thi s gam e is to be operated for amusement purposes only and not in contravention
of any federal, state or local law or regulation of the United States or any foreign country governing gaming
devices. All operato rs of this game are respo nsibl e for its o peratio n in acc ordanc e with su ch law s and regul ations .
The manufacturer's factory settings for this game may require adjustment in order to comply with laws applicable
in an operator's s pe ci fic j uris di cti on . It i s the op era t or's res po ns ibi lit y to determine whether adj us tme nts a re nec es sary and, if they are, to make the appropriate adjustments prior to operating the amusement game.
midway amusemen t games, llc
3401 north california avenue chicago, illinois 60618 usa
http://www.midway.com
Page 2
TOUCHMASTER® INFINITY COUNTERTOP QUICKSTART
1
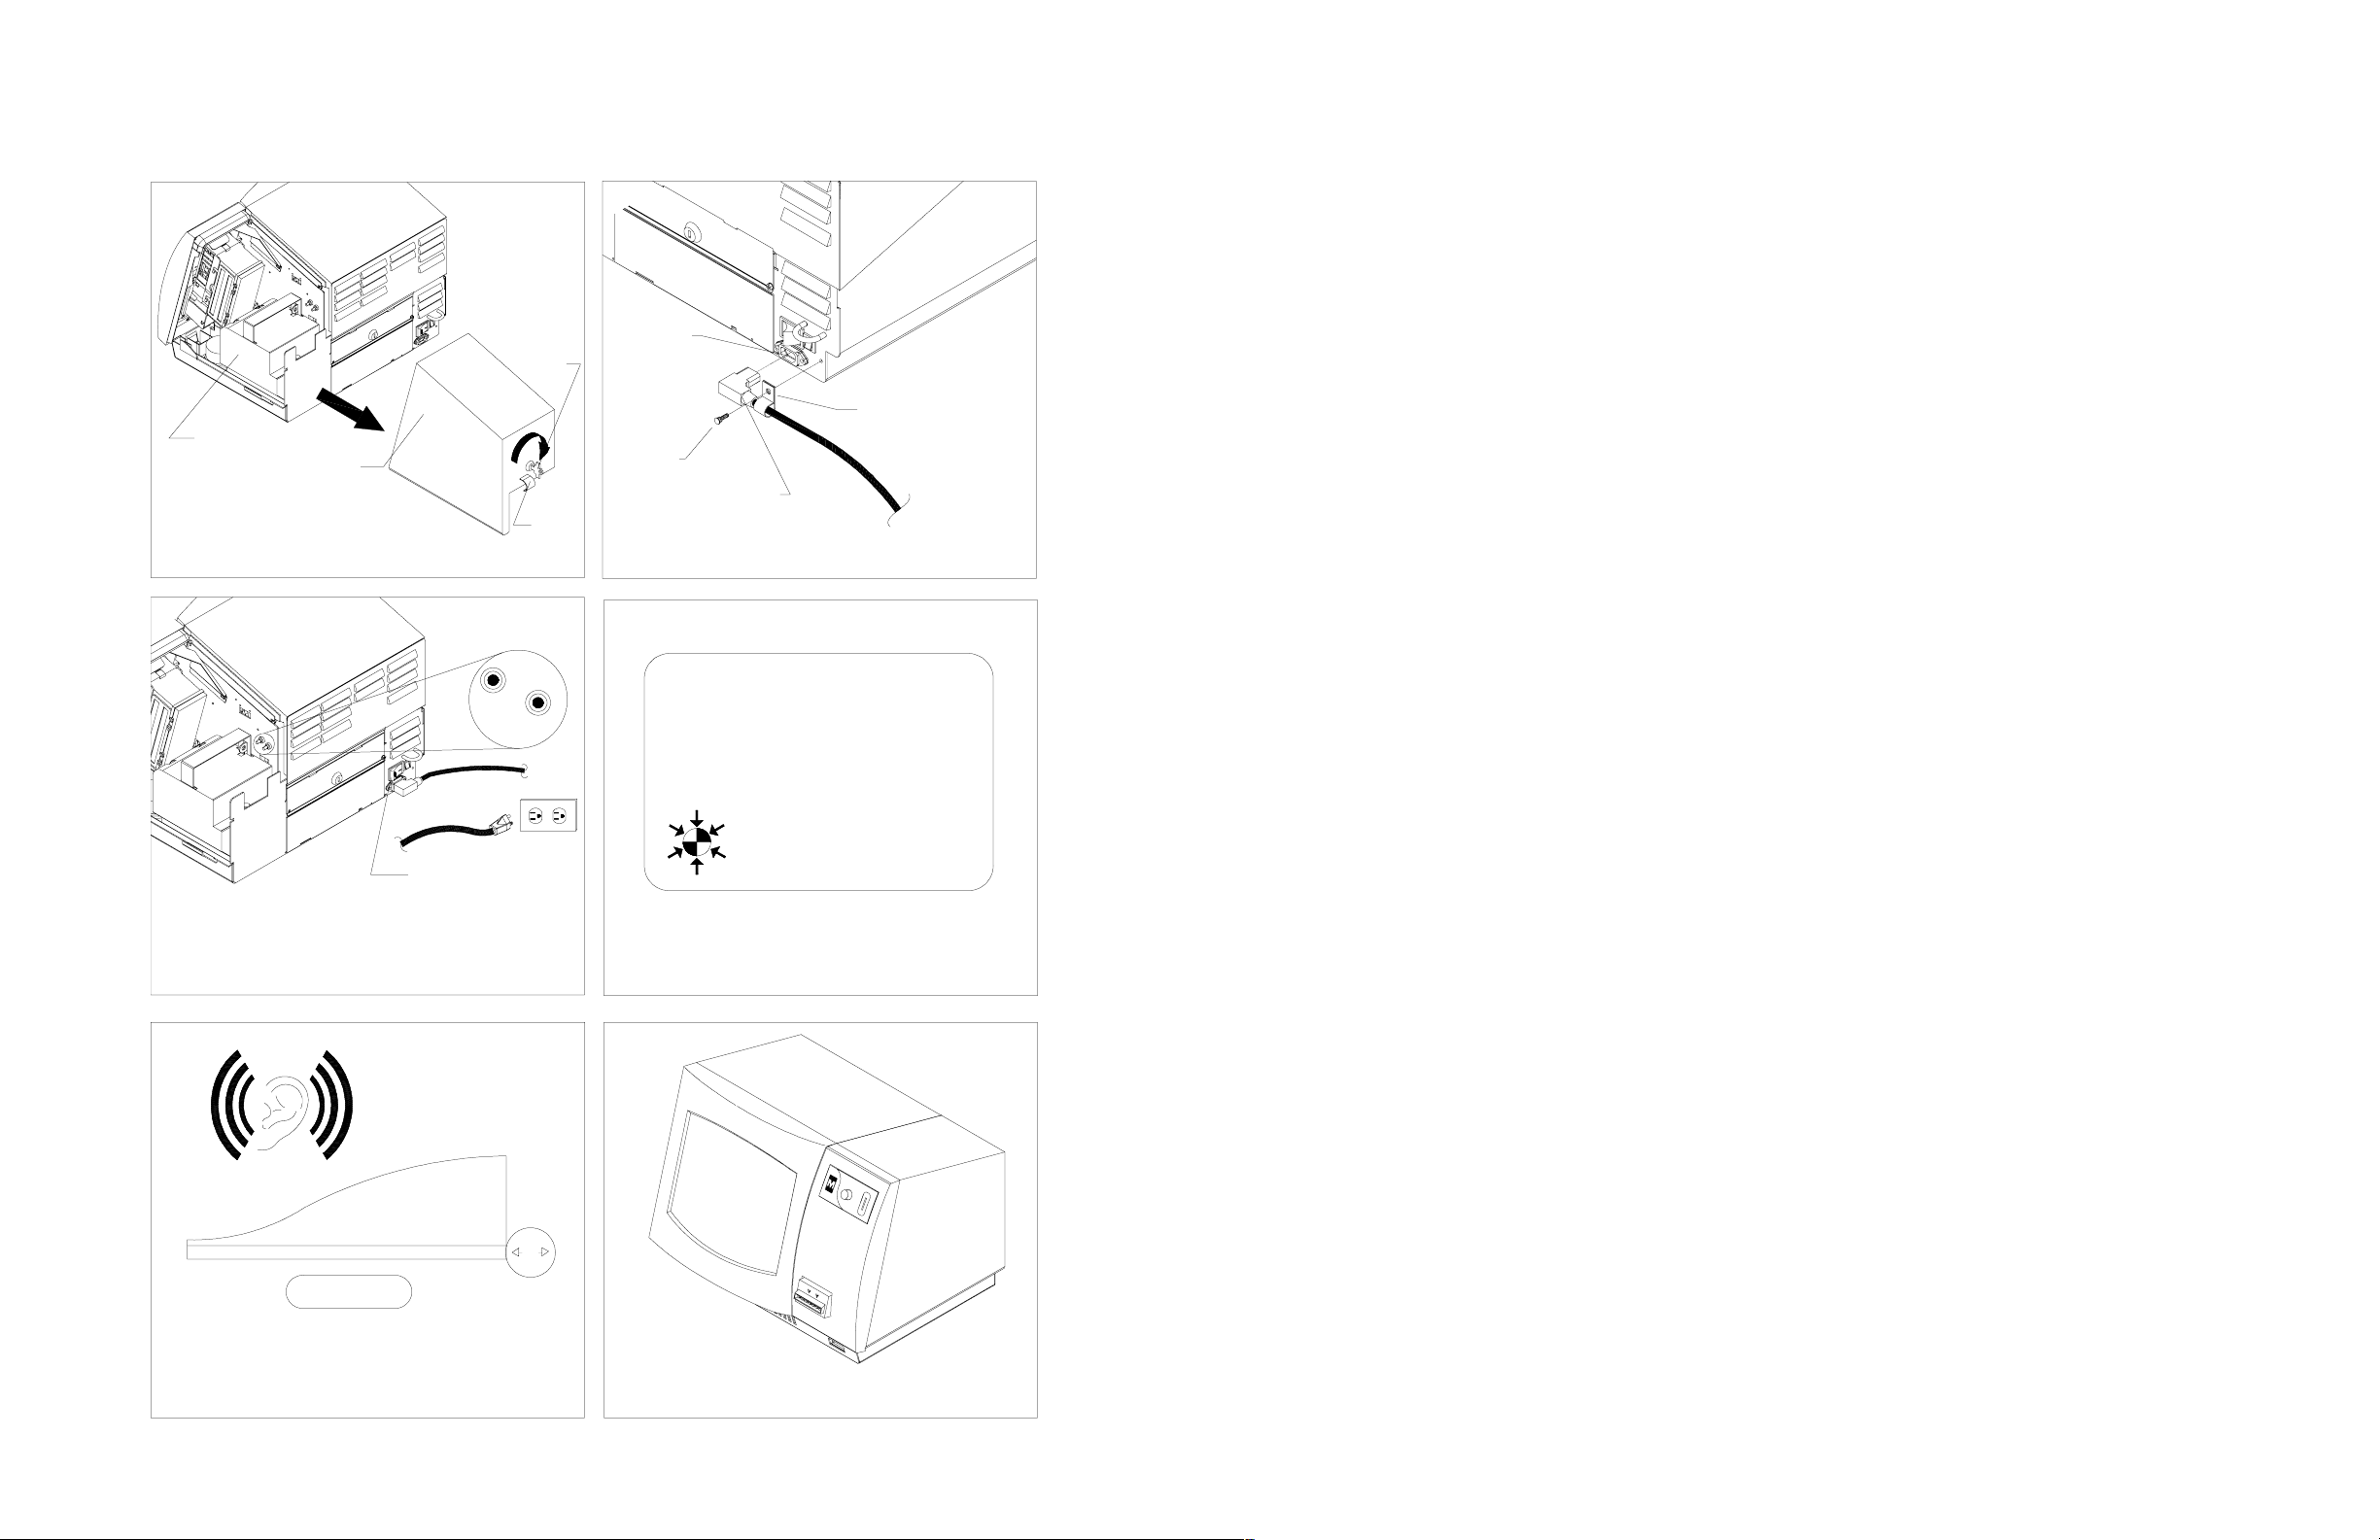
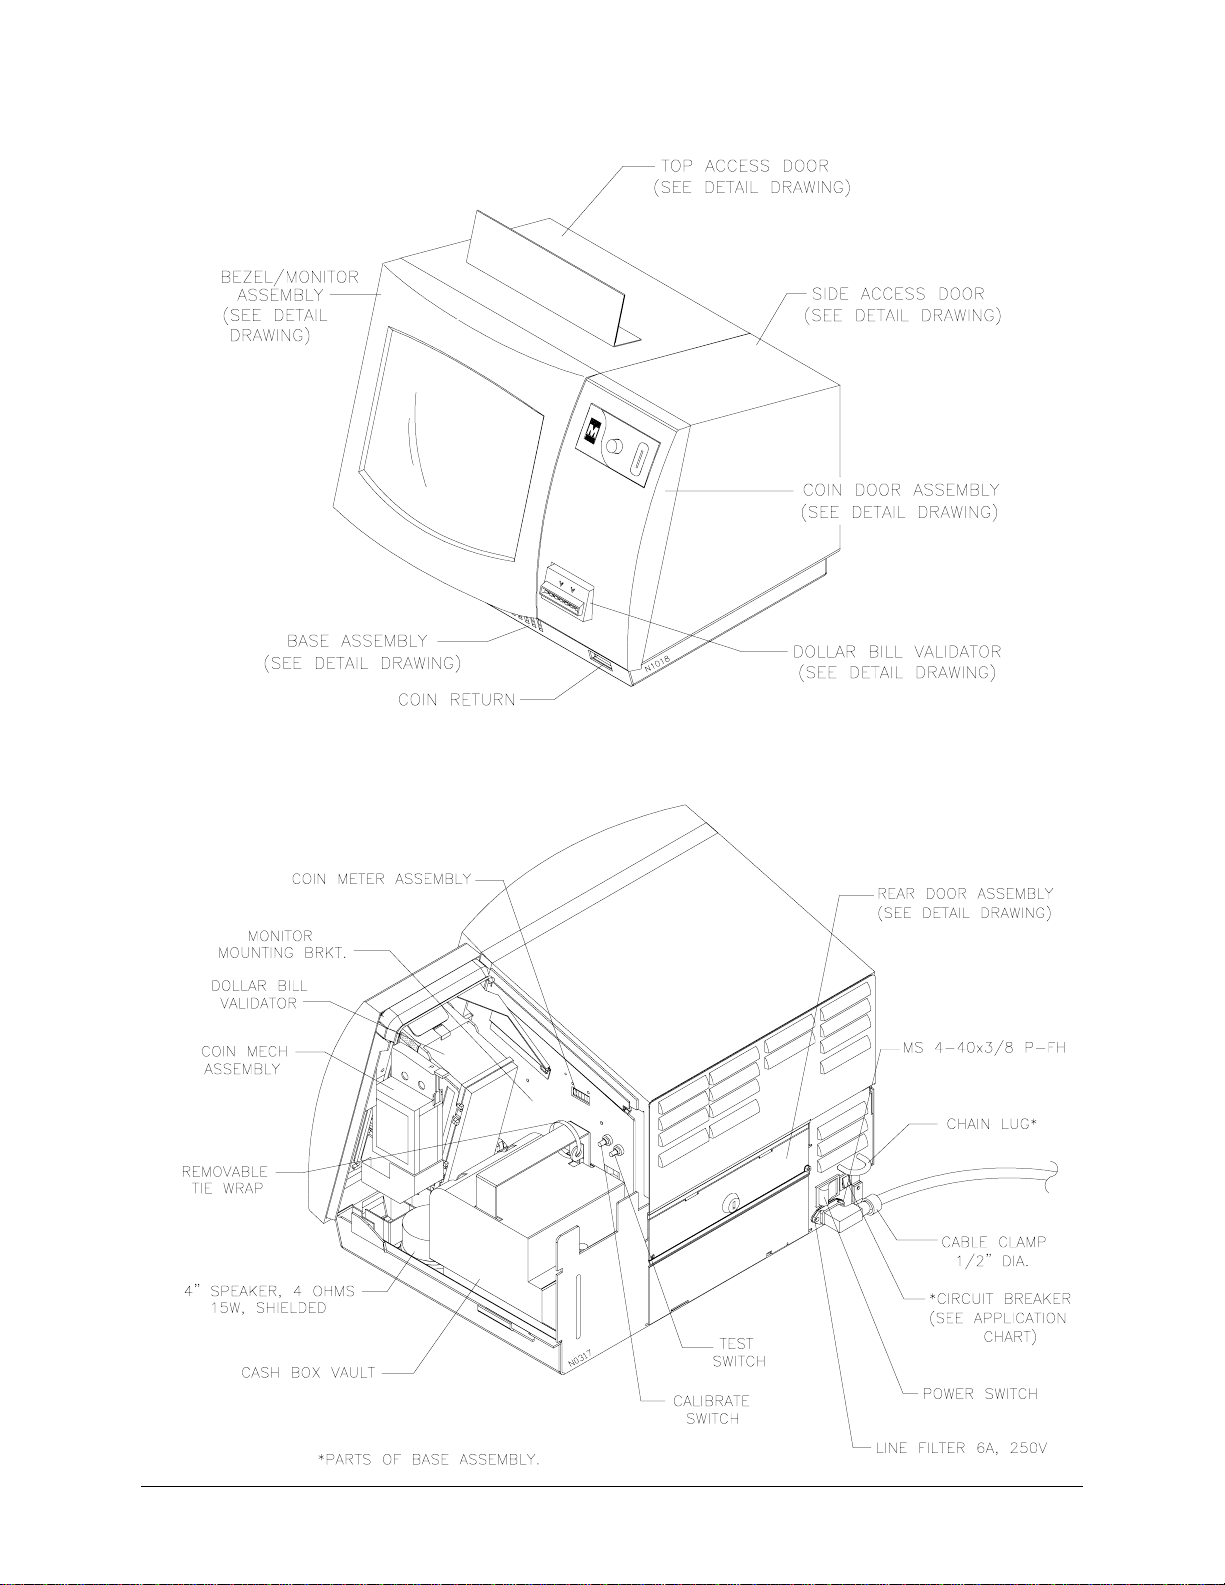
CASH VAULT
SIDE COVER
Insert key in side cover. Turn
key clockwise. Pull cover back by
hook and remove. Remove cash vault.
Remove all items from cash vault. Replace vault.
3
CAL.
KEY
HOOK
TEST
2
I.E.C.
SOCKET
KNURLED
SCREW
POWER PLUG
Install and secure power cord with cable clamp.
4
Touch the Target
CABLE CLAMP
FreeBSD Software copyright 1994-1999 FreeBSD, Inc. All rights reserved.
Redistribution and use in source and binary forms, with or without modification, are permitted provided
that the following conditions are met:
1. Redistributions of source code must retain the above copyright notice, this list of conditions and the
following disclaimer.
2. Redistributions in binary form must reproduce the above copyright notice, this list of conditions and
the following disclaimer in the documentation and/or other materials provided with the distribution.
THIS SOFTWARE IS PROVIDED BY THE FREEBSD PROJECT "AS IS" AND ANY EXPRESS OR
IMPLIED WARRANTIES, INCLUDING, BUT NOT LIMITED TO, THE IMPLIED WARRANTIES OF
MERCHANTABILITY AND FITNESS FOR A PARTICULAR PURPOSE ARE DISCLAIMED. IN NO
EVENT SHALL THE REGENTS OR CONTRIBUTORS BE LIABLE FOR ANY DIRECT, INDIRECT,
INCIDENTAL, SPECIAL, EXEMPLARY, OR CONSEQUENTIAL DAMAGES (INCLUDING, BUT
NOT LIMITED TO, PROCUREMENT OF SUBSTITUTE GOODS OR SERVICES; LOSS OF USE,
DATA, OR PROFITS; OR BUSINESS INTERRUPTION) HOWEVER CAUSED AND ON ANY THEORY OF LIABILITY, WHETHER IN CONTRACT, STRICT LIABILITY, OR TORT (INCLUDING
NEGLIGENCE OR OTHERWISE) ARISI NG IN ANY WAY OUT OF THE USE OF THIS SOFTWARE,
EVEN IF ADVISED OF THE POSSIBILITY OF SUCH DAMAGE.
© 1996-2000 Midway Amusement Games, LLC. All rights reserved. MIDWAY & LOGO, TOUCHMASTER INFINITY & LOGO, 3 PEAK DELUXE, 5 STAR GENERALS, CRYSTAL BALLS, DOUBLE
T AKE, HOT HOOPS, MAH JONGG PAIRS, MAHKI, MOVIE TRIVIA, PAIRS, SOLIT AIRE CLASSIC,
SUPER SCORE SOLOTAIRE, TARGET 21, WORD SEARCH, VIEW FINDER, ARTIFACT, LINE OF
SIGHT JET SET and UNDERCOVERS are trademar ks of Midway Amusement Games, LLC. QUIZ WIZ
trademark and content owned by Tiger Electronics. Ltd. And used under license. ™, ®, and © 1999 Tiger
Electronics, Ltd. All Rights Reserved.
ON/OFF SWITCH
Plug in unit and turn on AC power.
Press CAL. pushbutton in cash chamber.
Calibrate Touch Screen and perform Calibration Test.
Press TEST pushbutton.
56
100
MAX
VOLUME
Set volume and time. Make other adjustments.
Exit Menu System.
Replace cover. Lock. Remove key. Play games.
Special Editions, Ltd.: From The Playboy Photo Archives. © 1999 Special Editions, Ltd. PLAYBOY,
PLAYMATE, RABBIT HEAD DESI GN, FEMLIN a nd FEMLIN DESIGN are used under lic ens e by Midway Games Inc.
Page 3

CHAPTER
1
2 3
5 6
Setup and Safety
NOTICE:
Amusement Games, LLC reserves the right to im prove equipment function, design, or
components as progress in engineering or manufacturing methods may warrant. Field
installed upgrade kits may also change the operating sequence or functions.
Information in this manual is subject to change without notice. Midway
Page 4

SAFETY INSTRUCTIONS
Read safety instructions before preparing Touchmaster® Infinity for play, performing maintenance, or
beginning service procedures. These instructions apply to all operators and service personnel. Specific
notes, cautions, and warnings appear in manual where applicable.
LABELS:
Labels posted directly on and in Touchmaster
®
Infinity contain important
information. Most replaceable assemblies are labeled with part num bers and versions or
date codes for easy identification. Caution labels are placed to alert readers to potential
equipment damage. Warning labels address possibility of personal injury.
HIGH VOLTAGE CONSIDERATIONS:
CRTs and their power supplies can retain energy
long after power is turned off. T his is especially true when a defective circuit prevents a
normal dischar ge. Connect a well-ins ulated gr ound str ap to metal chassis. Slide free end of
strap under CRT anode cap until you make c ontact. W ait two m inutes for charge recover y,
then discharge anode again.
ELECTRICAL GROUND:
To avoid electrical shock s, do not connect line cord or turn AC
power On until you have inspected cabinet and components. Use only factory-approved
AC line cords. O nly plug this game into a grounded 3-wire outlet. Never use a “cheater”
plug or cut off ground pin on line cord.
AC LINE VOLTAGE:
AC line voltage and frequency vary for different countries and
continents. Measure local line voltage if you are not sure of its value. Set power supply
selector switch and transformer taps for best voltage match.
HEAT:
may become very hot. Check temperature of internal components before touching.
When left on for long periods of time, internal co mponents–especially heat sink–
MOVEMENT:
Touchmaster
when moving machine to its destination. Do not relocate Touchm aster
power is on.
®
Infinity contains fragile components. Avoid rough handling
®
Infinity while AC
UNPACKING:
Inspect shipping carton and its contents for signs of damage before
removing cabinet. Begin ass embly only after identifying and accounting for all parts. Keep
spare parts and documents with machine.
EPILEPSY WARNING:
A very small portion of the population has a condition which may
cause them to experience epileptic seizures or have momentary loss of consciousness
when viewing certain kinds of flashing lights or patterns that are com monly present in our
daily environment. These pers ons may experience seizures while watching some k inds of
television pictures or playing certain video games. People who have not had any previous
seizures may nonetheless have an undetected epileptic condition.
If you or anyone in your family has experienced symptoms link ed to an epileptic condition
(e.g. seizure or loss of awareness), immediately consult your physician before using any
video games.
Parents should observe their children while they play video games. If you or your child
experience any of the following symptoms: dizziness, altered vision, eye or muscle
twitching, involuntary movements, loss of awareness, disorientation, or convolutions,
discontinue use immediately and consult your physician.
GAME LOCATION:
Do not operate Touchmaster
®
Infinity near equipment or vents that
produce excessive heat or m oisture. Ensure drapes or other furnishings do not block air
circulation around cabinet vents. Platform beneath cabinet must safely support its weight
and remain steady when touched. Route line cord away from possible foot traffic.
RADIATION:
High voltages used in monitor can generate X-rays under fault conditions.
Do not substitute high voltage components or m odify circuit without factory authorization.
Follow manufacturer’s directions for measuring and adjusting CRT anode voltage.
Setup - 2 Midway Amusement Games, LLC
Page 5

GLASS PARTS:
parts made of glass. Fluorescent tubes and CRTs usually implode if broken. Glass pieces
can fly eight feet (more than two meters) or more from point of impact.
WARNING:
equipment damage. Use only Midway authorized parts.
•
For safety and reliability, substitute parts and modifications are not recommended.
•
Substitute parts or modifications may void CE type acceptance.
•
This game is protected by Federal Copyright, trademark, and patent laws.
Unauthorized modifications may be illegal under Federal law. This also applies to
Midway Amusement Games, LLC logos, designs, publications, and assemblies.
Moreover, facsimiles of Midway equipment (or any feature thereof) may be illegal
under federal law, regardless of whether such facsimiles are manufactured with
Midway components.
Wear protective gloves and use both hands when carrying or moving
Use of non-Midway parts or circuit modifications may cause serious injury or
HARD DRIVE:
settings, high scores, etc. Hard drives are sensitive to static electricity. When transporting
or storing drives, place them in anti-static bags. Or, you can transport drive in hard drive
box (part 08-8068). Handle hard drives carefully. Do not drop them or store heavy items on
top of them, as this may cause damage.
NOTICE:
or electronic process, or in the form of a phonographic recording, nor may be transmitted,
or otherwise copied for public or private use, without permission of the publisher.
This machine uses a hard disk drive to store game information, custom
No part of this publication may be reproduced by any mechanical, photographic,
PRODUCT SPECIFICATIONS
Operating Requirements
Location
Domestic
Foreign
Japan
Cabinet Statistics
Game Dimensions
Width 21" (53.3 cm)
Depth 17" (43.2 cm)
Height 16" (39.4 cm)
Electrical Power
120VAC @ 60Hz 3.0 Amps
230VAC @ 50Hz 2.0 Amps
100VAC @ 50Hz 3.0 Amps
Shipping Dimensions
Width 25” (63.5 cm)
Depth 21” (53.3 cm)
Height 20” (50.8 cm)
Temperature
32°F to 100°F
(0°C to 38°C)
Shipping Weight
105 Lbs
(43.0 kg.)
Humidity
Not to exceed 95% relative
Design Type
Countertop Video Game
Equipment Characteristics
Video Display Monitor
VGA
14” (35.6 cm) CRT with
Touchscreen
Game Characteristics
Player Variables
Choice of many different games
1 or 2 players per game
High score recognition
Touchmaster® Infinity Countertop Setup - 3
Audio System
Digital Monaural
4” (10 cm) Full
Range Speaker
Operator Variables
Coinage, Difficulty,
Graphics, Statistics
Modem, Time, Volume
Currency Acceptors
Standard 1 Coin Mechanism Door
DBV ready
1 Coin Counter
Diagnostics
Automatic Power-Up Self-Test
Manual Multi-Level Menu System
Touchscreen Calibration
Page 6

GAME PLAY
Touchmaster® Infinity offers opportunities for expanded gameplay, graphics, connectivity, upgradability,
and earnings. The hard disk drive lets players enjoy a wider variety of games, more vivid images and
action, and the chance to pit their scores against other players. It also makes upgrading simpler.
You can customize up to four Attract Mode Ad Screens, calling attention to games or tournaments,
advertising drink or food specials, announcing birthdays or special occasions, or promoting your
establishment name.
Models in Playboy
®
and other erotic games strip to their bikinis or their birthday suits. You can control
when and if these images are viewable, although they are turned off at the factory. You can also change
the “card” games to “tactic” games and make playing cards look like tiles to comply with local regulations.
Game instructions are built into the software and appear at the start of each game. Players can recall
instructions during game play by touching the ? button. A player unhappy with a game can stop a game
with the Exit button. However, game credits are spent once play begins and are not refunded or reused.
®
Place your Touchmaster
Infinity on a bar, countertop, or sturdy table at a convenient height. Its built-in
lazy-Susan lets players turn the machine to gain access. (While the cabinet spins 360 degrees, power
cord safety prevents you from doing so too often.)
STANDARD MAINTENANCE
Touchmaster® Infinity uses the same surface for video display and player controls. Because players use
their fingers, the entire cabinet will quickly become covered with fingerprints. We recommend you clean
the cabinet frequently to ensure maximum customer interest.
CAUTION:
Use only isopropyl alcohol and warm water as a Touchscreen cleaning
solution. Do not use products with ammonia, chlorine, bleach, lemon, vinegar, TSP (trisodium phosphate), or any abrasive ingredients. Many common household cleaners
include these chemicals.
Glass surfaces
You do not need to switch off AC power to clean glass. Apply a mixture of isopropyl alcohol and water to
a clean cloth or sponge, then use this to wipe screen. Do not apply the cleaner directly on glass! Liquids
could drip down into Touchscreen circuits and cause erratic operation.
TOUCHSCREEN
CONTROLLER
C3H8O & H2O
TOUCHSCREEN
Cabinet
Use only non-abrasive cleaners to avoid damaging decals and graphics. Apply the cleaner to a clean
cloth or sponge, then use this to wipe. Do not apply the cleaner directly to cabinet! Liquids could enter the
cabinet, damaging electronic circuits and voiding the warranty.
Calibration
After each cleaning, and after each time you move the cabinet, check screen calibration for accuracy.
Use Calibrate Test to determine if recalibration is required.
Setup - 4 Midway Amusement Games, LLC
Page 7

TYPICAL COUNTERTOP CABINET INSTALLATION
1. Inspect cabinet exterior and screen for signs of damage.
2. Place cabinet on countertop, sturdy table, or other convenient location with access to AC outlet. Do
not block the front air intake vents.
3. Remove keys from chain lug on rear of cabinet.
4. Insert key into lock on rear of Side Cover Assembly and turn key clockwise to unlock. Slide side cover
backwards off base assembly.
5. Insert key into Rear Door and turn key clockwise to unlock. Pivot Rear Door and remove from
cabinet. Remove three right screws from Top Cover Assembly and disconnect fan cable connector as
you remove cover from cabinet.
6. Verify that power supply voltage selector switch is set correctly for your local power source. Replace
Top Cover Assembly and reconnect fan. Replace and lock Rear Door.
7. Cut tie wrap and remove Cash Box from cash chamber and remove spare parts inside. Line cord is
with spare parts.
8. Adjust ease of cabinet rotation by hand tightening knurled screw at base of cash chamber. Use flathead screwdriver if necessary.
9. Match holes on IEC plug of line cord with prongs in receptacle and push firmly to seat line cord. Hold
cord flat against cabinet and secure it to rear of cabinet using cable clamp and knurled screw
provided in spare parts kit.
10. Plug line cord into grounded (3-plug) wall outlet. Turn AC power on at power switch at rear of cabinet.
Touchmaster
®
powers up and begins self-diagnostics. Upon finding no errors, Attract Mode begins.
11. Press CAL. (calibrate) pushbutton. Calibrate Touchscreen.
12. Press TEST pushbutton. Set game options, such as volume and country coin setup. Customize Ad
Screens and set other variables.
13. Exit Menu System. Replace and lock side cover.
14. Fold marquee and insert into plastic marquee holder. Place holder on top of cabinet. Play games.
POWER SWITCH
IEC PLUG
KNURLED SCREW
LINE CORD
CIRCUIT BREAKER
CHAIN LUG
CABLE CLAMP
LINE CORD AND CABINET REAR
NOTICE:
Your Touchmaster
®
Infinity has erotic software turned off at the factory and a
green AAMA label indicating games are suitable for all ages.
Should you choose to turn erotic software on, apply appropriate red AAMA label over the
original label. The additional label is included in the spare parts kit.
Touchmaster® Infinity Countertop Setup - 5
Page 8

NOTES
........................................................................................................................................................................
........................................................................................................................................................................
........................................................................................................................................................................
........................................................................................................................................................................
........................................................................................................................................................................
........................................................................................................................................................................
........................................................................................................................................................................
........................................................................................................................................................................
........................................................................................................................................................................
........................................................................................................................................................................
........................................................................................................................................................................
........................................................................................................................................................................
........................................................................................................................................................................
........................................................................................................................................................................
........................................................................................................................................................................
........................................................................................................................................................................
........................................................................................................................................................................
........................................................................................................................................................................
........................................................................................................................................................................
........................................................................................................................................................................
........................................................................................................................................................................
........................................................................................................................................................................
........................................................................................................................................................................
........................................................................................................................................................................
........................................................................................................................................................................
........................................................................................................................................................................
........................................................................................................................................................................
........................................................................................................................................................................
Setup - 6 Midway Amusement Games, LLC
Page 9

CHAPTER
1 2
5 6
3
Service
NOTICE:
LLC reserves the right to make improvements in equipment function, design, or
components as progres s in engineering or m anufactur ing methods warrants. Installing field
upgrade kits may also change the operating sequence or functions.
This manual is subject to change without notice. Midway Amusement Games,
Page 10

SERVICE
Only qualified service personnel should maintain and repair a Touchmaster® Infinity. Read all instructions
and safety warnings carefully before beginning service. Failure to do so may cause serious injury or
damage to machine. More specific notes, cautions, and warnings appear in manual where applicable.
Read the safety notices in the previous chapter thoroughly before beginning service.
®
Touchmaster
Observe the following precautions when handling any electronics.
•
Ensure AC power is turned off prior to servicing electronics. Do not remove or connect electronics
assemblies when power is on. Doing so will damage electronics assemblies and void the
warranty.
•
Discharge any static electricity buildup in your body by touching the cabinet. This must be done
before touching or handling electronic assemblies.
•
Store electronics assemblies in an anti-static bag in an anti-static area. When replacing
electronics, reuse the bag from the new part to store removed boards during service.
Infinity uses complex electronic components that are sensitive to static electricity.
ACCESSING COMPONENTS
SIDE COVER ASSEMBLY REMOVAL
1. Insert key into rear lock of Side Cover Assembly. Turn key 90 degrees clockwise to unlock.
2. Grasp hook and pull down along slope of base assembly. Set Cover in safe place.
3. To replace, slide Cover back onto Base Assembly. Turn key 90 degrees counter-clockwise to lock.
DEFLECTION BOARD BRACKET
CASH VAULT
BASE ASSEMBLY
KNURLED SCREW
TOP COVER ASSEMBLY
CASH CHAMBER
TEST SWITCH
CAL. SWITCH
SIDE COVER ASSEMBLY
REAR DOOR
COVERS AND DOOR REMOVAL
Service - 2 Midway Amusement Games, LLC
Page 11

REAR DOOR REMOVAL
1. Insert key into Rear Door. Turn key 90 degrees clockwise to unlock.
2. Remove two screws that secure Rear Door.
3. Rear Door is hinged at bottom. Swing Door on hinge, remove, and set in safe place.
4. To replace, insert bottom hinges and swing Door closed. Turn key 90 degrees counter-clockwise to
lock. Reinstall Rear Door screws.
REAR DOOR REMOVAL
TOP COVER ASSEMBLY REMOVAL
1. Remove Rear Door. Remove three right screws from rear of Top Cover Assembly. (Screw on left is
tamper proof and does not hold Top Cover Assembly.)
2. Without completely removing, gently pull Top Cover Assembly downward two to three inches along
slope of Base Assembly. Pivot the Cover enough to expose fan wire. Disconnect fan wire. Remove
Top Cover Assembly and set in a safe place.
3. To replace Cover, align on Base Assembly close enough to reattach fan cable connector. Slide Top
Cover Assembly fully onto base assembly. Fasten three screws and tighten.
CABLE
CONNECTOR
FAN
TOP COVER ASSEMBLY REMOVAL
Touchmaster® Infinity Countertop Service - 3
Page 12

CONTROL SWITCH ACCESS
Remove Side Cover Assembly to access TEST and CAL. pushbuttons on interior wall of cash chamber.
•
CAL. pushbutton lets you calibrate Touchscreen. This is crucial to maintaining quality of game play.
•
TEST pushbutton gives you access to system software to reset high scores, customize Attract Mode
with location name, review game audits, and set other options.
CAL. AND TEST BUTTONS LOCATION
DEFLECTION BOARD BRACKET PIVOTING
You need not remove the Deflection Board Bracket to access components. Pivot the Bracket as follows:
1. Remove Rear Door and Top Cover Assembly.
2. Remove Deflection Board Bracket screw nearest Coin Meter.
3. Loosen Bracket screws holding plate on the opposite side, but do not remove.
4. Lift Rear of bracket until spring-loaded pin near Touchscreen snaps into hole in side panel wall.
To replace Bracket, push in spring-loaded pin and swivel Bracket back into position. Replace and tighten
screws.
REMOVE THIS SCREW
SPRING-LOADED PIN
LOOSEN THESE SCREWS.
DEFLECTION BOARD BRACKET PIVOTING
Service - 4 Midway Amusement Games, LLC
Page 13

SERVICING THE TOUCHMASTER® INFINITY COUNTERTOP
Only qualified service personnel should maintain and repair a Touchmaster® Infinity. Read all instructions
and safety warnings carefully before beginning service. Failure to do so may cause serious injury or
damage to machine. More specific notes, cautions, and warnings appear in manual where applicable.
Each of the following service instruc tions requires you to switch AC power off and unplug
line cord from AC power source. Do not attem pt any service while AC power is on. This
may damage your video game machine or cause injury, as well as void warranty.
Marquee
Grip both sides of marquee
and pull forward and down to
free magnet strips from top
cover. Lift sign up and off
cabinet. Slide sign out of top
cover.
Padlocks
®
Your Touchmaster
not
built with a padlock, but
Infinity is
you can install one to deter
removal of cash vault. Place
cash vault in cash chamber
and install a small padlock
through hasp.
HASP
CABINET REA R
MARQUEE RETAINER
WITH MARQUEE
MAGNETIC STRIP
CIRCUIT BREAKER
POWER SWITCH
Power Switch
Remove top cover. Press
upper and lower locking tabs
on one side of switch inward.
Slide that side partially out
through rear wall. Use flat
screwdriver if needed. Press
in tabs on other side and
wriggle device until tabs on
both sides are outside
cabinet. Remove wires.
Remove power switch from
cabinet.
Circuit Breaker
To reset, push in circuit
breaker button. To remove
circuit breaker, remove top
cover. With a flat
screwdriver, push tab on one
side of circuit breaker inward.
Slide side partially out
through rear wall. Press tab
on other side and wiggle
device until both tabs are
free. Remove wires.
POWER SWITCH
CIRCUIT BREAKER
POWER SWITCH AND CIRCUIT BREAKER
Touchmaster® Infinity Countertop Service - 5
Page 14
Rotating Base
Unlock and open Side Cover.
Remove Cash Vault.
Remove nylon screw from
cash chamber. Replace
Cash Vault and Side Cover.
Turn cabinet upside down.
Cut holes in pad to access
nuts. Unscrew nuts and
remove base.
Fan
Remove Rear Door and Top
Cover Assembly. Disconnect
fan wire connector. Use
small pliers or nut driver to
loosen and remove four nuts
and fan grill from threaded
studs. Remove fan from Top
Cover Assembly.
Speaker
Remove Side Cover
Assembly. Remove DBV and
Cash Vault if necessary.
Disconnect speaker wiring.
Remove speaker mounting
nuts. Leave washers for use
with replacement. Lift
speaker up and off studs.
Note that replacement
speaker must be
magnetically shielded.
ROTATING BASE REMOVAL
TOP COVER ASSEMBLY
VAULT
SPEAKER
SPEAKER REMOVAL
Service - 6 Midway Amusement Games, LLC
Page 15
Pushbutton Switches
Remove Side Cover
Assembly, Rear Door, Top
Cover Assembly. Remove
switch mounting nuts. Push
switches through hole.
Disconnect wiring and remove
switches.
COIN METER
PUSHBUTTON
SWITCHES
Coin Meter
Remove Side Cover
Assembly, Rear door, Top
Cover Assembly. Swing up
Deflection Board Bracket.
Remove meter mounting
screws. Disconnect wiring and
lift meter away from interior
wall.
CONNECTORS:
connectors. They are k eyed to fit in only one location. Bent pins and reversed connectors
may damage your game and void warranty. You may want to check all connections when
you remove your machine from its carton, as connections may have loosened in transit.
ANTI-STATIC BAGS:
assemblies in anti-static bags during service, transport, or storage.
STATIC ELECTRICITY:
exterior of cabinet. Do this
this may damage assemblies.
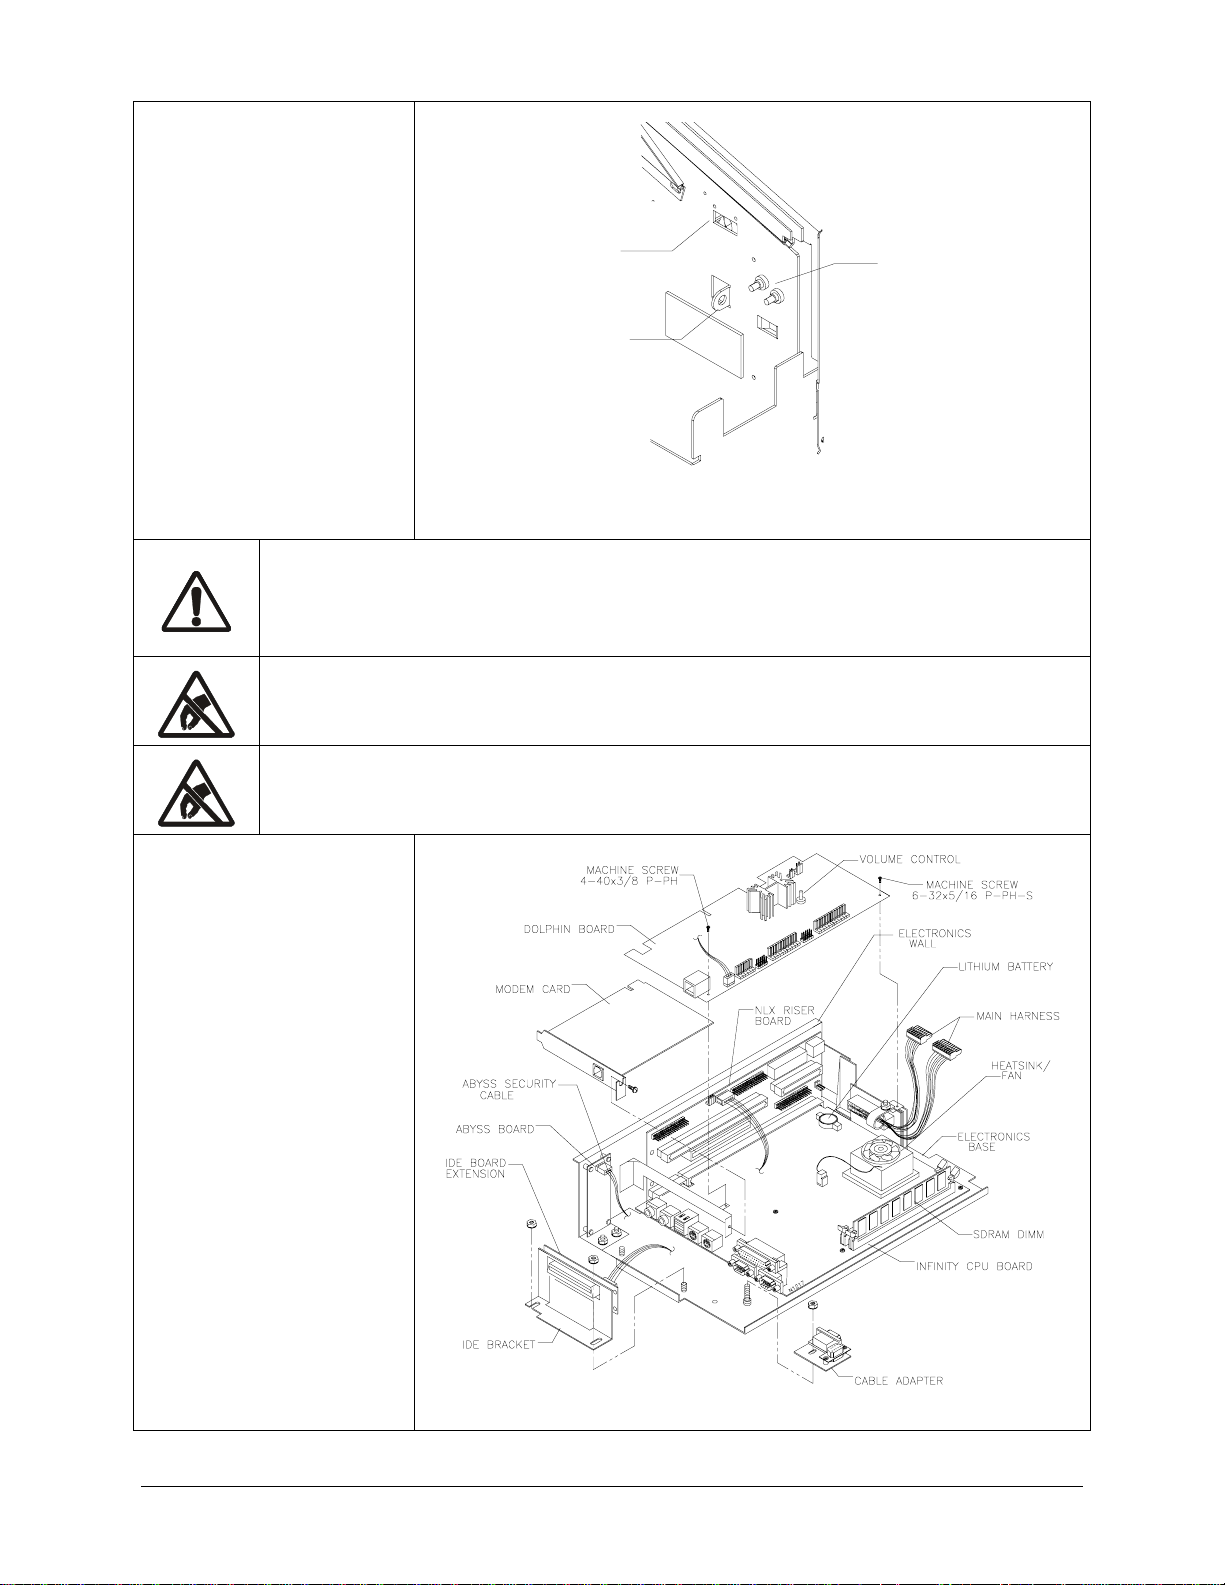
Electronics Assemblies
Remove Rear Door.
Disconnect hard disk drive
ribbon connector. Remove
screw in rear center of tray.
Grasp electronics tray by
vertical lip at bottom of tray.
Disconnect power cables
and other wiring as you
slowly slide tray out of
cabinet. Remove Top Cover
if needed.
HASP
CASH CHAMBER
Check that all cable connectors are correctly secured. Do not force
Store electronic assemblies in an anti-static area. Keep board
Discharge static electricity buildup in your body by touching
before
touching or handling electronics assemblies. Failure to do
Security Board Assembly
Remove Rear Door. Pull
Abyss Security Board
Assembly away from top two
retaining pins with a firm,
gentle tug. When free, pull
board away from bottom
pins.
ELECTRONICS TRAY
Touchmaster® Infinity Countertop Service - 7
Page 16

Modem Cable
Remove Rear Door. Detach
connector from modem port.
Remove nut and washer
from modem cable clamp.
To replace, secure cable in
clamp and tighten nut and
washer. Insert connector into
port. Tie a knot in the cable
between clamp and rear door
for strain relief.
Replace Rear Door, guiding
cable through notch at
bottom of door next to left
hinge.
Battery
Remove electronics tray from
cabinet. Disconnect cables
and remove Dolphin I/O
Board Assembly to gain
access to CPU Board
Assembly. Pry lithium battery
from socket and discard
according to replacement
battery instructions.
MODEM CARD
Hard Disk Drive
Remove Side Cover
Assembly, Rear Door and
Top Cover Assembly. Pivot
Deflection Board Bracket up.
Disconnect cables to hard
drive. Remove screws
holding Mounting Brackets to
interior wall of Base
Assembly. Remove Hard
Disk Drive from cabinet.
Remove screws holding
Mounting Brackets to Drive.
Do not overtighten screws
when replacing Mounting
Brackets on Drive.
LOCATION OF BATTERY
HARD DISK DRIVE ASSEMBLY
Service - 8 Midway Amusement Games, LLC
Page 17

Touchscreen Controller
Remove Rear Door and Top
Cover Assembly. Pivot
Deflection Board Bracket up
for access. Disconnect
Touchscreen Controller
cable connector (DB9) from
CPU Board Assembly.
Disconnect flat, rectangular
Touchscreen Connector from
center of Touchscreen
Controller and let it hang free
in cabinet.
A hook and loop fastener
holds controller to bulkhead.
Gently pull controller box
away from bulkhead and
remove from cabinet.
Touchscreen
Remove Rear Door and Top
Cover Assembly. Pivot
Deflection Board Bracket.
Disconnect Touchscreen
Connector Cable from
Touchscreen Controller.
Lower Bracket down.
Remove monitor bezel.
Remove tape from around
Touchscreen. Carefully note
orientation of Touchscreen
cable and adhesive strips
before separating screen
from monitor.
When reinstalling bezel,
begin with top screw nearest
coin slot, then remaining top
screw. Reinstall bottom
screws in either order.
TOUCHSCREEN
CONNECTOR
CABLE
CABLE REMOVAL
TOUCHSCREEN
CONTROLLER
MONITOR ASSEMBLY
Power Supply
Remove Rear Door and Top
Cover Assembly. Pivot
Deflection Board Bracket up.
Unplug IEC plug from
receptacle. Unplug DC
connector from front of
power supply. Remove front
and rear screws from power
supply. Lift power supply up
off power chassis and out of
cabinet.
POWER SUPPLY ASSEMBLY
Touchmaster® Infinity Countertop Service - 9
Page 18

Monitor Controls
Remove Rear Door and Top Cover Assembly. Monitor control board is just above power supply and
includes adjustments for contrast, brightness, horizontal size and delay, vertical size and vertical center.
HIGH VOLTAGE CONSIDERATIONS:
energy charges long after power is turned off. T his is especially true when defective circuits
prevent normal discharge. Perform
ANODE DISCHARGE
1. Connect a well-insulated ground strap to metal chassis.
2. Pivot Deflection Board Bracket.
3. Slide free end of ground strap under CRT anode cap until you make contact with anode.
4. Wait two minutes for charge recovery.
5. Repeat steps 1 through 3 a second time.
Monitor Bezel
Remove Rear Door, Top Cover Assembly, and electronics tray. Remove #8 nuts from inside bottom of
monitor mounting bracket. (Do not remove nut holding cable clamp.) Hold bezel in place while removing
screws holding top of bezel. Lift bezel up and off cabinet. Begin reinstallation with top screw nearest coin
slot, then other top screw. Reinstall bottom screws in either order.
CAUTION:
support monitor as you remove it from cabinet.
Monitor is very heavy. Most of its weight is toward front of cabinet. Firmly
CRTs and their power supplies can retain
two
anode discharges before working on monitors.
lethal
Monitor Mounting Bracket
Pivot Deflection Board Bracket and discharge anode twice. Replace Bracket and Remove monitor bezel.
Disconnect Touchscreen Connector Cable. Unscrew #10 nuts holding Monitor Mounting Bracket to
Cabinet and carefully remove. Disconnect any remaining wiring.
ISOLATION TRANSFORMER:
during normal oper ation. However, when operating outside cabinet or servicing m onitor on
a test bench, isolate monitor from line voltage with isolation transformer.
Monitor
CAUTION:
remove the monitor, neckboard, and Deflection Bracket–and only with the aid of an
assistant.
1. Remove monitor bezel.
2. Pivot Deflection Board Bracket and discharge anode twice.
3. Unplug AC connector from Bracket and remove cables from cable clamp on cash chamber side of
Bracket. Snip wire ties on cables leading to Bracket to allow more freedom of movement.
4. Unplug Touchscreen Connector Cable. Leave Touchscreen Controller in cabinet.
5. Remove nuts and washers from four studs at front of cabinet.
6. Unscrew remaining Deflection Board Bracket screw. Have assistant turn Bracket 90 degrees, but do
not rest it on any other equipment.
7. Carefully pull monitor out front of cabinet while assistant guides Bracket out with monitor.
Service - 10 Midway Amusement Games, LLC
This is a difficult procedure. Only qualified service personnel s hould attempt to
Monitor does not require isolation from AC line voltage
Page 19

CHAPTER
1 3
2
4 5 6
System
NOTICE:
LLC reserves the right to make improvements in equipment function, design, or
components as progres s in engineering or m anufactur ing methods warrants. Installing field
upgrade kits may also change the operating sequence or functions.
This manual is subject to change without notice. Midway Amusement Games,
Page 20

SYSTEM SOFTWARE
Touchmaster® Infinity uses a graphical user interface for its Menu System that simplifies audits and
diagnostics. The following button conventions are used at the bottom of Menu System screens.
Accepts modifications to current screen and returns to previous screen.
or
Ignores recent modifications to current screen and returns to previous screen.
Proceeds to next screen in a series.
Leaves Menu System and returns to Attract Mode.
Returns to previous screen.
Entering the system
FULL MENU SYSTEM ACCESS
Open the Side Access Cover and press the TEST pushbutton.
Champions
Displays
game help
demo
Touch
category to see
list of games.
Touch bottom
left of Attract
Mode screen
to open Touch
Key access
screen.
Playboy
Favorites
Cards
Action
Strategy
Quiz
Sexy Men
MIDWAY
1cr
1cr
1cr
1cr
Make
a
Selection
Credits: 3
Displays names
of record-
breaking high
scores for all
games.
Permits
language
selection, if
available.
System - 2 Midway Amusement Games, LLC
Page 21

M
t
TOUCHKEY (partial) MENU SYSTEM ACCESS
Touch the bottom left of the Attract Mode main screen to access the Touchkey PIN entry screen.
Touch each
digit of your
PIN (setup by
operator). If
Touchscreen.
does not sense
a signal for
about 10
seconds,
Attract Mode
begins again.
FULL MENU SYSTEM
Asterisks
representing
your four
digits appear
here. As the
fourth correct
digit is
recognized, the
Menu System
opens. If your
PIN is wrong,
Attract Mode
resumes.
MAIN MENU
Lets you
modify game
characteristics
and currency
settings.
Permits time
and date, Ad
Screen, Touch
Key PIN,
language, and
other
adjustments.
Accesses
Calibrate and
Calibrate Test
screens.
Increases
number of free
credits up to
the maximum.
"
Credits: 0
By default the
Volume Fixed
mode is visible.
Shows software version.
Main Menu
80
VOLU ME VOL UME
FIXE D TIME
Select Volume Time to show a
bar chart that changes volume
based on hour of day.
Date and Time
ove circle left or right
o lower or raise volume.
Lets you view
and reset game
high scores.
Details a wide
variety of info
about player
behavior. This
can help you
increase
earnings.
Accesses
various video
and sound
tests.
Touchmaster® Infinity Countertop System - 3
Page 22

TOUCHKEY MENU SYSTEM
MAIN MENU
Accesses
Calibrate and
Calibrate
Test screens.
Touchm aster Infinity
Vers io n X.X X
Touchke y™
Date and Time
Lets you view
and reset high
scores for all
Lets you
choose
language
availability.
customize Ad
Turns nudity
on or off. Be
sure to cover
existing green
AAMA labe l
with the
appropriate red
AAMA labe l.
Erotic Games
71 70
22 21 20 20 21 21 20
10 10
11 10
VOLU ME VOL UME
FIXE D TIME
40 42 40
15
16 16
Select the graph
to edit volume
over time.
FULL MENU SYSTEM TOUCHKEY MENU SYSTEM
games.
Lets you
Screens.
MAIN MENU or MAIN MENU
VOLUME TIME VOLUME TIME
Drag each
column up to
set volume
higher at the
Touchm aster Infinity
MAX
Time C o n tr o l Volu me
90
909090
Date and Tim e
time noted
beneath the
column.
Reverts graph
to factory-set
volumes over
time.
75
71
70
50
40 42 40
25
22 21 20
10 10
11 10
MIN
DP DP DP SP SP SP SP SP SP DP DP DP
20 21 21 20
16
Drag each
column down
to reduce
volume at that
time until you
reach zero to
shut off sound.
1615
System - 4 Midway Amusement Games, LLC
Page 23

FULL MENU SYSTEM
GAME/COINAGE SETUP
Lets you modify
both global and
Touchm aster Infinity
Vers io n X.X X
specific game
characteristics.
Enables
unlimited free
play.
Players can
accumulate as
few as 1 and as
many as 99
Max Credits: 1
credits in the
machine.
FULL MENU SYSTEM
GAME/COINAGE SETUP
GAME SETUP
Game Setup
Free Play? Erotic
Show Pricing?
Date and Time
Shows a variety
of countries and
their preset
coinage setups.
Resets
Adjustments,
Audits, and High
Scores.
Shows cost of
a credit.
Enables erotic
games.
Some games
(like Mah Jongg)
permit players to
M a in Game A d ju stme nt s
Bu y in Cre d its : Off 1 G a me C r.
Date and Time
Disables or
allows wild
cards in games
continue after
time runs out.
You can prevent
continuation
(Off), or price
the continuation
at either one (1)
credit or the cost
of the original
game (Game Cr.)
Ca r d Gr aph ics : Tac tic Cards
W ild Car d s: Off On
Sh o w Tr iv ia A n s wers : Off On
High Score Free Gam es: Off On
Fa n De c k fo r 1 0 Se c : Off O n
Ex te n de d Play Mod e : Off On
Rewards top
scorer with
free game.
After shuffle,
displays all cards
for 10 seconds.
When on,
certain games
Changes cards to
tiles and retitles
the “Card”
category to
“Tactic.”
Gives right answer
after a wrong guess.
Resets game
adjustments to
repeat until
time expires.
When off,
usually only
two rounds are
factory defaults.
Touchmaster® Infinity Countertop System - 5
played.
Page 24

FULL MENU SYSTEM
GAME/COINAGE SETUP
Erotic Games On
To turn nudity
on at a given
time, touch the
Full
desired time to
start, then drag
up to either
semi-nude or
fully nude
Semi
level. Set each
half hour
increment
likewise. To
Bikini
turn off erotic
software, drag
the bar down to
Off
“off.”
or
TOUCH KEY MENU SYSTEM
EROTIC GAMES
On
24 Ho ur Ero tic A d jus tme n t
DP DP DP SP SP SP SP SP SP DP DP DP
FULL MENU SYSTEM
GAME/COINAGE SETUP
GAME SETUP
Next
Lets you price
all games at
from 1-4
credits, as well
as adjust
difficulty of
bonus level.
Scrolls up or
down through
game list.
Select a game and adjust credits to 0 to turn
game off. Or price a game at up to 9 credits.
Select a game
to modify
bonus level
difficulty.
System - 6 Midway Amusement Games, LLC
Page 25
FULL MENU SYSTEM
GAME/COINAGE SETUP
RESTORE FACTORY SETTINGS
Selecting Restore Factory Settings clears three settings and shows you these screens:
The first reads,
All Game Adjustments Reset
The next reads,
All Game Audits Cleared
And finally,
Setting HiScores to Defaults
Note that some settings, such as Touchscreen calibration are not affected here.
FULL MENU SYSTEM
GAME/COINAGE SETUP
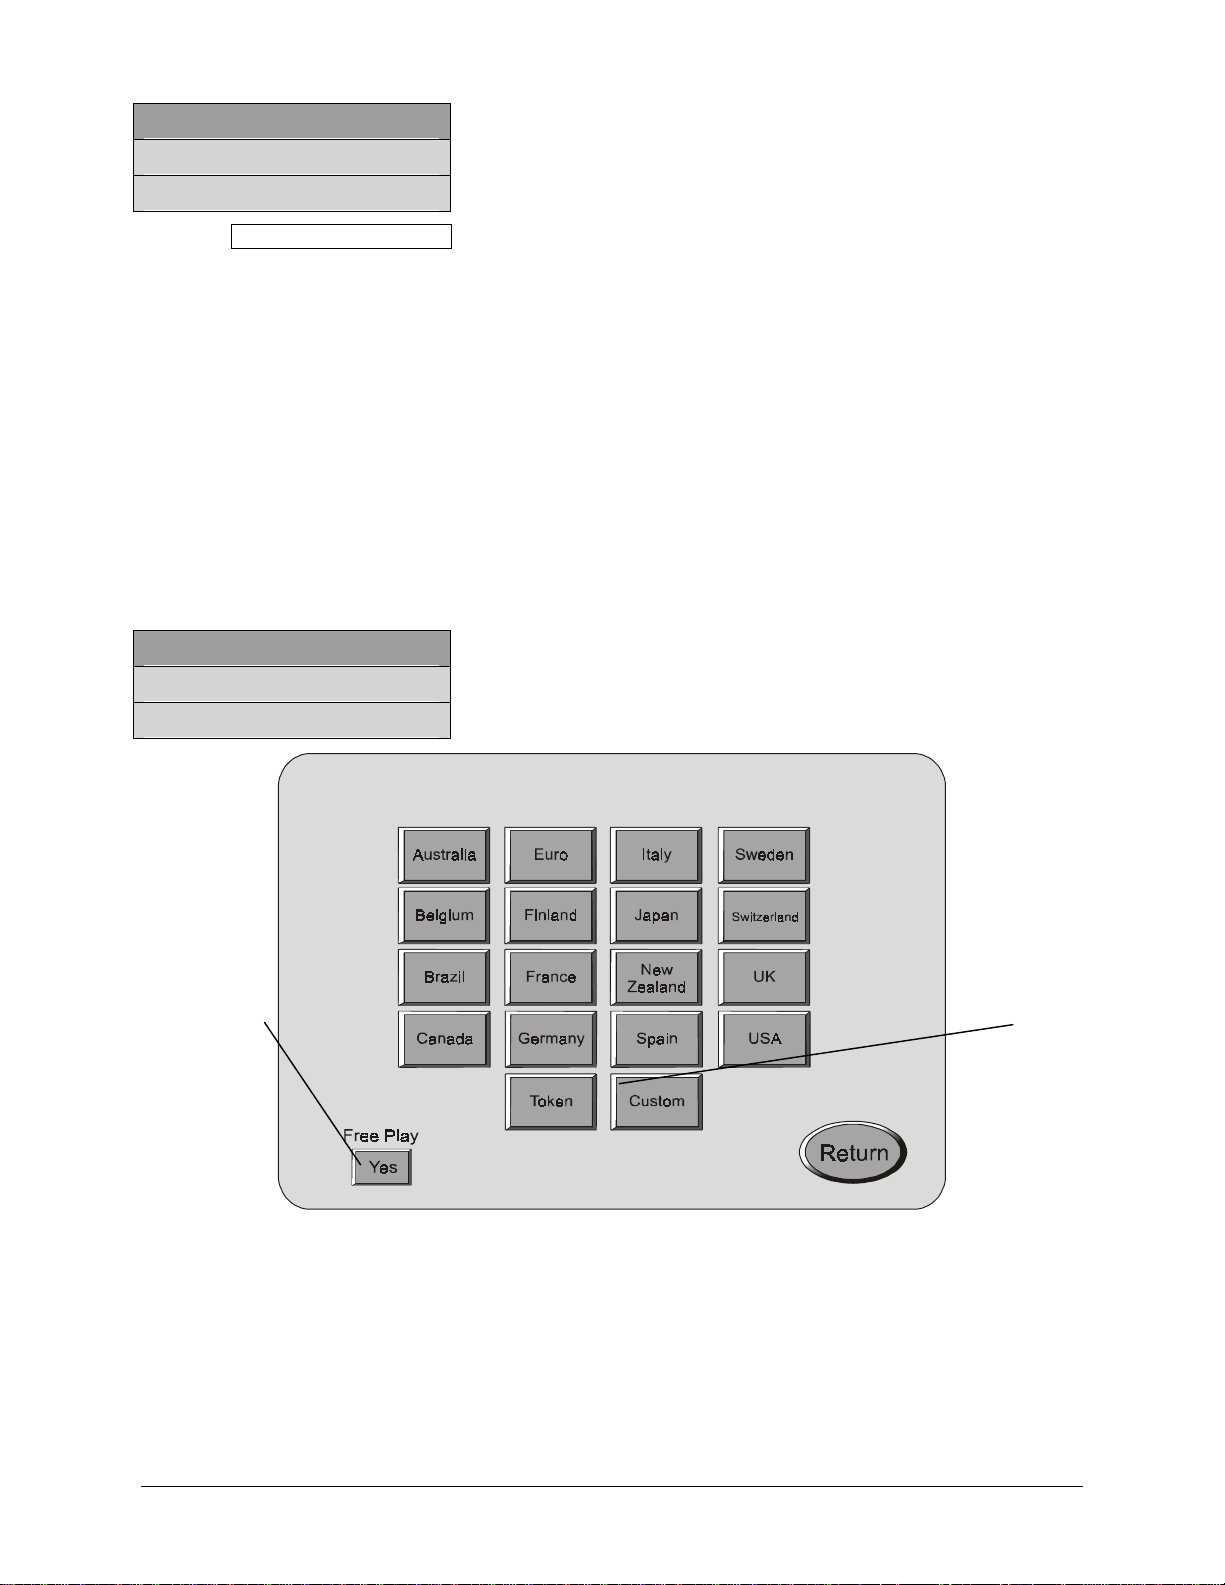
COINAGE SETUP
Select your
country to
display its
coinage choices.
The last nation
modified
remains
highlighted on
this screen.
This duplicates
the function of
the Free Play
button on Game
Setup screen.
Touchm aster Infinity
Coinag e Values
Date and Tim e
Lets you
program custom
coinage setups if
no existing one
meets your
needs.
Touchmaster® Infinity Countertop System - 7
Page 26

FULL MENU SYSTEM
GAME/COINAGE SETUP
COINAGE SETUP
Country Coinage
Touchm aster Infinity
Select coinage
choice. Not all
countries offer
multiple choices.
FULL MENU SYSTEM
GAME/COINAGE SETUP
COINAGE SETUP
CUSTOM
Country Name
Co inag e Value
Date and Tim e
If your location
requires a coin
lockout
mechanism, you
cannot set this
amount past the
number of units
a dollar bill will
buy.
System - 8 Midway Amusement Games, LLC
Page 27

FULL MENU SYSTEM
AUDIT MENU
Touchm aster Infinity
Vers io n X.X X
Shows a series
of screens that
summarize
game
popularity,
revenues, player
continuations,
etc.
Audits
Date and Tim e
Allows you to
send audit
information to a
printer or a PC.
Prints data, if
you are already
hooked up to a
printer.
FULL MENU SYSTEM
AUDIT MENU
VIEW AUDITS
Number of oneand two-player
games.
Number of play
continuations
bought.
Clears all
game audit
information.
Tota l 1 P Ga mes 0
Tota l 2 P Ga mes 0
Total Time Buyins 0
TOTA L GAMES PLAYED 0
AVE RAGE GAME P L AY T IME 0 : 0 0
Playboy: 0 W ord: 0
Top : 0 Sexy M e n: 0
Card: 0 Tactic: 0
Action: 0
Tournam ent: 0
S k ill: 0
Tallies plays by
category
Touchmaster® Infinity Countertop System - 9
Page 28

FULL MENU SYSTEM
AUDIT MENU
VIEW AUDITS
Next
Displays total
coins or bills
registered in
each device
Sets all audits
(not just
coinage) to
zero.
FULL MENU SYSTEM
AUDIT MENU
VIEW AUDITS
Next
Sorts games
alphabetically
by name.
Select a game
to view a
variety of
audit details.
Clears all
game audit
information–
not just this
screen..
Sorts games
by length of
average play.
Sorts games
by popularity.
Scrolls through
game list.
System - 10 Midway Amusement Games, LLC
Page 29

FULL MENU SYSTEM
AUDIT MENU
VIEW AUDITS
Next
Games are
ranked by
popularity.
Histogram
shows relative
frequency of
play.
Clears all game
audit
information–not
just this screen.
FULL MENU SYSTEM
AUDIT MENU
VIEW AUDITS
Next
Touchmaster® Infinity Countertop System - 11
Page 30

FULL MENU SYSTEM
AUDIT MENU
REPORT AUDITS
Checking this
button prepares
a table of
audits.
Checking any
other box will
give that
information in
simple list
format.
In some cases
this screen is
replaced by a
blue screen and
the note:
“Printing.”
FULL MENU SYSTEM
Sends selected
information to
the serial port,
to be captured
X
by a printer or a
computer.
Sends report to
serial port and
clears all
audits.
HIGH SCORES
Select a
game to see
its high
scores.
Sets all scores to
zero
Resets all high
scores to
factory-set
names and
scores.
Date & Time
High Scores
If there are 10
high scores, the
oldest ones can
be dropped each
week, after two
weeks, three or
four weeks, or
never. There is
then an opening
for new players
to add their
scores.
System - 12 Midway Amusement Games, LLC
Page 31

FULL MENU SYSTEM
HIGH SCORES
Typical Game
or
TOUCH KEY MENU SYSTEM
HIGH SCORES
Typical Game
Some games
have separate
columns for
different
difficulty levels.
Shows the
factory-set
names and high
scores. These
cannot be
cleared
permanently.
Shows the list of
high scores that
will display in
Attract Mode:
either factoryset, player-set,
or zero.
FULL MENU SYSTEM
Erases current
high scores so
that all scores in
Attract Mode
are set to zero.
LOCATION SETUP
Lets you assign a
PIN and Touch
Key access
privileges. If you
forget your P IN,
reset it here.
Permits
changes to
time, time
zone, and date.
Lets you choose
which languages
games can be
played in.
Touchm aster Infinity
Location Setup
The word “Language” flashes in several langua ges so
that no matter what tongue the Menu System is in, this
will guide you to the button that can change the Menu
System to your language.
Date and Time
Lets you
customize up to
four Ad Screens.
Accesses
modem setup
information
screens, if
tournaments are
permitted.
Button is only
visible if modem
is detected.
Lets you name
and number
Touchmaster
Infinity
machines at your
location.
®
Touchmaster® Infinity Countertop System - 13
Page 32

FULL MENU SYSTEM
LOCATION SETUP
TOUCH KEY SETUP
Touch four keys
to program your
PIN.
Remember that
the cash box key
is more powerful
than the PIN. If
you can access
the TEST
pushbutton, you
can reset the
PIN.
Still, exercise
caution in
revealing your
PIN.
Your
encrypted PIN
appears here.
Check this box
to make the PIN
active.
Buttons beneath
determine how
much control a
Touch Key user
has.
FULL MENU SYSTEM
LOCATION SETUP
SET DATE AND TIME
Moves forward
a month.
Moves back a
month.
Lets you choose
a time zone.
Touchm aster Infinity
Time Zone: G MT
Set Date & Time
O c t 3 1 1 9 9 9 0 2 :2 0 A M
System - 14 Midway Amusement Games, LLC
Page 33

FULL MENU SYSTEM
LOCATION SETUP
OPERATOR AD SCREEN
Touch the spot
on the Ad Screen
design workspace where text
or graphic should
appear.
Shows keyboard
for entering
messages.
Touch clip art to
place on Screen.
Displays
background
scenes.
Scrolls through
graphics
choices.
Deletes
selected
elements.
Background choices include two
default ad screens announcing
new games. One includes
Playboy
not announce er otic software.
®
games. The other does
Options
Scale
Forgets all changes.
Displays the
Ad Screen in
full-screen
mode.
Sets duration
the Screen
displays in
Attract Mode.
Toggles
between the 4
Ad Screens.
Enlarges or
shrinks selected
element.
Shows pictures
you can include
in Ad Screens.
Displays borders.
FULL MENU SYSTEM
LOCATION SETUP
LANGUAGE SETUP
Sets the
language of
Attract Mode,
help screens,
system software,
and some games.
You can have
only one default.
Players can
override your
default and
choose from
languages you
make available
by checking
boxes here. You
can check
multiple boxes.
Touchmaster® Infinity Countertop System - 15
Page 34

FULL MENU SYSTEM
LOCATION SETUP
TOURNAMENT SETUP
Touchm aster Infinity
Vers io n X.X X
Tournament Setup screens are only available if your
Touchmaster
®
senses the presence of a modem card.
In order to participate in tournaments, contact Midway
Amusement Games, LLC for registration information.
To ur na ment Set up
Date and Tim e
Lists
Tournament
participants.
Allows you to
prepare the
internal modem
to place calls.
FULL MENU SYSTEM
LOCATION SETUP
TOURNAMENT SETUP
VIEW AUDITS
Shuts off
Tournament
Mode
Takes you to an
interactive
questionaire that
helps place a
modem phone
call.
Touchm aster Infinity
Vers io n X.X X
Tournam ent Audits
Date and Tim e
System - 16 Midway Amusement Games, LLC
Page 35

FULL MENU SYSTEM
LOCATION SETUP
TOURNAMENT SETUP
MODEM SETUP
Answer Yes or
No to these three
consecutive
questions to let
Touchmaster
enable
tournaments for
you.
If your answers
are all “Yes,” the
keys appear so
you can enter
information.
Tournament Setup screens are only available if your
Touchmaster® senses the presence of a modem card.
In order to participate in tournaments, contact Midway
Amusement Games, LLC for registration information.
FULL MENU SYSTEM
LOCATION SETUP
TOURNAMENT SETUP
DIAL SETTINGS
Type the
primary and
backup phone
numbers.
Sets timeframe
in which to
attempt call.
Displays result
codes from last
call.
Dials the primary
number
immediately.
Dials the backup
number
immediately.
Touchmaster® Infinity Countertop System - 17
Page 36

FULL MENU SYSTEM
LOCATION SETUP
GAME LOC./NO. SETUP
You can
identify the
location (bar,
arcade, etc.) of
your game.
FULL MENU SYSTEM
LOCATION SETUP
GAME LOC./NO. SETUP
OK
You can
uniquely
identify each
game at a
location.
System - 18 Midway Amusement Games, LLC
Page 37

FULL MENU SYSTEM
CALIBRATE TOUCHSCREEN
or
TOUCH KEY MENU SYSTEM
CALIBRATE TOUCHSCREEN
Takes you to a
Touchm aster Infinity
screen to set
calibration.
Immediately
after that, you
will be given a
calibration test.
FULL MENU SYSTEM
TOUCHSCREEN CALIBRATE
CALIBRATE
Calibrate Touchscreen
or
Date and Tim e
If you just
want to verify
calibration,
touch this
button.
TOUCH KEY MENU SYSTEM
CALIBRATE TOUCHSCREEN
CALIBRATE
Touch the ta rget
dead center as it
changes position
on the screen.
Touch the Target
Touchmaster® Infinity Countertop System - 19
Page 38

FULL MENU SYSTEM
CALIBRATE TOUCHSCREEN
CALIBRATE TEST
or
TOUCH KEY MENU SYSTEM
CALIBRATE TOUCHSCREEN
CALIBRATE TEST
As you move
your finger
across the
screen, verify
that the
crosshairs
follow your
finger’s motion
exactly.
These are the
horizontal and
vertical
coordinates of
your finger on
the screen.
FULL MENU SYSTEM
DIAGNOSTICS MENU
X: 436 Y: 157
Touch to test.
X X X X X
Date and Tim e
Returns to
Diagnostic
Menu.
A number here
indicates your
Touchscreen
Controller
version.
Accesses video
test patterns to
diagnose
monitor.
Same screen as
Modem Setup
under
Tournament
Settings.
Lets you change
settings for
making minor
software
upgrades.
Touchm aster Infinity
Date and Tim e
Helps diagnose
electronics boards
and hard disk drive.
Accesses sound
testing programs to
diagnose speaker
and sound chip.
Accesses software
version information.
System - 20 Midway Amusement Games, LLC
Page 39

FULL MENU SYSTEM
DIAGNOSTICS MENU
VIDEO TEST
Fills the screen
with horizontal
and vertical
lines so you can
adjust the
horizontal and
vertical position
of the image.
Shows a series
of colored
screens to help
you calibrate the
monitor’s color
levels.
Touchm aster Infinity
When you arrive at these screens, touch the screen to advance to the
next test. Use the monitor control panel above the Power Supply to
adjust contrast, brightness, horizontal and vertical size, horizontal
delay and vertical center.
Date and Tim e
Shows colored
vertical bars. To
help you adjust
sharpness and
brightness.
FULL MENU SYSTEM
DIAGNOSTICS MENU
HARDWARE TEST
Runs a series of
diagnostics that
analyze board
function.
Lets you see
whether
switches are
open or closed.
Touchm aster Infinity
Date and Tim e
Verifies
operation of
coin meter and
coin lockout
circuits, if
present in your
Video Game
Machine.
Touchmaster® Infinity Countertop System - 21
Page 40

FULL MENU SYSTEM
DIAGNOSTICS MENU
HARDWARE TEST
SWITCH TEST
Activate one of
the switches to
watch the
response on
screen.
FULL MENU SYSTEM
DIAGNOSTICS MENU
HARDWARE TEST
DRIVER TEST
Touching this
button advanc es
the coin meter,
but does not
affect the audit
record.
System - 22 Midway Amusement Games, LLC
Page 41

FULL MENU SYSTEM
DIAGNOSTICS MENU
HARDWARE TEST
FILE INTEGRITY CHECK
Date and Tim e
FULL MENU SYSTEM
DIAGNOSTICS MENU
HARDWARE TEST
MOTHERBOARD TEST
Date and Tim e
Touch Screen to Exit
Touchmaster® Infinity Countertop System - 23
Page 42

FULL MENU SYSTEM
DIAGNOSTICS MENU
SOUND TEST
Lets you hear
each game’s
sounds in
random
sequence.
Plays a low,
medium and
high-range tone
to help verify
the speaker’s
dynamic range.
Touchm aster Infinity
Date and Tim e
System - 24 Midway Amusement Games, LLC
Page 43

CHAPTER
1 3
4
2
5 6
Parts
WARNING:
cause serious injury or equipment damage. Use only Midway authorized parts.
For safety and reliability, substitute parts and modifications are not recommended.
Substitute parts or modifications may void FCC type acceptance.
Use of non-Midway Amusement Games, LLC parts or circuit modifications may
Page 44
CABINET ASSEMBLY (Front View)
04-12702.1
03-9762-2
*5555-14680-00
CABINET ASSEMBLY (Rear View)
A-21069
*4004-01041-06
02-5191.1
*03-7655-8
04-12703.1
*5642-14632-00
*5102-14240-00
Parts - 2 Midway Amusement Games, LLC
Page 45
31-3512.1
CABINET ASSEMBLY (Rear View)
A-23465
4008-01227-06
TOUCH SCREEN COMPONENTS (Front View)
Touchmaster® Infinity Countertop Parts - 3
Page 46

POWER SUPPLY (A-23340)
4408-01128-00
20-10613
03-7655-12
04-12856
4006-01003-06
HARD DRIVE/BRACKET ASSEMBLY (A-23343)
4006-01041-06
04-12930-1
4006-01209-04
5795-15344-08
04-12930-2
A-23344
Parts - 4 Midway Amusement Games, LLC
Page 47

SIDE DOOR ASSEMBLY (A-23337-2)
04-12699.1-2
01-15072.1
TOP COVER ASSEMBLY (A-23338-2)
20-10475
4406-01128-00
20-10414
A-23460
04-12821-1
31-3630
04-12700.3-2
4008-01227-06
REAR DOOR ASSEMBLY (A-23390-2)
4006-01005-06
01-15112
20-10475
01-15118.1-2
Touchmaster® Infinity Countertop Parts - 5
Page 48

BASE ASSEMBLY (BOTTOM VIEW, A-23336-2)
20-10244
20-10239
01-15105
4700-00011-00
5555-14680-00
4408-01128-00
4010-01202-12
4410-01129-00
04-12698.4-2
04-12701-2
03-9644-1
04-12396.1
RM-62-01
MONITOR MOUNTING BRACKET ASSEMBLY (A-23335)
4008-01227-06
20-10413
04-13018
23-6825
5677-16312-00
4410-01129-00
23-6821.1
04-10693
4700-00118-00
RM-42-01
RM-43-01
04-12702.1
Parts - 6 Midway Amusement Games, LLC
Page 49

COIN DOOR ASSEMBLY, U.S. DOLLAR BILL VALIDATOR READY (A-23334-2)
03-9395-1
4006-01003-05
03-9973-1
4006-01003-06
24-8865
24-8768
03-9962-1
03-9972-1
A-21067
04-12723.1
4108-01219-08
*03-9702-1
01-15082
03-9972-1
4010-01044-24
03-9534
12-7413
4108-01219-05
01-13982.1
04-12876.1-1
*5647-15524-00
*03-9703
*4604-01145-12
03-9515-1
4408-01128-00
09-96028-1
Touchmaster® Infinity Countertop Parts - 7
Page 50

CPU BOARD ASSEMBLY (A-23341)
4004-01005-06
4006-01003-05
4006-01003-05
04-12852.1
5795-16486-08
04-12680
04-12826
4408-01128-00
5795-15344-12
01-15229.1
04-12818.6
20-10665.1
H-23595.1
04-12791
04-12853
01-15232
H-23448
01-15230
02-5295-36
04-12854
A-23523
4404-01124-00
03-6047-1
4408-01128-00
04-12823
NOTICE:
Dolphin I/O Board are matched at the fac tory and cannot be mixed. Replacing any one of
these components without the others may result in an inoperative Video Game Machine.
The hard disk drive, the Abyss Security Board, the CPU Board Assembly, and the
Parts - 8 Midway Amusement Games, LLC
Page 51

LINE CORD APPLICATION CHART
Part Number
Country
USA
UK
Italy
Japan
New Zealand
Germany
Spain
Denmark
Finland
Holland
Norway
Sweden
Switzerland
Hungary
Canada
Austria
France
Australia
Belgium
Saudi Arabia
Brazil
India
Indonesia
58501469900
58501469901
58501469902
58501469903
58501469904
58501469905
58501469906
58501469907
TYPICAL LINE CORD
Touchmaster® Infinity Countertop Parts - 9
Page 52

COIN DOOR/ACCEPTOR APPLICATION CHART
Coin Doors Coin Acceptors
Part No.
A-23334-1
Country
A-23334-2
A-23374-2
A-23374-4
A-23374-10
A-23374-17
A-23374-20
A-23374-22
A-23374-2
09.96004-1
Germany
France
UK
New Zealand
Spain
Switzerland
US DBV Installed
US DBV Ready
•
•
•
•
•
•
•
•
•
•
•
•
MARS DBV SETTING (A-E2411U5E)
DIP 1 DIP 2 DIP 3 DIP 4 DIP 5 DIP 6 DIP 7
Domestic
Off On On On On On Off Off
•
•
DIP 8
•
New Jersey
Function
2 way 2 way
Off On On On Off Off Off On
High
Security
$1
accept
$2
accept
$5
accept
1 pulse
per dollar
Harness
enable
MARS DBV SETTING (VN2511U5)
Long
pulse
Long pulse
DIP 1 DIP 2 DIP 3 DIP 4 DIP 5 DIP 6 DIP 7
Domestic
New Jersey
Function
2 way 2 way
Off On On On On On Off Off
Off On On On Off Off Off Off
High
Security
$1
accept
$2
accept
$5
accept
Parts - 10 Midway Amusement Games, LLC
DIP 8
Page 53

CHAPTER
Wiring
1 3
4 5
2
6
WARNING:
with each mounting screw installed and securely tightened may result in r adio frequency
interference.
Failure to reconnect all ground wires or replace metal shields and covers
Page 54

CABINET WIRING DIAGRAM
Wiring - 2 Midway Amusement Games, LLC
Page 55

POWER WIRING DIAGRAM
Touchmaster® Infinity Counterto p Wiring - 3
Page 56

CABINET CABLE CONNECTOR IDENTIFIER CHART
Switch Function Cable (H-23476)
Coin Door Cable (H-23482)
Name
Coin
From AC
From
Function
-5VDC
Light
GND
GND
Coin
Coin 1
+ Speaker
Spkr
- Speaker
Line
Ground
Power
Neutral
-5VDC
DC
ower
Ground
Not Used
Not Used
Not Used
Hot
Ground
To DBV
Neutral
Ground
DBV
Not Used
Ground
Not Used
Not Used
Coin 1
Not Used
DBV
Not Used
Not Used
+ Speaker
- Speaker
Not Used
To Switch Function Cable (H-23476)
Not Used
Ground
Cnctr
Pin Color +12VDC
Yellow +5VDC
Yellow Brown +5VDC
Black Meter 1
Black Brown Coin 1
Red Gray Coin 2
Brown Gray NC
8P3
8P3
8P3
8P1
8P1
8P2
8P2
8P2
8P2
8P2
8P2
8P2
8P2
8P2
8P4
8P4
8P4
8P4
8P4
8P4
8P4
8P4
8P4
8P4
8P4
8P4
1 Black DBV
2 Green Yellow Calibrate
3 White Test
1 Yellow Lockout 1
2 Yellow Brown Lockout 2
1 NC + Speaker
2 NC - Speaker
3 NC Not Used
4 Black
5 Green Yellow +5VDC
6 White
7 Black Calibrate
8 Black White Ground
9 NC
1 Black Ground
2 NC +12VDC
3 NC +5VDC
4 Black Brown Coin 1
5 NC Coin 2
6 Black White DBV
7 NC Lockout 1
8 NC Lockout 2
9 Red Gray + Speaker
10 Brown Gray - Speaker
11 NC Not Used
12 NC
Name
Function
Ground
To Main Harness (H-23448)
Not Used
Coin
Meter
Meter 1
Switches
Test
Pshbutton
To Coin Door Cable (H-23482)
Not Used
Cnctr
11P2
11p2
11P2
11P2
11P2
11P2
11P2
11P2
11P2
11P2
11P2
11P2
11P2
11P2
11P2
11P2
11P2
11P2
8P5
8P5
8P6
8P6
8P6
8P4
8P4
8P4
8P4
8P4
8P4
8P4
8P4
8P4
8P4
8P4
8P4
Pin Color
1 Black
2 Black
3 Orange
4 Red
5 Red
6 Brown
7 Black Brown
8 Black Red
9 NC
10 Black White
11 White Green
12 White Blue
13 White Violet
14 White Gray
15 Red Gray
16 Brown Gray
17 NC
18 NC
1 Red
2 Brown
1 White Green
2 Black
3 White Blue
1 Black
2 Orange
3 Red
4 Black Brown
5 Black Red
6 Black White
7 White Violet
8 White Gray
9 Red Gray
10 Brown Gray
11 NC
12 NC
Connector Name Prefixes
1 CPU Board 2 Touchscreen 3 Dolphin I/O
Board
7 NLX Riser
Board
8 Cash
Chamber
9 Cable
Adapter
4 IDE
Extension
10 Abyss
Board
5 Power
Supply
11 Internal
Cabling
6 Video
Monitor
12 Hard Disk
Drive
Wiring - 4 Midway Amusement Games, LLC
Page 57

DC Power Cable (H-23449)
Name
To NLX Riser Board
o Cn
Door
To Hard
To Power
Function
+3.3VDC
+3.3VDC
Ground
+5VDC
Ground
+5VDC
Ground
Power OK
+5VSB
+12VDC
+3.3VDC
-12VDC
Ground
PSONGround
Ground
Ground
-5VDC
+5VDC
+5VDC
-5VDC
Cable
Ground
+12VDC
Ground
Drive
Ground
+5VDC
+12VDC
Ground
Ground
Supply
+5VDC
Cnctr
7P3
7P3
7P3
7P3
7P3
7P3
7P3
7P3
7P3
7P3
7P3
7P3
7P3
7P3
7P3
7P3
7P3
7P3
7P3
7P3
8P1
8P1
12P1
12P1
12P1
12P1
5P1
5P1
5P1
5P1
Pin Color
Name
Function
1 Orange +3.3VDC
2 Orange +3.3VDC
3 Blk & Yel Brn Ground
4 Red +5VDC
5 Black Ground
6 Red +5VDC
7 Black Ground
8 Gray Power OK
9 Violet +5VSB
10 Yellow +12VDC
11 Orange +3.3VDC
12 Blue -12VDC
13 Black Ground
14 Green PSON-
To Power Supply Connector
15 Black Ground
16 Black Ground
17 Black Ground
18 White & Yllow -5VDC
19 Red +5VDC
20 Red
1 Yellow
2 Yellow/Brown
1 Orange
+5VDC
Fan Power Cable (H-23595)
2 Black Ground
3 Black Not Used
4 Red +12DVC
1 Orange Not Used
2 Black +5VDC
3 Black
Power Out
Ground
4 Red +12VDC
Ground
Ground
To IDE
Extension
+5VDC
+12VDC
Not Used
To Fan
Ground
Cnctr
7P3
7P3
7P3
7P3
7P3
7P3
7P3
7P3
7P3
7P3
7P3
7P3
7P3
7P3
7P3
7P3
7P3
7P3
7P3
7P3
7P4
7P4
7P4
7P4
7P4
7P4
4J2
4J2
4J2
4J2
11P1
11P1
11P1
Pin Color
1 Orange
2 Orange
3 Blk Yel Brn
4 Red
5 Black
6 Red
7 Black
8 Gray
9 Violet
10 Yellow
11 Orange
12 Blue
13 Black
14 Green
15 Black
16 Black
17 Black
18 White Yellow
19 Red
20 Red
1 Black
2 Key
3 Orange
4 NC
5 Red
6 Black
1 Yellow
2 Black
3 Black
4 Red
1 Orange
2 NC
3 Black
Miscellaneous
Name
Function
Ground
+12VDC
Fan
CPU
Board
Not Used
Line
Ground
VGA
From
Monitor
Neutral
See page 2 for connector name prefixes
Cnctr
11P1
11P1
11P1
6P1
6P1
6P1
Pin Color
1 Black +12VDC
2 Red Not Used
3 NC
1 Black +12VDC
2 Green Yellow Ground
3 White Not Used
Name
To
Tchscreen
Fan
Cabinet
Controller
Function
Ground
Not Used
Cnctr
11P1
11P1
11P1
2P1
2P1
2P1
2P1
Pin Color
1 Red
2 NC
3 Black
1 Orange
2 Gray
3 N/C
4 N/C
Touchmaster® Infinity Counterto p Wiring - 5
Page 58

Main Harness (H-23448)
Name
To Switch Function Cable (H-23476)
Out
Spkr
Function
Ground
Ground
+12VDC
+5VDC
+5VDC
Meter 1
Coin 1
Coin 2
NC
DBV
Calibrate
Test
Lockout 1
Lockout 2
+ Speaker
- Speaker
Not Used
Not Used
Speaker +
Speaker -
Contr
11P2
11P2
11P2
11P2
11P2
11P2
11P2
11P2
11P2
11P2
11P2
11P2
11P2
11P2
11P2
11P2
11P2
11P2
Pin Color
1 Black +12VDC
2 Black Black
3 Orange Not Used
4 Red Not Used
5 Red Not Used
6 Brown Not Used
7 Black Brown Not Used
8 Black Red +5VDC
9 NC Not Used
10 Black White Coin Meter
11 White Green Lock Out 1
12 White Blue
13 White Violet Ground
14 White Gray +5VDC
15 Red Gray Coin Mech 1
16 Brown Gray Coin Mech 2
17 NC DBV
18 NC Not Used
3P1
3P1
1 Red Gray Not Used
2 Brown Gray Not Used
Cal. Switch
Not Used
Name
To TTL Lamp on Dolphin Board
Switch In on Dolphin Board
Function
Lock Out 2
Test Switch
Cnctr
3P2
3P2
3P2
3P2
3P2
3P2
3P2
3P2
3P2
3P2
3P2
3P2
3P3
3P3
3P3
3P3
3P3
3P3
3P3
3P3
3P3
3P3
3P3
Pin Color
1 Orange
2 Black
3 Key
4 NC
5 NC
6 NC
7 NC
8 Red
9 NC
10 Brown
11 White Gray
12 White Violet
1 Black
2 Red
3 Black Brown
4 Black Red
5 Black White
6 NC
7 NC
8 NC
9 White Green
10 Key
11 White Blue
Function
To DC Power Cable
Name
To
Touchscrn
Power
To DC
Function
+12VDC
Ground
Ground
Controller
+5VDC
+12VDC
Ground
Cable
Ground
+5VDC
Cnctr
2P1
2P1
2P1
2P1
5P1
5P1
5P1
5P1
Power Wiring
Pin Color
1 Yellow +3.3VDC
2 Black +3.3VDC
3 Black Ground
4 Red +5VDC
1 Yellow Ground
2 Black +5VDC
3 Black Ground
4 Red Power OK
+5VSB
+12VDC
+3.3VDC
-12VDC
Ground
PSON Ground
Ground
Ground
Name
See page 2 for connector name prefixes. -5VDC
+5VDC
+5VDC
Cnctr
5P2
5P2
5P2
5P2
5P2
5P2
5P2
5P2
5P2
5P2
5P2
5P2
5P2
5P2
5P2
5P2
5P2
5P2
5P2
5P2
Pin Color
1 Orange
2 Orange
3 Black
4 Red
5 Black
6 Red
7 Black
8 Gray
9 Violet
10 Yellow
11 Orange
12 Blue
13 Black
14 Green
15 Black
16 Black
17 Black
18 White
19 Red
20 Red
Wiring - 6 Midway Amusement Games, LLC
Page 59
CHAPTER
4 5 6
Troubleshooting
CAUTION :
turned on. Doing so will damage the CPU board assembly or the
hard disk drive and void the warranty.
Do not remove or install any connector when power is
21 3
Touchmaster® Inifnity uses complex electronic components that are sensitive to static electricity. The
following precautions must be observed and followed prior to handling any electronics.
•
Ensure that the AC power to the cabinet is turned off prior to servicing.
•
Discharge any static electricity build up in your body by touching any unpainted metal on the cabinet,
such as the chain lug. This is to be done
•
Handle the electronic assemblies by their edges and store them in an anti-static area when not in
active use. Anti-static bags are to be used to store or transport the CPU Board Assembly.
•
Do not
touch, remove, or connect any electronic assemblies when the AC power is on. Doing so will
damage electronic assemblies and void the warranty.
•
Always replace ground wires, shields, safety covers, etc. when maintenance or service is completed.
Ensure that all ground and mounting screws are installed and tightened firmly.
before
touching or handling the assemblies.
Page 60

Touchmaster® Infinity Does Not Start
Symptom Problem Suggested Solution
•
Machine appears
non-functional.
•
No audio
•
No fan
•
No video display
Poor AC
Lack of electricity 1. Check that power switch is set to ON.
2. Verify that line cord is plugged in.
3. Try another power outlet.
4. Reset circuit breaker at rear of cabinet.
1. Check airflow out of cabinet near fan. (This does
connection
not mean that voltages or signals are correct, but it
indicates that DC power is available from power
supply.)
2. Turn off AC power.
3. Remove line cord cable clamp.
4. Test line cord, power plug and IEC connector for
breaks or damage.
5. Verify continuity of each wire in cord.
6. Fully seat IEC connector into mating cabinet
receptacle.
7. Replace cable clamp and its screw.
8. Ensure cabinet wiring harness connectors are fully
seated in corresponding AC power wiring harness
connectors.
9. Verify AC wire connections at power supply
terminals.
Tripped circuit
breaker
Faulty AC line filter 1. Examine AC line fuse on Power Supply
1. Examine AC circuit breaker on cabinet.
2. If circuit was broken, reset button protrudes from
circuit breaker.
3. Press button in until it latches to restore power.
Board Assembly.
2. Replace faulty fuse with identical fuse
of proper voltage and current rating.
3. Connect line cord and verify operation.
4. Fully seat AC plug in outlet.
5. Verify AC line voltage is present.
6. Turn AC power on.
7. Check DC wiring harness and
connectors if breaker opens circuit
again.
Troubleshooting - 2 Midway Amusement Games, LLC
Page 61

Startup Problems
Symptom Problem Suggested Solution
continued
•
Machine appears
non-functional, but
currency acceptor
price indicator is
illuminated.
Poor connection 1. Turn AC power off. Unplug AC line cord. Unlock
and remove Rear Door and Top Cover Assembly.
2. Inspect CPU Board Assembly.
3. Ensure DC Power connector is attached and fully
seated onto mating board connector.
4. Check other wiring harness connectors in same
way.
Poor DC power 1. Turn AC power on.
2. Using 20-Volt DC range on a digital voltmeter,
measure DC voltages present at power connector
pins. Refer to Cabinet Wiring Diagram for specific
wiring information and voltage limits.
Poor AC power 1. Using 2-Volt AC range on a digital voltmeter,
measure same DC voltages as above.
2. Any reading here indicates that power supply
voltages are unstable and may contain ripple or
noise.
®
System errors 1. Verify that Touchmaster
Up Self-Test sequence without errors.
2. Note errors and/or failures found during tests.
3. Remove Side Cover Assembly.
Infinity completes Power-
4. Enter Menu System by pressing TEST pushbutton.
5. From MAIN MENU, choose DIAGNOSTICS
MENU, then VIDEO TEST.
6. Perform tests, then proceed to HARDWARE TEST,
and SOFTW ARE TEST .
7. Use these tests to check function of components
and software.
Touchmaster® Infinity Countertop Troubleshooting- 3
Page 62

Currency Does Not Start Game
Symptom Problem Suggested Solution
•
Machine does not
accept currency or
tokens.
•
Machine cannot be
started.
•
Audio present
•
Video present
Blocked coin
Unleveled coin
•
Machine does not
accept currency or
tokens.
•
Audio present
•
Video present
•
Machine accepts
currency or tokens.
•
Machine does not
start.
•
Audio present
•
Video present
Bad currency 1. Turn AC power off. Unlock and remove Side Cover
Assembly.
2. Empty cash vault and DBV.
3. Inspect revenue for counterfeit currency.
4. Check vault and remove items that block path from
coin mechanism.
1. Turn AC power off. Unlock and remove Side Cover
mechanism
mechanism
Software setting 1. Enter Menu System. At MAIN MENU, choose
Faulty coin
mechanism
Assembly.
2. Check coin mechanism and DBV to ensure proper
mounting.
3. Remove coin mechanism and DBV and clear
currency path.
1. Verify coin mechanism is level.
2. Ensure that connector is attached and fully seated.
3. Repair or replace mechanism if bent or damaged.
4. Ensure cables and wiring are connected to
currency acceptor or coin mechanism.
GAME/COINAGE SETUP.
2. Check maximum credit limit.
1. Unlock and remove Side Cover Assembly.
2. Check each mechanism to ensure proper
mounting.
3. Verify that each release latch is in closed and
locked position.
4. Test known good and bad coins to see if
mechanism accepts and rejects currency correctly.
5. Enter Menu System.
6. From MAIN MENU, choose DIAGNOSTICS
MENU, then HARDWARE TEST, then SWITCH
TEST.
7. Use tests to confirm operation of each switch.
Troubleshooting - 4 Midway Amusement Games, LLC
Poor connection 1. Inspect to see if external coin door indicators
(pricing, flashing arrows, etc.) are illuminated.
2. Check connectors and cables for wiring continuity
from CPU board connector to the coin door.
3. Turn AC power off.
4. Ensure that no parts or wires are caught in hinges
or switch contacts.
Page 63

Currency Problems
Symptom Problem Suggested Solution
continued
•
Machine accepts
currency or tokens.
•
Number of credits
per coin or bill is
incorrect.
•
Credits are
sometimes not given
for valid currency.
Incorrect pulse
Incorrect program Examine currency acceptor for programmable features.
Some devices require operator adjustment for each
specific type of currency recognized. Refer to
manufacturer’s literature for assistance in setting
acceptor features to required values.
Faulty switch Check for continuity in each suspect switch connection
(Common to Normally Open or Common to Normally
Closed). Replace faulty switches (bent levers, broken
actuators, etc.).
Defective
mechanism
System error 1. Unlock and remove Side Cover Assembly.
width
Verify that each mechanism operates properly by
placing in a known good unit.
2. Enter Menu System by pressing the TEST
pushbutton.
8. From MAIN MENU, choose DIAGNOSTICS
MENU, then HARDWARE TEST, then SWITCH
TEST.
3. Use these tests to confirm operation of each
switch.
1. From MAIN MENU, choose GAME/COINAGE
SETUP and verify that currency acceptor is
enabled.
2. Consult manufacturer’s literature and adjust pulse
width to
3. Verify that currency acceptor operates correctly by
placing in a known good unit.
Incorrect acceptor
program
Poor wiring 1. Check that cabinet wiring is correct. Ensure that
Defective acceptor Verify that each acceptor operates properly by placing
Refer to manufacturer’s literature. Set acceptor
features to required values.
coin meter and coin switches are properly
connected. Refer to Cabinet Wiring Diagram for
specific information.
in a known good unit.
long
setting.
Touchmaster® Infinity Countertop Troubleshooting- 5
Page 64

Touchscreen Problems
Symptom Problem Suggested Solution
•
Touchscreen is not
accurate for two or
more players.
Overzealous
Players need
•
Touchscreen
chooses incorrect
items.
•
Touchscreen does
not respond when
certain areas are
touched.
Dirty screen Clean entire cabinet frequently, especially video screen
glass and Touchscreen area. It is not necessary to
switch off AC power to clean Touchmaster
Apply an isopropyl alcohol and warm water to a clean
cloth or sponge, then use this to wipe surface. Do not
apply cleaner directly on unit. Liquids could drip into
circuits and cause erratic operation.
Turn off AC power. Remove monitor bezel (refer to
Service chapter for instructions). Clean Touchscreen,
especially areas normally hidden by bezel.
Warn players to use only one finger at a time.
touching
grounding
Incorrect calibration 1. Unlock and remove Side Cover Assembly.
Simultaneous touches confuse Touchscreen Controller.
Some players may find Touchscreen response
improves when they touch the metal surface of cabinet
with one hand as they operate the Touchscreen with
other hand.
2. Enter Menu System by pressing TEST pushbutton
inside coin vault.
3. From MAIN MENU, choose CALIBRATE
TOUCHSCREEN. Calibrate, then test calibration.
4. Confirm that the Touchscreen is detecting and
properly tracking finger position in all areas of the
screen.
®
Infinity.
Bad controller Ensure Touchscreen Controller operates properly by
placing in a known good unit.
•
Touch controls are
intermittent or
completely nonfunctional.
•
Machine starts
normally.
Poor connection 1. Unlock and remove Side Cover Assembly.
2. Enter Menu System by pressing TEST pushbutton
inside coin vault.
3. From MAIN MENU, select DIAGNOSTICS MENU,
then choose HARDWARE TEST and then
SWITCH TEST.
4. Confirm operation of each switch in Video Game
Machine.
Troubleshooting - 6 Midway Amusement Games, LLC
Page 65

Touchscreen Problems
Symptom Problem Suggested Solution
CPU board power Unlock and remove Rear Door and Top Cover
continued
Assembly. Observe CPU Board Assembly and touch
the screen. You will see a glow from a red LED if touch
is sensed.
Poor Controller
power
Poor Controller
connection
Bad controller Ensure Touchscreen Controller operates properly by
•
Touchscreen does
not calibrate.
•
“Touch Controller
Not Found” error
message
Bad controller or
Touchscreen
Poor connection 1. Turn AC power off. Remove Rear Door and Top
You can see a glow from a green LED on the end of
Touchscreen Controller (underneath the CPU) if there
is voltage in these circuits. Refer to LED Indicator
Status Chart (Wiring Chapter). If the LED fails to glow,
check power connection to Controller.
1. Turn AC power off. Remove Rear Door and Top
Cover Assembly. Pivot Deflection Board Bracket.
2. Check that Touchscreen Controller Cable is fully
seated in connector of Touchscreen Controller.
placing in a known good unit.
1. Ensure that Touchscreen Controller operates
properly by placing in a known good unit.
2. If Controller works well in a known good unit,
replace Touchscreen.
Cover Assembly. Pivot Deflection Board Bracket.
2. Check that Touchscreen Controller Cable is fully
seated in connector of Touchscreen Controller.
3. Ensure that Touchscreen Controller operates
properly by placing in a known good unit.
Touchmaster® Infinity Countertop Troubleshooting- 7
Page 66

Audio Problems
Symptom Problem Suggested Solution
•
Audio is nonfunctional.
•
Video present
•
Machine appears to
operate normally.
Volume set too low
Software error
Faulty speaker
Volume set too low
in software
on CPU board
assembly (some
models)
wiring
1. Unlock and remove Side Cover Assembly.
2. Enter Menu System by pressing TEST pushbutton
inside coin vault.
3. From MAIN MENU, observe Volume Fixed level.
4. Verify that volume is not set at zero. Change level
to maximum to make sounds audible.
1. Select an endlessly repeating sound track.
2. With screen audio level at maximum, turn CPU
Board Assembly master volume control full up.
Some models do not have master volume control.
3. Reduce master volume until sound is as loud as
possible without distortion.
4. Use screen adjustments to set a comfortable
playing level.
1. While in SOUND TEST menu, select GAME
SOUNDS and listen to sounds to confirm operation
of audio amplifier and speaker.
2. Note if any sounds are unintelligible voice
messages, strange noises, missing, etc.
1. Turn AC power off.
2. Verify correct cabinet wiring for this Machine.
3. Ensure that speaker is properly connected to audio
output wires from the audio connector.
4. Verify speaker continuity.
5. Refer to Cabinet Wiring Diagram for specific wiring
information.
Missing DC voltage 1. Turn AC power off.
2. Using 20-Volt DC range on a digital voltmeter,
measure DC voltages at Power connector pins.
3. Verify +5V, -5V and +12V sources.
4. Refer to Cabinet Wiring Diagram for specific wiring
information and voltage limits.
Ripple in DC supply Using 2-Volt AC range on a digital voltmeter, measure
same DC voltages as above. Any reading here
indicates that power supply voltages are unstable and
may contain ripple or noise.
Bad CPU board Verify proper operation of CPU Board Assembly by
placing in a known good Machine.
Troubleshooting - 8 Midway Amusement Games, LLC
Page 67

Audio Problems
Symptom Problem Suggested Solution
continued
•
Audio distorted or
muffled
•
Constant low hum
present
•
Sounds missing
Wrong speaker 1. Turn AC power off.
Poor connection Inspect speaker and its wires. Ensure that no loose
•
Sounds missing
Defective speaker Verify that speaker operates properly by placing it in a
System error 1. Unlock and remove Side Cover Assembly.
2. Enter Menu System by pressing TEST pushbutton
inside the coin vault.
3. From the SYSTEM SETUP menu, go to
DIAGNOSTICS and choose SOUND TESTS.
These tests verify some functions of the audio
circuits.
2. Unlock and remove cabinet cover. Locate the
speaker.
full range
(100 to 10,000 Hz
Poor wiring, bad
ground
3. Ensure that it is
response) and rated for at least 15 watts
continuous power.
parts or wires are caught in speaker cone, terminals,
mounting screws, or stuck to magnets.
Check that cabinet wiring is correct for this Video Game
Machine. Ensure all cabinet ground wires are
connected. Refer to Cabinet Wiring Diagram for
specific wiring information.
known good unit.
Defective amplifier Temporarily connect a different speaker to Video Game
Machine to test CPU Board Assembly audio amplifier
operation.
Touchmaster® Infinity Countertop Troubleshooting- 9
Page 68

Video Problems
Symptom Problem Suggested Solution
•
Monitor nonfunctional
•
Audio present
•
Controls operate as
expected.
Poor connection 1. Turn AC power off.
Faulty fuse Examine AC line fuse on Video Monitor Board
Bad settings Check that the brightness (intensity) and contrast have
No power to
monitor
1. Unlock and remove Rear Door and Top Cover
Assembly. Pivot Deflection Board Bracket.
2. Verify that AC Power is connected to the Video
Monitor.
3. Inspect neck of the CRT under low light level
conditions.
4. You can see a glow near the CRT base if there is
voltage in the filament circuits. This does not mean
that other voltages or signals are as they should be,
but it does indicate that some of the monitor circuits
are receiving power.
2. Verify that video signal and the Remote Adjustment
Board connectors are fully seated on the Video
Monitor Board Assembly.
3. Check the other monitor connectors in same way.
Do not operate a monitor without a Remote
Adjustment Board.
Assembly. If faulty, replace it with an identical fuse of
the proper voltage and current rating.
not been set to their minimum levels.
Defective monitor Verify that the video monitor operates correctly by
placing it in a known good Machine.
•
Power-Up Self Test
runs.
•
Game does not
appear.
•
No audio
System error 1. Note and record any error messages that occur
during self-test.
2. Turn AC power off.
3. Restore power after one minute.
4. Note and record any new messages that appear on
the screen.
5. Unlock and remove Side Cover Assembly.
6. Enter Menu System by pressing TEST pushbutton
inside coin vault.
7. From the SYSTEM SETUP menu, go to
DIAGNOSTICS and choose VIDEO TEST. These
tests verify some functions of video circuits.
Troubleshooting - 10 Midway Amusement Games, LLC
Page 69

Video Problems
Symptom Problem Suggested Solution
continued
Faulty DC voltage
source
Ripple on DC
supply pins
Faulty power at
CPU Board
Assembly
•
Monitor does not
lock onto signal.
•
Picture unstable
•
Colors are missing,
etc.
•
Machine operates
normally.
•
Picture wavers or
rolls, has dark bars,
uneven colors, etc.
Poor connection 1. Check connectors and cables for wiring continuity
Poor connection Check connectors and cables for wiring continuity from
Defective monitor Verify that the Video Monitor operates correctly by
1. Turn AC power on.
2. Using the 20-Volt DC range on a digital voltmeter,
measure DC voltages present at the Power
connector pins.
3. Refer to the Cabinet Wiring Diagram (Wiring
Chapter) for specific wiring information and voltage
limits.
4. Adjust the +5V source if it is variable.
Using the 2-Volt AC range on a digital voltmeter,
measure the same DC voltages as above. Any reading
indicates that the supply voltages are unstable and may
contain ripple or noise.
Compare CPU Board Light Emitting Diode states with
the CPU Indicator Chart (Wiring Chapter).
the CPU Board to the Video Monitor.
placing it in a known good unit.
from the CPU Board Assembly to Video Monitor.
2. Ensure that all cabinet ground wires are connected,
especially at Video Monitor frame.
Interference Move cabinet away from machines, appliances, other
Machines, etc. Some equipment emits very strong
electrical or magnetic fields.
Defective monitor Verify that Video Monitor operates correctly by placing it
in a known good Machine.
Touchmaster® Infinity Countertop Troubleshooting- 11
Page 70

Miscellaneous
Symptom Problem Suggested Solution
•
Machine operates
normally.
•
Cabinet gets very
warm after several
hours of use.
•
System may reset or
freeze after time.
•
Touchscreen
requires excessive
recalibration to
maintain Machine
accuracy.
Overzealous
Relocation Repeat Calibrate and Calibrate Test sequence each
Poor air circulation 1. Check bottom and rear of cabinet for blocked
airflow. Move Machine away from sources of heat.
2. Turn AC power off.
3. Apply high power vacuum cleaner to vent holes to
remove dust.
4. Unlock and remove Rear Door.
5. Ensure all fans are connected and operate at full
speed.
Dirty screen 1. Clean entire cabinet frequently, especially video
screen glass and Touchscreen area. It is not
necessary to switch off AC power to clean.
2. Apply an isopropyl alcohol and warm water to a
clean cloth or sponge.
3. Use the sponge or cloth to wipe the surface.
4. Do not apply the cleaner directly on unit. Liquids
could drip into circuits and cause erratic operation.
Warn players to use only one finger at a time.
touching
Simultaneous touches confuse Touch Controller.
time cabinet is relocated.
•
Error messages
appear on screen.
•
Machine does not
work.
•
No audio
•
“Security Key Error”
message
System error 1. Check any assembly (RAM, ROM, battery,
Touchscreen, etc.) identified in Error Message.
2. If errors seem to occur at random, try to determine
what conditions are connected with appearance of
message (i.e., time of day, when other equipment
is turned off or on, when room temperature is
elevated, only with certain players, periods of low or
high humidity, etc.).
3. Call your authorized distributor for help with
unresolved screen messages
Security failure 1. Check to see if security key is missing or incorrectly
installed on board assembly.
2. Confirm that security key version matches software
version.
Troubleshooting - 12 Midway Amusement Games, LLC
 Loading...