


INSTRUCTION MANUAL
POWER CHARGE™
PSC-700
Power Supply / Maintenance Charger
for 12-volt Batteries/Systems
February 2017
167-000182EN-B

Blank page

3
www.midtronics.com
POWER CHARGE™ PSC-700
Contents
General Safety Precautions 4
Personal Precautions 5
Preparing To Charge The Battery 6
Grounding And AC Power Cord Connection 8
Overview 10
Protection Features 11
Charger Location 11
Connecting To A Battery 12
Disconnecting From A Battery 12
Troubleshooting Guide 14
Frequently Asked Questions 15

4
www.midtronics.com
POWER CHARGE™ PSC-700
General Safety Precautions
1. IMPORTANT SAFETY INSTRUCTIONS. IT IS OF UTMOST IMPORTANCE
THAT BEFORE USING YOUR CHARGER, YOU READ THIS MANUAL AND
FOLLOW THE SAFETY AND OPERATING INSTRUCTIONS EXACTLY. SAVE
THESE INSTRUCTIONS.
Risk of explosive gases
Batteries generate explosive gases during
normal operation, and when discharged or
charged.
Required by California Prop. 65
Wash hands after handling.
Battery posts,
terminals, and related accessories
contain
lead and lead compounds, chemicals
known to the state of California to cause
cancer and birth defects or other reproductive harm.
1.1 To reduce risk of battery explosion, follow these safety instructions and
those published by the battery manufacturer and the manufacturer of any
equipment you intend to use in the vicinity of a battery. Review cautionary marking on these products and on the engine, and on the vehicle or
equipment containing the battery.
Charging a non-rechargeable battery may cause the battery to burst
To reduce the risk of injury, only charge rechargeable ooded-type batteries including maintenance-free, low-maintenance,
or deep-cycle batteries.
If you are uncertain as to the type of battery you are attempting to charge, or
the correct procedure for checking the battery’s state of charge, contact the
seller or battery manufacturer.
1.2 Use of an attachment not recommended or sold by the battery charger
manufacturer may result in a risk of re, electric shock, or injury to persons.
1.3 To reduce risk of damage to the electric plug and cord, pull by the plug
rather than by the cord when disconnecting the charger.

5
www.midtronics.com
POWER CHARGE™ PSC-700
1.4 Position the AC and DC leads to avoid tripping over them and to prevent
damage by hood, doors, or moving engine parts; protect from heat, oil,
and sharp edges.
1.5 Do not operate the charger if it has received a sharp blow, been dropped
or otherwise damaged in any way; take it to a qualied service center.
1.6 Do not disassemble charger; take it to a qualied service center when repair is required. Incorrect reassembly may result in a risk of electric shock
or re.
1.7 To reduce risk of electric shock, unplug the charger from the AC outlet before attempting any maintenance or cleaning. Turning o the controls will
not reduce this risk.
Remove marine “boat” batteries
and charge them on shore
Charging marine batteries on-board
requires specially designed equipment for
marine use.
1.8
Connect and disconnect the battery leads only when the AC supply cord is
disconnected.
1.9
Do not overcharge the battery. (See sections 3)
1.10
Charge the battery in a dry, well-ventilated area.
1.11
Never place articles on or around the charger, or locate the charger in a
way that will restrict the ow of cooling air through the cabinet.
1.12
An extension cord should not be used unless absolutely necessary. (See
paragraph 4.3.)
1.13 Have a damaged cord or plug replaced immediately.
1.14
Do not expose the charger to rain or snow.
Personal Precautions
2.1 Always have someone within range of your voice, or close enough to come
to your aid, when working around ooded batteries.
2.2 Have plenty of fresh water and soap nearby in case battery acid contacts
skin, clothing or eyes.

6
www.midtronics.com
POWER CHARGE™ PSC-700
2.3 Wear complete eye protection, clothing protection, and wear rubber soled
shoes. Place damp cloth over battery to protect against acid spray. When
ground is very wet or covered with snow, wear rubber boots. Avoid touching eyes while working near battery.
2.4 If battery acid contacts skin or clothing, wash immediately with soap and
water. If acid enters the eye, immediately ush with cold running water for
at least 10 minutes, and seek medical attention.
2.5 NEVER smoke or allow a spark or ame in vicinity of a battery or engine.
2.6 Be extra cautious to reduce risk of dropping a metal tool onto the battery.
It might spark or short circuit the battery or other electrical part that may
cause an explosion.
2.7 Before working with a ooded battery, remove personal metal items such
as rings, bracelets, necklaces, watches, etc. A ooded battery can produce
a short circuit current high enough to weld such items causing a severe
burn.
Non-rechargeable batteries may
burst when charging causing personal injury and damage
Only charge rechargeable ooded
maintenance-free, low-maintenance or
deep-cycle batteries.
The charger is not intended to supply power to a low-voltage electrical
system other than applications using rechargeable, ooded type batteries.
Do not use the battery charger for charging dry-cell batteries commonly
used with home appliances. These batteries may burst and cause personal
injury and property damage.
2.9 NEVER charge a frozen battery; thaw it out rst.
2.10
NEVER use the PSC-700 to charge AGM batteries in showroom applica-
tions.Charging AGM batteries above 13.8V for extended periods of time
may cause damage to the battery.

7
www.midtronics.com
POWER CHARGE™ PSC-700
Preparing To Charge The Battery
IMPORTANT: The PSC-700 charger has only one output voltage. Verify
the battery voltage matches the voltage of charger before charging.
3.1
If it is necessary to remove the battery from vehicle to charge it, always remove the grounded terminal from the battery rst. Make sure all accessories
in the vehicle are o, so as not to cause an arc.
3.2
Be sure the area around the battery is well ventilated while the battery is
being charged. Gas can be forcefully blown away by using a piece of cardboard or other non-metallic material as a fan.
3.3
Clean the battery terminals. Be careful to keep corrosion from coming into contact with your eyes.
3.4 Add distilled water in each cell until the battery acid reaches the level specied by the manufacturer. This helps purge excessive gas from the cells. Do
not overll. For a battery without caps, carefully follow the manufacturer’s
recharging instructions
3.5 Study all battery manufacturer’s specic precautions such as removing or
not removing cell caps while charging and recommended rates of charge.

8
www.midtronics.com
POWER CHARGE™ PSC-700
Grounding And AC Power Cord Connection
4.1 The charger must be grounded to reduce risk of electric shock. The charger
is equipped with an electric cord having an equipment grounding conductor and a grounding plug. The plug must be plugged into an outlet that
is properly installed and grounded in accordance with all local codes and
ordinances.
Hazardous voltage.
An improper connection can result in
electric shock
To avoid electrical shock or burn, never alter
the charger’s original AC cord and plug.
Disconnect plug from outlet when charger
is idle.
IF THE PLUG DOES NOT FIT THE OUTLET, HAVE A PROPER OUTLET
INSTALLED BY A QUALIFIED ELECTRICIAN.
4.2
This battery charger is for use on a nominal 120-volt circuit and has a
grounding plug that looks like the plug illustrated in Figure A. A temporary
adapter, which looks like the adapter illustrated in Figures B and C, may be
used to connect this plug to a two-pole receptacle as shown in Figure B, if
a properly grounded outlet is not available. The temporary adapter should
be used only until a properly grounded outlet can be installed by a qualied electrician.
Hazardous voltage.
An improper connection can result in
electric shock
Before using an adapter be certain the center
screw of the outlet plate is grounded. The
rigid ear or lug extending from the adapter
must be connected to a properly grounded
outlet. Make certain it is grounded. If necessary, replace the original screw that secures
the adapter ear or lug to the cover plate and
make the ground connection to the grounded outlet.

9
www.midtronics.com
POWER CHARGE™ PSC-700
USE OF AN ADAPTER IS NOT ALLOWED IN CANADA. IF A GROUNDINGTYPE RECEPTACLE IS NOT AVAILABLE, DO NOT USE THIS APPLIANCE
UNTIL THE PROPER OUTLET IS INSTALLED BY A QUALIFIED ELECTRICIAN.
4.3 An extension cord should not be used unless absolutely necessary. Use of
an improper extension cord could result in a risk of re and electric shock.
If an extension cord must be used, make sure:
• that the pins on plugs of the extension cord are the same number, size,
and shape as those of the plug on the charger;
• that the extension cord is properly wired and in good electrical condi-
tion;
• that the wire size is large enough for the AC ampere rating of charger
as specied in the following table.
Recommended minimum AWG* size
for extension cords for battery chargers
AC input rating amperes AWG* size of cord
Equal or
greater than:
But less
than:
Length of cord, feet (m)
25
(7.6)
50
(15.2)
100
(30.5)
150
(45.6)
8 10 18 14 12 10
10 12 16 14 10 8
12 14 16 12 10 8
14 16 16 12 10 8
16 18 14 12 8 8
*American Wire Gauge

10
www.midtronics.com
POWER CHARGE™ PSC-700
Overview
The Midtronics Power ChargeTM Series of power supply/ maintenance chargers
converts 120 volts nominal AC to 14.4 volts DC. As a power supply, the unit’s
controlled regulation enables you to operate a 12-volt nominal DC load up
to the unit’s rated output current. As a battery charger, the unit maintains
the battery, delivering its full-rated current when the battery capacity falls
suciently low. The voltage is set to deliver its maximum current for the time
needed to minimize stress to the battery caused by heating of its cells. This
helps to ensure the longest possible life of the battery. As the battery nears its
full capacity, the Power Charge oat-charges the battery to prevent the cells
from discharging.
Specications
Input Volts (Vac): 105–130
Frequency (Hz): 50–60
No Load DC
Output Voltage
14.4 VDC
Max. DC
Output Current
70 A
Max. Watt
Draw (VA):
1250
Dimensions
Width:
22.9 cm (9 in)
Length: 17.8 cm (9.15 in)
Height: 9.1 cm (3.6 in)

11
www.midtronics.com
POWER CHARGE™ PSC-700
Protection Features
Each Power Charge
power supply/maintenance
charger is designed with high
quality components to help ensure years of continuous use. The Power Charge is
protected by multiple protection features for a long, trouble-free life:
• Reverse battery polarity protection. (Note: The green LED on the On/O
switch does not light when the Power Charge is connected in reverse polarity.
• Brownout input protection.
• Over-current protection: cycle-by-cycle peak-limiting, as well as rated cur-
rent-limiting, to maximize the life of the Power Charge.
• Over-temperature protection.
In addition, the Power Charge is designed with a unique “proportional” fancontrol circuit. Fan speed is directly proportional to the Power Charge’s internal
ambient temperature. This enables the fan to turn on and o very slowly,
minimizing unwanted fan-starting noise.
Charger Location
The Power Charge PSC-700 must be located in an area with sucient air space
to allow unrestricted airow in and around the charger.
Not for permanent installation: Modifying this charger for permanent
installation in a vehicle or installing this charger in a vehicle for permanent use
is not recommended.
In the event of fail device may generate and emit sparks.
Only charge rechargeable ooded
maintenance-free, low-maintenance or
deep-cycle batteries.
The PSC-700 is not designed for wet location mounting and must be protected
from direct contact with water.

12
www.midtronics.com
POWER CHARGE™ PSC-700
Connecting To A Battery
Use the following steps when connecting the Power Charge to a battery in a
vehicle:
1. Identify the polarity of the battery terminals. Negative is marked NEG, N, or
– . Positive is marked POS, P, or + .
2. With the Power Charge unplugged, connect the positive clamp (red) to the
positive battery terminal.
3. C
onnect the negative clamp (black) to the vehicle chassis. Do not connect to
carburetor, fuel line or body sheet metal.
4. Plug the power cord into a grounded 120 Vac outlet. (For the maximum current draw and required input voltages, see the Specications table).
Disconnecting From A Battery
1. Unplug the Power Charge from the 120 Vac outlet.
2. Disconnect the positive (red) clamp from the positive battery terminal.
3. Disconnect the negative clamp (black) from the vehicle chassis.
13
www.midtronics.com
POWER CHARGE™ PSC-700
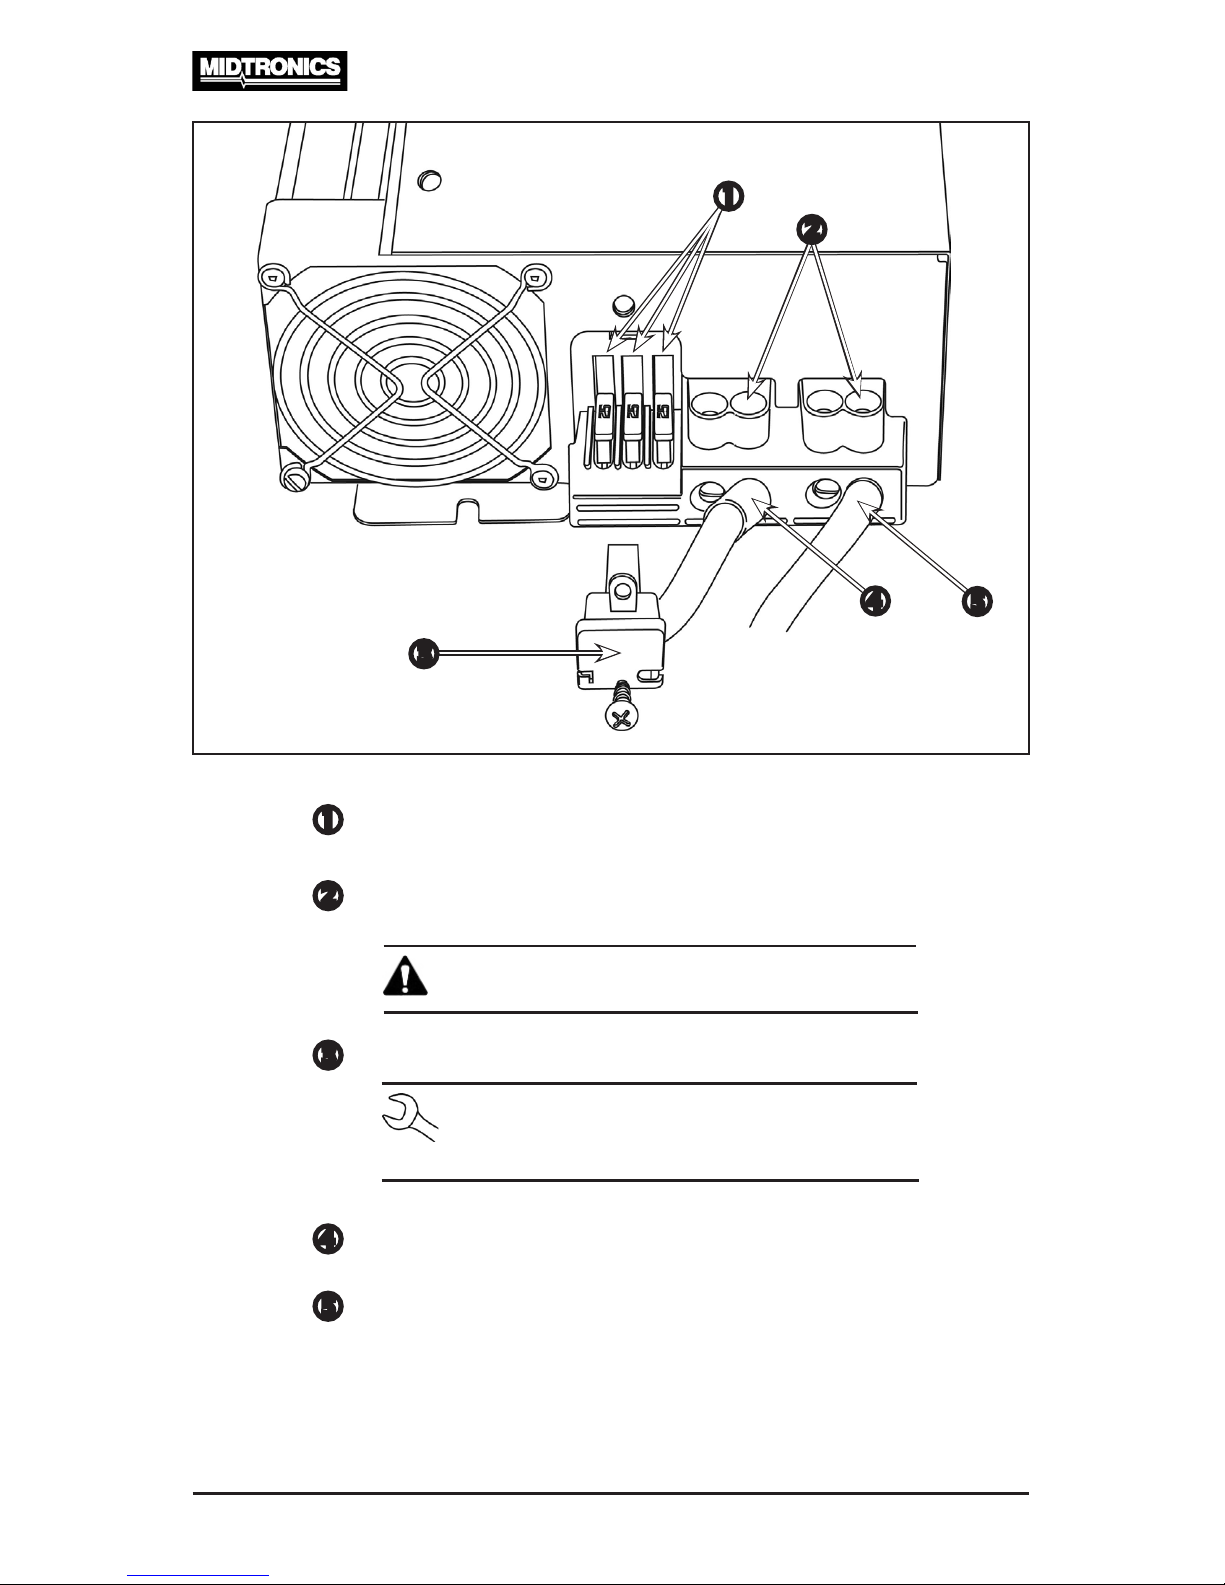
Reverse Battery Protection Fuses
Screws for cable connections. Use a 5/32 hex driver
to tighten the output screws.
IMPORTANT: Do not exceed 50 in-lb. torque.
Total Charging Management System (TCMS) plug
NOTE: The TCMS plug must be removed
to access the Reverse Battery Protection
Fuses
Connection for positive (red) charger cable
Connection for negative (black) charger cable

14
www.midtronics.com
POWER CHARGE™ PSC-700
Troubleshooting Guide
Problem Possible Causes Action
1. No Output 120 VAC supply not
connected
Connect power supply
Check AC distribution panel for
proper operation
External Fuses Blown Check for reverse polarity
Replace fuses with same type
and rating
Unit has shutdown due
to overheating
Check air ow
Allow unit to cool
Unit has shutdown due
to over voltage (Also
see Item 5 below)
Check input voltage
Converter will shut down if the
input voltage exceeds 132 volts
Correct input voltage
2. External Fuses
Blown
Reverse battery hook upCorrect hook up and replace
fuses with same type and rating
3. Converter cycles
on & off
Power Charge gets
too hot
Check air ow to the converter
Improve ventilation to the
compartment
4. Low Output Excessive load for
converter
Reduce load requirements
Input voltage not
between 105-130 VAC
Correct input supply voltage
Bad battery cell(s) Replace battery
5. Intermittent
or no output,
works on outlet
power
Unit has shutdown due
to over voltage
Add another load to the
generator, this may reduce the
"spikes" to an acceptable level

15
www.midtronics.com
POWER CHARGE™ PSC-700
Do not replace the converter unless the following checks have been performed:
1. Loosen the screw on the positive terminal and disconnect the positive
wire. Read the converter output voltage using a DC voltmeter. If the voltage is above 14 volts, the converter is working properly.
2. If the converter output is zero volts, use an AC voltmeter to check for proper voltage at the 120 VAC outlet that the converter is plugged into. This
voltage should be between 105 and 130 volts.
3. Check the fuses located at the front of the converter. These fuses will only
blow if the battery or output leads were connected in reverse, even for a
moment. Replace the fuses and repeat step 1.
NOTE: When replacing fuse(s) the TCMS plug must be removed to
provide clearance for fuse replacement.
Frequently Asked Questions
Q: Why isn’t the PSC
providing 70 amps?
A: The PSC is voltage limited at 14.4V. The
PSC will provide enough current, up to 70
amps, to keep the voltage at 14.4V. The
PSC will not charge at the full 70 amps if the
battery will not accept that much current.
Q: Why is the voltage
lower than 14.4V?
A: The maximum current is 70 amps. If the
load and battery charge current requirement
exceeds 70 amps it may depress the
voltage.
Q: What can reduce the
power output of the
PSC?
A: Using an extension cord that is not
commercial grade (12 gage).
The circuit that you are plugged into has large
parallel loads.
Q: Why won’t the fan
on the PSC run?
A:
The fan is temperature controlled and
variable speed
based on the temperature.
The fan also has what is called a “soft start”
which is part of the variable speed control.

167-000182EN-B 2/17 ©2017 Midtronics, Inc. All rights reserved.
www.midtronics.com
Corporate Headquarters
Willowbrook, IL USA
Phone: 1.630.323.2800
Canadian Inquiries
Toll Free: +1 1 866 592 8052
Midtronics b.v.
European Headquarters
Houten, The Netherlands
Serving Europe, Africa, the Middle
East, and The Netherlands
Phone: +31 306 868 150
Midtronics China
China Operations
Shenzhen, China
Phone: +86 755 2374 1010
Midtronics India
Navi Mumbai, India
Phone: +91 22 2756 4103/1513
Contact Corporate Headquarters
Phone: +1.630.323.2800
Asia/Pacíc (excluding China)
PATENTS
This product is made by Midtronics, Inc., and is protected by one or more U.S. and foreign patents.
For specic patent information, contact Midtronics, Inc. at +1 630 323-2800.
LIMITED WARRANTY
Midtronics products are warranted to be free of defects in materials and workmanship for a period
of one (1) year from date of purchase. Midtronics will, at our option, repair or replace the unit with
a re-manufactured unit. This limited warranty applies only to Midtronics products, and does not
cover any other equipment, static damage, water damage, overvoltage damage, dropping the
unit, or damage resulting from extraneous causes including owner misuse. Midtronics is not liable
for any incidental or consequential damages for breach of this warranty. The warranty is void if
owner attempts to disassemble the unit or to modify the cable assembly.
SERVICE
In USA:
Midtronics, Inc.
Attn: RMA # xxxxx (this is the RMA number that you must obtain from Midtronics)
7000 Monroe St.
Willowbrook, IL 60527
In Canada:
Midtronics c/o FTN (FTN is Fed-ex Trade Networks –this is NOT a Midtronics facility)
Attn: RMA # xxxxx (this is the RMA number that you must obtain from Midtronics)
7075 Ordan Drive
Mississauga, ON L5T1K6
Midtronics will service and return the unit using the same type of service as received. If Midtronics
determines that the failure was caused by misuse, alteration, accident, or abnormal condition of
operation or handling, purchaser will be billed for the repaired product and it will be returned
freight prepaid with shipping & handling charges added to the invoice. Midtronics products
beyond the warranty period are subject to the repair charges in place at that time. Optional
re-manufacturing service is available to return our products to like-new condition. Out-of-warranty
repairs carry a 3-month warranty. Re-manufactured units purchased from Midtronics are covered
by a 6-month warranty.
To obtain service, contact Midtronics at 866-592-8052. Have your model and serial numbers ready.
This rst step is critical as we will trouble-shoot the problem(s) over the phone, and many problems
are resolved during this step. If the problem cannot be resolved, then the Customer Service Agent
will issue you a Return Material Authorization (RMA). This number becomes your tracking number.
The nal step is to return the unit to Midtronics freight prepaid (you pay), to the attention of the
RMA number obtained.
 Loading...