

Page 1
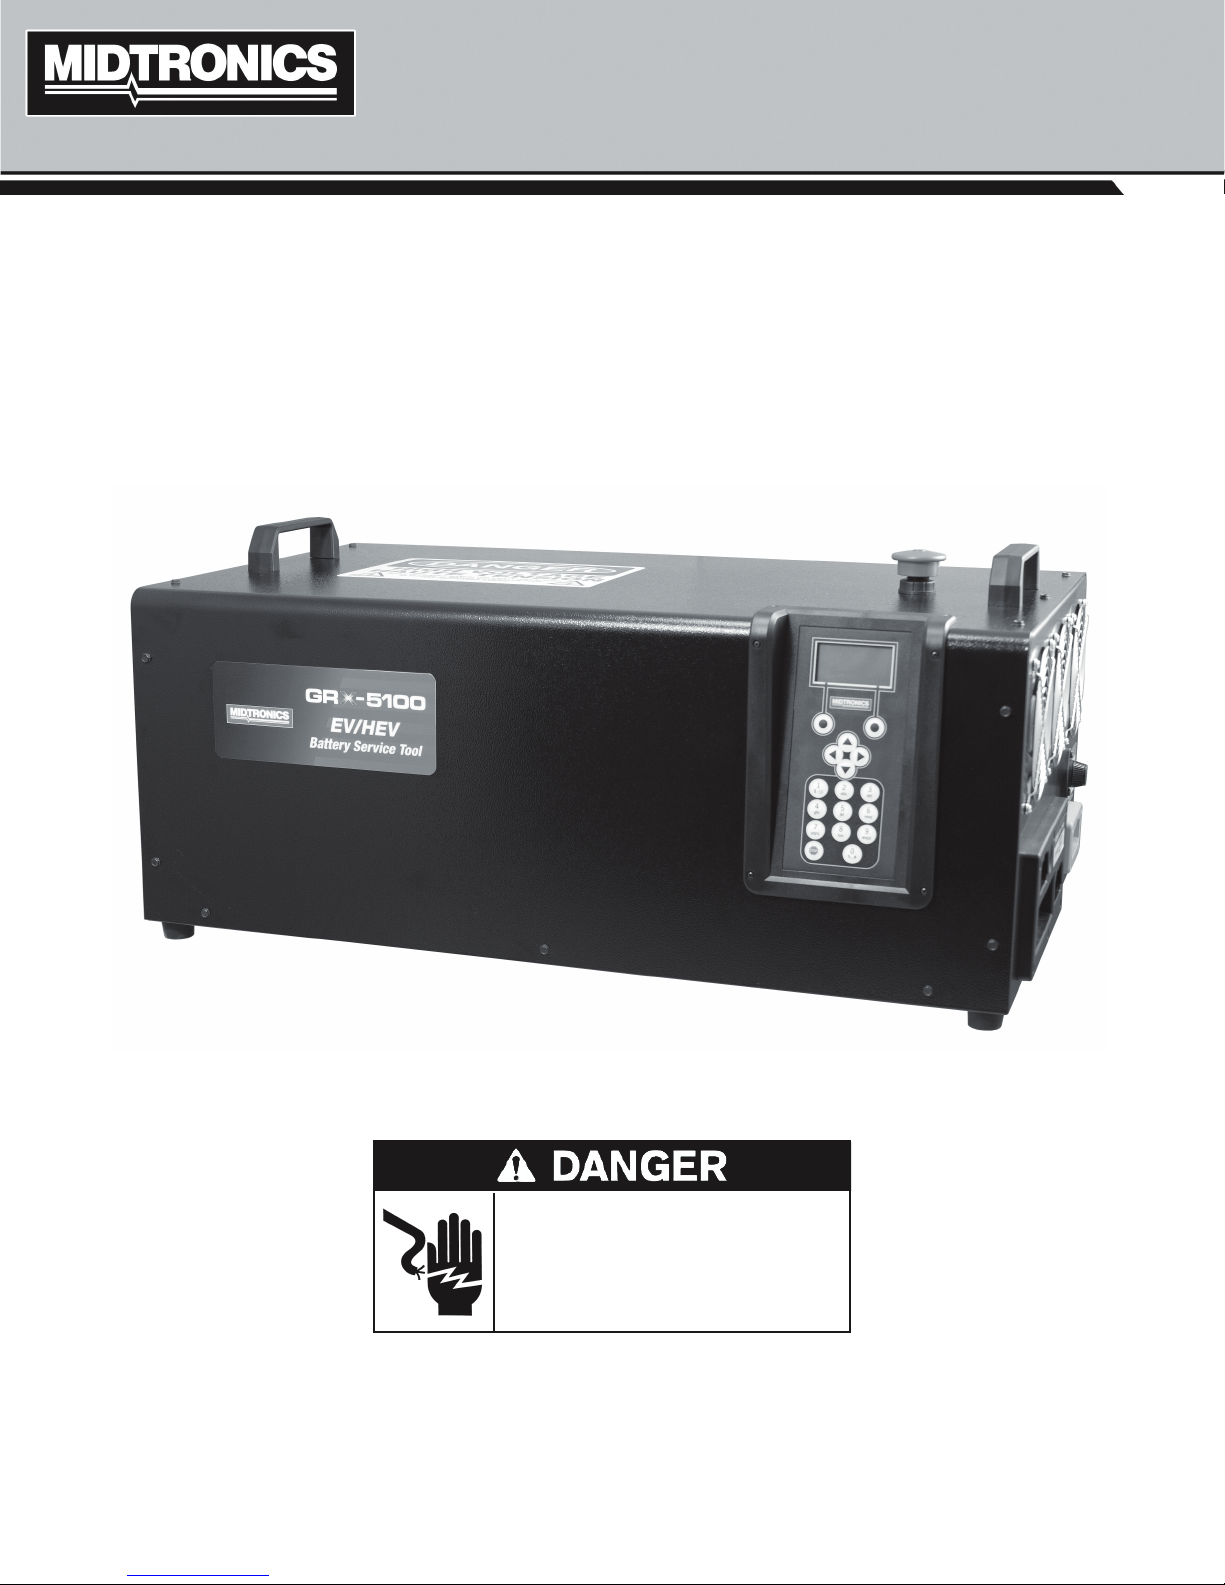
GRX-5100 L
HEV/EV Battery Service Tool
January 2013
167-000442EN-A
INSTRUCTION MANUAL
Hazardous voltage.
An improper connection can result in
serious injury or death.
To avoid electrical shock or burn, never alter the
GRX-5100L’s original AC cord and plug. Disconnect plug from outlet when GRX-5100L is idle.
Page 2

This page intentionally left blank.
Page 3

GRX-5100 L HEV/EV Battery Service Tool
Contents
General Safety Guidelines 5
Maintenance 5
Personal Precautions 6
Grounding & Power Cord Connections 6
Grounding 7
GRX-5100 L Location 7
DC Connection Precautions 7
Chapter 1: Introduction & Overview 8
Safety Reminder 8
Safety Precautions 8
Front View 9
Right End Panel 9
Connection Panel 9
Accessories 10
Universal Fuse Box 10
High Voltage Interface Cable (Orange) 10
Sheathed High Voltage Banana Jack Cables 10
High Voltage Alligator Clamps 10
High Voltage Ring Terminals 10
Accessory Part Numbers 10
Display and Keypad 10
Data Entry Methods 11
Menu Icons 11
Option Buttons 11
Scrolling Lists 12
Alphanumeric Entry 12
Main Menu 12
Tool Info Menu 12
Utility Menu 12
Connecting to AC Power 13
Initial Startup 13
Changing User Preferences 13
Chapter 2: Charge 14
Constant Voltage 14
Constant Current 15
Charge Results 15
Chapter 3: Discharge 16
Chapter 4: Battery Info 18
VPOS–VNEG 18
VPOS–Chassis 18
VNEG–Chassis 18
Chapter 5: Tool Info 19
Totals 19
Life Time Totals 19
Version 19
Chapter 6: Utility Menu 20
Clock 20
Mode 20
Time 20
Format 20
Date 20
Users 20
Entering A New User ID 20
Deleting A User ID 21
Editing A User ID 21
Display 21
Temperature 21
Capacity 22
Language 22
Admin 22
Options 22
Clear Test Totals 22
Reset Defaults 22
Change Admin Pin 22
Update 22
Buzzer 22
Chapter 7: Error Messages 23
Possible Error Messages 23
Hardware Error 23
Communication Error 23
Internal Temperature Sensor Failure 23
Incorrect Voltage Detected 23
Voltage Matches Target Voltage 23
Constant Voltage 16
Constant Current 16
Charge Results 17
www.midtronics.com
3
Midtronics Inc. 7000 Monroe Street Willowbrook, IL 60527
Page 4

This page intentionally left blank.
Page 5
GRX-5100 L HEV/EV Battery Service Tool
General Safety Guidelines
General Safety Guidelines
IMPORTANT SAFETY INSTRUCTIONS - SAVE
THESE INSTRUCTIONS
IT IS OF UTMOST IMPORTANCE THAT BEFORE USING YOUR
GRX-5100L, YOU READ THIS MANUAL AND FOLLOW THE
SAFETY AND OPERATING INSTRUCTIONS EXACTLY.
Hazardous voltage.
Can result in electric shock when the
protective covers are removed.
Circuit boards, test points, and output voltages also may be oating above (below) chassis
ground.
This GRX-5100 L is designed for indoor
use only.
1. Maintenance
• Periodic inspection and care are highly recommended,
especially if the GRX-5100L is operating in a harsh environment.
• Inspect signs of overheating, rust paint deterioration, and
general condition of the unit. Corrective measures should
be taken if necessary.
• Removal of dust, dirt, and debris from the external enclo-
sure surfaces is encouraged and may be performed while
the unit is in operation.
IMPORTANT: There are no user-serviceable parts
inside the GRX-5100L. At no time should personnel remove any cover.
• Ensure that the AC power line ground is connected prop-
erly to the GRX-5100L input connector or chassis. Similarly,
other power ground lines including those to application
and maintenance equipment must be grounded properly
for both personnel and equipment safety.
• Always ensure that AC input power is de-energized prior
to connecting or disconnecting any cable.
• In normal operation, the operator does not have access
to hazardous voltages within the chassis. However, depending on the user's application conguration, HIGH
VOLTAGES HAZARDOUS TO HUMAN SAFETY may be normally generated on the output terminals. The customer/
user must ensure that the output power lines are labeled
properly as to the safety hazards and that any inadvertent
contact with hazardous voltages is eliminated.
• This GRX-5100L is not intended for use by persons (including
children) with reduced physical, sensory or mental capabilities, or lack of experience and knowledge, unless they have
been given supervision or instruction concerning use of the
GRX-5100L by a person responsible for their safety.
Risk of explosive gases
Batteries generate explosive gases during normal
operation, and when discharged or charged.
1.1 To reduce risk of battery explosion, follow these safety
instructions and those published by the battery manufacturer and the manufacturer of any equipment you intend to use in the vicinity of a battery. Review cautionary
marking on these products and on the engine, and on the
vehicle or equipment containing the battery.
Charging a non-rechargeable battery may
cause the battery to burst.
To reduce the risk of injury, only charge rechargeable
type batteries.
If you are uncertain as to the type of battery you are attempting
to charge, or the correct procedure for checking the battery’s
state of charge, contact the seller or battery manufacturer.
1.2 Use of an attachment not recommended or sold by the
GRX-5100L manufacturer may result in a risk of re, electric shock, or injury to persons.
1.3 To reduce risk of damage to the electric plug and cord,
pull by the plug rather than by the cord when disconnecting the GRX-5100L.
1.4 Do not operate the GRX-5100L if it has received a sharp
blow, been dropped or otherwise damaged in any way;
take it to a qualied service center.
1.5
Do not disassemble the GRX-5100 L; when repair is required contact Midtronics to return the unit to Midtronics
Inc. (see back cover for more information). Incorrect reassembly may result in a risk of electric shock or re.
1.6 To reduce risk of electric shock, unplug the GRX-5100L
from the AC outlet and auxiliary 12VDC power cord before attempting any maintenance or cleaning. Turning o
the controls will not reduce this risk.
www.midtronics.com
5
Midtronics Inc. 7000 Monroe Street Willowbrook, IL 60527
Page 6
General Safety Guidelines
1.7
Connect and disconnect the battery leads only when the
AC supply cord and auxiliary 12VDC power cord are disconnected.
1.8
Do not overcharge the battery (See Section 3).
1.9
Charge the battery in a dry, well-ventilated area.
1.10 Never place articles on or around the GRX-5100L, or locate
the GRX-5100L in a way that will restrict the ow of cooling air through the cabinet.
1.11
An extension cord should not be used unless absolutely
necessary. (See paragraph 3.3.)
1.12 Have a damaged cord or plug replaced immediately.
Do not expose the GRX-5100 L to rain or
snow.
2. Personal Precautions
2.1
Always have someone within range of your voice, or close
enough to come to your aid, when working around batteries.
2.2 Have plenty of fresh water and soap nearby in case battery
electrolyte contacts skin, clothing or eyes.
2.3 Wear complete eye protection, clothing protection, and
wear rubber soled shoes. Place damp cloth over battery to
protect against electrolyte spray. When ground is very wet
or covered with snow, wear rubber boots. Avoid touching
eyes while working near battery.
2.4 If battery electrolyte contacts skin or clothing, wash immediately with soap and water. If electrolyte enters the
eye, immediately ush with cold running water for at least
10 minutes, and seek medical attention.
2.5 NEVER smoke or allow a spark or ame in vicinity of a battery or engine.
2.6 Be extra cautious to reduce risk of dropping a metal tool
onto the battery. It might spark or short circuit the battery
or other electrical part that may cause an explosion.
2.7 Before working with a battery, remove personal metal
items such as rings, bracelets, necklaces, watches, etc. A
battery can produce a short circuit current high enough
to weld such items causing a severe burn.
GRX-5100 L HEV/EV Battery Service Tool
3. Grounding & Power Cord Connections
3.1
The GRX-5100L must be grounded to reduce risk of electric shock. The GRX-5100 L is equipped with an electric
cord having an equipment grounding conductor and a
grounding plug. The plug must be plugged into an outlet
that is properly installed and grounded in accordance with
all local codes and ordinances.
Hazardous voltage.
An improper connection can result in
electric shock
To avoid electrical shock or burn, never alter
the GRX-5100L’s original AC cord and plug. Disconnect plug from outlet when GRX-5100L is
idle.
IF THE PLUG DOES NOT FIT THE OUTLET, HAVE A PROPER
OUTLET INSTALLED BY A QUALIFIED ELECTRICIAN.
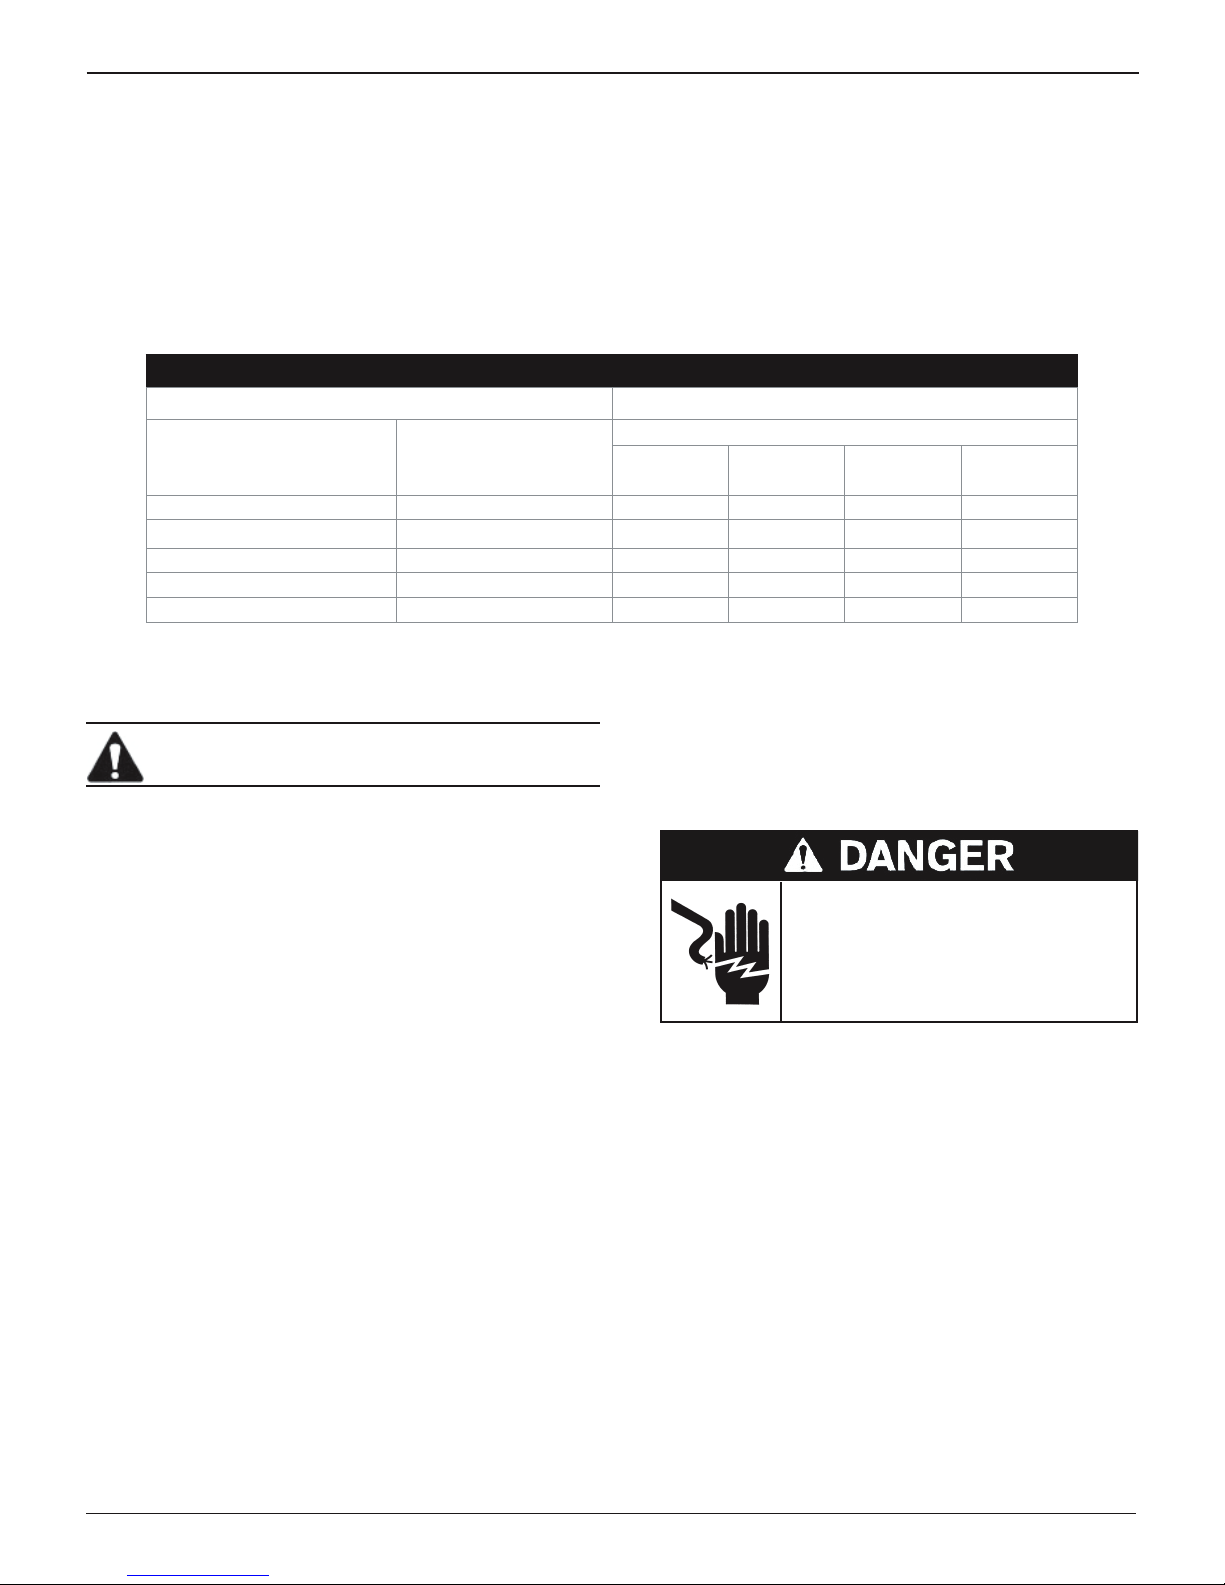
3.2
This GRX-5100L is for use on a nominal 120-volt circuit and
has a grounding plug that looks like the plug illustrated in
Figure A. A temporary adapter, which looks like the adapter
illustrated in Figures B and C, may be used to connect this
plug to a two-pole receptacle as shown in Figure B, if a properly grounded outlet is not available. The temporary adapter should be used only until a properly grounded outlet can
be installed by a qualied electrician.
Hazardous voltage.
An improper connection can result in
electric shock
Before using an adapter be certain the center
screw of the outlet plate is grounded. The rigid
ear or lug extending from the adapter must be
connected to a properly grounded outlet. Make
certain it is grounded. If necessary, replace the
original screw that secures the adapter ear or
lug to the cover plate and make the ground
connection to the grounded outlet.
USE OF AN ADAPTER IS NOT ALLOWED IN CANADA. IF A
GROUNDING-TYPE RECEPTACLE IS NOT AVAILABLE, DO
NOT USE THIS APPLIANCE UNTIL THE PROPER OUTLET IS
INSTALLED BY A QUALIFIED ELECTRICIAN.
Non-rechargeable batteries may burst when
charging causing personal injury and damage.
To avoid electrical shock or burn, never alter the GRX5100L’s original AC cord and plug. Disconnect plug from
outlet when GRX-5100L is idle.
The GRX-5100L is not intended to supply power to a lowvoltage electrical system other than applications using
rechargeable batteries.
2.8 NEVER charge a frozen battery; thaw it out rst.
Midtronics Inc. 7000 Monroe Street Willowbrook, IL 60527
6
www.midtronics.com
Page 7
GRX-5100 L HEV/EV Battery Service Tool
General Safety Guidelines
3.3 An extension cord should not be used unless absolutely
necessary. Use of an improper extension cord could result in a risk of re and electric shock. If an extension cord
must be used, make sure:
a. that the pins on plugs of the extension cord are the
same number, size, and shape as those of the plug
on the GRX-5100L;
b. that the extension cord is properly wired and in
good electrical condition;
Recommended minimum AWG* size for extension cords for the GRX-5100 L
AC input rating amperes AWG* size of cord
Equal or greater than: But less than:
8 10 18 14 12 10
10 12 16 14 10 8
12 14 16 12 10 8
14 16 16 12 10 8
16 18 14 12 8 8
*American Wire Gauge
5. GRX-5100 L Location
c. that the wire size is large enough for the AC ampere
rating of GRX-5100L as specied in the table.
4. Grounding
4.1 The plugs and receptacles have dedicated grounding
terminals and must be mated with plugs and receptacles
having matching grounding terminals
Length of cord, feet (m)
25
(7.6)
50
(15.2)
100
(30.5)
150
(45.6)
6. DC Connection Precautions
IMPORTANT: The GRX-5100L is designed for indoor
use only!.
It is the responsibility of the operator to provide a controlled
environment for the equipment. Work tents are a common
method of protecting equipment in adverse conditions.
The GRX-5100L depends upon the surrounding air for cooling.
The free ow of air is important as is the air temperature. The
GRX-5100L must be mounted so that air can freely circulate all
around it.
5.1 Do not place combustible materials on or near the GRX5100L or mount the GRX-5100L closer than 3 inches from
any adjacent wall. The GRX-5100L must never be mounted next to or above heat generating equipment.
5.2 Locate the GRX-5100L as far away from the battery as the
cables permit.
5.3 Never place the GRX-5100L directly above the battery being charged; gases from the battery will corrode and damage the GRX-5100L.
5.4 Only operate the GRX-5100L in a well-ventilated area that
is free of dangerous vapors.
5.5 Store the GRX-5100L in safe, dry location.
6.1
All switches should be set in the OFF position and AC cord
should be DISCONNECTED from electrical outlet before you
connect the output cables. If the auxiliary 12VDC input is
used, it should be disconnected from the power source.
Hazardous voltage.
Can cause death or serious
personal injury.
Setting the switches to “OFF” does not always
disconnect the HEV/EV Battery Service Tool
electrical circuit from the AC power cord.
www.midtronics.com
7
Midtronics Inc. 7000 Monroe Street Willowbrook, IL 60527
Page 8
Chapter 1: Introduction & Overview
GRX-5100 L HEV/EV Battery Service Tool
Chapter 1: Introduction & Overview
Safety Reminder
For safe, ecient, and accurate charging and discharging,
review the safety and operating instructions in this manual
before using the HEV/EV Battery Service Tool. In addition,
follow all manufacturers’ instructions and SAE instructions.
Safety Precautions
Always use the necessary safety precautions when working
with batteries to prevent severe injury or death. Follow all
manufacturers’ instructions and SAE safety recommendations,
which include the following precautions:
Risk of explosive gases.
Never smoke or allow a spark or
ame in the vicinity of a battery.
Batteries can produce a highly explosive mix
of gases, even when the battery is not in
operation. Always work in a well-ventilated
area..
Wash hands after handling.
REQUIRED BY CALIFORNIA PROP. 65: Battery posts, terminals, and related accessories can contain lead and lead
compounds, chemicals known to the state of California
to cause cancer and birth defects or other reproductive
harm.
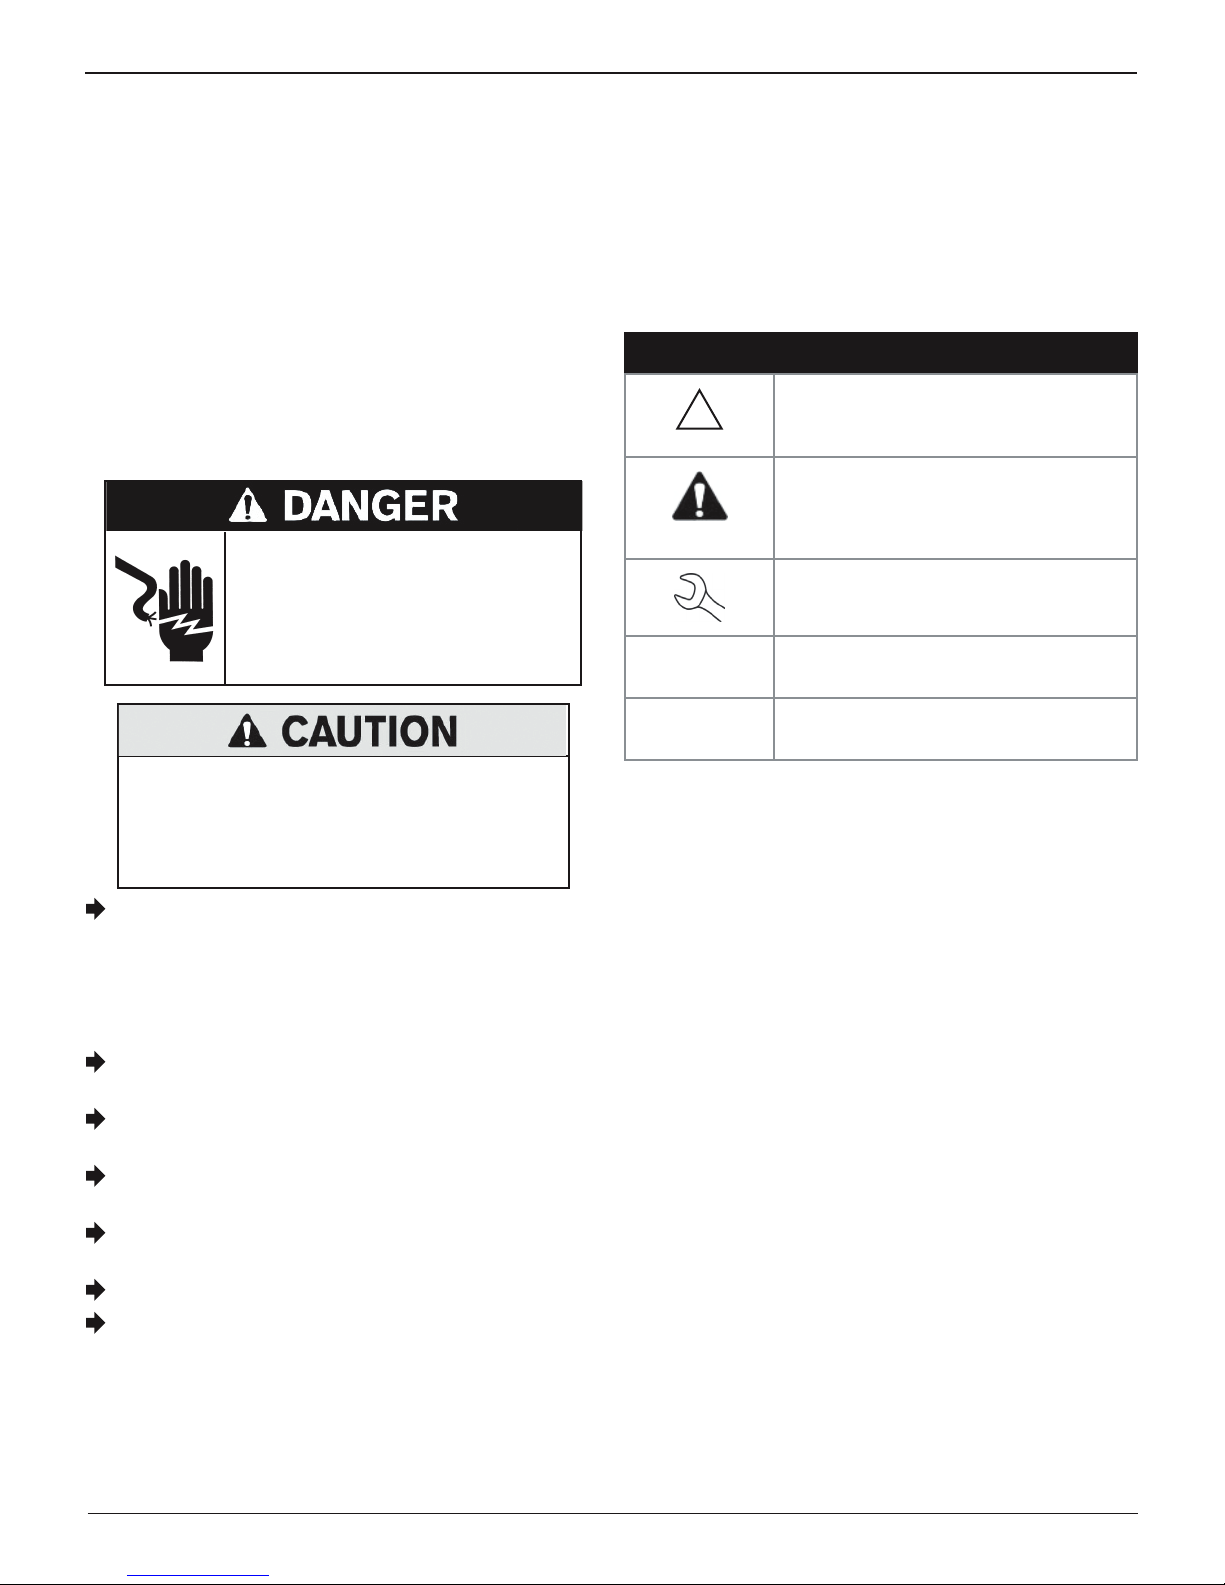
Conventions Used in This Manual
To help you learn how to use your GRX-5100L, the manual
uses these symbols and typographical conventions:
Symbols And Typographical Conventions
Convention Description
The safety symbol indicates instructions
!
CAPITAL
LETTERS
NEXT The text for soft keys are in Bold capital
for avoiding hazardous conditions and
personal injury.
The safety symbol with the words
CAUTION, WARNING, or DANGER
indicates instructions for avoiding
hazardous conditions and personal injury.
The wrench symbol indicates procedural
notes and helpful information.
The text for screen options are in regular
capital letters.
letters.
Battery electrolyte is highly corrosive. If electrolyte enters
your eyes, immediately ush them thoroughly with cold
running water for at least 10 minutes and seek medical
attention. If battery electrolyte gets on your skin or clothing, wash immediately with a mixture of water and baking
soda.
Always wear proper safety glasses or face shield when
working with or around batteries.
Keep hair, hands, and clothing as well as the analyzer
cords and cables away from moving engine parts.
Remove any jewelry or watches before you start servicing
the battery.
Use caution when working with metallic tools to prevent
sparks or short circuits.
Never lean over a battery when charging or discharging.
Never charge a frozen battery. Gases may form, cracking
the case, and spray out battery electrolyte.
Midtronics Inc. 7000 Monroe Street Willowbrook, IL 60527
8
www.midtronics.com
Page 9
GRX-5100 L HEV/EV Battery Service Tool
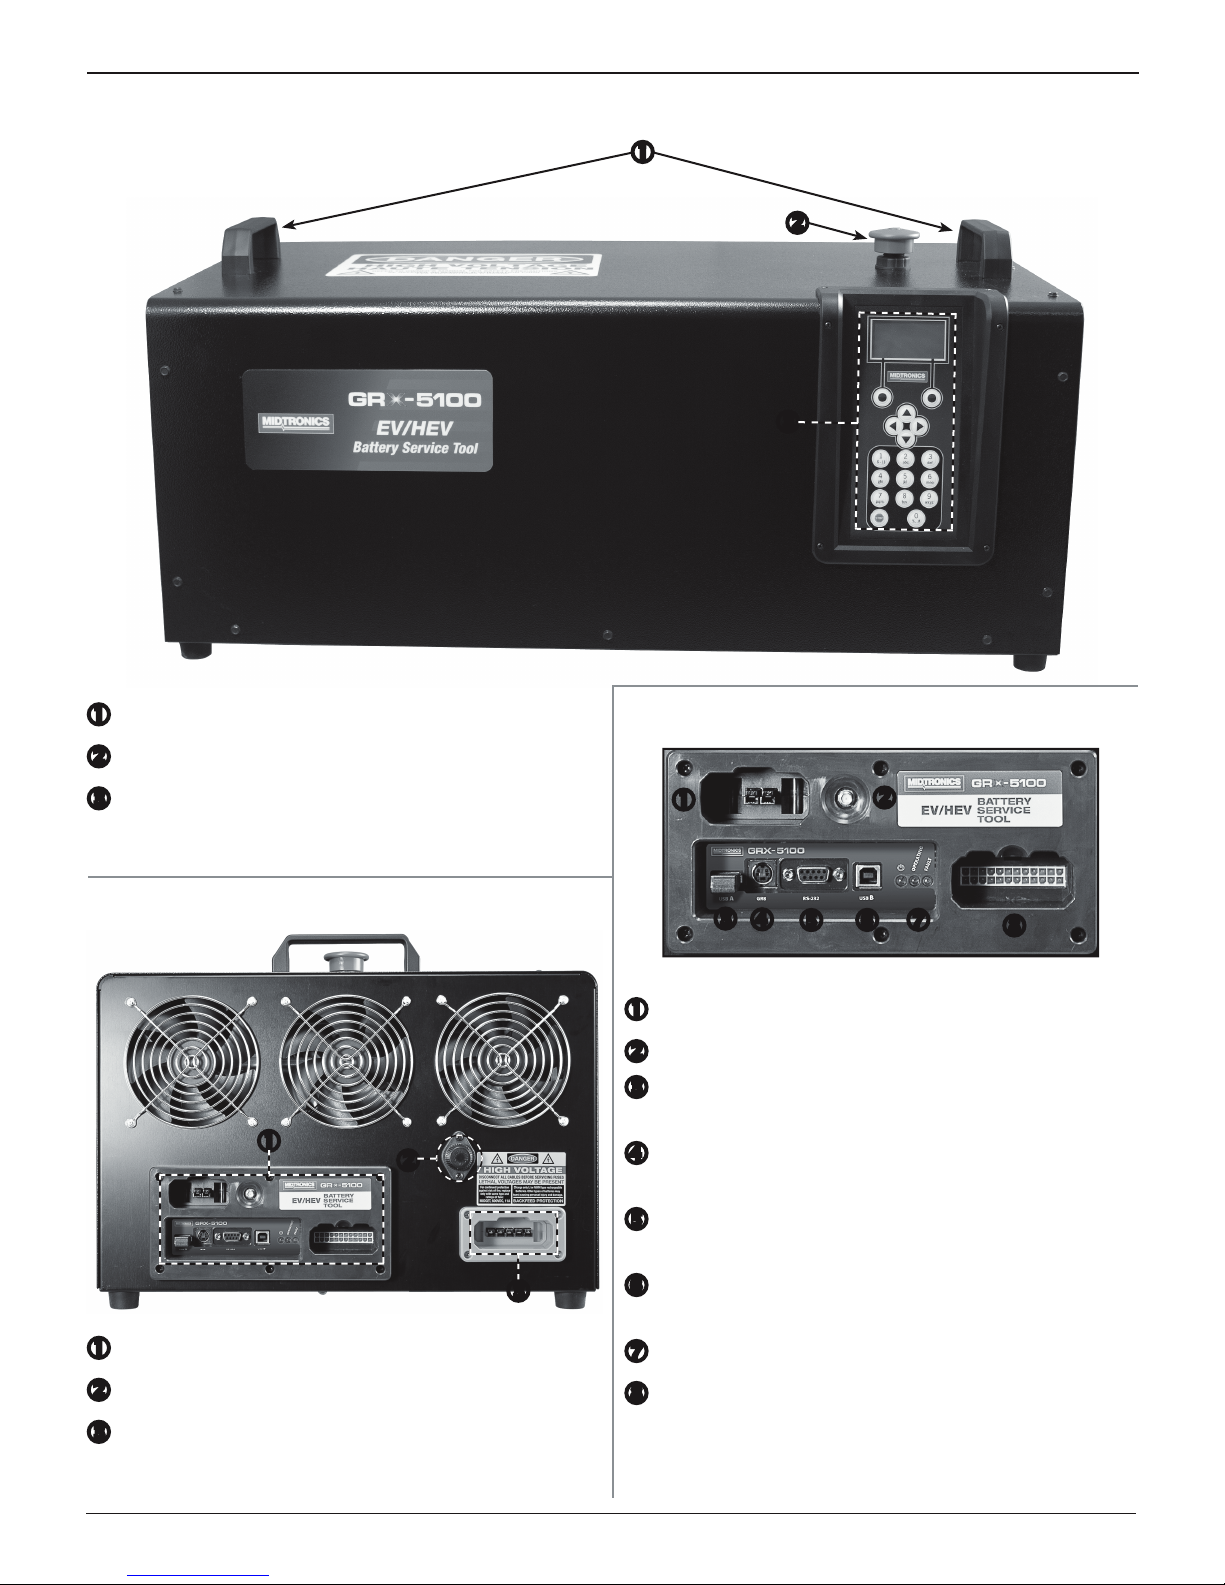
Front View
Chapter 1: Introduction & Overview
Lifting Handles
Emergency STOP Button
Keyboard & Display
Right End Panel
Connection Panel
External 12V Auxiliary Power
Wi-Fi Antenna Connector
USB-A Port
For connecting an external USB-style jump drive.
GR-8
For connecting a GR8-style Control Module.
RS-232
For future use.
USB-B
For future use.
Connection Panel
11A Midget Fuse
High Voltage Cable Connection
www.midtronics.com
Diagnostic Indicator LED Lights
VIM Low Voltage Cable Connection
Used to connect to the low voltage battery electronic
control unit based on the application.
9
Midtronics Inc. 7000 Monroe Street Willowbrook, IL 60527
Page 10
Chapter 1: Introduction & Overview
GRX-5100 L HEV/EV Battery Service Tool
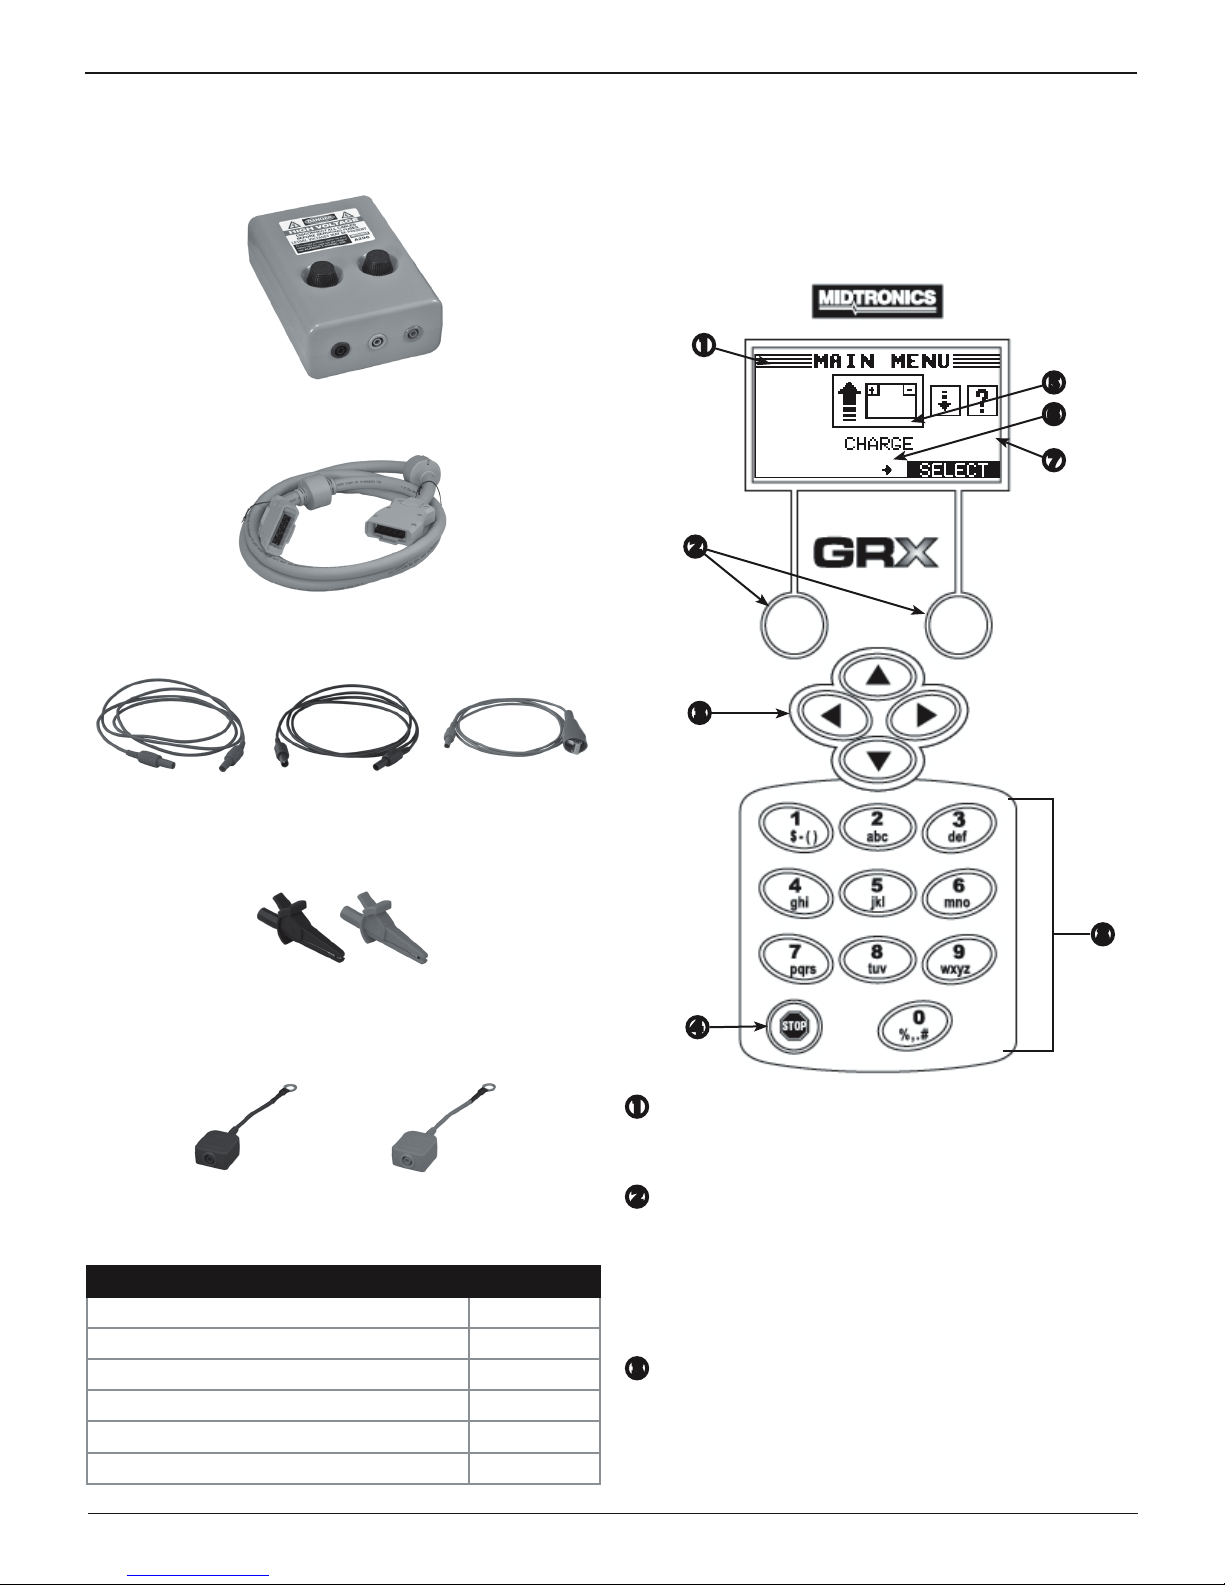
Accessories
Universal Fuse Box
High Voltage Interface Cable (Orange)
Sheathed High Voltage Banana Jack Cables
Display and Keypad
The display and keypad work together to help you quickly
nd and use the right tools at the right time. The display also
keeps you on track with onscreen navigation aids, directions
and messages. The illustration shows how the elements on the
screen relate to the keypad.
Red Black Green
High Voltage Alligator Clamps
Black Red
High Voltage Ring Terminal Adapters
Black Red
Accessory Part Numbers
Accessory Part Number
Universal Fuse Box A296
High Voltage Interface Cable (Orange) 130-000232
Sheathed High Voltage Banana Jack Cables 130-000280
High Voltage Alligator Clamps 142-000047
High Voltage ¼ Ring Terminal Harness (Black)
High Voltage ¼ Ring Terminal Harness (Red)
130-000303
130-000304
Title Bar
The title bar shows you the name of the current menu,
utility, or function.
Soft Keys
Press the two soft keys linked to the bottom of the screen
to perform the functions displayed above them. The
functions change depending on the menu or test process.
So it may be helpful to think of the words appearing above
them as part of the keys.
ARROW () Keys
Press the ARROW keys to scroll to numerical values and
move to menus and icons.
Midtronics Inc. 7000 Monroe Street Willowbrook, IL 60527
10
www.midtronics.com
Page 11
GRX-5100 L HEV/EV Battery Service Tool
Chapter 1: Introduction & Overview
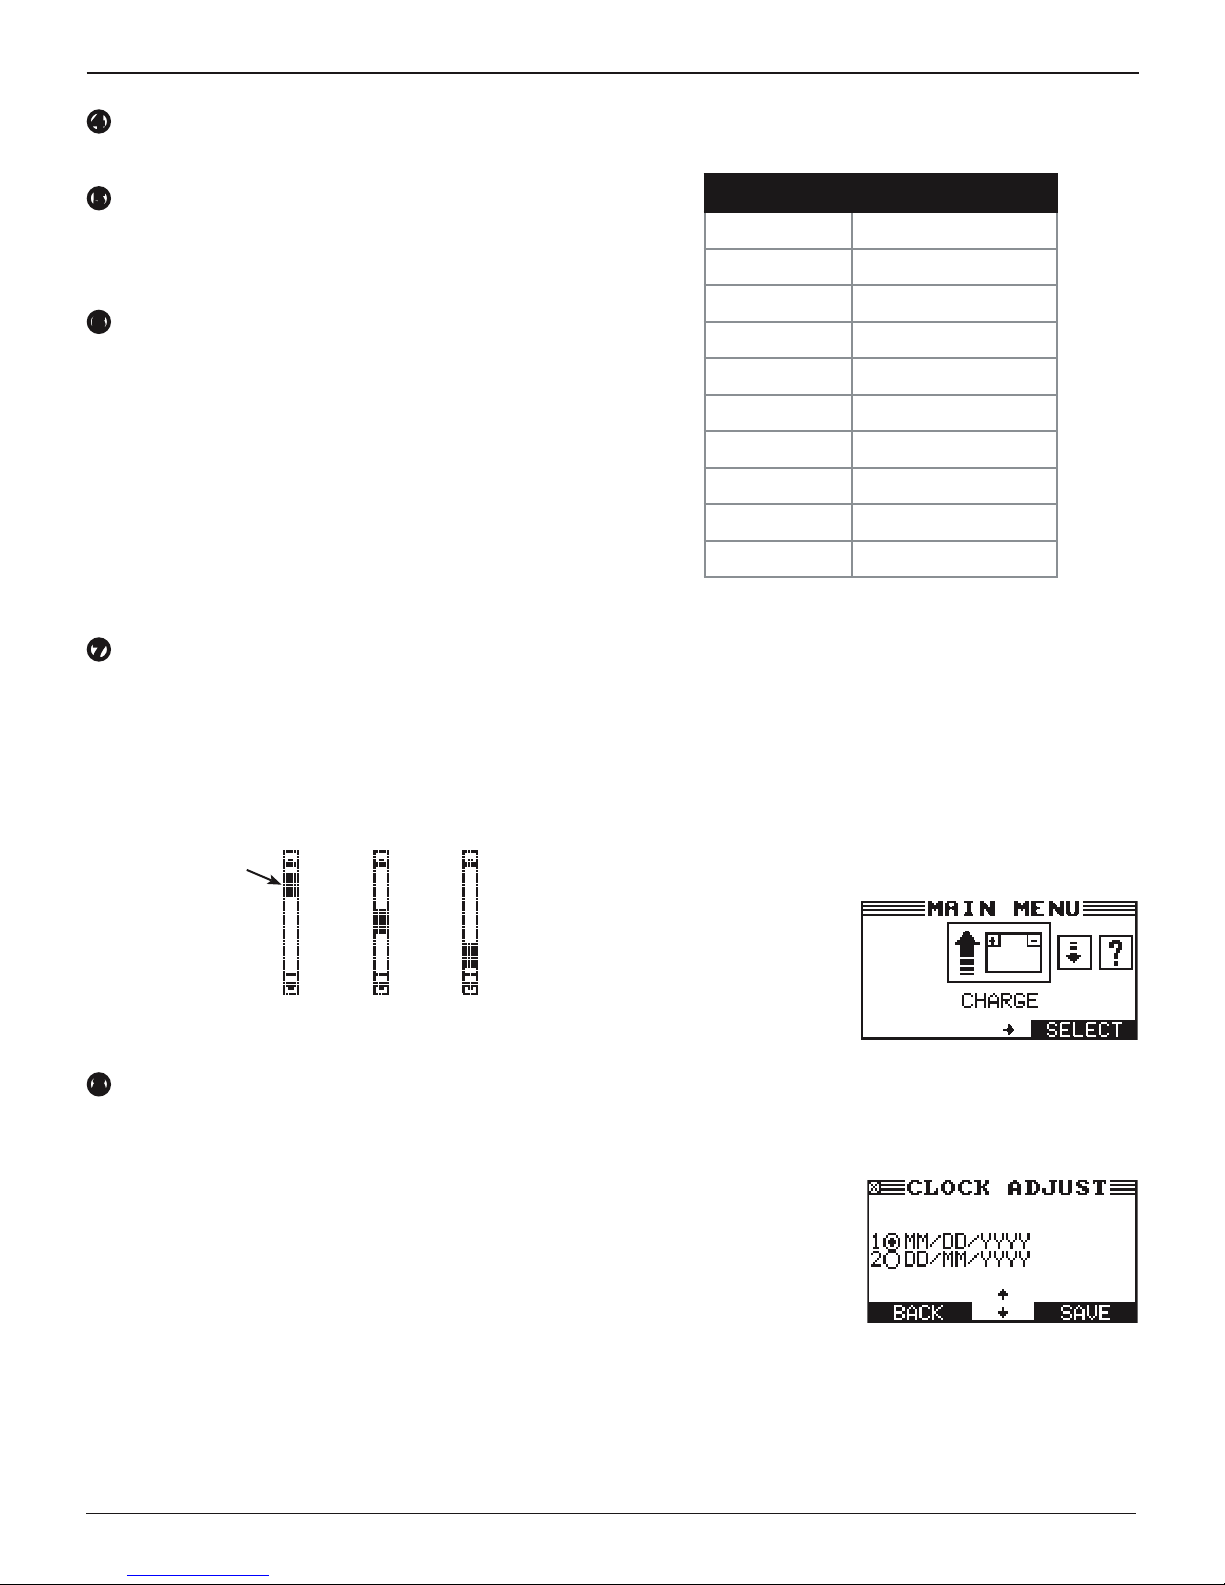
STOP Key
Press the STOP key to stop an ongoing process.
Selection Area
The selection area below the Title Bar contains selectable
items or dialog boxes that display information or require
a response.
Menu Screen Arrows
When displayed in menu screens, the menu screen arrows
show you which ARROW key on the keypad to press to
display other icons or screens.
For example, the up and down arrows indicate when to
press or to display the screens above and below the
current screen.
you when to use or to select an icon.
When displayed under a list of options, the menu screen
arrows show you which keypad arrow to press to highlight
a character or item in a list.
Scroll Bar
Another navigational aid is the scroll bar on the right side
of the screen. The position of its scroll box shows you
whether the screen is the top (or only screen), middle, or
last in a series.
Some screens also indicate the page order with a notation
such as P1/3 (page 1 of 3).
The left and right menu screen arrows tell
Refer to the following table for the characters associated
with each alphanumeric key.
Key Character
Alphanumeric Keys and Associated Characters
$ - ( ) 1
a b c 2
d e f 3
g h i 4
j k l 5
m n o 6
p q r s 7
t u v 8
w x y z 9
% , . # 0
Data Entry Methods
Typically, the soft key below the right half of the screen
conrms your choice, although the command above it may
vary. (Examples: SELECT, NEXT, and SAVE.) In a similar
fashion, the soft key below the left half of the screen cancels
your choice or returns you to the previous screen, although
the word above it may also vary. (Examples: BACK and CLEAR.)
Scroll
Box
Top or only
screen
Alphanumeric Keypad
In some cases, you can use the alphanumeric keypad to
enter numerical test parameters instead of scrolling to
them with the ARROW keys.
You can also use the alphanumeric keys to create and edit
customer coupons and your shop contact information on
printed test results, and manage User IDs.
To add a space, press . To erase a space and insert a
character, press .
Middle
screen
Last
screen
Menu Icons
A menu icon is a graphical
representation of a function
you can select, such as the
Diagnostic Icon in the Main
Menu. To select an icon,
use or to highlight it.
Highlighting changes the
icon to a white picture on a black background. To conrm your
selection, press the appropriate soft key.
Option Buttons
Some lists have option
buttons before each item.
To select an item, use or
to move the dot to the
button next to the item. To
conrm your selection, press
the appropriate soft key.
You can also use the alphanumeric keypad to enter the
number preceding the option button of your choice. No
additional keypress is needed to proceed.
www.midtronics.com
11
Midtronics Inc. 7000 Monroe Street Willowbrook, IL 60527
Page 12
Chapter 1: Introduction & Overview
GRX-5100 L HEV/EV Battery Service Tool
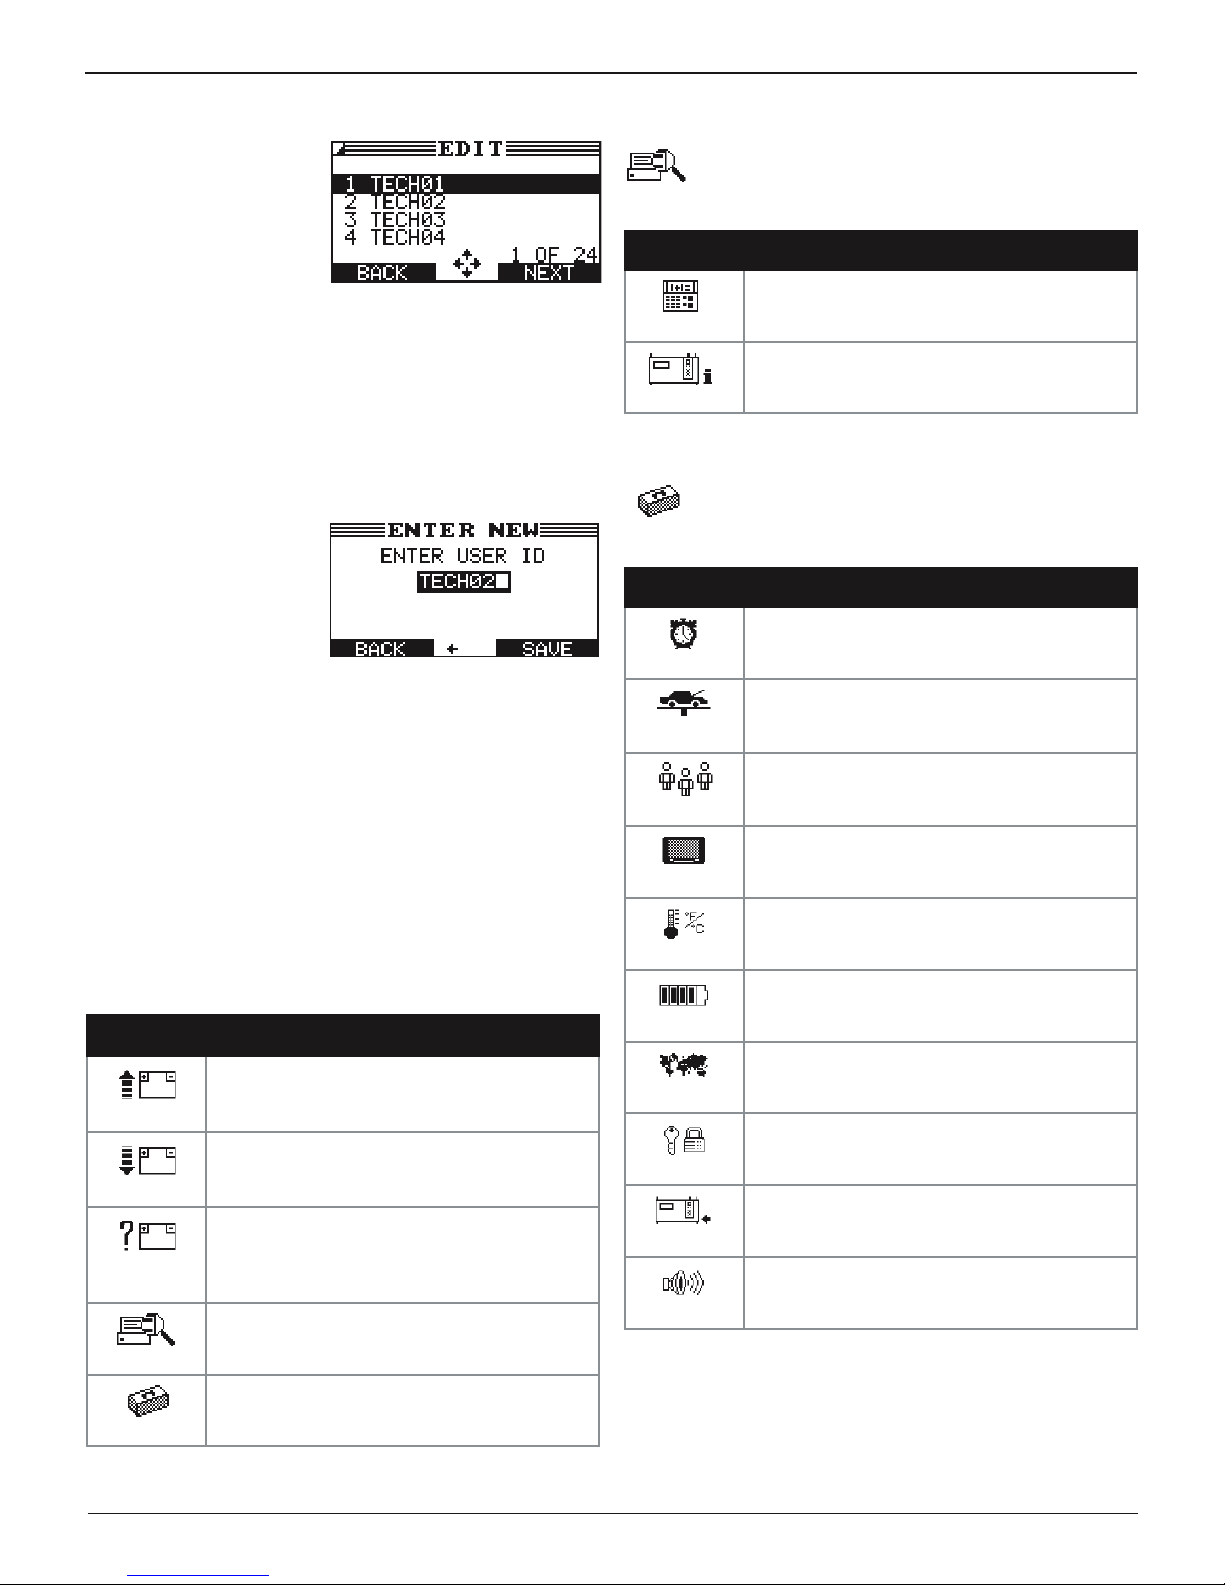
Scrolling Lists
Scrolling lists contain items
that extend above and
below the screen. The rst
number above the right soft
key indicates the position in
the list of the highlighted
item. The second number
above the right soft key indicates the number of items in the
list.
To select an item, use or to highlight the item, and press
the appropriate soft key. To move the highlight bar up five
lines at a time, press . To
lines at a time,
press
move the highlight bar down ve
.
Alphanumeric Entry
Some selections require you
to use the alpha-numeric
keypad. These “userdefined” selections have
a blinking horizontal line
(cursor) to the right of the
last character.
Use or to highlight a line for editing. Display the character,
symbol, or number you want by rapidly pressing its key as
many times as needed. If you pause, the cursor moves to the
right. To backspace, press . Use to add a space. Use
or to highlight a line for editing. When nished, press the
appropriate soft key to save your settings.
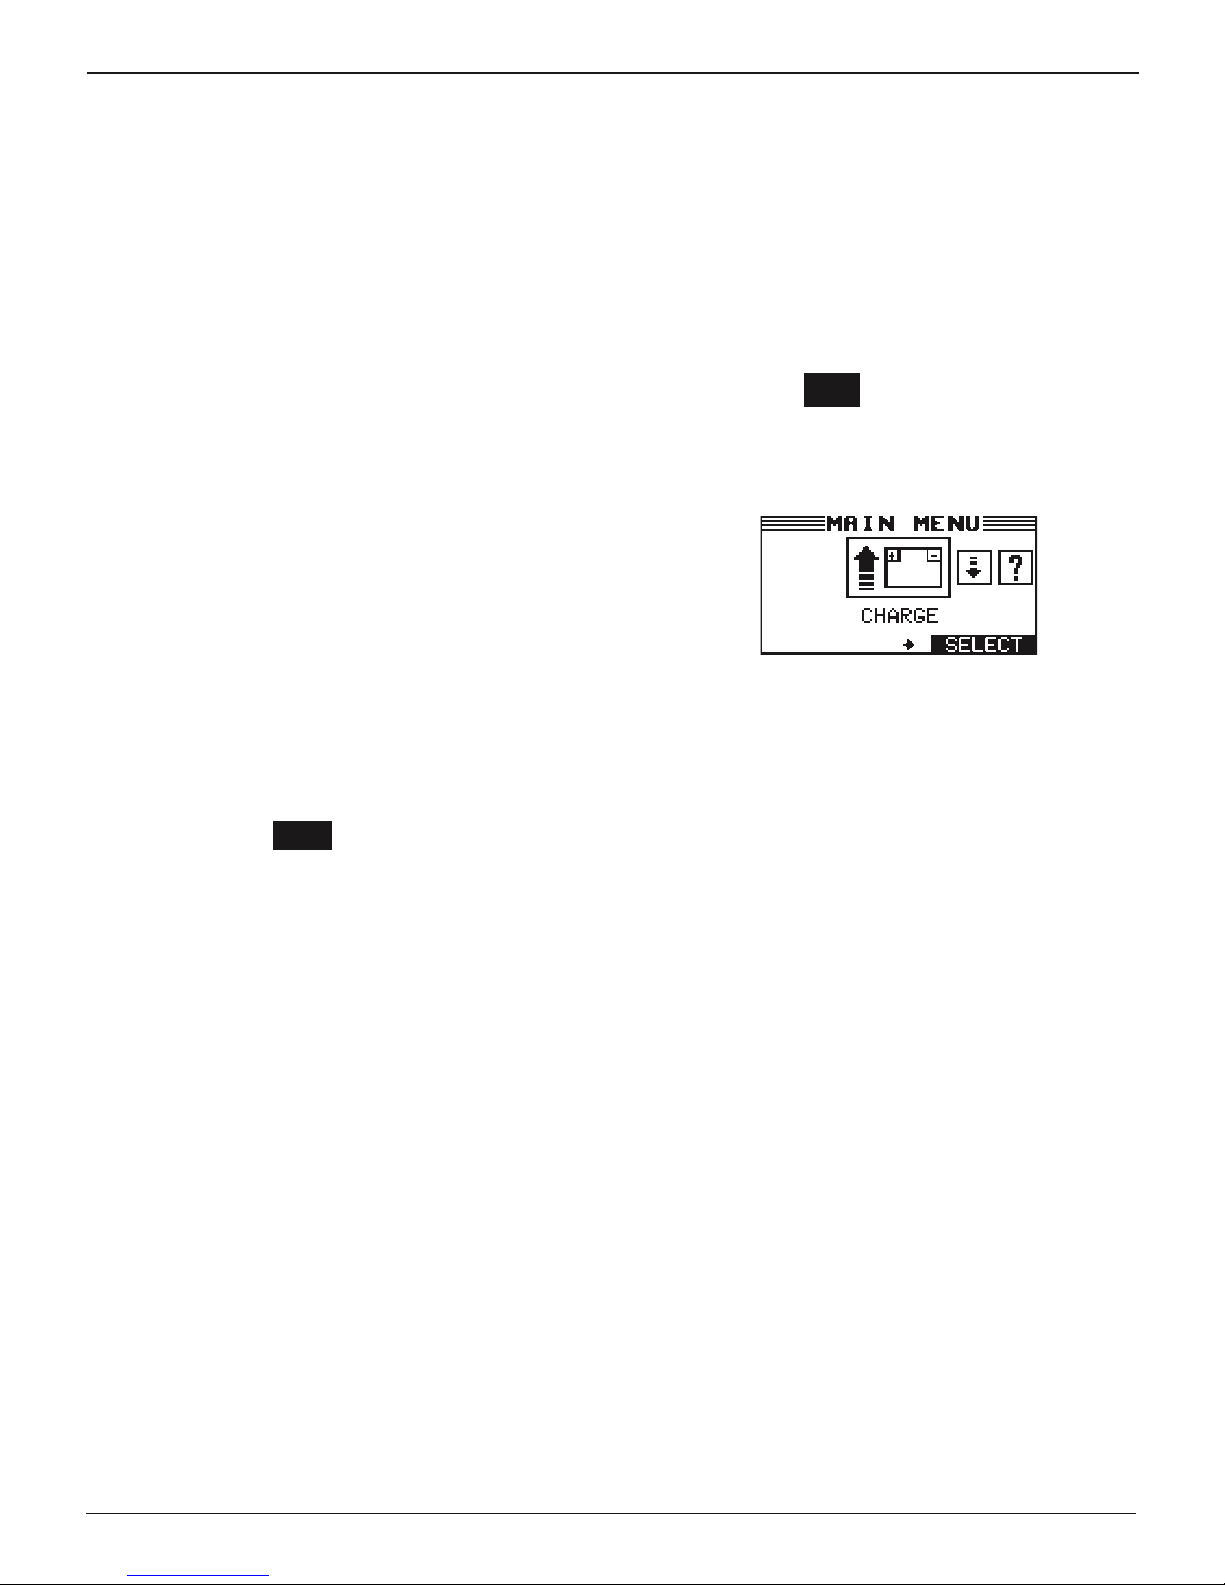
Main Menu
The Main Menu is the starting point for all tools and utilities,
which are depicted as icons. Some icons lead directly to the
function they represent, while others are menu icons that lead
to two or more options.
Menu Icon Description
Charges the battery to a user-specied target
voltage.
INFO
Discharges a battery to a user-specied target
voltage.
Displays battery information including voltage.
The Tool Info option lets you view lifetime test
totals. Also use to access software version
information.
Use this function to make modications to the
GRX-5100 L's administrative settings.
CHARGE
DISCHARGE
BATTERY
TOOL INFO
UTILITY
Tool Info Menu
The Info menu allows you to select and view lifetime
Totals and view Software Version information.
Menu Icon Description
This report displays the total number of
charges and discharges performed by the tool.
TOTALS
Displays important information about the GRX5100 L's internal software and serial number.
VERSION
Utility Menu
The Setup Menu lets you customize your analyzer to
suit your needs. Before testing, check default values
to see what options you may want to change.
Menu Icon Description
Settings to adjust the time.
CLOCK
For entering your shop information into the
GRX-5100 L.
SHOP INFO
Add, edit, or delete your User IDs.
USERS
Settings to adjust the screen contrast and
backlight time.
DISPLAY
Allows you to select degrees in C or F for
temperature measurements.
TEMPERATURE
Select between Amp hours or Kilowatt hours
displayed.
CAPACITY
Sets the language of the display.
LANGUAGE
Offers additional administration options such
as showing the User ID.
ADMIN
Updates the tool software using a USB-style
jump drive.
UPDATE
Allows you to turn the buzzer OFF. Default
is ON.
BUZZER
Midtronics Inc. 7000 Monroe Street Willowbrook, IL 60527
12
www.midtronics.com
Page 13
GRX-5100 L HEV/EV Battery Service Tool
Chapter 1: Introduction & Overview
Connecting to AC Power
Plug the GRX-5100L into a dedicated, grounded nominal 15amp or higher AC outlet. Press the power switch to the ON
position.
Initial Startup
When you start the GRX-5100L for the rst time you are asked
to enter a number of settings so you can already adapt the
GRX-5100L to your personal settings. Among these settings
are the language, date, time, etc. This only needs to be done
once; it can be changed afterwards in the Utility Menu.
After turning the GRX-5100L on, following the logo screen, the
LANGUAGE selection screen appears on the display.
1. Use or and press NEXT, or press the corresponding
number key to select your LANGUAGE preference.
1 ENGLISH
2. Use or to select date format and press NEXT to continue, or press the corresponding number key.
1 MM/DD/YYYY (month/day/year)
2 DD/MM/YYYY (day/month/year)
Press BACK to return to the LANGUAGE screen.
3. Use
or
to highlight the day, month, or year. Use or
to adjust the digits.
5. Use or to select 24-hour or 12-hour (AM/PM) clock
and press NEXT to continue, or press the corresponding
number key.
1 24 HOUR
2 AM/PM
Press BACK to return to the CLOCK/DATE screen.
6. Use
or
to select the hour, minutes, or AM or PM. Use
or to adjust the digits.
9 : 07 AM
7. Press NEXT to continue or press BACK to return to the
CLOCK/ADJUST screen.
8. The Main Menu is now displayed on the screen.
Changing User Preferences
Before using your GRX-5100L, you may want to change some
of the default settings. Setting preferences are located in
Chapter 6: Utility Menu.
11 / 26 / 2012
4. Press NEXT to continue or BACK to return to the date format screen.
www.midtronics.com
13
Midtronics Inc. 7000 Monroe Street Willowbrook, IL 60527
Page 14
Chapter 2: Charge
GRX-5100 L HEV/EV Battery Service Tool
Chapter 2: Charge
Use this function to automatically charge a battery ac-
cording to a selected target voltage or current.
Hazardous voltage.
An improper connection can result in
electric shock
To avoid electrical shock or burn, never alter the
GRX-5100L’s original AC cord and plug. Disconnect plug from outlet when GRX-5100L is idle.
IMPORTANT: Make sure to properly prepare the battery by following all required guidelines. Refer to your
documentation for complete information.
Before charging a battery, make sure all of the external
components connected to the GRX-5100 L are in good
working order.
1. At the Main Menu, highlight the Charge icon and press
SELECT.
2. Use or to select CHARGE TYPE and press NEXT to
continue.
1 CONSTANT VOLTAGE
2 CONSTANT CURRENT
Constant Voltage
1. Use or to select the TARGET VOLTAGE and press NEXT
to continue, or press the corresponding number keys.
10.0 V
3. Use or to select the MAX CURRENT and press NEXT
to continue, or press the corresponding number keys.
5.0 A
Range Current
Minimum 0.1A
Maximum 5.0A
NOTE: The minimum current value selected for MAX
CURRENT should be above the FINAL CURRENT
value selected in step 2.
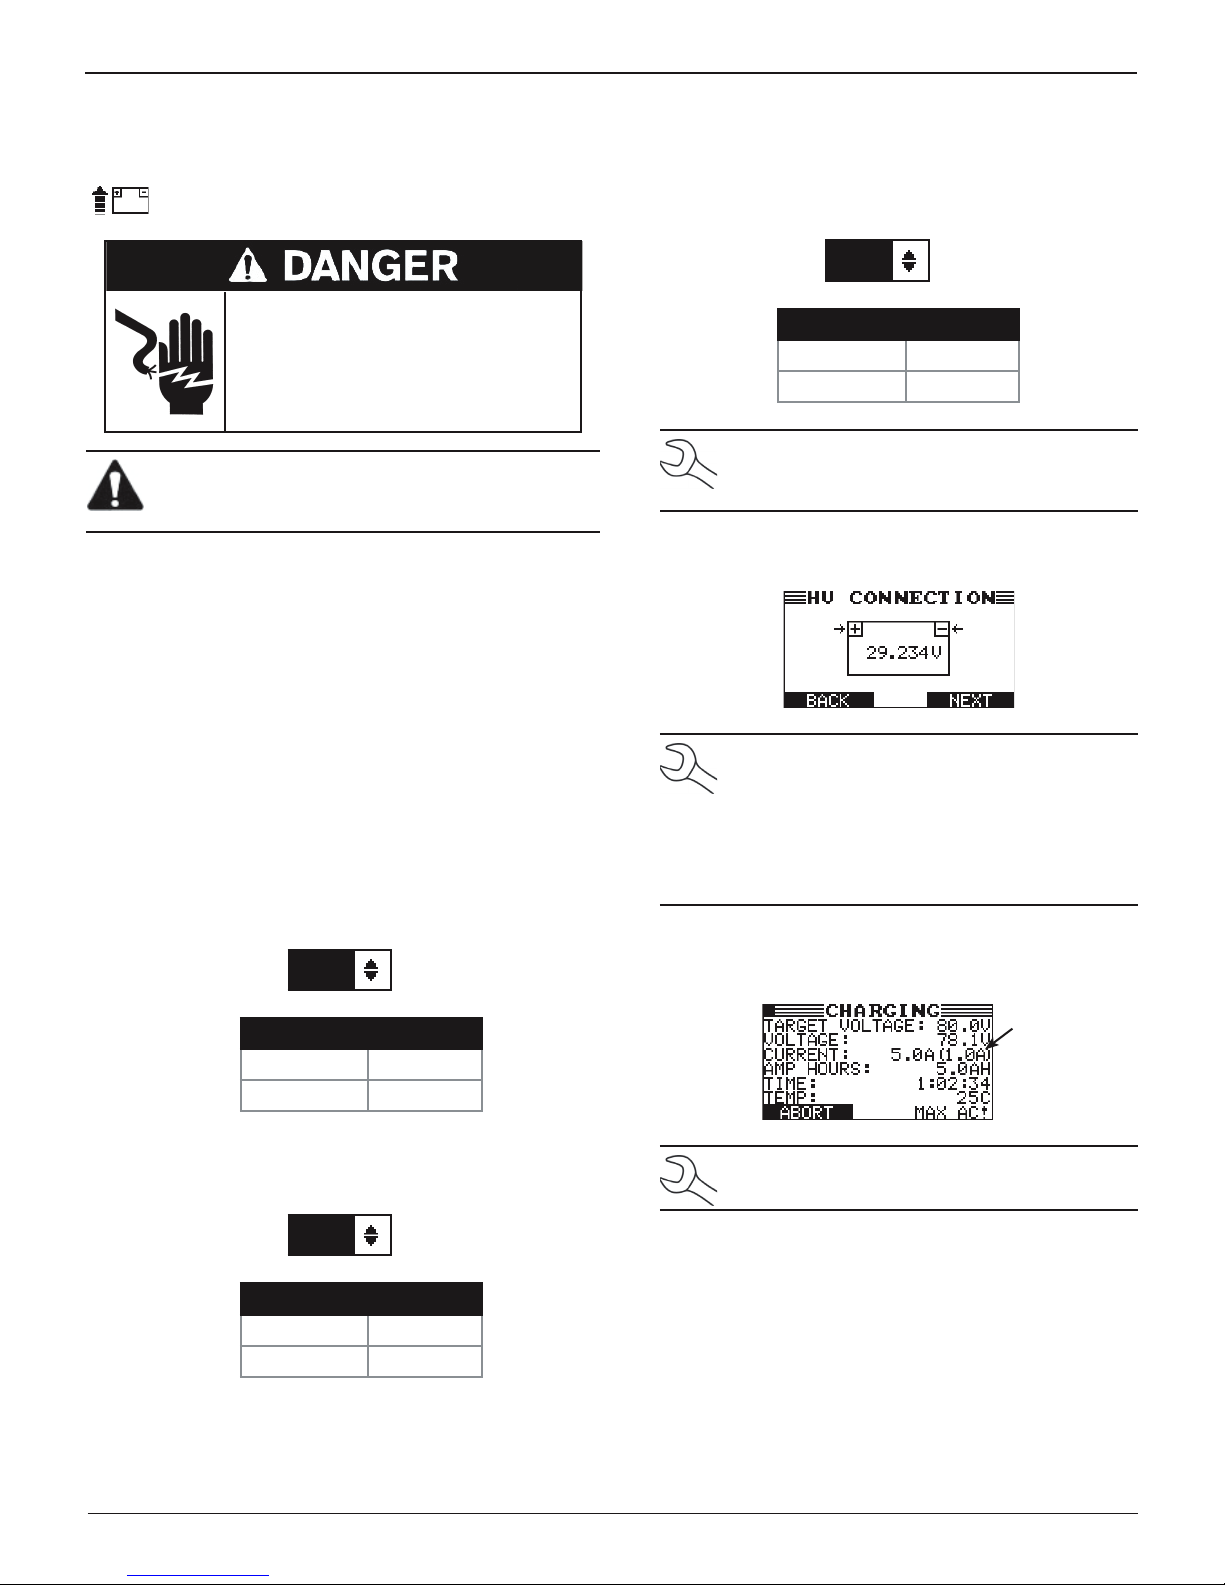
Following a Self Test, the HV CONNECTION screen is
displayed on the GRX-5100L screen.
NOTE:
"REVERSE" is displayed when the detected
battery voltage is less than zero (0).
"--.---" is displayed if no voltage is detected.
The voltage display is highlighted when the de-
tected battery voltage is not within the dened
battery voltage range.
4. If the battery voltage is within range, press NEXT to begin
the charging process. The CHARGING screen is displayed
on the screen.
Range Voltage
Minimum 10.0V
Maximum 384.0V
2. Use or to select the FINAL CURRENT value to meet to
stop the operation and press NEXT to continue, or press
the corresponding number keys.
1.0 A
Range Current
Minimum 0.1A
Maximum 5.0A
Midtronics Inc. 7000 Monroe Street Willowbrook, IL 60527
14
Termination
Current
(In Parenthesis)
NOTE: "MAX AC! is displayed when the unit is limiting output based on the AC input current.
www.midtronics.com
Page 15
GRX-5100 L HEV/EV Battery Service Tool
Chapter 2: Charge
Constant Current
1. Use or to select TARGET CURRENT and press NEXT to
continue, or press the corresponding number keys.
5.0 A
Range Current
Minimum 0.1A
Maximum 5.0A
2. Use or to select FINAL VOLTAGE and press NEXT to
continue, or press the corresponding number keys.
384.0 V
Range Voltage
Minimum 10.0V
Maximum 384.0V
Following a Self Test, the HV CONNECTION screen is
displayed on the GRX-5100L screen.
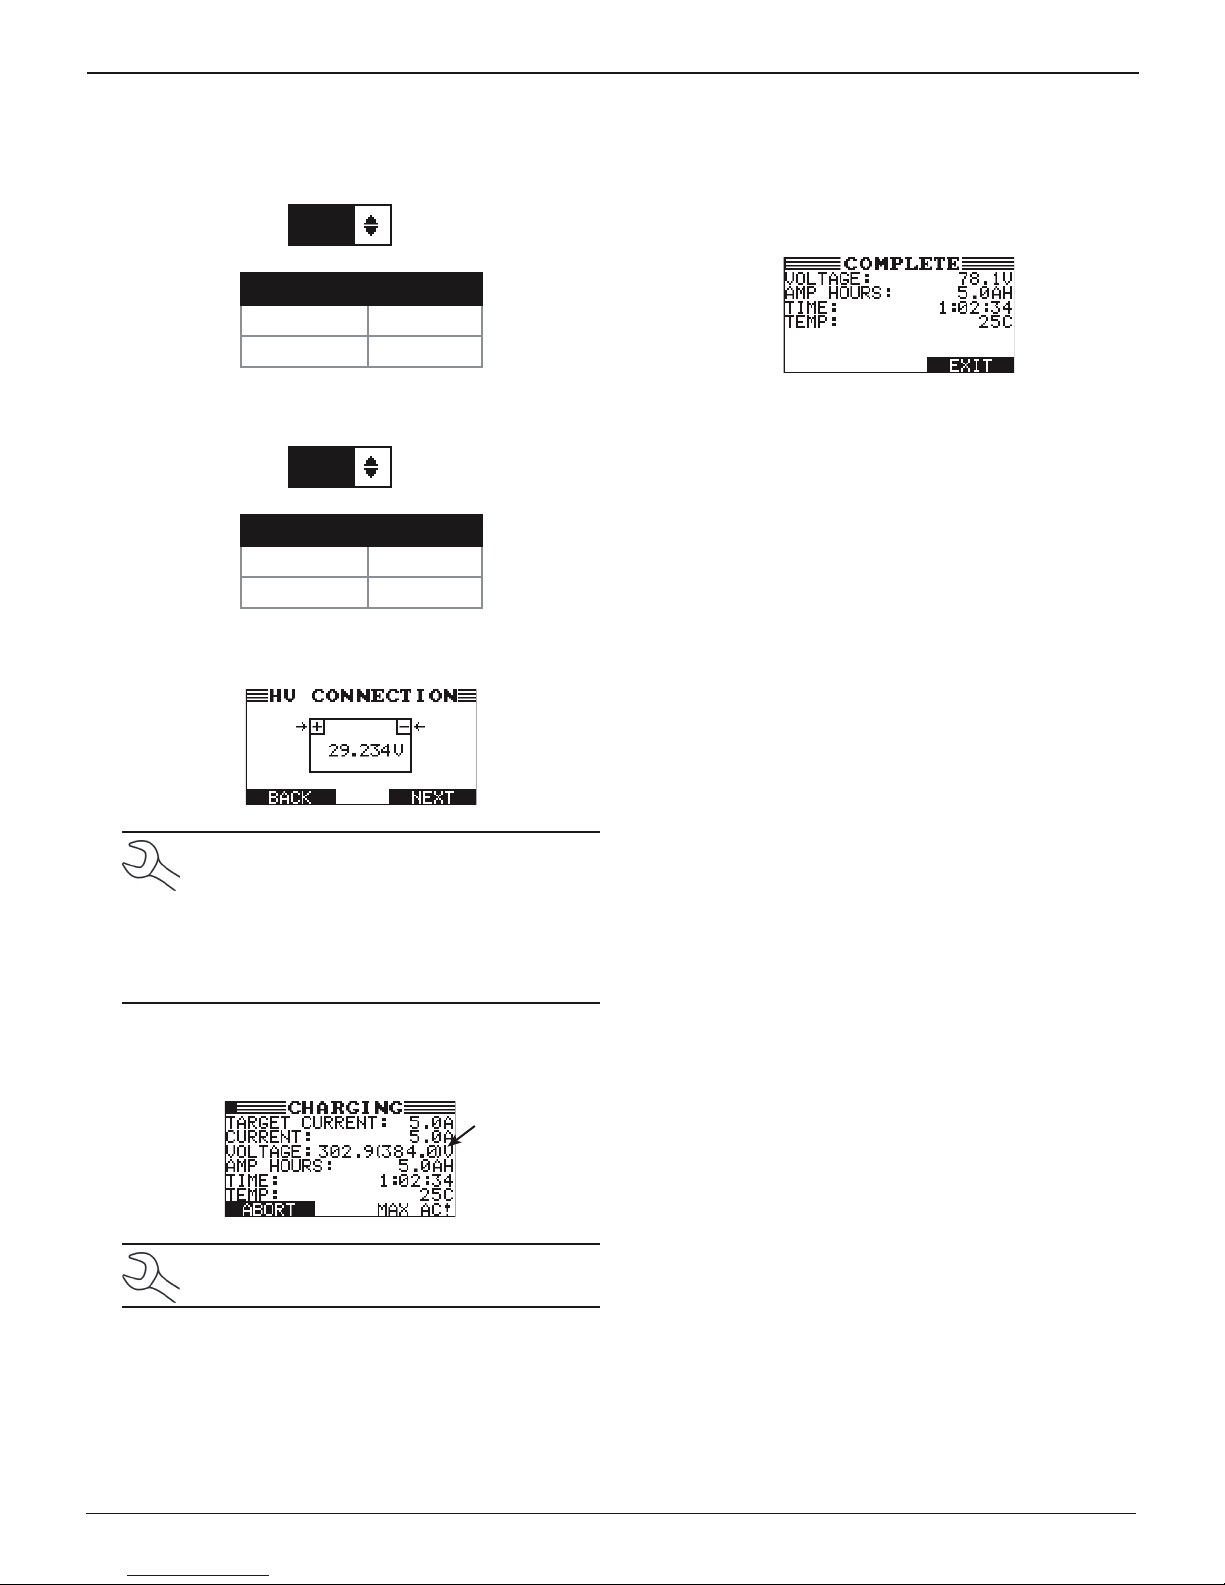
Charge Results
Following a successful charging session, the results are written
to an inserted USB jump drive.
1. Once the session is complete, the results are displayed on
the GRX-5100L screens.
Once the charging session is complete, the GRX-5100L
alerting tone will sound every 30 seconds.
2. Press EXIT to return to the Main Menu.
The GRX-5100L can now be disconnected from the battery.
NOTE:
"REVERSE" is displayed when the detected
battery voltage is less than zero (0).
"--.---" is displayed if no voltage is detected.
The voltage display is highlighted when the de-
tected battery voltage is not within the dened
battery voltage range.
3. If the battery voltage is within range, press NEXT to begin
the charging process. The CHARGING screen is displayed
on the screen.
Termination
Voltage
(In Parenthesis)
NOTE: "MAX AC! is displayed when the unit is lim-
iting output based on the AC input current.
www.midtronics.com
15
Midtronics Inc. 7000 Monroe Street Willowbrook, IL 60527
Page 16
Chapter 3: Discharge
GRX-5100 L HEV/EV Battery Service Tool
Chapter 3: Discharge
Use this function to automatically discharge a battery
according to manually entered target voltage or current.
Hazardous voltage.
An improper connection can result in
electric shock
To avoid electrical shock or burn, never alter
the GRX-5100L’s original AC cord and plug. Disconnect plug from outlet when GRX-5100L is
idle.
IMPORTANT: Make sure to properly prepare the battery by following all required guidelines Refer to your
documentation for complete information.
Before discharging a battery, make sure all of the external
components connected to the GRX-5100 L are in good
working order.
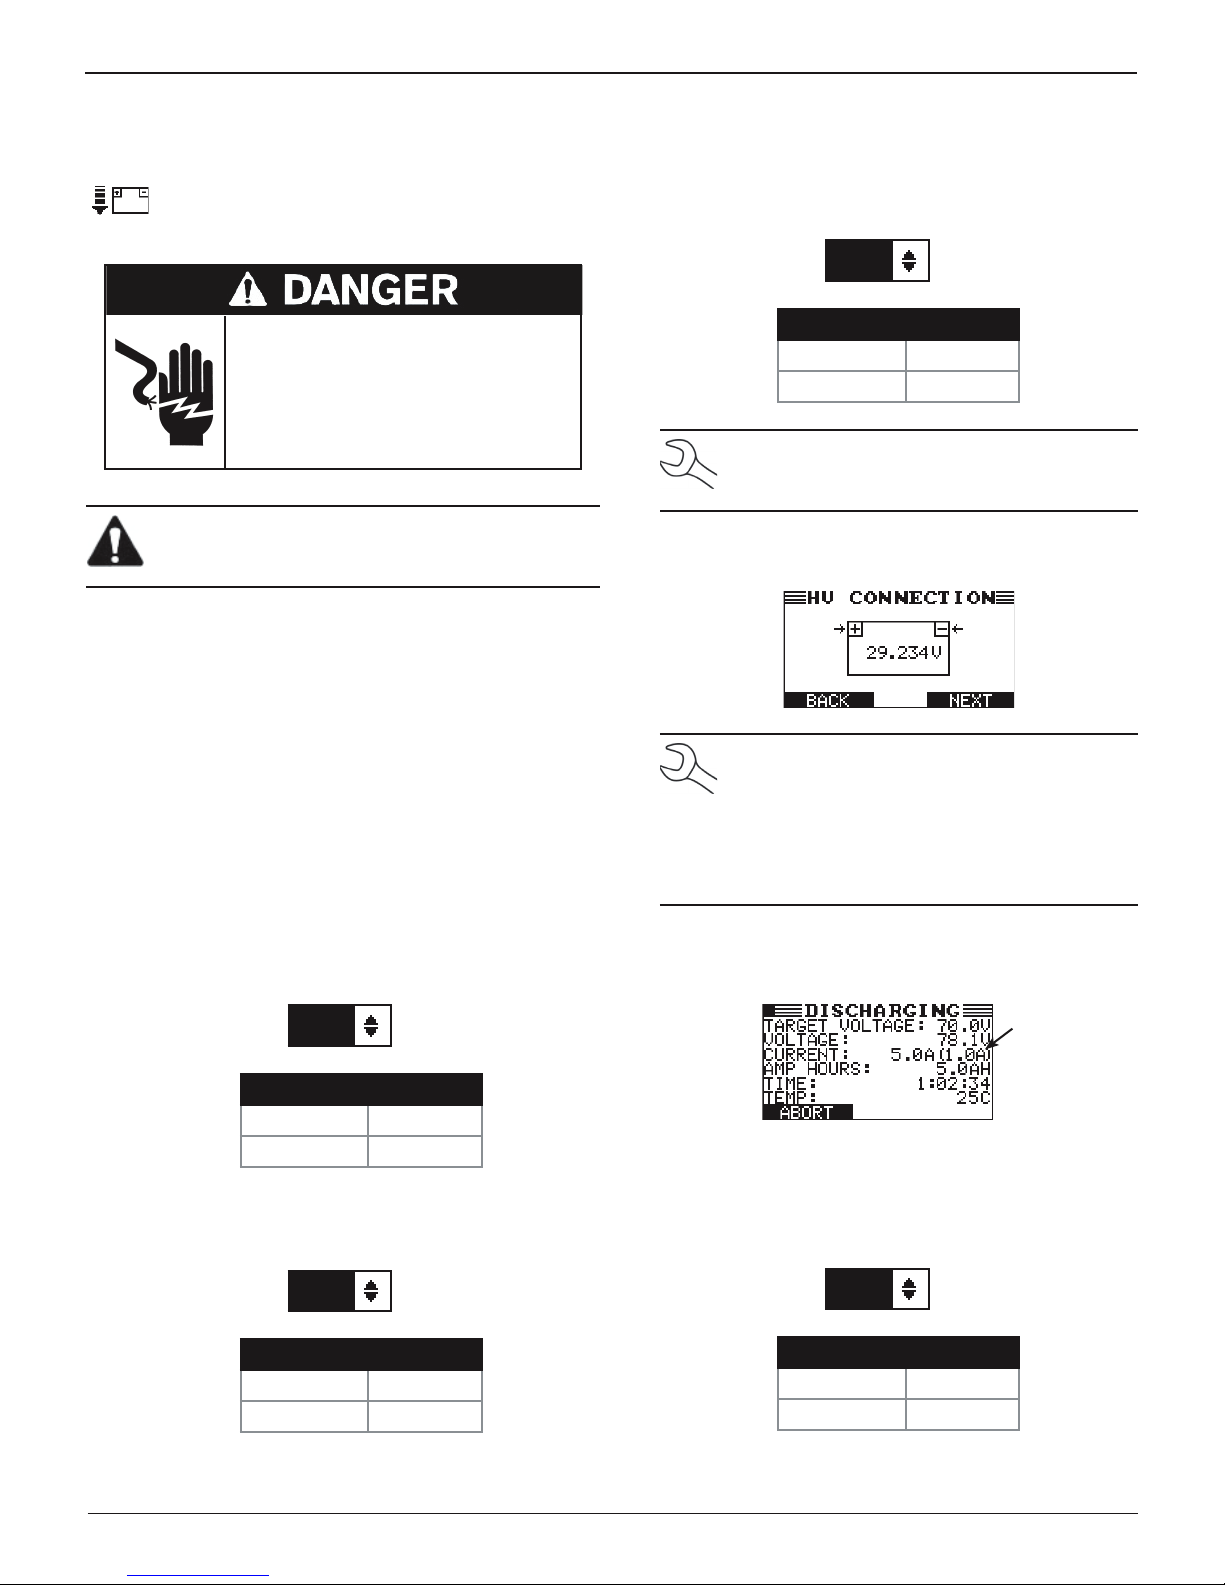
1. At the Main Menu, highlight the Discharge icon and press
SELECT.
2. Use or to select DISCHARGE TYPE and press NEXT
to continue.
1 CONSTANT VOLTAGE
2 CONSTANT CURRENT
Constant Voltage
1. Use or to select the TARGET VOLTAGE and press NEXT
to continue, or press the corresponding number keys.
3. Use or to select the MAX CURRENT and press NEXT
to continue, or press the corresponding number keys.
7.5 A
Range Current
Minimum 0.1A
Maximum 7.5A
NOTE: The minimum current value selected for MAX
CURRENT should be above the FINAL CURRENT
value selected in step 2.
Following a Self Test, the HV CONNECTION screen is
displayed on the GRX-5100L screen.
NOTE:
"REVERSE" is displayed when the detected
battery voltage is less than zero (0).
"--.---" is displayed if no voltage is detected.
The voltage display is highlighted when the de-
tected battery voltage is not within the dened
battery voltage range.
4. If the battery voltage is within range, press NEXT to begin
the charging process. The DISCHARGING screen is displayed on the screen.
2.0 V
Range Voltage
Minimum 2.0V
Maximum 384.0V
2. Use or to select the FINAL CURRENT value to meet to
stop the operation and press NEXT to continue, or press
the corresponding number keys.
7.5 A
Range Current
Minimum 0.1A
Maximum 7.5A
Midtronics Inc. 7000 Monroe Street Willowbrook, IL 60527
Termination
Current
(In Parenthesis)
Constant Current
1. Use or to select TARGET CURRENT and press NEXT to
continue, or press the corresponding number keys.
7.5 A
Range Current
Minimum 0.1A
Maximum 7.5A
16
www.midtronics.com
Page 17
GRX-5100 L HEV/EV Battery Service Tool
2. Use or to select FINAL VOLTAGE and press NEXT to
continue, or press the corresponding number keys.
2.0 V
Range Voltage
Minimum 2.0V
Maximum 384.0V
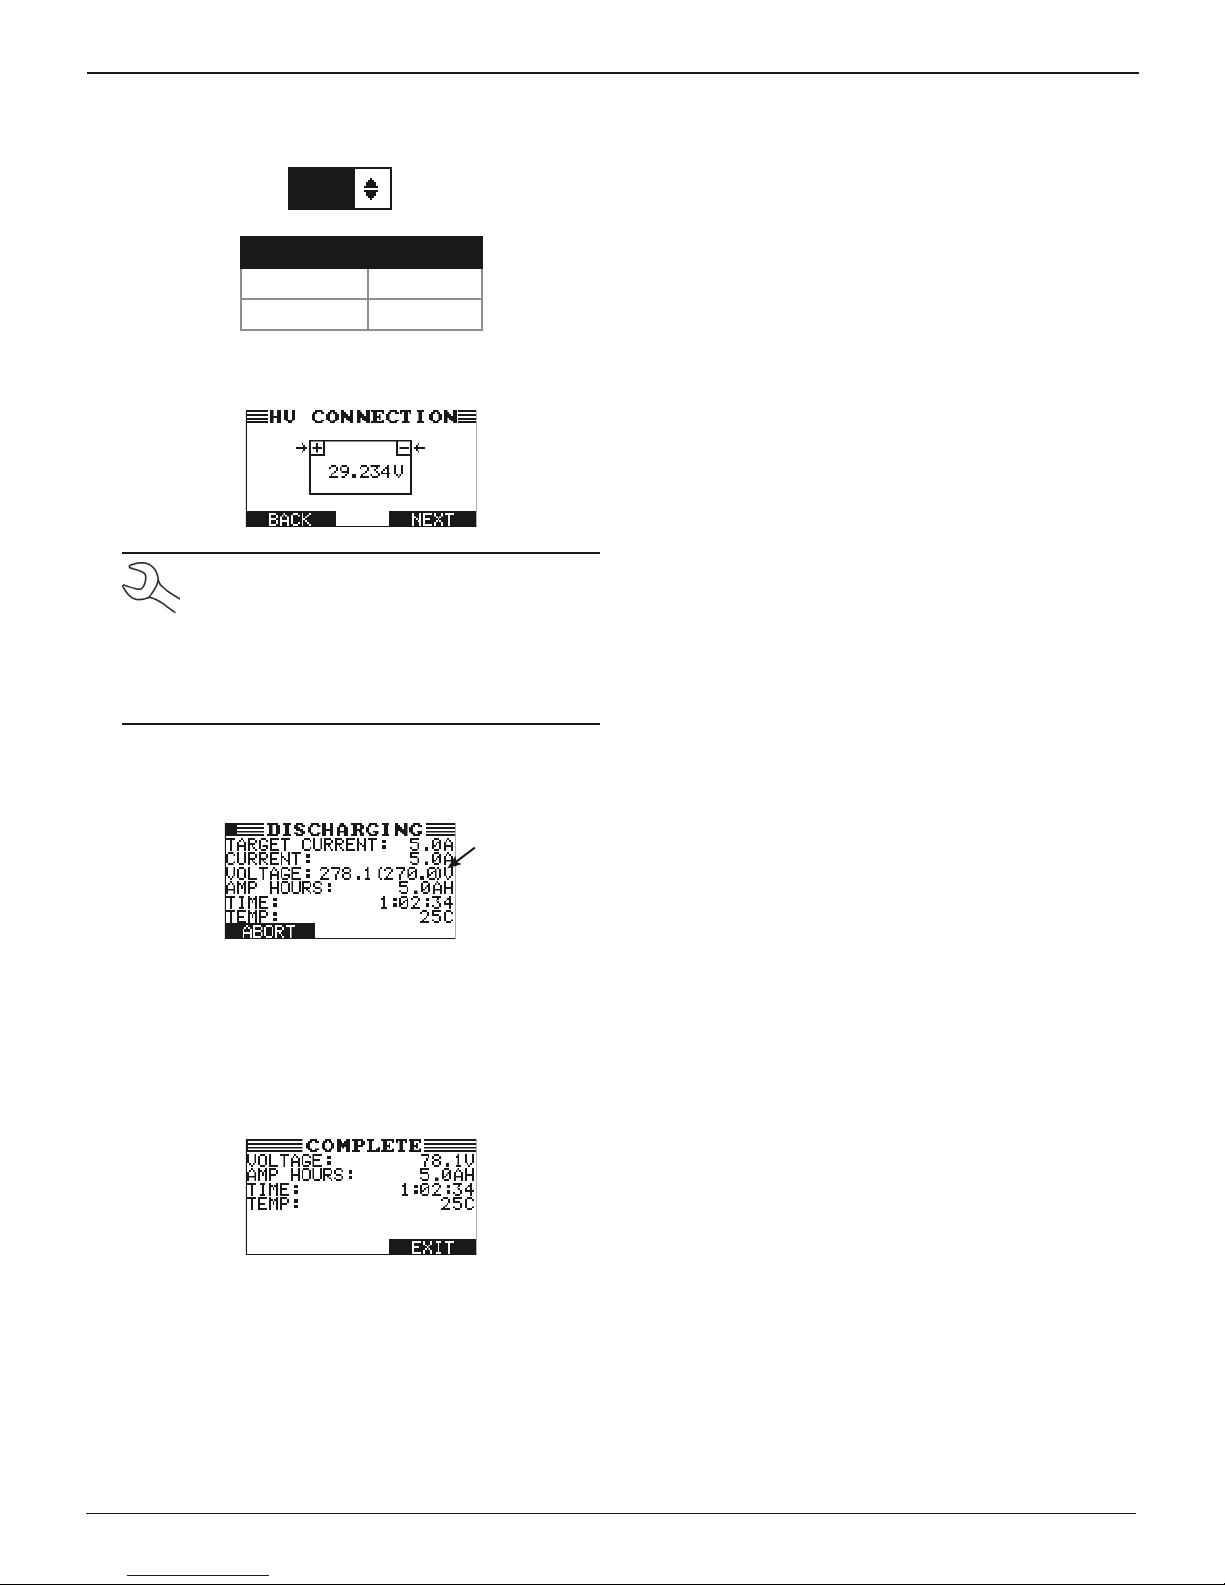
Following a Self Test, the HV CONNECTION screen is
displayed on the GRX-5100L screen.
NOTE:
"REVERSE" is displayed when the detected
battery voltage is less than zero (0).
"--.---" is displayed if no voltage is detected.
The voltage display is highlighted when the de-
tected battery voltage is not within the dened
battery voltage range.
Chapter 3: Discharge
3. If the battery voltage is within range, press NEXT to begin
the charging process. The DISCHARGING screen is displayed on the screen.
Termination
Voltage
(In Parenthesis)
Discharge Results
Following a successful discharging session, the results are
written to an inserted USB jump drive.
1. Once the session is complete, the results are displayed on
the GRX-5100L screens.
Once the discharging session is complete, the GRX-5100L
alerting tone will sound every 30 seconds.
2. Press EXIT to return to the Main Menu.
The GRX-5100L can now be disconnected from the battery.
www.midtronics.com
17
Midtronics Inc. 7000 Monroe Street Willowbrook, IL 60527
Page 18
Chapter 4: Battery Info
Chapter 4: Battery Info
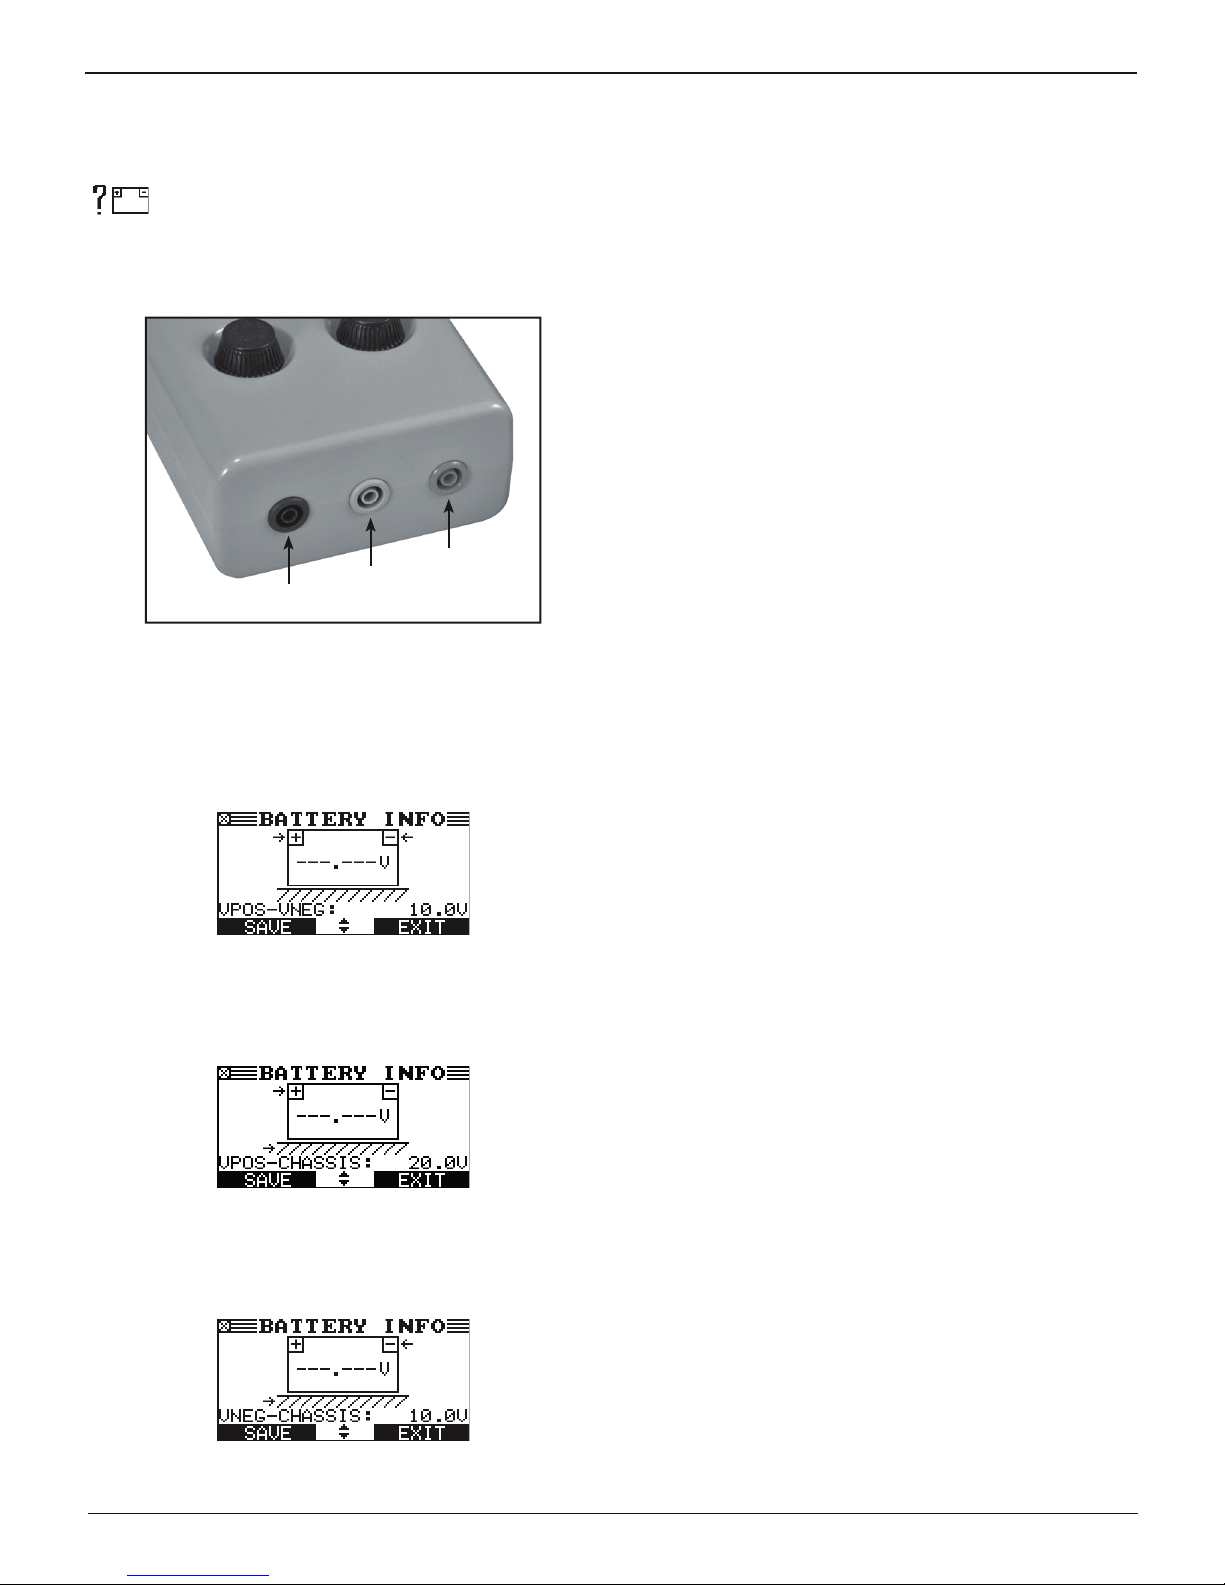
The Battery Info function displays the voltage potential
between the battery terminals and the vehicle chassis
as well as the voltage across the battery terminals.
The corresponding connectors on the Universal Fuse Box are
shown in the following image.
GRX-5100 L HEV/EV Battery Service Tool
VNeg
VChassis
VPos
The information is displayed in three screen. Use or to
display each screen.
VPOS–VNEG
Displays the measured voltage across the positive (+) and
negative (–) terminals.
VPOS–Chassis
Displays the measured voltage between the positive (+)
battery terminal and the vehicle chassis.
VNEG–Chassis
Displays the measured voltage between the negative (–)
battery terminal and the vehicle chassis.
Midtronics Inc. 7000 Monroe Street Willowbrook, IL 60527
18
www.midtronics.com
Page 19
GRX-5100 L HEV/EV Battery Service Tool
Chapter 5: Tool Info
The Tool Info menu has two (2) utilities to help you
track the usage and history of your GRX-5100L.
Totals
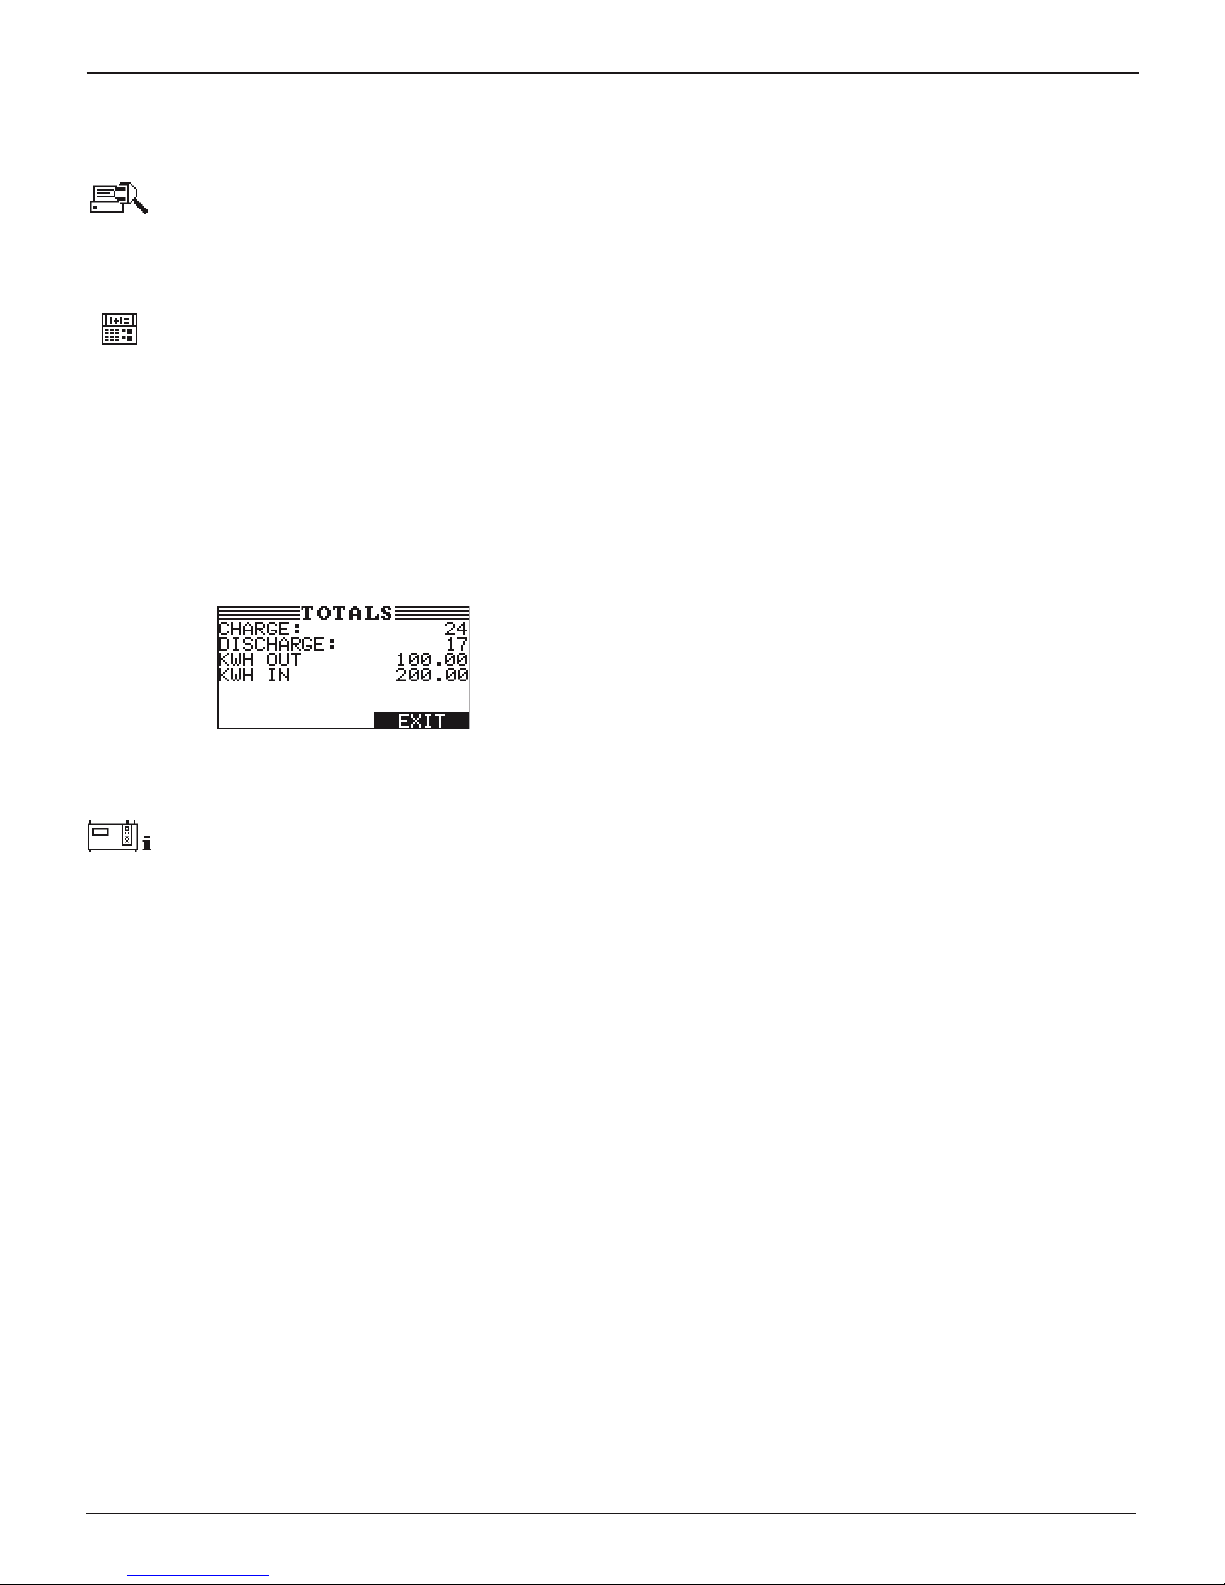
The TOTALS function counts the number of charges or
discharges and tracks the results.
1 LIFE TIME TOTALS
Select the Totals option you want to see and press NEXT to
continue.
Life Time Totals
LIFE TIME TOTALS show the total number of times the tool is
used to determine health and charge of batteries tested.
Chapter 5: Tool Info
Version
The VERSION utility displays the important information
about GRX-5100 L across multiple screens including
software version, EEPROM, version date, tool serial
number, and build number.
Use or to scroll between the screens of version
information.
www.midtronics.com
19
Midtronics Inc. 7000 Monroe Street Willowbrook, IL 60527
Page 20
Chapter 6: Utility Menu
GRX-5100 L HEV/EV Battery Service Tool
Chapter 6: Utility Menu
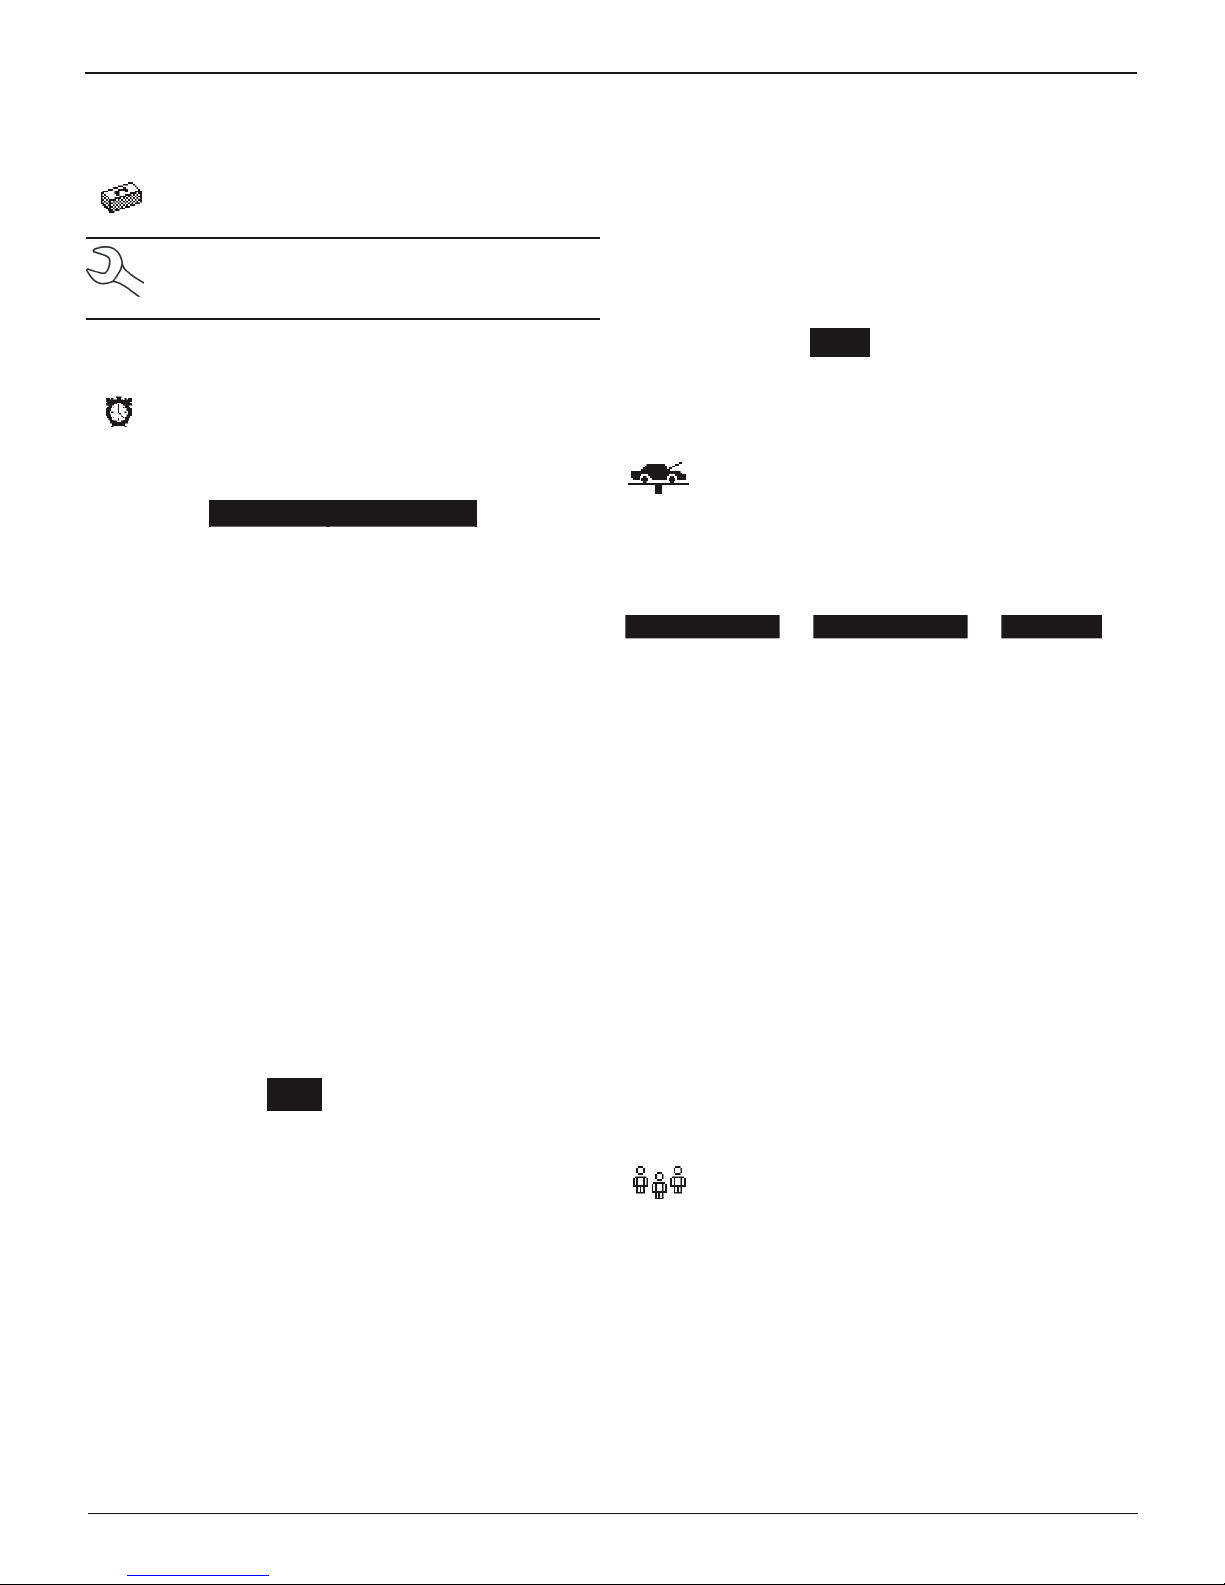
The Utility Menu has several functions that you can
use to customize the GRX-5100L user interface.
NOTE: If the PIN function is enabled, y
ou will need to
enter the 5-digit PIN when accessing the Utility function of the GRX-5100L.
Clock
Use or to highlight the setting you want to change.
Although the date and time have been set at the factory, you may want to make adjustments based your
time zone or Daylight Saving Time.
MODE : AM/PM
TIME : 9:07 AM
FORMAT : /DD/MM/YYYY
DATE : 9/26/12
Mode
1. Use or to select the MODE and press NEXT to continue.
2. Use or to select 24-hour or 12-hour (AM/PM) clock
and press NEXT to continue, or press the corresponding
number key.
1 24 HOUR
2 AM/PM
Date
1. Use or to s
tinue,
and press NEXT to continue.
2. Use
or
elect the DATE
and press NEXT to con-
to highlight the day, month, or year. Use or
to adjust the digits.
11 / 18 / 2012
3. Press SAVE to save your settings.
Shop
The SHOP INFO utility allows you to create a header
for your printed test results showing your business location information. The utility’s three (3) information
screens contain 12 lines of text with a maximum of 17
characters per line.
Screen 1 Screen 2 Screen 3
1–YOUR SHOP NAME
2–1000 ANY STREET 6–YOUR PHONE NUMBER 10–
3–YOUR TOWN, STATE 7–WWW.WEBSITE.COM 11–
4–YOUR POSTAL CODE 8–SHOP ID NUMBER 12–
To create or overwrite a header:
1. Press or to highlight the line you want to change.
The cursor will be blinking to the right of the last character
in the line.
5–YOUR COUNTRY
—
9–
—
—
3. If you used the ARROW keys, press SAVE to save your set-
ting or BACK to return to the CLOCK/DATE screen without
saving the changes.
Time
1. Use or to select the TIME and press NEXT to continue.
2. Use
or
to select the hour, minutes, or AM or PM. Use
or to adjust the digits.
9 : 07 AM
3. Press SAVE to save your setting, or press BACK to return to
the CLOCK/DATE screen.
Format
1. Use or to select the FORMAT and press NEXT to continue.
2. Use or to select date format and press NEXT to continue, or press the corresponding number key.
1 DD/MM/YYYY (day/month/year)
2 MM/DD/YYYY (month/day/year)
3. If you used the ARROW keys, press SAVE to save your set-
ting or BACK to return to the CLOCK/DATE screen without
saving the changes.
2. Press to move the cursor backward to erase a character.
To move the cursor forward, press .
3. Insert a character by pressing the key associated with the
character as many times as needed.
4. You can center text by selecting blank spaces before and
after lines of text or insert spaces between words.
5. Press SAVE to save your setting or BACK to return to the
SHOP INFO screen without saving the changes.
Users
The USERS utility allows you to create and edit a USER
ID with 1 to 7 alphanumeric characters and link it to a
test counter. It also allows you to delete a USER ID and
its associated test total.
Entering A New User ID
1. Use or to select ENTER NEW and press NEXT to continue, or press the corresponding number key.
1 ENTER NEW
2 DELETE
3 EDIT
Midtronics Inc. 7000 Monroe Street Willowbrook, IL 60527
20
www.midtronics.com
Page 21
GRX-5100 L HEV/EV Battery Service Tool
Chapter 6: Utility Menu
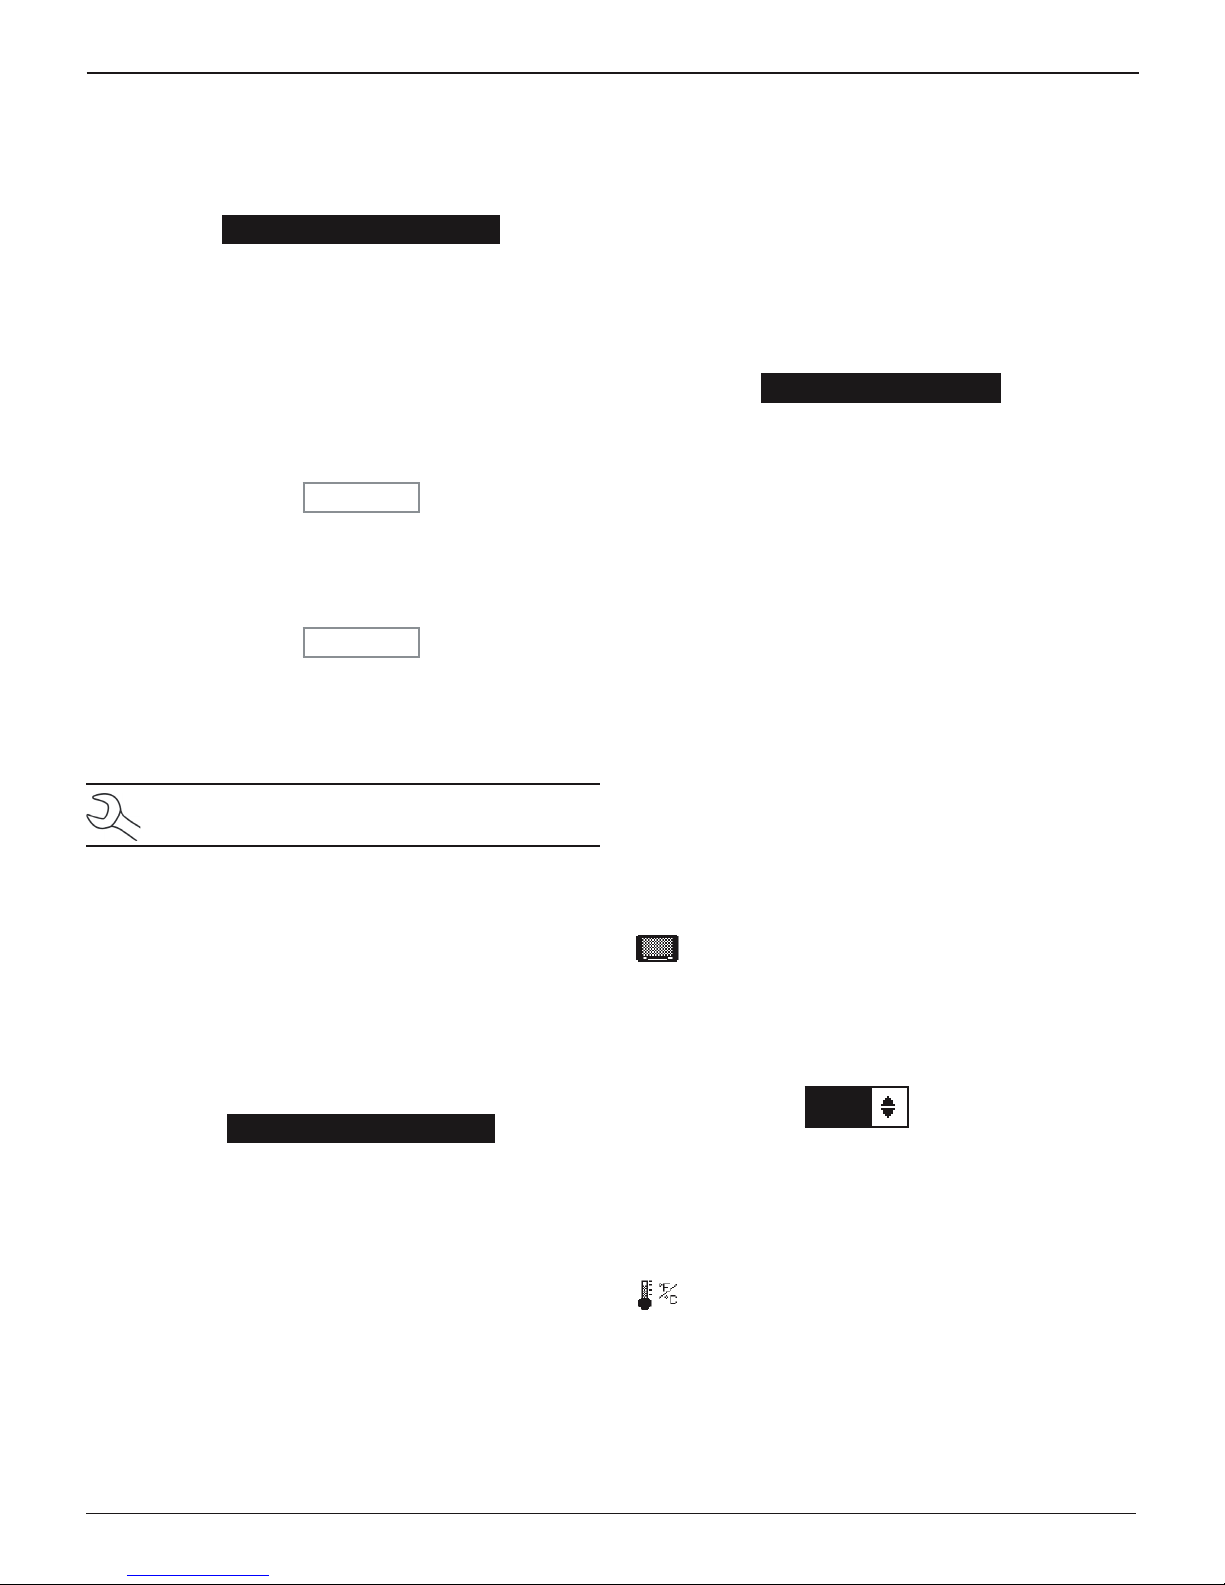
2. Use or to scroll to the ID placeholder you want to
use. To display more placeholders, continue scrolling or
use or to jump up or down through the list ve lines
at a time.
1 TECH01
2 TECH02
3 TECH03
4 TECH04
3. Press NEXT to continue.
4. To clear the default characters, press as many times as
necessary. To add a space, move the cursor forward by
pressing .
ENTER USER ID
TECH01
5. Insert a character by pressing the alphanumeric key associated with the character as many times as needed. Press
SAVE.
ENTER USER ID
GREG
6. If USER PIN is enabled, after enter a User ID, you need to
enter a corresponding new User PIN.
Deleting A User ID
NOTE: You cannot delete the default USER ID place-
holders (i.e., TECH03).
1. Use or to select DELETE and press NEXT to display
the list of IDs, or press the corresponding number key.
Editing A User ID
1. Use or to select EDIT and press NEXT to continue, or
press the corresponding number key.:
1 ENTER NEW
2 DELETE
3 EDIT
2. Use the ARROW keys to select USER ID that you want to
edit and press NEXT to continue.
1 GREG
2 DAVID
3 ALEX
4 TECH04
3. Use or to scroll to the ID placeholder you want to edit.
To display more placeholders, continue scrolling or use
or to jump up or down through the list ve lines at a time.
4. Press NEXT to continue.
5. To clear the default characters, press as many times as
necessary. To add a space, move the cursor forward by
pressing .
6. Insert a character by pressing the alphanumeric key associated with the character as many times as needed.
7. Press SAVE to save your changes.
8. If USER PIN is enabled, after edit a User ID, you need to
enter a corresponding User PIN.
Display
1 ENTER NEW
2 DELETE
3 EDIT
2. Use the ARROW keys to select a USER ID as described in
step 2 in “Entering a New User ID”.
1 GREG
2 DAVID
3 TECH03
4 TECH04
3. Press DELETE to continue.
4. At the conrmation screen, press YES to conrm that you
want to delete the user and return to the DELETE users
screen.
The DISPLAY utility allows you to adjust the contrast
of the text on the display and the backlight time.
The contrast level is 1 (lightest) to 10 (darkest). To change it:
1. Press or to adjust the LCD contrast, or use the cor-
responding number keys.
8 (1-10)
2. Press SAVE to save your setting or BACK to return to the
LCD OPTIONS screen without saving the changes.
Temperature
The TEMPERATURE utility allows you to set the units
of measurement to either Fahrenheit or Celsius. To set
your preference:
1. Use or to select the TEMPERATURE units, or press the
corresponding number key.
1 CELSIUS
2 FAHRENHEIT
www.midtronics.com
21
Midtronics Inc. 7000 Monroe Street Willowbrook, IL 60527
Page 22
Chapter 6: Utility Menu
GRX-5100 L HEV/EV Battery Service Tool
2. If you used the ARROW keys, press SAVE to save your set-
ting or BACK to return to the Utility Menu without saving
the changes.
Capacity
The CAPACITY function lets you select the units of battery capacity between Kilowatt hours and Amp hours.
1. Use or to select the battery CAPACITY units, or press
the corresponding number key.
1 AMP HOURS
2 KILOWATT HOURS
2. If you used the ARROW keys, press SAVE to save your set-
ting or BACK to return to the Utility Menu without saving
the changes.
Language
The LANGUAGE utility allows you to select a language
for the display and printouts. You can override the selection when the GRX-5100L displays the language option after you turn it on.
1. Use or to select the LANGUAGE you want to use, or
press the corresponding number key.
1 ENGLISH
2. If you used the ARROW keys, press SAVE to save your set-
ting or BACK to return to the Utility Menu without saving
the changes.
3 – PIN
Select this setting to enable or disable the ADMIN PIN
number.
Each option is easily enabled or disabled by turning it ON or OFF.
To save your settings after each selection, press SAVE.
To return to the administrative functions list without saving,
press BACK.
Clear Test Totals
This function allows you to clear the test totals by User ID and
battery test decision. The GRX-5100L veries that you want
the counter reset to 0 before it continues.
NOTE: This will not clear the lifetime test total avail-
able in the VERSION information screen.
Reset Defaults
This function allows you to reset Administrative options to
their original settings. It will clear all registered users.
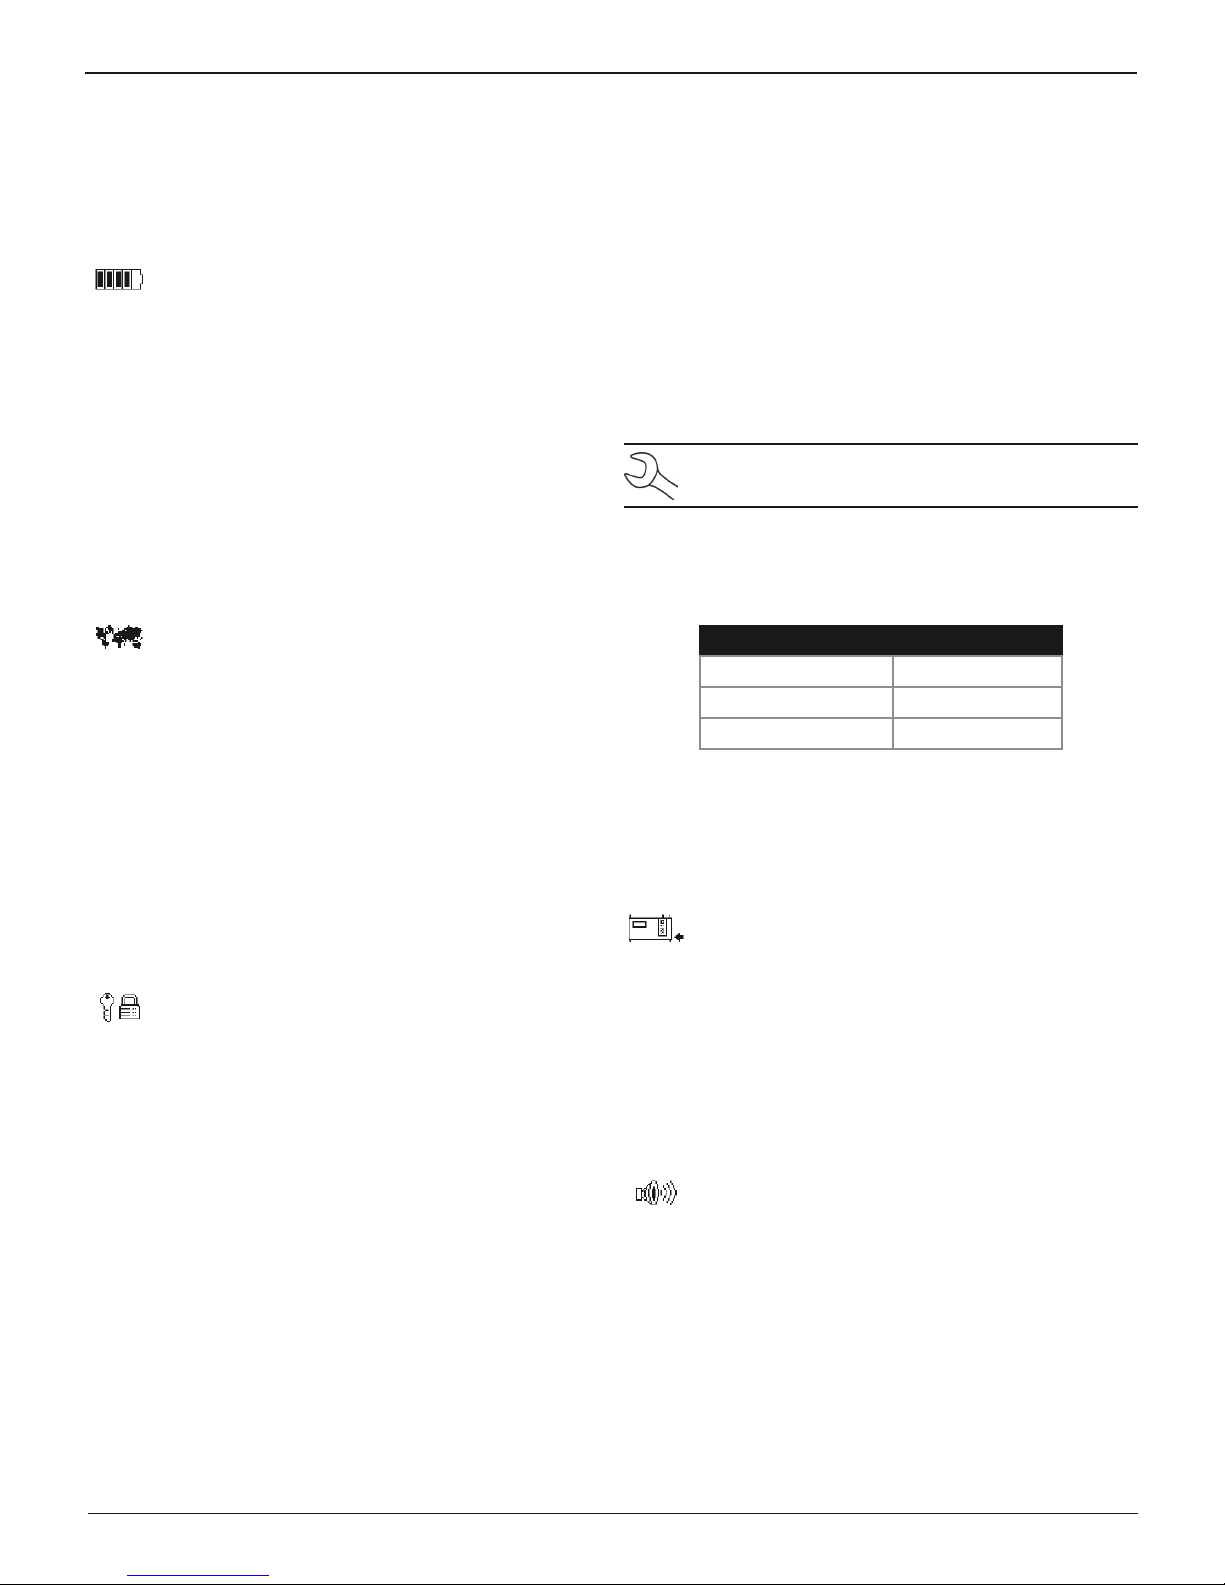
Option Default Settings
1 – USER ID ON
2 – UNREG. USER OFF
3 – PIN Not Available
Change Admin Pin
This function allows you to enter a new 5-digit Admin Pin.
Update
Admin
Select the ADMIN icon to display a list of administra-
tive functions:
1 OPTIONS
2 CLEAR TEST TOTALS
3 RESET DEFAULTS
4 CHANGE ADMIN PIN
Options
In the OPTIONS section there are three functions that allow
you to control user access to the Main Menu and Admin Menu.
1 – USER ID
Select this setting to enable (ON) or disable (OFF) the
USER ID login screen.
2 – UNREG. USER
Select this setting to enable (ON) or disable (OFF)
unregistered
login access to the GRX-5100L.
When software updates become available, use this
utility to update the GRX-5100 L using a USB-style
jump drive inserted into the USB-A port.
When selected, the GRX-5100L rst checks the inserted USB
drive. The currently loaded software version information and
the new version information found on the drive are displayed
on the screen. Press YES to perform the update.
Buzzer
The BUZZER utility allows you to enable or disable the
warning tone that alerts you if the clamps are connected improperly and or there are other errors.
1. Use or to select the BUZZER option you want, or
press the corresponding number key.
1 OFF
2 ON
2. If you used the ARROW keys, press SAVE to save your set-
ting or BACK to return to the Utility Menu without saving
the changes.
Midtronics Inc. 7000 Monroe Street Willowbrook, IL 60527
22
www.midtronics.com
Page 23

GRX-5100 L HEV/EV Battery Service Tool
Chapter 7: Error Messages
The table below will help you troubleshoot test messages. If
troubleshooting does not solve the problem, call Midtronics
at 1-800-776-1995.
Possible Error Messages
Hardware Error
This error can be generated by damaged or improperly
connected cables. To clear the error, turn o the GRX-5100L,
re-seat the cable connections, and power the GRX-5100L back
up.
If the error message reappears contact Midtronics for service.
Communication Error
Indicates an internal communication problem in the GRX5100L. Turn the power o and then turn it back on again. If
the error message reappears, contact Midtronics for service.
Chapter 7: Error Messages
Internal Temperature Sensor Failure
Contact Midtronics for service.
Incorrect Voltage Detected
The voltage of the battery is out of range.
Voltage Matches Target Voltage
The measured voltage of the battery is already at the entered
Target Voltage. No additional conditioning is required.
www.midtronics.com
23
Midtronics Inc. 7000 Monroe Street Willowbrook, IL 60527
Page 24
www.midtronics.com
Corporate Headquarters
Willowbrook, IL USA
Phone: 1.630.323.2800
Canadian Inquiries
Toll Free: +1 1 866 592 8052
Midtronics b.v.
European Headquarters
Houten, The Netherlands
Serving Europe, Africa, the Middle
East, and The Netherlands
Phone: +31 306 868 150
Midtronics China
China Operations
Shenzhen, China
Phone: +86 755 8202 2036
Midtronics India
Navi Mumbai, India
Phone: +91 22 27564103/1513
Asia/Pacíc (excluding China)
Contact Corporate Headquarters
Phone: +1.630.323.2800
167-000442EN-A 7/13 ©2013 Midtronics, Inc. All rights reserved.
 Loading...