

Page 1
February 2019
167-000899EN-A
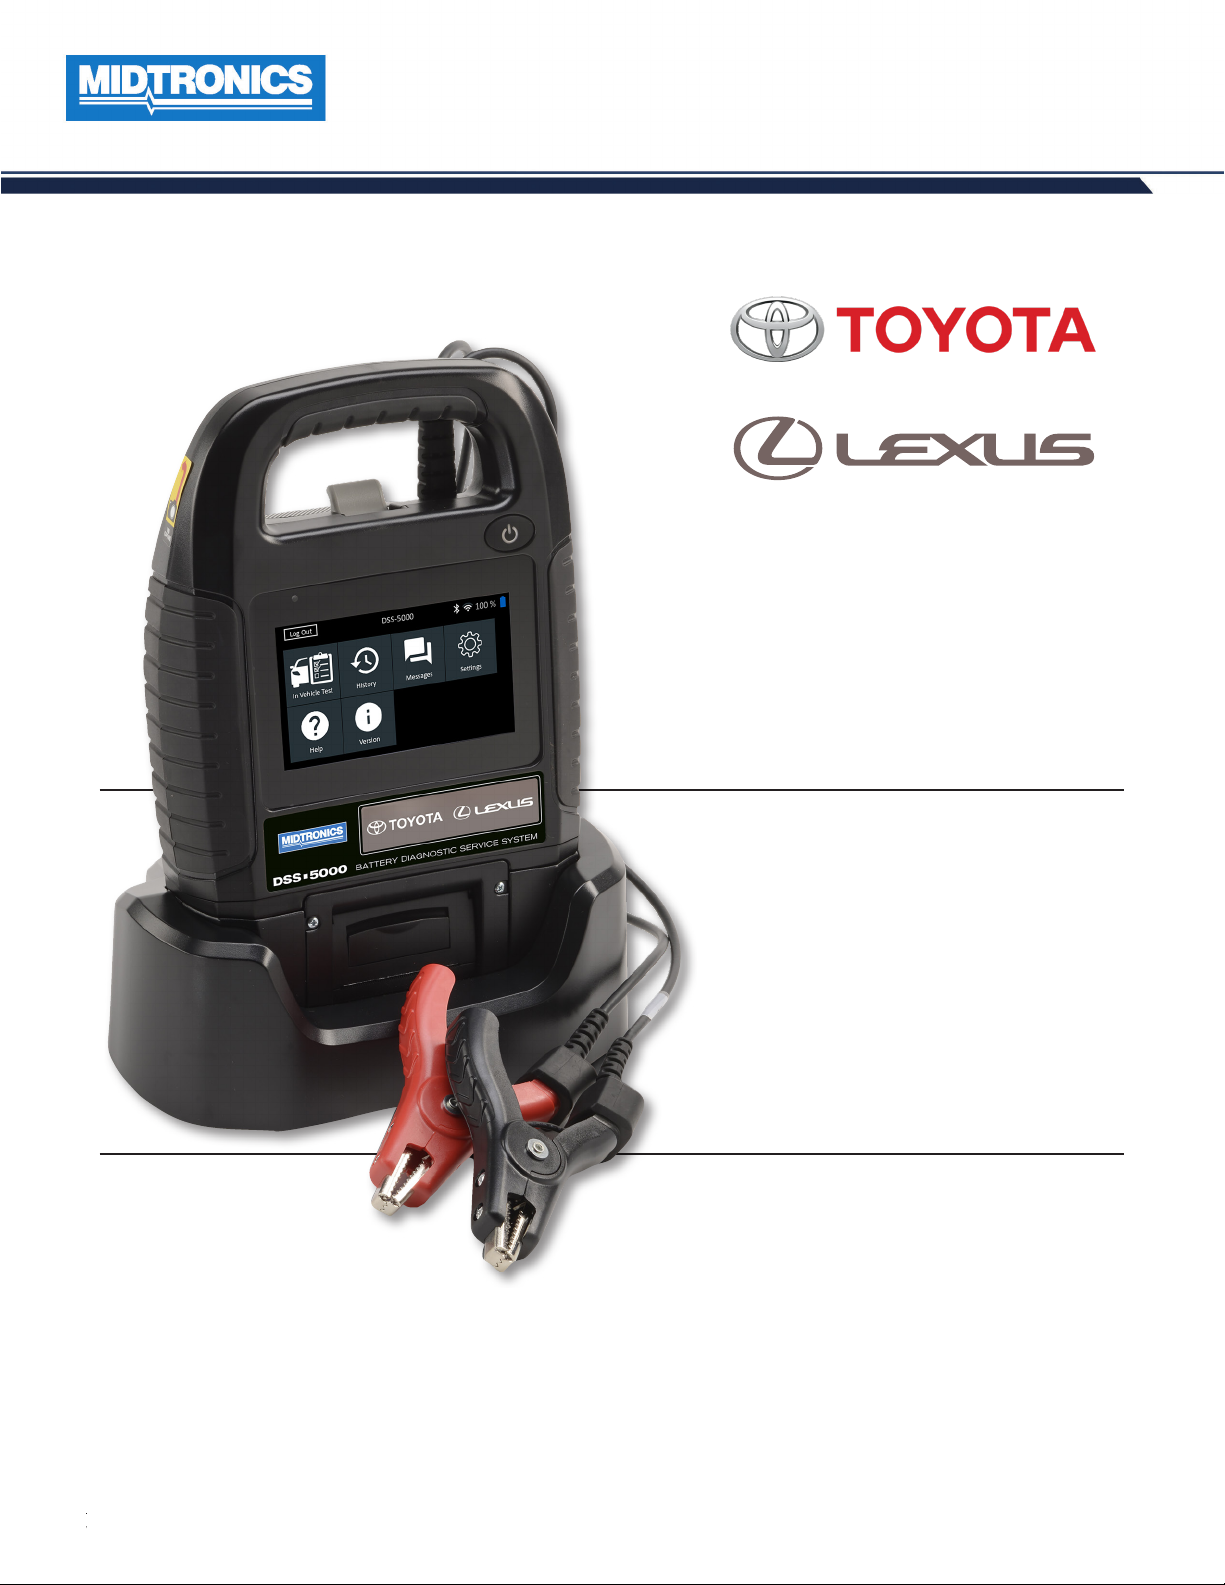
DSS-5000 Toyota Lexus
DSS-5000
Battery Diagnostic
Service System
Testing 6- and 12-volt
Automotive Batteries
Instruction Manual
For additional support materials and the latest information go to toyota.dss5000.com
www.midtronics.com
1
Midtronics Inc. 7000 Monroe Street Willowbrook, IL 60527
Page 2

Page 3

Contents
DSS-5000 Toyota Lexus
Chapter 1: Introduction 5
Personal Precautions 5
Symbols Conventions 5
Description 5
Accessories 5
Accessory Ording Information 5
Tester Components 6
Controller 6
Tester Pod 6
Charging Dock 6
Test Preparation 7
Inspecting the Battery 7
Testing Out-of-Vehicle 7
Testing In-Vehicle 7
Connecting To A Battery 7
Connecting An Accessory Cable 7
Setting User Preferences 7
Initial Power Up 7
Main Menu 9
Additional Screens 9
Main Menu Icons 9
Support 9
Chapter 2: In Vehicle Test 10
Battery Test 10
Battery Test Results 11
Additional Screens 11
System Test 12
Test Results-Summary 12
Chapter 3: History 14
Tool History 14
Totals By Test Decision 14
Totals By Date And Location 14
Vehicle History 14
Vehicle Select Option 15
Chapter 4: Messages 16
Accessing Messages 16
Message Types 16
Chapter 5: Settings 17
WiFi 17
Adding A Network 17
Deleting A Network 17
Printer Settings 17
Adding A WiFi Printer 17
Deleting A Printer 17
Email 18
Add Address 18
Edit Address 18
Deleting An Address 18
Server Settings 18
User Settings 18
User Management 18
Language Settings 18
System Language 18
Test Result Language 18
Email Language 18
Print Language 18
Display Settings 19
Brightness 19
Auto Brightness 19
Sleep Time 19
Dim Time 19
BMIS Login 19
Shop Information 19
Shop Information 19
Test Settings 20
Device List 20
Add Tester Pod 20
Deleting A Diagnostic Base 20
Version Information 21
Factory Preset 21
Legal Information 21
Check for Updates 21
Appendix 22
Battery Information Screen Descriptions 22
Recommended Test Procedure 22
VIN Scanning 22
Scanning Tips 22
www.midtronics.com
3
Midtronics Inc. 7000 Monroe Street Willowbrook, IL 60527
Page 4

DSS-5000 Toyota Lexus
Consent to Collection and Use of Data
This device is the sole product of Midtronics, Inc. (“Midtronics’) and Midtronics is solely responsible for the design and
manufacture of this device. Copyrights in the programs included in this device are the property of Midtronics or its licensors.
“Toyota,” “Lexus,” and the various marks and logos used to identify Toyota and Lexus products (collectively, “Toyota Marks”) are
the sole property of Toyota Motor Corporation (“TMC”), and are used pursuant to a limited license from TMC or its aliated
entities (collectively, “Toyota”). The Toyota Marks are used solely to identify this device as including certain features that
relate specically to the use of this device in connection with Toyota dealer service programs. Toyota is not responsible for
design, operation, or manufacture of this device, and disclaims all liability with respect thereto. The user of this device is solely
responsible for its proper operation.
This device may be used only by the Toyota dealer purchasing this device (“Dealer”), pursuant to the terms and conditions
(“Additional Terms”) governing the device and its use and such Dealer’s dealership and ancillary agreements with Toyota Motor
Sales, U.S.A., Inc. and its aliates, and may not be resold without Toyota’s prior written permission.
Dealer is solely responsible for obtaining any necessary permissions required in connection with providing any personal
information by means of the device.
Dealer agrees that Midtronics and Toyota may collect, store, transmit, transfer, use and otherwise process all data and related
information arising from the use of the device (including but not limited to technical information about this device, associated
system and application software, and any vehicle (including vehicle identication number), parts and accessories) to (i) facilitate
the provision of product support, product improvements, product development, and other services related to use of this device
and its associated system, (ii) support Toyota’s ongoing evaluation of vehicle and parts design, performance and manufacture,
dealer service and performance, and warranty claim eligibility, (iii) comply with law; and/or (iv) support any other matters
associated with Toyota products and services.
DEALER AGREES TO INDEMNIFY AND HOLD HARMLESS MIDTRONICS AND TOYOTA AND THEIR RESPECTIVE SUBSIDIARIES,
OFFICERS, EMPLOYEES AND AGENTS FROM ANY LIABILITY ASSOCIATED WITH THE USE, OPERATION AND/OR MAINTENANCE
OF THE DEVICE BY USERS OR OTHERS ACTING ON USER’S BEHALF, OR THE COLLECTION, STORAGE, AND TRANSMISSION OF
PERSONAL INFORMATION BY USER OR OTHERS ON ITS BEHALF BY MEANS OF THE DEVICE.
Midtronics and Dealer agree that Toyota is an express third party beneciary of these terms and conditions and the Additional
Terms. In order to proceed with the registration and activation of this device, Dealer must assent to the foregoing conditions,
including the Additional Terms, by clicking the “I Agree” button during device registration.
The individual who signies assent to these terms warrants to Midtronics and Toyota that he or she has full right, power and
authority to give such assent on behalf of Dealer.
Midtronics Inc. 7000 Monroe Street Willowbrook, IL 60527
4
www.midtronics.com
Page 5
Chapter 1: Introduction
Chapter 1: IntroductionDSS-5000 Toyota Lexus
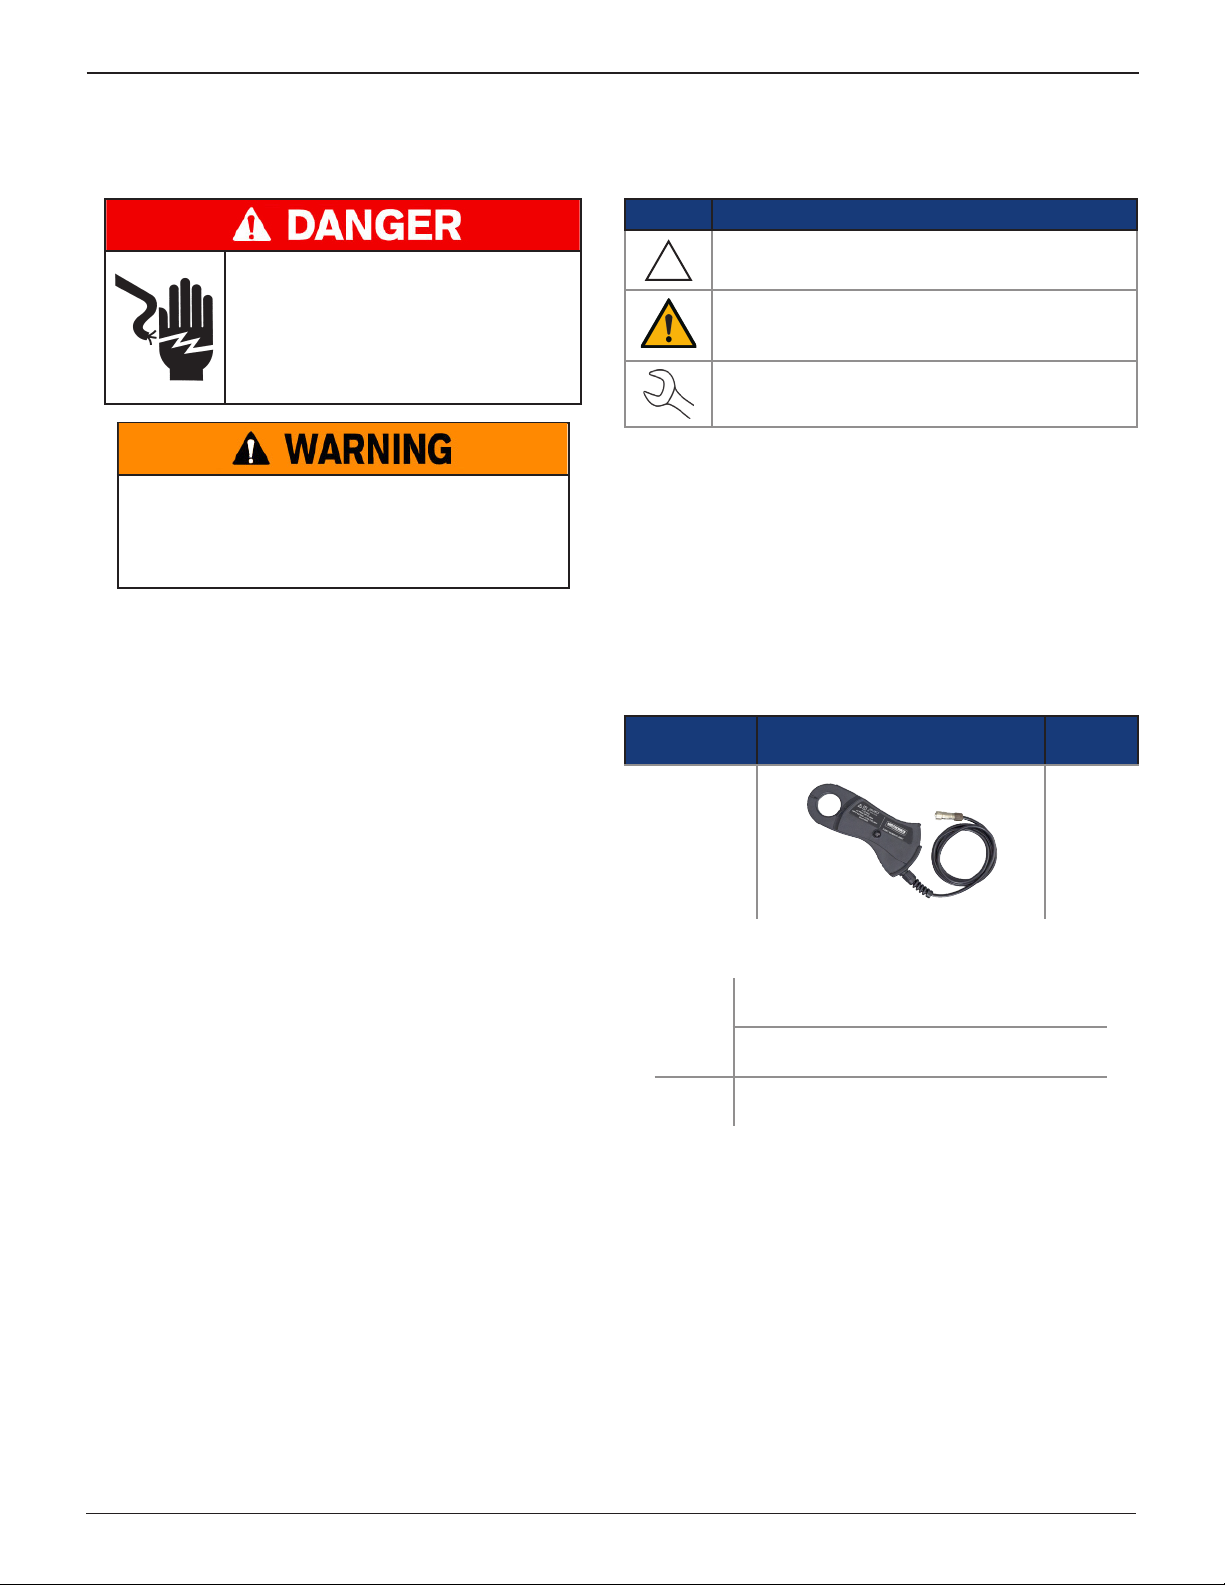
Personal Precautions
Risk of explosive gases.
Never smoke or allow a spark or
ame in the vicinity of a battery.
Batteries can produce a highly explosive mix
of hydrogen gas and oxygen, even when the
battery is not in operation. Always work in a
well-ventilated area.
Wash hands after handling.
REQUIRED BY CALIFORNIA PROP. 65:
terminals, and related accessories contain lead and lead
compounds, chemicals known to the state of California to
cause cancer and birth defects or other reproductive harm.
Inspect the battery for damage. Always use the necessary safety
precautions when working with batteries to prevent severe
injury or death. Follow all manufacturers’ instructions and
BCI (Battery Council International) safety recommendations,
which include the following precautions:
Battery acid is highly corrosive. If acid enters your eyes,
immediately ush them thoroughly with cold running
water for at least 15 minutes and seek medical attention.
If battery acid gets on your skin or clothing, wash immediately with a mixture of water and baking soda.
Always wear proper safety glasses or face shield when
working with or around batteries.
Keep hair, hands, and clothing as well as the analyzer
cords and cables away from moving engine parts.
Remove any jewelry or watches before you start servicing
the battery.
Use caution when working with metallic tools to prevent
sparks or short circuits.
Never lean over a battery when testing, charging, or jump
starting.
Battery posts,
Symbols Conventions
Symbol Description
The safety symbol indicates instructions for
avoiding hazardous conditions and personal injury.
!
The safety symbol with the words CAUTION,
WARNING, or DANGER indicates instructions for
avoiding hazardous conditions and personal injury.
The wrench symbol indicates procedural notes and
helpful information.
Description
The analyzer uses function-specific applications accessed
through a series of menus and icons to guide users through the
battery testing process for consistent testing implementation
and accuracy. These are accessed using the Controller’s touch
screen display. Test results can be displayed on the full-color
screen, printed, or wirelessly emailed.
Accessories
Description Diagram
Amp Clamp A657
Accessory Ording Information
Toyota: https://toyota.service-solutions.com
Online
Lexus: https://lexus.service-solutions.com
Phone Call Us - 1-800-933-8335
Part
Number
www.midtronics.com
5
Midtronics Inc. 7000 Monroe Street Willowbrook, IL 60527
Page 6
Chapter 1: Introduction DSS-5000 Toyota Lexus
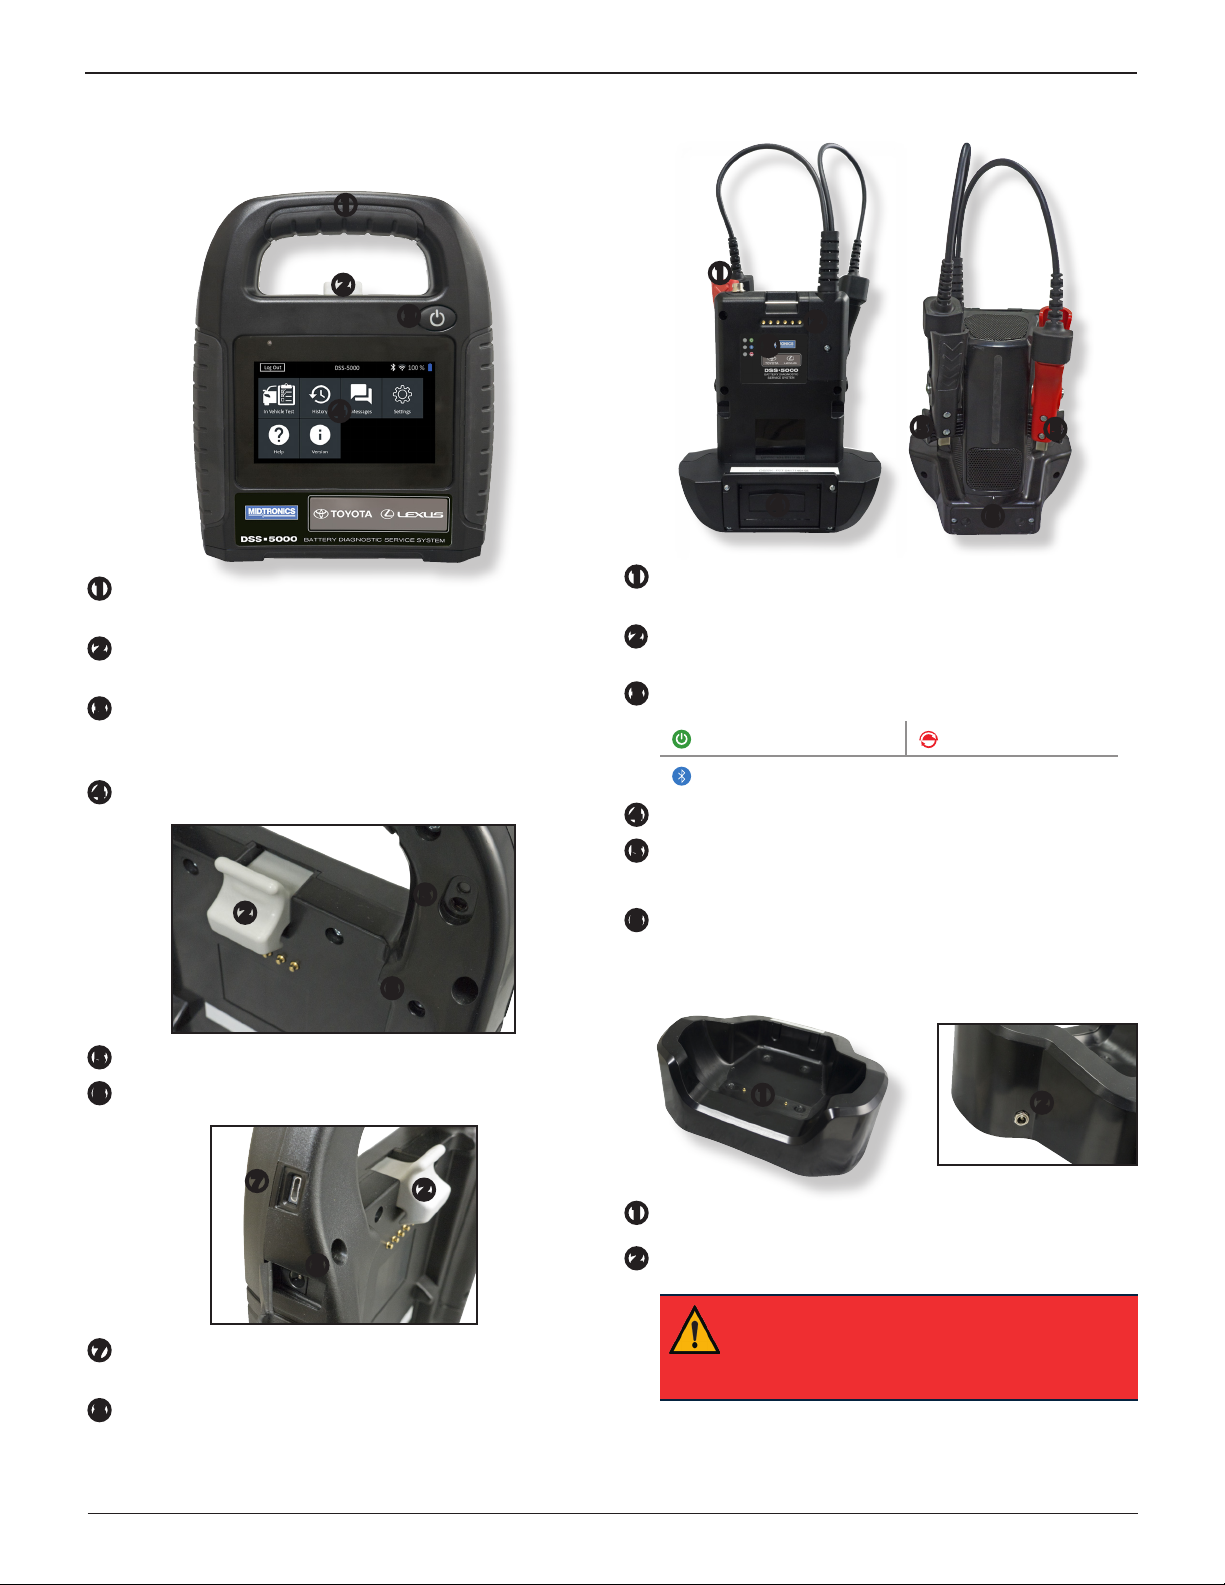
Tester Components
Controller
Carrying Handle: For carrying the Controller and Tester
Pod (when attached).
Controller Release Lever: Press to release the Controller
from the Tester Pod.
Power Button: Hold for 2 seconds to
on and o independent of the Tester Pod. Flashes when
the Controller is being charged.
Touch Screen: Primary user interface.
turn the Controller
Tester Pod
Accessory Connector: For connecting an optional acces-
sory (ex. Amp Clamp / DMM Cable) to the Tester Pod.
Controller Charging Contacts: For charging and communi-
cating
with the Controller when mounted to the Tester Pod.
Status Indicator LEDs:
- Power is on - Clamps reversed
- Tester Pod is communicating with the Controller
Integrated Printer: For printing and sharing test results.
Camera & Flashlight: For VIN scanning and identication.
Temperature Sensor: For measuring battery temperature.
Micro-USB Port: For updating and servicing the Control-
ler when a WiFi network is not available.
Power Supply Connection
Clamp Storage Mounts: Use to keep the test clamps
protected when the tester is not in use.
Tester Pod Internal Batteries
Charging Dock
Tester Pod Charging Contacts: For charging the Tester Pod
Power Supply Connection
IMPORTANT: Always place the DSS-5000 in the
plugged-in charging dock when not in use to
allow the tool to automatically check for and
perform any available software updates.
Midtronics Inc. 7000 Monroe Street Willowbrook, IL 60527
6
www.midtronics.com
Page 7
Chapter 1: IntroductionDSS-5000 Toyota Lexus
Test Preparation
Inspecting the Battery
Before starting the test, visually inspect the battery for:
• Cracked, buckled, or leaking case. If you see any of these
defects, replace the battery.
• Corroded, loose, or damaged cables and connections. Re-
pair or replace them as needed.
• Corrosion on the battery terminals, and dirt or acid on the
case top. Clean the case and terminals using a wire brush
and a mixture of water and baking soda.
• Corroded or loose battery tray and hold-down xture.
Tighten or replace as needed.
Testing Out-of-Vehicle
The preferred battery test location is in the vehicle. However, if
you plan to test out of the vehicle:
• Always disconnect the negative cable from the battery
rst and reconnect it last.
• Always use a carry tool or strap to lift and transport the
battery.
A poor connection will prevent testing, and the tester will
display the message CHECK CONNECTION. If the message
reappears after you have correctly reconnected the clamps,
clean the terminals and reconnect.
Connecting An Accessory Cable
Optional accessories such as an Amp Clamp plug into the
connector on the top of the Tester Pod. To lock the connector,
rotate it to the left. Turn it to the right to unlock.
Setting User Preferences
Before starting your test you may want to customize the use
of your analyzer by setting preferences in the Settings ( )
Menu. The Settings Menu is described in Chapter 6.
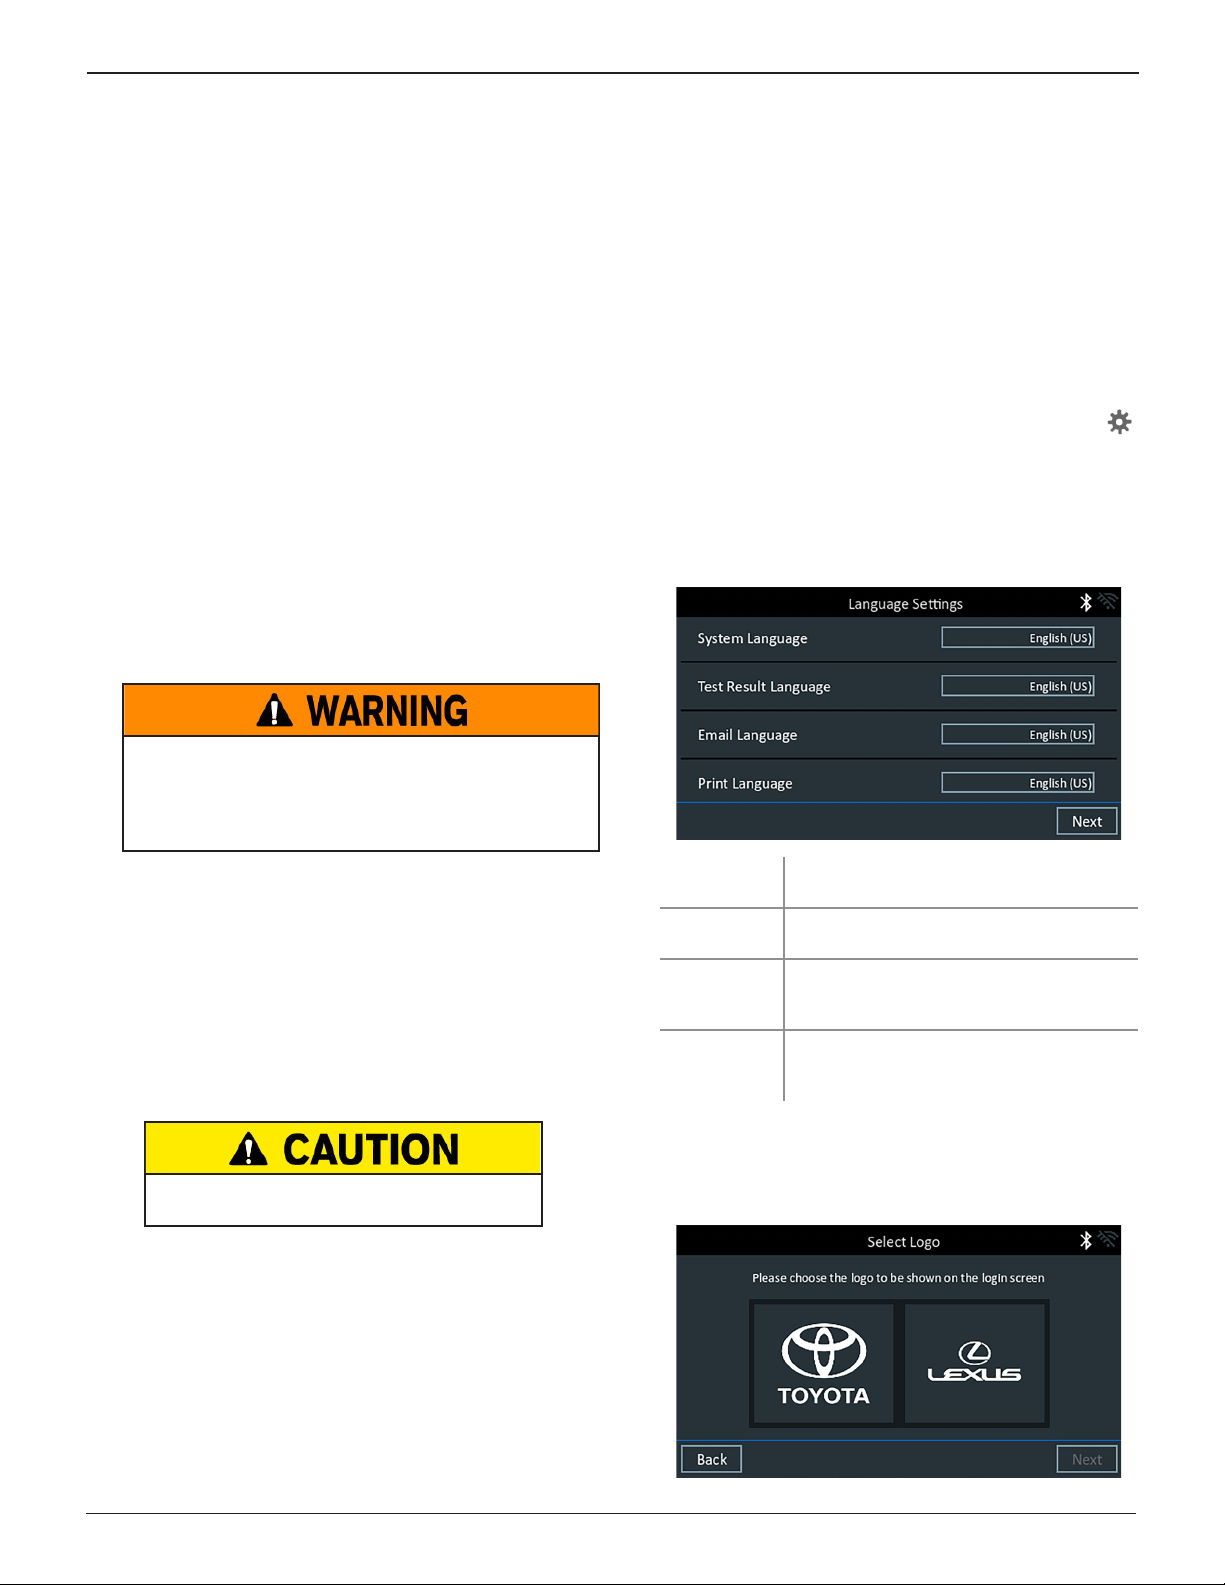
Initial Power Up
1. Upon initial power-up, the Language Settings screen is
displayed. Tap Next to continue.
Failure to properly install lead terminal adapters,
or using adapters that are dirty or worn, may
cause false test results.
When testing side-post or Group 31 batteries, always use lead
terminal adapters – do not test at the battery’s steel bolts.
Testing In-Vehicle
The preferred test position is at the battery posts. If you must
test at a remote-post location, it should have both a positive
and negative post. Otherwise, you must remove the battery
and perform an out-of-vehicle test.
At the start of the test, make sure all vehicle accessory loads
are o, the key is not in the ignition, and the doors are closed.
Connecting To A Battery
Do not connect the tester to a voltage source
greater than 30 Vdc.
Connect the clamps to the tester: the red clamp to the positive
(+) terminal and the black clamp to the negative (–) terminal.
If you connect the clamps in the wrong polarity (positive to
negative or negative to positive), the tester displays CLAMPS
REVERSED! Reconnect the clamps.
System
Language
Test Result
Language
Email
Language
Print
Language
Select the Controller default language
displayed on the screen.
Select the Controller default language for
all displayed tests and test results.
Select the default standard language for
the analyzer to use for all tests and results
sent via email.
Select the default standard language for
the analyzer to use for all tests and results
printed using a networked printer.
2. A Consent to collect data screen is displayed (details on
page 4). Read the terms for collecting data, tap the Consent check box and then tap Next to continue.
3. Select the correct logo for the dealer location.
www.midtronics.com
7
Midtronics Inc. 7000 Monroe Street Willowbrook, IL 60527
Page 8
Chapter 1: Introduction DSS-5000 Toyota Lexus
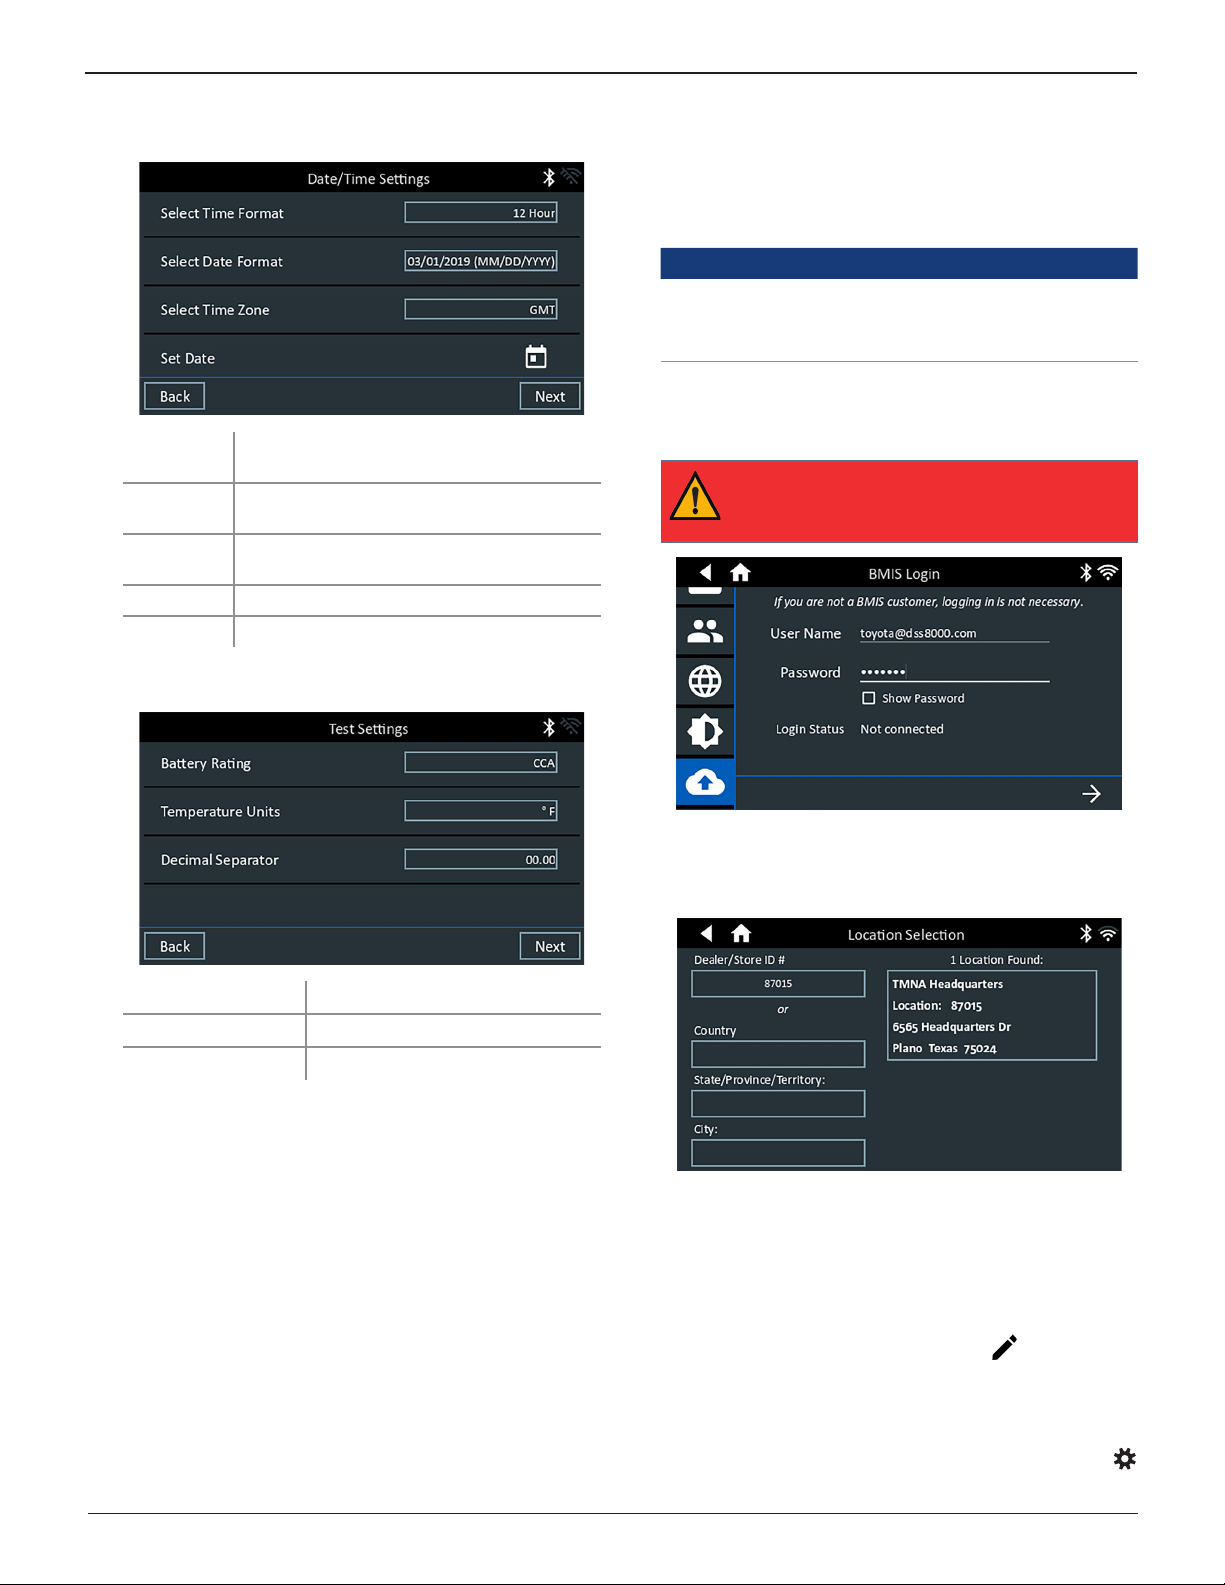
4. The Date/Time Settings are displayed. Tap Next to continue after making any adjustments.
Select Time
Format:
Select Date
Format:
Select Time
Zone:
Set Date: Set the current date
Set Time:
12-hour or 24-hour format
DD/MM/YYYY, MM/DD/YYYY, or
YYYY/MM/DD
Time zone offset from Greenwich Mean Time
Set the current time in the selected time zone
5. The Test Settings are displayed. Tap Next to continue after
making any adjustments.
7. Select the country in which the tool will be used (U.S. or
Canada).
8. The BMIS (Battery Management Information System) Account screen is displayed. If the username and password are
not displayed, enter the correct username and password.
Country Username Password
Toyota U.S. [email protected] Toyota1!
Toyota
Canada
Toyota U.S.
Toyota
Canada
[email protected] Toyota1!
[email protected] LexusMdx1!
[email protected] LexusMdx1!
IMPORTANT: If no WiFi connnection has been
made, follow the procedure described in the
WiFi section of Chapter 6: Settings.
Battery Rating
Default: CCA (Cold Cranking Amps)
Temperature Units Select Fahrenheit or Celsius
Decimal Separator Select decimal point or comma
6. A list of detected Congured WiFi networks is displayed.
To select a network: For initial setup, no networks will be
displayed here yet.
To add a network: Tap the plus (+) sign, then select from
one of the displayed detected networks.
To manually add a network, tap the plus (+) sign again.
Follow the on-screen instructions to select the Network
SSID, Security, and IP Settings. Tap Next when nished.
Use the onscreen keypad to manually enter the Network
SSID, security type, and IP settings. If necessary, enter the
WiFi network password. Tap Next when nished.
A conrmation screen is displayed when the analyzer has
successfully connected to the WiFi network.
To delete a network: Tap a displayed network to select it.
Tap trash can icon (3) to delete it.
9. Press to download the list of BMIS locations.
10. Enter the Dealer ID or dealership name to search for the
correct dealership and tap on the displayed location.
11. Tap on the displayed location to connect the analyzer to an
existing BMIS account.
12. The email Address Book screen is displayed.
To add an email address: Tap the plus (+) sign, then use
the displayed keyboard to add the address.
To edit an email address: Tap the pencil icon, then use
the displayed keyboard to edit the address.
To delete an email address: Tap a displayed email address
to select it. Tap trash can icon (3) to delete it.
To use the Default Email Server Settings: Tap the gear
icon to use the default.
Midtronics Inc. 7000 Monroe Street Willowbrook, IL 60527
8
www.midtronics.com
Page 9
Chapter 1: IntroductionDSS-5000 Toyota Lexus
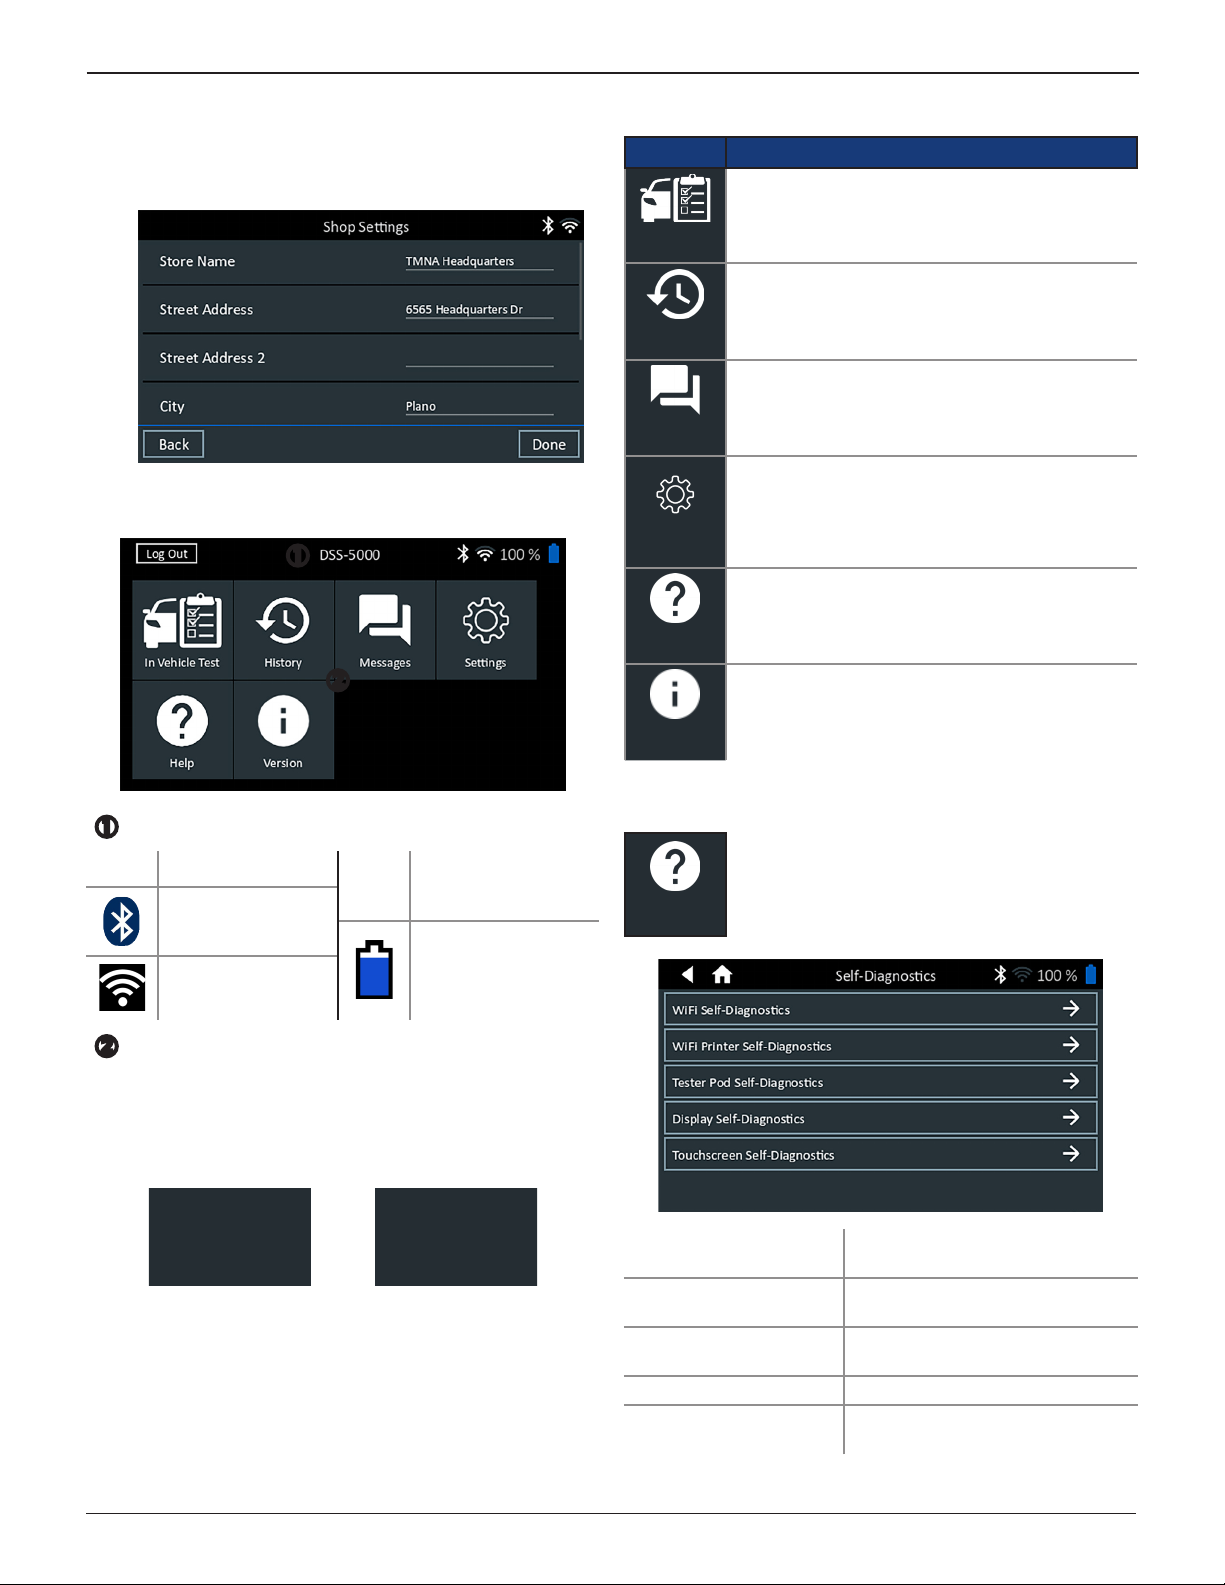
13. The Shop Information screen is displayed. Use the onscreen keypad to enter the store name, address, and
phone number. Tap Next to continue. The Main Menu
screen is displayed.
Main Menu
Main Menu Icons
Icon Description
Perform Battery Tests on in-vehicle batteries using
test parameters determined by the vehicle VIN or
In Vehicle Test
History
Messages
Sengs
Help
year, make, and model. A System Test (with the
option to use an Amp Clamp) is also available.
Access archived test histories or search test
history or by VIN.
Displays alerts and notications for upcoming
tests and activities including scheduled tests,
tool software updates and maintenance
opportunities.
Setup/adjust: WiFi, printer setup,
user information, default language, display
and sound settings, BMIS information, shop
information, and connected devices. Also access
to tester software version information.
Access the analyzer Self-Test and a digitized
version of the Instruction Manual that was shipped
with the analyzer.
Access to tester software version information.
email settings,
Menu Bar
Log Out
Log out current user
Bluetooth
connectivity status
WiFi signal strength
93%
Controller internal
battery level
Controller internal
battery status
Main Menu Selection Area
Additional Screens
Swipe left, right, up or down across the Controller screen to
view all of the results.
Screen 1
Screen 2
Screen 3
Swipe Horizontally Swipe Vertically
Screen 1
Screen 2
Version
Support
Use the Support function to access built-in SelfTesting functions or to view a digitized version of
Help
WiFi Self-Diagnostics
WiFi Printer
Self-Diagnostics
Tester Pod
Self-Diagnostics
Display Self-Diagnostics Tests Controller pixel display
Touchscreen
Self-Diagnostics
the Instruction Manual.
Tests connectivity to the BMIS
server via the selected WiFi network
Use to congure a WiFi printer
Check connectivity between the
Controller and the Tester Pod
Tests Controller touchscreen
responsiveness
www.midtronics.com
9
Midtronics Inc. 7000 Monroe Street Willowbrook, IL 60527
Page 10
Chapter 2: In Vehicle Test DSS-5000 Toyota Lexus
Chapter 2: In Vehicle Test
Use In Vehicle Test to perform Battery Tests on
in-vehicle batteries based on test parameters
In Vehicle Test
entered by the user. A System Test (with the
option to use an Amp Clamp) is also available.
At any time during the test tap to return to the previous
screen or to return to the Main Menu.
IMPORTANT: Always place the DSS-5000 in the
plugged-in charging dock when not in use to allow
the tool to automatically check for and perform any
available software updates.
Battery Test
1. Connect the Tester Pod test clamps to the battery and remove the Controller.
2. On the Controller at the Main Menu tap In Vehicle Test.
The Connect Clamps screen is displayed.
3. Tap Next to begin the test. If the Tester Pod clamps have
already been connected to the battery terminals, the
60-second test begins automatically, applying a small load
to the battery and measuring the reserve capacity.
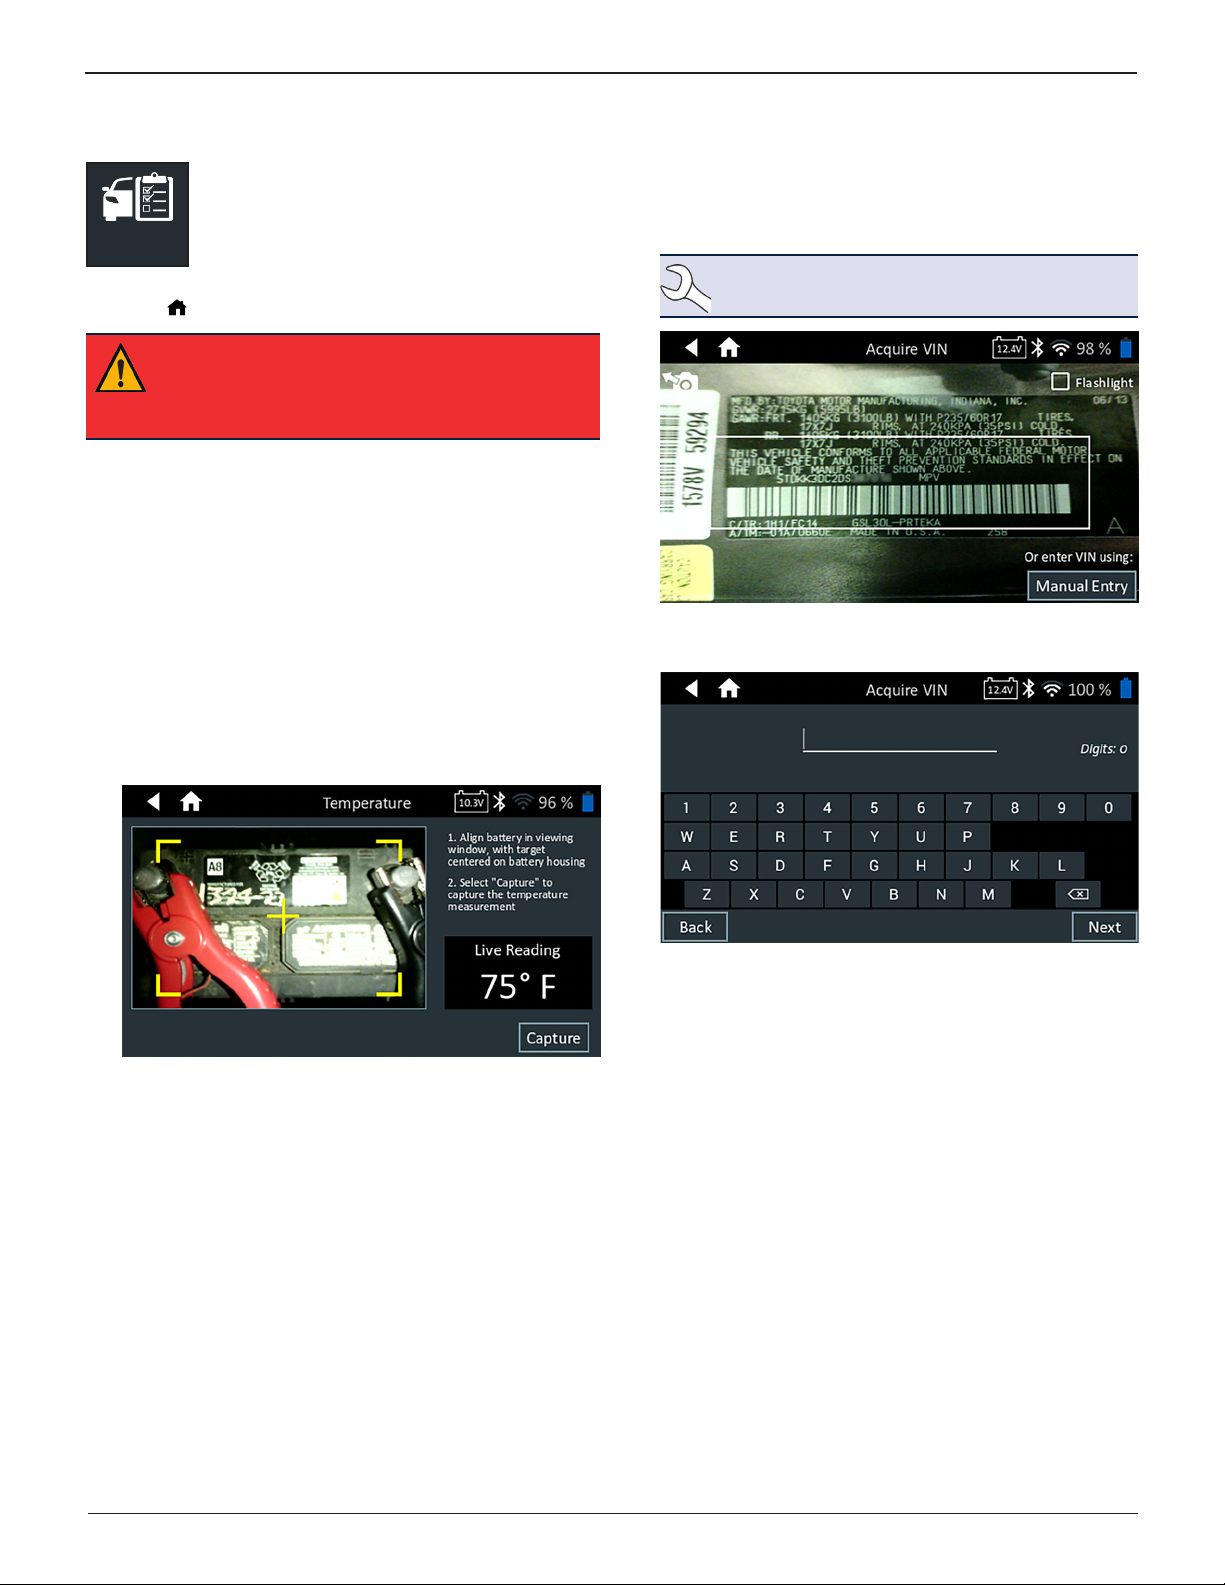
4. Following the testing process, the Temperature screen is
displayed.
6. The Acquire VIN screen is displayed.
Use the built-in camera to scan the VIN bar code, usually
located on the driver’s side door frame.
NOTE: Refer to the Appendix for recommended
scanning procedures and VIN scanning help.
Manual Entry: Use the on-screen keypad to manually type
the 17-digit VIN and tap Next.
5. Align the temperature sensor on the Controller over the
battery and tap Capture. The test begins when the temperature is successfully captured.
Midtronics Inc. 7000 Monroe Street Willowbrook, IL 60527
The displayed Digits counter will count up the
alphanumeric characters as they are being entered on
the keypad.
Use Manual Entry if the battery being tested is not listed.
Tap > to continue to the Edit Battery Information screen.
10
www.midtronics.com
Page 11
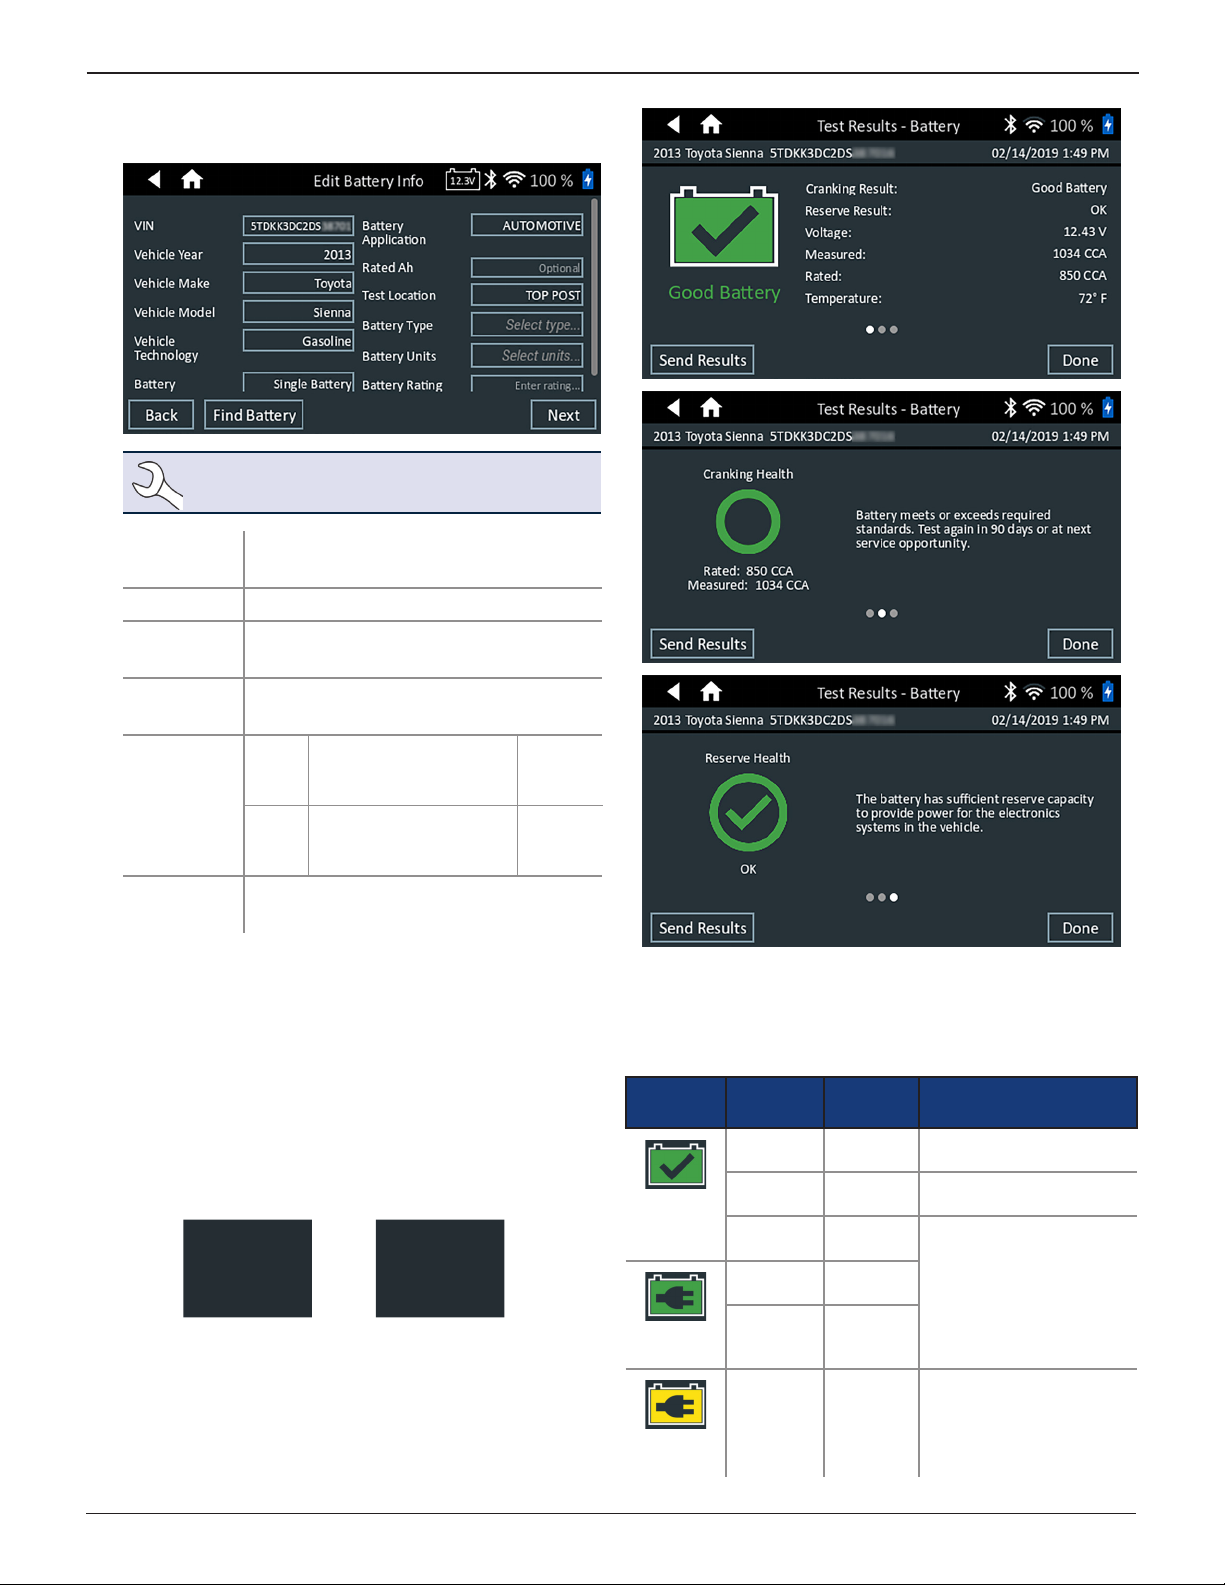
7. At the Edit Battery Info screen, tap on the corresponding
box to edit the parameter information.
NOTE: Battery Type, Units, and Rating must be
lled in before proceding.
Chapter 2: In Vehicle TestDSS-5000 Toyota Lexus
Battery
Application
Battery Post
Test
Location
Battery
Type
Battery
Rating
Units
Automotive
Top Post
Top Post, Remote Post
Flooded, AGM (Absorbed Glass Mat),
AGM Spiral, Gel, EFB
CCA
Cold Cranking Amps:
Battery current at 0 ºF
100 to
3000
(–17.8 ºC).
JIS
Japanese Industrial
Standard: Usually
26A17 to
245H52
printed on battery label.
Battery
Rating
Enter the Battery Rating Units value.
8. Tap Next to begin the Battery Test.
Battery Test Results
The test results are displayed on the Controller screen.
Additional Screens
The dots at the bottom or side of a menu or results screen
indicate additional screens are available. Swipe horizontally
or vertically across the Controller screen to view additional
results screens.
Screen 1
Screen 2
Screen 3
Swipe
Horizontally
Screen 1
Screen 2
Swipe
Vertically
Test Results - Battery Test
To print or send the test results to a congured printer tap
Send Results. To return to the Home Screen, tap Done
or
System Test to continue with the System Test.
Decision
Good
Battery
Good
Recharge
Charge &
Retest
Cranking
Good
Battery
Good
Battery
Good
Recharge
Charge &
Retest
Good
Recharge
Charge &
Retest
Health
Reserve
Capacity
Good
Battery
Unknown
Reserve
Good
Battery
Good
Battery
Unknown
Reserve
Unknown
Reserve
Description
Battery meets or exceeds
required standards.
Battery meets or exceeds
required standards.
Battery is good, but low
on charge. Fully charge
the battery for optimal
performance and life. Check
for causes of low charge.
Battery requires charge to
determine condition.
www.midtronics.com
11
Midtronics Inc. 7000 Monroe Street Willowbrook, IL 60527
Page 12
Chapter 2: In Vehicle Test DSS-5000 Toyota Lexus
Decision
Replace
Battery
Badcell
Short
Replace
Cranking
Badcell
Replace
Short
Charge &
Retest
Good
Battery
Good
Recharge
Replace
Battery
Replace
Battery
Replace
Battery
Badcell
Replace
Short
Badcell
Replace
Short
Health
Reserve
Capacity
Replace
Battery
Replace
Battery
Replace
Battery
Replace
Battery
Good
Battery
Replace
Battery
Unknown
Reserve
Good
Battery
Unknown
Reserve
Description
Battery fails to meet industry
accepted standards.
Battery is low in charge and
shows low reserve capacity.
Low reserve capacity will
compromise the battery’s
ability to provide system
current and hold a charge.
Battery is good for cranking
purpose but shows low
reserve capacity. Low
reserve capacity will
compromise the battery’s
ability to provide system
current and hold a charge.
Battery fails to meet industry
accepted standards
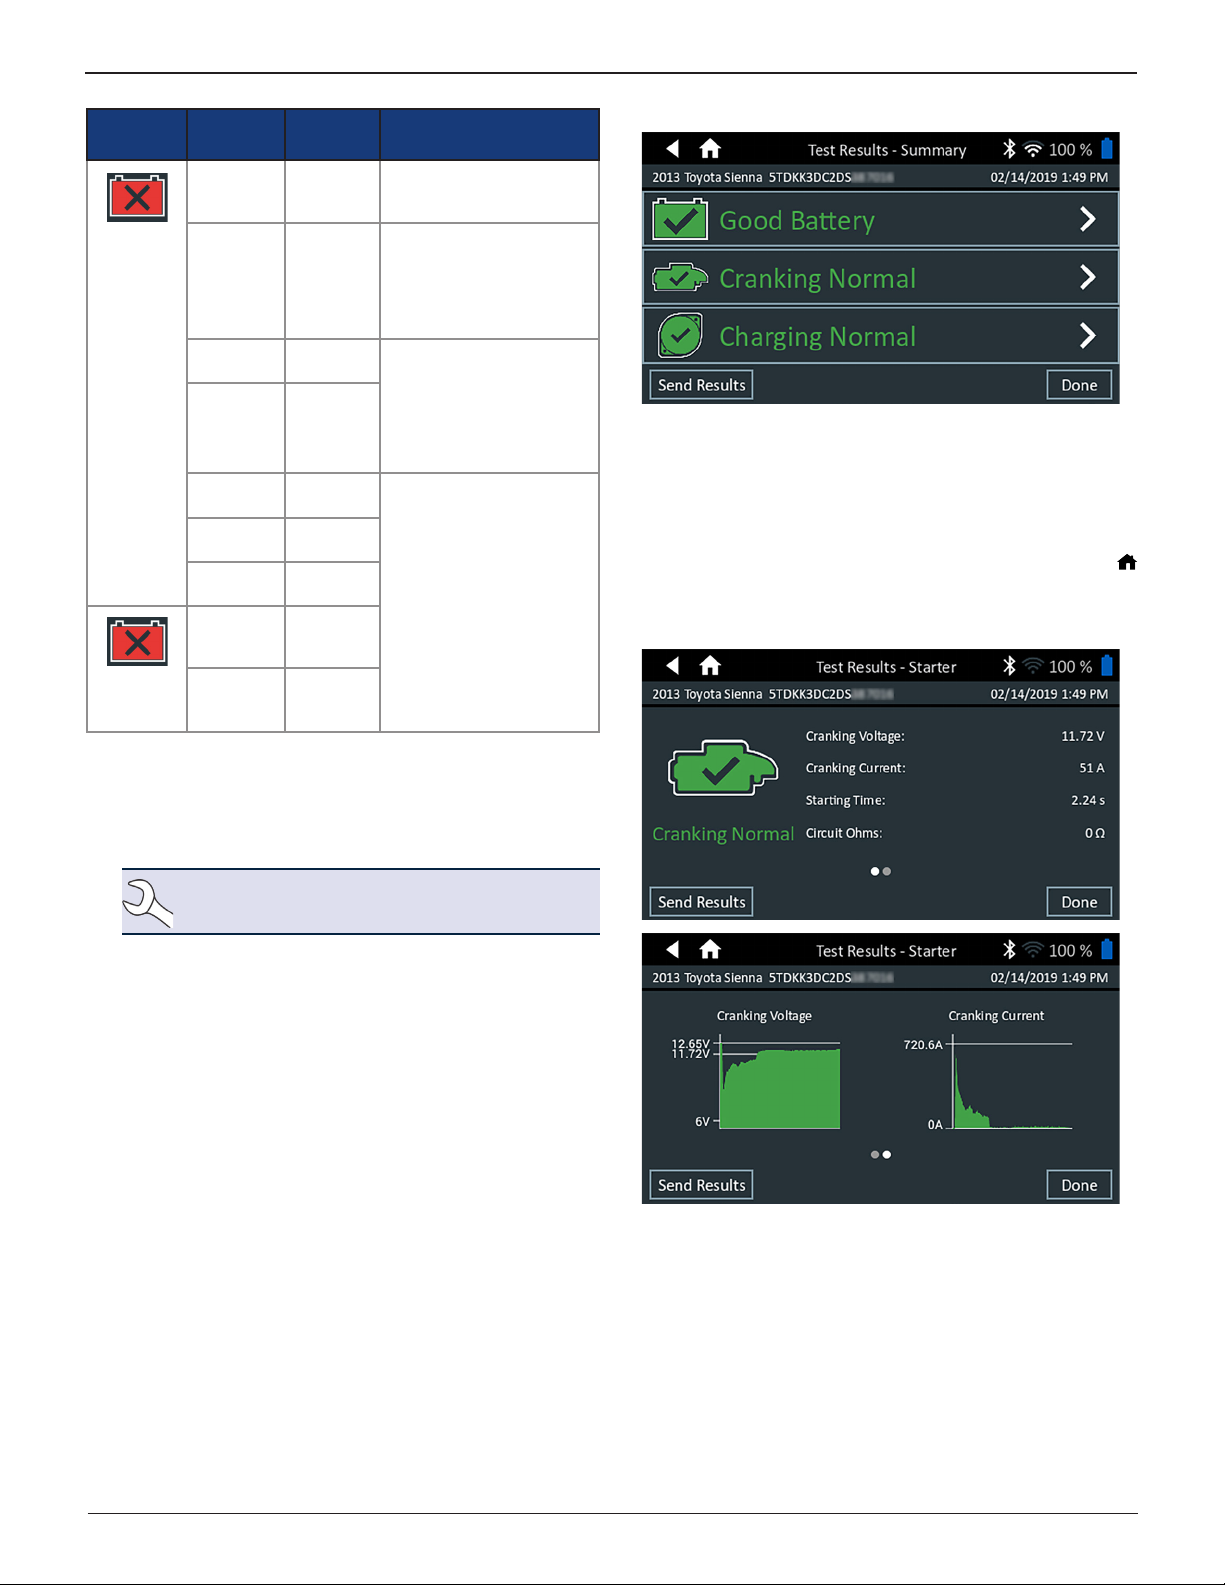
Test Results-Summary
Test Results - Summary
A Test Results - Summary screen is displayed following a
System Test. Tap > to view detailed test results for each part
of the test.
To send the test results to a congured printer or via email tap
Send Results. To return to the Home Screen, tap Done or
to return to the Main Menu.
Starter Test Results
System Test
1. If using the optional Amp Clamp, connect it to the Tester
Pod and hold the clamp away from any cables with the
jaws closed.
NOTE: If no Amp Clamp is being used, begin the
System Test at Step 4.
2. Tap Next to zero out the clamp or Skip if the Amp Clamp
is not being used.
3. With the engine and electrical loads o, place the Amp Clamp
around the negative (–) battery cable and tap
4. When prompted, start the vehicle engine and select Next
5. Ensure all vehicle accessories, including headlights and
ventilation blower are o and select Next
The alternator output is tested at idle.
6. When prompted, rev and hold the engine to 2000-3000
RPM and select Next.
7. When prompted, return the engine to idle and select Next.
8. Turn on the high beam headlights and put the ventilation
blower fan on "High" and select Next.
The alternator output is tested at idle.
9. When prompted, rev and hold the engine to 2000-3000
RPM and select Next.
10. When prompted, return the engine to idle and select Next.
11. Turn all loads o and shut o the engine.
12. The test results are displayed on the Controller screen.
.
Next
.
.
Test Results - Starter Test
Midtronics Inc. 7000 Monroe Street Willowbrook, IL 60527
12
www.midtronics.com
Page 13
Chapter 2: In Vehicle TestDSS-5000 Toyota Lexus
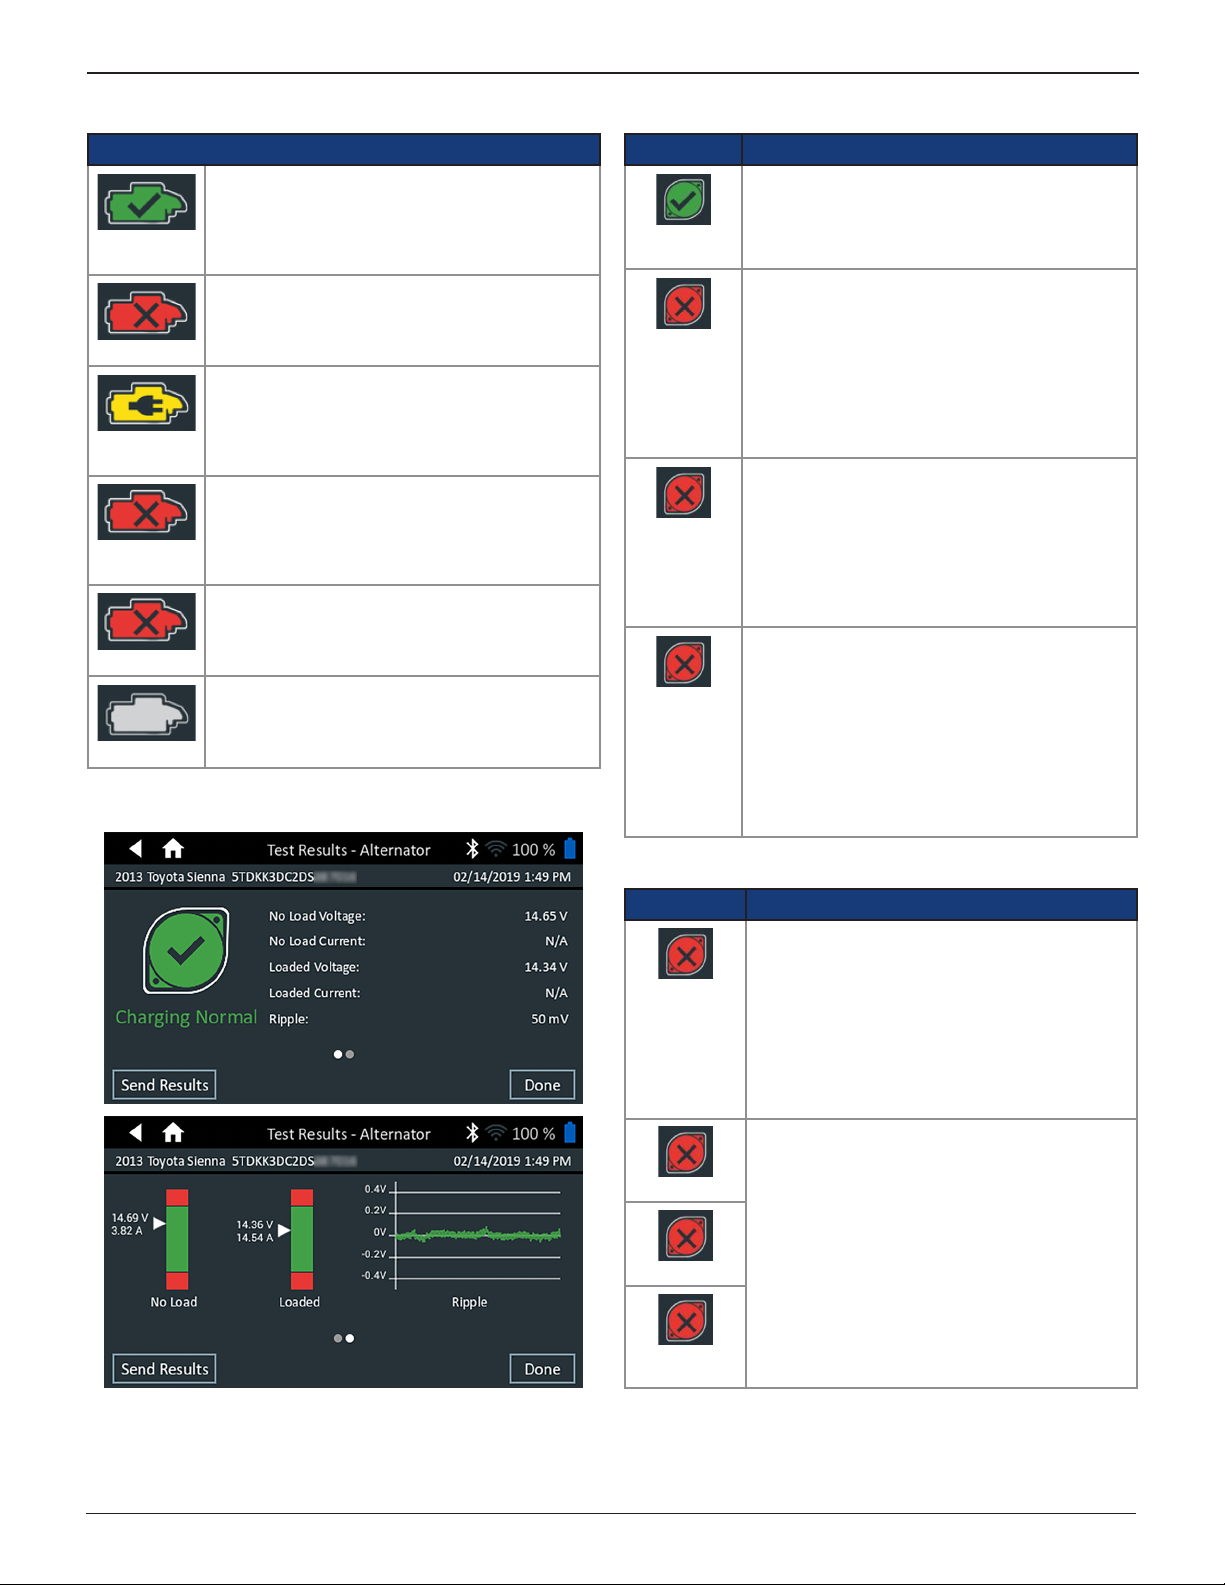
Test Results - Starter
Decision Action
The starter voltage is normal and the battery is
fully charged.
Cranking
Normal
The starter voltage is low and the battery is
fully charged.
Low Voltage
The starter voltage is low and the battery is
discharged. Fully charge the battery and repeat
the starter system test.
Charge
Battery
(If the battery test result was (REPLACE or
BAD CELL.) The battery must be replaced
before testing the starter.
Replace
Battery
The starter voltage is high but the cranking
amps are low.
Low Current
The engine didn’t start and the test was
aborted or the vehicle’s starting prole was not
detected and the Starter Test was skipped.
No Start
Alternator Test Results
Test Results - Alternator
Decision Action
The output from the alternator is normal.
CHARGING
NORMAL
No output detected. Check belts to ensure
alternator is rotating when engine is running.
NO OUTPUT
√ Check all alternator connections including
to the battery. Clean or replace if
necessary and retest.
√ If the belts and connections are in good
working condition, replace alternator or
external voltage regulator.
Alternator not providing enough current to
power electrical loads and charge the battery.
LOW
OUTPUT
√ Check belts to ensure the alternator is
rotating with the engine running.
√ Check alternator connections to and from
the battery. If loose or heavily corroded,
clean or replace the cable and retest.
Alternator voltage to the battery exceeds
normal limits of a functioning regulator.
HIGH
OUTPUT
√ Check for loose and normal ground
connections. If no connection problems
are found, replace the regulator.
The normal high limit of a typical automotive
regulator is 14.5 volts +/–0.5. Refer to the
manufacturer specications for the correct limit,
which may vary by vehicle type.
Test Results - Alternator Test
Test Results - Diode
Decision Action
One or more diodes in the alternator are not
functioning or there is stator damage, which is
EXCESSIVE
RIPPLE
shown by an excessive amount of AC ripple
current supplied to the battery.
√ Make sure the alternator mounting is
sturdy and that the belts are in good
shape and functioning properly. If the
mounting and belts are good, replace the
alternator.
OPEN PHASE
Replace the alternator.
OPEN DIODE
SHORTED
DIODE
www.midtronics.com
13
Midtronics Inc. 7000 Monroe Street Willowbrook, IL 60527
Page 14
Chapter 3: History DSS-5000 Toyota Lexus
Chapter 3: History
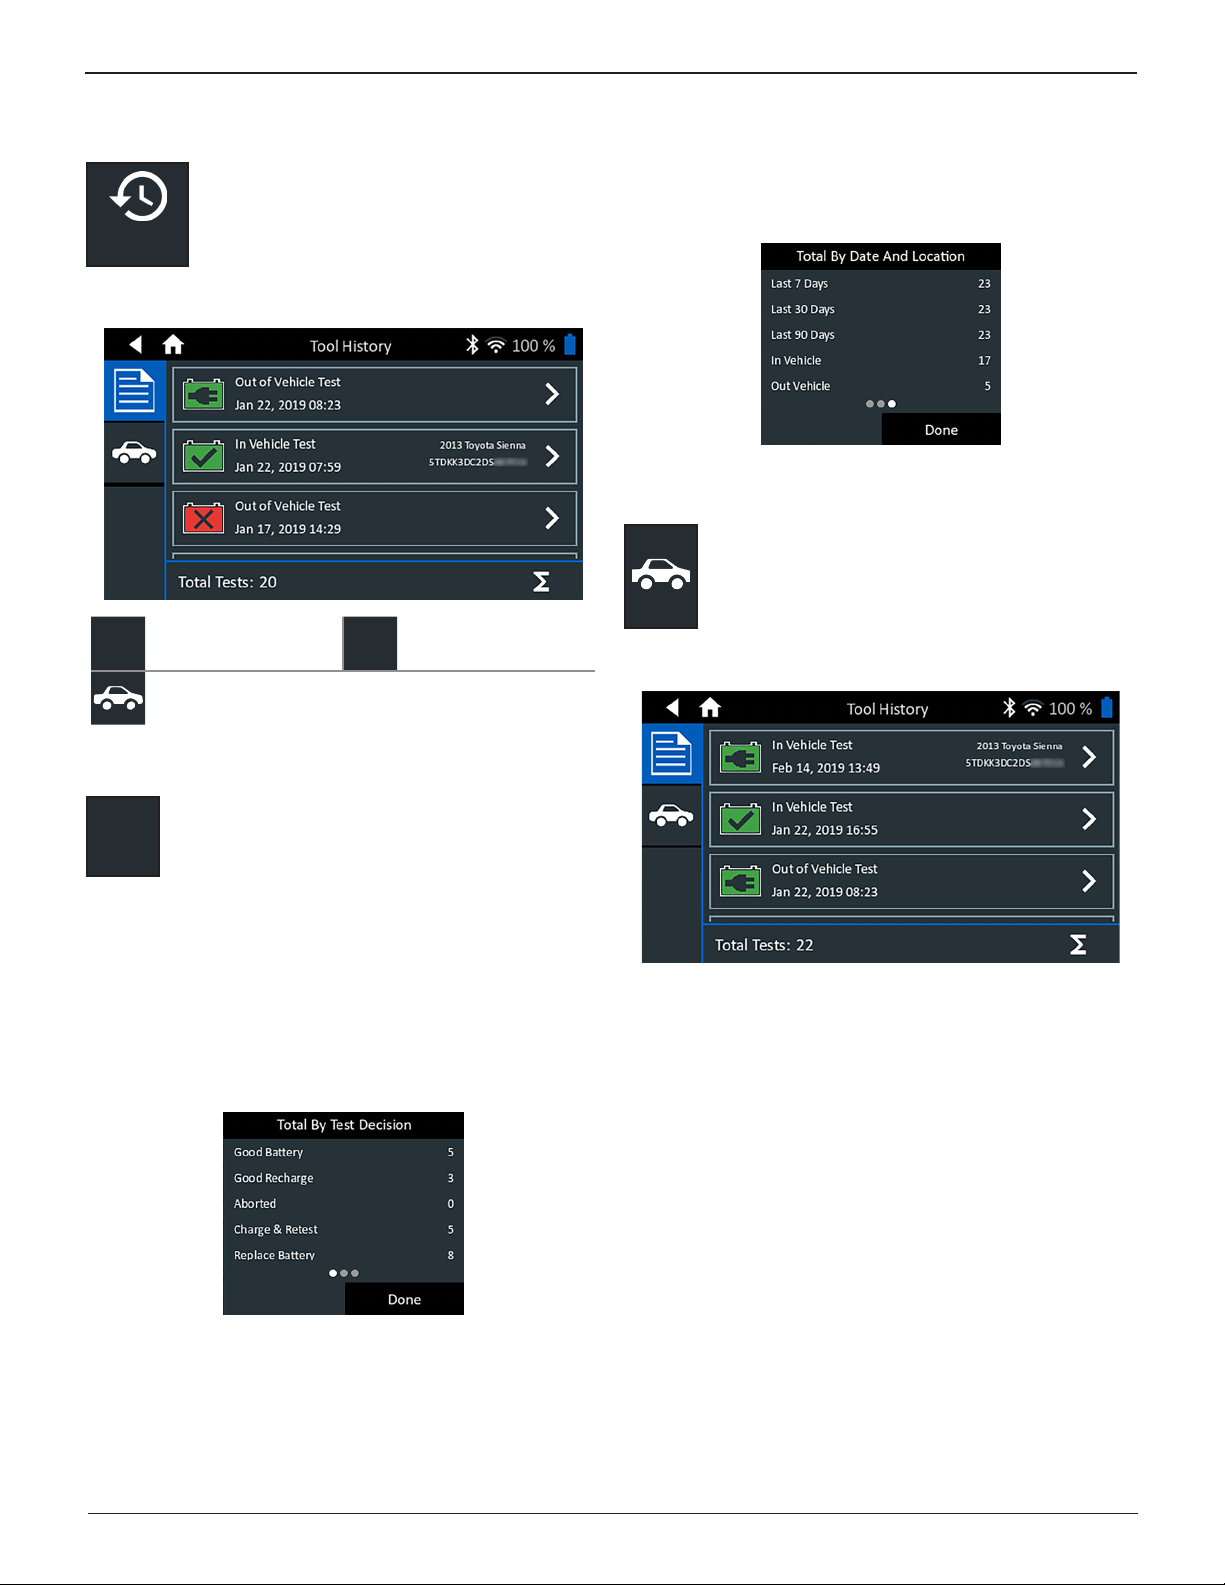
Use History to
vehicle history based on VIN. The search function
History
At the Main Menu, tap History. By default the Tool History
screen is displayed.
can also be used to nd test records for specic
vehicles.
Tool History
Vehicle History
access the tool usage history and a
Totals
Σ
Totals By Date And Location
Displays test totals by time interval. Also displays the number
of tests performed in and out of vehicle.
Vehicle History
Vehicle History displays test totals conducted on
specic vehicles based on VIN. It is also possible to
scan or manually enter a VIN to search for a specic
vehicle by tapping the displayed buttons.
Tap on the records displayed on the right side of the screen to
view the individual test results.
Tool History
Use Tool History to view test total history as well as
Tap > to view individual test details.
Tap Σ to view Total By Test Decision and Total By Date And
Location.
Tap Done to return to the Tool History screen.
Totals By Test Decision
The totals are displayed by possible results for all battery
chemistries and potential test results.
in vehicle test totals. Individual test results are also
displayed.
Midtronics Inc. 7000 Monroe Street Willowbrook, IL 60527
14
www.midtronics.com
Page 15
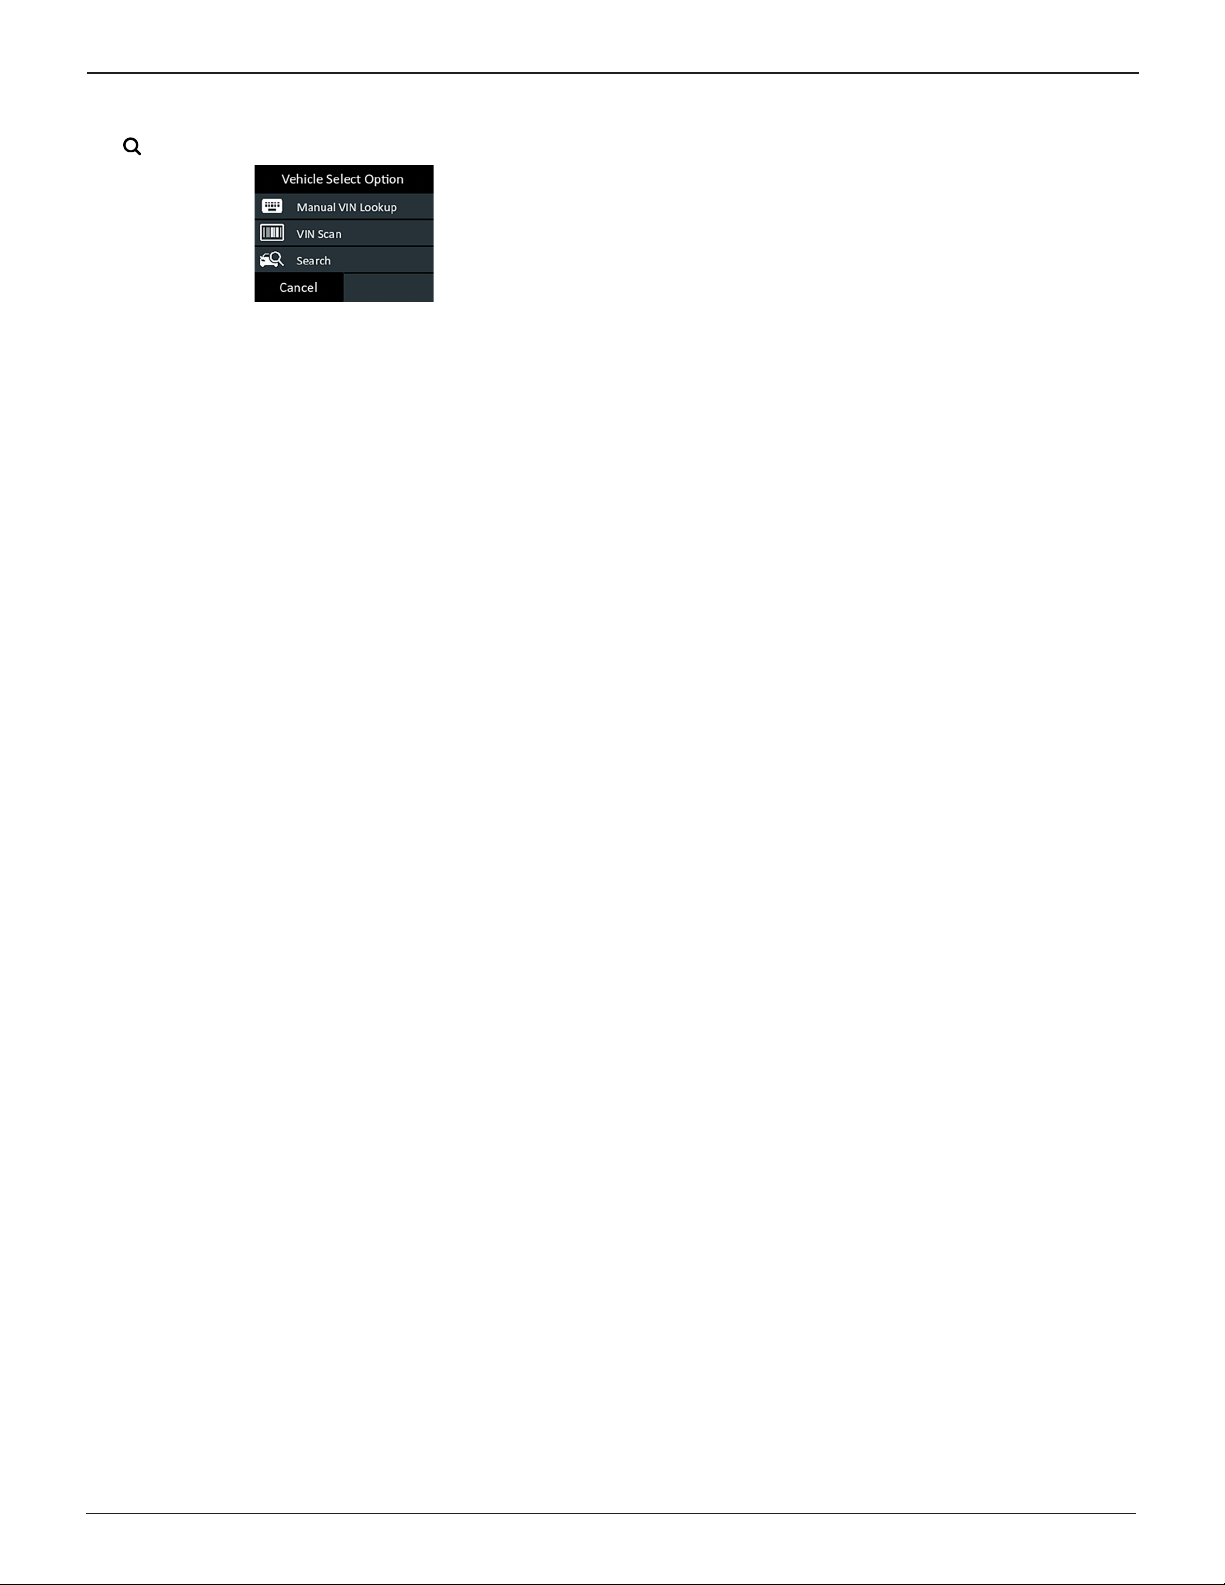
Vehicle Select Option
Tap to select vehicle search option.
Manual VIN Lookup: Use the on-screen keypad to manually
type the 17-digit VIN and tap Next.
VIN Scan: Use the camera built into the Controller to capture
a VIN barcode, usually located on the driver’s side door frame.
Search: Search records by Vehicle Year, Make, and Model.
Chapter 3: HistoryDSS-5000 Toyota Lexus
www.midtronics.com
15
Midtronics Inc. 7000 Monroe Street Willowbrook, IL 60527
Page 16
Chapter 4: Messages DSS-5000 Toyota Lexus
Chapter 4: Messages
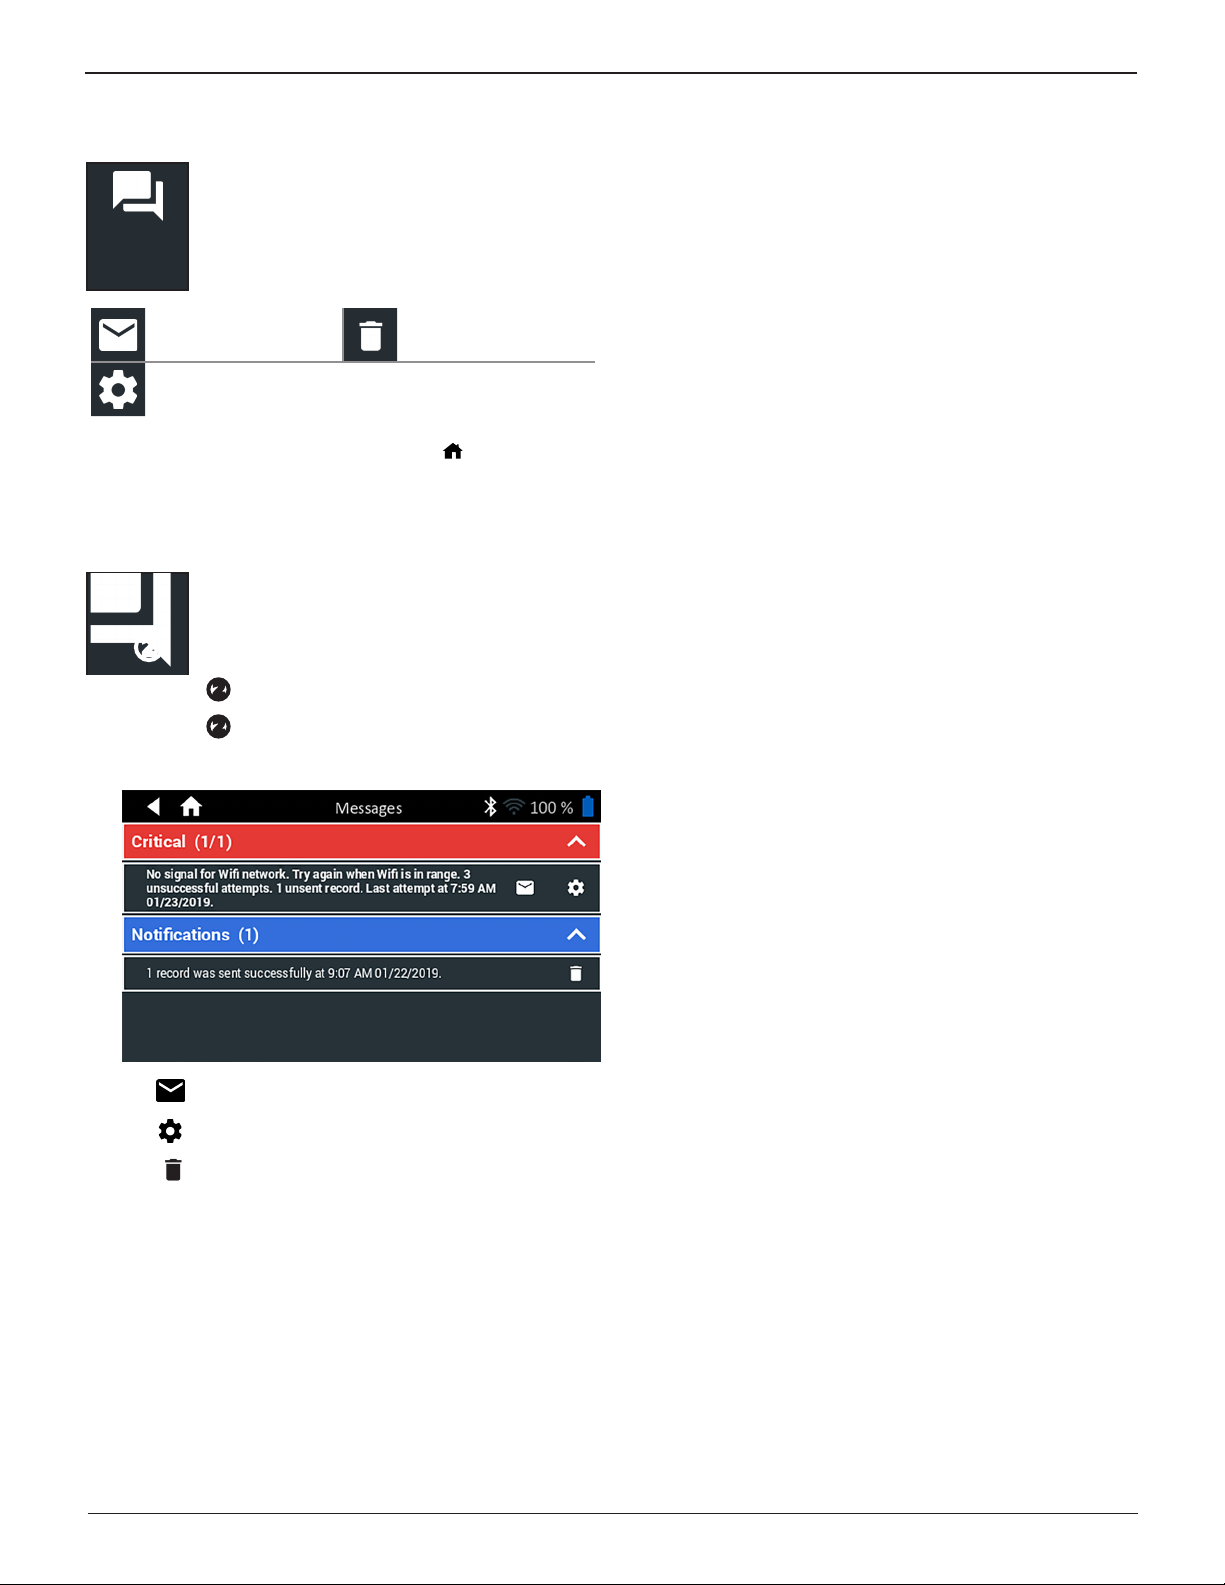
The Messages function displays alerts and
notications for upcoming tests and activities.
Messages
Tap to return to the previous screen or to return to the
Main Menu.
Accessing Messages
This includes scheduled testing as well as
tool software updates and maintenance
opportunities.
Mark Read Or Unread Delete Notication
Perform Message
Action
A number is displayed next to the Messages
icon when the analyzer has received any critical
messages. The number does not include noncritical Notications.
Unread Critical Messages
Read Critical Messages
1. Tap Messages on the Main Menu screen.
2. Tap to read a message.
Tap to perform the message action item.
Tap to delete a message.
3. Tap ∧ to collapse a list of messages or ∨ to expand the
list.
Message Types
Critical: An important action cannot be performed and may
require user action.
Notications: Indicates an action has been performed or data
has been sent.
Midtronics Inc. 7000 Monroe Street Willowbrook, IL 60527
16
www.midtronics.com
Page 17
Chapter 5: Settings
Chapter 5: SettingsDSS-5000 Toyota Lexus
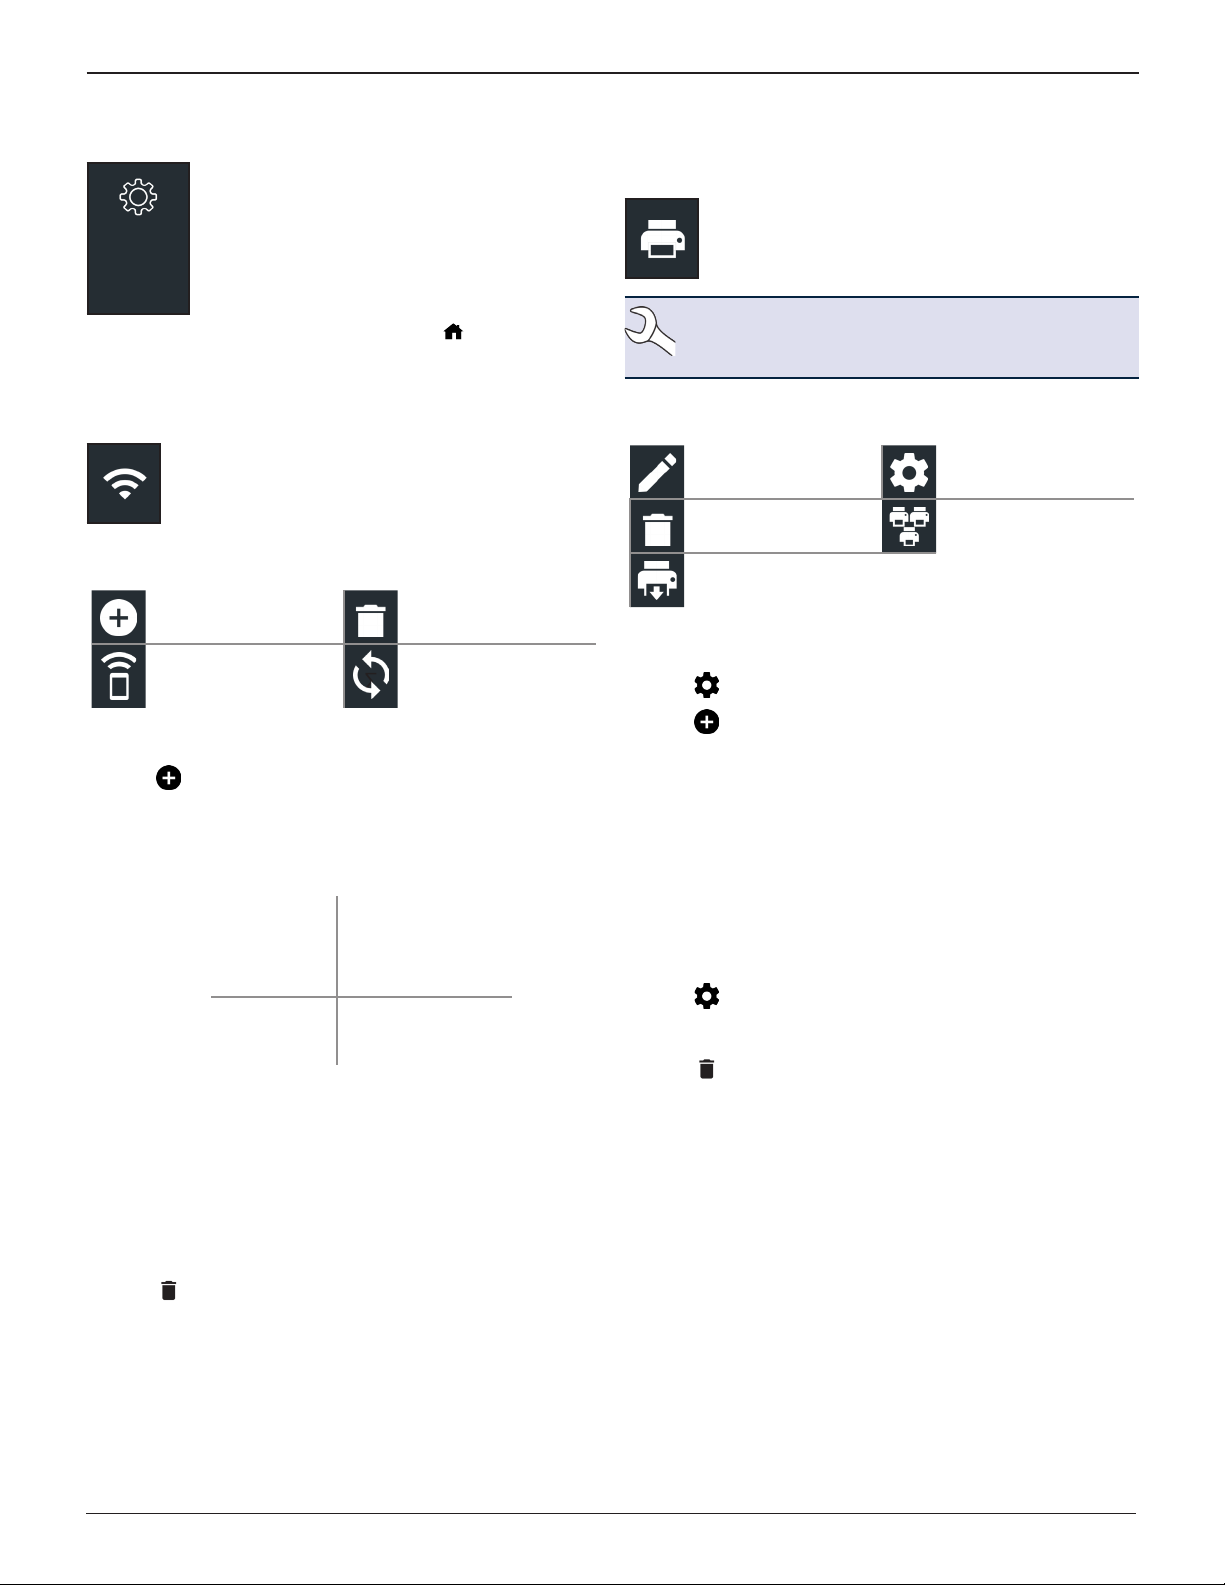
Use the Setup options to setup and adjust WiFi,
printer setup and selection, email settings, user
Sengs
information, default language, display settings,
sound settings, BMIS login information, shop
information, user management, connected
accessories, and device information.
Tap to return to the previous screen or to return to the
Main Menu.
WiFi
Use WiFi to view, add, and delete wireless networks.
Tap on the WiFi icon to display a list of detected and congured
WiFi networks.
Add Network
Connect Highlighted
Network
Adding A Network
1. Tap to add a WiFi network.
A list of detected wireless networks is displayed with
next to the selected network.
2. Tap > to access the network Security and IP Settings.
Delete Selected
Network
Refresh Network List
∑
Printer Settings
The Printer Setup function detects and displays a
list of connected and available WiFi and Bluetooth
printers.
NOTE: WiFi network communication must be suc-
cessfully established before a printer or printers can
be detected and setup.
Tap on the Printer icon to display a list of available printers on
the congured WiFi and Bluetooth networks.
Edit Printer Settings Printer Setup
Delete Selected
Network
Print Test Page
Adding A WiFi Printer
1. Tap to access the Printer Setup functions.
2. Tap to add a WiFi printer.
Make sure the printer is on and connected to the same
wireless network as the analyzer.
3. Tap to add the printer to the list of eligible printers.
4. Tap > to connect to the selected printer. A message is displayed when the conguration is successful.
Congured Printers
Security None
WEP
WPA/WPA2 PSK
IP Address DHCP
Static
3. Tap to congure the selected network.
4. Once the network has been successfully congured, tap
to return to the list of available congured networks. A
indicates the selected network.
Deleting A Network
1. Tap a displayed network.
2. Tap to delete the network and tap Yes to conrm.
5. Tap > to return to the printer list.
Deleting A Printer
1. Tap to access the Printer Setup functions.
2. Tap a displayed printer.
3. Tap to delete the printer and tap Yes to conrm.
www.midtronics.com
17
Midtronics Inc. 7000 Monroe Street Willowbrook, IL 60527
Page 18
Chapter 5: Settings DSS-5000 Toyota Lexus
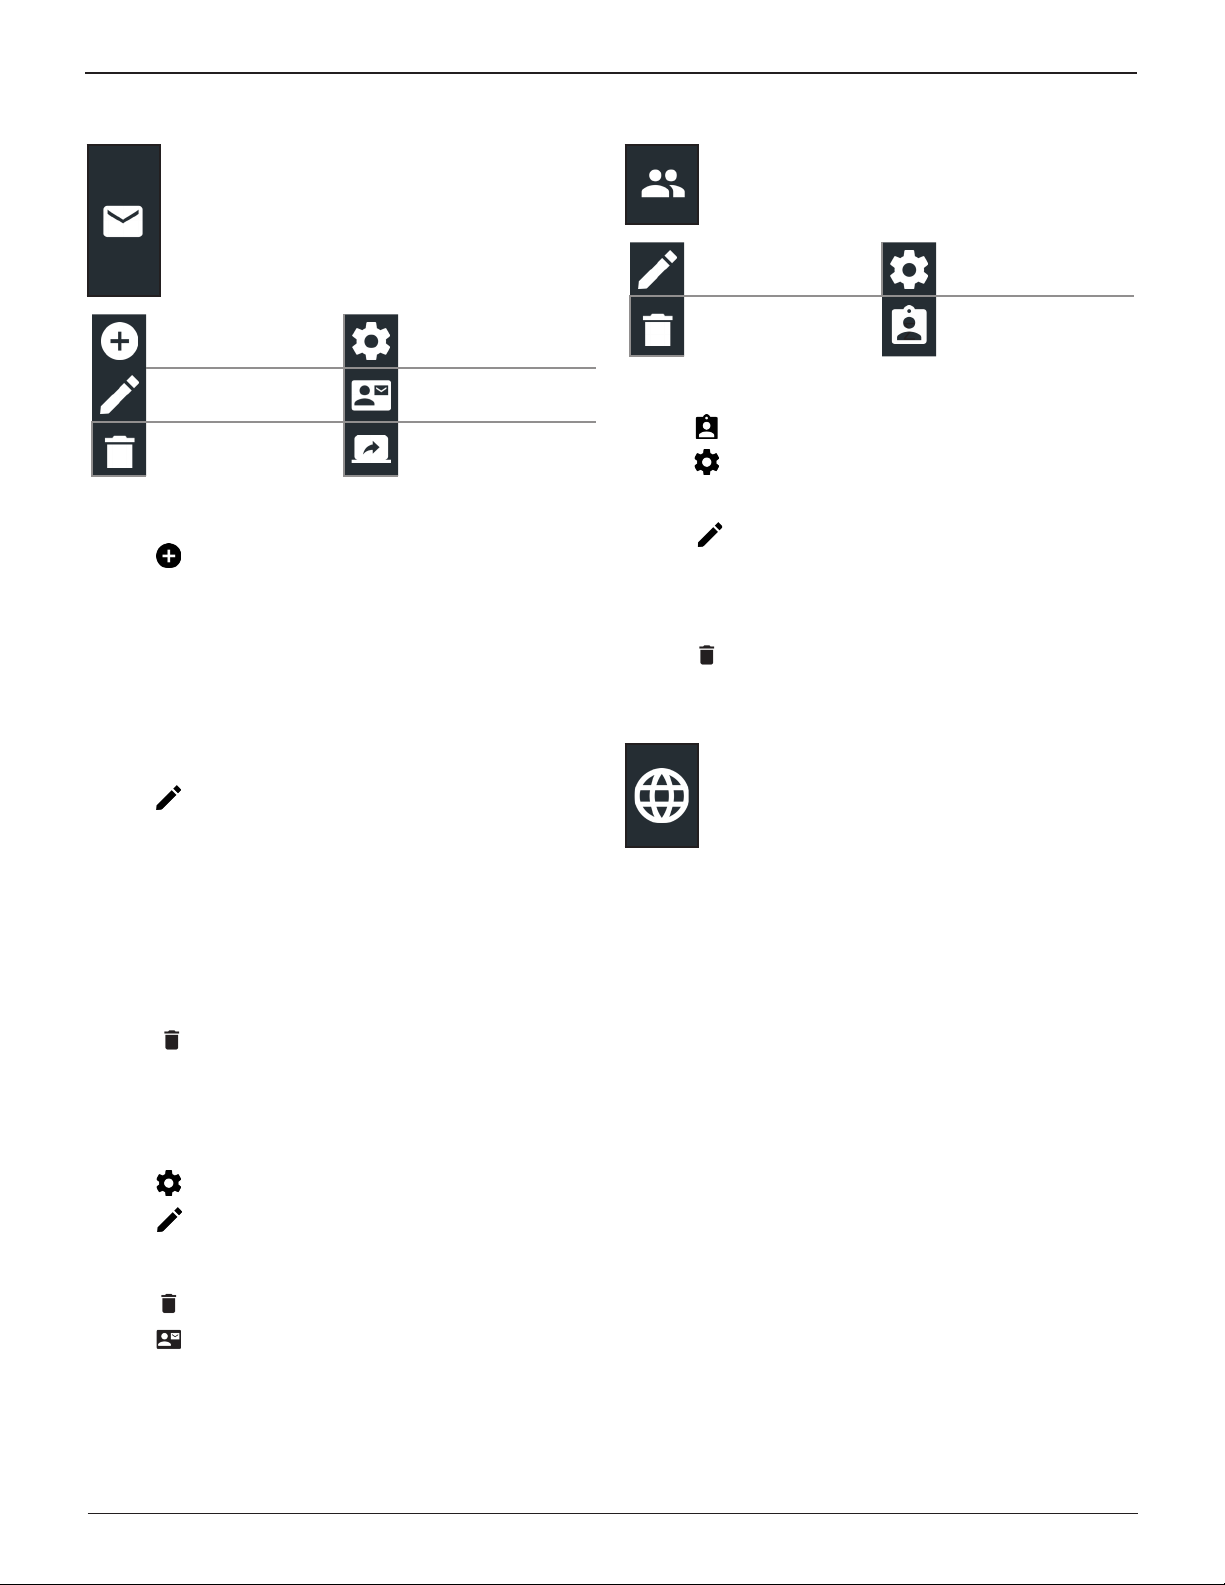
Email
Displays all entered email addresses. Addresses
can be added, edited, and deleted. Entered email
accounts are added to the email address book.
Frequently used email addresses can be selected
from the displayed address list rather than being retyped each time.
Add Address Server Settings
Edit Address Address Book
Delete Selected
Address
Add Address
1. Tap to add an email address.
2. Use the displayed keypad to enter the contact name and
email address.
3. Tap Add to add the address to the email list or Cancel to
exit and return to the email list.
Send Test Email
User Settings
Modify Usernames and Passwords. Tap next to
Enable Uer Accounts to turn the function on.
Edit Users User Settings
Delete Users
User Management
1. Tap to access User Management functions.
2. Tap to display the current logged in Admin user.
3. Select a displayed user by tapping it.
4. Tap to edit the Username, Password, and User Type
(Standard or Admin).
5. Tap X when complete to return to the User Management
screen.
6. Tap to delete the selected user and Yes to conrm.
User Management
∑
Edit Address
1. Select a displayed email address by tapping it.
2. Tap to edit the address.
3. Use the displayed keypad to edit the contact name and
email address.
4. Tap Add to add the address to the email list or Cancel to
exit and return to the email list.
Deleting An Address
1. Select the email address by tapping it.
2. Tap to delete the address and tap Yes to conrm or
Cancel to exit and return to the email list.
Server Settings
Enter and edit the email settings for sending outgoing email.
1. Tap to access the email sever settings.
2. Tap to enter or modify existing server settings including Host, Port, Login, Password, SMTP Authorization, Enable TLS, and From Email Address information.
Language Settings
Use the Language & Input function to select the
default system language used by the tool. User
defaults also include Test Results, Email, and Print
languages.
System Language
Select the default standard language for the analyzer to use on
the Controller.
Test Result Language
Select the default language for the analyzer to use for all tests
and results displayed on the Controller.
Email Language
Select the default standard language for the analyzer to use for
all tests and results sent via email.
Print Language
Select the default standard language for the analyzer to use for
all tests and results printed using a networked printer.
3. Tap to clear all server settings.
4. Tap to return to the email Address Book.
Midtronics Inc. 7000 Monroe Street Willowbrook, IL 60527
18
www.midtronics.com
Page 19
Chapter 5: SettingsDSS-5000 Toyota Lexus
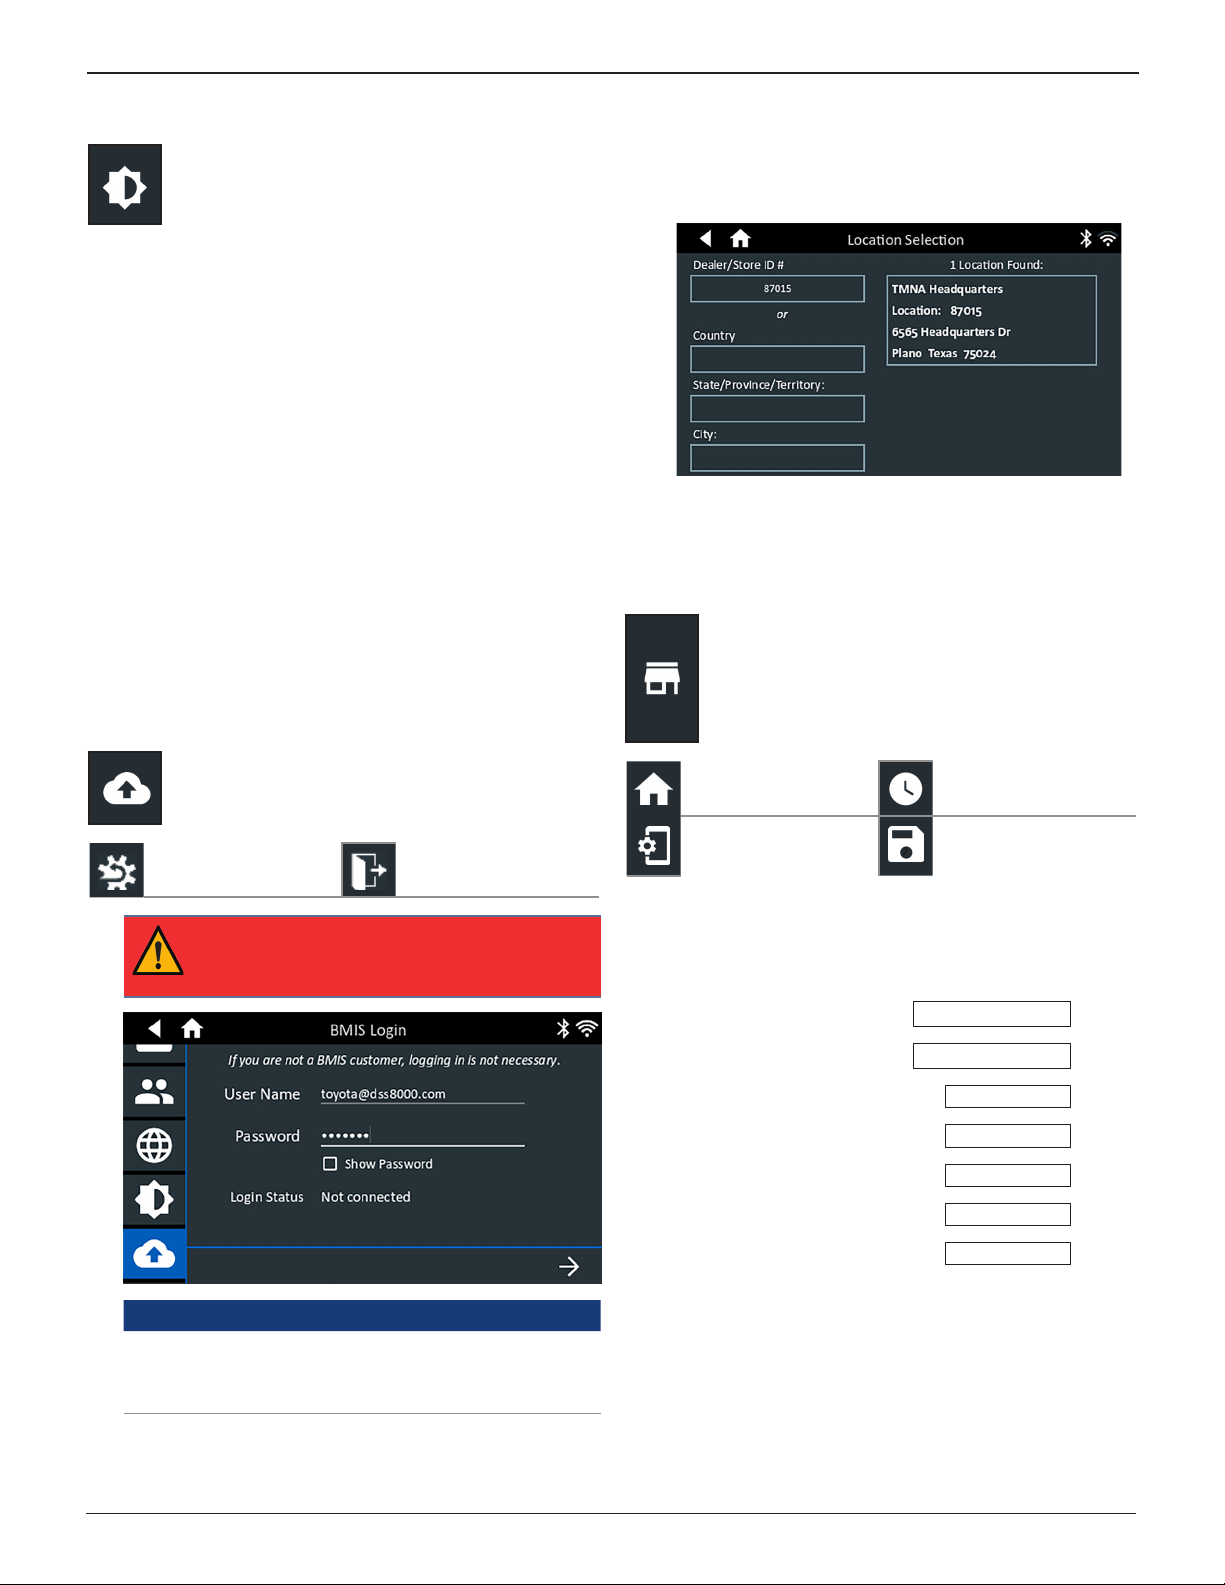
Display Settings
Adjust the Controller display including the Brightness,
Sleep Time, and Dim Time. Auto Brightness can also
be turned on and o.
Brightness
Adjust the display Brightness by tapping and holding the
slider, then moving it right or left to make the screen brighter
or darker.
Auto Brightness
Enable and disable Auto Brightness by tapping on the check
box.
Sleep Time
Adjust the amount of elapsed time before the Controller goes
into a power saving (Sleep) mode. Default = 2 minutes.
Dim Time
Adjust the amount of elapsed time before the Controller goes
into a power saving (Dim) mode. Default = 1 minute.
BMIS Login
1. Press to download the list of BMIS locations.
2. A searchable list of dealerships is displayed. Enter the
Dealer ID or dealership name to search for the correct
dealership and tap .
3. Tap on a displayed location to connect the analyzer to an
existing BMIS account.
Shop Information
Access default Shop Information including Store
Name, address, and phone number. Also access
battery test defaults including rating, temperature
units, and decimal separator. Use also to adjust the
tester date and time settings.
Enter and edit the User Name, Location and Login
Status. Log into a BMIS account.
Recongure Logout
IMPORTANT: If no WiFi connnection has been
made, follow the procedure described in the
WiFi section.
Country Username Password
Toyota U.S. [email protected] Toyota1!
Toyota
Canada
Toyota U.S.
Toyota
Canada
[email protected] Toyota1!
[email protected] LexusMdx1!
[email protected] LexusMdx1!
Settings Home Date/Time Settings
Test Settings
Create MDCA Log File
∑
Shop Information
Use the onscreen keypad to enter the store name, address, and
phone number.
Store Name
Street Address
Street Address 2
City
State
Zipcode
Phone #
TMNA Headquarters
6565 Headquarters Dr
Plano
TX
75024
www.midtronics.com
19
Midtronics Inc. 7000 Monroe Street Willowbrook, IL 60527
Page 20
Chapter 5: Settings DSS-5000 Toyota Lexus
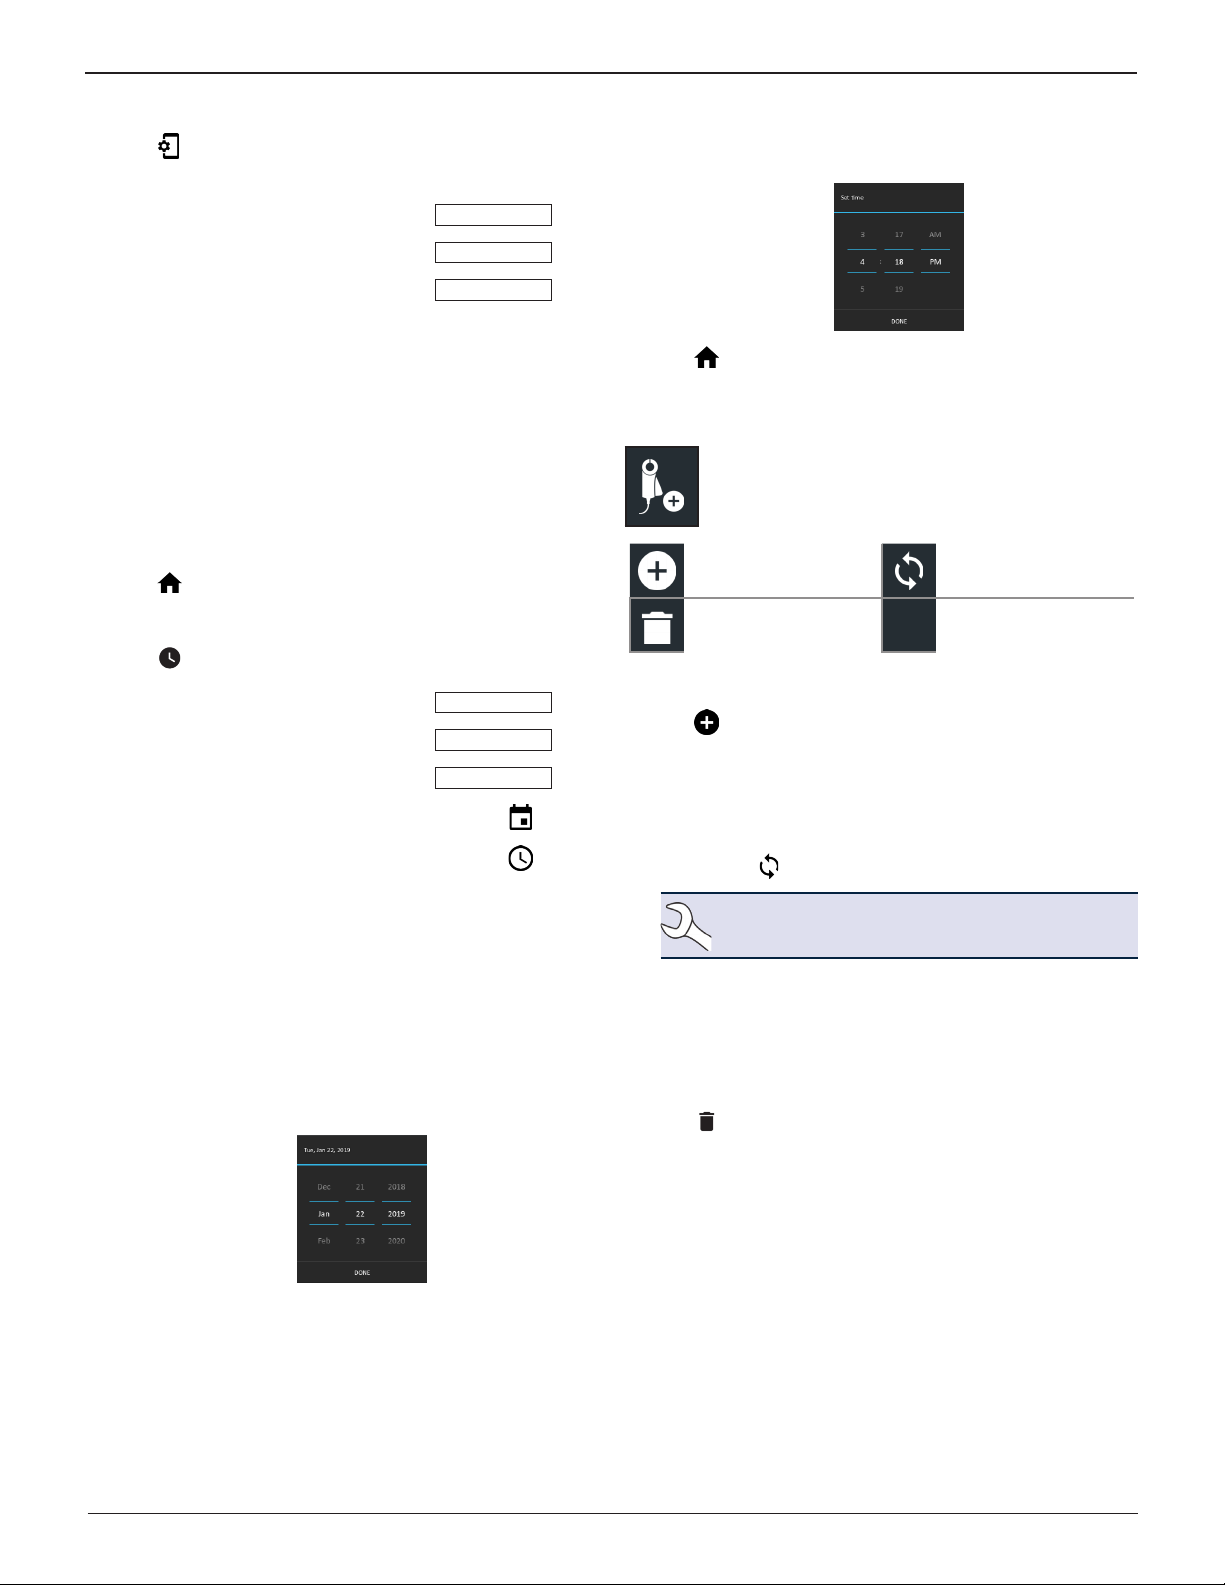
Test Settings
1. Tap to access the test setting defaults. Tap the boxes or
icons to change the values.
Battery Rating
Temperature Units
Decimal Separator
CCA
0 F
00.00
Battery Rating
Default battery rating units used when testing batteries.
Temperature Units
Default temperature units used when measuring battery
temperature.
Decimal Separator
Default number display using commas or periods
separators.
2. Tap to return to the Shop Information screen.
Date/Time Settings
1. Tap to access the Date/Time setting defaults.
Select Time Format
Select Date Format
Select Time Zone
12 Hour
2/28/2019
CST
Set Time
Tap or to enter the hours, minutes, and AM/PM. Tap
Set to save the date or Cancel to exit without saving.
2. Tap to return to the Shop Information screen.
Device List
Displays connected and linked accessory devices.
Additional devices can also be added.
Add Refresh
Delete Paired Device
Add Tester Pod
1. Tap to add a device.
2. Move the device to be linked within 30 feet of the Control-
ler, turn on the device, then tap .
Enabled
Set Date
Set Time
Select Time Format
12 or 24 Hour Format
Select Date Format
Month/Day/Year, Day/Month/Year, or Year/Day/Month
Select Time Zone
Time zone in which the analyzer will be operated.
Set Date
Tap or to enter the month, day, and year. Tap Set to
save the date or Cancel to exit without saving.
3. A list of detected devices is displayed. Tap > next to the
desired device to select it. If the desired device is not displayed, tap to refresh the list.
NOTE:
A passkey number is automatically generat-
ed once the Bluetooth pairing has been established.
A conrmation message is displayed when the device has
been successfully linked.
4. Tap to return to the Device List screen.
Deleting A Diagnostic Base
1. Tap next to the base to be deleted.
2. Tap Yes to delete.
Midtronics Inc. 7000 Monroe Street Willowbrook, IL 60527
20
www.midtronics.com
Page 21
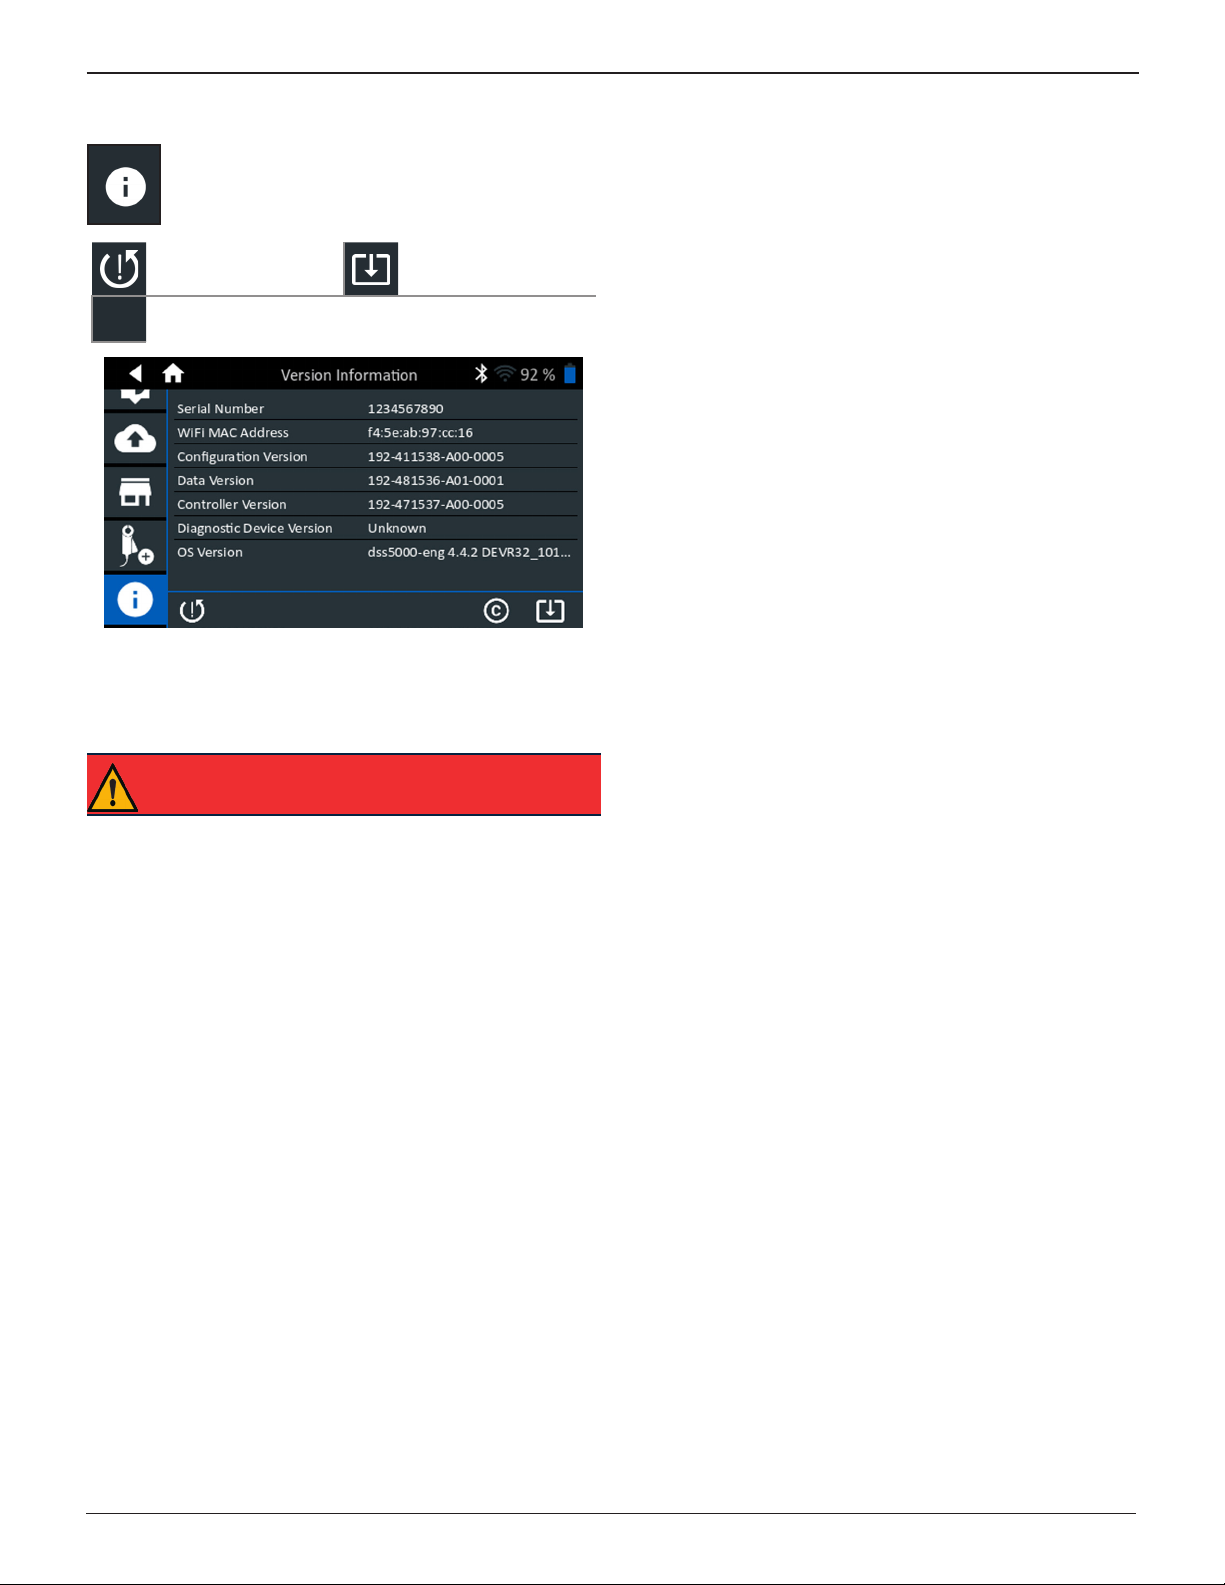
Version Information
Use Version Information to display WiFi connection
data the DSS Controller, Diagnostic Device, and
software version information.
Factory Reset Check For Updates
Legal Information
©
Chapter 5: SettingsDSS-5000 Toyota Lexus
Factory Preset
Use this function to return the tool to the original as built
conguration including all history and test settings.
IMPORTANT: All previous modications to the
original settings will be overwritten.
Legal Information
Displays software attribution information via the Midtronics
website. The analyzer must be connected to the Internet.
Check for Updates
Use this function to check via the internet connection for any
updates to the tester software.
www.midtronics.com
21
Midtronics Inc. 7000 Monroe Street Willowbrook, IL 60527
Page 22
Appendix DSS-5000 Toyota Lexus
Appendix
Battery Information Screen Descriptions
VIN A unique code, including a serial number,
to identify individual motor vehicles,
motorcycles, scooters and mopeds, as
dened in ISO 3833.
Vehicle Year Model year that a vehicle was
manufactured.
Vehicle Make Vehicle manufacturer
Vehicle Model Vehicle name or number
Vehicle
Technology
Battery
Installation
Battery
Application
Battery Post Top Post
Test Location Top Post
Battery Type Flooded, AGM (Absorbed Glass Mat),
Battery Units
Battery Rating Enter the Battery Rating Units value.
Hybrid, Gasoline, Electric, Start-Stop,
Hybrid Start-Stop, Diesel
Single Battery or Dual Batteries
Automotive
AGM Spiral, Gel, Enhanced Flooded
CCA
JIS
Cold Cranking Amps:
Battery current at 0 ºF
(–17.8 ºC).
Japanese Industrial
Standard: Usually
printed on battery label.
100 to
3000
26A17 to
245H52
VIN Scanning
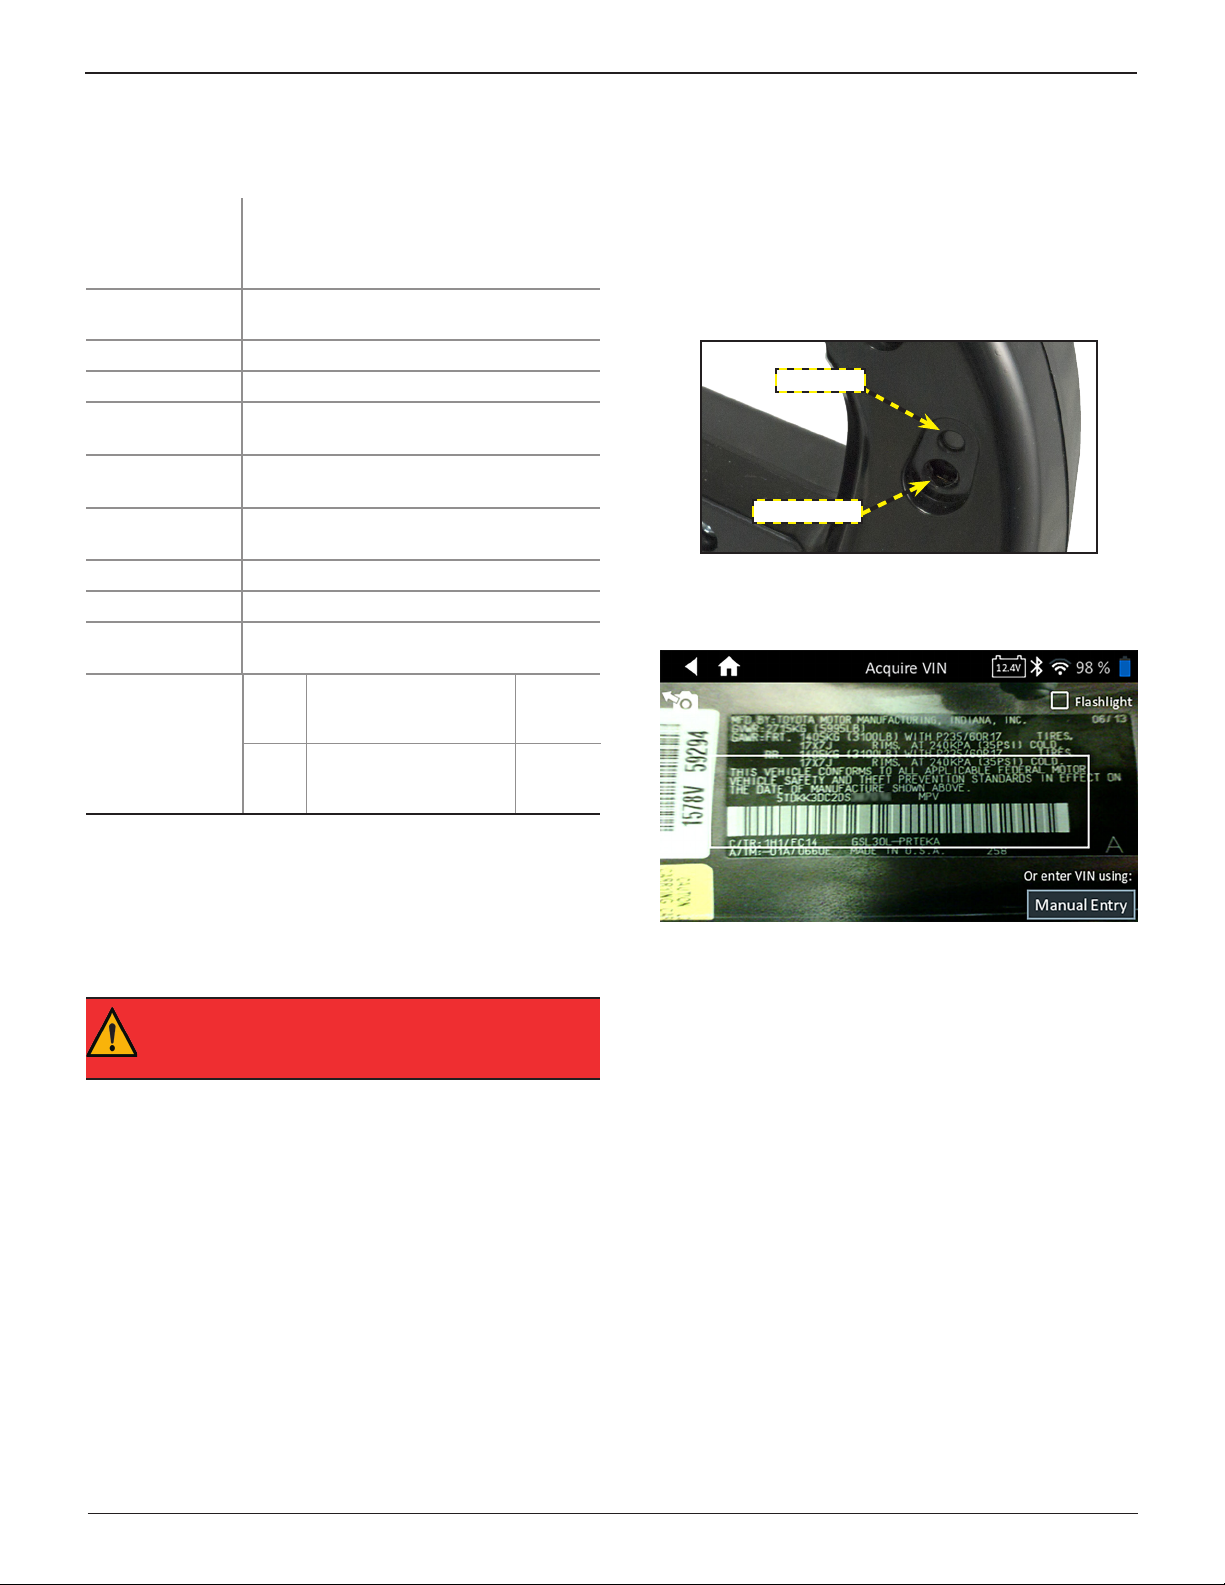
The DSS-5000 uses a camera built into the Controller handle to
scan the VIN of the vehicle being tested.
Scanning Tips
• Camera: Located in the upper left portion on the back of
the Controller handle.
Flashlight
VIN Camera
• Hold Steady: Hold Controller steady when scanning the
VIN barcode. This allows the user to clearly see the barcode and allows the camera to focus on it.
Recommended Test Procedure
The Conductance Proling™ technology determines battery
cranking and Reserve Capacity testing. This additional process,
can take up to 60 seconds to complete.
IMPORTANT: Always begin each test by connecting
the Tester Pod clamps to the battery being tested
test begins as soon as the clamps are connected.
. The
• Fill Viewnder: Make sure the entire barcode is visible.
Keeping the entire VIN barcode visible while slowly moving the camera closer or further away will help capture.
• Clean Barcode/Window: Surface dirt can interfere with
the scanning process. If necessary wipe the VIN barcode
with a cloth or your nger remove any surface dirt.
• Lighting/Glare: The built-in ashlight will automatically
turn on In low light situations. If the ashlight, or sunlight,
is shining directly onto the VIN barcode, try pivoting the
camera up or down slightly to reduce any glare.
Midtronics Inc. 7000 Monroe Street Willowbrook, IL 60527
22
www.midtronics.com
Page 23

AppendixDSS-5000 Toyota Lexus
www.midtronics.com
23
Midtronics Inc. 7000 Monroe Street Willowbrook, IL 60527
Page 24

PATENTS
This product is made by Midtronics, Inc., and is protected by one or more U.S. and foreign patents. For specic patent information,
contact Midtronics, Inc. at +1 630 323-2800.
LIMITED WARRANTY
Midtronics products are warranted to be free of defects in materials and workmanship for a period of one (1) year from date of
purchase. Midtronics will, at our option, repair or replace the unit with a re-manufactured unit. This limited warranty applies only to
Midtronics products, and does not cover any other equipment, static damage, water damage, overvoltage damage, dropping the unit,
or damage resulting from extraneous causes including owner misuse. Midtronics is not liable for any incidental or consequential
damages for breach of this warranty. The warranty is void if owner attempts to disassemble the unit or to modify the cable assembly.
SERVICE
To obtain service, contact Toyota Special Service Tool Program at 800-933-8335. Have your model and serial numbers ready. This rst
step is critical as we will trouble-shoot the problem(s) over the phone, and many problems are resolved during this step. If the problem
cannot be resolved, then the Customer Service Agent will issue you a Return Material Authorization (RMA). This number becomes your
tracking number. The nal step is to return the unit to Midtronics freight prepaid (you pay), to the attention of the RMA number
obtained.
In USA:
Midtronics, Inc.
Attn: RMA # xxxxx (this is the RMA number that you must obtain from Midtronics)
7000 Monroe St.
Willowbrook, IL 60527
In Canada:
Midtronics c/o FTN (FTN is Fed-ex Trade Networks –this is NOT a Midtronics facility)
Attn: RMA # xxxxx (this is the RMA number that you must obtain from Midtronics)
7075 Ordan Drive
Mississauga, ON L5T1K6
Midtronics will service and return the unit using the same type of service as received. If Midtronics determines that the failure was
caused by misuse, alteration, accident, or abnormal condition of operation or handling, purchaser will be billed for the repaired
product and it will be returned freight prepaid with shipping & handling charges added to the invoice. Midtronics products beyond
the warranty period are subject to the repair charges in place at that time. Optional re-manufacturing service is available to return
our products to like-new condition. Out-of-warranty repairs carry a 3-month warranty. Re-manufactured units purchased from
Midtronics are covered by a 6-month warranty.
www.midtronics.com
Corporate Headquarters
Willowbrook, IL USA
Phone: 1.630.323.2800
Canadian Inquiries
Toll Free: +1 1 866 592 8052
Midtronics b.v.
European Headquarters
Houten, The Netherlands
Serving Europe, Africa, the Middle
East, and The Netherlands
Phone: +31 306 868 150
Midtronics China
China Operations
Shenzhen, China
Phone: +86 755 2374 1010
Midtronics India
Navi Mumbai, India
Phone: +91 22 2756 4103/1513
Asia/Pacíc (excluding China)
Contact Corporate Headquarters
Phone: +1.630.323.2800
167-000899EN-A 2/19 2019 ©Midtronics, Inc. All rights reserved.
 Loading...