

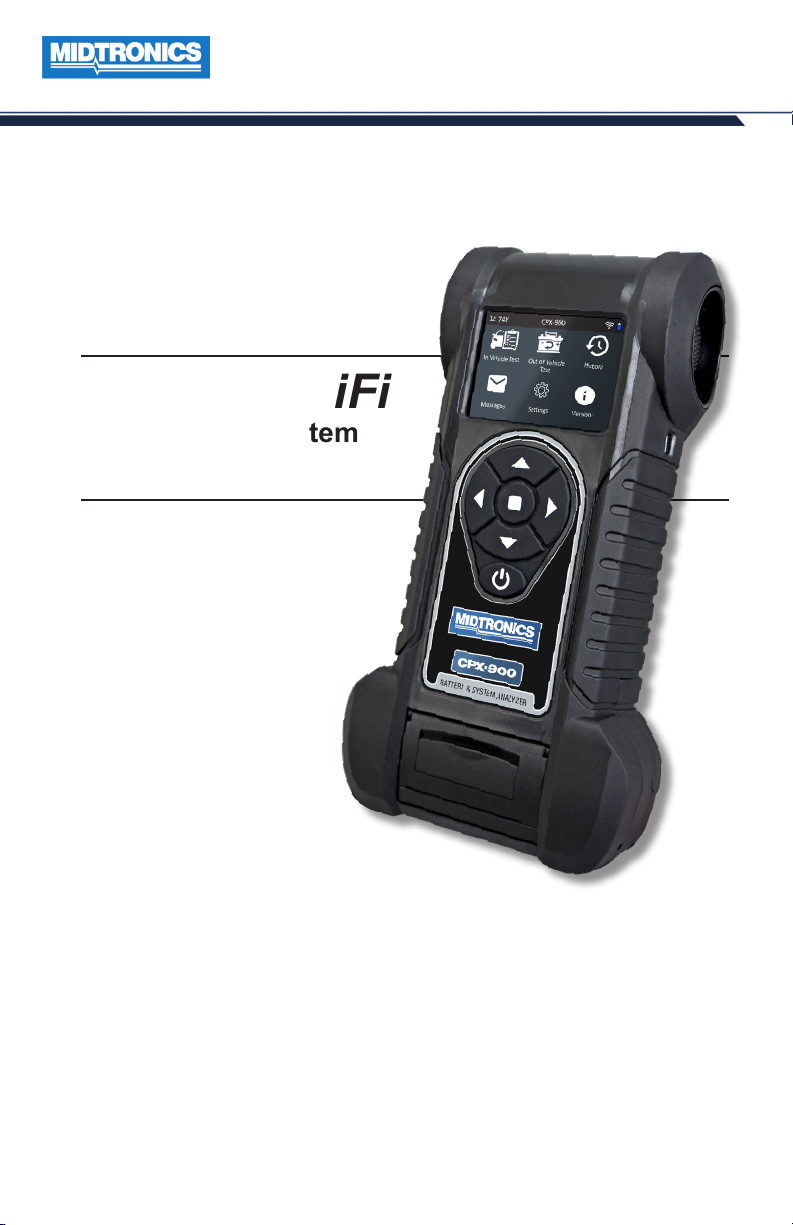
CPX-900
CPX-900 WiFi
Battery & System
Analyzer
October 2018
167-000848EN-B
For testing 6 and 12-volt automotive batteries and
12- and 24-volt charging systems
User Manual
support.cpx900.com
www.midtronics.com
1

blank page behind cover

CPX-900
Contents
1 – Introduction 5
Personal Precautions 5
Symbols Conventions 5
Description 5
Consent to Collection and Use of Data: 5
Controls & Connections 6
Main Menu 6
Additional Screens 6
Main Menu Icons 7
Initial Power Up 7
WiFi Settings 7
BMIS Settings 8
Shop Settings 8
Data Collection Consent 8
Test Preparation 8
Inspecting the Battery 8
Testing Out-of-Vehicle 9
Testing In-Vehicle 9
Connecting To A Battery 9
Setting User Preferences 9
2 – In Vehicle Test 10
Battery Test 10
Battery Test Results 12
System Test 13
System Test Results 13
3 – Out Of Vehicle Test 14
Battery Test 14
Battery Test Results 15
4 – History 16
5 – Messages 17
Accessing Messages 17
6 – Settings 18
Tool 18
Display 18
Date & Time 18
Print Format 19
Work Order 19
Auto Test 19
VIN Entry 19
Version 19
Shop Settings 19
Admin 19
Shop Info 20
Network 20
WiFi 20
BMIS Settings 20
www.midtronics.com
3

CPX-900
7 – Maintenance & Troubleshooting 21
Tester Cables 21
Cleaning Clamps 21
Handling Test Cables 21
Storing Test Cables 21
Printer Paper 22
Replacing The Paper Roll 22
Replacing The Internal Batteries 23
Appendix A: Recommended Scanning Procedure 24
Scanning Tips 24
Appendix B:Test Results Decision Tables 25
Battery Test Results 25
Alternator Test Results 26
4
Midtronics Inc. 7000 Monroe Street Willowbrook, IL 60527

CPX-900
Personal Precautions
1 – Introduction
1 – Introduction
Risk of explosive gases. Never
smoke or allow a spark or ame
in the vicinity of a battery.
Batteries can produce a highly
explosive mix of hydrogen gas and
oxygen, even when the battery is not
in operation. Always work in a wellventilated area.
Wash hands after handling.
REQUIRED BY CALIFORNIA PROP. 65:
posts, terminals, and related accessories contain
lead and lead compounds, chemicals known to
the state of California to cause cancer and birth
defects or other reproductive harm.
Battery
Inspect the battery for damage and check the electrolyte level. If the electrolyte level is too
low, replenish it and fully charge the battery. Always use the necessary safety precautions when
working with batteries to prevent severe injury or death. Follow all manufacturers’ instructions
and BCI (Battery Council International) safety recommendations, which include the following
precautions:
9 Battery acid is highly corrosive. If acid enters your eyes, immediately ush them thoroughly
with cold running water for at least 15 minutes and seek medical attention. If battery acid
gets on your skin or clothing, wash immediately with a mixture of water and baking soda.
9 Always wear proper safety glasses or face shield when working with or around batteries.
9 Keep hair, hands, and clothing as well as the analyzer cords and cables away from moving
engine parts.
9 Remove any jewelry or watches before you start servicing the battery.
9 Use caution when working with metallic tools to prevent sparks or short circuits.
9 Never lean over a battery when testing, charging, or jump starting.
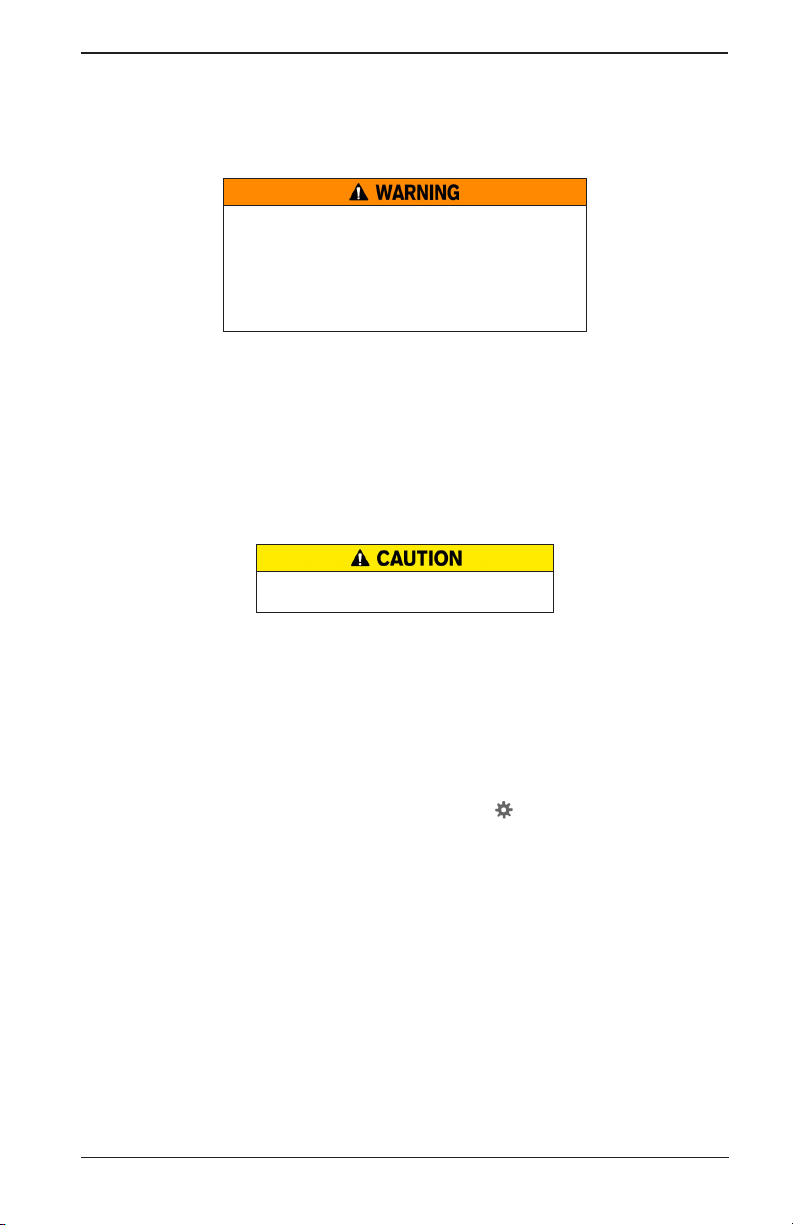
Symbols Conventions Description
Symbol Description
The safety symbol indicates
instructions for avoiding hazardous
conditions and personal injury.
The safety symbol with the
words CAUTION, WARNING, or
!
DANGER indicates instructions for
avoiding hazardous conditions and
personal injury.
The wrench symbol indicates
procedural notes and helpful
information.
The analyzer uses function-specic applications
accessed through a series of menus and icons
to guide users through the battery testing
process for consistent testing implementation
and accuracy. These are accessed using the
tester’s touch screen display. Test results can
be displayed on the full-color screen, printed,
or wirelessly emailed.
Consent to Collection and Use of Data:
You agree that Midtronics, Inc. may collect, store, transmit, and use technical data and related
information, including but not limited to technical information about this device, system and
application software, and accessories, that is gathered periodically to facilitate the provision of
product support, product improvements, product development, and other services related to
use of this device. If electing to collect personal data (such as e-mail addresses) the user is solely
responsible for obtaining any necessary permissions, and agrees to indemnify and hold harmless
Midtronics, Inc. its subsidiaries, ocers, employees and agents from any liability associated with
collecting, storing, and transmitting such personal data.
www.midtronics.com
5
1 – Introduction CPX-900
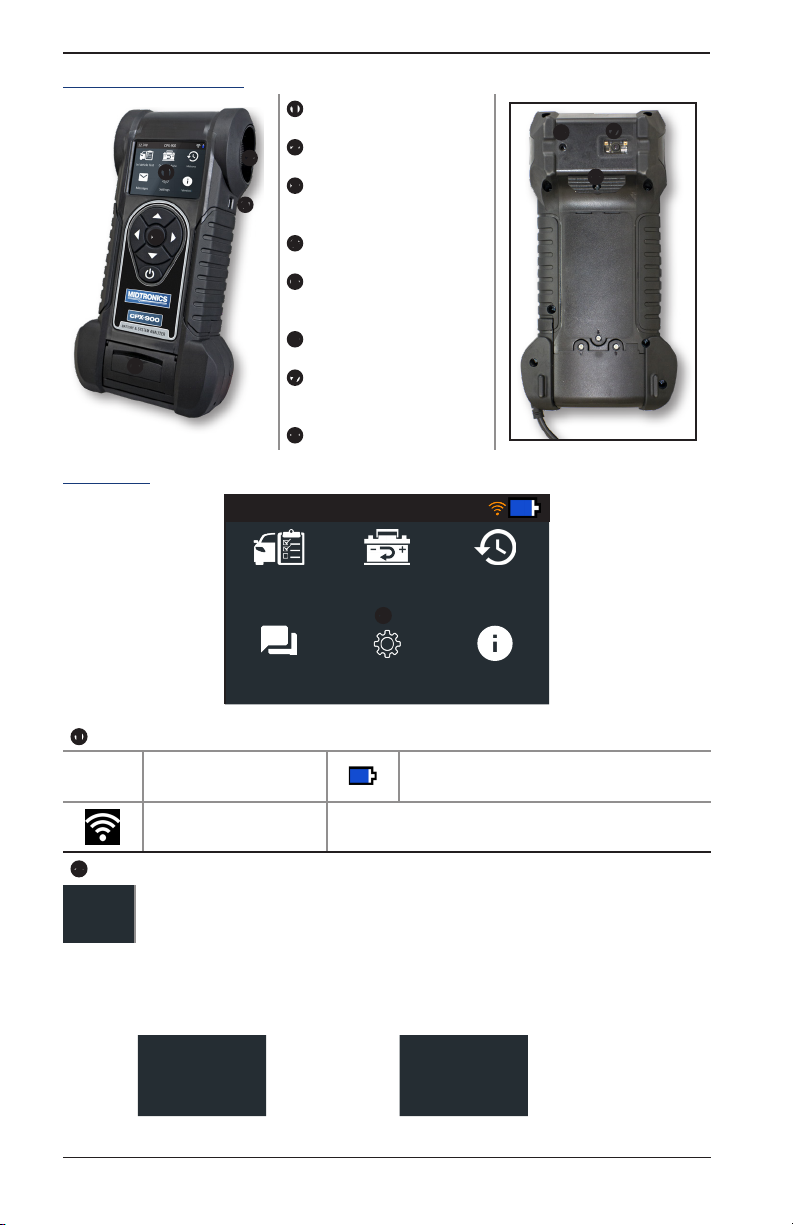
Controls & Connections
Display Screen
Cooling Vent
Arrow Keys & Power But-
ton
Mini-USB Port
Thermal Printer
(optional)
Temperature Sensor
VIN Barcode Scanner
(optional)
Clamp Tabs
Main Menu
12.74V CPX-900
In Vehicle Test
Messages
Out of Vehicle
Test
Sengs
History
Version
Menu Bar
12.74V
Battery Voltage
(if connected)
WiFi signal strength
Controller internal battery status
Main Menu Selection Area
When displayed, the Screen Arrows show which ARROW key on the keypad to press to
Additional Screens
The dots at the bottom or side of a menu or results screen indicate additional screens are available,
display other icons or screens. When displayed under a list of options, the Screen Arrows
show which keypad arrow to press to highlight a character or item in a list.
Screen 1
Screen 2
Screen 3
Press or
Screen 1
Press or
Screen 2
6
Midtronics Inc. 7000 Monroe Street Willowbrook, IL 60527
CPX-900
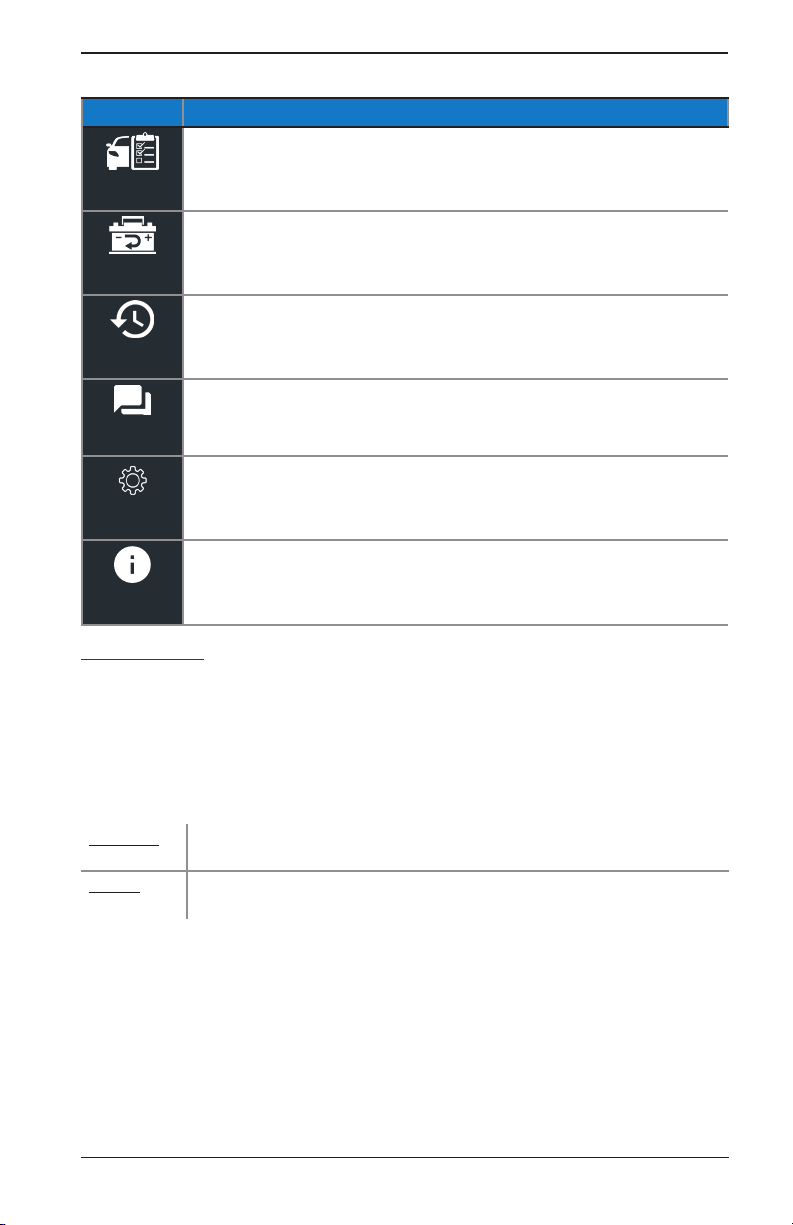
Main Menu Icons
Icon Description
For testing batteries that are connected to and installed in a vehicle. An In Vehicle
Test includes a Battery Test and a System (Starter and Charging) Test.
In Vehicle Test
For testing batteries not connected to or removed from a vehicle.
Out of Vehicle
Test
Access archived test histories or search test history by VIN or by technician.
History
Displays alerts and notications for upcoming tool software updates.
Messages
1 – Introduction
Setup/adjust: WiFi, printer setup,
display and sound settings, BMIS information, and shop information.
email settings, user information, default language,
Sengs
Access to tester software version information.
Version
Initial Power Up
The tester will take a few moments when powered up for the rst time.
BMIS Setup-does not display if Wi not successfully setup (See "BMIS" in Chapter 6: Setup)
WiFi Settings
Set up the tool's WiFi connection. Select Skip to congure WiFi at a later time. See "Network" in
Chapter 6: Setup
Automatic The tester searches for any detectable WiFi networks. Select a displayed
Manual Manually enter Security, SSID, Password, Encryption, and WEP Keys.
network is then displayed on the tester screen.
www.midtronics.com
7

1 – Introduction CPX-900
BMIS Settings
At the User Credentials screen, enter the Midtronics-provided username, password, Client ID, and
Location ID to access BMIS data management.
Use to highlight the numbers on the displayed keyboard and press to select. Press
Skip to move to the next step.
NOTE: If WiFi was not congured in the previous step, the BMIS setup screen is not
displayed.
Username Provided by Midtronics
Password Provided by Midtronics
Client ID Provided by Midtronics
Location ID Provided by Midtronics
Shop Settings
Use to enter information about the shop in which the tester will be used.
Shop Name Country
Shop Address Phone Number
Shop Address 2 Email Address
City Website
State (Blank)
Zipcode (Blank)
Country
With the displayed alphanumeric keypad, u
se to highlight the desired alphanumeric
character. Select to access the lower case and symbol character maps.
Once all of the alphanumeric characters have been entered, select Save or Esc to exit without saving.
Data Collection Consent
Select Accept to acknowledge test data is being collected via BMIS.
Test Preparation
Inspecting the Battery
Before starting the test visually inspect the battery for:
• Cracked, buckled, or leaking case. If you see any of these defects, replace the battery.
• Corroded, loose, or damaged cables and connections. Repair or replace them as needed.
• Corrosion on the battery terminals, and dirt or acid on the case top. Clean the case and termi-
nals using a wire brush and a mixture of water and baking soda.
• Low electrolyte level. If the electrolyte level is too low, add distilled water to ll up to ½ above
the top of the plates and fully charge the battery. Do not overll.
• Corroded or loose battery tray and hold-down xture. Tighten or replace as needed.
8
Midtronics Inc. 7000 Monroe Street Willowbrook, IL 60527
CPX-900
1 – Introduction
Testing Out-of-Vehicle
The preferred battery test location is In-Vehicle. However, for testing Out-Of-Vehicle:
• Always disconnect the negative cable from the battery rst and reconnect it last.
• Always use a carry tool or strap to lift and transport the battery.
Failure to properly install lead terminal adapters,
or using adapters that are dirty or worn, may
cause false test results.
When testing side-post or Group 31 batteries, always use
lead terminal adapters provided with the tester—do not
test at the battery’s steel bolts. To avoid damage, never use
a wrench to tighten the adapters more than ¼ turn.
Testing In-Vehicle
The preferred test position is at the battery posts. If you must test at a remote-post location, it
should have both a positive and negative post. Otherwise, you must remove the battery and
perform an out-of-vehicle test.
At the start of the test, make sure all vehicle accessory loads are o, the key is not in the ignition,
and the doors are closed.
Connecting To A Battery
Do not connect the tester to a voltage source
greater than 30 Vdc.
Connect the clamps to the tester: the red clamp to the positive (+) terminal and the black clamp to
the negative (–) terminal. If the clamps are reversed when connected, the tester displays CLAMPS
REVERSED! Reconnect the clamps.
Make sure both sides of the clamps are gripping the terminals by rocking each clamp back and
forth. A poor connection will prevent testing, and the tester will display a CHECK CONNECTION
message. If the message reappears after reconnecting, clean the terminals and reconnect.
Setting User Preferences
Customize the analyzer by setting preferences in the Settings ( ) Menu, described in Chapter 6.
www.midtronics.com
9

2 – In Vehicle Test CPX-900
2 – In Vehicle Test
Use In Vehicle Test to perform Battery Tests on in-vehicle batteries using test
parameters determined by vehicle VIN or through manual entry of battery
In Vehicle Test
NOTE:When VIN Entry is enabled (See Chapter 6 - Settings), an In Vehicle Test test will
The CPX-900 provides a battery decision along with additional detailed information on battery
cranking and reserve capacity. Press to return to the previous screen, select options and
when necessary, to enter or continue to the next step.
Battery Test
1. Connect the tester clamps to the battery terminals.
2. Auto Test - If enabled, the tool immediately begins testing the battery. (See Chapter 6 - Settings)
parameters. A System Test for Starter and Charging testing is also available.
always associate the in-vehicle battery to the VIN of the vehicle being tested.
IMPORTANT: To expidite the testing procedure, makes sure Auto Test is enabled.
(Chapter 6 - Settings) The testing process begins as soon as the clamps are connected.
NOTE:
3. At the Main Menu select In Vehicle Test.
4. Enter Work Order - If enabled, use the displayed keyboard template to Enter Work Order information. (See Chapter 6 - Settings)
5. Temperature - when prompted, hold the tester temperature sensor 6 to 12 inches over the
top of the battery being tested.
Select Capture to lock in the live temperature reading.
6. VIN Capture - (scanner optional) scan the VIN bar code, usually located in the right corner of
the vehicle's front windshield or on the driver’s side door frame.
Refer to Appendix A for additional scanning tips.
NOTE: VIN scanning is skipped when the CPX-900 is not equipped with an op-
NOTE: Barcode types supported by the CPX-900 include A: 1D: Code 39, Code
The testing process uses Conductance Proling™ technology to determine
battery cranking capability and Reserve Capacity. This additional analysis can take
up to 60 seconds to complete.
Temp Sensor
tional scanner.
128, UPC, Codabar, GS1-Limited; 2D: PDF417, QR Code: Model 2, and Data Matrix
type barcodes. Refer to Appendix A for recommended VIN scanning procedures.
10
Midtronics Inc. 7000 Monroe Street Willowbrook, IL 60527

CPX-900
2 – In Vehicle Test
VIN Barcode
Scanner
Drivers Door Frame
Windshield
Manual Entry - Use the on-screen keypad to manually type the 17-digit VIN and select Next.
1 2 3 4 5 6 7 8 9 0
W E R T Y U P
A S D F G H J K L
Z X C V B N M
ESC Save
The displayed digit counter will count up the alphanumeric characters as they are entered.
7. Battery Test Setup - Edit the displayed battery information. Select Start to begin the testing
process.
Application Automotive
Battery Post Top Post Side Post
Battery Type Flooded
Battery Units CCA
Battery Rating
Rating Description Range
CCA Cold Cranking Amps (specied by SAE): The
CA Cranking Amps: The amount of current a
DIN Deutsche Industrie-Norm 100 to 1000
SAE Society of Automotive Engineers - European
IEC International Electrotechnical Commission 100 to 1000
EN Europa-Norm 100 to 1700
MCA Marine Cranking Amps: The amount of current
EN2 Europa-Norm 100 to 1700
amount of current a battery can provide at 0 ºF
(–17.8 ºC).
battery can provide at 32°F (0 ºC).
labeling of CCA
a battery can provide at 32°F (0 ºC).
4D/8D
AGM Spiral
EFB
DIN
IEC
MCA
Hold down or to increase
scrolling speed.
Group 31
AGM
Gel
CA
SAE
EN
EN2
100 to 3000
100 to 3000
100 to 3000
100 to 3000
www.midtronics.com
11

2 – In Vehicle Test CPX-900
Battery Test Results
Icons are color-coded to indicate status.
Green
Yellow
Battery Test
All test parameters were completed
:
and have passed.
Some test parameters may require
:
further testing.
VIN: 1HGEM225X5Lxxxxxx
Good Baery
Send Results System Test Done
Cranking Health
Rated: 575 CCA
Measured: 599 CCA
Starter Test
Red
Gray
Test Results - Baery
Rated 575 CCA
Voltage 12.72 V
Measured 599 CCA
Temperature: 970 F
The battery has failed the test.
:
Insufcent data to perform the test.
:
Test Results - Baery
Baery meets or exceeds
required standards. Test
again in 90 days.
Alternator Test
Test Results - Baery
Reserve Health
The baery has sucient
reserve capacity to
provide power for the
electronics systems in the
OK
vehicle.
Test Results - Battery Test
NOTE: See Appendix B for complete parameter descriptions.
12
Midtronics Inc. 7000 Monroe Street Willowbrook, IL 60527

CPX-900
Select Send Results displayed at the bottom of the tester screen to send the test results to the
optional built-in printer or via email. Select Done to return to the Main Menu.
Email
Printer
6
2 – In Vehicle Test
System Test
1. Select System Test displayed at the bottom of the screen to continue to the System Test.
2. Start the vehicle's engine and let it idle.
3. Ensure all accessories (High Beam headlights/ventilation blower etc.) are o and select Next.
The alternator output is tested.
4. When prompted, rev and hold the engine to between 2000 to 3000 rpm.
The alternator output is tested.
5. When prompted Idle the engine and and select Next.
6. Turn on the high beam headlights and ventilation blower and select Next.
The alternator output is tested.
7. When prompted, rev and hold the engine to between 2000 to 3000 rpm.
The alternator output is tested.
8. When prompted, turn o all loads and Idle the engine. Select Next.
System Test Results
Test Results - Summary
Good Baery
Cranking Normal
Charging Normal
Send Results Done
Test Results - Summary
T
he Test Results - Summary screen is displayed following a System Test. Select the Battery, Cranking,
or Charging Test to view detailed test results for each part of the test.
NOTE: See Appendix B for complete parameter descriptions.
Select Send Results displayed at the bottom of the tester screen to send the test results to the
optional built-in printer or via email. Select Done to return to the Main Menu.
Email
Printer
6
www.midtronics.com
13

3 – Out Of Vehicle Test CPX-900
3 – Out Of Vehicle Test
Use Out Of Vehicle Test to test and verify the condition of a batteries that is not
connected to a vehicle..
Out Of Vehicle
Test
IMPORTANT: To expidite the testing procedure, makes sure Auto Test is enabled.
(Chapter 6 - Settings) The testing process begins as soon as the clamps are connected.
The CPX-900 provides a battery decision along with additional detailed information on battery
cranking and reserve capacity. Press to return to the previous screen, select options and
when necessary, to enter or continue to the next step.
Battery Test
1. Connect the tester clamps to the battery terminals.
2. Auto Test - If enabled, the tool immediately begins testing the battery. (See Chapter 6 - Settings)
NOTE:
The testing process uses Conductance Proling™ technology to determine
battery cranking capability and Reserve Capacity. This additional analysis can take
up to 60 seconds to complete.
3. At the Main Menu select Out Of Vehicle Test. The Battery Test begins immediately.
4. Enter Work Order - (if enabled) Use displayed template to Enter Work Order information.
5. Battery Test Setup - Edit the displayed battery information. Select Start to begin the testing
process.
Application Automotive
Battery Post Top Post Side Post
Battery Type Flooded
Battery Units CCA
Battery Rating
4D/8D
AGM Spiral
EFB
DIN
IEC
MCA
Hold down or to increase
scrolling speed.
Group 31
AGM
Gel
CA
SAE
EN
EN2
14
Midtronics Inc. 7000 Monroe Street Willowbrook, IL 60527

CPX-900
Rating Description Range
CCA Cold Cranking Amps (specied by SAE): The
CA Cranking Amps: The amount of current a
DIN Deutsche Industrie-Norm 100 to 1000
SAE Society of Automotive Engineers - European
IEC
EN
MCA Marine Cranking Amps: The amount of current
EN2
amount of current a battery can provide at 0 ºF
(–17.8 ºC).
battery can provide at 32°F (0 ºC).
labeling of CCA
International Electrotechnical Commission 100 to 1000
Europa-Norm 100 to 1700
a battery can provide at 32°F (0 ºC).
Europa-Norm 100 to 1700
3 – Out Of Vehicle Test
100 to 3000
100 to 3000
100 to 3000
100 to 3000
6. Temperature - when prompted, hold the tester temperature sensor 6 to 12 inches over the
top of the battery being tested.
Temp Sensor
Select Capture to lock in the live temperature reading.
Battery Test Results
NOTE: See Battery Test Results in Chapter 2 - In Vehicle Test for test result screens
and descriptions.
www.midtronics.com
15
4 – History CPX-900
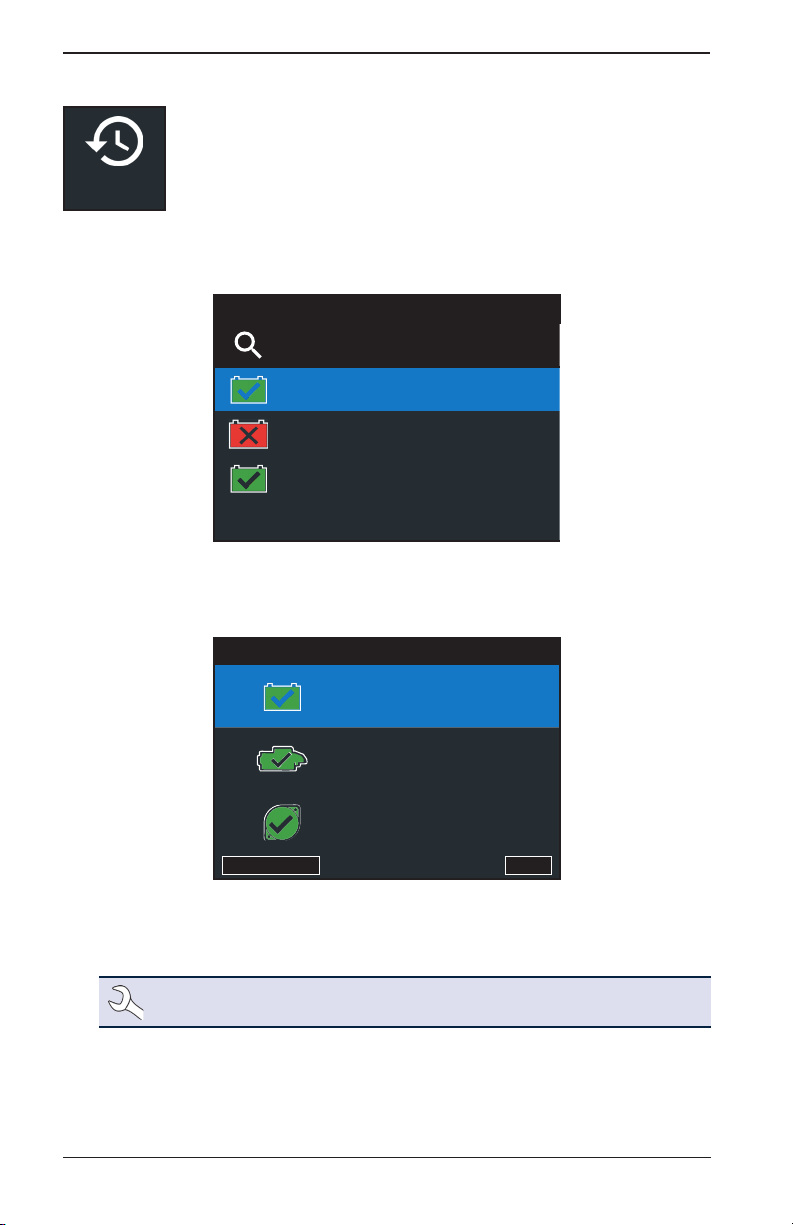
4 – History
Use History to access the tool usage history, a vehicle history based on VIN, and
user histories. The search function can also be used nd test records for specic
History
Press to return to the previous screen, select options and when necessary, to enter or
continue to the next step.
1. At the Main Menu, select History. The Tool History screen is displayed.
vehicles and technicians.
Search Records
In Vehicle Test 1HGEM225X5Lxxxxxx
06/08/2018 12:09 PM
In Vehicle Test
06/08/2018 8:45 AM
Out of Vehicle
06/07/2018 3:16 PM
Tool History
5UXZV4C50D0xxxxxx
No VIN
1/3
2. Select a vehicle record to view the results or select Search Options to search for records by
manually entering a VIN, scanning a VIN, or by test result decision.
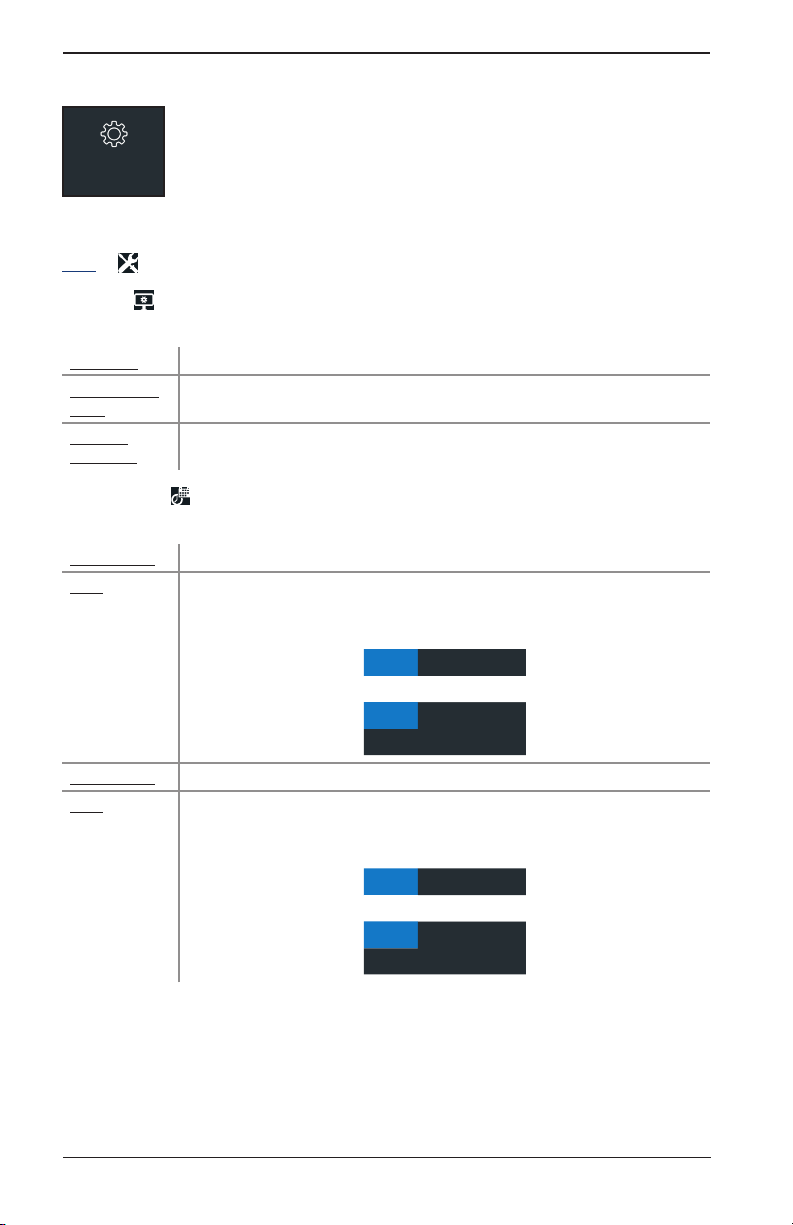
3. For In Vehicle tests, the Summary screen is displayed.
Test Results - Summary
Good Baery
Cranking Normal
Charging Normal
Send Results Done
Test Results - Summary
4. Select the Battery, Cranking, or Alternator Test to view detailed test results for each part of
the test.
NOTE: See Battery Test Results in Chapter 2 - In Vehicle Test for test result screens
and descriptions.
5. To send the test results to a congured printer or via email select Send Results. To return to
the Home Screen, select Done to the Main Menu.
16
Midtronics Inc. 7000 Monroe Street Willowbrook, IL 60527

CPX-900
5 – Messages
The Messages function displays alerts and notications for upcoming tool
software updates.
Messages
Select to return to the previous screen or to return to the Main Menu.
Accessing Messages
A number is displayed next to the Messages icon when the analyzer has
received any critical messages.
Unread Critical Messages
Read Critical Messages
5 – Messages
www.midtronics.com
17
6 – Settings CPX-900
6 – Settings
Use Setup to setup and adjust the tester display and time, shop and
administrative settings, network connectivity, and BMIS settings.
Sengs
Press to return to the previous screen, select options and when necessary, to enter or
continue to the next step.
Tool
Display
Use to return to the Display menu.
Language Select the analyzer default standard language.
Temperature
Units
Number
Separator
Date & Time
Use to return to the Display menu.
Date Format Select Month/Day/Year (MM/DD/YYYY), or Day/Month/Year DD/MM/YYYY.
Date
Select the default temperature units (Fahrenheit/Celsius) used when measuring
battery temperature.
Select the default number display using commas or periods separators.
Use or to advance the month, day, and year. Use or to advance
left or right and move to Cancel or Next. Select Next to save the date or
Cancel to exit without saving.
Time Format Select 12 or 24 Hour Format.
Time
Use or to advance the hours, minutes, and AM/PM setting. Use or
to advance left or right and move to Cancel or Next. Select Next to save the
time or Cancel to exit without saving.
18
June 18 2018
Cancel Next
10 46 AM
Cancel Next
Midtronics Inc. 7000 Monroe Street Willowbrook, IL 60527
CPX-900
6 – Settings
Print Format
Set the default to include Shop Info and State Of Health (SoH) information on test result printouts.
Use to return to the Display menu.
Include
Shop Info
Include
SoH Graph
Press to check and uncheck the box. A checked box indicates the shop
information will be included on printed test results.
Press to check and uncheck the box. A checked box indicates the State Of Health
screen will be included on printed test results.
Work Order
Work Order
Customize
Enable
Work Order
Tex t
Press to check/uncheck the box to enable/disable the function.
Press to check/uncheck the box to enable/disable the ability to customize
Work Order Text.
Use to highlight characters on the displayed keyboard and press
to select. Limit=13 characters. Select Esc to return to the Work Order Settings
screen.
Auto Test
Press to check and uncheck the box. A checked box indicates the tester will immediately begin
testing a battery as soon as it is connected. Use to return to the Tool menu.
NOTE: To expidite the testing procedure, enable the Auto Test function.
VIN Entry
Press to check and uncheck the box. A checked box indicates the VIN Entry option will be
included as part of an In Vehicle Test. Use to return to the Tool menu.
Version
Use to conrm technical information for internal tester software and hardware.
Shop Settings
Admin
Admin
Enable
Admin
Pin
www.midtronics.com
Press to check and uncheck the box. A checked box indicates the Admin
function is enabled.
Use to select a four (4) digit Admin PIN. Select OK to save the PIN or
Cancel to exit without saving. Use to return to the Shop Settings menu.
Cong: Build Number:
Firmware: Serial Number:
Flash: MAC ID:
EEPROM: FCC ID:
Build Date:
19

6 – Settings CPX-900
Shop Info
Use to enter information about the shop in which the tester will be used.
Shop Name Country
Shop Address Phone Number
Shop Address 2 Email Address
City Website
State (Blank)
Zipcode (Blank)
Country (Blank)
With the displayed alphanumeric keypad, u
se to highlight the desired alphanumeric
character.
Select to access the lower case and symbol character maps.
Once all of the alphanumeric characters have been entered, select Save or Esc to exit without saving.
Network
WiFi
Automatic The tester searches for any detectable WiFi networks. A list of detected WiFi
Manual Manually enter Security, SSID, Password, Encryption, and WEP Keys. Select
networks is then displayed on the tester screen. Highlight a displayed network
and press to connect. Press to return to the WiFi Settings screen.
Connect.
BMIS Settings
Username Provided by Midtronics
Password Provided by Midtronics
Client ID Provided by Midtronics
Location ID Provided by Midtronics
20
Midtronics Inc. 7000 Monroe Street Willowbrook, IL 60527
CPX-900
7 – Maintenance & Troubleshooting
7 – Maintenance & Troubleshooting
Tester Cables
The test cables that come with your analyzer are consumable items. Cables are like tires in that
the more you use them and the harder you drive them, the shorter their useful life. Here are a few
things you can do to protect your test cables from damage and premature wear:
Cleaning Clamps
• The grease, dirt, and sulfation that build up on battery terminals are highly corrosive and can
damage the clamps over time. Before connecting the clamps, ensure accurate test readings
and protect the clamps by cleaning the battery case and terminals using a wire brush and a
mixture of water and baking soda.
• Periodically clean the clamps using a mixture of baking soda and water, or a mild hand-soap,
and a small bristle brush.
• To protect the clamps from oil and dirt, clip them to the Clamp Tab on the back of the analyzer.
Clamp Tab
Handling Test Cables
• Always connect and disconnect the clamps to the battery by opening and closing the clamps.
Never pull on the test cables to remove the battery clamps. Pulling can damage the Y-junction, the cables, and the clamps to the extent that the analyzer may produce lower-thanexpected conductance readings or fail completely.
• Never carry the analyzer by the cables. Carrying the analyzer or swinging it by the cables puts
unnecessary strain on the cables and can result in premature failure. Handle the analyzer with
care to get the maximum use from the product.
Storing Test Cables
• Never wrap the cables around the analyzer; this puts unnecessary strain on the test cables.
Because the test cables are the “tires” of the analyzer, they have a certain life expectancy and will
wear out eventually. However, the abuse examples cited above are not covered under warranty. To
ensure the best performance and longest life of the test cables, attach and remove them with care,
and carry the analyzer and cables together.
If an inspection or a change in test results indicate that the test cables need to be replaced, call
Midtronics Customer Service at 1-800-776-1995.
www.midtronics.com
21
7 – Maintenance & Troubleshooting CPX-900
Printer Paper
The internal printer is shipped with a roll of 2¼" wide by 17/8" in diameter thermal printing paper
installed. Replacement rolls are available through Midtronics or online oce supply websites.
NOTE: Due to production variances some paper roll diameters may be too large.
Please remove paper from roll to recommended 17/8" diameter. DO NOT force cover to
close if roll is too large.
NOTE: The analyzer uses only thermal printing paper.
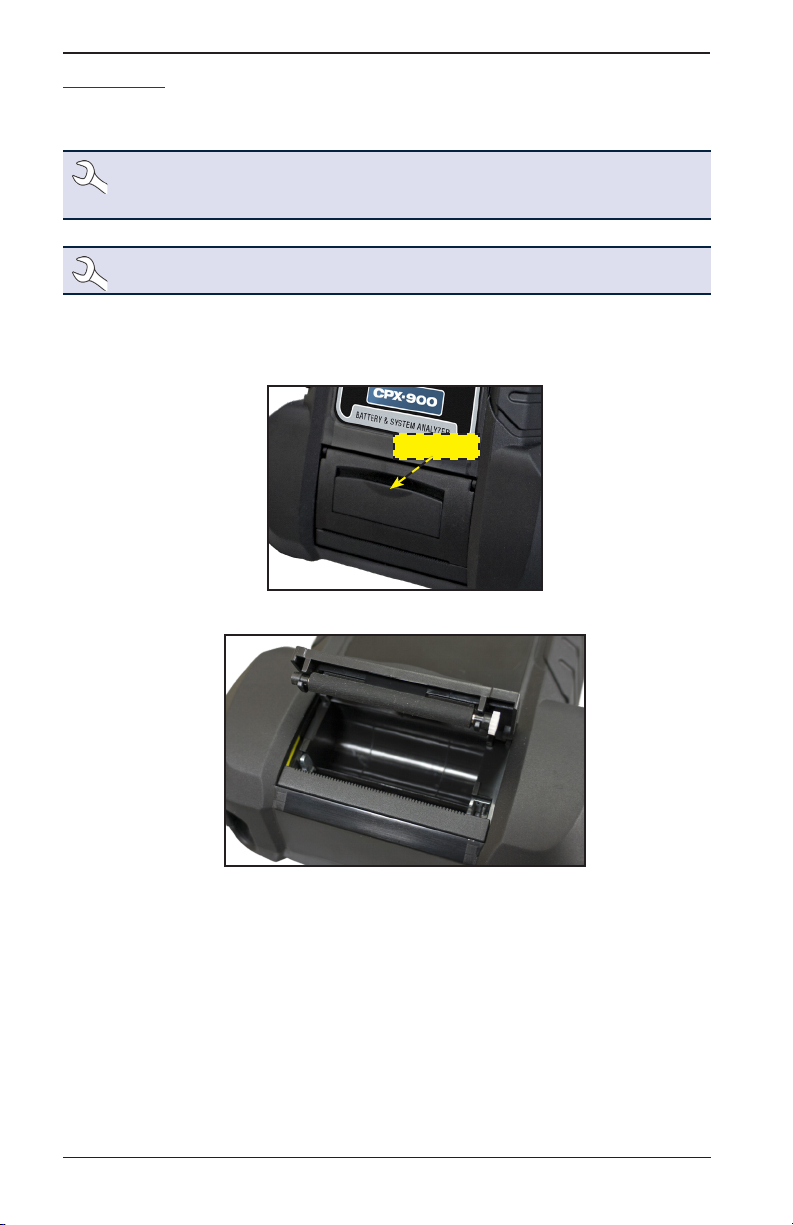
Replacing The Paper Roll
1. Unlock the printer door by gently lifting up on the release.
Release
2. Lift the printer door and remove the spent roll.
3. Place a new roll of paper in the compartment. The paper feeds from the bottom of the roll.
4. Pull the paper forward so that it extends past the serrated edge of the paper slot.
5. Close the door and make sure the lever locks securely. For a clean tear, pull the paper along
the serrated edge. Do not pull the paper straight out of the printer.
22
Midtronics Inc. 7000 Monroe Street Willowbrook, IL 60527
CPX-900
7 – Maintenance & Troubleshooting
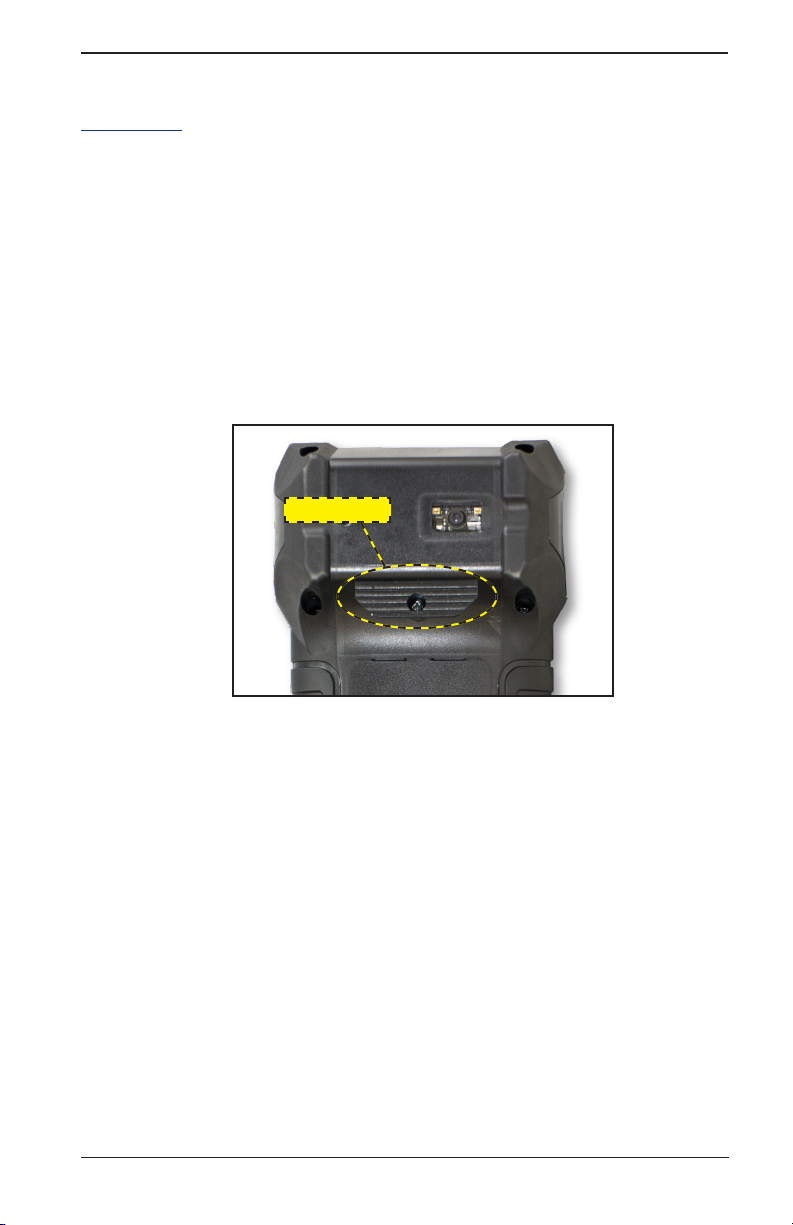
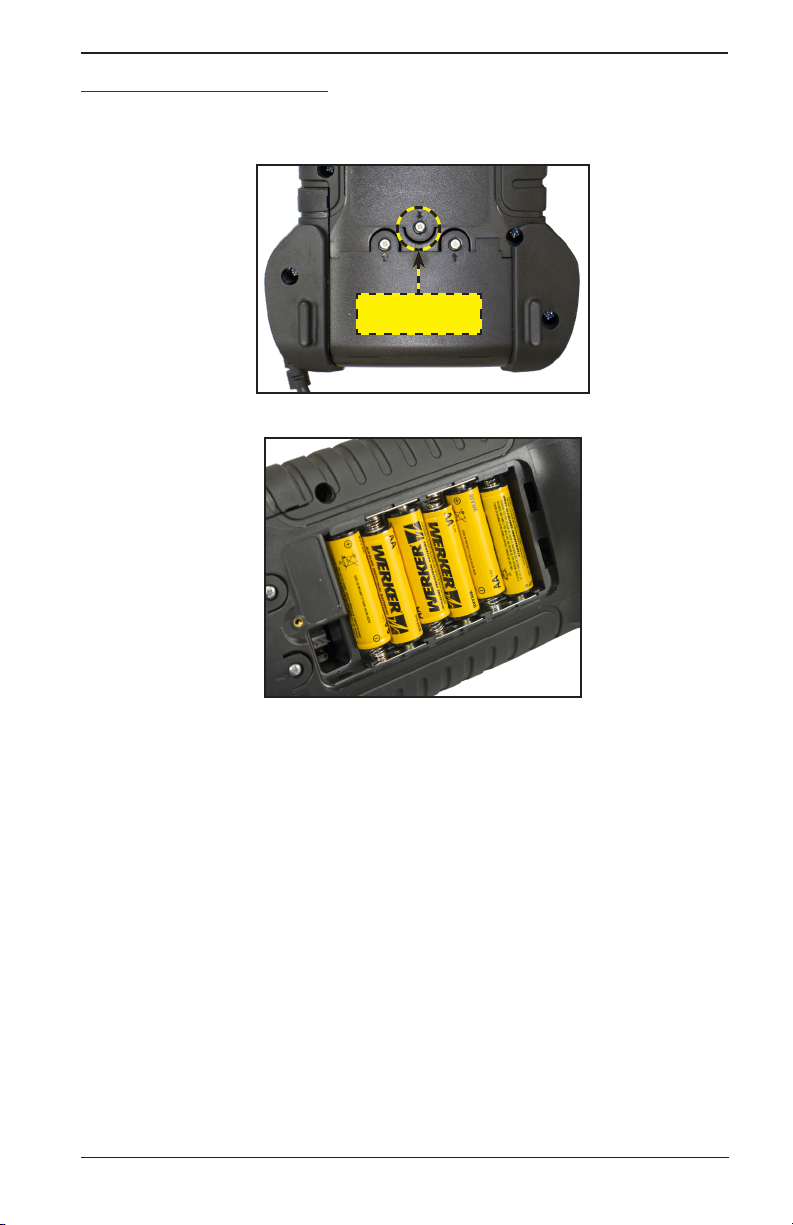
Replacing The Internal Batteries
1. Turn the analyzer face down.
2. Use a Phillips screwdriver to remove the screw securing the door to the battery compartment.
Battery
Cover Screw
3. Lift the door at the tab and place it aside.
4. Remove the discharged batteries.
5. Insert new batteries as shown. Make sure the positive and negative terminals are positioned
correctly.
6. Reposition the door on the battery compartment.
7. Reinsert and tighten the screw.
www.midtronics.com
23
Appendix A: Recommended Scanning Procedure CPX-900
Appendix A: Recommended Scanning Procedure
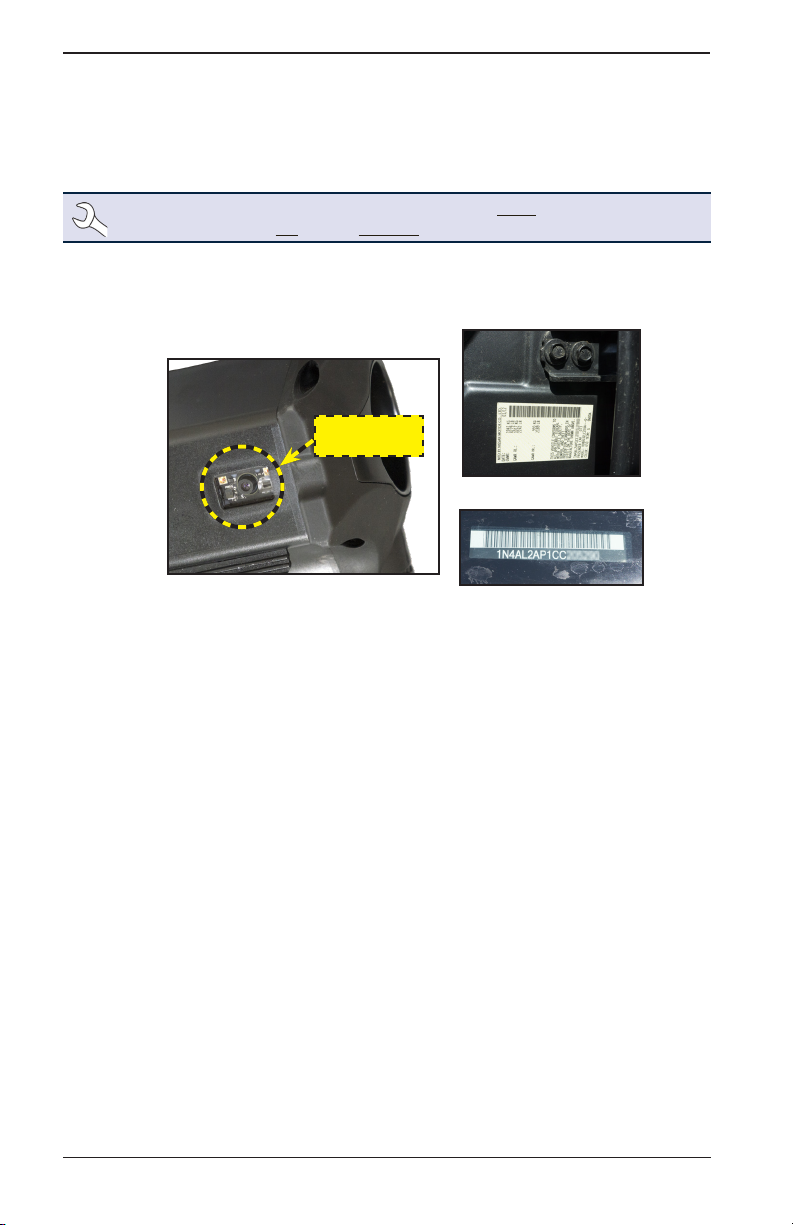
The CPX-900 uses an optional 1D/2D barcode scanner built into the back of the tester to scan the
VIN of the vehicle being tested. This number is then cross referenced with the original equipment
manufacturer's battery specications stored in the tester's database and displayed on the tester
screen.
NOTE:
Barcode types supported by the CPX-900 include A: 1D: Code 39, Code 128, UPC,
Codabar, GS1-Limited; 2D: PDF417, QR Code: Model 2, and Data Matrix type barcodes.
Scanning Tips
• Barcode Scanner: Located in the upper left portion on the back of the tester.
VIN Barcode
Scanner
Drivers Door Frame
Windshield
• Hold Steady: Hold the tester steady when scanning the VIN barcode. This allows the user to
clearly see the barcode and allows the scanner to focus on it.
• Clean Barcode/Windshield: Surface dirt can interfere with the scanning process. If necessary
wipe the VIN barcode with a cloth or your nger remove any surface dirt.
• Lighting/Glare: If sunlight is shining directly onto the VIN barcode, try pivoting the scanner
up or down slightly to reduce any glare.
24
Midtronics Inc. 7000 Monroe Street Willowbrook, IL 60527

CPX-900
Appendix B:Test Results Decision Tables
Battery Test Results
Decision
Good Battery
Good
Recharge
Charge &
Retest
Replace
Battery
Badcell Short
Replace
Cranking
Health
Good Battery Good Battery Battery meets or exceeds required standards.
Good Battery Unknown
Good
Recharge
Charge &
Retest
Badcell
Replace Short
Charge &
Retest
Good Battery Replace
Good
Recharge
Replace
Battery
Replace
Battery
Replace
Battery
Badcell
Replace Short
Badcell
Replace Short
Reserve
Capacity
Reserve
Good Battery
Unknown
Reserve
Unknown
Reserve
Charge &
Retest
Replace
Battery
Replace
Battery
Battery
Replace
Battery
Good Battery
Replace
Battery
Unknown
Reserve
Good Battery
Unknown
Reserve
Appendix B:Test Results Decision Tables
Description
Battery meets or exceeds required standards.
Battery is good, but low on charge. Fully charge the battery for
optimal performance and life. Check for causes of low charge.
Battery requires charge to determine condition.
Battery fails to meet industry accepted standards.
Battery is low in charge and shows low reserve capacity. Low
reserve capacity will compromise the battery’s ability to provide
system current and hold a charge.
Battery is good for cranking purpose but shows low reserve
capacity. Low reserve capacity will compromise the battery’s
ability to provide system current and hold a charge.
Battery fails to meet industry accepted standards
www.midtronics.com
25

Appendix B:Test Results Decision Tables CPX-900
Alternator Test Results
Decision Action
The output from the alternator is normal.
Charging
Normal
No Output
Low Output
High
Output
No output detected. Check belts to ensure alternator is rotating when engine is running.
√ Check all alternator connections including to the battery. Clean or replace if necessary and
retest.
√ If the belts and connections are in good working condition, replace alternator or external voltage
regulator.
Alternator not providing enough current to power electrical loads and charge the battery.
√ Check belts to ensure the alternator is rotating with the engine running.
√ Check alternator connections to and from the battery. If loose or heavily corroded, clean or
replace the cable and retest.
Alternator voltage to the battery exceeds normal limits of a functioning regulator.
√ Check for loose and normal ground connections. If no connection problems are found, replace
the regulator.
The normal high limit of a typical automotive regulator is 14.5 volts +/–0.5. Refer to the manufacturer
specications for the correct limit, which may vary by vehicle type.
26
Midtronics Inc. 7000 Monroe Street Willowbrook, IL 60527

CPX-900
Appendix A: Recommended Scanning Procedure
www.midtronics.com
27

PATENTS
This product is made by Midtronics, Inc., and is protected by one or more U.S. and foreign patents.
For specic patent information, contact Midtronics, Inc. at +1 630 323-2800.
Midtronics products are warranted to be free of defects in materials and workmanship for a period
of one (1) year from date of purchase. Midtronics will, at our option, repair or replace the unit with
a re-manufactured unit. This limited warranty applies only to Midtronics products, and does not
cover any other equipment, static damage, water damage, overvoltage damage, dropping the
unit, or damage resulting from extraneous causes including owner misuse. Midtronics is not liable
for any incidental or consequential damages for breach of this warranty. The warranty is void if
owner attempts to disassemble the unit or to modify the cable assembly.
SERVICE
To obtain service, contact Midtronics at 866-592-8052. Have your model and serial numbers ready.
This rst step is critical as we will trouble-shoot the problem(s) over the phone, and many problems
are resolved during this step. If the problem cannot be resolved, then the Customer Service Agent
will issue you a Return Material Authorization (RMA). This number becomes your tracking number.
The nal step is to return the unit to Midtronics freight prepaid (you pay), to the attention of the
RMA number obtained.
In USA:
LIMITED WARRANTY
Midtronics, Inc.
Attn: RMA # xxxxx (this is the RMA number that you must obtain from Midtronics)
7000 Monroe St.
Willowbrook, IL 60527
In Canada:
Midtronics c/o FTN (FTN is Fed-ex Trade Networks –this is NOT a Midtronics facility)
Attn: RMA # xxxxx (this is the RMA number that you must obtain from Midtronics)
7075 Ordan Drive
Mississauga, ON L5T1K6
Midtronics will service and return the unit using the same type of service as received. If Midtronics
determines that the failure was caused by misuse, alteration, accident, or abnormal condition of
operation or handling, purchaser will be billed for the repaired product and it will be returned
freight prepaid with shipping & handling charges added to the invoice. Midtronics products
beyond the warranty period are subject to the repair charges in place at that time. Optional
re-manufacturing service is available to return our products to like-new condition. Out-of-warranty
repairs carry a 3-month warranty. Re-manufactured units purchased from Midtronics are covered
by a 6-month warranty.
www.midtronics.co m
Corporate Headquarters
Willowbrook, IL USA
Phone: 1.630.323.2800
Canadian Inquiries
Toll Free: +1 1 866 592 8052
support.cpx900.com
Midtronics b.v.
European Headquarters
Houten, The Netherlands
Serving Europe, Africa, the Middle
East, and The Netherlands
Phone: +31 306 868 150
Midtronics China
China Operations
Shenzhen, China
Phone: +86 755 2374 1010
167-000848EN-B 10/18 ©2018 Midtronics, Inc. All rights reserved.
Midtronics India
Navi Mumbai, India
Phone: +91 22 2756 4103/1513
Asia/Pacíc (excluding China)
Contact Corporate Headquarters
Phone: +1.630.323.2800
 Loading...