

Page 1
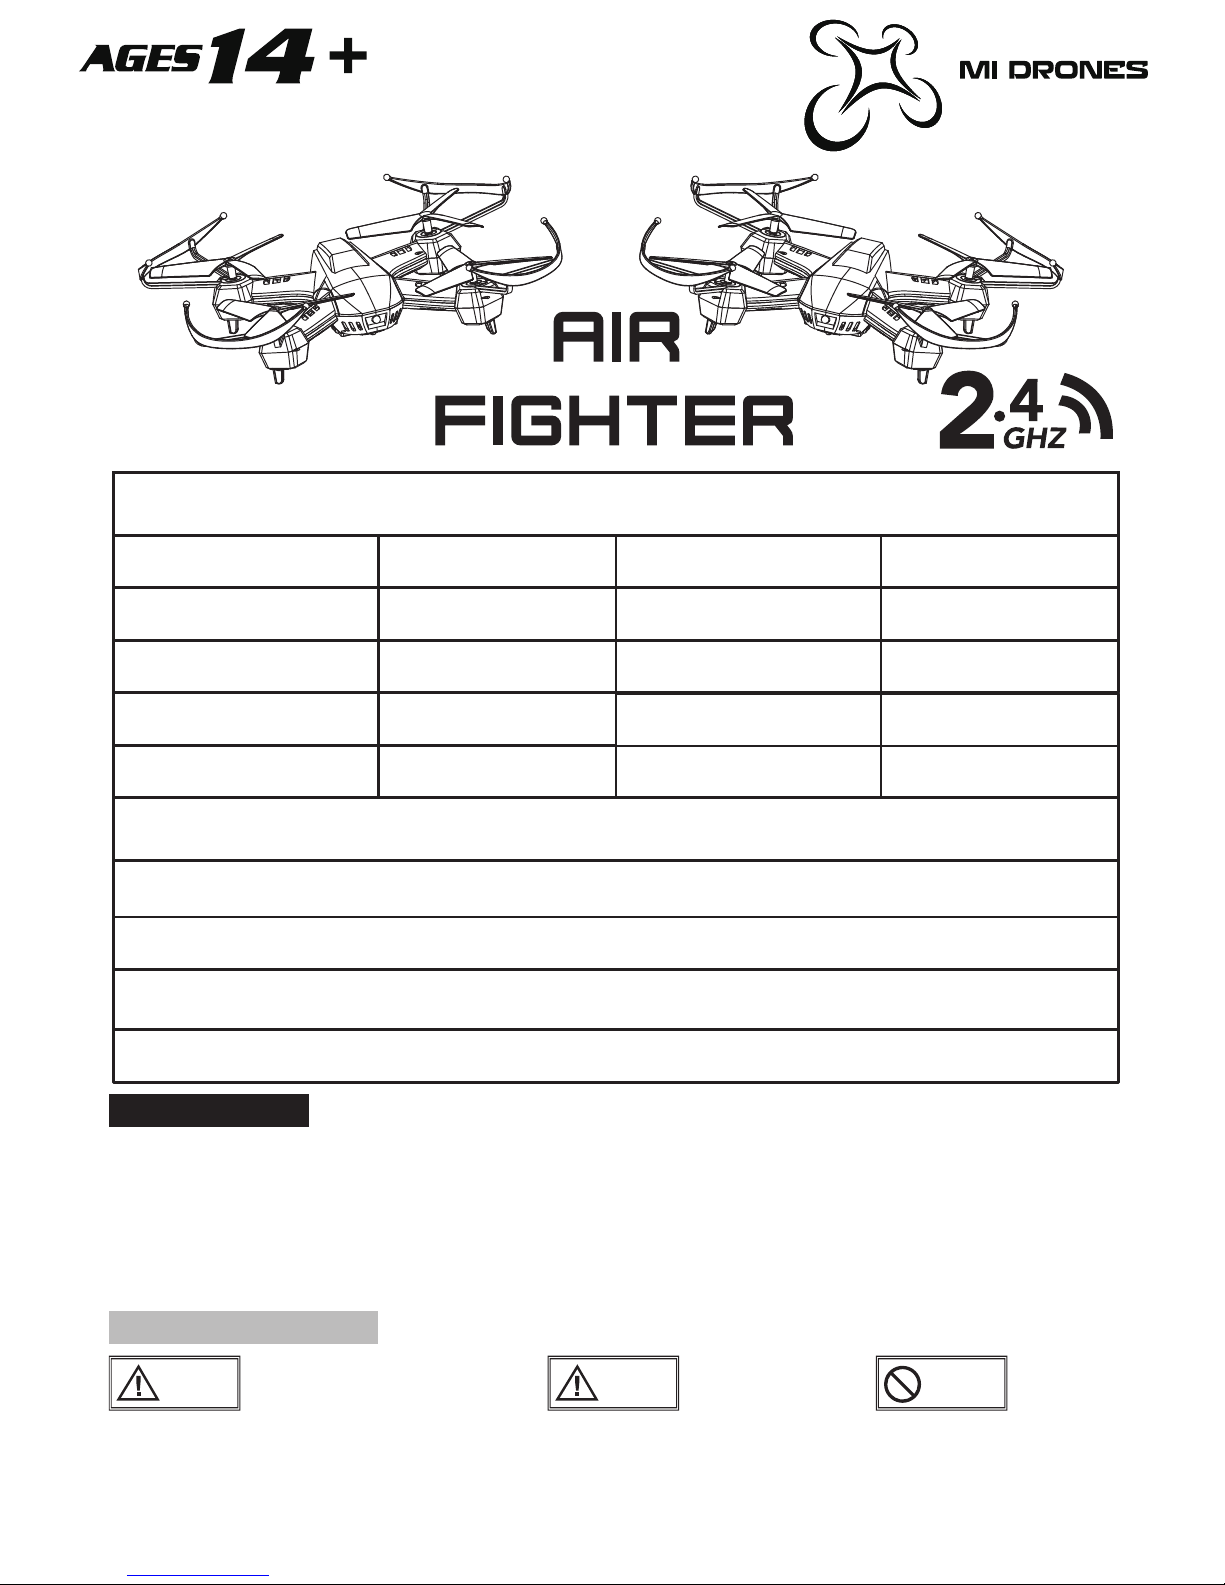
62mm
149mm
38mm
6x15 4pcs
40 min
5-6 min
Main blade diameter
:
Built-in
Gyroscope
:
Frame width
:
Frame height
:
Main motor type
:
149mm
3.7V220mAh
34g±2g
Frame length
:
Battery
:
Total weight
:
Charge time
:
Flight time
:
MAIN PARAMETERS
:
1:the 4 motors within the heli give the heli stable flight and enable it to perform the actions
easily
2:with the modularized structure, it’s easy to install and convenient to disassemble for repair
3:with the 6 axis gyroscope and position control system automated, the heli can be easily
stopped and accurately aloft
4:once fully charged, the 3.7V220mAh Li-Po battery gives approximately 5-6 minutes flight
MIAN FEATURES
:
1.INTRODUCTION
Thanks for choosing MILLENNIAL product! This is a 4 axle aircraft which is capable of flying
in confined space and outdoor, in order for you to maneuver the R.C. helicopter more
conveniently and easily, please fly it only after this instruction manual is carefully read,
in the meantime, this manual shall be properly kept for future necessary adjustment
and repair work.
Suitable for indoor or outdoor which under Grade 3 winds.
WARNING LABEL LEGEND
Mistakes made due to negligence
of these operation instructions may
cause property loss and severe
human injury.
Mistakes made due to
negligence of operation
instruction may cause
danger.
Please do not fly the R.C.
helicopter under any
specified forbidden
environment.
WARNING
CAUTION
FORBIDDEN
1
Page 2
IMPORTANT NOTES
This RC drone is not a toy, though it is just a mini RC 4 axle drone, it still could be
dangerous. Please fly the model RC drone according to the manual instruction and its
notices. Any modification, maloperation or unfamiliarity to the heli could bring about
unexpected danger or accident, please be prudent.
NOTE: for any RC drone, neither manufacture nor dealers is responsible for any
losses caused by maloperation or improper assembly or accidents owing to abnormal
abrasion or inappropriate environment. This product is suitable for 14years old and
above. Please only operate the heli in safety environment, once sold; MILLENNIAL will not
hold any responsibilities for property loss and personal injury caused by maloperation,
disassembly and modification.
This model RC drone requires high operation skills and is consumable. After itspackage
is opened and the heli is flown, varying degree of abrasions occur. Malfunction or
dissatisfactory brought about during usage will not be entitled to replacement nor
return. In case of operation and repair instruction, please contact MILLENNIAL and our
agencies for technical support and after sale service.
2.SAFETY NOTES
R.C model and 4 axle aircrafts are products with danger; it must be away
from the crowd when flying. Misassemble, defect, poor performance of the
electronic control or improperoperation could lead to unexpected incident like
plane damage or personal injury. Please pay attention to flight safety and make sure it is
well understood that responsibility will fall on the player for accidents caused by himself.
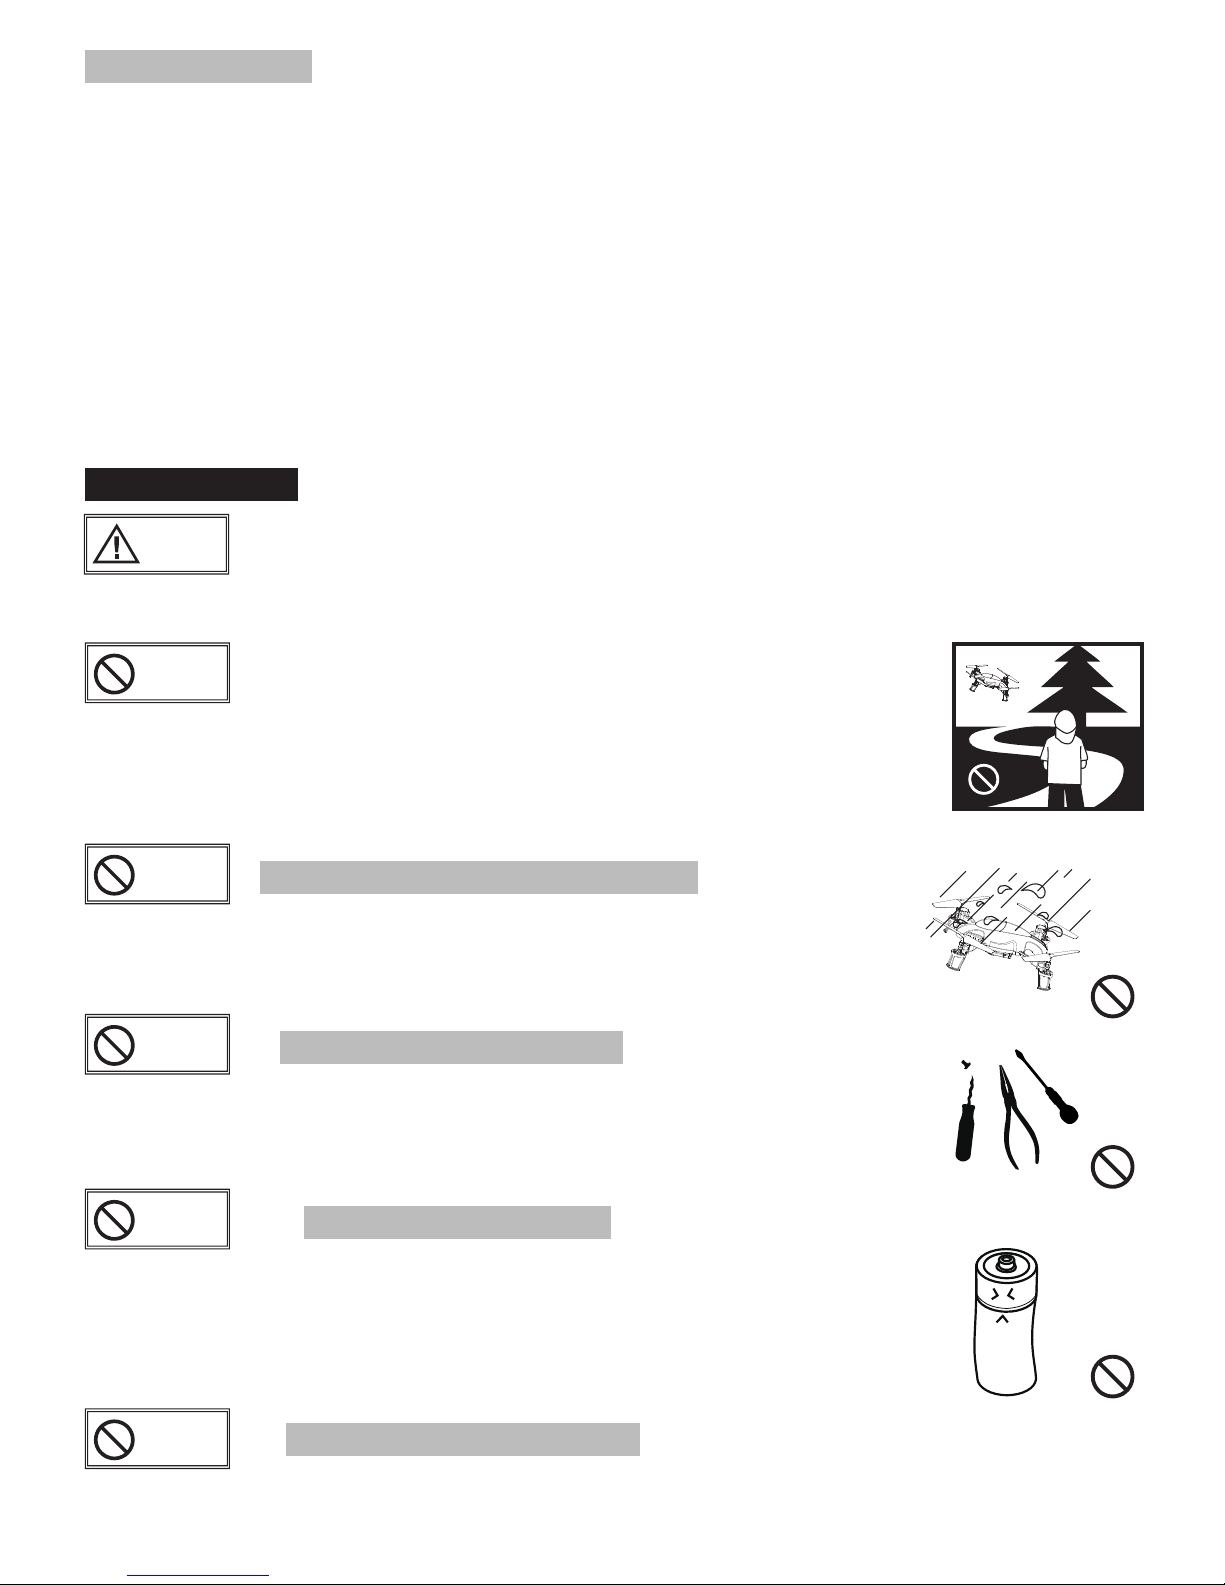
R.C. heli. is for indoor and outdoor use only, must stay away
from obstacles when flying This product is suitable for indoor
and outdoor (wind scale must be under 4) use only, for
indoor, please make sure it is clear of obstacles; for outdoor, stay away
from crowd and pets etc, do not fly it in improper environment,such as
areas with heat source, power line and power source etc.otherwise, fire
or electric shock,loss of fortuneor personalinjury could occur due to
crash, emergency landing or entwining.
CAUTION
FORBIDDEN
Stay away from damp conditions
The interior of heli consists of many precise electronic and mechanic
components, therefore moisture and water must be prevented and it
shall not be performed in bathroom or in rainy days to avoid breakdown
of the components that may cause unexpected accident
!
FORBIDDEN
Use the product properly
Please do not tear apart or modify the RC heli at will and only apply
authentic MILLENNIAL components to update, replace or fix RC heli to ensure
its safety. Please only maneuver it within its limit. Any illegal purpose of
use concerning its safety shall bestopped.
FORBIDDEN
Attent ions to battery
When install batteries, make sure the electric polarities are correct, do not
mix new batteries with old ones. For long time storage, please take them
out to prevent battery leakage.
Please dispose abandoned batteries in accordance to the laws and
regulations of the corresponding region to prevent pollutionto the
environment.
FORBIDDEN
Instruction for Li-po battery
FORBIDDEN
2
Page 3
LI-Po battery is comparatively more dangerous than other batteries. Please make
sure below instruction is carefully read and rigorously followed prior to using them.
ATTOP shall not be responsible for any damages caused by improper operation of
the battery.
The battery can only be charged by authentic MILLENNIAL charger, otherwise it may
lead to fire or explosion. Do not hit, disassemble, burn or connect them to the
wrong pole. Avoid contact from metal or sharp item otherwise it may cause short
circuit or fire.
Be cautious when charging the battery and make sure it is within sight and beyond
the reach of children to avoid any danger.
Please do not charge the battery if it becomes when during
usage.Otherwise it will inflate, deform or even cause fire which could cause
property damage and personal injury.
Please dispose abandoned batteries in accordance to the law and regulation of
the corresponding region to prevent pollution to the environment.
Stay away from heat source
Most of the RC aircraft are made of PA fiber, plastic and electronic materials
therefore it should stay away from heat source, sun shine to prevent
deformation even damage caused by high temperature.
Not to do it alone
This product is suitable for 14 years old or above. It is not easy to learn to fly
4 axle RC heli at the beginning, try not tofly it alone and make sure with
experience adult instructing.
WARNING
CAUTION
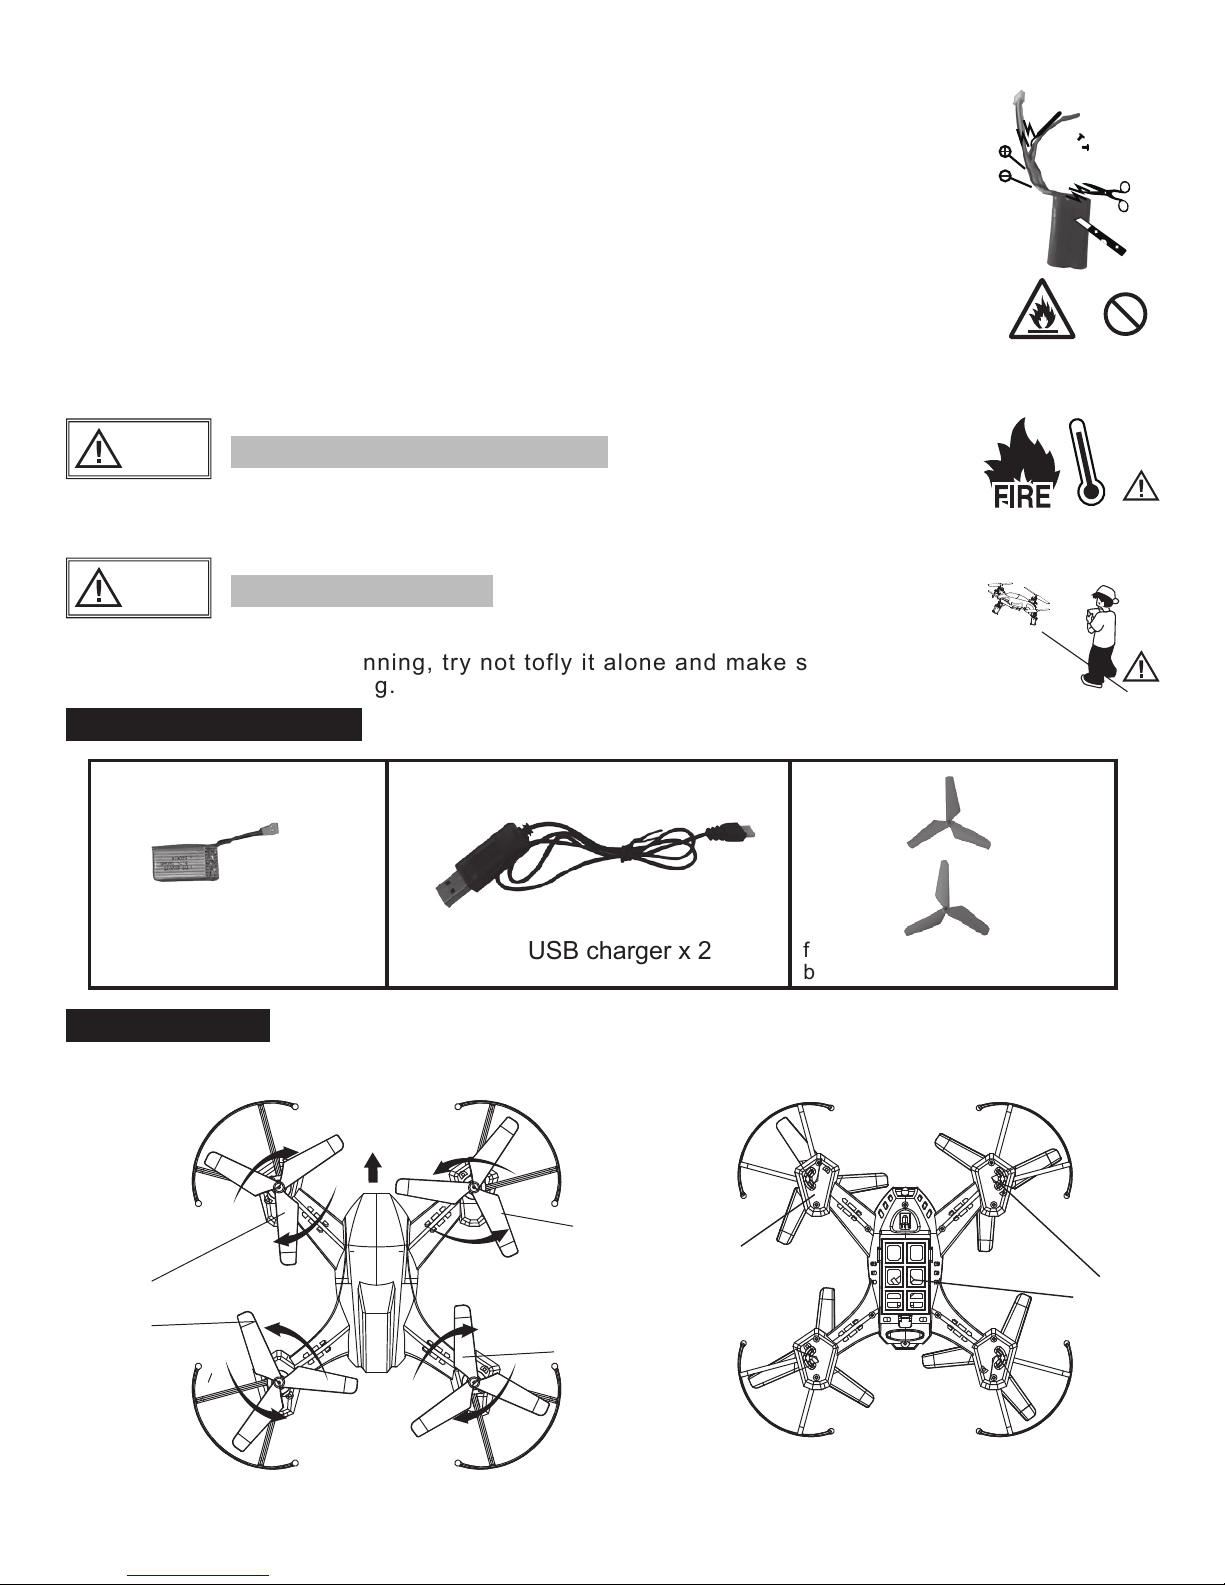
3.STANDARD EQUIPMENT
USB charger x 2
(2)
(1)
forward direction blade *2pcs
backward direction blade *2pcs
Li-Po battery 3.7V 220mAh x 2
4.NOMENCLATURE
3
motor
receiver
motor seat
Head front
2#blade
2#blade
1#blade
1#blade
clockwise
anticlockwise
anticlockwise
clockwise
Page 4
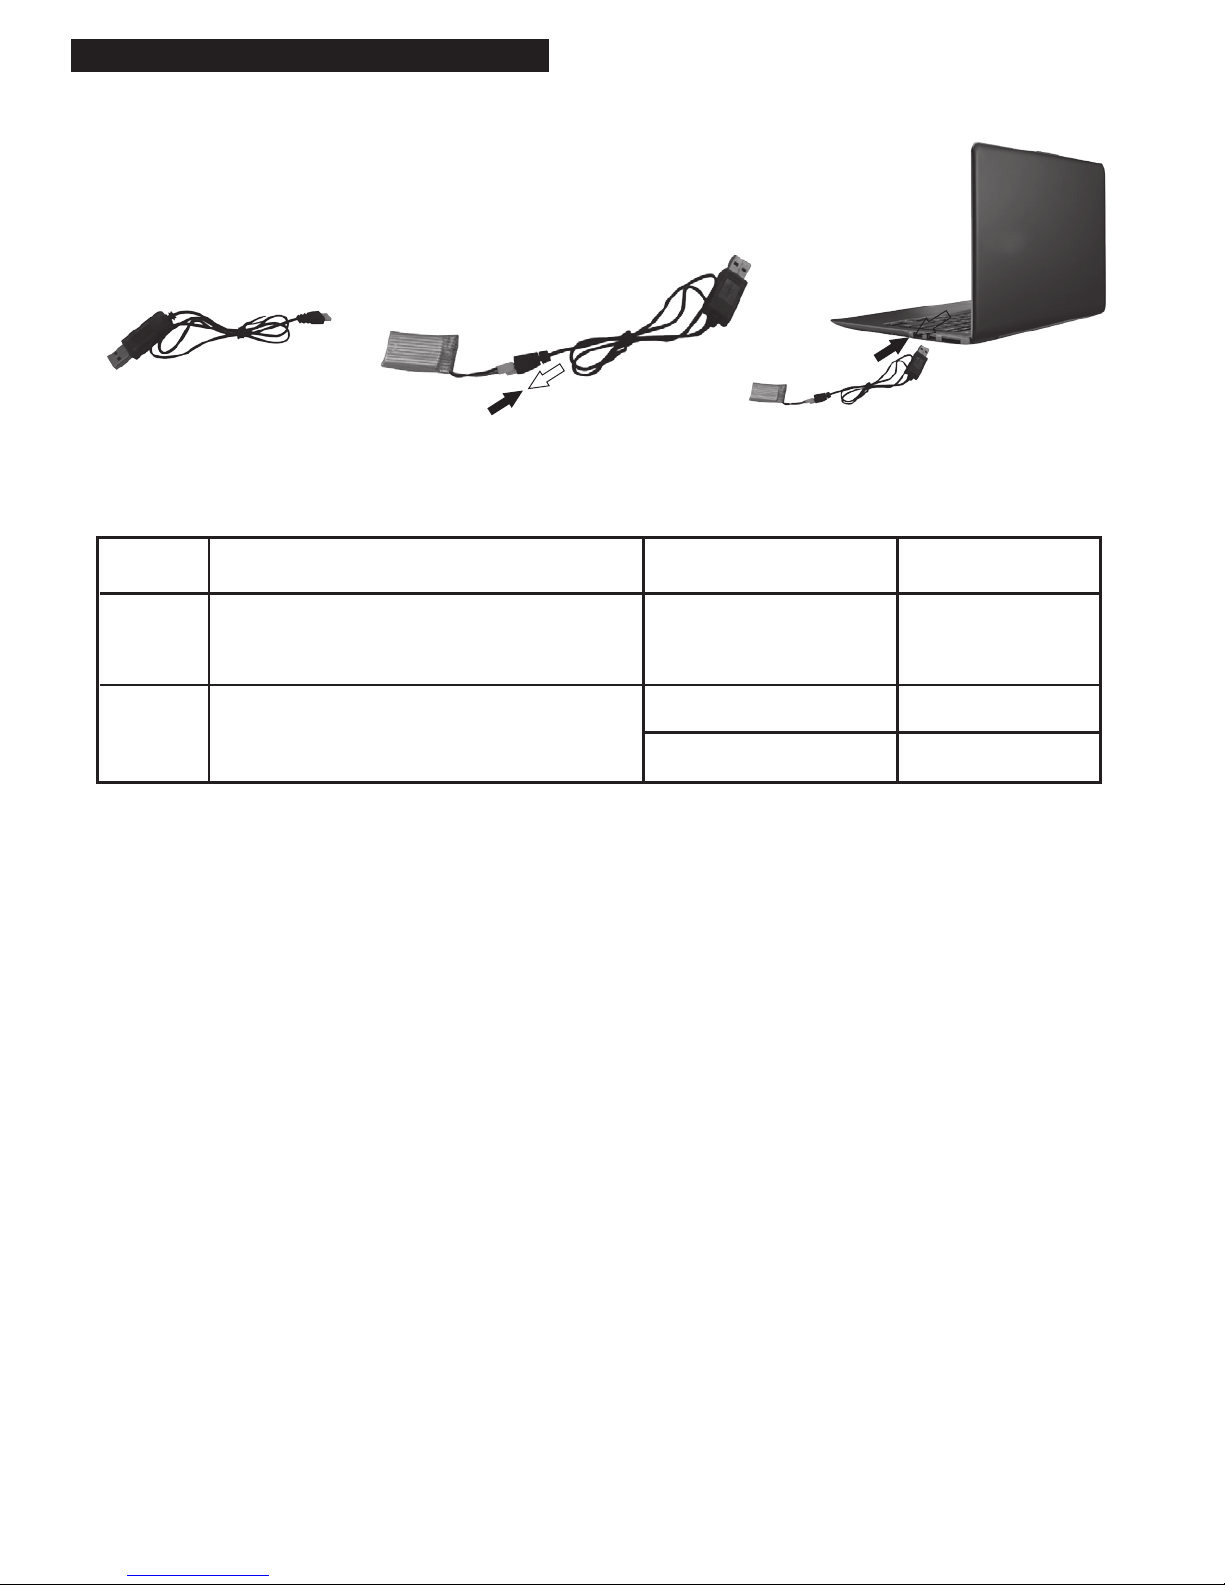
5.Installation and attention of USB charger
4.matters needing attention
(1)
During charging, the charger should be put in dry and ventilated place and far away from heat source and
inflammable and explosive substance.
(2)
Only used to charging Li-ion or Li-polymer battery pack .if not ,the charger or battery may be damaged .
(3)
Never leave the charger unsupervised during the process of charging in order to avoid risk of accidents.
(4)
Never immediately charge your battery pack as soon as the flight is finished ,or when its temperature
doesn’t cool down .otherwise the battery will take a risk in swelling ,even a fire.
(5)
Ensure the correctness of polarity before connection the battery to charger.
(6)
Avoid drop and violence during the process of charging .drop and violence will result in internal short circuit
of the battery.
(7)
For the sake of safety ,please use original charging equipment and battery pack .
please change new one in time when the flying time is becoming shorten due to long time usage .
(8)
If it is retained in the charger for a long time after saturated ,the battery may automatically discharge.
When the charger detects that the voltage of individual cells is lower than the rated voltage, it will re-charge
until saturated. Frequently charging and discharging will shorten the lifetime of your battery pack .It is
advised that please cut off the power and took off the battery after the charging is saturated.
5.Maintenance of battery pack
(1)
The battery pack should be put in dry and ventilated place. The storage temperature of environment is
ranged from 18°C to 25°C.
(2)
Please avoid frequent charging and excessive discharging the battery pack in order to prolong its life cycle.
(3)
It is a must to maintain the battery pack before long-term storage. That is to charge the battery to the level
of 50-60% saturation.
(4)
If the storage term is over 1 month, it is advised to monthly check the voltage of every cell of the battery pack.
The voltage of every cell should be not less than 3V. Otherwise, please refer to the above article (3).
(5)
From the view point of protection, new battery pack should be motivated before usage. That is to charge and
discharge 3-5 times,but discharge is not less than the level of 70% saturation. This process will make the
battery lifetime longer and voltage more stable.
3.Charging statuses corresponding to LED
Step operation
LED status
Charging status
1
2
Connect the USB cable to
the computer
Step 1 + connect the battery pin
to USB cable
LED is in red
LED red light is off
Charging
LED is in red Saturated
Power on
1.
Suitable for (3.7V) Li-polymer battery pack.
3.Operation steps
4
Page 5
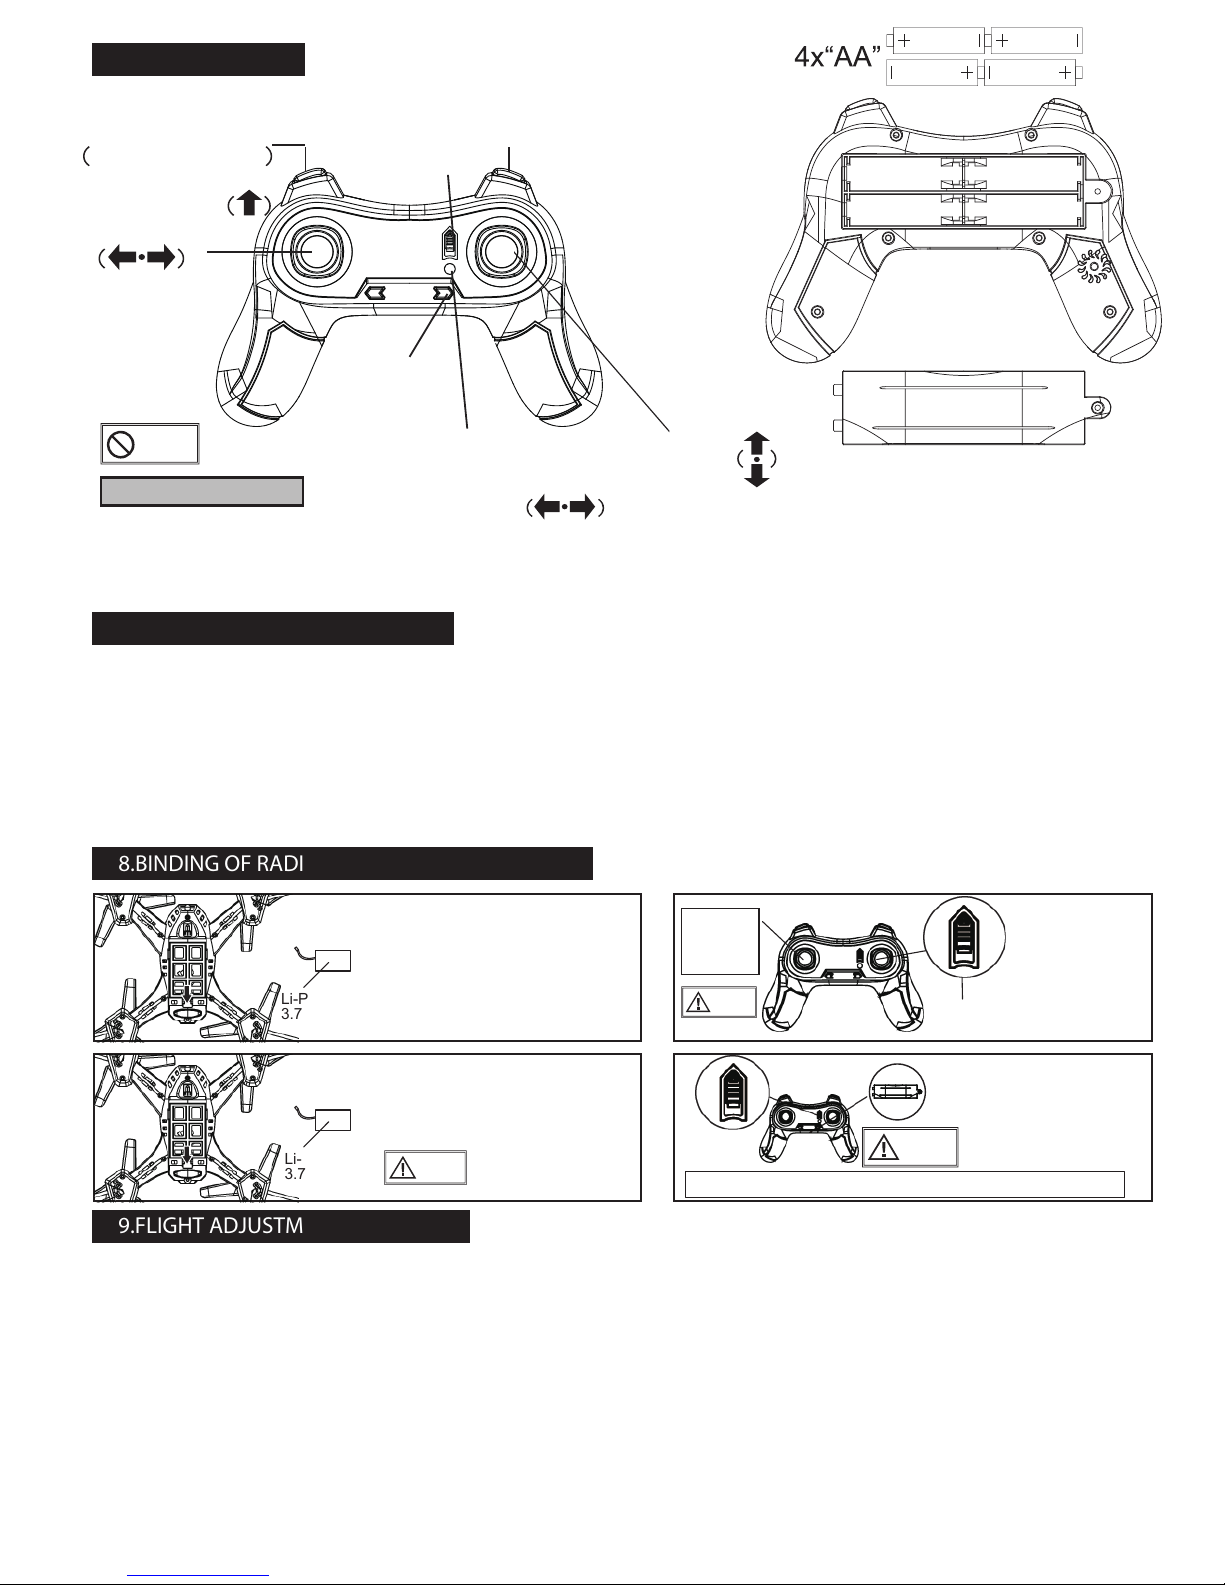
6.NOMENCLATURE
DO not disassemble
FORBIDDEN
(Power indicator light is red; low power is flashing slowly,and flashing fast when searching the frequency)
The model is using the last six-axis gyro system and auto frequency adjusting system,normally the user
don’t need to adjusting the trimmer.User can use trimmer when failed in auto-adjusting.
7.SPECIAL TIPS BEFORE OPERATING
1.Power on the aircraft: Connecting the power of aircraft,then put the aircraft on a flat
ground or table,3 secs rest.
2.power on the remote:the indicator light is flashing,pull the throttle to the top and back
to the lowest.then the remote indicator light is solid lighting,that means the aircraft has
successfully connected with the romote,and you can prepare for your flying action.
3.Notes when flying:Throttle down the throttle stick to the lowest position promptly if the
aircraft is crashing or the rotor block down.Otherwise,the received circuit board will be
damaged.
8.BINDING OF RADIO TRANSMITTER AND RECEIVET
STEP1
put the aircraft on a flat surface
and insert the Li-Po battery as
indicated on the drawing into the
battery box until it is fixed. Do not
move the helicopter and regulate
the lever of remote and gyro to
their center point
Li-Po battery
3.7V 220mAh
Li-Po battery
3.7V 220mAh
CAUTION
put power
joystick to
lower
NO/OFF
power switch
NO/OFF
power switch
STEP2
push the throttle
stick to the lowest
point and switch
on the remoter
power
STEP3
after flight, please remove the battery
from the helicopter and please form
a habit doing this to keep them well
maintained.
if not taken out, they
may be damaged due
to over discharging,
which could even cause
fire
。
WARNING
For long time storage, please remove the battery from
the remote and keep them well maintained.
STEP4
for long time storage, please
remove the batteries and keep
them well maintained.
if taken out, they may be
damaged due to over
discharging,which could
even cause fire.
WARNING
9.FLIGHT ADJUSTMENT AND SETTING
PRIOR TO FLIGHT, PLEASE PRACTICE FIRST
Prior to flight, please practice first so as to acquaint yourself with the operations Before it is
well understood how to maneuver the flight, please do not fly the R.C heli. Please read
instruction manual and keep practicing until the basic flying skills are mastered.
1.put the R.C heli in an open area with its tail facing the player.
2.practice operating all the controlling sticks on the remote (see detailed operation in below
picture) and repeat the practice for throttle sticks, L/R turning trimmer, and F/B flying
trimmer.
3.practice for flight is crucial, please keep practicing until all the operations can be done on
hearing the orders for each movement without thinking
5
speed switch
“ V ” “ S ”
power switch
Flips button
battle switch
Forward/Backward
L/R sideward fly
L/R turning
ascend/descend
power
indicator light
battery
case
40%/70%/100%
Page 6
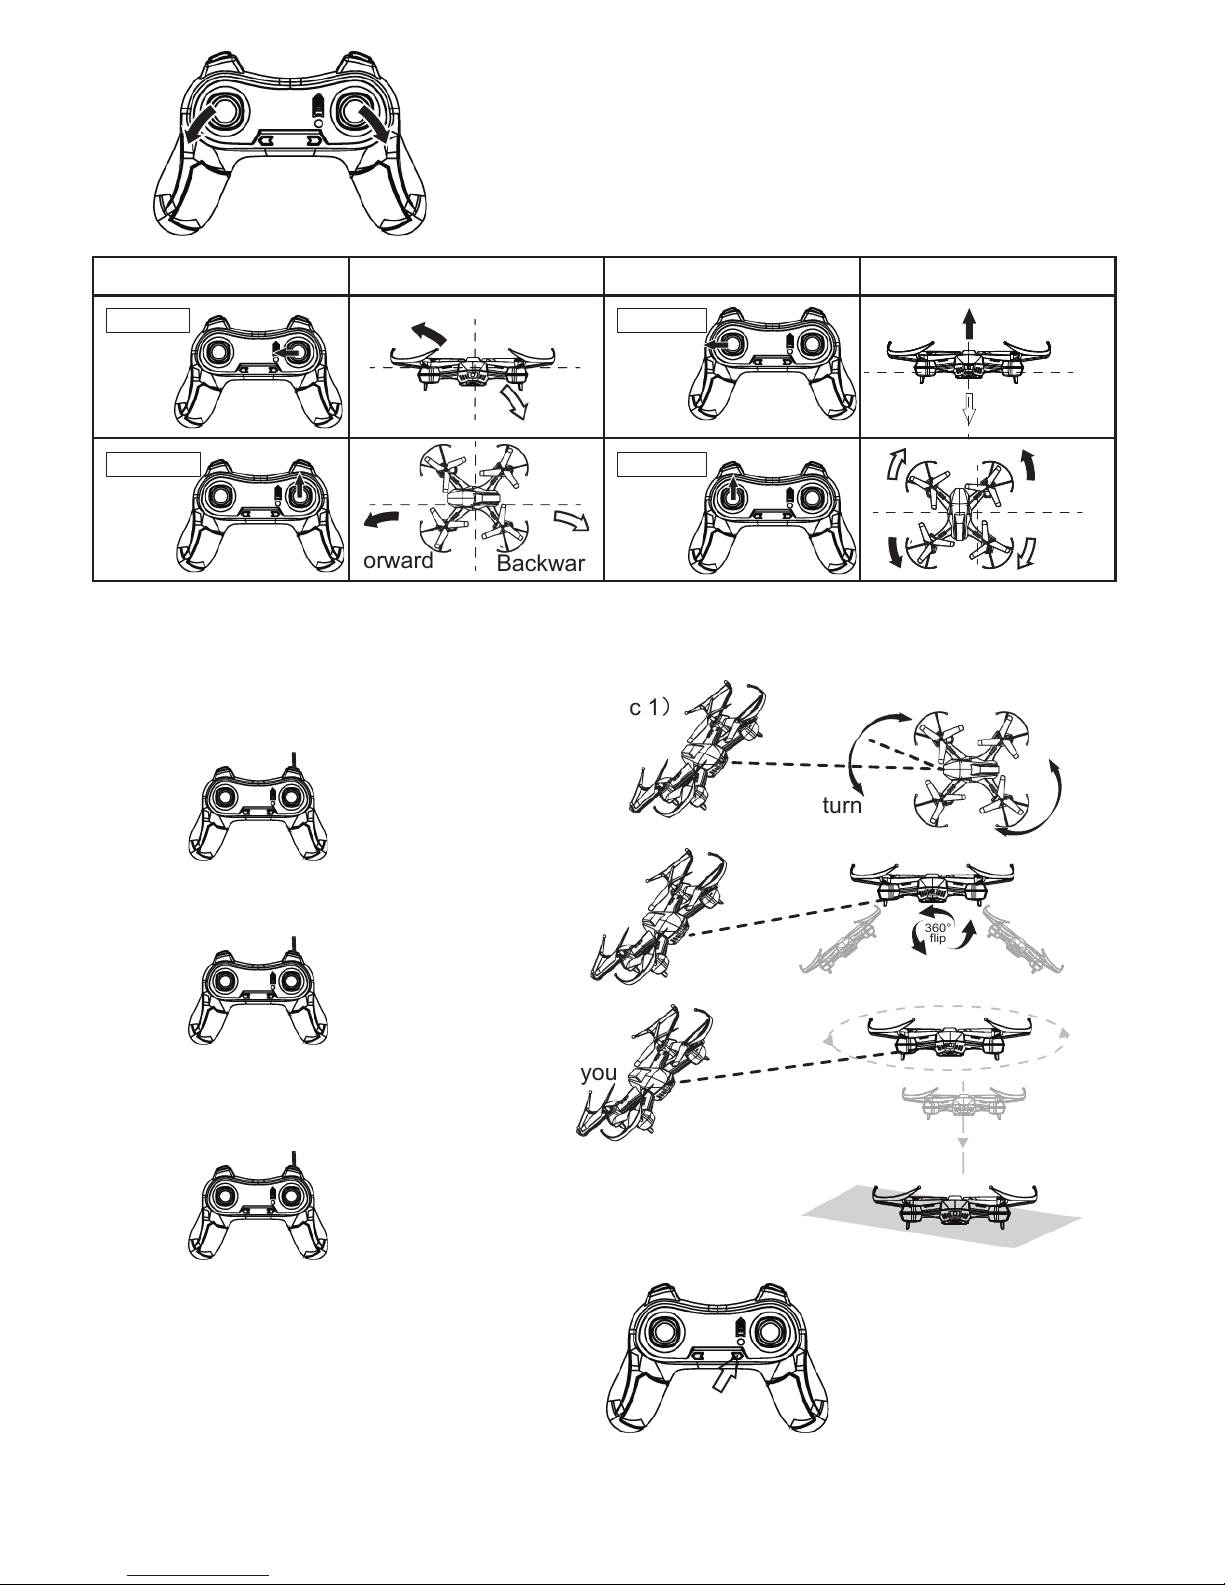
AUTO FREQUENCY ADJUSTING
Pull the left stick to lower left corner and right stick to
lower right corner simultaneously.
After 3 seconds.LED light on the UFO head will flash,
meansthe adjusting is complete.you can control the
quadcopter now.
move left
move right
go up
go down
turn left
turn left
turn
right
turn
right
MODE MODEILLUSTRATION ILLUSTRATION
forward
Backward
Aileron
Elevator Rudder
Throttle
360° flip function operation manual
1.slowly raise the throttle stick
2.keep the UFO flying smoothly in the air.
3.Press the right button once,after “Beep…”
,
the UFO is ready to do 4-ways 360° flip.Now
you can pull the right direction stick to achieve
front,back,left,right side flip.The right direction stick will
auto restore to the default status.Repeat above method
to continue your flip fun.
Vertical pressing the right
top button then“Beep,Beep...”
6
battle switch
battle switch
battle switch
In frared combat functions:
Slowly raise the throttle stick and keep the drones flying smoothly in the air then the combat mode
is ready.
(
pic 1
)
(
pic 2
)
(
pic 3
)
1.The First/Second hits,the drone head is turning(pic 1
)
2.TheThird hit,the drone is flipping.(pic 2
)
3.The Fourth hit,the drone is slowly landing and you
lose in the game.(pic 3
)
360°
flip
Page 7
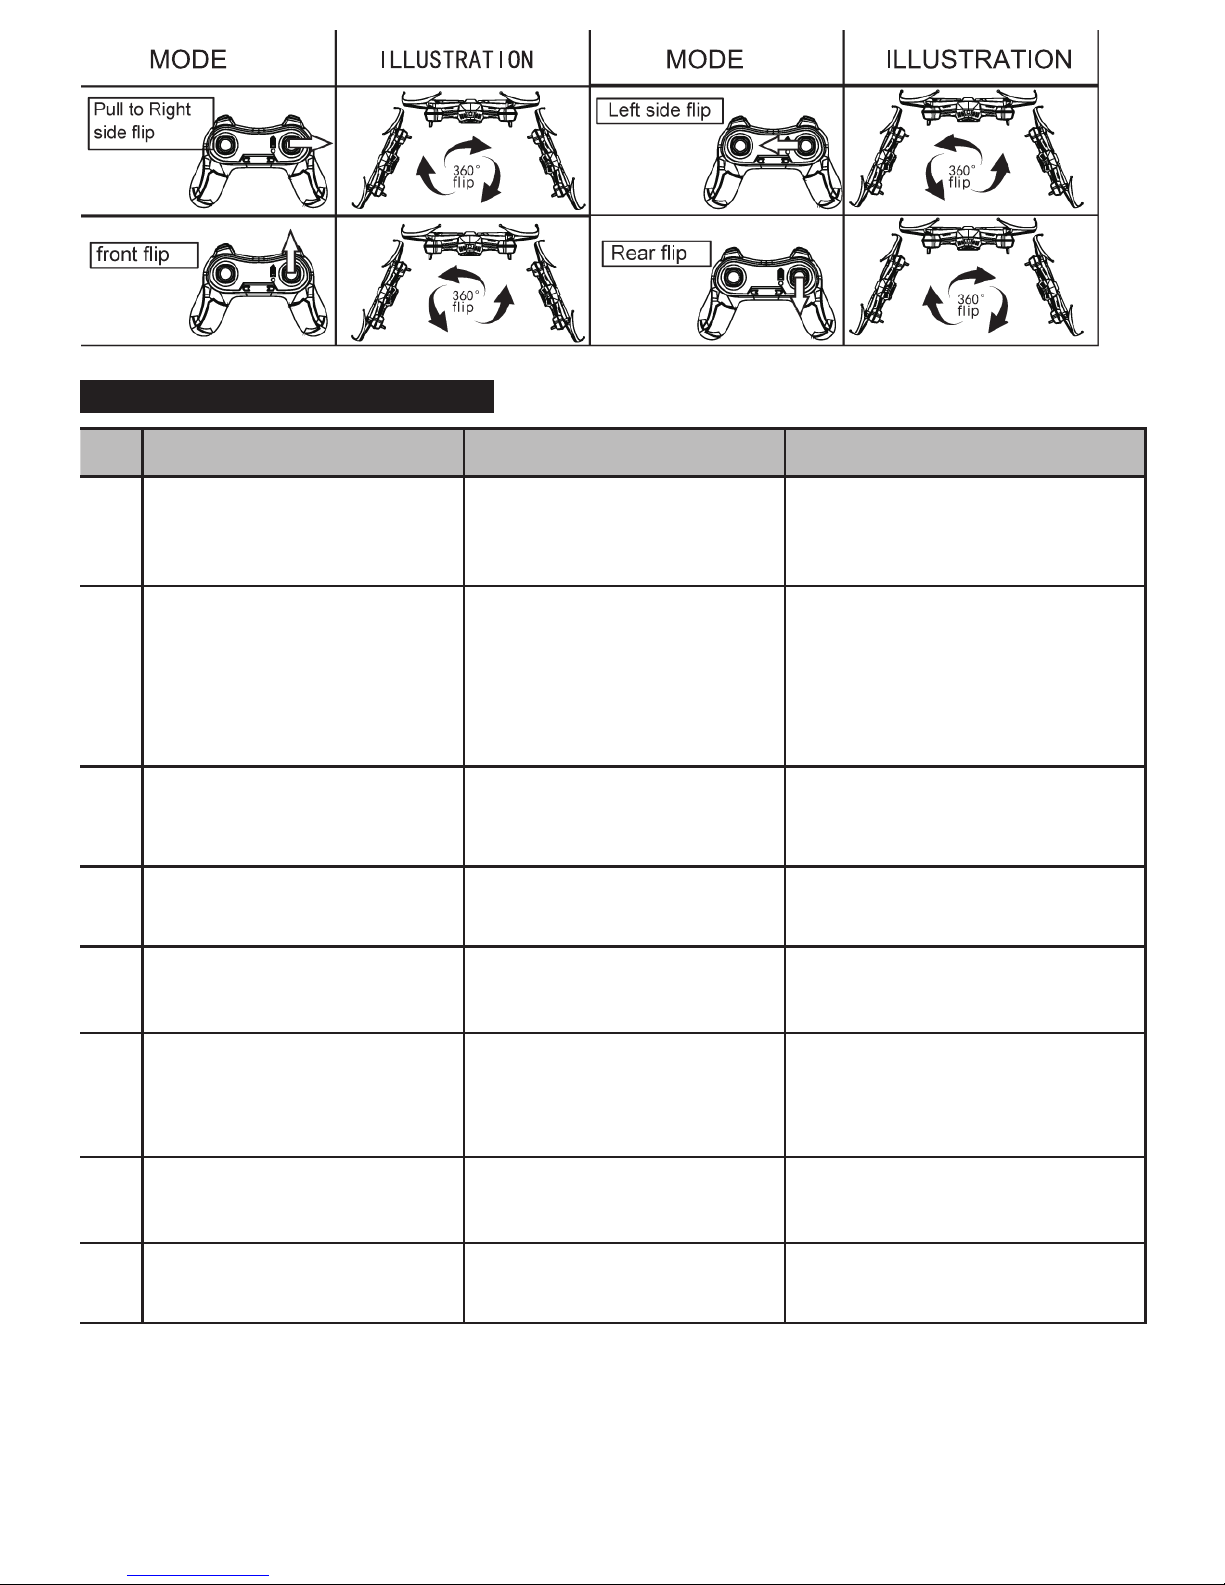
10.TROUBLE SHOOTING DURING FLIGHT
ISSUES CAUSE SUGGESTIONS
1
2
3
6
4
5
8
After the battery is inserted
in the heli, indicator light
on receiver keeps flashing,
no response to operations
No response after battery is
inserted in the heli
Motor does not run when
operating the throttle stick
and the indicator light on
receiver keeps flashing
Main motor blade spins but
heli won’t fly
Heli shakes a lot
Turning trimmer has been
tried but heli still spins,
speed to the right and left
does not conform
It won’t fly after it falls
down
1.main blade has deformed
2.motor does not work wel
1.motor has dropped off
2.gear has loosened
1.reinstall the motor
2.tighten the gear
1.replace main blade
2.replace main motor
1.the blade has deformed
2.battery power is not
enough
1.replace the main blade
2.replace the main frame
1.replace the main blade
2.charge the battery or replace
it with a fully charged battery
Power for the Li-Poly batter
is not enough
Charge the battery or replace it
with a full battery
1.check if the power for
remote and receiver is on
2.check the voltage of the
batteries of remote and
receive
3.contact on the poles are
not good
1.open the transmitter and make
sure if the battery is inserted
in right position
2.use a fully charged battery
3.reinstall the battery and
confirm if the contact for
the pole is o
Frequency adjusting between
remote and receiver not
successful
Readjust frequency for remote
and receiver.(please refer to P.6
for details)
1.main blade has deformed
2.main frame has deformed
7
Heli leans forward/backward
Turn on the heli and center the
climbing and diving trimmer then
restart the heli
Center on the gyro is not
correct
7
Page 8
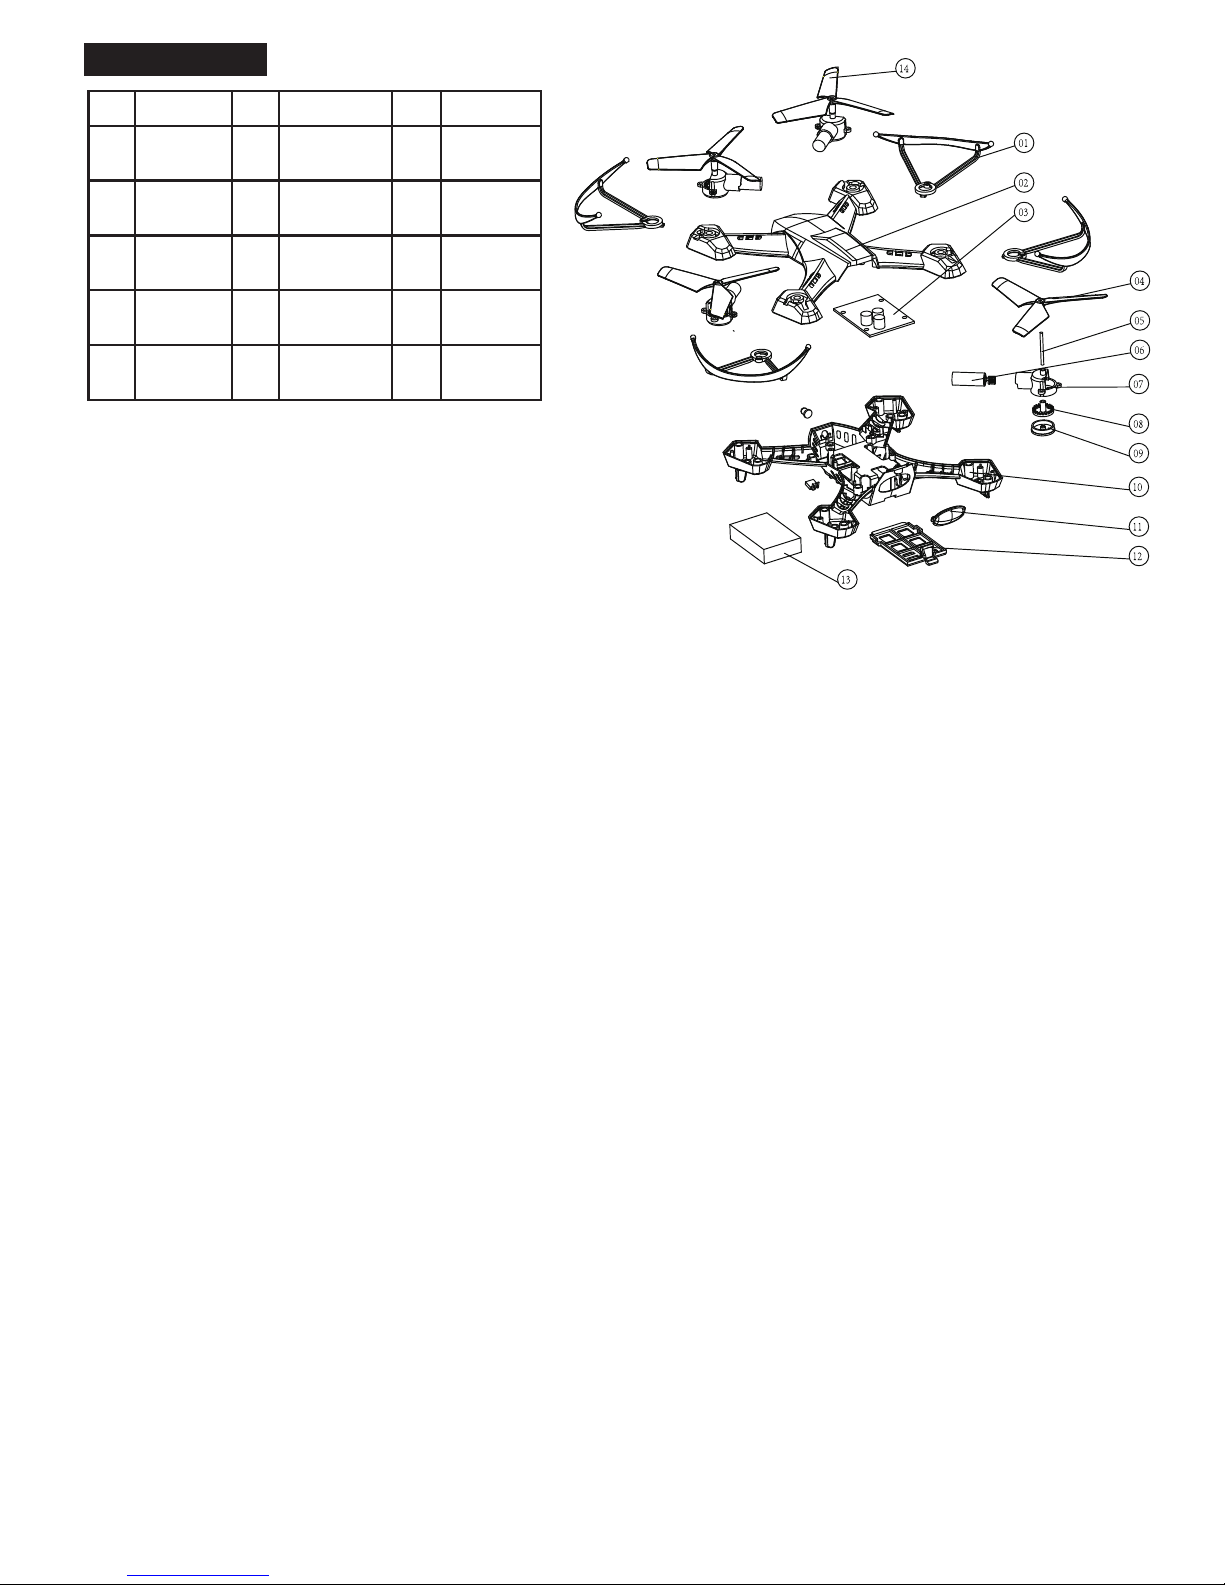
11.PARTS LIST
Materials, specifications for the parts and packing
indicated in the instruction manual are only for
reference, MILLENNIAL will not be responsible for their
changes in future nor could we notify consumers.
8
NO
1
4
7
10
13
NAME NO NAME NO NAME
2
5
8
11
14
3
6
9
12
Airframe
housing
Upper
housing
Receiving
board
Rotor A
Main
motor
Gear
cover
Main
gear
Lower
housing
Motor
seat
Battery
door
Transparent
parts
Li-battery Rotor B
Main
axle
 Loading...