

Page 1

Mi Drone 4K User Manual
Please read the user manual carefully before using and keep the manual for future reference
Page 2

Page 3
Important Safety Information
Scan the QR code to download Mi Drone App
This product does not suit those aged below 18.
Keep away from airports, railways, highways, high-rises, electric wires and areas where drones are restricted.
Keep away from telecommunication base stations, high-power antennas and areas with complex electromagnetic signals.
Flight distance and altitude are subject to regulations set forth by government and regulatory agencies.
Do not use this product in restricted areas.
For your rights and interests, please abide by safety instructions.
Fly only in open areas, and keep away from people, animals, tre es, vehicles and buildings.
Page 4
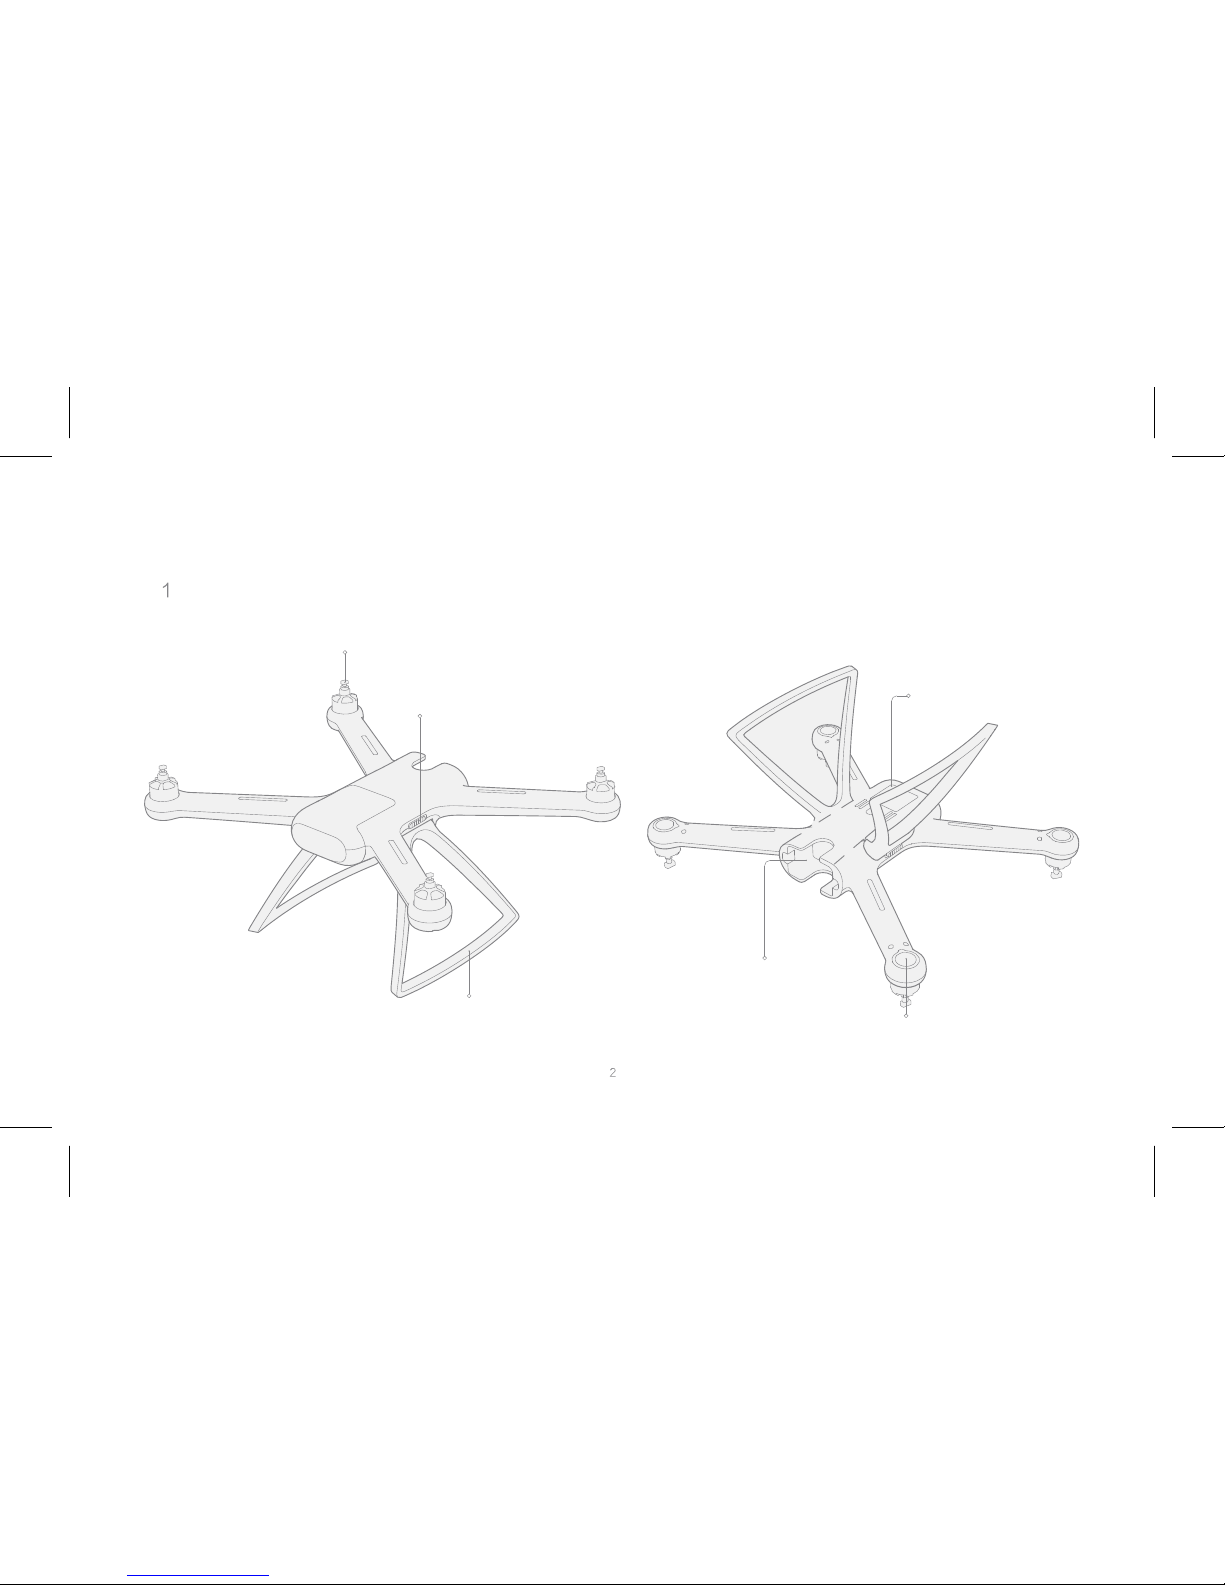
Product Overview
Aircraft
Motor
Landing Gear Lock
Gimbal Cap
Battery Compartment
Flight Status Indicator
Landing Gear
Note: landing gear is retracted in the box.
Page 5
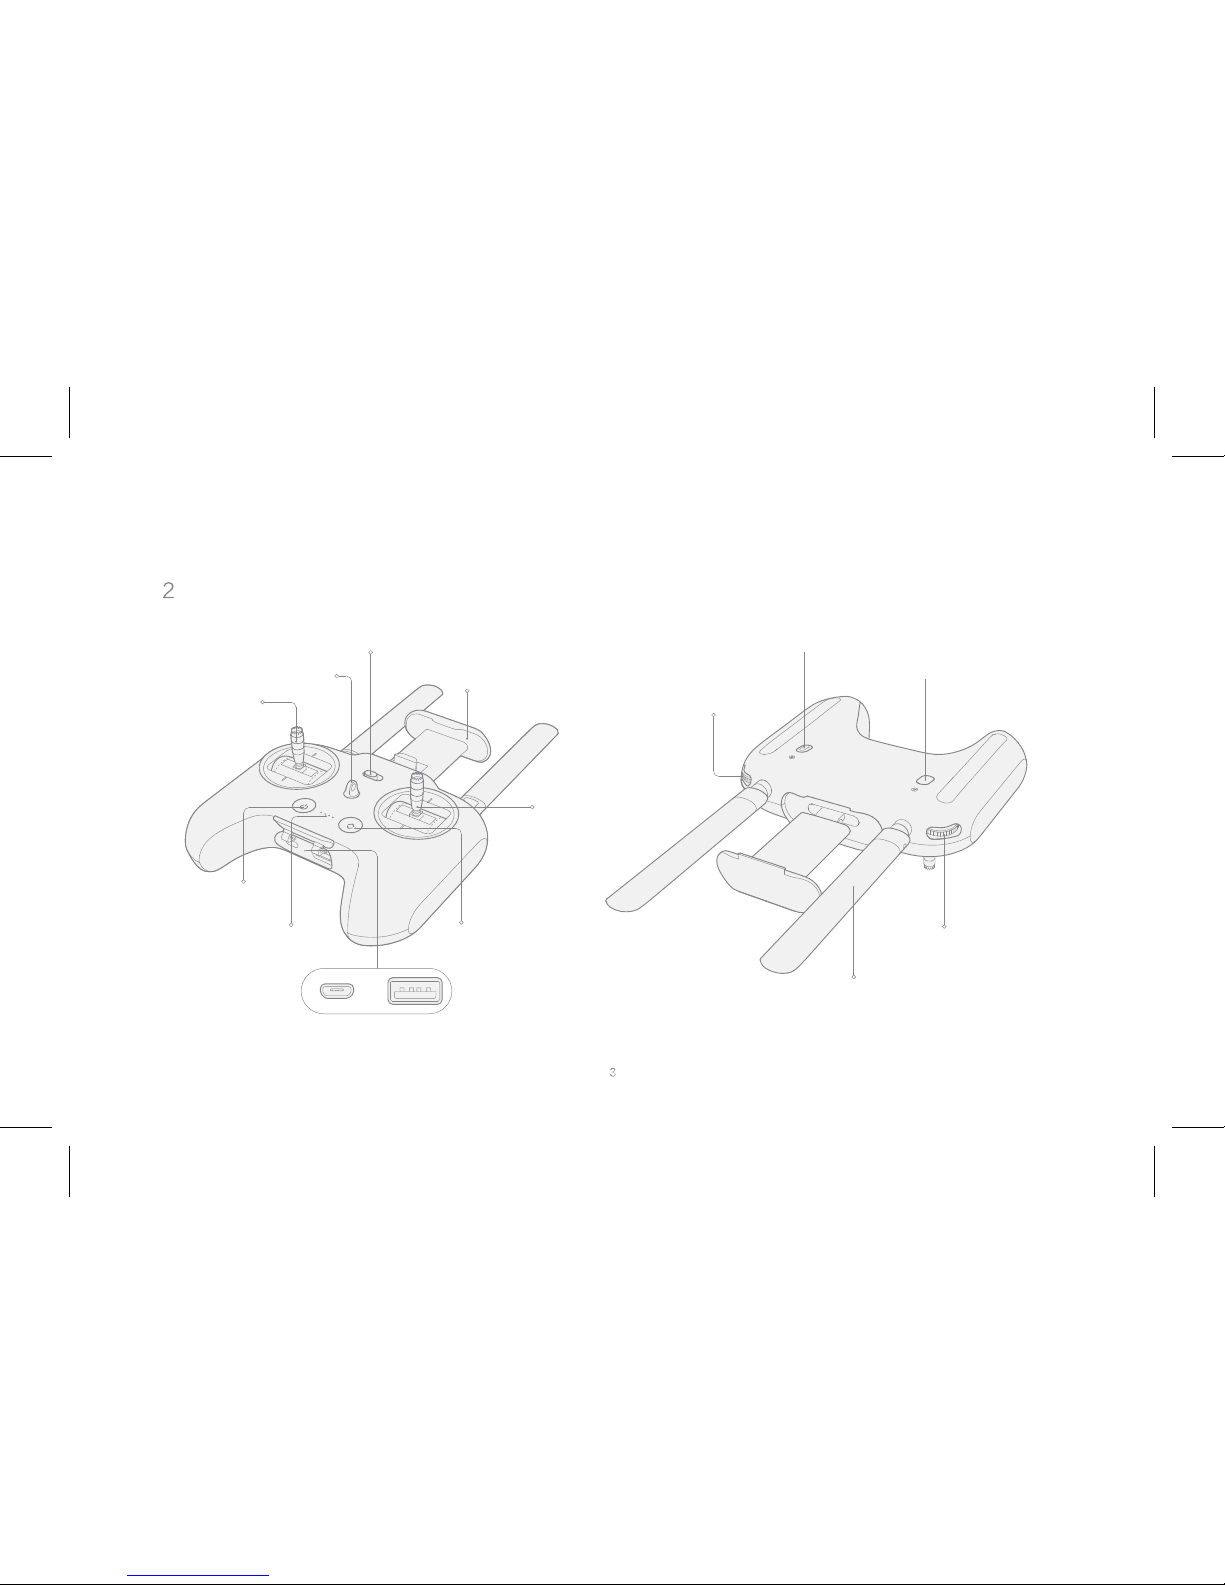
Product Overview
Remote
Course/Home Lock
Lanyard Hole
Phone Holder
Left Roller
Video Button
Camera Button
Right Roller
Antenna
Right Stick
Power Button
Battery Level Indicator Auto Take-off/Land Button
Charging Port
USB Port
Left Stick
Note: left roller and video/camera button are used for controlling
gimbal camera.
Page 6
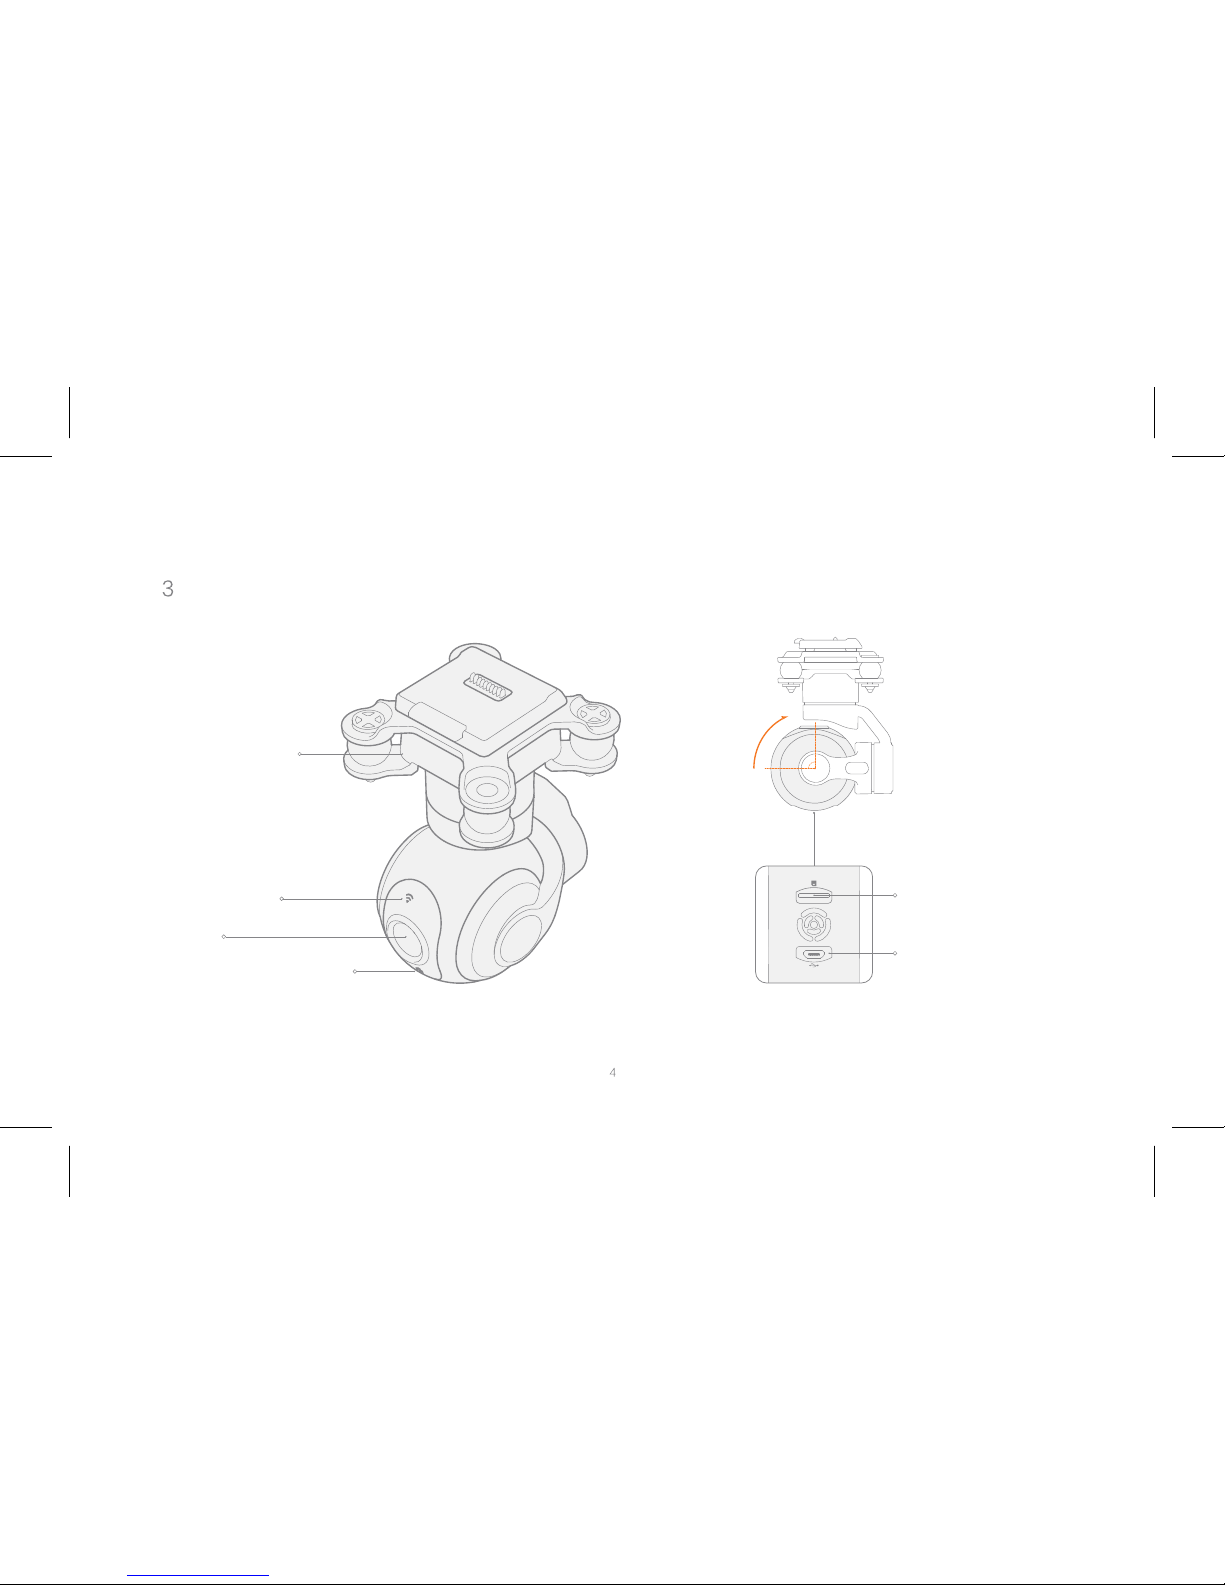
Product Overview
Gimbal and Camera
Shock Absorber
Link Indicator
Lens
Camera Status Indicator
Micro SD Card Slot
USB Port
Page 7
Product Overview
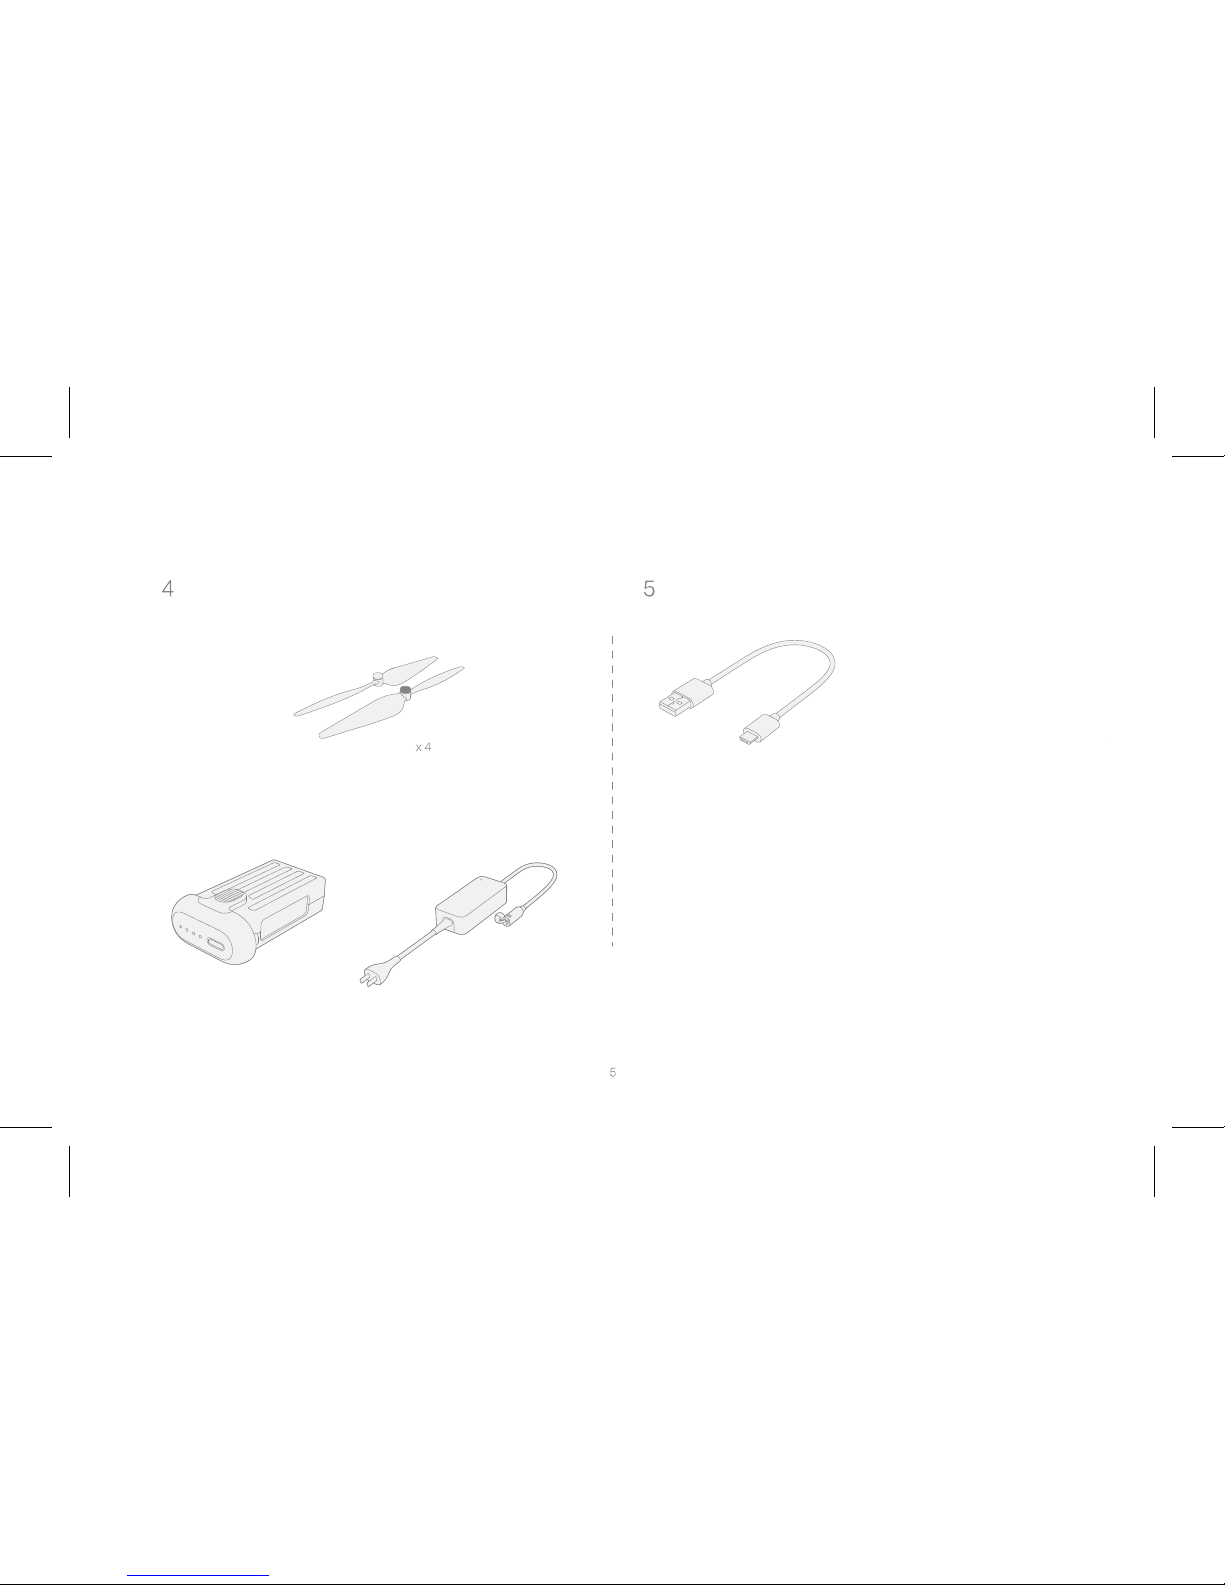
Accessories Tool Box
Propellers
USB Cable
Battery
Charger
Page 8
Charging
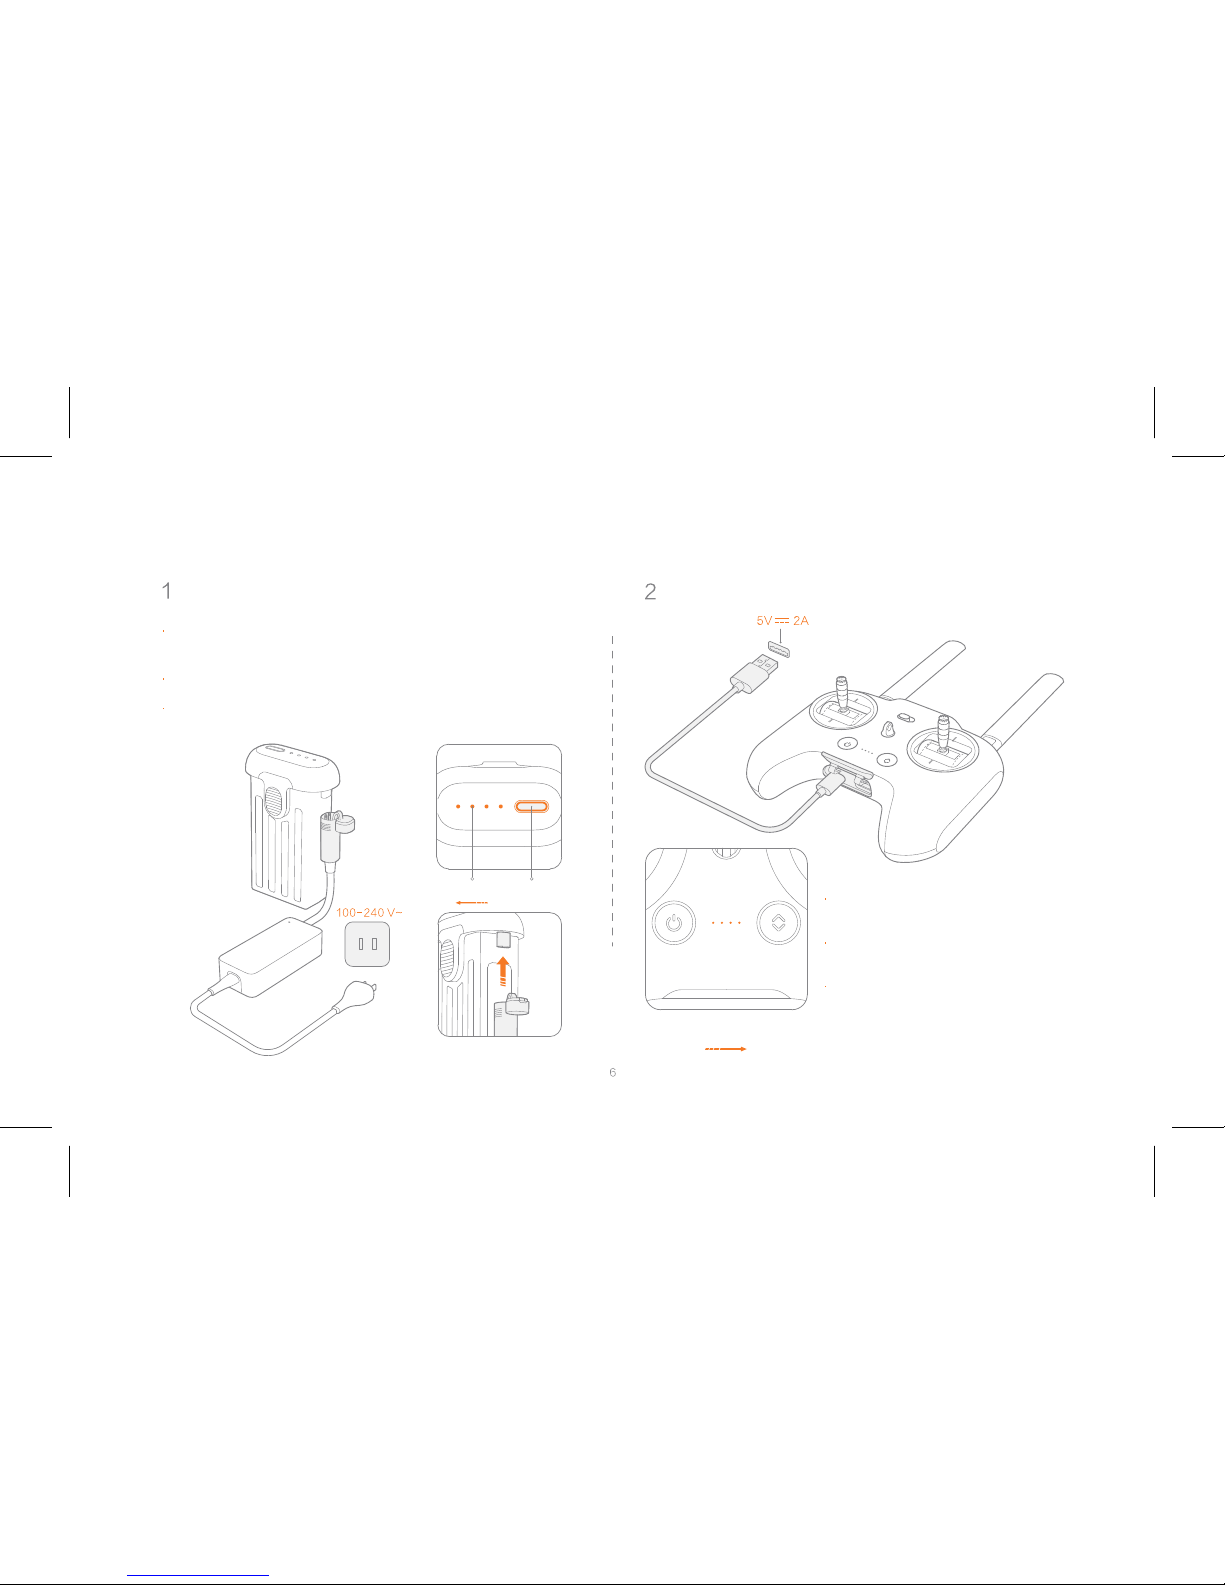
Charge the aircraft battery
Charge the remote
Connect the battery and charger as shown in the figure,
and plug the charger into a power supply
Connect the remote to a power adapter
as shown in the figure
When charging the remote, the LED
indicator is flashing
When the remote is fully charged, the
LED indicator is turned off
When charging the battery, the LED indicator is flashing
When the battery is fully charged, the LED indicator is
turned off
Note: ports on both sides suppor t chargin g.
Low High
Battery Level Power Button
High Low
Battery Leve l
Page 9
Mounting and Dismounting
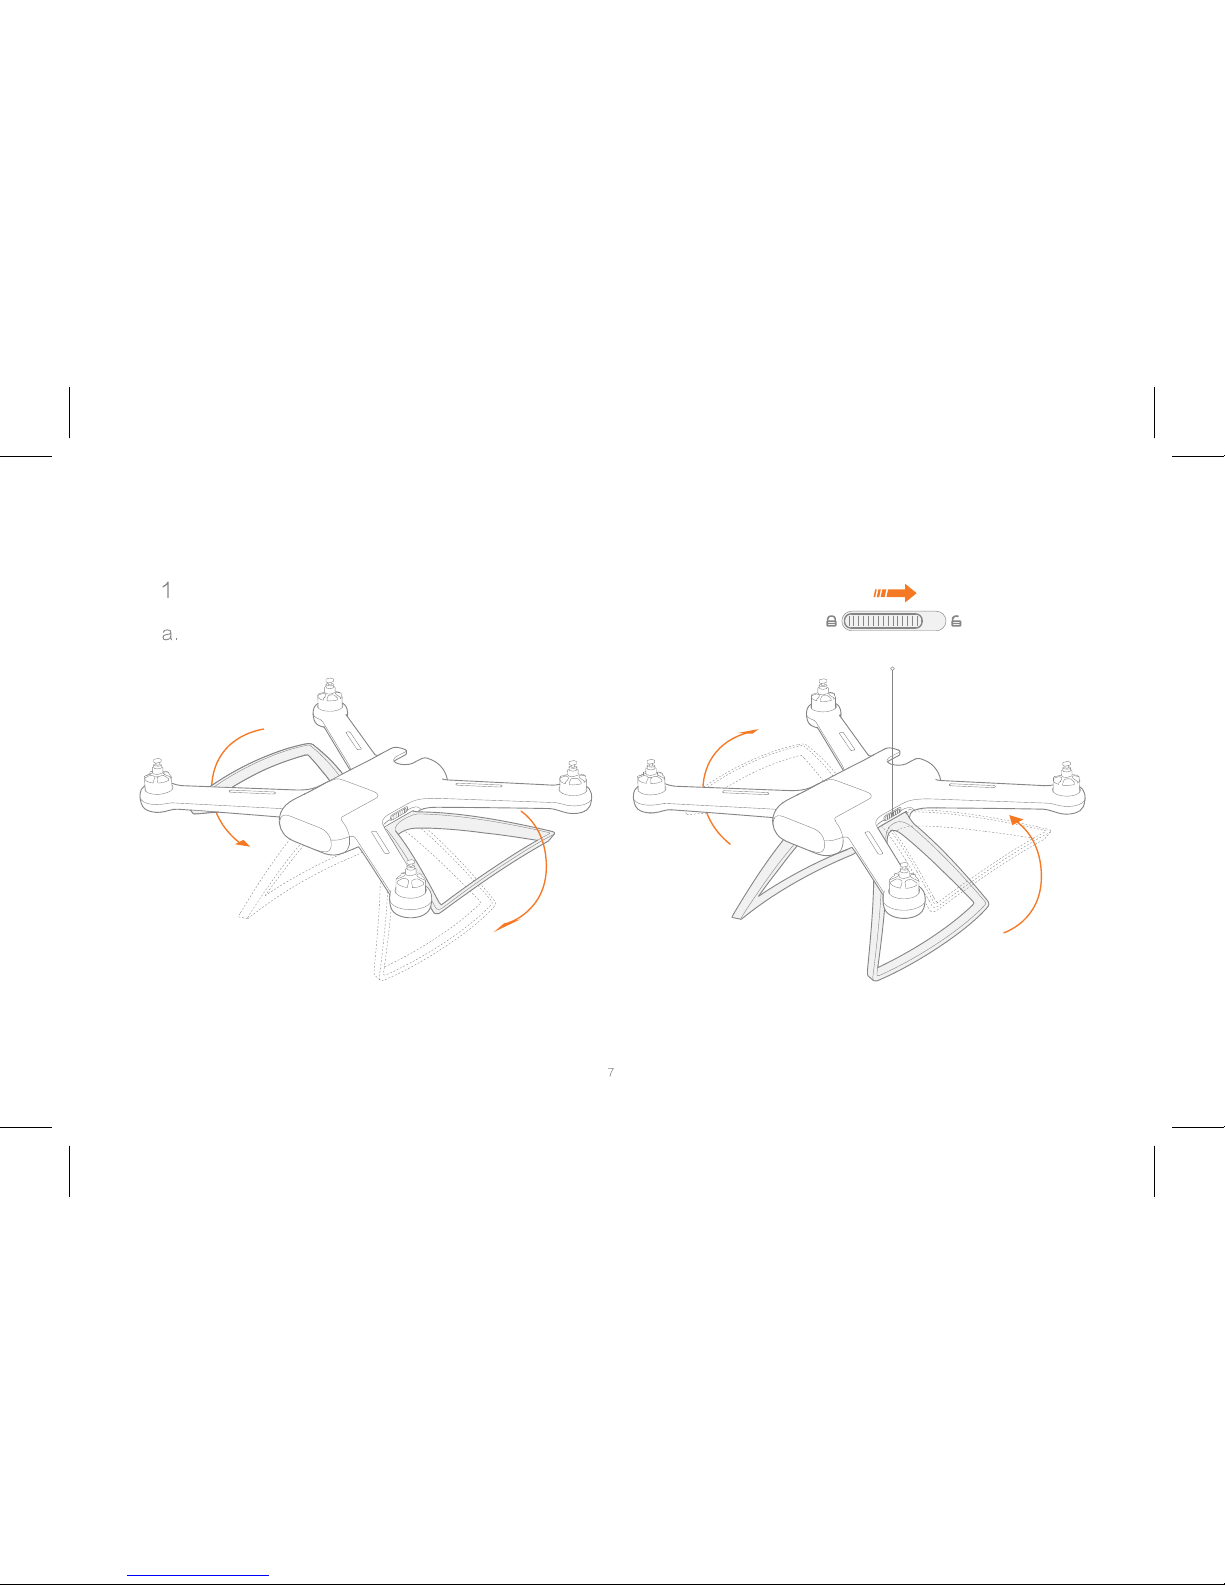
Aircraft
Landing Gear
Put down the landing gear until you hear a click sound. Switch to unlock and retract the landing gear.
Landing Gear Lock
Note: the compass is located on the landing gear. Be sure to properly
put down the landing gear.
Page 10
Battery
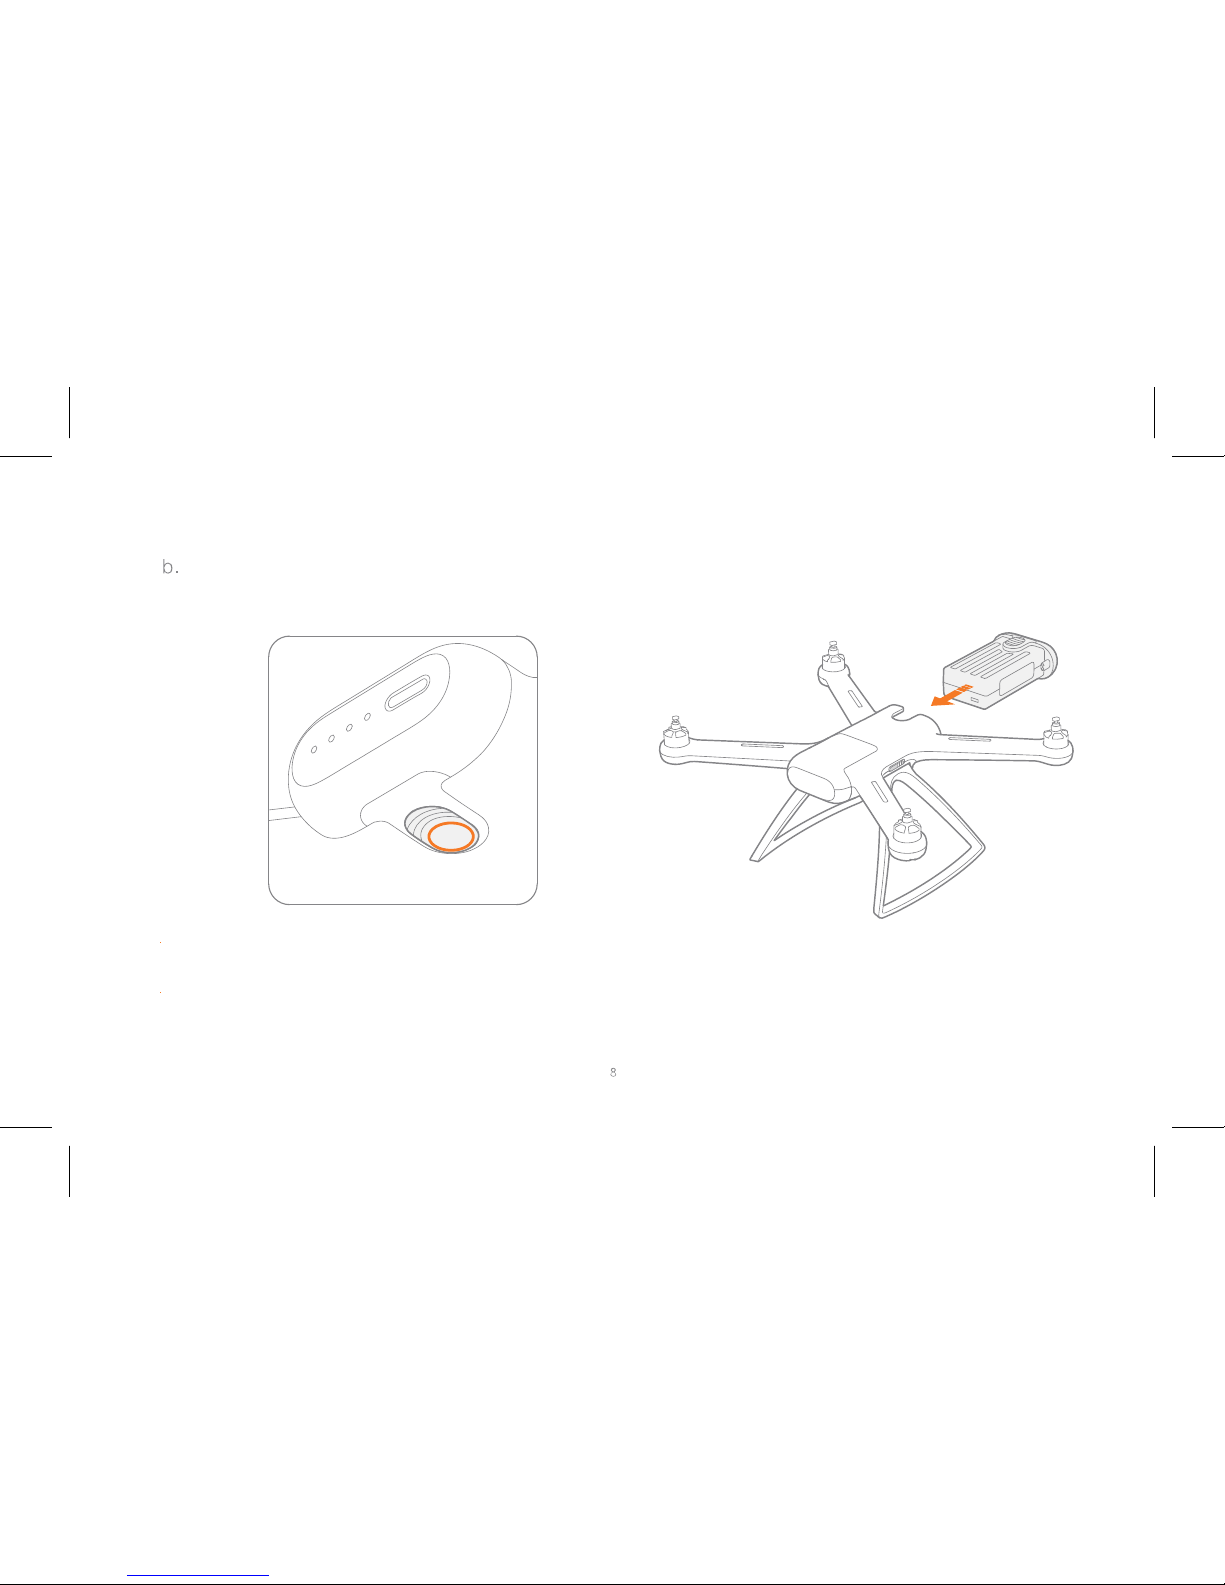
Battery Mount Button
Push the battery into the compartment until you hear a
click sound.
Press and hold the battery mount button, and pull out
the battery.
Page 11
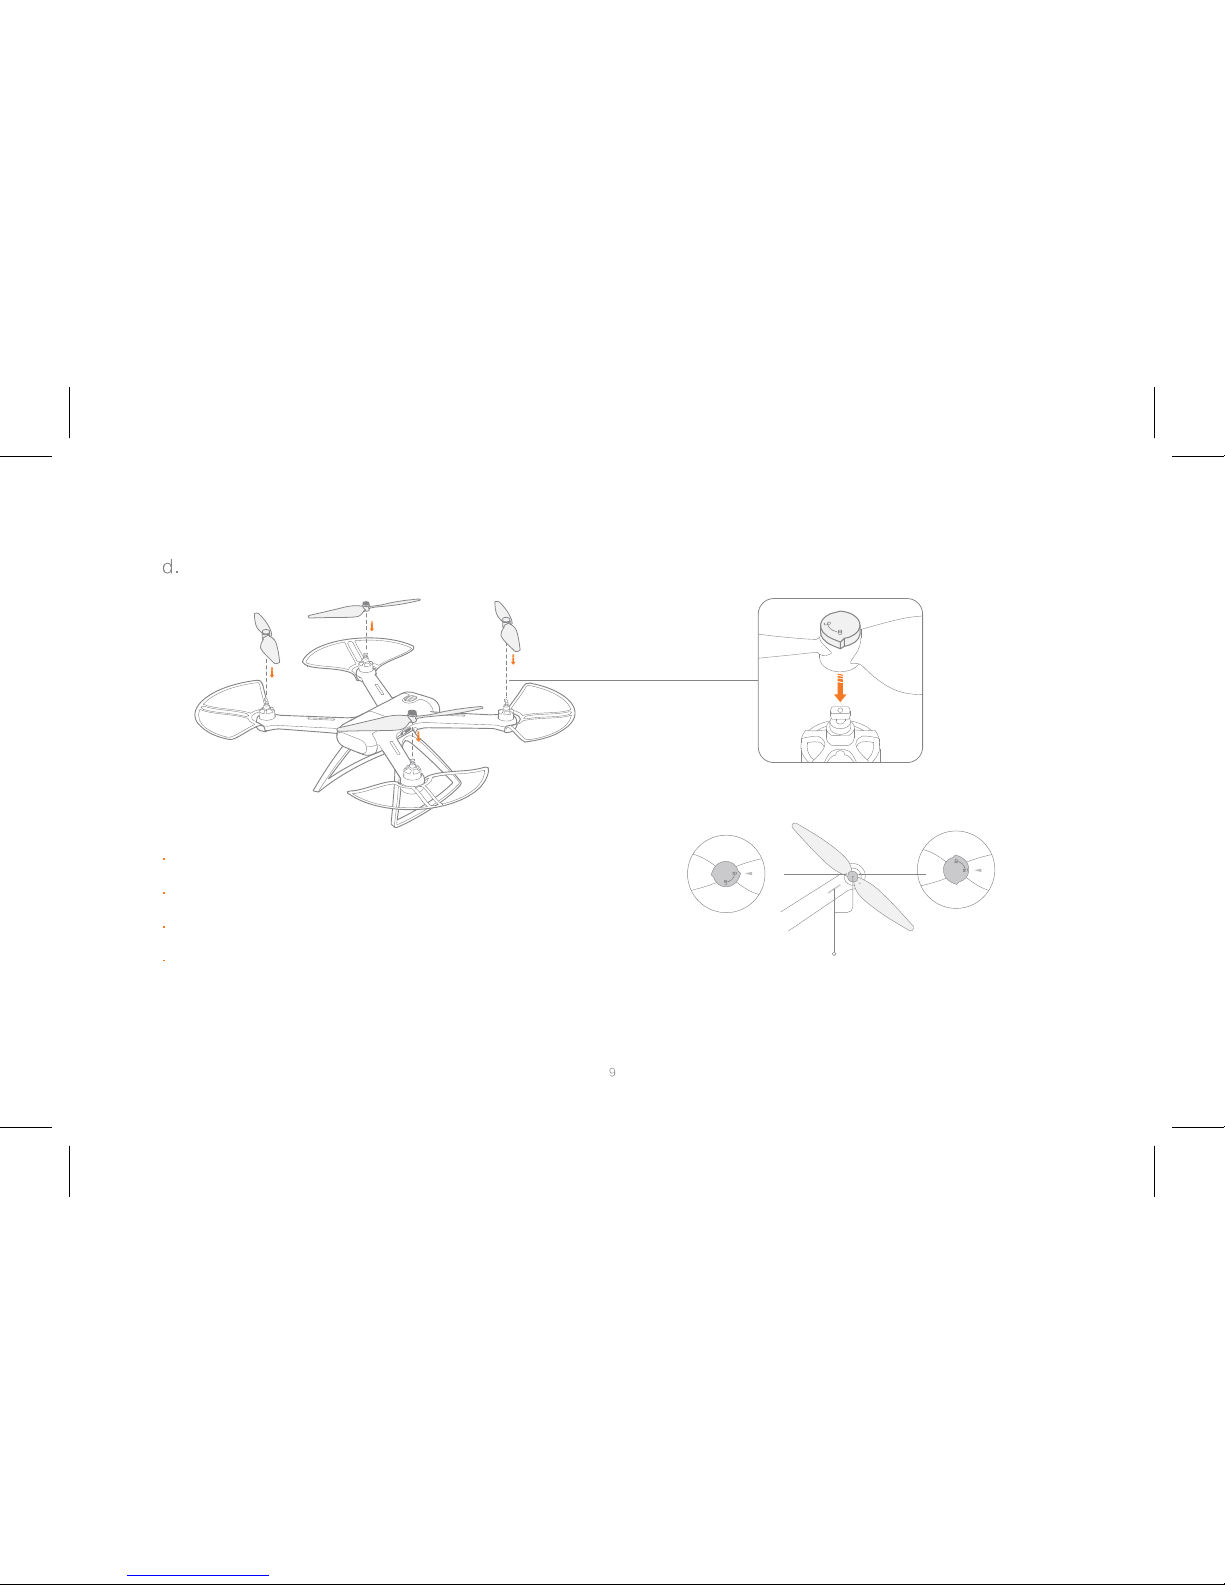
Propellers
Be sure to unlock prop nuts first.
Attach propellers according to color indicators on the motor axis.
Rotate prop nuts clockwise to secure propellers in place.
Rotate prop nuts counter-clockwise to loosen and remove propellers.
Note: if propellers are damaged, please replace them to ensure flight safety and efficiency.
Color Indicator
Lock Unlock
Page 12
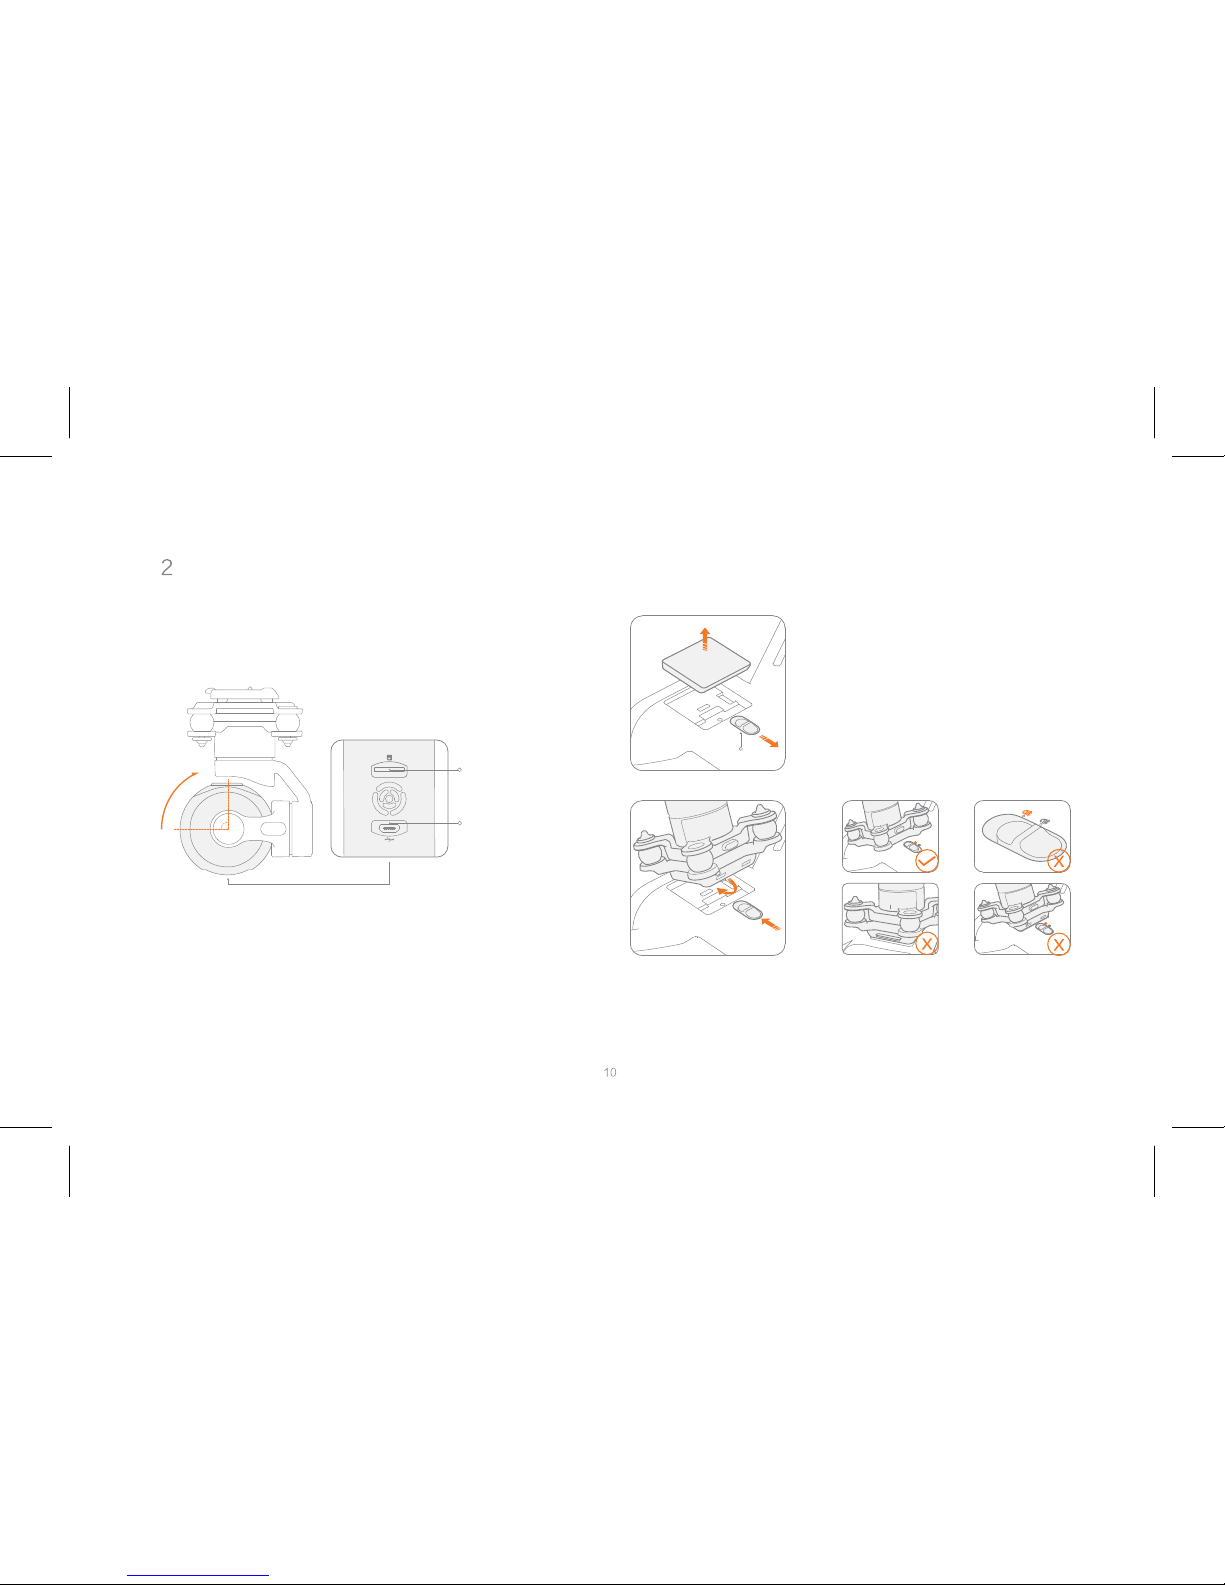
Gimbal and Camera
Insert the TF card
Rotate the lens 90 ° upwards
Micro SD Card
Slot
Unlock and remove the gimbal cap
USB Port
Note: mainstream brands of class 10 or above, and U3 Micro SD cards
with over 16GB storage are recommended.
Gimbal Mount Switch
Properly installed
Switch unlocked
improperly installed
improperly installed
Keep the lens slightly tilted to the nose, and insert the gimbal and
camera until it clicks into place. Be sure to check the switch is
locked afterwards.
Note: reverse the procedure to remove gimbal and camera.
Page 13
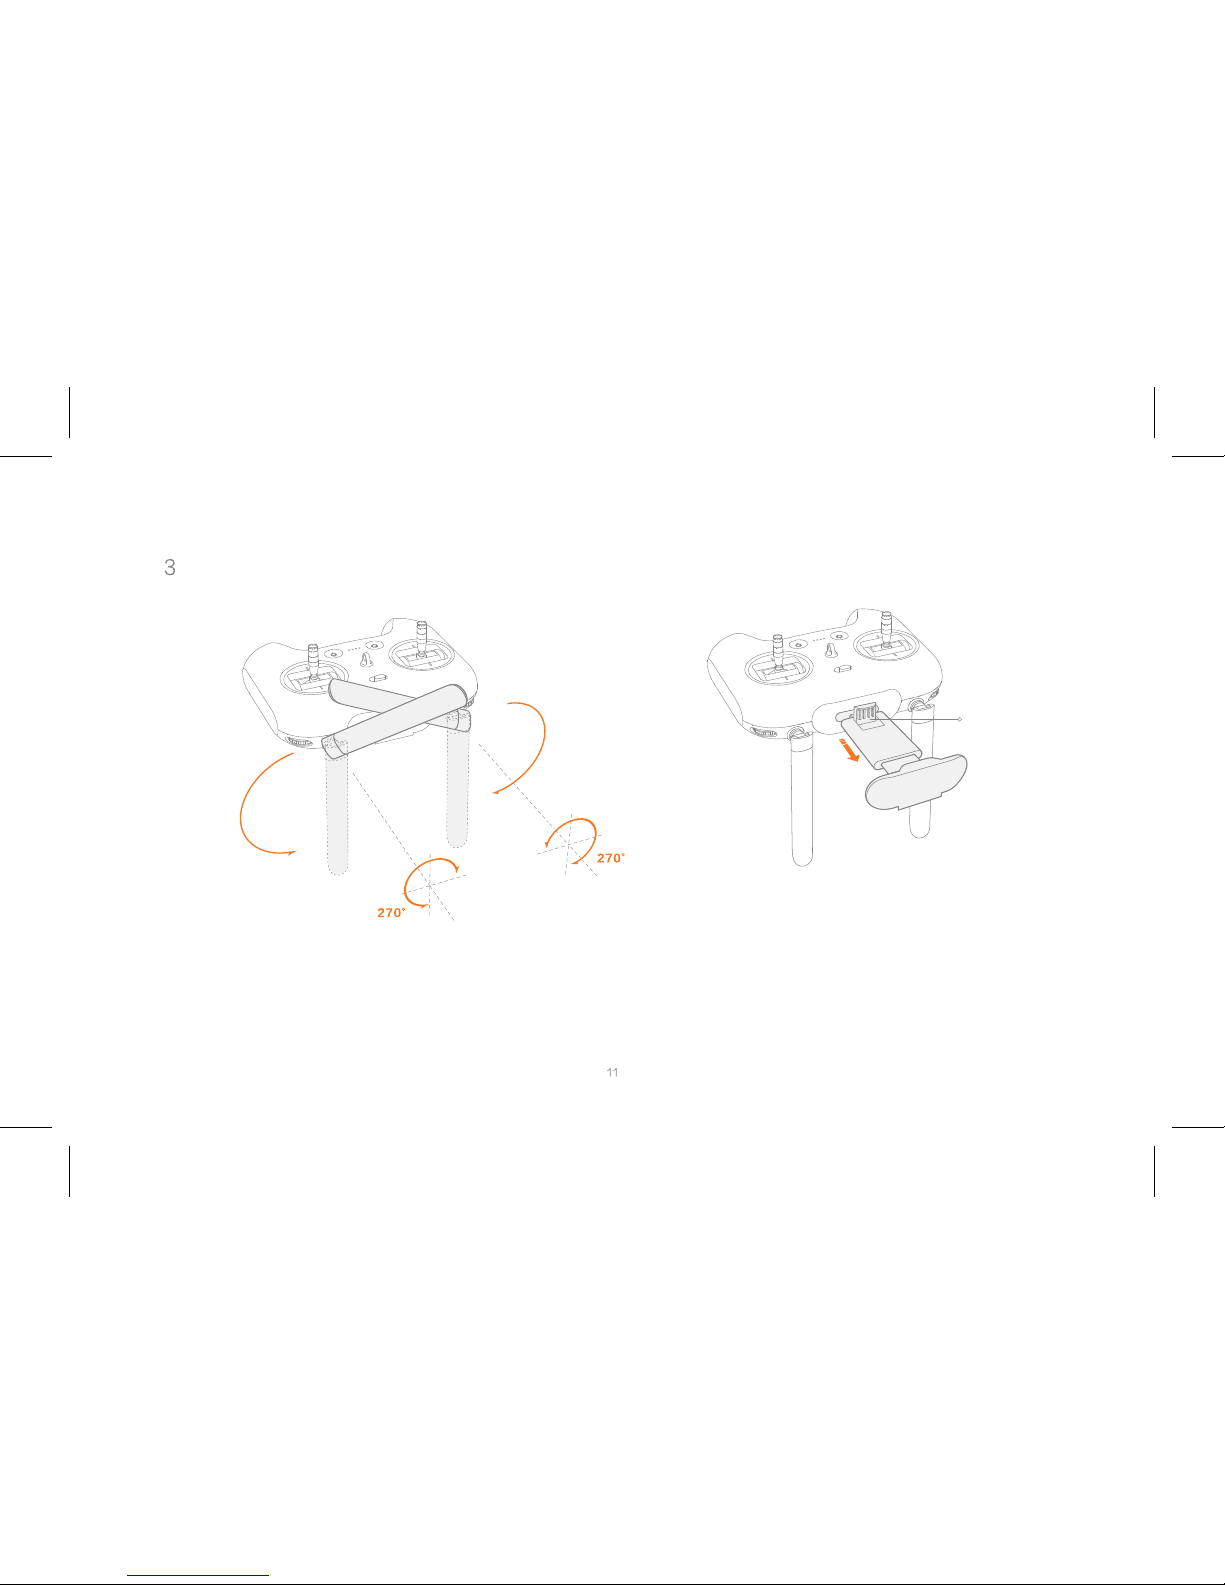
Remote
Keep antennas crossed as shown in the figure Pull out the phone holder, and the lower clamp will
automatically pop out.
Phone Clamp
Note: antennas can only rotate within 270°, please operate with caution.
To maintain stable signals, always keep antennas' longitudinal plane to
the aircraft.
Page 14
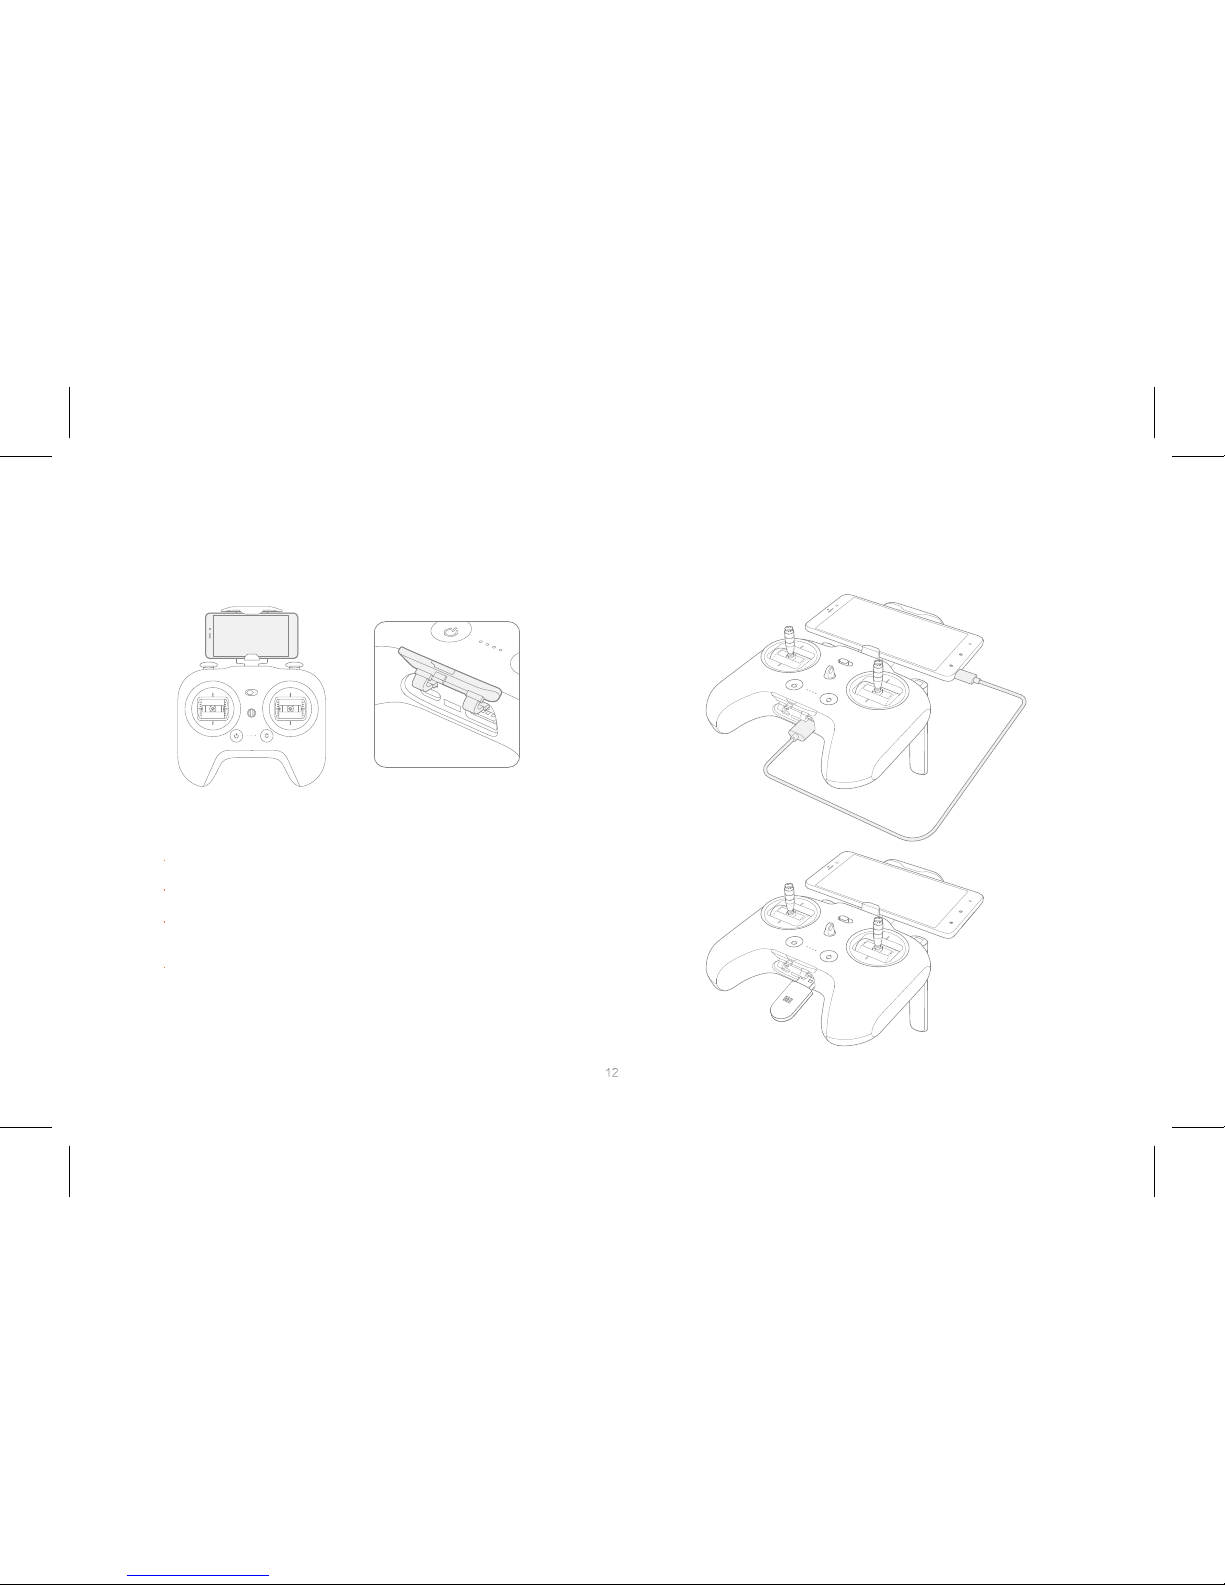
Fix your phone on the holder, and avoid touching any buttons.
Open the bottom cap.
Connect your remote and phone with a USB cable or a wireless
adapter
Connect to and control the aircraft, and upgrade firmware according
to instructions in Mi Drone App.
Note: only Micro USB cable is complimentary. Due to size restrictions, some phones
may not fit on the holder.
Page 15
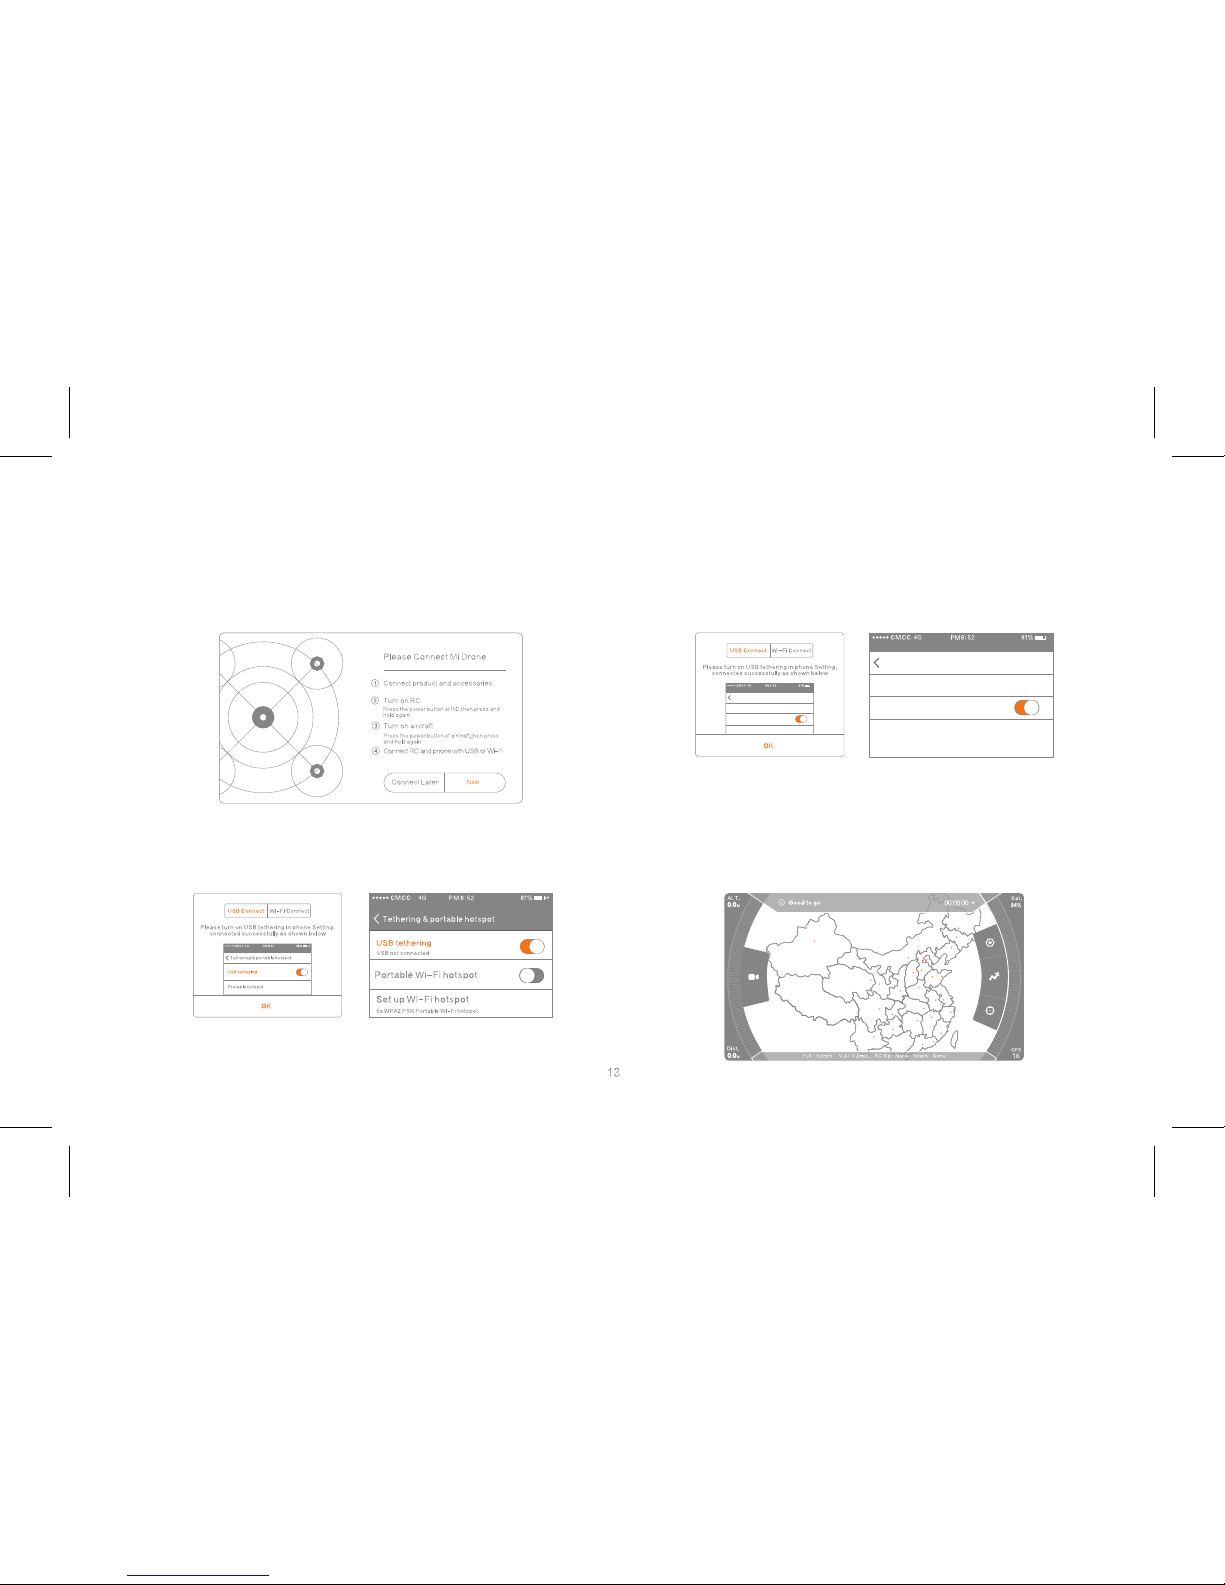
Android
iOS
Connect your remote and phone with a USB cable
1 Open Mi Drone App, and select "Next".
3 Once connection to the aircraft is established,
return to Mi Drone App.
2 Select "USB connection" and follow
instructions in the App.
set
personal hots pot
personal hotspo t
set
personal hotspot
personal hotspot
Page 16
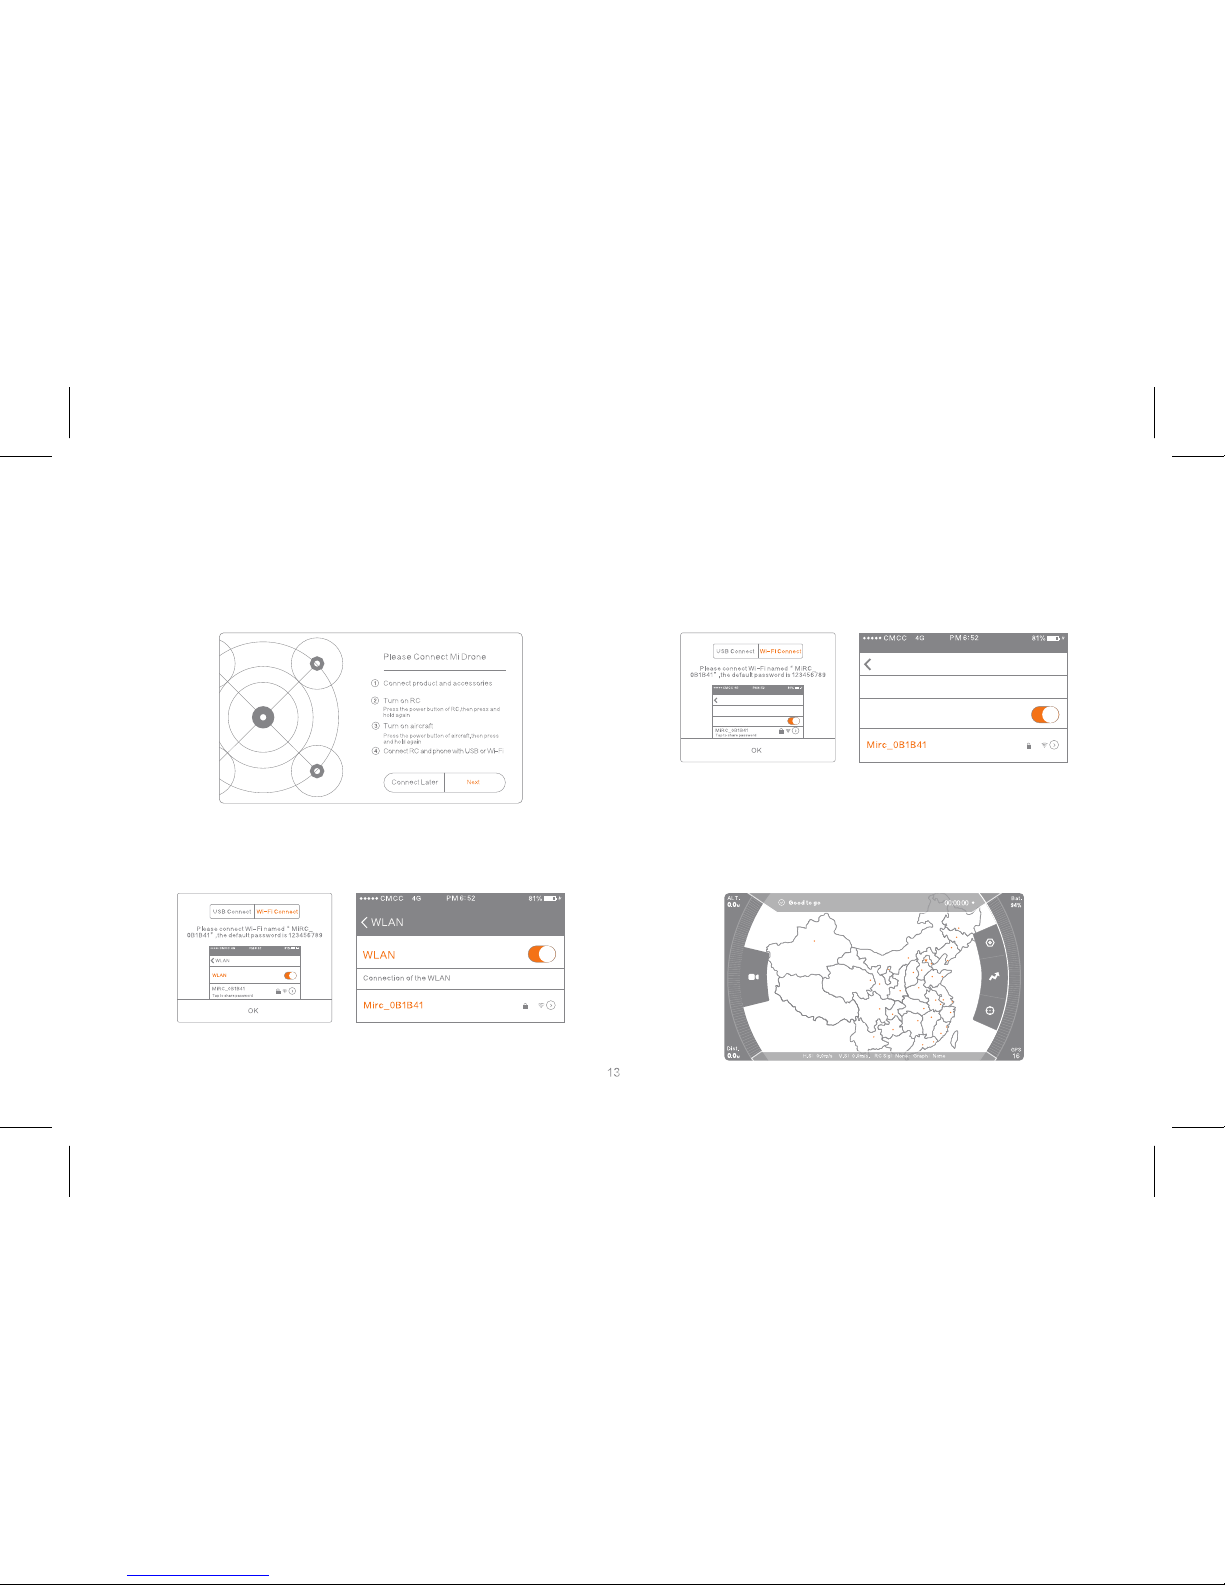
Android
iOS
Connect your remote and phone with a wireless adapter
1 Open Mi Drone App, and select "Next".
3 Once connection to the aircraft is established,
return to Mi Drone App.
2 Select "Wi-Fi connection" and follow instructions
in the App.
Set
Wi-Fi
Wi-Fi
Set Wi-Fi
Wi-Fi
Page 17
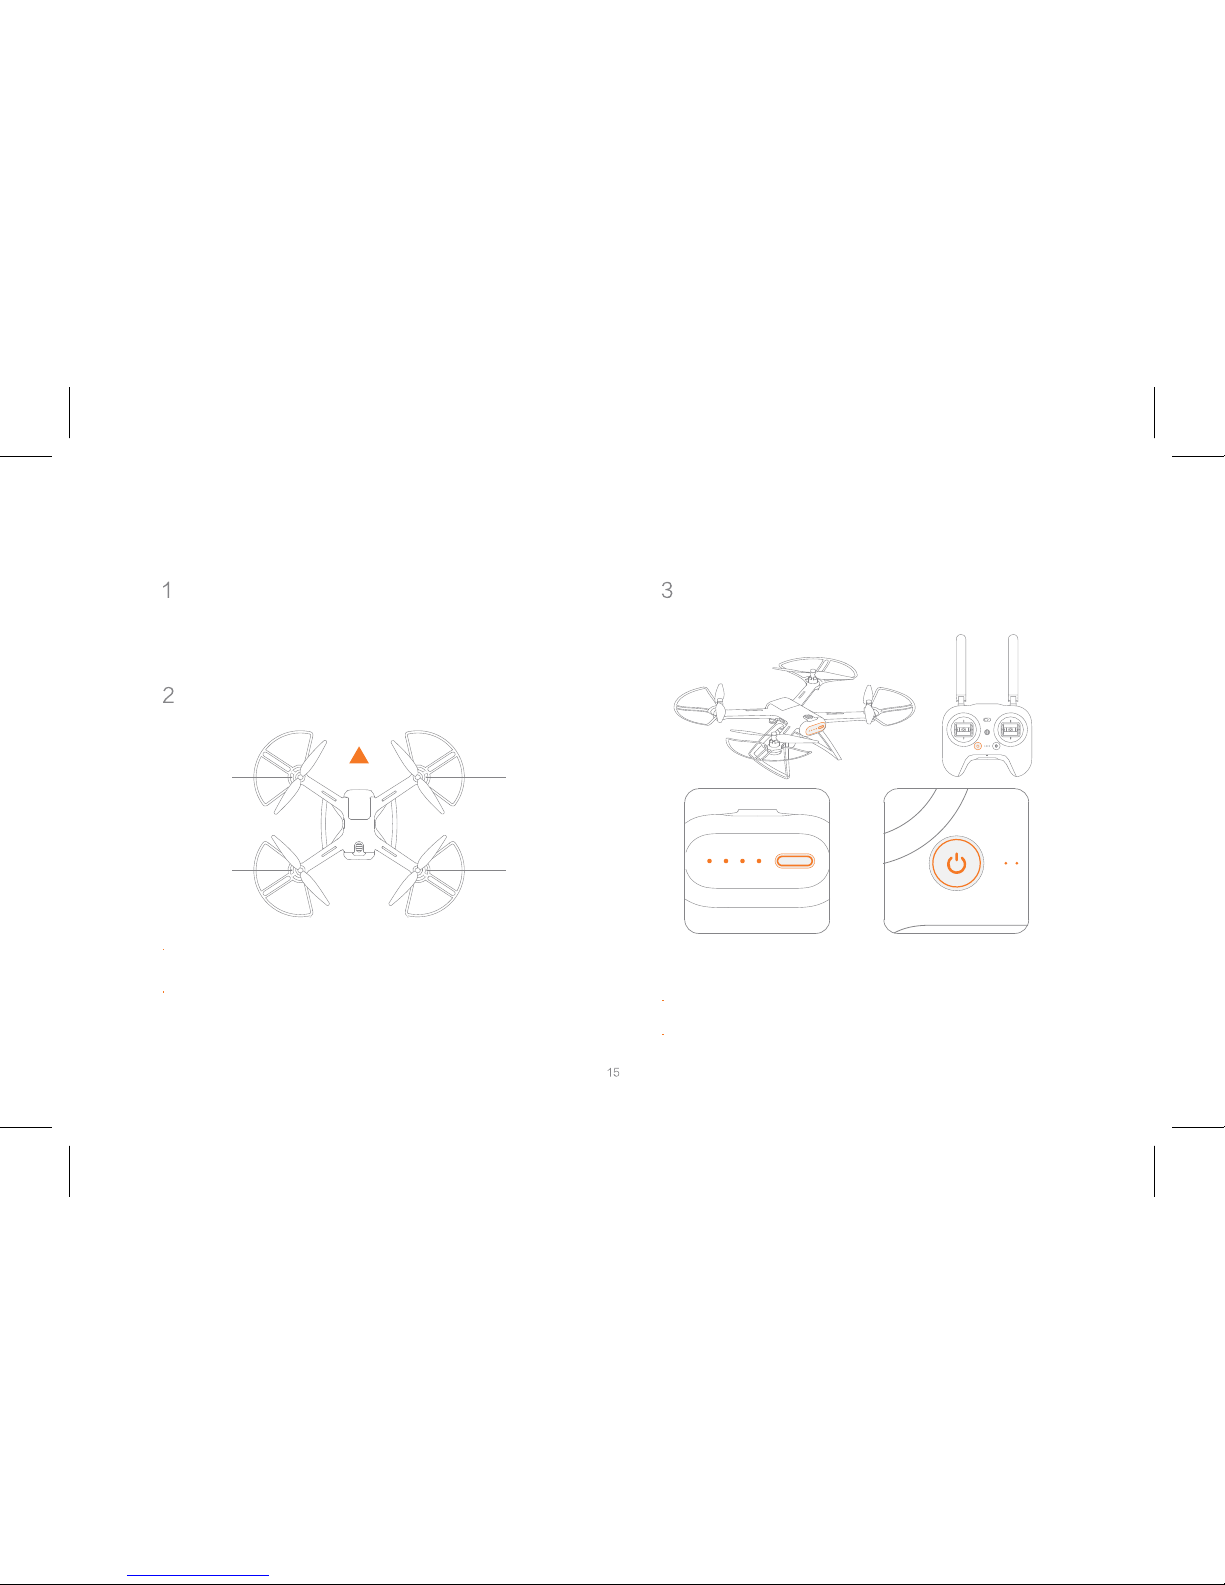
Instructions
Open Mi Drone App
Turning on and off the aircraft and
remote
Confirm the aircraft heading
Your remote and phone have to be properly connected to
establish connection between Mi Drone App and the
aircraft, and unlock motors.
Instructions for turning on and off the aircraft and
remote are the same:
Press to check battery level
Press, and press again and hold for 2 seconds to
turn on and off.
Gimbal and camera should be mounted at the nose,
battery at the tail.
Once the aircraft is turned on, the heading can be told by
navigation lights - two white lights indicate the nose, and
red & green lights indicate the tail.
Safety tips: always keep the tail pointed at the user to avoid direction misjudge.
White Light
Aircraft Heading
Red Light
Green Light
Whi te Light
Page 18
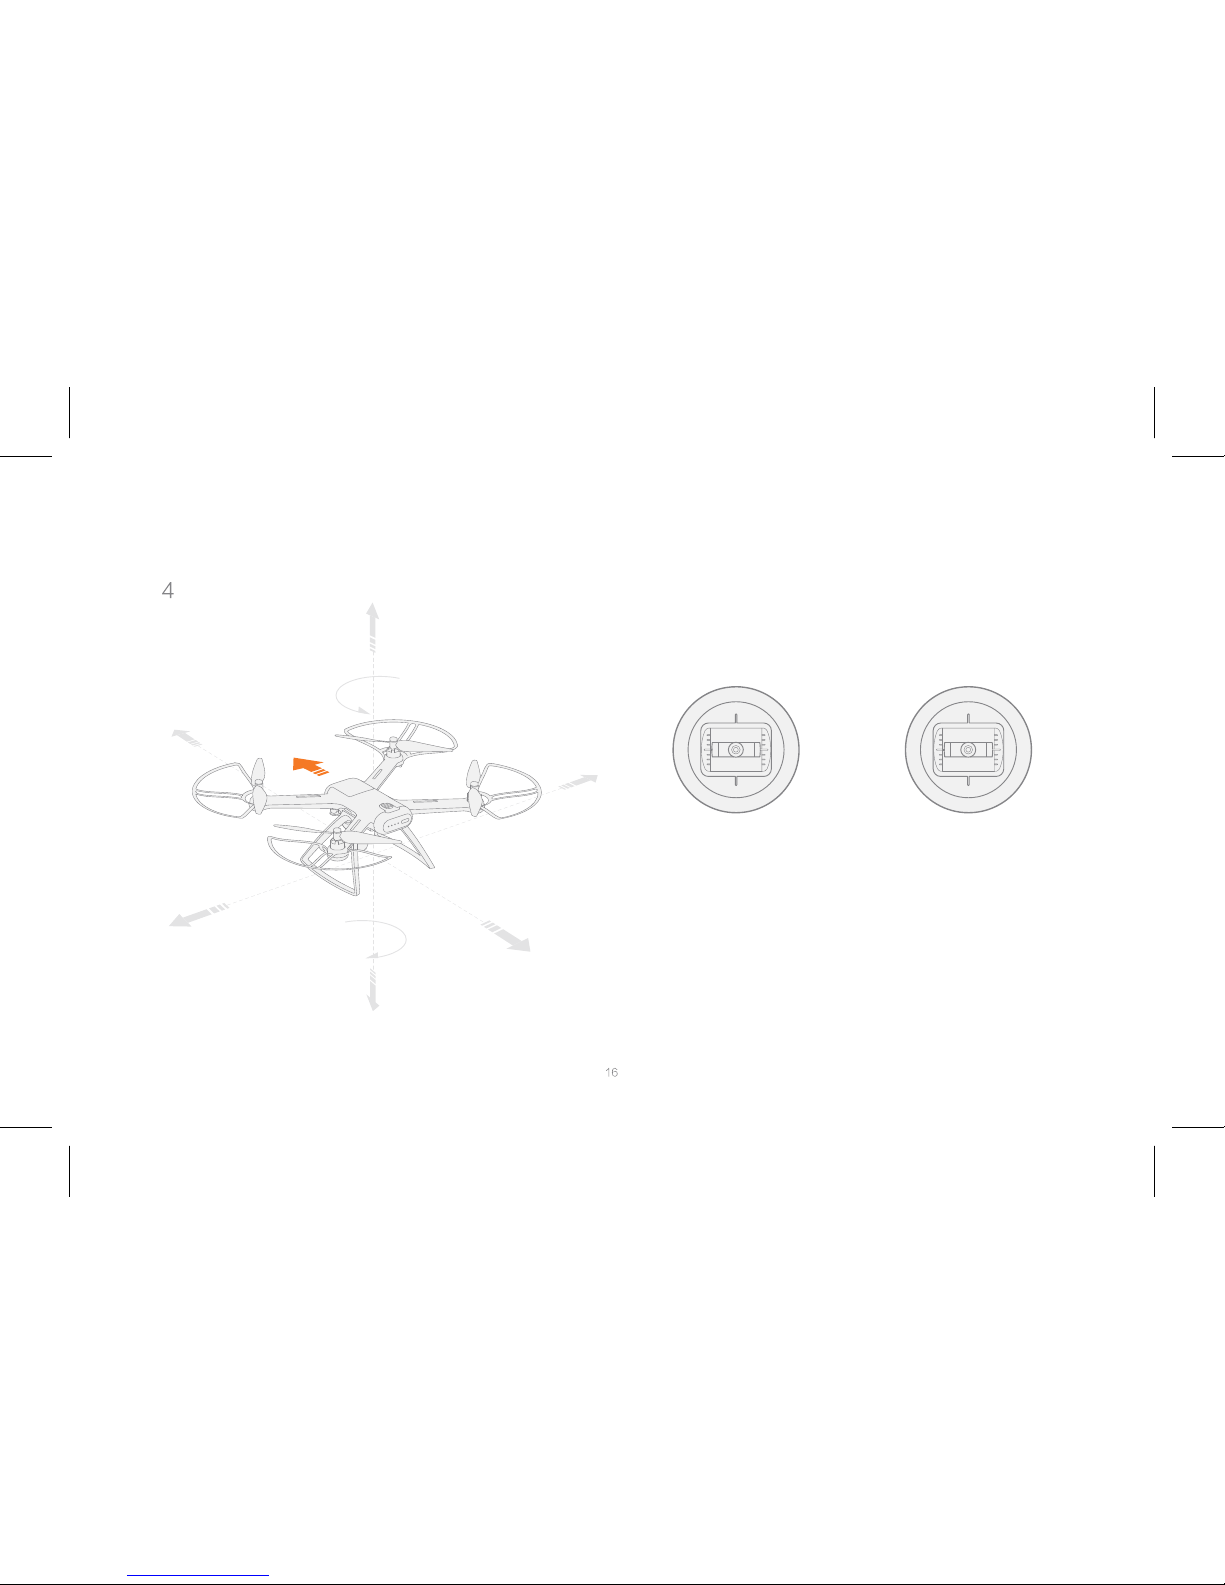
Controlling remote sticks
Aircraft Heading
Note: above directions base the aircraft heading as the reference direction.
Change stick settings in the Mi Drone App
Up
Clockwise
Counter
clockwise
Counter-clockwise
Clockwise
Down
Up
Down
Forward
Forward
Backward
Backward
Right Stick
Left Stick
Left
Left
Right
Right
Page 19
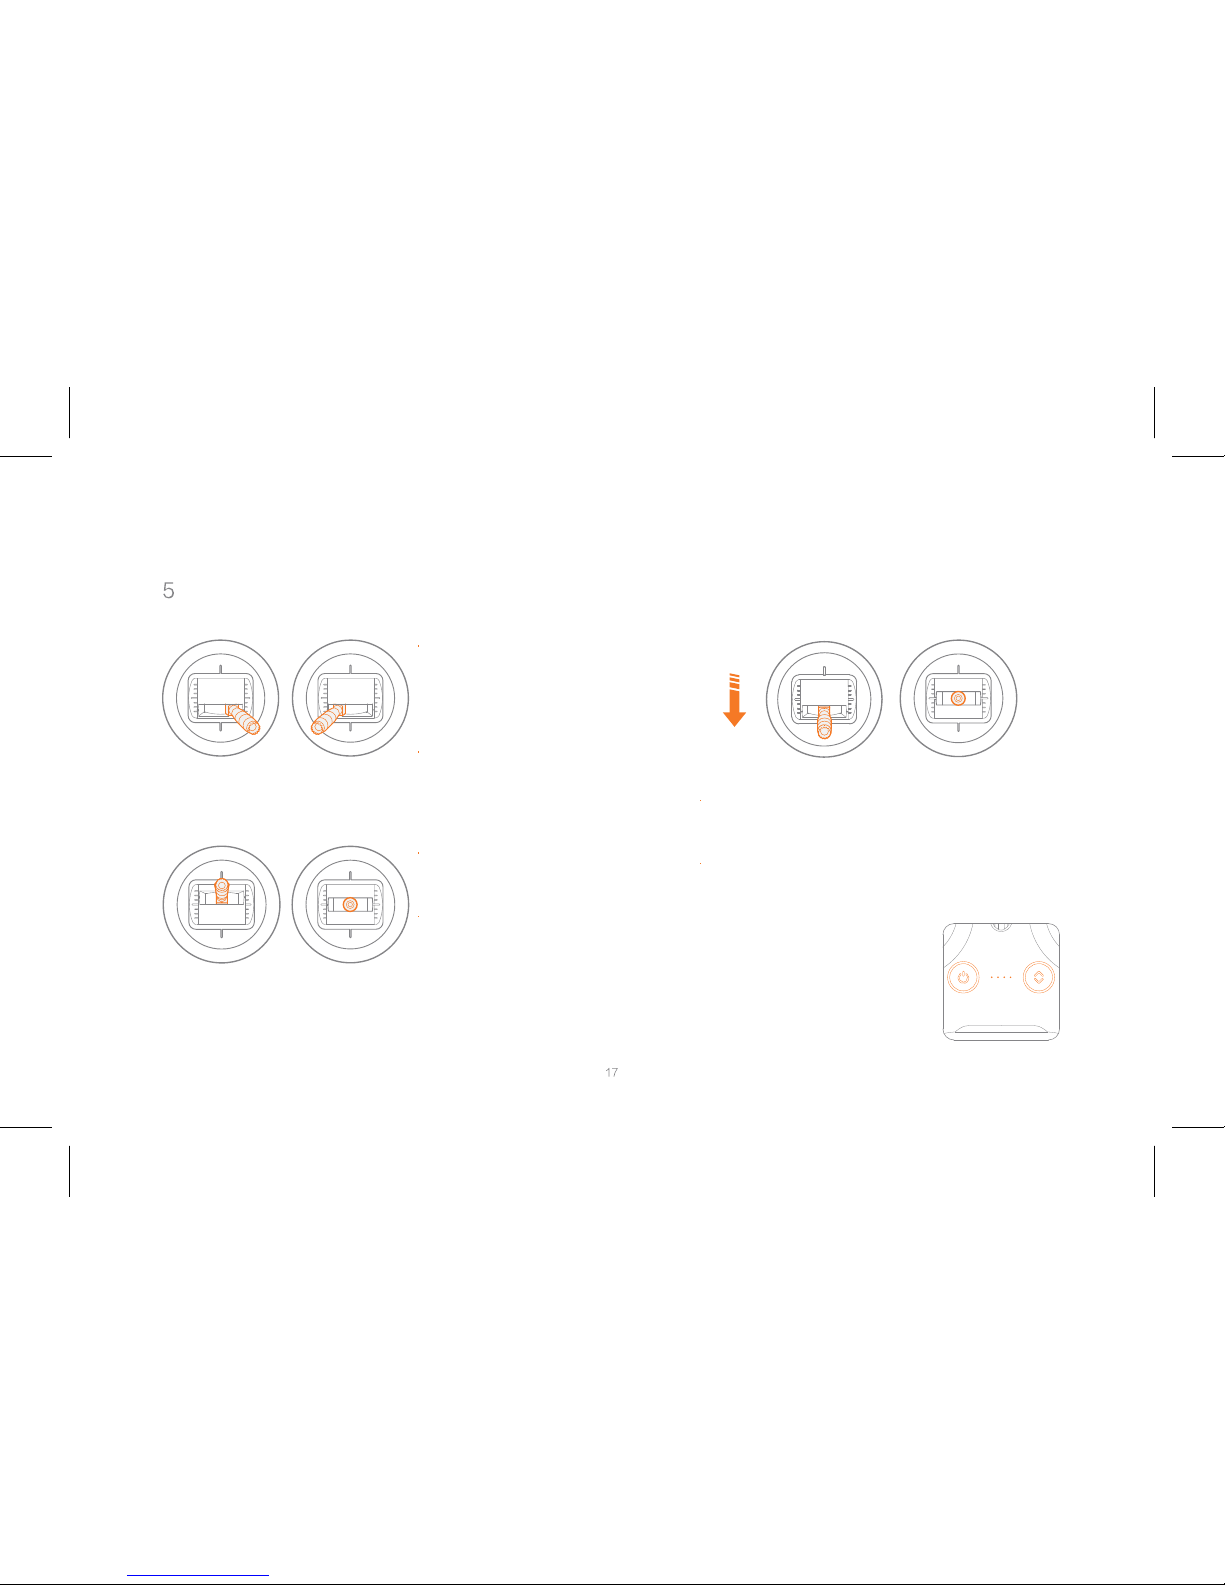
Taking off and landing
Left Stick
Keep both sticks still for
3 seconds as shown in
the left figure to initiate
propellers.
Slowly pull down the stick to land the aircraft.
Once the aircraft touches down, hold the stick
for 5 more seconds to shut motors.
Safety tips:
When motors can't properly turn off,
press and hold power button and auto
take-off/land button simultaneously
for 5 seconds to shut motors.
Do not press power button and auto
take-off/land button at the same time
during normal flight to avoid falling
accidents.
Let go when propellers
are moving.
Firmly push the left stick
upward to fly the aircraft.
During flight, let go both
sticks to hover.
Safety tips:
push the stick firmly. The aircraft
may roll over if you push too slow.
Firmly push the left
stick upward
Pull slowly
Right Stick
Left Stick
Right Stick
Page 20
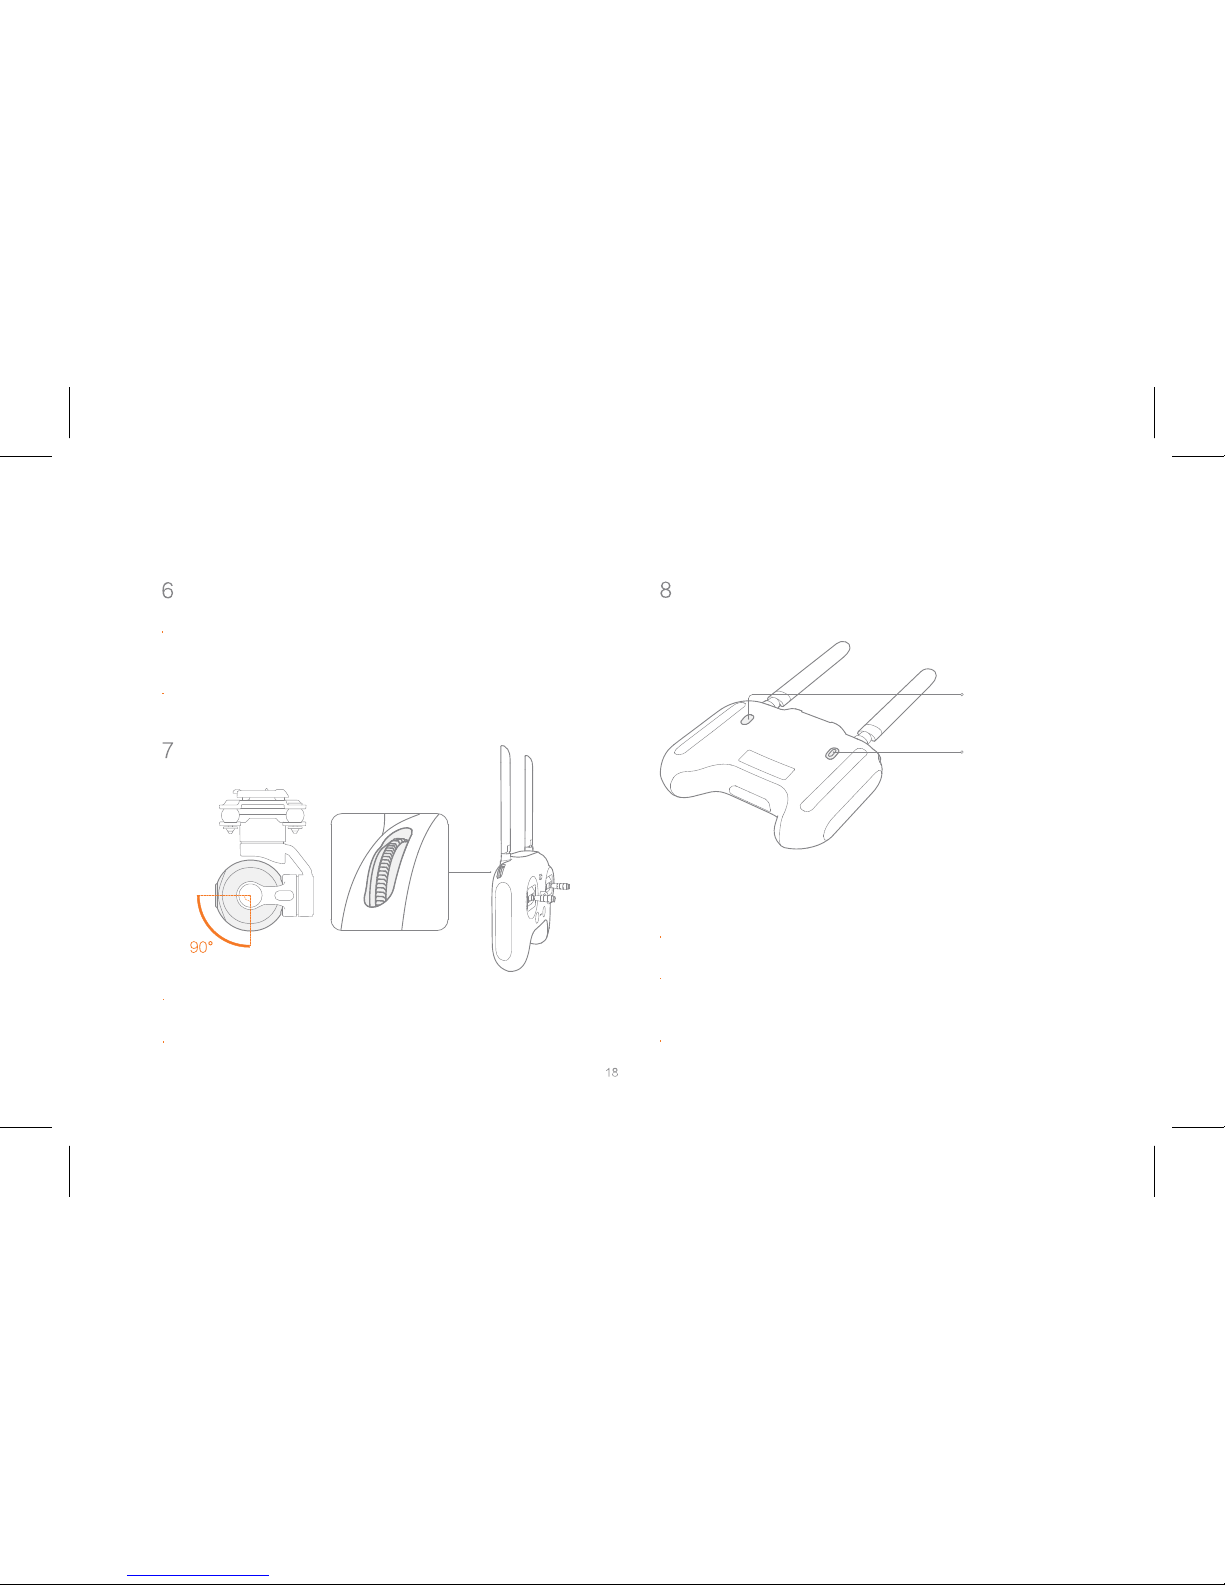
Turning on and off the gimbal camera
Taking photos and recording videos
Controlling the lens
when the aircraft is turned on, the gimbal camera turns
on automatically along with it and enters stand-by mode.
Press the camera button to take a photo. A photo is
taken when you hear 2 short sounds.
Press the video button to record videos. Recording
starts when you hear 2 short sounds. Press again to
stop recording confirmed by 4 short sounds.
During recording, the LED indicator is breathing.
The gimbal camera turns off when the aircraft is turned
off.
Camera Button
Use the left roller to tilt the lens within the angle range as
shown in the figure.
Let go of the left roller to remain the tilt.
Video Button
Page 21
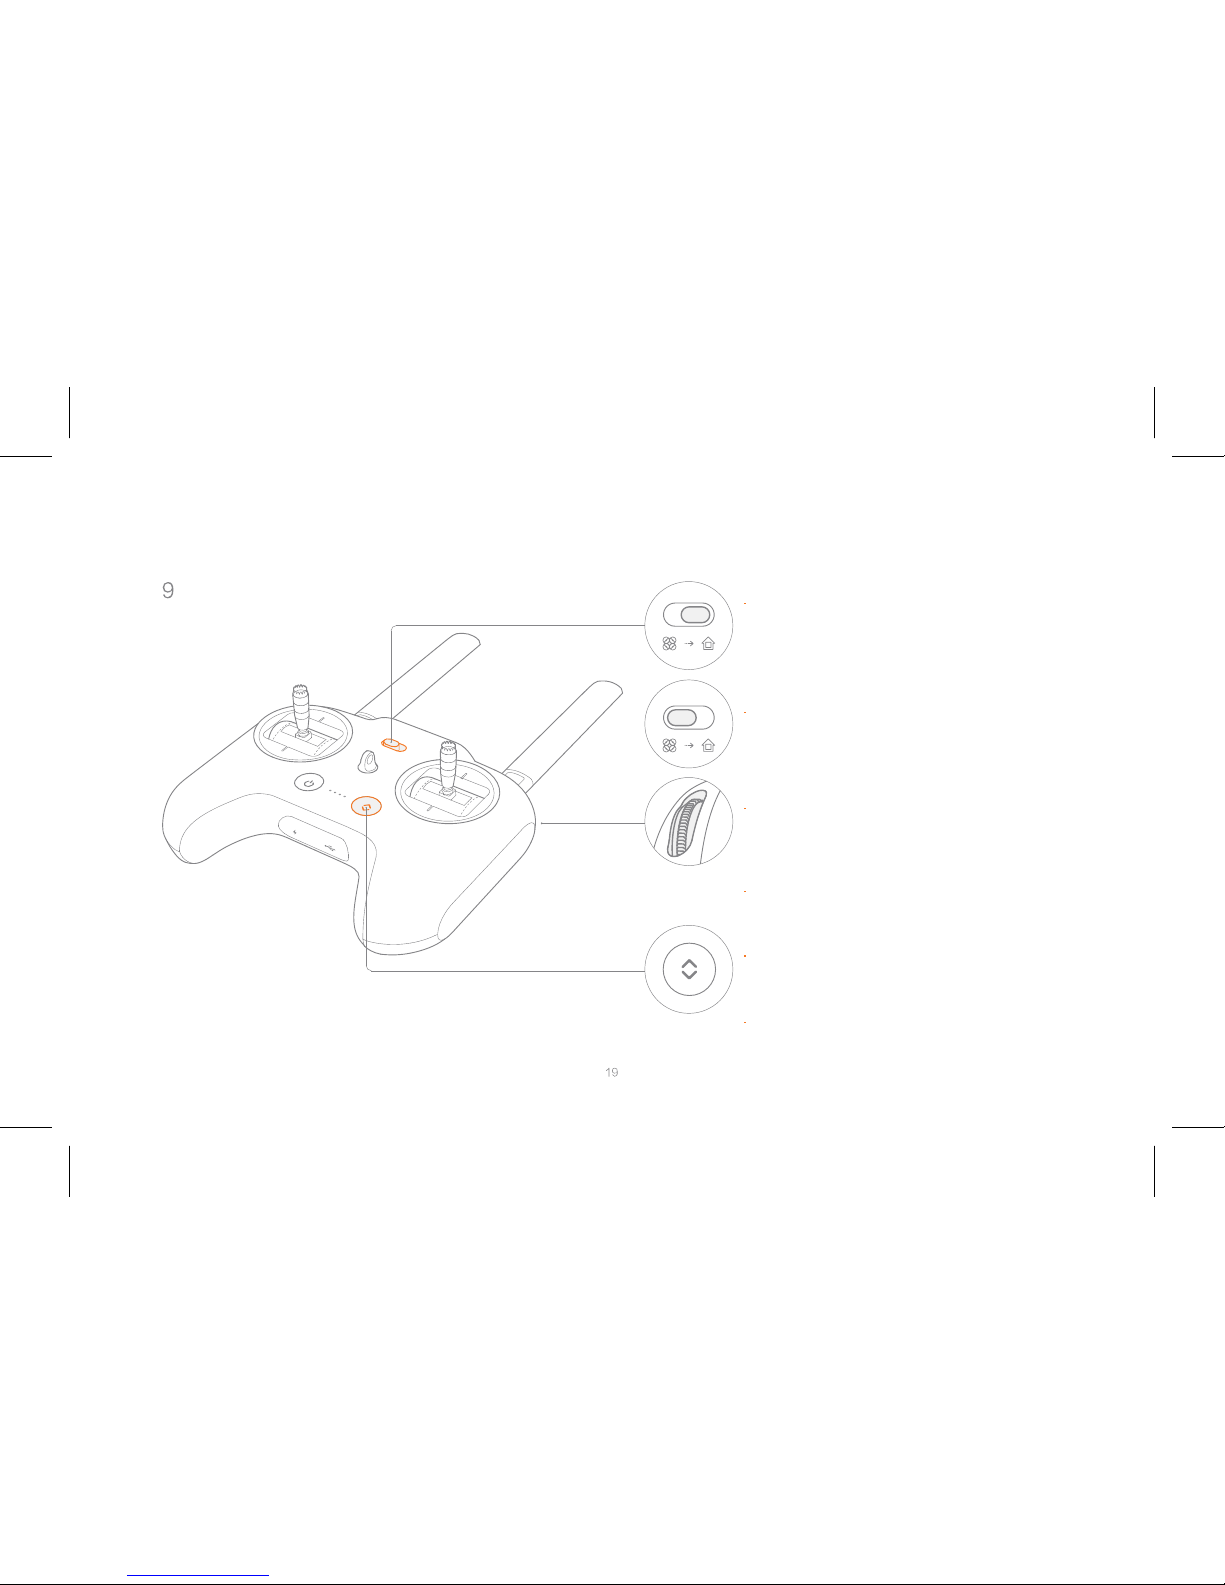
Shortcut buttons
During flight, switch the course/home lock to the
right to command the aircraft to return home.
During its return, switch the course/home lock to
the left to command the aircraft to hover and wait
for further instructions.
The right roller is set to adjust white lights'
brightness by default. The setting can be chang ed
in Mi Drone App.
When the auto take-off/land button flashes white
light, the aircraft is ready for auto taking off and
landing.
When the aircraft is ready for taking off, press the
auto take-off/land button, and press again and
hold for 2 seconds to fly the aircraft.
When the aircraft is ready for landing, press the
auto take-off/land button, and press again and
hold for 2 seconds to land the aircraft.
Page 22
Maintenance and Calibration
Propellers
Battery
Self-check
Compass calibration
Propellers are wearing parts. When they're damaged,
replace them in time to ensure flight safety and efficiency.
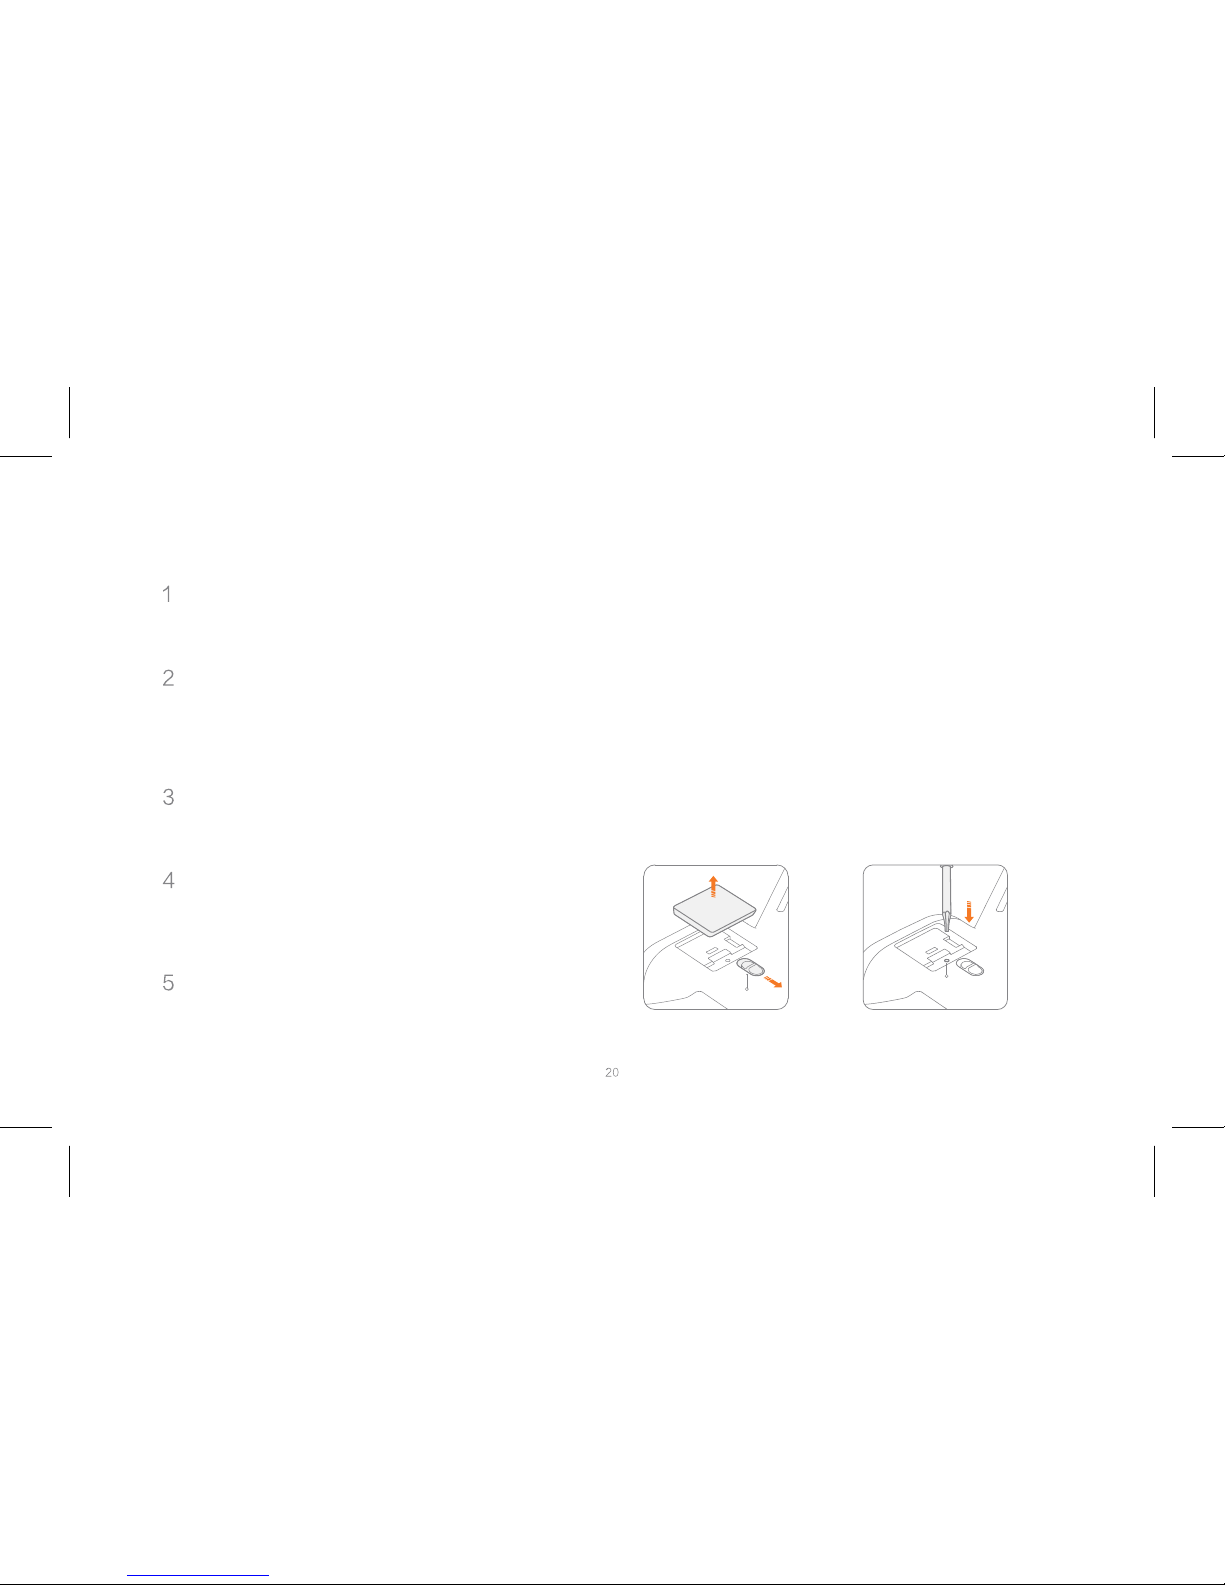
Code matching
When replacing a new remote or aircraft, code matching
between your remote and aircraft should be renewed as
follows:
Do not throw the battery into fire; Do not batter the battery;
Lithium battery's capacity reduces significantly in low
temperature conditions. Do not use the battery when it is
below 5 degrees.
1 Turn on the aircraft.
Gimbal Mount Switch Code Matching Hole
2 Turn on the remote. 15 seconds later, press and hold
the power button until you hear a beeping sound and
the power button flashes
3 Unlock and remove the gimbal cap to locate the code
matching hole. Press the screwdriver into the hole for
one second and let go for the aircraft to enter code
matching state, confirmed by that the white lights on the
aircraft are out.
4 The code matching succeeds when the power button
flashes white light and the white lights on the aircraft
resume.
The drone self-checks every time after turned on. When
self-check fails, a notification will be sent in your App.
The compass needs recalibration when magnetic field
changes. Follow instructions in the App to recalibrate the
compass.
Page 23

Maintenance and Calibration
Wireless adapter
Stick calibration
1 Some phones will indicate no wireless network
when connected to the remote, please remain
the connection.
When you detect inconsistencies between stick
control and aircraft flying, please disconnect the
remote and aircraft, and calibrate the remote in
Mi Drone App settings.
2 Change the name and password of the wireless
adapter to avoid mis-connection.
3 When wireless adapter's password is changed,
renew the connection to your phone.
4 The wireless adapter works alongside the remote.
If the remote is replaced, the adapter's username
and password will resume to default.
5 if forget username or password, please connect
remote and phone by USB cable to check username
and password. the method is as following.
How to change the name and p assword of the wireles s adapter?
a. Connect to Mi Drone App.
b. Open "Settings".
c. Select "Manage Wi-Fi passwords ".
d. Enter new name and password, and save.
Page 24

Indicator
Aircraft indicator Remote indicator
Gimbal camera indicator
Aircraft indicator
Link indicator flashes slowly
Link indicator on
Camera status
Both indicators flash twice at
regular intervals
Camera status indicator on
When the gimbal camera enters stand-by mode
All lights breathing
All lights on
Aircraft on the ground: self-check fails
Two white lights on; Red
and green lights flash at
regular intervals
Four lights flash twice
at regular intervals
Four lights glaring
Note: shoots trouble in Mi Drone App
Aircraft in the air: internal error
Ready to fly / Flying
Low battery alerts
Battery is low, land as soon as possible
Self-checking
Aircraft status
Remote indicator
Power button's red light on
Auto take-off/land button's white light on
Power button's white light on
Power button's red light flashes
Camera status indicator
flashes slowly
Camera indicator
Connected to Mi Drone App
Not connected to Mi Drone App
Camera is turned on
Taking photos or recording videos
TF card missing
firmware upgrading
Remote status
Weak signal or not connected to the aircraft
Normal signal
Code matching or upgrading firmware
Auto take-off/land button's red light on
Power button's white light flashes
Recording videos
Auto taking off or landing prohibited
Ready for auto taking off or landing
Page 25
Specifications
Accessories
Aircraft
Model: WRJTZ02F M
Dimensions: 310 x 380 x 190mm
Diagonal length: 434mm
Weight: 0.75kg (battery excluded)
Battery type: Li-ion polymer battery pack
Battery capacity: 5100mAh/15.2V(77.52Wh)
Charger input: 100-240V~ 50/60Hz 1.5A
Charger output: 17V 2.9A
Image transmission: IEEE 802.11 a 5GHz
Gimbal and camer a
Weight: 0.18kg (shock-absorber included)
Aperture: f/2. 8
Focal length: 3.5mm (35mm format equivalent : 20mm )
Video max. resolution: 3840 x 2160p/30fps
Photo max. resolution: 4072 x 3044
Max. data stream: 65Mbps
Remote
Weight: 0.47K g
Wireless connections: 5GHz
Battery type: Li-ion Battery
Battery capacity: 5000mAh/3.7V(18.5Wh)
Charging input: 5V 2A
Wireless adapter
Weight: 5.7 g
Frequency: 2.4GH z
Operating temperature: 0-40℃
Operating altitude: < 5000m
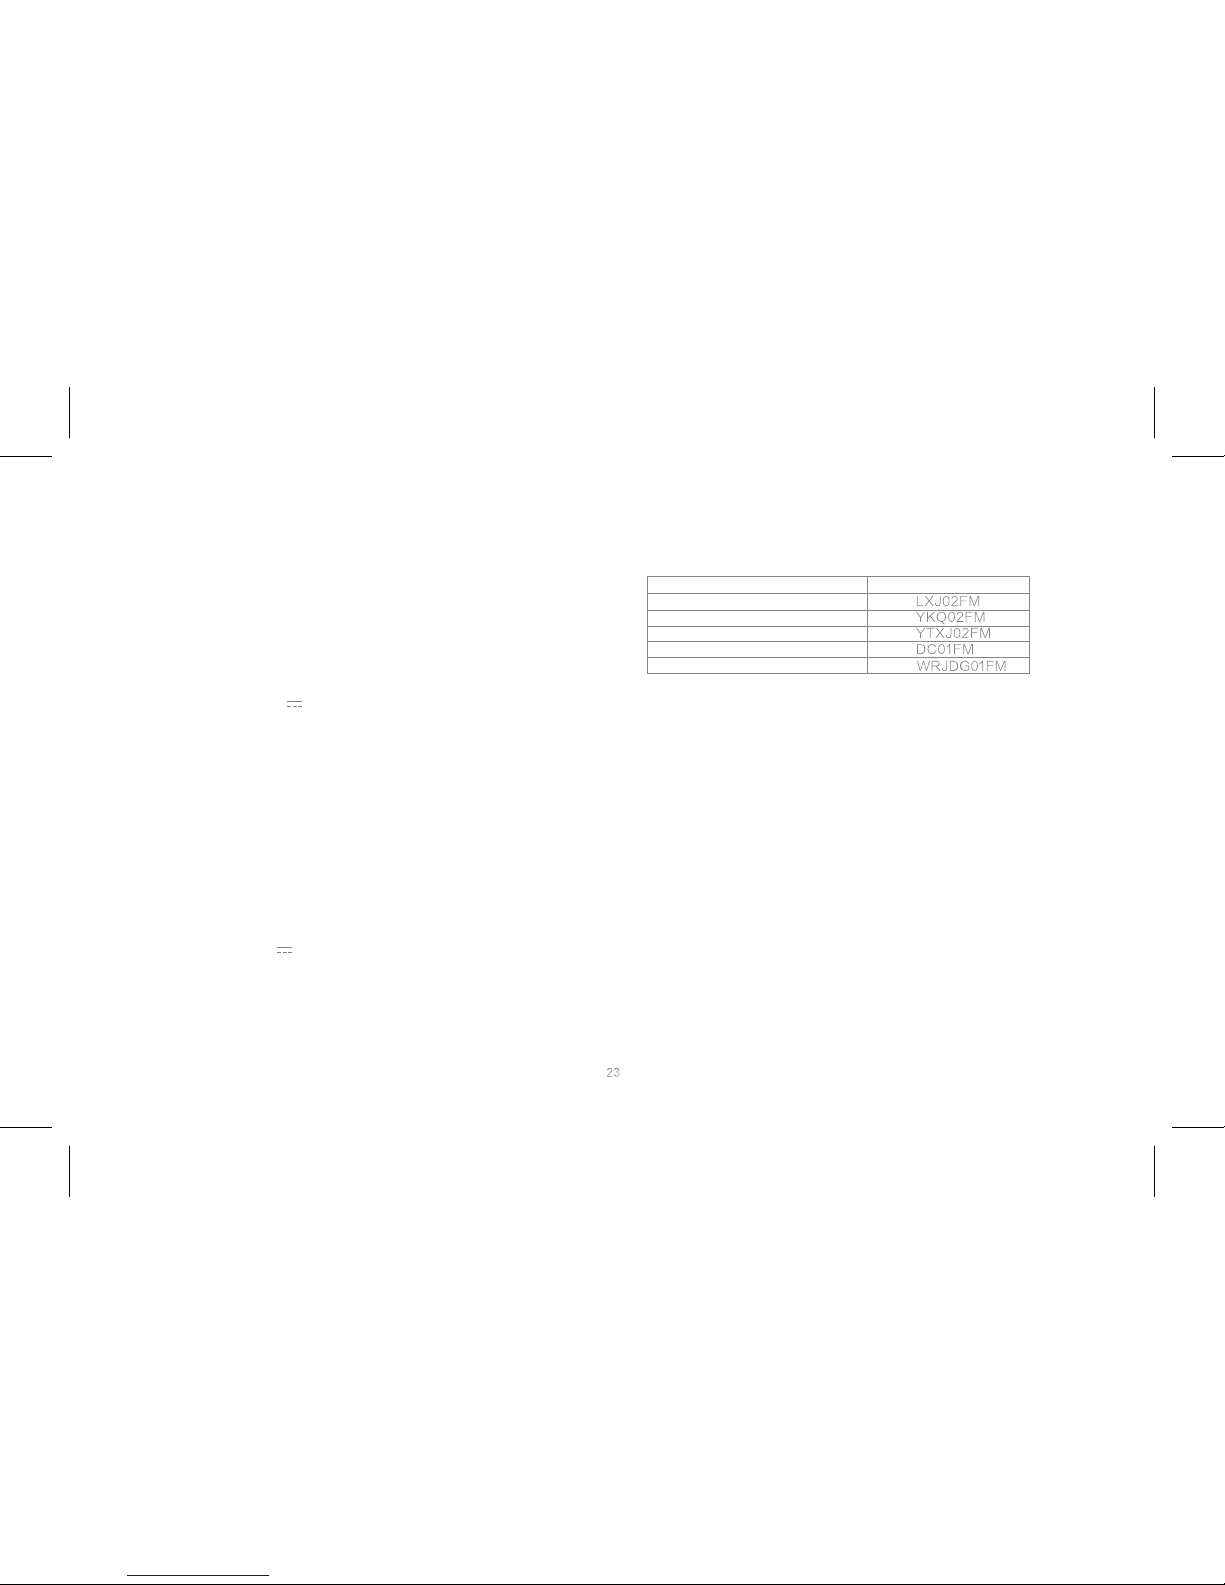
Name
Det achable propellers
Remote
Gimbal and camera
Batte ry
Model
Please go to www.mi.co m for latest accessories informatio
Wireless adapter
Page 26

WEEE Disposal and Recycling Information
Federal Communications Commission Declaration of Conformity
Correct Disposal of this product.This marking indicates that this product should not be disposal with other household wastes
throughout the EU.prevent possible harm to the environment or human health form uncontrolled waste disposal,recycle it
responsibly to promote the sustainable return of material resources. To return your used device,please use the return and
collection systems or contact the retailer where the product was purchased. They can take this product for environmental safe recycling.
This equipment has been tested and found to comply with the limits for a Class B digital device, pursuant to Part 15 of the FCC Rules.
These limits are designed to provide reasonable protectionagainst harmful interference in a residential installation. This equipment
generates, uses, and can radiate radio frequency energy and, ifnot installed and used in accordance with the instructions, may cause
harmful interference to radio communications. However, there isno guarantee that interference will not occur in a particular installation.
If this equipment does cause harmful interference to radio or television reception, which can be determined by turning the equipment
offand on, the user is encouraged to try to correct the interference by one or more of the following .
measures:
Reorient or relocate the receiving antenna.
Increase the separation between the equipment and receicer.
Connect the equipment into an outlet on a circuit different from that to which the receiver is connected.
Consult an authorized dealer or service representative for help.
Regulatory Notice for Users in USA
FCC ID:2AG53FXQ02FM
Name:Mi Drone
Model:FXQ02FM
FCC ID: 2AG53YKQ02FM
Name:Radio Controller
Model:YKQ02FM
FCC ID: 2AG53WRJDG01FM
Name:Wireless Adapter
Model:WRJDG01FM
USA—Federal Communications Commission(FCC)
This device are granted with following FCC ID by Federal Communications Commission(FCC)
24
Page 27

RF exposure warning
This equipment must be installed and operated in accordance with provided instructions and theantenna(s) used for this transmitter
must be installed to provide a separation distance of at least 20 cmfrom all persons and must not be co-located or operating in
conjunction with any other antenna or transmitter.End-users and installers must be provide with antenna installation instructions
and transmitter operating conditions for satisfying RF exposurecompliance.
SAR Statement(only apply to FCC ID: 2AG53YKQ02FM IC: 21054-YKQ02FM Name:Radio Controller
Model:YKQ02FM FCC ID: 2AG53WRJDG01FM IC: 21054-WRJDG01FM Name:Wireless adapter Model:WRJDG01FM)
This equipment complies with FCC&ISED SAR limits ,the highest SAR value reported to the FCC andISED for this device is
YKQ02FM: 1.08W / KG; WRJDG01FM:0.463W / KG. Cet équipement est conforme aux limites FCC&ISED SAR, la valeur SAR la
plus élevée rapportée à la FCC et ISED pour cet appareil est YKQ02FM: 1.08W / KG;WRJDG01FM:0.463W / KG.
IC RF Exposure statement
This equipment complies with IC radiation exposure limits set forth for an uncontrolled environment.This equipment should be
installed and operated with minimum distance 20cm between the radiator & your body.
Déclaration d'exposition aux radiations:
Cet équipement est conforme aux limites d'exposition aux rayonnements IC établies pour un environnement non contrôlé.
Cet équipement doit être installé et utilisé avec un minimum de 20 cm de distance entre la source de rayonnement et votre
corps.
i. for devices with detachable antenna(s), the maximum antenna gain permitted for devices in the band 5725-5850 MHz shall be
such that the equipment still complies with the e.i.r.p. limits specified for point-to-point and non-point-to-point operation
asappropriate; and
i. pour les dispositifs munis d'antennes amovibles, le gain maximal d'antenne permis (pour les dispositifs utilisant la bande de
5 725 à 5 850 MHz) doit être conforme à la limite de la p.i.r.e. spécifiée pour l'exploitation point àpoint et l'exploitation non
point à point, selon le cas;
25
Page 28

Online service:http://www.mi.com/en/support/
Principal:Xiaomi Communication Technology Co.Ltd.
Manufacturer:Beijing Fimi echnology Co.Ltd.(Xiaomi ecological chain enterprise)
Address:No.348, Floor 3, 1# Complex Building, Yongtaiyuan Jia, Qinghe, Haidian District, Beijing, China
 Loading...