

MidNite Solar Whizbang Jr, Whizbang Junior Installation Instructions Manual

10-264-1 REV-C
Whizbang Jr. – Installation Instructions
The Whizbang Junior provides highly accurate current sensing when used with
compatible Midnite Solar products. However, for our customers that already own
similar products, the Whizbang Jr. has been designed for cooperative
attachment. If you already own another battery-monitoring product and wish to
continue using it, skip down to step 1.2.
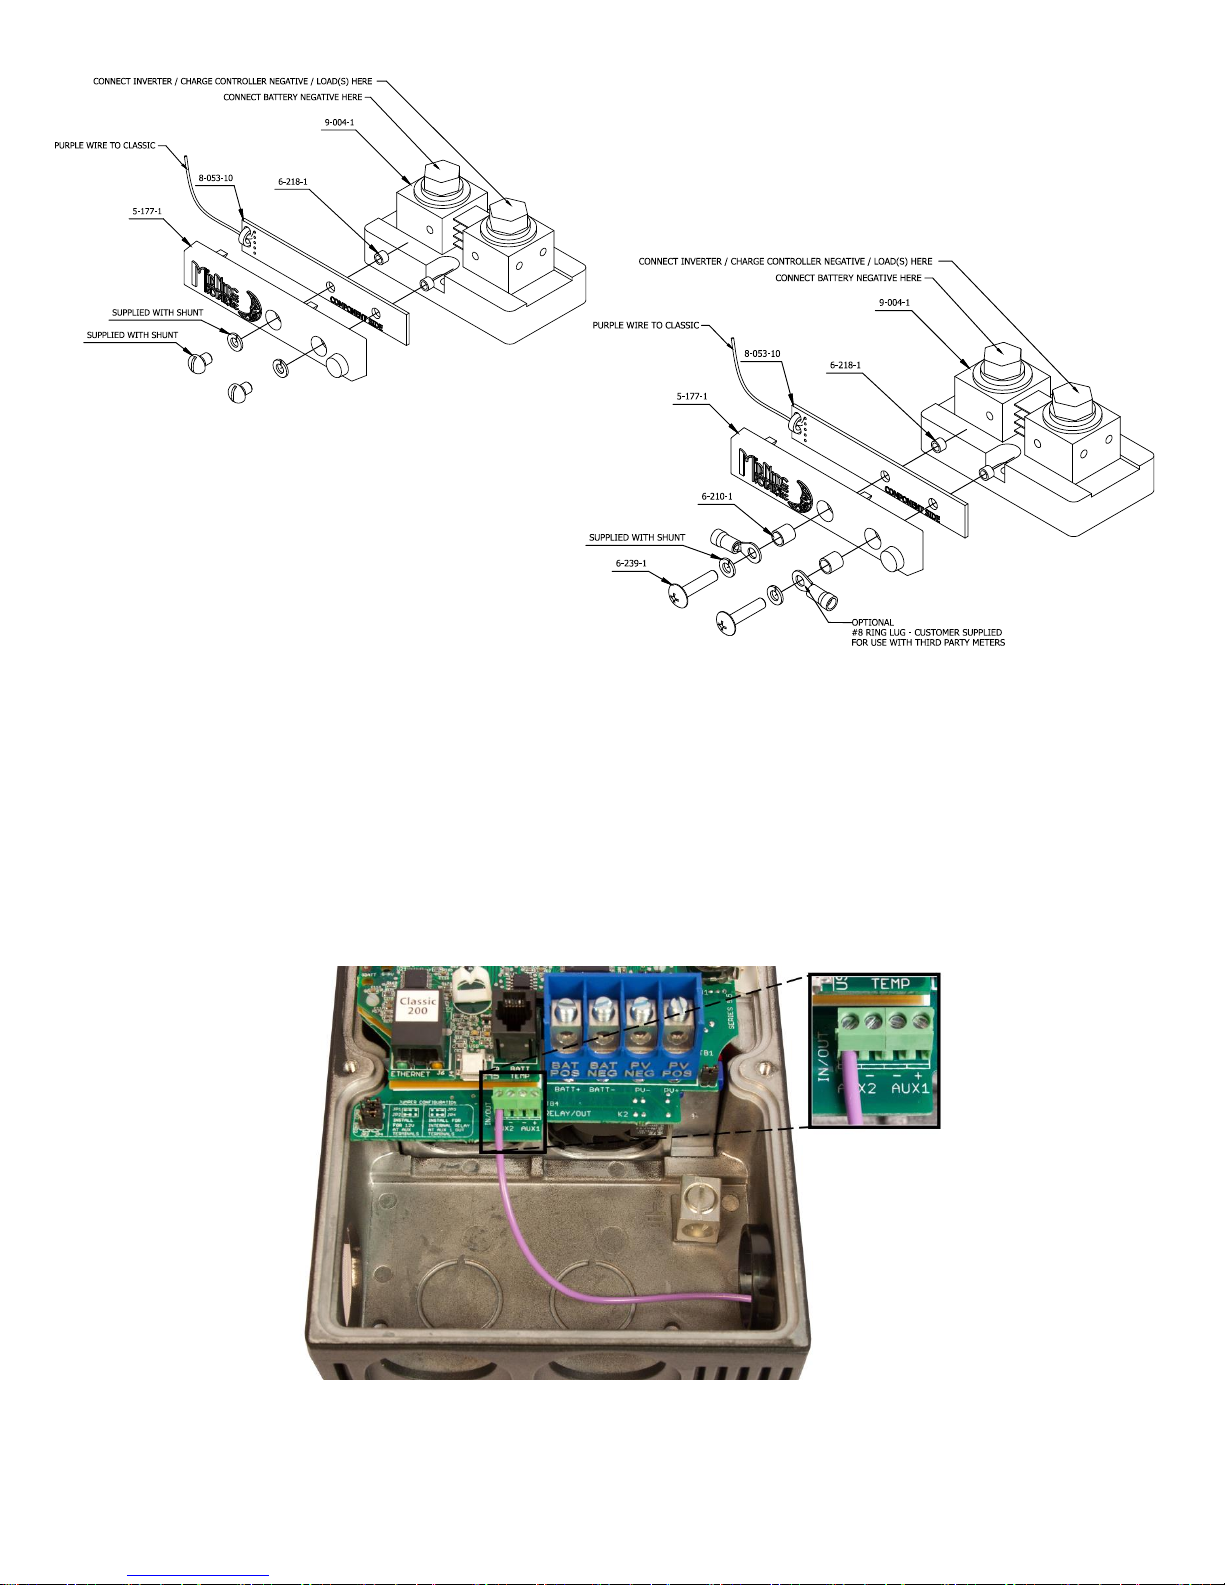
Step 1.1 (Whizbang Jr. only): Attach Whizbang Jr. to 500A/50mV Deltec MKB Shunt
or equivalent (see Figure 1).
WARNING: The Whizbang Jr. is designed for low-side shunt measurement. Make
certain shunt is attached to battery-negative, not battery-positive.
A. Remove sensing screws from shunt, including lock-washer and flat-washer.
Put flat washers to the side, they will not be used.
B. With lock-washers attached, guide both screws through the Whizbang
terminals.
C. Slide on provided 1/8” long spacers over screws on the back-side of the
Whizbang Jr.
D. Carefully guide the Whizbang Jr. to the shunt. The Whizbang Jr.’s purple
wire should be pointing toward the battery cable side of the shunt. Handtighten screws to provide a solid connection. Loosen and retighten screws
to ensure a snug fit. Skip to 2.1.
Step 1.2 (Cooperative): Attach Whizbang Jr. to 500A/50mV Deltec MKB Shunt or
equivalent (see Figure 2).
WARNING: The Whizbang Jr. is designed for low-side shunt measurement. Make
certain shunt is attached to battery-negative, not battery-positive.
A. Remove sensing screws from shunt. Gather their attached lock-washers. The
pre-mounted screws and flat-washers will not be used. Put them to the
side.
B. Place provided 1/4" long spacers into Whizbang terminal recesses.
C. Attach lock-washers to included stainless-steel 3/4” screws, then slide
on #8 ring terminals w/attached 3rd party wiring.
D. Guide both screws through the spacers and Whizbang terminals.
E. Slide on provided 1/8” long spacers over screws on the back-side of the
Whizbang Jr.
F. Carefully guide the Whizbang Jr. to the shunt. The Whizbang Jr.’s purple
wire should be pointing toward the battery cable side of the shunt. Handtighten screws to provide a solid connection. Loosen and retighten screws
to ensure a snug fit.
1
10-264-1 REV-C
Figure 2 – Whizbang Jr. and
3rd party connections
Figure 1 – Whizbang Jr. Only
Included Hardware:
2x
6-218-1
1/8” long, 1/4" O.D., .171” I.D. Alum. Spacer
2x
6-210-1
1/4" long, 1/4" O.D., .171” I.D. Alum. Spacer
2x
6-239-1
3/4" long #8-32 Phillips, Stainless.
Not-Included Hardware:
1x
9-004-1
Deltec MKB Series, 500A, 50mV Shunt.
2x
None.
#8 Ring Terminals.
NOTE: WHIZBANG JR. CAN BE MOUNTED ON SHUNT
BACKWARDS, BUT MEASURED CURRENTS WILL BE OF
INCORRECT POLARITY!
Step 2.1: Attach Whizbang Jr. to Midnite Classic.
A. Strip approximately 3/16” from the end of the 22AWG purple
Whizbang Jr. wire. Twist the strands together to reduce fraying.
B. Feed wire through preferred conduit opening.
C. Secure wire to Classic AUX2+ input, see Fig. 3 below.
D.
Figure 3 – Whizbang Jr., connection to Classic.
2
 Loading...