

Page 1
IQholter®, EX/EP
Version 10.0.0
Operation Manual
39-78-0001 Rev. A
Page 2

2
39-78-0001 © Midmark Corporation 2016
Notice
The information in this manual is subject to change without notice.
Midmark Corporation shall not be liable for technical or editorial omissions made herein, nor for incidental or
consequential damages resulting from the furnishing, performance, or use of this operation manual.
This document contains proprietary information protected by copyright. No part of this document may be
photocopied or reproduced in any form without prior written consent from Midmark Corporation.
IQecg, IQholter, IQspiro, IQvitals, IQmanager, and IQpath are trademarks of Midmark Corporation.
Windows and Microsoft are registered trademarks of Microsoft Corporation in the United States and other countries.
Intel and Intel Core are trademarks of Intel Corporation in the United States and other countries.
Energizer is a registered trademark of Energizer.
Part number: 39-78-0001 Rev A
Page 3

3
39-78-0001 © Midmark Corporation 2016
Table of Contents
Related Documents .........................................................................................................6
Precautions .........................................................................................................................7
I. General Information .....................................................................................................8
A. Recorder Description .......................................................................................................8
B. Recorder Specications .................................................................................................10
C. Holter System Description ............................................................................................11
D. Necessary Computer Skills ...........................................................................................11
E. Product Features ............................................................................................................12
F. Contents Checklist ..........................................................................................................13
II. Installation ....................................................................................................................14
A. Minimum Computer Requirements ..............................................................................14
B. System Components ......................................................................................................15
C. Set Up ..............................................................................................................................15
D. Software Installation .......................................................................................................17
E. Conguring IQholter
®
.....................................................................................................18
III. Patient Preparation ..................................................................................................27
A. Electrode Site Preparation ............................................................................................27
B. Three Channel ECG Recording ...................................................................................29
IV. Recorder Operation ................................................................................................. 31
A. Recorder Set-Up and Conguration ............................................................................31
B. Conrm Operation and Start Recording ......................................................................36
C. Before the Patient Leaves the Ofce ...........................................................................38
D. Early Termination of Recording ....................................................................................39
E. When patient returns with the IQholter® recorder ......................................................39
V. Creating a Holter Report ........................................................................................40
A. Starting IQmanager
®
......................................................................................................40
B. Reviewing and Editing Holter Tests .............................................................................49
VI. Appendices ................................................................................................................85
A. Appendix A - Operations at a Glance ..........................................................................85
B. Appendix B - Troubleshooting Guides .........................................................................87
C. Appendix C - Maintenance and Storage .....................................................................89
D. Appendix D - Radio and Television Interference ........................................................91
E. Appendix E - Programming the IQholter® Recorder 24+ ..........................................95
F. Appendix F - Safety and International Symbols ..........................................................96
G. Appendix G - Accessories and Supplies .....................................................................97
Page 4

4
39-78-0001 © Midmark Corporation 2016
VII. Customer Support and Warranty Information ............................................98
VIII. Contact Information .............................................................................................99
Page 5
5
39-78-0001 © Midmark Corporation 2016
Physician’s Responsibility
The statistical results provided by the Midmark IQholter®, IQholter® EX, or IQholter® EP are for the exclusive
use of licensed physicians or personnel under their direct supervision. The numerical and graphical results
should be examined with respect to the patient’s overall clinical condition, recording preparation quality, and
general recorded data quality, which can affect the accuracy of reported data.
Proper administration of the test is the physician’s responsibility, as is making a diagnosis, obtaining expert
opinions on the results, and implementing the correct treatment, if indicated.
Caution
Federal Law restricts this device to sale by or on the order of a physician.
Page 6

6
39-78-0001 © Midmark Corporation 2016
Related Documents
The following documents may be needed in order to operate Midmark diagnostic devices and software
products with the IQholter®:
• IQmanager® Software Operation Manual (Part number: 62-78-0001)
• IQholter® Quick Reference Guide – Patient Preparation (Part number: 39-79-0004)
All documents referenced above are located on the Midmark Operation Manuals CD (part number:
3-100-2000), included with every device. All product Operation Manuals can also be downloaded from
midmark.com. For additional information contact Midmark Technical Service at 1-800-624-8950, option 2.
Page 7

7
39-78-0001 © Midmark Corporation 2016
Precautions
Read the following to ensure the proper operation of this instrument:
1. Become familiar with the operational procedures of the IQholter® recorder prior to use.
• Disconnect the recorder from patients during defibrillation.
• The recorder is not designed for sterile use.
• The recorder is not intended for use with rechargeable batteries.
• Recorder maintenance:
− Keep the recorder away from splashing water.
− Do not store or use the recorder where humidity, ventilation, direct sunlight or air containing dust,
salt or sulfur might affect it.
− Prevent the recorder from slipping and protect it from the possibility of vibration, shock or drop;
be particularly careful during transport
− Do not store or use the recorder in a chemical storage ager, or where gas is generated.
• Preparation of the recorder prior to operation:
− Verify proper recorder operation.
− Check that cable connections are secure.
• Precautions while using the recorder:
− Avoid activities that could affect the quality of recorded signals. Do not sleep under an electric
blanket.
− Patients should not shower, take baths, use hot tubs or perform similar activities while wearing
the recorder.
− Keep the recorder and electrode sites dry while in use.
− Do not tamper with the recorder. Do not remove the secure digital (SD) card or battery
until the recording is complete.
• Precautions after using the recorder:
− Remove the battery and SD card.
− Download patient data to computer as soon as possible to preserve patient data.
− Do not reinstall battery into the recorder with the SD card installed. Patient data will be lost.
− Keep the recorder clean to ensure trouble-free operation during next use.
• Perform routine inspection of the recorder and accessories.
• Do not make any modifications to the recorder.
DANGER
Possible explosion hazard if used in the presence of flammable anesthetics.
Caution
Refer servicing to qualified service personnel.
Page 8
8
39-78-0001 © Midmark Corporation 2016
I. General Information
IQholter® Recorder
A. Recorder Description
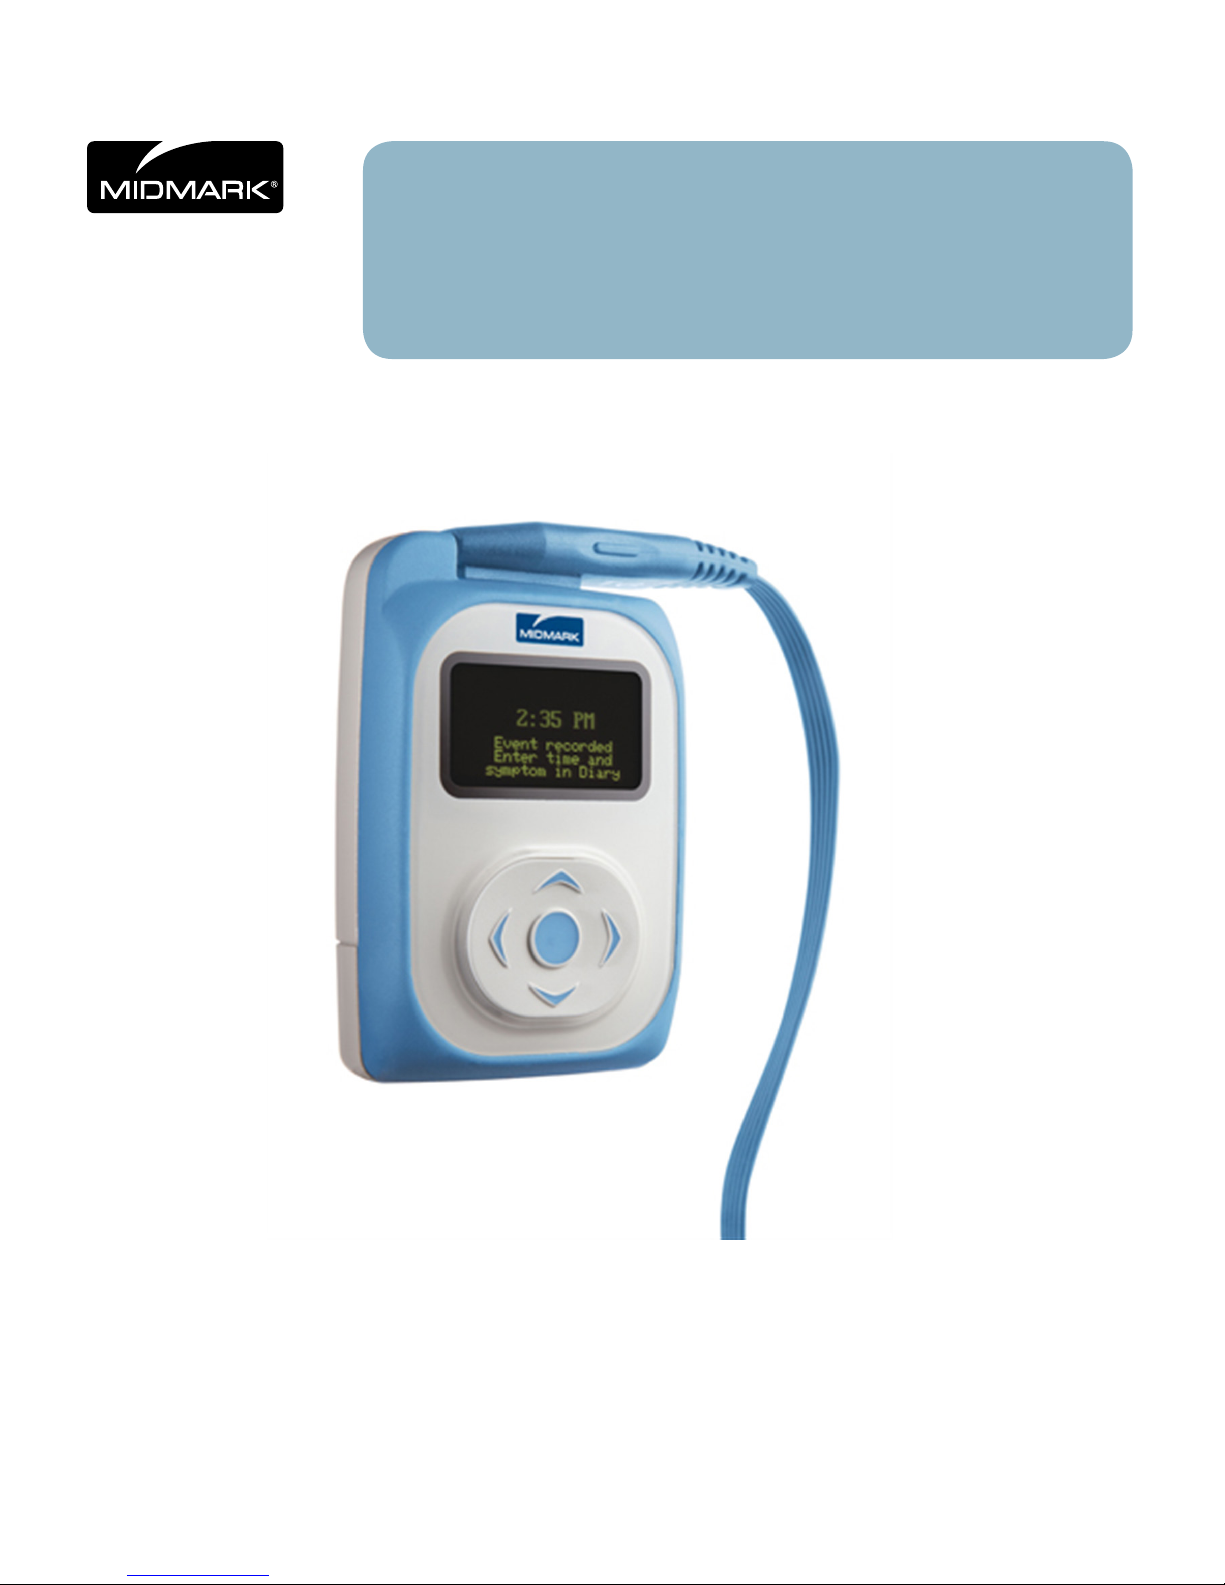
The IQholter® recorder is a lightweight, compact, digital Holter recorder designed for reliability and ease
of use in ambulatory ECG applications. Because the digital design has no moving parts, the IQholter®
recorder records cleaner ECG quality and has lower maintenance cost when compared to tape-based Holter
recorders.
The IQholter® recorder can be congured as a 5-lead/3-channel or 7-lead/3-channel recorder by changing
the patient cable.
7-lead/3-channel recording is recommended to attain best signal quality.
OLED
An Organic Light Emitting Diode (OLED) display assists Holter technicians in the verication of proper
patient hookup on the spot, eliminating the need for expensive test cable interfaces with ECG machines or
connecting to a computer.
Five-Way Navigation Button and Patient Event Button
A ve-way (up, down, left, right, center/enter) button provides intuitive access to the options and menus
within the IQholter® recorder. The center button also acts as a momentary Event button, providing a
convenient means of marking and storing event times. Once the Holter data is downloaded and analyzed,
ECG strips correlate to the Event (center) button being pressed can be access easily.
Storage Media
Data is conveniently stored on a removable and reusable SD card, eliminating the need for cassette tapes.
Digital technology also eliminates tape-based variables such as tape-head frequency, speed variations,
distortion and tape brand inconsistencies.
Page 9
9
39-78-0001 © Midmark Corporation 2016
Removable SD card frees up the IQholter® recorder for next patient without waiting for the recorded data to
download.
Note
Midmark only recommends using SD cards issued by Midmark.
Using other SD cards may cause recording or download errors
and potential loss of test data.
Belt Clip
A repositionable belt clip is available on the back of the IQholter® recorder. For better patient comfort the clip
is mounted to the recorder so the recorder rests in a horizontal orientation when attached to a belt.
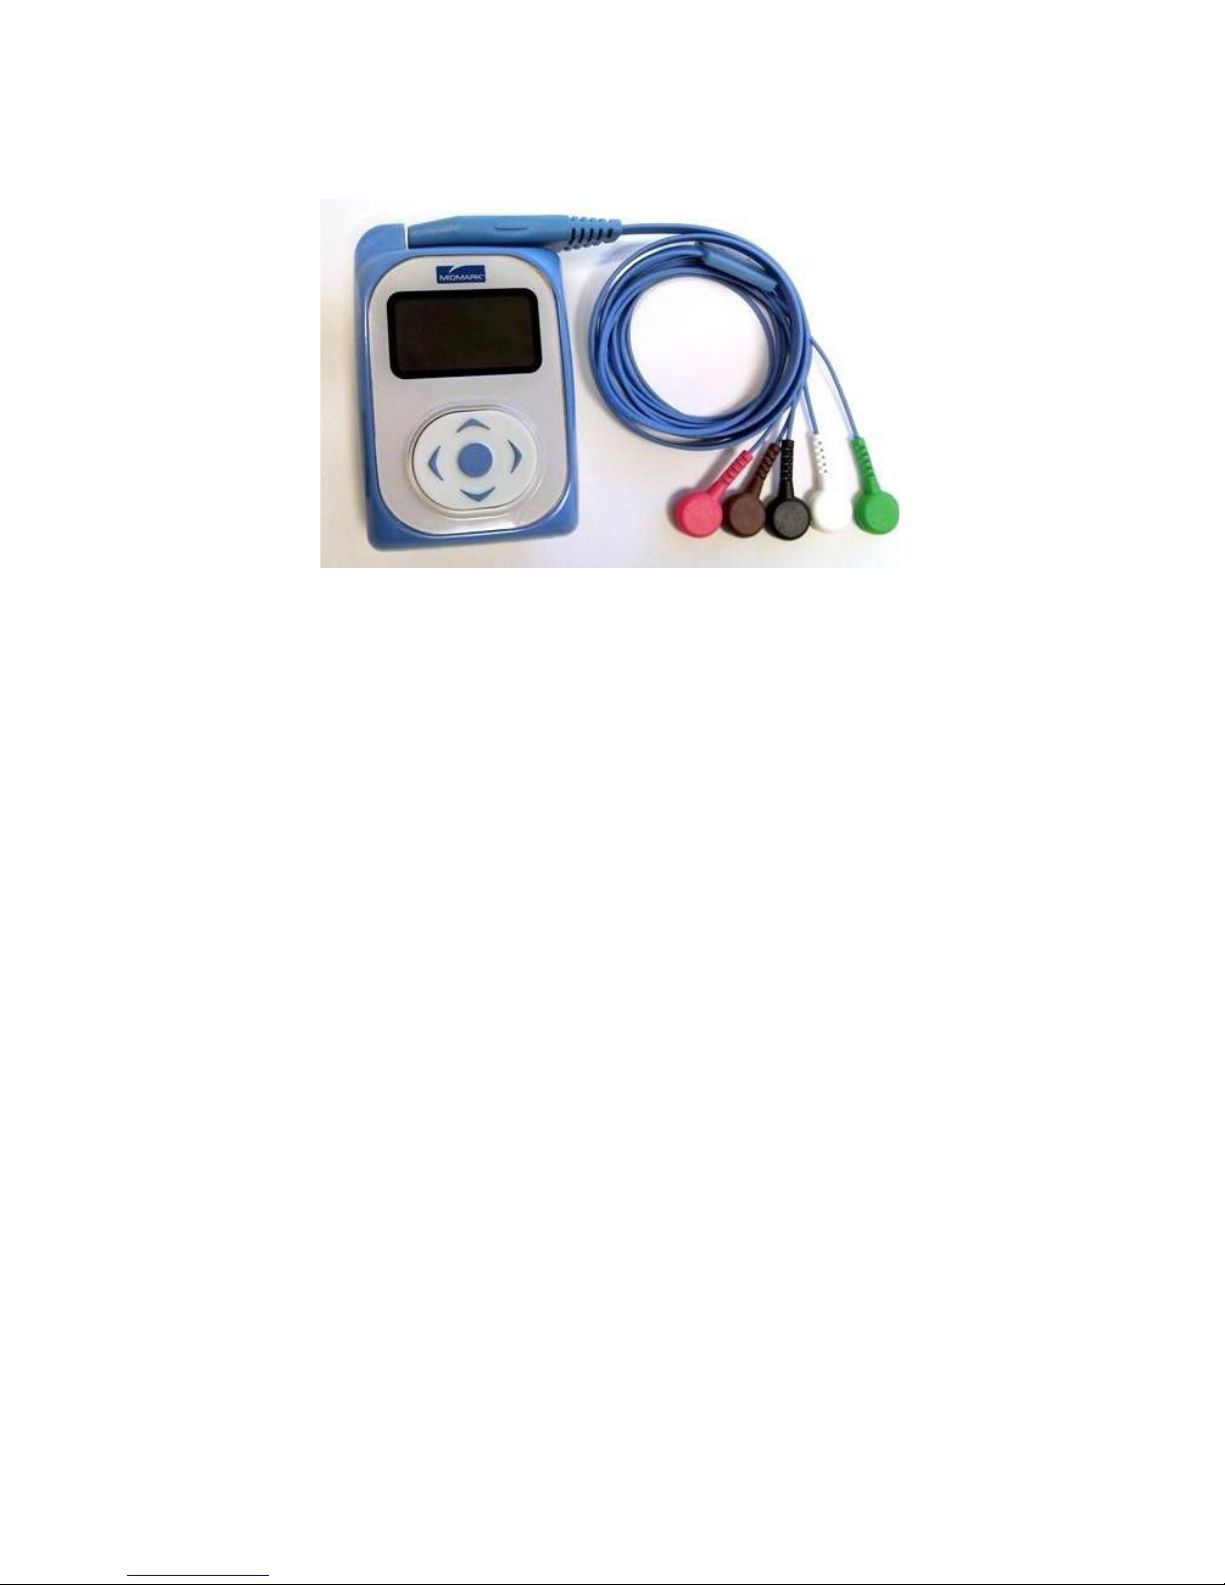
5-Lead or 7-Lead Cable
Depending on the model purchased, a color-coded 5-Lead or 7-Lead cable comes with the IQholter®
recorder.
Note
The 5-Lead and 7-Lead cables require different Holter prep kits.
Please contact a Midmark sales representative or call Midmark
Technical Service for more information.
7-lead/3-channel recording is recommended to attain best signal quality.
24 Hour Mode or 24, 48, 72 Hour Mode
The IQholter® recorder indicated by 24+ on the serial number label is capable of being upgraded to record
24, 48, or 72 hours in “Hi-Def” mode. See table below. Upgrade kit (1-370-0020) will provide this capability.
Attribute
Standard Mode
(Default)
‟Hi-Def” Mode
(Upgrade kit needed)
Hours of Recording 24 24, 48, or 72
Patient ID Not Available
AlphaNumeric (up to 21
characters)
Sample Rate 128 samples/sec 256 samples/sec
Resolution 8 bits 12 bits
Data Size (per 24 hours) 33 Mbytes 132 Mbytes
Upload Time (per 24 hours) 2 minutes 2 minutes
Page 10
10
39-78-0001 © Midmark Corporation 2016
Note
Use electrodes that are rated for the timeframe (24, 48, 72 hours)
for the patient tests.
Note
Use a lithium battery for 72 hour patient tests.
B. Recorder Specications
IQholter® Recorder Performance Specifications
Category Specification
Intended Use
The IQholter
®
recorder is intended for the recording of ECG data collected from
ambulatory patients. The recorder can collect data in the presence of implanted
pacemaker pulses, and can detect and record the occurrence of signals characteristic of
pacemaker pulses. The recorder is used under the order of a physician, who reviews the
data after downloading and processing by IQholter
®
program.
PHYSICAL
Weight 2.8 ounces
Dimensions 3.7” x 2.6” x 1.25” (with belt clip) / 1.06” (without clip)
Operating Temperature 0 to 40 degrees Celsius (32 to 104 degrees Fahrenheit)
Storage Temperature 0 to 70 degrees Celsius (32 to 162 degrees Fahrenheit)
Non Operating Shock 1 meter drop (39 inches)
Operating Position Any orientation
Humidity 0% to 90% (non-condensing)
Storage Media Secure digital media card (64MB – 2GB)
FUNCTIONAL
Recording Time 24 hours (Optional 48, 72 hours)
Channels 3
Sample Rate 128 samples per channel/sec (Optional 256 samples per channel/sec)
Resolution 8 bits (Optional 12 bits)
Bandwidth 0.05 to 60Hz -3dB
Input range +/- 5.0 mV
Battery 1 AA, IEC-LR6 – Alkaline for 24, 48; Lithium for 72
Patient Input 5- or 7-lead configuration
CMRR 60 dB
PACE DETECTION SPECIFICATION
Pulse Amplitude (at skin) +/- 2 mV to +/- 500 mV
Pulse Width (at skin) 2ms to 0.1ms
Page 11

11
39-78-0001 © Midmark Corporation 2016
C. Holter System Description
Note
This manual is intended for IQmanager® users. If using the
IQholter
®
or IQholter® EX/EP through an EMR, please contact
Midmark Technical Service for assistance with installation, setup
and operation.
IQholter®, IQholter® EX, and IQholter® EP (IQholter® EX/EP) is seamlessly integrated with IQmanager®
software, the portal to all of Midmark’s medical diagnostic utilities, including ECG, Spirometry, and Vital
Signs. It is designed to scan ECG waveform digitally stored on a secure digital (SD) card by the IQholter®
recorder, and to produce an analytical report on arrhythmic cardiac activity. It is a computer-based medical
diagnostic instrument designed for use on Microsoft® Windows® 10, 8, or 7, operating systems.
The IQholter® is intuitive and simple to operate. It is designed for clinics that do not see patients with atrial
brillations or pacemakers. The IQholter® EX/EP is developed to allow more interactions from the clinician.
The feature differences between the IQholter®, IQholter® EX, and IQholter® EP are shown in the IQholter®
Product Matrix table below.
Holter monitoring is performed for mean heart rate, minimum and maximum heart rates, isolated premature
arrhythmia, interpolated ventricular arrhythmia (VE), pairs (VE Pairs), runs of three or more VEs (VE Runs),
premature supraventricular isolated ectopic beats (SVE), coupled SVEs (SV Pairs), supraventricular runs
of three or more SVEs (SV Runs), pause, R on T, bigeminy, trigeminy, atrial brillation and ST segment
depressions and elevations for channels 1, 2, and 3. Ventricular Tachycardia (V Tach) episodes are included
in the VE Runs category. Color-coded beat identication enhances the operator’s ability to scrutinize and
validate the computer analysis of the Holter test. Important values are presented in tables and graphics for
easy overview.
After the patient’s demographics and recording information are entered in IQmanager®, the Holter program
can scan the recorded ECG and automatically generate preselected reports with minimum operator
intervention. The clinician can then review the data, perform editing as needed, produce a nal report,
archive test results for future reference, and share them with colleagues via networks or email.
Note
The IQholter® and IQholter® EX/EP system is designed to scan
only ECG data recorded with the IQholter® recorder.
D. Necessary Computer Skills
This manual is intended for a user capable of using Microsoft® Windows®-based applications, has some
understanding of PC operations, and is familiar with the basic operations of Windows®.
Page 12

12
39-78-0001 © Midmark Corporation 2016
This Operation Manual is a comprehensive guide, designed to educate the user on the operation and
functions of the IQholter®, EX, and EP devices. The information in this manual includes all options that are
available with IQholter®, IQholter® EX, and IQholter® E P.
E. Product Features
The following table indicates the features available in the IQholter®, IQholter® EX and IQholter® E P.
IQholter® Product Matrix
Feature IQholter
®
IQholter® EX
(With A-Fib
Analysis)
IQholter® EP
(With Pacemaker
Analysis)
Patient Management Software
(Patient Search, Report Sorting, Vitals Trending, etc.)
√ √ √
Network Editing and Reviewing √ √ √
Pacemaker Analysis with Paced Beat Template Editing √
Atrial Fibrillation Analysis √ √
Template Editing for all Categories √ √
User Defined Templates √ √
Individual Beat Editing for All QRS Beats √ √ √
Group Editing for All QRS Beats √ √ √
Inserting or Deleting QRS Beats √ √
HR Variability Analysis - Time and Frequency Domains √ √
HRV Analysis Graphical and Tabular Reports √ √
Output HRV Frequency Analysis Results to Text Files √ √
Automatic 3-Channel QT/QTc Interval Analysis √ √
QT/QTc Trend and Tabular Reports √ √
Automatic 3-Channel ST-Segment Analysis √ √ √
ST Trend and Tabular Reports √ √ √
Page Scan functions √ √ √
Smart Page Scan by Selected Events √ √
Sample Strip Viewing and Editing √ √ √
Heart Rate Trend √ √ √
RR Interval/Ratio Graphs √ √ √
3-Channel Full Disclosure Preview Before Analysis √ √
Automatic Downloading of Patient Events √ √ √
Patient Diary Viewing and Editing with ECG Strip √ √ √
Page 13
13
39-78-0001 © Midmark Corporation 2016
IQholter® Product Matrix
Feature IQholter
®
IQholter® EX
(With A-Fib
Analysis)
IQholter® EP
(With Pacemaker
Analysis)
Simultaneous 3-Channel Arrhythmia Analysis √
Automatic Color-Coded Arrhythmia √
Automatic Narrative Summary Report √ √ √
Automatic Artifact Rejection √ √ √
Automatic Printing of Pre-selected Reports √ √ √
Print Selected Hours of Full Disclosure √ √ √
Print ECG strips with colored grid √ √ √
Automatically Saves All Results and Full Disclosure √ √ √
On-line Help √ √ √
Note
For the rest of this manual, unless otherwise specified, all features
and functionalities described for IQholter® also apply to both
IQholter® EX and IQholter® E P.
F. Contents Checklist
The IQholter® kit (including part numbers: 4-000-0110, 4-000-0113, and 4-000-0116) contains the items listed
below. Open the package and account for each item. Inspect them for any signs of damage such as dents,
cracks, tears or scratches. If an item is missing or damaged, contact Midmark Technical Service at 1-800624-8950, option 2, for replacement.
Quantity Each Description
1 IQholter
®
Recorder
1 Patient Cable
1 SD Card
1 Secure Digital Card Reader
1 Reusable IQholter
®
Recorder Pouch and Belt
1 Software Security Key, USB Version
4 Holter Prep Kits
1 Mouse Pad
1 Training DVD
1 Operation Manual CD
1 Quick Reference Guide
1 Warranty Card
Page 14
14
39-78-0001 © Midmark Corporation 2016
II. Installation
Note
Contact Midmark Technical Service before installing and setting
up the IQholter®. Computers today are more complex with
more software and hardware options than before, making each
computer almost unique. Midmark wants to make sure that your
IQholter® system is installed and configured as quickly and easily
as possible.
Midmark Technical Service can be reached at 1-800-624-8950,
option 2.
A. Minimum Computer Requirements
This section describes the minimum computer resources and hardware components needed when using
new Midmark devices and software. As is the nature of technology to change often, these requirements will
be evaluated and modied periodically. We suggest always referring to the most recent Minimum Computer
Requirements document at www.midmark.com, or contact Midmark Technical Service at 1-800-624-8950,
option 2, for additional information.
Note
If updating existing computer systems currently being used with
older Midmark devices and software, please contact Midmark
Technical Service before doing so.
The IQholter® is a Windows-based medical software program. For successful installation and use of
the Holter system, make sure that the host computer meets the minimum requirements and follow the
installation instructions carefully.
IQholter® Computer Minimum Requirements
Item Requirement
Operating Systems
Windows
®
10, Professional and Enterprise, 32-bit and 64-bit
Windows
®
8, Professional and Enterprise, 32-bit and 64-bit
Windows
®
7, Professional and Enterprise, 32-bit and 64-bit
Hardware Requirements Windows
®
compatible personal computer. Desktop model strongly recommended.
CPU
Intel
®
Core™ 2 Duo Processor E4300 (2M Cache, 1.80 GHz, 800 MHz FSB) (x86)
or 64-bit (x64) processor or faster
Disk 2 GB of free disk space or greater
Memory Minimum 2GB of system memory
Page 15
15
39-78-0001 © Midmark Corporation 2016
IQholter® Computer Minimum Requirements
Item Requirement
Input/Output Ports
One (1) USB port:
• One Universal Serial Bus (USB) port for the external flash card reader
The flash card reader is required for new test downloads only.
An additional USB port is required if a printer is used.
Pointing Device Windows
®
compatible mouse.
Keyboard Windows
®
compatible keyboard.
Display
1024x768 or higher resolutions for the real time acquisition screen. 16-bit color.
Wide-screen (1680x1050) is highly recommended.
Printer
Microsoft Windows
®
compatible inkjet or laser printer.
Note: A high-speed laser printer is highly recommended specially for continuous
rhythm strip printing.
The above is the minimum computer requirement specication for operating the IQholter® through
IQmanager®. A faster CPU and/or more Memory may be required if planning to operate the IQholter® through
an EMR or install additional software.
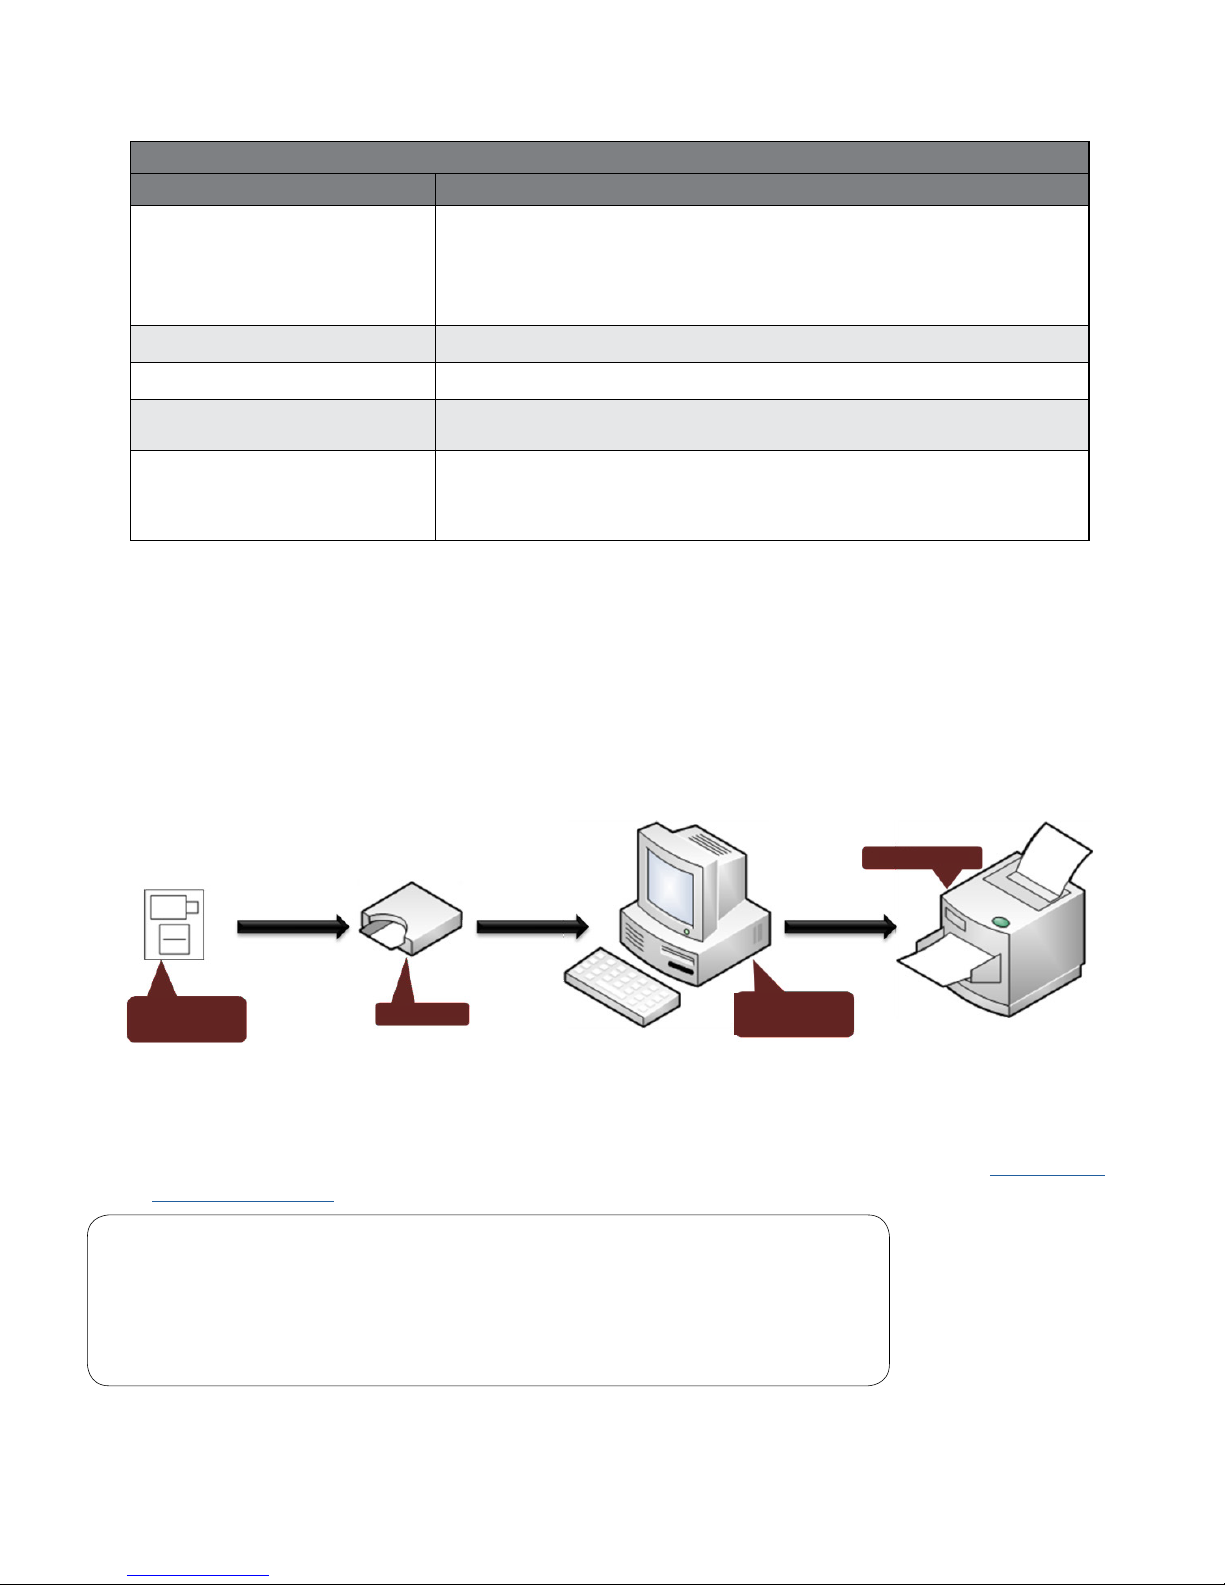
B. System Components
Figure 1-1 illustrates a general conguration of the IQholter® system. The primary components are a
Windows-based computer, a printer, and the IQholter® recorder.
Figure 1-1 Conguration of the IQholter® System
C. Set Up
1. Remove the IQholter® from its packaging, and verify that all the items are present. See Section I-F,
Contents Checklist.
Note
If using an electronic medical record (EMR) system that does not
interact with the IQholter®, the IQmanager® software will need
to be installed. Contact Midmark Technical Service to order an
IQmanager® software, if needed.
Recorded
memory card
Windows-based
computer
Card Reader
Printer
Page 16
16
39-78-0001 © Midmark Corporation 2016
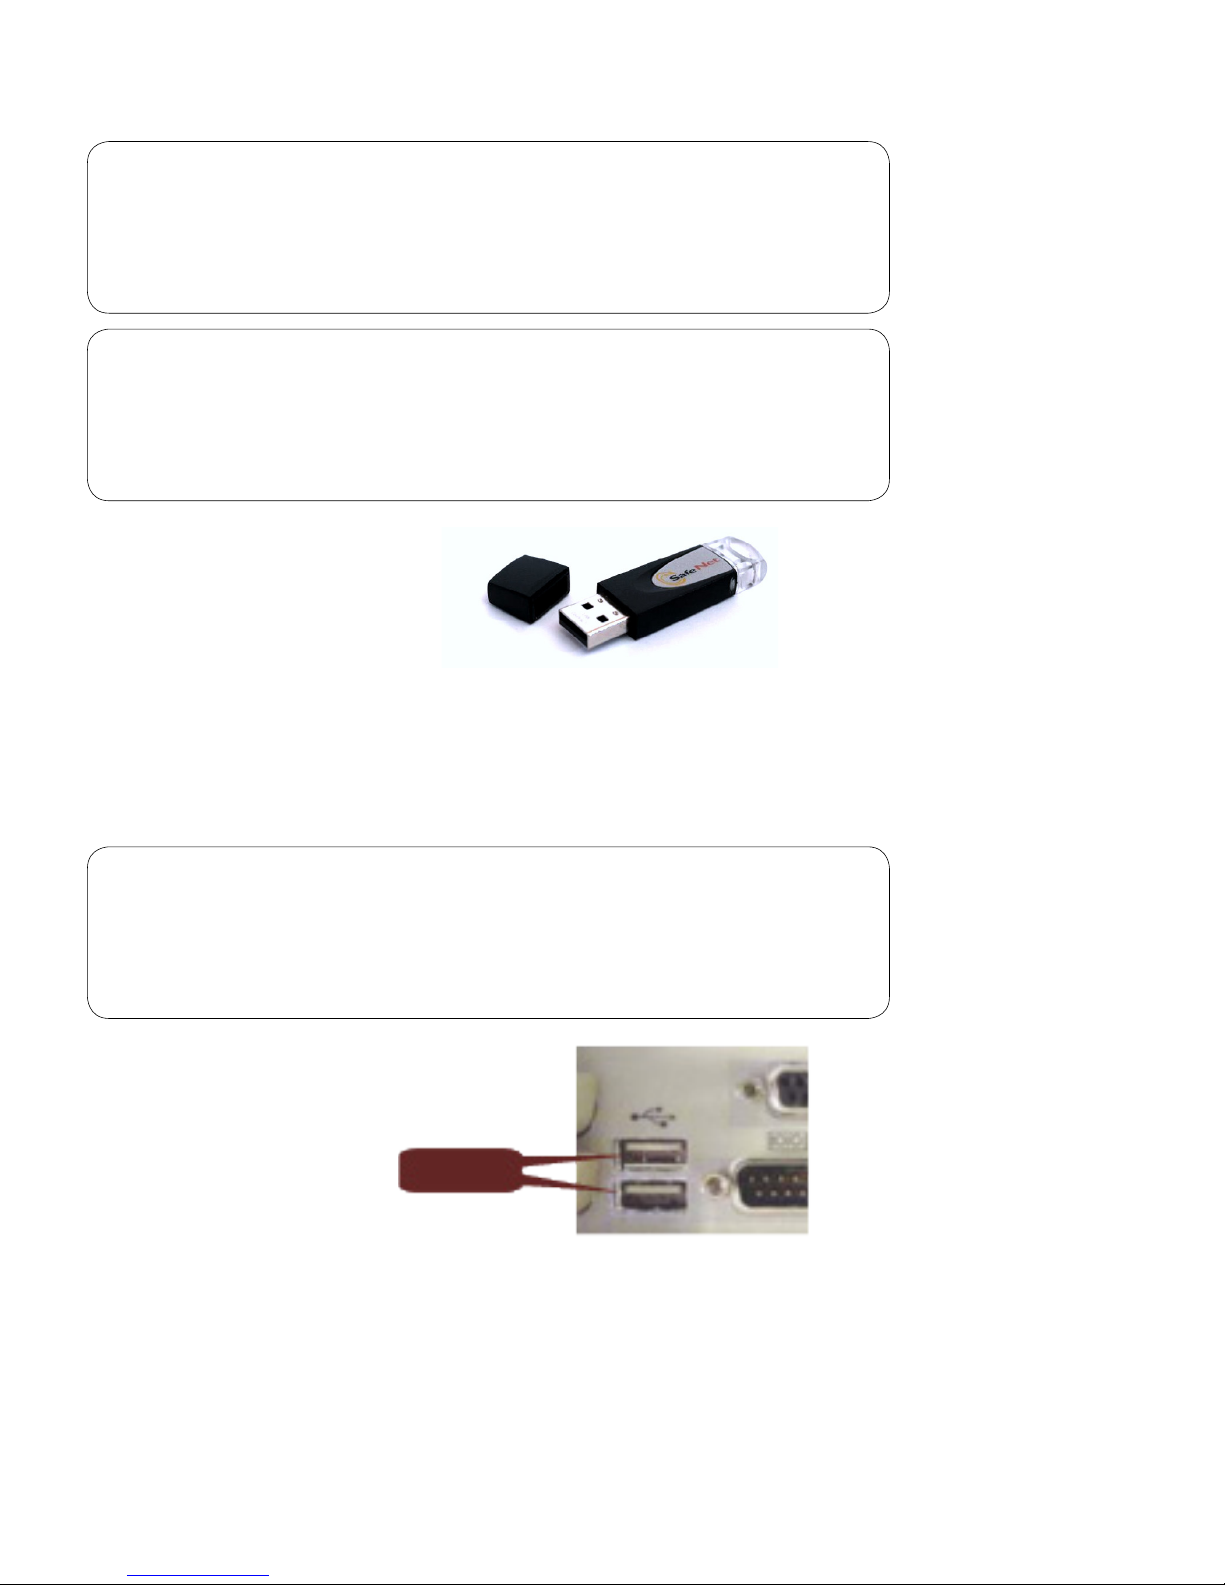
Note
A Sentinel Security Key will be included with the device kit. This
is NOT a flash drive! Do NOT lose this security key! Contact
Technical Service at 1-800-624-8950, option 2, for any questions
about the Security Key.
Note
If using with IQmanager, IQiC, IQiA v.10 or above, or any EMR
powered by IQconnect™, please contact Technical Service at
1-800-624-8950, option 2, to discuss exchanging your key for a
software security license.
Figure 2-0 Holter Sentinel Security Key
2. If the host computer does not have a SD card reader, install the external USB SD card reader
according to the installation instructions included.
3. If using a software security license, add the license to your license server. If using the Sentinel
Security Key (dongle), unpack the key and connect it directly to a USB port on the computer.
Note
Contact Technical Service at 1-800-624-8950, option 2, for any
questions about the Security Key or Software Security License
Figure 2-1 Example of USB ports on a computer.
USB Ports
Page 17

17
39-78-0001 © Midmark Corporation 2016
D. Software Installation
Note
The following software installation information refers to
IQmanager
®
Diagnostic Workstation Software users only. If using
the IQholter
®
through an EMR, please contact Midmark Technical
Service for assistance with installation and setup.
Note
If IQmanager® is installed on the computer and are upgrading or
adding a new Midmark product, please skip this section and refer
to the IQmanager® Operation Manual for detailed information on
the installation.
Note
Setting up any application in a network environment typically
requires administrator privileges, special access rights, and
knowledge of the network. Contact the network administrator
if you do not have Administrator privileges. The IQmanager®
installation program grants all users on the local machine read/
write permissions to the Brentwood folder.
Windows® Taskbar
IQmanager® is designed to run as a full-screen program. For best results, the Windows Taskbar should not
be displayed in order to provide maximum display area. Place the mouse pointer on the blank portion of the
Taskbar on the bottom of the screen, then right-click and select Properties. Check the Auto-hide the taskbar
box to hide the taskbar when it is not in use; to display the taskbar when it is hidden, move the mouse cursor
over the area where the taskbar is normally set, and it will reappear.
Installation Steps
Note
Close all Windows programs before installing this software.
Do not interrupt the installation program while it is running. The
installation should take less than five minutes.
Note
The Midmark IQholter® requires software to operate. The following
instructions use the IQmanager® software. Please contact
Midmark at 1-800-624-8950 to purchase the required software
license.
Page 18

18
39-78-0001 © Midmark Corporation 2016
1. Double-click the IQmanager® Isetup file. The installation starts automatically. For any questions on the
installation please refer to the IQmanager® Operation Manual.
2. Follow the instructions on the screen. For detailed installation, setup and detailed operation
instructions for IQmanager
®
software, please refer to the IQmanager® Operation Manual.
3. If there are any new licenses, add them to the licensing server. For any questions on adding licenses
please refer to the IQmanger
®
operation manual.
E. Conguring IQholter
®
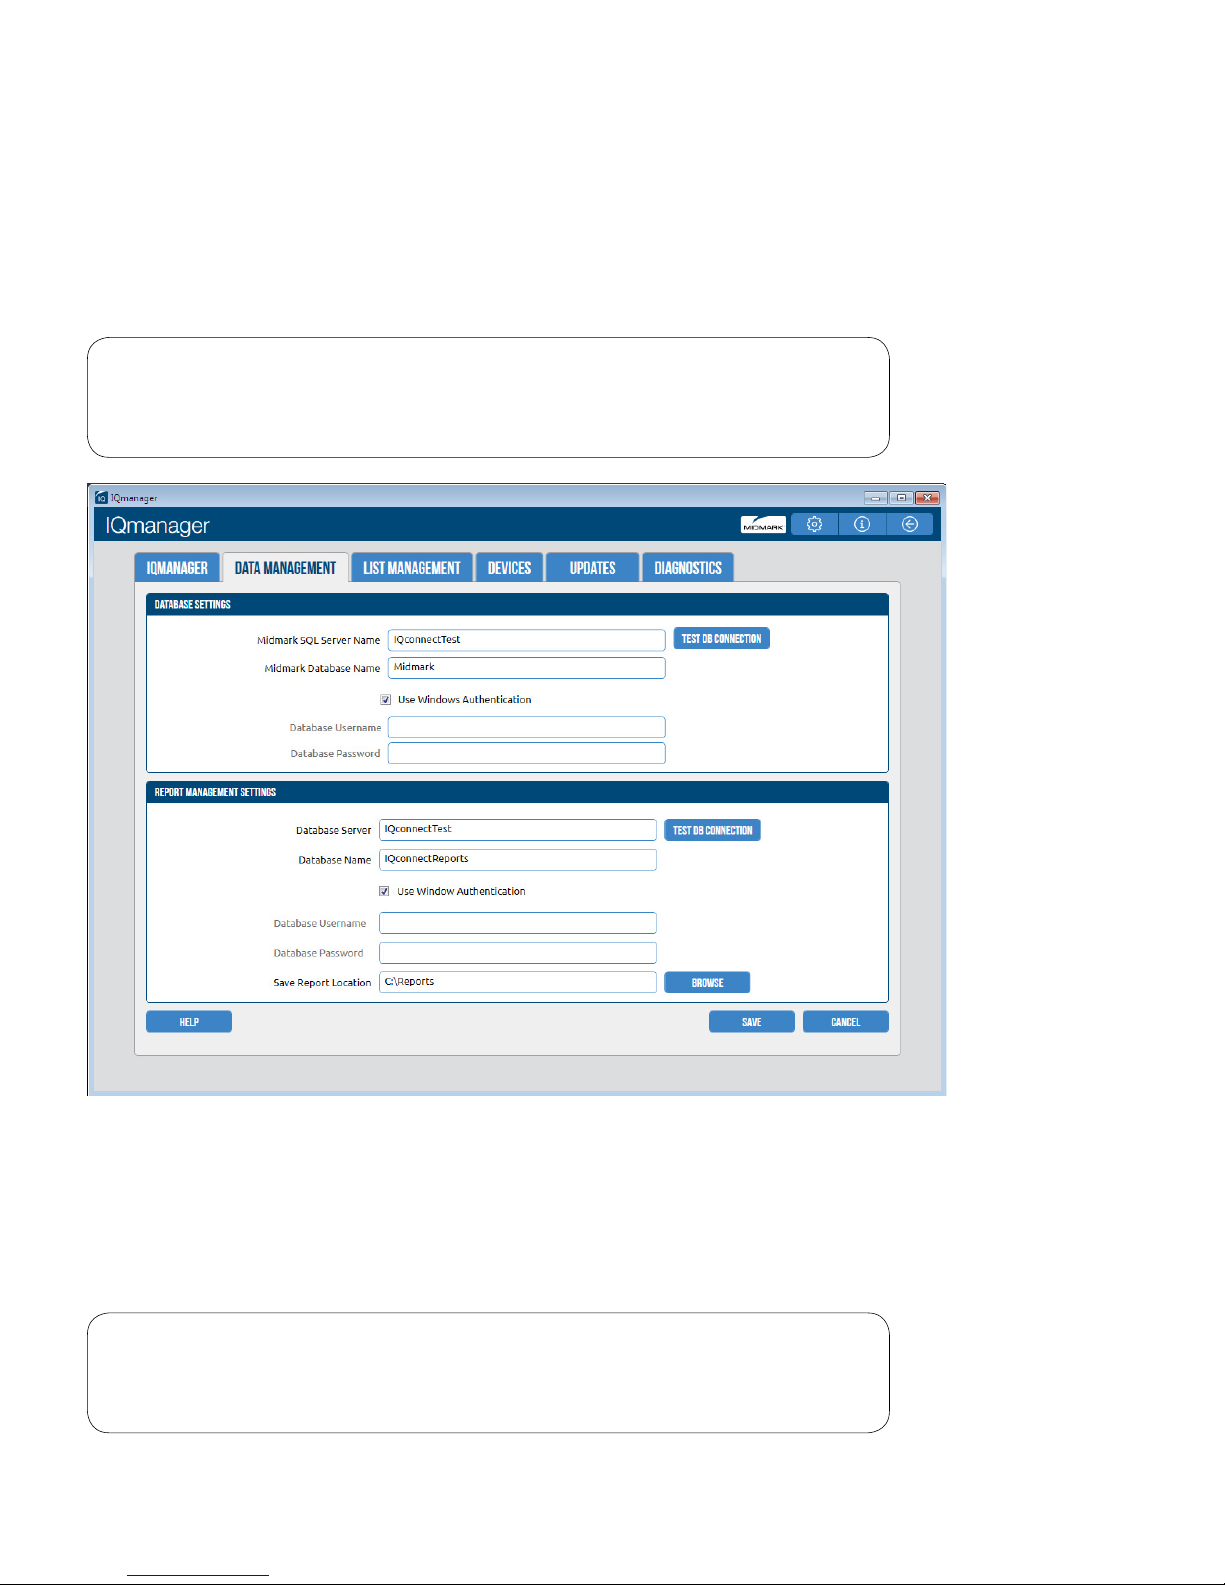
IQmanager® and the IQholter® can be customized by using the conguration settings. Access the
Conguration Settings by using the following steps:
• Click on the SETTINGS button in the upper right side of the IQmanager® opening screen
.
The IQmanager Settings window appears:
Complete the Institution Name and Address boxes with information about your medical practice. The
IQholter
®
will print the institution name on the Analysis Summary cover page of the reports. Enter a name
that describes the practice or operation to enable other medical personnel to identify the reports.
Page 19
19
39-78-0001 © Midmark Corporation 2016
Choose between Metric and English units of measurement, which affect how some of the patient data (e.g.,
weight and height) is displayed. The IQholter® uses both Date and Time Format settings, but part of the
Holter screen will always be in 24-hour format.
The other settings on this screen are irrelevant to Holter. When done, press Save.
Database Settings
Note
Refer to the IQmanager® Operation Manual for customizing the
database settings.
The Save Report Location setting determines where the full disclosures and report les will be stored. Each
24-hour Holter ECG le requires 33MB or 132MB (Optional 24, 48, 72) of storage.
List Management
The List Management conguration option customizes the lists used in IQmanager®, including Indications
and User Name, which may be used for Holter tests.
Note
Refer to the IQmanager® Operation Manual for information on
customizing List Management.
Page 20
20
39-78-0001 © Midmark Corporation 2016
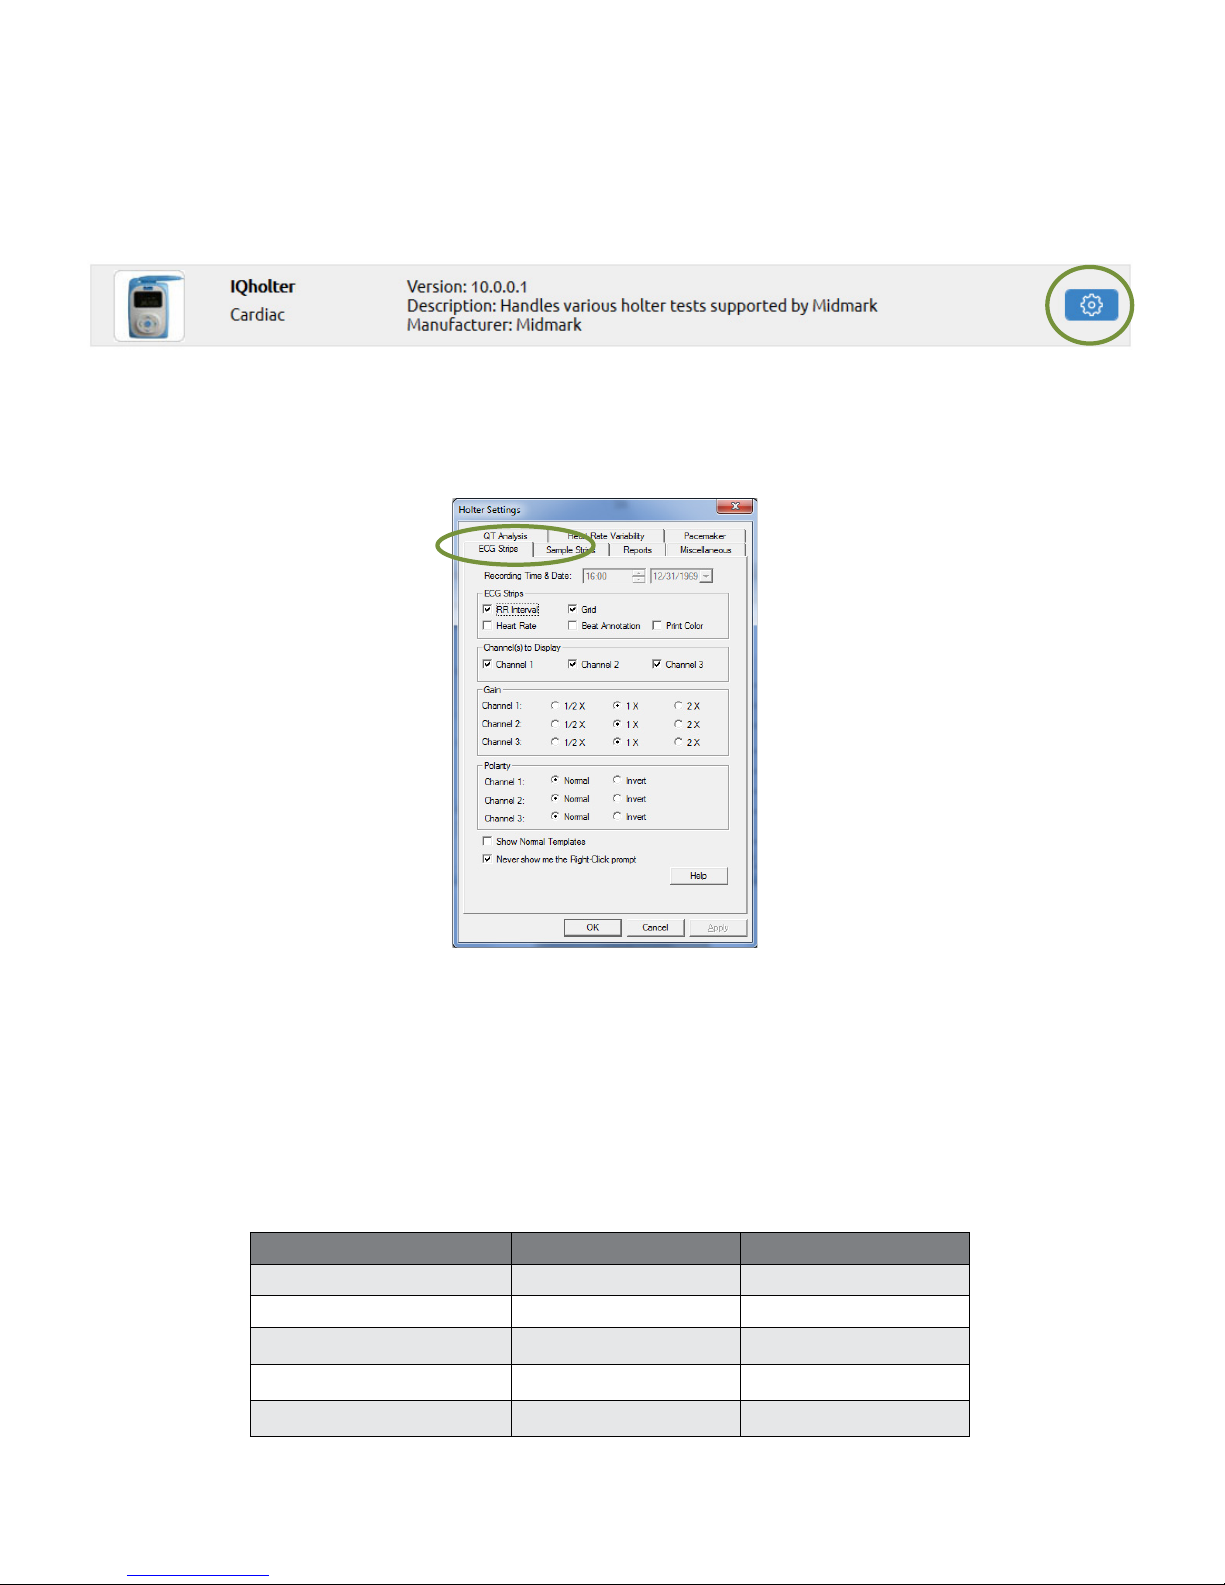
Holter Settings
Change the default settings for Holter tests by clicking Holter Settings from the Devices tab or by clicking
Holter Settings inside the Holter program. Both methods provide similar options.
ECG Strips
The ECG Strips tab species how to view or print ECG strips.
If RR Interval is checked, each interval value, in millisecond (ms), will appear on top of the ECG strip
between every two RR. If Heart Rate is checked, an instantaneous heart rate value, in BPM, will appear on
top of the ECG strip between every two RR.
The Grid option affects the display only; sample strip printouts always have gridlines.
If Beat Annotation is checked, a letter code will appear above each QRS complex indicating its classication.
If using a color printer and the Print Color box is checked, the diagnostic ECG strips will be printed with a red
grid and all ECG beats will be printed with the following designated color codes:
Beat Category Display Color Beat Annotation
Normal beats Black N
Ventricular beats Red V
Supraventricular beats Blue S
Pause beats Pink P
Artifacts Dark yellow ?
Page 21
21
39-78-0001 © Midmark Corporation 2016
Note
Print Color checkbox only affects the printout if a color printer is
used.
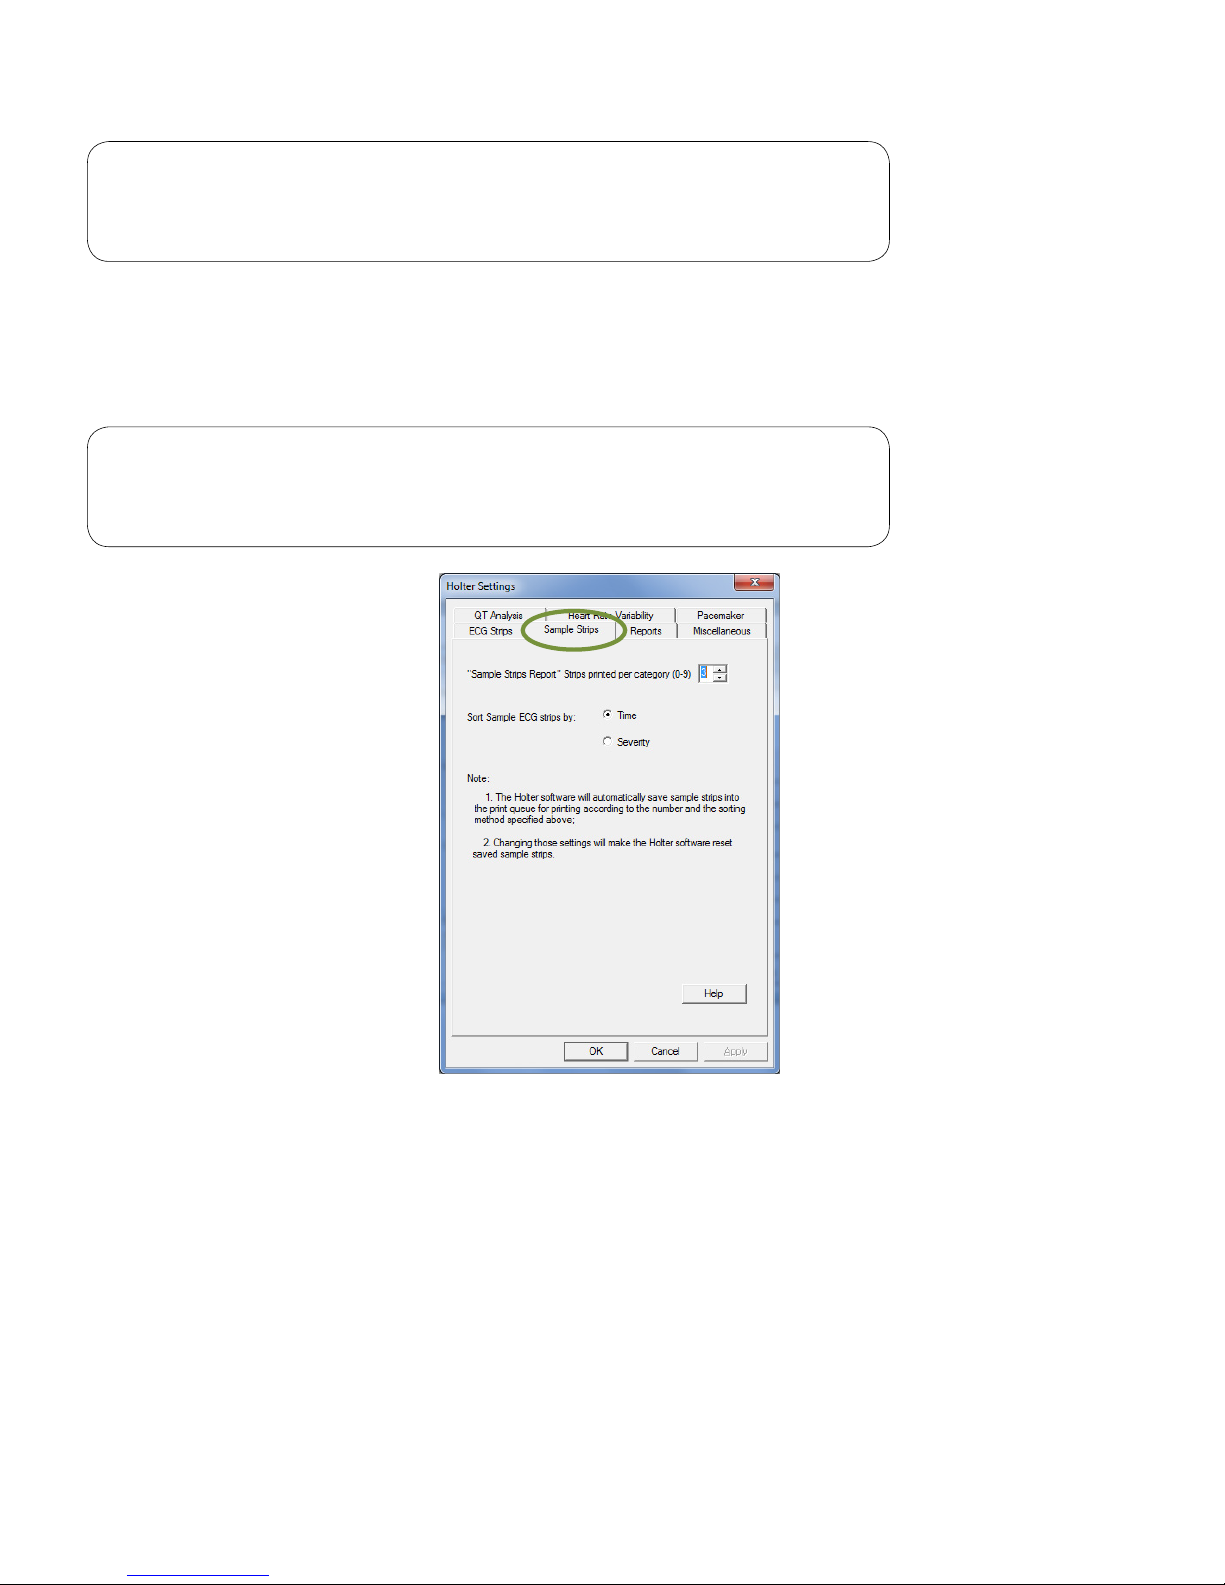
Sample Strips
The Sample Strips tab sets the maximum number of sample strips (up to 9) per category for printing, and
selects to sort sample ECG strips by time or severity.
Note
High Heart Rate, Low Heart Rate and ST Segment sample strips
will be sorted by severity only.
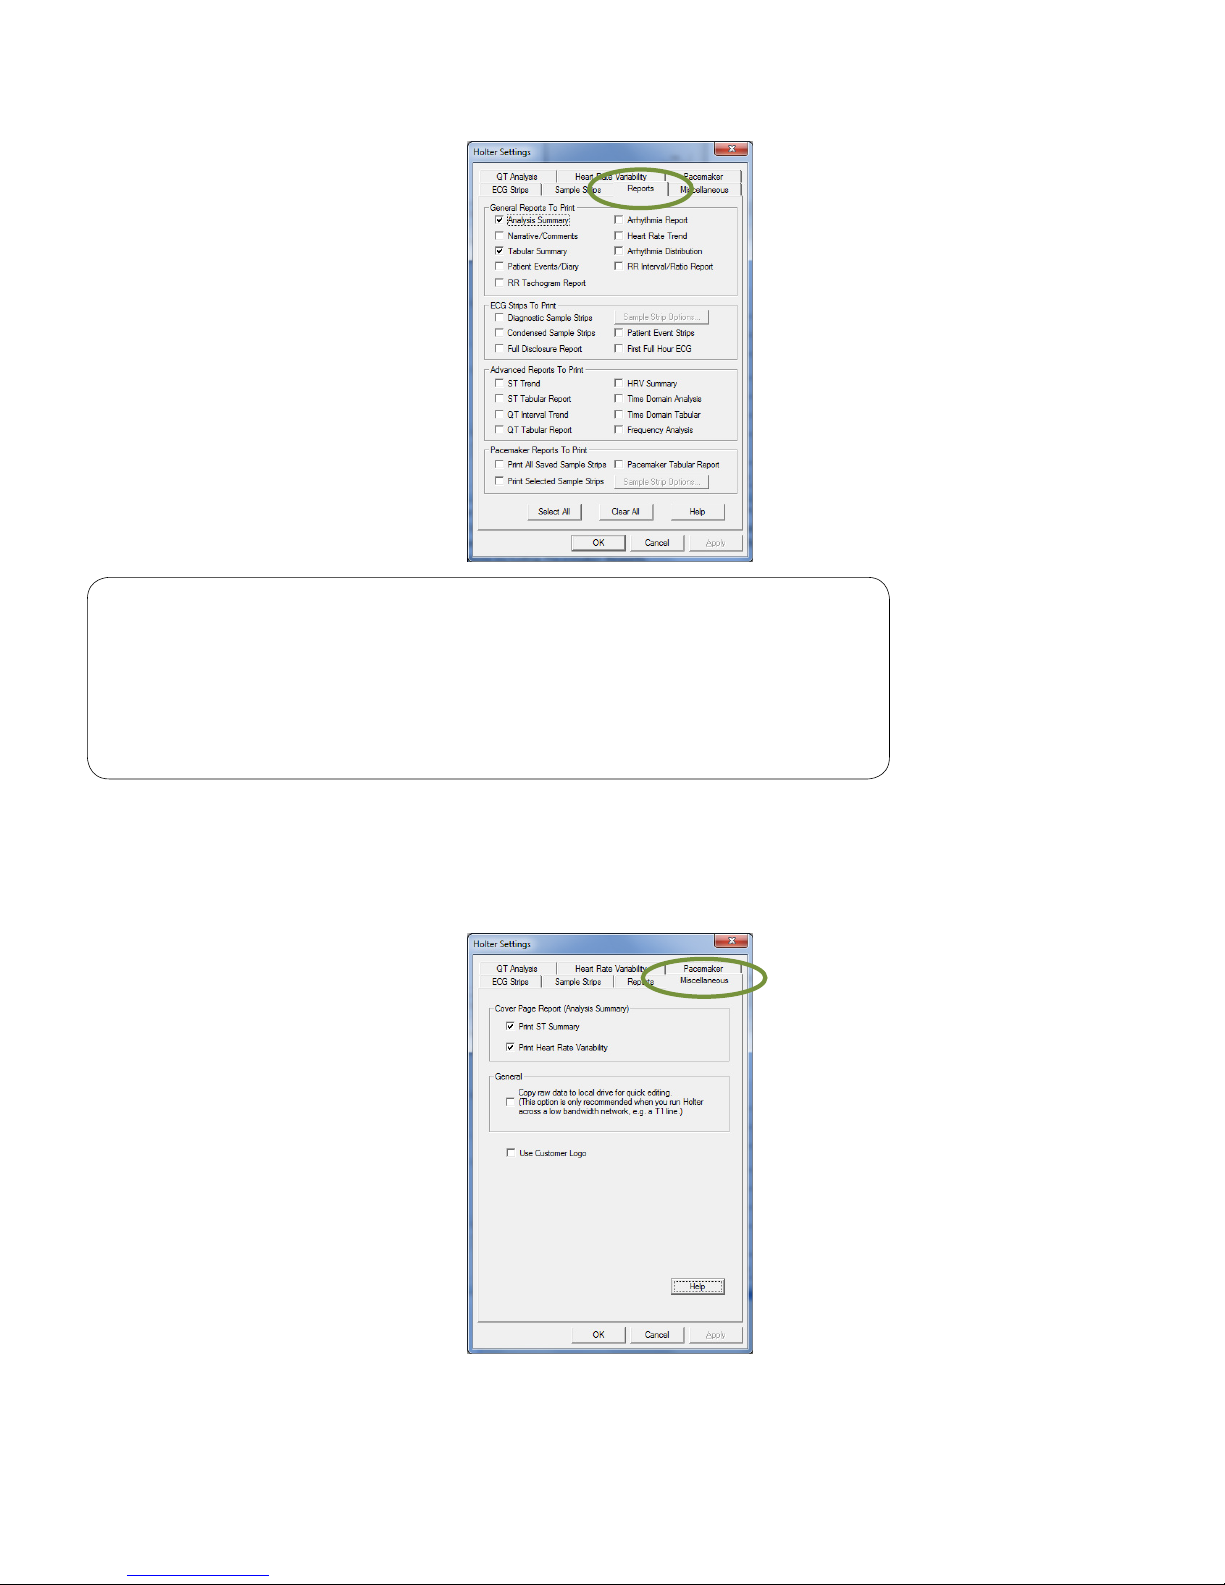
Reports
The Reports tab of the Holter Settings dialog box selects the default reports for printing.
Page 22
22
39-78-0001 © Midmark Corporation 2016
Note
The following reports are only applicable to the IQholter® EX: RR
Tachogram, QT Interval Trend, QT Tabular, HRV Summary, Time
Domain Analysis, Time Domain Tabular and Frequency Analysis.
IQholter® EP offers all reports options including Pacemaker
Reports.
Miscellaneous
The Miscellaneous tab provides the option to print ST Summary and Heart Rate Variability summary results
on the cover page of Holter report.
Page 23
23
39-78-0001 © Midmark Corporation 2016
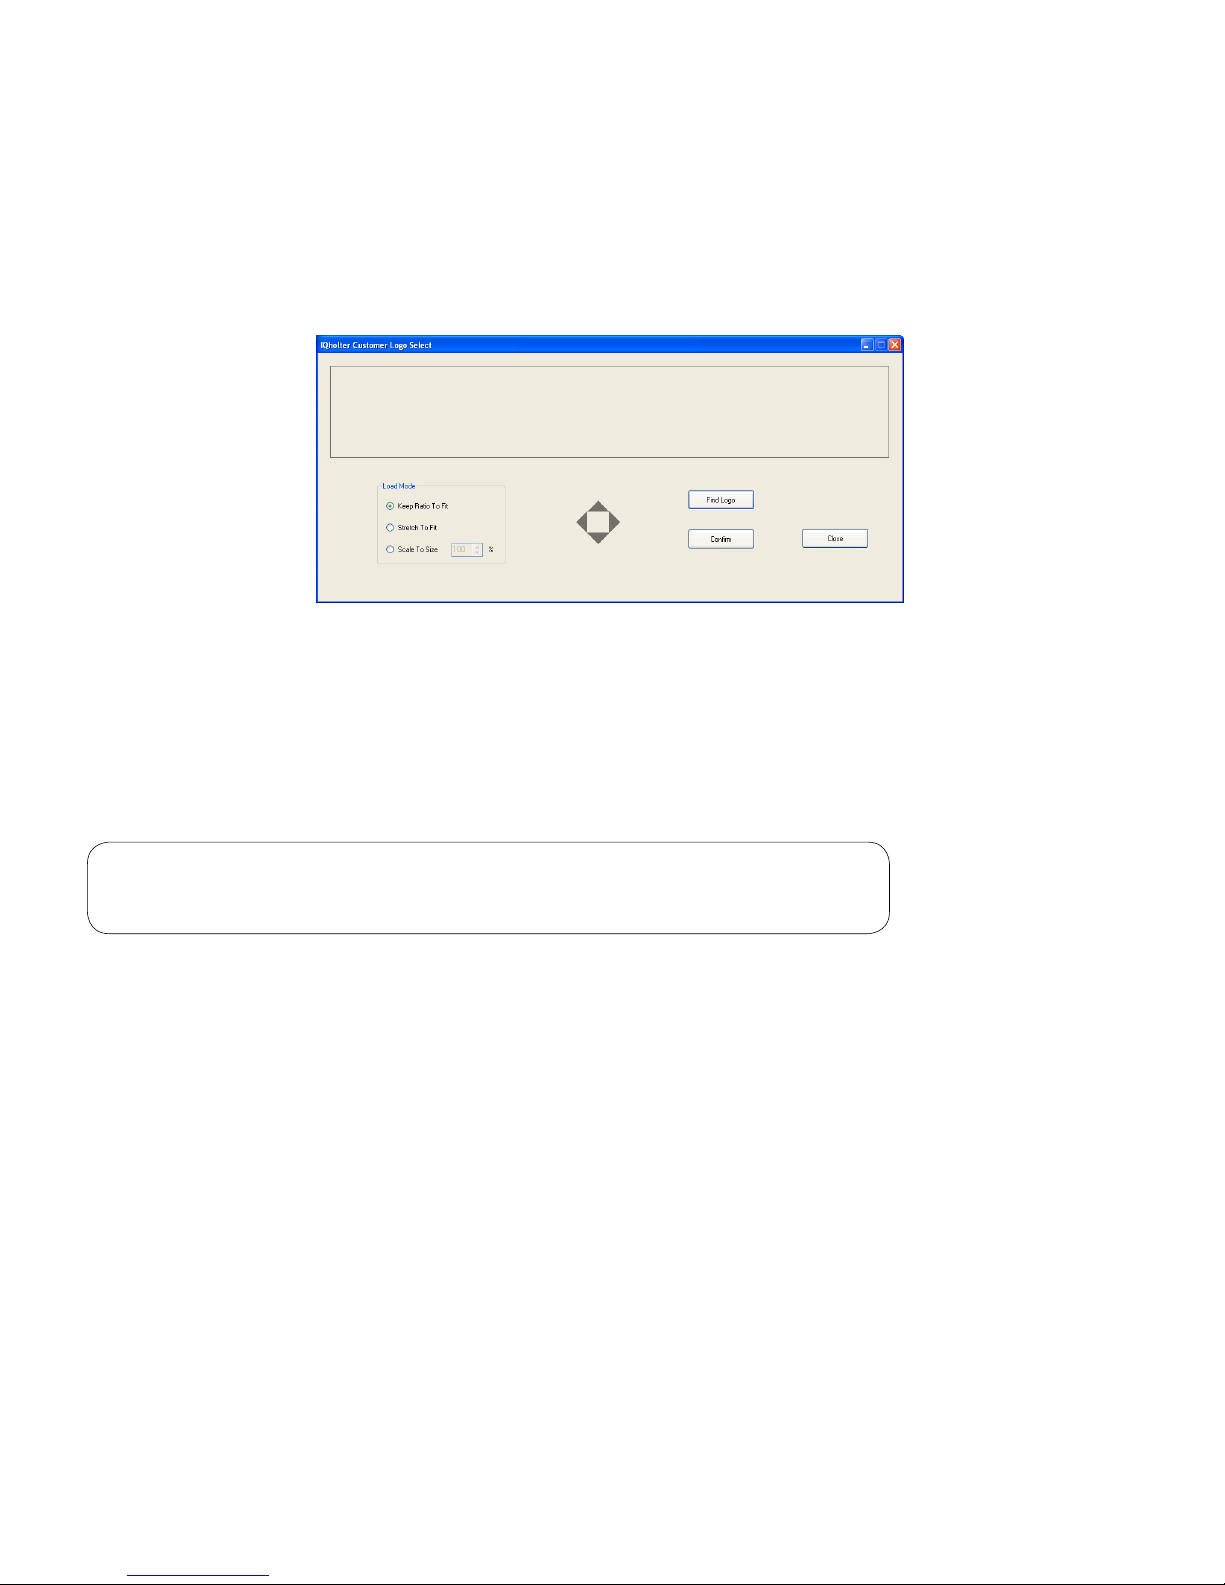
If working on a network and the Holter full disclosure is stored on a network drive, check the General box to
speed up data access during reviewing and editing. This is useful when operating Holter on a relatively lowbandwidth network, such as a T1 network.
The IQholter
®
report can be customized to include a logo to the top of cover page. Before clicking on the
Use Customer Logo checkbox, rst prepare a digital image of the logo in jpeg format. Then execute the
LogoSelect application in Brentwood\Program folder and click Find Logo button to pick the logo image.
The logo window is about 7.3” (W) x 1.1” (H). The options available are to keep the original ratio of the
image to t, stretch to t, or scale to a desired size. Use the four grey arrows in the middle to position the
logo inside the window. Click Conrm to save, then Close to exit.
Check the Use Customer Logo box.
QT Analysis
Note
These settings apply only for IQholter® EX and IQholter® E P.
The QT Analysis tab species how the Holter software analyzes QTc intervals. Apply one of the available
formulas for QTc analysis; Bazett’s formula is selected by default.
Determine which channel the QT Tabular Report to be based on. This setting will affect online viewing and
report printout.
Page 24

24
39-78-0001 © Midmark Corporation 2016
WARNING
Computerized calculation of QTc is not a substitute for physician interpretation of the
Holter. It is the responsibility of a qualified physician to review the ECG to determine the
accuracy of QTc calculation before using QTc to make a diagnosis.
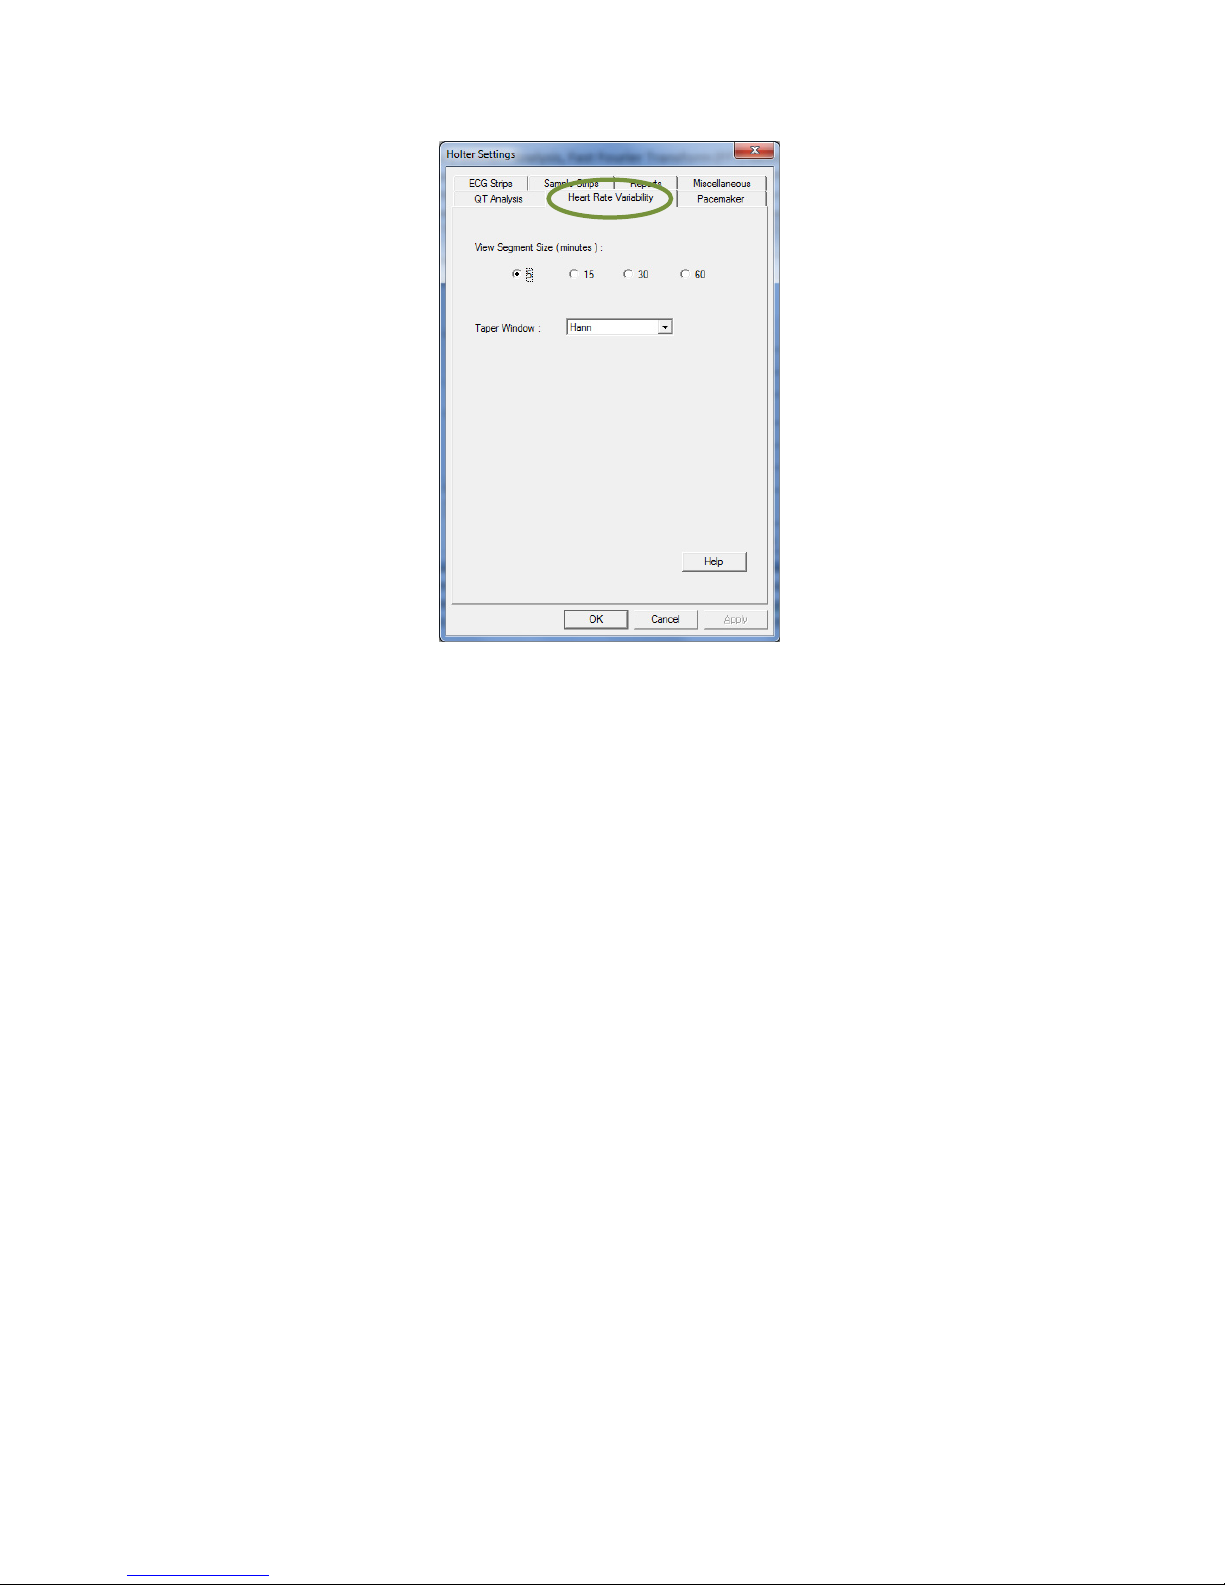
Heart Rate Variability
Note
These settings apply only for IQholter® EX and IQholter® E P.
Only normal RR intervals are used for in the Heart Rate Variability (HRV) analysis. A normal RR interval is
when the current, the previous, and the next QRS waves are classied as normal (i.e. they are not noise or
ectopic beats).
IQholter® provides two HRV analysis domains, Time Domain Analysis and Frequency Domain Analysis. In
Time Domain Analysis, the segment size used for calculation is 5 minute.
In the Frequency Domain Analysis, Fast Fourier Transform (FFT) based algorithm is used to estimate the
power spectral density (PSD). The segment size for PSD estimation is always 5 minutes, although a longer
segment size can be selected for viewing in the setting. If 15 minutes of View Segment Size is selected, the
HRV frequency analysis results display will use the average PSD values of three 5-minute segments. For
30 or 60 minutes view segments, the average PSD values of six or twelve 5-minute segments, respectively,
will be used.
Page 25
25
39-78-0001 © Midmark Corporation 2016
The Taper Window option determines the windowing formula (Blackman, Exact Blackman, Hamming or
Hann) used to calculate power values in different ranges of the frequency domain analysis.
If more than 50 percent of the intervals are invalid in a 5-minute segment, then that segment will be marked
as invalid and displayed as “-”.
Page 26
26
39-78-0001 © Midmark Corporation 2016
Pacemaker
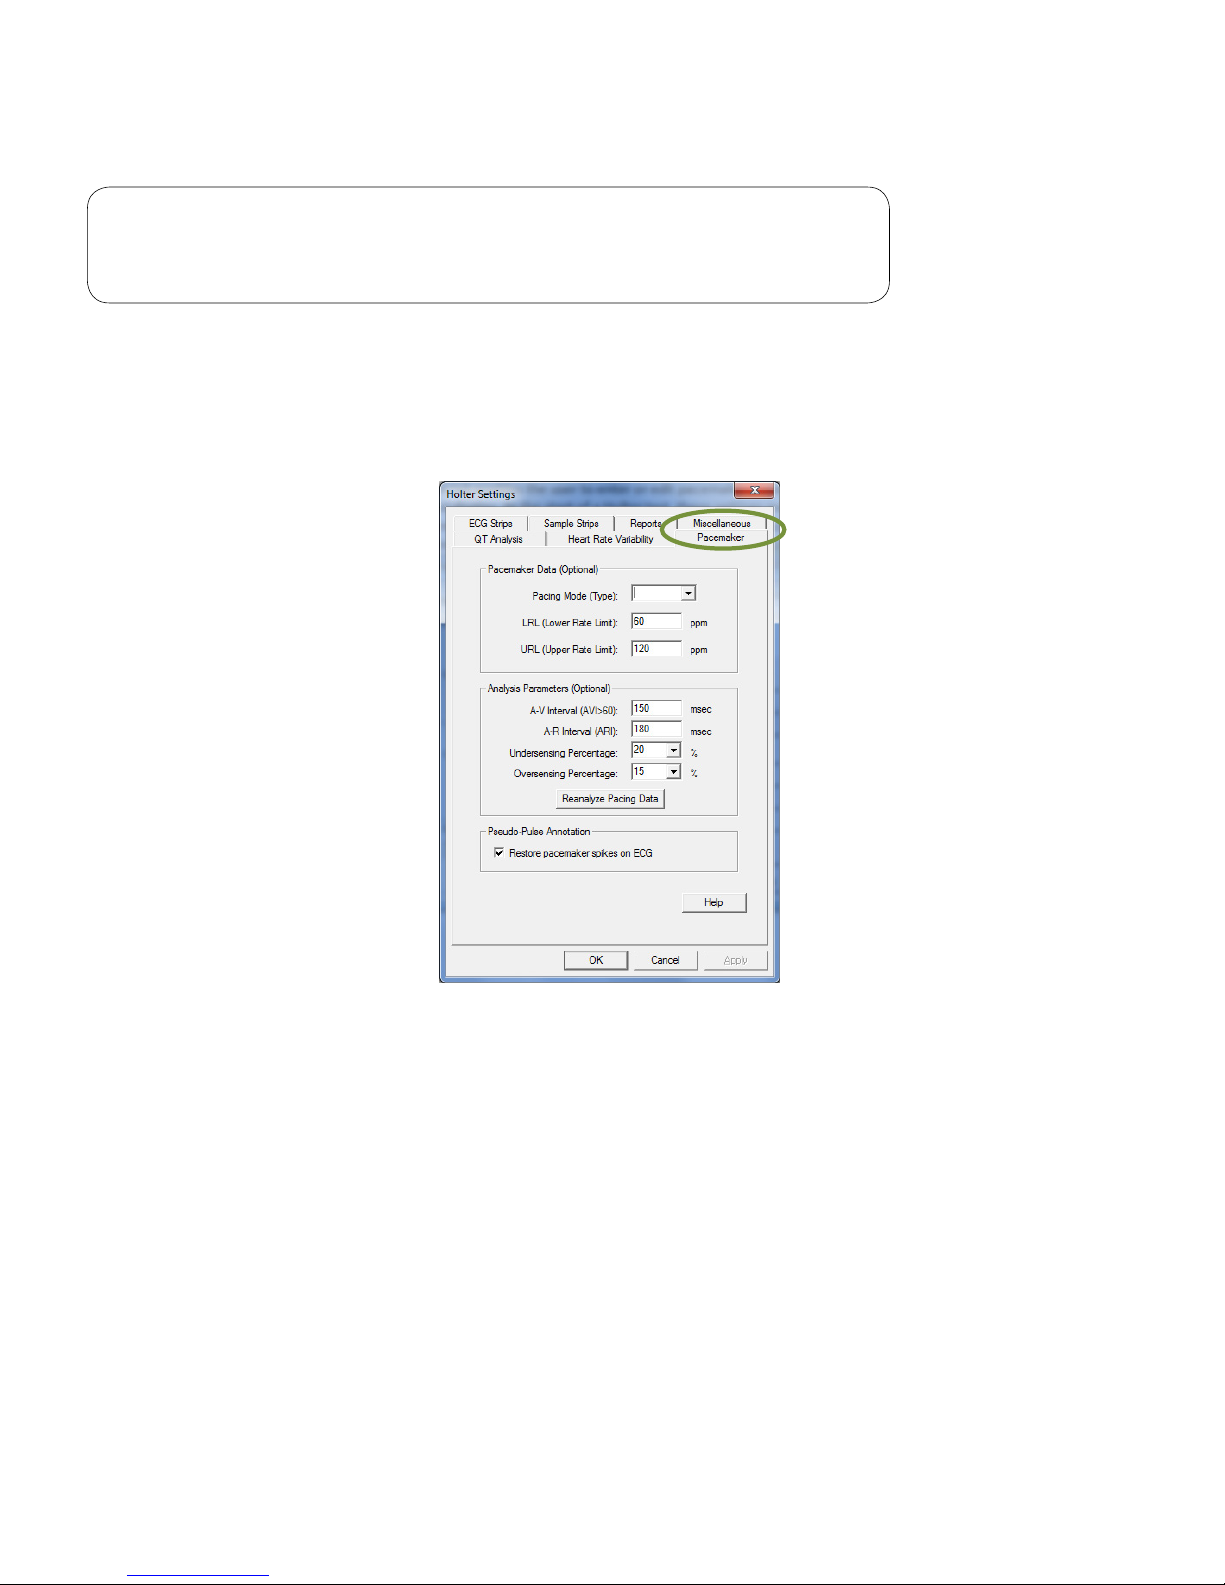
Note
These settings apply only for IQholter® EP (Pacemaker Analysis)
option.
The Pacemaker tab enables the user to enter or edit pacemaker parameters and settings for analysis and
display. At the start of a Holter test, these settings may be customized for each pacemaker patient. All values
are optional; the software assigns default values if the parameters are not manually reset. If the Restore
pacemaker spikes on ECG box is checked, a red vertical line will appear for each pacemaker spike on the
ECG tracing.
Page 27
27
39-78-0001 © Midmark Corporation 2016
III. Patient Preparation
Required Materials
Before beginning the patient preparation, be sure to have a Midmark Holter Patient Preparation Kit or a
similar high-quality Holter preparation kit available.
The Midmark Holter Patient Preparation Kit contains:
• 5 or 7 silver chloride disposable electrodes designed for Holter monitoring
• Abrasive pad
• Patient diary
• Isopropyl alcohol wipes
• Razor
• Two (2) AA alkaline batteries
Note
Use one (1) Energizer® brand lithium battery for 72 hour
recording to ensure adequate capacity for duration of patient
test. This battery is not included in the Midmark Holter Patient
Preparation Kit.
Note
Do not use 12-lead resting ECG electrodes. We recommend
using the Midmark Holter Patient Preparation Kit for consistent
quality ECG data. Use electrodes that are rated for the timeframe
(24, 48, 72 hours) for the patient tests.
A. Electrode Site Preparation
Careful preparation of the patient’s electrode sites is essential for obtaining an interference-free ECG and
accurate result, especially in Holter monitoring. The skin is naturally a poor conductor of electricity and
frequently creates artifact that distorts the ECG signal due to dry or dead epidermal cells, oils, sweat and
dirt. Well managed skin preparation, will reduce the resistive barrier that causes muscle noise and baseline
wander, ensuring high-quality signal and test data.
Caution
Poor site preparation, improper electrode placement or use of inferior electrodes may lead to
unusable data or an inaccurate analysis.
Page 28

28
39-78-0001 © Midmark Corporation 2016
Note
Refer to the IQholter® Quick Reference Guide – Patient
Preparation (included in the product kit) for more detailed
instructions.
The following steps are essential in obtaining usable ECG data:
1. Select the electrode placement configuration from a reliable clinical reference source. Two typical
configurations are illustrated in Figures 3-2 and 3-3.
2. Select electrode sites located over bony areas where reduced tissue movement will minimize the
amount of signal artifact. Electrode sites should be over a rib rather than an intercostal space.
3. Shave electrode placement areas, as needed.
4. Gently scrub the skin with an abrasive pad, lint-free gauze pad or fine sandpaper enclosed in the
preparation kit. This loosens and removes dead skin.
5. Wipe the scrubbed area with a clean alcohol pad and ensure the entire electrode site is free of oil.
Repeat for all sites. Allow these areas to air dry naturally before attaching electrodes.
6. Follow the electrode manufacturer’s application instructions when applying snap leads to the
electrodes. To simplify this process, first apply the lead wire snaps to the electrodes then apply the
electrodes to the patient.
7. Remove the backing from a pre-gelled disposable electrode and place an electrode on each of the
prepared electrode sites, make certain that the right colored lead is placed on the proper site. Ensure
that the gel in the center of each electrode maintains contact with the prepared skin surface and the
electrode is not wrinkled.
8. Form a stress loop with each electrode lead then tape the loop to the skin. This reduces artifacts
caused by snap rotation when leads are pulled or tugged by normal patient movements.
Figure 3-1 Examples of stress loops
Electrodes
Tape
Stress loops
Page 29

29
39-78-0001 © Midmark Corporation 2016
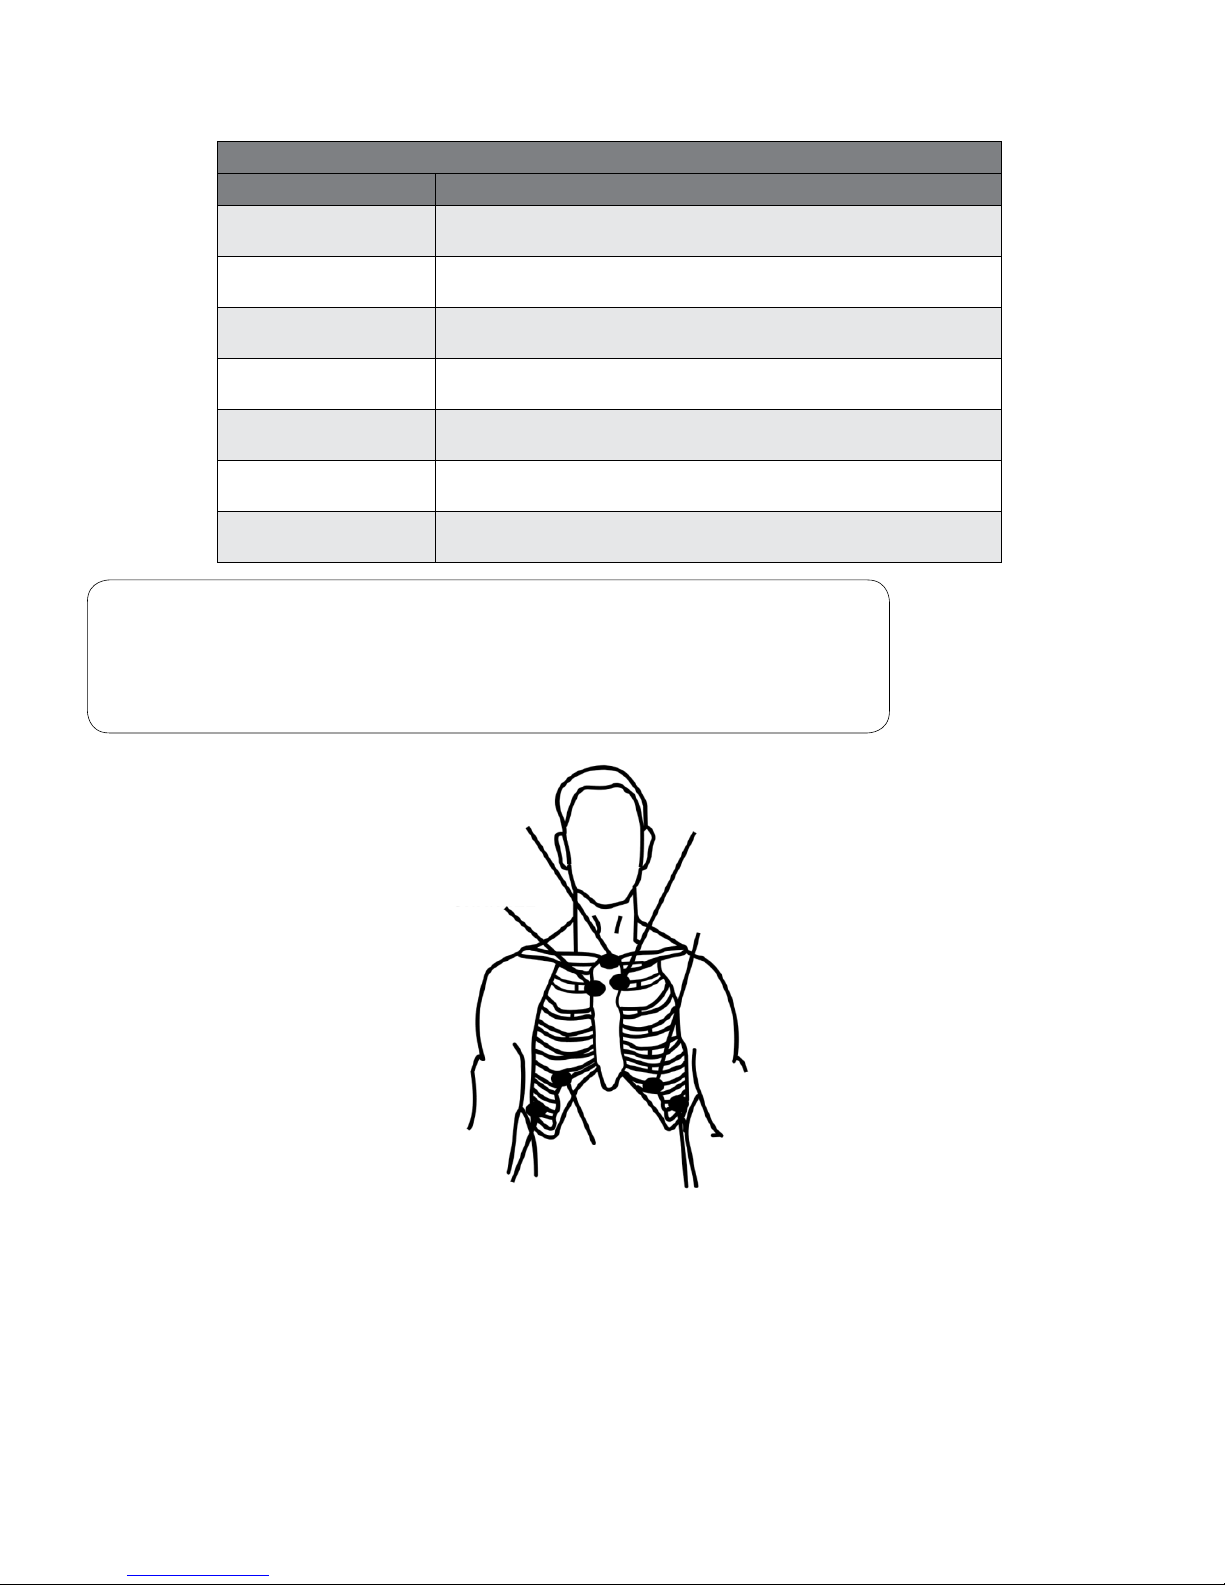
B. Three Channel ECG Recording
• 5-lead Holter recordings
Utilize a bipolar lead system that shares either positive or negative leads between the channels and
a recorder ground.
• 7-lead Holter recordings
Utilize a bipolar lead system where there is one positive and one negative lead for each channel,
plus a recorder ground.
Five Lead Wire Configuration
Lead Color Placement
Red
Channel 1 (-), Channel 2 (-)
Place at center of manubrium and top of sternum.
White
Channel 3 (-)
Place on the right side, below the V1 or V3R position, at the bottom of
the rib cage.
Brown
Channel 1 (+)
Place on the left side at or below the V3 position, on a rib.
Black
Channel 2 (+), Channel 3 (+)
Place on the left side at or below the V5 position, on a rib.
Green
Ground
Place on the right side, opposite and below the V5 position.
Note
RED (-) BROWN (+) = CHANNEL 1
RED (-) BLACK (+) = CHANNEL 2
WHITE (-) BLACK (+) = CHANNEL 3
Figure 3-2 Typical three channel ve lead electrode placement conguration
RED
CHANNEL 1-2-
BROWN
CHANNEL
1+
BLACK
CHANNEL
2+, 3+
GREEN
GROUND
WHITE
CHANNEL 3-
Page 30
30
39-78-0001 © Midmark Corporation 2016
Seven Lead Wire Configuration
Lead Color Placement
White
Channel 1 (-)
Place at top of sternum.
Red
Channel 1 (+)
Place on the left side at or below the V3 position, on a rib.
Black
Channel 2 (-)
Place at top of sternum, adjacent to white lead.
Brown
Channel 2 (+)
Place on the left side at or below the V5 position, on a rib.
Blue
Channel 3 (-)
Place at top of sternum, adjacent to white lead.
Orange
Channel 3 (+)
Place on the right side at or below the V1 or V3R position, on a rib.
Green
Ground
Place on the right side, opposite and below the V5 position.
Note
WHITE (-) RED (+) = CHANNEL 1
BLACK (-) BROWN (+) = CHANNEL 2
BLUE (-) ORANGE (+) = CHANNEL 3
Figure 3-3 Typical three channel, seven lead electrode placement conguration
BLUE
CHANNEL 3-
RED
CHANNEL 1+
BROWN
CHANNEL 2+
GREEN
GROUND
BLACK
CHANNEL 2-
WHITE
CHANNEL 1-
Page 31

31
39-78-0001 © Midmark Corporation 2016
IV. Recorder Operation
Required Materials
• One SD memory card
Note
Only a Midmark issued SD memory card (P/N: 1-370-0010)
should be used.
• Midmark Holter Patient Preparation Kit
Note
Use electrodes that are rated for the timeframe (24, 48, 72 hours)
for the patient tests.
Note
For 72 hour recording, DO NOT USE alkaline battery from prep
kit. Use Lithium battery.
• IQholter® recorder
• Patient cable
A. Recorder Set-Up and Conguration
Patient Cable
1. Remove the color-coded patient cable from the shipping package.
2. Attach cable to the patient cable connector on top of the recorder.
a. Ensure proper alignment of the connector before pressing the cable into the recorder.
Recorder input conguration is automatically selected by the attachment of the appropriate patient cable.
The options are 5-lead/3-channel or 7-lead/3-channel. Please see Figures 3-2 and 3-3 for proper lead
placement.
Page 32

32
39-78-0001 © Midmark Corporation 2016
Remove Battery Door
Open the recorder battery door by gently pressing down on the triangular marking. The door will slide open
by itself.
Note
Do not apply excessive pressure to the battery door. Pressing
down and sliding the door at the same time may result in damage.
SD Card Insertion and Removal
1. Insert SD card as shown below.
2. The SD card can be removed by pressing the card gently; it will pop out for retrieval.
Page 33

33
39-78-0001 © Midmark Corporation 2016
Battery Installation
After inserting the SD card, install a new AA battery.
Note
It is not recommended to install the SD card after the battery, as
the SD card access port is located in the battery compartment.
Caution
All previously recorded ECG data stored on the SD card will be erased once the new battery
is installed.
Replace the Battery Door
Gently slide the battery door on to the recorder as shown.
Page 34

34
39-78-0001 © Midmark Corporation 2016
Setting Patient ID, Length of Recording, and Date/Time
1. After installing the SD card and battery, the recorder turns on automatically.
Note
Slightly different start-up process for 24 ONLY and Upgraded 24,
48, 72 hour program.
Upgraded 24, 48, 72 hour menu Standard 24hour only menu
2. For Upgraded 24, 48, 72 hour ONLY – Scroll down to Patient ID.
3. For Upgraded 24, 48, 72 hour ONLY – Use recorder arrow keys to navigate the AlphaNumeric
characters (up to 21 characters), press center button to Select character, select DONE when
complete.
4. For Upgraded 24, 48, 72 hour ONLY - Scroll down to recording length (default is 24 HOURS).
Page 35

35
39-78-0001 © Midmark Corporation 2016
5. For Upgraded 24, 48, 72 hour ONLY – Use arrow keys to navigate to recording length, press center
button to select.
Note
Recorder returns to 24 hour mode each time the battery is
replaced.
6. Press the down arrow to scroll to the time or date.
7. Press Enter (the center button) to go to the change screen.
8. Use the up and down arrows to scroll through the numbers.
9. Use the right and left arrows to move between fields.
a. Time fields, from left to right: Hour, Minute, AM/PM
Page 36

36
39-78-0001 © Midmark Corporation 2016
b. Date fields, from left to right: Month, Day, Year
10. Press the center button to save changes and return to the main screen.
Note
Recorder has an internal clock battery that will last about 3 years.
Date and time settings are saved.
B. Conrm Operation and Start Recording
Note
The recorder emits a continual tone and the OLED displays
FLASHCARD NOT INSERTED if the SD card is inserted
improperly.
Note
The recorder tests the battery, sounds warning beeps and
displays LOW BATTERY if the battery is not suitable for a 24 or
48 hour recording. Replace the AA battery with a fresh battery.
Note
Use a lithium battery for 72 hour recordings.
Recorder should beep once and the OLED will activate. If not, verify if:
• The above sequence was followed
• The battery is correctly installed
• The recorder is operating properly
• To confirm the ECG signal, the recorder displays the three channels of the patient’s ECG on the
readout.
Page 37

37
39-78-0001 © Midmark Corporation 2016
• Press the center button to display an enlarged single-channel display or press the down-arrow to
rotate through the channels. The top left corner of the screen indicates the channel displayed and
color of the lead wires used for that channel.
• The recorder will automatically start recording in approximately eight (8) minutes. If more time is
needed to complete or correct the patient hookup, remove the battery and replace it when ready to
continue.
Note
After confirming the ECG signal quality, the recording mode may
be started immediately by pressing and holding the event button
for five seconds or until the ECG display turns off.
• Document the recording start time in the patient diary.
Note
The IQholter® recorder displays the start time in real time. See
Section IV-A, Recorder Set-Up and Configuration for more
information.
Page 38

38
39-78-0001 © Midmark Corporation 2016
C. Before the Patient Leaves the Ofce
1. Secure the recorder to the patient with one of the following:
• Reusable pouch (each recorder is shipped with one)
• Disposable pouch
2. Verify that the patient or caregiver understands the following:
• How to use the event button and patient diary (see Section I-A, Recorder Description for more
information).
• Keep the recorder away from moisture.
• Keep electrode sites dry: do not shower, take baths, use hot tubs or perform similar activities while
wearing the recorder.
• Refrain from placing the recorder in a back pocket.
• Do not tamper with the recorder, battery or SD card.
• Do not remove or reposition any electrodes.
• Do not use an electric blanket while using the recorder.
• Avoid environment that has strong electrical or electromagnetic interference. See Appendix D -
Radio and Television Interference.
Page 39

39
39-78-0001 © Midmark Corporation 2016
D. Early Termination of Recording
The recorder automatically stops at the predetermined recording length. To terminate the recording early,
remove the battery and the SD card. A loss of up to six (6) minutes of data is normal if the recording is
terminated early.
Caution
Removal of the SD card during the first thirty (30) minutes of recording will result in a SD
card with no data stored on it.
E. When patient returns with the IQholter® recorder
• Remove and discard the battery. (Follow instructions described in Section IV-A, Remove Battery
Door.)
• Remove the SD Card and keep with the Patient’s Diary until it has been analyzed.
− SD card can be removed by pressing the card gently; it will pop out for retrieval.
Page 40

40
39-78-0001 © Midmark Corporation 2016
V. Creating a Holter Report
This section is written to help the user get started and become familiar with the IQholter® system.
While this manual describes features of the IQholter® in the operational sequence that most new operators
will follow, the user is not restricted to following this particular sequence. Many of the features are
interconnected and can be accessed from more than one screen. The Holter Main Buttons Bar appears at
the bottom of each screen, with shortcut buttons to other screens. On each screen, there may be tabs and
buttons that can be used to access different functions.
Because of the extensive list of the Holter features and the exibility of the program, not every possibility is
described here. A more comprehensive explanation of the features and functionalities of each screen are
available through the online help system installed within the program. Once familiar with the basic operation
of this product, the user can operate the Holter program in different ways to meet specic purposes.
Of course, there are certain sequences that must be followed, such as entering a patient’s medical data
before performing the Holter scan. However, this program is designed to be both user-friendly and exible.
We have included a condensed guide to operating the IQholter® with new patients. See Appendix A -
Operations at a Glance.
A. Starting IQmanager
®
Follow this section to get started with a new Holter scan quickly and obtain a standard Holter report printout
with minimal involvement in the various screens and functions.
Open IQmanager® software by double-clicking on the IQmanager® icon on the desktop:
Midmark IQmanager
The IQmanager® opening screen appears. Click New Patient or Search for a patient.
Page 41

41
39-78-0001 © Midmark Corporation 2016
Entering Patient Data
In the Patient Data screen, enter all necessary information regarding the patient. A name or an ID is required
to start a Holter test.
Note
For upgraded IQholter recorders only: If the patient ID does not
match the ID entered on the recorder the program will display a
warning message when downloading the Holter data for analysis.
See Section V-A, Starting IQmanager®/Completing the Holter
Scan.
Page 42

42
39-78-0001 © Midmark Corporation 2016
Starting a New Holter Test
To start a test, click New Test from the Patient Data screen. Click on the play icon next to IQholter.
If desired, select the Technician’s name and the Physician’s name from the pull-down list. The reason for
testing the patient can also be selected from the Indication list as shown in the New Test Selection Screen.
This information is optional.
If the List Management has been congured for the practice, these entries can be selected from the lists.
Click OK. The Holter Analysis dialog box appears:
The software automatically enters the recording start time and date from the IQholter® recorder. Time is in
24-hour format: 1:00 p.m. is entered as 13:00.
The Pacemaker Analysis option is enabled for IQholter® EP only. If the patient has an electronic pacemaker,
check the Pacemaker box to obtain pacemaker analysis results. If the Holter data was recorded using a nonupgraded standard 24hour recorder, the program will check the recording for pacemaker spikes detected
during the monitoring period and prompt if the Pacemaker box is not checked.
Note
If the Holter application does not include the Pacemaker Analysis
option, this box and the Pacemaker Data button will be disabled.
Page 43

43
39-78-0001 © Midmark Corporation 2016
Pacemaker Data
The Pacemaker Settings dialog box will appear if Pacemaker Data is selected, which provides the specic
parameters of the pacemaker device. For example, the type of pacemaker that the patient is wearing
(i.e., DDD, DVI, VDD, VVI), can be selected from a list.
Report Options
To have the Holter software to print reports automatically when the scan is nished, select the Print Reports
After Analysis box on the Holter Analysis dialog box. View or select which reports to be printed by clicking
Report Settings.
Page 44

44
39-78-0001 © Midmark Corporation 2016
Note
The following reports are only applicable to the IQholter® EX: RR
Tachogram, QT Interval Trend, QT Tabular, HRV Summary, Time
Domain Analysis, Time Domain Tabular and Frequency Analysis.
IQholter® EP offers all report options including Pacemaker
Reports.
Note
Available for IQholter® EP only, the Pacemaker Reports choices
are disabled if the Pacemaker box on the Holter Analysis dialog
box is not checked.
Note
Verify that the default printer is on and ready with enough paper
for the report. At least 24 sheets of paper (for each 24 hours) will
be needed if the Full Disclosure Report is selected in the Report
Settings.
Analysis Settings
To view or change the analysis criteria, click Analysis Settings in the Holter Analysis dialog box. The default
analysis settings are shown below:
IQholter® Analysis Settings screen
Page 45

45
39-78-0001 © Midmark Corporation 2016
IQholter® , EX, EP Analysis Settings screen
These criteria can be changed to best t the ofce or users needs. For example, some ofces may choose
to use 60bpm as bradycardia limit or 2.0 seconds as the lower asystole/pause limit. The upper pause limit is
set to 7.5 seconds as the default to avoid possible false detection caused by lead disconnect or excessive
artifact. If the patient has pause(s) that is longer than 7.5 seconds, use the dropdown menu to change the
Upper Limit of Asystole/Pause to a desired length.
Under Analyzed Channels, select one or more of the available channels to analyze and select one of those
channels as the primary channel. By default, all three channels are selected and Channel 1 is the primary
channel.
For IQholter®, EX, or EP, the bottom window displays the raw ECG data from the recording. Drag the slider
bar below the ECG strip to view the entire length of the recorded ECG before the analysis starts. This
provides an overview of the patient’s ECG and the quality of the recording, helping to determine if whether or
not to change the default settings for this test.
Note
To obtain a preliminary Holter report with better accuracy, do not
analyze channel(s) that is very noisy and select the channel that
has the best signal quality, least artifacts and tall amplitude as the
primary channel.
For IQholter®, EX, or EP, select the Enable A-Fib Detection box to perform automatic atrial brillation
analysis. Any episodes of A-Fib can be manually reclassied, regardless if this box is enabled.
Page 46

46
39-78-0001 © Midmark Corporation 2016
If automatic A-Fib analysis is enabled, the following parameters are used to adapt the algorithm to suit
different ECG tracings for better results:
• A-Fib Duration Limit sets the minimum run of beats of an atrial fibrillation episode. Select a value
from the drop-down list or enter a number between 5 and 1000; the default value is 20.
Note
Since the A-Fib Duration Limit determines the minimum length
requirement for the qualification of an A-Fib episode, the smaller
it is, the more easily a sequence of beats is identified as positive
A-Fib episode, assuming that the other two parameters are fixed.
While this may increase the true positive detection if the ECG is
really atrial fibrillation with great RR irregularity even in a short
period, it can also increase the false positive detection if the ECG
is just sinus arrhythmia without any real A-Fib episodes. The true
positive detection does not always increase proportionally with
the decrease of this setting. For a particular atrial fibrillation ECG,
there is a lower bound, below which the true positive detection will
decrease because the RR intervals may not be able to change
too much. The optimal value of A-Fib Duration Limit is heavily
dependent on the particular ECG itself. There is no fixed optimal
value for all Holter tests.
• Non A-Fib Duration Limit sets the minimum run of beats of a non-atrial fibrillation rhythm. Select a
value from the drop-down list or enter a number between 5 and 1000; the default value is 10.
Note
The Non A-Fib Duration Limit determines the minimum length
requirement for the qualification of a non-atrial fibrillation rhythm.
The smaller it is set to, the more easily a sequence of beats
is identified as a non-atrial fibrillation rhythm if the other two
parameters are fixed. Consequently, a short sequence of relatively
regular RR intervals embedded in a true atrial fibrillation rhythm
may be mistakenly identified as non-atrial fibrillation. Thus, a true
atrial fibrillation rhythm lasting for a long period could be broken
into many short episodes of atrial fibrillation with those regular RR
atrial fibrillation beats missed. On the other hand, a smaller value
does increase the identifying power to find any short period of
non-atrial fibrillation beats. Like A-Fib Duration Limit, there is no
one optimal value of Non A-Fib Duration Limit for all Holter tests.
• Irregularity sets the percentage of RR interval variation for an atrial fibrillation episode. Select a
value from the drop-down list or enter a number between 2 and 100; the default value is 15.
Page 47
47
39-78-0001 © Midmark Corporation 2016
Note
Irregularity has a relatively simple relation with positive detection
for atrial fibrillation rhythm. The smaller the value, the more likely
a sequence of beats will be identified as atrial fibrillation. While
this increases the true positive detection if the ECG is truly atrial
fibrillation, it may also increase the false positive detection if the
ECG is sinus arrhythmia, but not atrial fibrillation.
The default settings are biased for low false positive detection taking into consideration that non-atrial
brillation patients are more than atrial brillation patients.
If working with a patient with chronic A-Fib, check the Mark All as A-Fib box. This setting is the equivalence
of zero percent variability.
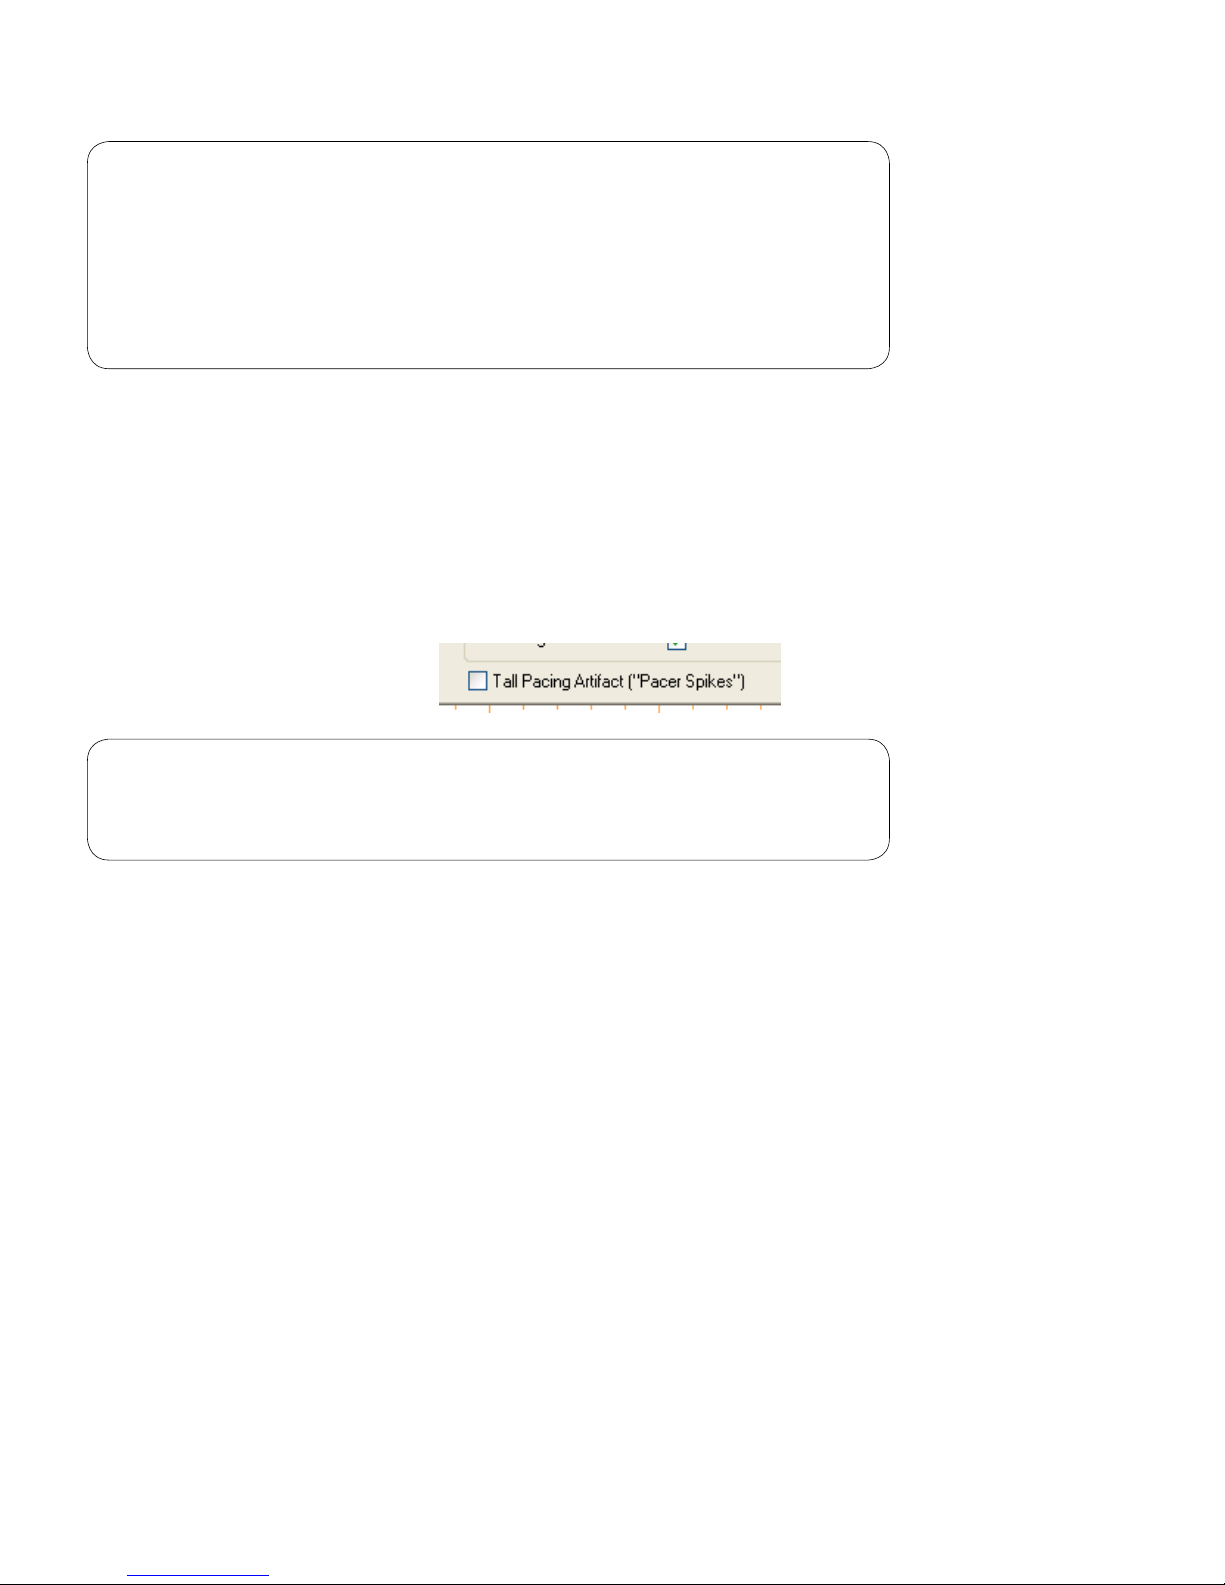
For IQholter® EP, the Tall Pacing Artifact (“Pacer Spikes”) box is only available if the Pacemaker box is
checked on the Holter Analysis dialog box. Selecting Tall Pacing Artifact would produce more accurate
pacemaker analysis results for typical unipolar pacemakers, which produce tall spikes.
Note
Do not check the Tall Pacing Artifact (“Pacer Spikes”) box if the
amplitude of the spikes is small.
Click OK to save any changes and return to the Holter Analysis dialog box.
Patient Diary
If the patient has written notes in their patient diary, enter them in the Holter software. On the Holter Analysis
dialog box, click Patient Diary to open the Patient Diary dialog box. If the patient has pushed the event
button on the recorder during the recording, the Holter software automatically tabulates each event as a
Recorder Event.
Enter any times, symptoms and comments as recorded on the patient’s diary. Once nished, click Save to
save the entries. Click Close to return to the Holter Analysis dialog box.
Page 48

48
39-78-0001 © Midmark Corporation 2016
Completing the Holter Scan
In the Holter Analysis dialog box, click Acquire & Analyze. The Holter program acquires the ECG data
recorded on the SD card and analyzes it.
Note
For upgraded IQholter® recorders only. If the selected patient
ID does not match the ID entered on the recorder, the program
will display a warning message as shown below. Click No if this is
not the right patient or not the correct SD card.
Note
If Yes is selected, the ID entered in the Holter data will not be
used. The Holter analysis will continue under the current selected
patient ID.
Depending on the speed of the computer, it will take about one to two minutes for the Holter to complete the
analysis. The Holter reports are then printed automatically if Print Reports After Analysis is checked. Printing
time varies with the type of printer being used, the type of reports selected, and the Holter analysis results.
Page 49

49
39-78-0001 © Midmark Corporation 2016
Note
If Print Reports After Analysis was not checked before the
analysis, the Analysis Results screen will appear for review and
edit. See Section V-B, Reviewing and Editing Holter Tests.
The Holter scan for the patient is now completed. IQmanager® automatically launches the full disclosure
editing screen.
Note
The average Full Report occupies about 35 MB of hard-disk
space if acquired from the standard 24-hour IQholter® recorder;
135 MB for each 24 hour if acquired from the upgraded 24, 48, 72
hour IQholter® recorder. A Summary Report takes up about 3MB
for each 24 hour. The number of Holter reports that can be stored
depends on the hard-disk space available on the computer.
B. Reviewing and Editing Holter Tests
The full Holter analysis results are available for review and edit by clicking Edit on the Report Review
screen. Summary results of the data analyzed during a Holter scan are displayed on the Analysis Results
screen:
IQholter® Analysis Results screen
IQholter®, EX, EP Analysis Results screen
Page 50

50
39-78-0001 © Midmark Corporation 2016
IQholter®, EX, EP Analysis Results screen with pacemaker analysis
The layout of each Holter screen is designed for ease of use. Access the major functions by clicking on one
of the buttons at the bottom of the screen. In the Summary, Data Review, ST/QT, Templates or HRV creens,
more information is available with the tabs indicated at the top of the screen.
Functions of the Holter Main Buttons Bar
Button Tab/Sub-menu Functions
Print
Print Current Page Print the report(s) currently displayed.
Preview Current Page Preview the printout(s) currently displayed.
Print Setup Set or change default printer settings.
Print All Selected Pages Print all reports selected in the report settings.
Preview All Selected
Pages
Preview all printout(s) selected in the report settings.
Select Report Pages &
Print
Select individual reports for printing; changes madehere will
affect the default report settings.
Summary
Analysis Summary
• View a numerical summary of the analysis results and the
doctor’s interpretation.
• The results are updated automatically when changes are
made in the other screens.
Interpretation/ Comments
• View and edit interpretation, narrative results and
comments.
• Editing is saved automatically when leaving this screen
unless Cancel is clicked.
• Any text entered in the Interpretation box is transferred to
the bottom page of the Analysis Summary screen.
Tabular Summary
• View and edit a tabulated summary of all events and
various statistics in an hourly breakdown of the ECG
recording.
• Edit any numeric result that appears in black, but this is
not recommended; editing the Tabular Summary does not
update the rest of the reports.
• In order to maintain consistency with other parts of the
Holter reports, edit these results only in the Sample Strips
and Page Scan screens.
Page 51

51
39-78-0001 © Midmark Corporation 2016
Functions of the Holter Main Buttons Bar
Button Tab/Sub-menu Functions
Data Review
Sample Strips
• View and edit sample strips for all events, including events
that have been selected.
• Save sample strips for printing.
• Choose condensed or diagnostic-sized printouts.
Page Scan
NOTE: Not available if the
report is converted to a
Summary Report format
• View the original continuous ECG waveforms (Full
Disclosure).
• Select channel(s) to view.
• Select Auto Scan or manual scan.
• Set Auto Scan direction and interval.
• Print all or selected hours of Full Disclosure.
• Adjust view to 8/30/60/120 seconds per line.
• Search a time to view.
• Print current strip.
• Print continuous strips of 8 to 96 seconds.
Patient Events/Diary View and edit a diary of patient-recorded events.
Heart Rate
• View heart rate trends (maximum, minimum, average)
over the recording.
• View an 8-second strip of the maximum and minimum
heart rate.
RR Interval/Ratio
View various beat quantity vs. heart rate/RR intervals and
beat quantity vs. RR interval ratio histograms; presenting the
distribution of heart rate, either by the RR intervals (ms) or
by RR(i)/RR(i+1) ratio, over the recorded period.
Events Distribution View hourly bar charts of various events
ST/QT
NOTE: QT is
available for
IQholter
®
EX/EP
only.
ST Trend
• View average heart rate, ST level and ST slope trends
over the recording.
• Select which channel to view.
• Click on trend graphs to view specific ECG sample strips.
ST Tabular
View and edit heart rate and ST statistics in an hourly
breakdown.
QT Trend
• View average heart rate, QT and QTc interval trends over
the recording.
• Select which channel to view.
• Click on trend graphs to view specific ECG sample strips.
QT Tabular
View and edit heart rate, QT and QTc statistics in an hourly
breakdown.
Page 52

52
39-78-0001 © Midmark Corporation 2016
Functions of the Holter Main Buttons Bar
Button Tab/Sub-menu Functions
Templates
NOTE: Available
for IQholter
®
EX/EP
only.
Arrhythmia Templates
NOTE: Not accessible to
individual templates if the
report is converted to a
Summary Report format
View and edit templates automatically classified by the Holter
program from the recorded ECG:
• VE
• Asystole/Pause
• Borderline
• SVE
• Normal
• Artifact
Normal Templates
View and edit templates for Borderline, Normal and Artifact.
• This tab is hidden by default; to show, click on Settings
and check Show Normal Templates in the ECG Strips tab.
HRV
NOTE: Available
for IQholter
®
EX/EP
only.
HRV Analysis Summary View a summary of HRV analysis.
Time Analysis View the time-domain analysis results for HRV.
Frequency Analysis
• View the frequency domain analysis results for HRV.
• Print the frequency tabular report to a text (.txt) file, which
can be imported into other commercial software and used
for customized charts.
Pacemaker
NOTE: Available
for IQholter
®
EP
only. Not displayed
if Pacemaker
Analysis was not
done.
Pacemaker Templates
NOTE: Not accessible to
individual templates if the
report is converted to a
Summary Report format
View and edit templates automatically generated from the
pacemaker detection data recorded on the Holter recorder.
• Atrial Paced
• Ventricular Paced
• Dual-Chamber Paced
• Non-Capture
• Undersensing
• Oversensing,
• Event 1 and 2 (user-defined events)
Pacemaker Tabular
Summary
View and edit a tabulated statistical summary of all
pacemaker events in an hourly breakdown of the ECG
recording.
• Edit any numeric result that appears in black as a quick fix
(not recommended).
• In order to maintain consistency with other parts of the
Holter reports, edit the pacemaker events only in the
Pacemaker Templates screen.
Page 53

53
39-78-0001 © Midmark Corporation 2016
Functions of the Holter Main Buttons Bar
Button Tab/Sub-menu Functions
Settings
NOTE: See
Section II-E
Configuring
IQholter
®
/Holter
Settings
ECG Strips
• Display the recording start time and date of the Holter.
• Correct the time/date of the recording.
• View and print RR Interval, heart rate, grid, and beat
annotation in color.
• Select channel(s) to display.
• Select 1/2X, 1X or 2X gain for each channel
• Select polarity for each channel.
• Disable the right-click prompt; by default, the right-click
prompt appears when the mouse is moved over any ECG
strips.
Sample Strips
• Set maximum number of sample strips per category for
printing.
• Sort sample ECG strips by time or severity.
Reports
Select and set various reports to print.
• If the Print Reports After Analysis option in the Holter
Analysis dialog box is checked, selected reports are
printed.
Miscellaneous
• Select to print ST and HRV summary results on Cover
Page Report.
• Copy raw data to local drive in a low bandwidth network
environment for quick editing.
• Select to use Customer Logo.
QT Analysis
Select a QTc formula. Default is Bazett. Other options
are Hodges, Linear Regression and Fridericia. Select the
channel for generating QT Tabular Report.
Heart Rate Variability
Select View Segment Size and Taper Window method for
frequency domain HRV analysis.
Pacemaker
Select the pacing mode and analysis parameters. These
entries are optional and should only apply to individual
patient with pacemaker. Enable Restore pacemaker spikes
on ECG especially when the pacer spikes are very small.
Criteria
NOTE: Changing the
Criteria settings may
affect any editing
previously done.
The criteria settings can be changed in this tab after the
computerized analysis is completed. The results will be
updated immediately without manually re-analyzing the
entire Holter data. See figure following this table.
Help Multiple Topics
View and print help on various screen topics. This is a useful
tool that explains the features of the screen being viewed.
Exit Exit the Holter program and return to IQmanager
®
.
Page 54

54
39-78-0001 © Midmark Corporation 2016
WARNING
Always change the Criteria settings, if needed, before starting any manual editing. Any
editing done before changing the Criteria settings may be lost.
The IQholter® software is designed with a lot of exibility to meet many clinicians’ needs. Different clinicians
may operate the software in different order depending on available software options and the patient’s
indication. The following sections describe the software in a workow order for editing a new Holter test,
however, a clinician may use the software in a different order. For example, when reviewing a nalized
report, it can be read from left to right beginning with the Summary button, then Data Review button, etc.
Correcting the Time and Date of the Holter Recording
The IQholter® recorder automatically records the recording start time and date. After the recorded data is
acquired, the IQholter® software will have the correct time and date information. If the recording time and
date of the Holter test needs to be changed, rst open the desired test and click Settings.
Page 55

55
39-78-0001 © Midmark Corporation 2016
Correct the recording time and date as necessary. Changing the recording time and date does not reanalyze
the Holter results. All edited results are retained and adjusted appropriately according to the new recording
time. Any entry in the Interpretation eld will remain as before, except in the Narrative Results/Comments
box.
Note
Any changes made in the Narrative Results/Comments box will
be discarded, as the Holter software will regenerate the Narrative
Results.
Working with Templates
[Available in IQholter®, EX and EP]
All arrhythmias and events identied by the Holter software are grouped into 19 templates. Editing and
reclassifying arrhythmias in these templates provides the quickest and easiest way to adjust the Holter
analysis results; all Holter analysis results are updated automatically as the changes are made. Click
Templates to view all templates.
Page 56

56
39-78-0001 © Midmark Corporation 2016
15 templates appear on the Arrhythmia Templates tab:
− Ventricular Ectopics (VE) (12 templates)
− Asystole/Pause (1 template)
− Supraventricular Ectopics (SVE) (1 template)
− Unnamed 1 (1 template)
Four other templates are not shown by default:
− Borderline (1 template)
− Normals (2 templates)
− Artifact (1 template)
To show these templates, click Settings and check Show Normal Templates on the ECG tab. The templates
will appear on a separate tab next to the Arrhythmia Templates tab.
Page 57

57
39-78-0001 © Midmark Corporation 2016
Template Unnamed 1 can be classied to any event by clicking Rename; any beat can be reclassied into
this user-dened category.
To view or edit any of these templates, click the desired template button. An example of VE Template 1 is
shown below.
Note
When a test is converted to a Summary Report, no template
editing can be performed. The Templates Viewing screens are not
available.
The Template Viewing screen displays the QRS beats that are identied and grouped by the software
for a particular arrhythmia. The top-left corner indicates the page displayed, the number of pages in the
current template, and the channel displayed. The QRS beats are arranged in rows and columns in the QRS
complexes review area, where they are displayed in different colors according to their categories:
Normal beats Black
Ventricular beats Red
Supraventricular beats Blue
Pause beats Pink
Artifact beats Dark Yellow
Unnamed 1 Teal
A blue box follows the mouse from beat to beat. The time of the ‘boxed’ beat is indicated in the upperright corner of the screen. The viewer underneath the review window displays the corresponding standard
Page 58

58
39-78-0001 © Midmark Corporation 2016
8-second diagnostic strip with the selected QRS beat in the middle, directly under the pointing-hand icon.
The time displayed at the bottom of the strip indicates the beginning of this 8-second diagnostic strip.
Click on a beat in the QRS complexes review area to reclassify it according to the Default Reclassication
Category settings.
Template Options
Click Options to view Template Options. The Template Options dialog box sets which analyzed channel is
displayed in the Template Viewing screen. By default, the channel displayed in the QRS complexes review
area is the primary channel selected before the analysis. Sometimes a different channel may have clearer
morphology, higher amplitude, or a cleaner ECG signal that can make editing easier.
The Default Reclassify Category is the category assigned to the left-mouse click; click on any beat to
reclassify it into this category. Intelligent Sorting sorts all QRS beats in the template according to similarities
in their shapes and morphologies. By default it is enabled. If Intelligent Sorting is disabled, the beats are
arranged chronologically.
Other Templates Viewing Operations
Use Page No. to jump to the desired page if the template has more than one page. Click the <<< or >>>
buttons to move back or forward one page in the template.
All Page(s) and Current Page open the Beat Activity dialog box so that either all the pages or just the
current page can be reclassied to a selected category.
Page 59

59
39-78-0001 © Midmark Corporation 2016
Click OK to save changes and exit the current template view.
Click Help for further information on this topic.
Reclassifying Beats
In addition to the methods listed above, there are several methods for reclassifying or changing the category
of the heartbeats in a template. These editing functions are the same in all the templates. When nished
editing in all templates, move to other functions through the Holter Main Buttons Bar.
Reclassifying Mouse Operations on the Template Viewing Screen
Reclassification Mouse Action
Reclassify a single beat, column, or row to the category
defined in the Default Reclassify Category.
Click a beat, column number or row letter in the QRS
complexes review display.
Reclassify a single beat, column, or row to any
category of choice.
Right-click a single beat, column number or row letter
then pick a category from the Beat Activity dialog box.
Reclassify a group of beats to any category of choice.
Select a group of beats by dragging the mouse across
these beats while holding the left mouse button; the
Beat Activity dialog box appears when the mouse
button is lifted.
Use the keyboard to navigate and reclassify the ‘boxed’ beat on the Template Viewing screen using
the following hot keys:
Reclassifying Keyboard Operations on the Template Viewing Screen
Key Function
Move to the beat above the current beat
Move to the beat to the left of the current beat
Page 60

60
39-78-0001 © Midmark Corporation 2016
Reclassifying Keyboard Operations on the Template Viewing Screen
Key Function
Move to the beat to the right of the current beat
Move to the beat below the current beat
Home To the beginning of the current page
End To the end of the current page
Ctrl + G Go to a specific available QRS page
X Mark the current beat as Artifact
N Mark the current beat as Normal
P Mark the current beat as Pause
S Mark the current beat as Supraventricular
U Mark the current beat as Unnamed
V Mark the current beat as Ventricular
Note
The mouse pointer must remain inside the upper-window of the
Template Viewing screen when using hot keys.
To lock the blue selection box onto any beat in the QRS complexes review display, freeing the mouse for
other operations, hold the Control (Ctrl) key and move the mouse out of the display area. This allows the
user to perform tasks in the lower ECG strip view without losing the selected beat.
Working with Pacemaker Templates
[Available in IQholter® EP]
Note
This is only available if the Pacemaker Analysis option is enabled
in IQholter
®
E P.
The Pacemaker feature contains Pacemaker Templates and Pacemaker Tabular Summary of all pacemaker
categories.
Click Pacemaker to view the Pacemaker Templates screen as shown below. This button is available only if
the Pacemaker Analysis was enabled before clicking Acquire & Analyze.
Page 61

61
39-78-0001 © Midmark Corporation 2016
The Pacemaker Templates screen lists the following categories: Atrial Paced, Ventricular Paced, Dualchamber Paced, Non-Capture, Undersensing, Oversensing and two custom event categories, Event 1 and
Event 2.
To view or edit any of these templates, click the desired template button. An example of Ventricular Paced
detail screen is shown below.
The Pacemaker Templates Viewing screen provides the same aspect and very similar operations as the
Template Viewing screen, see Section V-B, Reviewing and Editing Holter Tests/Working with Templates for
more information.
Template Options
Click Options to open the Pacemaker Template Options dialog box. This is where which channel to be
displayed in the Templates Viewing screen was selected. The Default Reclassication Category is the
category into which the software will default any event that is classied without specifying a category name.
Page 62
62
39-78-0001 © Midmark Corporation 2016
The Show Saved Strips First option enables or disables the display sorting for the current category events. If
selected, the software will display ECG strips that are saved for printing rst so that users can quickly review
these sample strips.
Reclassifying Events
To reclassify pacing events, the software provides the same methods as in arrhythmia templates. See
Section V-B, Reviewing and Editing Holter Tests/Working with Templates. The difference here is that the
classication names are pacing event categories instead of arrhythmia categories. The Pacing Event
Categories screen shown below lists all event names for pacing events.
Page 63

63
39-78-0001 © Midmark Corporation 2016
The hot keys for navigating and reclassifying beats are as follows:
Reclassifying Keyboard Operations on the Template Viewing Screen
Key Function
Move to the beat above the current beat
Move to the beat to the left of the current beat
Move to the beat to the right of the current beat
Move to the beat below the current beat
Home To the beginning of the current page
End To the end of the current page
Ctrl + G Go to a specific available QRS page
A Mark the current beat as Atrial Paced
V Mark the current beat as Ventricular Paced
D Mark the current beat as A-V Paced
N Mark the current beat as Non-Capture
U Mark the current beat as Undersensing
O Mark the current beat as Oversensing
1 Mark the current beat as Event 1
2 Mark the current beat as Event 2
X Mark the current beat as Artifact
Note
The mouse pointer must remain inside the upper-window of the
Template Viewing screen when using hot keys.
Viewing Pacemaker Tabular Statistics
Note
This is only available if the Holter program has the Pacemaker
Analysis option.
Click Pacemaker, and then click Pacemaker Tabular Summary to view the hourly-tabulated statistics of
pacing events.
The Tabular Summary displays the statistical results for each hour of pacing events. For multiple day
formats, a new ‘shade’ will denote the transition from chronological days.
Page 64

64
39-78-0001 © Midmark Corporation 2016
Note
Only the numerical values displayed in black in the Tabular
Summary can be edited. However, this editing is not generally
recommended, as the Holter program does not automatically
update all other sections of the Holter report to reflect these
changes.
Viewing and Editing Sample Strips
[Available in IQholter®, EX and EP]
Select the Sample Strips tab of the Data Review screen. Select to view any category in the Category List.
The numbers in the right column indicate the number of saved strips and total number of beats or runs in
each category, except for High Heart Rate, Low Heart Rate, and ST Segment categories, which show a
maximum of 20 strips.
Page 65

65
39-78-0001 © Midmark Corporation 2016
• Under Display ECG, select whether to display all strips or only the saved strips in the selected
category, displayed at the bottom of the screen. The program automatically saves 3 strips from
each category to print.
Note
When a test is converted to a Summary Report, only the strips
saved to print are retained. All strips not saved for printing are
discarded. This does not alter the analysis result.
− If “Condensed Sample Strips” Report is checked, up to 30 condensed strips can be printed per
page. If the check box is cleared, all sample strips are printed in diagnostic size (25mm/sec) with
a maximum of three strips per page.
− In the Current Strip control group, Save to Print and Don’t Print indicators show whether the
displayed strip is saved; select one of these options to save or save to print. If Instant Update is
checked, any single change made to the current displayed strip (e.g., Save to Print/Don’t Print,
Add Comments or reclassification) will be updated instantly and the next strip in the category
will automatically be displayed. If making multiple changes to the current strip, clear the Instant
Update box.
− Add Comments enters a selected or custom comment to the bottom center of the ECG strip.
− Use the arrow buttons on the screen to move the view from strip to strip within the selected
category.
− Reject Current Strip is available for the High Heart Rate, Low Heart Rate and ST Segment
categories; use to quickly reject the current strip if it is incorrectly classified as high or low heart
rate, probably due to excessive movement artifacts or low ECG amplitude.
Page 66

66
39-78-0001 © Midmark Corporation 2016
Specic arrhythmia events are displayed in different colors. The sample strips can be printed in color if using
a color printer and if the Print Color option is selected on the ECG Strips tab of the Holter Settings dialog
box. The diagnostic size ECG strips will be printed on red grid. The category code can be displayed above
each beat by checking the Beat Annotation box.
Beat Category Color Code Beat Annotation
Normal beats Black N
Atrial fibrillation beats Brown N
Supraventricular beats Blue S
Ventricular beats Red V
Pause beats Pink P
Artifacts Dark yellow ?
Note
Atrial fibrillation beat category and atrial fibrillation analysis are
available in IQholter
®
EX and EP.
Reclassify any beat in the 8-second strip by double-clicking the QRS complex of the beat to be changed.
Reclassify the beat to VE, SVE, Pause, Normal, Artifact, Unnamed 1 (user-dene) or Atrial Fibrillation beat
via the Beat Activity dialog box.
The A-Fib Episode box is a tri-state check box. When it is not checked, the selected beat is not part of an
A-Fib episode. To add the selected beat to an A-Fib episode, check the A-Fib Episode box once and click
OK. The selected beat will be reclassied as part of the A-Fib episode.
Note
VE beat will need to be reclassified to Normal beat before it can
be reclassified as an A-Fib beat.
Page 67
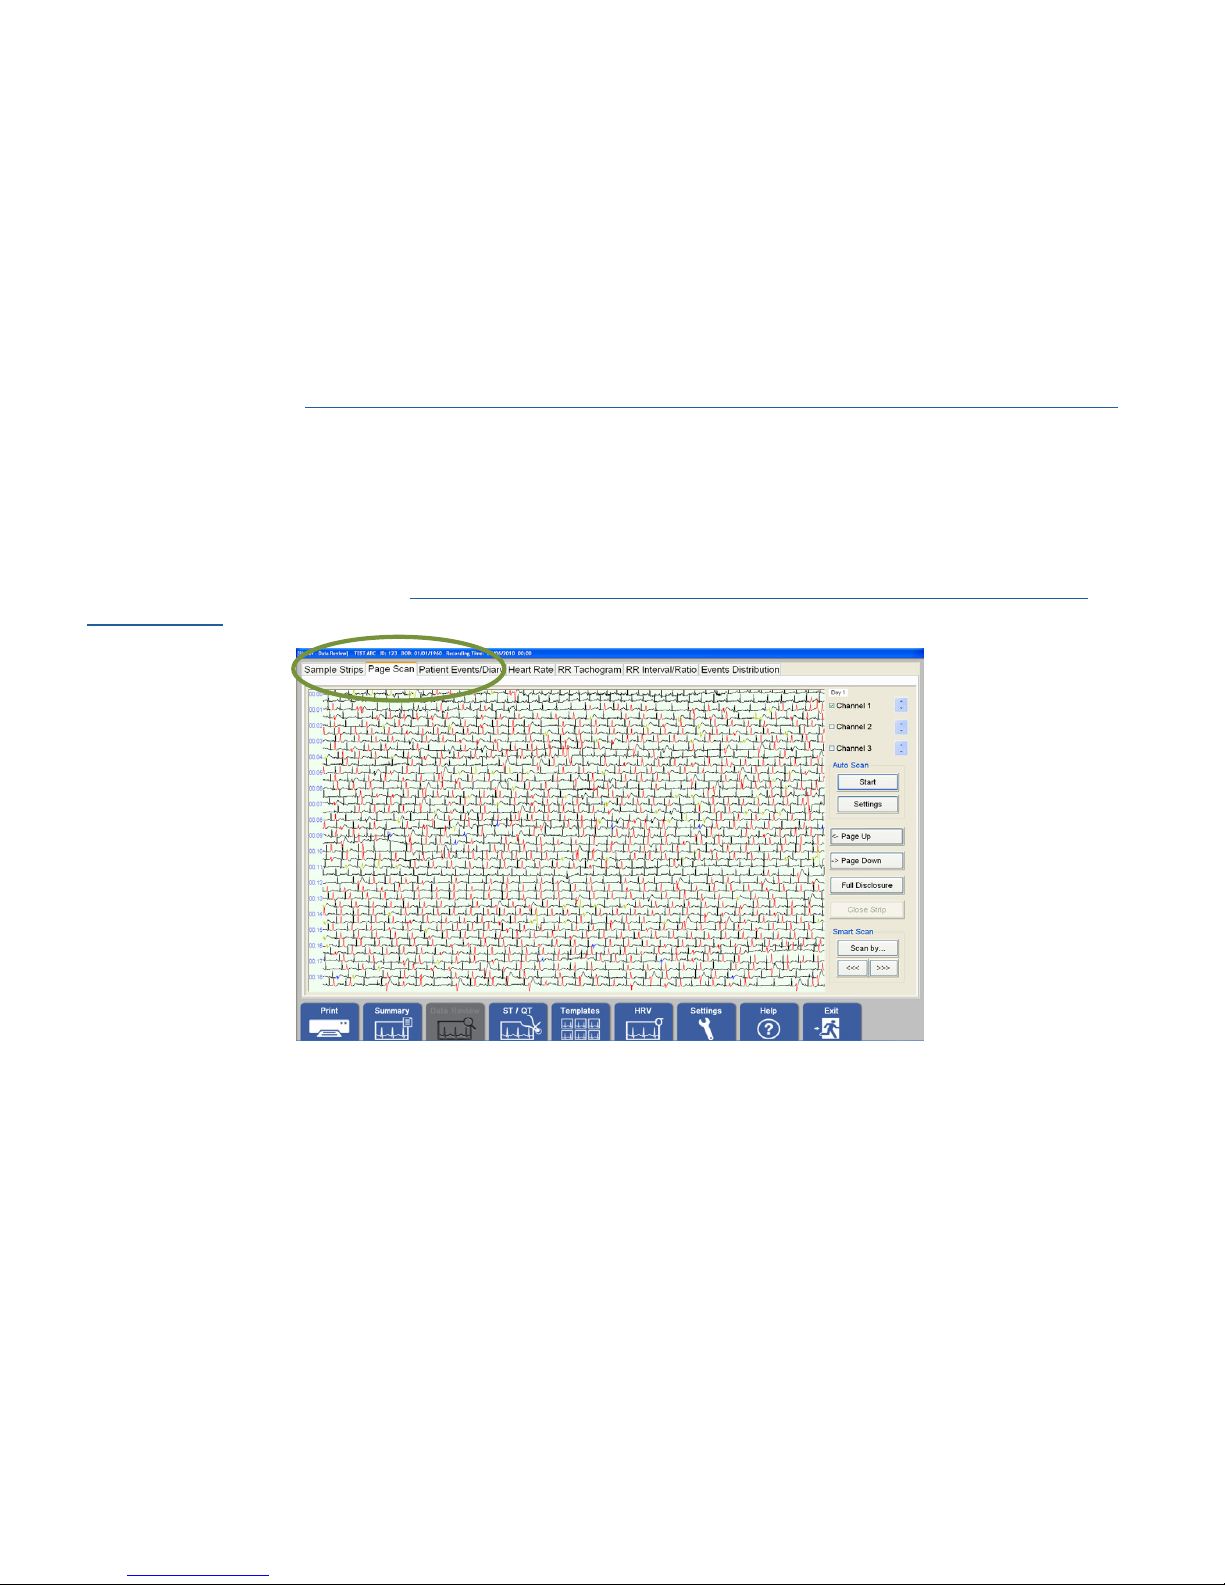
67
39-78-0001 © Midmark Corporation 2016
If the selected beat is already part of an A-Fib episode, this check box will be grayed and checked. Exclude
the current beat from the A-Fib episode by clearing the box. Reclassify the current beat to any other
categories at the same time by selecting the appropriate box.
If using group editing to reclassify a series of beats to an A-Fib episode, checking the A- Fib episode box will
classify only beats with the normal beat morphology, i.e. Normal, Pause and SVE, into A-Fib beats.
If using group editing to remove a section or an episode of A-Fib event, un-checking the A-Fib episode box
and clicking OK will restore selected beats into Normal or SVE beats. VE beats will remain unchanged.
For group editing, see Section V-B, Reviewing and Editing Holter Tests/Using the Right-Click Menu Options
and read the Begin Group and End Group descriptions.
Viewing Full Disclosure in Page Scan
The Page Scan tab enables the user to review the full disclosure of the Holter recording. By default, the
screen shows the primary channel with 30 seconds per line. To adjust the density from the menu that
appears, right-click the strip. See Section V-B, Reviewing and Editing Holter Tests/Using the Right-Click
Menu Options.
As the mouse is moved, a redline cursor shows the current position in the Page Scan screen. Click on the
screen to display a diagnostic ECG strip either at the top or bottom of the display, depending on where the
screen is clicked. A green rectangle in the page view indicates which 8-second period is being displayed.
Page 68

68
39-78-0001 © Midmark Corporation 2016
Functions Available on the Page Scan Screen
Check a channel box to show the ECG for that channel in the page view.
Bydefault, only the primary channel ECG is shown. Use the arrows to
adjust the amplitude of the ECG by increments of 15%, which affects
printouts of the full disclosure only.
Display the previous page; the ECG strip view will close.
Display the next page; the ECG strip view will close.
Click Start to browse the ECG. By default, the full-disclosure view is refreshed every
three seconds. To stop Auto Scan, click the button again.
• Auto Scan stops whenever the Page Scan screen is clicked and a diagnostic strip
appears; resume Auto Scan by clicking Start again.
Click Settings to adjust the direction of the scan and the Auto Scan Interval (in
seconds).
Page 69

69
39-78-0001 © Midmark Corporation 2016
Functions Available on the Page Scan Screen
Print a full-disclosure report; the Print Full Disclosure dialog box will appear. By
default, only the primary channel is selected and the entire recording is set to print.
Optionally, select Selected Hours and check the hours to print.
Close the ECG strip view.
NOTE: Available for
IQholter
®
EX and EP only.
Use Smart Scan to select one or more arrhythmia events to automatically browse in
the Page Scan view. Click Scan by to display the Smart Page Scan dialog box:
The number of strips for each event category is shown in parentheses. Events that
contain no strips are not available. If Highlight Events is checked, selected events
are highlighted in the page scan view.
Page 70

70
39-78-0001 © Midmark Corporation 2016
Using the Right-Click Menu Options
Right-click a waveform in the Page Scan view or ECG Strip view to access additional features. The following
menu appears:
Reclassify
Reclassify the beat to which the cursor is pointing. This option is available only when
the cursor is pointing to a beat in the ECG strip view.
Begin Group
Specify the beginning of a group. This is used for reclassifying a group of continuous
beats.
End Group
Specify the ending of a group. This is used for reclassifying a group of continuous
beats. The Beat Activity dialog box appears automatically when the End Group
menu is selected.
Remove Analysis
Results
Quickly remove the analysis results of a specific period that has excessive artifacts.
For example, if the patient removed the hookup 20 minutes before the end of the
recording and it is full of artifacts, right-click on the last of the good ECG beats,
select Remove Analysis Results then To the end of the recording. The analysis
result and the beat information of the selected period will be deleted, but the full
disclosure will not be changed.
Measurements
Use the mouse to measure the current ECG strip to get the interval between two
measurement lines and the amplitudes for all available channels. Measurements
are given numerically at the bottom of the screen. To move both measurement lines
together with a fixed interval, hold down the Ctrl (Control) key then click and drag
one of the lines. Click Close to exit Measurements.
Insert a Beat
NOTE: Available for
IQholter
®
EX and EP only.
Insert at the cursor position a QRS beat that the Holter program might have missed.
By default, it is a normal beat; reclassify it into another category if needed.
Delete the beat
NOTE: Available for
IQholter
®
EX and EP only.
Delete the QRS beat at the cursor position. The program automatically adjusts the
RR interval to remove the deleted beat.
Page 71

71
39-78-0001 © Midmark Corporation 2016
Zoom
Specify the number of seconds of ECG strip to display in each line of the ECG strip
view.
• 8 seconds per line (default for diagnostic ECG strips)
• 30 seconds per line (default for page scan review)
• 60 seconds per line
• 120 seconds per line
Next Page
Display the next page of the ECG strips. The page size is determined by the length
of the ECG strips in the current view.
Page Down performs the same function.
Previous Page
Display the previous page of the ECG strips. The page size is determined by the
length of the ECG strips in the current view.
Page Up performs the same function.
Search Time Open the Search Time dialog box to search and view the ECG by time.
Comment & Save
Set the label for the current ECG strip and save the ECG strip to the print queue for
batch printing later.
Save to print Save the current ECG strip to the print queue for batch printing.
Print Current Strip Print the current ECG strip or current report.
Print Continuous Strips
Print continuous ECG strips. Diagnostic-size strips from 8 seconds (1 ECG strip) to
96 seconds (12 ECG strips) long. Print up to 3 strips per page.
Viewing and Editing the Patient Diary
• To enter or update patient diary entries, click Data Review then select the Patient Events/Diary tab.
• Click Insert to insert a blank row for each new diary entry.
• Click Delete to erase the selected row.
• When entering a Date (if applicable) and a time in the Time column, the corresponding ECG strip is
displayed. After the diary entries are entered, click Save before continuing.
Note
Time entered must be in 24-hour format. Enter 0945 for 09:45:00
(9:45:00 a.m.) or 132522 for 13:25:22 (1:25:22 p.m.).
Page 72

72
39-78-0001 © Midmark Corporation 2016
Viewing the Heart Rate Trend
The upper part of the screen displays the heart-rate trend curves while the lower part displays the ECG Strip
view. A redline cursor appears as t mouse over the heart-rate trend curves, indicating the current minute.
The time indicated by the cursor on the trend curves is displayed in the Status box at the lower-right corner,
with the maximum, minimum and average heart rates of that minute.
The Heart Rate Trend will also automatically indicate if a 24, 48, or 72 hour format. All days will be displayed.
Page 73

73
39-78-0001 © Midmark Corporation 2016
When clicking on the heart-rate trend curves, the ECG strip beginning from the rst second of the current
minute appears in the ECG Strip view. Zoom in on the heart-rate trend curves by right-click and drag across
the specic section of the graph. To return to full view of the trend graph, click Auto Scale.
Viewing the RR Tachogram
[Available in IQholter® EX/EP]
The upper part of the screen displays the RR trend curve while the lower part displays the ECG Strip view. A
redline cursor appears as the mouse is moved over the trend curve, indicating the current minute. The time
indicated by the cursor on the trend curves is displayed in the Status box at the lower-right corner.
The Maximum RR and Minimum RR strips are based on instantaneous RR intervals between two
successive normal beats. By this denition, the Maximum RR strip has the longest instantaneous RR interval
that is not classied as Pause.
The brown highlights on the RR trend curve indicate occurrence of A-Fib episodes if the Highlight box is
enabled. Longest, Fastest and Slowest show the middle 8-seconds of the corresponding A-Fib episode.
Zoom in on the RR trend graph by right-click and dragging across the specic section of the graph. To return
to full view of the trend graph, click Auto Scale.
Page 74

74
39-78-0001 © Midmark Corporation 2016
Viewing the RR Interval and RR Ratio Graphs
The RR Interval/Ratio view displays six histograms showing the relationships between the number of
heartbeats and the RR intervals or the RR interval ratio.
The three upper histograms represent the distribution of the number of heartbeats versus the RR intervals
(in milliseconds) and heart rate (in bpm).
The three lower histograms represent the distribution of the number of heartbeats and the RR ratio, which is
the ratio of two consecutive RR intervals.
The position of the redline cursor on the histograms affects the status information shown on the lower-right
side of the screen.
Page 75

75
39-78-0001 © Midmark Corporation 2016
Viewing the Events Distribution
The Events Distribution view displays bar charts showing the hourly distribution of the following arrhythmia
events: VE, VE Pair, VE Run, SVE, and SVE Run. VE Runs include V Tach episodes.
Viewing ST and QT Results
[QT analysis is available in IQholter® EX and EP]
To view ST or QT trends or tabular results, click ST/QT then select the appropriate tab.
In the ST Trend view, the upper part of the screen displays the average heart rate trend curve, ST segment
level curves and ST segment slope curves, while the lower part shows the ECG Strip view.
The Status box on the lower-right side of the screen displays information that pertains to the position of
the redline cursor on the trend curves. Click on the trend curves and the full-size strip beginning at the rst
second of the selected minute will be displayed.
To zoom in on the ST Trend view, click and drag the right mouse button inside the chart area. Click 24 Hour
Scale, 48 Hours, or 72 Hours or Auto Scale to return to the full-scale curve.
Select one of the available channels from the Channel pull-down menu to view its corresponding ST level
curve and the ST slope curve.
The default channel is the primary channel, specied when the Holter data is analyzed.
Page 76

76
39-78-0001 © Midmark Corporation 2016
To view the ST tabular results, click on the ST Tabular tab. The table displays the heart rate and ST
information for each hour of the Holter monitoring.
The QT Trend view enables the user to review the average heart rate trend curve, QT interval curves, and
QT correction (QTc) curves.
As in the ST Trend view, zoom in on the QT Trend graphs by clicking and dragging the right mouse button
inside the chart area. Click 24 Hour Scale, 48 Hours, or 72 Hours or Auto Scale to return to the full-scale
curve.
Apply one of the available formulas for the QTc analysis; Bazett’s formula is selected by default. Click
Settings then select the QT Analysis tab. The QTc values are updated automatically once OK is selected in
the Holter Settings dialog box.
Page 77

77
39-78-0001 © Midmark Corporation 2016
Viewing Heart Rate Variability (HRV) Results
[Available in IQholter® EX and EP]
To view heart rate variability (HRV) analysis results, click HRV. The HRV Analysis Summary screen appears:
The HRV Analysis Summary displays 14 statistics, covering time and frequency domain: SDNN, SDANN,
rMSSD, pNN50, Triangular Index, Total Power, ULF, VLF, LF, LF norm, HF, HF norm, LF/HF and HF/TP.
Statistics Shown in Heart Rate Variability Analysis
SDNN Standard deviation of all normal RR intervals in the entire ECG recording.
SDANN
Standard deviation of the average normal RR intervals for all 5-minute
segments of entire ECG recording.
rMSSD
Root-mean-square successive difference (the square root of the squared
differences between adjacent normal RR intervals).
pNN50
The number of times in which the change in consecutive N-N intervals
exceeds 50 milliseconds, measured as a percentage of total NN pairs for the
unit time.
Triangular Index
Total number of all NN intervals divided by the height of the histogram of all
NN intervals measured on a discrete scale with bins of 7.8125 ms.
Total Power The variance of NN intervals over the selected segment (<= 0.4 Hz).
ULF Power in the ULF range (<= 0.003 Hz) not defined for 5-minute segments
VLF Power in the VLF range (5-minute: <= 0.04Hz, 24-hour: 0.003 - 0.04 Hz).
LF Power in the LF range (0.04 - 0.15 Hz).
LF norm LF power in normalized units 100*LF/(total power - VLF).
HF Power in the HF range (0.15 - 0.4 Hz).
Page 78

78
39-78-0001 © Midmark Corporation 2016
Statistics Shown in Heart Rate Variability Analysis
HF norm HF power in normalized units 100*HF (total power - VLF).
LF/HF Ratio LF/HF.
HF/TP Ratio HF/Total Power
View the HRV results based on time domain analysis by selecting the Time Analysis tab:
To perform any editing or create customized charts, export the Time Analysis results in a tabulated text
format readable by most commercial spreadsheet programs; right-click inside the Time Analysis screen and
select Print Tabular Report.
The HRV Time Analysis Tabular Printing dialog box appears:
To export the Time Analysis Tabular Report into a text le, check the Print to File box. Enter a lename and
location for saving the le. To print, click Print.
The frequency domain analysis results are provided via the Frequency Analysis tab.
Page 79

79
39-78-0001 © Midmark Corporation 2016
Change the View Segment Size and Taper Window settings for the HRV analysis by clicking Settings and
selecting the Heart Rate Variability tab.
Changing these settings automatically updates the HRV analysis summary and frequency analysis results.
To perform any editing or create a customized chart, export the frequency analysis results in a tabulated text
format read by most commercial spreadsheet programs; right-click inside the Frequency Analysis screen
and select Print Tabular Report.
Page 80

80
39-78-0001 © Midmark Corporation 2016
The HRV Frequency Domain Tabular Printing dialog box appears:
To export the Frequency Analysis Tabular Report to a text le, check Print to File. Enter a lename and
location for saving the le. To print, click Print.
Viewing the Tabular Summary
The Tabular Summary displays the Holter analysis results for each hour. Click Summary and select the
Tabular Summary tab.
Note
Limited editing is allowed in the Tabular Summary tab. Only the
numerical values displayed in black can be edited. However, this
editing is not generally recommended, as the Holter program does
not automatically update all other sections of the Holter report to
reflect these changes.
Page 81

81
39-78-0001 © Midmark Corporation 2016
Viewing and Entering Interpretation/Comments
When the Holter analysis has been reviewed, enter the interpretations or comments by clicking Summary
and selecting the Interpretation/Comments tab.
Interpretations entered in the top box also appear in the Interpretation section at the bottom of the Analysis
Summary tab.
Narrative results and comments in the lower box are generated automatically by the Holter program and are
editable on this tab.
Note
Any changes made in the Analysis Results screen are saved
automatically when the screen is exited. If performing re-analysis
of the current Holter test, any changes made in this screen will be
lost.
Printing Reports
Once the Holter test is complete, print or preview reports pre-selected in Holter Settings. Click Print then
click Print All Selected Pages or Preview All Selected Pages.
To print any selected reports: click Print and click Select Report Pages & Print. The Holter Settings dialog
box appears.
Select or clear any reports as desired, click OK, and the selected reports will be printed.
Page 82

82
39-78-0001 © Midmark Corporation 2016
Note
These are the same selections for the Print Reports After Analysis
function. If any changes were made in this setting, remember to
readjust the selections to reflect the original report preferences
after the report has printed.
Under ECG Strips To Print, if the Diagnostic Sample Strips is checked, Sample Strip Options is available
for selecting categories of sample strips for printing.
Exiting the Holter program
Once the Holter test has been completed and reviewed, click Exit to return to the Report Review screen.
Enter the reviewer’s name in the Reviewed by box. The Review Date is entered automatically when and
changes are saved when the report is exited. The Review by and Date on the Analysis Summary Report are
updated by the software accordingly.
Page 83

83
39-78-0001 © Midmark Corporation 2016
Converting a Full Report to a Summary Report Format
Depending on the number of arrhythmic events, an average 24-hour Holter Full Report format requires about
35MB of hard-disk space if acquired from the standard 24-hour IQholter
®
recorder; 135 MB for each 24hour
if acquired from the upgraded 24, 48, 72 hour IQholter
®
recorder. Without the full disclosure, a Summary
Report takes up about 3MB for each 24hour. Manually convert a full Holter report to a summary Holter report
by clicking Delete ECG when viewing the Holter report.
Note
Converting to a Summary Report format deletes the full
disclosure, i.e. the recorded raw ECG for that Holter test. This
action is NOT reversible.
Full editing, printing, and viewing options are available with the full report, however, some operations are not
available with the summary report format, as listed below:
Operations Restricted in Summary Report Format
Buttons Tabs/Submenu Remark
Summary Tabular Summary No editing available.
Data Review
Sample Strips
View only strips that have been saved to print. By default, only
3 sample strips from each category are saved. Others are
discarded.
Page Scan
Not available.
No full-disclosure printing.
Patient Diary/User Events
No additional entry.
Saved event strips are retained.
Heart Rate
Only the first high heart rate strip is displayed.
No other strips are available from the Heart Rate Trend screen.
RR Tachogram Only ECG strips for maximum RR and minimum RR are available.
Page 84

84
39-78-0001 © Midmark Corporation 2016
Operations Restricted in Summary Report Format
Buttons Tabs/Submenu Remark
ST/QT
ST Trend
Only the first ST Segment sample strip is displayed. No other ECG
strips are available when clicking in the ST Trend graph.
ST Tabular No editing available.
QT Trend No ECG strip view when clicking in the QT Trend graph.
QT Tabular No editing available.
Settings
ECG Strips Recording Time and Date cannot be changed.
Sample Strips Settings disabled.
Reports
Arrhythmia Report, Full Disclosure Report and First Full Hour ECG
Report are not available.
Templates All Templates No editing available.
Pacemaker
Pacemaker Templates No editing available.
Pacemaker Tabular
Summary
No editing available.
Page 85

85
39-78-0001 © Midmark Corporation 2016
VI. Appendices
A. Appendix A - Operations at a Glance
A quick guide to using the IQholter® on a new patient.
1. Obtain the recorded SD card from the IQholter® recorder.
2. Insert the SD card into the SD card reader in the computer.
3. Start IQmanager®.
4. Choose New Patient from the opening screen.
• For an established patient, search by the patient’s name or ID number.
5. Enter as much information as possible on the Patient Data screen. The patient’s name or ID number
is required.
6. Select New Test on the menu bar.
7. Click Holter after entering relevant information, by clicking the play icon in the Holter section.
8. The software automatically enters the recording start time and date from the recorder.
9. Check Print Reports After Analysis to print a preliminary report if needed.
10. Click Patient Diary to enter the patient’s notes from his or her diary, if available.
11. Click Acquire & Analyze to start the Holter analysis.
12. Reports are automatically saved and printed.
13. Click Exit to return to the IQmanager® opening screen.
Page 86

86
39-78-0001 © Midmark Corporation 2016
A quick guide to using the IQholter® EX/EP on a new patient.
1. Obtain the recorded SD card from the IQholter® recorder.
2. Insert the SD card into the SD card reader in the computer.
3. Start IQmanager
®
.
4. Choose New Patient from the opening screen.
• For an established patient, search by the patient’s name or ID number.
5. Enter as much information as possible on the Patient Data screen. The patient’s name or ID number
is required.
6. Select New Test on the menu bar.
7. Select Holter after entering relevant information, by clicking the play icon in the Holter section.
8. The software automatically enters the recording start time and date from the recorder.
9. Check the Pacemaker box for pacemaker analysis on the recorded data.
10. Check the Print Reports After Analysis box to print a preliminary report if needed.
11. Click Analysis Settings to preview the raw ECG or change the analysis settings.
12. Select Enable A-Fib Detection to perform automatic atrial fibrillation analysis.
13. Click Patient Diary to enter the patient’s notes from his or her diary, if available.
14. Click Acquire & Analyze to start the Holter analysis.
15. Review and edit the Holter analysis results through the Templates functions.
16. Review and edit Pacemaker analysis results using Pacemaker functions.
17. Click Data Review. Enter final interpretations and comments on the Interpretation/Comments tab of
the Analysis Results screen.
18. Click Exit to return to the IQmanager
®
Holter Report Review screen.
19. Enter the reviewer’s name in Reviewed by and click Exit.
Page 87

87
39-78-0001 © Midmark Corporation 2016
B. Appendix B - Troubleshooting Guides
These Troubleshooting Guides provide a list of solutions and recommendations to issues that may be
encountered with the IQholter® EX/EP software and IQholter® Recorders. Before calling Midmark Technical
Service, please refer to the following table for help. Error messages appear at the center or at the bottom
right of the computer screen.
Note
For errors that occur during analysis or management of test files,
refer to the Troubleshooting Guide in the IQmanager® Operation
Manual.
Software Troubleshooting Guide
Error Message or Issue Solution or Recommendation
Can’t analyze non-Midmark format
ECG files.
Message appears after clicking
Acquire & Analyze.
The IQholter
®
EX/EP analyzes only ECG data recorded from
the IQholter
®
recorder.
• Please contact Technical Service for more information.
Can’t find Holter data, please make
sure the flash card is inserted into the
reader properly
Message appears after clicking
Acquire & Analyze.
The SD is not inserted or not making proper contact.
• Verify that the correct SD card is inserted in the SD card reader.
• Eject and reinsert the SD.
Can’t successfully save raw ECG
data!
Message appears after clicking
Acquire & Analyze.
The IQholter
®
EX/EP program cannot copy the raw ECG data file
to the required location.
• Verify that the holter data folder exists.
• Create the required folder or call Technical Service.
All other operational problems.
• Refer to the online help by clicking Help on any screen.
• Refer to the IQmanager
®
Operation Manual for additional
troubleshooting covering IQmanager
®
.
• For support services information, please see Section VII,
Customer Support and Warranty Information.
Page 88

88
39-78-0001 © Midmark Corporation 2016
Recorder Troubleshooting Guide
Error Message/Issue Possible Solution or Recommendation
No tone or display
following initial battery
installation
• Battery is very weak
• Battery is incorrectly installed
OLED displays ‘SD
CARD
NOT INSERTED’ and the
unit emits a continuous
tone following battery
installation.
Incomplete SD card installation:
1. REMOVE BATTERY
2. INSTALL SD CARD
3. Reinstall battery
Unit emits a continuous
single-tone beeping
alarm
• SD card did not initialize correctly, reinstall battery
One or more channel
has low amplitude,
excessive artifact or a
wandering baseline.
• Bad lead wire set
• Poor connection
ECG data is not observed
after recording session is
complete
• Poor battery
• Unit operated for less than ten minutes prior to
battery or SD card removal
• SD card or recorder has malfunctioned
SD CARD ERROR
• SD card busy
• Bit timeout
• SD card too slow
• SD card incorrect type
• SD card defective
• Replace defective SD card
WARNING PATIENT
CABLE HAS NOT BEEN
DETECTED
• Cable has not been inserted into recorder
• The cable is not inserted completely (loose)
Press in securely.
LOW BATTERY
• Battery voltage is below the usable threshold.
• Appears before controlled shut down
• If on startup, use a fresh battery.
ERROR SD CARD IS
TOO
SLOW
• RAM BUFFERS OVERFLOW BEFORE DATA HAS
BEEN WRITTEN TO THE DISK.
• SD card too slow
• SD card incorrect type, worn or lower quality than
necessary.
• SD card defective.
WARNING SD
CAPACITY
IS TOO SMALL FOR
RECORD LENGTH
• SD card capacity is not large enough for the
recording length / quality selected.
WARNING BATTERY
IS NOT CAPABLE OF
RECORDING FOR
SELECTED LENGTH
• Battery failed start up test
• Battery is of incorrect capacity to perform length of
recording selected
• Lithium battery required for 72 hour recordings.
Page 89

89
39-78-0001 © Midmark Corporation 2016
C. Appendix C - Maintenance and Storage
Preventative Inspection
Perform a periodic preventative inspection prior to each use of the recorder. Visual inspection should include
the inspection of the recorder and all cables for signs of damage and deterioration, including but not limited
to: cracks, cuts, discoloration and oxidation. If a cable or other accessory exhibits any of these symptoms
replace it immediately prior to use of the recorder.
Cleaning the Recorder
Caution
Do not use aromatic hydrocarbons, rubbing alcohol or chlorinated solvents for cleaning the
Holter recorder. Do not use alcohol or acetone on lead wires or cables, since they could
stiffen and crack the insulating plastic.
Clean the outside of the IQholter® recorder with a soft cloth dampened with a mild household soap. Avoid
using excessive amounts of solution, which may inltrate the connectors, battery compartments or recording
module. Verify that all equipment and accessories are completely dry before using.
Caution
Do not immerse the Holter recorder in any kind of liquid.
Cleaning the Patient Cable
Clean the cables following a hospital approved cleaning procedure, such as those recommended by AAMI
or AORN. Wiping the cables with a solution of soap and water followed by a rinse with water is a simple yet
effective method for cleaning the cables.
Do not immerse the cables in water. The cables may be disinfected by wiping with a 1:10 solution of chlorine
bleach and water, or a 2% gluteraldehyde solution such as Cidex™. The cables should then be rinsed and
wiped dry.
Note
Worn or damaged patient cables are the most common cause
of poor quality recordings. Successive poor ECG tracings may
indicate the patient cable needs to be replaced.
Bad Weather Conditions
In rain or snow conditions, instruct patients to protect the recorder from the elements by wearing the
recorder inside a coat.
Page 90

90
39-78-0001 © Midmark Corporation 2016
Storage
To prevent damage to the recorder due to battery leakage or oxidation, the battery should be removed
whenever the recorder is not in use or prior to storage for a long period of time. Avoid extreme humidity and
heat during storage.
Although the SD card is very durable, it should be stored within the recorder or its original case when not in
use. This reduces the possibility of it being damaged by dust or moisture.
Page 91

91
39-78-0001 © Midmark Corporation 2016
D. Appendix D - Radio and Television Interference
This equipment generates and uses radio frequency energy. If not installed and used properly, in strict
accordance with the manufacturer’s instructions, it may cause interference with radio and television
reception.
This equipment has been tested and proven to be in compliance with standards for medical devices in
accordance with the IEC 601-1 rules, which are designed to provide reasonable protection against such
interference in a medical or hospital environment.
EMC Requirements for the IQholter® Recorder
Medical electrical equipment needs special precautions regarding EMC and needs to be installed and put
into service according to the EMC information provided in this Addendum.
Portable and mobile RF communications equipment can affect the operation of medical electrical equipment.
The IQholter® recorder is medical electrical equipment.
The following is a list of the lead wires and SD cards that are used as part of the IQholter® recorder
that comply with sections 36.201 and 36.202 of the EMC Standard IEC60601-1-2 (E). Electromagnetic
compatibility testing has not been conducted using lead wires longer than 40 inches (101.6 cm).
Lead Wires
5-Lead 3-Channel Lead Wires
7-Lead 3-Channel Lead Wires
Memory Cards
Secure Digital (SD) Memory Cards: Standard length up to 2GB, conforming to SD Specication 2.0 as
issued by the SD Association. Class 6 SD cards, or higher, should be used for optimal performance.
Use of lead wires, SD cards, or accessories other than those specied, with the exception of lead wires, SD
cards, and accessories sold by the manufacturer of the IQholter® recorder as replacement parts for internal
components, may result in increased EMISSIONS or decreased IMMUNITY of the IQholter® recorder.
Caution
THE IQholter® RECORDER SHOULD NOT BE USED ADJACENT TO OR STACKED WITH
OTHER EQUIPMENT. IF ADJACENT OR STACKED USE IS NECESSARY, THE IQholter®
RECORDER SHOULD BE OBSERVED TO VERIFY NORMAL OPERATION IN THE
CONFIGURATION IN WHICH IT WILL BE USED.
Page 92

92
39-78-0001 © Midmark Corporation 2016
Guidance and manufacturer’s declaration – electromagnetic emissions
The IQholter
®
recorder is intended for use in the electromagnetic environment specified below. The customer or user of the
IQholter® recorder should assure that it is used in such an environment.
Emissions test Compliance Electromagnetic environment – guidance
RF emissions
CISPR11
Group 1
The IQholter
®
recorder uses RF energy only for its internal function.
Therefore, its RF emissions are very low and are not likely to cause any
interference in nearby electronic equipment.
RF emissions
CISPR11
Class B
The IQholter
®
recorder is suitable for use in all establishments, including
domestic establishments and those directly connected to the public low
voltage power supply network that supplies buildings used for domestic
purposes
Harmonic Emissions
CISPR11
N/A
Voltage fluctuations/flicker
emissions
IEC 61000-3-3
N/A
Guidance and manufacturer’s declaration – electromagnetic immunity
The IQholter
®
recorder is intended for use in the electromagnetic environment specified below. The customer or user of the
IQholter® recorder should assure that it is used in such an environment.
Immunity test IEC 60601 test level Compliance level Electromagnetic environment – guidance
Electrostatic discharge
(ESD)
IEC 61000-4-2
+/- 6 kV contact
+/- 8 kV air
+/- 6 kV contact
+/- 8 kV air
Floors should be wood, concrete or ceramic tile.
If floors are covered with synthetic material, the
relative humidity should be at least 30%.
Electrical fast transient/
burst
IEC 61000-4-4
+/- 2 kV for power supply
lines
+/- 1 kV for input/output
lines
N/A N/A
Surge
IEC 6100-4-5
+/- 1kV line(s) to lines(s)
+/ - 2kV line(s) to earth
N/A N/A
Voltage dips, short
interruptions and
voltage variations on
power supply input
lines
IEC 61000-4-11
<5 % U
T
(>95% dip in UT)
for 0,5 cycle
40% U
T
(60% dip in UT)
for 5 cycles
70% U
T
(30% dip in UT)
for 25 cycles
<5% U
T
(>95% dip in UT)
for 5 sec
N/A N/A
Power frequency
(50/60 Hz)
IEC 61000-4-8
3 A/m 3 A/m
Power frequency magnetic fields should be
at levels characteristic if a typical location in a
typical commercial or hospital environment.
NOTE: U
T
is the a.c. mains voltage prior to application of the test level
Page 93

93
39-78-0001 © Midmark Corporation 2016
Guidance and manufacturer’s declaration – electromagnetic immunity
The IQholter
®
recorder is intended for use in the electromagnetic environment specified below. The customer or user of the IQholter®
recorder should assure that it is used in such an environment.
Immunity test IEC 60601 test level Compliance level Electromagnetic environment – guidance
Conducted RF
IEC 61000-4-6
Radiated RF
IEC 6100-4-3
3 Vrms
150 kHz to 80 MHz
3 V/m
80 MHz to 2.5 GHz
N/A
3 Vrms
80 MHz to 6.0 GHz
Portable and mobile RF communications
equipment should be used no closer to any part
of the IQholter
®
recorder, including cables, than
the recommended separation distance calculated
for the equation applicable to the frequency of the
transmitter.
Recommended separation distance.
d = 1.17
√ P
d = 1.17 √ P 80 MHz to 800 MHz
d = 2.33
√ P 800 MHz to 6.0 GHz
where P is the maximum output power rating
of the transmitter in watts (W) according to
the transmitter manufacturer and d is the
recommended separation distance in meters (m).
Field strengths from fixed RF transmitters, as
determined by an electromagnetic site survey,
a
should be less than the compliance level on each
frequency range.
b
Interference may occur in the vicinity of equipment
marked with the following symbol:
NOTE 1: At 80 MHz and 800 MHz, the higher frequency range applies.
NOTE 2: These guidelines may not apply in all situations. Electromagnetic propagation is affected by absorption and reflection from
structures, objects and people.
a
Field strengths from fixed transmitters such as base stations for radio (cellular / cordless) telephones and land mobile radios,
amateur radio, AM and FM radio broadcast and TV broadcast cannot be predicted theoretically with accuracy. To access the
electromagnetic environment due to fixed RF transmitters, an electromagnetic site survey should be considered. If the measured
field strength in the location in which the IQholter
®
recorder is used exceeds the applicable RF compliance level above, the IQholter®
recorder should be observed to verify normal operation. If abnormal performance is observed, additional measures may be
necessary, such as reorienting or relocating the IQholter
®
recorder.
b
Over the frequency range 150 kHz to 80 MHz, field strengths should be less than [V1] V/m.
Page 94

94
39-78-0001 © Midmark Corporation 2016
Recommended separation distances between portable and mobile RF communications equipment and the IQholter®
recorder
The IQholter
®
recorder is intended for use in an electromagnetic environment in which radiated RF disturbances are controlled. The
customer or the user of the IQholter
®
recorder can help prevent electromagnetic interference by maintaining a minimum distance
between portable and mobile RF communications equipment (transmitters) and the IQholter
®
recorder as recommended below,
according to the maximum output power of the communications equipment.
Rated maximum output
power of transmitter
(W)
Separation distance according to frequency of transmitter
(m)
150 kHz to 80 MHz
d = 1.17 √ P
80 MHz to 800 MHz
d = 1.17 √ P
800 MHz to 5 GHz
d = 2.33 √ P
0.01 0.12 0.12 0.23
0.1 0.37 0.37 0.77
1 1.17 1.17 2.33
10 3.69 3.69 7.37
100 11.67 11.67 23.3
For transmitters rated at a maximum output power not listed above, the recommended separation distance d in meters (m) can be
estimated using the equation applicable to the frequency of the transmitter, where P is the maximum output power rating of the
transmitter in watts (W) according to the transmitter manufacturer.
NOTE 1: At 80 MHz and 800 MHz, the separation distance for the higher frequency range applies.
NOTE 2: These guidelines may not apply in all situations. Electromagnetic propagation is affected by absorption and reflection from
structures, objects and people.
Page 95

95
39-78-0001 © Midmark Corporation 2016
E. Appendix E - Programming the IQholter® Recorder 24+
ONLY update recorders with the “24+” symbol indicated on the back of the recorder. The same process is to
be followed to change from 24 hour ONLY to 24, 48, 72 hour or change 24, 48, 72 hour to 24 hour ONLY.
Programming the 24+ recorder will affect le size and downloading time.
Attribute 24 Hour Only Mode 24, 48, 72 Hour Mode
Patient ID Not Available AlphaNumeric (up to 21 characters)
Sample Rate 128 samples/sec 256 samples/sec
Resolution 8 bits 12 bits
Data Size (per 24 hours) 33 Mbytes 132 Mbytes
Upload Time (per 24 hours) 2 minutes 2 minutes
1. Install the SD card with the Red or Green dot into the IQholter® recorder 24+ and then install a fresh
AA battery.
2. When the IQholter® recorder 24+ detects the program, a screen will display: “WARNING…YOU ARE
ABOUT TO PROGRAM THIS DEVICE (.) TO CONTINUE, OR REMOVE BATTERY AND SD CARD
TO CANCEL”.
3. Press and hold the center (enter) button when ready. This begins the programming process for the
IQholter® recorder 24+. The programming will take approximately 7 minutes to complete.
4. When the programming is complete, follow the instructions on the screen: “PROGRAMMING
COMPLETE REMOVE BATTERY AND SD CARD”.
Note
Once the IQholter® recorder 24+ is programmed, the SD card will
be erased and become a blank SD card.
Note
Use electrodes that are rated for the timeframe (24, 48, 72 hours)
for the patient tests.
Note
For 72-hour recording, a Lithium battery is required.
To program the IQholter® 24+ recorder, order the following:
• 24 ONLY (Red dot) Part Number: 1-370-0021
• 24, 48, 72 (Green dot) Part Number: 1-370-0020
Page 96
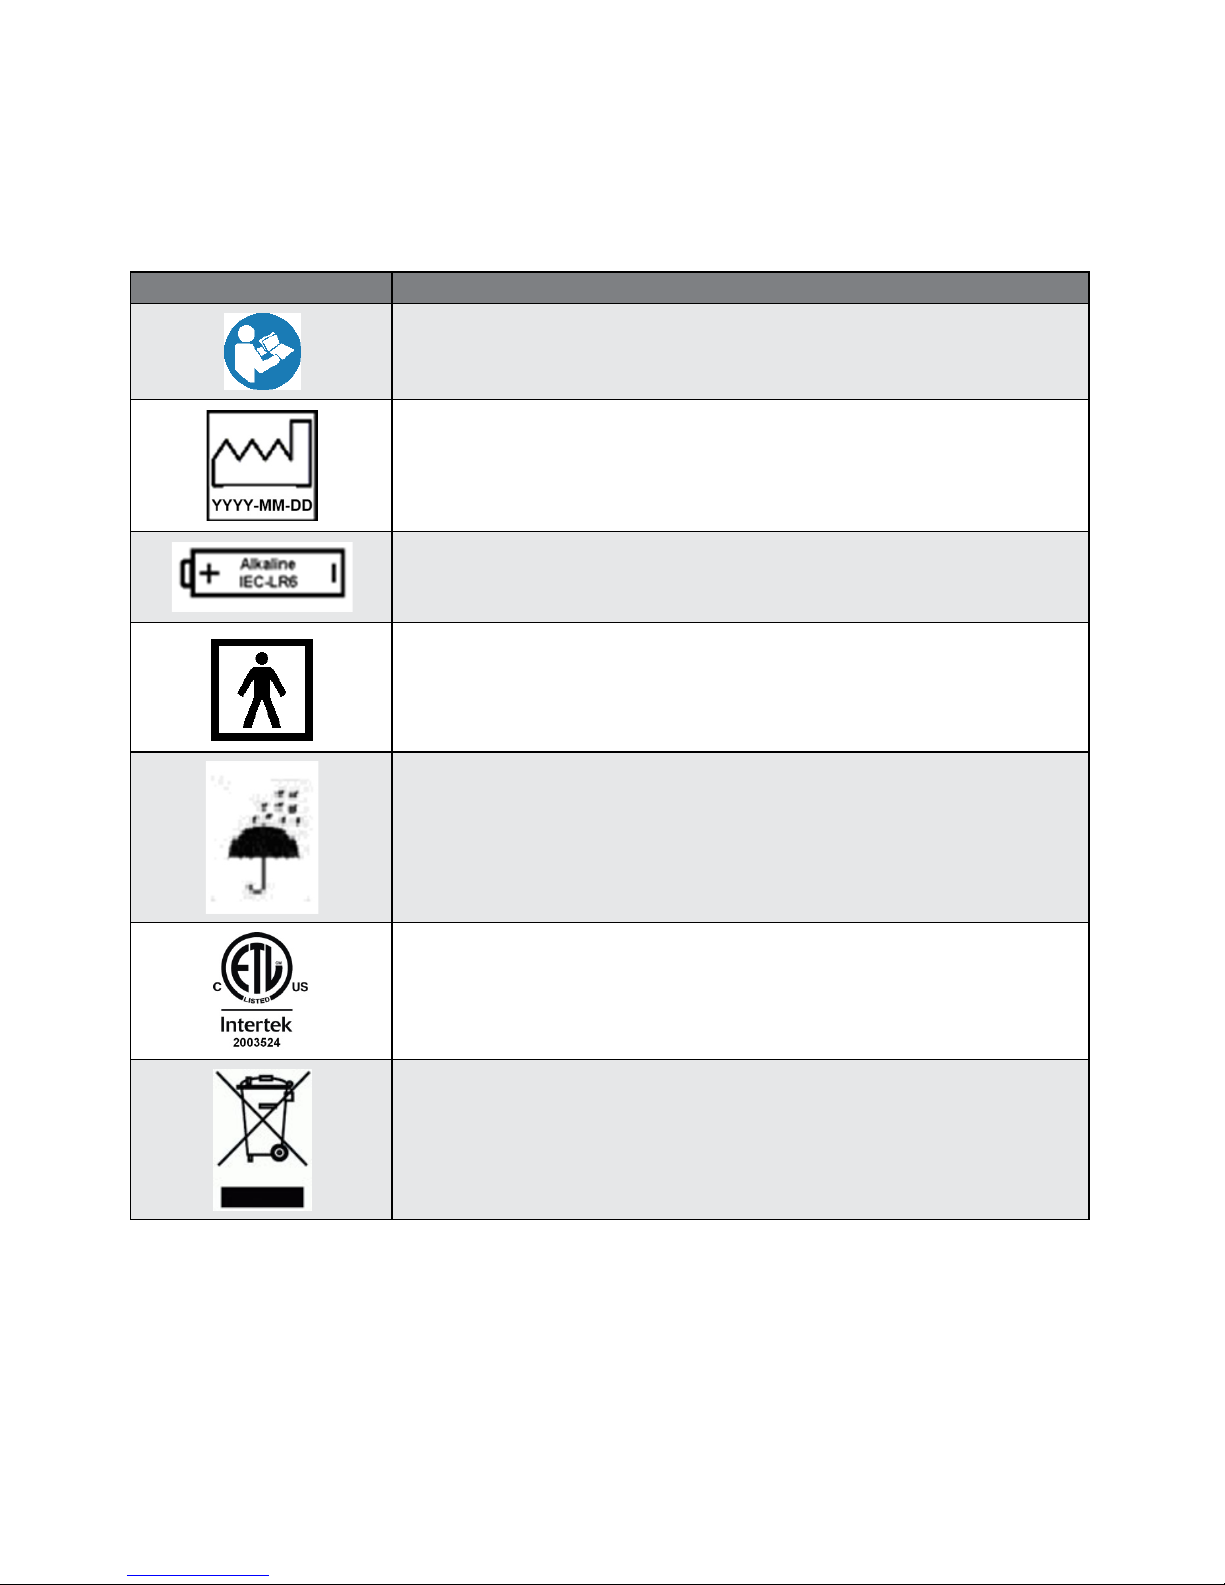
96
39-78-0001 © Midmark Corporation 2016
F. Appendix F - Safety and International Symbols
The following symbols are used on the IQholter® recorder. Refer to this directory for details concerning
symbols used on the instrument.
Symbol Description
Follow instructions for use.
Year of manufacture.
Battery Orientation
This device uses 1 AA alkaline or lithium (72 hour) battery. The icon indicates the proper
orientation of battery to be installed.
Device is compliant with IEC 60601-1 as a Type BF, internally powered device.
“Ordinary” enclosure IPX0:
Keep the instrument away from splashing water.
Conforms to UL Std. 60601-1
Certified to CAN/CSA Std. C22.2 No. 601.1
Do not dispose of this product as unsorted municipal waste. Dispose this product in
accordance with national requirements per EC Directive 2002/96.
Page 97

97
39-78-0001 © Midmark Corporation 2016
G. Appendix G - Accessories and Supplies
Contact a local distributor for reordering supplies for Holter monitoring.
Midmark Part
Number
Description
1-370-0010 SD Memory Card
2-100-0080 Prep Kit – Midmark IQholter
®
, 5-lead, 2AAs (each)
2-100-0081 Prep Kit – Midmark IQholter
®
, 5-lead, 2AAs (case – 30 kits)
2-100-0090 Prep Kit – Midmark IQholter
®
, 7-lead, 2AAs (each)
2-100-0091 Prep Kit – Midmark IQholter
®
, 7-lead, 2AAs (case – 30 kits)
90-30-0205 Lead Wire, 5-lead, IQholter
®
recorder
90-30-0206 Lead Wire, 7-lead, IQholter
®
recorder
2-100-0060 Holter Snap Electrodes (box of 50)
2-100-0050 Disposable IQholter
®
Recorder Pouches (pack of 25)
2-100-0051 Reusable IQholter
®
Recorder Pouch with Belt
Page 98

98
39-78-0001 © Midmark Corporation 2016
VII. Customer Support and Warranty Information
For help diagnosing problems by phone with this product, contact Midmark Technical Service at (800) 624-
8950, option 2, between 6:00 AM to 4:00 PM, Pacic Standard Time.
To contact Midmark Technical Service via email: techsupport@midmark.com
Self-help knowledge base and live chat can be accessed at: kb.midmark.com
Warranty
Midmark warrants the IQholter® recorder to be free from manufacturing and material defects for 12 months
from the date of purchase. Patient cables for the IQholter® recorder are warranted for 90 days. Any misuse
or abuse of a Midmark product voids all applicable warranties.
Please refer to midmark.com for the full and current Warranty Terms and Conditions.
Return Materials Authorization
To return any product for repair, a Return Materials Authorization (RMA) number must be obtained from
Midmark Technical Service. This RMA number should be referenced on the package(s) containing the items
to be returned and in any correspondence regarding the return.
Shipping
Before shipping any unit to Midmark, be certain that an RMA number has been issued and that all guidelines
regarding this authorization are followed. We highly recommend following all guidelines for the shipment of
medical products set forth by the shipping company you choose to use. If a question should arise regarding
the appropriate method of shipment, please feel free to ask when calling for your RMA number. It is the
responsibility of the customer when shipping a product to ensure that all packages and their contents get to
Midmark safely. Midmark will not assume responsibility for damage due to improper packaging, shipment or
product use. Such actions will void all applicable warranties
Midmark Corporation
690 Knox Street, Suite 100
Torrance, California 90502
Tel: (310) 516-6050
USA: (800) 624-8950, option 2
Fax:(310) 516-6517
Page 99

99
©Midmark Corporation 2014
VIII. Contact Information
Midmark Corporation
690 Knox Street, Suite 100
Torrance, California 90502
Phone: (310) 516-6050
USA: (800) 624-8950, option 2
Fax: (310) 516-6517
Email: techsupport@midmark.com
Website: midmark.com
Knowledge base: kb.midmark.com
 Loading...