

Midmark Barrier-Free 626, Barrier-Free 626-003, Barrier-Free 626-004, Barrier-Free 626-005, Barrier-Free 626 -006 User Manual
Page 1

Barrier-Free
®
Exam Chair
w/ IQscale® and Vital Signs Connections
User Guide
TP202 20-42-FO-00014 Rev A2 C2169
Style P
003-10027-99 Rev. AA5 (12/10/18)
English
Español
Français
For Models:
626 (-003, -004, -005, -006)
Page 2
English - 2
003-10027-99 © Midmark Corporation 2017
TP202 20-42-FO-00014 Rev A1 C2169
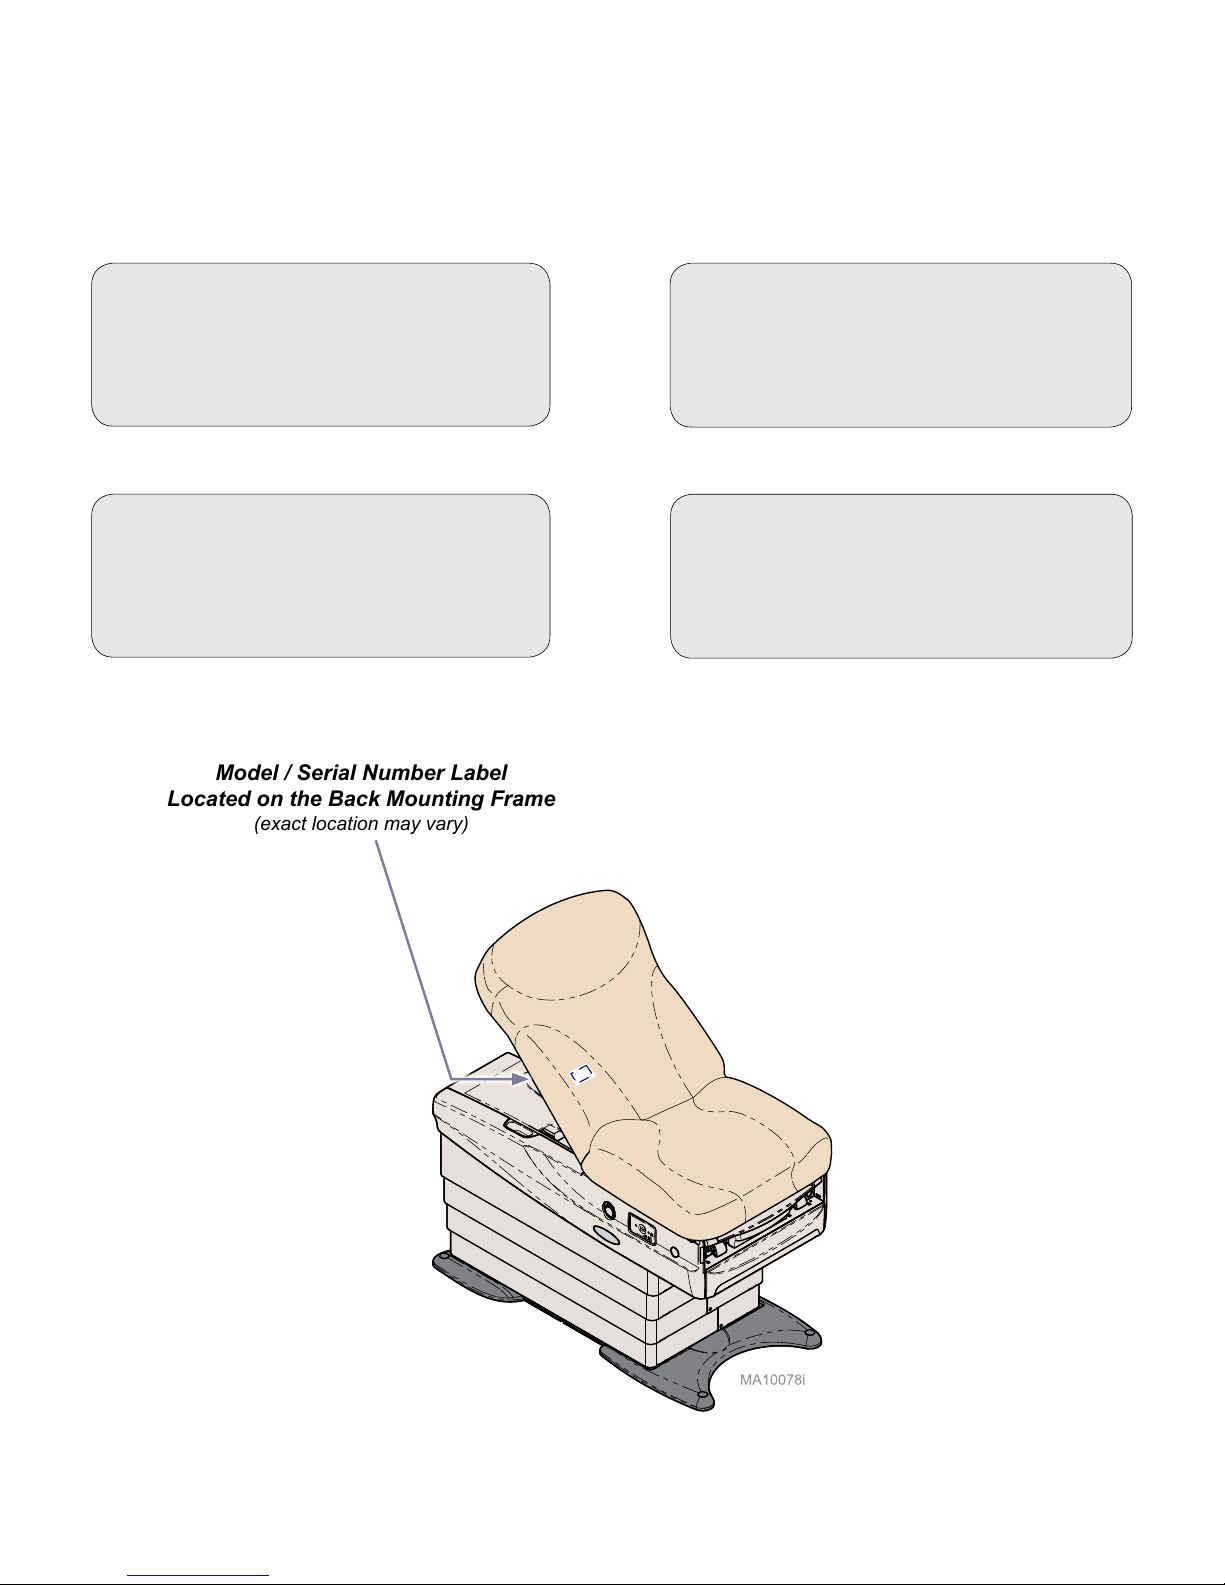
Model / Serial Number:
Date of Purchase:
Midmark Authorized Service
Company:
Dealer:
Product Information
Model / Serial Number Label
Located on the Back Mounting Frame
(exact location may vary)
Page 3

English - 3
003-10027-99 © Midmark Corporation 2017
TP202 20-42-FO-00014 Rev A1 C2169
Table of Contents
Important Information
Safety Symbols ........................................................................................................................4
Product Registration ................................................................................................................5
Transportation / Storage Conditions .........................................................................................5
Operating Conditions ...............................................................................................................5
Disposal of Equipment .............................................................................................................5
Compliance Information ...........................................................................................................6
Intended Use ............................................................................................................................7
Electrical Requirements ...........................................................................................................7
Electromagnetic Interference ...................................................................................................7
Digital Scale Accuracy .............................................................................................................. 8
Safety Instructions ....................................................................................................................9
Operation
IQscale® Functions ................................................................................................................. 11
Active Sensing TechnologyTM .................................................................................................17
Base / Back Functions ...........................................................................................................18
Programmable ’Home’ Function .............................................................................................19
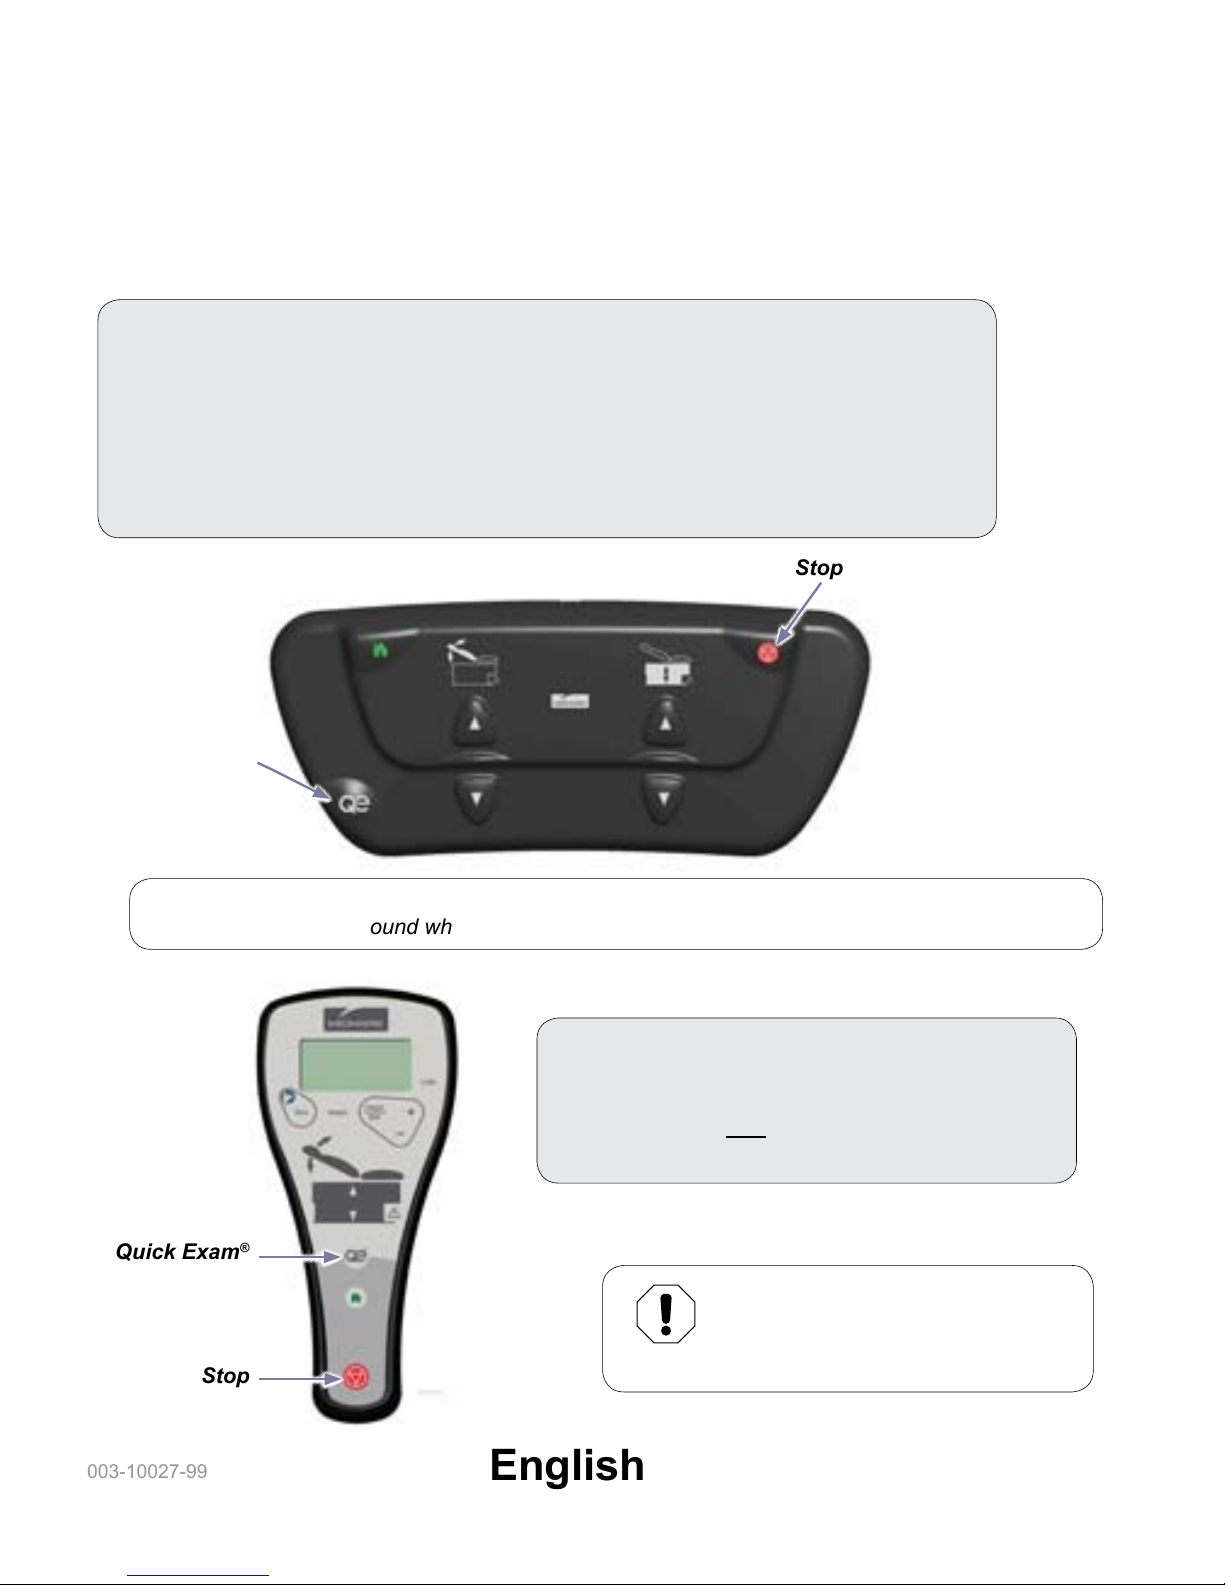
Quick Exam® Function ............................................................................................................20
Control Lockout ......................................................................................................................21
Association Procedure ...........................................................................................................22
Paper Roll & Tear Strap .........................................................................................................23
Stirrups ...................................................................................................................................24
Footrest & Treatment Pan ......................................................................................................25
Drawer Heater ........................................................................................................................26
Upholstery Heater (-004 /-006) ..............................................................................................27
Pelvic Tilt ................................................................................................................................28
Simplex Receptacles ..............................................................................................................29
Data Connections ...................................................................................................................30
Clean Assist™ Roller System ...............................................................................................33
Maintenance
Calling for Service ..................................................................................................................34
Cleaning .................................................................................................................................34
Preventative Maintenance ......................................................................................................34
Troubleshooting ......................................................................................................................35
Specications
Specications Chart ...............................................................................................................36
Model Identication / Compliance Chart ................................................................................37
Range of Motion ....................................................................................................................38
Dimensions ............................................................................................................................39
Warranty Information
Limited Warranty ....................................................................................................................40
Page 4
English - 4
003-10027-99 © Midmark Corporation 2017
TP202 20-42-FO-00014 Rev A1 C2169
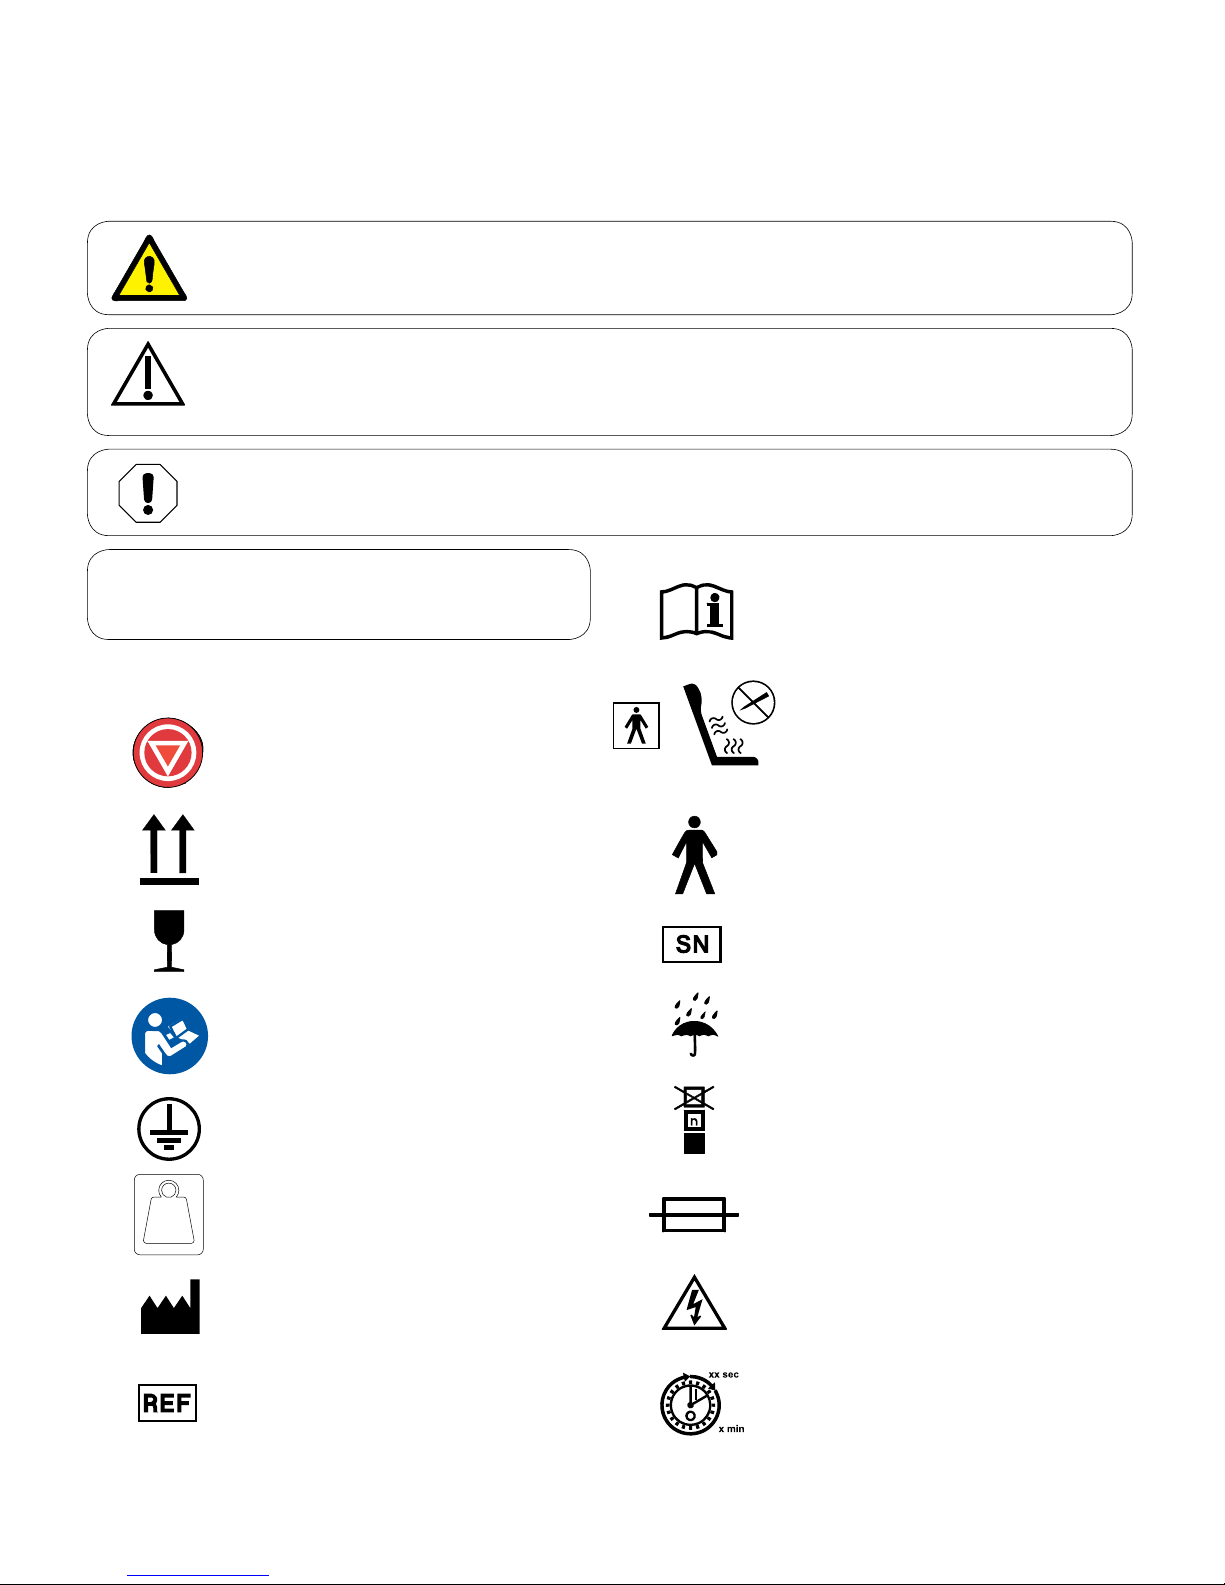
Catalogue Number
Manufacturer
Serial Number
Stop
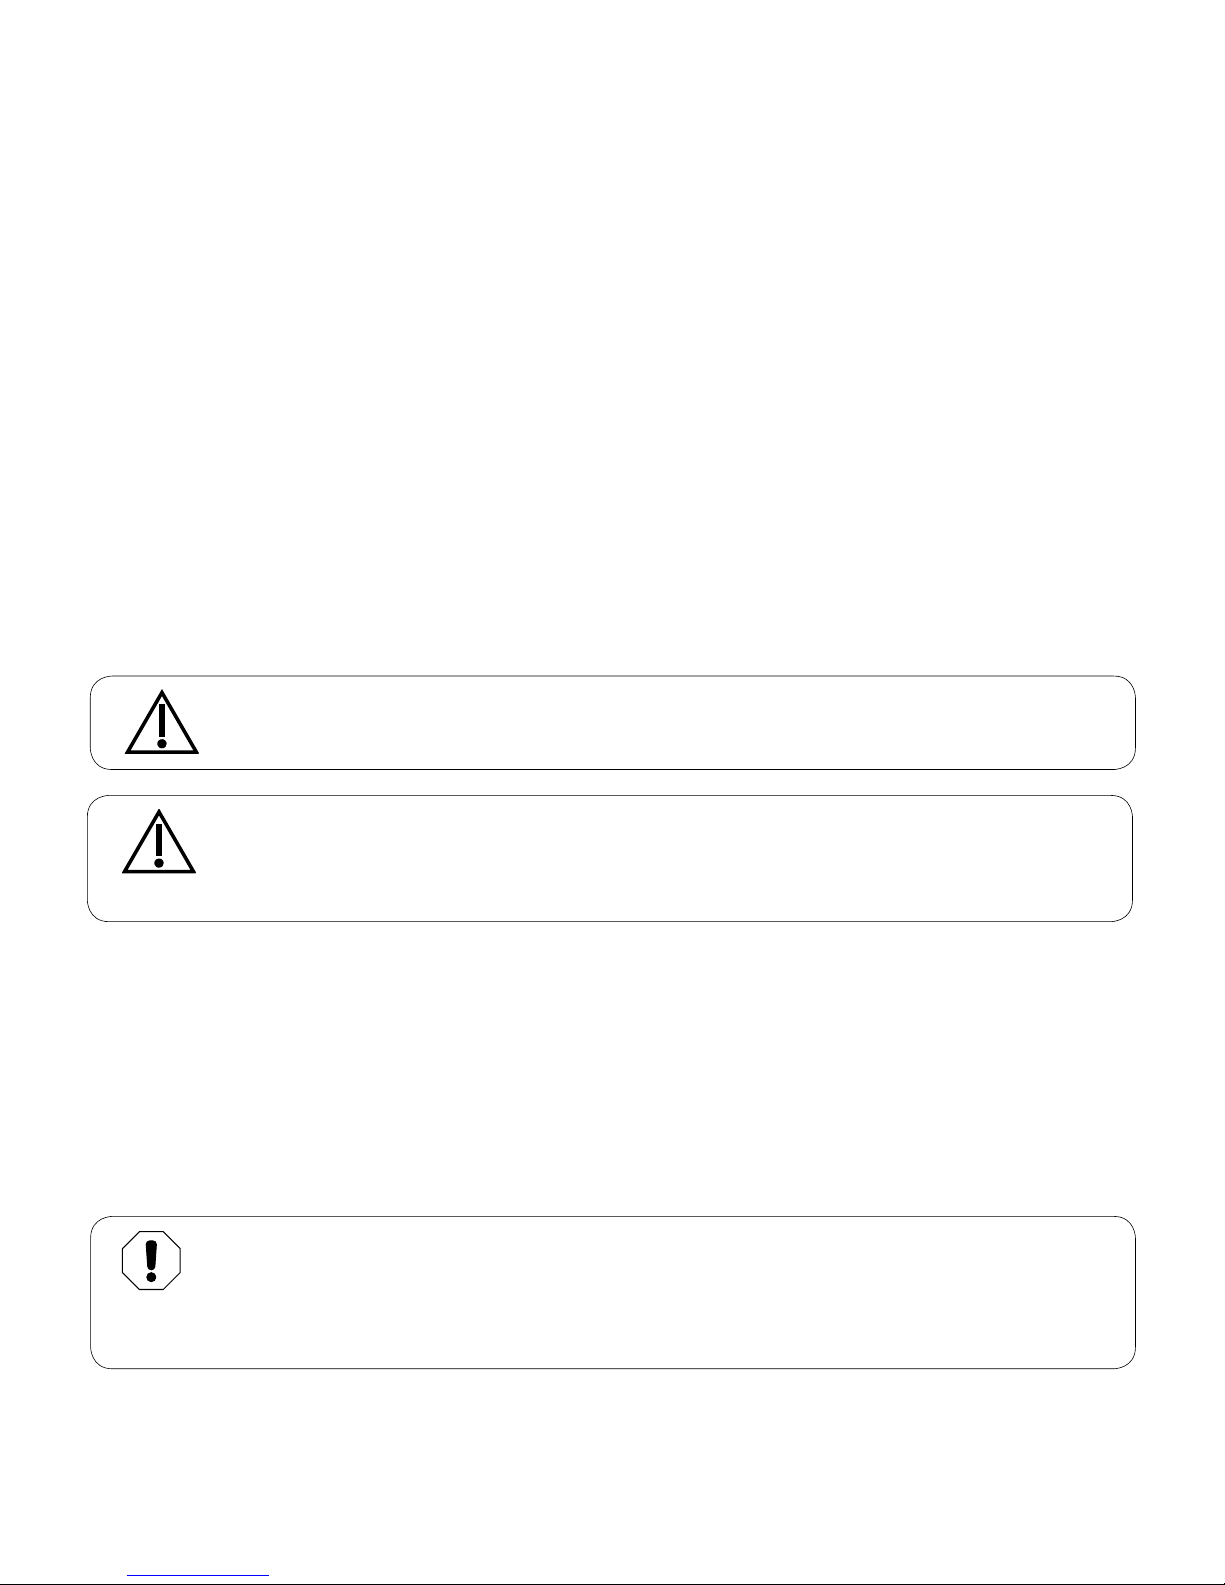
WARNING
Indicates a potentially hazardous situation which could result in serious injury.
Important Information - Safety Symbols
Caution
Indicates a potentially hazardous situation which may result in minor or moderate injury.
It may also be used to alert against unsafe practices
Equipment Alert
Indicates a situation which could result in equipment damage.
Protective earth ground
Proper shipping orientation
Fragile
Type B, Applied Part
(Standard Upholstery)
Patient Weight Limit
xxx kg
xxx lbs
Fuse rating specication
Dangerous voltage / shock hazard
Maximum stacking height
(palletted units)
Keep dry
Duty Cycle (motor run time)
30 seconds ON, 5 minutes OFF
Note
Amplifies a procedure, practice, or condition.
Refer to manual
Symbol Glossary
The heated upholstery is a
Type BF, Applied Part.
Do not penetrate upholstery
with sharp objects, such as
needles, knives, etc.
Operating Instructions
Page 5

English - 5
003-10027-99 © Midmark Corporation 2017
TP202 20-42-FO-00014 Rev A1 C2169
Transportation / Storage Conditions
Ambient Temperature Range: .....................................-30°C to +60°C (-22°F to +140°F)
Relative Humidity........................................................10% to 90% (non-condensing)
Disposal of Equipment
At the end of product life, the chair, accessories, and other consumable goods may have become
contaminated due to normal medical use. Consult local codes and ordinances for proper disposal
of equipment, accessories and other consumable goods.
Operating Conditions
Ambient Temperature Range: .....................................+10°C to +40°C (+50°F to +104°F)
Relative Humidity........................................................30% to 75% (non-condensing)
Altitude........................................................................3000m or less
Product Registration
To register your product, go to www.midmark.com
Page 6

English - 6
003-10027-99 © Midmark Corporation 2017
TP202 20-42-FO-00014 Rev A1 C2169
Compliance Information
FCC Compliance Statement
This equipment has been tested and found to comply with the limits for a class A digital device, pursuant to
part 15 of the FCC rules. These limits are designed to provide reasonable protection against harmful
interference when the equipment is operated in a commercial environment. This equipment generates, uses,
and can radiate radio frequency energy and, if not installed and used in accordance with the instruction
manual, may cause harmful interference to radio communications. Operation of this equipment in a
residential area is likely to cause harmful interference in which case the user will be required to correct
the interference at their own expense.
Any modications to this product may violate the rules of the Federal Communications Commission and
make operation of the product unlawful.
IC Compliance Statement
Interference
“This device complies with Industry Canada license-exempt RSS standard(s). Operation is subject to the
following two conditions: (1) this device may not cause interference, and (2) this device must accept any
interference, including interference that may cause undesired operation of the device.”
“Le présent appareil est conforme aux CNR ďIndustrie Canada applicables aux appareils radio exempts
de licence. Ľexploitation est autorisée aux deux conditions suivantes: (1) ľappareil ne doit pas produire
de brouillage, et (2) ľutilisateur de ľappareil doit accepter tout brouillage radioélectrique subi, même si le
brouillage est susceptible ďen compromettre le fonctionnement.”
Antennas
“Under Industry Canada regulations, this radio transmitter may only operate using an antenna of a type and
maximum (or lesser) gain approved for the transmitter by Industry Canada. To reduce potential radio
interference to other users, the antenna type and its gain should be so chosen that the equivalent
isotropically radiated power (e.i.r.p.) is not more than that necessary for successful communication.”
“Conformément à la réglementation ďIndustrie Canada, le présent émetteur radio peut fonctionner avec une
antenne ďun type et ďun gain maximal (ou inférieur) approuvé pour ľémetteur par Industrie Canada. Dans le
but de réduire les risques de brouillage radioélectrique à ľintention des autres utilisateurs, il faut choisir le
type ďantenne et son gain de sorte que la puissance isotrope rayonnée équivalente (p.i.r.e.) ne dépasse pas
ľintensité nécessaire à ľétablissement ďune communication satisfaisante.”
Page 7
English - 7
003-10027-99 © Midmark Corporation 2017
TP202 20-42-FO-00014 Rev A1 C2169
Intended Use
The examination chair is intended to be used as a chair / table to provide positioning and support of patients
during general examination procedures conducted by medical professionals.
With the addition of the integrated digital scale, the examination chair is additionally intended to be used for
regular monitoring to assess patient weight change, as well as measuring patient weight to assist medical
diagnosis. The integrated digital scale is not intended to be used for patients that weigh less than 30 pounds
(13.6 kilograms) or more than 650 pounds (295 kilograms).
Electrical Requirements
Caution
To completely isolate the chair from electrical mains supply, power cord must be unplugged.
Before connecting the Midmark device power cord into an electrical power source outlet, it is recommended
to contact a local licensed electrician or a local Authority Having Jurisdiction over the internal building power
distribution to verify that the device when powered up will comply with all local electrical codes. Use the
electrical power rating marked on the device when determining the appropriate electrical branch circuit and
outlet requirements. For 115V rated device models with a current rating at or above 12 Amps, a dedicated
branch circuit may be required if the branch circuit protection is provided by a 15 Amp breaker.
Electromagnetic Interference
This product is designed and built to minimize electromagnetic interference with other devices. However, if
interference is noticed between another device and this product:
• Remove interfering device from room
• Plug chair into isolated circuit
• Increase separation between chair and interfering device
• Contact Midmark if interference persists
Equipment Alert
Portable RF communications equipment (including peripherals such as antenna cables and
external antennas) should be used no closer than 30 cm (12 inches) to any part of the
Exam Chair including cables specified by the manufacturer. Otherwise, degradation of the
performance of this equipment could result.
Caution
Prior to use of high frequency surgical devices or endocardial catheters, consult the operating
instructions for those devices. Failure to comply may result in electric shock or burns to the
patient.
Page 8

English - 8
003-10027-99 © Midmark Corporation 2017
TP202 20-42-FO-00014 Rev A1 C2169
Immunity Test Immunity Test Level
Electrostatic Discharge ± 8 kV Contact, ±15 kV Air
Radiated RF EM Fields 3V/m
80MHz-2.7 GHz 80% AM at 1kHz
Rated Power Frequency Magnetic Fields 30 A/m
Electrical Fast Transients ±2 kV at 100kHz repetition frequency
Surges Line to Line: ±1 kV
Line to Ground: ±2 kV
Conducted RF 3V: 0.15MHz -80MHz
6V in ISM Bands between 0.15MHz - 80MHz
80% AM at 1kHz
Voltage Dips 0 % UT; 0,5 cycle
At 0°, 45°, 90°, 135°, 180°, 225°, 270° and 315°
0 % UT; 1 cycle
and
70 % UT; 25/30 cycles
Single phase: at 0°
Voltage Interruptions 0 % UT; 250/300 cycle
Note
The emissions characteristics of this equipment make it suitable for use in industrial areas and
hospitals. The exam chair is not intended to be used in a residential environment.
EMC - Manufacturer’s Declaration and Guidance
Radiated Test Radiated Test Level
Conducted and Radiated RF Emissions CISPR 11 Group 1 Class A
Digital Scale Accuracy
Equipment Alert
Before using the digital scale, verify the scale is measuring accurately using a reference
weight of known value. In addition, refer to the Preventive Maintenance Schedule for the
recommended frequency of this check. If the scale is determined to be out of calibration,
contact your authorized Midmark service provider before using the scale.
Caution
For models with a wired hand control, placing tension on the hand control cord
can have an effect on the scale accuracy.
Page 9
English - 9
003-10027-99 © Midmark Corporation 2017
TP202 20-42-FO-00014 Rev A1 C2169
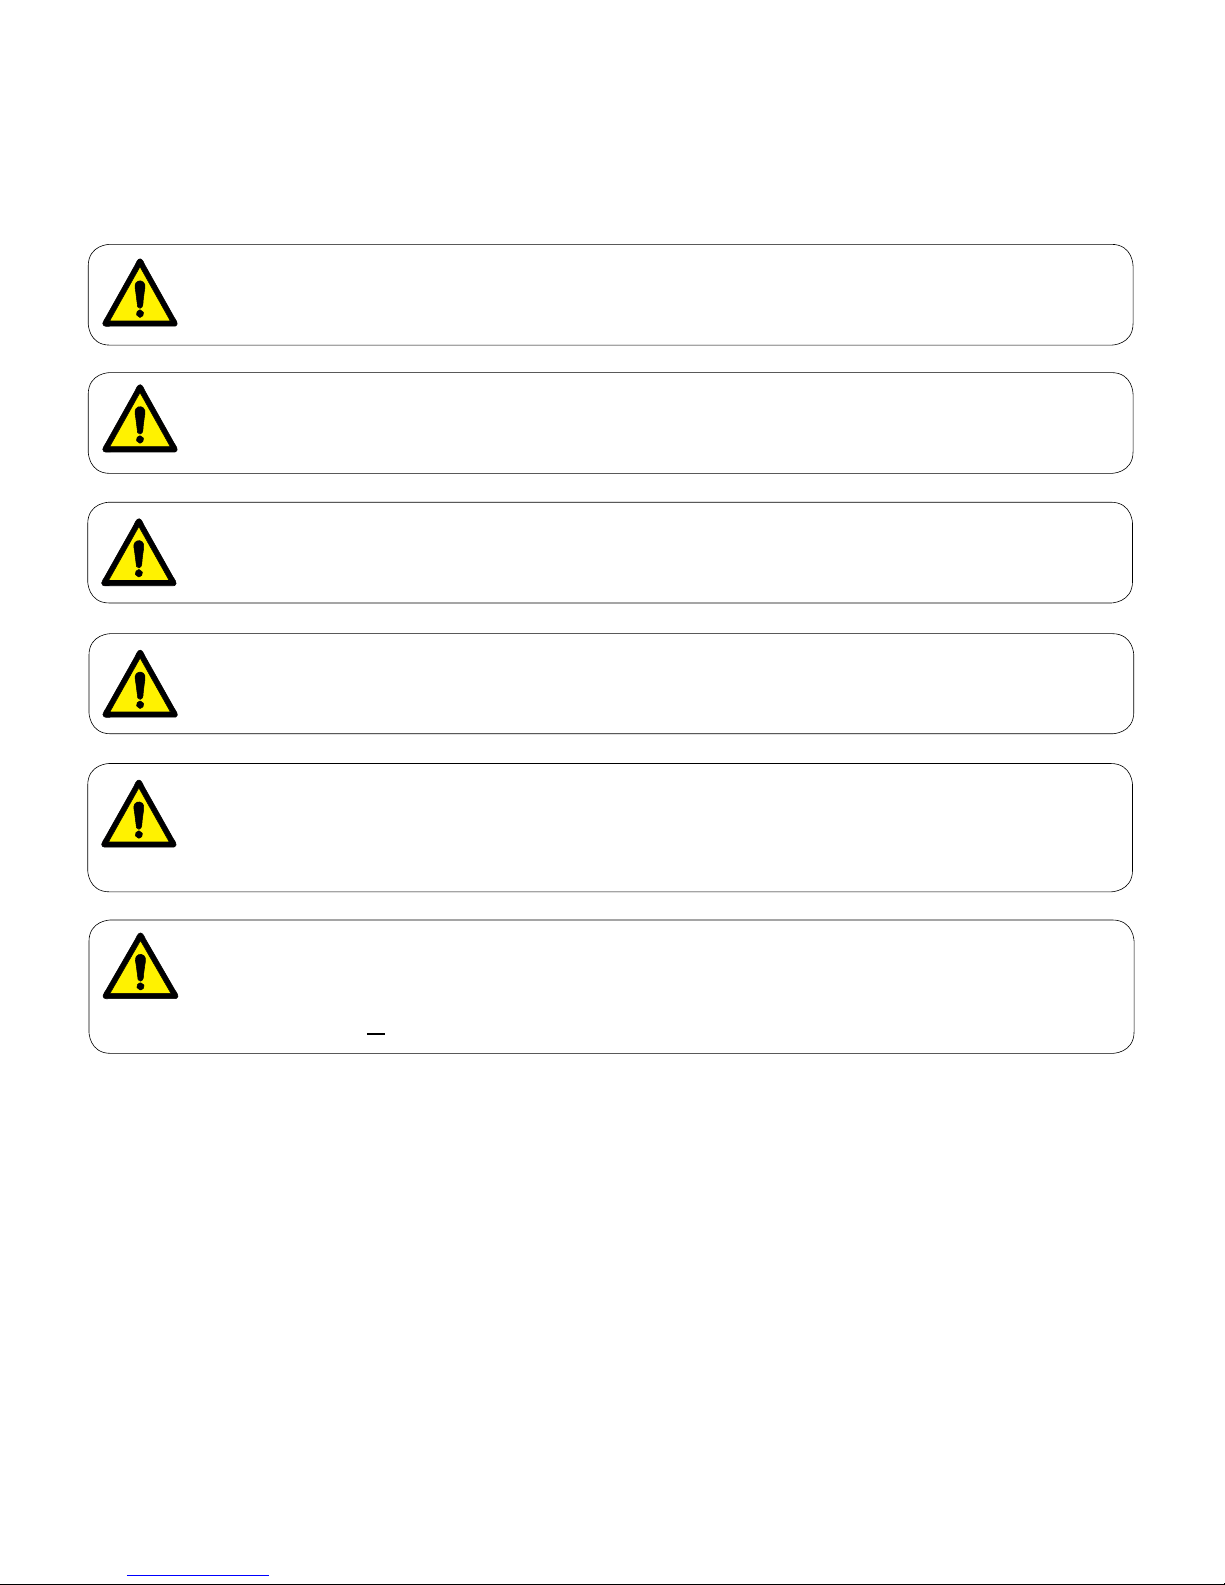
WARNING
Equipment is not suitable for use in the presence of a flammable anesthetic mixture.
Clarification: Equipment is suitable for use in the presence of oxygen, air, or nitrous oxide.
Safety Instructions
Warning
No modification of this equipment is allowed.
Warning
Connecting equipment to the multiple socket outlet effectively leads to creating a Medical
Electrical System and the result can be a reduced level of safety.
Warning
To avoid a fire hazard or risk of electric shock, this equipment must only be connected to a
supply mains with protective earth ground.
Warning
Use of accessories, transducers and cables other than those specified or provided by the
manufacturer of this equipment could result in increased electromagnetic emissions or
decreased electromagnetic immunity of this equipment and result in improper operation.
Warning
Ensure that the surrounding area is clear of obstructions prior to each use. Otherwise improper
operation and serious injury could occur.
Page 10

English - 10
003-10027-99 © Midmark Corporation 2017
TP202 20-42-FO-00014 Rev A1 C2169
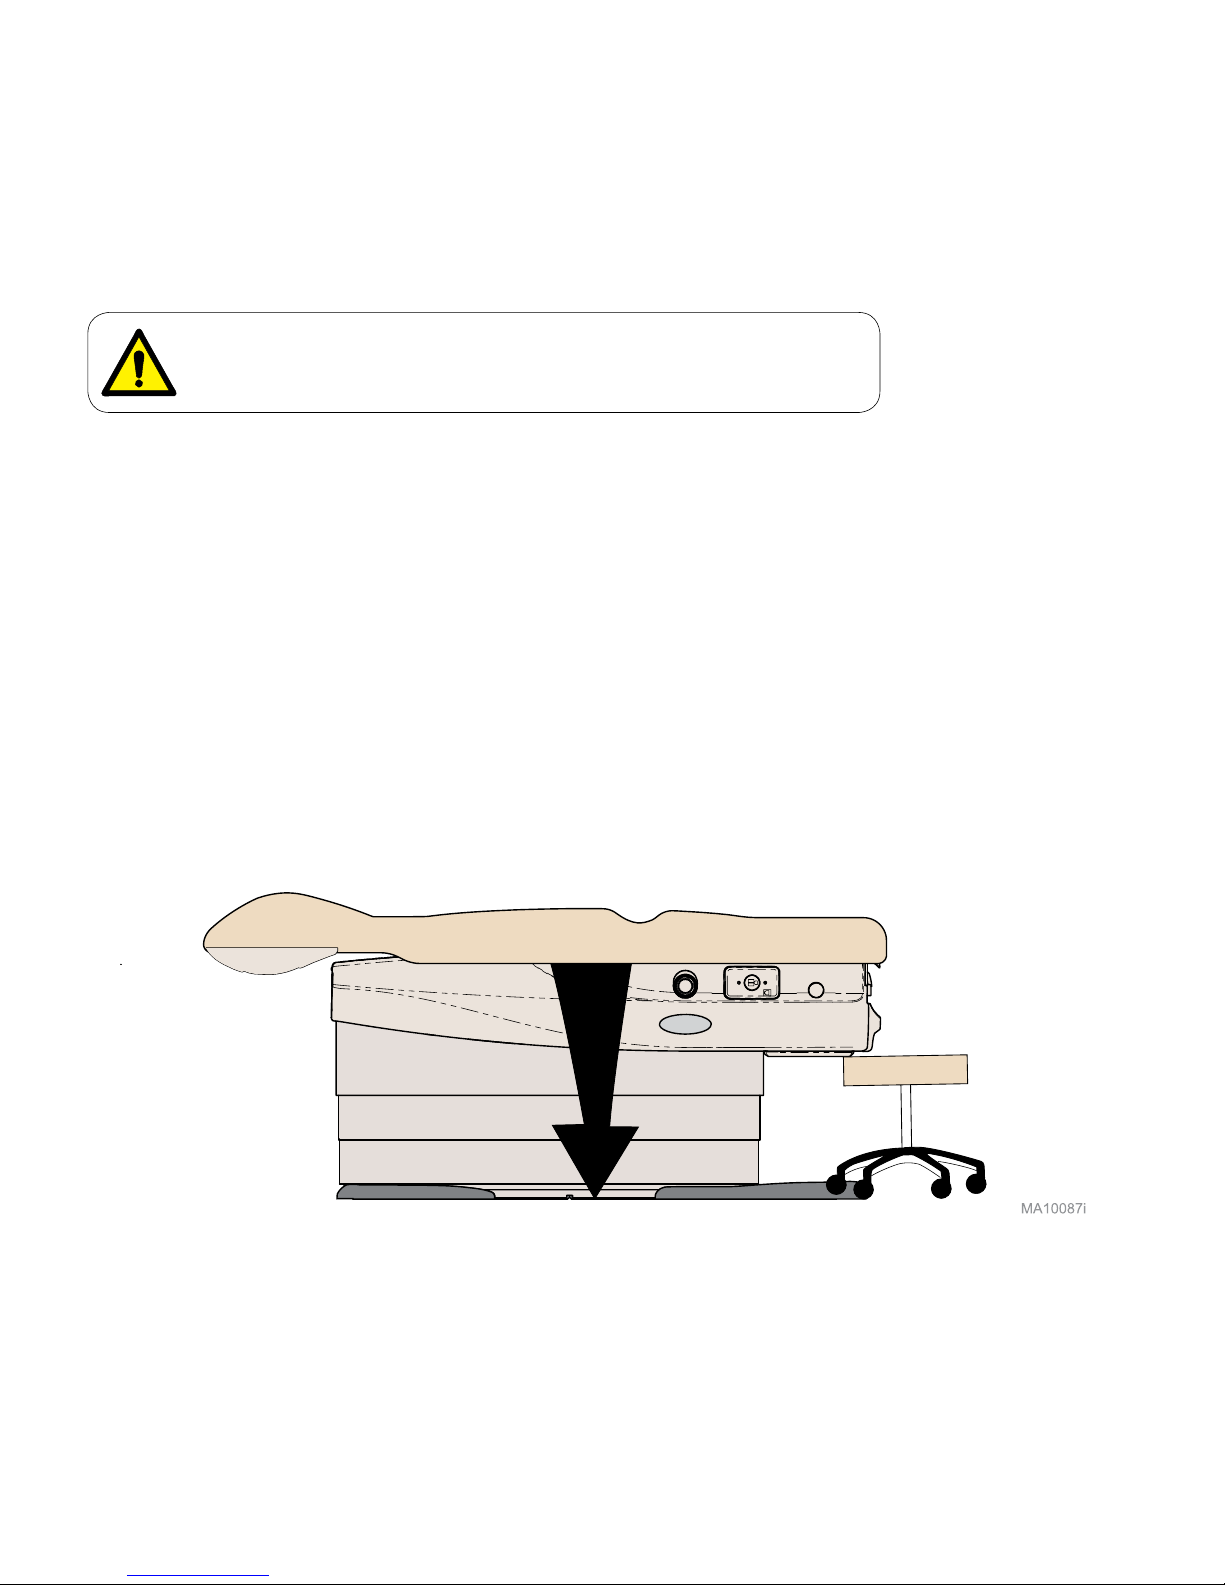
At the chair’s lowest height [14.6 in. (37 cm)] w/ compressed foam, the clearance between
the bottom of the drawer and the oor is approximately 0.37 in. (0.94x cm). Make sure
patient (esp. feet) and all objects are clear of this area before lowering chair.
If the chair malfunctions, immediately release controller, unplug the chair power cord,
and assist the patient from the chair. If chair continues to malfunction, call for service.
Failure to comply with these instructions may result in injury to patient and/or damage to
equipment.
Safety Instructions - continued
Clearance
Approx. 0.37 in. (0.94 cm)
Warning
Be sure that all personnel and equipment are clear of the chair before
activating any function. Failure to do so could result in personal injury.
Equipment Alert
Chair must be positioned in normal use such that the power
cords can be easily accessed to unplug.
Page 11
English - 11
003-10027-99 © Midmark Corporation 2017
TP202 20-42-FO-00014 Rev A1 C2169
Operation
IQscale® Functions
Best practice is to always zero the scale prior to weighing the patient. For details, please refer to
the weighing guidelines in this manual.
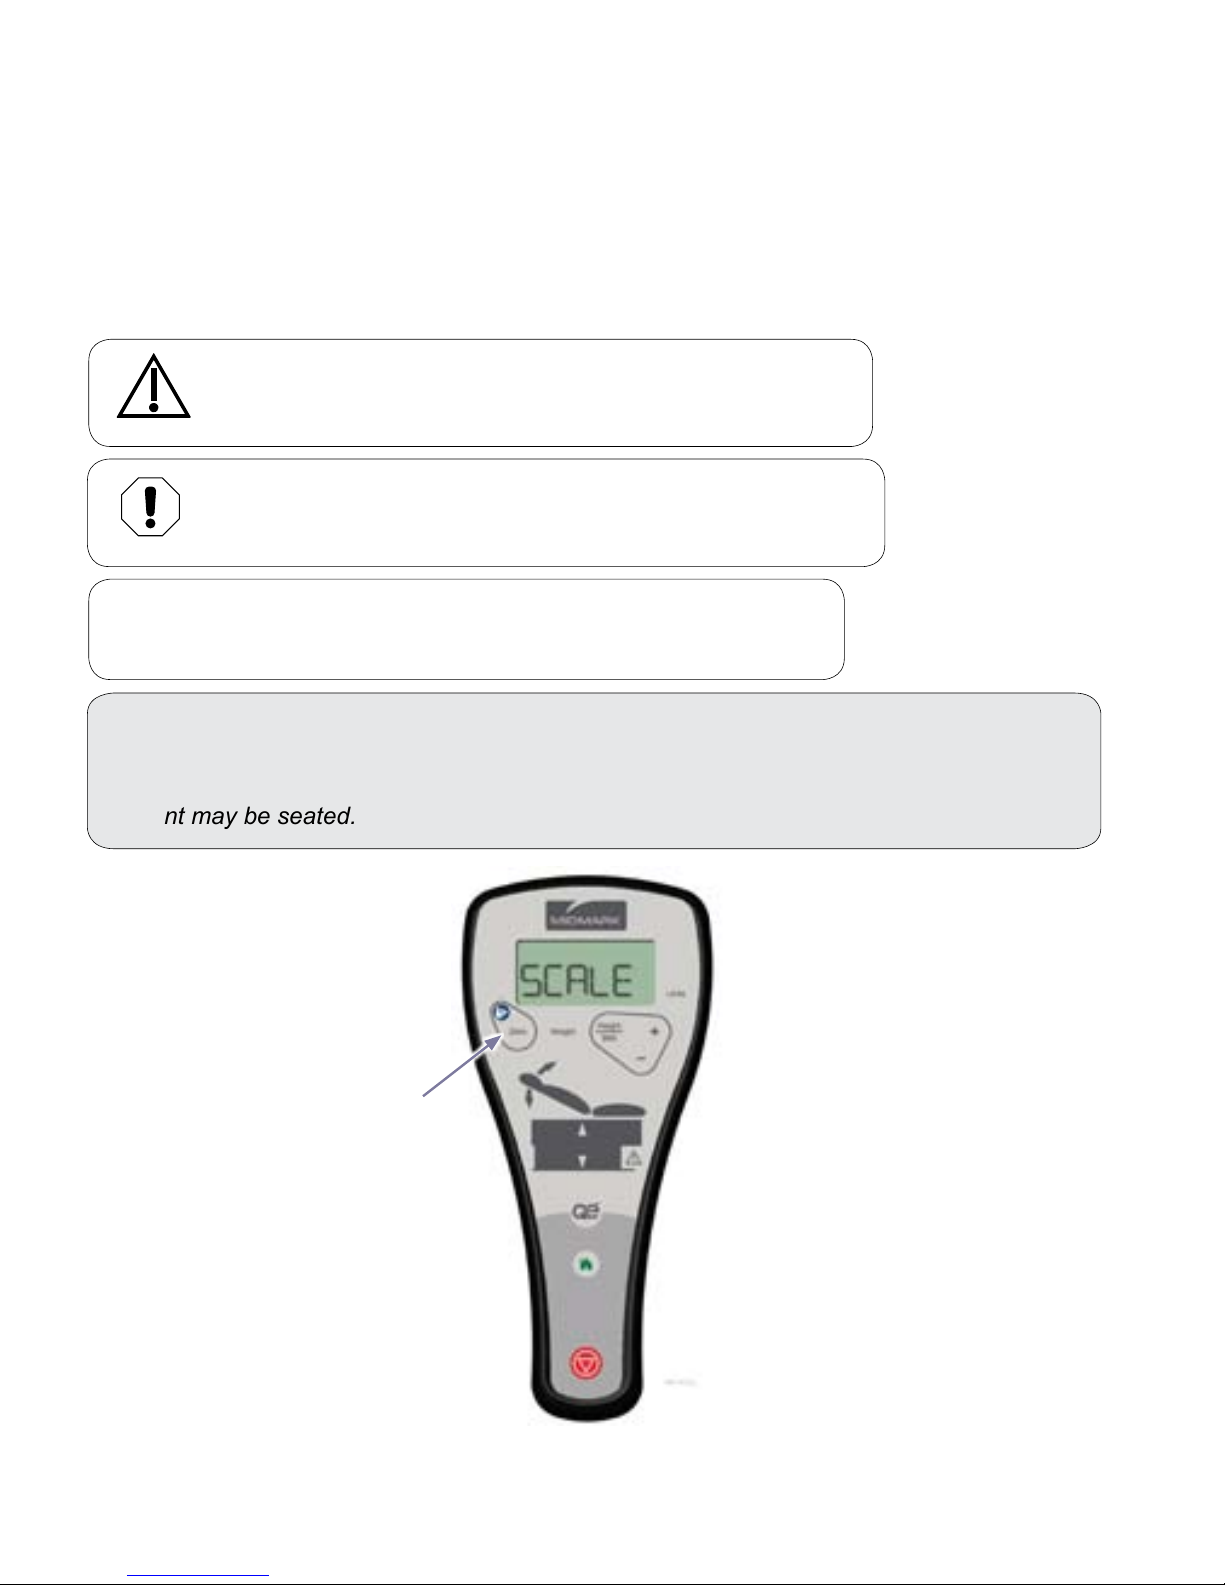
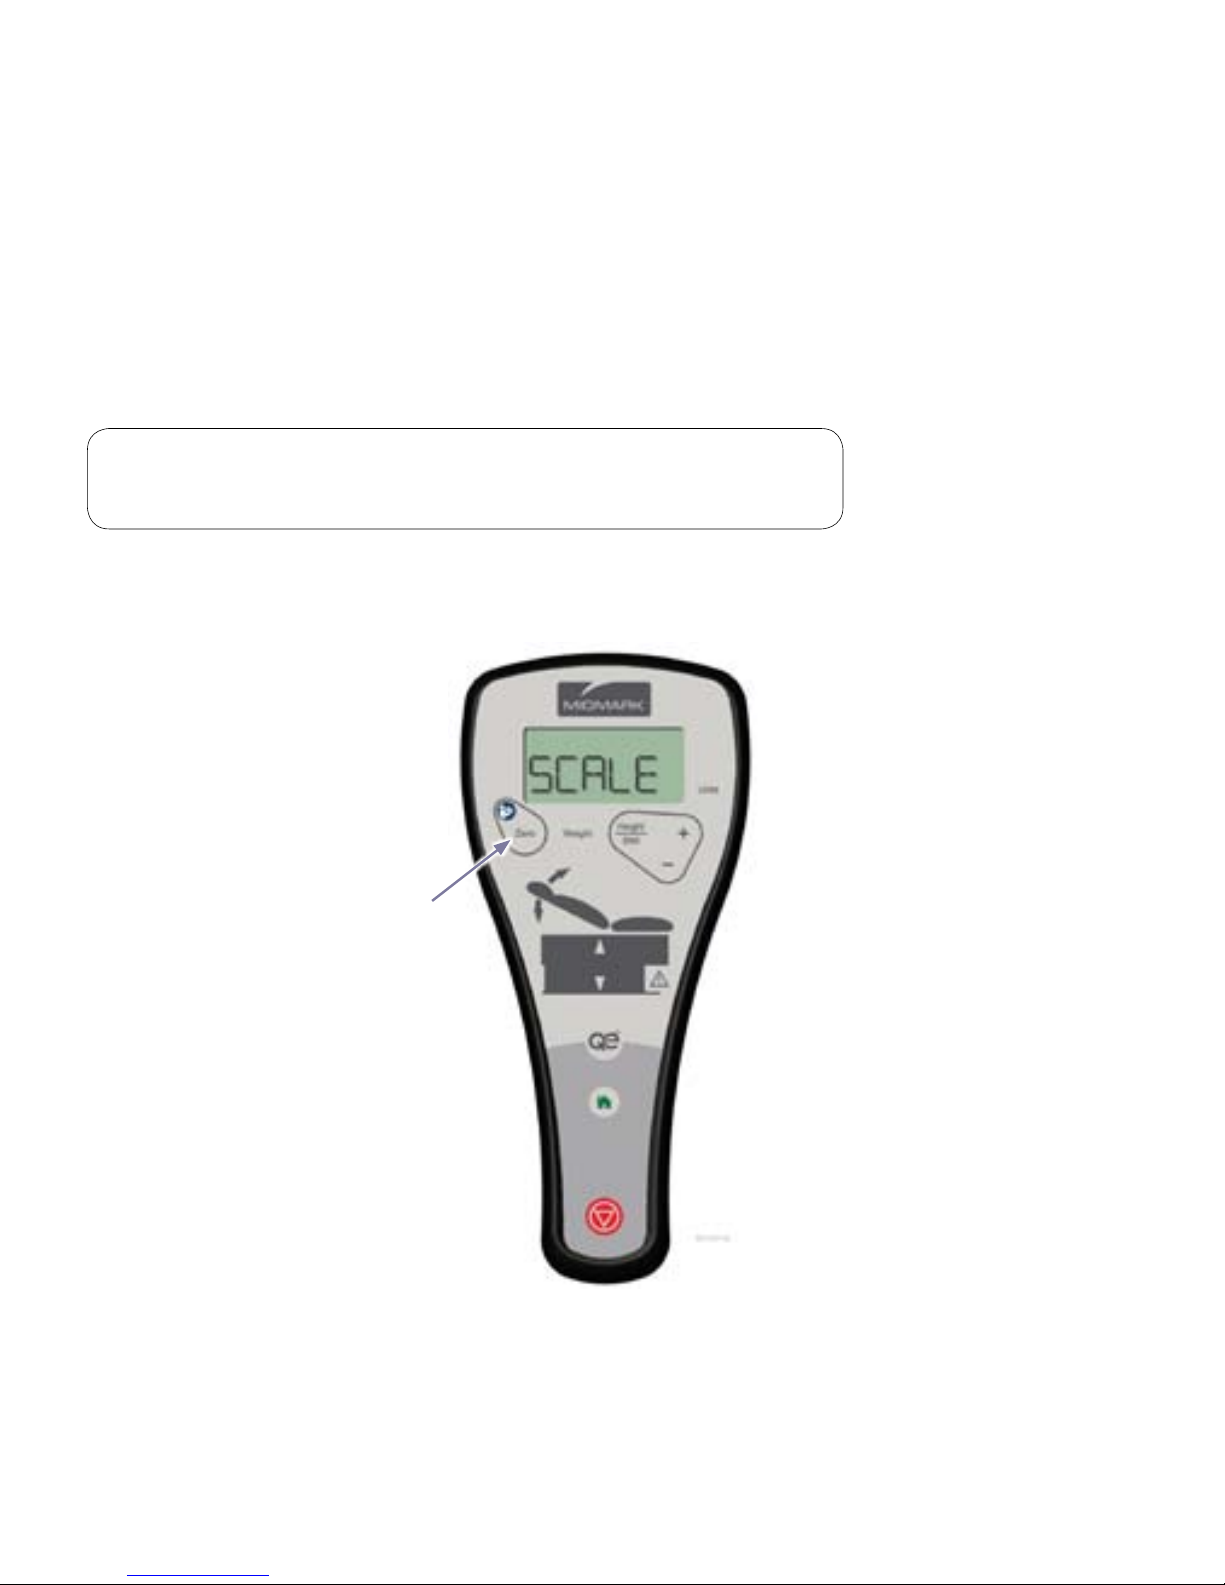
To zero the scale...
Before seating patient, press and release the Zero button. The display scolls “ZEROING”
and then when complete, scrolls “SCALE READY”; the zero operation is complete and the
patient may be seated.
Note
Before seating patient on exam chair, ensure the scale has been zeroed.
Failure to do so may affect the measurement of the patient’s weight.
Zero
Equipment Alert
The integrated digital scale is not intended to be used for patients
that weigh less than 30 lbs (13.6 kg) or more than 650 lbs (295 kg).
Caution
For models with a wired hand control, place hand control in holster
before pressing the Zero button to ensure highest scale accuracy.
Page 12
English - 12
003-10027-99 © Midmark Corporation 2017
TP202 20-42-FO-00014 Rev A1 C2169
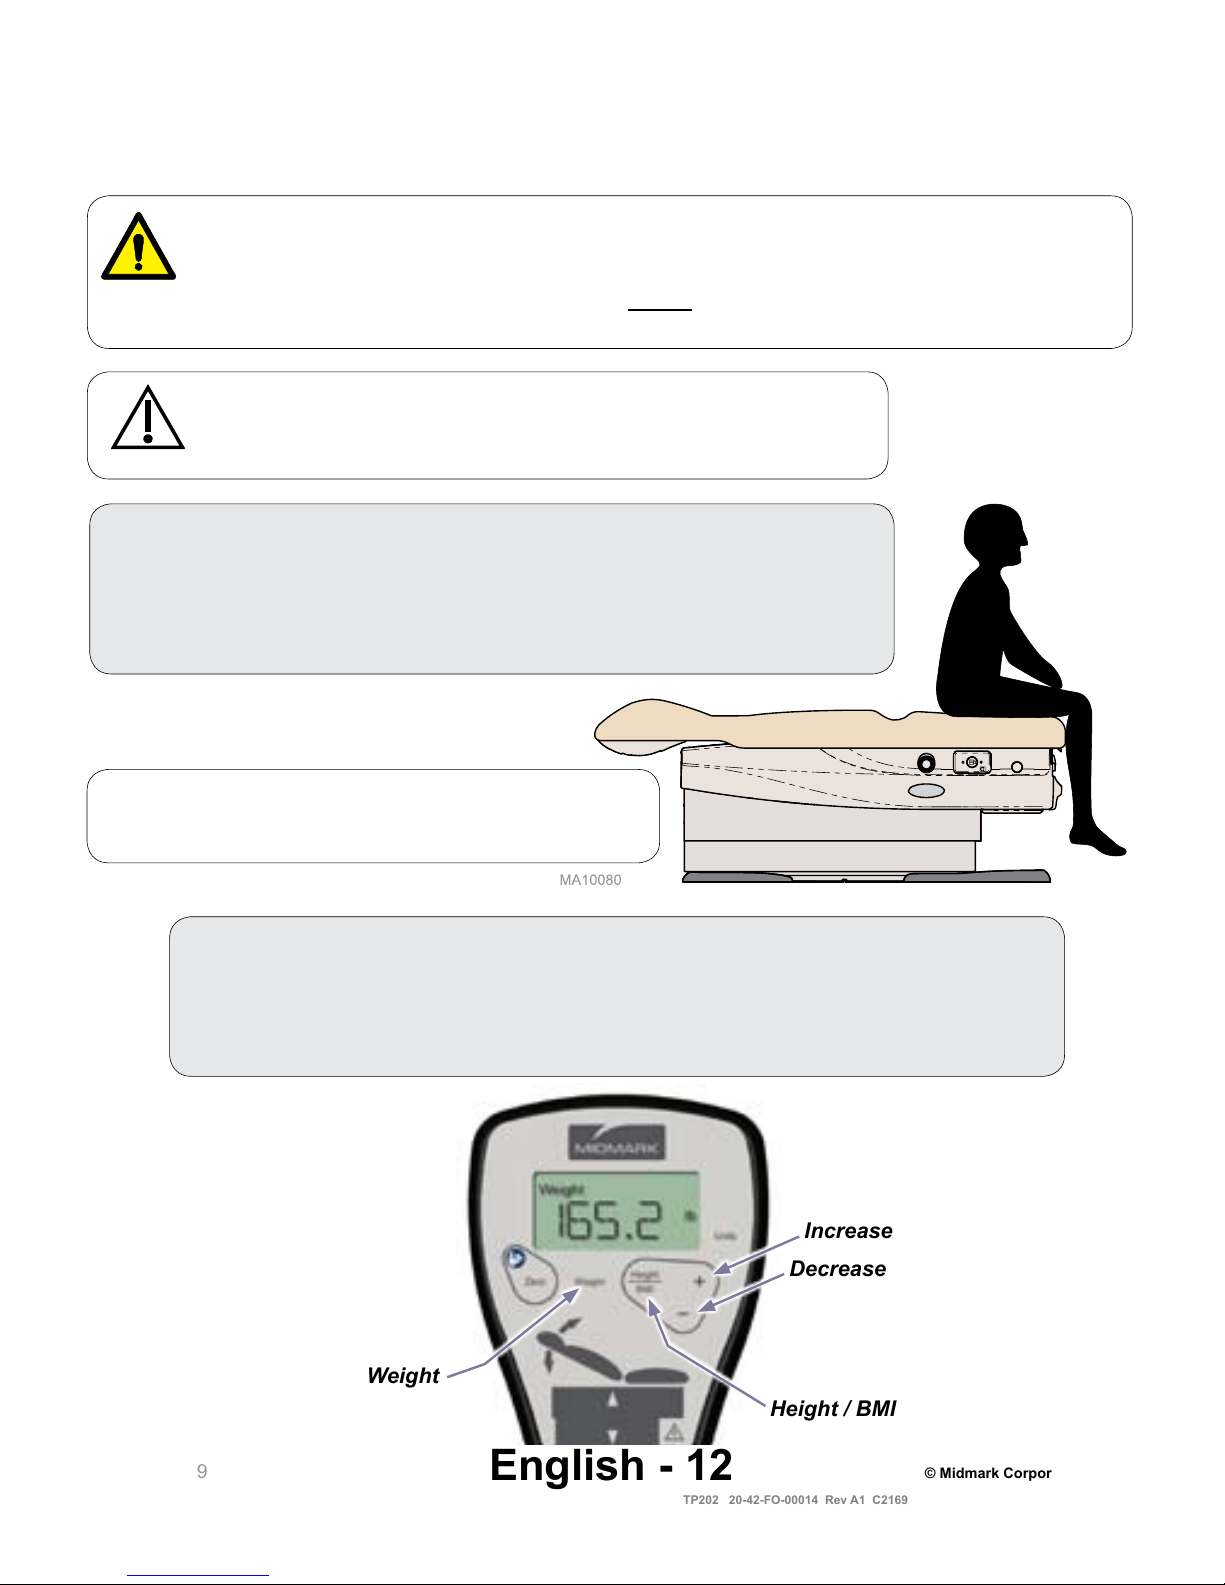
Warning
The scale is intended for use with patients who weigh between 30 and 650 lbs (13.6 / 295 kg).
For weights below 30 lbs (13.6 kg) or above 650 lbs (295 kg), the display will flash the weight
reading to indicate the weight is out of range. Do not use an out of range (flashing) weight
reading for patient measurements.
Weight
Height / BMI
Increase
Decrease
To measure the patient’s weight...
With patient in the seated position, press & release the Weight button.
Note: To prevent the patient’s feet from touching the ground, the chair will automatically
rise to a height of twenty five inches prior to displaying patient weight.
To calculate the patient’s BMI...
a) After patient weight is displayed, press and release the Height / BMI button.
b) Press the (+) or (-) buttons to increase or decrease patient height on display.
c) Press the Height / BMI button again to display patient BMI.
IQscale® Functions - continued
Note
Patient’s weight will be displayed no more than three
seconds after the “weight” button has been pressed.
Caution
For models with a wired hand control, place hand control in holster
before pressing the Weight button to ensure highest scale accuracy.
Page 13
English - 13
003-10027-99 © Midmark Corporation 2017
TP202 20-42-FO-00014 Rev A1 C2169
Auto Zero
Best practice is to always zero the scale prior to weighing the patient. For details, please refer to the
weighing guidelines in this manual.
In addition, at regular intervals the digital scale will zero itself automatically. This auto zero will only be
performed when there is no patient on the exam chair.
Note
Before seating patient on exam chair, ensure the scale has been zeroed.
Failure to do so may affect the measurement of the patient’s weight.
Zero
Page 14

English - 14
003-10027-99 © Midmark Corporation 2017
TP202 20-42-FO-00014 Rev A1 C2169
Units Conguration
The Units key will be used to lock the units (English or Metric), and to unlock the units.
The Units key will behave dierently when the units are locked than when they are unlocked.
If Units are unlocked:
• When the display is blank releasing the Units key will show the current units indicator.
• When the display is showing only the units indicator then releasing the Units key will cause the
Units indicator to toggle between displays showing inch/lb and cm/kg.
• When the display is showing only the units indicator then holding the Units key for 3 seconds will
cause the LCD to scroll the following message ‘UNITS’, ‘LOCKED’, ‘ ’ twice.
• When the display is showing Weight, pressing and releasing the Units key will toggle the units
indicator between lb/kg and display the weight in the new units.
• When the display is showing Height, pressing and releasing the Units key will toggle the units
indicator between in/cm and display the height in the new units.
If Units are locked:
• When the display is blank releasing the Units key will show the current Units indicator.
• When the display is showing only the units indicator then releasing the Units key will do nothing
• When the display is showing only the units indicator then holding the Units key for 3 seconds will
cause the LCD to scroll the following message ‘UNITS’,‘UNLOCKED’, ‘ ’ twice.
• When the display is showing Weight, pressing the Units key will toggle the units indicator between
lb/kg and display the weight in the new units. Releasing the Units key will toggle the units indicator
back to the previous units.
• When the display is showing Height, pressing the Units key will toggle the units indicator between
in/cm and display the height in the new units. Releasing the Units key will toggle the units indicator
back to the previous units.
Page 15
English - 15
003-10027-99 © Midmark Corporation 2017
TP202 20-42-FO-00014 Rev A1 C2169
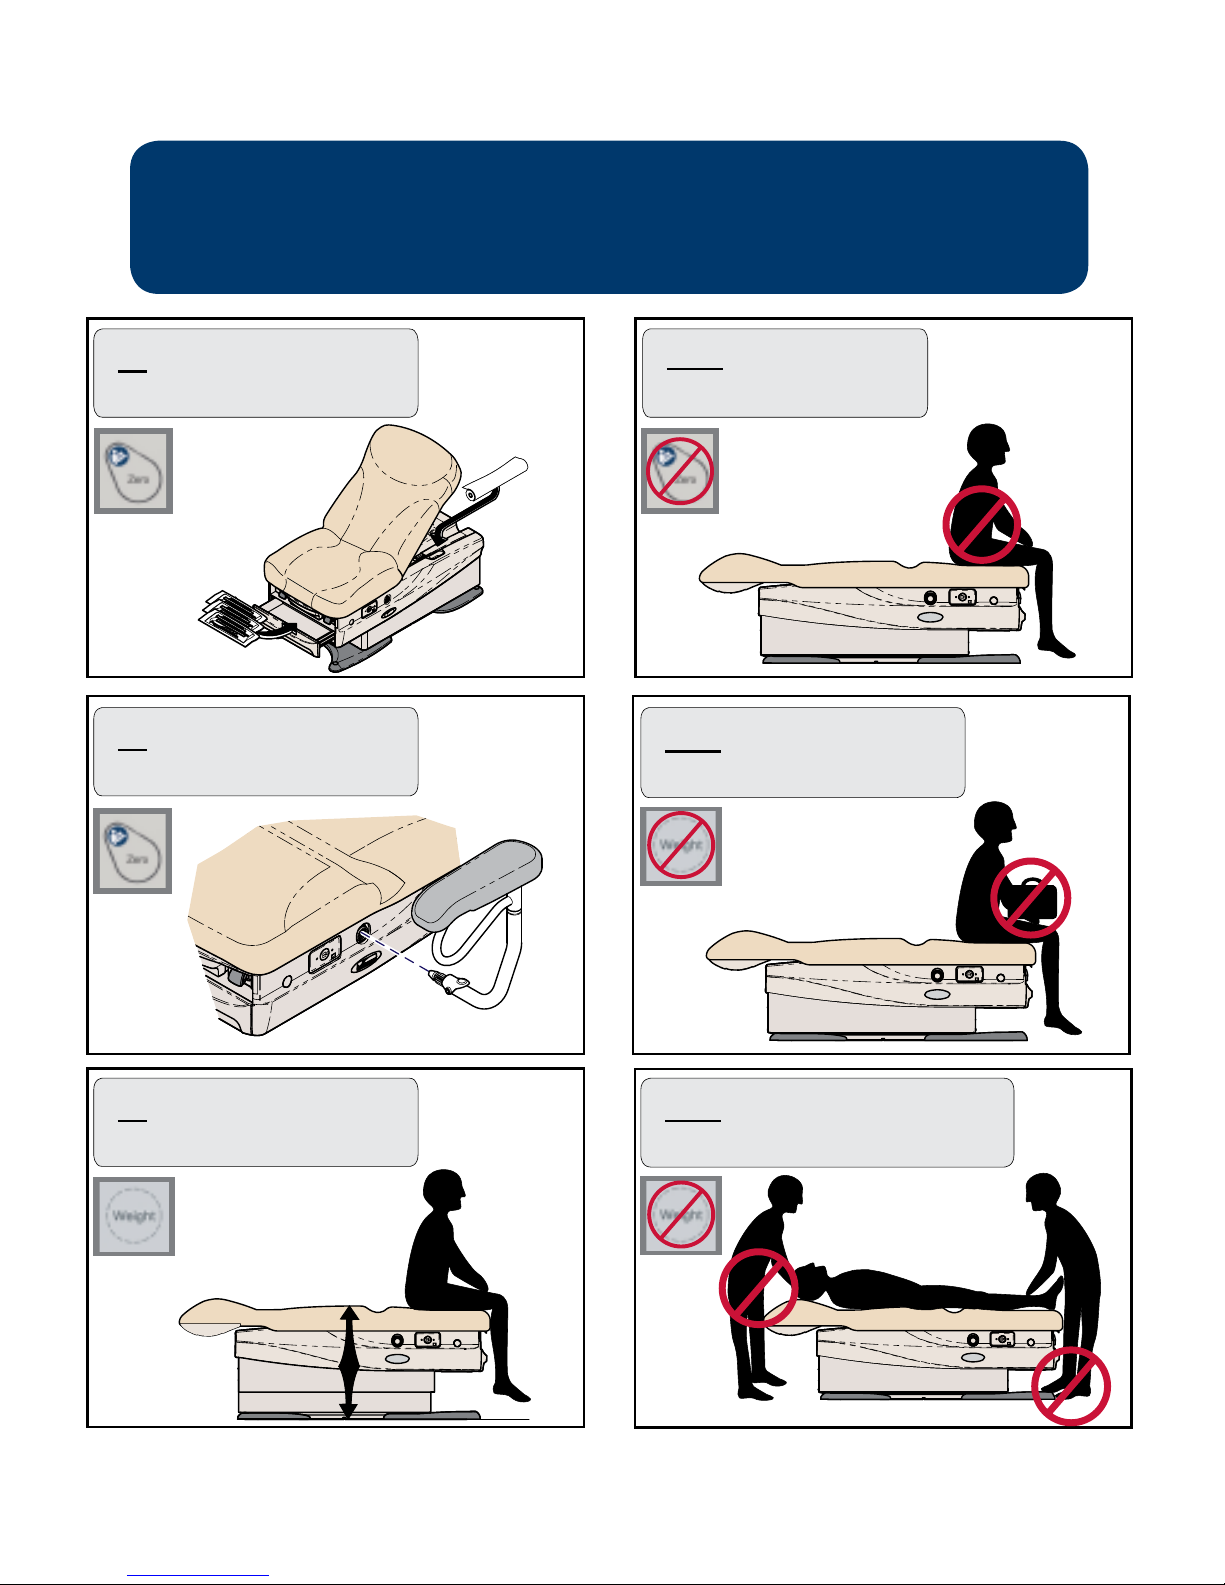
To ensure proper weighing of patients
please review the following guidelines.
Don’t zero the scale while
the patient is on the chair.
Do ensure the patient’s feet are
off the floor during weighing.
Do zero the scale after adding
or removing equipment.
Do zero the scale after adding
or removing supplies.
Don’t lean, step or otherwise apply
load to chair while measuring weight.
Don’t weigh patients holding
items such as purses, coats etc.
Page 16
English - 16
003-10027-99 © Midmark Corporation 2017
TP202 20-42-FO-00014 Rev A1 C2169
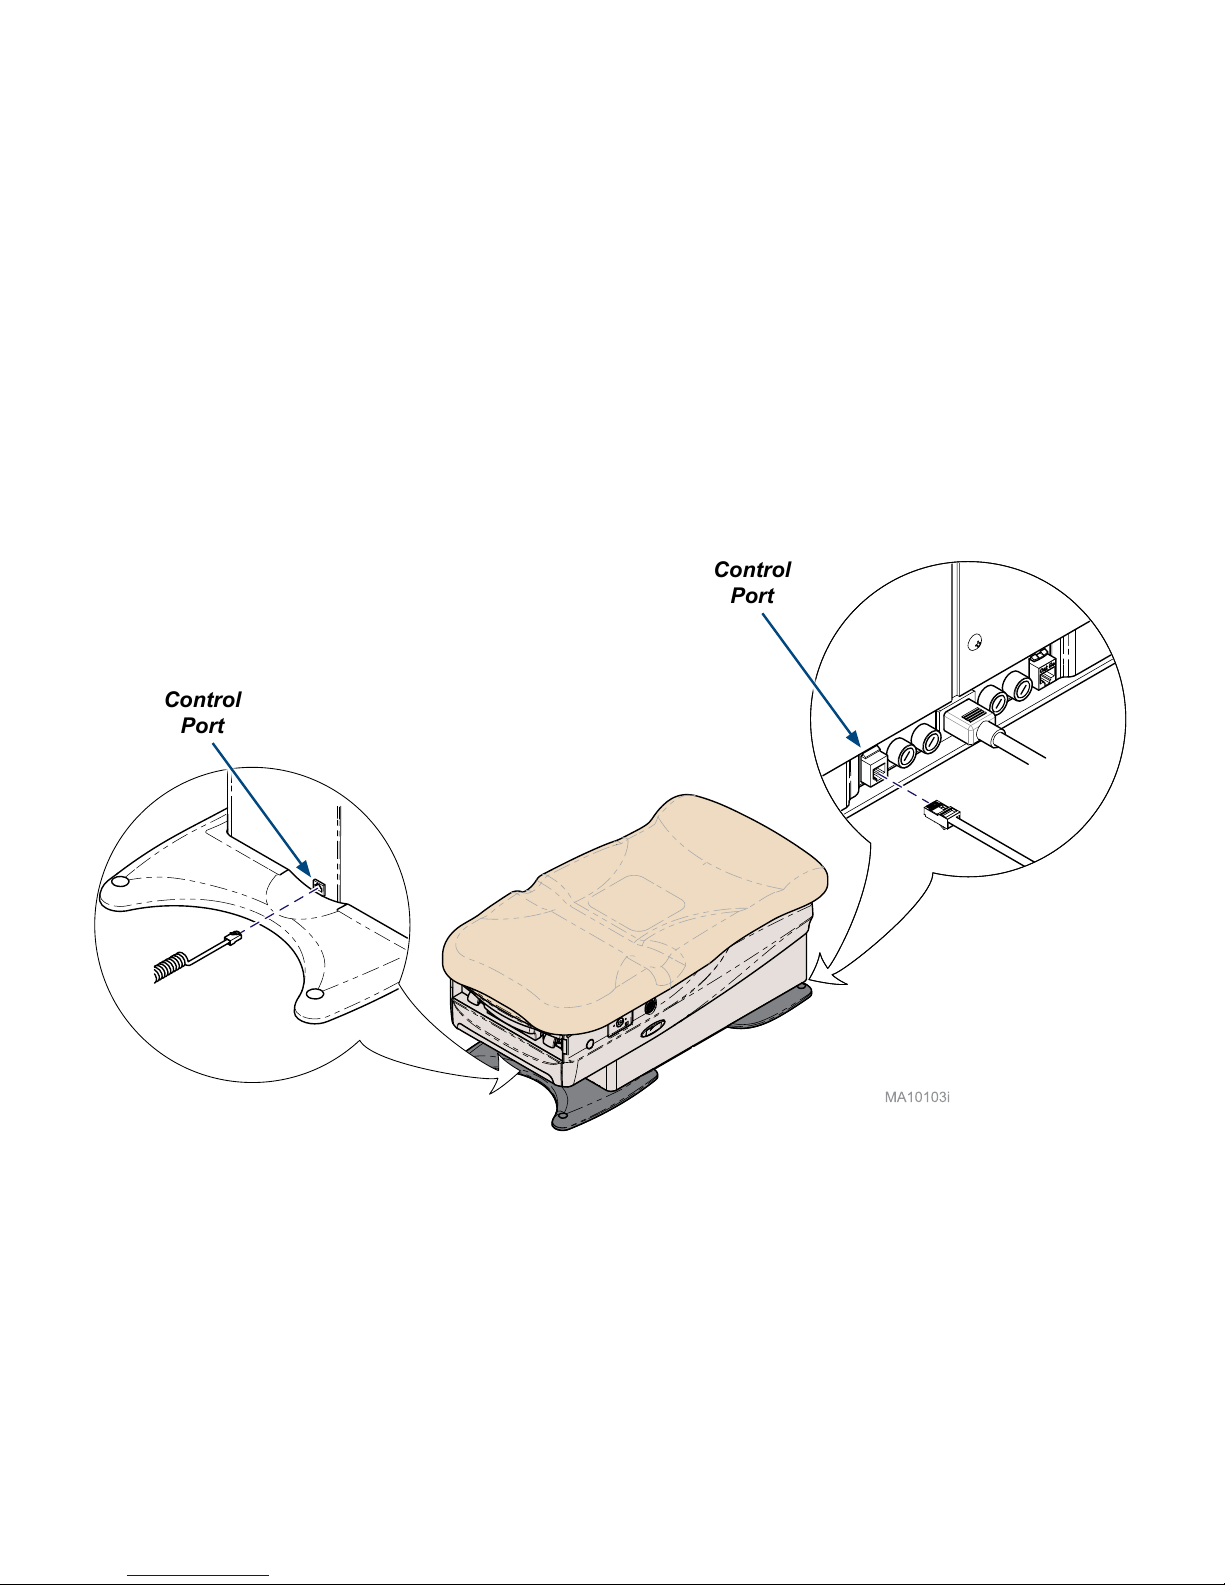
Hand / Foot Control Connection
Although wireless controls are standard on some models, there are hand / foot control ports
for wired controls located on the base at the head and foot end of the chair.
Control
Port
Control
Port
Page 17
English - 17
003-10027-99 © Midmark Corporation 2017
TP202 20-42-FO-00014 Rev A1 C2169
Operation
Active Sensing Technology
TM
The Active Sensing TechnologyTM prevents the chair from moving Down if the bottom of the drawer
contacts another object. If the Active Sensing TechnologyTM is activated, it will sound a series of “Beeps,”
disable the Base Down function and move chair in the Base Up direction. To resume Base Down operation,
remove object from under the bottom of the drawer and press the Base Up / Down buttons on controller.
Warning
Be sure that all personnel and equipment are clear of the chair before
activating any function. Failure to do so could result in personal injury.
Page 18
English - 18
003-10027-99 © Midmark Corporation 2017
TP202 20-42-FO-00014 Rev A1 C2169
Back
Function
Base
Function
Stop
Attention!
The Active Sensing Technology
TM
will stop the Base Down function and retract Up if the
bottom of the drawer contacts another object.
(You will hear a series of “Beeps” if the Active Sensing TechnologyTM is activated.)
To resume Base Down operation:
Remove object from under the bottom of the drawer.
Press Base Down button.
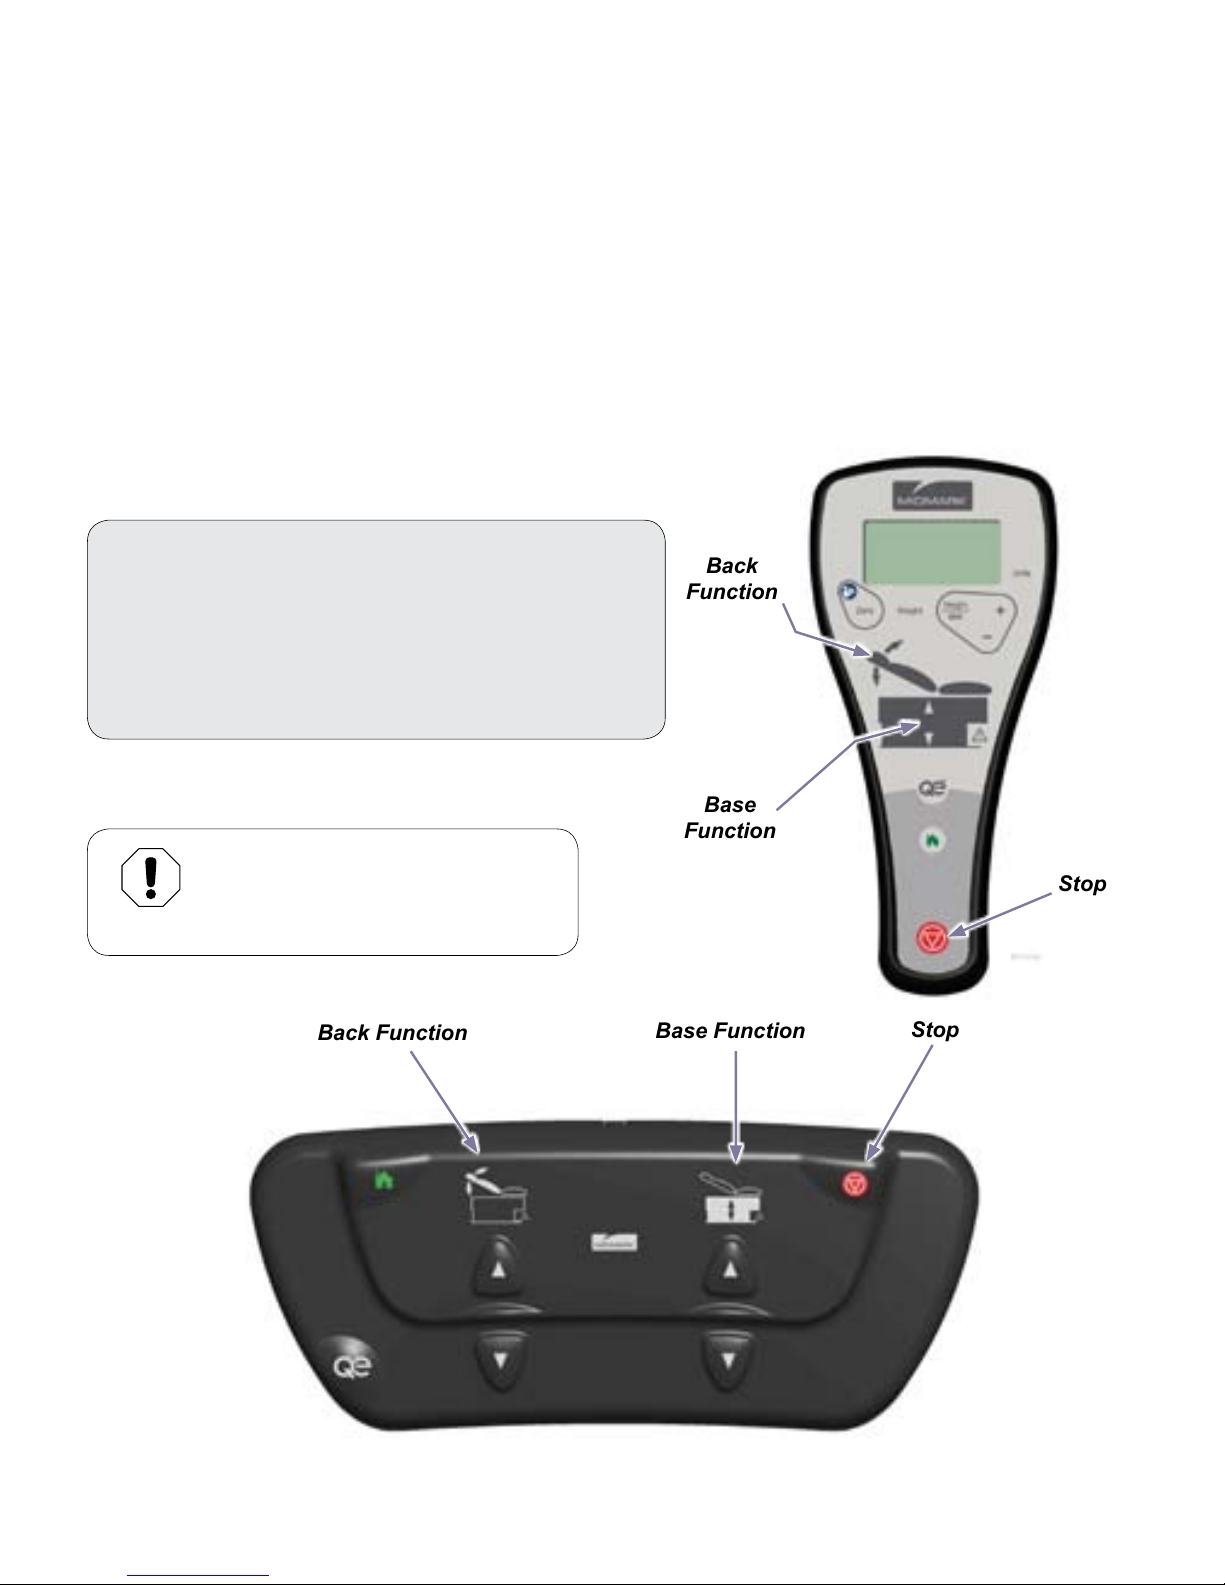
Operation - continued
Base / Back Functions
To operate the Base / Back functions...
Press & hold the Up or Down arrow button for the
desired function.
Note: The chair automatically stops at its maximum and
minimum height. At anytime, the Stop button can
be pressed to terminate movement.
Back Function
Base Function
Stop
Equipment Alert
Controllers must be within a Fifteen
foot radius of chair to be able to
command the chair.
Page 19
English - 19
003-10027-99 © Midmark Corporation 2017
TP202 20-42-FO-00014 Rev A1 C2169
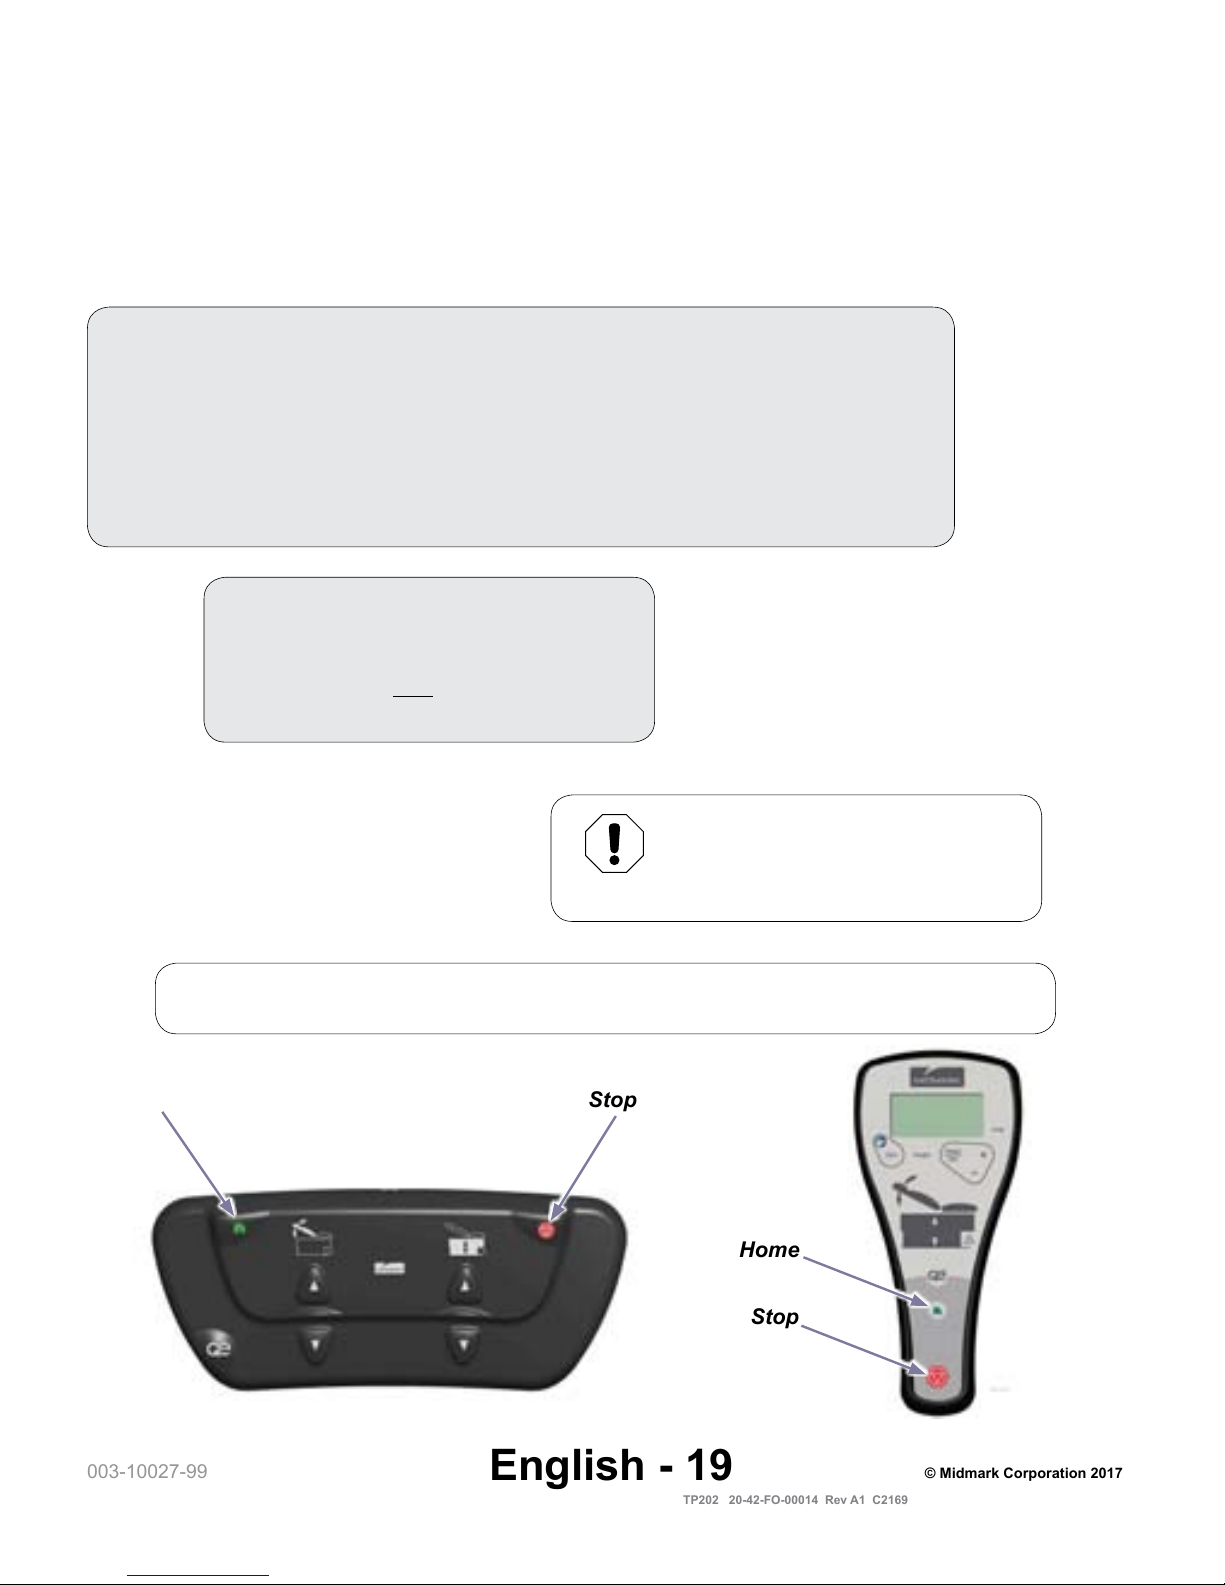
Programmable ’Home’ Function
The Home function automatically commands the chair to a programmed position.
The Home function is factory preset to automatically raise or lower the chair height to 17 inches (43 cm)
and raise the Back angle to 80 degrees.
To activate the Home function...
Press & release the Home button.
Note: At any time, ANY button can be
pressed to terminate movement.
Home
Stop
Home
Stop
To program the Home function...
a) Press the Base Up / Down button to move the Base to the desired height.
b) Press the Back Up / Down button to move the Back to the desired angle.
c) Press the Stop button, then the Home button and hold simultaneously for
three to four seconds.
Note: You will hear an audible tone when the new ’Home’ position is saved.
Note
An audible tone will sound when the Home button is pressed to indicate auto-movement.
Equipment Alert
Controllers must be within a Fifteen
foot radius of chair to be able to
command the chair.
Page 20
English - 20
003-10027-99 © Midmark Corporation 2017
TP202 20-42-FO-00014 Rev A1 C2169
Quick Exam
®
Stop
To program the Quick Exam® function...
a) Press the Base Up / Down button to move the Base to the desired height.
b) Press the Back Up / Down button to move the Back to the desired angle.
c) Press the Stop button, then the Quick Exam® button and hold simultaneously
for three to four seconds.
Note: You will hear an audible tone when the new Quick Exam® position is saved.
Quick Exam® Function
The Quick Exam® function automatically commands the chair to a programmed position.
The Quick Exam® function is factory preset to automatically raise or lower the chair height
to 34 inches (86 cm) and raise the Back angle to 80 degrees.
To activate the Quick Exam® function...
Press & release the Quick Exam® button.
Note: At any time, ANY button can be pressed to
terminate movement.
Stop
Quick Exam
®
Note
An audible tone will sound when the Quick Exam® button is pressed to indicate auto-movement.
Equipment Alert
Controllers must be within a Fifteen
foot radius of chair to be able to
command the chair.
Page 21
English - 21
003-10027-99 © Midmark Corporation 2017
TP202 20-42-FO-00014 Rev A1 C2169
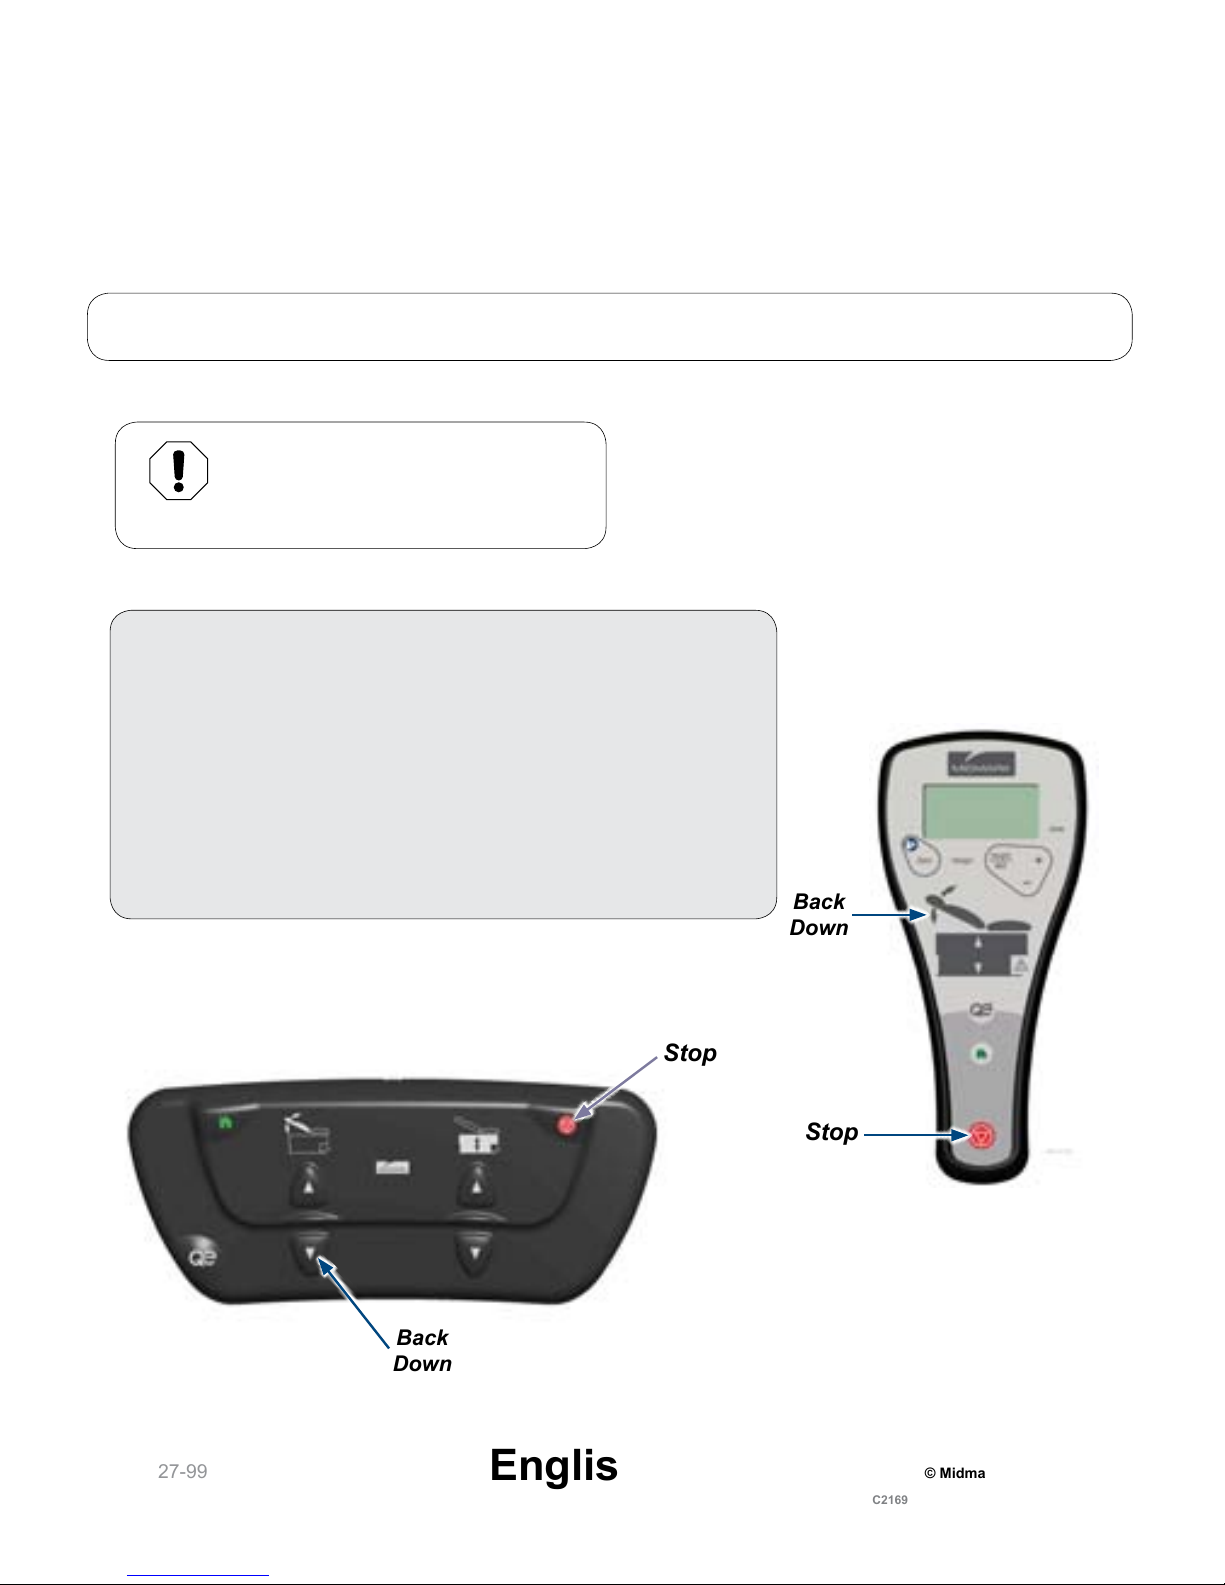
Stop
Stop
Back
Down
Back
Down
To enable / disable the Control Lockout feature...
Press and hold the Stop and Back Down buttons
simultaneously for three to four seconds.
You will hear...
• When locked, a single “Beep”
• When unlocked, “Beeps” until buttons are released.
Note: If motion is attempted while the controls are locked out, you will
hear a series of “Beeps” until motion is no longer attempted.
Control Lockout
The Control Lockout feature provides a means to lock out any movement of the Base and Back functions
on the chair. This includes movement initiated by the hand and foot controls. It will also lock out the ability
to receive weight from the scale to the hand control.
Note
The factory default setting for the Control Lockout is “disabled” and requires the operator to enable it.
Equipment Alert
Controllers must be within a Fifteen
foot radius of chair to be able to
command the chair.
Page 22
English - 22
003-10027-99 © Midmark Corporation 2017
TP202 20-42-FO-00014 Rev A1 C2169
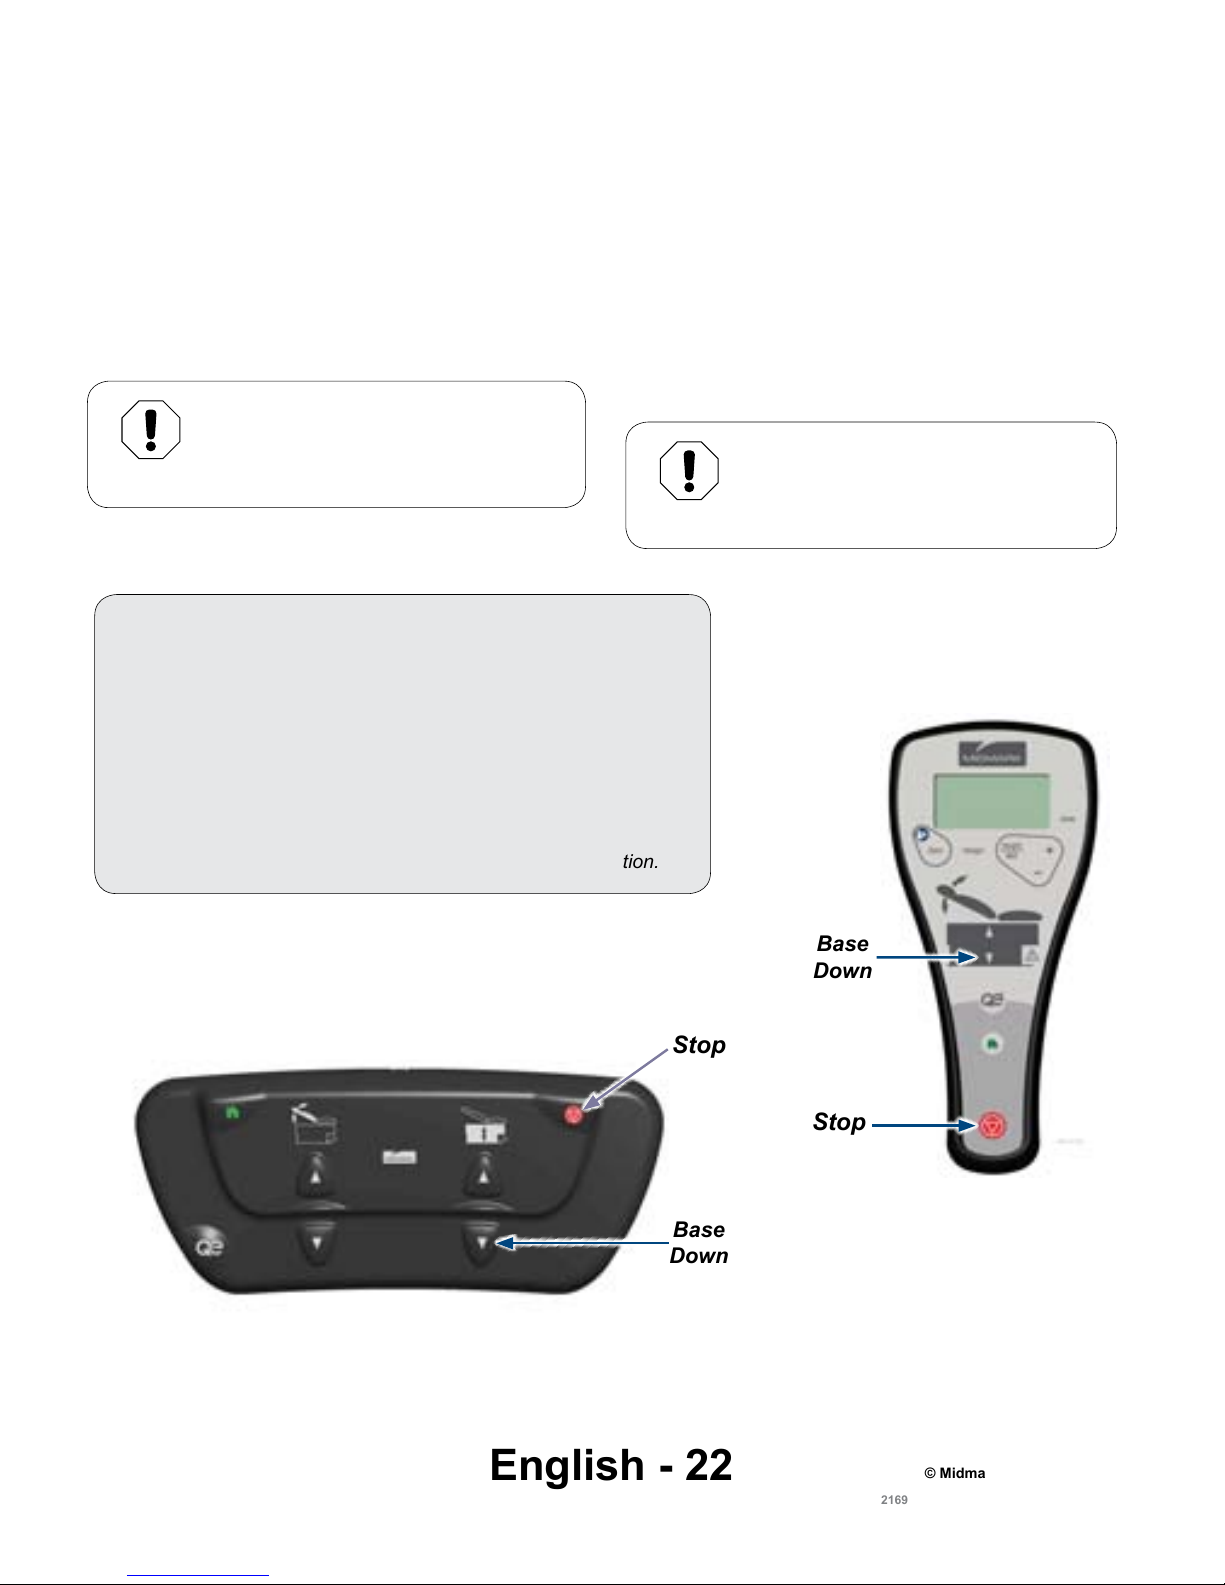
Stop
Stop
Base
Down
Association Procedure...
Disconnect power for at least three seconds.
Reconnect power and wait until the chair “Beeps”
three times.
Press and hold the Stop and Base Down buttons
until the Control “Beeps” three times.
Note: Two “Beeps” indicates an unsuccessful association.
Base
Down
Equipment Alert
A maximum of one hand control and
one foot control may be associated
to the chair at any one time.
Association Procedure
The wireless controllers will only function with the chair they have been “associated” with. This prevents
unwanted movement in locations with more than one chair. Each wireless controller’s association is preset
at the factory. This procedure is only required in the event of multiple controllers being used for more than
one chair or any time a controller is being used with a chair other than the one it was previously
associated with.
Equipment Alert
Controllers must be within a Fifteen
foot radius of chair to be able to
command the chair.
Page 23
English - 23
003-10027-99 © Midmark Corporation 2017
TP202 20-42-FO-00014 Rev A1 C2169
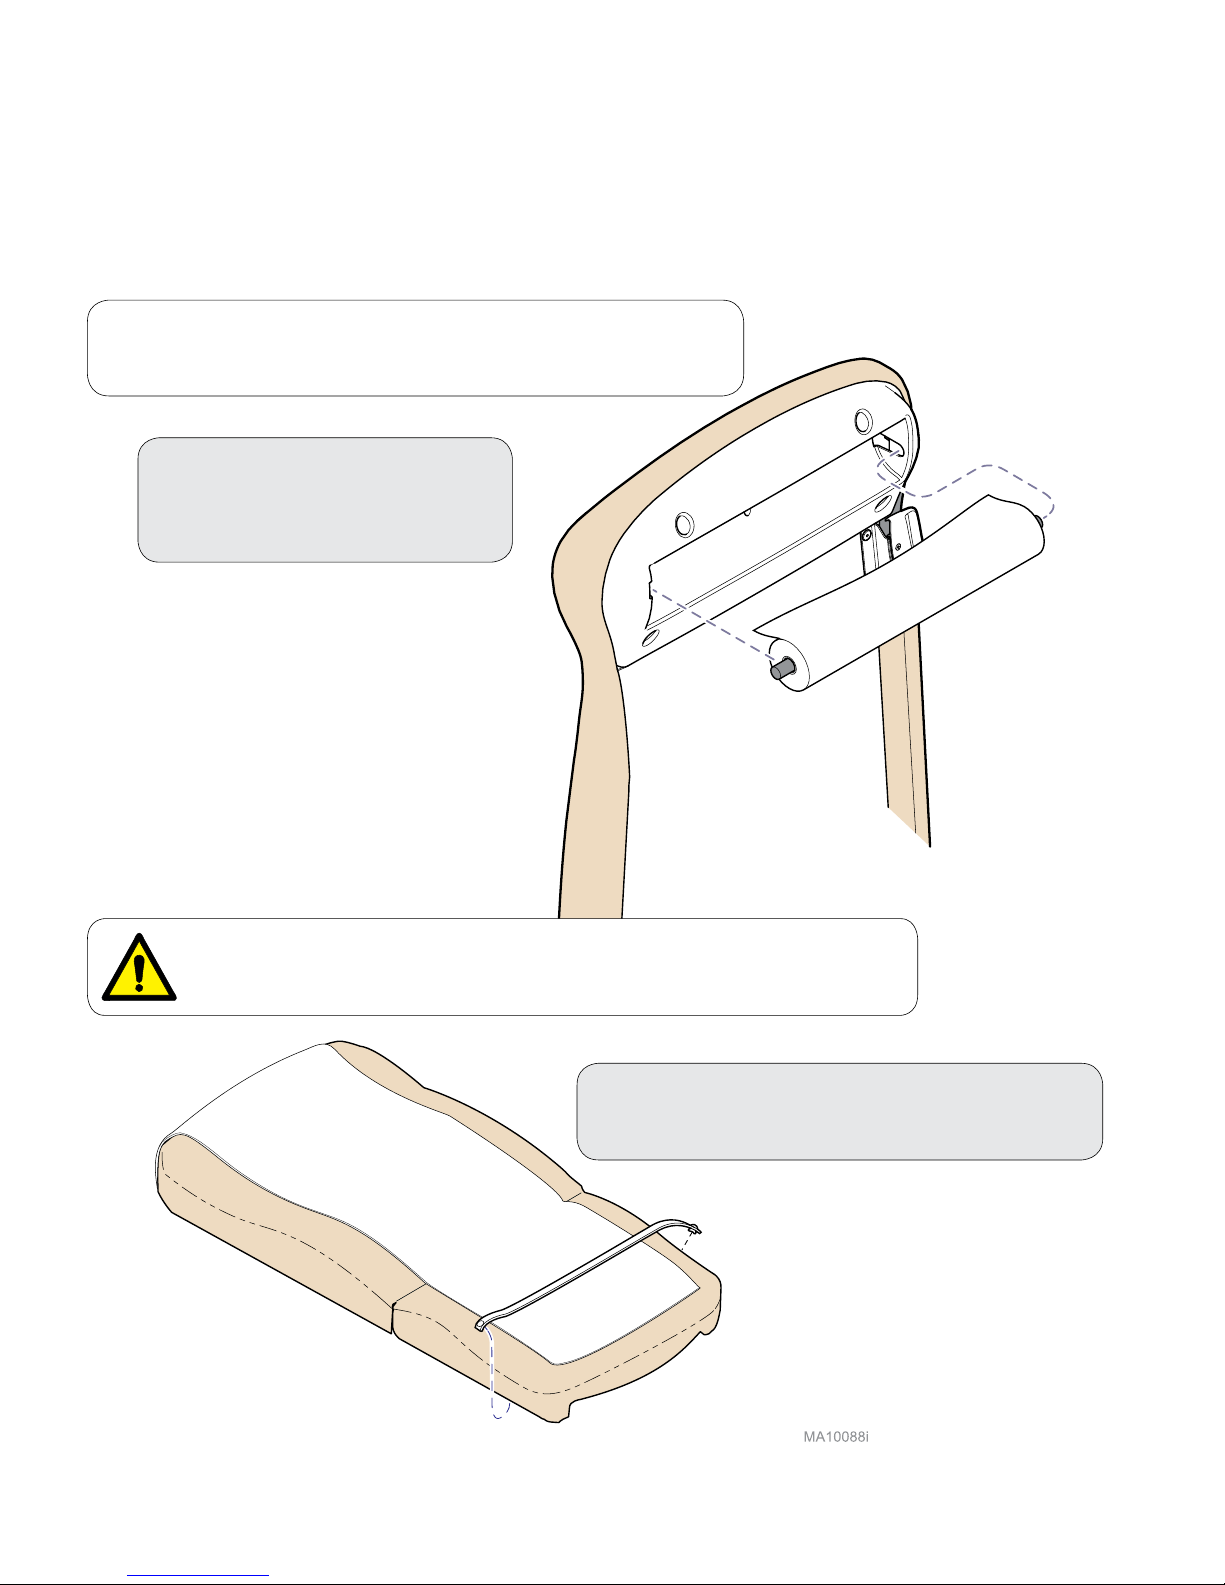
To install paper roll...
Insert rod ends into sockets
under head end of upholstery.
To install paper tear strap...
Attach strap to snaps on each side of chair.
Warning
To avoid injury, do not put head or extremities under the paper tear strap.
Note
One additional paper roll may be stored under the back section.
Paper Roll & Tear Strap
Paper Roll Size (maximum): ....................................................... 24 in. wide x 3.5/8 in. diameter
(61 cm x 9.2 cm)
Page 24
English - 24
003-10027-99 © Midmark Corporation 2017
TP202 20-42-FO-00014 Rev A1 C2169
To position the stirrups...
A) Pull the stirrup out, then unfold.
B) Lift the stirrup slightly, then move it left or right as desired.
C) Release stirrup to lock in position.
Stirrups
Caution
Be sure the stirrups are locked in place before using.
The stirrups will not support the patient’s entire weight.
Page 25
English - 25
003-10027-99 © Midmark Corporation 2017
TP202 20-42-FO-00014 Rev A1 C2169
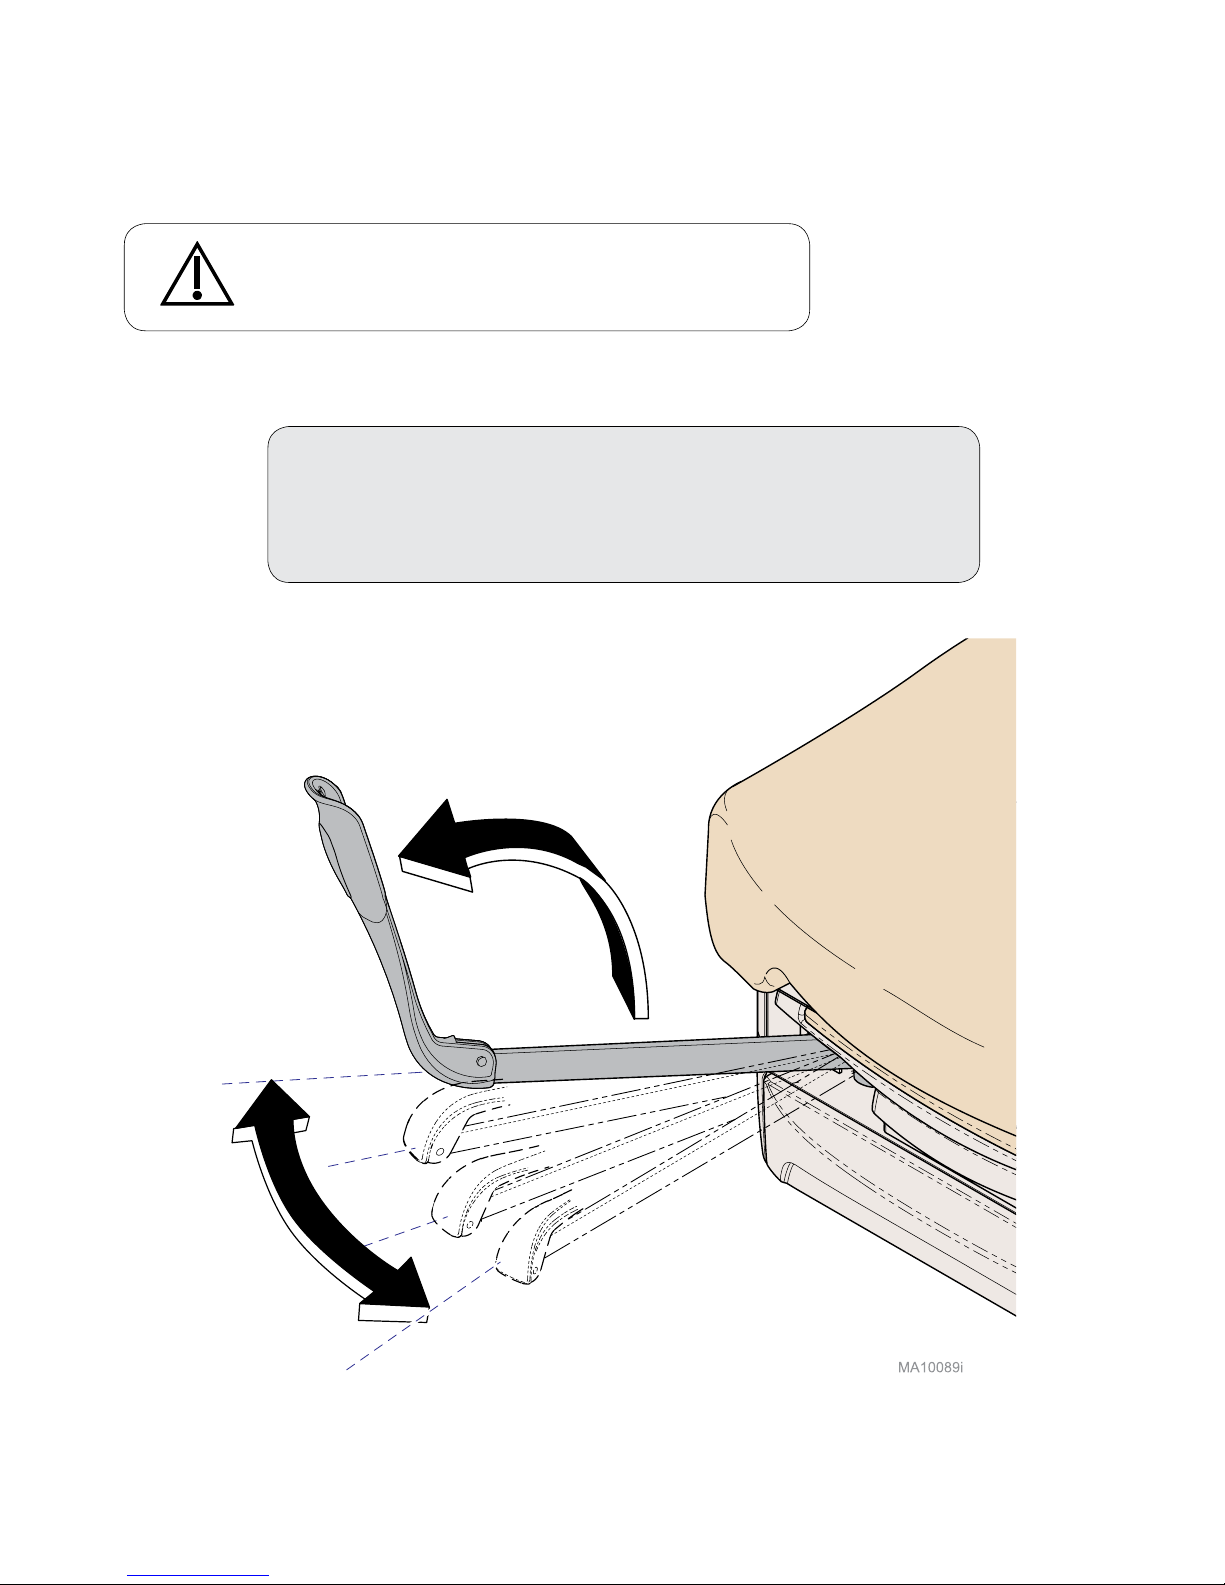
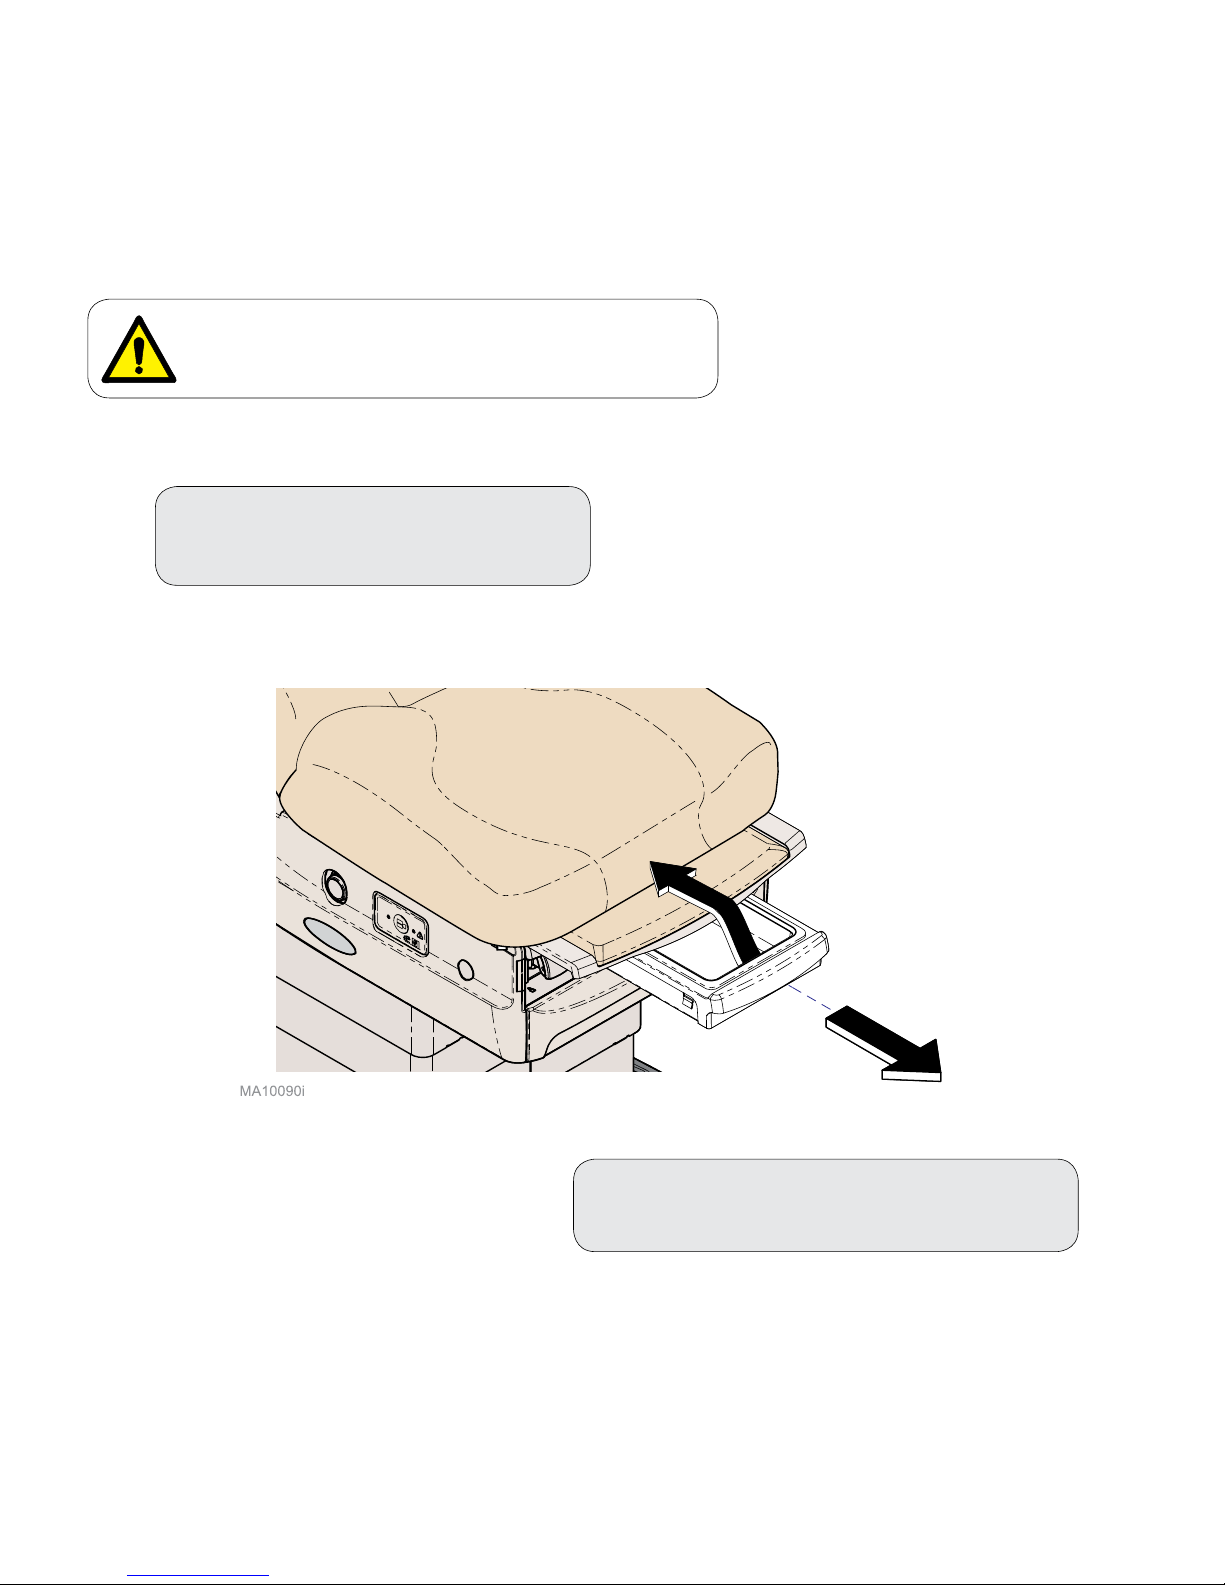
To extend footrest...
Pull footrest out to desired position.
Footrest & Treatment Pan
To access the treatment pan...
Pull treatment pan out to desired position.
Warning
Do not use footrest to support patient’s entire weight.
Page 26
English - 26
003-10027-99 © Midmark Corporation 2017
TP202 20-42-FO-00014 Rev A1 C2169
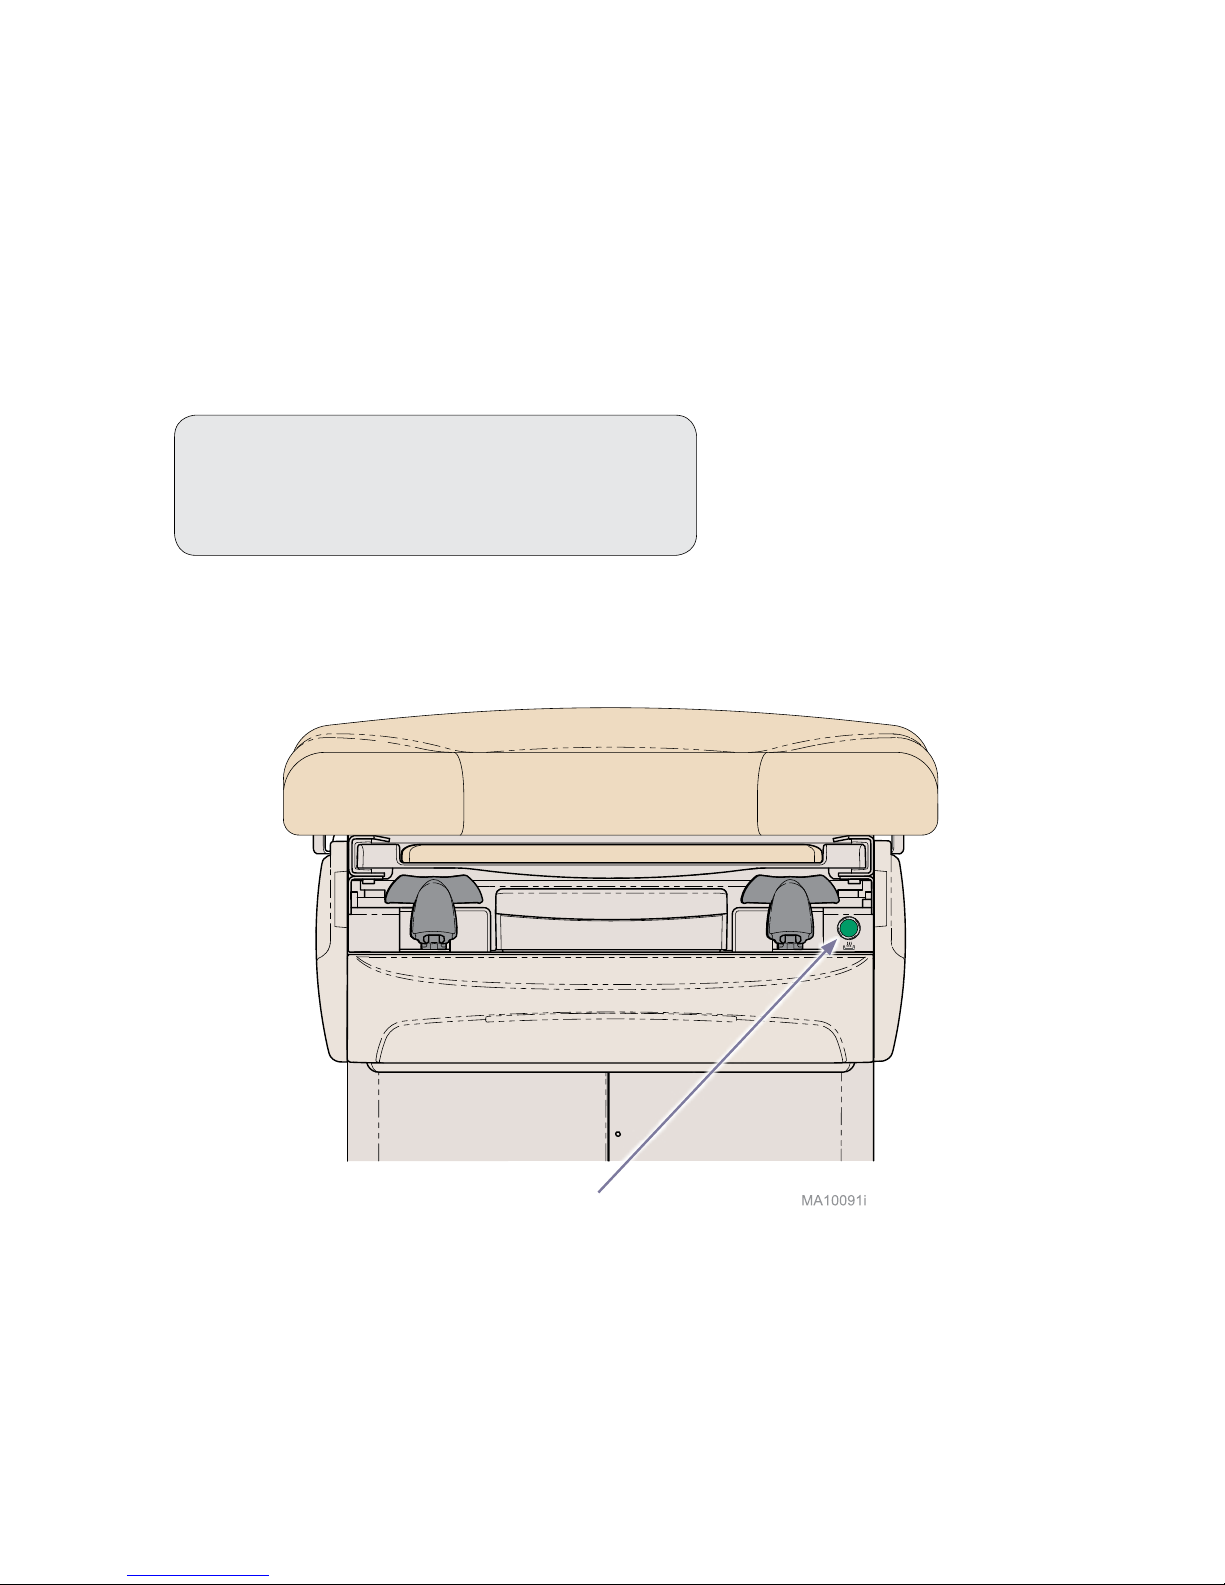
The drawer heater warms to 92ºF (33ºC) to 112ºF (44ºC) measured at the center of the drawer
at room temperature and nominal input voltage.
Drawer Heater
Switch
Drawer Heater
To turn the drawer heater ON / OFF...
Press and release the drawer heater switch.
Note: Switch will illuminate when heater is ON.
Page 27
English - 27
003-10027-99 © Midmark Corporation 2017
TP202 20-42-FO-00014 Rev A1 C2169
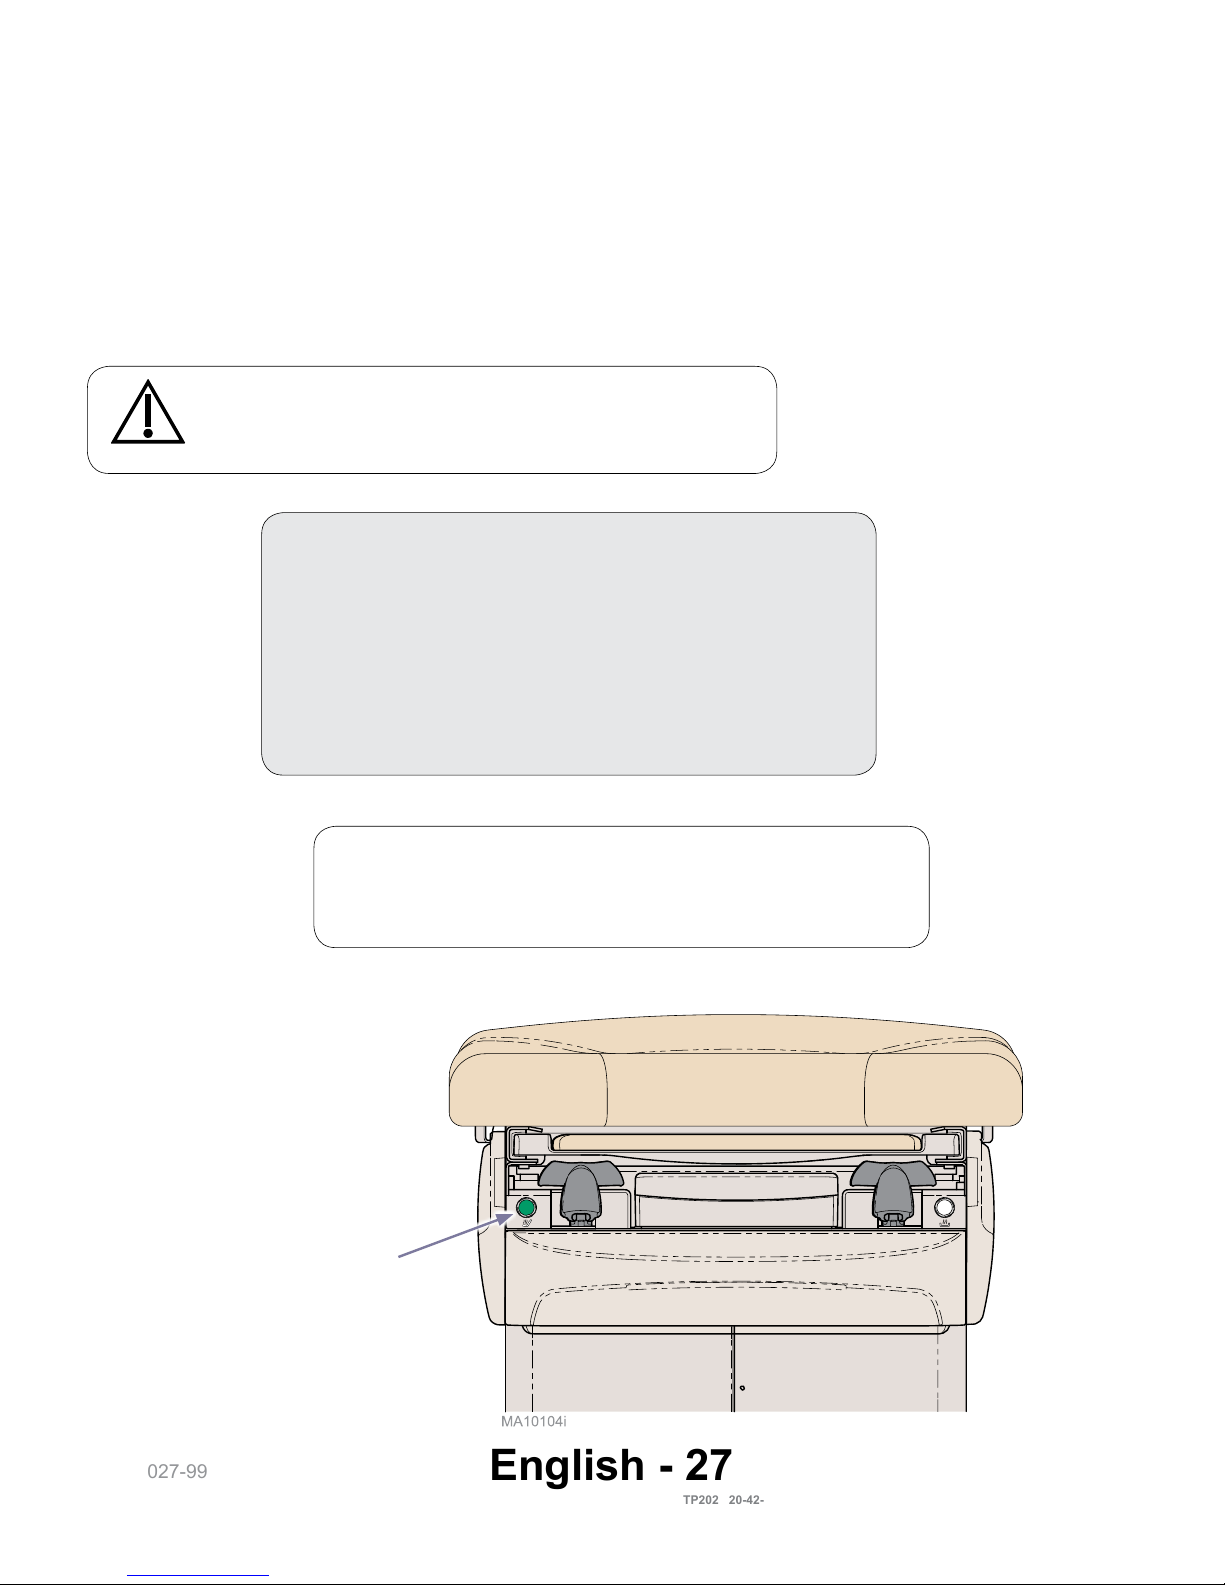
Upholstery Heater (-004 /-006)
The nominal surface temperature of the LOW setting is approximately 95° +/- 5° F, and the nominal surface
temperature of the HIGH setting is approximately 102° +/- 5° F at an ambient temperature of 70° +/- 2° F.
There will be approximately a dierence of 7° +/- 2° F between the high and low setting.
The upholstery heater will automatically shut o after ten hours of operation. It takes the upholstery
approximately 20 to 25 minutes to reach 99° F from an ambient temperature of 73° F.
Upholstery Heater
Switch
To turn the upholstery heater ON / OFF...
Press and release the upholstery heater switch once
for the LOW setting and twice for the High setting.
Pressing the heater switch a third time will turn
upholstery heater off.
Note: Switch will illuminate “Dim Green” on the LOW setting,
and illuminate “Bright Green” on the HIGH setting.
Caution
Use of the upholstery heater in combination with other
heating devices could cause elevated body temperature.
Note
Harnesses protruding out of the table from underneath the
back weldment are to be used for heated upholstery only.
Page 28
English - 28
003-10027-99 © Midmark Corporation 2017
TP202 20-42-FO-00014 Rev A1 C2169
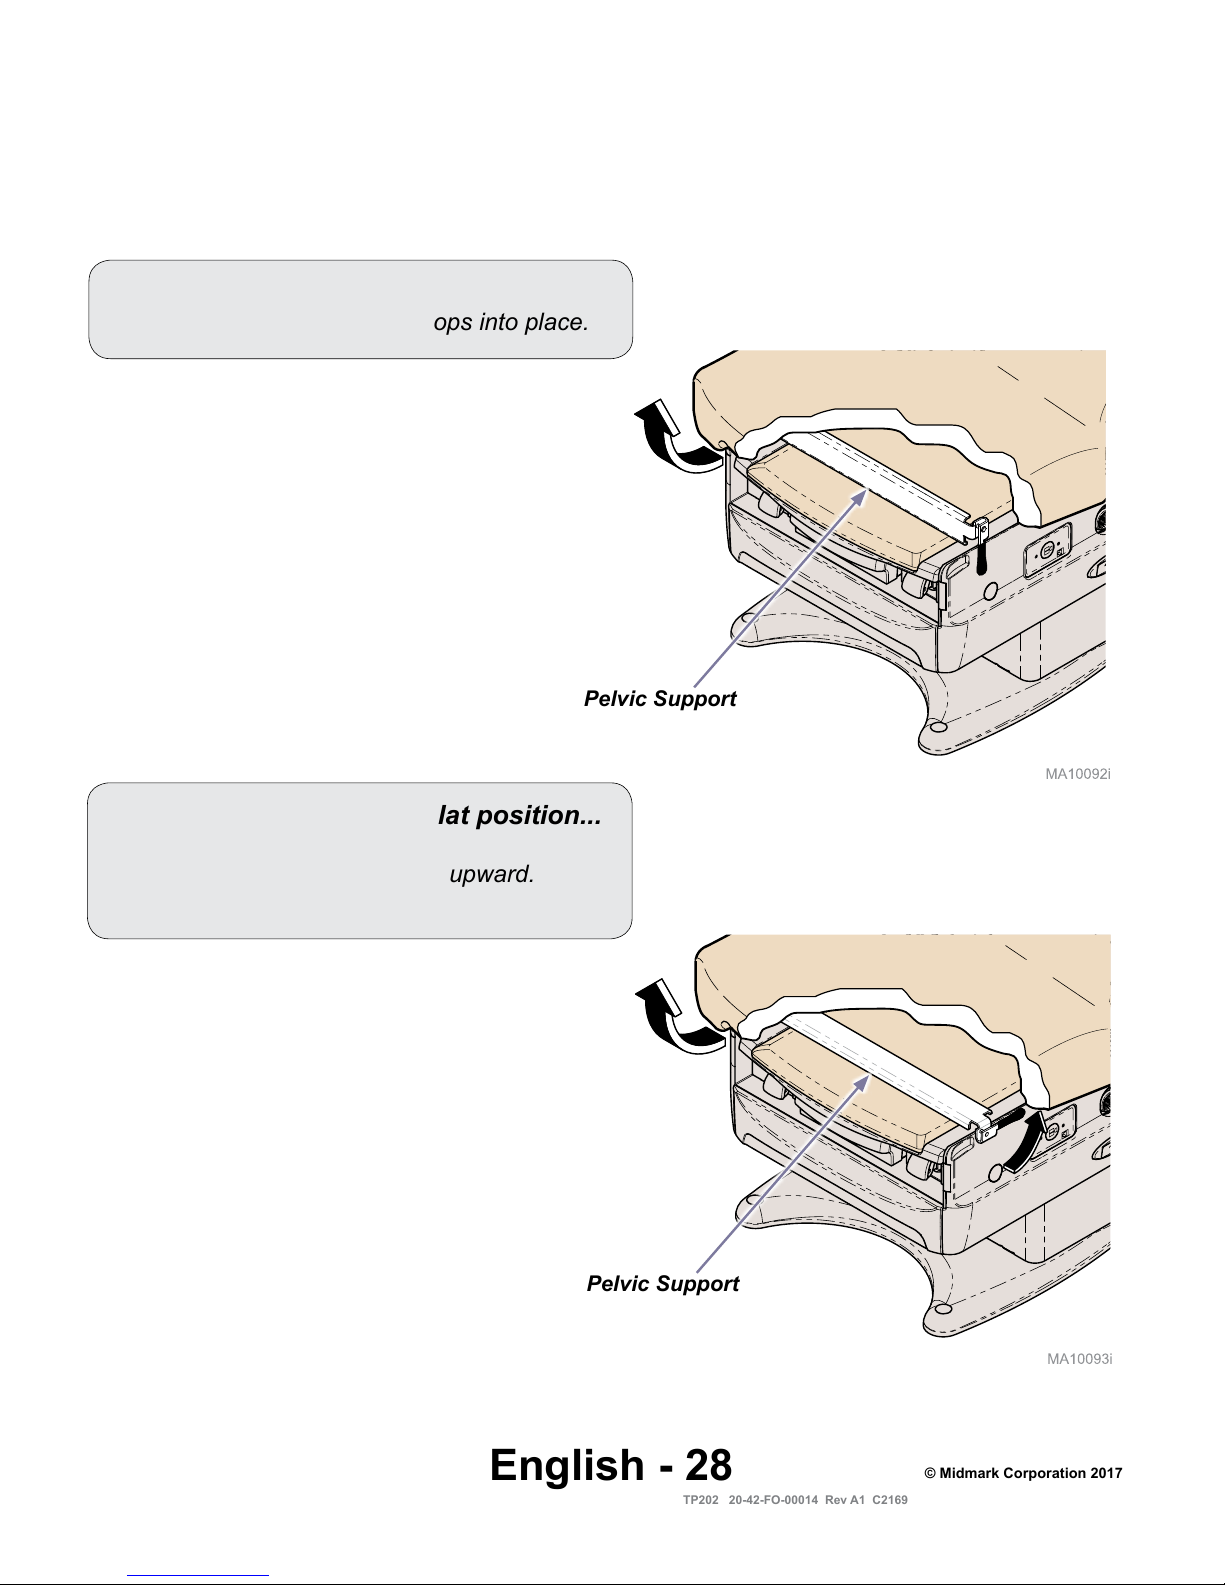
Pelvic Support
To elevate seat section...
Lift seat until pelvic support drops into place.
To return seat section to flat position...
A) Lift seat section slightly.
B) Pivot pelvic support handle upward.
C) Lower seat section.
Pelvic Tilt
Pelvic Support
Page 29
English - 29
003-10027-99 © Midmark Corporation 2017
TP202 20-42-FO-00014 Rev A1 C2169
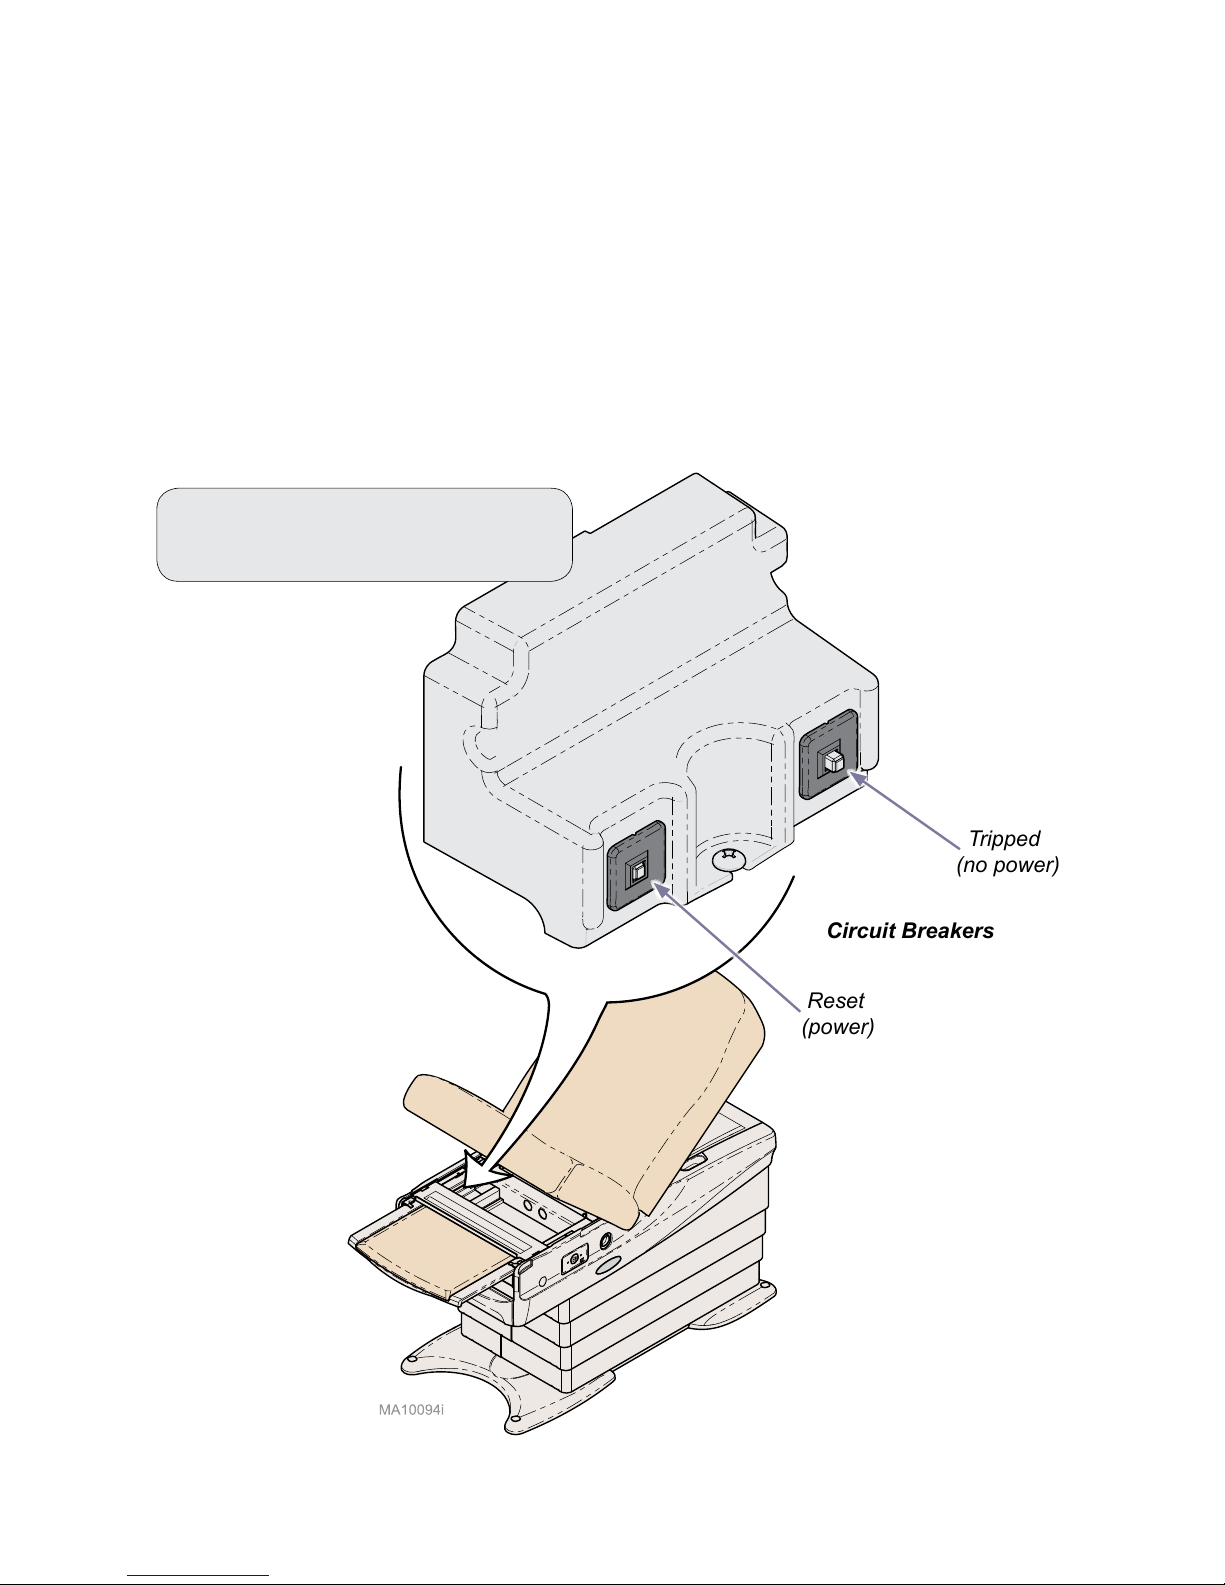
The simplex receptacle on each side of chair provides power for accessories used during
medical procedures. There are two circuit breakers located under the seat section.
If the receptacles’ maximum load is exceeded, the circuit breakers interrupt power to the receptacles.
Maximum Load..........................................................................................115 VAC, 4 amps
Simplex Receptacles
Tripped
(no power)
Reset
(power)
Circuit Breakers
To reset the circuit breaker...
Push circuit breaker switch.
Page 30
English - 30
003-10027-99 © Midmark Corporation 2017
TP202 20-42-FO-00014 Rev A1 C2169
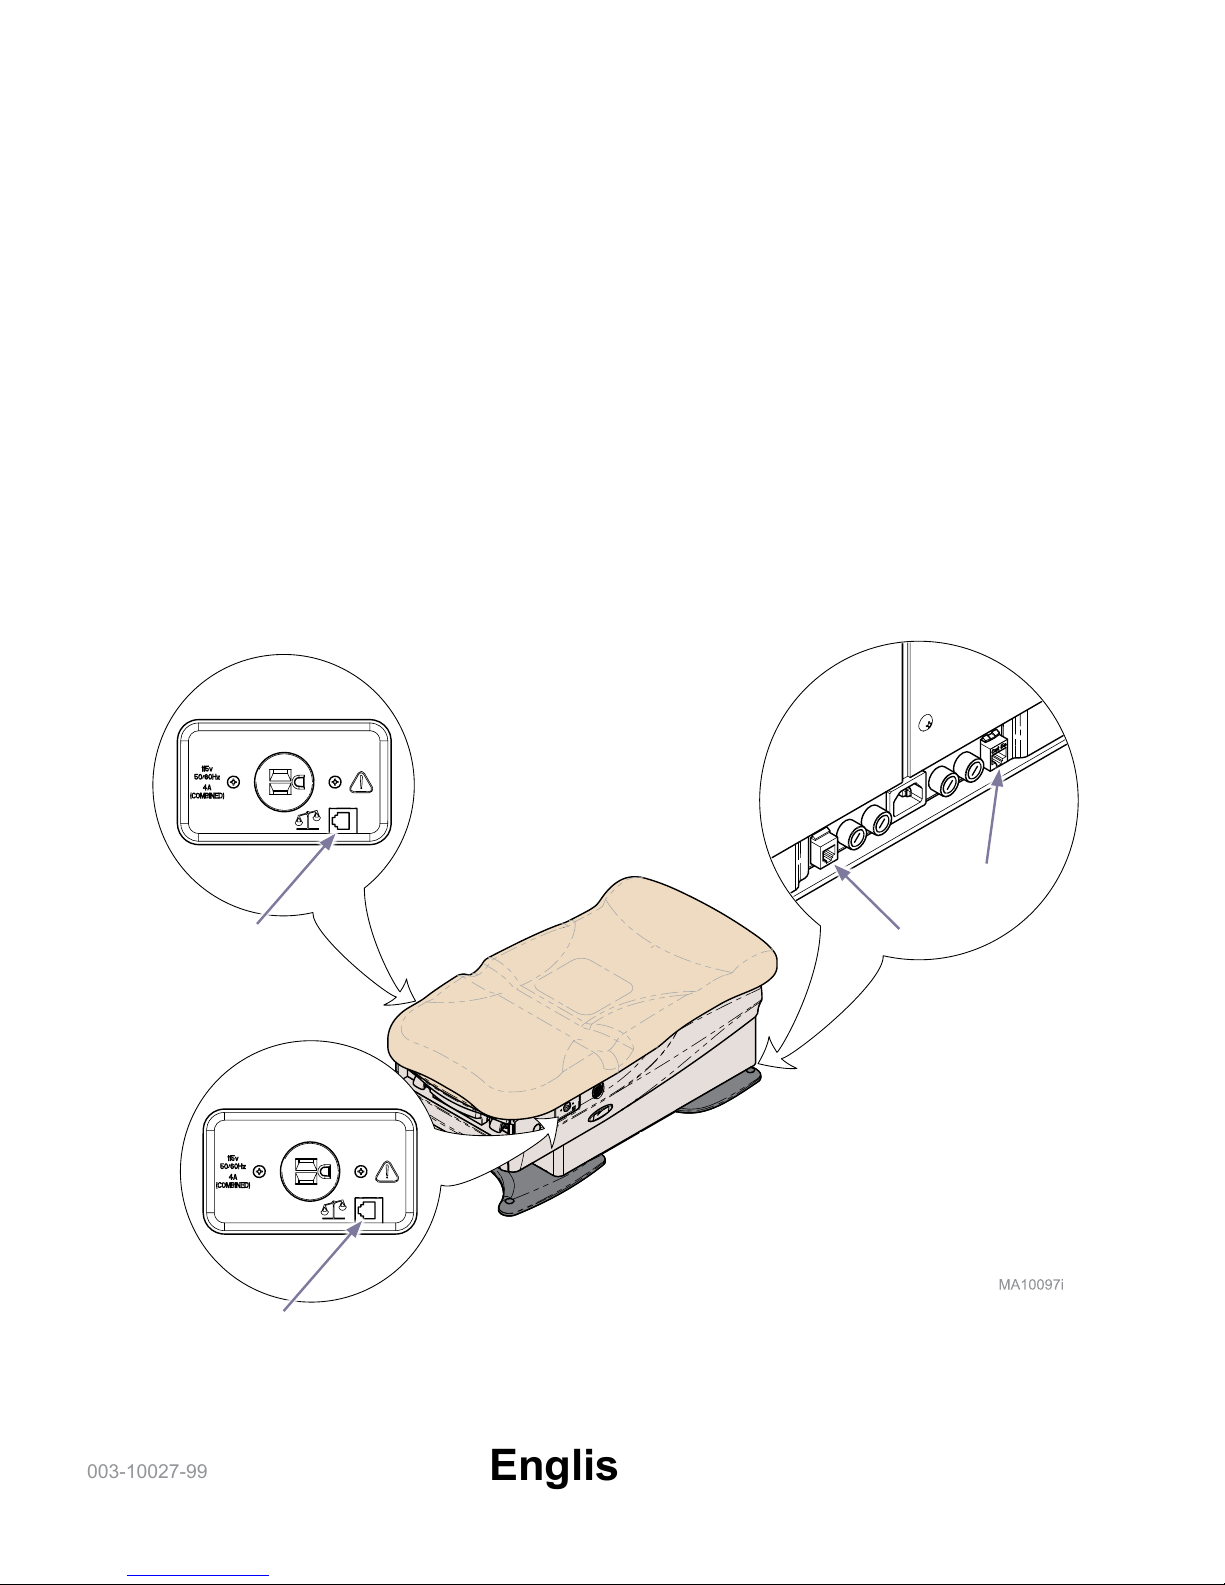
Data Connections
Data connections are located on each side of chair and on rear base of chair.
Port 1, 2, & 3: Vital Signs connections.
Port 4: Optional wired hand or foot control.
Port 1
Port 3
Port 4
Port 2
Page 31

English - 31
003-10027-99 © Midmark Corporation 2017
TP202 20-42-FO-00014 Rev A1 C2169
Data Connections - continued
Vital Signs Connections
The serial ports on the chair provide connection to a vital signs device. This allows for the patient
weight to be captured from the digital scale and transferred to the vital signs device for display
and capture.
Supported vital signs devices are:
• Midmark IQvitals
®
• Welch Allyn
®
Spot Vital Signs® LXi *
• Midmark IQvitals
®
ZoneTM
Setup:
Purchase the appropriate serial cable for your equipment:
• Midmark IQvitals
®
and IQvitals® Zone
TM
Serial Cable, 6 foot length, coiled (9A478001).
• Midmark IQvitals
®
and IQvitals® Zone
TM
Serial Cable, 15 foot length, straight (9A478002).
• Midmark IQvitals
®
and IQvitals® Zone
TM
Serial Cable, 30 foot length, straight (9A478003).
• Midmark IQvitals
®
and IQvitals® Zone
TM
Serial Cable, 50 foot length, straight (9A478004).
• Welch Allyn
®
Spot Vital Signs® LXi Serial Cable, 6 foot length, coiled (9A479001).
• Welch Allyn
®
Spot Vital Signs® LXi Serial Cable, 15 foot length, straight (9A479002).
Connect one of the vital signs connections (ports 1, 2, or 3) to one end of the serial cable,
and the other end to the corresponding port on your vital signs device.
Patient weight will automatically be measured when the patient sits on the chair.
25 Inches
Minimum
*
Welch Allyn® and Spot Vital Signs® are registered trademarks of Welch Allyn, Inc.
Note
Before seating patient on exam chair, ensure the scale has been zeroed.
Failure to do so may affect the measurement of the patient’s weight.
Note
If weight does not display on your vital signs device,
raise chair using hand or foot controls.
Chair must be at a height of 25 inches or greater.
Page 32

English - 32
003-10027-99 © Midmark Corporation 2017
TP202 20-42-FO-00014 Rev A1 C2169
Note
Only one vital signs device may be connected at a time.
Midmark IQvitals®
Device
Welch Allyn®
Spot Vital Signs
®
LXi
Device
Data Connections - continued
Connecting Chair to Vital Signs Device
The serial cable may be connected to one of three ports located on the chair.
Midmark IQvitals®
Zone
TM
Device
Page 33

English - 33
003-10027-99 © Midmark Corporation 2017
TP202 20-42-FO-00014 Rev A1 C2169
Note
Control levers will automatically reset to the Clean
Assist™ Roller System
disengagement position.
Zero the scale after the chair is moved for cleaning.
Equipment Alert
Be sure to activate both control levers.
To activate Clean Assist™ Roller System...
A) Raise back section 30 to 45 degrees.
B) Ensure chair is at least two inches higher than its
lowest position.
C) Move control levers on each side of chair to the
Clean Assist™ Roller System engagement position.
D) Move chair to the lowest position to activate rollers.
Equipment Alert
After Clean Assist™ Roller System has been
activated, disconnect power cord and foot control and
stow away from chair to prevent damage to cords.
Clean Assist™ Roller System
Clean Assist™ Roller
System Engagement
Position
Clean Assist™
Roller System
Equipment Alert
The intended use of the
Clean Assist™ Roller System
is for chair positioning within
the exam room only.
Control levers located under the back section on each side, activate and deactivate the Clean Assist™
Roller System. The rollers are located on each corner of the chair to allow positioning of chair.
Caution
To prevent injury, never activate /
deactivate Clean Assist™ Roller System
or move chair with patient aboard. Use
caution when moving chair.
To deactivate Clean Assist™ Roller System...
A) Move chair to desired location.
B) Reconnect power cord.
C) Raise chair at least 2” to deactivate Clean
Assist™ Roller System.
Note: An audible click will occur to confirm deactivation.
Clean Assist™ Roller
System Disengagement
Position
WARNING
To avoid risk of fall, the Clean Assist™ Roller
System must be disengaged while a patient
ingresses or egresses the chair
Page 34

English - 34
003-10027-99 © Midmark Corporation 2017
TP202 20-42-FO-00014 Rev A1 C2169
Maintenance
Calling for Service
If service is required, contact your authorized Midmark dealer. To contact Midmark directly:
1-800-MIDMARK (1-800-643-6275)
8:00 am until 5:00 pm Monday - Friday (EST) [excluding standard U.S. holidays]
Cleaning
Upholstery
Wash your upholstery weekly with a mild liquid soap and water mixture, rinse with clear water
and dry completely to remove disinfection cleaner build-up.
Disinfect your upholstery with a solution of standard bleach and water mixed 1 in 10 (10%) or chlorine based
cleaners. Follow this with a clear water rinse and thorough drying of material. See current CDC Guideline for
Disinfection & Sterilization in Healthcare Facilities.
To minimize damage caused by disinfectant cleaner residue build-up, do not allow disinfectants to pool on
the upholstery surface. Once the approved contact time has been obtained, remove and dry excess liquid
remaining on the surface.
Detailed care and maintenance instructions are included with your product. This information is also available
on www.midmark.com in the Technical library under the User Information tab for your product.
Painted Metal / Plastic Surfaces
Clean the painted metal and plastic surfaces weekly using a clean soft cloth, and mild cleaner.
Preventative Maintenance
Periodically inspect the following areas:
• Power cord(s) should be free of cuts or other visible damage.
• All fasteners should be in place and tightened securely.
• All mechanical functions should operate properly.
Periodically lubricate the back hinge to maintain quiet, smooth, operation (use light machine oil).
Have an authorized service technician inspect your equipment every six months.
Periodic calibration of the scale is not required. It is recommended to verify the scale is measuring
accurately using a reference weight of known value every six months.
Note
Model / serial number information is required when calling for service.
Equipment Alert
The upholstery is resistant to most medicinal-type stains, but may be damaged
by solvents and dyes. Immediately remove any fluids spilled on the upholstery.
Warning
Should damage and or loose parts be identified, the examination chair should be removed from
use and serviced. Failure to do so may result in injury.
Warning
The upholstery should be inspected before each use and replaced
if punctured or otherwise damaged.
Page 35

English - 35
003-10027-99 © Midmark Corporation 2017
TP202 20-42-FO-00014 Rev A1 C2169
Troubleshooting
Symptom Probable Cause Correction
No functions will operate. Facility supply voltage. Secure power cord connections.
Reset facility circuit breaker.
Chair stops and beeps. Patient weight exceeded 650 lbs. Inform sta that the maximum
patient weight limit is 650 lbs.
No power at chair receptacles.
All other functions work.
Chair circuit breaker(s) tripped. Lift seat section to access circuit
breaker(s), press to reset.
When any control button is pressed,
that controller sounds a single beep.
(All functions operate)
Low battery. Replace batteries. (size: AA)
When the weight button is pressed,
the controller displays “Chair Low”.
Momentary power interruption. Lower chair all the way down.
Chair does not move when pressing
Quick Exam
®
button, or does not go
to the correct position.
Quick Exam
®
positioning is user
adjustable and may need to be
reprogrammed.
See Quick Exam® instructions
in this manual.
Active Sensing Technology
TM
activated.
Remove object from under the
bottom of the drawer.
Chair does not move when pressing
’Home’
button, or does not go
to the correct position.
’Home’ positioning is user
adjustable and may need to be
reprogrammed.
See ’Home’ instructions
in this manual.
Active Sensing Technology
TM
activated.
Remove object from under the
bottom of the drawer.
Page 36

English - 36
003-10027-99 © Midmark Corporation 2017
TP202 20-42-FO-00014 Rev A1 C2169
Specications Chart
Patient Weight (maximum): 650 lbs (295 kg)
Scale Resolution:
Scale Accuracy:
30 - 100 lb (13.6 - 45.4 kg)
100 - 300 lb (45.4 - 136.1 kg)
300 - 500 lb (136.1 - 226.8 kg)
500 - 650 lb (226.8 - 294.8 kg)
0.2 lb (0.1kg)
± 0.2 lb (0.1 kg)
± 0.4 lb (0.2 kg)
± 0.6 lb (0.3 kg)
± 0.8 lb (0.4 kg)
Paper Roll (maximum size): 24 in. long x 3.5/8 in. diameter
(61 cm x 9.2 cm)
Range of Motion & Dimensions: (See Range of Motion & Dimensions page)
Weight of Chair:
w/upholstery
w/packaging & skid (no uph.)
Uph. w/packaging (shipped separately)
475 lbs (215.5 kg)
485 lbs (220 kg)
40 lbs (18.1 kg)
Power Cord Length: 8 ft. (244 cm)
Electrical Requirements: [See Model Identication / Compliance Chart]
Foot / Hand Control Voltage: 3.3 VDC, SELV (Safety Extra Low Voltage)
Simplex Receptacles (maximum load) 115 VAC, 4A, 50/60 Hz
Fuses:
IEC inlet fuses
F1 (on Main PC board)
F2 (on Main PC board)
Models w/ upholstery heaters
F1 & F2 (on Uph Heater PC board)
T8AH, 250V, 5 x 20 mm
T250mAH, 250V, 5 x 20 mm
T6.3AH, 250V, 5 x 20 mm
T3.15AH, 250V, 5 x 20 mm
Duty Cycle
(Motor Run Time):
Receptacles, Drawer Heater:
Intermittent Operation
[30 seconds ON / 5 minutes OFF]
Continuous Operation
Classications: Class I, Type B Applied Part, except as noted for
optional heated upholstery,
Intermittent Operation
[30 seconds ON / 5 minutes OFF]
Certications ES 60601-1:2012, CSA C22.2 No. 60601-1:14;
AAMI/ISO 80601-2-35:2009,
CSA C22.2 No. 80601-2-35:12, IEC 60601-1-2:2014
Optional heated upholstery, Type BF Applied Part,
complies with IEC 80601-2-35
IPX0 Chair
IPX1 Foot Control
IPX2 Heated Upholstery
Transmit / Recieve Frequencies 2.402GHz - 2.480GHz
Specications
Page 37

English - 37
003-10027-99 © Midmark Corporation 2017
TP202 20-42-FO-00014 Rev A1 C2169
Model Description
Complies To: Electrical Ratings:
ANSI/AAMI
ES60601-1
CAN/CSA-C22.2
No. 60601-1:14
IEC
60601-1-2
NFPA
99
VAC
+/-10%
Amps
Cycles
(Hz)
626-003
Two-function chair (Base / Back)
w/ Simplex Receptacles,
Recessed Rollers, Pelvic Tilt,
Drawer Heater,
Wireless Controls, IQscale
®
, & IQhub
®
• • • •
115 12 50 / 60
626-004
Two-function chair (Base / Back)
w/ Simplex Receptacles,
Recessed Rollers, Pelvic Tilt,
Drawer Heater, Heated Upholstery,
Wireless Controls, IQscale
®
, & IQhub
®
• • • •
115 12 50 / 60
626-005
Two-function chair (Base / Back)
w/ Simplex Receptacles,
Recessed Rollers, Pelvic Tilt,
Drawer Heater,
Wired Controls, IQscale
®
, & IQhub
®
• • • •
115 12 50 / 60
626-006
Two-function chair (Base / Back)
w/ Simplex Receptacles,
Recessed Rollers, Pelvic Tilt,
Drawer Heater, Heated Upholstery,
Wired Controls, IQscale
®
, & IQhub
®
• • • •
115 12 50 / 60
Fire Code Ratings: All upholstery complies with California Bureau of Home Furnishing Technical Bulletin 117 and California
Code of Regulations, Sect. 93120-93120.12, Title 17. Optional upholstery is available that complies with
California Bureau of Home Furnishing Technical Bulletin 133.
Model Identication / Compliance Chart
Page 38

English - 38
003-10027-99 © Midmark Corporation 2017
TP202 20-42-FO-00014 Rev A1 C2169
Max.
37 ± 0.5 in.
(94 ± 1.3 cm)
Pelvic Tilt
Max. 7° ± 2°
Min. 1.5°
0° (horizontal) to
+80° ± 5°
Min.
14.6 ± 0.5 in.
(37 ± 1.3 cm)
Range of Motion:
Page 39

English - 39
003-10027-99 © Midmark Corporation 2017
TP202 20-42-FO-00014 Rev A1 C2169
48 in.
(122 cm)
Standard: 8 ft. (2.4 m)
Optional: 3 ft. (91 cm)
10 in.
(25 cm)
Up to:
16 in.
(41 cm)
60 in.
(152 cm)
25 in.
(63.5 cm)
28 in.
(71 cm)
OR
32 in.
(81 cm)
76 in.
(193 cm)
23.5 in.
(60 cm)
Dimensions:
Page 40

English - 40
003-10027-99 © Midmark Corporation 2017
TP202 20-42-FO-00014 Rev A1 C2169
Limited Warranty
Warranty Information
SCOPE OF WARRANTY Midmark Corporation (“Midmark”) warrants to the original retail purchaser that it will, at Midmark’s option, repair or
replace components of the domestic and international medical products manufactured by Midmark (except for components not warranted
under “Exclusions”) that are defective in material or workmanship under normal use and service. The sole remedy under this limited warranty is the repair or replacement, at Midmark’s option, of the applicable components. This limited warranty shall only apply to defects that are
reported to Midmark within the applicable warranty period and which are determined to exist upon examination by Midmark,. This warranty
extends only to the original retail purchaser of a product and is not transferable or assignable. Replacement components or products may
be used and/or refurbished components or products, provided they are of like quality and speci cations as new components or products.
Midmark warrants to the original retail purchaser that during the applicable warranty period it will repair or replace software contained
within the products manufactured by Midmark (except for those not warranted under “Exclusions”) if: (1) the media on which the software is
furnished exhibits defects in material or workmanship under normal use; or (2) the software does not substantially conform to its published
speci cations.
APPLICABLE WARRANTY PERIOD The applicable warranty period, measured from the date of invoice to the original retail purchaser of
the product and shall be one (1) year for all warranted products and components.
OBTAINING WARRANTY SERVICE Warranty service must be obtained through either Midmark or an authorized dealer in the Midmark
product line for which warranty service is requested. Midmark may be contacted for warranty service inquiries or issues via email at www.
midmark.com; by phone at 1-800-MIDMARK or by mail to Midmark Corporation, 60 Vista Drive, Versailles, Ohio 45380. It is the retail purchaser’s obligation to arrange for delivery of a product to Midmark or one of its authorized dealers for warranty service, which delivery shall
be at retail purchaser’s expense. It is also the retail purchaser’s obligation to comply with the warranty service instructions provided either
by Midmark or its authorized dealer. The retail purchaser must provide Midmark with completed warranty registration information within
thirty (30) days after purchase in order to obtain the bene ts of this limited warranty.
EXCLUSIONS: This limited warranty does not cover and Midmark shall not be liable for the following:
(1) Defects, damage or other conditions caused, in whole or in part, by misuse, abuse, negligence, alteration, accident, freight damage,
negligent storage, tampering or failure to seek and obtain repair or replacement in a timely manner;
(2) Products which are not installed, used, and properly cleaned and maintained as required or recommended in the Midmark “Installation”
and/or “Installation/Operation Manual” for the applicable product, including the speci ed structural and operational environmental conditions
and electrical requirements;
(3) Products considered to be of a consumable or sterile nature;
(4) Accessories or parts not manufactured by Midmark;
(5) Charges by anyone for adjustments, repairs, replacement parts, installation or other work performed upon or in connection with such
products which are not expressly authorized in writing in advance by Midmark;
(6) Costs and expenses of routine maintenance and cleaning; and
(7) Representations and warranties made by any person or entity other than Midmark.
(8) Matching of color, grain or texture except to commercially acceptable standards;
(9) Changes in color caused by natural or arti cial light;
(10) Custom manufactured products;
(11) Alterations or modi cations to the product by any person or entity other than Midmark; and
(12) Products that would otherwise by covered under this limited warranty, but are acquired: (i) from a person or entity that is not Midmark
or one of its authorized dealers; or (ii) from a Midmark dealer that is not authorized to sell the product at issue in the geographic territory
where the purchaser is located, or is not authorized to sell the product at issue within the medical market.
SOFTWARE; WITH RESPECT TO SOFTWARE THAT IS A PRODUCT OR COMPONENT THEREOF, MIDMARK DOES NOT WARRANT
THAT THE SOFTWARE: (1) IS ERROR FREE; (2) CAN BE USED WITHOUT PROBLEMS OR INTERRUPTIONS; OR (3) IS FREE FROM
VULNERABILITY TO INTRUSION OR ATTACK BY VIRUSES OR OTHER METHODS.
EXCLUSIVE REMEDY; CONSEQUENTIAL DAMAGES DISCLAIMER MIDMARK’S ONLY OBLIGATION UNDER THIS LIMITED WARRANTY IS THE REPAIR OR REPLACEMENT OF DEFECTIVE PARTS. MIDMARK SHALL NOT BE LIABLE FOR AND HEREBY DISCLAIMS
ANY DIRECT, SPECIAL, INDIRECT, INCIDENTAL, EXEMPLARY OR CONSEQUENTIAL DAMAGES OR DELAYS, INCLUDING, BUT
NOT LIMITED TO, DAMAGES FOR LOSS OF PROFITS OR INCOME, LOSS OF USE, LOSS OF DATA, DOWNTIME, COVER AND
EMPLOYEE OR INDEPENDENT CONTRACTOR WAGES, PAYMENTS AND BENEFITS. THIS DISCLAIMER SHALL SURVIVE ANY
FAILURE OR ASSERTED FAILURE OF THE ESSENTIAL PURPOSE OF THIS LIMITED WARRANTY OR ITS REMEDIES SPECIFIED
HEREIN. WARRANTY DISCLAIMER THIS WARRANTY IS MIDMARK’S ONLY WARRANTY AND IS IN LIEU OF ALL OTHER WARRANTIES, EXPRESS OR IMPLIED. MIDMARK MAKES NO IMPLIED WARRANTIES OF ANY KIND INCLUDING ANY IMPLIED WARRANTIES
OF MERCHANTABILITY OR FITNESS FOR A PARTICULAR PURPOSE. THIS WARRANTY IS LIMITED TO THE REPAIR OR REPLACEMENT OF DEFECTIVE PARTS.
STATUTE OF LIMITATIONS No action may be brought against Midmark for breach of this limited warranty, an implied warranty, if any, or for
any other claim arising out of or relating to the products, more than ninety (90) days following expiration of the limited warranty period.
NO AUTHORIZATION No person or rm is authorized to create or approve for Midmark any other obligation or liability in connection with
the products.
Warranty Information
Page 41

English - 41
003-10027-99 © Midmark Corporation 2017
TP202 20-42-FO-00014 Rev A1 C2169
Notes:
Page 42

Midmark Corporation
60 Vista Drive
Versailles, OH 45380 USA
1-800-643-6275
+1-937-526-3662
TP202 20-42-FO-00014 Rev A1 C2169
Page 43

Style P
Sillón de exploración
Barrier-Free®
con IQscale® y conexiones para
las constantes vitales
TP202 20-42-FO-00014 Rev A2 C2169
Inglés
Español
Francés
Para los modelos:
626 (-003, -004, -005, -006)
Guía del usuario
Page 44

Español - 2
003-10027-99 © Midmark Corporation 2017
TP202 20-42-FO-00014 Rev A1 C2169
Modelo/número de serie:
Fecha de compra:
Servicio técnico autorizado
por Midmark:
Distribuidor:
Información del producto
Etiqueta de modelo / número de serie
situada en el armazón de soporte del respaldo
(la ubicación exacta puede variar)
Page 45

Español - 3
003-10027-99 © Midmark Corporation 2017
TP202 20-42-FO-00014 Rev A1 C2169
Índice
Información importante
Símbolos de seguridad ................................................................................................................4
Registro del producto ...................................................................................................................5
Condiciones de transporte/almacenamiento ................................................................................5
Condiciones de funcionamiento ...................................................................................................5
Cómo deshacerse del equipo ......................................................................................................5
Información sobre el cumplimiento ..............................................................................................6
Uso previsto .................................................................................................................................7
Requisitos eléctricos ....................................................................................................................7
Interferencia electromagnética .....................................................................................................7
Precisión de la balanza digital ......................................................................................................8
Instrucciones de seguridad ..........................................................................................................9
Funcionamiento
Funciones de IQscale® ............................................................................................................... 11
Active Sensing TechnologyTM .....................................................................................................17
Funciones de la base y el respaldo ............................................................................................18
Función «Inicio» programable ....................................................................................................19
Función Quick Exam® ................................................................................................................20
Bloqueo de control .....................................................................................................................21
Procedimiento de asociación .....................................................................................................22
Rollo de papel y cintas ...............................................................................................................23
Estribos ......................................................................................................................................24
Bandeja de tratamiento y reposapiés ........................................................................................25
Calentador de cajón ...................................................................................................................26
Calentador de la tapicería (-004 /-006) ......................................................................................27
Inclinación pélvica ......................................................................................................................28
Tomacorrientes simples .............................................................................................................29
Conexiones de datos .................................................................................................................30
Sistema de ruedas Clean Assist™ .............................................................................................33
Mantenimiento
Contactar con el servicio técnico ...............................................................................................34
Limpieza .....................................................................................................................................34
Mantenimiento preventivo ..........................................................................................................34
Resolución de problemas ...........................................................................................................35
Especicaciones
Tabla de especicaciones ..........................................................................................................36
Identicación del modelo/Tabla de cumplimiento de las normativas..........................................37
Límite de movimiento .................................................................................................................38
Dimensiones ..............................................................................................................................39
Información sobre la garantía
Garantía limitada ........................................................................................................................40
Page 46

Español - 4
003-10027-99 © Midmark Corporation 2017
TP202 20-42-FO-00014 Rev A1 C2169
Número del catálogo
Fabricante
Número de serie
Detener
ADVERTENCIA
Indica una situación potencialmente peligrosa que podría ocasionar lesiones graves.
Información importante - símbolos de seguridad
Precaución
Indica una situación potencialmente peligrosa que puede ocasionar lesiones leves o
moderadas. También puede usarse para alertar contra prácticas peligrosas.
Advertencia sobre el equipo
Indica una situación que podría provocar daños en el equipo.
Toma de tierra protectora
Orientación correcta para el
transporte
Frágil
Pieza aplicada de tipo B
(tapicería estándar)
Límite de peso del paciente
xxx kg
xxx lbs
Especicación nominal del fusible
Voltaje peligroso / peligro de descarga eléctrica
Altura máxima de apilamiento
(unidades almacenadas)
Mantener seco
Ciclo de utilización (tiempo de
funcionamiento del motor)
30 segundos ON (encendido),
5 minutos OFF (apagado)
Nota
Desarrolla un procedimiento, una práctica o
una condición.
Consultar el manual
Glosario de símbolos
La tapicería con calefacción es
una pieza aplicada de tipo BF.
No rasgue la tapicería con objetos punzantes como agujas,
bisturís, etc.
Instrucciones de funcionamiento
Page 47

Español - 5
003-10027-99 © Midmark Corporation 2017
TP202 20-42-FO-00014 Rev A1 C2169
Condiciones de transporte/almacenamiento
Rango de temperatura ambiente: ...............................de -30 °C a +60 °C (de -22 °F a +140 °F)
Humedad relativa .......................................................de 10 % a 90 % (sin condensación)
Condiciones de funcionamiento
Rango de temperatura ambiente: ...............................de +10 °C a +40 °C (de +50 °F a +104 °F)
Humedad relativa .......................................................de 30 % a 75 % (sin condensación)
Altitud..........................................................................3 000 m o menos
Cómo deshacerse del equipo
Al nal del ciclo de vida del producto, tanto el sillón como sus accesorios y otros consumibles podrían estar
contaminados por efecto de su uso habitual. Consulte las normativas y códigos locales para la correcta
eliminación de equipos, accesorios y otros productos fungibles.
Registro del producto
Para registrar su producto, visite www.midmark.com.
Page 48

Español - 6
003-10027-99 © Midmark Corporation 2017
TP202 20-42-FO-00014 Rev A1 C2169
Información sobre el cumplimiento
Declaración de conformidad con las emisiones de CFC
Este equipo ha sido probado y cumple con los límites establecidos para un dispositivo digital de Clase A,
conforme a la parte 15 de las normativas sobre CFC. Tales límites se han determinado para ofrecer una
protección razonable contra las interferencias cuando el equipo funciona en un entorno comercial. Este
equipo genera, utiliza y puede emitir energía de frecuencia radio, y, si no se instala y utiliza de conformidad
con el manual de instrucciones, puede provocar interferencias con las comunicaciones por radio. Es
probable que el funcionamiento de este equipo en una zona de viviendas provoque interferencias. En tal
caso, el usuario deberá correr con los gastos derivados de subsanar la interferencia.
Cualquier modicación de este producto puede violar las normas de la Comisión Federal de
Comunicaciones e incurrir en el uso ilegal del producto.
Declaración de conformidad CI
Interferencia
«Este dispositivo cumple con las normas RSS exentas de licencia de la Industria de Canadá. El
funcionamiento depende de las dos condiciones siguientes: (1) este dispositivo no puede provocar
interferencias y (2) este dispositivo debe admitir las interferencias recibidas, incluso interferencias que
causen un funcionamiento no deseado del dispositivo».
"Le présent appareil est conforme aux CNR ďIndustrie Canada applicables aux appareils radio exempts
de licence. Ľexploitation est autorisée aux deux conditions suivantes: (1) ľappareil ne doit pas produire
de brouillage, et (2) ľutilisateur de ľappareil doit accepter tout brouillage radioélectrique subi, même si le
brouillage est susceptible ďen compromettre le fonctionnement".
Antenas
«Con arreglo a las normas de la Industria de Canadá, este radiotransmisor solo puede funcionar utilizando
una antena de un tipo y una ganancia máxima (o inferior) aprobada para el transmisor por la Industria
de Canadá. Para reducir las posibles interferencias de la radio con otros usuarios, el tipo de antena y su
ganancia deben elegirse de forma que la potencia isotrópica radiada equivalente (p.i.r.e.) no sea mayor de
la necesaria para una correcta comunicación».
"Conformément à la réglementation ďIndustrie Canada, le présent émetteur radio peut fonctionner avec une
antenne ďun type et ďun gain maximal (ou inférieur) approuvé pour ľémetteur par Industrie Canada. Dans
le but de réduire les risques de brouillage radioélectrique à ľintention des autres utilisateurs, il faut choisir le
type ďantenne et son gain de sorte que la puissance isotrope rayonnée équivalente (p.i.r.e.) ne dépasse pas
ľintensité nécessaire à ľétablissement ďune communication satisfaisante".
Page 49

Español - 7
003-10027-99 © Midmark Corporation 2017
TP202 20-42-FO-00014 Rev A1 C2169
Requisitos eléctricos
Uso previsto
El sillón de exploración, que puede utilizarse como sillón/camilla, está diseñada para proporcionar apoyo
a los pacientes y para mantener su posición durante procedimientos de exploración generales a cargo de
profesionales médicos.
Con la adición de la balanza digital integrada, el sillón de exploración también está previsto para su uso
en la supervisión regular para evaluar el cambio de peso del paciente, así como para la medición del peso
del paciente con el n de ayudar en el diagnóstico médico. La balanza digital integrada no está prevista
para ser utilizada con pacientes que pesan menos de 13,6 kilogramos (30 libras) o más de 295 kilogramos
(650 libras).
Interferencia electromagnética
Este producto se ha diseñado y construido para reducir al mínimo la interferencia electromagnética con
otros dispositivos. Sin embargo, si detecta interferencias entre este producto y otros dispositivos:
• Retire el dispositivo que cause interferencias de la sala
• Enchufe el sillón en un circuito aislado
• Aumente la separación entre el sillón y el dispositivo que cause las interferencias
• Póngase en contacto con Midmark si las interferencias persisten
Antes de conectar el cable de alimentación del dispositivo Midmark a una fuente de alimentación eléctrica,
se recomienda contactar con un electricista local autorizado o una autoridad local que tenga jurisdicción
sobre la distribución de energía interna del edicio para vericar que, al conectar el dispositivo, este
cumple con todos los códigos eléctricos locales. Utilice la potencia eléctrica marcada en el dispositivo para
determinar cuáles son los circuitos eléctricos derivados apropiados y los requisitos de salida. Para modelos
de 115 V con una calicación de corriente de 12 amperios o más, puede requerirse un circuito dedicado en
caso de que la protección de dicho circuito provenga de un disyuntor de 15 amperios.
Advertencia sobre el equipo
Los equipos portátiles de comunicación por radiofrecuencia (entre ellos los periféricos como los
cables de antena y las antenas externas) deben utilizarse a una distancia superior a los 30 cm
(12 pulgadas) con respecto a cualquier parte del sillón de exploración, incluyendo los cables
especificados por el fabricante. De lo contrario, el rendimiento de este equipo podría empeorar.
Precaución
Para aislar completamente el sillón de la red eléctrica principal, el cable de alimentación debe
estar desenchufado.
Precaución
Antes de utilizar los dispositivos quirúrgicos de alta frecuencia o los catéteres endocárdicos,
consulte las instrucciones de funcionamiento de dichos dispositivos. De lo contrario, el
paciente puede sufrir una descarga eléctrica o una quemadura.
Page 50

Español - 8
003-10027-99 © Midmark Corporation 2017
TP202 20-42-FO-00014 Rev A1 C2169
Ensayo de inmunidad Nivel del ensayo de inmunidad
Descarga electrostática ± 8 kV contacto, ±15 kV aire
Campos radiofrecuencia electromagnética radiados 3 V/m
80 MHz-2,7 GHz 80 % AM a 1 kHz
Frecuencia de alimentación nominal campos magnéticos 30 A/m
Transitorios eléctricos rápidos Frecuencia de repetición ±2 kV a 100 kHz
Sobretensión Línea a línea: ±1 kV
Línea a tierra: ±2 kV
Radiofrecuencia conducida 3 V: 0,15 MHz-80 MHz
6 V en bandas ISM entre 0,15 MHz-80 MHz
80 % AM a 1 kHz
Bajadas de tensión 0 % UT; 0,5 ciclo
A 0°, 45°, 90°, 135°, 180°, 225°, 270° y 315°
0 % UT; 1 ciclo
y
70 % UT; 25/30 ciclos
Monofásico: a 0°
Cortes de tensión 0 % UT; 250/300 ciclo
Nota
Las emisiones características de este equipo hacen que sea adecuado para zonas industriales
y hospitales. El sillón de exploración no es apropiado para utilizarse en un entorno residencial.
CEM: directrices y declaración del fabricante
Ensayo de radiación Nivel del ensayo de radiación
Emisiones de radiofrecuencia conducidas o radiadas CISPR 11 Grupo 1 Clase A
Precisión de la balanza digital
Advertencia sobre el equipo
Antes de utilizar la balanza digital, verique que mide con precisión mediante un peso
de referencia de valor conocido. Además, consulte el Programa de mantenimiento
preventivo para ver la frecuencia recomendada para esta comprobación. Si se concluye
que la balanza está mal calibrada, póngase en contacto con su proveedor de servicios
Midmark autorizado antes de utilizar la balanza.
Precaución
Para los modelos con un mando de control por cable, ejercer tensión en el cable del
mando de control puede afectar a la balanza digital.
Page 51

Español - 9
003-10027-99 © Midmark Corporation 2017
TP202 20-42-FO-00014 Rev A1 C2169
Advertencia
Para evitar el peligro de incendio o el riesgo de descarga eléctrica, este equipo debe
conectarse únicamente a enchufes provistos de toma a tierra de protección.
Instrucciones de seguridad
Advertencia
No se permite la modificación de este equipo.
Advertencia
Al conectar el equipo a una toma con enchufes múltiples se crea efectivamente un sistema
médico eléctrico que puede tener como consecuencia una reducción del nivel de seguridad.
Advertencia
El uso de accesorios, transductores y cables que no sean los especificados o suministrados
por el fabricante de este equipo podría aumentar las emisiones electromagnéticas o reducir la
inmunidad electromagnética de este equipo y dar lugar a un funcionamiento inadecuado.
ADVERTENCIA
El equipo no se puede utilizar en presencia de mezclas anestésicas inflamables.
Aclaración: El equipo puede utilizarse en presencia de oxígeno, aire u óxido nitroso.
Advertencia
Antes de cada uso, asegúrese de que el entorno esté libre de obstáculos. De lo contrario,
podría producirse un funcionamiento inadecuado, así como lesiones graves.
Page 52

Español - 10
003-10027-99 © Midmark Corporation 2017
TP202 20-42-FO-00014 Rev A1 C2169
Espacio
Aproximadamente
0,94 cm (0,37 in)
En la altura más baja del sillón [37 cm (14,6 in)] con espuma comprimida, el espacio entre
la parte inferior del cajón y el suelo es de aproximadamente 0,94 cm (0,37 in). Asegúrese de
que el paciente (especialmente sus pies) y cualquier otro objeto se encuentren fuera de esta
área antes de bajar el sillón.
Si el sillón funciona incorrectamente, suelte de inmediato el mando de control, desconecte el
cable de alimentación y ayude al paciente a bajar del sillón. Si el sillón continúa funcionando
incorrectamente, llame al servicio técnico.
De no seguir estas instrucciones se pueden provocar lesiones al paciente o daños al equipo.
Advertencia
Asegúrese de que no haya personas ni instrumental cerca del sillón antes de
activar cualquier función. Si no lo hace puede provocar lesiones personales.
Advertencia sobre el equipo
El sillón, en uso normal, se debe ubicar de tal forma que se pueda
acceder con facilidad a los cables de alimentación para desenchufarlos.
Instrucciones de seguridad – continuación
Page 53

Español - 11
003-10027-99 © Midmark Corporation 2017
TP202 20-42-FO-00014 Rev A1 C2169
Funcionamiento
Funciones de IQscale
®
La mejor práctica es poner siempre la balanza a cero antes de pesar al paciente. Consulte las directrices de
pesaje en este manual para obtener más información.
Para tarar la balanza...
Antes de sentar al paciente, pulse y suelte el botón «Zero» (puesta a cero). La pantalla
muestra «ZEROING» (puesta a cero) y, a continuación, cuando termina, muestra
«SCALE READY» (balanza lista); la operación de puesta a cero se ha completado y el
paciente puede sentarse.
Nota
Antes de sentar al paciente en el sillón de exploración, asegúrese de que se ha
puesto a cero la balanza.
No hacerlo puede afectar a la medición del peso del paciente.
Zero
(Puesta
a cero)
Advertencia sobre el equipo
La balanza digital integrada no está prevista para ser utilizada con
pacientes que pesan menos de 13,6 kg (30 lbs) o más de 295 kg (650 lbs).
Precaución
Para los modelos con un mando de control por cable, colocar el mando
de control en la funda antes de pulsar el botón «Zero» (puesta a cero)
para garantizar la máxima precisión de la balanza.
Page 54

Español - 12
003-10027-99 © Midmark Corporation 2017
TP202 20-42-FO-00014 Rev A1 C2169
Advertencia
La balanza está prevista para su uso con pacientes que pesan entre 13,6 y 295 kg (30 / 650 lbs).
Para pesos inferiores a 13,6 kg (30 lbs) o superiores a 295 kg (650 lbs), en la pantalla parpadeará
la lectura del peso para indicar que el peso está fuera del rango. No utilice una lectura de peso
fuera de rango (parpadeando) para las mediciones de los pacientes.
Peso
Altura / IMC
Aumentar
Disminuir
Para medir el peso del paciente...
Con el paciente sentado, presiones y suelte el botón Weight (pesar).
Nota: Para evitar que el paciente toque el suelo con los pies, el sillón se elevará
automáticamente hasta una altura de sesenta y tres centímetros y medio
(veinticinco pulgadas) antes de mostrar el peso del paciente.
Para calcular el IMC del paciente...
a) Una vez mostrado el peso del paciente, pulse y suelte el botón «Height / BMI» (altura / IMC).
b) Pulse los botones (+) o (-) para aumentar o disminuir la altura del paciente que aparece en la
pantalla.
c) Vuelva a pulsar el botón «Height / BMI» (altura / IMC) para mostrar el IMC del paciente.
Funciones de IQscale® – continuación
Nota
Después de pulsar el botón «Weight» (peso),
el peso del paciente permanecerá en la
pantalla solo durante tres segundos.
Precaución
Para los modelos con un mando de control por cable, colocar el mando
de control en la funda antes de pulsar el botón «Weight» (pesar) para
garantizar la máxima precisión de la balanza.
Page 55

Español - 13
003-10027-99 © Midmark Corporation 2017
TP202 20-42-FO-00014 Rev A1 C2169
Puesta a cero automática
La mejor práctica es poner siempre la balanza a cero antes de pesar al paciente. Consulte las directrices de
pesaje en este manual para obtener más información.
Además, la balanza digital se pondrá a cero automáticamente a intervalos regulares. Esta puesta a cero
automática solo se realizará cuando no haya pacientes en el sillón de exploración.
Nota
Antes de sentar al paciente en el sillón de exploración, asegúrese de que
se ha puesto a cero la balanza.
No hacerlo puede afectar a la medición del peso del paciente.
Zero
(Puesta a cero)
Page 56

Español - 14
003-10027-99 © Midmark Corporation 2017
TP202 20-42-FO-00014 Rev A1 C2169
Conguración de las unidades
La tecla «Units» (unidades) se utilizará para bloquear las unidades (inglesas o métricas), y para
desbloquearlas.
La tecla «Units» (unidades) funcionará de modo diferente cuando las unidades estén bloqueadas y
cuando estén desbloqueadas.
Si las unidades están desbloqueadas:
• Cuando no se muestra nada en la pantalla, al soltar la tecla «Units» (unidades) se mostrará el
indicador de unidades actual.
• Cuando en la pantalla se muestra únicamente el indicador de unidades, entonces, al soltar la
tecla «Units» (unidades) se provocará que el indicador de unidades cambie entre las pantallas
mostrando pulg/lbs y cm/kg.
• Cuando la pantalla muestra únicamente el indicador de unidades, al mantener pulsada la tecla
«Units» (unidades) durante 3 segundos, el LCD mostrará el siguiente mensaje: ‘UNITS’,’LOCKED’,’
‘ (unidades, bloqueado) dos veces.
• Cuando en la pantalla se muestra el peso, pulsar y soltar la tecla «Units» (unidades) hará que el
indicador de unidades cambie entre lbs/kg y mostrará el peso en la nueva unidad.
• Cuando en la pantalla se muestra la altura, pulsar y soltar la tecla «Units» (unidades) hará que el
indicador de unidades cambie entre in/cm y mostrará la altura en la nueva unidad.
Si las unidades están bloqueadas:
• Cuando no se muestra nada en la pantalla, al soltar la tecla «Units» (unidades) se mostrará el
indicador de unidades actual.
• Cuando en la pantalla solo se muestra el indicador de unidades, al soltar la tecla «Units»
(unidades) no ocurrirá nada.
• Cuando la pantalla muestra únicamente el indicador de unidades, al mantener pulsada
la tecla «Units» (unidades) durante 3 segundos, el LCD mostrará el siguiente mensaje:
‘UNITS’,’UNLOCKED’,’ ‘ (unidades, desbloqueado) dos veces.
• Cuando en la pantalla se muestra el peso, pulsar la tecla «Units» (unidades) hará que el indicador
de unidades cambie entre lbs/kg y mostrará el peso en la nueva unidad. Soltar la tecla «Units»
(unidades) volverá a cambiar el indicador de unidades a las unidades anteriores.
• Cuando en la pantalla se muestra la altura, pulsar la tecla «Units» (unidades) hará que el indicador
de unidades cambie entre in/cm y mostrará la altura en la nueva unidad. Soltar la tecla «Units»
(unidades) volverá a cambiar el indicador de unidades a las unidades anteriores.
Page 57

Español - 15
003-10027-99 © Midmark Corporation 2017
TP202 20-42-FO-00014 Rev A1 C2169
Para garantizar un pesaje adecuado de los pacientes,
revise las siguientes directrices.
No ponga la balanza a cero mientras el paciente
esté en el sillón.
Asegúrese de que los pies del paciente
no tocan el suelto durante el pesaje.
Ponga la balanza a cero después de añadir o
quitar equipamiento.
Ponga la balanza a cero después de añadir o
quitar suministros.
No se apoye, pise ni aplique
carga en el sillón mientras esté midiendo el peso.
No pese a los pacientes con objetos
como bolsos, abrigos, etc.
Page 58

Español - 16
003-10027-99 © Midmark Corporation 2017
TP202 20-42-FO-00014 Rev A1 C2169
Conexión de la palanca y el pedal de control
Aunque los controles inalámbricos son estándar en algunos modelos, hay puertos del mando/pedal
de control para controles por cable que se encuentra en la base del reposacabezas y del reposapiés
de la camilla.
Puerto de
control
Puerto de
control
Page 59

Español - 17
003-10027-99 © Midmark Corporation 2017
TP202 20-42-FO-00014 Rev A1 C2169
Funcionamiento
Active Sensing Technology
TM
La Active Sensing TechnologyTM evita que el sillón se mueva hacia abajo si la parte inferior del cajón entra
en contacto con otro objeto. Si la Active Sensing TechnologyTM está activada, sonarán una serie de pitidos,
la función Bajar base se desactivará y el sillón se moverá en la dirección Subir base. Para reanudar el
funcionamiento Bajar base, retire el objeto que se encuentra bajo el cajón y pulse los botones Subir/bajar
base del mando de control.
Advertencia
Asegúrese de que no haya personas ni instrumental cerca del sillón antes de
activar cualquier función. Si no lo hace puede provocar lesiones personales.
Page 60

Español - 18
003-10027-99 © Midmark Corporation 2017
TP202 20-42-FO-00014 Rev A1 C2169
Función del
respaldo
Función
de la base
Detener
¡Atención!
La Active Sensing Technology
TM
detendrá la función de bajada de la base y la replegará hacia arriba
si la parte inferior del cajón entra en contacto con otro objeto.
(Si la Active Sensing TechnologyTM está activada, escuchará una serie de pitidos.)
Para reanudar el funcionamiento de bajada de la base:
Retire el objeto que se encuentra debajo del cajón.
Pulse el botón de Bajar base.
Funcionamiento - continuación
Funciones de la base y el respaldo
Para accionar las funciones de la base
y del respaldo...
Mantenga pulsado el botón de flecha Arriba o
Abajo para activar la función deseada.
Nota: El sillón se detiene automáticamente al llegar a la
altura máxima y la mínima. El botón de Detener
puede pulsarse en cualquier momento para
detener el movimiento.
Función del respaldo
Función de la base
Detener
Advertencia sobre el equipo
Los mandos de control deben estar
en un radio de cuatro metros y medio
(quince pies) en torno al sillón para
poder manejar el mismo.
Page 61

Español - 19
003-10027-99 © Midmark Corporation 2017
TP202 20-42-FO-00014 Rev A1 C2169
Inicio
Detener
Inicio
Detener
Nota
Al pulsar el botón Inicio, se escuchará un tono para indicar el movimiento automático.
Advertencia sobre el equipo
Los mandos de control deben estar en un
radio de cuatro metros y medio
(quince pies) en torno al sillón para poder
manejar el mismo.
Función «Inicio» programable
La función Inicio mueve automáticamente el sillón a una posición programada.
La función Inicio viene preajustada de fábrica para bajar el sillón automáticamente a la altura de 43 cm
(17 pulgadas) y subir el respaldo hasta un ángulo de 80 grados.
Para activar la función Inicio...
Pulse y suelte el botón Inicio.
Nota: para detener el movimiento solo hay
que pulsar CUALQUIER botón en
cualquier momento.
Para programar la función Inicio...
a) Pulse el botón Subir/bajar base para mover la base hasta la posición deseada.
b) Pulse el botón Subir/bajar respaldo para mover el respaldo hasta la posición
deseada.
c) Pulse el botón Detener y después el botón Inicio y manténgalos pulsados de
forma simultánea durante tres o cuatro segundos.
Nota: escuchará un tono cuando la nueva posición «Inicio» se haya guardado.
Page 62

Español - 20
003-10027-99 © Midmark Corporation 2017
TP202 20-42-FO-00014 Rev A1 C2169
Para activar la función Quick Exam®...
Pulse y suelte el botón Quick Exam®.
Nota: para detener el movimiento solo hay que pulsar
CUALQUIER botón en cualquier momento.
Detener
Quick Exam
®
Advertencia sobre el equipo
Los mandos de control deben estar
en un radio de cuatro metros y medio
(quince pies) en torno al sillón para
poder manejar el mismo.
Quick Exam
®
Detener
Para programar la función Quick Exam®...
a) Pulse el botón Subir/bajar base para mover la base hasta la posición deseada.
b) Pulse el botón Subir/bajar respaldo para mover el respaldo hasta la posición
deseada.
c) Pulse el botón Detener y después el botón Quick Exam® y manténgalos pulsados de
forma simultánea durante tres o cuatro segundos.
Nota: escuchará un tono cuando la nueva posición Quick Exam® se haya guardado.
Función Quick Exam
®
La función Quick Exam® mueve automáticamente el sillón a una posición programada.
La función Quick Exam® viene preajustada de fábrica para subir el sillón automáticamente a la altura de
86 cm (34 pulgadas) y subir el respaldo hasta un ángulo de 80 grados.
Nota
Al pulsar el botón Quick Exam
®
, se escuchará un tono para indicar el movimiento automático.
Page 63

Español - 21
003-10027-99 © Midmark Corporation 2017
TP202 20-42-FO-00014 Rev A1 C2169
Detener
Detener
Bajar
el respaldo
Bajar
el respaldo
Para habilitar o deshabilitar la función
de control de bloqueo...
Mantenga pulsados simultáneamente los
botones Detener y Bajar respaldo de tres a
cuatro segundos.
Escuchará...
• Un solo pitido cuando esté bloqueado.
• Pitidos hasta que suelte los botones cuando
esté desbloqueado.
Nota: si se intenta un movimiento mientras los controles están
bloqueados, oirá una serie de pitidos hasta que cese el
intento de movimiento.
Bloqueo de control
La función de bloqueo de control es un medio para bloquear cualquier movimiento de la base y el respaldo
en el sillón. Esto incluye los movimientos accionados mediante el mando y el pedal de control. También
bloqueará la capacidad de recibir peso desde la balanza al mando de control.
Nota
El ajuste predeterminado de fábrica para el bloqueo de control es «deshabilitado» y el operario debe
habilitarlo.
Advertencia sobre el equipo
Los mandos de control deben estar en un radio
de cuatro metros y medio (quince pies) en
torno al sillón para poder manejar el mismo.
Page 64

Español - 22
003-10027-99 © Midmark Corporation 2017
TP202 20-42-FO-00014 Rev A1 C2169
Detener
Detener
Bajar
la base
Procedimiento de asociación...
Desconecte la alimentación durante al menos
tres segundos.
Vuelva a conectar la alimentación y esperar hasta
que el sillón pite tres veces.
Pulse y mantenga pulsados los botones Detener y
Bajar base hasta que el control pite tres veces.
Nota: dos pitidos indican que la asociación no se ha realizado
correctamente.
Bajar
la base
Advertencia sobre el equipo
Al sillón solo se puede asociar un
mando de control y un pedal de control
al mismo tiempo.
Procedimiento de asociación
Los mandos de control inalámbricos solo funcionarán con el sillón al que se hayan «asociado». Esto evita
los movimientos no deseados en más de un sillón. Cada asociación de los mandos de control inalámbricos
viene preajustada de fábrica. Este procedimiento solo es necesario en caso de que se estén utilizando
varios mandos de control para más de un sillón o cuando se utilice un mando de control con un sillón que
no sea el que tenía asociado previamente.
Advertencia sobre el equipo
Los mandos de control deben estar
en un radio de cuatro metros y medio
(quince pies) en torno al sillón para
poder manejar el mismo.
Page 65

Español - 23
003-10027-99 © Midmark Corporation 2017
TP202 20-42-FO-00014 Rev A1 C2169
Para instalar el rollo de papel...
Inserte los extremos de la barra en
los encastres debajo del extremo
tapizado de la cabecera.
Para instalar la cinta...
Coloque la cinta de modo que se enganche
a ambos lados del sillón.
Advertencia
Para evitar lesiones, no ponga la cabeza ni las extremidades debajo de la cinta de papel.
Nota
Bajo la sección del respaldo se puede almacenar un rollo de
papel adicional.
Rollo de papel y cintas
Tamaño del rollo de papel (máximo): ......................................... 61 cm de ancho x 9,2 cm de diámetro
(24 in x 3,5/8 in)
Page 66

Español - 24
003-10027-99 © Midmark Corporation 2017
TP202 20-42-FO-00014 Rev A1 C2169
Para colocar los estribos...
A) Saque el estribo y despliéguelo.
B) Eleve ligeramente el estribo y muévalo hacia la izquierda
o la derecha, como lo desee.
C) Libere el estribo y fíjelo en la posición deseada.
Estribos
Precaución
Asegúrese de los estribos estén bloqueados en su
posición antes de usar el sillón Los estribos no están
diseñados para soportar todo el peso del paciente.
Page 67

Español - 25
003-10027-99 © Midmark Corporation 2017
TP202 20-42-FO-00014 Rev A1 C2169
Para extender el reposapiés...
Tire del reposapiés hacia fuera
hasta la posición deseada.
Bandeja de tratamiento y reposapiés
Para acceder a la bandeja de
tratamiento...
Tire de la bandeja de tratamiento hacia
fuera hasta la posición deseada.
Advertencia
No use el reposapiés para apoyar todo el peso del paciente.
Page 68

Español - 26
003-10027-99 © Midmark Corporation 2017
TP202 20-42-FO-00014 Rev A1 C2169
Para encender y apagar el calentador de cajón...
Pulse y suelte el interruptor del calentador de cajón.
Nota: el interruptor se iluminará cuando el calentador esté encendido.
Interruptor del
calentador de cajón
Calentador de cajón
El calentador del cajón calienta de 33ºC (92ºF) a 44ºC (112ºF) medidos en el centro del cajón a temperatura
ambiente y tensión de entrada nominal.
Page 69

Español - 27
003-10027-99 © Midmark Corporation 2017
TP202 20-42-FO-00014 Rev A1 C2169
Calentador de la tapicería (-004 /-006)
Interruptor del calentador
de la tapicería
Para encender y apagar el calentador de la tapicería...
Pulse y suelte el interruptor del calentador de la tapicería una vez para
el ajuste BAJO y dos veces para el ajuste ALTO. Pulse el interruptor del
calentador una tercera vez para apagar el calentador de la tapicería.
Nota: el interruptor se iluminará con un verde tenue en el ajuste BAJO y con
un verde brillante en el ajuste ALTO.
Precaución
La utilización del calentador de tapicería junto con otros dispositivos
calefactores podría causar temperaturas corporales elevadas.
La temperatura nominal de la supercie del ajuste BAJO es de aproximadamente 35 °C +/- 3 °C (95 ° +/5 °F), y la temperatura nominal de la supercie del ajuste ALTO es de aproximadamente 39 °C +/- 3 °C
(102 ° +/- 5 °F) con una temperatura ambiente de 21 °C +/- 1 °C (70 ° +/- 2 °F). Habrá una diferencia
aproximada de 4 °C +/- 1 °C (7 ° +/- 2 °F) entre el ajuste alto y bajo. El calentador de la tapicería se
apagará automáticamente después de diez horas de funcionamiento. La tapicería tarda aproximadamente
20-25 minutos en alcanzar 37 °C (99 °F) desde una temperatura ambiente de 23 °C (73 °F).
Nota
Los arneses que sobresalen de la camilla por debajo de la soldadura
trasera solo se deben utilizar para tapizados con calentamiento.
Page 70

Español - 28
003-10027-99 © Midmark Corporation 2017
TP202 20-42-FO-00014 Rev A1 C2169
Soporte pélvico
Para elevar la sección del asiento...
Eleve el asiento hasta que el soporte pélvico
esté en su sitio.
Para volver a colocar la sección del
asiento en posición horizontal...
A) Levante ligeramente la sección del
asiento.
B) Gire la manija del soporte pélvico hacia
arriba.
C) Baje la sección del asiento.
Inclinación pélvica
Soporte pélvico
Page 71

Español - 29
003-10027-99 © Midmark Corporation 2017
TP202 20-42-FO-00014 Rev A1 C2169
Los tomacorrientes simples de ambos laterales del sillón proporcionan alimentación a los accesorios que se
utilizan durante procedimientos médicos. Hay dos disyuntores situados debajo de la sección del asiento. Si
se supera la carga máxima de los tomacorrientes, los disyuntores interrumpirán la alimentación.
Carga máxima.......................................................................................... 115 V CA, 4 amperios
Tomacorrientes simples
Disparado
(sin alimentación)
Restablecido
(con alimentación)
Disyuntores
Para volver a activar el disyuntor...
Pulse el interruptor del disyuntor.
Page 72

Español - 30
003-10027-99 © Midmark Corporation 2017
TP202 20-42-FO-00014 Rev A1 C2169
Conexiones de datos
Las conexiones de datos están colocadas en cada lado del sillón y en la parte trasera
del mismo.
Puertos 1, 2 y 3: conexiones constantes vitales.
Puerto 4: palanca ni el pedal de control por cable opcional.
Puerto 1
Puerto 3
Puerto 4
Puerto 2
Page 73

Español - 31
003-10027-99 © Midmark Corporation 2017
TP202 20-42-FO-00014 Rev A1 C2169
Conexiones de datos – continuación
Conexiones de constantes vitales
Los puertos serie del sillón proporcionan conexión a un dispositivo de constantes vitales. Esto permite leer el
peso del paciente de la balanza digital y transferirlo al dispositivo de constantes vitales para mostrarlo y leerlo.
Los dispositivos de constantes vitales compatibles son:
• IQvitals
®
de Midmark
• Welch Allyn
®
Spot Vital Signs® LXi *
• IQvitals® ZoneTM de Midmark
Instalación:
Compre el cable serie apropiado para su equipo:
• Cable serie para IQvitals® e IQvitals® Zone
TM
de Midmark, 1,8 m (6 pies) de largo, en espiral
(9A478001).
• Cable serie para IQvitals® e IQvitals® Zone
TM
de Midmark, 4,5 m (15 pies) de largo, recto (9A478002).
• Cable serie para IQvitals® e IQvitals® Zone
TM
de Midmark, 9 m (30 pies) de largo, recto (9A478003).
• Cable serie para IQvitals® e IQvitals® Zone
TM
de Midmark, 15 m (50 pies) de largo, recto (9A478004).
• Cable de serie para Welch Allyn
®
Spot Vital Signs® LXi, 1,8 m (6 pies) de largo, en espiral (9A479001).
• Cable de serie para Welch Allyn
®
Spot Vital Signs® LXi, 4,5 m (15 pies) de largo, recto (9A479002).
Conecte una de las conexiones de constantes vitales (puertos 1, 2 o 3) a un extremo del cable de serie y el otro
extremo al puerto correspondiente de su dispositivo de constantes vitales.
El peso del paciente se medirá automáticamente cuando este se siente en el sillón.
63,5 centímetros
(25 pulgadas)
mínimo
*
Welch Allyn® y Spot Vital Signs® son marcas registradas de Welch Allyn, Inc.
Nota
Antes de sentar al paciente en el sillón de exploración, asegúrese de que se ha puesto a cero la
balanza.
No hacerlo puede afectar a la medición del peso del paciente.
Nota
Si no se muestra el peso en su dispositivo de
constantes vitales, suba el sillón con la palanca o el
pedal de control. El sillón debe estar a una altura de
63,5 centímetros (25 pulgadas) o superior.
Page 74

Español - 32
003-10027-99 © Midmark Corporation 2017
TP202 20-42-FO-00014 Rev A1 C2169
Nota
Solo puede conectarse un dispositivo de constantes vitales cada vez.
Dispositivo IQvitals®
de Midmark
Dispositivo Welch Allyn
®
Spot Vital Signs
®
LXi
Conexiones de datos – continuación
Conexión del sillón al dispositivo de constantes vitales
El cable de serie puede conectarse a uno de los tres puertos que hay en el sillón.
Dispositivo IQvitals®
Zone
TM
de Midmark
Page 75

Español - 33
003-10027-99 © Midmark Corporation 2017
TP202 20-42-FO-00014 Rev A1 C2169
Para activar el Sistema de ruedas Clean Assist™...
A) Suba la sección del respaldo de 30 a 45 grados.
B) Asegúrese de que el sillón esté al menos cinco centímetros
(dos pulgadas) por encima de su posición más baja.
C) Mueva las palancas de control de cada lado del sillón a la
posición de acoplamiento del Sistema de ruedas Clean Assist™.
D) Mueva el sillón a su posición más baja para activar las ruedas.
Advertencia sobre el equipo
Una vez que se haya activado el Sistema de ruedas
Clean Assist™, desconecte el cable de alimentación
y el pedal de control y guárdelos lejos del sillón para
evitar que los cables sufran daños.
Posición de acoplamiento
del Sistema de ruedas
Clean Assist™
Sistema de ruedas Clean Assist™
Advertencia sobre el equipo
El uso previsto del Sistema de ruedas
Clean Assist™ es el posicionamiento
del sillón solamente dentro de la sala de
exploración.
Las palancas de control, situadas debajo de la sección del respaldo a ambos lados, sirven para activar y
desactivar el Sistema de ruedas Clean Assist™. Las ruedas están ubicadas en las esquinas del sillón
para facilitar el posicionamiento del mismo.
Advertencia sobre el equipo
Asegúrese de activar las dos palancas
de control.
Precaución
Para evitar lesiones, no active/desactive
nunca el Sistema de ruedas Clean Assist™
ni mueva el sillón con el paciente subido.
Mueva el sillón con precaución.
Para desactivar el Sistema de ruedas Clean Assist™...
A) Mueva el sillón hasta el lugar deseado.
B) Vuelva a conectar el cable de alimentación.
C) Eleve el sillón al menos 5 cm (2”) para desactivar el
Sistema de ruedas Clean Assist™.
Nota: se escuchará un clic para confirmar la desactivación.
Nota
Las palancas de control volverán automáticamente a la posición de
desacoplamiento del Sistema de ruedas Clean Assist™.
Ponga a cero la balanza después de mover el sillón para limpiarlo.
Posición de desacoplamiento del
Sistema de ruedas Clean Assist™
ADVERTENCIA
Para evitar el riesgo de caídas, el Sistema de
ruedas Clean Assist™ debe estar desactivado
cuando un paciente se suba o se baje del sillón
Sistema de ruedas Clean Assist™
Page 76

Español - 34
003-10027-99 © Midmark Corporation 2017
TP202 20-42-FO-00014 Rev A1 C2169
Mantenimiento
Contactar con el servicio técnico
Póngase en contacto con su distribuidor autorizado de Midmark si necesita asistencia técnica. Para ponerse
en contacto directamente con Midmark:
+1-937-526-3662
desde las 8:00 horas hasta las 17:00 de lunes a viernes (EST)
[excepto en días festivos regulares de los Estados Unidos]
Limpieza
Tapicería
Lave la tapicería todas las semanas utilizando una mezcla con un jabón líquido suave y agua, enjuague con
agua limpia y seque toda la supercie para eliminar la acumulación de residuos de desinfectante/limpiador.
Desinfecte la tapicería utilizando una solución de lejía común y agua 1:10 (10 %) o productos basados en cloro. A
continuación, enjuague con agua limpia y seque a fondo el material. Véanse las Directrices vigentes de los Centros
para el Control y la Prevención de Enfermedades para la desinfección y esterilización en centros sanitarios.
Para minimizar la acumulación de residuos de desinfectante/limpiador, no deje que los desinfectantes se
acumulen en la supercie de la tapicería. Una vez transcurrido el tiempo de contacto aprobado, retire y
seque el exceso de líquido que quede en la supercie.
Con el producto se incluyen instrucciones detalladas de conservación y mantenimiento. Esta información
también está disponible en www.midmark.com en la biblioteca técnica situada en el apartado «Información
del usuario» de su producto.
Supercies de metal o plástico pintadas
Limpie semanalmente las supercies de metal o plástico pintadas pasando un paño suave y limpio con
limpiadores suaves.
Mantenimiento preventivo
Revisión periódica de las siguientes áreas:
• El cable de alimentación no debe presentar cortes ni otros daños visibles.
• Todos los elementos de sujeción deben estar colocados y bien apretados.
• Todas las funciones mecánicas deben funcionar correctamente.
Lubrique periódicamente la bisagra del respaldo para mantener un funcionamiento continuo y silencioso
(utilice aceite ligero para máquinas.)
Un técnico debidamente autorizado deberá revisar el equipo cada seis meses.
No es necesario calibrar periódicamente la balanza. Es recomendable comprobar que la balanza mide con
precisión utilizando un peso de referencia de valor conocido cada seis meses.
Nota
Cuando llame para solicitar asistencia técnica
deberá indicar el modelo y el número de serie.
Advertencia sobre el equipo
La tapicería es resistente a la mayoría de las manchas que pueden producirse con
el uso médico, pero puede dañarse si se derraman tintes o disolventes sobre ella.
Debe secar inmediatamente los líquidos que se derramen sobre la tapicería.
Advertencia
Si se identifican daños o piezas sueltas, debería retirarse de uso el sillón de exploración y
procederse con su mantenimiento. Si no se hace esto, pueden sufrirse lesiones personales.
Advertencia
La tapicería debería revisarse antes de cada uso y sustituirse
si se encuentra perforada o presenta algún otro daño.
Page 77

Español - 35
003-10027-99 © Midmark Corporation 2017
TP202 20-42-FO-00014 Rev A1 C2169
Resolución de problemas
Síntoma Posible causa Corrección
No opera ninguna función. Tensión de alimentación de la
instalación.
Compruebe las conexiones del
cable de alimentación.
Reinicie el disyuntor de circuito.
El sillón se para y pita. El peso del paciente es superior
a 295 kg (650 lbs).
Informe al personal de que el
peso máximo del paciente es de
295 kg (650 lbs).
No hay alimentación en los
tomacorrientes del sillón.
Todas las demás opciones
funcionan.
Disyuntor/es del sillón activado. Levante la sección del asiento
para acceder al disyuntor, pulse
para reiniciar.
Al pulsar cualquier botón de control,
el mando de control emite un
único pitido. (Todas las opciones
funcionan)
Poca batería. Cambie las pilas. (tamaño: AA)
Cuando el botón del peso está
pulsado,
el mando de control muestra «Chair
Low» (sillón bajo).
Interrupción momentánea de la
alimentación.
Baje el sillón hasta abajo.
El sillón no se mueve al presionar
el botón Quick Exam
®
o no va a la
altura correcta.
La posición Quick Exam® se
ajusta al usuario y puede ser
necesario reprogramarla.
Vea las instrucciones de Quick Exam® en este manual.
Active Sensing Technology
TM
activada.
Retire el objeto que se
encuentra debajo del cajón.
El sillón no se mueve al presionar el
botón «Inicio» o no va a la posición
correcta.
La posición «Inicio» puede
ajustarse al usuario y puede que
necesite ser reprogramada.
Vea las instrucciones de
«Inicio» en este manual.
Active Sensing Technology
TM
activada.
Retire el objeto que se
encuentra debajo del cajón.
Page 78

Español - 36
003-10027-99 © Midmark Corporation 2017
TP202 20-42-FO-00014 Rev A1 C2169
Tabla de especicaciones
Peso del paciente (máximo): 295 kg (650 libras)
Resolución de la balanza:
Precisión de la balanza:
13,6 - 45,4 kg (30 - 100 lb)
45,4 - 136,1 kg (100 - 300 lb)
136,1 - 226,8 kg (300 - 500 lb)
226,8 - 294,8 kg (500 - 650 lb)
0,1kg (0,2 lb)
± 0,1kg 0,2 lb)
± 0,2kg 0,4 lb)
± 0,3kg 0,6 lb)
± 0,4kg 0,8 lb)
Rollo del papel (tamaño máximo): 61 cm de largo x 9,2 cm de diámetro (24 in x 3,5/8 in)
Límites de movimiento y dimensiones: (Consulte la página Límites de movimiento y dimensiones)
Peso del sillón:
con tapicería
con embalaje y plataforma (sin tap.)
Tap. con embalaje (enviado por separado)
215,5 kg (475 lbs)
220 kg (485 lbs)
18,1 kg (40 lbs)
Longitud del cable de alimentación: 244 cm (8 pies)
Requisitos eléctricos: [Consulte Identicación del modelo /
Tabla de cumplimiento de las normativas]
Voltaje del pedal/palanca de control: 3,3 V CC, voltaje de seguridad extra bajo (SELV)
Tomacorrientes simple (carga máxima) 115 V CA, 4A, 50/60 Hz
Fusibles:
Fusibles de entrada IEC
F1 (en la placa principal de circuito impreso)
F2 (en la placa principal de circuito impreso)
Modelos con calentadores de la tapicería
F1 y F2 (en la placa de circuito impreso del
calentador de la tapicería)
T8AH, 250 V, 5 x 20 mm
T250mAH, 250 V, 5 x 20 mm
T6.3AH, 250 V, 5 x 20 mm
T3.15AH, 250 V, 5 x 20 mm
Ciclo de trabajo
(tiempo de funcionamiento del motor):
Tomacorrientes, calentador de cajón:
Funcionamiento intermitente
[30 segundos ENCENDIDO, 5 minutos APAGADO]
Funcionamiento continuo
Clasicaciones: Clase I, pieza aplicada tipo B, excepto según se indi-
ca para tapicería opcional con calefacción,
funcionamiento intermitente
[30 segundos ENCENDIDO, 5 minutos APAGADO]
Certicaciones ES 60601-1:2012, CSA C22.2 No. 60601-1:14;
AAMI/ISO 80601-2-35:2009,
CSA C22.2 No. 80601-2-35:12, IEC 60601-1-2:2014
Tapicería opcional con calefacción, pieza aplicada
tipo BF, cumple con la norma IEC 80601-2-35
IPX0 Sillón
IPX1 Pedal de control
IPX2 Tapicería con calefacción
Frecuencias de transmisión/recepción 2 402 GHz-2 480 GHz
Especicaciones
Page 79

Español - 37
003-10027-99 © Midmark Corporation 2017
TP202 20-42-FO-00014 Rev A1 C2169
Modelo Descripción
Conformidad con:
Clasicaciones
eléctricas:
ANSI/AAMI
ES60601-1
CAN/CSA-C22.2
N.º 60601-1:14
IEC
60601-1-2
NFPA
99
VAC
+/-10
%
Amperios
Ciclos
(Hz)
626-003
Sillón de doble función (base / respal-
do) con tomacorrientes simples, rue-
das de retención, inclinación pélvica,
calentador de cajón, controles inalám-
bricos, IQscale
®
e IQhub
®
• • • •
115 12 50/60
626-004
Sillón de doble función (base / res-
paldo) con tomacorrientes simples,
ruedas de retención, inclinación
pélvica, calentador de cajón, tapicería
con calefacción controles inalámbricos,
IQscale
®
e IQhub
®
• • • •
115 12 50/60
626-005
Sillón de doble función (base / res
paldo) con tomacorrientes simples,
ruedas de retención, inclinación
pélvica, calentador de cajón, controles
por cable, IQscale®, & IQhub®
• • • •
115 12 50/60
626-006
Sillón de doble función (base / res
paldo) con tomacorrientes simples,
ruedas de retención, inclinación
pélvica, calentador de cajón, tapicería
climatizada, controles por cable,
IQscale®, & IQhub®
• • • •
115 12 50/60
Clasicación de códigos de incendios: Toda la tapicería cumple con el Boletín Técnico 117 de la Ocina de California
para Mobiliario del Hogar y con el Código de Regulaciones de California, Sección
93120-93120.12, Título 17. Hay tapizados opcionales disponibles que cumplen con
el Boletín técnico 133 del Bureau of Home Furnishing de California (Ocina de
Mobiliario Doméstico).
Identicación del modelo/Tabla de cumplimiento de las normativas
Page 80

Español - 38
003-10027-99 © Midmark Corporation 2017
TP202 20-42-FO-00014 Rev A1 C2169
Máx.
94 ± 1,3 cm
(37 ± 0,5 in)
Inclinación pélvica
Máx. 7° ± 2°
Mín. 1,5°
0° (horizontal) a
+80° ± 5°
Mín.
37 ± 1,3 cm
(14,6 ± 0,5 in)
Límite de movimiento:
Page 81

Español - 39
003-10027-99 © Midmark Corporation 2017
TP202 20-42-FO-00014 Rev A1 C2169
Hasta:
41 cm
(16 in)
152 cm
(60 in)
Dimensiones:
71 cm
(28 in)
O
81 cm
(32 in)
193 cm
(76 in)
122 cm
(48 in)
Estándar: 2,4 m (8 ft)
Opcional: 91 cm (3 ft)
25 cm
(10 in)
63,5 cm
(25 in)
60 cm
(23,5 in)
Page 82

Español - 40
003-10027-99 © Midmark Corporation 2017
TP202 20-42-FO-00014 Rev A1 C2169
Garantía limitada
COBERTURA DE LA GARANTÍA, Midmark Corporation («Midmark») garantiza al comprador minorista original que reparará o reemplazará, a discreción de Midmark, los componentes de los productos médicos nacionales e internacionales fabricados por Midmark (excepto
los componentes no garantizados en «Exclusiones») que contengan materiales defectuosos o fallos de mano de obra en condiciones
normales de uso y servicio. La responsabilidad única en virtud de esta garantía limitada es a la reparación o la sustitución, a discreción
de Midmark, de los componentes aplicables. Esta garantía limitada solo se aplicará a los defectos que se notiquen a Midmark dentro del
período de garantía y cuya existencia se llega a determinar tras un examen efectuado por Midmark. Esta garantía se expide únicamente al
comprador minorista original de un producto y no es transferible ni asignable. Se pueden utilizar componentes o productos de repuesto o
reformados, siempre y cuando tengan la misma calidad y especicaciones que los componentes y productos nuevos.
Midmark garantiza al comprador minorista original que, durante el período de garantía, reparará o reemplazará el software contenido en
los productos fabricados por Midmark (excepto los que no estén garantizados en «Exclusiones») si: (1) los formatos en los que se proporciona el software muestran materiales defectuosos o fallos de mano de obra en condiciones normales de uso y servicio; o (2) el software
no se ajusta sustancialmente a las especicaciones publicadas.
PERÍODO DE LA GARANTÍA El período de validez de la garantía de todos los productos y componentes es de un (1) año a partir de la
fecha de facturación al comprador minorista original del producto.
OBTENCIÓN DEL SERVICIO DE GARANTÍA El servicio de garantía debe obtenerse a través de un distribuidor de Midmark o un distribuidor autorizado por Midmark en la línea de productos para la que se solicita el servicio de garantía. Puede contactar con Midmark para consultarle dudas o problemas sobre el servicio de garantía por correo electrónico en www.midmark.com, por teléfono al 1-800-MIDMARK o
por correo postal a Midmark Corporation, 60 Vista Drive, Versailles, Ohio 45380. Es obligación del comprador minorista organizar la entrega de un producto a Midmark o a uno de sus distribuidores autorizados para el servicio de garantía, la cual correrá a cargo del comprador.
También es obligación del comprador minorista cumplir las instrucciones de servicio de garantía proporcionadas, ya sea por Midmark o por
su distribuidor autorizado. El comprador minorista debe suministrar a Midmark la información de registro de la garantía completada en un
plazo de treinta (30) días después de la compra con el n de obtener los benecios de esta garantía limitada.
EXCLUSIONES: Esta garantía limitada no cubre (y Midmark no es responsable de) lo siguiente:
(1) Defectos, daños u otras condiciones causadas, en su totalidad o en parte, por el mal uso, abuso, negligencia, alteración, accidente,
daños durante el transporte, almacenamiento negligente, manipulación o incapacidad de solicitar y lograr la reparación o la sustitución
dentro del plazo estipulado;
(2) Productos que no se hayan instalado, utilizado o limpiado y mantenido adecuadamente tal y como se indica o se recomienda en la
«Instalación» de Midmark y/o el «Manual de instalación/uso» del producto en cuestión, incluidas las condiciones de entorno estructural y
operativo y los requisitos de alimentación eléctrica;
(3) Productos considerados de naturaleza consumible o estéril;
(4) Accesorios o piezas no fabricados por Midmark;
(5) Facturas de terceros en concepto de ajustes, reparaciones, piezas de recambio, instalaciones o cualquier otra modicación del producto, o relacionada con el mismo, que se hayan realizado sin la autorización previa por escrito de Midmark;
(6) Costes y gastos de mantenimiento y limpieza rutinarios; y
(7) Declaraciones y garantías hechas por cualquier persona o entidad que no sea Midmark.
(8) Coincidencia de color, grano o textura, a excepción de las normas comercialmente aceptables;
(9) Cambios en el color causados por la luz natural o articial;
(10) Productos fabricados a medida;
(11) Alteraciones o modicaciones del producto efectuadas por cualquier persona o entidad que no sea Midmark; y
(12) Productos que estarían cubiertos por esta garantía limitada pero que se hayan adquirido: (i) a través de una persona o entidad distinta a
Midmark o sus distribuidores autorizados; o (ii) a través de un distribuidor de Midmark que no tenga la autorización para vender el producto en
cuestión en el territorio donde se encuentre el comprador, o que no tenga la autorización para vender el producto en el sector médico.
SOFTWARE; EN RELACIÓN CON EL SOFTWARE QUE CONSTITUYA UN PRODUCTO O COMPONENTE DEL MISMO, MIDMARK NO
GARANTIZA QUE EL SOFTWARE: (1) ESTÉ LIBRE DE ERRORES; (2) SE PUEDA UTILIZAR SIN PROBLEMAS NI INTERRUPCIONES;
O (3) NO SEA VULNERABLE A LA INTRUSIÓN O AL ATAQUE DE VIRUS U OTROS MÉTODOS.
RESPONSABILIDAD EXCLUSIVA; DAÑOS EMERGENTES; LA ÚNICA RESPONSABILIDAD DE MIDMARK EN VIRTUD DE LA PRESENTE GARANTÍA LIMITADA ES LA DE REPARAR O SUSTITUIR LAS PIEZAS DEFECTUOSAS. MIDMARK NO SE HACE RESPONSABLE
DE, Y POR LA PRESENTE RENUNCIA A, CUALESQUIERA DAÑOS DIRECTOS, ESPECIALES, INDIRECTOS, ACCIDENTALES, EJEMPLARES O CONSECUENTES, O DEMORAS, INCLUIDOS, SIN LIMITACIÓN, DAÑOS POR PÉRDIDA DE GANANCIAS O INGRESOS,
PÉRDIDA DE USO, PÉRDIDA DE DATOS, TIEMPO MUERTO, COBERTURA Y SALARIOS DE EMPLEADOS O DE CONTRATISTA
INDEPENDIENTE, PAGOS Y BENEFICIOS. LA PRESENTE EXENCIÓN DE RESPONSABILIDAD SERÁ VÁLIDA AUN EN CASO DE
INCUMPLIMIENTO O INCUMPLIMIENTO ALEGADO DEL OBJETIVO PRINCIPAL DE ESTA GARANTÍA LIMITADA O DE SUS RESPONSABILIDADES ESPECIFICADAS EN EL PRESENTE DOCUMENTO. EXENCIÓN DE RESPONSABILIDAD DE LA GARANTÍA ESTA ES
LA GARANTÍA COMPLETA DE MIDMARK Y SUSTITUYE A CUALQUIER OTRA GARANTÍA, EXPLÍCITA O IMPLÍCITA. MIDMARK NO
OFRECE GARANTÍAS IMPLÍCITAS DE NINGÚN TIPO, INCLUIDAS LAS IMPLÍCITAS DE COMERCIABILIDAD O IDONEIDAD PARA UN
PROPÓSITO DETERMINADO. ESTA GARANTÍA SE LIMITA A LA REPARACIÓN O SUSTITUCIÓN DE PIEZAS DEFECTUOSAS.
ESTATUTO DE LIMITACIONES No podrá interponerse ninguna acción contra Midmark por incumplimiento de esta garantía limitada, de
una garantía implícita, si las hubiere, o por cualquier otra reclamación que surja de o en relación con los productos, después de transcurridos noventa (90) días después del vencimiento del período de garantía limitada.
AUTORIZACIÓN Midmark no autoriza a ninguna persona ni empresa a imponer ni aprobar ninguna otra obligación ni responsabilidad en
relación con los productos.
Información sobre la garantía
Page 83

Español - 41
003-10027-99 © Midmark Corporation 2017
TP202 20-42-FO-00014 Rev A1 C2169
Notas:
Page 84

Midmark Corporation
60 Vista Drive
Versailles, OH 45380 USA
1-800-643-6275
+1-937-526-3662
TP202 20-42-FO-00014 Rev A1 C2169
Page 85

Style P
Fauteuil d’examen Barrier-Free®
avec IQscale® et connexions pour la
surveillance des signes vitaux
TP202 20-42-FO-00014 Rev A2 C2169
Anglais
Espagnol
Français
Pour les modèles :
626 (-003, -004, -005, -006)
Guide de l’utilisateur
Page 86

Français - 2
003-10027-99 © Midmark Corporation 2017
TP202 20-42-FO-00014 Rev A1 C2169
Numéro de modèle/de série :
Date d’acquisition :
Société de service technique
gréée Midmark :
Distributeur :
Informations sur le produit
L’étiquette sur laquelle gure le
numéro de modèle/de série est située
sur le support de montage du dossier
(l’emplacement exact peut varier)
Page 87

Français - 3
003-10027-99 © Midmark Corporation 2017
TP202 20-42-FO-00014 Rev A1 C2169
Table des matières
Renseignements importants
Symboles de sécurité ...............................................................................................................4
Enregistrement du produit ........................................................................................................5
Transport / Conditions de stockage ..........................................................................................5
Conditions d’utilisation .............................................................................................................5
Mise au rebut de l’équipement .................................................................................................5
Informations sur la conformité ..................................................................................................6
Utilisation prévue ......................................................................................................................7
Spécications électriques .........................................................................................................7
Interférences électromagnétiques ............................................................................................7
Précision de la balance numérique ..........................................................................................8
Consignes de sécurité ..............................................................................................................9
Fonctionnement
Fonctions IQscale® ................................................................................................................ 11
Technologie Active SensingTM ................................................................................................17
Fonctions de l’assise/du dossier ............................................................................................18
Fonction « Position initiale » programmable ..........................................................................19
Fonction Quick Exam® ............................................................................................................20
Verrouillage des commandes .................................................................................................21
Procédure d’association .........................................................................................................22
Rouleau de papier et sangle de maintien ...............................................................................23
Étriers .....................................................................................................................................24
Repose-pied et cuvette ..........................................................................................................25
Élément chauant du tiroir .....................................................................................................26
Élément chauant de garniture (-004 /-006) ..........................................................................27
Surélévation du bassin ...........................................................................................................28
Prises simplex ........................................................................................................................29
Ports pour les connexions de données ..................................................................................30
Système de roulettes Clean Assist™ ....................................................................................33
Entretien
Service technique ...................................................................................................................34
Nettoyage ...............................................................................................................................34
Entretien préventif ..................................................................................................................34
Dépannage .............................................................................................................................35
Caractéristiques techniques
Tableau des caractéristiques ..................................................................................................36
Identication du modèle/Tableau de conformité .....................................................................37
Amplitude de mouvement .....................................................................................................38
Dimensions ...........................................................................................................................39
Renseignements sur la garantie
Garantie limitée ......................................................................................................................40
Page 88

Français - 4
003-10027-99 © Midmark Corporation 2017
TP202 20-42-FO-00014 Rev A1 C2169
Numéro de catalogue
Fabricant
Numéro de série
Stop
Mise à la terre de protection
Orientation correcte pour
transport
Fragile
Type B, partie appliquée
(garniture standard)
Poids limite du patient
xxx kg
Calibre des fusibles
Tension dangereuse / risque d’électrocution
Hauteur maximale d’empilage
(nombre de palettes)
Conserver au sec
Cycle d'utilisation (cycle du moteur)
30 secondes de marche, 5 minutes
d’arrêt
Consulter le manuel
La garniture chauffée est une
partie appliquée sur le patient
de type BF. Ne pas enfoncer
d'objets tranchants, tels que des
aiguilles, des couteaux, etc.,
dans la garniture.
Mode d’emploi
AVERTISSEMENT
Signale un danger potentiel qui pourrait entraîner des blessures graves.
Renseignements importants - Symboles de sécurité
Attention
Signale un danger potentiel qui risque d’entraîner des blessures modérées ou mineures. Il
peut également servir à signaler à l’utilisateur des pratiques dangereuses.
Avertissement concernant l’équipement
Signale une situation qui pourrait endommager l’équipement.
Remarque
Attire l’attention sur une procédure, une pratique ou une situation.
Glossaire des symboles
Page 89

Français - 5
003-10027-99 © Midmark Corporation 2017
TP202 20-42-FO-00014 Rev A1 C2169
Transport / Conditions de stockage
Plage de températures ambiantes :............................De -30°C à +60°C (-22°F à +140°F)
Humidité relative .........................................................de 10 à 90 % (sans condensation)
Conditions d’utilisation
Plage de températures ambiantes :............................De +10 °C à +40 °C (+50 °F à +104 °F)
Humidité relative .........................................................de 30 à 75 % (sans condensation)
Altitude........................................................................inférieure ou égale à 3 000 m
Mise au rebut de l’équipement
À la n de la durée de vie du produit, le fauteuil, les accessoires et autres fournitures peuvent avoir été
contaminés dans le cadre d’une utilisation médicale normale. Consulter les codes et les arrêtés locaux pour
vous renseigner sur la mise au rebut appropriée de l’équipement, des accessoires et autres fournitures.
Enregistrement du produit
Pour enregistrer votre produit, visiter le site www.midmark.com.
Page 90

Français - 6
003-10027-99 © Midmark Corporation 2017
TP202 20-42-FO-00014 Rev A1 C2169
Informations sur la conformité
Déclaration de conformité de la FCC
(Commission fédérale américaine des communications)
Ce matériel a été testé et s'est révélé conforme aux limites pour un dispositif numérique de classe A
conformément à la Partie 15 des règles de la FCC. Ces limites sont prévues pour assurer une protection
raisonnable contre les interférences nuisibles lorsque l’équipement est utilisé dans un environnement
commercial. Cet équipement génère, utilise et peut émettre de l’énergie de fréquence radio et, s’il n’est
pas installé et utilisé conformément au manuel d’instructions, peut causer des interférences nuisibles aux
radiocommunications. L'utilisation de ce matériel dans une zone résidentielle est susceptible de provoquer
des interférences dangereuses, que vous devrez corriger à vos frais.
Toute modication apportée à ce matériel peut violer les règles de la Commission fédérale américaine des
communications et rendre l'utilisation du matériel illégale.
Déclaration de conformité d’Industrie Canada (IC)
Interférences
“This device complies with Industry Canada license-exempt RSS standard(s). Operation is subject to the
following two conditions: (1) this device may not cause interference, and (2) this device must accept any
interference, including interference that may cause undesired operation of the device.”
« Le présent appareil est conforme aux CNR ďIndustrie Canada applicables aux appareils radio exempts
de licence. Ľexploitation est autorisée aux deux conditions suivantes : (1) ľappareil ne doit pas produire
de brouillage, et (2) ľutilisateur de ľappareil doit accepter tout brouillage radioélectrique subi, même si le
brouillage est susceptible ďen compromettre le fonctionnement. »
Antennes
“Under Industry Canada regulations, this radio transmitter may only operate using an antenna of a type
and maximum (or lesser) gain approved for the transmitter by Industry Canada. To reduce potential
radio interference to other users, the antenna type and its gain should be so chosen that the equivalent
isotropically radiated power (e.i.r.p.) is not more than that necessary for successful communication.”
« Conformément à la réglementation ďIndustrie Canada, le présent émetteur radio peut fonctionner avec
une antenne ďun type et ďun gain maximal (ou inférieur) approuvé pour ľémetteur par Industrie Canada.
Dans le but de réduire les risques de brouillage radioélectrique à ľintention des autres utilisateurs, il faut
choisir le type ďantenne et son gain de sorte que la puissance isotrope rayonnée équivalente (p.i.r.e.) ne
dépasse pas ľintensité nécessaire à ľétablissement ďune communication satisfaisante. »
Page 91

Français - 7
003-10027-99 © Midmark Corporation 2017
TP202 20-42-FO-00014 Rev A1 C2169
Spécications électriques
Utilisation prévue
Ce fauteuil d’examen est destiné à être utilisé comme un fauteuil ou une table an de permettre le
placement et le support du patient lors d’une procédure ou d’un examen général(e) eectué(e) par un
professionnel de la santé qualié.
Grâce à l’ajout d’une balance numérique intégrée, le fauteuil d’examen peut en outre être utilisé dans le
cadre d’un contrôle régulier an d’évaluer les uctuations pondérales des patients et de mesurer le poids
des patients pour faciliter le diagnostic médical. La balance numérique intégrée n’est pas conçue pour les
patients pesant moins de 13,6 kg (30 pounds) ou plus de 295 kg (650 pounds).
Interférences électromagnétiques
Ce produit est conçu et fabriqué pour minimiser les interférences électromagnétiques avec d’autres
appareils. Cependant, en cas d’interférences entre un autre appareil et ce produit :
• Retirer de la pièce l’appareil qui génère des interférences.
• Brancher le fauteuil sur un circuit isolé.
• Augmenter la distance entre le fauteuil et l’appareil qui crée les interférences.
• Contacter Midmark si les interférences persistent.
Avant de brancher le cordon d’alimentation de l’appareil Midmark à une prise électrique, il est recommandé
de contacter un électricien agréé de votre localité ou une autorité locale compétente en matière de
distribution électrique interne dans les bâtiments pour vérier que l’appareil, une fois sous tension, sera
conforme à tous les codes électriques locaux. Utiliser la puissance nominale indiquée sur l’appareil pour
déterminer l’alimentation électrique appropriée pour le circuit de dérivation et la prise. Pour les modèles
d’appareil d’une puissance nominale de 115 V avec un courant nominal égal ou supérieur à 12 A, un
circuit de dérivation dédié peut être nécessaire si la protection du circuit de dérivation est fournie par un
disjoncteur 15 A.
Avertissement concernant l’équipement
Les équipements de communication RF portables (y compris les périphériques tels que les
câbles d’antenne et les antennes externes) ne doivent pas être utilisés à moins de 30 cm
(12 po) de toute partie du fauteuil d’examen, y compris les câbles spécifiés par le fabricant,
pour éviter tout risque de dégradation des performances de cet équipement.
Attention
Pour que le fauteuil soit complètement isolé du réseau électrique, le cordon d’alimentation
doit être débranché.
Attention
Avant d’utiliser des dispositifs chirurgicaux à haute fréquence ou des cathéters
endocardiques, consulter le mode d’emploi de ces dispositifs. Tout manquement à cette
recommandation peut provoquer une électrocution ou des brûlures au patient.
Page 92

Français - 8
003-10027-99 © Midmark Corporation 2017
TP202 20-42-FO-00014 Rev A1 C2169
Essai d’immunité Niveau d’essai d’immunité
Décharge électrostatique ± 8 kV Contact, ±15 kV Air
Champs EM RF rayonnées 3 V/m
80 MHz-2,7 GHz 80 % AM à 1 kHz
Champs magnétiques à fréquence nominale 30 A/m
Transitoires électriques rapides ±2 kV à une fréquence de répétition de 100 kHz
Surtensions Ligne à ligne : ±1 kV
Ligne à la terre : ±2 kV
RF transmise par conduction 3 V : 0,15 MHz -80 MHz
6 V dans les bandes ISM de 0,15 MHz à 80 MHz
80 % AM à 1 kHz
Chutes de tension 0 % UT ; 0,5 cycle
À 0°, 45°, 90°, 135°, 180°, 225°, 270° et 315°
0 % UT ; 1 cycle
et
70 % UT ; 25/30 cycles
Monophasé : à 0°
Interruptions de tension 0 % UT ; 250/300 cycles
Remarque
Les caractéristiques d’émissions de cet équipement permettent son utilisation dans les zones
industrielles et les hôpitaux. Ce fauteuil d’examen n’est pas destiné à être utilisé dans un
environnement résidentiel.
CEM - Déclaration du fabricant et conseils
Essai par rayonnement Niveau d’essai par rayonnement
Émissions RF transmises par conduction et rayonnées CISPR 11 Groupe 1 Classe A
Précision de la balance numérique
Avertissement concernant l’équipement
Avant d’utiliser la balance numérique, il est recommandé de vérier la précision de la
mesure de la balance en utilisant un poids de référence d’une valeur connue. En outre,
reportez-vous au calendrier d’entretien préventif pour la fréquence recommandée de
cette vérification. Si la balance s’avère mal étalonnée, contacter votre technicien de
maintenance agréé Midmark avant d’utiliser la balance.
Attention
Pour les modèles dotés d’une commande manuelle câblée, l’exercice d’une tension
sur le cordon de la commande manuelle peut avoir un effet sur la précision de la balance.
Page 93

Français - 9
003-10027-99 © Midmark Corporation 2017
TP202 20-42-FO-00014 Rev A1 C2169
Avertissement
Pour éviter le risque d’incendie ou d’électrocution, brancher cet équipement uniquement dans
une prise secteur reliée à la terre.
Consignes de sécurité
Avertissement
Aucune modification de cet équipement n’est autorisée.
Avertissement
Le branchement de l’équipement dans une prise multiple entraîne en fait la création d’un
système électromédical, susceptible d’aboutir à une réduction du niveau de sécurité.
Avertissement
L’utilisation d’accessoires, de transducteurs et de câbles autres que ceux spécifiés ou
fournis par le fabricant de cet équipement peut induire une augmentation des émissions
électromagnétiques ou une diminution de l’immunité électromagnétique de cet équipement et
entraîner un mauvais fonctionnement.
AVERTISSEMENT
Le matériel ne doit pas être utilisé à proximité d’un mélange anesthésique inflammable.
Clarification : Ce matériel peut être utilisé en présence d’oxygène, d’air ou de protoxyde d’azote.
Avertissement
S’assurer que l’environnement est dégagé d’obstacles avant chaque utilisation, pour éviter tout
fonctionnement incorrect ou blessure grave.
Page 94

Français - 10
003-10027-99 © Midmark Corporation 2017
TP202 20-42-FO-00014 Rev A1 C2169
Espace
Environ 0,94 cm (0,37 po)
Consignes de sécurité – suite
Lorsque le fauteuil est abaissé au maximum [37 cm (14,6 po)] avec mousse comprimée,
l’espace entre le bas du tiroir et le sol est d'environ 0,94 cm (0,37 po). Éloigner le patient
(notamment ses pieds) et tout objet de cette zone avant d’abaisser le fauteuil d’examen.
Si le fauteuil d’examen ne fonctionne pas correctement, relâcher immédiatement la
pédale, débrancher le cordon d’alimentation et aider le patient à descendre du fauteuil. Si
le dysfonctionnement persiste, contacter le service technique.
Il est impératif de respecter ces instructions pour éviter toute blessure au patient et/ou
dommage matériel.
Avertissement
Veiller à ce que tout membre du personnel et tout équipement soient
éloignés du fauteuil avant d’activer une fonction. Tout manquement à
cette recommandation peut entraîner des blessures.
Avertissement concernant l’équipement
Dans le cadre d'une utilisation normale, le fauteuil doit être
installé de façon à permettre un accès aisé aux cordons
d'alimentation afin de les débrancher.
Page 95

Français - 11
003-10027-99 © Midmark Corporation 2017
TP202 20-42-FO-00014 Rev A1 C2169
Fonctionnement
Fonctions IQscale®
Une bonne pratique consiste à toujours mettre la balance à zéro avant de peser un patient. Pour plus de
détails, se reporter aux directives en matière de pesage dans ce manuel.
Pour remettre la balance à zéro...
Avant de faire asseoir le patient, appuyer brièvement sur le bouton Zéro. « ZEROING »
défile à l’écran puis, une fois la remise à zéro effectuée, « SCALE READY » (balance
prête) ; le patient peut être installé.
Remarque
Avant d’inviter un patient à s’asseoir sur le fauteuil d’examen, s’assurer que la
balance est mise à zéro.
Le non-respect de cette consigne peut affecter la pesée du patient.
Zéro
Avertissement concernant l’équipement
La balance numérique intégrée n’est pas conçue pour les patients
pesant moins de 13,6 kg (30 pounds) ou plus de 295 kg (650 pounds).
Attention
Pour les modèles dotés d’une commande manuelle câblée, placer la commande
manuelle dans l’étui avant d’appuyer sur le bouton « Zéro » afin d’assurer la précision
maximale de la balance.
Page 96

Français - 12
003-10027-99 © Midmark Corporation 2017
TP202 20-42-FO-00014 Rev A1 C2169
Avertissement
La balance est prévue pour les patients pesant entre 13,6 et 295 kg (30 et 650 lbs).
Si le poids est inférieur à 13,6 kg (30 lbs) ou supérieur à 295 kg (650 lbs), le relevé de poids
clignotera sur l’écran pour indiquer que le poids est hors plage. Ne pas utiliser un relevé de
poids hors plage (clignotant) pour les mesures du patient.
Poids
Taille/IMC
Augmenter
Diminuer
Pour peser le patient...
Lorsque le patient est en position assise, enfoncer puis relâcher
le bouton Weight (Poids).
Remarque : pour éviter que les pieds du patient ne touchent le sol, le fauteuil se relève
automatiquement à une hauteur de 63,5 cm (25 po) avant d’afficher le poids
du patient.
Pour calculer l’indice de masse corporelle (IMC) du patient...
a) Après l’affichage du poids du patient, appuyer brièvement sur le bouton Height/BMI (Taille/IMC).
b) Appuyer sur le bouton (+) ou (-) pour augmenter ou diminuer la taille affichée du patient.
c) Appuyer à nouveau sur le bouton Height/BMI (Taille/IMC) pour afficher l’IMC du patient.
Fonctions IQscale® - suite
Remarque
Le poids du patient s’affiche dans les trois secondes
après avoir appuyé sur le bouton « weight » (poids).
Attention
Pour les modèles dotés d’une commande manuelle câblée, placer la commande
manuelle dans l’étui avant d’appuyer sur le bouton « Poids » afin d’assurer la précision
maximale de la balance.
Page 97

Français - 13
003-10027-99 © Midmark Corporation 2017
TP202 20-42-FO-00014 Rev A1 C2169
Mise à zéro automatique
Une bonne pratique consiste à toujours mettre la balance à zéro avant de peser un patient. Pour plus de
détails, se reporter aux directives en matière de pesage dans ce manuel.
En outre, à intervalles réguliers, la balance numérique se met automatiquement à zéro. Cette mise à zéro
automatique n’intervient qu’en l’absence de patients sur le fauteuil d’examen.
Remarque
Avant d’inviter un patient à s’asseoir sur le fauteuil d’examen, s’assurer
que la balance est mise à zéro.
Le non-respect de cette consigne peut affecter la pesée du patient.
Zéro
Page 98

Français - 14
003-10027-99 © Midmark Corporation 2017
TP202 20-42-FO-00014 Rev A1 C2169
Conguration des unités
La touche Unités est utilisée pour verrouiller les unités (métriques ou anglosaxonnes) et pour les
déverrouiller.
La touche Unités se comporte de manière diérente selon que les unités sont verrouillées ou
déverrouillées.
Si les unités sont déverrouillées :
• Lorsque l’écran n’ache aucune information, relâcher la touche Unités ache l’indicateur des
unités actuelles.
• Lorsque l’écran ache exclusivement l’indicateur des unités, relâcher la touche Unités fait
apparaître l’achage alterné des pouces/lb et des cm/kg à l’écran.
• Lorsque l’écran ache exclusivement l’indicateur des unités, maintenir la touche Unités pendant
3 secondes fait apparaître et déler le message « UNITS » (Unités), « LOCKED » (Verrouillées)
« » deux fois sur l’écran LCD.
• Lorsque l’écran ache le poids, enfoncer et relâcher la touche Unités fait apparaître sur l’indicateur
des unités l’achage alterné du poids en lb/kg et du poids dans la nouvelle unité.
• Lorsque l’écran ache la taille, enfoncer et relâcher la touche Unités fait apparaître sur l’indicateur
des unités l’achage alterné de la taille en po/cm et de la taille dans la nouvelle unité.
Si les unités sont verrouillées :
• Lorsque l’écran n’ache aucune information, relâcher la touche Unités ache l’indicateur des
unités actuelles.
• Lorsque l’écran ache exclusivement l’indicateur des unités, relâcher la touche Unités restera
sans eet.
• Lorsque l’écran ache exclusivement l’indicateur des unités, maintenir la touche Unités
pendant 3 secondes fait apparaître et déler le message « UNITS » (Unités), « UNLOCKED »
(Déverrouillées) « » deux fois sur l’écran LCD.
• Lorsque l’écran ache le poids, appuyer sur la touche Unités fait apparaître sur l’indicateur des
unités l’achage alterné du poids en lb/kg et du poids dans la nouvelle unité. Relâcher la touche
Unités fait basculer à nouveau l’indicateur des unités sur l’unité précédente.
• Lorsque l’écran ache la taille, appuyer sur la touche Unités fait apparaître sur l’indicateur des
unités l’achage alterné de la taille en po/cm et de la taille dans la nouvelle unité. Relâcher la
touche Unités fait basculer à nouveau l’indicateur des unités sur l’unité précédente.
Page 99

Français - 15
003-10027-99 © Midmark Corporation 2017
TP202 20-42-FO-00014 Rev A1 C2169
Afin de garantir une pesée correcte du patient, veuillez
passer en revue les directives suivantes.
Ne pas mettre la balance à zéro quand le
patient est sur le fauteuil.
S’assurer que les pieds du patient ne
touchent pas le sol pendant la pesée.
Mettre la balance à zéro après avoir ajouté ou
retiré un équipement.
Mettre la balance à zéro après avoir ajouté ou
retiré des fournitures.
Ne pas s’appuyer, poser le pied ou appliquer une
charge sur le fauteuil au moment de la pesée.
Ne pas peser les patients qui portent des
objets tels qu’un sac à main, un manteau, etc.
Page 100

Français - 16
003-10027-99 © Midmark Corporation 2017
TP202 20-42-FO-00014 Rev A1 C2169
Raccordement de la commande manuelle et de la pédale
Bien que les commandes sans l soient standard sur certains modèles, des ports de commande
manuelle/à pied pour les commandes câblées, se trouvent sur l’embase près de la tête et du pied
du fauteuil.
Port de
commande
Port de
commande
 Loading...