

Midland Valley FieldMove Clino, FieldMove Clino Pro User Manual

Contents
1
This is a guide to using FieldMove Clino and the FieldMove Clino Pro features.
Introduction 2
Disclaimer 3
Important safety note.
Definitions 4
Glossary of terms used in the app and their definitions.
Side Panel 5
Navigation between the app pages.
Compass / Clino 6
Setting a bearing using the compass and recording planar and linear data.
Notes & Images 11
Chronological record of all the data in your project, much like a field notebook.
Map 14
Display the data that has been collected on the phone, import maps and for FieldMove
Clino Pro, draw on the map.
Stereonet 19
View structural data on an equal area or equal angle stereonet
(FieldMove Clino Pro only).
Project 20
Details of the active project.
Switch Project 22
Switching between active projects and accessing settings.
Settings 24
Defining GPS, conventions and for FieldMove Clino Pro only, line picking accuracy.
Contains information of version and acknowledgements.
Export 25
Exporting data, the data format, and how to import data into other software applications.
Digital Compass Calibration 27
Our advice on how to calibrate a digital compass.
FAQs 29
Concise answers to commonly asked questions.
Our Experience 32
Battery life, performance and checks.
System Requirements 34
Minimum platform requirements and other available platforms.
About Midland Valley 35
Introduction
2
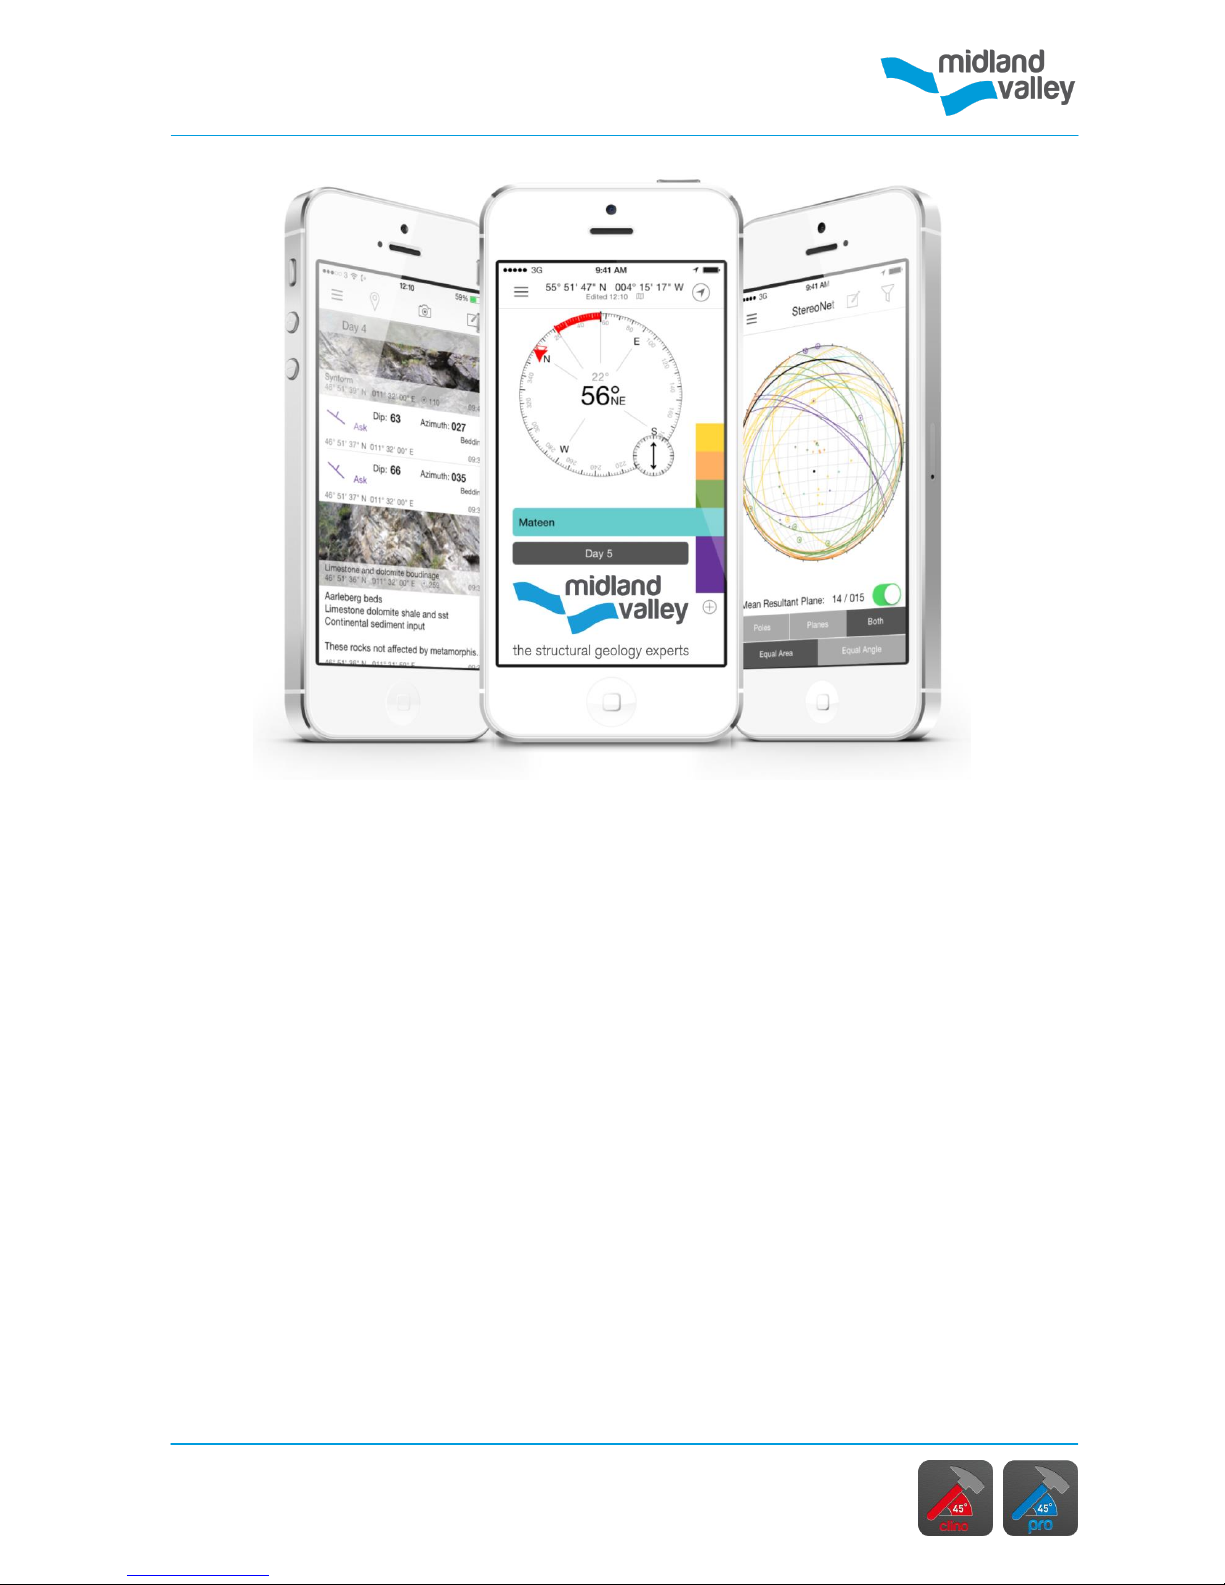
FieldMove Clino is a digital compass-clinometer for data capture on smartphones. The app
allows an iPhone or Android phone (see the Android user guide) to be used as a traditional
hand-held bearing compass and clinometer for measuring and capturing the orientation of
planar and linear features in the field. The field notebook and camera are an integral part of
this new technology allowing the capture and storage of georeferenced photographs and
text notes. FieldMove Clino Pro allows stereonets to be plotted, lines and polygons to be
drawn on maps and map symbols to be chosen.
FieldMove Clino supports online Google Maps as well as offline maps as georeferenced
MBTile basemaps. Projects can be exported to CSV (.csv comma-separated values), Move™
(.mve) and, with FieldMove Clino Pro, Google Earth (.kmz).
This document outlines functionality and recommends workflows to use within FieldMove
Clino.

Disclaimer
3
The use of GPS devices and smartphones as navigation aids
The internal GPS in your device can be used to automatically set location information in the
app, which is recorded as latitude and longitude.
Global Positioning System (GPS) devices are commonly used to aid navigation, having
grown in popularity over the past decade. Over the last few years, this has extended to
smartphones and digital compasses, which are often equipped with GPS functionality.
GPS is a valuable aid to navigation during fieldwork, however it is important to keep safety
at the forefront, and we draw your attention to the advice given by a number of
mountaineering councils:
“Everyone heading into the hills needs to learn how to read a map, and be able to navigate
effectively with a paper map and traditional magnetic compass, especially in poor visibility.”
The FieldMove Clino App requires online data transfers for some features (Maps, sharing
exported files, etc.). Using such functionality over mobile network services (such as 3G)
may incur costs from your provider. If you use the app and services on your mobile phone,
you are responsible for any fees that your phone service provider charges for data services,
etc. Your phone service provider is not the provider of the FieldMove Clino App.
Midland Valley accepts no liability or loss, resulting from the use or misuse of this product.

Definitions
4
Terms used in FieldMove Clino
Project
A project is a set of localities, structural data, notes and images related to a specific
mapping area. When exporting data it is the whole project that is exported.
Localities
Localities are a way of grouping data and are user definable. For example, localities can be
applied to an outcrop or for a new day in the field.
Stratigraphy
User defined list that is used to assign a colour to structural measurements or line objects
i.e. to define a rock type or a fault. This information is recorded as an attribute on the
object.
Data Type
Defined as planar and linear data. Location can be set automatically using the device GPS.
Comments
These are linked to specific measurements, for example describing in detail the surface
where a dip measurement has been taken from.
Notes
Notes are geo-referenced descriptions, such as a sample location or notable change in
vegetation. This is akin to the notes taken in a field notebook while mapping. Photos may be
added to notes.
Maps
Images can be shown over the online map on the Map page. Map overlays can be loaded in
as MBTile files.
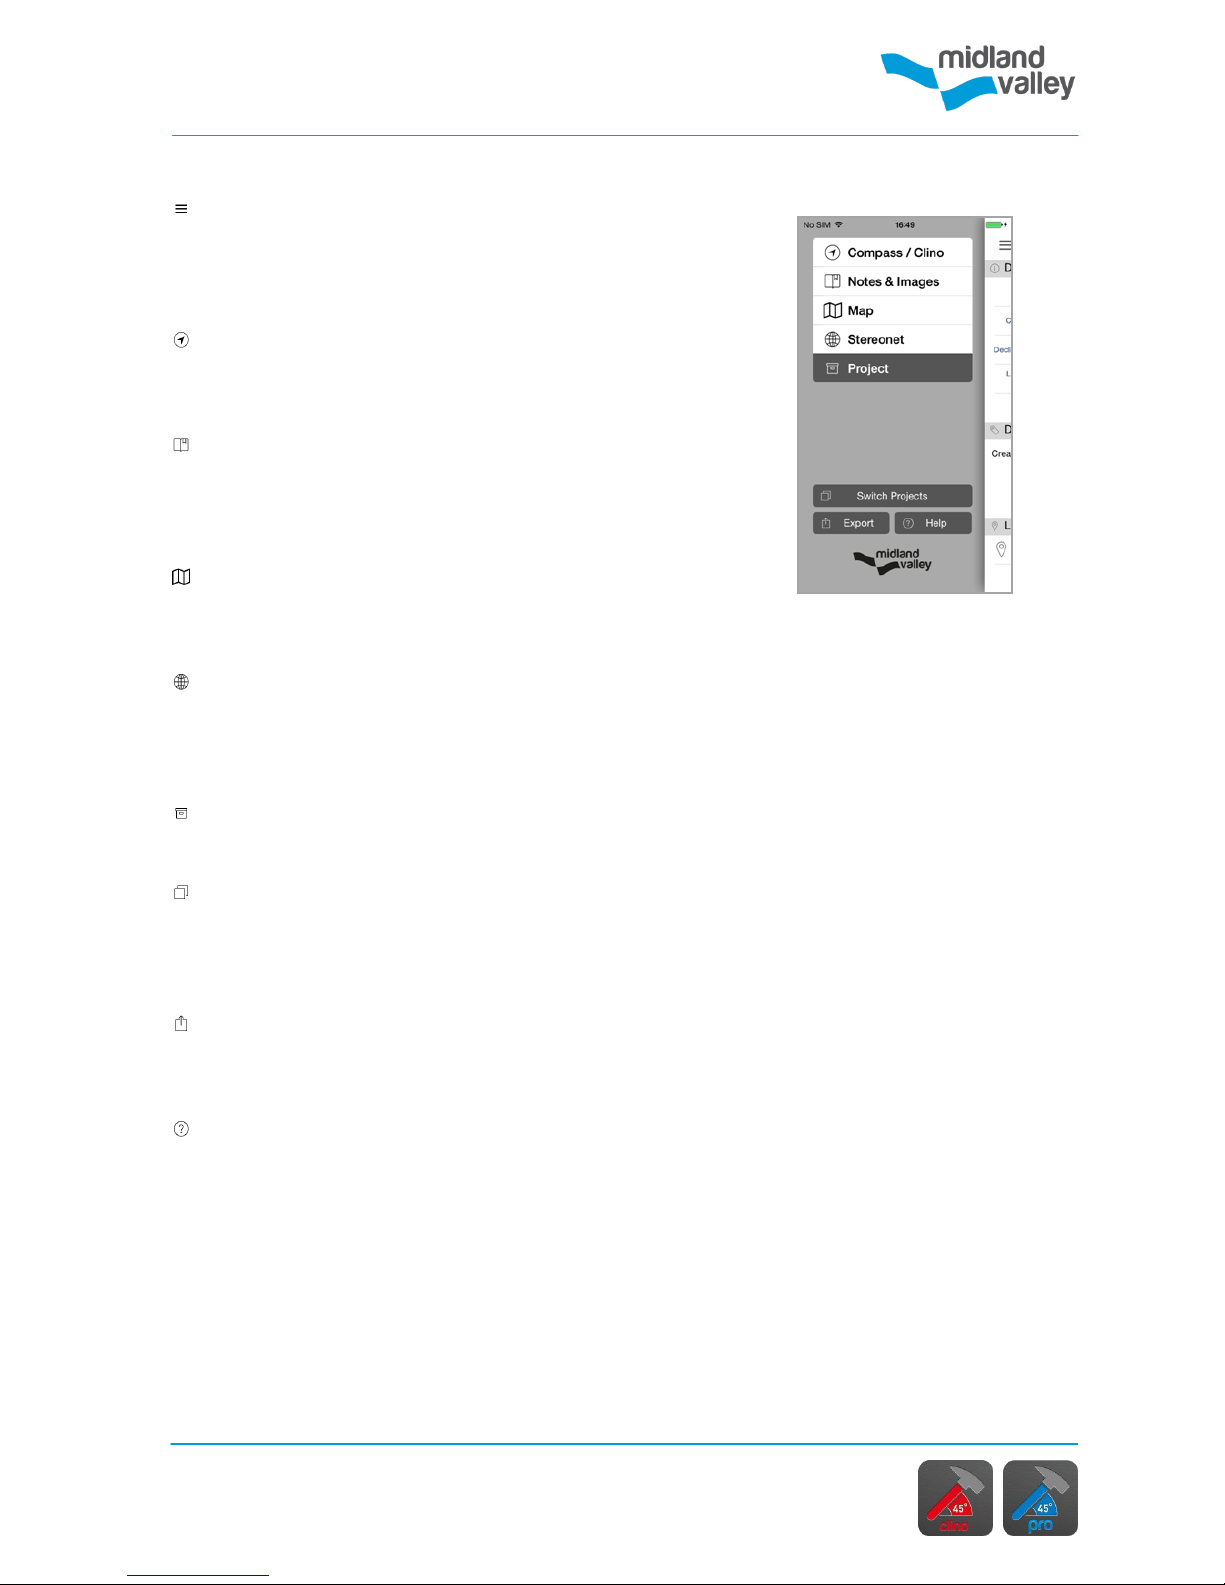
Side Panel
5
Side Panel
The Side Panel can be opened from any page using the
icon or by swiping from the left edge of the page.
The Side Panel allows navigation between the following
pages:
Compass / Clino
Take a bearing or record structural planes and lineations
with a range of attributes, and create new localities.
Notes & Images
Keeps a chronological record of data captured and allows
georeferenced notes and photos to be taken, which can be
edited and deleted.
Map
Displays structural data on online and offline maps, and in
FieldMove Clino Pro, allows line drawing.
Stereonet
Available in FieldMove Clino Pro, the stereonet displays
data as poles and planes on an equal area or equal angle
stereonet plot.
Project
Details of the active project.
Switch Projects
The Project List page displays all the projects stored on
the phone, allows creation of new projects, and gives
access to additional settings and access to import.
Export
Data can be exported as a CSV, Move and, in FieldMove
Clino Pro, as Google Earth Files.
Help
Access to Quick Help or Extended Help (this guide).
Compass / Clino
6
Compass face. The
set bearing is shown
by the red bar.
Clinometer face
Compass face. Tap to
set a bearing.
Compass / Clino page
Navigate to the Compass / Clino page from the
Side Panel.
A hand bearing compass or clinometer face will be
activated. The active face can be switched between by
tapping on the small face.
Note: always give the compass and clinometer a few
seconds to stabilize before tapping the clinometer to lock
the reading. This will help to ensure the data is consistent.
Compass
To take a bearing with the compass rotate the phone in
the desired heading and tap on the compass face. When
the phone is rotated a red bar shows the deviation from
the set bearing to the current orientation. Tap the
compass face again to stop tracking the bearing.
The red arrow on the compass face displays True North
and the red outline arrow displays Magnetic North.
Declination can be user defined or calculated by the device
on the project Settings page.
Note: the compass works best when the phone is held
level. See our guide on Digital Compass Calibration.
Clinometer
The display on the clinometer shows a dip symbol if planes
are being recorded or an arrow symbol if lineations are
being recorded.
To lock the reading, tap the clinometer face. The icon will
change from red (active) to black (locked). The reading
can be manually overwritten by tapping on the dip and
azimuth, or dip and strike numbers for a plane; or plunge
and plunge azimuth numbers for a lineation.
To measure the orientation of a planar feature the back
of the phone should be placed flat on the plane to be
recorded.
To take a lineation reading the long edge of the phone
should be placed parallel to the lineation, ideally with
the back of the phone on the plane.
Note: the dip icon orientation corresponds to the phones
orientation, not north.
Compass / Clino
7
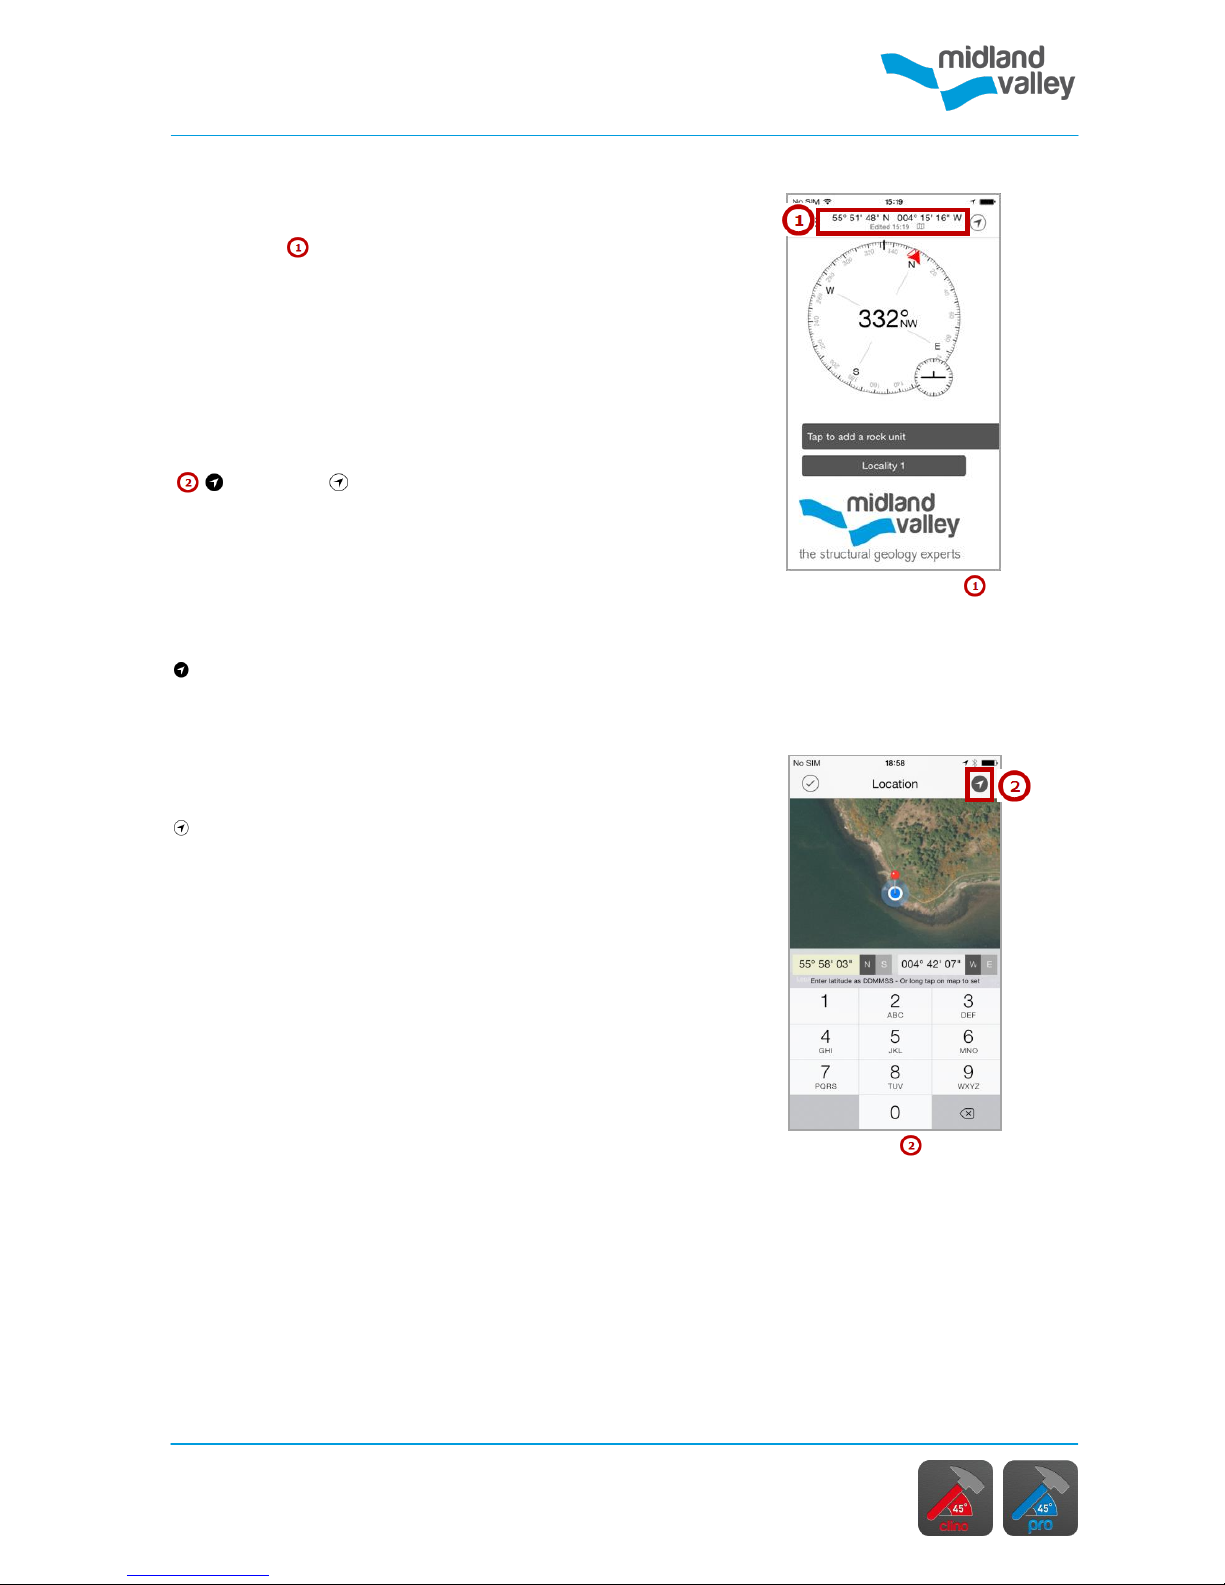
Location
Location is displayed as a latitude and longitude at the top
of the page, . Below this, the time of the last location
update is displayed. The text gives an indication of how
the location was set; Updated indicates that the location
was received from the GPS, whilst Edited indicates it was
manually set.
Note: UTM co-ordinates are only displayed in the exported
data tables.
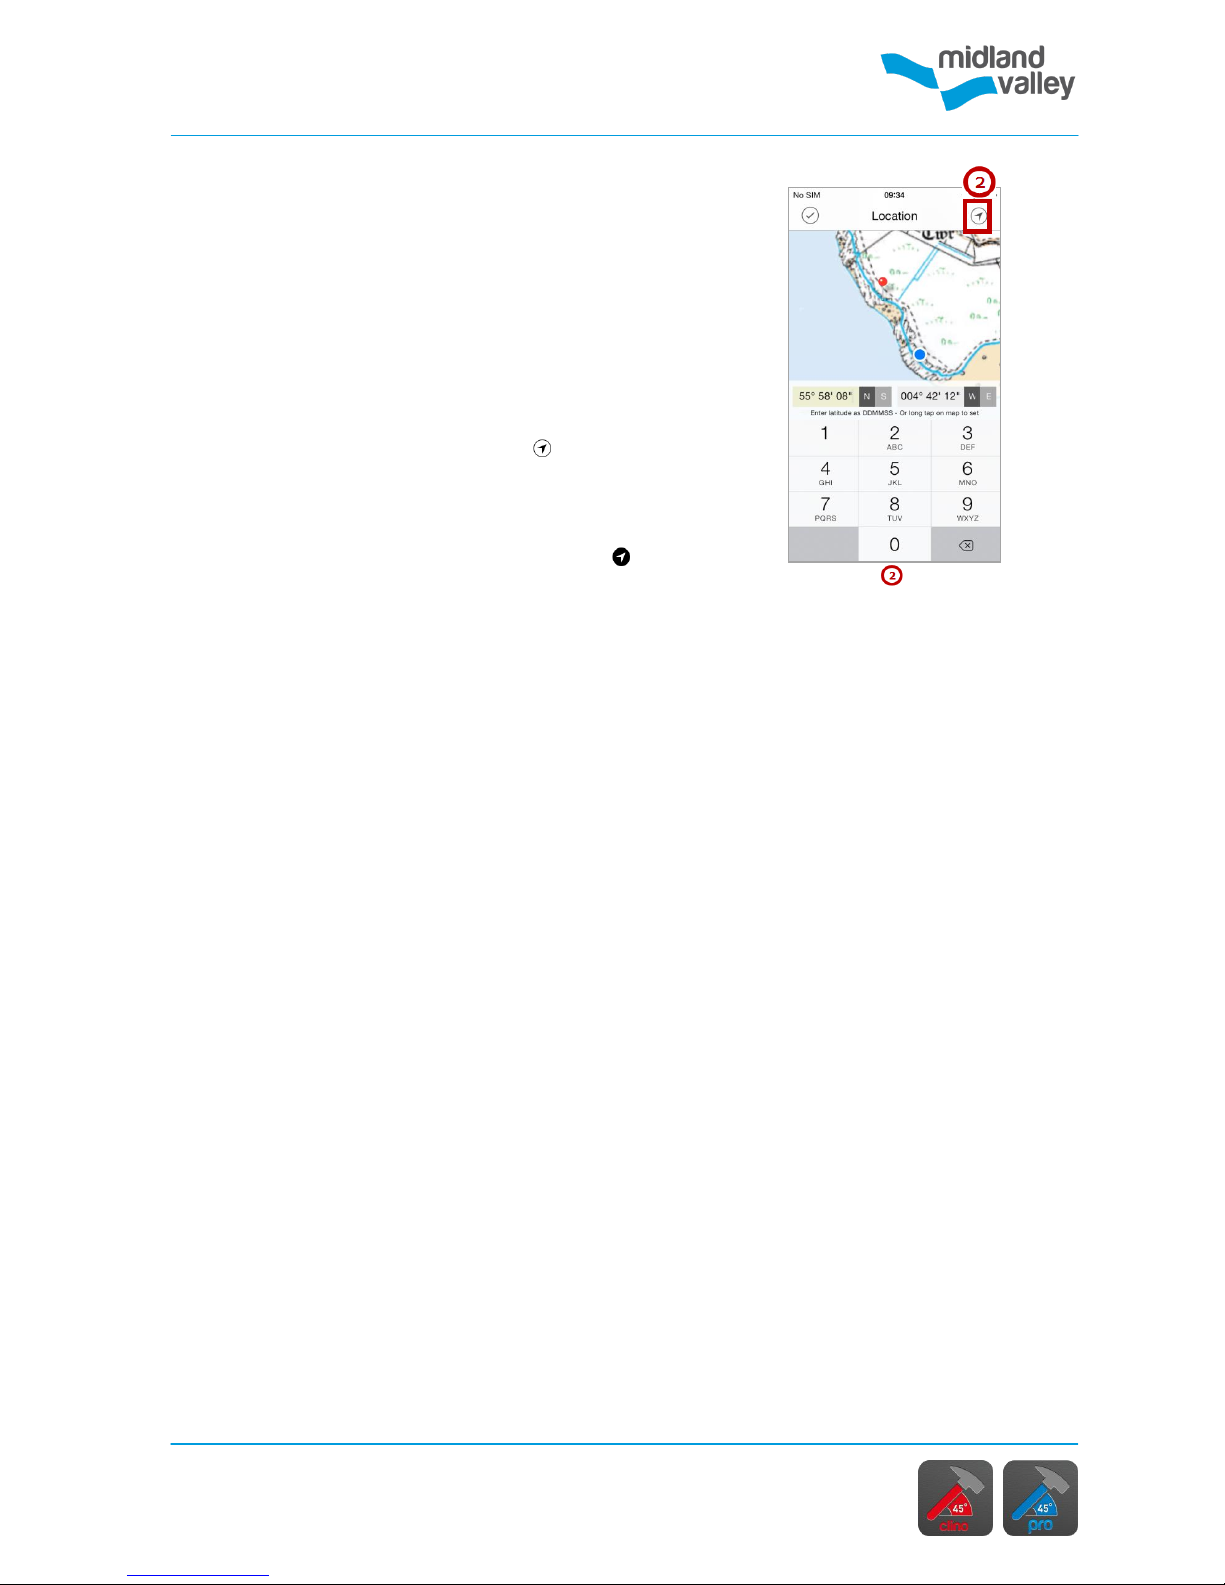
Active or Idle GPS
When taking a reading from the Compass / Clino or Map
page an arrow icon is displayed in the top right corner of
the iPhone (below the battery icon). There are two modes,
active and idle which can be toggled by tapping on the
arrow icon.
Active
The white arrow with black background indicates that
the phone’s GPS is in use, and the current location is
being updated. The time stamp in the top bar shows the
last time a new position was found.
Idle
The black arrow with a white background indicates
that the phone’s GPS is idle. Any new data point or note
will be assigned to the last location update the app
received, either from the GPS or set by the user.
Automatic positioning using the GPS and
updates
FieldMove Clino uses the iPhone’s inbuilt GPS unit for two
tasks:
Finding your location when taking a reading.
Showing where you are on the map.
In the Location page, the last GPS location is shown as a
glowing blue dot. The red pin represents a manually set
location.
Note: the GPS is constantly trying to update when the
circle behind the arrow is black (active). This is battery
intensive and the idle (white background) mode can be
used to preserve battery when GPS is not required.
Active GPS , last
updated GPS position
is shown by blue dot
and the current
location by the red pin
Tap the coordinates
to open the Location
page. Long press on the
map to set the location
manually, the GPS will
be set to idle
Location
Compass / Clino
8
Setting location manually
Locations can be set manually without using the GPS
functionality, in Degrees / Minutes / Seconds, from the
Compass / Clino page. On the Compass / Clino page
tap on the latitude / longitude (lat / long) value in the Top
Bar this will open the lat / long Edit Location page. The
current data location is shown by the red pin.
The GPS or current location can be manually overwritten
by using a long press on the map to set a new position.
This will automatically set the GPS to idle.
Alternatively, lat / long values can be entered in Degrees /
Minutes / Seconds using the number key pad.
If you tap the GPS arrow the GPS will turn on (active)
and the red arrow jumps to the received location on the
map, shown as a blue dot.
Declination convention
Measurements in and exported by the app are given
relative to True North. All data is automatically adjusted to
True North. True North is calculated using the declination
value set in the Project Details page.
Idle GPS , last
updated GPS position
is shown by blue dot
and the current
location by the red pin
Location

Compass / Clino
9
Stratigraphy
Clinometer face
Rock Type page
Units added to Rock
Type List
Stratigraphy
All clinometer readings must be assigned to a unit in the
Stratigraphy Column i.e. rock type or object colour, such
as a fault or joint. When using the app for the first time,
the Stratigraphy Column is blank.
Tap to add rock unit or on the plus icon (on preexisting columns) to open the Stratigraphy / Rock
Types page. In the Stratigraphy / Rock Types page tap
the plus icon to add new rock units.
To change the name of a unit, tap on the text to
activate the on screen keyboard.
To change the colour of a unit tap on the pencil icon
on the right hand side of the page. Select a new colour
from the options and tap the tick icon in the top left
corner to apply.
Units can be reordered by dragging them to the correct
position in the list. To do this, long press on the three
vertical dots on the left hand side of the unit. The unit row
will expand to indicate it can now be dragged. Move it to
the desired location and lift your finger from the screen to
drop it.
Stratigraphy can be imported from pre-existing
FieldMove Clino projects or from Move as .csv files. Press
the import icon to open the Import page. Tap the
cross icon to cancel import.
Note: to change the active unit on the Compass / Clino
page, tap on the desired unit in the Stratigraphy
Column on the right hand side of the page.
Tap the tick icon when complete.
Deleting a unit from the stratigraphic
column
A rock unit can be deleted from the Stratigraphy / Rock
Type page by swiping from right to left on the right hand
side of the unit. This will display a bin icon. Tap to
delete.
Locality
To change which locality new data will be created in, tap
this button and select the desired locality from the list.
Tap the plus icon to create a new locality.

Compass / Clino
10
Edit Symbol page
Data Type page
Clinometer face
Data type
Refer to the Project section to find out more about the
automatic naming of localities, and Editing Data for more
information on editing locality details.
Data type
Tap this option to choose between a range of planar
and linear data types. Open the Select Data Type page
by tapping on the current plane or lineation type. Tap any
symbol to assign it to the current data or tap above to
dismiss.
In FieldMove Clino Pro this list can be customized:
Select the Settings icon . This opens the list of currently
collectable planar and linear data types.
Selecting an existing data type allows the icon and
name to be edited or the symbol deleted. Any data
assigned to a symbol that is deleted will be set to the
default symbol of its type. For this reason, the default
bedding and lineation symbols cannot be deleted.
New icons (icon and name) can be added to the current
list by pressing the plus icon at the top right hand
corner of the Edit Symbol page. Press the tick icon to
apply or the cross icon to cancel.
Comments
Add a comment which will be saved with the reading.
When adding a comment for the next data point on the
Clino page, you have the option to take a picture using the
phone's camera. In this case, when the data is saved,
TWO entries will be created: one data point entry and one
note entry with the images. Both entries will share the
same location and comment.
Save
Click Save to store the reading which is displayed in the
note book and on the map. Make sure the confirmation
popup Saved! is displayed or the reading will not have
been stored.
The Save button will be disabled if the clinometer is active
or if the stratigraphy table is empty.
 Loading...