

Midland STREET GUARDIAN GPS+ User Manual
VIDEOCAMERA DA AUTO
CAR CAMCORDER
CAMÉSCOPE DE VOITURE

About this Guide
The content of this document is for information purpose and is subject to change without
prior notice.
We made every eort to ensure that this User Guide is accurate and complete. However, no
liability is assumed for any errors and omissions that may have occurred.
The manufacturer reserves the right to change the technical specifications without prior notice.
Introduction
Thank you for purchasing STREET GUARDIAN GPS+, the FULL HD car DVR.
STREET GUARDIAN GPS+ is a robust and compact car camcorder, with a modern design,
that is able to record whatever happens while you are driving. A reliable witness in case of
accidents or unforeseen events.
This product is based on maintaining the original appearance of the vehicle and does not aect
your driving and the view.
If compared to the other car camcorders, STREET GUARDIAN GPS+ stands out for its
exclusive design and perfectly fits inside the vehicle.
ENGLISH
1

Main functions
• FULL HD car camcorder
• 160° ultra wide angle lens
• Super video resolution: HD 1080P
• HDR (High Dynamic Range) videos
• 2.7 inch high resolution LCD
• G-Sensor
• Motion Detection
• Files protected in case of emergency
• Audio data saving
• HDMI output, etc.
Warnings
• This manual includes details on how to use the device, its working, technical specifications and
precautions. We recommend to carefully read it before using the camera and keep it for the
future. We trust that this car dvr will meet your needs for a long time!
• Do not use the camera in damp conditions. STREET GUARDIAN GPS+ is not waterproof, so
please do not expose it to water or rain.
• Do not try to open the shell and repair it: this will void the warranty. If you experience problems,
go to the professional service centre for repairing.
• To clean the camera do not use thrill chemical substances or clean solvents, but only a moist
soft cloth.
• To avoid aecting the videos, do not use STREET GUARDIAN GPS+ in presence of excessive
dust or fog.
• At the end of its life, do not discard the camera randomly and do not throw it into the fire, it
may explode.
• The results of GPS positioning are only for reference, and should not aect the actual driving
situation. The feature cannot ensure the location accuracy.
• GPS location accuracy may dier depending on weather and location such as high buildings,
tunnels, undergrounds, or forests. GPS satellite signals cannot pass through solid materials
(except glass). Tinted window may aect the performance of the GPS satellite reception.
• This camera is intended for non-commercial use, within the limits permitted by applicable law.
The company is NOT responsible for the loss of any data/content during operation
• Due to local laws and vehicles safety considerations, do not manually operate the device while
driving
2

What’s in the box
• Street Guardian GPS+ car camcorder
• Suction cup with GPS
• 12V charger with cigarette lighter plug
• Cable for the connection to PC
Notes on Installation
• Install the device near the rear-view mirror to obtain the best open-field view. Do NOT install
the camcorder in a location that will obstruct your required driving view.
• Make sure that the lens is within the wiping range of the windscreen wiper to ensure a clear
view even when it rains.
• Do not touch the lens with your fingers. Finger grease may be left on the lens and will result in
unclear videos or snapshots. Clean the lens on a regular basis.
• Do not install the device on a tinted window. Doing so may damage the tint film.
• Make sure that the installation position is not hindered by the tinted window.
ENGLISH
3
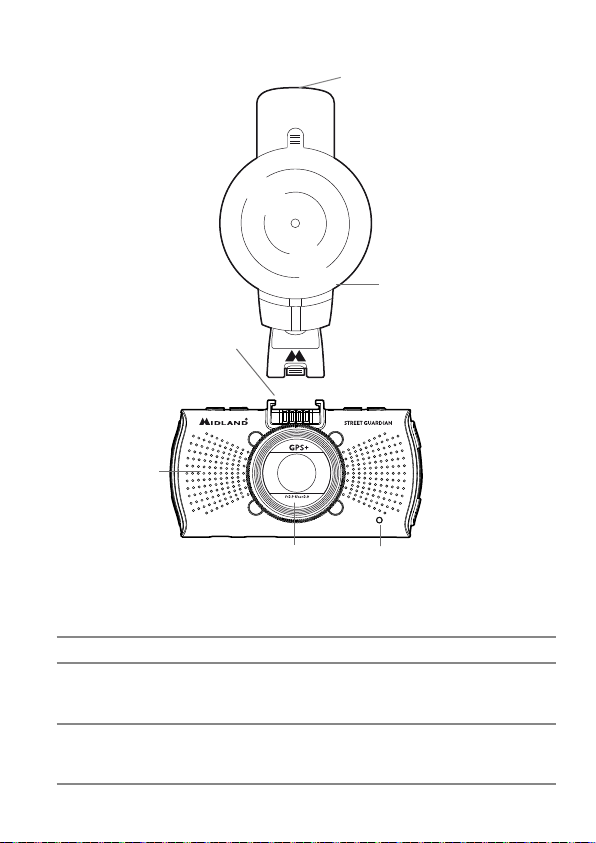
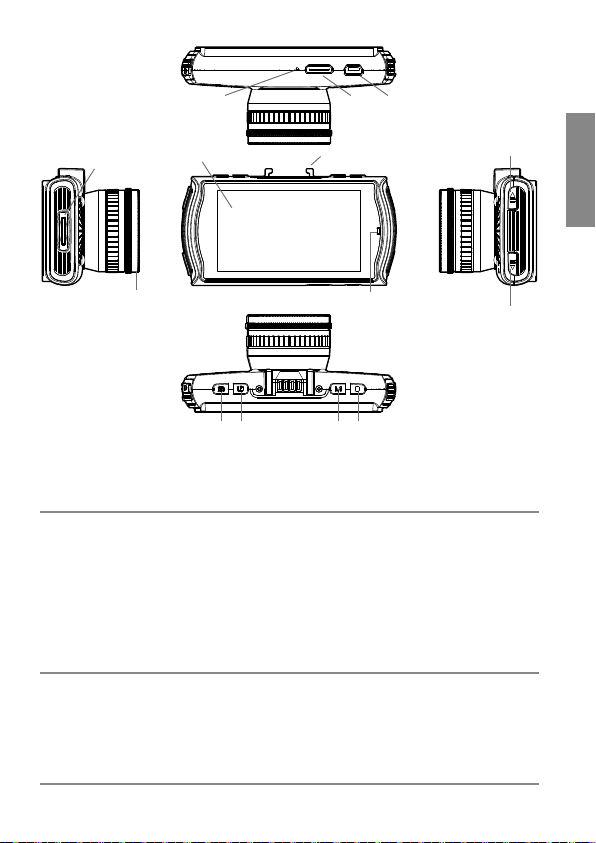
Description of the controls
13
14
18
17
1234
5
6
1512
N. Button/Function Description
1 MENU
Menu/Photo
2 POWER
Power/IR Led/lock
1. while in Recording/Photo/Preview mode, the MENU key is
used to enter/exit the menu.
2. while recording is used for taking a photo.
1. Short press to power on. Press for 2 seconds to power o.
2. In recording mode, short press to turn on/o the IR LEDs.
3. Under thumbnail mode, short press to lock the current file.
4
10 11 16
9
12
3. MODE
Switch amongst
photo /recording/
playback/emergency
4 REC/PHOTO/OK
KEY
7
13
8
5
6
1 2 3 4
1. In video mode: short press once to switch to photograph mode
2. In photograph mode: short press once to switch to video/photo playback mode (thumbnail mode)
3. In video/photo playback mode (thumbnail mode): short press
once to switch to video mode
4. While in menu you can toggle between video settings and
configuration settings.
5. Lock or unlock files while recording.
6. While in playback mode, press “MODE” key back to thumbnail.
1. While in menu settings press the button to confirm your selection.
2. While in Thumbnail mode press REC to confirm playing of the
video/photo.
3. While in video playback mode, press to start/pause playing.
4. While in video mode, press REC to start recording.
ENGLISH
5

5 UP
Up/Screen
6 DOWN
Down/Audio
7 LCD Display
8 Status LED 1. Red while battery charging. Turns o when battery fully char-
9 Micro SD card slot Insert the micro SD card into this slot
10 Microphone
11 Mini HDMI
interface
High definition output
12 Lens
13 Bracket port Slide the bracket to connect the GPS
14 Speaker
15 Reset Short press to reset. The camera turns o.
16 Mini USB port
Storage/charging
17 GPS mount Mount the support to the camera
18 Mini USB port of
the GPS mount
Recording/charging
1. While in MENU mode, this button is used for the menu se-
lection;
2. While in thumbnail mode, press it to select videos/photos;
3. While in video playback mode, press it to rewind
4. While in recording mode, push it to turn on/o audio recording
1. While in MENU mode, it is used for the menu selection;
2. While in thumbnail mode, push it to select videos/photos;
3. While in video playback mode, press it to fast forward
4. While in recording mode, push it to turn on/o screen
ged
2. Blue while unit turned on.
3. Blue flashing while recording.
To view videos and photos connect the camera to HD television
by HDMI cable
1. Connect the USB cable for auto recording
2. Connect the USB cable for auto charging
3. Connect the USB to PC to download photos/videos
1. Connect the USB cable for auto recording
2. Connect the USB cable for auto charging
6
 Loading...