

Page 1

HH54
www.midlandradio.com
1
INDEX
Quick Start Instructions ......................................................................................................................................................2
Installing the Belt Clip ...........................................................................................................................................................
2
Thank you ................................................................................................................................................................................2
HH54 Features, Controls and LCD Indicators ..............................................................................................................
3
Set the Clock ..........................................................................................................................................................................
3
Set the Sleep Alarm ...............................................................................................................................................................3
Set the Channel ......................................................................................................................................................................
3
S.A.M.E County Codes ........................................................................................................................................................
4
Getting the S.A.M.E County Code ....................................................................................................................................4
Programming S.A.M.E Codes into the HH54 .............................................................................................................4-5
Travel/Home Modes .........................................................................................................................................................5-6
Choosing an Alert Type ....................................................................................................................................................
6
Reviewing Alerts ................................................................................................................................................................ 6
Display Backlighting ..........................................................................................................................................................
6
Reception ............................................................................................................................................................................ 7
Troubleshooting .................................................................................................................................................................7
One Year Limited Warranty ............................................................................................................................................
8
Service .................................................................................................................................................................................
8
Other Midland Products ..................................................................................................................................................9
Page 2

2
www.midlandradio.com
Thank you
Congratulations on your purchase of the Midland
HH54 Portable Emergency Weather Alert Radio. All hazards
means the radio is the fastest, most reliable means of
receiving information on life threatening weather such as
tornadoes, hurricanes, floods, ice storms as well as civil
emergencies such as Amber alerts, hazardous explosions,
fires and chemical spills. This information is broadcast by the
National Weather Service 24 hours a day, 7 days a week so
you can stay informed no matter what time of day it is. In
addition to all hazards, the HH54 also has S.A.M.E technology
(Specific Area Message Encoding). This gives you the option of
screening out unwanted broadcasts and receiving alerts only
targeted for the geographical area you live in. Midland is proud
to say the HH54 is Public Alert Certified- meaning it has
been tested and approved to meet the Consumer Electronics
Association standards of reliability and quality as a product
carrying public safety warnings. Midland has become synony
mous in the weather industry for safety and reliability. We are
the leading manufacturer of weather alert radios. The HH54
is no exception. It is a quality piece of electronic equipment
skillfully constructed with the finest components. This radio is
designed for reliable and trouble free performance for years
to come. You can rely on your Midland weather radio during
severe weather.
Please Note: We encourage you to read this owner’s manual before operating the radio. This manual is a valuable
part of your new Midland HH54 Portable Emergency
Weather Alert Radio. After the radio is programmed and
operating properly, store the manual in a safe place for
future reference.
Quick Start Instructions
1. Place 3 AA alkaline batteries or the optional battery pack
into the battery compartment on the backside of the
radio. The LCD will display 12:00 AM.
2. Press the ON/OFF button for 3 seconds to turn the unit
on into standby mode and program the settings.
3. Program the weather channel for your area:
(a) Press the MENU button once.
(b) Press the DOWN arrow until CHANNEL is
displayed on the LCD.
(c) Press the SELECT button.
(d) Press the DOWN arrow until you hear the
broadcast of your station.
(e) Press the SELECT button to save your station
and exit back to Menu mode.
(f) Press the MENU button to exit back to standby
mode.
4. Press the WX/SNOOZE button to listen to the weather
broadcast. Use the UP/DOWN arrows on the side of the
radio to adjust the volume to a desired listening level. To
exit the weather broadcast mode press the WX/SNOOZE
button again.
Note: When in weather mode and the volume is adjusted and
volume is displayed you must press the WX/SNOOZE button
twice to exit back to standby mode.
You are now able to receive weather alerts for your area and
surrounding areas. To narrow the alerts to just your county,
see page 4 to program the S.A.M.E code for your county and/
or surrounding counties.
Installing the Belt Clip
To install the belt clip, slide the clip down into the slot on the
back of the radio until the belt clip latch clicks. To remove the
belt clip, press the lock tab down, then gently pull the belt clip up
toward the top of the radio.
Page 3
HH54
www.midlandradio.com
3
Set the Clock
1. Press the MENU button to open menu options.
2. Press the UP arrow to scroll through the menu
until TIME is displayed. Press the SELECT button.
3. Press the UP arrow until the current hour is
displayed. ( Note AM/PM changes as you scroll
through the hours.)
4. Press the RIGHT arrow to save current hour
and advance to minutes.
5. Program the minutes the same way.
6. Press the SELECT button to store the current
time. Press the MENU button to exit menu mode.
Set the Sleep Alarm
1. Press the MENU button to open menu options.
2. Press the UP arrow to scroll through the menu until
ALARM is displayed. Press the SELECT button.
3. Press the UP arrow until the current hour is displayed.
(Note AM/PM changes as you scroll through the hours.)
4. Press the RIGHT arrow to save current hour and
advance to minutes.
5. Program the minutes the same way.
6. Press the SELECT button to store the current time.
7. Press the MENU button to exit menu mode.
To temporarily silence the sleep alarm, press the WX/SNOOZE
button. This will advance the alarm time by 9 minutes. To silence the alarm
for the remainder of the day, press the MENU button.
Set the Channel
1. Press the MENU button once.
2. Press the DOWN arrow until CHANNEL is displayed
on the LCD. Press the SELECT button.
3. Press the DOWN arrow until you hear the broadcast
of your station. Then Press the SELECT button to save
your station and exit back to Menu mode.
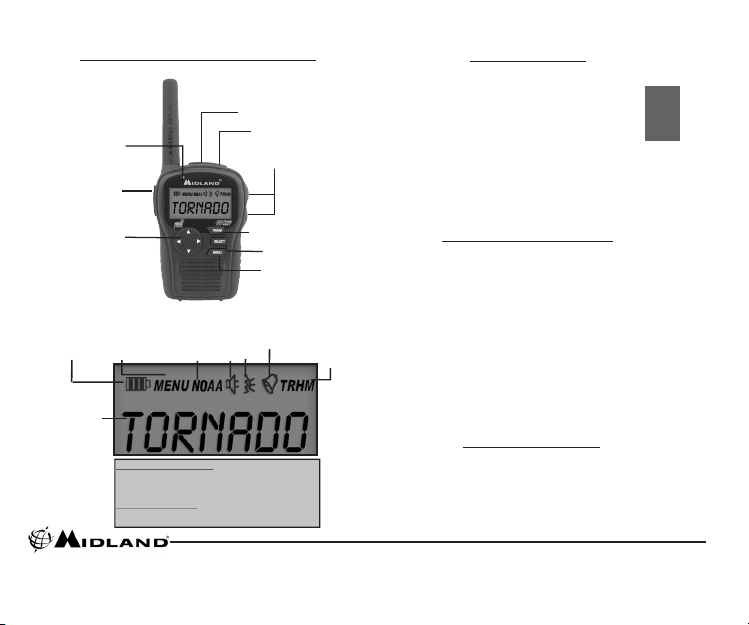
HH54 Features and Controls
ON/OFF Button
WX/Snooze
Button
Headset/Charge
Jack
Volume Up/Down
Buttons
Travel/Home
Button
Select Button
Navigational
Buttons
Menu Button
Controls
LCD Indicators
Travel/Home
Indicates when
the radio is
either in Travel
or Home
Mode
Alarm Clock
Indicates when
the alarm clock is
activated
Alert Type
Indicates when
VOICE or
SIREN Alert
type is selected
NOAA
Indicates when
the radio is on
and in weather
radio mode
MENU
Indicates when
the radio is in
MENU mode
Battery
Indicates when
the battery
level is low
Alphanumeric
Readout
Displays type and
time of alert
Tri-Color Alert
LED
Start Over Programming: If you want to start over
while programming, press the MENU button continuously until
it “backs out” of the programming mode. If no buttons are pres
sed for about one minute the radio will exit the menu mode
Invalid Button Press: When you press a button that is not
correct for programming the button will beep twice. A single
button beep indicates a valid button press.
Page 4

4
www.midlandradio.com
S.A.M.E (Specific Area Message
Encoding) County Codes
Getting the S.A.M.E County Code
Please Note: In Canada you can visit the Environment
Canada website at: http://www.msc-smc.ec.gc.ca/msb/
weatheradio/transmitter/index_e.cfm to obtain the CLC
code for your region.
Programming S.A.M.E Codes into the HH54
You can program the HH54 Por table Emerg ency
Weather Alert Radio with up t o 9 S.A.M.E . county
codes. The National Weather ser vice divides the United
States by state and county (or pari sh) and ass igns a six
digit code number called a FIPS (Federal Information
Processing System) code, also known as a S.A.M .E. county
code. This will eliminate any aler ts that are not within
these 9 areas of interest. Warnings, watches, advisories
and statements, about 80 different types, will activate
the weather radio for only your programmed specific
area. The S.A.M.E. message the NWS sends contains
information pertaining to the per iod for whic h the aler t
is valid. NWS can set the active time of the a lert from
15 minutes up to 6 hours. When the designated time has
passed, the weather radio display message and ligh t will
automatically reset to their normal ap pearance.
You can program S.A.M.E. codes to the HH54 Portabl e
Emergency Weather Alert Radio in three different ways
but first, determine the counties you are interested in and
be prepared to write them down:
1. Call the National Weather Service Toll Free
Number at 1-888-NWS-S.A.M.E or (1-888-697-7263)
When you call the NWS toll-free number, automated
instructions will guide you to obtai ning the si x-digit S.A.M.E.
County Code(s) you need by entering you r state and county
name through a “touch-tone” telephone keypad. Be sure to
write it down for future reference. The automated telephone
system will also give you the option t o enter “another com
bination” which will enable you to o btain additi onal S.A.M.E.
Codes for surrounding counties.
2. Visit the National Weather Service website at
www.nws.noaa.gov/nwr/indexnw.htm.
The above internet link will take you to the NWS website.
From there you will need to click on your state, find your
county, and record the “S.A.M.E. code” which will be listed
to the right of your cou nty. Do the same for any other
counties in which you are interested.
3. Visit the Midland Radio Corporation
website at www.midlandradio.com/Products/
Be-Weather-Aware
The above int ern et l ink will ta ke you to the Mid land
Radi o Co rpor ati on B e Weath er Aware landing pag e.
From there, clic k on SA ME c odes for states , count ies
and terr itor ies under t he E mergenc y Prepare dnes s
sect ion. This will take you to the NWS webs ite . From
there you wil l ne ed to c lick on your state, find y our
coun ty, and record the “S.A.M.E. code” w hich wil l be
list ed t o th e r ight of your cou nty. Do the s ame for any
othe r co unti es in w hich you are int erested.
“ANY” S.A.M.E. County Codes is the
Default Factory Setting:
Your HH54 Portable Emergency Weather Alert Radio
comes preprogrammed to receive NWS weather and
hazard alert transmissions for all S.A.M.E. county codes
within range. If this is what you want, leave the radio set
to “ANY.”
Page 5

HH54
www.midlandradio.com
5
Helpful Tip: The S.A.M.E. code is created using the
following method:
• The first digit is the sub county code-currently 0 in most
areas.
• The second two digits represent the state code.
• The last three digits represent the county code.
A Single S.A.M.E. County Code:
1. Press the MENU button to open menu options .
2. Press the UP arrow to scroll through menu
options until “S.A.M.E. SET” is displayed, then
press SELECT button.
3. Press the UP arrow to scroll through: “SINGLE”,
“MULTIPLE”, or “ANY.”
4. Display “SINGLE”, then press the SELECT but ton.
“S.A.M.E.01”will be displayed. (Note if you are
programming a single S.A.M.E. County Code,
only the “01” setting will be used.) Press SELECT.
5. Using the UP arrow, find the first digit of your
S.A.M.E. County Code. Press the RIGHT arrow
to save the digit and automatically advance to the
next digit.
6. Program all digits of your S.A.M.E. County Code in
the same way.
7. Press the SELECT button to store your S.A.M.E.
County Code. Press the MENU button to close
the programming menu.
Multiple S.A.M.E. County Codes:
1. Press the MENU button to open menu options .
2. Press the UP arrow to scroll through menu
options until “S.A.M.E. SET” is displayed, then
press the SELECT button.
3. Press the UP arrow to scroll through: “SINGLE”,
“MULTIPLE”, or “ANY.”
4. Display “MULTIPLE” as explained, then press
SELECT. “S.A.M.E.01” will be displayed, indicating
you will be programming your first S.A.M.E.
County Code at weather radio me nu location
“01.”
5. After programming your first S.A.M.E. County
Code, press the SELECT button then the
“UP” arrow to advance to “S.A.M.E. 02.”
Program all of your S.A.M.E. County
Codes in the same way as above.
6. When finished entering all your codes,
press the MENU button to close the
programming menu.
The HH54 gives you the option of home or
travel mode, making it easy to take the radio from ho me
onto a road trip or vacation without having to reprogram
your settings Here are the basic differenc es between
travel and home mode:
Home Mode:
In this mode the radio uses your de fault
settings for response location. So, if you have chosen mul
tiple S.A.M.E counties and programmed in three,
these will be the counties the rad io will ale rt for. In
addition your channel selected during the quick start
set-up will be saved as a home default as well, unless you
manually change it through the menu while in home mode.
When you switch to travel mode , these settings will be
saved for when you return back to home mode .
Travel Mode: In this mode the radio autom atically scans
to the first available weather channel with a broadcas t
signal strong enough to use. If later the signal becomes too
weak to use the radio will automatic ally resume sc anning
to find a usable signal.
Travel/Home Modes
Page 6

6
www.midlandradio.com
Alert Type Description
DISPLAY
When the DISPLAY alert type is chosen, only a
text alert will scroll on the display. There will be no
audible alarm.
VOICE When the VOICE alert type is chosen, the alert tone
will sound for 8 seconds, then you will hear the voice
of the weather broadcast for 5 minutes.
TONE When the TONE alert type is chosen, the alert
tone will sound for 5 minutes, or until you press any
button.
This ensures no matter where you go you wil l always be
locked onto the weather channel for that area. As for the
S.A.M.E settings, the radio automatically dis ables Singl e
and Multiple options so the radio will only al ert for Any
counties within range of where you are . To activate
travel mode, press and hold the TR/HM button for 3
seconds. To return to home hold TR/HM again 3 seconds.
1. Press the MENU button to open menu options.
2. Press the UP arrow to scroll through menu options
until “ALT TYPE” (Alert Type) is displayed, then press
the SELECT button.
3. Press the UP arrow to scroll through the
following (3) aler t types: “DISPLAY”, “VOICE”,
or “TONE”.
4. Press the SELECT button to choose the Alert Type
you want.
5. Press the SELECT button to store your S.A.M.E.
County Code. Press the MENU button to cl ose the
programming menu.
Choosing an Alert Type
The HH54 Portable Emergency Weather Alert Radio can
store up to 10 different Weather/Hazard alerts (w ith
overlapping effective times) in its memor y. If the weather
radio receives a new alert while any previo us alert is still
in effect, it automatically displays the new alert. You can
review all aler ts still in effect by pres sing the UP arrow to
scroll through the weather radio’s active alert m emory.
A double beep indicates the end of the list. “NO MESSA
GE” will be displayed if no alerts are a ctive. Also, when
the radio receives an aler t the corresp onding LED will be
lit- RED= Warning, Orange= Watch and Yellow= Advisory.
Reviewing Alerts
Display Backlighting
The HH54 has 2 settings for controlling the backlighting
on the display. Choose between BLT NORM or BLT ON.
With BLT NORM the backlight turns on whenever any
button is pushed and will turn off after 5 se conds. With
BLT ON, the backlight comes on a nd will stay on continuously until you turn it off manually t hrough the menu.
Reception
1. The typical weather reception distance will range from
25-50 miles depending on the l ocation and conditions
of weather, terrain, etc... Also, some weather stations
operate at much higher power levels than others and
have their transmitting towers on the top of high
buildings or hills. If reception in your area is not good ,
try different locations to find a place of good
reception.
Page 7

HH54
www.midlandradio.com
7
Troubleshooting
Alert Type Description
NO POWER
Make sure the batteries are installed
correctly into the radio observing
polarity as you install them.
NO SOUND
Check volume to ensure it is turned up
to an audible level.
NO WEATHER
BROADCAST WHEN
YOU PRESS THE WX/
SNOOZE BUTTON
Ensure the radio is set to the NWS
weather channel in use for your area.
Contact NWS to ensure they are
presently broadcasting.
If in a metal structure, make sure you
are close to a window.
THE RADIO IS NOT
RESPONDING
PROPERLY TO NWS
WEATHER ALERT
BROADCASTS
Check to see that you have
programmed in the correct S.A.M.E
county codes.
Check with the NWS that the tower is
broadcasting.
THE ADVISORY LIGHT
HAS BEEN ON FOR A
WHILE
If your advisory light is on and
continues to stay on, the radio will
automatically reset this function within
6 hours.
Please Note: the Midland HH54 Portable Emergency
Weather Alert Radio device complies with part 15 of the
FCC Rules. Operation is subject to the following
conditions: (1) This device may not cause harmful
interference; (2) This device must accept any interference
received including interference that may cause undesired
operation.
2. If weather stations cannot be heard on any channel,
contact your local National Weather Service office to
verfiy the station is on air and also verify t he
CHANNEL and location of the weat her station .
3. All National Weather Service stations periodically
transmit test signals. You can find out when your lo cal
NWS station broadcasts test signals by calling the
NOAA National Weather Service Forecast Office
(listed under “Weather” in the Federal Government
section of the telephone book) . During the weekly test
signal, the local NWS station will give a list of cou nties
covered by their transmitter. The NWS test signal
allows ever yone with weather radio receivers to verify
the operation of their equipme nt. The following test
signals may be sent by the NWS duri ng testing:
required weekly test, required monthly test, system
demo, and national periodic test. During a test, the
yellow advisory LED will light up and the “Weekly
Test” or “Monthly Test” message wi ll be visib le on the
display. The radio will not sound an audible alert tone
to avoid giving the impression of an actual alarm. The
visual response to the test is c onfirmation that your
radio is working properly.
4. Mobile home reception is difficult due to t he metallic
structure preventing reception. Put your HH54 near
a window.
Page 8

8
www.midlandradio.com
Service
If your Midland Weather Radio fails to operate properly,
check the “Troubleshooting” section in this manual
before returning it for service. If necessary, return as
follows:
1. Pack the unit in its original box and packing. Then
pack the original box in a suitable shipping carton.
Caution: Improper packing may result in damage
during shipment.
2. Include the following:
a. full description of any problems
b. daytime telephone number, name & address
3. For warranty service include a photocopy of the bill
of sale from an authorized dealer or other proof of
purchase showing the date of sale.
4. You do not need to return accessory items (AC/DC
Adapter, Batteries, Owners Guide) unless they
might be directly related to the problem.
5. A flat rate of $25.00 will apply to repairs not
covered by warranty or units that are over one year
old. Send only cashier’s check, money order or
Master Card or Visa card number.
Midland Radio Corporation
5900 Parretta Drive
Kansas City, MO 64120
816-241-8500
One Year Limited Warranty
Midland Radio Corporation will repair or replace, at its
option without charge, any weather alert transceiver which
fails due to a defect in material or workmanship within One
Year following the initial consumer purchase. This warranty
does not apply to water damage, battery leak or abuse.
Accessories have a 90 day warranty from date of purchase,
including any antennas, chargers, or earphones. This warranty
does not include the cost of labor for removal or
re-installation of the product in a vehicle or other mounting.
For Product Purchased in the USA:
Performance of any obligation under this warranty may be
obtained by returning the warranted product, prepaid freight,
along with proof of purchase to:
Midland Radio Corporation
Warranty Service Department
5900 Parretta Drive
Kansas City, MO 64120
This warranty gives you specific legal rights, and you may also
have other rights, which vary from state to state. Note : The
above warranty applies only to merchandise purchased in the
United States of America or any of the territories or
possessions thereof, or from a U.S. Military exchange.
For Product Purchased in Canada:
Performance of any obligation under this warranty may be
obtained by returning the warranted product, along with
proof of purchase to your dealer in Canada. This warranty
gives you specified legal rights. Additional warranty rights may
be provided by law in some areas.
Page 9

HH54
www.midlandradio.com
9
Page 10

10
www.midlandradio.com
MIDLAND RADIO CORPORATION
5900 Parretta Drive
Kansas City, MO 64120
Call 816.241.8500
visit us at http://www.midlandradio.com
 Loading...