

Page 1
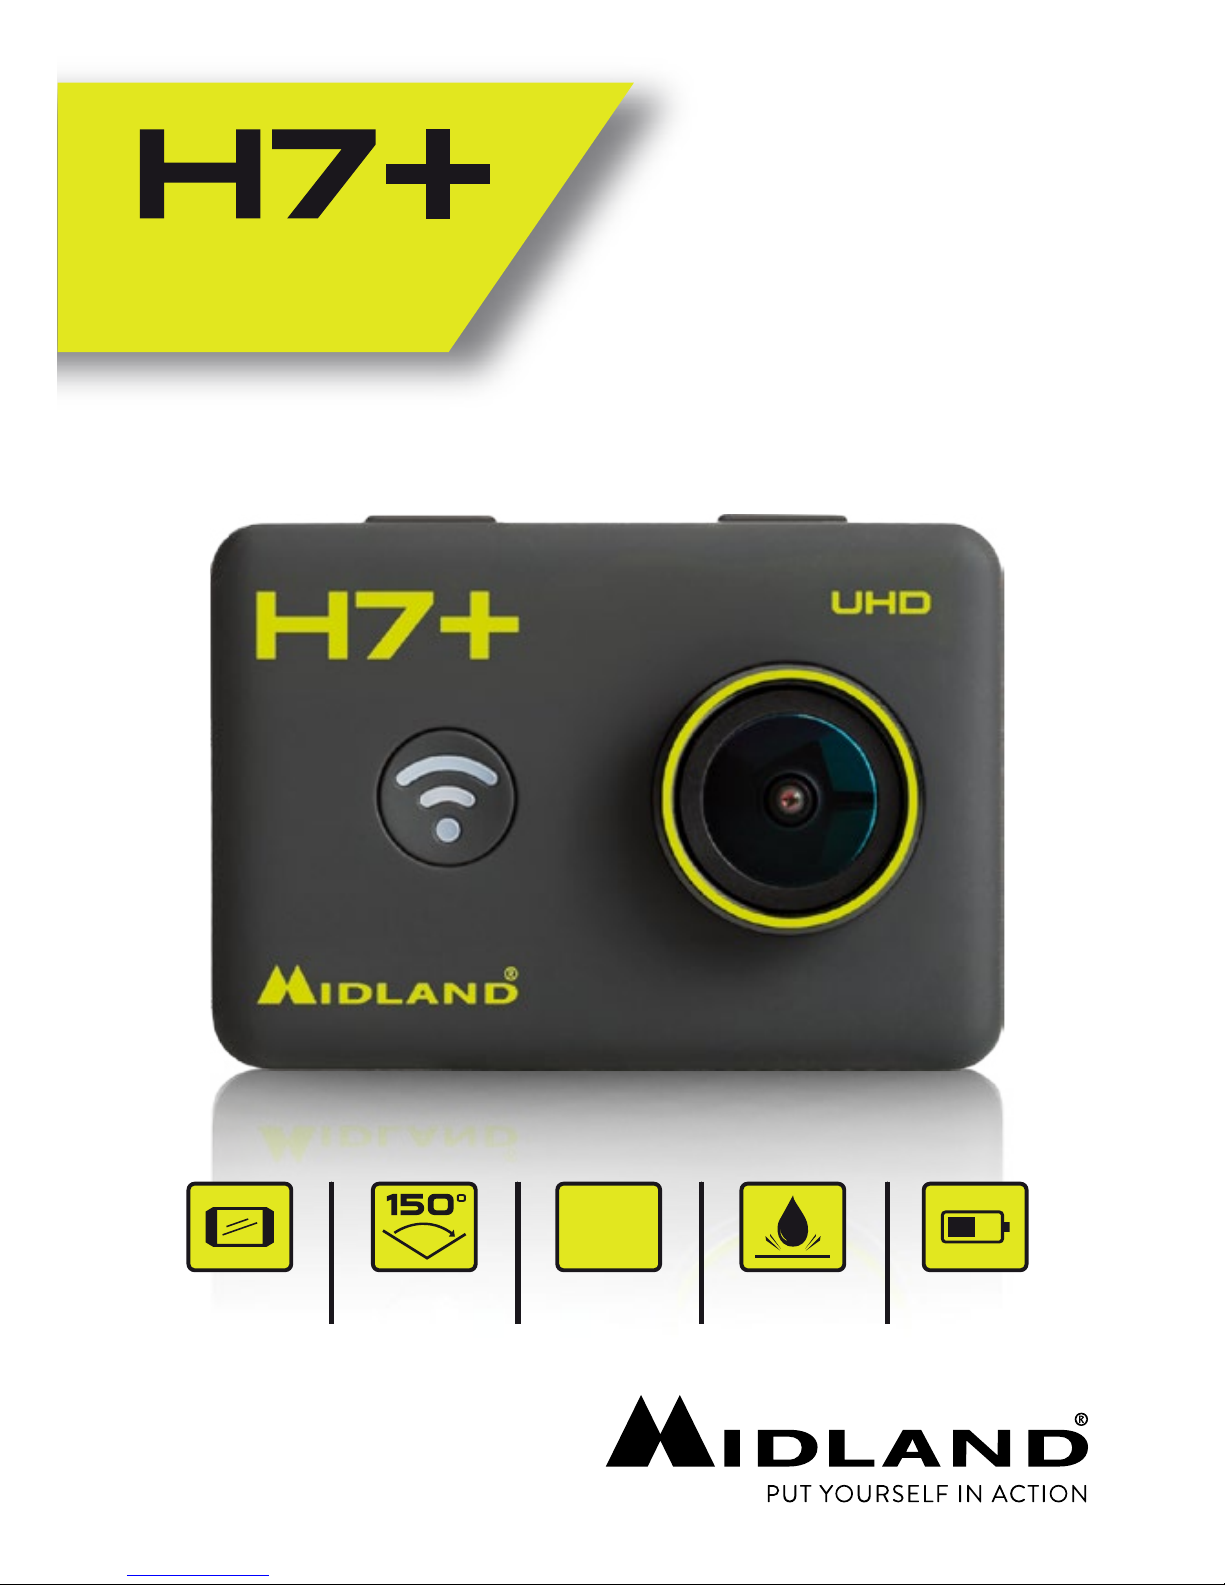
UHD
UHD
Ultra High
Definition
2160p@24fps
Waterproof
up to 30m
1.5 HoursWide Angle
Lens
2-inch
LCD
USER MANUAL
MANUALE D’USO
BEDIENUNGSANLEITUNG
MANUAL DE USUARIO
MANUEL DE L’UTILISATEUR
INSTRUKCJA OBSŁUGI
MANUAL DO USUÁRIO
ΟΔΗΓΊΕΣ ΧΡΉΣΗΣ
Page 2

2
Il manuale multilingua e disponibile sul sito
www.midlandeurope.com
The multi-language user manual is available on our website
www.midlandeurope.com
Die mehrsprachige Anleitung finden Sie auf unserer Webseite
www.midlandeurope.com
El manual multilingue esta disponible en
www.midlandeurope.com
Le manuel multi langue est disponible sur notre site internet
www.midlandeurope.com
O manual multilingua disponivel em www.midlandeurope.com
Το πολύγλωσσο εγχειρίδιο χρήσης είναι διαθέσιμο στην ιστοσελίδα μας
www.midlandeurope.com
Instrukcja w wielu językach dostępna na stronie
www.midlandeurope.com
Page 3

3
English
Cautions
• Do not drop your camera.
• Do not place heavy objects on the camera.
• Keep the camera away from water and liquids (unless used in the
waterproof case). This may cause the camera to malfunction.
• Recharge the battery via the USB cable.
• The camera should not be in heat over 65°C.
• When the camera cannot work well, please don’t disassemble it
by yourself, if your behavior cause damage, the original factory
will not undertake responsibility and the warranty will become
void.
1. Key Features
• Video resolution: 2880x2160p@24fps, 2.7K@30fps,
1080p@60fps, 1080p@30fps, 720p@120fps, 720@60fps,
1440p@30fps
• Image resolution: 12MP, 8MP, 5MP, 3MP
• Supports Wi-Fi connection, range up to 15 meters
• Supports 2.4G Wireless remote control (no waterproof)
• Underwater 30meters when bundled with waterproof case
• 2” TFT LCD screen
• 3.7V/1000mAh detachable Lithium-ion battery, supports up
to 90min continuously recording (Wi-Fi disabled and LCD o).
Page 4

4
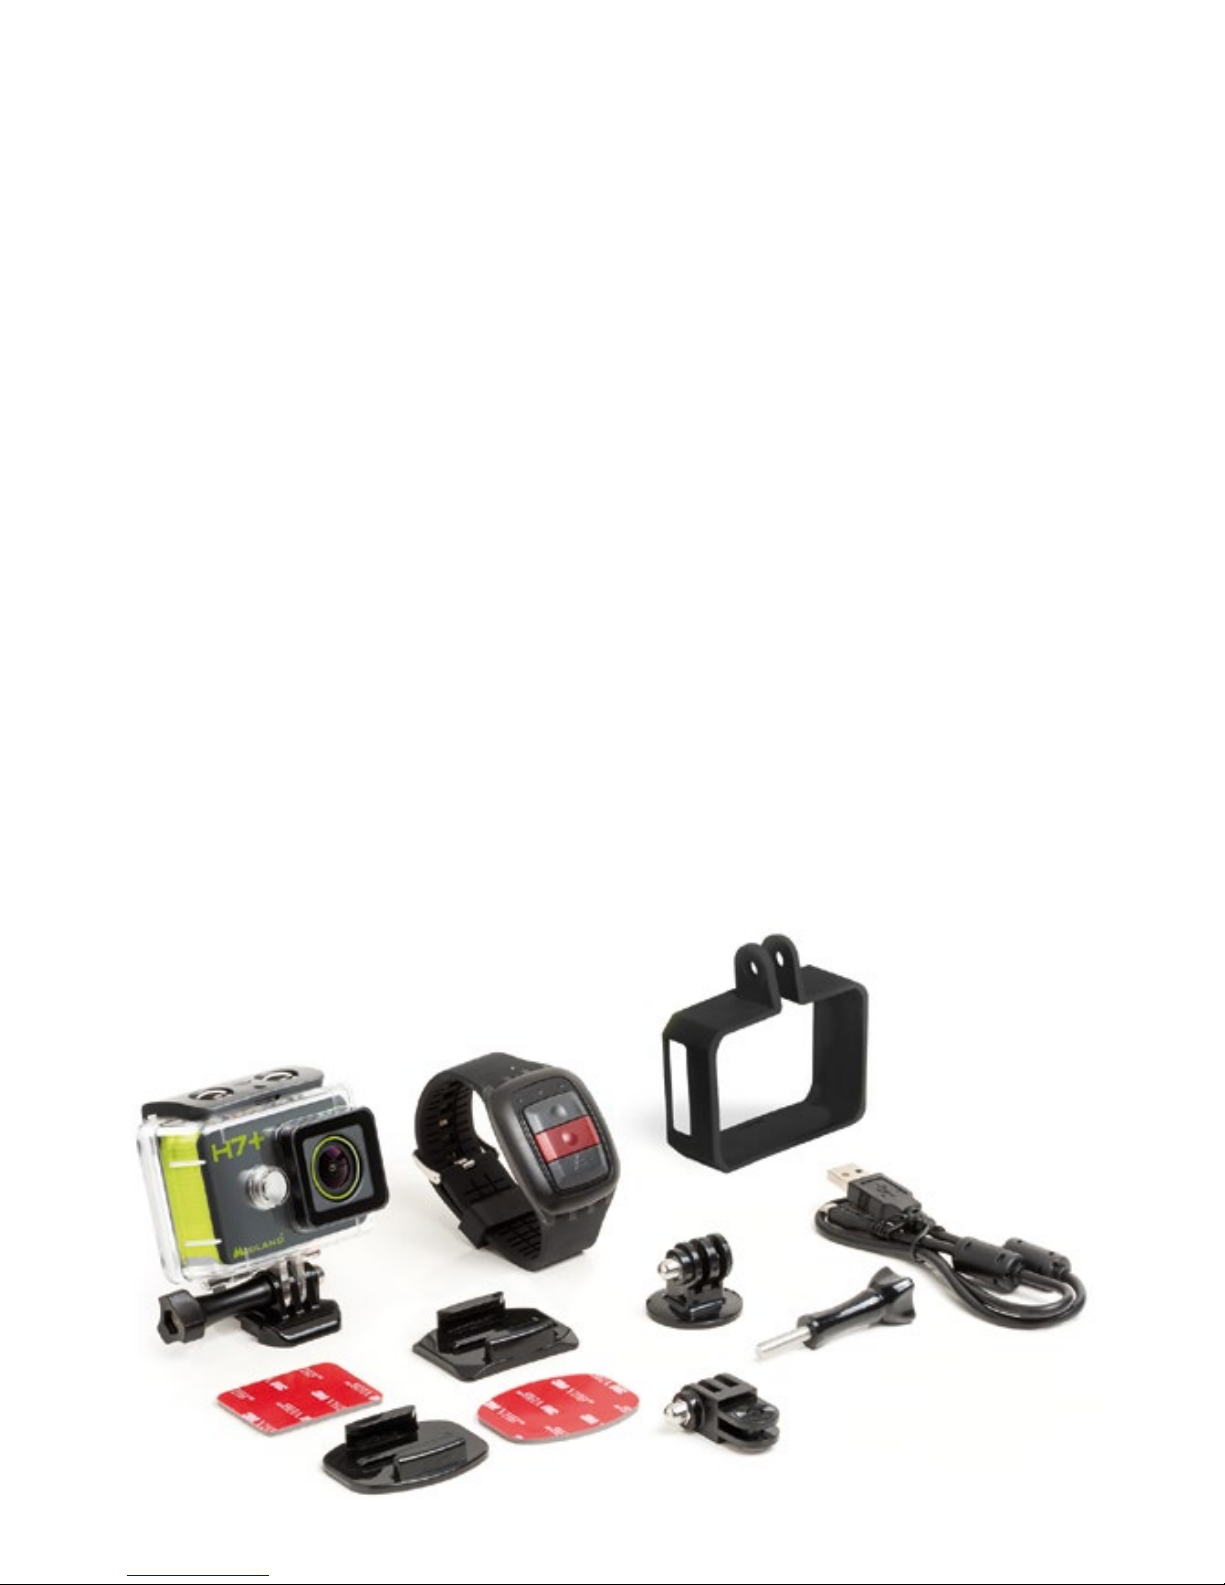
2. What’s in the box
• Camera
• Remote control
• Waterproof case
• Frame
• 90° mount
• Tripod mont
• Curved mount
• Flat mount
• 3M double side adhesive
• Quick release mount
• USB Cable
• Screw
Page 5
5
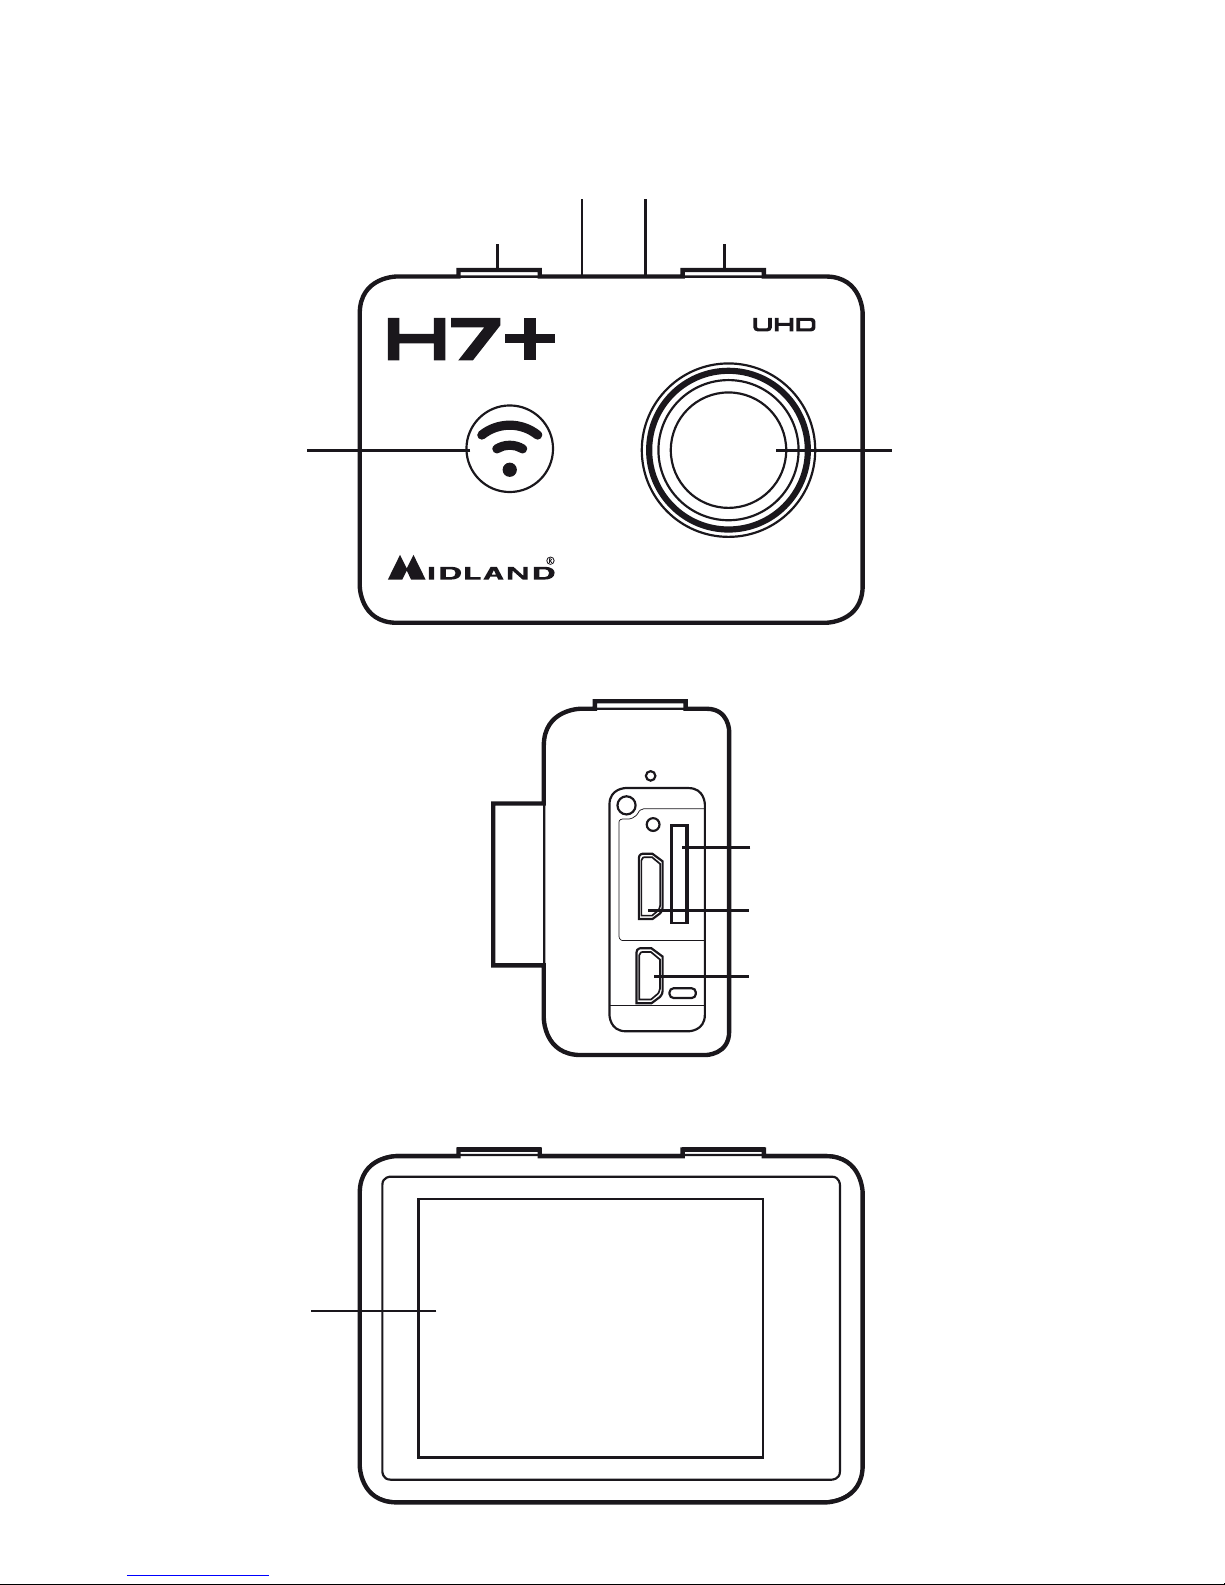
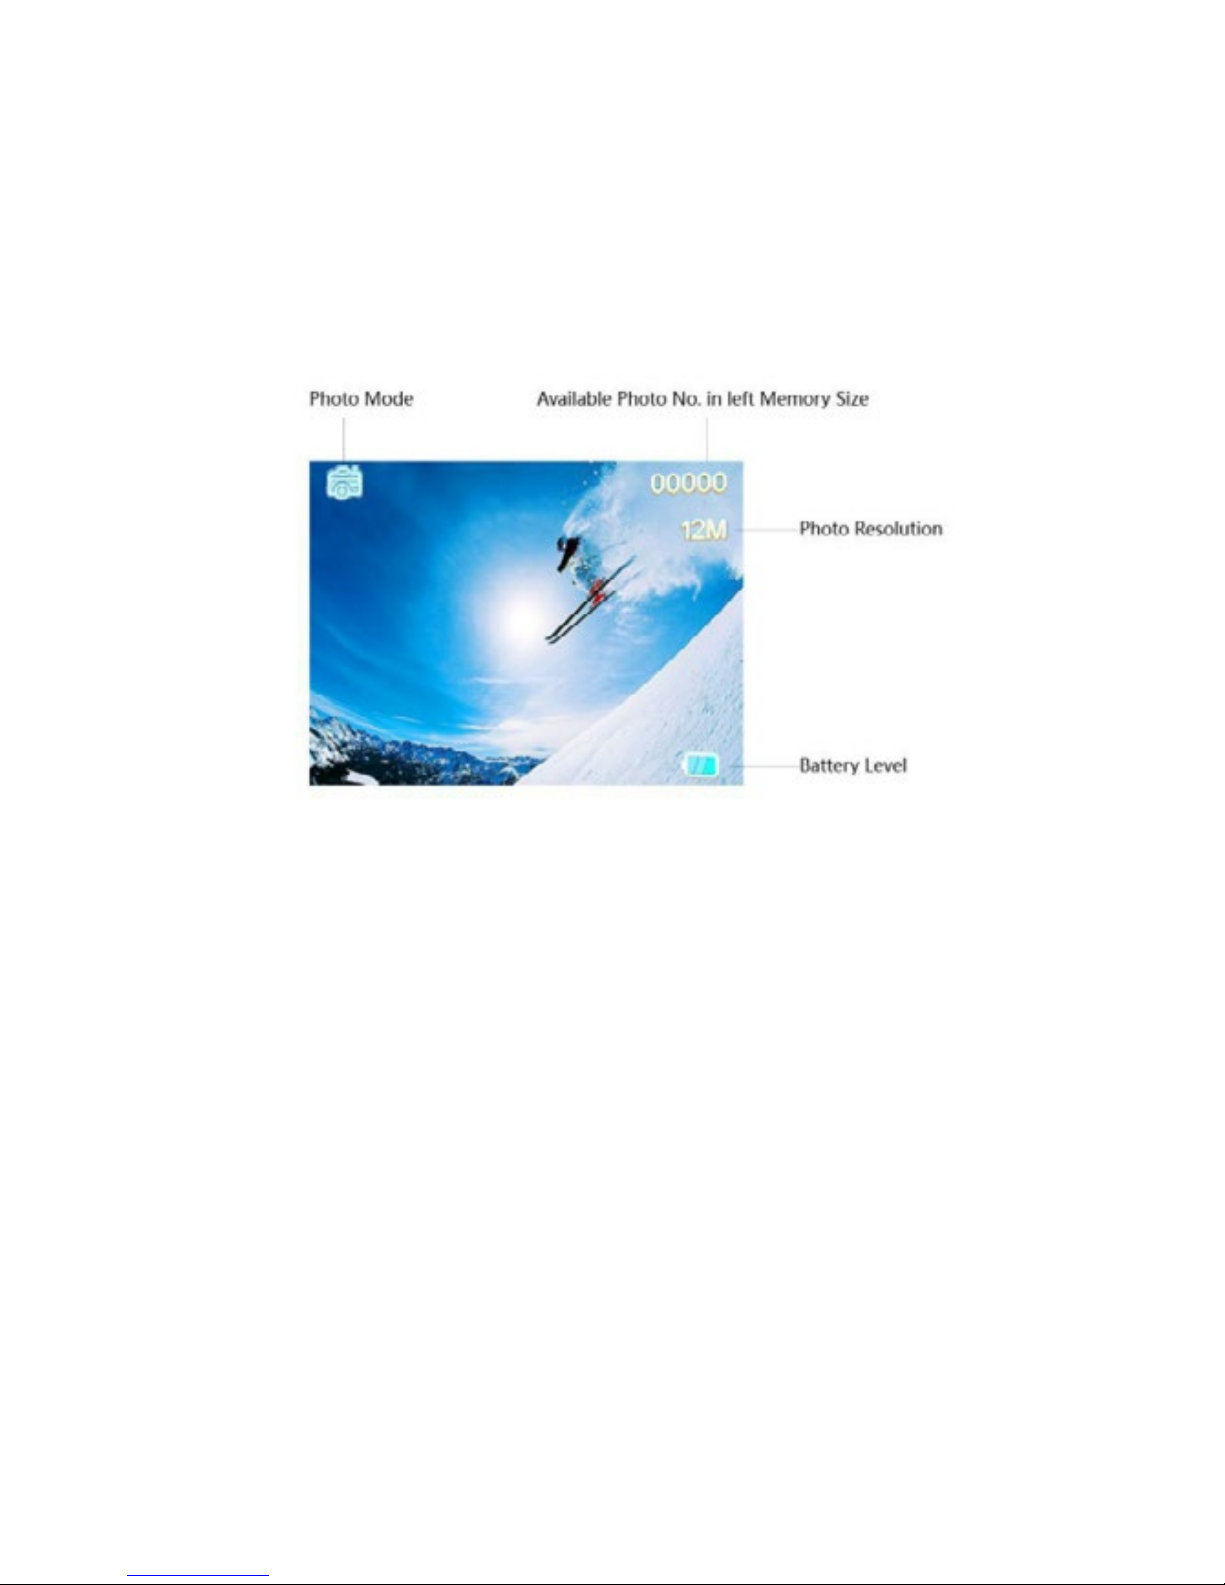
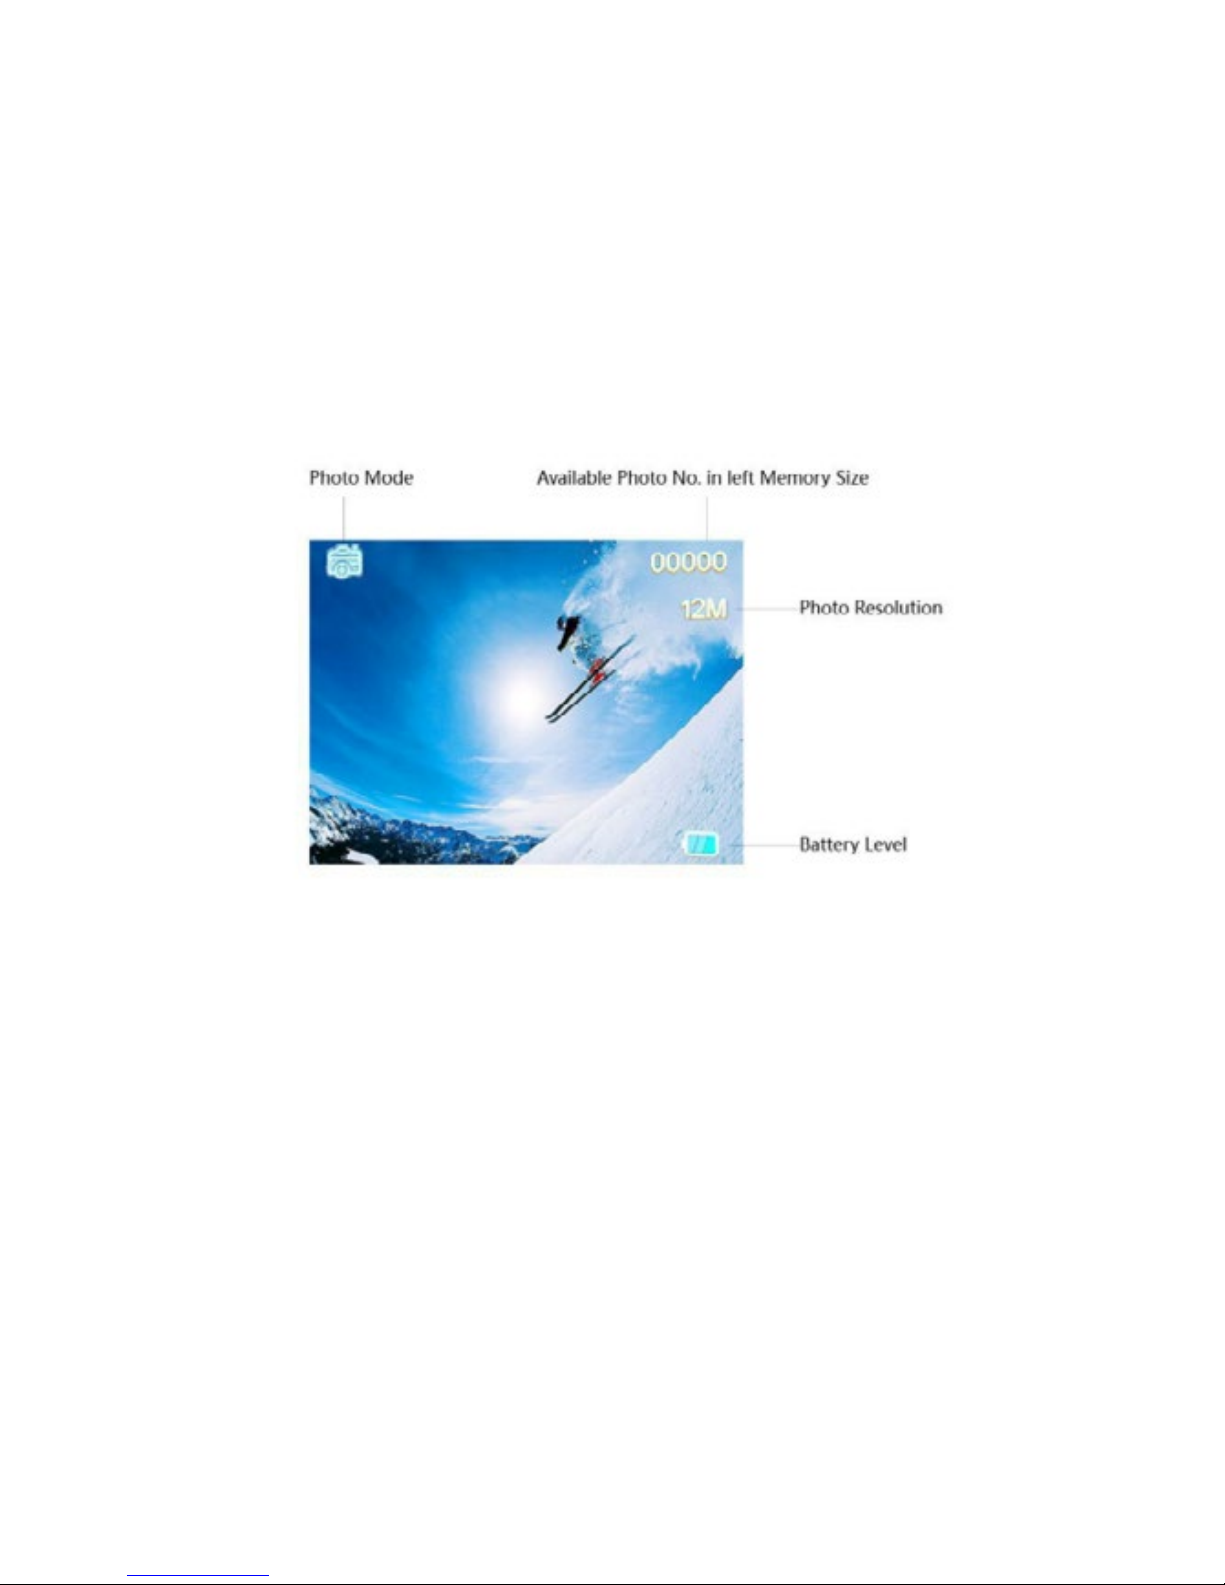
3. Camera Description
Recharging indicator Working status indicator
Shoot button Power button
Wifi button
& indicator
Lens
Memory card interface
Micro USB interface
Micro HDMI interface
Display
Page 6

6
4. How to use your camera
4.1 Turn on / o
Turn on: Press and hold the Power button for 2 seconds, the LED
indicator will turn red. The camera defaults to video mode when
turned on.
Turn o: Press and hold the Power button for 2 seconds.
4.2 Modes
Midland H7+ has 3 dierent operative modes: Video, Picture and
Play back. The camera switches automatically to video mode when
turned on. To switch to dierent modes you have to press Shoot button for 1,5 seconds: Video Picture Playback
4.3 Take a Video
By default, the camera is on video mode when it is turned on.
• Press Shoot button once to start recording;
• Press Shoot button again to stop recording, the video clip will be
automatically saved.
4.4 Shooting Single Picture
• Press and hold Shoot button for 1.5 seconds to switch from video
mode to picture mode.
• Press Shoot button once to shoot a single picture.
4.5 Playback mode
• Press and hold the Shoot button for 1.5 seconds to switch from
Picture mode to playback mode. In this mode you can review all
your captured videos and photos.
• Use the WiFi button to scroll, the Shoot button to enter and play,
the Power button to enter, to protect/delete file menu.
• Press and hold the Shoot button for 1.5 seconds to shift to video
mode.
Page 7

7
4.6 Charging the camera
Before using the H7+ for the first time, please fully charge the battery first.
• Connect the camera to the charger via USB cable. The red indicator will be on, charging is in process.
• When the battery is fully charged, the red indicator will turn o. It
takes around 3.5 hours to fully charge the battery.
Some functions, such as the WiFi function, cannot be used if battery
is going to be low.
4.7 Insert the TF Card
• Insert a Micro SD card into the card slot according to the direction shown on the camera.
• Unit supports Micro SD card up to 32 GB.
Note:
a. We suggest using ≥CLASS 10 (High speed) Micro SD card for
smoothly shooting purpose. Lower CLASS of Micro SD Card
may cause video jammed.
b. There is only one correct direction to insert the Micro SD card
into the slot. Do not force the card into the card slot, as it may
damage both the camera and the Micro SD card.
c. A new Micro SD card should be formatted with the camera be-
fore using.
4.8 How to use the waterproof case
The camera can support underwater 30meters if mounted in the
waterproof case.
• Ensure the case is dry and clean
• Open the waterproof case latch.
• Insert the camera properly.
• Close the waterproof case buckle.
• After the use, please carefully clean the case with clean water and
dry with a soft cloth.
Page 8

8
5. Setting your camera
5.1 Video mode setting
When the camera is on video mode, press the Power button once
(release immediately, if it is held too long, the camera will switch o),
then enter the picture setting menu. Use the Wi-Fi button to scroll,
the Shoot button to confirm, the Power button to go back to the
latest menu.
Resolution: select between 4k@24fps - 2.7k@30fps 1080p@60fps - 1080p@30fps - 720p@120fps - 720p@60fps
- 1440p@30fps
Loop Recording: The video will be separated into dierence files by
the Time Length.
• Selected “O”: the video will be separated into dierent files by
every 12mins if 4K selected; by every 25mins if 1080p/720p is
selected.
• “3 Min”: the video will be separated into dierence files by every
3 minutes.
• “5 Min”: the video will be separated into dierence files by every
5 minutes.
Page 9

9
• “10 Min”: the video will be separated into dierence files by
every 10 minutes.
• For example, if you select “5 Min”, time length, a 20 Minutes
video will be separated into 4 Video Clips (5 Minutes each Clip).
Time-lapse Record: this feature allows you to set the intervals at
which a frame is captured.
You can set the time intervals as: O - 1Second - 5Seconds 10Seconds - 30Seconds - 1 Minute - 5 Minutes - 10 Minutes
Slow Motion: this feature allows you to create a slow motion video.
This option is available only at 720@120fps resolution.
After recording a video with this feature ON, the video will be
played at 1:4 speed ratio.
For example, recording for 5 minutes the unit creates a 20 minute
video slowed by 1:4 ratio
GYRO: activating this function, the built-in Gyroscope will start to
make the video shooting more steadily, less shaking.
Exposure: this function allows users to choose exposure parameter
from options including +2.0 +1.7 +1.3 +1.0 +0.7 +0.3 0.0 -0.3 -0.7
-1.0 -1.3 -1.7 -2.0
High exposure suits to dark environments.
White balance: The default set is auto, you can adjust the mode as
concrete lighting condition.
Color Mode: users can choose dierent color mode from options:
Normal - Black&White - Sepia - Dive Mode
Metering: this option allows to select the way the unit measures
and adjusts the exposure. Users can choose Average - Center Spot
Sharpness: users can setup sharpness to: Strong - Standard - Low
Saturation: users can setup saturation to: High - Standard - Low
Record Audio: Select “On”, shoot video with sound
Select “O”, shoot video without sound.
Date Stamp: You can display the time and date on video or not.
Page 10
10
5.2 Picture mode setting
When the camera is in photo mode, press the Power button once
(release immediately, if it is held too long, the camera will switch o),
then enter the picture setting menu. Use the Wi-Fi button to scroll,
the Shoot button to confirm, the Power button to go back to the
previous menu.
Capture Mode:
• Single: Shoot a single picture;
• 2S Timer: Shoot a single picture every 2 seconds;
• 5S Timer: Shoot a single picture every 5 seconds;
• 10S Timer: Shoot a single picture every 10 seconds;
Resolution: select value between 12M - 8M - 5M - 3M
Burst: the camera will shoot 3 pictures quickly. You can use this
function even together with timer set in “Capture Mode”.
Quality: set the image quality: Fine - Normal - Economy.
Metering: this option allows to select the way the unit measures and
adjusts the exposure. Users can choose Average - Center - Spot
Sharpness: users can setup sharpness to: Strong - Standard - Low
White balance: The default set is auto, you can adjust the mode as
concrete lighting condition.
Page 11

11
Color Mode: users can choose dierent color mode from options:
Normal - Black&White - Sepia - Dive Mode
Saturation: users can setup saturation to: High - Standard - Low
ISO: to determine how sensitive the camera sensor is. Options are:
Auto - 100 - 200 - 400
Exposure: this function allows users to choose exposure parameter
from options including +2.0 +1.7 +1.3 +1.0 +0.7 +0.3 0.0 -0.3 -0.7
-1.0 -1.3 -1.7 -2.0
High exposure suits to dark environments.
Anti Shaking: activating this function, the built-in Gyroscope will
start to make photo shooting more steadily, less shaking.
Quick Review: show quickly the taken picture. Select OFF - 2 seconds - 5 seconds
Date Stamp: display the time and date on pictures or not;
• O: does not display date & time on pictures;
• Date: displasy date on pictures
• Date/Time: displays date & time on pictures.
5.3 General Settings
When the camera is in photo or video mode, press the Power button
once, then press and hold the Shoot button for 1.5 seconds, then
enter the General Settings. Use the Wi-Fi button to scroll, the
Shoot button to confirm, the Power button to go back to the latest
menu.
Screen Save: Select 1, 3, 5min option, the camera LCD screen will
be o if no operation after 1, 3, 5min.
Date & Time: The default format is YY/DD/MM. You can set the
date and time, time sequence by yourself.
Auto power o: Select 3, 5 or 10min option, the camera will be o if
no operation after 3, 5 or 10 min.
Beep Sound: O: Turn the key tone o.
On: Turn the key tone on.
Language: there are 7 languages at your choice, including English,
Page 12

12
French, Spanish, Italian ect.
TV Mode: Select the NTSC or PAL to suit your TV system.
TV Out: this option allows to output the video on USB port. Users
can choose OFF or ON.
The display of the unit will turn OFF.
Frequency: Select correct light frequency to avoid strobing.
Format: You can format the TF card on camera.
Default Setting: this operation will return all the menu settings to
factory defaults.
Version: you can check your camera OSD software version
Wi-Fi SSID: Set the Wi-Fi ID by yourself. The default SSID is
“WIFI_H7Plus”.
Wi-Fi Password: Set the Wi-Fi password by yourself.
The default Wi-Fi password is “12345678”.
6. Wi-Fi set-up
Note: Make sure your camera is full of power before using the Wi-Fi
function.
a. Download the App “MelifeCam-I3” to your smart-phone or tab-
let from Google play store or Apple App store.
b. Turn on the camera, then press the Wi-Fi button to enter into
the Wi-Fi mode.
c. Go to Wi-Fi setting of your smart-phone or tablet, then you can
see “WIFI_H7Plus” in your list.
d. Input password “12345678” to connect the camera with your
smart-phone or tablet.
e. Open the App “MelifeCam-I3”.
Page 13
13
D
A
B
C
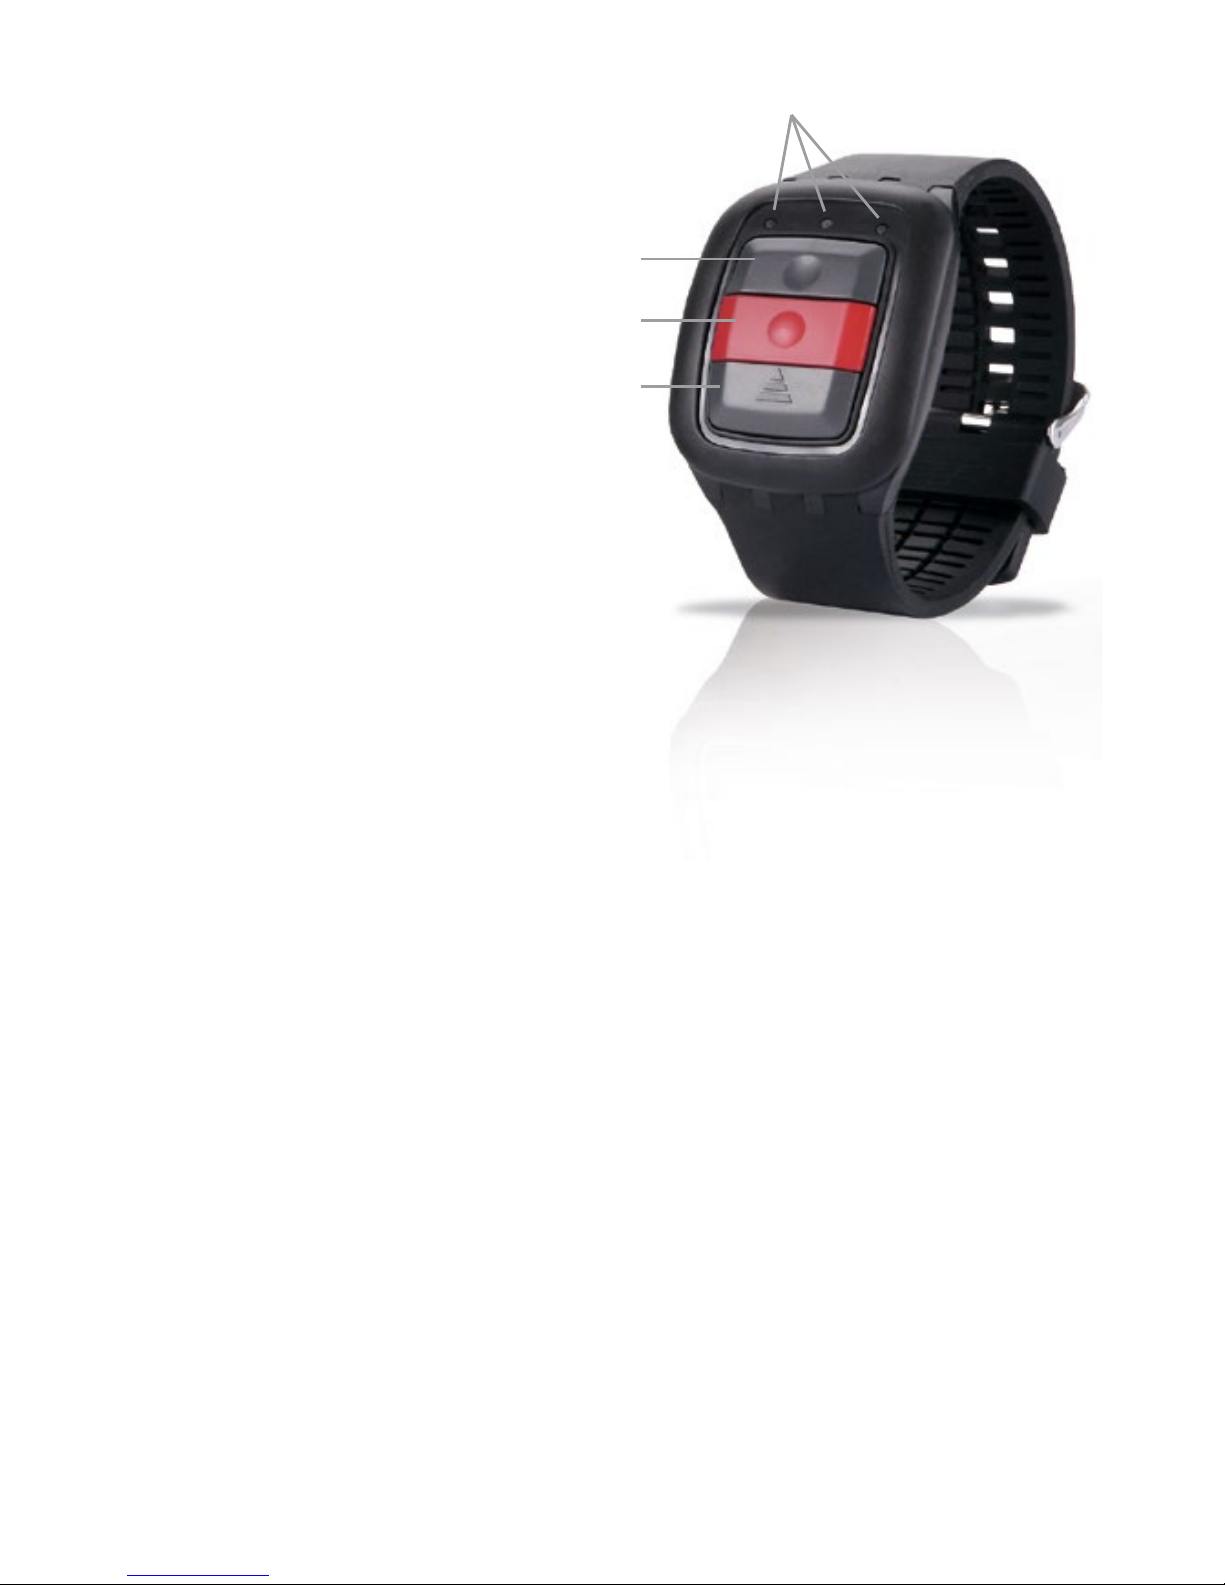
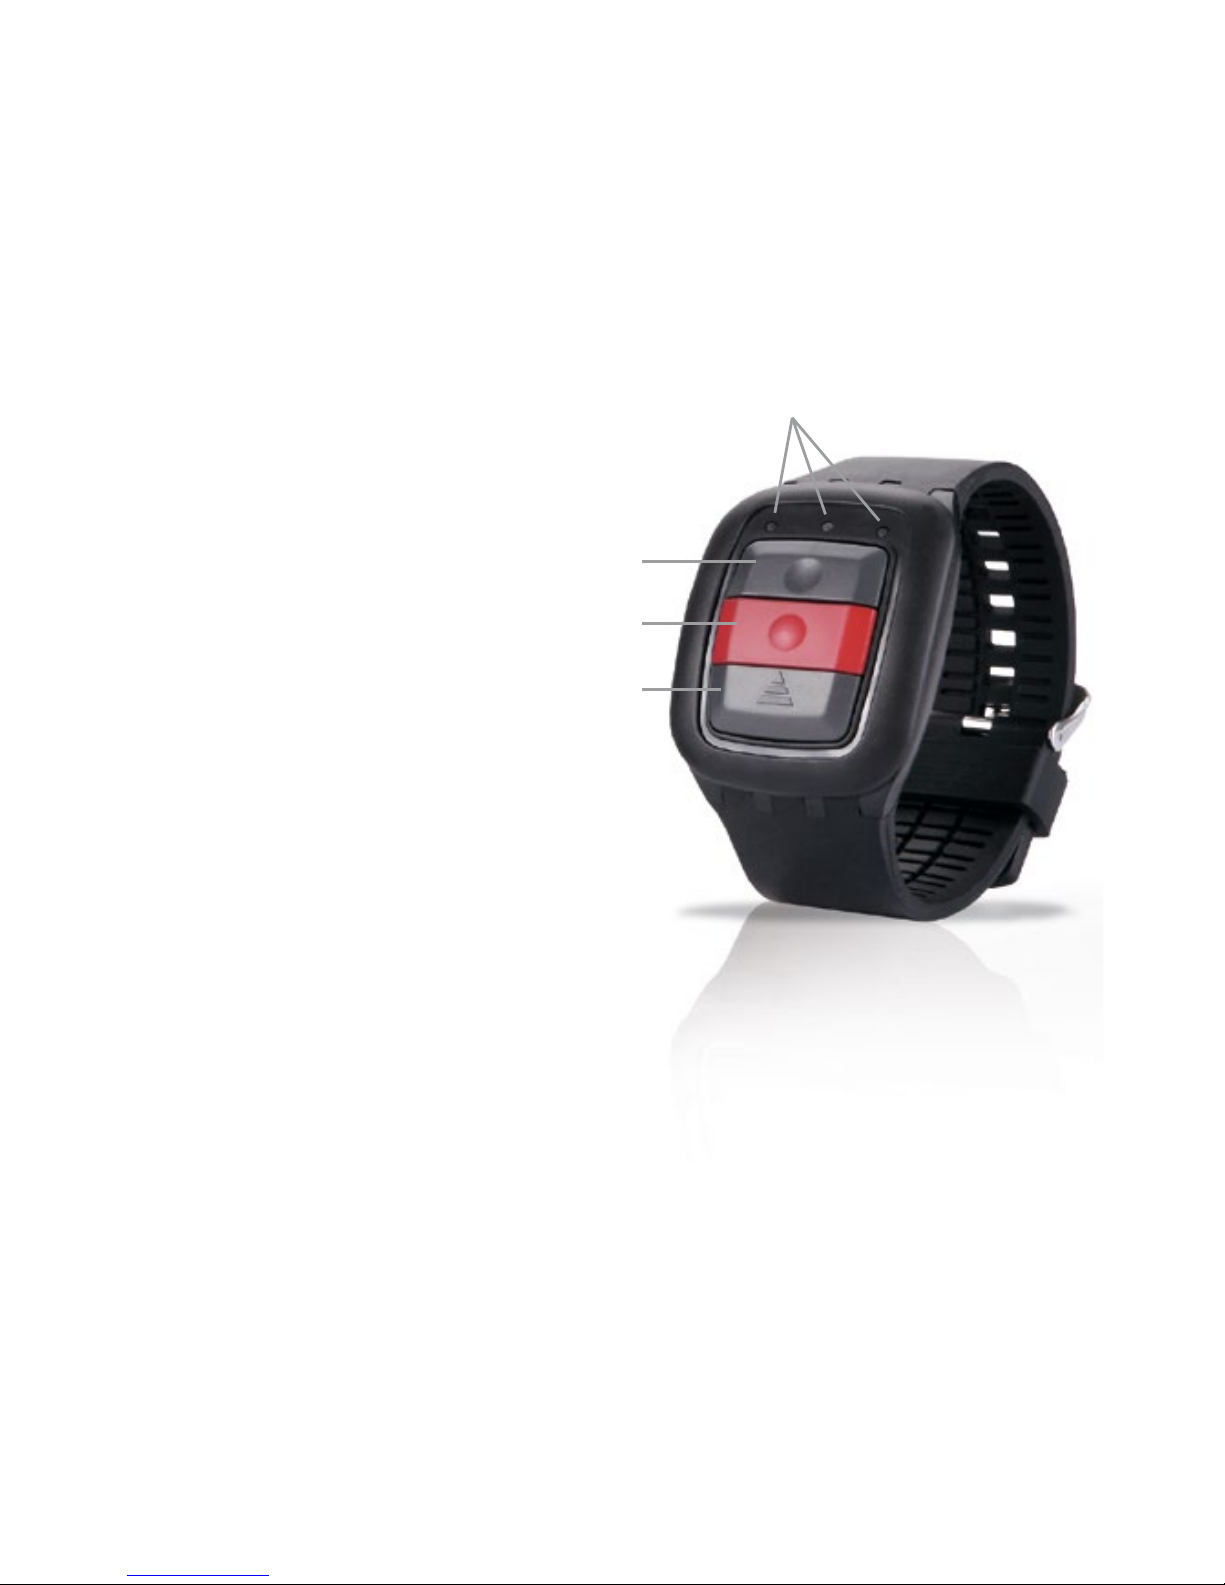
7. Remote Control
A. Picture key
B. Video key
C. Power O key
D. Indicator
Note: before using the remote control, please charge its battery.
1. Picture key: Press once to take a single picture.
2. Video key: Press once to start recording a video, press again to
stop.
3. Power o key: Press and hold for 4 seconds to turn o the camera.
4. Indicator function:
Left indicator: when the Wi-Fi is connected, it flickers blue;
Middle indicator: When paired, the light is blue;
During charging, the light is red;
During charging when camera is on, the light is
purple;
Right indicator: When video recording, it flickers green;
When a picture is captured, it flickers once for each single picture.
7.1 Pairing your camera and remote control
1. Make sure your camera and remote control are fully charged.
2. Press and hold the “Photo” & “Video” buttons of the remote at
the same time, and turn the camera on.
3. When the camera turns on, release the “Picture”&”Video” but-
Page 14

14
tons of remote.
4. When the pairing is finished, the middle indicator lights up blue.
Note: the camera must be paired only once, afterwards it will recognize automatically;
Wi-Fi function & remote controller cannot be used simultaneously.
8. PC Camera (Webcam)
The Camera can be used as a PC camera (webcam)
• Connect camera and PC via the USB cable provided.
• The camera will turn on automatically, and will show two options,
“Mass Storage” & “ PC Camera”, then choose PC Camera.
9. Connect with TV
You can playback captured videos and pictures on TV via a HDMI
cable.
• Connect the camera to TV via a HDMI cable.
• Power the camera on.
• The displayed images on the TV are all the same with the camera
screen. You can operate same as the camera also.
• Press and hold the Power button for 2 seconds to turn o the
camera.
10. Transferring files to PC
You can transfer the captured videos and pictures to PC.
• Connect camera and PC via a USB cable.
• The camera will turn on automatically, and will show two options,
“ Mass Storage” & “ PC Camera”, then choose “Mass Storage”.
• Select the files you want to transfer to your computer.
Page 15

15
11. Reset the Camera
The “Reset” button is under the connector’s cap, near to the USB
and TF card interface.
• When the camera does not work properly or is jammed, you
might use a pin to press the “Reset” button for 2 seconds to reset the camera, so that you can restart the camera for properly
shooting.
Page 16

16
FAQ
Q: The camera cannot turn on. Why?
A: Check if the battery is running flat, if yes, charge the battery via
USB cable or AC adaptor first.
Q: The camera freezes. What should I do ?
A: reset the camera.
Q: The video and photos are blurred. Why?
A: The lens may be dirty, please clean the lens.
Q: The camera cannot connect with PC. Why?
A: Try another USB cable or computer USB port.
Q: The camera will auto turn o. Why?
A: Check if auto power o in the general setting is on, if so, turn
it o.
B. Check if the battery is running flat, if so, charge the battery first.
Page 17

17
Technical specifications
Video resolution 2880x2160p@24fps, 2.7K@30fps,
1080p@60fps, 1080p@30fps,
720p@120fps, 720p@60fps,
1440p@30fps
Image resolution 12MP, 8MP, 5MP, 3MP
Storage Micro SD card up to 32GB (optional)
Video looping OFF, every 3, 5, 10 minutes
Sensitivity automatic ISO 100-200-400
Microphone built-in
Display 2” TFT LCD screen
Wide angle 150°
Waterproof up to 30m with submersible case
Power supply 3.7V/1000mAh detachable Li-Ion
battery
Battery life about 90min video without WI-FI
Video format MP4
Still Photo format .JPG
Interface USB 2.0, micro HDMI
Working temperature -10° to +55°
Language English, Italian, German, French, Span-
ish, Russian, Portuguese
Remote control Photo, Video, Power o
Remote method 2.4GHz RF (direction no limited)
Page 18

18
Remote power source built-in rechargeable Li-Ion battery
90mAh
Battery life of the remote up to 450 minutes
Remote Wi-Fi range about 15meters
To download firmware updatings and for information about the warranty, go to www.midlandeurope.com
Page 19

1
Italiano
Precauzioni
• Non appoggiate oggetti pesanti sulla videocamera.
• Se non utilizzate la custodia waterproof, non bagnate la video-
camera: potrebbe danneggiarsi irreparabilmente.
• Ricaricate la batteria tramite il cavo USB in dotazione.
• Non esponete la videocamera a temperature oltre i 65°C.
• In caso di malfunzionamento, non aprite la videocamera nè
tentate di ripararla per nessun motivo: questo farà decadere automaticamente la garanzia.
1.Principali funzioni
• Risoluzione video: 2880x2160p@24fps, 2.7K@30fps,
1080p@60fps, 1080p@30fps, 720p@120fps, 720p@60fps,
1440p@30fps.
• Risoluzione immagine: 12MP, 8MP, 5MP, 3MP
• Supporta la connessione Wi-Fi, con una portata fino a 15 metri
• Supporta un telecomando wireless 2.4G (no waterproof)
• Custodia waterproof: permette l’immersione della videocamera
fino a 30 metri di profondità
• Display LCD 2” TFT
• Pacco batteria Li-Ion 3.7V/1000mAh, in grado di registra-
re continuamente fino a 90 minuti (con Wi-Fi disattivato e
schermo spento).
Page 20
2
2. Contenuto della confezione
• Videocamera
• Telecomando
• Custodia waterproof
• Cornice
• Supporto 90°
• Aggancio a vite
• Base curva
• Base piatta
• Biadesivo 3M
• Aggancio rapido
• Cavo USB
• Vite
Page 21

3
3. Descrizione dei comandi
Indicatore di carica LED indicatore
Tasto Scatto
Tasto Accensione/Spegnimento
Tasto Wi-Fi
Lente
Alloggiamento Micro SD
Porta micro USB
Interfaccia Mini HDMI
Display
Page 22

4
4. Per iniziare
4.1 Accensione/spegnimento
• Accensione: Tenere premuto il tasto Accensione per 2 secondi, il
LED indicatore di stato si accende di rosso. Quando la telecamera si accende commuta in modalità video.
• Spegnimento: Tenere premuto il tasto Accensione per 2 secondi.
4.2 Modalità
Midland H7+ opera in 3 diverse modalità: Video, Foto (Picture) e
Riproduzione (Play back). Quando accendete la videocamera, au-
tomaticamente commuta in modalità video. Per passare ad altre
modalità premete il tasto Scatto per 1,5 secondi:
VideoFotoPlay back (Riproduzione)
4.3 Girare un video
Di default, H7+ è in modalità Video quando viene accesa.
• Premete il tasto Scatto per iniziare la registrazione;
• premetelo di nuovo per terminarla. Il video viene automatica-
mente salvato.
4.4 Scattare una foto
• Tenete premuto il tasto Scatto per 1.5 secondi per passare dalla
modalità Video alla modalità Foto (Picture).
• Premete il tasto Scatto per scattare una singola foto.
4.5 Modalità Playback (Riproduzione)
• Tenete premuto il tasto Scatto per 1.5 secondi per passare dalla
modalità Picture (Foto) a Playback (Riproduzione). Grazie a
questa modalità potete rivedere i vostri video e foto.
• Utilizzate il tasto WiFi per scorrere i filmati e le foto, il tasto
Scatto per entrare e riprodurre, il tasto Accensione per entrare,
proteggere/cancellare i file.
• Per passare alla modalità Video tenete premuto il tasto Scatto
per 1.5 secondi.
Page 23

5
4.6 Ricaricare la videocamera
• Ricaricate la videocamera prima di utilizzarla per la prima volta.
• Per la ricarica collegate la videocamera al PC tramite il cavo USB.
L’indicatore di stato si illumina di rosso durante la fase di carica.
• Quando la batteria è completamente carica l’indicatore rosso si
spegne. Per una ricarica completa sono necessarie 3 ore e mezza.
Alcune funzioni come per esempio il WIFI non possono essere utilizzate se la batteria è scarica.
4.7 Inserire la Micro SD TF Card
Inserite una Micro SD card nell’apposito alloggiamento seguendo la
direzione indicata sulla videocamera.
H7+ utilizza una memoria micro SD da 32GB
Note:
a. Per ottenere riprese di buona qualità consigliamo di utilizzare una
Micro SD card ≥ CLASSE 10 (High speed). Micro SD Card di
classe inferiore non garantiscono riprese soddisfacenti e possono
causare interruzioni o inceppamenti nei vostri video.
b. C’è solo una direzione in cui va inserita la Micro SD card nel suo
alloggiamento; non forzate se non entra, potreste danneggiarla.
c. Prima di utilizzare una nuova Micro SD card, è necessario for-
mattarla.
4.8 Come utilizzare la custodia waterproof
La custodia waterproof permette di utilizzare la videocamera fino ad
una profondità di 30m.
• Assicuratevi che la custodia sia asciutta e pulita.
• Aprite la custodia sbloccando l’apposito gancio.
• Inserite H7+.
• Chiudete la custodia bloccando il gancio di chiusura.
• Dopo l’utilizzo, la custodia deve essere sempre pulita con acqua
dolce e asciugata.
• Non utilizzate nessun prodotto per la pulizia.
Page 24

6
5. Impostazioni
5.1 Impostazione modalità Video
• Quando H7+ è in modalità Video, premete il tasto Accensione
(rilasciatelo immediatamente, se lo premete a lungo la videocam-
era si spegnerà), poi entrate nel menu Impostazione Foto.
• Utilizzate il tasto Wi-Fi per scorrere, il tasto Scatto per confer-
mare e il tasto Accensione per ritornare al menu precedente.
Risoluzione: 4k@24fps - 2.7k@30fps - 1080p@60fps 1080p@30fps - 720p@120fps - 720p@60fps - 1440@30fps.
Loop Video: (Registrazione ciclica)
I vostri video saranno separati in vari file a seconda della durata.
Qui di seguito le diverse opzioni:
• “O”: i video sono separati in file da 12 minuti (se avete se-
lezionato 4K); file da 25 minuti se selezionate la risoluzione
1080p/720p.
• “3 Min”: i video sono suddivisi in file da 3 minuti.
• “5 Min”: i video sono suddivisi in file da 5 minuti.
• “10 Min”: i video sono suddivisi in file da 10 minuti.
• Per esempio, se selezionate l’opzione “5 Min”, un video da 20
Page 25

7
minuti sarà suddiviso in 4 file da 5 minuti ciascuno.
Time-lapse: questa funzione permette di impostare gli intervalli di
tempo predefiniti con cui vengono acquisiti i fotogrammi.
Modalità possibili: O - 1 Secondo - 5 Secondi - 10 Secondi - 30
Secondi - 1 Minuto - 5 Minuti - 10 Minuti
Slow Motion: questa funzione permette di creare un video rallentato
di 1 / 4 (opzione disponibile solo con una risoluzione 720@120fps).
Per esempio, se la registrazione ha una durata di 5 minuti, verrà
creato un video di 20 ad una velocità ridotta di 1:4.
GYRO: se questa modalità viene attivata, il giroscopio incorporato
permette di eettuare riprese più stabili e di evitare oscillazioni della
videocamera.
Esposizione: è possible scegliere il parametro di esposizione tra +2.0
1.7 +1.3 +1.0 +0.7 +0.3 0.0 -0.3 -0.7 -1.0 -1.3 -1.7 -2.0
Un’esposizione elevata è adatta ad ambienti o riprese poco luminose.
Bilanciamento del bianco (white balance): di default è impostato
il bilanciamento automatico, ma potete regolarlo a piacimento a
seconda delle condizioni di luce.
Modalità colore: è possible scegliere tra alcune modalità colore:
Normale - Nero & Bianco - Seppia - Modalità subacquea (Dive
Mode)
Focus: (Metering) funzione che permette di misurare e regolare
l’esposizione: Medio / Centro / Spot
Nitidezza: (Sharpness) Elevata - Standard - Bassa
Saturazione: Alta - Standard - Bassa
Registrazione Audio: Selezionate “On”, per eettuare riprese con
l’audio.
Selezionate “O”, per girare video senza audio.
Imposta Data: (Date Stamp) con questa opzione potete impostare
l’ora e la data sui vostri video.
Page 26
8
5.2 Impostazione modalità Foto
• Quando H7+ è in modalità Foto, premete il tasto Accensione
(rilasciatelo immediatamente perchè se lo tenete premuto a
lungo, la videocamera si spegne) ed entrate nel menu imposta-
zione Foto.
• Per scorrere le varie foto utilizzate il tasto Wi-Fi, il tasto Scatto
per confermare e il tasto Accensione per ritornare all’ultimo
menu selezionato.
Modalità Foto:
• Singola: Scatta una foto singola;
• 2S Timer: Scatta una foto ogni 2 secondi;
• 5S Timer: Scatta una foto ogni 5 secondi;
• 10S Timer: Scatta una foto ogni 10 secondi;
Risoluzione: 3m, 5m, 8m, 12m.
Sequenza foto: H7+ scatta 3 foto velocemente.
Potete utilizzare questa funzione anche in modalità Foto impostando
un determinate timer.
Qualità (immagine): Buona - normale - bassa
Focus (Metering): funzione che permette di misurare e regolare
l’esposizione: Medio / Centro / Spot
Nitidezza (Sharpness): Elevata - Standard - Bassa
Bilanciamento del bianco (White balance): di default è impostato
Page 27

9
il bilanciamento automatico, ma potete regolarlo a piacimento a
seconda delle condizioni di luce.
Modalità colore: è possible scegliere tra alcune modalità colore:
Normale - Nero & Bianco - Seppia - Modalità subacquea (Dive
Mode)
Saturazione: Alta - Standard - Bassa
ISO: determina la sensibilità del sensore della videocamera. Opzioni
disponibili: Auto - 100 - 200 - 400
Esposizione: è possible scegliere il parametro di esposizione della
luce tra +2.0 +1.7 +1.3 +1.0 +0.7 +0.3 0.0 -0.3 -0.7 -1.0 -1.3 -1.7
-2.0
Un’esposizione lunga è adatta in condizioni di poca luce.
Anti-oscillazione: quando questa funzione è attivata, il giroscopio
incorportato permette di scattare foto stabili e di evitare oscillazioni
della videocamera.
Visualizzazione anteprima (Quick Review): in questa modalità
potete scorrere velocemente le foto eseguite. Opzioni disponibili:
OFF - 2 secondi - 5 secondi
Indicazione Data (Date Stamp): con questa opzione potete
impostare l’ora e la data nelle vostre foto.
• O: nessuna di queste informazioni viene visualizzata;
• Data: nelle foto viene indicata la data
• Data/Ora: nelle foto vengono visualizzate la data e l’ora.
5.3 Impostazioni generali
• Quando la videocamera è in modalità Foto o Video, premete
il tasto Accensione, poi tenete premuto il tasto Scatto per 1.5
secondi ed entrate nel menu Impostazioni generali.
• Utilizzate il tasto Wi-Fi per scorrere, il tasto Scatto per confer-
mare e il tasto Accensione per ritornare al menu precedente.
Spegnimento automatico LCD (Screen Save): Se la telecamera non
viene utilizzata per 1, 3, 5 minuti, potete programmare lo spegnimento automatico del display (1, 3, 5 minuti).
Ora e data (Date & Time): con questa funzione potete inserire la
Page 28

10
data e l’ora. Il formato impostato è AA/GG/MM ma è possibile modificarlo in questa voce del menu.
Spegnimento automatico (Auto power o): É possible programmare lo spegnimento automatico della videocamera se non viene
utilizzata per 3, 5 o 10 minuti.
Beep tastiera: O: Disattivazione beep tastiera. On: attivazione
beep tastiera
Lingua (Language): Sono disponibili 7 diverse lingue che potete selezionare, tra cui inglese, francese, italiano e spagnolo, ecc..
Modalità TV: É possible collegare H7+ al televisore. Selezionate
NTSC o PAL per la compatibilità con il vostro dispositivo TV.
Uscita TV: questa opzione permette di trasferire il video al televisore
tramite la porta USB. Potete scegliere di abilitare o meno la funzione
selezionando OFF o ON. Il display dell’H7+ si spegnerà.
Frequenza luce artificiale (Light Frequency): Selezionate il valore
appropriato per evitare l’eetto stroboscopico.
Formattazione (Format): Formattate la Micro SD Card della videocamera.
Reset (default setting): questa operazione permette di ripristinare
H7+ ai valori pre-impostati in fabbrica.
Versione: viene visualizzata la versione software della videocamera
Wi-Fi SSID: Impostate l’identificativo Wi-Fi ID by yourself (default:
“WIFI_H7Plus”).
Wi-Fi Password: Impostate la password Wi-Fi.
La password originale è “12345678”.
6. Impostazione Wi-Fi
Nota: Prima di utilizzare la funzione Wi-Fi verificate che H7+ sia completamente carica.
a. Scaricate la App “MelifeCam-I3” sul vostro smart-phone o
tablet da Google play store o Apple App store.
b. Accendete la videocamera, poi premete il tasto Wi-Fi per entrare
in modalità Wi-Fi.
c. Cercate l’impostazione Wi-Fi nel vostro smart-phone o tablet, e
Page 29
11
D
A
B
C
vedrete “WIFI_H7Plus”.
d. Inserite la password “12345678” per collegare H7+ al vostro
smartphone o tablet.
e. Aprite la App “MelifeCam-I3”.
7. Telecomando
A. Tasto scatto foto
B. Tasto video
C. Tasto accensione/spegnimento
D. Indicatori LED
Nota: prima di utilizzare il telecomando, è necessario ricaricarlo.
1. Tasto Foto: Premete questo tasto per scattare una foto.
2. Tasto Video: Premete questo tasto per iniziare o per inter-
rompere la registrazione di un filmato.
3. Tasto Accensione/Spegnimento: Tenete premuto 4 secondi per
spegnere la videocamera.
4. Indicatori di funzione:
Indicatore di sinistra: Quando il Wi-Fi è attivo, lampeggia blu;
Indicatore centrale: Quando l’abbinamento è terminato, si
illumina di blu;
Durante la carica l’indicatore è rosso;
Durante la carica con la videocamera accesa si illumina di color
Page 30

12
porpora;
Indicatore di destra: Durante la registrazione di un filmato, il led
lampeggia di verde;
Ogni volta che viene scattata una foto, il led lampeggia.
7.1 Abbinare H7+ al telecomando
• Assicuratevi innanzitutto che la videocamera ed il telecomando
siano completamente carichi.
• Premete e tenete premuto contemporaneamente i tasti “Foto”
& “Video” sul telecomando ed accendete la videocamera.
• Quando H7+ è accesa, rilasciate i tasti “Foto” & “Video”.
• Quando l’abbinamento è terminato, il led centrale del teleco-
mando si illumina di blu.
Nota:
• L’abbinamento deve essere eseguito solo la prima volta, successi-
vamente i due dispositivi si riconoscono automaticamente.
• Nel caso in cui la telecamera non risponda al telecomando,
ripetete la procedura di abbinamento.
• Il Wi-Fi ed il telecomando non possono essere utilizzati contem-
poraneamente.
8. Utilizzare H7+ come Webcam
H7+ può anche essere utilizzata come webcam.
Procedimento:
• Collegate la videocamera al PC tramite il cavo USB in dotazione.
• La videocamera si accende automaticamente e mostrerà due
opzioni: “ Mass Storage” & “ PC Camera”. Selezionate “PC
Camera”.
Page 31

13
• 9. Collegare H7+ alla TV
É possibile rivedere i vostri filmati e foto sulla TV tramite un cavo
HDMI.
• Collegate H7+ alla TV con un cavo HDMI.
• Accendete la videocamera.
• La TV vi mostrerà in diretta ciò che state riprendendo, oppure
potete rivedere i vostri filmati e foto già salvati nella videocamera.
• Per spegnere la videocamera tenete premuto il tasto Accensione
per 2 secondi.
10. Trasferire i file su PC
• Per trasferire i video o le foto su PC seguite questo procedimen-
to:
• Collegate H7+ al PC tramite cavo USB.
• La videocamera si accenderà automaticamente e mostrerà due
opzioni “ Mass Storage” & “ PC Camera”. Selezionate “Mass
Storage”.
• Selezionate i file che volete trasferire sul vostro computer.
11. Reset della videocamera
• Il tasto “Reset” si trova vicino alla porta USB e all’alloggiamento
per la Micro SD card.
• Nel caso in cui H7+ non funzioni correttamente o è bloccata,
premete il tasto Reset (con uno spillo) per 2 secondi per eseguire
un reset della videocamera e ripristinare il suo funzionamento
normale.
Page 32

14
FAQ
D: La videocamera non si accende. Perché?
R: Controllate che la batteria sia carica. Se è scarica caricatela
tramite il cavo USB o con un adattatore CA.
D: La telecamera è bloccata. Cosa devo fare?
R: Eseguite il reset della videocamera.
D: I video e le foto sono ouscate. Perché?
R: La lente può essere sporca, pulitela.
D: La videocamera non si connette al PC. Perchè?
R: Provate ad utilizzare un altro cavo USB o un’altra porta USB sul
computer.
D: La videocamera si spegne automaticamente. Perché?
R: Controllate se avete attivato l’autospegnimento (nelle impostazioni generali). Disattivatelo.
R1. Controllate la batteria: se è scarica caricatela.
Page 33

15
Specifiche tecniche
Risoluzione video 2880x2160p@24fps,
2.7K@30fps, 1080p@60fps,
1080p@30fps, 720p@120fps,
720p@60fps, 1440p@30fps
Risoluzione immagini 12MP, 8MP, 5MP, 3MP
Memoria Micro SD con una capacità fino a
32GB (opzionale)
Registrazione ciclica OFF / 3 / 5 / 10 minuti
Sensibilità automatica ISO 100-200-400
Microfono incorporato
Display schermo TFT LCD 2”
Grandangolo 150°
Resistente all’acqua fino a 30m grazie alla custodia
subacquea
Alimentazione pacco batteria Li-Ion estraibile
3.7V/1000mAh
Autonomia batteria circa 90 minuti di video senza
WI-FI
Formato video MP4
Formato foto .JPG
Interfaccia USB 2.0, micro HDMI
Temperatura operativa -10° / +55°
Lingua Inglese, Italiano, Tedesco, Francese,
Spagnolo, Russo, Portoghese
Telecomando Foto, Video, Spegnimento
Page 34

16
Tipo telecomando 2.4GHz RF
Alimentazione telecomando: pacco batteria Li-Ion incorporato
90mAh
Autonomia telecomando fino a 450 minuti
Copertura Wi-Fi telecomando circa 15metri
Per scaricare aggiornamenti firmware e per informazioni sulla
garanzia visitate il sito www.midlandeurope.com
Page 35

1
Vorsicht
• Die Kamera nicht fallen lassen.
• Keine schweren Gegenstände auf die Kamera legen.
• Die Kamera von Wasser und anderen Flüssigkeiten fernhalten (es
sei denn, sie wird im Unterwassergehäuse verwendet). Dies kann
zu Fehlfunktionen der Kamera führen.
• Den Akku über das USB-Kabel aufladen.
• Die Kamera sollte keinen Temperaturen über 65 °C ausgesetzt
werden.
• Sollte die Kamera nicht ordnungsgemäß funktionieren, nehmen
Sie die Kamera nicht selber auseinander. Sollte durch Ihr Ver-
halten ein Schaden entstehen, übernimmt das Herstellerwerk
keine Verantwortung dafür.
• Verwenden Sie die Kamera nicht während des Ladezyklus.
1. Wichtige Funktionen
• Videoauflösung: 2880x2160p@24fps, 2.7K@30fps,
1080p@60fps, 1080p@30fps, 720p@120fps, 720p@60fps,
1440p@30fps
• Bildauflösung: 12MP, 8MP, 5MP, 3MP
• Unterstützt WLAN-Verbindung, Reichweite bis zu 15 m.
• Unterstützt 2,4 G Funk-Fernbedienung (no waterproof).
• Wasserdicht bis 30 m mit wasserdichtem Gehäuse.
• 2” TFT LCD Bildschirm.
• 3.7V/1000mAh wechselbare Lithium-Ionen Batterie, welche
eine kontinuierliche Aufnahmezeit von bis zu 90min unterstützt
(WLAN und LCD ausgeschaltet)
Page 36

2
2. Lieferumfang
• Kamera
• Gebogene Klebehalterung
• Fernbedienung
• Klebehalterung
• Unterwassergehäuse
• 3M Doppelseitiger Kleber
• Rahmenhalterung
• Schnellspannhalterung
• 90° Halterung
• USB Kabel
• Stativhalterung
• Schraube
Page 37

3
3. Kameraübersicht
Ladestandsanzeige LED-Anzeige
Auslöser
Ein/Aus
WLAN-Taste
Objektiv
microSD-Kartensteckplatz
USB-Port
Mini-HDMI-Port
LCD-Display
Page 38

4
4. Verwenden der Kamera
4.1 Ein-/Ausschalten
• Einschalten: Halten Sie Ein/Aus für 2 Sekunden gedrückt, die
LED leuchtet rot. Beim Einschalten geht die Kamera in den
Standard-Videomodus.
• Ausschalten: Halten Sie Ein/Aus für 2 Sekunden gedrückt.
4.2 Modi
Die Midland H7+ hat 3 verschiedene Betriebsarten: Video, Foto und
Wiedergabe. Zum Umschalten des Modus halten Sie den Auslöser
für 1,5 Sekunden gedrückt: Video Foto Wiedergabe
4.3 Video aufnehmen
Standardmäßig befindet sich die Kamera beim Einschalten im Videomodus.
• Drücken Sie einmal den Auslöser, um die Aufnahme zu starten.
• Drücken Sie den Auslöser erneut, um die Aufnahme zu beenden,
das Video wird automatisch gespeichert.
4.4 Foto
• Halten Sie den Auslöser für 1,5 Sekunden gedrückt, um vom Vid-
eomodus zum Fotomodus umzuschalten.
• Drücken Sie einmal den Auslöser, um ein Foto aufzunehmen.
4.5 Wiedergabemodus
• Halten Sie den Auslöser für 1,5 Sekunden gedrückt, um vom Ein-
zelbildmodus in den Wiedergabemodus umzuschalten.
• In diesem Modus können Sie die aufgenommenen Videos und
Bilder wiedergeben.
• Mit der WLAN-Taste scrollen Sie, mit dem Auslöser rufen Sie
die Wiedergabe auf und starten sie, mit Ein/Aus rufen Sie das
Schutz-/Löschmenü für die Datei auf.
• Halten Sie den Auslöser für 1,5 Sekunden gedrückt, um in den
Videomodus umzuschalten.
Page 39

5
4.6 Kamera laden
• Bevor Sie die H7+ das erste mal benutzen, laden Sie bitte den
Akku komplett auf.
• Verbinden Sie die Kamera mit einem USB-Kabel am Ladegerät.
Die rote Anzeige leuchtet auf und der Ladevorgang beginnt.
• Wenn der Akku vollständig geladen ist, schaltet sich die rote An-
zeige aus. Es dauert ca. 3,5 Stunden, um den Akku vollständig
aufzuladen.
• Einige Funktionen, wie die WLAN-Funktion, können nicht ver-
wendet werden, wenn dr Akkustand niedrig ist.
4.7 Einlegen der TF-Karte
Setzen Sie eine microSD-Karte in den Kartensteckplatz ein, entsprechend der auf der Kamera angegeben Ausrichtung.
Die Kamera unterstützt Micro SD Karten mit bis zu 32 GB Speicher.
a. Wir empfehlen die Verwendung einer ≥KLASSE 10 (High Speed)
Micro SD-Karte für reibungslosen Aufnahmebetrieb. Niedrigere
Klassen von microSD-Karten können einen Videostau verursachen.
b. Es gibt nur eine korrekte Ausrichtung für das Einsetzen der mi-
croSD-Karte in den Steckplatz. Versuchen Sie nicht, die Karte
gewaltsam in den Steckplatz einzusetzen, da dies sowohl die
Kamera als auch die microSD-Karte beschädigen kann.
c. Eine neue microSD-Karte muss vor der Verwendung in der Kam-
era formatiert werden.
4.8 Verwendung des Unterwassergehäuses
• Die Kamera unterstützt Unterwasseraufnahmen bis 30 m, sofern
sie im wasserdichten Gehäuse montiert ist. Stellen Sie sicher,
dass das Gehäuse trocken und sauber ist.
• Önen Sie die Verriegelung des Unterwassergehäuses;
• Setzen Sie die Kamera korrekt ein;
• Schließen Sie das wasserdichte Gehäuse.
• Nach Gebrauch reinigen Sie bitte das wasserdichte Gehäuse mit
klarem Wasser und trocknen es mit einem weichen Tuch aus.
Page 40

6
5. Kamera einrichten
5.1 Videoeinstellungen
Mit der Kamera im Videomodus drücken Sie einmal Ein/Aus (nur
kurz drücken, da sich die Kamera ansonsten ausschaltet), um das
Menü Video Setting aufzurufen. Mit der WLAN-Taste scrollen Sie,
mit dem Auslöser bestätigen Sie, mit Ein/Aus kehren Sie in das vorherige Menü zurück.
Auflösung: Wählen Sie zwischen 4K@24fps, 2.7K@30fps,
1080p@60fps, 1080p@30fps, 720p@120fps, 720p@60fps,
1440p@30fps
Video-Aufnahmeintervall: Das Video, abhängig von der gewählten
Zeitdauer, in verschiedene Dateien getrennt.
• Auswahl von „O”: Das Video wird, wenn 4k ausgewählt ist, alle
12 Minuten in verschiedene Dateien getrennt; alle 25 Minuten
wenn 1080p/720p ausgewählt ist.
• Auswahl von „3 Min“: Das Video wird in Einzelvideos von 3 Mi-
nuten Länge unterteilt.
• Auswahl von „5 Min“: Das Video wird in Einzelvideos von 5 Mi-
nuten Länge unterteilt.
• Auswahl von “10 Min”: Das Video wird in Einzelvideos von 10
Minuten Länge unterteilt.
Page 41

7
Wenn Sie zum Beispiel eine Zeitlänge von „5 Min” auswählen, wird
ein 20-minütiges Video in 4 Videoclips (von jeweils 5 Minuten)
aufgeteilt.
Zeitraer: Mit dieser Funktion können Sie das Intervall einstellen, in
dem ein Bild erfasst werden soll.
Sie können das Intervall wie folgt einstellen: Aus - 1 Sekunde - 5
Sekunden - 10 Sekunden - 30 Sekunden - 1 Minute - 5 Minuten
- 10 Minuten
Zeitlupe: Diese Funktion ermöglicht Ihnen Videos in Zeitlupe
aufzunehmen, dies ist nur in der Auflösung möglich: 720@120 fps.
Nachdem Sie ein Video mit der Zeitlupen-Funktion aufgenommen
haben, wird das Video mit 1:4 Geschwindigkeit abgespielt.
Wird zum Beispiel ein 5 Minuten Video aufgenommen, so erzeugt
die Kamera hieraus ein 20 Minuten Video.
Stabilisierung: Mit Hilfe dieser Funktion werden Verwackelungen
ausgeglichen und das Video wird ruhiger.
Belichtung: Die Belichtung kann auf folgende Werte eingestellt
werden: +2.0 +1.7 +1.3 +1.0 +0.7 +0.3 0.0 -0.3 -0.7 -1.0 -1.3 -1.7
-2.0. Starke Belichtung wird für Dunkle Umgebungen empfohlen
Weißabgleich: Der Standardwert ist „Auto”, Sie können den Modus
an konkrete Lichtverhältnisse anpassen.
Farbe: Es kann zwischen Normal - Schwarz & Weiss - Sepia Tauchmodus gewählt werden
Belichtungsmessung: Mit dieser Funktion können Sie auswählen,
wie die Kamera die Belichtung misst und anpasst. Benutzer können
zwischen Durchschnitt - Mittelpunkt - Spot wählen.
Schärfe: Benutzer können folgende Schärfe auswählen: Intensiv Standard - Schwach.
Sättigung: Benutzer können folgende Sättigungen auswählen: Hoch
- Standard - Niedrig
Mikrofon: Auswahl von „On“: Videoaufnahme mit Ton.
Auswahl von „O“: Videoaufnahme ohne Ton.
Datumstempel: Sie können einstellen, ob auf dem Video ein Zeit-
und Datumsstempel angezeigt werden soll.
Page 42

8
5.2 Bildeinstellungen
Mit der Kamera im Einzelbildmodus drücken Sie einmal Ein/Aus
(nur kurz drücken, da sich die Kamera ansonsten ausschaltet), um
das Menü Picture Setting aufzurufen. Mit der WLAN-Taste scrollen
Sie, mit dem Auslöser bestätigen Sie, mit Ein/Aus kehren Sie in das
vorherige Menü zurück
Aufnahmemodus:
• Einzeln: Nehmen Sie ein einzelnes Bild auf.
• 2s Timer: Nehmen Sie alle 2 Sekunden ein Bild auf.
• 5s Timer: Nehmen Sie alle 5 Sekunden ein Bild auf.
• 10s Timer: Nehmen Sie alle 10 Sekunden ein Bild auf.
Auflösung: 12M - 8M - 5M - 3M
3er Reihe: Die Kamera nimmt schnell hintereinander 3 Bilder auf.
Diese Funktion können Sie auch zusammen mit dem im Aufnahmemodus eingestellten Timer verwenden.
Qualität: Stellen Sie die Bildqualität wie folgt ein: Fein - Normal Sparsam
Belichtungsmessung: Mit dieser Funktion können Sie auswählen,
wie die Kamera die Belichtung misst und anpasst. Benutzer können
zwischen Durchschnittlich - Mittebetont und Spot wählen.
Schärfe: Benutzer können folgende Schärfe auswählen: Intensiv Standard - Schwach.
Page 43

9
Weißabgleich: Die Voreinstellung ist „Automatisch”; Sie können den
Modus an konkrete Lichtverhältnisse anpassen.
Farbmodus: Benutzer können aus verschiedenen Farboptionen auswählen: Normal - Schwarz&Weiss - Sepia - Tauchmodus.
Sättigung: Benutzer können folgende Sättigungen auswählen: Hoch
- Standard - Niedrig
ISO: Stellen Sie die Empfindlichkeit des Kamerasensors ein. Folgende Optionen sind möglich: Auto - 100 - 200 - 400
Belichtung: Die Belichtung kann auf folgende Werte eingestellt
werden: +2.0 +1.7 +1.3 +1.0 +0.7 +0.3 0.0 -0.3 -0.7 -1.0 -1.3 -1.7
-2.0. Starke Belichtung wird für Dunkle Umgebungen empfohlen
Stabilisierung: Mit Hilfe dieser Funktion werden Verwackelungen
ausgeglichen und das Video wird ruhiger.
Bildvorschau: Diese Funktion zeigt Ihnen die aufgenommen Bilder.
Wählen Sie zwischen: „AUS - 2 Sekunden - 5 Sekunden aus.
Datumstempel: Sie können einstellen, ob auf dem Foto ein Zeitund Datumstempel angezeigt werden soll.
Aus: Zeigt kein Datum&Zeit an.
Datum: Zeigt das Datum auf den Bildern an.
Datum/Zeit: Zeigt das Datum und die Zeit auf den Bildern an.
Page 44

10
5.3 Weitere Einrichtung
Mit der Kamera im Einzelbild- oder Videomodus drücken Sie einmal
Ein/Aus, dann halten Sie den Auslöser für 1,5 Sekunden gedrückt,
um das Menü Set-up More aufzurufen. Mit der WLAN-Taste
scrollen Sie, mit dem Auslöser bestätigen Sie, mit Ein/Aus kehren
Sie in das vorherige Menü zurück.
Bildschirmschoner: Wählen Sie 1, 3, 5 min, der LCD-Bildschirm der
Kamera schaltet sich nach 1, 3 oder 5 Minuten Passivität aus.
Datum & Uhrzeit: Das Standardformat ist JJ/TT/MM. Sie können
das Datum, die Uhrzeit und die Zeitfolge selbst festlegen.
Autom. Abschaltung: Wählen Sie 1,3, 5 min, die Kamera schaltet
sich nach 1, 3 oder 5 Minuten Passivität aus.
Signalton: AUS: Schaltet den Tastenton aus
AN: Schaltet den Tastenton an
Sprache: Sie haben 8 Sprachen zur Auswahl, darunter Englisch,
Französisch, Spanisch Italienisch, usw.
TV Modus: Wählen Sie zwischen NTSC oder PAL, passend für Ihr
TV System.
TV Out: Diese Funktion ermöglicht die Videoausgabe via USB Port.
Das Display schaltet sich dabei aus. Benutzer können die Funktion
„Ein“ oder „Aus“-schalten.
Frequenz: Wählen Sie die richtige Lichtfrequenz aus, um Bildflackern zu vermeiden.
Formatieren: Sie können Ihre Micro SD-Karte über die Kamera
formatieren.
Werkseinstellungen: Setzen Sie alle Einstellungen auf Werkseinstellung zurück.
Version: Zeigt die Software Version der Kamera an.
WLAN SSID: Legen Sie die WLAN- ID selbst fest. Die Standard
SSID lautet „WIFI_H7PLUS“
WLAN Passwort: Legen Sie das WLAN Passwort selbst fest. Das
Standard WLAN Passwort lautet: „12345678“
Page 45

11
D
A
B
C
6. WLAN-Einrichtung
Hinweis: Stellen Sie sicher, dass die Kamera vollständig aufgeladen
ist, bevor Sie die WLAN-Funktion verwenden.
a. Laden Sie die App „MelifeCam-I3“ aus dem Google Playstore
oder Apple Appstore auf Ihr Smartphone oder Tablet herunter.
b. Schalten Sie die Kamera ein, dann drücken Sie die WLAN-Taste
zum Aufrufen des WLAN-Modus;
c. Gehen Sie zu den WLAN Einstellungen Ihres Smartphones oder
Tablet. Sie werden dort, die Kamera in Ihrer WLAN Liste unter
folgenden Namen finden: „WIFI_H7Plus“
d. Geben Sie das Passwort „12345678“ ein, um die Kamera mit
Ihrem Smartphone oder Tablet zu verbinden;
e. Önen Sie die App „MelifeCam-I3“.
7. Fernbedienung
A. Bildtaste
B. Videotaste
C. Ausschalttaste
D. Anzeige
Hinweis: bevor Sie die Fernbedienung verwenden, anderenfalls laden
Page 46

12
Sie den Akku.
1. Bildtaste: Zur Aufnahme eines einzelnen Bildes einmal drücken.
2. Videotaste: Um eine Videoaufzeichnung zu starten, einmal
drücken. Erneut drücken, um die Aufnahme zu beenden.
3. Ausschalttaste: Für 4 Sekunden gedrückt halten, um die Kamera
auszuschalten.
4. Anzeigefunktion:
Linke Anzeige: Blinkt blau bei WLAN-Verbindung. Blinkt blau
bei WLAN-Verbindung.
Mittlere Anzeige: Leuchtet blau, wenn die Kopplung abgeschlos-
sen ist; Während des Ladevorgangs leuchtet sie rot; Während des
Ladevorgangs mit eingeschalteter Kamera leuchtet sie violett.
Rechte Anzeige: Blinkt grün während der Videoaufnahme;
Bei einer Bildaufnahme blinkt sie einmal für jedes einzelne Bild.
ACHTUNG: Die Fernbedienung ist nicht wasserdicht
7.1 Kopplung der Kamera und der Fernbedienung
1. Stellen Sie sicher, dass die Kamera und Fernbedienung voll auf-
geladen sind.
2. Drücken und halten Sie die Foto & Video Tasten an der Fernbe-
dienung und schalten Sie die Kamera ein.
3. Sobald die Kamera eingeschaltet ist, lassen Sie die Foto & Video
Tasten an der Fernbedienung los.
4. Wenn die mittlere LED Blau leuchtet, ist die Kopplung abge-
schlossen.
Hinweis:
• Die Kopplung muss nur einmal ausgeführt werden. Anschließend
wird die Kamera automatisch erkannt;
• WLAN-Funktion und Fernbedienung können nicht gleichzeitig
verwendet werden.
Page 47

13
8. PC-Kamera (Webcam)
Die Kamera kann als PC-Kamera (Webcam) verwendet werden.
• Verbinden Sie die Kamera und einen PC über ein USB-Kabel;
• Die Kamera schaltet sich automatisch ein und zeigt zwei Op-
tionen, „Mass Storage“ (Massenspeicher) & „PC Camera“,
wählen sie „PC Camera“ aus.
9. Anschluss am Fernseher
Sie können aufgezeichnete Videos und Bilder über HDMI-Kabel auf
einem Fernseher wiedergeben.
• Schließen Sie die Kamera über ein HDMI-Kabel am Fernseher
an;
• Schalten Sie die Kamera ein;
• Auf dem Bildschirm des Fernsehers erscheint nun die aktive Sze-
ne. Das anzeigte Bild ist das gleiche, wie das des Kameradisplays.
Sie können die Kamera weiterhin betreiben.
• Halten Sie Ein/Aus für 2 Sekunden gedrückt, um die Kamera
auszuschalten.
10. Übertragen von Dateien auf PC
Sie können aufgezeichnete Videos und Bilder auf den PC übertragen.
• Verbinden Sie die Kamera und einen PC über ein USB-Kabel;
• Die Kamera schaltet sich automatisch ein und zeigt zwei Op-
tionen, „Mass Storage“ (Massenspeicher) & „PC Camera“,
wählen sie „Mass Storage“ aus.
• Wählen Sie die Dateien aus, die Sie auf den Computer übertra-
gen möchten.
11. Kamera zurücksetzen
• Die Rücksetztaste befindet sich in der Nähe der USB- und
TF-Kartenschnittstelle.
• Falls die Kamera nicht einwandfrei arbeitet oder „hängt“, dann
Page 48

14
halten Sie die Rücksetztaste für 2 Sekunden mit einem Stift zum
Zurücksetzen der Kamera gedrückt.
FAQ
F: Die Kamera lässt sich nicht einschalten. Warum?
A: Überprüfen Sie, ob der Akku leer ist. In diesem Fall laden Sie
den Akku zunächst über USB-Kabel oder Netzteil.
F: Die Kamera friert ein. Was soll ich tun?
A: Setzten Sie die Kamera zurück.
F: Das Video und die Bilder sind unscharf. Warum?
A: Das Objektiv ist möglicherweise verschmutzt. Reinigen Sie bitte
das Objektiv.
F: Die Kamera kann nicht mit dem PC verbunden werden.
Warum?
A: Versuchen Sie ein anderes USB-Kabel oder einen anderen
USB-Anschluss am Computer.
F: Die Kamera wird automatisch ausgeschaltet. Warum?
A: Überprüfen Sie, ob Auto Power O in den allgemeinen
Einstellungen auf On eingestellt ist. In diesem Fall stellen Sie
auf O ein.
B. Überprüfen Sie, ob der Akku leer ist. In diesem Fall laden Sie
den Akku zunächst.
Hinweis: Sollte die Kamera „einfrieren“, so drücken Sie die Rücksetztaste, um sie auszuschalten.
Page 49

15
Gewährleistung
Die Gewährleistung schränkt nicht die gesetzlichen Rechte des Benutzers gemäß den jeweils geltenden nationalen Gesetzen in Bezug
auf den Verkauf von Verbraucherprodukten ein.
Während der Gewährleistungsfrist wird jedes Produktversagen,
das auf Mängel in Material, Konstruktion oder Ausführung zurückzuführen ist, innerhalb einer angemessenen Frist unentgeltlich
repariert. Ist eine Reparatur nicht möglich, stellen wir dem Benutzer
ein vergleichbares oder besseres funktionsfähiges Gerät oder Zubehörteil als Ersatz zur Verfügung. Die Gewährleistungsfrist beginnt
mit dem Zeitpunkt des Produktkaufes durch den ersten Endnutzer.
Die Gewährleistungsfrist beträgt:
• 24 Monate für das Gerät bzw. dessen Hauptbestandteile.
• 6 Monate für Zubehör (Batterien, Ladegeräte, Antennen, Kopf-
hörer, Kabel).
Die Geltendmachung eines Produktmangels muss innerhalb einer
angemessenen Frist nach dem erstmaligen Feststellen des Mangels und in jedem Fall vor Ablauf der Gewährleistungsfrist gemeldet
werden.
Diese Garantie deckt nicht ab:
• Produktabnutzung durch normalen Gebrauch.
• Mängel, die durch falsche Verwendung oder den Anschluss an
bzw. die Verwendung mit Zubehör und/oder Software, die kein
Originalprodukt von Midland sind, entstanden sind.
Die Garantie ist nicht vollstreckbar:
• Wenn das Produkt durch andere Personen als autorisierte Ser-
vicecentermitarbeiter demontiert, verändert oder repariert
wurde oder wenn es mit nicht zugelassenen Ersatzteilen repariert
wurde.
• Wenn das Produkt Umgebungsbedingungen ausgesetzt wurde,
für die es nicht ausgelegt ist.
• Im Falle von Korrosion, Oxidation oder Auslaufen von Batterief-
lüssigkeit.
Page 50

16
• Wenn die Seriennummer entfernt, gelöscht oder verändert
wurde bzw. unleserlich geworden ist.
Eine Entschädigung für die Zeit der Nichtnutzbarkeit des Geräts ist
ausgeschlossen, ebenso wie eine Rückerstattung oder Ansprüche
aus direkt verursachten oder Nebenschäden einer unsachgemäßen
Verwendung des Geräts.
Page 51

17
12. Technische Daten
Videoauflösung 2880x2160p@24fps,
2.7K@30fps, 1080p@60fps,
1080p@30fps, 720p@120fps,
720p@60fps, 1440p@30fps
Fotoauflösung 12MP, 8MP, 5MP, 3MP
Speicher microSD-Karte bis zu 32 GB
(gehört nicht zum Lieferumfang)
Video-Aufnahmeschleife AUS, jede 3,5,10 Minuten
Empfindlichkeit Automatisch ISO 100-200-400
Mikrofon Integriert
Display 2” TFT-LCD-Bildschirm
Weitwinkel 150°
Wasserdicht Bis 30 m (mit wasserdichtem
Gehäuse)
Akku 3,7 V/1000 mAh wechselbare
Lithium-Ionen-Batterie
Akkulaufzeit Ca. 90 min Video ohne WLAN
Videoformat MP4
Bildformat JPEG
Schnittstellen USB2.0, micro HDMI
Betriebstemperatur -10 °C bis +55 °C
OSD-Sprachen Englisch, Italienisch, Deutsch,
Französisch, Spanisch, Russisch,
Portugiesisch
Fernbedienung Foto, Video, Ein/Aus
Page 52

18
Übertragung 2,4 GHz HF (nicht
richtungsgebunden)
Akku Fernbedienung Integrierter Lithium-Ionen-Akku,
90 mAh
Fernbedienung Akkulaufzeit Bis zu 450 Minuten
WLAN-Reichweite
Fernbedienung
Ca. 15 m
Um die Gewährleistung in Anspruch zu nehmen, füllen Sie bitte das
Support-Formular unter www.midlandeurope.com aus.
Page 53

1
Español
Precauciones
• No deje caer su cámara.
• No coloque objetos pesados sobre la cámara.
• Mantenga la cámara alejada del agua y otros líquidos (excepto
cuando se use con la funda waterproof). Eso podría dañar la
cámara.
• Recargue la batería con el cable USB.
• La cámara no debe alcanzar temperaturas superiores a 65 ºC.
• Si la cámara no funciona, no la desmonte usted mismo. En caso
de apertura, modificación o reparación por parte de personal no
autorizado por Midland, la garantía quedará invalidada.
1. Características principales
• Resolución de vídeo: 2880x2160p@24fps, 2.7k@30fps,
1080p@60fps, 1080p@30fps, 720p@120fps, 720@60fps,
1440p@30fps.
• Resolución de imagen: 12PM, 8MP, 5MP, 3MP
• Soporta conexión Wi-Fi, hasta 15 metros de distancia.
• Soporta control remoto 2.4G Wireless (no waterproof).
• Resistente al agua hasta 30 m con funda estanca.
• Pantalla 2” TFT LCD.
• Batería Li-ion extraíble de 3.7V/1000mAh. Soporta hasta 90
minutos de grabación continua (con WiFi y pantalla apagados).
Page 54

2
2. La caja incluye
• Cámara
• Control Remoto
• Carcasa waterproof
• Carcasa portátil
• Soporte 90º
• Soporte para trípode
• Base curva
• Base plana
• Biadhesivos 3M
• Pivote
• Cable USB
• Tornillo
Page 55

3
3. Diagrama de la cámara
Indicador de carga Indicador de estado
Botón Disparador
Botón de Encendido
Botón e
Indicador
WiFi
Lente
Ranura MicroSD
Puerto USB
Puerto MicroHDMI
Pantalla
Page 56

4
4. Cómo utilizar la cámara
4.1 Encender / apagar
• Encender: mantenga presionado durante 2 segundos el botón
de Encendido, el indicador LED se volverá rojo. La cámara se
enciende siempre en modo vídeo por defecto.
• Apagar: mantenga presionado durante 2 segundos el botón de
Encendido.
4.2 Modos
La Midland H7+ tiene 3 modos operativos diferentes: Vídeo, Foto
y Reproductor. La cámara está en modo Vídeo por defecto cuando
se enciende. Para navegar por los distintos modos presione el botón
Disparador durante 1,5 segundos:
VídeFotoReproductor
4.3 Grabar un Vídeo
Por defecto, la cámara entra siempre en modo Vídeo cuando se
enciende.
• Presione una vez el botón Disparador para empezar a grabar.
• Presione de nuevo el botón Disparador para parar de grabar. El
vídeo se guardará automáticamente.
4.4 Tomar una Fotografía
• Mantenga presionado el botón Disparador durante 1,5 segundos
para cambiar de modo Vídeo a modo Foto.
• Presione una vez el botón Disparador para tomar una fotografía.
4.5 Modo Reproductor
• Mantenga presionado el botón Disparador durante 1,5 segundos
para cambiar de modo Foto a modo Reproductor. En este modo
puedes ver todos tus vídeos y fotos.
• Usa el botón WiFi para recorrer los ficheros, el botón Disparador
para visualizar, y el botón Encendido para proteger/borrar los
ficheros.
Page 57

5
• Mantenga presionado el botón Disparador durante 1,5 segundos
para cambiar a modo Vídeo.
4.6 Cargar la cámara
Antes de usar la H7+ por primera vez, por favor, cargue
completamente la batería.
• Conecte la cámara al cargador con el cable USB. El LED
indicador rojo estará encendido durante la carga.
• Cuando la batería esté totalmente cargada, el LED indicador rojo
se apagará. El tiempo de carga es de 3,5 horas, aproximadamente.
4.7 Insertar la tarjeta MicroSD
Inserte una tarjeta MicroSD en la ranura correcta y en la dirección
indicada en la cámara. Soporta una tarjeta MicroSD de hasta 32GB.
Nota:
• Aconsejamos la utilización de tarjetas MicroSD de, como
mínimo, Clase 6 (High speed). Tarjetas de clases inferiores
pueden bajar la calidad de los vídeos y fotos.
• Hay una sola forma correcta de insertar la tarjeta MicroSD en
la ranura. No la fuerce o podría causar daños a la cámara y a la
tarjeta.
• Una tarjeta nueva debe ser formateada antes de empezar.
4.8 Cómo usar la Carcasa Waterproof
La cámara es sumergible a 30 metros de profundidad cuando se usa
con la funda.
• Asegúrese de que la funda está seca y limpia.
• Abra la funda.
• Inserte la cámara correctamente.
• Cierre la funda
• Después de usarla debe lavarla siempre con agua dulce y secarla
con un paño seco.
Page 58

6
5. Configuración de la cámara
5.1 Configuración modo Vídeo
En modo Vídeo, presione una sola vez el botón Encendido y entre en
el menú Vídeo. Use el botón Wi-Fi para navegar, el botón Disparador
para seleccionar y el botón Encendido para volver al menú anterior.
Resolución: seleccione entre 4k@24fps, 2.7k@30fps,
1080p@60fps, 1080p@30fps, 720p@120fps, 720p@60fps,
1440p@30fps.
Video looping: el vídeo será separado en diferentes ficheros según
la opción que elija.
• Seleccione “O”: los vídeos se separarán en ficheros de 12 minu-
tos si está seleccionado 4K o en ficheros de 25 minutos si está
seleccionado 1080p/720p.
• Seleccione “3 Min”: los vídeos se separarán en ficheros de 3
minutos.
• Seleccione “5 Min”: los vídeos se separarán en ficheros de 5
Page 59

7
minutos.
• Seleccione “10 Min”: los vídeos se separarán en ficheros de 10
minutos.
• Por ejemplo, si selecciona “5 Min”, un vídeo de 20 minutos se
separará en 4 clips de vídeo de 5 minutos cada uno.
Time Lapse: esta función permite ajustar en qué intervalos son
capturados los fotogramas.
Puede ajustar intervalos en: o - 1 segundo - 5 segundos - 10
segundos - 30 segundos - 1 minuto - 5 minutos - 10 minutos.
Cámara Lenta: esta función permite crear vídeos a cámara lenta.
Esta opción está disponible sólo a una resolución de 720@120fps.
Después de grabar un vídeo con esta función, el vídeo se
reproducirá a una ratio de 1:4.
Por ejemplo, grabando durante 5 minutos el dispositivo creará un
vídeo a cámara lenta de 20 minutos.
GYRO: activando esta función, el giroscopio incorporado empezará
a tomar el vídeo grabando de forma más estable, con menos temblor.
Exposición: esta función permite a los usuarios escoger los
parámetros de exposición incluyendo +2.0 +1.7 +1.3 +1.0 +0.7 +0.3
0.0 -0.7 -1.0 -1.3 -1.7 -2.0
Una exposición alta es adecuada para ambientes oscuros.
Balance de blancos: por defecto está en automático, puede regularlo
dependiendo de las condiciones de luz.
Modo de color: puede escoger modos de color diferentes entre las
opciones: Normal - Blanco y Negro - Sepia - Modo Buceo
Metering: esta opción permite seleccionar la forma en que el
dispositivo mide y ajusta la exposición. Se puede escoger entre
Matricial - Centrada - Puntual
Definición: se puede seleccionar Alta - Estándar - Baja
Saturación: se puede seleccionar Alta - Estándar - Baja
Grabación de audio: seleccione “On” para grabar vídeos con sonido.
Seleccione “O” para grabar vídeos sin sonido.
Fecha y Hora: puede elegir sobreimprimir la fecha y la hora en sus
vídeos.
Page 60

8
5.2. Configuración modo Foto
• Cuando la cámara esté en modo Foto, presione una vez el botón
Encendido y entre en el menú Foto. Use el botón Wi-Fi para
navegar, el botón Disparador para seleccionar y el botón Encen-
dido para volver al menú anterior.
Modo Captura:
• Single: toma una sola foto;
• 2S timer: toma una foto cada 2 segundos;
• 5S timer: toma una foto cada 5 segundos;
• 10S timer: toma una foto cada 10 segundos;
Resolución: seleccione un valor entre 12M - 8M - 5M - 3M
Burst (ráfaga): la cámara tomará 3 fotos seguidas. Puede usar
esta función incluso con el temporizador configurado en el modo
Captura.
Calidad: puede escoger entre Fina - Normal - Económica.
Metering: esta opción permite seleccionar la forma en que el
dispositivo mide y ajusta la exposición. Se puede escoger entre
Matricial - Centrada - Puntual.
Definición: se puede seleccionar Alta - Estándar - Baja
Page 61

9
Balance de blancos: por defecto está en automático, puede regularlo
dependiendo de las condiciones de luz.
Modo de color: puede escoger modos de color diferentes entre las
opciones: Normal - Blanco y Negro - Sepia - Modo Buceo
Saturación: se puede seleccionar Alta - Estándar - Baja
ISO: determina la sensibilidad del sensor. Puede escoger entre Auto
- 100 - 200 - 400
Exposición: esta función permite a los usuarios escoger los
parámetros de exposición incluyendo +2.0 +1.7 +1.3 +1.0 +0.7 +0.3
0.0 -0.7 -1.0 -1.3 -1.7 -2.0
Una exposición alta es adecuada para ambientes oscuros.
Antivibración: activando esta función, el giroscopio incorporado
empezará a tomar fotos disparando de forma más estable, con
menos temblor.
Revisión rápida: muestra rápidamente la imagen tomada. Seleccione
entre OFF - 2 segundos - 5 segundos.
Fecha y Hora: puede elegir sobreimprimir la fecha y la hora en sus
fotos.
• O: no muestra fecha ni hora en las fotos.
• Fecha: muestra la fecha en las fotos.
• Fecha/hora: muestra la fecha y la hora en las fotos.
5.3 Configuración general
En modo Foto o Vídeo, presione una vez el botón Encendido,
mantenga presionado el botón Disparador durante 1,5 segundos
y entre en el menú de Configuración. Use el botón Wi-Fi para
navegar, el botón Disparador para seleccionar y el botón Encendido
para volver al menú anterior.
Apagado auto LCD: seleccione la opción 1, 3 o 5 minutos. La
pantalla LCD se apagará si no se utiliza en 1, 3 o 5 min.
Fecha & Hora: el formato por defecto es YY/DD/MM. Puede
establecer la secuencia usted mismo.
Auto Power O: seleccione la opción 1, 3 o 5 minutos. La cámara se
Page 62

10
apagará si no se utiliza en 1, 3 o 5 min.
Sonido de las teclas: O: desactiva el sonido de las teclas
On: activa el sonido de las teclas
Idioma: puede escoger entre 7 idiomas, incluyendo Inglés, Francés,
Español, Italiano, etc.
Modo TV: seleccione NTSC o PAL según su sistema de TV.
TV Out: esta opción permite la salida del vídeo a través de un puerto
USB. Puede escoger On o O. La pantalla del dispositivo se apagará.
Frecuencia: seleccione la frecuencia de luz correcta para evitar
parpadeos.
Formatear: puede formatear la tarjeta TF en la cámara.
Configuración por defecto: esta opción restablece todas las
configuraciones a los valores de fábrica.
Versión: para comprobar la versión del software OSD.
Wi-Fi SSID: el ID del Wi-Fi por defecto es “WIFI_H7Plus”.
Wi-Fi Password: el password por defecto es “12345678”.
Page 63

11
D
A
B
C
6. Configuración Wi-Fi
Importante: asegúrese de que la batería está completamente cargada
antes de utilizar la función Wi-Fi.
a. Descargue la App “MelifeCam-13” a su smartphone o tableta
desde Google Play o Apple Store;
b. encienda la cámara, presione el botón Wi-Fi para entrar en el
modo Wi-Fi;
c. entre en la configuración Wi-Fi de su smartphone o tableta y
podrá ver “WIFI_H7Plus” en su lista;
d. escriba el password “1234567890” para conectar su cámara con
su smartphone o tableta;
e. abra la App “MelifeCam-13”.
7. Control Remoto
A. Botón Foto
B. Botón Vídeo
C. Botón Encendido
D. LEDS indicadores
Nota: cargue el control remoto antes de usarlo.
1. Botón Foto: presione una vez para tomar una foto.
2. Botón Vídeo: presione una vez para iniciar la grabación, presione
de nuevo para detenerla.
3. Botón Encendido: mantenga presionado el botón durante 4 se-
gundos para apagar la cámara.
Page 64

12
4. LEDs luminosos:
LED izquierdo: si el Wi-Fi está encendido, parpadea en azul.
LED central: cuando acaba el emparejamiento, se ilumina en
azul; durante la carga, se ilumina en rojo; durante la carga con la
cámara encendida, se ilumina en morado.
LED derecho: durante una grabación, parpadea en verde; par-
padea una vez cuando toma una foto.
7.1 Emparejar su cámara con el Control Remoto
1. Asegúrese de que la cámara y el Control Remoto están comple-
tamente cargados.
2. Mantenga presionados simultáneamente los botones Foto y
Vídeo del Control Remoto y encienda la cámara.
3. Cuando la cámara se encienda, suelte los botones Foto y Vídeo
del Control Remoto.
3. Cuando el indicador azul se ilumine, el emparejamiento habrá
finalizado.
Nota:
Sólo necesita emparejar una vez, después la cámara lo reconocerá
automáticamente.
La función Wi–Fi y el control remoto no se pueden usar
simultáneamente.
Page 65

13
8. Webcam
La cámara se puede usar como webcam.
• Conecte la cámara y el PC mediante el cable USB suministrado;
• La cámara se encenderá automáticamente y mostrará dos op-
ciones, “Mass Storage” y “PC Camera”. Escoja “PC Camera”.
9. Conectar con la TV
Puede reproducir los vídeos y fotos almacenados en su cámara en la
TV mediante un cable HDMI.
• Conecte la cámara a la TV con el cable HDMI;
• encienda la cámara;
• la TV mostrará la escena activa;
• mantenga presionado el botón Encendido durante 2 segundos
para apagar la cámara.
10. Transferir ficheros al PC
Puede transferir las fotos y vídeos almacenados al PC.
• Conecte la cámara y el PC mediante el cable USB;
• La cámara se encenderá automáticamente y mostrará dos op-
ciones, “Mass Storage” y “PC Camera”. Escoja “Mass Storage”.
• Seleccione los ficheros que desea transferir al PC.
11. Resetear la Cámara
El botón Reset está bajo la tapa de conectores, junto al puerto USB.
Cuando la cámara no funciona correctamente utilice un clip para
presionar el botón Reset durante 2 segundos para reiniciar el sistema.
Page 66

14
FAQ
P: La cámara no se enciende. ¿Por qué?
R: Compruebe la carga de la batería y cárguela si es necesario.
P: La cámara se congela. ¿Qué debo hacer?
R: Resetee la cámara con el botón Reset.
P: Los vídeos y las fotos están desenfocados. ¿Por qué?
R: Limpie la lente si está sucia.
P: La cámara no puede conectar con el PC. ¿Por qué?
R: Pruebe otro cable USB u otro puerto USB.
P: La cámara se apaga. ¿Por qué?
R: Compruebe si la función Autoapagado está activada. Si es así,
desactívela.
R. Compruebe la carga de la batería.
Page 67

15
Especificaciones
Resolución vídeo 2880x2160p@24fps, 2.7k@30fps,
1080p@60fps, 1080p@30fps,
720p@120fps, 720p@60fps,
1440p@30fps
Resolución foto 12MP, 8MP, 5MP, 3MP
Tipo de memoria Micro SD hasta 32GB (no incluida)
Loop vídeo OFF, cada 3,5, 10 min
Sensibilidad automática ISO 100-200-400
Micrófono incorporado
Display LCD 2” TFT
Gran angular 150°
Resistencia al agua hasta 30m (con funda sumergible)
Alimentación batería Li-ion extraíble 3.7V/1000mAh
Vida de la batería unos 90 minutos sin Wi-Fi
Formato vídeo MP4
Formato foto JPEG
Conexiones USB 2.0 , micro HDMI
Temperatura operativa -10°C a +55°C
Idiomas seleccionables Inglés, Italiano, Alemán, Francés,
Español, Ruso,
Portugués
Control Remoto (RC) Foto, Vídeo, Apagado
Page 68

16
Conexión RC 2.4GHz RF omnidireccional
Alimentación RC batería Li-Ion recargable integrada de
90mAh
Autonomía RC hasta 450 minutos
Rango RC aprox. 15 metros
Para descargar actualizaciones de firmware y para información sobre
la garantía, vaya a www.midlandeurope.com
Page 69

1
Français
Mise en garde
• Ne laissez pas tomber votre appareil photo.
• Ne placez pas d’objets lourds sur l’appareil photo.
• Gardez l’appareil hors de l’eau et des liquides (à moins de l’utiliser
dans le boîtier étanche). Cela peut provoquer des problèmes de
fonctionnement.
• Rechargez la batterie via le câble USB.
• La caméra ne doit pas être exposé à une chaleur de plus de 65ºC.
• Lorsque l’appareil photo peut ne pas fonctionner correctement,
s’il vous plaît ne la démontez pas vous-mê- me, si vous causez des
dommages, l’usine ne pourra pas en assumer la responsabilité et
la garantie sera nulle.
1. Caracteristiques principales
• Résolution video: 2880x2160p@24fps, 2.7K@30fps,
1080p@60fps, 1080p@30fps, 720p@120fps, 720@60fps,
1440p@30fps
• Resolution de l’image: 12MP, 8MP, 5MP, 3MP
• Connexion Wi-Fi jusqu’à 15 mètres .
• Télécommande sans-fils radio 2.4G (no waterproof)
• Ecran LCD TFT 2”
• Submersible avec le caisson étanche jusqu’à 30 mètres
• Batterie Li-Ion 3.7V/1000mAh intégré, supporte 90min d’en-
registrement continu (Wi-Fi et écran LCD éteint).
Page 70

2
2. Dans la boite
• Caméra
• Télécommande
• Caisson étanche
• Cadre
• Support 90°
• Tripod
• Support courbé
• Support plat
• Adhésif double face 3M
• Support à attache rapide
• Câble USB
• Vis
Page 71

3
3. Camera
Indicateur de recharge
Indicateur de fonctionnement
Declencheur
Bouton d’alimentation
Indicateur et
bouton WIFI
Lentille
interface carte mémoire
Interface micro USB
Interface micro HDMI
Achage
Page 72

4
4. Comment utiliser votre camera
4.1 Allumer / éteindre la caméra
• Allumer: Appuyez et maintenez enfoncé le bouton d’alimenta-
tion pendant 2 secondes, le voyant devient rouge. Le mode par
défaut de la caméra est le mode vidéo lors de la mise sous tension.
• Éteindre: Appuyez et maintenez enfoncé le bouton d’alimenta-
tion pendant 2 secondes.
4.2 Modes
Le Midland H7+ dispose de 3 modes de fonctionnement diérents:
Vidéo, Photo et lecture. L’appareil passe automatiquement en
mode vidéo lorsqu’il est allumé. Pour passer à diérents modes
vous devez appuyer sur le déclencheur pendant 1,5 secondes:
VidéoPhoto Lecture
4.3 Prendre une video
Par défaut, la caméra est en mode vidéo quand elle est allumé.
• Appuyez sur le déclencheur pour démarrer l’enregistrement
• Appuyez de nouveau sur le déclencheur pour arrêter l’enregis-
trement, la séquence vidéo sera enregistrée automatiquement.
4.4 Prise de photo
• Appuyez et maintenez le déclencheur pendant 1,5 secondes pour
passer du mode vidéo au mode photo.
• Appuyez sur le déclencheur pour prendre une photo
4.5 Mode de lecture
• Appuyez et maintenez le déclencheur pendant 1,5 secondes pour
passer du mode Photo au mode de Lecture. Sur ce mode, vous
pouvez consulter toutes vos vidéos et photos capturées.
• Utilisez le bouton WiFi pour faire défiler, le déclencheur pour
entrer et lire, le bouton d’alimentation pour entrer dans le menu
protéger/supprimer.
• Appuyez et maintenez le déclencheur pendant 1,5 secondes pour
passer en mode vidéo.
Page 73

5
4.6 Charger la caméra
Avant la première utilisation de la H7+, veuillez la recharger complètement une première fois.
• Branchez l’H7+ à l’ordinateur via un câble USB. Le voyant rouge
s’allume, la charge est en cours.
• Lorsque la batterie est complètement chargée, le voyant rouge
s’éteint. Il faut environ 3 heures 30 min pour charger complète-
ment la batterie.
Certaine fonction, comme la fonction WIFI, ne peuvent pas être
utilisé si la batterie est trop basse.
4.7 Mise en place de la carte mémoire
• Insérez une carte Micro SD dans la fente de carte dans le sens
indiquée sur l’appareil.
• L’appareil supporte les cartes Micro SD jusqu’à 32GB
Note:
• Nous vous suggérons d’utiliser ≥CLASS 10 (haute vitesse) carte
Micro SD pour l’enregistrement. Une classe inférieur de carte
Micro SD peut provoquer des vidéos endommagées.
• Il y a seulement un sens correcte pour insérer la carte Micro SD
dans la fente. Ne forcez pas la carte dans la fente, car cela pour-
rait endommager la caméra et la carte Micro SD.
• Une nouvelle carte Micro SD doit être formatée avant d’être
l’utilisée.
4.8 Comment utiliser le caisson étanche
La caméra peut être immergé jusqu’à une profondeur de 30 mètres
si elle est mise dans son caisson étanche.
• Assurez vous que le caisson est sec et propre
• Ouvrez le verrou du caisson étanche
• Insérez la caméra correctement
• Fermez la boucle du caisson étanche.
• Après l’utilisation, s’il vous plaît nettoyer soigneusement le cais-
son avec de l’eau douce et sécher avec un chion sec.
Page 74

6
5. Configurer votre caméra
5.1 Configuration du mode Vidéo
Lorsque l’appareil est en mode vidéo, appuyez sur le bouton d’alimentation une fois (relâchez immé- diatement, s’il est maintenu trop
longtemps, l’appareil s’éteint), puis entrez dans le menu de réglage
de l’image. Utilisez la touche Wi-Fi pour défiler, le déclencheur pour
confirmer, le bouton d’alimentation pour revenir au menu précédent.
Résolution: 4k@10fps, 2.7k@15fps, 1080p@60fps,
1080p@30fps, 720p@120fps, 720p@60fps.
Boucle Vidéo: La vidéo sera séparé en plusieurs fichiers en fonction
du Temps d’enregistrement choisi.
• “O” sélectionné: La vidéo sera séparé en morceaux de 12 minu-
tes si vous avez séléctionné 4K, de 25 minutes si vous avez séléc-
tionné 1080p/720p.
• “3 Min” sélectionné: La vidéo sera séparé en morceaux de 3
minutes.
• “5 Min” sélectionné: La vidéo sera séparé en morceaux de 5
minutes.
• “10 Min” sélectionné: La vidéo sera séparé en morceaux de 10
minutes.
Page 75

7
• Par exemple, si vous sélectionnez “5 min” comme durée, une
vidéo de 20 minutes sera séparé en 4 Clips vidéo (de 5 minutes
chaqu’un).
Enregistrement Time-Laps: Cette fonction vous permets d’inserer
un intervalle entre chaques images capturés.
Vous pouvez selectionnez les intevalles de temps suivant: OFF, 1
seconde, 5 secondes, 10 secondes, 30 secondes, 1 minute, 5 minutes, 10 minutes.
Slow motion: Cette caractéristique permet de prendre des vidéos au
ralenti. Cette option est disponible seulement avec une résolution
720p@120fps.
Après l’enregistrement de cette vidéo avec cette fonction d’activé, la
vidéo sera joué à 1/4 de sa vitesse.
Par exemple pour une vidéo de 5 minutes, la caméra créera une
vidéo de 20 minutes à 1/4 de la vitesse.
GYRO: En activant cette fonction, le gyroscope incorporé commencera à faire des prises de vue de façon plus stable, moins secouer.
Exposition: Cette fonction permet à l’utilisateur de choisir les paramètres d’exposition: 2.0, 1.7, 1.3, 1.0, 0.7, 0.3, 0.0, -0.3, -0.7, -1.0,
-1.3, -1.7, -2.0
Balance des blancs: Le réglage par défaut est auto, vous pouvez
ajuster le mode en fonction de l’éclairage.
Mode couleur: les utilisateurs peuvent choisir diérente option de
mode de couleur: Normal - Black&White - la Sépia – Mode de
plongé
Mesure: cette option permet de sélectionner la manière dont l’appareil mesure et ajuste l’exposition. Les utilisateurs peuvent choisir:
Moyenne - Centré - Spot
Netteté: les utilisateurs peuvent régler la netteté: Forte - Standard – Faible
Saturation: les utilisateurs peuvent régler la saturation à: Elevé Standard – Faible
Page 76

8
Microphone:
• Sélectionnez “On”, Film avec le son.
• Sélectionnez “O”, Film sans le son.
Horodatage: Vous pouvez définir la date et l’heure et l’acher ou
non sur vos vidéos.
5.2 Configuration du mode photo
Lorsque l’appareil est en mode photo, appuyez sur le bouton d’alimentation une fois (relâchez immédiatement, si elle est maintenue
trop longtemps, l’appareil s’éteint), puis entrez dans le menu de
réglage de l’image. Utilisez le bouton Wi-Fi pour faire défiler, le déclencheur pour confirmer, le bouton d’alimentation pour revenir au
menu précédent.
Mode de capture:
• Seul: Prendre une seul photo
• 2S Timer: Prendre une seul photo toutes les 2 secondes
• 5S Timer: Prendre une seul photo toutes les 5 secondes
• 10S Timer: Prendre une seul photo toutes les 10 secondes
Page 77

9
Résolution: Sélectionnez la valeur entre 12M – 8M – 5M – 3M
Rafale: l’appareil photographie 3 images rapidement. Vous pouvez
utiliser cette fonction même avec la minuterie réglée dans “Capture
Mode”.
Qualité: Sélectionnez la qualité de l’image: Bonne – Normal –
Economique
Mesure: cette option permet de sélectionner la manière dont l’appareil mesure et ajuste l’exposition. Les utilisateurs peuvent choisir:
Moyenne - Centré – Spot
Netteté: les utilisateurs peuvent régler la netteté: Forte - Standard – Faible
Balance des blancs: Le réglage par défaut est auto, vous pouvez
ajuster le mode en fonction de l’éclairage.
Mode couleur: les utilisateurs peuvent choisir diérente option de
mode de couleur: Normal - Black&White - la Sépia – Mode de
plongé
Saturation: les utilisateurs peuvent régler la saturation à: Elevé Standard – Faible
ISO: Déterminé la sensibilité du capteur de l’appareil. Les options:
Auto – 100 – 200 – 400
Exposition: Cette fonction permet à l’utilisateur de choisir les paramètres d’exposition: 2.0, 1.7, 1.3, 1.0, 0.7, 0.3, 0.0, -0.3, -0.7, -1.0,
-1.3, -1.7, -2.0
GYRO: En activant cette fonction, le gyroscope incorporé commencera à faire des prises de vue de façon plus stable, moins secouer.
Visionage rapide: Permet de regarder rapidement la photo prise:
OFF – 2 secondes – 5 secondes
Horodatage: Vous pouvez définir la date et l’heure et l’acher ou
non sur vos vidéos:
• OFF: Ne montre ni la date, ni l’heure
• Date: Ache la date sur la photo
• Date/Time: Ache la date et l’heure sur la photo
Page 78

10
5.3 Paramètre général
Lorsque l’H7+ est en mode photo ou en mode vidéo, appuyez sur
le bouton d’alimentation une fois, puis appuyez et maintenez le déclencheur pendant 1,5 secondes, puis entrez dans le menu de configuration. Utilisez le bouton Wi-Fi pour faire défiler, le déclencheur
pour confirmer, le bouton d’alimentation pour revenir au menu
précédent.
Veille écran LCD: Choix possible 1, 3, 5min. L’écran de la caméra
s’éteint automatiquement si aucune action n’est faite pendant 1, 3,
5min.
Date & Heure: Le format par défaut est YY/DD/ MM. Vous pouvez
régler la date et l’heure, sé- quence par vous-même.
Veille Auto: Choix possible 3, 5, 10min. La caméra s’éteint automatiquement si aucune action n’est faite pendant 3, 5, 10min.
Beep des touches:
• OFF: Désactive la tonalité des touches
• ON: Active la tonalité des touches
Langue: Il y a 7 langues disponible incluant l’anglais, le Français, l’espagnole, l’Italien, etc.
Mode TV: Sélectionnez NTSC ou PAL pour convenir à votre télévision
Sortie TV: Cette option permet de sortir la vidéo sur le port USB.
Les utilisateurs peuvent choisir OFF ou ON
L’achage de l’appareil s’éteint.
Fréquence: Sélectionnez la fréquence de lumière correcte pour
éviter la stroboscopie
Format: Formate la carte mémoire
Réglage par défaut: cette opération retourne tous les paramètres du
menu aux valeurs par défaut
Version: vous pouvez vérifier la version du logiciel OSD de votre
appareil
WI-FI_SSID: Configuerer la WI-FI par vous même. Le nom par défaut est “WIFI_H7Plus”
Page 79

11
D
A
B
C
Mot de passe WI-FI: Configurer le mot de passe WI-FI par vous
même. Le mot de passe par défaut est “12345678”
6. Configuration WIFI
Remarque: Assurez-vous que la batterie de votre appareil soit à pleine
charge avant d’utiliser la fonction Wifi.
a. Téléchargez l’application “MelifeCam-I3” sur votre smartphone
ou tablette depuis Google play store ou Apple store.
b. Allumez la caméra, puis appuyez sur le bouton Wi-Fi pour entrer
dans le mode Wi-Fi.
c. Entrez dans la configuration Wi-Fi de votre smartphone ou tab-
lette et connectez vous à “WIFI_H7Plus” dans votre liste.
d. Entrez le mot de passe “12345678” pour finaliser la connexion de
la caméra à votre smartphone ou tablette.
e. Ouvrez l’application “MelifeCam-I3”
7. Telecommande
A. Touche Photo
B. Touche Vidéo
C. Touche OFF
D. Voyant
Remarque: Chargez la télécommande avant de l’utiliser.
Page 80

12
1. Touche Photo: Appuyer une fois pour prendre une seul photo.
2. Touche vidéo: Appuyez une fois pour démarrer l’enregistrement
d’une vidéo, appuyez à nouveau pour arrêter l’enregistrement.
3. Touche O: Appuyez et maintenez enfoncé pendant 4 secondes
pour éteindre la caméra.
4. Voyant de fonction:
Voyant de gauche: Lorsque le Wifi est connecté, clignote en
bleu.
Voyant du milieu: Quand la connexion est établie, s’allume en
bleu. S’allume en rouge pendant la charge. Si pendant la charge la
caméra est active il s’allume en violet.
Voyant de droite: Clignote en vert pendant l’enregistrement
d’une vidéo. En mode photo clignote une fois en vert à chaque
prise de photo.
7.1 Connecter la caméra à la télécomande
1. Assurez-vous que la caméra et la télécommande sont complète-
ment chargés.
2. Maintenez les boutons «Photo» et «Vidéo» de la télécommande
en même temps et allumez la caméra.
3. Lorsque la caméra s’allume, relâchez les boutons “Image” et
“Vidéo” de la télécommande.
4. Lorsque le jumelage est terminé, l’indicateur du milieu s’allume en
bleu.
Remarque:
Il est nécessaire de coupler une seule fois la télécommande, car ensuite la caméra la reconnaîtra automatiquement.
Le contrôle à distance par le Wi-Fi ne peut pas être utilisé simultanément.
Page 81

13
8. Webcam
La Caméra peut être utilisé comme webcam pour PC.
a. Connectez la caméra au PC via un câble USB
b. L’appareil photo s’allume automatiquement et ache deux op-
tions: “Mass storage” (Stockage de masse) et “PC Camera”
(caméra PC), puis choisissez PC Camera.
9. Connexion a une TV
Vous pouvez lire les photos et vidéo sur votre TV à l’aide d’un câble
HDMI:
a. Connectez la caméra à votre TV via un câble HDMI
b. allumez la caméra
c. la TV reproduit l’achage de l’écran de la caméra. Vous pouvez
capturer des photos ou de vidéo pendant que la caméra est con-
necté à la TV. Mais également relire sont contenue
d. maintenez appuyez le bouton « power » pendant 2 secondes pour
éteindre la caméra.
10. Transfert de fichier au PC
Vous pouvez transférer les vidéos et les photos sur un PC:
a Connectez la caméra au PC via un câble USB
b. L’appareil photo s’allume automatiquement et ache deux op-
tions: “Mass storage” (Stockage de masse) et “PC Camera”
(caméra PC), puis choisissez Mass storage.
C. Sélectionnez le fichier que vous voulez transferer sur votre PC.
11. Reinitialiser la camera
Le bouton “Reset” est proche de l’interface USB et de la carte
mémoire.
Lorsque la caméra ne fonctionne pas correctement ou est coincé,
vous pouvez utiliser une pointe pour appuyer sur le bouton “Reset” pendant 2 secondes pour réinitialiser, de sorte que l’appareil
redémare et fonctionne correctement pour la prise de vue.
Page 82

14
F.A.Q
Q: L’appareil photo ne peut pas s’allumer. Pourquoi?
A: Vérifiez si la batterie est à plat, si oui, charger la batterie via le
câble USB ou l’adaptateur secteur en premier.
Q: La caméra se fige. Que devrais-je faire ?
A: Réinitialiser la caméra.
Q: La vidéo et les photos sont floues. Pourquoi?
A: L’objectif est sale, s’il vous plaît nettoyer la lentille
Q: L’appareil ne peut pas se connecter avec le PC. Pourquoi?
A: Essayez un autre câble USB ou un port USB de l’ordinateur
Q: L’appareil photo s’éteint tous seul. Pourquoi?
A: Vérifiez si mise hors tension automatique dans le cadre général est
allumé, si oui, désactivez-le.
B. Vérifiez si la batterie est à plat, si oui, charger la batterie.
Page 83

15
Specification technique
Résolution Vidéo 2880x2160p@24fps, 2.7K@30fps,
1080p@60fps, 1080p@30fps,
720p@120fps, 720p@60fps,
1440p@30fps
Résolution d’Image 12MP, 8MP, 5MP, 3MP
Mémoire Carte Micro SD maximum 32GB
(optionel)
Vidéo Loop OFF, toutes les 3, 5, 10 minutes
Sensibilité Automatique ISO 100-200-400
Micro Incorporé
Achage Ecran LCD 2” TFT
Grand Angle 150°
Résistance à l’eau Submersible jusque 30m avec le caisson
étanche
Alimentation batterie Li-ion intégré 3.7V/1000mAh
Autonomie Batterie 90min sans la WI-FI
Format Vidéo MP4
Format Photo JPG
Interface USB 2.0, micro HDMI
Température d’Utilisation -10° à +55°
Langue Anglais, Italien, Allemand, Français,
Espagnol, Russe, Portuguais
Télécommande Photo, Vidéo, Power OFF
Connexion RF 2.4GHz omnidirectionnel
Page 84

16
Alimentation RC Batterie Li-Ion rechargeable intégrée
de 90mAh
Autonomie RC Jusqu’à 450 minutes
Portée WI-FI 5m
Pour télécharger les mises à jour et pour plus d’informations sur la
garantie, rendez-vous sur www.midlandeurope.com
Page 85

1
Polski
Ostrzeżenia
• Chroń kamerę przed upadkiem na twarde podłoże.
• Nie kładź na kamerę ciężkich przedmiotów.
• Chroń kamerę przed zanurzenia w wodzie i innych płynach jeśli
nie jest zamknięta w obudowie wodoodpornej.
• Ładuj akumulator przez kabel USB.
• Nie przegrzewaj kamery powyżej 65°C.
• Nie staraj się samodzielnie naprawiać kamery i ot-
wierać jej obudowy, gdyż wtedy sprzedawca nie od-
powiada za poprawne funkcjonowanie produktu.
1. Podstawowe parametry
• Rozdzielczość filmu 2880x2160p@24fps, 2.7K@30fps,
1080p@60fps, 1080p@30fps, 720p@120fps, 720@60fps,
1440p@30fps.
• Rozdzielczość zdjęć 12MP, 8MP, 5MP, 3MP.
• Transmisja Wi-Fi na dystansie 15 m etrów (no waterproof).
• Oferuje zdalne sterowanie 2,4G.
• Zanurzenie do 30 metrów w obudowie wodoodpornej.
• 2” wyświetlacz LCD.
• 3,7V/1000mAh litowo-jonowy akumulator zapewnia do 90 min.
nagrywania.
Page 86

2
2. Zawartość opakowania
• Kamera
• Mocowanie łukowe
• Pilot zdalnego sterowania
• Obudowa wodoodporna
• Ramka
• Mocowanie szybko rozłączalne
• Mocowanie 90°
• Kabel USB
• Mocowanie statywowe
• Mocowanie płaskie
• Przylepiec dwustronny 3M
• Śruba
Page 87

3
3. Rozmieszczenie elementów
Wskaźnik ładowania Wskaźnik statusu
Przycisk migawki
Przycisk zasilania
Przycisk WiFi
i wskaźnik
Obiektyw
Miejsce na kartę pamięci
Gniazdo micro USB
Gniazdo micro HDMI
Wyświetlacz
Page 88

4
4. Używanie kamery
4.1 Włączanie/wyłączanie
• Włączanie: wciśnij i przytrzymaj przez 2 sek, przycisk zasilania,
dioda LED zaświeci na czerwono. Kamera uruchamia się domyśl-
nie w trybie video czyli nagrywania filmu.
• Wyłączanie: wciśnij i przytrzymaj przez 2 sek, przycisk zasilania.
4.2 Tryby
Midland H7+ pracuje w 3 różnych trybach: Video, Zdjęcia,
Odtwarzanie. Po łączeniu kamera automatycznie uruchamia
się w trybie Video. Zmiana trybu odbywa się przez wciśnięcie i przytrzymanie przez 1,5 sek. przycisku migawki w kolejności
Video ZdjęciaOdtwarzanie
4.3 Nagrywanie filmów
Kamera zaraz po włączeniu jest gotowa do nagrywania filmów, gdyż
znajduje się w trybie Video. Pamiętaj aby włożona była karta pamięci
z wystarczającą ilością miejsca na dane.
• Wciśnij krótko przycisk migawki aby zacząć nagrywać.
• Wciśnij ponownie przycisk migawki aby zakończyć nagrywanie.
4.4 Robienie pojedynczych zdjęć
• Wciśnij i przytrzymaj przez 1,5 sek. przycisk migawki aby przejść z
trybu Video do trybu Zdjęć.
• Skieruj obiektyw we właściwą stronę i wciśnij krótko przycisk mi-
gawki aby zrobić zdjęcie.
4.5 Odtwarzanie
• Wciśnij i przytrzymaj przez 1,5 sek. przycisk migawki aby przejść z
trybu Zdjęć do trybu Odtwarzania. W tym trybie możesz oglądać
wszystkie zapamiętane na karcie filmy i zdjęcia.
• Przycisk WiFi służy do przewijania, przycisk mi-
gawki do zatwierdzania i odtwarzania, przycisk zasilania
do wejścia w menu ochrony/kasowania.
Page 89

5
Naciśnięcie i przytrzymanie przez 1,5 sek. przycisku migawki
przełącza kamerę w tryb Video.
4.6 Ładowanie
Przed pierwszym użyciem kamery należy w pełni naładować akumulator.
• Połącz kamerę ze źródłem prądu stałego o napięciu 5V kablem
USB. Czerwona dioda będzie się świecić podczas procesu ład-
owania.
• Po skończeniu ładowania czerwona dioda gaśnie. Proces trwa
około 3,5 godziny.
Niektóre funkcje takie jak komunikacja WiFi nie mogą być użyte jeśli
stan naładowania akumulatora jest niski.
4.7 Karta pamięci
• Włóż kartę w szczelinę zgodnie z oznaczeniami na kamerze.
• Kamera obsługuje karty o pojemności do 32 GB
Pamiętaj:
a. Sugerujemy używanie kart lepszych bądź równych standardowi
CLASS 10 (High speed) dla płynnego zapisu i odtwarzania. Karty
o niższej szybkości transferu mogą się zawieszać.
b. Jest tylko jedno właściwe położenie karty w gnieździe kamery. Nie
używaj siły przy wkładaniu, gdyż prawdopodobnie wkładasz kartę
niewłaściwą stroną i możesz uszkodzić zarówno ją jak i gniazdo.
c. Nowa karta micro SD powinna być sformatowana w kamerze
przez pierwszym użyciem.
4.8 Obudowa wodoodporna
Kamera oferuje możliwość nagrywania pod wodą do głębokości 30m, o
ile zamknięta jest w dołączonej do kompletu wodoodpornej obudowie.
• Upewnij się, że obudowa jest czysta i sucha.
• Otwórz zatrzask obudowy.
• Włóż starannie kamerę.
• Zamknij zatrzask.
• Po użyciu przemyj obudowę czystą wodą i wytrzyj miękką szmatką
Page 90

6
5. Ustawienia kamery
5.1 Ustawienia w trybie Video
Kiedy kamera jest w trybie wideo wciśnij krótko przycisk zasilania
(dłuższe przytrzymanie spowoduje, że kamera wyłączy się) aby wejść
w tryb ustawień. Przyciskiem WiFi poruszasz się po menu, a przyciskiem migawki zatwierdzasz wybór. Przyciskiem zasilania cofasz się do
poprzedniego ekranu.
Rozdzielczość: do wyboru między 4k@24fps - 2.7k@30fps
-1080p@60fps - 1080p@30fps - 720p@120fps 720p@60fps- 1440p@30fps
Dzielenie plików: Filmy są dzielone na oddzielne pliki w zależności
od czasu trwania.
• Wybór „O”: Filmy będą dzielone na pliki odpowiednio- 12 min.
przy rozdzielczości 4K i 25 min. przy 1800p i 720p.
• 3 Min: Plik będą zapamiętywane co 3 min.
• 5 Min: Plik będą zapamiętywane co 5 min.
• 10 Min: Plik będą zapamiętywane co 10 min.
Film poklatkowy: Wybierasz odstęp czasowy pomiędzy pojedynczymi klatkami spośród następujących możliwości: O(wyłączone) – 1
Page 91

7
sek. – 5 sek. – 10 sek. – 30 sek. – 1 min. – 5 min. – 10 min.
Zwolnione tempo: Ta opcja pozwala nagrać film, który będzie odtwarzany w zwolnionym tempie i jest dostępna tylko w rozdzielczości
720@120fps. Po nagraniu filmu włączoną opcją ON, będzie on odtwarzany z 1:4 prędkości nagrywania.
GYRO: Funkcja dodatkowej stabilizacji obrazu zapewniająca bardziej
płynne nagranie kiedy kamera jest w ruchu.
Ekspozycja: Dobieranie wartości przesłony w zależności od intensywności oświetlenia planu zdjęciowego. Dostępne opcje to: +2.0 +1.7
+1.3 +1.0 +0.7 +0.3 0.0 -0.3 -0.7-1.0 -1.3 -1.7 -2.0.
Wysokie wartości stosuje się przy słabym oświetleniu.
Balans bieli: Domyślnie ustawiony jest tryb automatyczny, ale możesz dokonać manualnej regulacji w zależności od konkretnych warunków filmowania.
Tryb koloru: Do wyboru tryby Normalny, Czarno-biały, Sepia, Podwodny.
Próbkowanie: Użytkownik może wybrać w jaki sposób kamera
mierzy i reguluje ekspozycję. Do wyboru opcje Średnio, Centrum,
Punktowo.
Ostrość: Wybór między Wysoka – Standardowa – Niska.
Nasycenie: Wysokie – Standardowe – Niskie.
Nagrywanie Audio: Można nagrywać filmy z dźwiękiem (On) lub bez
(O).
Data: Data i godzina może być widoczna na filmie lub nie.
Page 92

8
5.2 Ustawienia w trybie zdjęć
Kiedy kamera jest w trybie zdjęć wciśnij krótko przycisk zasilania
(dłuższe przytrzymanie spowoduje, że kamera wyłączy się) aby wejść
w tryb ustawień. Przyciskiem WiFi poruszasz się po menu, a przyciskiem migawki zatwierdzasz wybór. Przyciskiem zasilania cofasz się do
poprzedniego ekranu.
Tryby robienia zdjęć:
• Pojedyncze: Jedno zdjęcie po naciśnięciu przycisku migawki.
• 2S Timer: Jedno zdjęcie co 2 sekundy.
• 5S Timer: Jedno zdjęcie co 5 sekund.
• 10S Timer: Jedno zdjęcie co 10 sekund.
Rozdzielczość: 12M – 8M – 5M – 3M
Zdjęcia seryjne: Kamera robi 3 zdjęcia w bardzo krótkim czasie.
Jakość: Do wyboru Wysoka – Normalna – Ekonomiczna.
Próbkowanie: Użytkownik może wybrać w jaki sposób kamera mierzy
i reguluje ekspozycję. Do wyboru opcje Średnio, Centrum, Punktowo.
Ostrość: Wybór między Wysoka – Standardowa – Niska.
Balans bieli: Domyślnie ustawiony jest tryb automatyczny, ale mo-
żesz dokonać manualnej regulacji w zależności od konkretnych warunków filmowania.
Page 93

9
Tryb koloru: Do wyboru tryby Normalny, Czarno-biały, Sepia, Pod-
wodny.
Nasycenie: Wysokie – Standardowe – Niskie.
ISO: Określa czułość przetwornika obrazu. Do wyboru Auto – 100
– 200 – 400.
Ekspozycja: Dobieranie wartości przesłony w zależności od intensywności oświetlenia planu zdjęciowego. Dostępne opcje to: +2.0 +1.7
+1.3 +1.0 +0.7 +0.3 0.0 -0.3 -0.7-1.0 -1.3 -1.7 -2.0.
Wysokie wartości stosuje się przy słabym oświetleniu.
System antywstrząsowy: Funkcja dodatkowej stabilizacji obrazu poprawiająca ostrość zdjęcia kiedy kamera jest w ruchu.
Szybki podgląd: Pokazuje zdjęcie przez zadany czas po jego zrobieniu. Do wyboru Wyłączone (OFF) – 2 sek. – 5 sek.
Znacznik daty: Data i godzina wykonania zdjęcia jest na nim widoczna. Do wyboru
• O: nie wyświetla informacji na zdjęciu.
• Date: wyświetla datę zrobienia zdjęcia.
• Date/Time: wyświetla datę i czas zrobienia zdjęcia.
Page 94

10
5.3 Ustawienia podstawowe
Jeżeli kamera jest w trybie Zdjęć lub Video naciśnij przycisk zasilania, a potem wciśnij i przytrzymaj 1,5 sek. przycisk migawki. Uzyskałeś dostęp do menu ustawień podstawowych. . Przyciskiem WiFi
poruszasz się po menu, a przyciskiem migawki zatwierdzasz wybór.
Przyciskiem zasilania cofasz się do poprzedniego ekranu.
Wygaszacz ekranu: Wybierasz opcję 1, 3, 5 min. Po zadanym czasie
wyświetlacz zgaśnie, mimo, ze kamera będzie pracować dalej.
Data&Czas: Domyślny format to rok/dzień/miesiąc. Można go
zmienić wg własnych preferencji.
Auto wyłączanie: Wybierz opcje 3,5 lub 10 min, po upływie których
kamera wyłączny się automatycznie, jeśli nie będzie używana.
Dźwięk potwierdzenia (Beep): Wyłączony – brak dźwiękowego potwierdzenia użycia przycisków. Włączony – słychać krótki dźwięk po
każdym wciśnięciu dowolnego przycisku.
Język: Do wyboru jest 7 rożnych języków, w których kamera wyświetla menu.
Tryb TV: Wybierz odpowiedni do swoich potrzeb standard NTSC lub
PAL do współpracy z telewiorem.
Wyjście TV: Ta opcja pozwala kablowo przesyłać obraz z kamery za
pomocą złącza USB. Do wybou: Właczone/ON i Wyłączone/OFF.
Przy włączonej opcji i wetkniętym kablu wyświetlacz kamery wyłącza
się.
Częstotliwość: Wybierz właściwą dla siebie częstotliwość, żeby uniknąć migotania obrazu.
Format: Możesz w kamerze sformatować kartę pamięci czyli
wykasować wszystkie dane i przygotować do nagrywania.
Ustawienia domyślne: Przywraca wszystkie ustawienia do wersji fabrycznej.
Wersja: Możesz sprawdzić wersję oprogramowania zainstalowanego
w kamerze.
Wi-Fi SSID: Pozwala ustalić swój identyfikator w sieciach Wi-Fi.
Domyślny to „WIFI_H7Plus”.
Page 95

11
D
A
B
C
Hasło Wi-Fi: Można ustanowić własne hasło do sieci Wi-Fi. Do-
myślne to „12345678”.
6. Ustawienia Wi-Fi
Uwaga: Przy korzystaniu z opcji Wi-Fi akumulator kamery powinien
być w pełni naładowany.
a. Pobierz aplikację „MelifeCam-I3” do smarfona lub tabletu z App
store lub Google play.
b. Włącz kamerę i wciśnij przycisk Wi-Fi, aby uaktywnić komunikac-
ję Wi-Fi.
c. W ustawieniach Wi-Fi w swoim smarfonie lub tablecie włącz
wyszukiwanie urządzeń i odnajdź „WIFI_H7Plus”.
d. Wprowadź hasło „12345678”.
e. Otwórz aplikację „MelifeCam-I3”.
7. Zdalne sterowanie
A. Przycisk zdjęć
B. Przycisk video
C. Przycisk zasilania
D. Wskaźnik
Uwaga: Przed użyciem zdalnego sterowania naładuj akumulator.
1. Przycisk zdjęć: Wciśnij aby zrobić zdjęcie.
2. Przycisk video: wciśnij, aby rozpocząć nagrywanie filmu, wciśnij,
żeby zakończyć.
Page 96

12
3. Przycisk zasilania: Wciśnij i przytrzymaj 4 sek., aby wyłączyć
kamerę.
4. Funkcje wskaźnika
Lewa dioda: miga na niebiesko, kiedy ustanowiono połączenie
WiFi.
Środkowa dioda: Kiedy sparowano świeci na niebiesko. W trakcie
ładowania świeci na czerwono. Podczas ładowania, kiedy kamera
jest włączona świeci na fioletowo.
Prawa dioda: W trakcie nagrywania filmu miga na zielono. Przy
robieniu zdjęć miga pojedynczo po zrobieniu każdego zdjęcia.
7.1 Parowanie kamery z pilotem zdalnego sterowania
1. Upewnij się, że akumulator w kamerze i w pilocie są w pełni naład-
owane.
2. Wciśnij i przytrzymaj jednocześnie 2 przyciski Zdjęcia i Video oraz
w tym czasie włącz kamerę.
3. Kiedy kamera włączy się puść przyciski na pilocie
4. Kiedy parowanie jest zakończone środkowa dioda pilota zaświeci
na niebiesko.
Uwaga:
• Parowanie przeprowadza się tylko przy pierwszym parowaniu pary
pilot-kamera. Później po włączeniu rozpoznają się automatycznie.
• Funkcja WiFi w kamerze i obsługa pilotem zdalnego sterowanie
nie mogą być realizowane jednocześnie.
Page 97

13
8. Kamera internetowa PC (Webcam)
Kamera może być używana jako kamera internetowa (webcam)
• Połącz komputer z kamerą kable USB
• Kamera włączy się automatycznie i pokaże 2 opcje do wyboru
„Pamięć masowa” i „Kamera PC”. Wybierz „Kamera PC”.
9. Połączenie z telewizorem
• Możesz oglądać nagrane filmy i zdjęcia w telewizorze dzięki
połączeniu kablem HDMI.
• Połącz kamerę z telewizorem kablem HDMI.
• Włącz kamerę.
• Obraz w telewizorze będzie dublował obraz z wyświetlacza
kamery.
• Wciśnij i przytrzymaj przez 2 sek. przycisk zasilania dla wyłączenia
kamery.
10. Przesyłanie plików do komputera
• Nagrany materiał można łatwo przesłać do komputera.
• Połącz kamerę z komputerem.
• Kamera włączy się automatycznie i pokaże 2 opcje do wyboru
„Pamięć masowa” i „Kamera PC”. Wybierz „Pamięć masowa”.
• Wybierz pliki i prześlij je do komputera.
11. Resetowanie kamery
• Przycisk resetowania znajduje się pod klapką chroniącą złącza
obok gniazda USB i szczeliny na kartę pamięci.
• Kiedy kamera nie działa prawidłowo lub się zawiesiła możesz cien-
kim narzędziem wcisnąć i przytrzymać przez 2 sek. przycisk reset,
co powinno przywrócić prawidłowe funkcjonowanie.
Page 98

14
Najczęściej zadawane pytania
Pyt: Kamera nie włącza się. Co zrobić?
Odp: Sprawdź czy akumulator jest naładowany. Jeśli nie naładuj przez
kabel USB i adaptor zasilający.
Pyt: Kamera zawiesiła się. Co zrobić?
Odp: Zresetuj kamerę
Pyt: Filmy zdjęcia są nieostre. Dlaczego?
Odp: Prawdopodobnie brudny obiektyw. Oczyść go starannie
Pyt: Kamera nie łączy się komputerem. Dlaczego?
Odp: Użyj innego kabla USB.
Pyt: Kamera sama wyłącza się podczas pracy. Dlaczego?
Odp: Sprawdź czy auto wyłączenie w ustawieniach podstawowych
jest włączone. Jeśli tak – wyłącz je.
Sprawdź czy akumulator nie jest wyczerpany i ewentualnie naładuj.
Page 99

15
Specyfikacja techniczna
Rozdzielczość 2880x2160p@24fps, 2.7K@30fps,
1080p@60fps, 1080p@30fps,
720p@120fps, 720p@60fps,
1440p@30fps
Zdjęcia 12//8/5/3 MP
Dzielenie filmów wyłączone, co 3,5,10 minut
Czułość automatyczne ISO 100-200-300
Mikrofon Wbudowany
Wyświetlacz 2’ kolorowy
Obiektyw 7G szerokokątny 150°
Wodoodporność do 30m w obudowie wodoodpornej
Zasilanie 3,7V/1000mAh wymienny akumulator
Czas pracy Do 90min dla 1080P przy wyłączonym
WiFi
Format filmów MP4
Format zdjęć JPEG
Matryca CMOS 5MP
WiFi 802.11b/g/n
Głośnik Wbudowany
Wejścia USB2.0, micro HDMI
Zakres temperatur pracy -10° to +55°
Język Angielski, włoski, francuski, hiszpański,
rosyjski, portugalski
Zdalne sterowania Zdjecia, video, wyłączanie
Transmisja 2,4 GHz niekierunkowa
Page 100

16
Czas pracy pilota Do 450min
Zasięg WiFi Do 15 m
Tryby Wideo, Zdjęcia, Zdjęcia seryjne, Film
poklatkowy,
Aktualizacje oprogramowania i warunki gwarancji można znaleźć na
www.midlandeurope.com
 Loading...