

Miditemp MP 11 Owner's Manual
User Manual
Version 1.0 | Date 11.05.2012
MP 11 Firmware-Version 1.64d
2
Important safety instructions
Read the instruction manual thoroughly. It provides you with all the
information you need to use this device properly.
The warranty becomes void in case of unauthorized access, use or interference. Use the device in compliance with the operating instructions. Use only accessories specied by the manufacturer.
CAUTION!
Risk of electric shock!
Do not open the device. There are no parts inside the device that you
can use for other purposes. Only qualied experts may attempt repair
work on the device.
Power connection
Before connecting MP11 to the power grid, please make sure the voltage is suitable for the device. MP11 gets its voltage from an external
wide range power supply that can be used worldwide.
• Use only the original power supply unit
• Do not use defective adapters or damaged power cables
Moisture
In order to avoid any risk of re or electric shock the device must not
be exposed to rain or moisture. Spray or splashing water, or dripping liquids must not get inside the unit. Do not place any objects containing
liquids, e.g. beverages or vases, on the device.
If the device is taken from a cold location to someplace warm, condensation may settle inside the device. Do not turn on the device before it
has adapted to and reached room temperature.
CAUTION!
Risk of exposure to high volume
Headphones can produce volumes so high that can be hazardous to
your health. Make sure the volume is not set too high before you put
on your headphones!
Assembly
Make sure you set up the device on a solid and rm surface.
Cleaning / maintenance
Do not use abrasive cleaners. A microber cloth would be most suitable, which you can slightly moisten if necessary.
Advice on packaging
Please safekeep the device‘s packaging. This will keep the unit safe for
transportation, e.g. if repair work becomes necessary.
3
2s
Bound by TRADITION
Back in the 90s, MIDITEMP equipment was indeed ahead of its time. Even
before everyone could aord laptop computers, ambitious musicians and
keyboarders were able to manage their MIDI setup with ease and access
MIDI les through their Multiplayer (MP44, MP88, MP88W) - later, even audio
les using integrated hard disks.
But times are changing; technology has evolved rapidly - and computers,
sequencers and hard-disk drives have become the norm.
The time had come to redene the history of MultiPlayer.
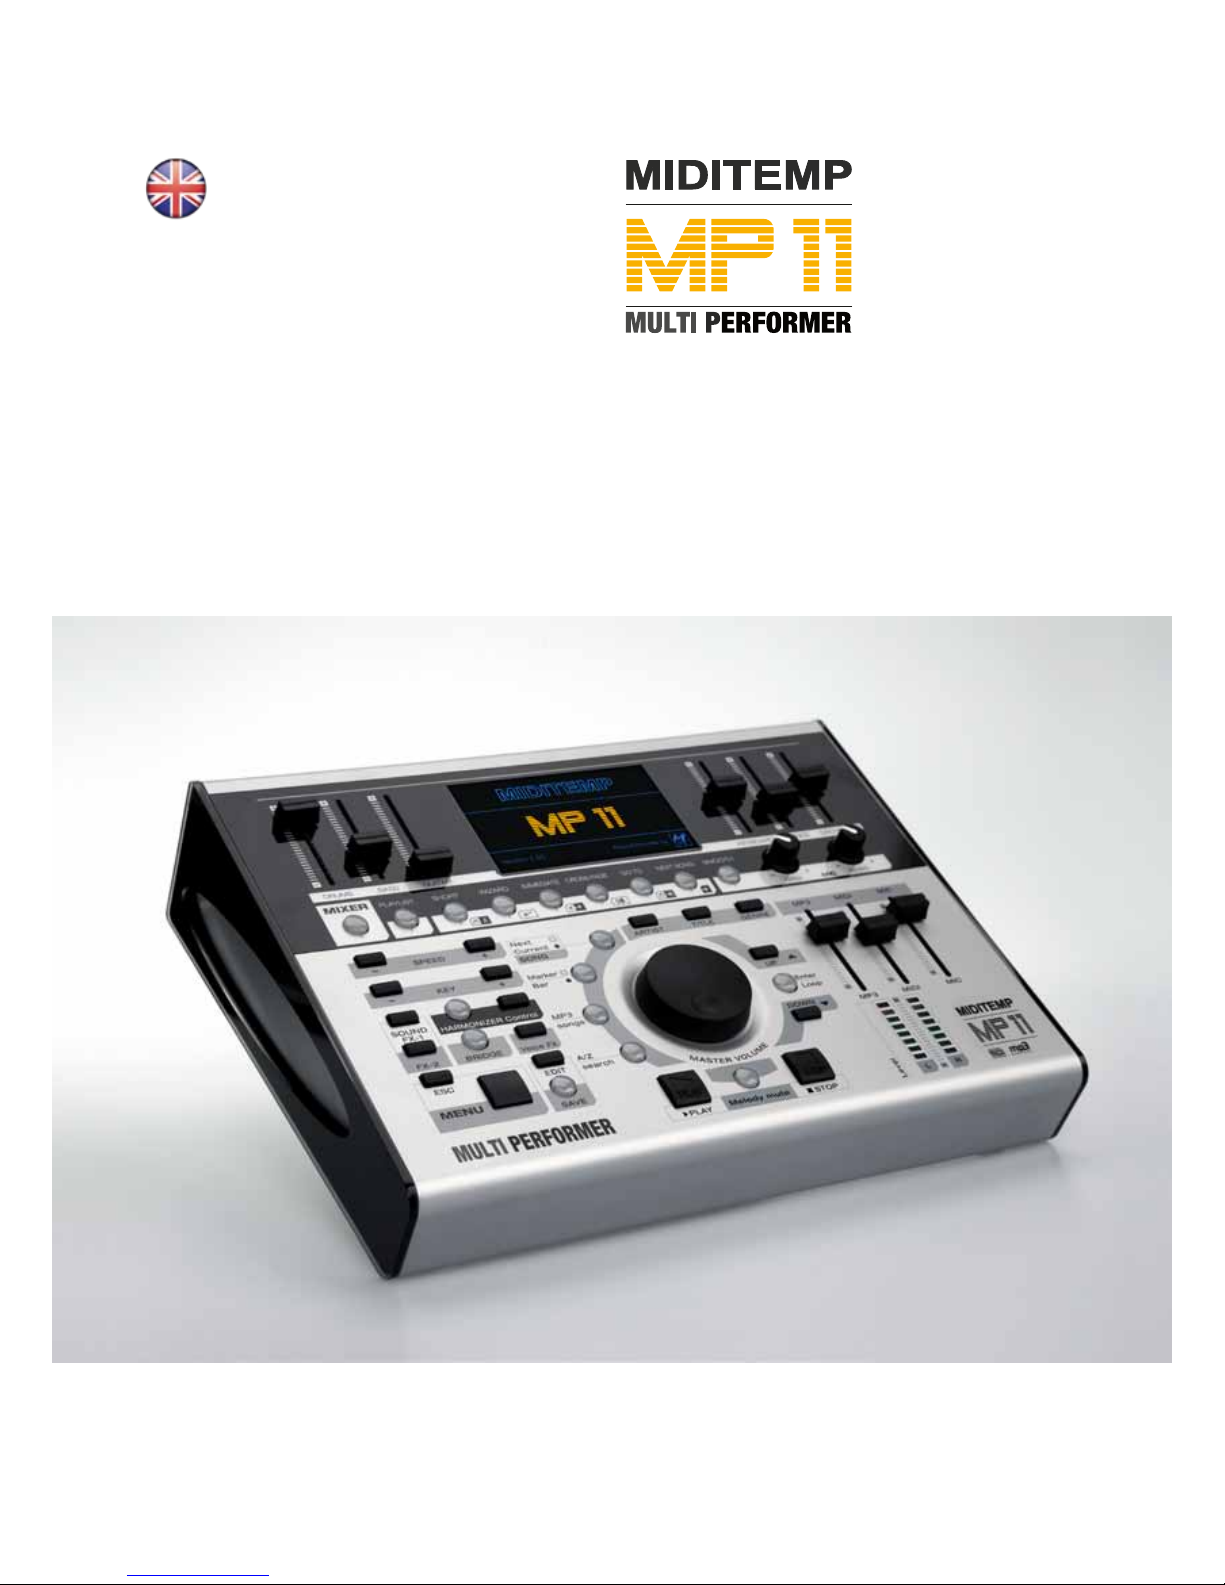
The MIDITEMP MP 11 Multi Performer is a MIDI-player and audio le player
with integrated voice harmonizer. This puts your entire band within your
reach at all times. Be it the drums, bass, guitars, keyboards, wind instruments
or even a whole orchestra – thanks to MIDI-le and MP3 playback.
Plug in your keyboard and microphone and you can get started. Mix every
instrument live and exactly to your liking using the six faders. Give your
vocals the eects you want; the lyrics appear directly on the display or on an
external monitor.
Create and organize your playlists and markers right on the device. An
intelligent algorithm recognizes musical phrases, and automatically creates
seamless song segues.
The control concept of MP 11 has been specially designed for live performances. You can control every important function in real-time using illuminated buttons, turning knobs and sliders.
It is also very easy to access the additional functions and submenus: just
press the button that you want and hold it down for 2 seconds; this launches
the user menu. You can navigate using the main Master Volume knob, the
Up-Down buttons and the Enter button.
In the operating instructions this additional function is displayed as:
We hope you have a lot of fun using your MP 11 by MIDITEMP - and above
all: a whole lot of applause.
4
Safety instructions 2
Introduction 3
Table of Contents 4-5
Quick Reference 6 Upper control panel
7 Display
8 Lower control panel
9 Central control panel
Quickstart 10 Power up
11 Songs-Selection (Titel, Artist, Genre)
Using the ESC-Button
Upper control panel 12 MIXER | PLAYLIST | SHORT | WIZARD
13 IMMEDIATE | CROSSFADE | GOTO | NEXT SONG | SMOOTH
MIC delay | MIC reverb
Lower control panel 14 SPEED | KEY | SOUND FX | HARMONIZER
15 VOICE FX | MENU Edit • Save • Esc
Output volume | Level Meter
Central control panel 16 MASTER VOLUME | ARTIST • TITLE • GENRE
17 UP/DOWN | ENTER/LOOP | PLAY | STOP
Melody mute | A/Z search | MP3 Songs
Marker/Bar | Next/Current SONG
Selecting and Playing Songs 18 - 19 Browsing for a song alphabetically
Preparing the next Song 20 Selecting the song
21 Switching the display between current and next song
GoTo 22 Skipping or crossfading from the current song to the next
23 Adjusting SPEED and KEY
SPEED | BPM | WIZARD
24 Quick skip to the next song
Marker 25 Toggling between markers of the current song
26 Skipping to a marker of the next song
27 Changing the bar without markers | LOOP-Function
Playlist 28 Creating and naming a playlist
29 Selecting a playlist or changing to a dierent playlist
Adding songs to a playlist
30 AutoPlay function
Exiting the playlist mode
31 Managing playlists
32 Managing playlist songs
33 SHORT - Function in Playlists
34 - 35 Wizard and AutoBPM functions in playlists
Editing MIDI - Files 36 Progr.Chg/Bank | Status | Volume |
Reverb | Chorus | Insert | Pan | Transpose
37 Insert eects
38 Wizard Sound Function (WSF)
Editing MP3 - Files 39 Voice Cancelling
Harmonizer 40 Harmonizer and Melody-Tracker mode
Melody-Track-Modus 41 Mode | Efx | Octave | Dry/Wet
5
General use 42 Menue Options
Mic Presets 43
Mic Equalizer 43
Music Equalizer 43
MIDI Settings 44
Melody track | Chord mode | Midi-In | Click Count In
General Settings 45
Pedal Mode | Short Time | Lists font |
Auto playlist | Songs history | Search mode
Fade Curve 46
Auto BPM 46
Sound FX Settings 47
Video Settings 47
Song History 48
Find new song 48
System settings 49
Change memory | Optimize memory | List mode | Factory reset
Storage media 50 Technical details
Formats and compatibility 51
Connections 52
Technical specications 53
Solo vocals 54 Connection Examples
Vocals with guitar, mixer and foot-switch 54
Vocals with monitor or TV screen 55
PC + USB master-keyboard (MP 11 as expander) 55
Small band with master-keyboard and click for the drummer 56
Frequently asked questions 57 FAQ
Introduction / Installation 58 MP11 Utility-Software
Menu bar 59
Handling 60 - 61
Sound tables 62 - 64 Sound Charts
Drum Kits 65
Performances 66
Sound FX / Presets / Bridge Music 67
68 - 73 MIDI Implementation
CE / RoHS / WEEE / Trademark / Copyright 74 Legal
Items delivered:
MIDITEMP MP 11
External power supply unit
1 GB Compact-Flash-Card
MP11-Utility-CD
Uaser manual
Cinch connector
AV breakout-cable
Scart to Cinch adapter

6
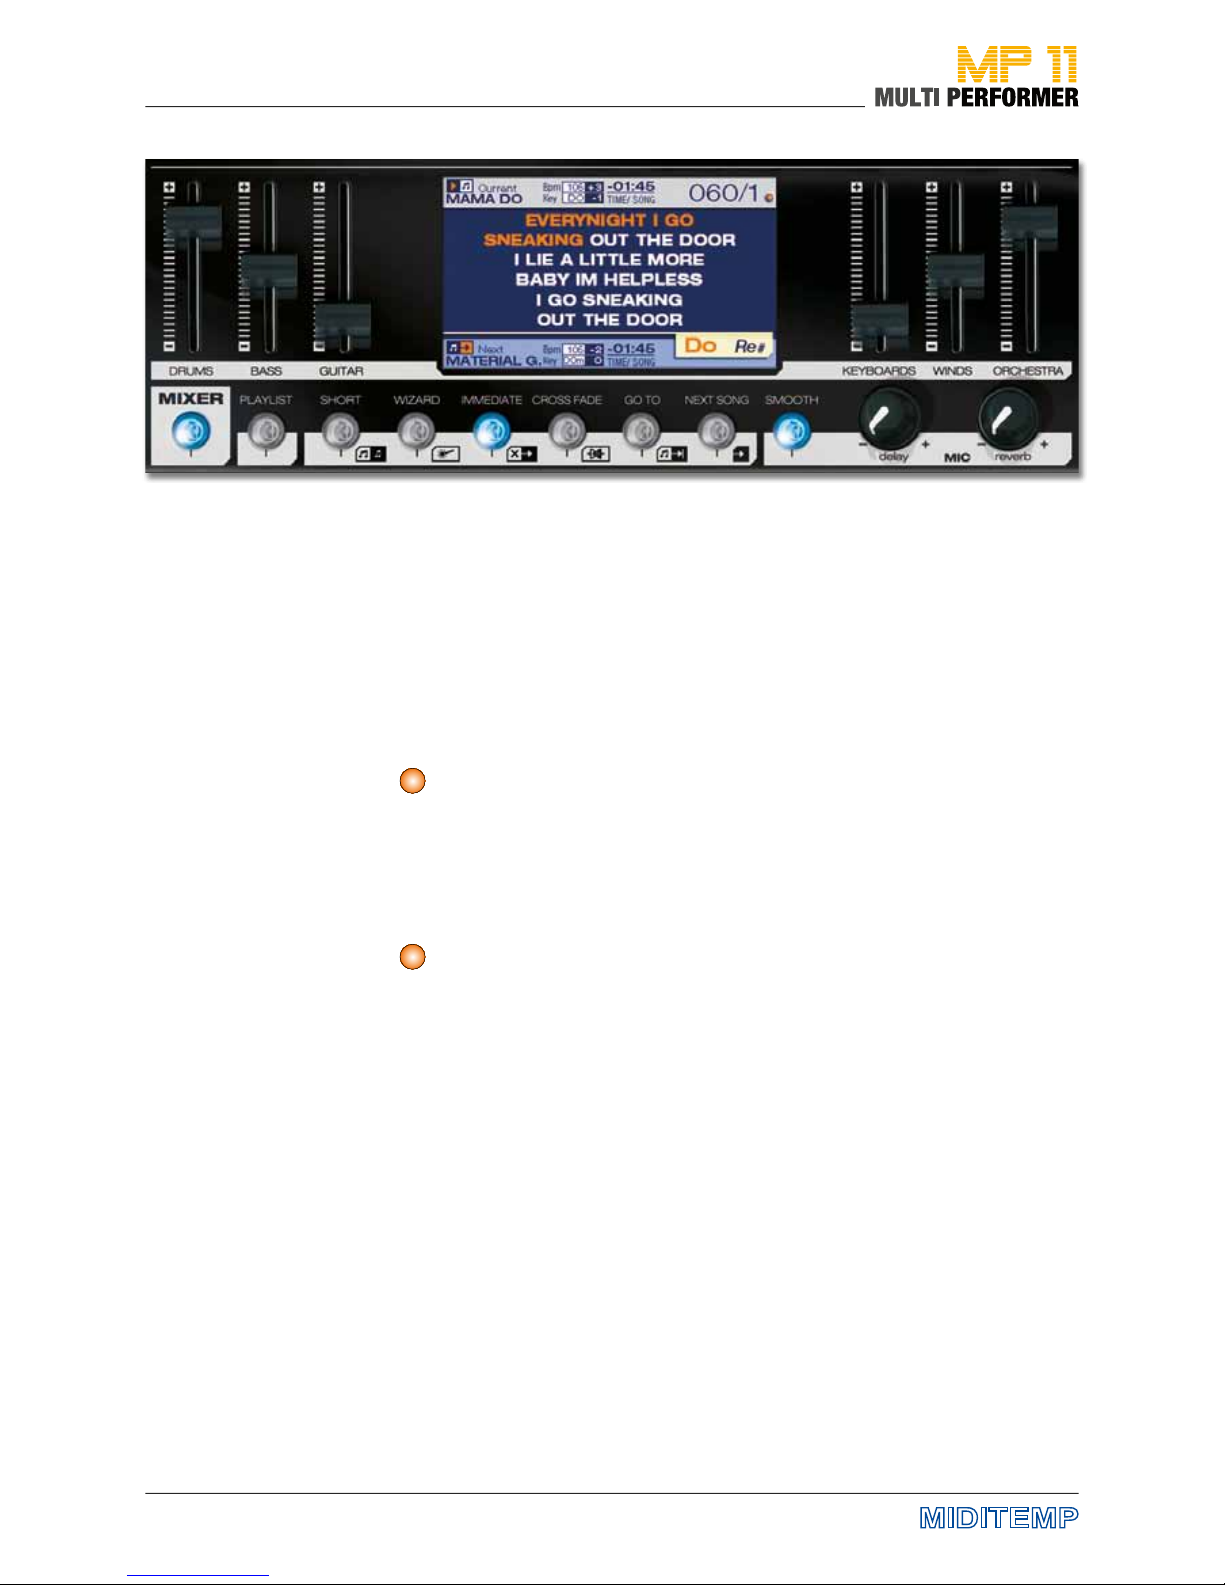
Quick Reference: Upper control panel
Volume control
MIDI Playback
Playlist- and Song-Functions Control for
microphone eects
Volume control
MIDI Playback
High denition graphic
display for putting
lyrics and menus on
view
7
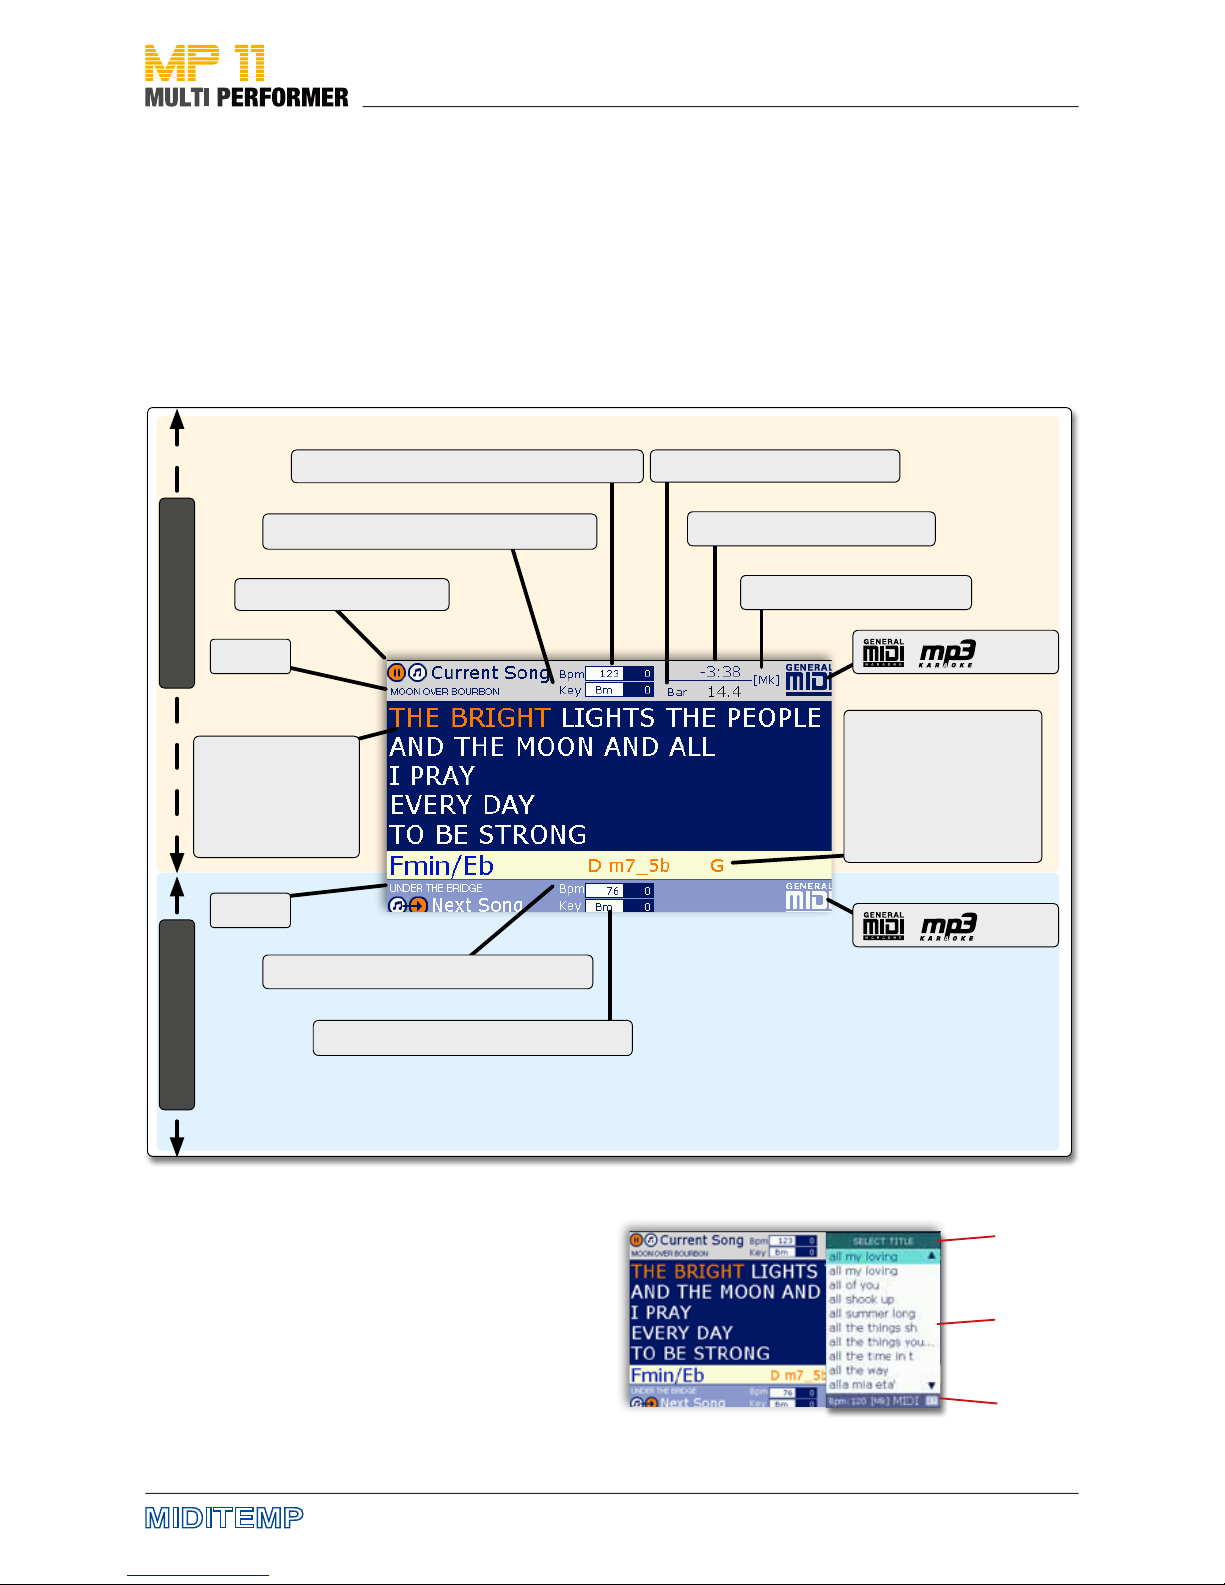
The main menu always has the lyrics of the song that is currently being
played (= Current Song) on display. The lyrics are divided in syllables based
on the tempo and highlighted in color. Of course, you can have the lyrics
displayed only if your songs contain the corresponding text les.
You can also see the following information on display:
• MK = Marker (if a song contains marker positions)
• BPM = Tempo (beats per minute)
• KEY = Tonic note and chord
and extra information on the song currently being played or the next song.
Also, if you press certain buttons, their corresponding
menus will be put on display, e.g.:
• Artists list
• Song list
• Genre list
• Playlist settings
• Marker settings
• General settings
• etc.
You can launch the menus that you need during the playback of a song
Operating status
Title
Title
Laufender Song
Lyrics
Highlighted in
color based on
the tempo
Nächster Song
Song chords
Highlighted in color
based on the tempo
Bpm: Tempo (and manual editing)
Bpm: Tempo (and manual editing)
Time: Remaining play time
Key: Tonic note (and manual editing)
Key: Tonic note (and manual editing)
Bar: Bar indicator
[Mk]: Marker present
/ : Format
/ : Format
Quick Reference: The Display
Name
Content
Info

8
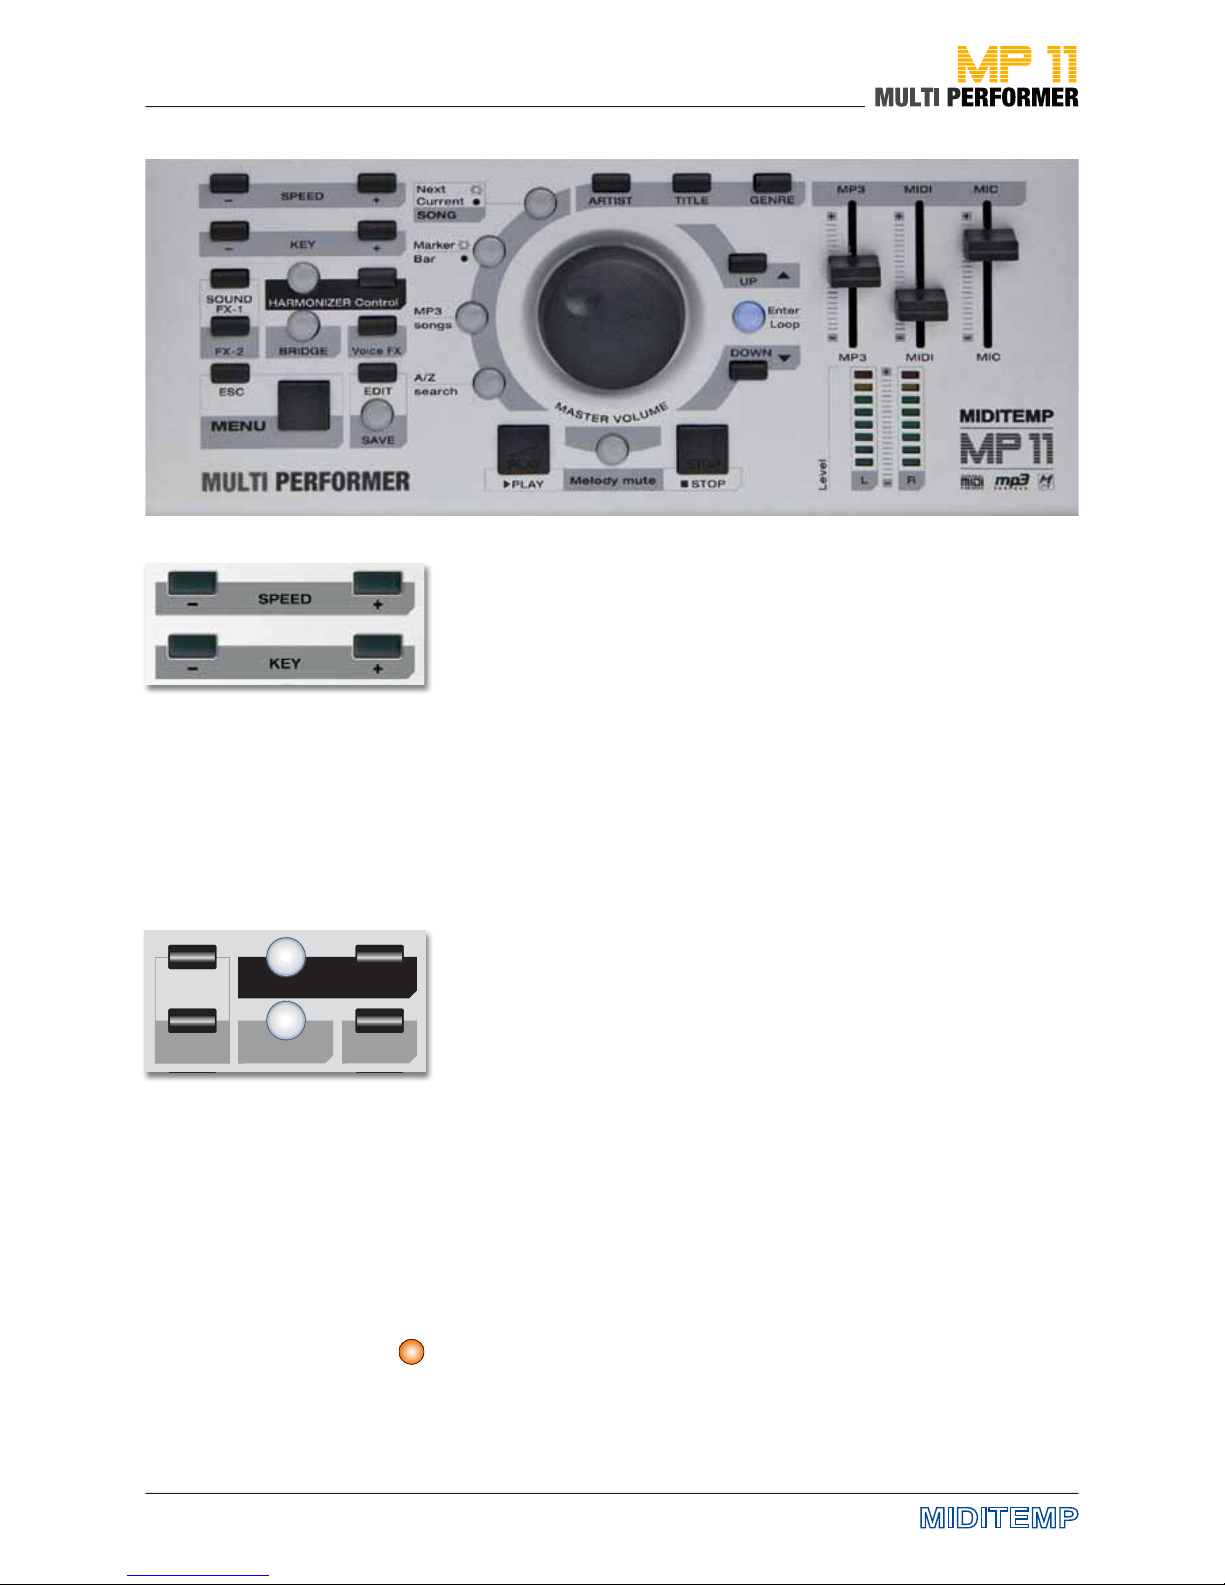
Quick Reference - Lower Control Panel
Main control panel
• Song slection
• Navigation
• Starting/stopping songs
• Search function
• and a lot more
Song control
• Tempo
• Key / pitch level
Control panel
• Harmonizer
• Eects
Menu - Buttons
Operating Panel
Volume control
• MP3
• MIDI
• Microphones
9
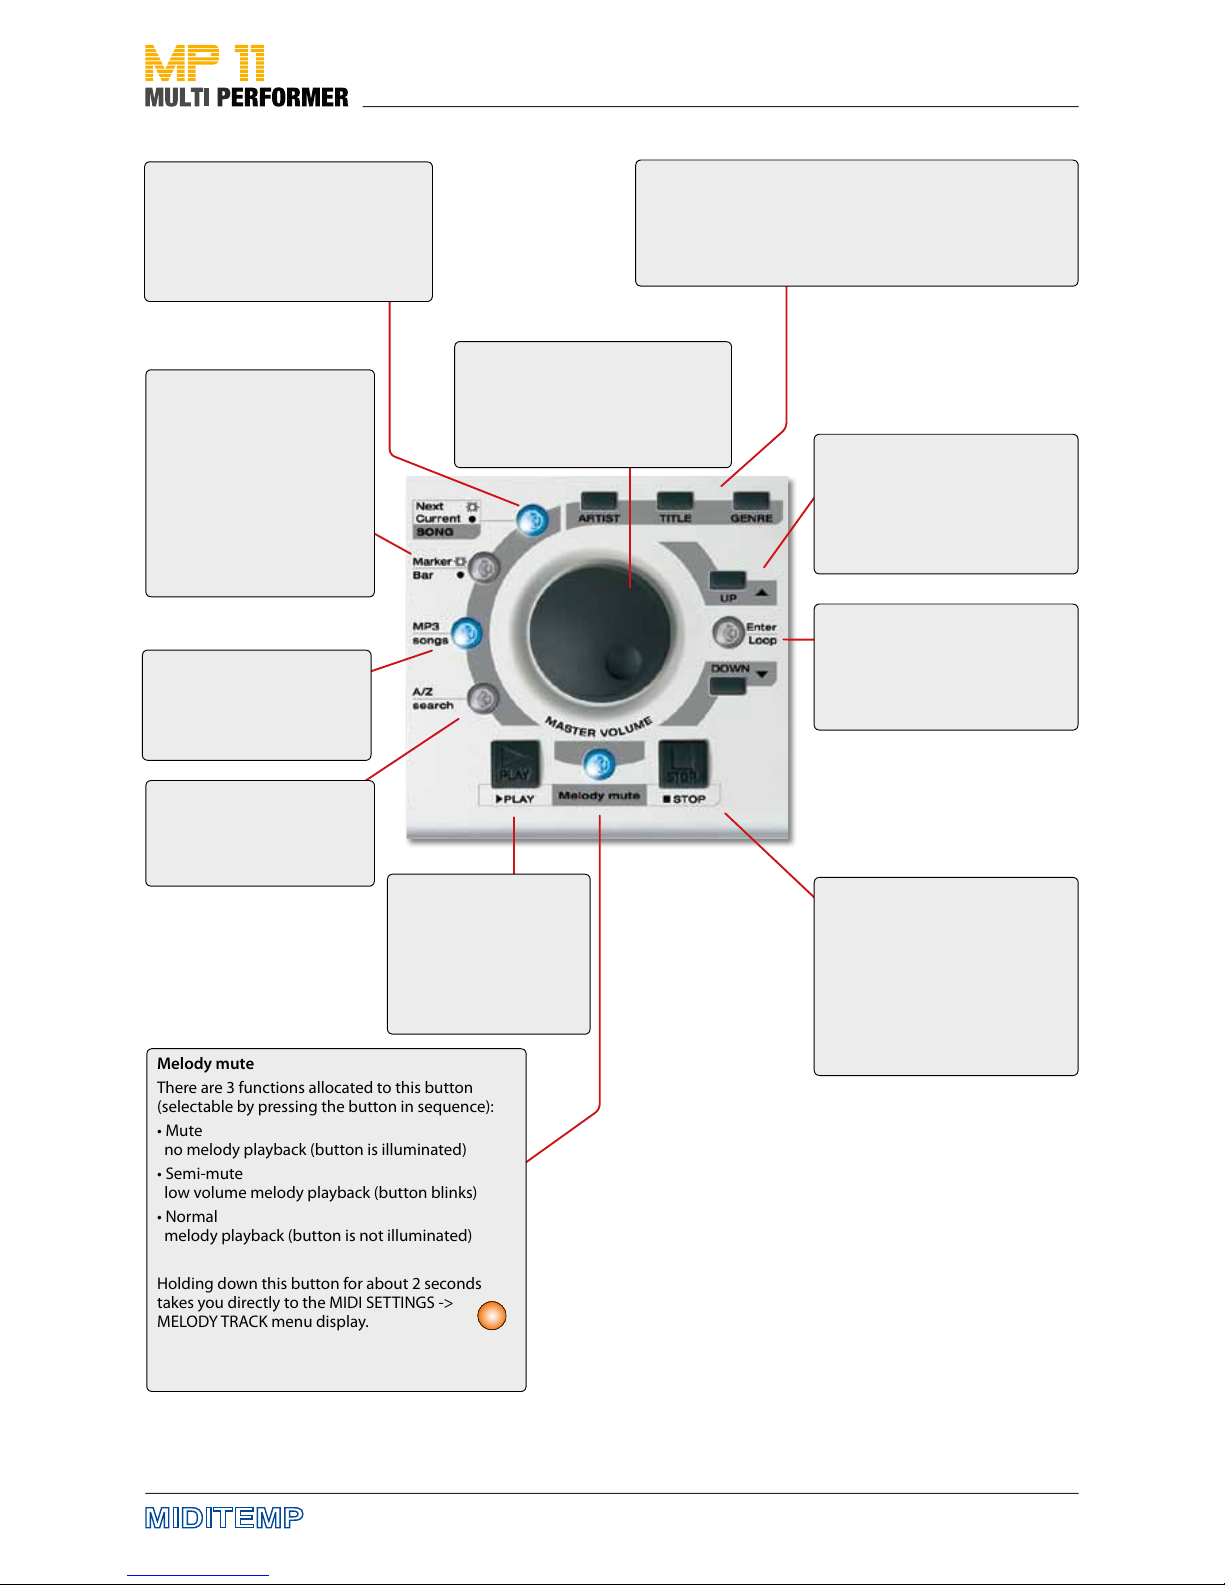
ARTIST - TITLE - GENRE
If you press these buttons, you can list songs by Artist, Title
(or lename) or Genre categories.
hold down the TITLE button for about 2 seconds lets you
select the storage medium of your choice.
UP / DOWN
Using these buttons you can
move the cursor (= colored bars)
up or down in dierent areas such as playlists, menus ...
Enter / Loop
You can conrm your current
selection or edits using this
button.
Special function: Loop
PLAY
This starts the playback.
Pressing the button again
starts the song from the
beginning (as long as you
do not use next song
functions).
Melody mute
There are 3 functions allocated to this button
(selectable by pressing the button in sequence):
• Mute
no melody playback (button is illuminated)
• Semi-mute
low volume melody playback (button blinks)
• Normal
melody playback (button is not illuminated)
Holding down this button for about 2 seconds
takes you directly to the MIDI SETTINGS ->
MELODY TRACK menu display.
STOP
Discontinues the playback of a
song.
Pressing 1 x = Pause
(Press PLAY to restart the playback
from the same position).
Pressing 2 x = Stop
MP3 songs
If this button is activated,
only MP3 les in the lists of
Artist, Title or Genre will be
played.
Next / Current SONG
You can toggle between the two
displays Current Song/Next Song by
pressing the button (as soon as a next
song has been loaded)
Marker / Bar
Button is illuminated = Current
song contains MARKERS.
Pressing the button opens
the MARKER MENU.
Button is not illuminated =
There are NO MARKERS.
Pressing the button opens
the BARS MENU.
(Not available for MP3 songs).
A/Z search
This activates the alphabetical search in the lists of Artist,
Title or Genre.
2s
DIAL knob
• Moving the cursor
• Editing the selected parameters
• Volume control (depending on
the menu you have activated)
Quick Reference - Central Control Panel
10
Plug in MP 11 to the outlet using the AC/DC adapter (9 Volt-DC) included in
delivery.
Connect the two jack sockets „R - Audio Out - L“ with the inputs of a mixing
console using 6.3 mm mono jack cable or connect a headphone set with a
3.5mm stereo jack plug to the mini jack socket „Phones“.
Now turn on MP11 by pressing the „On/O“ switch.
This starts MP11‘s operating system.
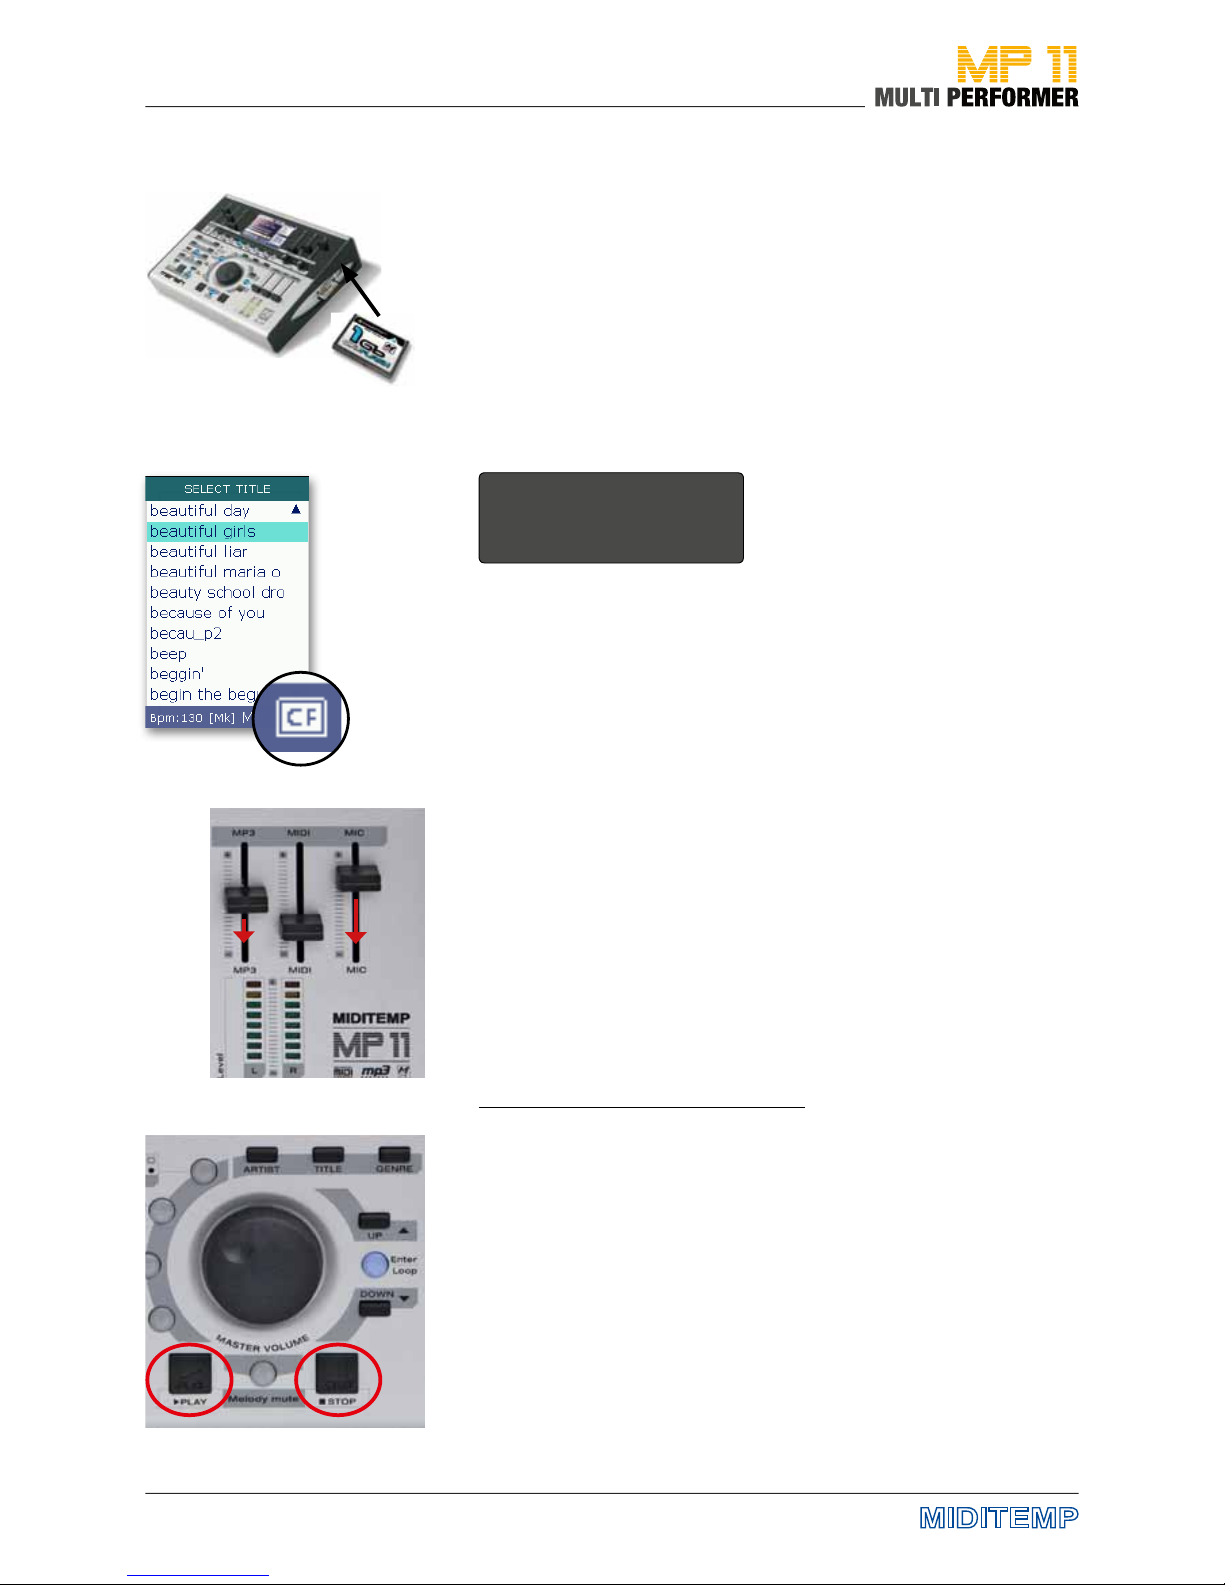
Since there is no storage medium connected to MP11 yet, the following message appears on display after a short time:
Memory not inserted
Insert CF or USB Pen
Press ENTER to continue
Put the CompactFlash card included in delivery into the CompactFlash slot
(the side with the label faces up) on the right side of the device, and press
ENTER.
If the message „Reading Memory - Do you want to create songs database“
appears on display, conrm the message by pressing ENTER again (-> songs
start loading).
Once MP11 has completed loading the data, a song list will appear on display (these are the les that are on the CompactFlash card).
You can now turn the DIAL knob or press the UP/DOWN buttons to select a
song from the song list (the song you choose gets shaded in color = selected).
CAUTION: Before playing the song, please set the 3 volume sliders for
MP3, MIDI and MIC to the lower one-third level - just to be on the safe
side.
You can now press PLAY to start the playback of the song you have selected.
Functions of the PLAY and STOP buttons
1 x PLAY > plays back the selected song
1 x STOP > pauses the current song
2 x STOP > stops the current song completely (and display the song list)
1 x STOP > 1 x PLAY > continues the playback of the current song
1 x PLAY > 1 x PLAY > song starts over after the rst start
Quick Start: First Use
11
> >
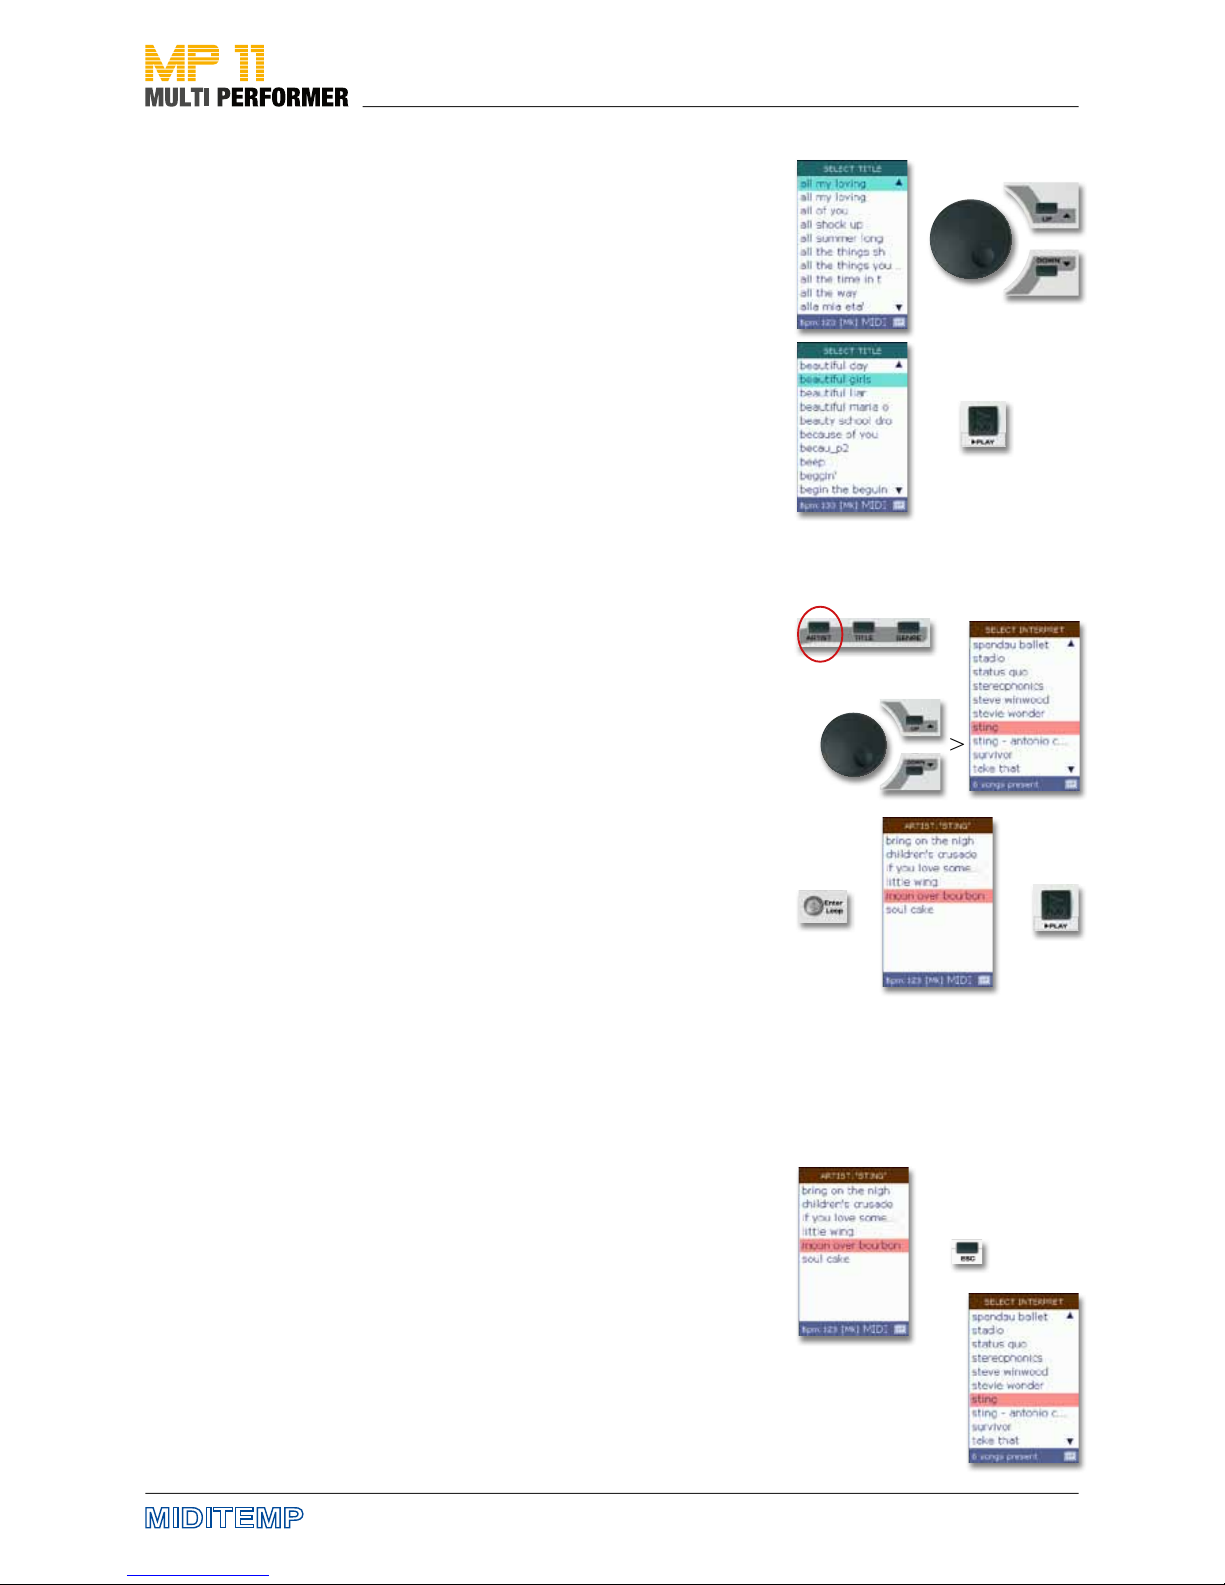
Quick Start: Selecting and playing songs
Selecting songs from TITLE list
After switching on MP11, the song list (SELECT TITLE) automatically appears
on display. Here, you can nd the list of all songs that are on the storage
medium. If the song list displays the complete name of the song (e.g. all my
loving) or just the lename (e.g. allmylov.mid) depends on whether you are
using MP11 Utility (see pages 14 - 17) or if you have decided to leave it out.
You can select the song of your choice (= shaded in color) using the DIAL or
by pressing the UP/DOWN buttons.
Play back the song you have selected by pressing PLAY.
Note: During the playback of a song you can have the song list displayed by
pressing the TITLE button.
Selecting songs via ARTIST list
If you are using MP11 Utility (see pages 58 - 61) and you have entered the
names of your songs‘ artists, you can select songs not only through the song
list, but also via the Artist list.
To do that, press rst the ARTIST button. This puts the list of artists on display
(SELECT ARTIST). Use the DIAL or press the UP/DOWN buttons to select the
artist of your choice (= shaded in color) and then press ENTER.
If you have several songs from the selected artist in your repertoire, all those
songs will be listed. You can now select the song of your choice (= shaded in
color) using the DIAL or by pressing the UP/DOWN buttons.
Press PLAY to start playing back the song.
Selecting songs via GENRE list
Selecting songs via the GENRE list (= musical genre) is carried out exactly in
the same way you select songs via the ARTIST list.
You only need to press the GENRE button at the beginning, instead of the
ARTIST button.
Using the ESC button to move back by one level
If you have opened an artist‘s list of songs, but you want to have the songs of
a dierent artist on display, you can simply press the ESC button and this will
take you one level back to ARTIST list.
>
>
>
>
>
> >
12
Pressing the MIXER button activates the Mixer-function (the button illuminates in blue). You can use this function e.g. if you want to have quick access
to the volume during the playback of MIDI les (via the internal source of
sound) and to set the volume using the 6 FADERS. The faders are divided up
into 6 groups: DRUMS • BASS • GUITAR • KEYBOARDS • WINDS • ORCHESTRA.
Note: You cannot access the Mixer function for MP3 les.
You have the possibility to create Playlists on MP11 (see page 29). If you have
already done this, and then briey press the PLAYLIST button one time, the
button illuminates in blue and the playlists you have created will appear on
the display. Holding down the PLAYLIST button for about 2 seconds takes
you directly to the GENERAL SETTINGS -> AUTO PLAYLIST menu display.
Note: There are no playlists by default on delivery.
If you briey press the SHORT button once, the button illuminates in blue
and the songs will be played back in short form (minimum setting = 1 minute). Holding down the SHORT button for about 2 seconds takes you directly
to the menu display, GENERAL SETTINGS -> SHORT TIME (see page 43). There
you can change the preset value (on delivery the default value is 1:00).
Note: If you have set MARKERS in your songs and then press the SHORT button
during the playback of those songs, MP11 rst considers the value that has been
set in GENERAL SETTINGS -> SHORT TIME, and then plays the current marker
part to the end.
If you press the WIZARD button once, the button illuminates in blue and
MP11 will use - while taking musical criteria into account - intelligent algorithms, in order to create decent segues between 2 songs or 2 MARKERS. The
segues, however, do not take place until a bar, a part of a song (e.g. refrain)
or a marker part is completed, or unless there are musically harmonious
parts available. The form, in which a segue is carried out, has to do directly
with the buttons IMMEDIATE and CROSSFADE.
Note: If you press the WIZARD button in the EDIT MODE (e.g. during post processing of a MIDI le), no algorithms will run, but the WSF (Wizard Sound Function)
will be activated (see page 38).
MIXER
PLAYLIST
> see page 28
SHORT
> see page 35
WIZARD
> see page 22
2s
2s
In detail: Upper Control Panel

13
Pressing the IMMEDIATE button once will activate it (illuminates in blue), and
will deactivate the CROSSFADE button. If you press the GO TO button during
the playback of a song, there will be a fast skip to the next MARKER or to the
next song
Pressing the CROSSFADE button one time briey will activate it , and will
deactivate the IMMEDIATE button. If during the playback of a song you press
the GO TO button, MP11 will slowly fade to the next MARKER or to the next
song, respectively.
Holding down the CROSSFADE button for about 2 seconds takes you directly
to the menu display, FADE CURVE. There you can change the current crossfade setting.
Note: IMMEDIATE and CROSSFADE cannot be active both at the same time.
The GO TO button is linked with the buttons, IMMEDIATE and CROSSFADE.
Pressing the GO TO button during the playback of a song while the IMMEDIATE button is activated (illuminates in blue) results in a fast skip to the next
MARKER or to the next song. If the CROSSFADE button is already activated,
pressing the GO TO button gets MP11 to slowly fade to the next MARKER or
to the next song.
Note: If the WIZARD is already activated (illuminates in blue) and you have put
MARKERS in your songs, the change - when you press the GO TO button - will
take place after the marker part that is currently playing is over. If the WIZARD
button is deactivated, the change will take place at the end of the bar that is
currently being played
Using this button you can add songs to a playlist, or prepare the next song
during the normal playback mode. Therefore, in the normal playback mode
for example, while a song is playing, press rst the TITLE button (= displays
the song list). Now select the song that you want (= the title gets shaded in
color) using the DIAL, and then press the NEXT SONG button. Now you can
see the song you have selected as NEXT SONG below on the display.
Note: If you are preparing the next song in the normal playback mode, the NEXT
SONG button might blink 3x in a row .The blinking of the button indicates that
the preparation of the next song could not be completed. In such cases, just give
it a few seconds and repeat the action. After that, the next song will be loaded as
usual and will appear below on the display.
Pressing the SMOOTH button once during the playback of a song activates
the so-called announcement mode (the button illuminates in blue) - this
reduces the volume of the song that is currently playing, and deactivates
the microphone eects. You can undo the SMOOTH function by pressing the
SMOOTH button one more time
Knob for the setting of the microphone eect, DELAY (echo).
Knob for the setting of the microphone eect, REVERB (reverberation).
IMMEDIATE
CROSSFADE
> see page 46
GOTO
NEXT SONG
SMOOTH
MIC delay
MIC reverb
2s
In detail: Upper Control Panel
14
SPEED -/+
This changes the tempo (pitch level does not change). Pressing both buttons
at the same time resets the tempo to its default value.
Note: With MP3 songs the change is displayed as +/- value (max. 20)
KEY -/+
This changes the key/pitch level. Pressing both buttons at the same time
resets the song to its original key.
Note: With MP3 songs, changing the key is not displayed as „Key“, but in +/half steps (+/- 12 semitone steps).
Important: Changes in SPEED and KEY relate only to the current playback.
Pressing the SAVE button xes the changes and stores them in the song. However, you have to save during the playback!
SOUND FX-1 / FX-2
You can allocate sound-eects to this button and play them by pressing the
button (also during the playback of a song).
If you briey press one of the two buttons once, the corresponding soundeect plays back completely. If you press and hold down the button, you can
have the corresponding sound-eect play for as long as you hold down the
button.
Important: The MP3 JINGLES have to be either on the USB ash drive or on the
CompactFlash card in the „sfx“ folder
HARMONIZER
Using this button you can activate or deactivate the Harmonizer or the
Melody-Tracker eect.
CONTROL
Use this button to go directly to the HARMONIZER/MELODY-TRACKER EFFECT SETTINGS menu display.
BRIDGE
This button allows you to set an MP3 le, and have the le play back e.g. during breaks. Holding down the BRIDGE button for about 2 seconds takes you
directly to the SELECT BRIDGE menu display. If you press the BRIDGE button
during the playback of a bridge-song, the song will fade out.
Important: The BRIDGE MP3s have to be either on the USB ash drive or on the
CompactFlash card in the „bridge“ folder
MIXER
rev erbdel ay
KEY BOAR DS
ORC HEST RA
WIN DS
DRU MS BASS GUITAR
MIC
IMM EDIA TE
WIZ ARD
GO TO
CRO SS FADE
SHO RT SMO OTHPLAY LIST
NEX T SO NG
MP3
son gs
UP
DOW N
Nex t
SOU ND
FX- 1
MIC
KEY
SPE ED
Cur rent
Voic e FX
BRI DGE
ART IST TIT LE GENRE
SON G
FX- 2
HAR MONIZER Co ntrol
MP3 MIDI
MIC
Marker
Bar
MP3 MIDI
Ent er
Loo p
2s
In detail: Lower Control Panel
PLAYLIST
> Details ab Seite XX
SPEED -/+
KEY -/+
SOUND FX-1 / FX-2
see page 47
HARMONIZER
see page 47
CONTROL
BRIDGE
see page 47

15
VOICE FX
Press this button several times and you can step through various vocal effects: Woman - Megaphone - Monster - Child - No Eect.
ESC
Pressing this button once or several times (depending on the menu window
you have opened or which window you are editing parameters in) allows
you to cancel the step and go back to the main display.
MENU
Press this button to open the main menu window.
EDIT
If you briey press this button once, you can open the Edit window (e.g. EDIT
TRACKS for MIDI les). If a song e.g. in the track list is selected, and you hold
down the EDIT button for about 2 seconds, a SONG INFO WINDOW for the
selected song will be displayed (however, this function is available only if the
selected song is not being played back).
SAVE
If you briey press this button once, you can open the Edit window (e.g.
EDIT TRACKS for MIDI les). If a song is selected, and you hold down the EDIT
button for about 2 seconds, a SONG INFO WINDOW for the selected song will
be displayed (however, this function is available only if the selected song is
not being played back)
Volume
Three faders to control the volume of MP3, MIDI und MIC.
The VU-Meter „LEVEL” shows the level of the output signal.
2s
In detail: Lower Control Panel
VOICE FX
ESC
MENU
EDIT
SAVE
Volume / VU-Meter
MIXER
rev erbdel ay
KEY BOAR DS
ORC HEST RA
WIN DS
DRU MS BASS GUITAR
MIC
IMM EDIA TE
WIZ ARD
GO TO
CRO SS FADE
SHO RT SMO OTHPLAY LIST
NEX T SO NG
MP3
son gs
UP
DOW N
Nex t
SOU ND
FX- 1
MIC
KEY
SPE ED
Cur rent
Voic e FX
BRI DGE
ART IST TIT LE GENRE
SON G
FX- 2
HAR MONIZER Co ntrol
MP3 MIDI
MIC
Marker
Bar
MP3 MIDI
Ent er
Loo p
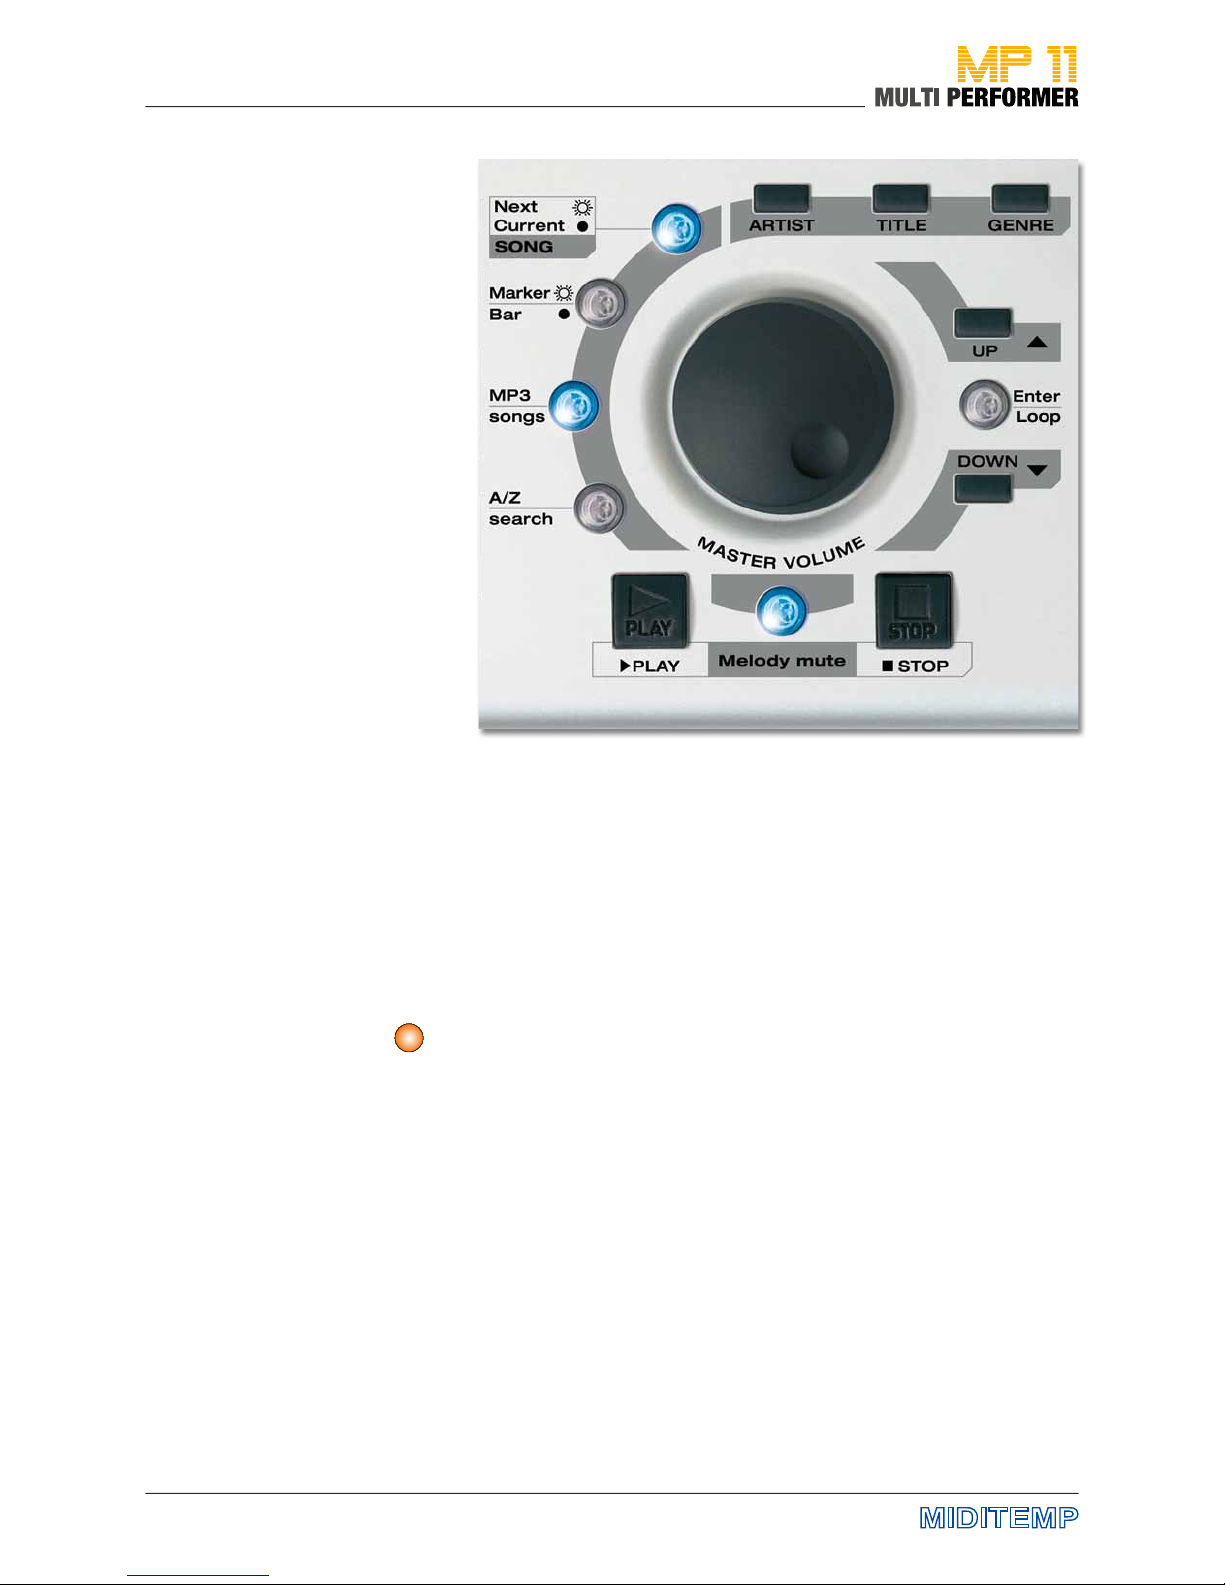
16
In detail: The Central Control Panel
• Moving the cursor
• Editing the selected parameters
• Volume control (depending on the menu you have activated).
If you press these buttons, you can list songs by Artist, Title (or lename) or
Genre categories. Artist and Genre song lists are available only if you have
added their corresponding data to every song using the MP11 Utility Software.
If there are 2 connected storage media (USB stick and CompactFlash card)
and you hold down the TITLE button for about 2 seconds, a window will
appear, in which you can select the storage medium of your choice.
.
MASTER VOLUME
Dial knob
ARTIST - TITLE - GENRE
2s
17
In detail: The Central Control Panel
UP / DOWN
Using these buttons you can move the cursor (= colored bars) up or down in
dierent areas - such as playlists, menus ...
Enter / Loop
You can conrm your current selection or edits using this button.
Open the MARKER menu - during a song - and while this is on display press
the ENTER button; the marker-part being played back will repeat continuously until the so-called loop-function is undone by pressing the ENTER
button one more time.
PLAY
This starts the playback.
Pressing the button again starts the song from the beginning.
STOP
Discontinues the playback of a song.
Pressing 1 x = Pause
(Press PLAY to restart the playback from the same position).
Pressing 2 x = Stop
Melody mute
There are 3 functions allocated to this button (selectable by pressing the
button in sequence):
• Mute = no melody playback (button is illuminated)
• Semi-mute = low volume melody playback (button blinks)
• Normal = melody playback (button is not illuminated)
Holding down this button for about 2 seconds takes you directly to the MIDI
SETTINGS -> MELODY TRACK menu display.
A/Z search
This activates the alphabetical search in the lists of Artist, Title or Genre.
You can use the DIAL knob to select letters.
MP3 songs
If this button is activated, only MP3 les in the lists of Artist, Title or Genre
will be played.
Marker / Bar (Not available for MP3 songs).
Button is illuminated = The song being played contains MARKERS. Pressing the
button opens the MARKER MENU.
Button is not illuminated = There are NO MARKERS.
Pressing the button opens the BARS MENU.
Next / Current SONG
Button is illuminated = The BPM, KEY and MARKER/BAR data (on display)
refer to the next, loaded song.
Button is not illuminated = the BPM, KEY and MARKER/BAR data refer to the
song that is currently being played back.
You can toggle between the two displays by pressing the button (as soon as
a next song has been loaded).
UP / DOWN
Enter / Loop
PLAY
STOP
Melody mute
A/Z search
> Details ab S. 18
MP3 songs
Marker / Bar
Next / Current SONG
2s
18
Selecting and Playing Songs
>
>
>
>
>
>
>
>
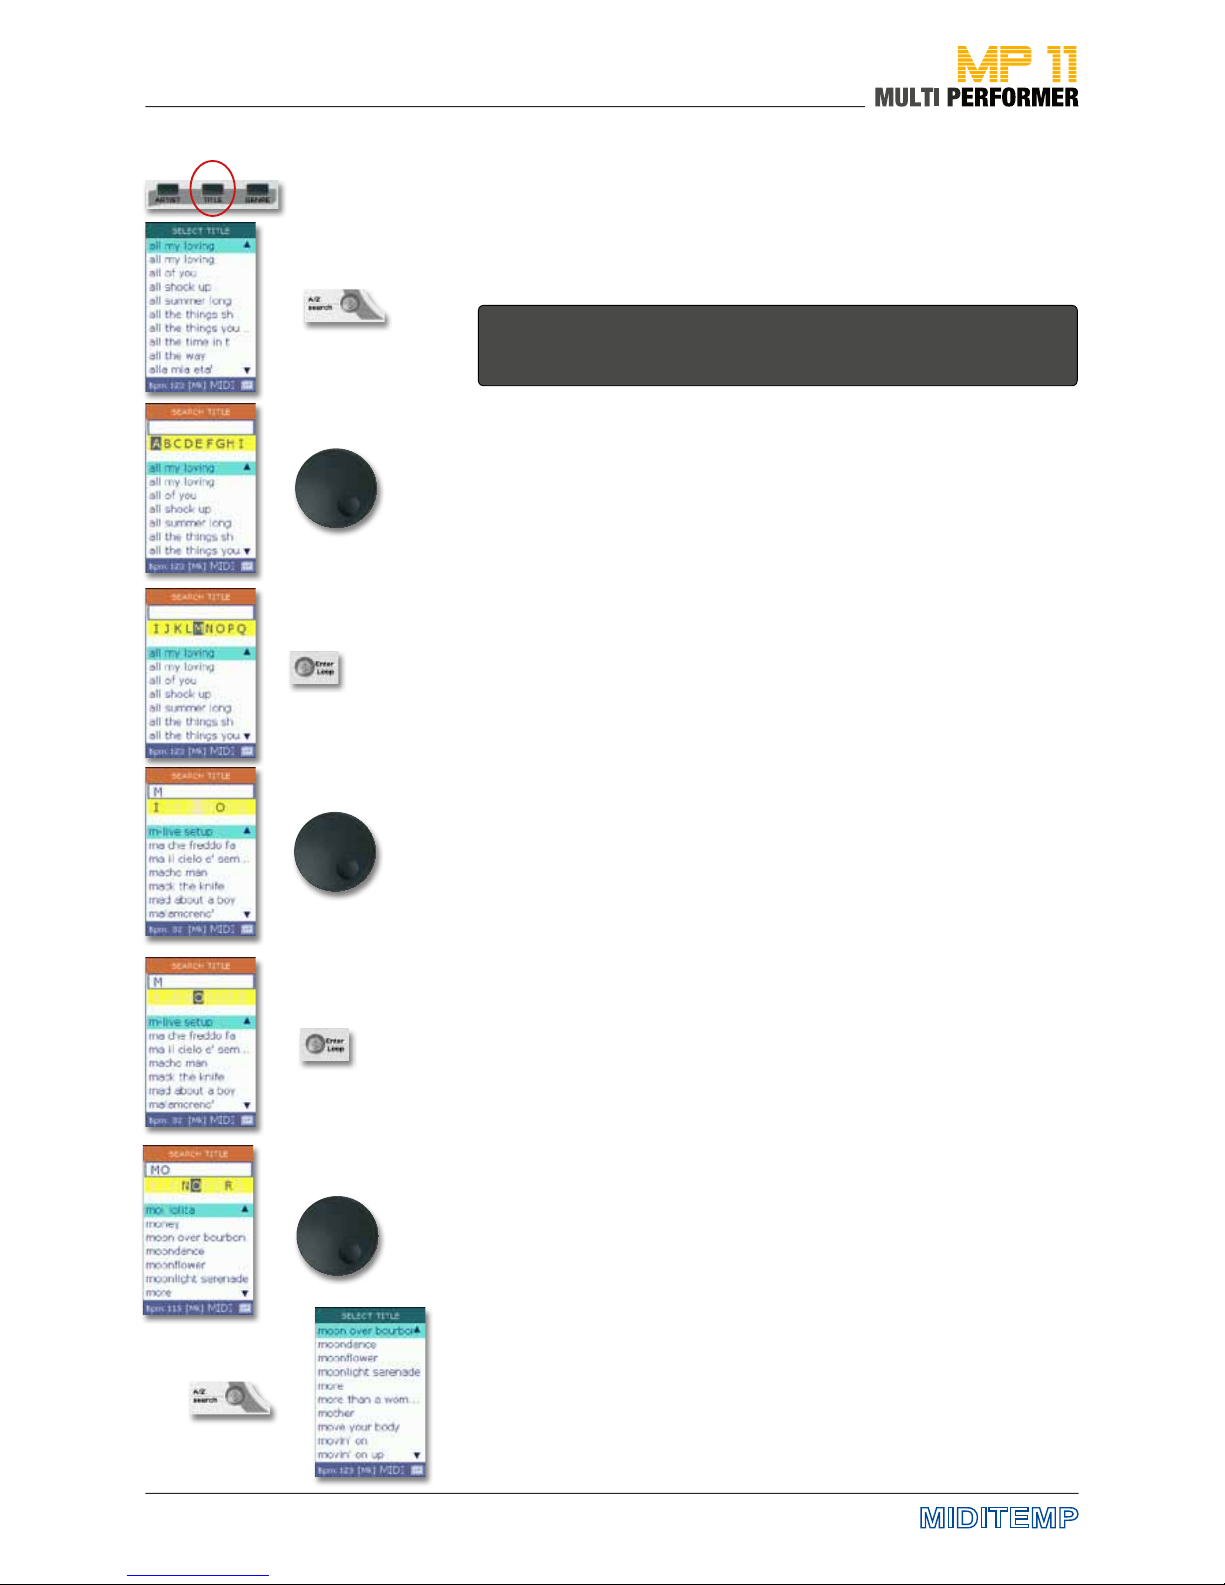
Browsing for a song alphabetically
To select a song in a fast and easy way, you can make use of the alphabetical
search. You can use this function to not only nd song titles, but also to nd
artists and genre. However, this is again subject to using MP11 Utility (see
page 58) and having integrated the corresponding song information in the
les.
Start by pressing the TITLE button (-> displays the title list) followed by the
A/Z search button. This opens the FIND TITLE window. Use the DIAL to nd
the rst letter of the song you are looking for (in our example „M“) in the line
with yellow background.
When you browse the letters, you will nd some of them displayed in GRAY. This
is due to the following reason: As soon as MP11 is switched on and the storage
medium is connected, the device starts reading the data stored on the CompactFlash card or the USB ash drive. In the process, sometimes you can see the
following message: „Reading Memory - Do you want to create songs database?“
You should conrm this message using ENTER, because, this will completely
update the data on the storage medium. And in the course of that, MP11 reads,
among other things, the names of titles. Then, if the songs do not contain for example the letter „K“ in the name of their title, that letter will be displayed in gray
in the line with yellow background on the FIND TITLE window.
Let‘s continue with our example: After selecting the rst letter (in our case
„M“) in the yellow line using the DIAL knob, press the ENTER button (this
puts „M“ in the white textbox above the yellow line). Use the DIAL again to
select the song’s second letter (in our example the letter „O“).
Here, you will again see some letters displayed in GRAY, because MP11
knows all the existing second letters of every title that starts with the letter
„M“.
Once you have selected the „O“, continue by pressing ENTER. This will add
the selected letter to the white textbox above the yellow line as well (in our
example „MO“ has been entered in the white textbox).
You can now continue selecting more letters as described above (-> choose
the next letter using the DIAL -> press ENTER -> next letter...). But this is not
really necessary. Because, after selecting the second letter, if you close the
FIND TITLE window by pressing the A/Z search button, the title list will be
displayed. If there are several songs in the title list containing the rst letters
that were found, always the rst song containing those rst letters will be
shaded in color after the search pattern is completed.
If the song displayed in colored background is the song you are looking for,
you can start playing it back as usual by pressing PLAY.
Otherwise, simply use the DIAL knob or the UP/DOWN buttons to select a
dierent song from the list that has the same rst letters, and press the PLAY
button to start its playback.
Note: You can browse for songs alphabetically in the ARTIST or GENRE LISTS in
exactly the same way. You only need to start the process by pressing the corresponding button (i.e. pressing either the ARTIST or GENRE button).
The following is an example of browsing alphabetically for a song with
MOON (the images on the left graphically demonstrate the example’s
process):
19
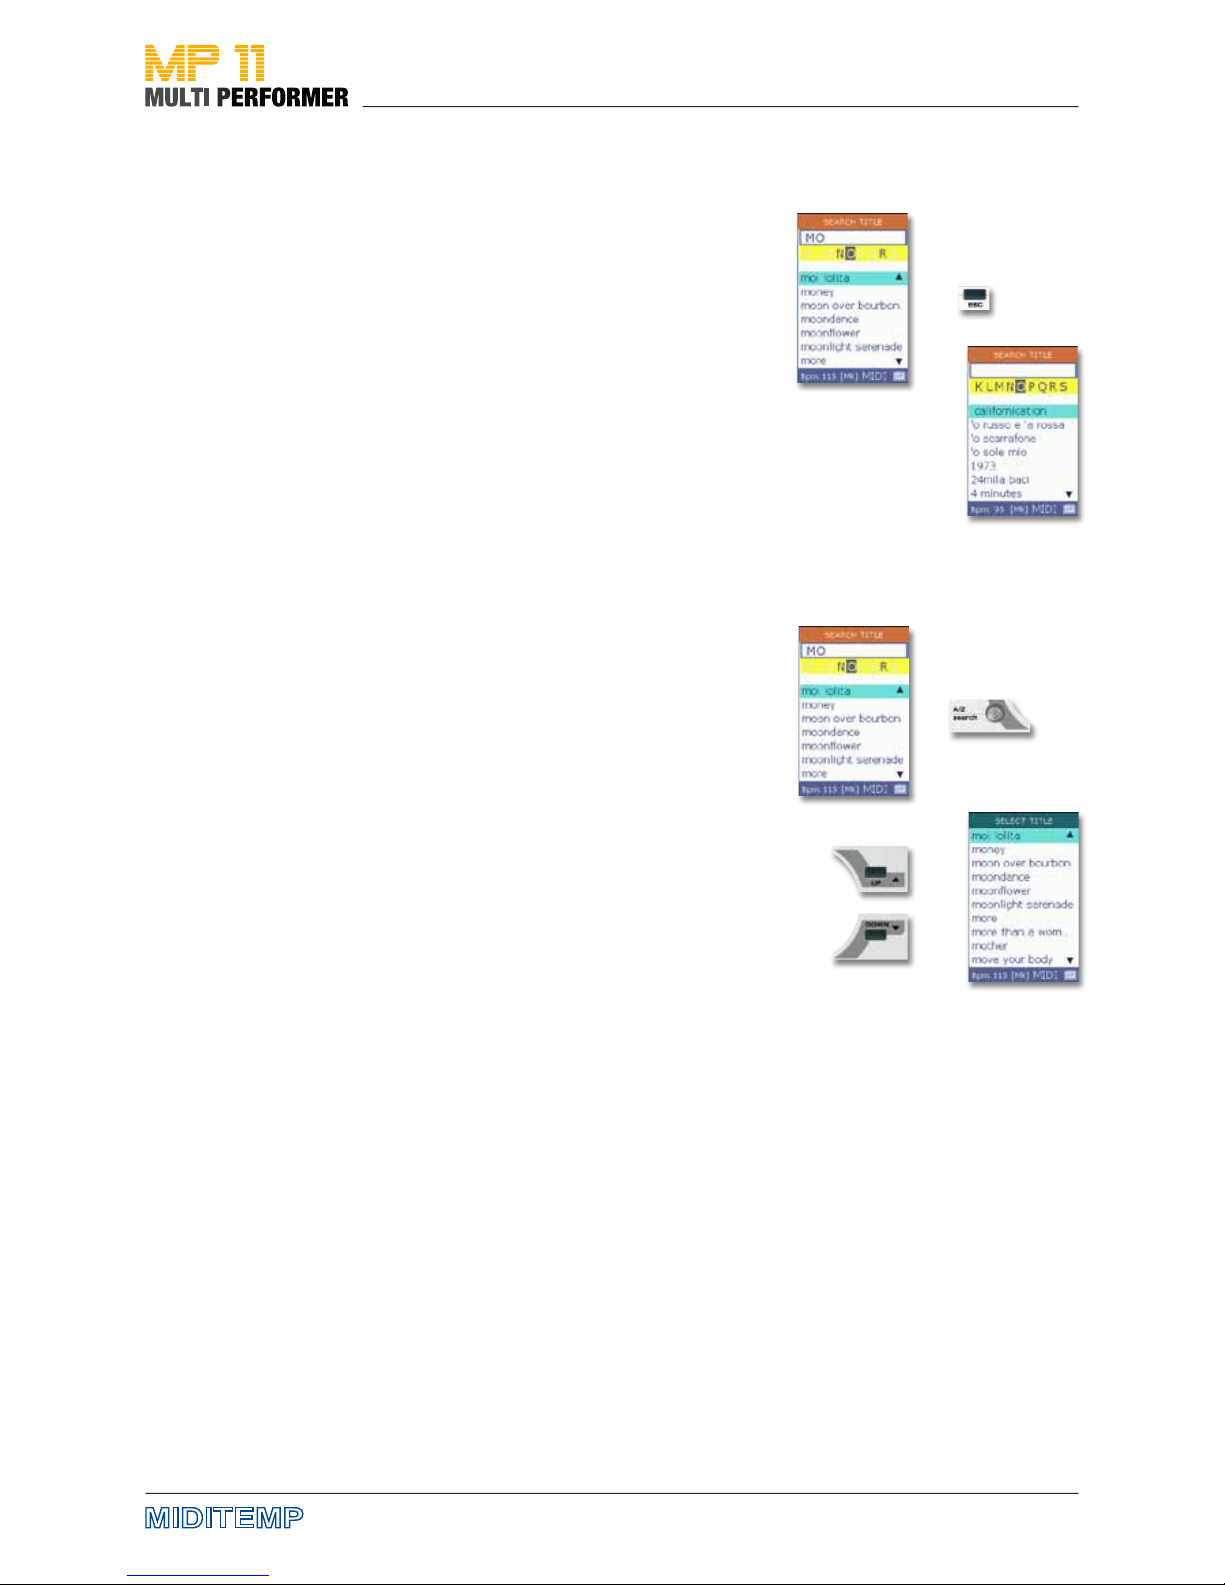
Resetting the alphabetical search
Closing the alphabetical search
> >
>
>
>
>
Resetting the alphabetical search
If you happen to make a typing error during the search, simply press the ESC
button. This deletes the letters already entered in the white textbox above
the yellow line, and you can restart the search.
Selecting and Playing Songs
Closing the alphabetical search
You can actually decide if you want to nd only the initial letters of a song, or
several letters.
As soon as there is one letter in the white textbox above the yellow line, you
can close the search by pressing the A/Z search button. After that, the title
list will be put on display.
If the list has several songs containing the letter that was found, the rst
song of that list will be automatically shaded in color. You can select the
song of your choice by pressing the UP/DOWN buttons.
20
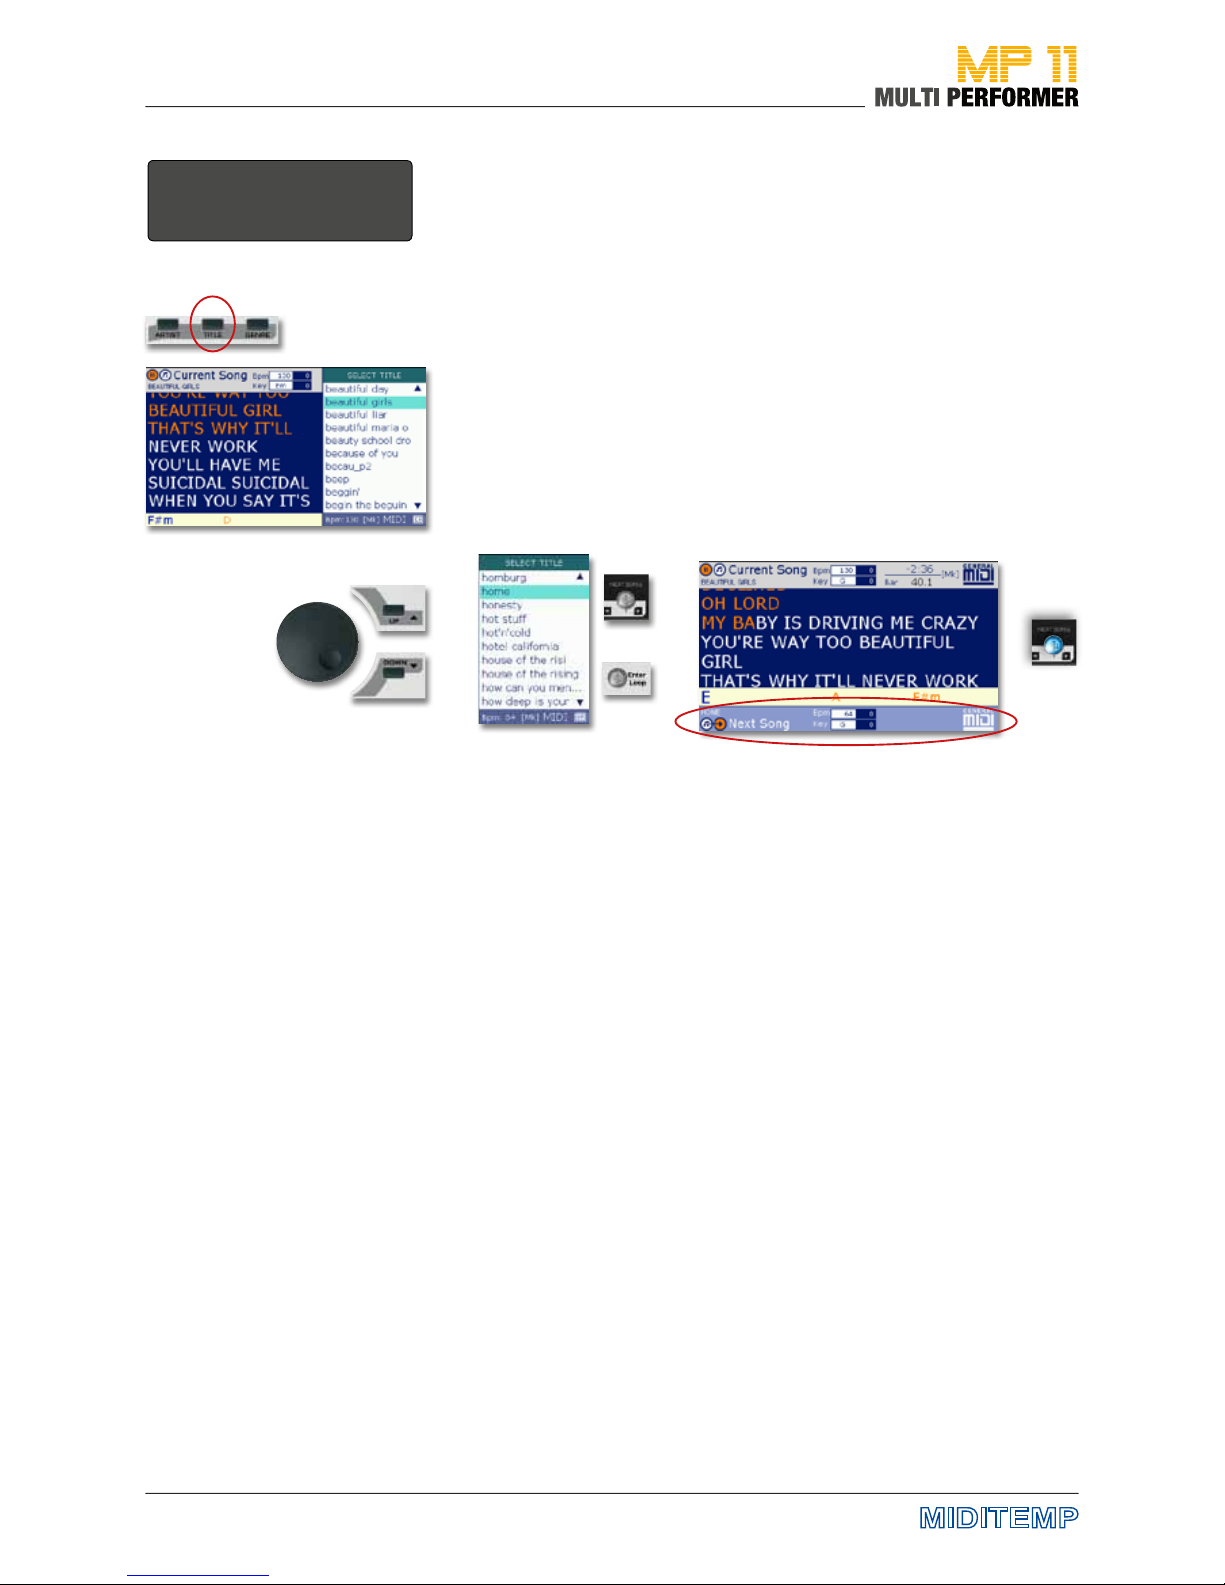
Preparing the next song
Press the TITLE button during the playback of a song to display the title list.
Then use the DIAL knob or the UP/DOWN buttons to select the next song (=
shaded in color).
Continue by pressing either the NEXT SONG or ENTER button. You have
completed preparing the next song - the song name, BPM and KEY of this
song appear on the lower part of the display. From here on, the NEXT SONG
button also illuminates in blue (= next song is prepared).
You can now use the GO TO button, during the playback of a song, to skip to
the song that you have just prepared. This puts also other functions at your
disposal (see pags 20).
>
>
>
>
Example, C ur rent Song =
Beautiful Girls. Preparing the
Next Song = Home
oder
>
>
NEXT SONG: Preparing the next song
21
Changing between the current
song and the next
Displaying song markers
Changing the display between the current song and the next
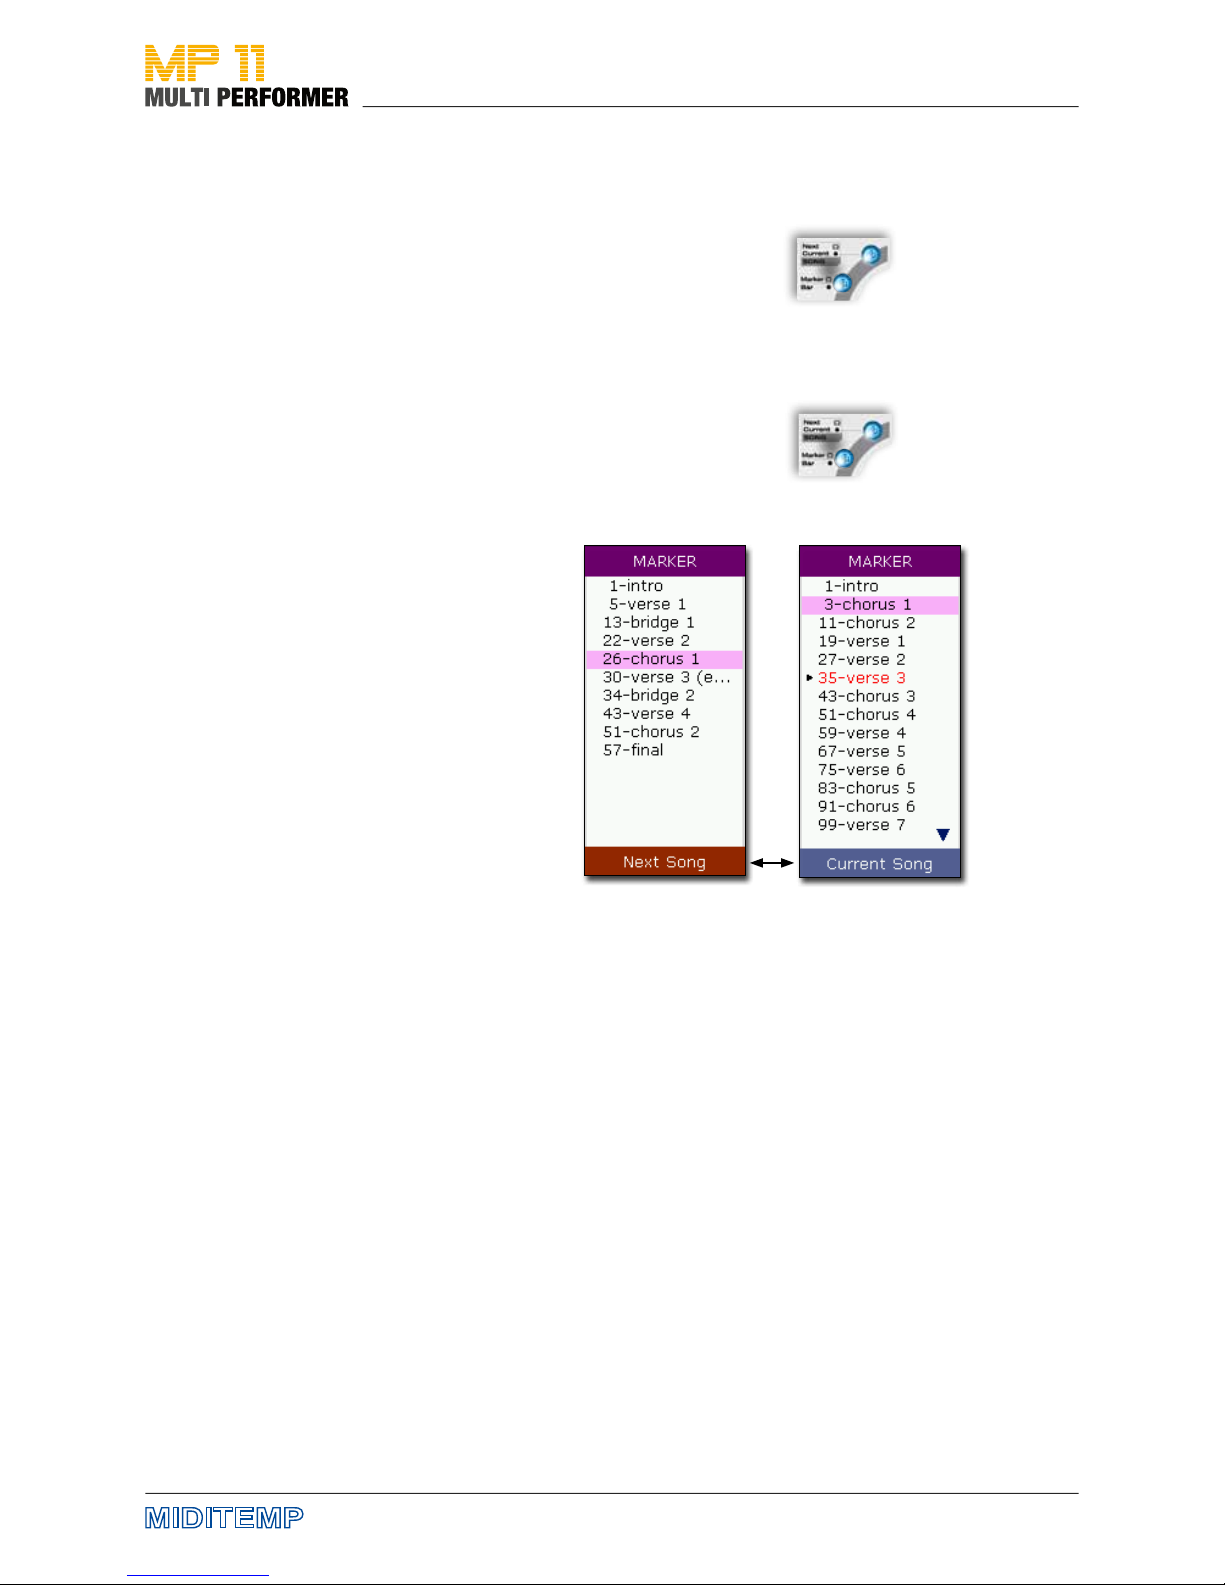
Pressing the NEXT/CURRENT SONG button in sequence allows you to toggle
between the current song and the song you have prepared; you can also edit
e.g. the BPM and key during the playback.
If the button is illuminated and you press the KEY -/+ or SPEED -/+ buttons,
the changes you make relate to the song that you have prepared. If the button is not illuminated, you can edit the key and BPM of the current song.
Displaying song markers
The buttons, NEXT/CURRENT SONG and MARKER/BAR illuminating at the
same time indicates that the song you have prepared contains MARKERS. If
you press the MARKER/BAR button while the NEXT/CURRENT SONG button
illuminates, the MARKER window will open and the markers of the song you
have prepared will be displayed.
Note: You cannot access this function for MP3 les.
NEXT SONG: Preparing the next song
22
Crossfading from the Current Song to the Next
Pressing the GO TO button during the playback of a song allows you to skip
to the next song (provided that you have already prepared the next song see page 20).
The way you can carry out this skip to the next song depends on whether
the following buttons are activated or deactivated: IMMEDIATE, CROSSFADE
and WIZARD (see page 13 and the following descriptions).
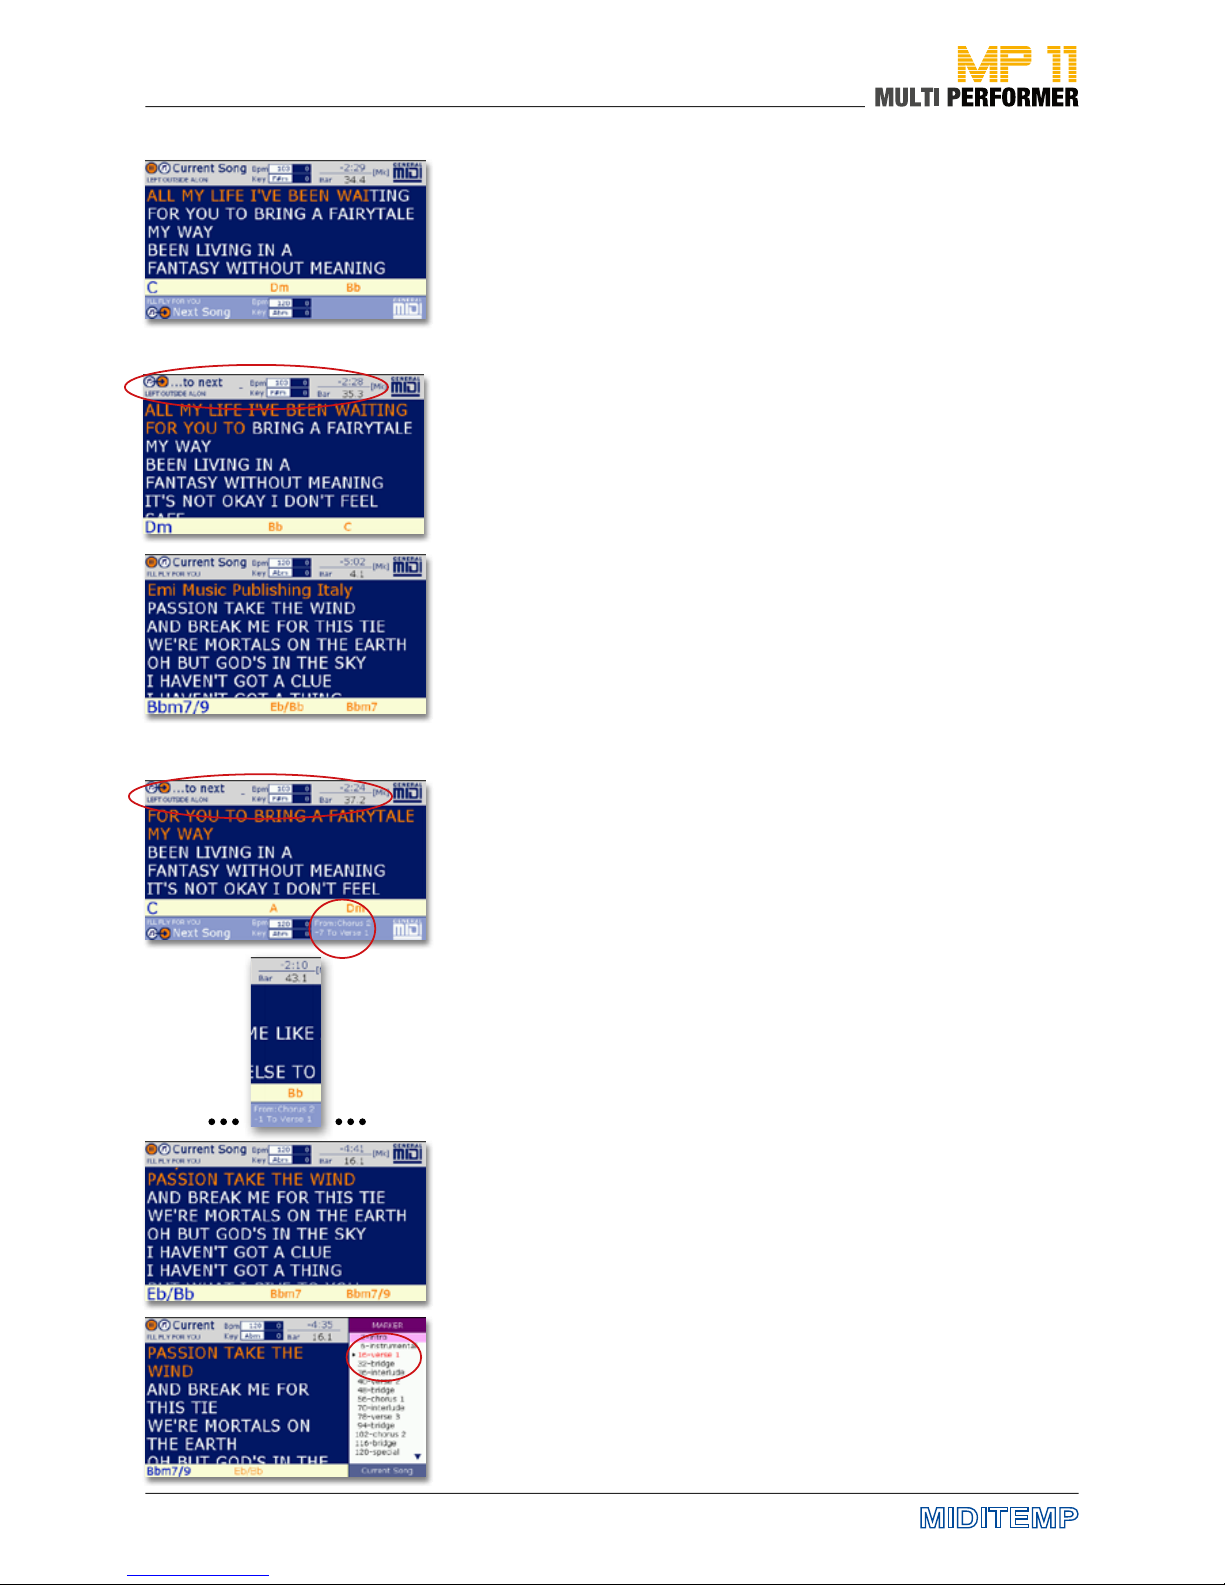
WIZARD = deactivated (button is not illuminated)
If the WIZARD is deactivated and you press the GO TO button during the
playback of a song, the change, to the already prepared next song, takes
place at the end of the current bar.
WIZARD = activated (button is illuminated)
If the WIZARD button is activated and there are MARKERS integrated in the
song being played back (available only for MIDI les, not MP3s), pressing the
GO TO button prompts the change (over to the already prepared next song)
at the end of the marker-part currently playing (and at the end of the bar
being played if the song does not have a marker).
If the next song that you have already prepared contains MARKERS as well,
it might well be that pressing the GO TO button does not cause a jump to
the beginning of the next song, but results in a skip to one of the MARKERS
integrated in that song. Because when the WIZARD is activated, the system
takes musical criteria into account and applies intelligent algorithms to create decent segues for skipping from one song to the next (only when there
are markers). The display also shows the number of bars remaining until the
change.
The 4 sample images show you that the song „Left outside alone“ is playing.
The segue will take place at the „Chorus2“ marker of the current song and
the „Verse 1“ marker of the prepared song „I‘ll y for you“ (the rst two markers in the prepared song will be skipped).
GoTo: Crossfading from the Current Song to the Next
23
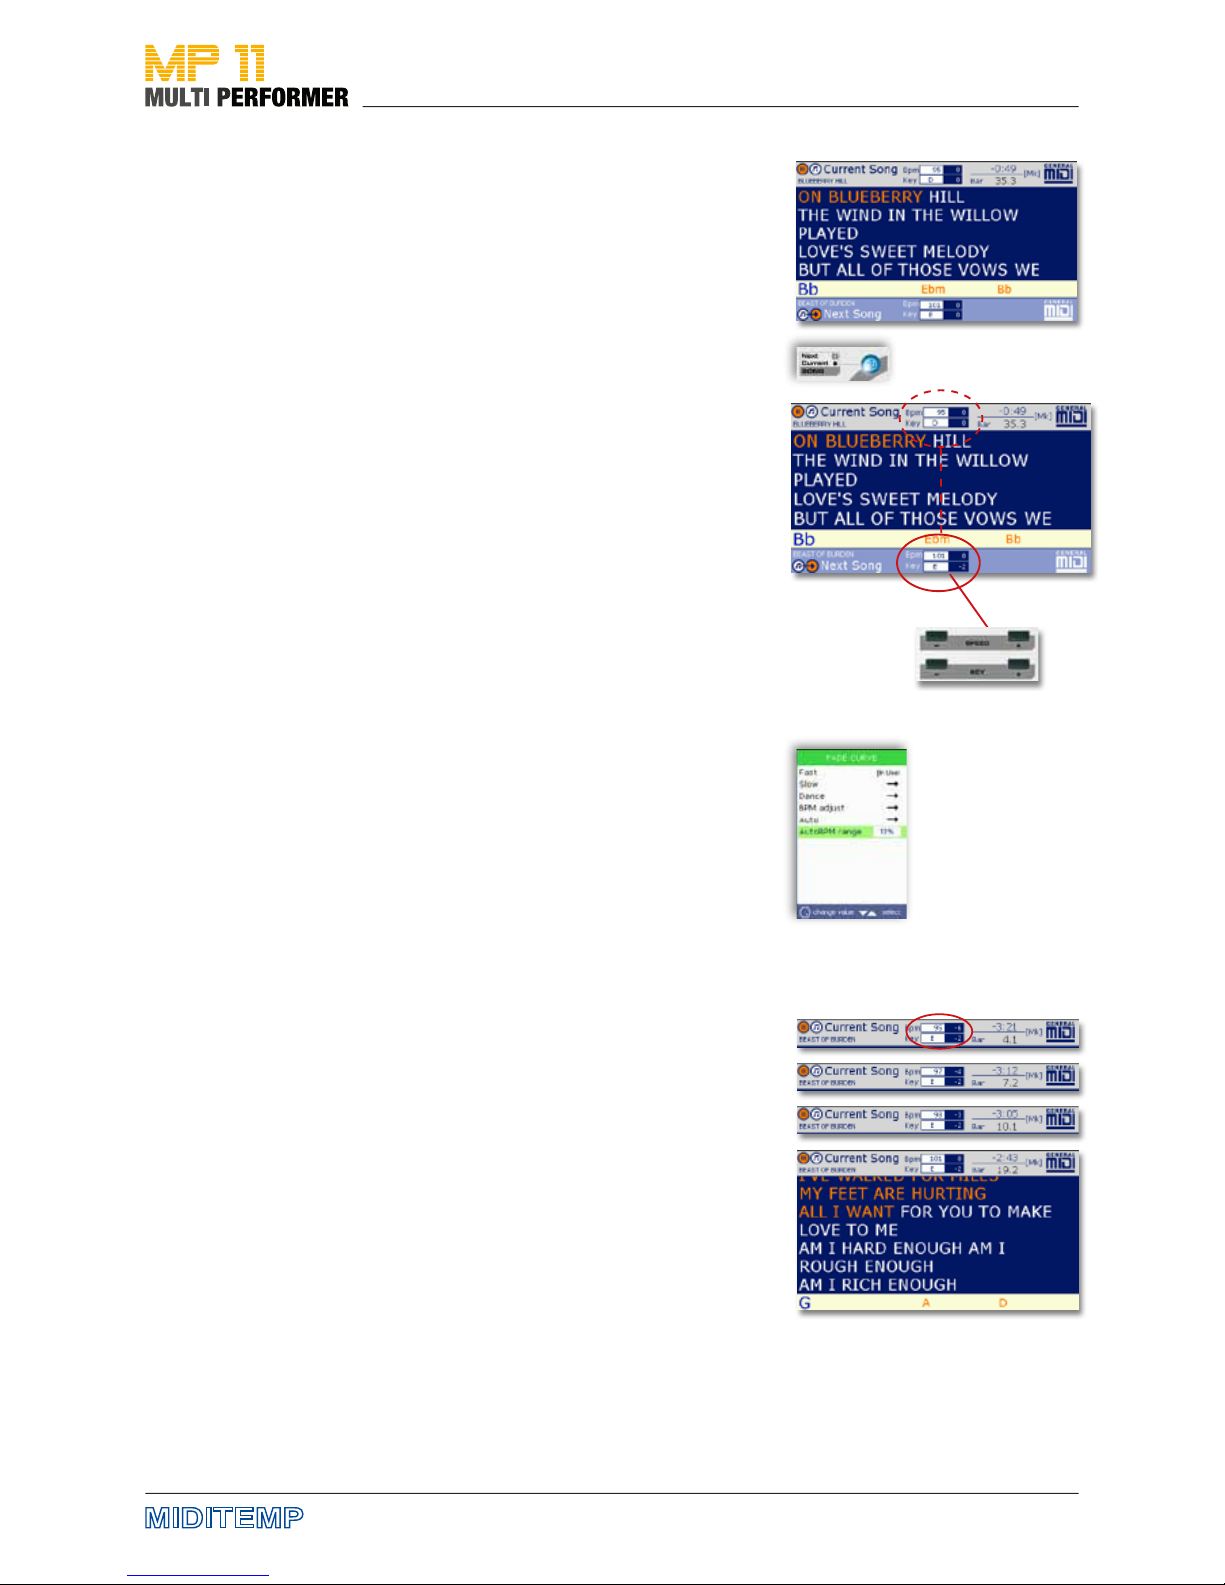
Manual adjustment
As already described on page 21, using the NEXT/CURRENT SONG button
you can dene the song to which your adjustments will apply regarding the
speed and key (button is not illuminated = current song / button is illuminated = next song).
In the example you can see that the song being played is in the „D“ key and
the song already prepared in the key „E“. If you want to adapt the key of the
prepared song to the key of the current song, check rst if the NEXT/CURRENT SONG button is illuminated (= pending adjustments relate to the next
song). If the button is deactivated, press once to activate it.
Then, press the KEY button 2x to transpose the next song by -2 semitones,
thus adapting the key to the current song. The KEY eld of the next song
does still show the „E“ key, but there is a -2 in the eld to the right of it.
If you want to adjust the speed of the prepared song as well, press the SPEED
button (SPEED -/+) to set the BPM of your choice. Pressing the GO TO button
will then allow you to change as usual between the current song and the
song you have prepared.
Automatic adjustment
If you want to use the crossfade function when changing from the current
song to the song you have prepared, before pressing the GO TO button
check if the CROSSFADE button is activated (which means the IMMEDIATE
button is deactivated).
If that is the case, MP11 will be able to adjust the speed also automatically.
The only condition is to make sure the parameter, AutoBPM range, in the
FADE CURVE menu has been set in advance (see page 44). You can open this
menu e.g. by holding down the CROSSFADE button for about 2 seconds.
Once you make that setting, MP11 will increase or decrease the BPM value
when crossfading from the current song to the next (until it reaches the
actual tempo).
Note: MP11 adjusts the speed automatically only if the dierence in BPM values
of the two songs is not TOO extreme. If the dierence in speed is too much, MP11
will not get slower, but crossfade immediately to the actual tempo.
Example: The original „E“ key was rst transposed manually by -2 semitones.
In addition, the CROSSFADE button was activated, and the GO TO button was
pressed. Since the previous song had a BPM value of 95 and the song - that
was skipped to - had a BPM value of 101, MP11 will start the speed when
crossfading to the next song at a BPM value of 95 (i.e. 6 BPMs slower). Then,
MP11 will increase the BPM slowly for the song that is being played until the
actual BPM value is reached (i.e. 101 BPM). In the example on the side you
can see that this will be at 19.2 BAR.
GoTo: Adjusting the SPEED and KEY
 Loading...