

Page 1

X mini MIDI KEYBOARD
USER’S MANUAL
VERSION 1.0
Page 2

Page 3

1
CATALOG
1. Introduction
2. Cautions
4. Features
5. Operations
5.1 SHIFT
5.2 Sub-functions under edit mode
5.3 Setting up Knobs and Buttons
5.4 Examples
5.5 Capacitive Touch Sensors
5.6 Reset to factory settings
Appendix 1: Specifications
Appendix 2: CC Controller Parameters
......................................................................................................
............................................................................................................
.............................................................................................................
........................................................................................................
.........................................................................................................
................................................................................................
...................................................................
.......................................................................
................................................................................
.........................................................
.............................................................
............................................................
2
2
3
3
3
3
4
4
6
6
7
7
Page 4

2
1. Introduction
Thank you for buying X mini MIDI keyboard. X mini MIDI keyboard has a lot of
features and is easy to use. With USB connection, you can enjoy making music whenever you
want to. This user handbook can help you quickly understand the features and the operations of
X mini MIDI keyboard. Please keep this user handbook carefully for future references.
Please pay attentions to the below in order to avoid any damage to the unit and any harm to
yourself
1. Avoid placing or using the unit in wet environment, e.g. bathroom, swimming pool, etc.
2. Avoid placing or using the unit in high temperature, e.g. under the sun, close to heatsink or
heater.
3. Unplug the external power supply when not in use.
4.
Beware of metal fragmemts dropping into the unit which could short the circuit.
5. Only professional repairmans are allowed to disassemble the unit.
6. Avoid keeping the unit powered on for a long time.
7. Children should not use the unit without adult ’s guidance.
8. Avoid using the unit close to radio sets, speakers, TV sets and other EMI sensitive devices.
9. To clean the unit, use a lightly soaked cloth and keep the unit unplugged. Never use
gasoline, alcohol and other solvent to clean the unit.
10. Avoid using the unit during a thunderstorm.
1. USB: Connecting PC and other USB devices for data transmission and power supply
2. MIDI OUT: Stand MIDI output for connecting other MIDI devices.
3. SUSTAIN: Connecting a standard switching sustain pedal
2. Cautions
3. Connections
Page 5

3
4. Features
1. X mini MIDI keyboards include X2 mini, X3 mini, X4 mini and X6 mini which have 25, 37, 49
and 61 weighted keys respectively.
2. X mini MIDI keyboard is hot plug supported. No driver is needed. It is powered by USB
and no external power supply is needed.
3. Capactive touch sensors to control PITCH and MODULATION.
4. Featured with SHIFT for customised functions and OCTAVE/TRANSPOSE.
5. 4 customisable knobs; Default setting: T1 (Volume), T2 (Pan), T3 (Expression Controller), T4
(Reverb).
6. 6 customisable buttons; Default set up for playback.
7. 1 MIDI out, 1 SUSTAIN pedal, 1 USB
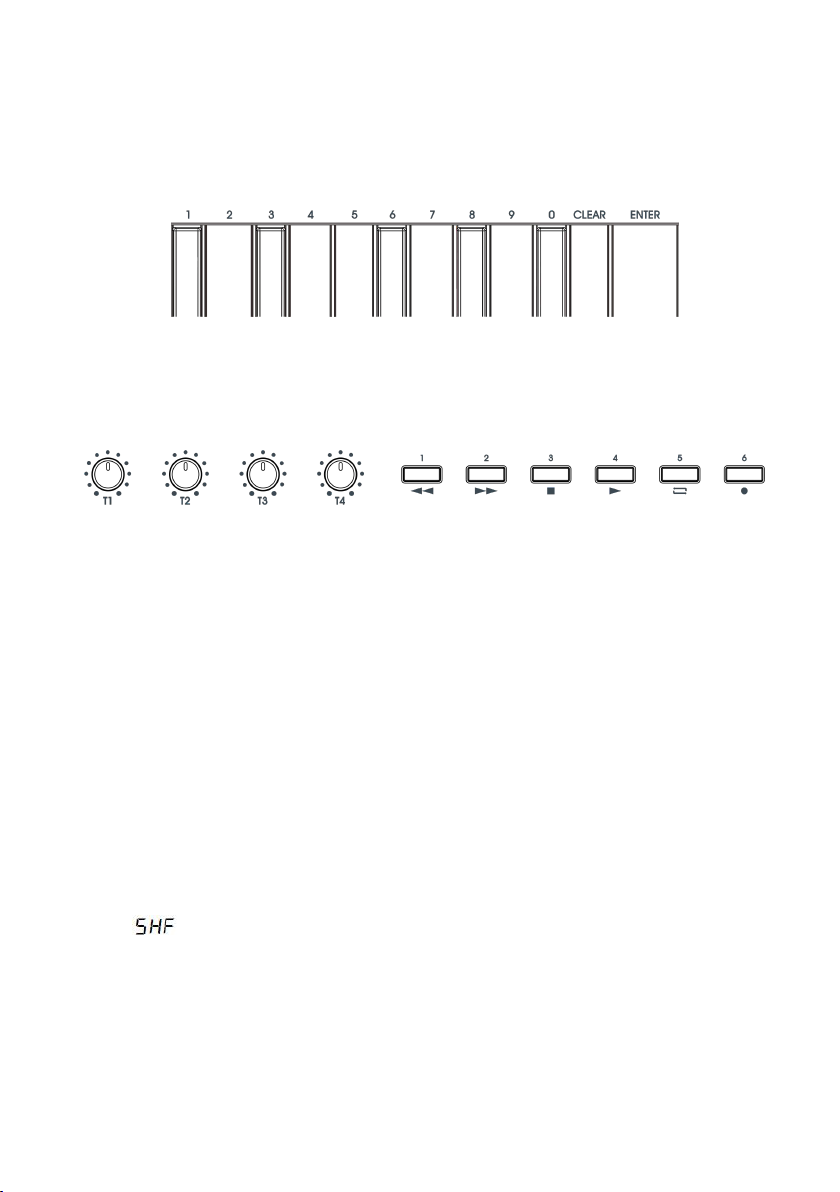
5.1 SHIFT
When switched on, the keyboard is in performing mode and each key functions as labelled
above itself. Pressing and holding the SHIFT button, the keyboard will shift to edit mode (LCD
display shows “ ”). Then select your function and press ENTER. Release SHIFT and the
keyboard will be back in performing mode.
(1) VEL: Key force sensitivity curve (1 - 3)
(2) CTRL CC: Controller CC setting (0 - 127)
(3) CTRL CHL: Controller channel setting (0 - 16)
(4) BANK MSB: Sound library tens adjustment (0 - 127)
(5) BANK MSB: Sound library digits adjustment (0 - 127)
5. Operations
5.2 Sub-functions under edit mode
5.2.1 Other key sub-functions (Setting will be memorised after setup)
Page 6
4
N.B. See the Appendix 2 for CTRL CC functions
When CTRL CHL is set to 0, the controller is set to be full channel. The controller channel will
follow the keyboard channel.
5.2.2 NUMERIC KEYPAD, CANCEL and ENTER
For numeric input, cancel and enter when setting other sub-functions.
5.3 Setting up Knobs and Buttons
5.3.1Default CC functions of knobs
T1: Volume
T2: Pan
T3: Expression Controller
T4: Reverb
Knob functions can be customised in SHIFT edit mode.
Factory setting of the buttions are for MMC playback. You can swtich between MMC and CC
mode by pressing SHIFT. In MMC mode, the backlight colour is red. In CC mode, the
backlight colour is blue and you can customise the button functions in SHIFT edit mode.
5.4 Examples
5.4.1 Set the piano force sensitivity curve to ‘2’
1. Press and hold SHIFT and you will be in sub-function edit mode (LCD display shows
“ ”).
2. Press the key labelled “VEL” and the display shows the current piano force sensitivity curve
setting, The default factory setting is “1”.
3. Press “2” on the keypad and press “ENTER”.
4. Release SHIFT and back in performing mode. The display shows the current channel.
(The piano force is set to “2” now)
5.3.2 Buttons (1 - 6)
Page 7

5
5.4.2 Set up knob T1 for CC91 (REVERB control)
1. Press and hold SHIFT and you will be in sub-function edit mode (LCD display shows
“ ”).
2. Press the key labelled “CTRL CC ” and the display shows the CC value of the active
controller.
3. Turn the knob “T1” to make it active. The default value of T1, 7, is shown on the display.
1. Input “91” with the keypad and press “ENTER”. The display shows “┄” now.
2. Release SHIFT and back in performing mode. The display shows the current channel. (T1
is now set up for CC91 (Reverb control)
5.4.3 Set up knob T1 for controlling channel 10
1. Press and hold SHIFT and you will be in sub-function edit mode (LCD display shows
“ ”).
2. Press the key labelled “CTRL CHL” and the display shows the channel number of the active
controller.
3. Turn the knob “T1” to make it active. The default channel of T1, 1, is shown on the display.
4. Input “10” with the keypad and press “ENTER”. The display shows “┄” now.
5. Release SHIFT and back in performing mode. The display shows the current channel. (T1 is
now set up for controlling channel 1)
5.4.4 Set Sound library program as “123”
1. Press and hold SHIFT and you will be in sub-function edit mode (LCD display shows
“ ”).
2. Press the key labelled “PRO” and the display shows the current sound library number. The
default “PRO” is “0”.
3. Input “123” with the keypad and press “ENTER”. The display shows “┄” now.
4. Release SHIFT and back in performing mode. The display shows the current channel.
5.4.5 Set up customisable button “1” to send CC function “51”
1. Press and hold SHIFT and you will be in sub-function edit mode (LCD display shows
“ ”).
2. Press the key labelled “CTRL CC ” and the display shows the CC value of the active
controller.
3.
Press customisable button “1”. The default value, “57” shows o
n the display.
4. Input “51” with the keypad and press “ENTER”. The display shows “┄” now.
5. Release SHIFT and back in performing mode. The display shows the current channel.
Note: All the settings will be kept even when the power is off.
Page 8

6
5.5 Capacitive Touch Sensors
5.5.1 PITCH Bend Wheel
Use the PITCH bend wheel to get the bend. Slide up or down to adjust the pitch. Release and
return to neutral.
5.5.2 MODULATION Wheel
Use the MODULATION wheel to get the result of vibrato : Slide up or down to adjust the level of
vibrato.
5.5.3 OCTAVE/TRANSPOSE
Use OCTAVE / TRANSPOSE buttons to adjust the piano octave. Press the two buttons
simultaneously to reset.
With holding SHIFT, use OCTAVE/TRANSPOSE buttons to adjust the piano transpose. With holding
SHIFT, press the two buttons simultaneously to reset.
5.6 Reset to factory settings
1. Power off and unplug the keyboard.
2. Press and hold button 1 and 2 at the same time.
3. Connect a USB cable to the keyboard and the display shows “ ”. Release the buttons
after 3 second sand the keyboard is now Factory settings.
Page 9

7
Appendix 1: Specifications
Product specifications
Product name
X2mini/X3mini/X4mini/X6mini
Piano key
25/37/49/61 force sensitive keys
Display
3-digit LED display
Buttons
SHIFT, OCTAVE/TRANSPOSE, customisable playback
buttons
Knobs
T1 to T4 customisable knobs
Jacks
USB, MIDI OUT, sustain pedal
Accessories
USB cable, information card, user’s manual
Dimensions
X2: 409×137×51(mm)
X3: 556×137×51(mm)
X4: 703×137×51(mm)
X6: 850×137×51(mm)
Appendix 2: CC Controller Parameters
0
Bank Select
1
Modulation Wheel or Lever
2
Breath Controller
3
Controller Change #3
4
Foot Controller
5
Portamento Time
6
Data Entry MSB
7
Channel Volume(formerly
Main Volume)
8
Balance
9
Undefined
10
Pan11Expression Controller
12
Effect Control 1
13
Effect Control 2
14
Controller Change #14
15
Controller Change
16
General Purpose Controller 1
17
General Purpose Controller
Page 10

8
18
General Purpose
Controller 3
19
General Purpose Controller 4
20
Controller Change
#20~#31
21~
32
LSB for Control 0 (Bank
Select)
33
LSB for Control 1 (Modulation
Wheel or Lever)
34
LSB for Control 2 (Breath
Controller)
35
LSB for Control 3
(Undefined)
36
LSB for Control 4 (Foot
Controller)
37
LSB for Control 5 (Portamento
Time)
38
LSB for Control 6 (Data
Entry)
39
LSB for Control 7 (Channel
Volume, formerly Main
Volume)
40
LSB for Control 8 (Balance)
41
LSB for Control 9
(Undefined)
42
LSB for Control 10 (Pan)
43
LSB for Control 11 (Expression
Controller)
44
LSB for Control 12 (Effect
control 1)
45
LSB for Control 13 (Effect
control 2)
46
LSB for Control 14 (Undefined)
47
LSB for Control 15
(Undefined)
48
LSB for Control 16 (General
Purpose Controller 1)
49
LSB for Control 17 (General
Purpose Controller 2)
50
LSB for Control 18 (General
Purpose Controller 3)
51
LSB for Control 19 (General
Purpose Controller 4)
52
Controller Change
#52~#63
53~
64
Damper Pedal on/off
(Sustain)
65
Portamento On/Off
66
Sostenuto On/Off
67
Soft Pedal On/Off
68
Legato Footswitch
69
Hold 2
70
Sound Controller 1
(default Sound Variation)
71
Sound Controller 2 (default
Timbre/Harmonic Intens.) )
72
Sound Controller 3 (default
Release Time)
73
Sound Controller 4
(default Attack Time)
74
Sound Controller 5 (default
Brightness)
75
Sound Controller 6 (default
Decay Time - see MMA
RP-021)
76
Sound Controller 7
(default Vibrato Rate -
see MMA RP-021)
77
Sound Controller 8 (default
Vibrato Depth - see MMA
RP-021)
78
Sound Controller 9 (default
Vibrato Delay - see MMA
RP-021)
79
Sound Controller 10
(default undefined - see
MMA RP-021)
80
General Purpose Controller 5
81
General Purpose Controller 6
Page 11

9
82
General Purpose
Controller 7
83
General Purpose Controller 8
84
Portamento Control
85
Controller Change #85
86
Controller Change #86
87
Controller Change #87
88
High Resolution Velocity
Prefix
89
Controller Change #89
90
Controller Change #90
91
Effects 1 Depth (default
Reverb Send Level - see
MMA RP-023) (formerly
External Effects Depth)
92
Effects 2 Depth (formerly
Tremolo Depth)
93
Effects 3 Depth (default
Chorus Send Level - see MMA
RP-023) (formerly Chorus
Depth)
94
Effects 4 Depth (formerly
Celeste [Detune] Depth)
95
Effects 5 Depth (formerly
Phaser Depth)
96
Data Increment (Data Entry
+1) (see MMA RP-018)
97
Data Decrement (Data
Entry -1) (see MMA
RP-018)
98
Non-Registered Parameter
Number (NRPN) - LSB
99
Non-Registered Parameter
Number (NRPN) - MSB
100
Registered Parameter
Number (RPN) - LSB
101
Registered Parameter Number
(RPN) - MSB
102
Controller Change
#102~#119
103
—
120
[Channel Mode
Message] All Sound Off
121
[Channel Mode Message]
Reset All Controllers (See MMA
RP-015)
122
[Channel Mode Message]
Local Control On/Off
123
[Channel Mode
Message] All Notes Off
124
[Channel Mode Message]
Omni Mode Off (+ all notes
off)
125
[Channel Mode Message]
Omni Mode On (+ all notes
off)
126
[Channel Mode
Message] Mono Mode
On (+ poly off, + all
notes off)
127
[Channel Mode Message] Poly
Mode On (+ mono off, +all
notes off)
Page 12

10
目录
1.前言
...............................................................................
11
2.安全事项
.......................................................................
11
3.连接示意
.......................................................................
12
4.产品特色
.......................................................................
12
5.操作说明
.......................................................................
13
5.1 SHIFT 功能
............................................................
13
5.2 编辑模式下的副功能
..........................................
13
5.3 旋钮和按键控制器的配置及功能选择
...............
14
5.4 举例说明
.............................................................
15
5.5 电容式触摸感应
..................................................
17
5.6 恢复出厂设置
......................................................
18
附表 1:规格表
...............................................................
18
附表 2:CC 控制器一览表
.............................................
19
Page 13

11
1.前言
感谢您购买 X mini 系列 MIDI 键盘。X mini 系列 MIDI 键盘具有丰
2.安全事项
富的功能且操作简单。通过 USB 连接 X mini 系列 MIDI 键盘,你可以随时享受
音乐创作的乐趣。本说明书可以帮助您快速了解 X mini 系列 MIDI 键盘的功能
与操作方法。请妥善保存本说明书,以便您能及时方便查阅。
请注意以下安全事项,以免损坏设备或者造成人身伤害。
1. 避免在潮湿的环境放置或操作本设备,如浴室,游泳池等。
2. 避免在高温或太阳直射的环境放置本设备,如散热器,暖气片附近。
3. 若长时间不使用该设备,请断开外部电源连接。
4. 避免小金属块落入设备,从而导致内部电路短路。
5. 请勿自行拆开设备,如果需要请咨询相关专业人士。
6. 避免长时间开启本设备。
7. 儿童需在成人的指引下使用。
8. 避免在收音机,音箱,电视机及其他设备附近使用本设备,以免引起电磁干
扰。
9. 不要使用汽油、酒精以及其它的溶解性溶剂清洗设备,以免造成设备损伤。
应用稍微湿润的布擦洗设备;擦洗时,请拔掉外部电源和 USB 连接线,避
免造成电击。
10. 避免在雷雨天气使用本设备,以防雷击。
Page 14

12
3.连接示意
1. USB 接口:连接电脑或其他带主 USB 的设备,用于数据传输和供电。
4.产品特色
1. X mini 系列 MIDI 键盘有 X2 mini、X3 mini、X4 mini 和 X6 mini 四个型号,
2. X mini 系列 MIDI 键盘即插即用,无需安装驱动;USB 供电,无需连接外部
3. 最新的电容式触摸感应方案,分别控制 PITCH 和 MODULATION。
4. 配有功能编辑键 SHIFT 和八度切换键 OCTAVE/TRANSPOSE。
5. 4 个可编辑旋钮控制器,默认:T1(音量) ; T2(声像) ; T3(表情控制) ; T4(混响
6. 6 个默认走带功能的可编辑按键控制器。
7. 拥有一个 MIDI OUT 接口, 一个 SUSTAIN 踏板接口和一个 USB 接口。
2. MIDI OUT 接口:标准 MIDI 输出接口,用于外连其他 MIDI 设备。
3. SUSTAIN 接口:用于外接一个标准开关式延音踏板。
分别拥有 25、37、49 和 61 个带力度 mini 琴键。
电源即可弹奏。
效果)。
Page 15

13
5.操作说明
5.1 SHIFT 功能
开机时琴键默认处于演奏模式,且每个琴键上方对应相应的标注功能。按
1. VEL.:琴键力度感应曲线选择(调整范围:1~3)
2. CTRL CC:控制器 CC 选择(调整范围:0~127)。
3. CTRL CHL.:控制器控制通道选择(调整范围:0~16)。
4. BANK MSB:音色库十位数调节(调整范围:0~127)。
5. BANK LSB:音色库个位数调节(调整范围:0~127)。
6. PRO.:音色选择(调整范围:0~127)。
住 SHIFT 按键,琴键进入副功能编辑模式(显示屏显示“ ”),选择你所需要的
功能,按下“ENTER”确认,松开 SHIFT 按键完成编辑,琴键返回到演奏模式。
5.2 编辑模式下的副功能
5.2.1 其它琴键副功能(此类功能设置后均被记忆)
注: CTRL CC(CC 选择)的功能详情请查看《附表二:CC 控制 器一览表》。
Page 16

14
CTRL CHL.(控制通道)选择 0 时,该控制器配置为全局通道,控制器的通道
将自动跟随琴键通道。
5.2.2 NUMERIC KEYPAD(数字键)、CANCEL 和 ENTER
用于配置“其它琴键副功能”时用的数字输入、清除和确认。
5.3 旋钮和按键控制器的配置及功能选择
5.3.1 旋钮控制器默认 CC 功能
T1 旋钮:Volume(音量)
T2 旋钮:Pan(声像)
T3 旋钮:EXpression Controller(表情控制)
T4 旋钮:REVERB(混响效果)
旋钮控制器可通过 SHIFT 的编辑模式自定义它的 CC 功能。
5.3.2 按键控制器(1-6)
按键控制器:默认出厂功能为 MMC 走带功能。
还可通过按住 SHIFT 按键自由切换功能 MMC/CC 模式,当按键控制器处于
MMC 模式下,按键背景灯为红色。当按键控制器处于 CC 模式下, 按键背景
灯为蓝色。同时按键控制器可以通过在 SHIFT 的编辑模式自定义它的 CC 功能。
Page 17

15
5.4 举例说明
5.4.1
(1) 按住 SHIFT 按键,进入副功能编辑模式。(显示屏显“ ”)
(2) 按下“VEL.”标注对应琴键,显示屏显示当前力度曲线编号,默认出厂设置
(3) 通过按下键盘右边标注数字的琴键,输入“2”,再按下“ENTER”标注对应琴
(4) 松开 SHIFT 按键,返回演奏模式,显示屏显示当前通道号。
把琴键力度曲线配置到
下力度曲线编号为“1”。
键进行确认,显示屏显示“┄”。
(此时琴键力度曲线改变成“2”且被记忆)
“2”
。
5.4.2
(1) 按住 SHIFT 按键,进入副功能编辑模式。(显示屏显示“ ”)
(2) 按下“CTRL CC”标注对应琴键,显示屏显示当前控制器的 CC 编号。
(3) 通过操作旋转“T1”旋钮对其编辑,默认出厂设置下“T1”应显示“7”。
(4) 通过按下键盘右边标注数字的琴键,输入“91”,再按下“ENTER”标注对应琴
(5) 松开 SHIFT 按键,返回演奏模式。显示屏显示当前通道号。
配置旋钮控制器
注意:如需编辑“T2”,请旋转“T2”旋钮。“T3” “T4”如此类推。
键进行确认,显示屏显示“┄”。
(此时旋钮“T1”选配 CC91(REVERB)功能被记忆)
“T1”
CC91(REVERB)
用于
混响效果控制。
5.4.3 配置旋钮控制器“T1”用于控制通道 10。
(1) 按住 SHIFT 按键,进入副功能编辑模式。(显示屏显示 “ ”)
(2) 按下“CTRL CHL.”标注对应琴键,显示屏显示当前控制器的通道编号。
(3) 通过操作旋转“T1”旋钮对其编辑,默认出厂设置下“T1”应显示“1”。
Page 18

16
(4) 通过按下键盘右边标注数字的琴键,输入“10”,按下“ENTER”标注对应琴键
进行确认,显示屏显示“┄”。
(5) 松开 SHIFT 按键,返回演奏模式。显示屏显示当前通道号。
(此时旋钮“T1”选配的控制通道被记忆)
5.4.4 将音色 PROGRAM 设置为“123”。
(1) 按住 SHIFT 按键,进入副功能编辑模式。(显示屏显示“ ”)
(2) 按下"PRO."标注对应琴键,显示屏显示当前音色编号。默认出厂设置下
"PRO."应显示“0”。
(3) 通过按下键盘右边标注数字的琴键,输入“123”,再按下“ENTER”标注对应
琴键进行确认,显示屏显示“┄”说明设置成功。
(4) 松开 SHIFT 按键,返回演奏模式,显示屏显示当前通道号。
(此时 PROGRAM 值被记忆)
5.4.5 配置按键控制器“1”发送 CC 信息“51”。
(1) 按住 SHIFT 按键,进入副功能编辑模式。(显示屏显示“ ”)
(2) 按下“CTRL CC”标注对应琴键,显示屏显示当前控制器的 CC 编号。
(3) 按下按键“1”对其编辑,默认出厂状态下按键“1”应显示“57”。
注:如需编辑按键“2”,请按下按键“2”。按键“3.4.5.6”如此类推。
(4) 通过按下键盘右边标注数字的琴键,输入“51“,按下“ENTER”标注对应琴键
进行确认,显示屏显示“┄”。
(5) 松开 SHIFT 按键,返回演奏模式,显示屏显示当前通道号。
(此时按键“1”选配 CC 功能被记忆)
注:被记忆的数据在下次开机依然保持。
Page 19

17
5.5 电容式触摸感应
5.5.1 PITCH
使用 PITCH 滑轮来调制弯音效果:触摸可上、下滑动,音高上升或下降 ,
松开自动还原到默认值。
滑轮
5.5.2 MODULATION 滑轮
使用 MODULATION 滑轮来调制颤音效果:触摸向上滑动,颤音增加;向下
滑动,颤音减小。
5.5.3
八度调节
通过按“OCTAVE/TRANSPOSE”按键直接调节琴键的 OCTAVE(八度),两个
按键同时按下,可恢复默认八度。
按住 SHIFT 按键,再按“OCTAVE/TRANSPOSE”按键调节琴键的 TRANSPOSE
(移调),按住 SHIFT 按键,再同时按下“OCTAVE/TRANSPOSE”的两个按键,恢
复默认调。
OCTAVE/TRANSPOSE
Page 20

18
5.6 恢复出厂设置
1. 断开电源,键盘处于关机状态下。
附表 1:规格表
产品规格
产品名称
X2mini/X3mini/X4mini/X6mini
琴键
25/37/49/61 个力度感应琴键
显示屏
3 位 LED 数码显示屏
按键
SHIFT、OCTAVE/TRANSPOSE 组、可编辑走带组
旋钮
T1~T4 可编辑旋钮控制器
插孔
USB 口、MIDI OUT、延音踏板
附件
USB 连接线、信息卡,
尺寸
X2:409×137×51(mm)
X3:556×137×51(mm)
X4:703×137×51(mm)
X6:850×137×51(mm)
2. 同时按下“按键 1、按键 2”两个按键。
3. 再接上 USB 线,设备启动显示屏显示“ ”,3 秒后松开按键即可恢复出厂
设置。
Page 21

19
附表2:
CC
控制器一览表
0
音色库选择MSB
37
连滑音速度(微调)
1
颤音深度(粗调)
38
低位元组数据输入
2
呼吸控制器(粗调)
39
主音量(微调)
3
N/A
40
平衡控制(微调)
4
踏板控制器(粗调)
41
N/A
5
连滑音速度(粗调)
42
声像调整(微调)
6
高位元组数据输入
43
情绪控制器(微调)
7
主音量(粗调)
44
效果FX控制1(微调)
8
平衡控制(粗调)
45
效果FX控制2(微调)
9
N/A
46-63
N/A
10
声像调整(粗调)
64
保持音踏板1(延音踏板)
11
情绪控制器(粗调)
65
滑音
12-15
N/A66持续音
16-19
一般控制器
67
弱音踏板
20-31
N/A68连滑音踏板控制器
32
插口选择
69
保持音踏板2
33
颤音速度(微调)
70
变调
34
呼吸控制器(微调)
71
音色
35
N/A72放音时值
36
踏板控制器(微调)
73
起音时值
Page 22

20
74
亮音
99
未登记的高元组数值(NRPN MSB)
75-79
声音控制
100
已登记的低元组数值
80-83
一般控制器(#5-#8)
101
已登记的高元组数值(RPN MSB)
84
连滑音控制
102-119
N/A
85-90
N/A
120
关闭所有声音
91
混响效果深度
121
关闭所有控制器
92
(未定义的效果深度)
122
本地键盘开关
93
合唱效果深度
123
关闭所有音符
94
(未定义的效果深度)
124
Omni模式关闭
95
移调器深度
125
Omni模式开启
96
数据累增
126
单音模式
97
数据递减
127
复音模式
98
未登记的低元组数值
(NRPN LSB)
Page 23

Page 24

www.midiplus.com
 Loading...