

X4 pro mini /X6 pro mini

Table Of Contents
Introduction ................................................................................................................................. 2
Important notes: ....................................................................................................................... 2
1. Overview ................................................................................................................................. 3
1.1 The Top Panel .................................................................................................................................. 3
1.2 The Rear Panel................................................................................................................................. 3
2. Basic Operation ....................................................................................................................... 4
2.1 Ready to use X pro mini .................................................................................................................. 4
2.2 Display Screen ................................................................................................................................. 4
2.3 The Octave Buttons ......................................................................................................................... 5
2.4 Pitch & Modulation Touch Bar ......................................................................................................... 5
2.5 MIDI/SELECT Button........................................................................................................................... 6
2.6 Knobs ............................................................................................................................................... 6
2.7 Buttons ............................................................................................................................................. 7
2.8 Transport Controls ............................................................................................................................ 7
2.9 Pads ................................................................................................................................................. 8
2.10 Keyboard ....................................................................................................................................... 8
2.10.1 MIDI Channels Keys ............................................................................................................... 9
2.10.2 Transpose Keys ...................................................................................................................... 9
2.10.3 Other Functions Keys ............................................................................................................. 9
2.10.4 Numeric Keypads ............................................................................................................... 10
3. Edit Mode .............................................................................................................................. 10
3.1 Changing the MIDI Channel ......................................................................................................... 10
3.2 Transposition .................................................................................................................................. 11
3.3 Changing The "B1 ~ B8" Buttons' Mode ....................................................................................... 11
3.4 Changing The "P1 ~ P8" Pads' Mode ........................................................................................... 11
3.5 Changing The Velocity Curve Of Keyboard ................................................................................. 12
3.6 Customizing The Controllers .......................................................................................................... 12
3.6.1 Customizing The "T1 ~ T0" Knobs .......................................................................................... 13
3.6.2 Customizing The "B1 ~ B8" Buttons ....................................................................................... 13
3.6.3 Customizing The Transport Buttons ........................................................................................ 14
3.6.4 Customizing The "P1 ~ P8" Pads ........................................................................................... 14
3.7 Assigning MIDI Channels ............................................................................................................... 15
3.8 Switching the Built in Tone ............................................................................................................. 15
4. Factory Reset ........................................................................................................................ 16
5. Appendix ............................................................................................................................... 16
5.1 Specifications ................................................................................................................................ 16
5.2 Instrument Patch Map ................................................................................................................... 17
5.3 Percussion Sounds Map ................................................................................................................ 19
5.4 MIDI Notes...................................................................................................................................... 20
5.5 MIDI CC (Continue Control) Map.................................................................................................. 21

Introduction
Thank you for purchasing the Midiplus X pro mini series MIDI keyboard.
The Midiplus X pro mini series includes 49 and 61 keys variants. They features compact keys which
maintain the comfort standard size keys, but with added portability. Includes the same stylish look
and color matching as the X pro Series. Also, has assignable knob and transport controls, 8 velocity
sensitive drum pads, touch sensitive pitch and modulation bars, and 128 built in tones. For added
portability rechargeable NiMh batteries can be used to power the X pro mini (batteries not included).
Whats in the box:
l X pro mini keyboard
l USB cable
l Quick start manual
l Midiplus posters
Important notes:
Please read the following precautions carefully before use to avoid
damaging the equipment or causing personal injury. Precautions include but
are not limited to the following:
1. Read and understand all the illustrations.
2. Always follow the instructions on the device.
3. Before cleaning the device, always remove the batteries and the USB cable. When
cleaning, use a soft and dry cloth. Do not use gasoline, alcohol, acetone, turpentine or
any other organic solutions; do not use a liquid cleaner, spray or cloth that's too wet.
4. Disconnect the USB cable and remove the batteries if not used for extended periods.
5. Make sure to turn off the power before install/remove the batteries.
6. Make sure to turn off the power while connect to speaker or other amplification system.
7. Do not use the device near water o r moisture, such as a bathtub, sink, swimming pool or
similar place.
8. Do not place the device in an unstable position where it might accidentally fall over.
9. Do not place heavy objects on the device.
10. Do not place the device near a heat vent at any location with poor air circulation.
11. Do not open or insert anything into the device that may cause a fire or electrical shock.
12. Do not spill any kind of liquid onto the device.
13. Do not use the device with thunder and lightning present; otherwise it may cause long
distance electrical shock.
14. Do not expose the device to hot sunlight.
15. Do not use the device when there is a gas leak nearby.
2

1. Overview
1.1 The Top Panel
① ④
⑤
⑥
②
③
Display:
①
Octave buttons:
②
Pitch & Modulation touch bar:
③
sound.
MIDI/SELECT button:
④
Knobs:
⑤
parameters.
Button s:
⑥
Transport controls:
⑦
DAW: Record, Play, Stop, etc., When the MMC button is deactivated, control DAW or software
instrument parameters.
Pads:
⑧
Keyboard:
⑨
Provides real time feedback of control information.
Activate keyboard’s pitch control.
Control the pitch bend and modulation parameters of your
Enter or exit the Edit mode of the keyboard.
Can control the effects of the built in sounds, as well as, DAW or software instrument
Store favorites of built in sounds, and control DAW or software instrument parameters.
When the MMC button is activated, offers standard features to control your
To trigger the built in percussive sounds, as well as the samples within your DAW.
Trigger not es on/off, also can be used as shortcuts to access Edit more parameters .
⑦ ⑧
⑨
1.2 The Rear Panel
6
1
2
3
Power Switch:
①
USB Connection:
②
this to connect X pro mini to your computer or external USB 5V power via USB cable.
Stereo Headphone Output:
③
Balanced Line Output:
④
Sustain Pedal Input:
⑤
X pro mini is turned on, so it can be used with any standard pedal.
Battery Compartment:
⑥
Do not use alkaline batteries or carbon zinc batteries
Hold to power the device on/off.
This port provides both power, MIDI data and charge the batteries. You can use
Connect to headphone or active monitor.
Connect to external amplifying system or linear recording system.
The Sustain pedal input automatically detects the polarity of the pedal when
Three nickel hydrogen batteries (AA) can be used to power this device.
3
5
4
.
2. Basic Operation
2.1 Ready to use X pro mini
X pro mini comes ready to use as a standalone performance keyboard with 128 built in tones, It can
also be used as a MIDI keyboard controller by connecting to the computer or other MIDI compatible
hardware.
As a MIDI keyboard controller:
Power is also supplied through this connection. Hold the power button to turn on the keyboard. X pro
mini is a class-complia nt USB device, so its drivers are automatically installed when connecting to a
computer.
As a performance keyboard:
Pedal & Headphone connectors on the rear panel of X pro mini, or connect to the external mixer
device through the balanced output, and then connect the device to the external USB power supply
via USB cable, or hold the powe r button after the battery is installed correctly to turn on the device.
Connect X pro mini to your PC or Mac using the included USB cable.
Connect the sustain pedal, headphone or active speaker to the
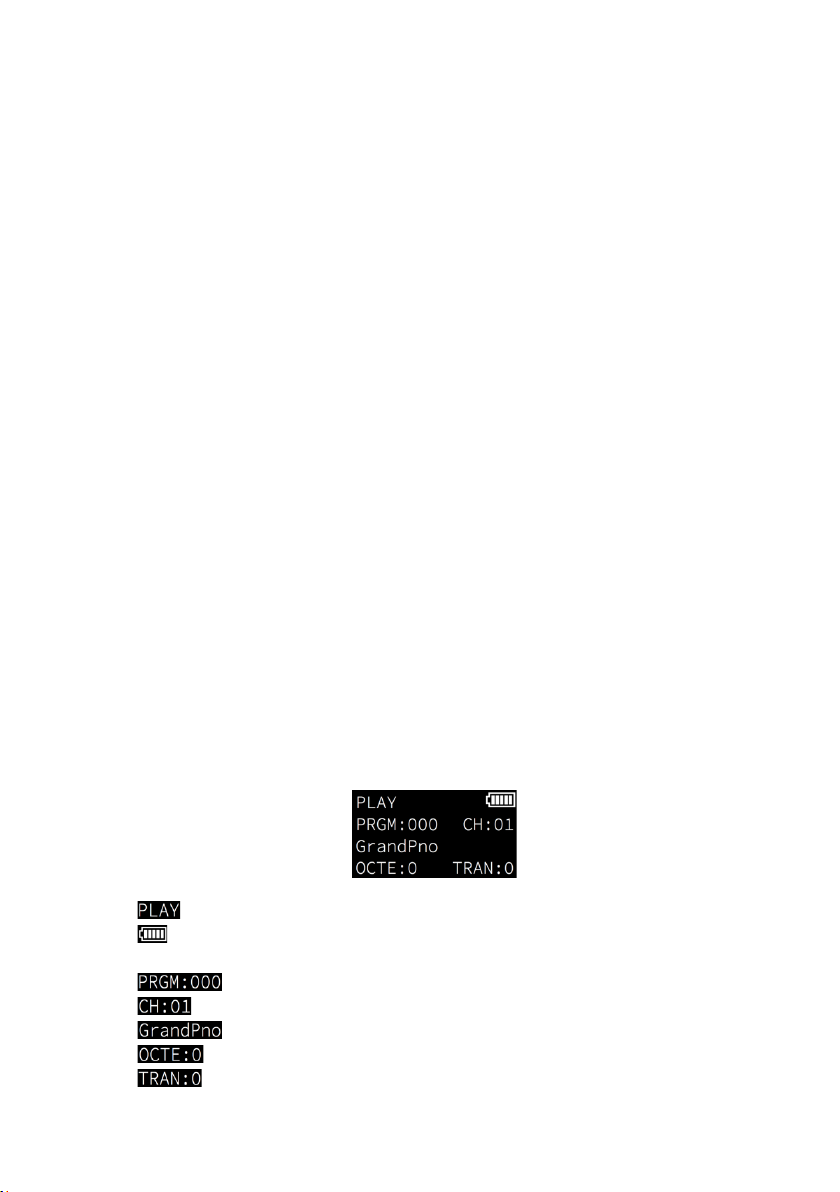
2.2 Display Screen
X pro Mini features a clear and easy to read OLED displa y screen. Content is displayed to provide
real time information to know the current control status of the keyboard at any time.
The information displayed by default is:
: The keyboard is cur
: Displays the battery capacity and status when the battery is installed correctly, and
no display when there is no battery installed
: The Program Change number of current tone
: The current MIDI Channel
: The name of the current tone
: The current Octave status
: The current Transpose status
rently in Play mode
4
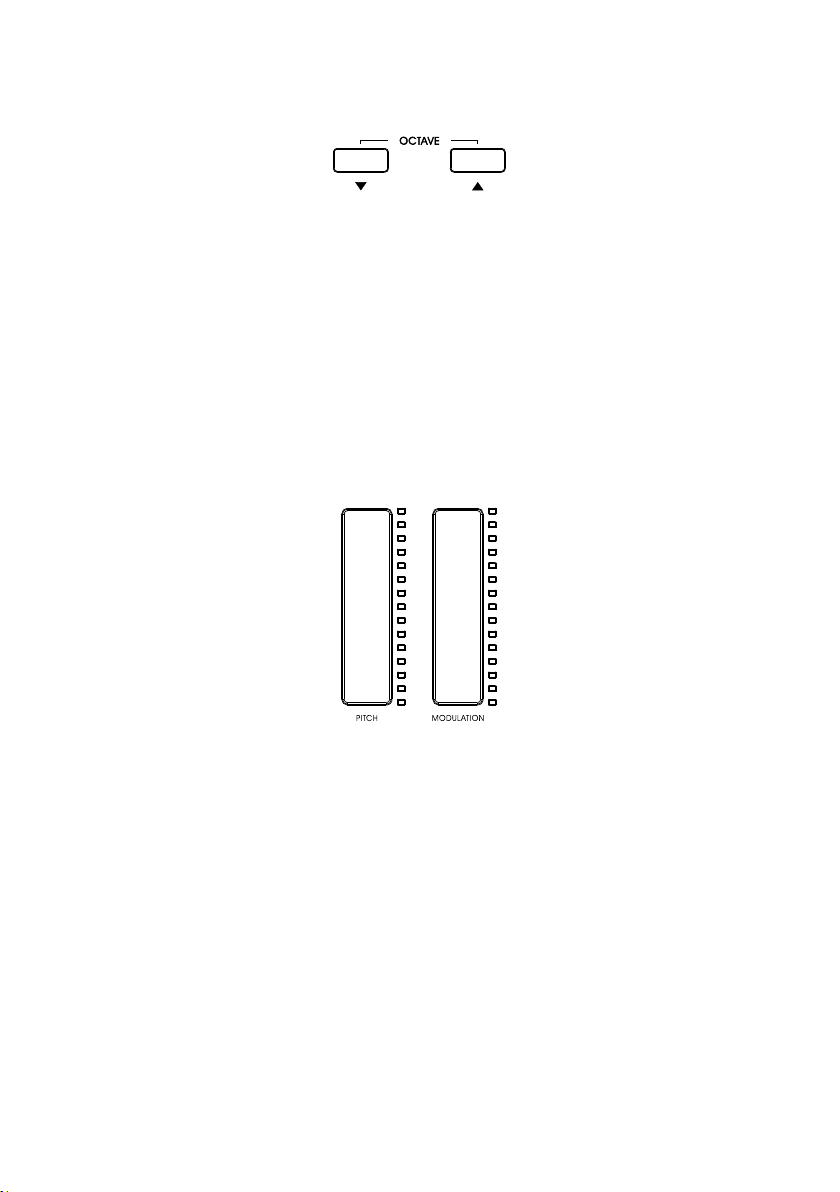
2.3 The Octave Buttons
These two buttons can shift the range of X pro mini’s keyboard in real-time, giving you access to
higher and lower pitches. The range that can be set is ±3 Octaves.
When activated, the selected octave button will light up, the display will also show the selected
octave, pressing the two octave buttons simultaneously will quickly reset the octave shift.
2.4 Pitch & Modulation Touch Bar
Two capacitive touch bars allow for real-time pitch bend and modulation control. The LED light strip
will reflect the current status of each controller. The display also shows the value of the controller.
Sliding up or down on the Pitch touch bar will raise or lower the pitch of the selected tone. The range
of this effect is set within the hardware or software instrument being controlled.
Sliding up on the Modulation touch bar increases the amount of modulation on the selected tone.
The response depends on the settings of the instrument being controlled. Certain instruments or
presets will not use the modulation parameter.
5
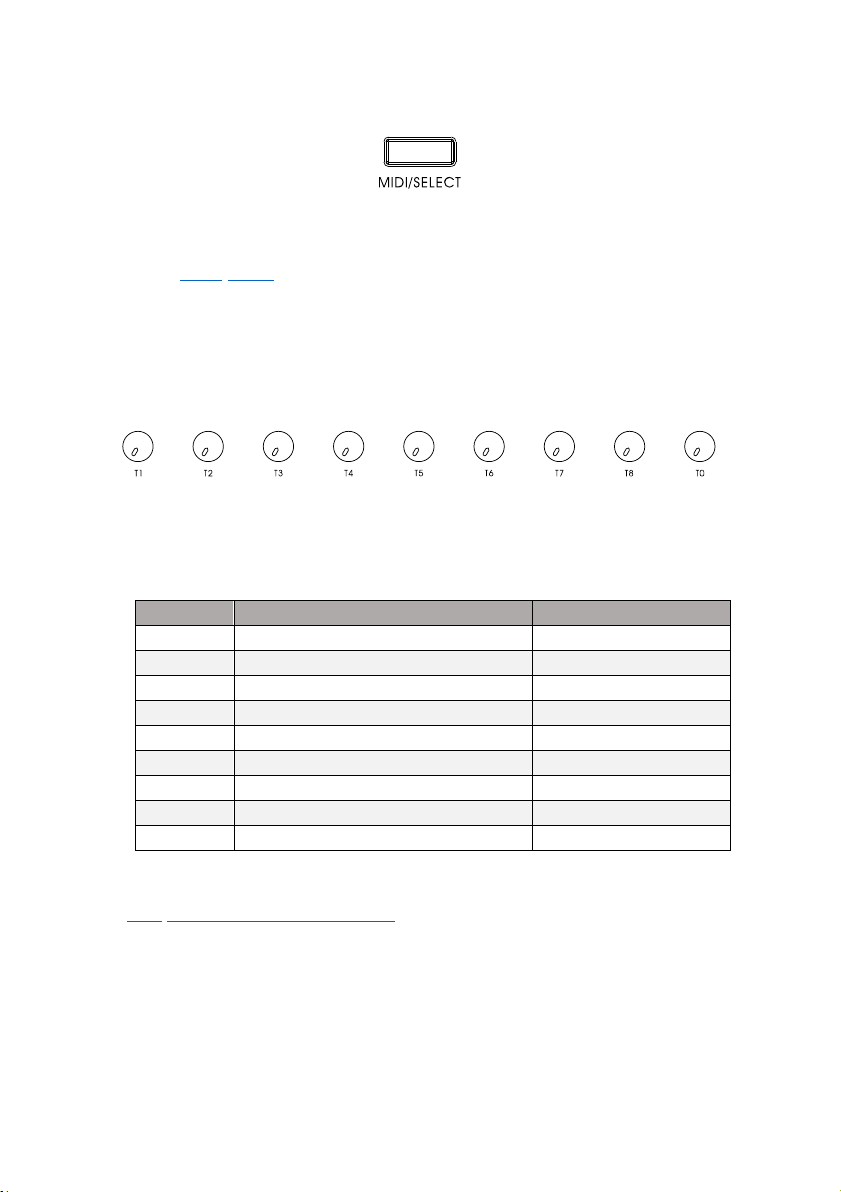
2.5 MIDI/SELECT Button
Press the MIDI/SELECT button to put the X pro mini into Edit Mode. Here you can change the MIDI
channel of the keyboard, transpose, modify the velocity response curve, etc. for further detail,
please refer to 3. Edit Mode.
2.6 Knobs
X pro mini features 9 assignable knobs that control the output effects of the built-in tones and the
parameters of the DAW or software instrument.
When used with the built-in tones, the default control functions of each knob are as follows:
Knobs Functions MIDI CC Number
T1 Undefined 46
T2 Undefined 47
T3 Undefined 48
T4 Undefined 49
T5 Undefined 50
T6 Pan 10
T7 Expression Controller 11
T8 Reverb 91
T0 Volume 7
You can assign any MIDI CC (continuous controller) number to each knob in Edit Mode. Please
refer to 3.6.1 Customizing The "T1 ~ T0" Knobs for detailed operation steps.
6

2.7 Buttons
X pro mini features 8 buttons with dual functionality, they can send Program Change (tones) or MIDI
CC messages. By default, it sends the Program Change message (backlight blue when pressed) to
quickly switched the build-in tones. The default tones corresponding to the button are as follows:
Buttons Program Change Name
B1 000 Acoustic Grand Piano
B2
B3
B4
B5
B6
B7
B8
004
019
049
088
112
-
-
Bright Acoustic Piano
Acoustic Guitar (Steel)
Acoustic Bass
Violin
Alto Sax
Previous Program
Next Program
You can assign your favorite or frequently used tone’s
in Edit Mode. To change the tone corresponding to the buttons, please refer to 3.6.2 Customizing
The "B1 ~ B8" Buttons for detailed operation steps.
In addition (while in Edit mode) you can change the Button Mode to send MIDI CC messages
(backlight white when pressed), to control DAW or software instrument parameters. For detailed
operation steps, please refer to 3.3 Changing The "B1 ~ B8" Buttons' Mode. Any MIDI CC number can
be assigned to each button, please refer to 3.6.2 Customizing The "B1 ~ B8" Buttons for detailed
operation steps.
Program Change
number to B1 to B6 button
2.8 Transport Controls
Like the buttons, X pro mini’s 5 transport buttons have dual functions, which can send MMC (MIDI
Machine Control) messages or MIDI CC messages.
When the MMC button is activated (backlight blue), the “M1 ~ M5” buttons are in MMC mode, and
correspond to the rewind, fast forward, stop, play and record functions of DAW respectively.
When the MMC button is off (backlight white), the “M1 ~ M5” buttons are in MIDI CC mode, which
can control
7

DAW or software instrument parameters. Any MIDI CC number can be assigned to each button,
please refer to 3.6.3 Customizing The Transport Buttons for detailed operation steps.
2.9 Pads
X pro mini's 8 velocity sensitive pads also have dual functions, sending MIDI note messages or
MIDI CC messages. By default, MIDI notes are sent (blue backlight pressed) to trigger the built-in
percussion sounds. The default output of the eight impact pads is as follows:
Pads MIDI Notes MIDI Channel Instrument Name
P1 36/C+2 10
P2 37/C#+2 10
P3 38/D+2 10
P4 39/D#+2 10
P5 40/E+2 10
P6 41/F+2 10
P7 42/F#+2 10
P8 43/G+2 10
Bass Drum 1
Side Stick
Acoustic Snare
Hand Clap
Electric Snare
Low Floor Tom
Closed Hi-Hat
High Floor Tom
You can customize the MIDI note number for each pad. To change the sound corresponding to the
pad. please refer to 3.6.4 Customizing The "P1 ~ P8" Pads for detailed operation steps.
In Edit mode, you can change the Pad mode to send MIDI CC messages (backlight white when
pressed), to control DAW or software instrument parameters. For detailed operation steps, please
refer to 3.4 Changing The "P1 ~ P8" Pads' Mode. You can assign any MIDI CC number to each pad,
please refer to 3.6.4 Customizing The "P1 ~ P8" Pads for detailed operation steps.
2.10 Keyboard
X pro Mini features 49 or 61 velocity sensitive slim keys for playing and sending note on/off
messages. The keys can also be used as shortcuts to access parameters in Edit mode, such as:
changing MIDI channel, transposition, switching keyboard velocity response curve, etc. for details,
please refer to 3. Edit Mode.
8

2.10.1 MIDI Channels Keys
Used for changing the MIDI channel of keyboard in Edit mode. Please refer to 3.1 Changing MIDI
Channel for details.
2.10.2 Transpose Keys
Used for changing the transposition setting in Edit mode. Please refer to 3.2 Transposition for details.
2.10.3 Other Functions Keys
Used for changing other advanced functions in Edit mode:
BUTTON MODE: Change the B1 to B8 buttons’ mode. For detailed operation, please refer to 3.3
Changing The "B1 ~ B8" Buttons' Mode.
PAD MODE: Change the P1 to P8 pads’ mode. For detailed operation, please refer to 3.4 Changing
The "P1 ~
VEL.: Change the velocity response curve of the keyboard. For details, please refer to 3.5 Changing
The Velocity Response Curve Of Keyboard.
CTRL ASSIGN: Select to customize the controllers (knobs, buttons, pads). For detailed operation,
please refer to 3.6 Customizing The Controllers.
CTRL CHL: Select to change the channel of controllers. For detailed operation, please refer to 3.7
Changing The Channel Of Controller.
P8" Pads' Mode.
9

2.10.4 Numeric Keypads
These numeric keypads can be used to enter the value of a selected controller in Edit mode. Press
enter key to confirm, and press cancel key to delete the number.
3. Edit Mode
Press the MIDI/SELECT button (backlight will turn white). The screen will display "EDIT" in the upper left
corner, indicating that X pro mini has entered
you like.
Note: In Edit mode, the keys with labeled functions will be used as shortcuts to access the
parameters, without sending any MIDI note message.
3.1 Changing the MIDI Channel
Edit Mode
. Here you can customize the X pro mini as
To change the MIDI channel, simply press the MIDI/SELECT button, and press the corresponding note
on the keyboard below the MIDI channels you wish to select.
For example, to change X pro mini’s MIDI output to channel 12, press the MIDI/SELECT button and
press the key labeled with
Note: Channel 10 is the built-in percussion sounds channel. When using the built-in tones, if the MIDI
channel is set to ch 10, the sound switching function and button will not work. You can only play the
percussion sounds.
12
below the MIDI channels.
10

3.2 Transposition
The X pro mini provides a quick way to transpose keys. Press the MIDI/SELECT button, and one of the
13 keys labeled “F
down, and notes above middle C will transpose up. Press the middle C key to cancel the
transposition.
Tips: The range of the transpose function is -6 to +6 notes. Use the octave buttons to extend this range.
#/Gb
, G, G#/Ab ……” to transpose. The notes lowe r than middle C will transpose
3.3 Changing The "B1 ~ B8" Buttons' Mode
The X pro mini's 8 buttons has dual functions. You can change the button to Program Change mode
or MIDI CC mode in Edit Mode.
To change the button mode, press the MIDI/SELECT button, and then press the key labeled “Button
Mode”. The display will show the currently selected button mode.
3.4 Changing The "P1 ~ P8" Pads' Mode
The X pro mini's 8 pads also has dual functions. You can change the pad to MIDI Note mode or MIDI
CC mode in Edit Mode.
To change the pad mode, press the MIDI/SELECT button, and then press the key labeled “Pad
Mode”. The display will show the currently selected pad mode.
11

3.5 Changing The Velocity Curve Of Keyboard
X pro mini features 8 velocity curves to suit different user preferences. The velocity curves are:
No.1 ~ 3:
songs with mostly low velocities.
NO.4:
matched to the MIDI velocity output.
No.5 ~ 6:
playing songs with mostly high velocities.
No.7 ~ 8:
or heavy you hit the keys, the output velocity of No.7 curve is 64, No.8 curve is 127.
To change the velocity curve of the keyboard, follow these steps:
1. Press MIDI/SELECT button to enter Edit mode
2. Press VEL. key
3. Enter a value using the numeric keypad (value range is between 1 to 8)
4. Press Enter key
5. Press MIDI/SELECT button to exit Edit mode
For example, to change the keyboard velocity curve to No.6, follow these steps:
1. Press MIDI/SELECT button
2. Press VEL. key
3. Enter a value “6” using the numeric keypad
4. Press Enter key
5. Press MIDI/SELECT button to exit Edit mode
Light - shifts the focus of the MIDI velocity output to being softer, useful when playing
Linear - provides a balanced response where the strength of your key strikes are equally
This is the default velocity curve.
Heavy - shifts the focus of the MIDI velocity output to being harder, useful when
Fixed - forces the MIDI velocity to always output at a fixed value. No matter how light
3.6 Customizing The Controllers
All controllers of X pro mini have been set with reasonable function control according to the most
frequently used, but you can customize these controllers as you like. The controllers that can be
customized include: “T1 ~ T0” knobs, “B1 ~ B8” buttons, “M1 ~ M5” transport control buttons and “P1
~ P8” pads. The customized setting range is 0 ~ 127.
12

3.6.1 Customizing The "T1 ~ T0" Knobs
To customize the knobs, follow these steps:
1. Press MIDI/SELECT button to enter Edit mode
2. Press “CTRL ASSIGN” key
3. Turn the knob you want to customize
4. Enter a value using the numeric keypad (value range between 0 to 127)
5. Press Enter key
5. Press MIDI/SELECT button to exit Edit mode
For example, to change the T1 knob to control the built-in tone’s “Chorus” effect. According to
5.5 MIDI CC (Continue Control) Map, the MIDI CC number of “Chorus” is “93” please follow these
steps:
1. Press MIDI/SELECT button to enter Edit mode
2. Press “CTRL ASSIGN” key
3. Turn the knob “T1”
4. Enter a value “93” using the numeric keypad
5. Press Enter key
6. Press MIDI/SELECT button to exit Edit mode
3.6.2 Customizing The "B1 ~ B8" Buttons
You can customize both modes of the buttons’ controls. In Program Change mode (except B7 and
B8), you can assign the button’s Program number, and in MIDI CC mode, you can assign the
button’s MIDI CC number. To customize the buttons, follow these steps:
1. Press MIDI/SELECT to enter Edit mode
2. Press “CTRL ASSIGN” key
3. Press the button you want to customize
4. Enter a value using the numeric keypad (value range between 0 to 9)
5. Press Enter key
6. Press MIDI/SELECT button to exit Edit mode
For example: assign the “B1” button as a shortcut to the “Church Organ” tone. First, make sure the
button is in Program Change mode (refer to 3.3 Changing The "B1 ~ B8" Buttons Mode for details).
According to 5.5 Instrument Patch Map, the number of “Church Organ” is “19”, please follow the
steps below:
1. Press MIDI/SELECT button to enter Edit mode
2. Press “CTRL ASSIGN” key
3. Turn the knob “B1”
4. Enter a value “19” using the numeric keypad
5. Press Enter key
6. Press MIDI/SELECT button to exit Edit mode
13

3.6.3 Customizing The Transport Buttons
To customize the transport buttons, make sure the MMC button is off (backlight is off), and then
follow these steps:
1. Press MIDI/SELECT to enter Edit mode
2. Press “CTRL ASSIGN” key
3. Press the button you want to customize
4. Enter a value using the numeric keypad (value range between 0 to 127)
5. Press Enter key
6. Press MIDI/SELECT button to exit Edit mode
For example: assign the “M1” button to function as a “Sustain Pedal”. First, make sure the MMC
button is off (backlight is off). According to 5.5 Instrument Patch Map, the MIDI CC number of
“Sustain” is “64”, please follow the steps below:
1. Press MIDI/SELECT to enter Edit mode
2. Press “CTRL ASSIGN” key
3. Press the button “M1”
4. Enter a value “64” using the numeric keypad
5. Press Enter key
6. Press MIDI/SELECT button to exit Edit mode
3.6.4 Customizing The "P1 ~ P8" Pads
To customize the pads, please follow these steps:
1. Press MIDI/SELECT to enter Edit mode
2. Press “CTRL ASSIGN” key
3. Press the pad you want to customize
4. Enter a value using the numeric keypad (value range between 0 to 127)
5. Press Enter key
6. Press MIDI/SELECT button to exit Edit mode
You can customize both modes of the pads. In MIDI Note mode, you can assign the pad’s MIDI
Note number, in MIDI CC mode, you can assign the pad’s MIDI CC number.
For example, changing the note of the “P1” pad to C6, first make sure that the pad is MIDI Note
mode (refer to 3.4 Changing The "P1 ~ P8" Pads' Mode for details). According 5.4 MIDI Notes, the
number of "C6" note is “84”.
Please follow the steps below:
1. Press MIDI/SELECT to enter Edit mode
2. Press “CTRL ASSIGN” key
3. Press pad “P1”
4. Enter a value “84” using the numeric keypad
5. Press Enter key
6. Press MIDI/SELECT button to exit Edit mode
14

3.7 Assigning MIDI Channels
The channel of the controllers can be set between 0 and 16. The default global is channel 0. To
change the channel of the controllers, please follow the steps below:
1. Press MIDI/SELECT to enter Edit mode
2. Press “CTRL CHL.” key
3. Press or turn the controller you want to customize
4. Enter a value using the numeric keypad (value range between 0 to 16)
5. Press Enter key
6. Press MIDI/SELECT button to exit Edit mode
For example, to set the control channel of knob “T2” to channel 9, follow the steps below:
1. Press MIDI/SELECT to enter Edit mode
2. Press “CTRL CHL.” key
3. Turn the knob “T2”
4. Enter a value “9” using the numeric keypad
5. Press Enter key
6. Press MIDI/SELECT button to exit Edit mode
3.8 Switching the Built in Tone
The X pro mini has 128 built-in tones. You can quickly switch between 6 tones using the B1 ~ B6
buttons, switch the previous or next tones by using the B7 and B8 buttons, or you can select the
tones directly by following these steps:
1. Press MIDI/SELECT to enter Edit mode
2. Enter a value using the numeric keypad (value range between 0 to 127)
3. Press Enter key
4. Press MIDI/SELECT button to exit Edit mode
For example: to switch the current tone to "String Ensemble 1", according to 5.2 Instrument Patch
Map, the program change number of "String Ensemble 1" is “48”, please follow the steps below:
1. Press MIDI/SELECT to enter Edit mode
2. Enter value “48” using the numeric keypad
3. Press Enter key
4. Press MIDI/SELECT button to exit Edit mode
Note: The built-in percussion sounds cannot be switched by this method. You can change the
MIDI channel to channel 10, which is the percussion sounds channel. For detailed operation,
please refer to 3.1 Changing The MIDI Channel.
15

4. Factory Reset
Product Names
X4 pro mini / X6 pro mini
Keyboard
Sounds
128
Maximum Polyphony
64
Display Screen
Black-and-White OLED display
Buttons
1 power switch button,1 MIDI/SELECT button,2 octave buttons,8
shortcut sounds/CC buttons,6 transport buttons
Knobs
9 assignable knobs
Pads
8 assignable velocity-sensitive pads
Connections
1 USB Type-B port, 1 3.5mm stereo headphone output, 2 balanced
line outputs, 1 sustain pedal input
Dimensions
X4 pro mini:703 × 137 × 51(mm)
X6 pro mini:850 × 137 × 51(mm)
Weight(Exclude
battery)
X4 Pro mini:1.85 kg
X6 Pro mini:2.35 kg
Accessory
At some point you may wish to reset your device back to factory settings. To perform a factory
reset on your X pro mini, make sure the battery is installed correctly and has sufficient power or
is connected to USB power, and then follow these steps:
1. Turn off the device via the power switch,
2. Press and hold the "B1" and "B2" buttons,
3. Turn the power
4. Release the "B1" and "B2" buttons when the screen displays “FACTORY RESET”.
back on,
Note: Performing a factory reset will clear all your changes to the keyboard. Please operates
carefully.
5. Appendix
5.1 Specifications
49/61 Slim keys with velocity-sensitive
USB Cable, User's manual, Midiplus posters
16

5.2 Instrument Patch Map
Piano
Chromatic Percussion
0
Acoustic Grand Piano
8
Celesta
1
Bright Acoustic Piano
9
Glockenspiel
2
Electric Grand Piano
10
Music box
3
Honky-tonk Piano
11
Vibraphone
4
Rhodes Piano
12
Marimba
5
Chorused Piano
13
Xylophone
6
Harpsichord
14
Tubular Bells
7
Clavichord
15
Dulcimer
Organ
Guitar
16
Hammond Organ
24
Acoustic Guitar (nylon)
17
Percussive Organ
25
Acoustic Guitar (steel)
18
Rock Organ
26
Electric Guitar (jazz)
19
Church Organ
27
Electric Guitar (clean)
20
Reed Organ
28
Electric Guitar (muted)
21
Accordian
29
Overdriven Guitar
22
Harmonica
30
Distortion Guitar
23
Tango Accordian
31
Guitar Harmonics
Bass
Strings/Orchestra
32
Acoustic Bass
40
Violin
33
Electric Bass(finger)
41
Viola
34
Electric Bass (pick)
42
Cello
35
Fretless Bass
43
Contrabass
36
Slap Bass 1
44
Tremolo Strings
37
Slap Bass 2
45
Pizzicato Strings
38
Synth Bass 1
46
Orchestral Harp
39
Synth Bass 2
47
Timpani
Ensemble
Brass
48
String Ensemble 1
56
Trumpet
49
String Ensemble 2
57
Trombone
50
Synth Strings 1
58
Tuba
51
Synth Strings 2
59
Muted Trumpet
52
Choir Aahs
60
French Horn
53
Voice Oohs
61
Brass Section
54
Synth Voi ce
62
Synth Brass 1
55
Orchestra Hit
63
Synth Brass 2
17

Instrument Patch Map (continue):
Lead
Pipe
64
Soprano Sax
72
Piccolo
65
Alto Sax
73
Flute
66
Tenor Sax
74
Recorder
67
Baritone Sax
75
Pan Flute
68
Oboe
76
Bottle Blow
69
English Horn
77
Shakuhac hi
70
Bassoon
78
Whistle
71
Clarinet
79
Ocarina
Synth Lead
Synth Pad
80
Lead 1 (square)
88
Pad 1 (new age)
81
Lead 2 (sawtooth)
89
Pad 2 (warm)
82
Lead 3 (caliope lead)
90
Pad 3 (polysynth)
83
Lead 4 (chiff lead)
91
Pad 4 (choir)
84
Lead 5 (charang)
92
Pad 5 (bowed)
85
Lead 6 (voice)
93
Pad 6 (metallic)
86
Lead 7 (fifths)
94
Pad 7 (halo)
87
Lead 8 (bass+lead)
95
Pad 8 (sweep)
Synth FX
Ethnic
96
FX 1 (rain)
104
Sitar
97
FX 2 (soundtrack)
105
Banjo
98
FX 3 (crystal)
106
Shamisen
99
FX 4 (atmosphere)
107
Koto
100
FX 5 (brightness)
108
Kalimba
101
FX 6 (goblins)
109
Bagpipe
102
FX 7 (echoes)
110
Fiddle
103
FX 8 (sci-fi)
111
Shanai
Percussive
Sound FX
112
Tinkle Bell
120
Guitar Fret Noise
113
Agogo
121
Breath Noise
114
Steel Drums
122
Seashore
115
Woodblock
123
Bird Tweet
116
Taiko Drum
124
Telephone Ring
117
Melodic Tom
125
Helicopter
118
Synth Drum
126
Applause
119
Reverse Cymbal
127
Gunshot
18

5.3 Percussion Sounds Map
Key#
Notes
Instrument Name
Key#
Notes
Instrument Name
27
D#+1
High Q
58
A#+3
Vibraslap
28
E+1
Slap
59
B+3
Ride Cymbal 2
29
F+1
Scratch P ush
60
C+4
Hi Bongo
30
F#+1
Scratch P ull
61
C#+4
Low Bongo
31
G+1
Sticks
62
D+4
Mute Hi Conga
32
G#+1
Square Click
63
D#+4
Open Hi Conga
33
A+1
Metronome Click
64
E+4
Low Conga
34
A#+1
Metronome Bell
65
F+4
High Timbale
35
B+1
Acoustic Bass Drum
66
F#+4
Low Timbale
36
C+2
Bass Drum 1
67
G+4
High Agogo
37
C#+2
Side Stick
68
G#+4
Low Agogo
38
D+2
Acoustic Snare
69
A+4
Cabasa
39
D#+2
Hand Clap
70
A#+4
Maracas
40
E+2
Electric Snare
71
B+4
Short Whistle
41
F+2
Low Floor Tom
72
C+5
Long Whistle
42
F#+2
Closed Hi-Hat
73
C#+5
Short Guiro
43
G+2
High Floor Tom
74
D+5
Long Guiro
44
G#+2
Pedal Hi-Hat
75
D#+5
Claves
45
A+2
Low Tom
76
E+5
Hi Wood Block
46
A#+2
Open Hi-Hat
77
F+5
Low Wood Block
47
B+2
Low-Mid Tom
78
F#+5
Mute Cuica
48
C+3
Hi-Mid Tom
79
G+5
Open Cuica
49
C#+3
Crash Cymbal 1
80
G#+5
Mute Triangle
50
D+3
High Tom
81
A+5
Open Triangle
51
D#+3
Ride Cymbal 1
82
A#+5
Shaker
52
E+3
Chinese Cymbal
83
B+5
Jingle Bell
53
F+3
Ride Bell
84
C+6
Bell Tree
54
F#+3
Tambourine
85
C#+6
Castanets
55
G+3
Splash Cymbal
86
D+6
Mute Surdo
56
G#+3
Cowbell
87
D#+6
Open Surdo
57
A+3
Crash Cymbal 2
88
E+6
Applause2
19

5.4 MIDI Notes
Key#
Notes
Key#
Notes
Key#
Notes
Key#
Notes 0 C-1
32
G#+1
64
E+4
96
C+7
1
C#-1
33
A+1
65
F+4
97
C#+7
2
D-1
34
A#+1
66
F#+4
98
D+7 3 D#-1
35
B+1
67
G+4
99
D#+7 4 E-1
36
C+2
68
G#+4
100
E+7 5 F-1
37
C#+2
69
A+4
101
F+7 6 F#-1
38
D+2
70
A#+4
102
F#+7 7 G-1
39
D#+2
71
B+4
103
G+7
8
G#-1
40
E+2
72
C+5
104
G#+7 9 A-1
41
F+2
73
C#+5
105
A+7
10
A#-1
42
F#+2
74
D+5
106
A#+7
11
B-1
43
G+2
75
D#+5
107
B+7
12
C0
44
G#+2
76
E+5
108
C+8
13
C#0
45
A+2
77
F+5
109
C#+8
14
D0
46
A#+2
78
F#+5
110
D+8
15
D#0
47
B+2
79
G+5
111
D#+8
16
E0
48
C+3
80
G#+5
112
E+8
17
F0
49
C#+3
81
A+5
113
F+8
18
F#0
50
D+3
82
A#+5
114
F#+8
19
G0
51
D#+3
83
B+5
115
G+8
20
G#0
52
E+3
84
C+6
116
G#+8
21
A0
53
F+3
85
C#+6
117
A+8
22
A#0
54
F#+3
86
D+6
118
A#+8
23
B0
55
G+3
87
D#+6
119
B+8
24
C+1
56
G#+3
88
E+6
120
C+9
25
C#+1
57
A+3
89
F+6
121
C#+9
26
D+1
58
A#+3
90
F#+6
122
D+9
27
D#+1
59
B+3
91
G+6
123
D#+9
28
E+1
60
C+4
92
G#+6
124
E+9
29
F+1
61
C#+4
93
A+6
125
F+9
30
F#+1
62
D+4
94
A#+6
126
F#+9
31
G+1
63
D#+4
95
B+6
127
G+9
20

5.5 MIDI CC (Continue Control) Map
Number
Control Function
Number
Control Function
0
Bank Select MSB
68
Legato Footswitch
1
Modulation
69
Hold 2
2
Breath Controller
70
Sound Variation
3
Undefined
71
Harmonic
4
Foot Controller
72
Release Time
5
Portamento Time
73
Attack Time
6
Data Entry MSB
74
Brightness
7
Main Volume
75 ~ 79
Undefined
8
Balance
80 ~ 83
General Purpose Controller 5 ~ 8
9
Undefined
84
Portamento Control
10
Pan
85 ~ 90
Undefined
11
Expression Controller
91
Reverb Send Level
12 ~ 15
Undefined
92
Effects 2 Depth
16 ~ 19
General Purpose Controller 1 ~ 4
93
Chorus Send Level
20 ~ 31
Undefined
94
Effects 4 Depth
32
Bank Select LSB
95
Effects 5 Depth
33
Modulation LSB
96
Data Increment
34
Breath Controller LSB
97
Data Decrement
35
Undefined
98
NRPN LSB
36
Foot Controller LSB
99
NRPN MSB
37
Portamento LSB
100
RPN LSB
38
Data Entry LSB
101
RPN MSB
39
Main Volume LSB
102 ~ 119
Undefined
40
Balance LSB
120
All Sound Off
41
Undefined
121
Reset All Controlle rs
42
Pan LSB
122
Local Control On/Off
43
Expression Controller LSB
123
All Notes Off
44 ~ 63
Undefined
124
Omni Mode Off
64
Sustain
125
Omni Mode On
65
Portamento On/Off
126
Mono Mode On
66
Sostenuto On/Off
127
Poly Mode On
67
Soft Pedal On/Off
21

www.midiplus.com
X pro mini Series Manual V1.0.0
MIDIPLUS Co.,Ltd.
 Loading...