

Page 1
MIDIPLUS Co, Ltd.
http://www.midiplus.com.tw
Page 2

MIDIPLUS Co, Ltd.
http://www.midiplus.com.tw
CONTENTS
Preface................................................................................................................3
What’s in the Box?............................................................................................3
SmartPAD introduction....................................................................................3
Connection Diagram.........................................................................................4
Software Setup..................................................................................................4
Chapter 1:Quick Start....................................................................................6
1.1 SmartPAD Overview..............................................................................6
1.1.1 SmartPAD panel Overview....................................................6
1.1.2 Controllers description............................................................6
1.2 Minimum System Requirement...........................................................21
Page 3

MIDIPLUS Co, Ltd.
3
http://www.midiplus.com.tw
Preface
Congratulations on purchasing the MIDIPLUS SmartPAD master
MIDI controller. It is one of the finest products of its kind, made after
extensive research into what customers require from a MIDI
Controller.
When using your MIDIPLUS SmartPAD in conjunction with a
computer and appropriate music software, you will be able to
discover the wonderful world of Computer Music, with a set of
complete musical instruments from your sound card or workstation.
What’s in the Box?
The following items should be in your package.
SmartPAD MIDI
Controller.
Owner’s Manual.
One standard
USB Cable.
SmartPAD introduction
SmartPAD is designed for performance with Ableton Live. In this
manual , you will find instructions on how to connect the
Page 4

MIDIPLUS Co, Ltd.
4
http://www.midiplus.com.tw
SmartPAD and use its basic features with Ableton Live —
Professional SmartPAD Edition . SmartPAD can also be used
in"generic mode"as a controller with other virtual DJ applications that
use MIDI protocol.
Connection Diagram
Connect
SmartPAD to yourcomputer witha standard USB cable(included).
Turn on
SmartPAD.
Open Ableton
Live — Professional SmartPAD Edition.
Software Setup
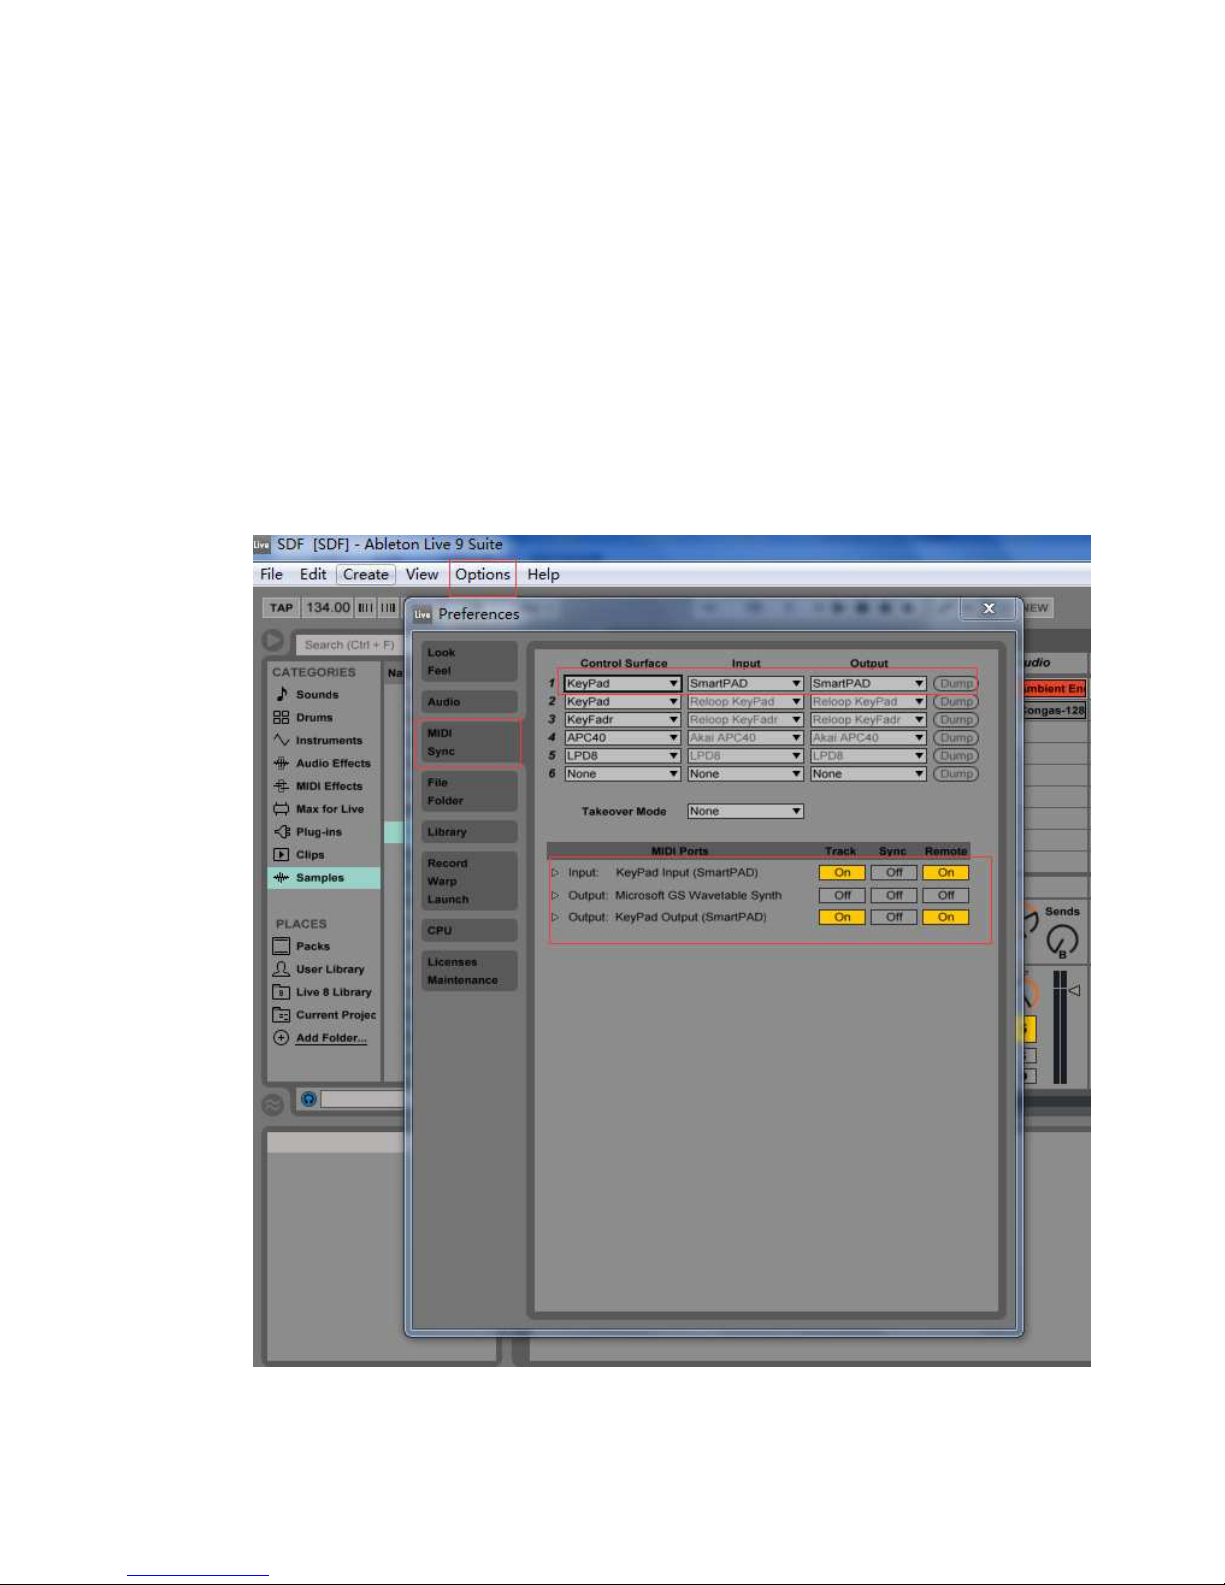
After connecting the SmartPAD(as shown in the Connection
Diagram),you will need to configure Ableton Live to recognize it:
Open Ableton
Live — Professional SmartPAD Edition(after connecting).
Go to Options
->Preferences(PC) or Live ->Preferences(MAC).
Select
“SmartPAD” as the device for the “Input”and “Output”.
Select “KeyPad”
as the device forthe“Control Surface”.
Page 5
MIDIPLUS Co, Ltd.
5
http://www.midiplus.com.tw
Under “MIDI ports”,
turn all available “Track”and “Remote” settings “On”.
Close the
Preferences window.
Page 6
MIDIPLUS Co, Ltd.
6
http://www.midiplus.com.tw
Chapter 1:
::
:Quick Start
1.1 SmartPAD Overview
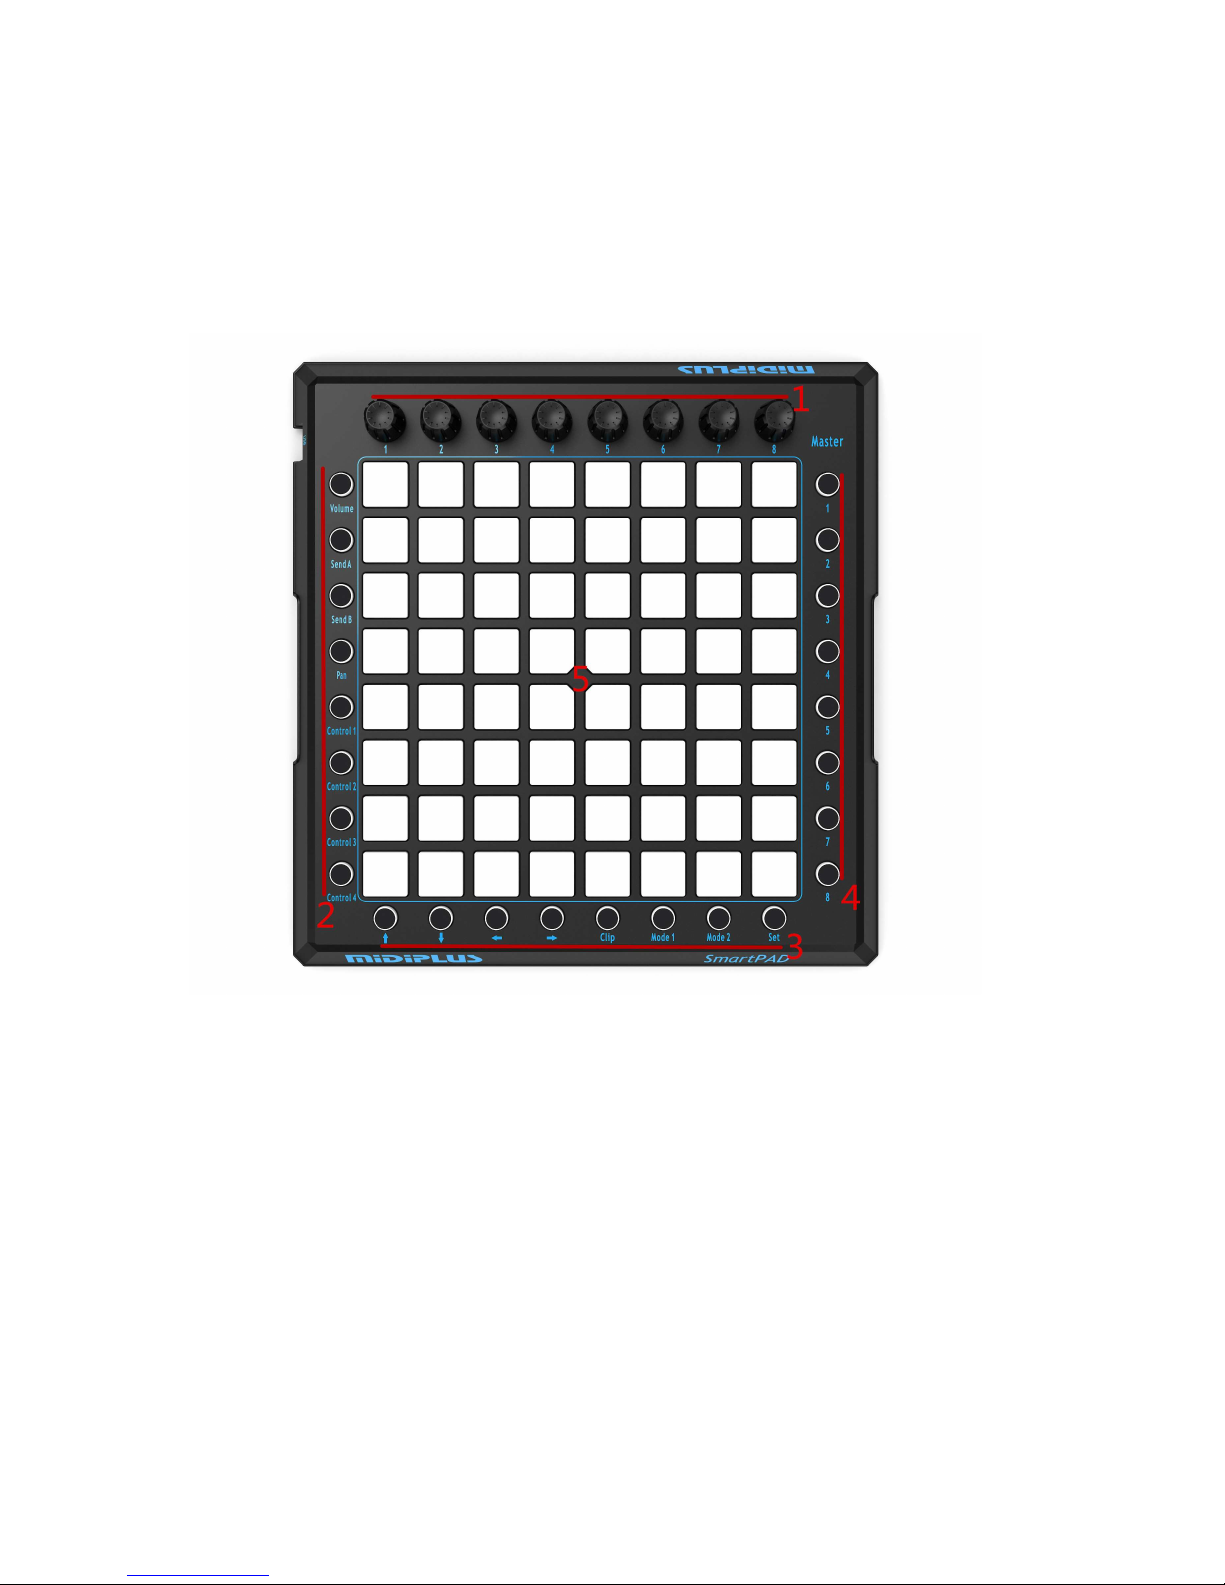
1.1.1 SmartPAD panel Overview
1.1.2 Controllers description
1 Encoder —
Change the values (CC)ofeach mode(Behind the list).
2 Eight kinds of
function
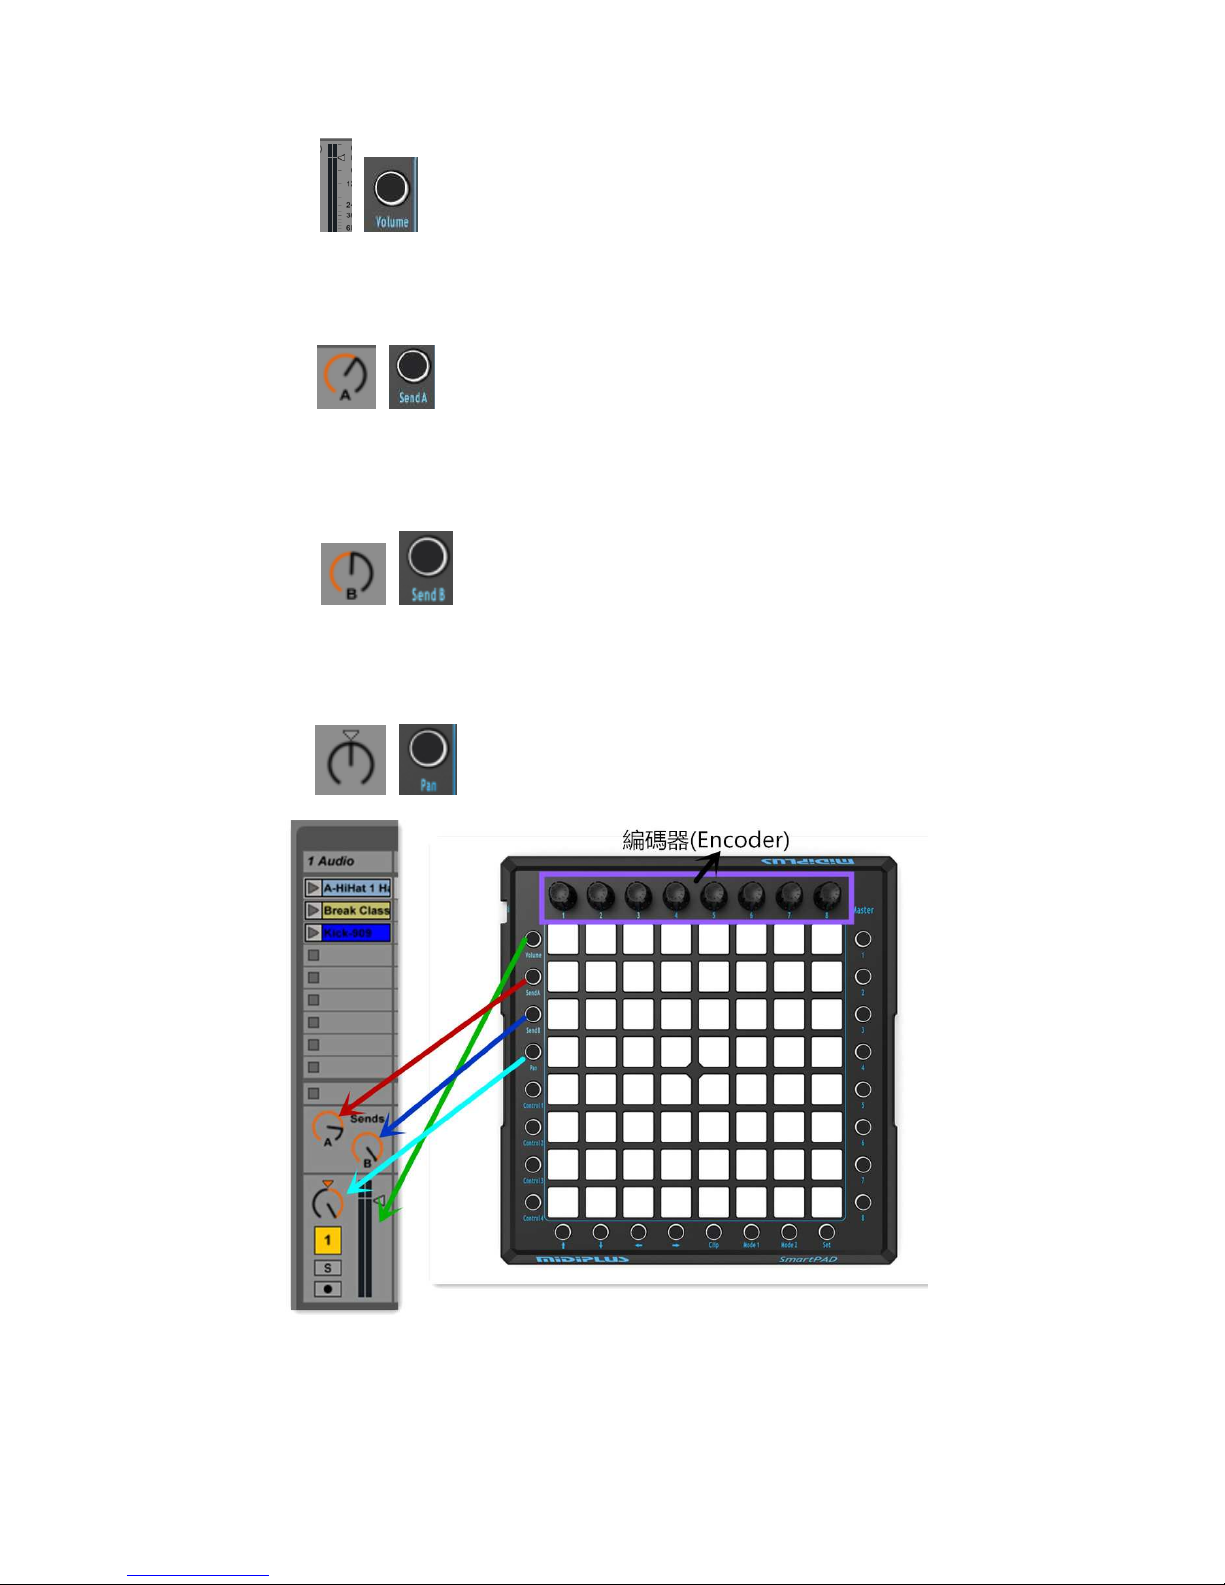
1. Volume —8 encoder can adjust eight tracksvolume
regulator .
Page 7
MIDIPLUS Co, Ltd.
7
http://www.midiplus.com.tw
2. Send A —8 encoder can adjust eight tracksregulator of
A(Send A).
3. Send B —8 encoder can adjust eight tracks regulator of
B(Send B).
4. PAN —8 encoder can adjust eight tracks regulator PAN
(PAN).
Page 8

MIDIPLUS Co, Ltd.
8
http://www.midiplus.com.tw
5~8. Control 1~4 —Custom manual mapping controller
(corresponding to 1-8 encoder) software mapping brief
explanation (details see "Software Mapping")
3 The direction
key and four play
1~4. Bank Select -Up: Current LIVE software SCENE (scene) move up a line;
Only the "Down" button LED light when to move up, moved
to 1-8 on the line, that is 0, " Down " button LED will turn off, "
Up"LED is not light.( SmartPad CLIP matrix buttons up send information accordingly, LED display effect is up, for
example: the current scene for 3-10 lines, move up a line into
2-9)
Down: Current LIVE software SCENE (scene) move down a
line; Most down eight line, even if the current one down the
line, the "Down" button LED will be lit.Only recovered to 1-8
line is 0, LED will turn off. ( SmartPad CLIP matrix buttons
down - send information accordingly, LED display effect is
down, for example: the current scene for 1-8 lines, move
down a line into 2-9)
Page 9
MIDIPLUS Co, Ltd.
9
http://www.midiplus.com.tw
"Up" and "Down" key is pressed together, SCENE (scene)
will be recovered to the original 1-8 line ,"Down" button LED
will turn off. +
Left: Current LIVE software Audio(audio) move left one
column; Only the "Right" button LED light when to move left,
moved to 1-8 on the column, that is 0, " Right" button LED
will turn off, "Left" LED is not light.( SmartPad CLIP matrix
buttons left - send information accordingly, LED display effect
is left, for example: the current audio for 2-9 column, move
left one column into 1-8)
Right: Current LIVE software Audio(audio) move right one
column; Most right eight column, even if the current one right
the column, the " Right " button LED will be lit.Only recovered
to 1-8 column is 0, LED will turn off. ( SmartPad CLIP matrix
buttons right - send information accordingly, LED display
effect is right, for example: the current audio for 1-8 column,
move down one column into 2-9)
" Left " and " Right " key is pressed together, Audio(audio) will
be recovered to the original 1-8 column ," Right " button LED
will turn off.
+
Page 10
MIDIPLUS Co, Ltd.
10
http://www.midiplus.com.tw
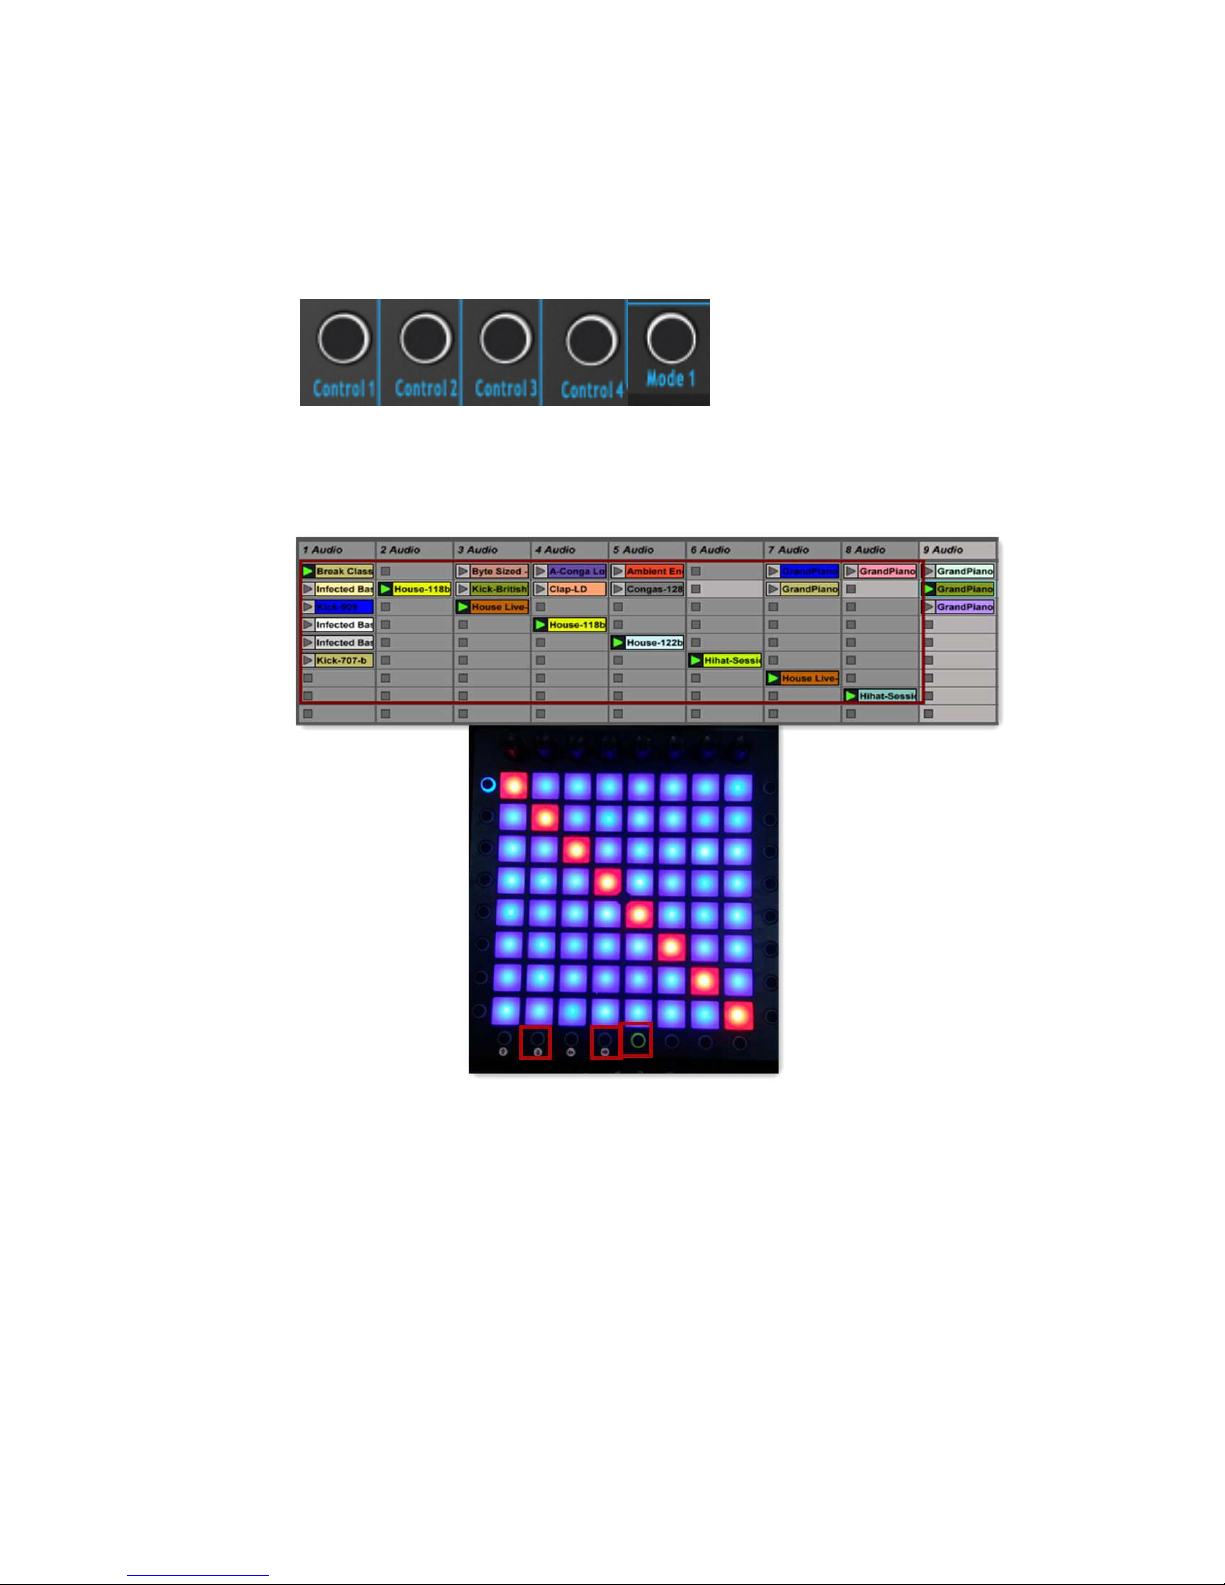
That has no effect when"Up", "Down", "Left", "Right" button in
the "Mode1" or "CONTROL1" ~ "CONTROL4".These mode is
not need to moves to the right or down.
The default 1-8 lines, 1-8 column, "Down"and"Right" LED are
not light:
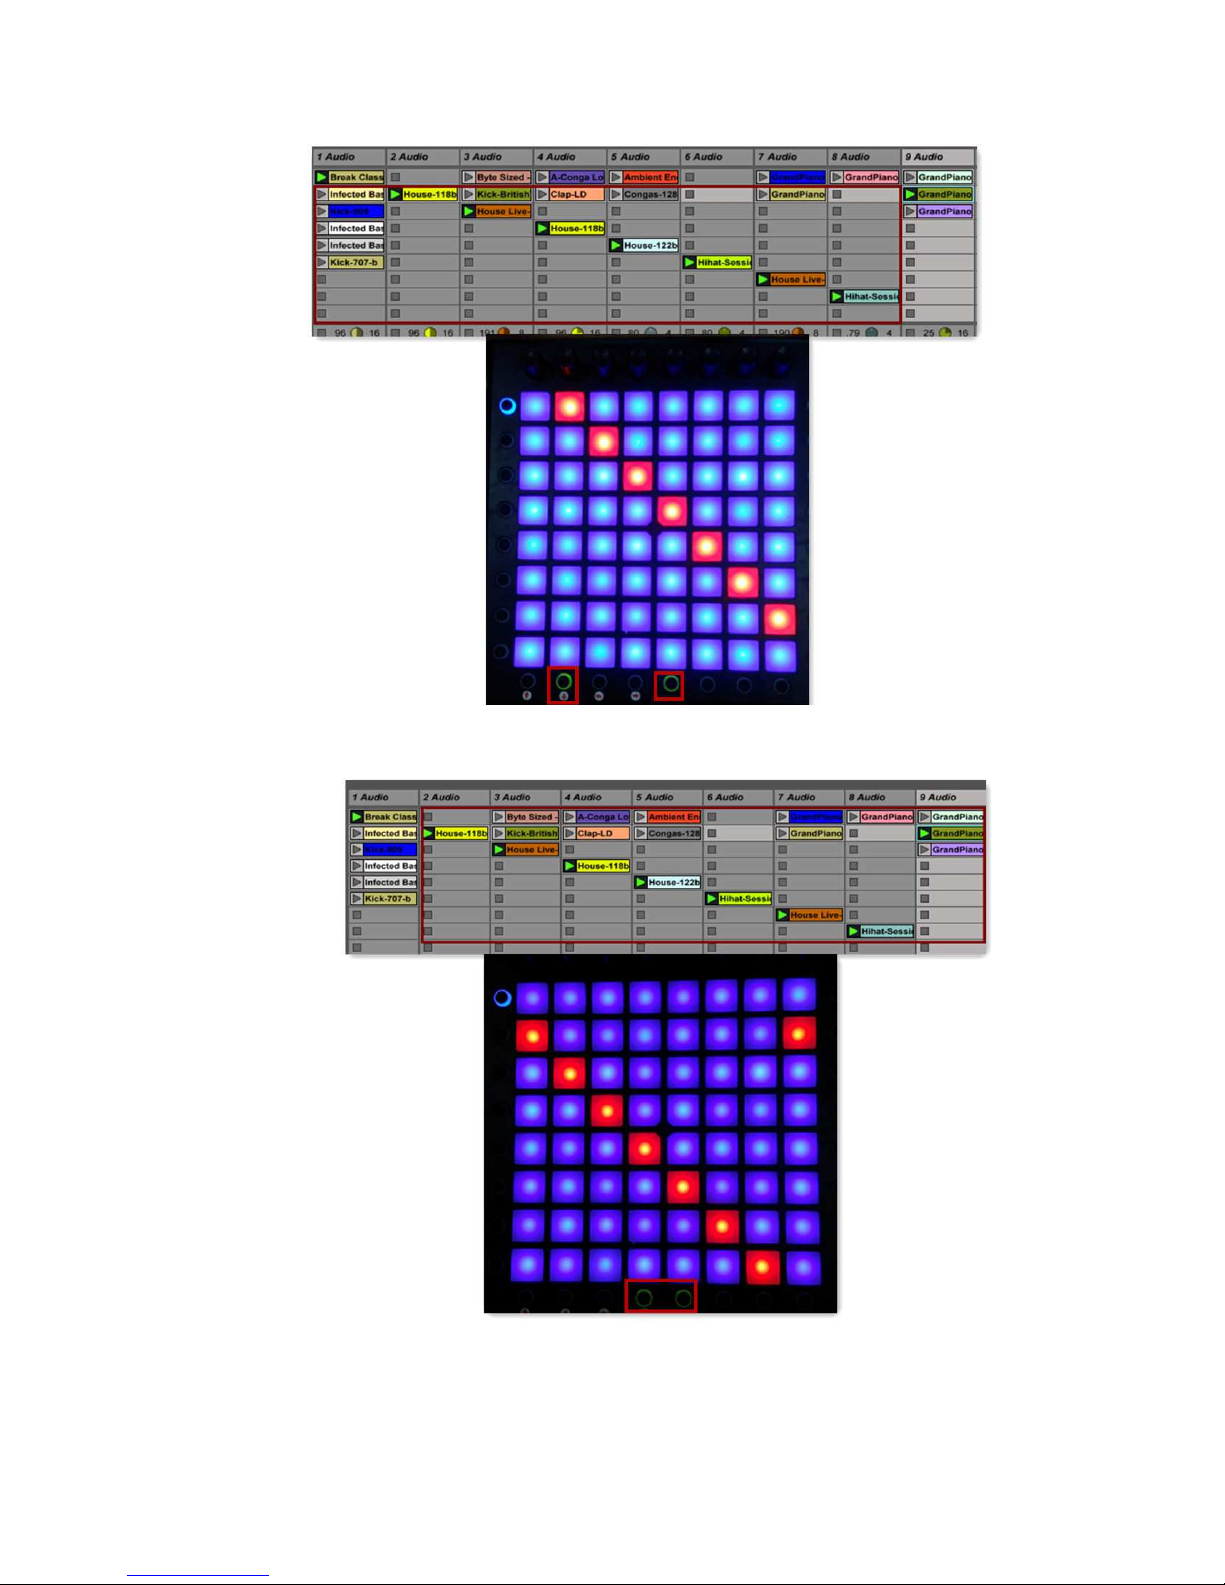
After move down a line, "Down" LED light:
Page 11
MIDIPLUS Co, Ltd.
11
http://www.midiplus.com.tw
After move right one column, "Right" LED light:
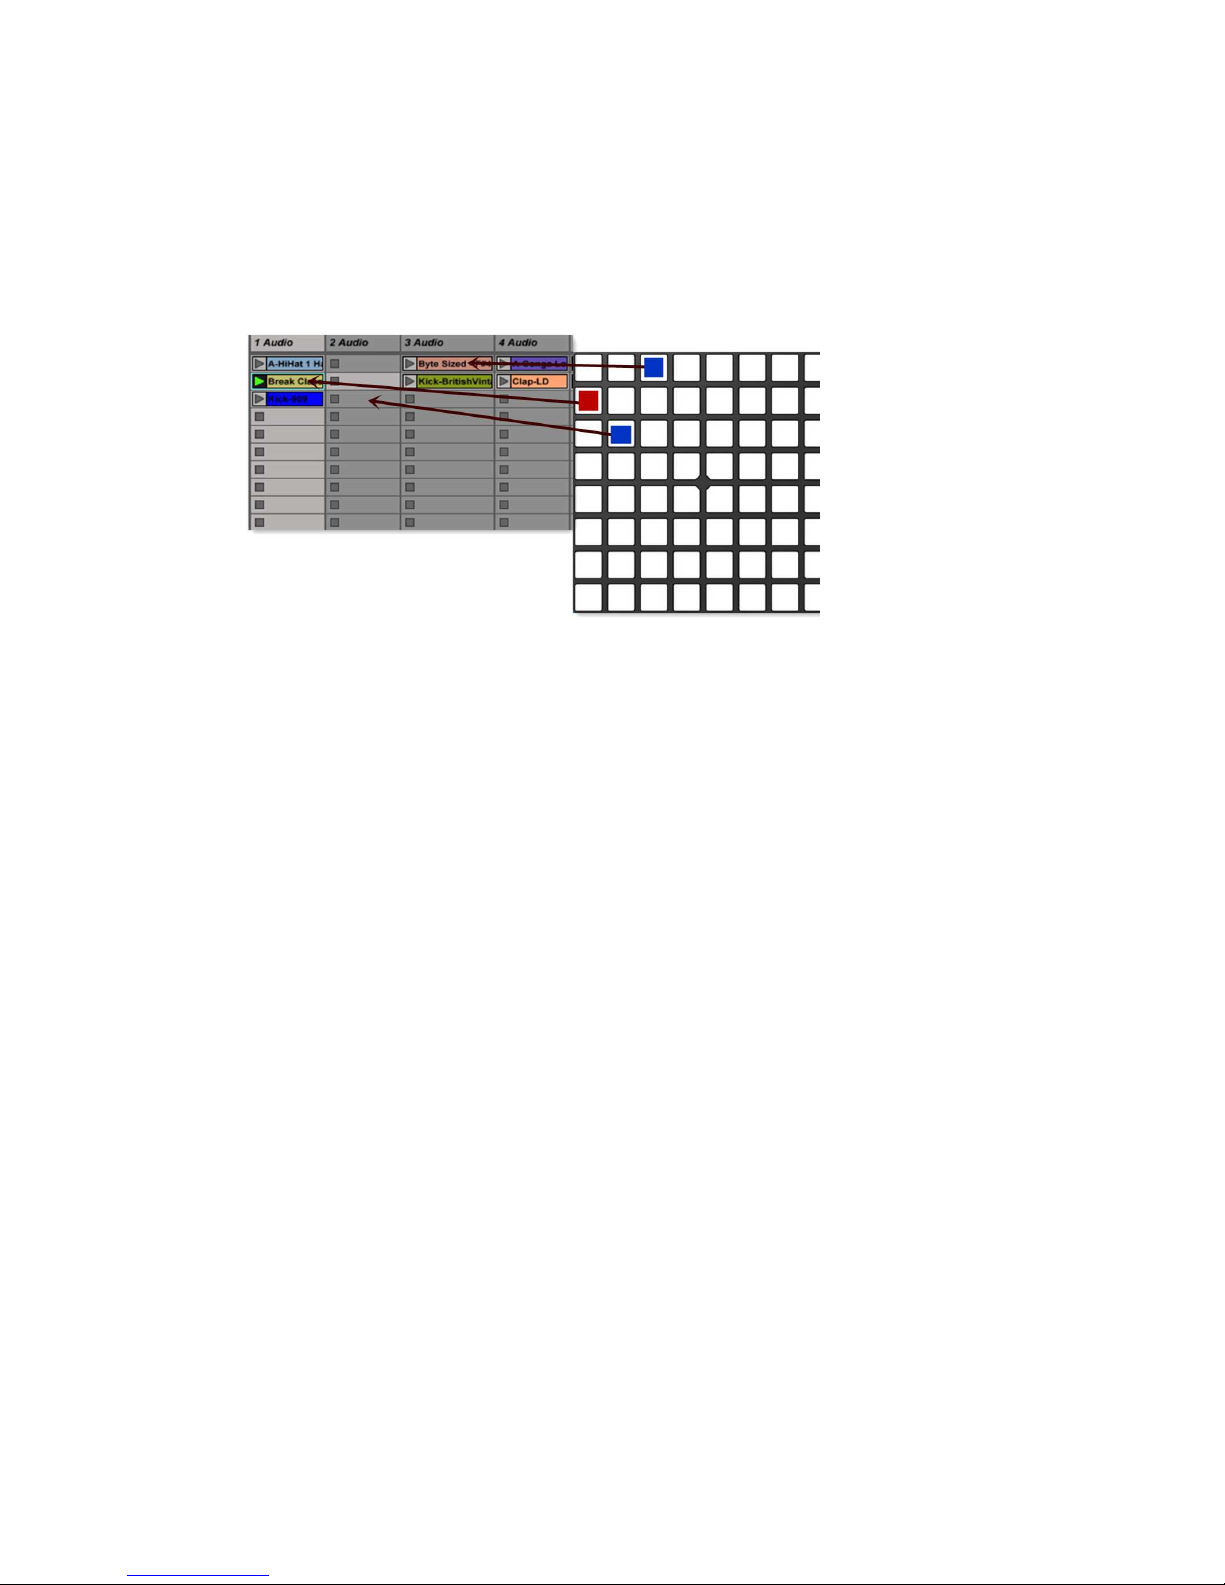
5. Clip –In Track View mode incised with Clip View mode (Clip
View model can control the scene, and the BUTTON under the
Page 12
MIDIPLUS Co, Ltd.
12
http://www.midiplus.com.tw
Track, press the BUTTON of "SmartPad" corresponding matrix
can enable software BUTTON, if the BUTTON of the software
have music, can make it light up the red LED, otherwise light blue
LED, you can use the "Up", "Down", "Left", "Right"BUTTON).
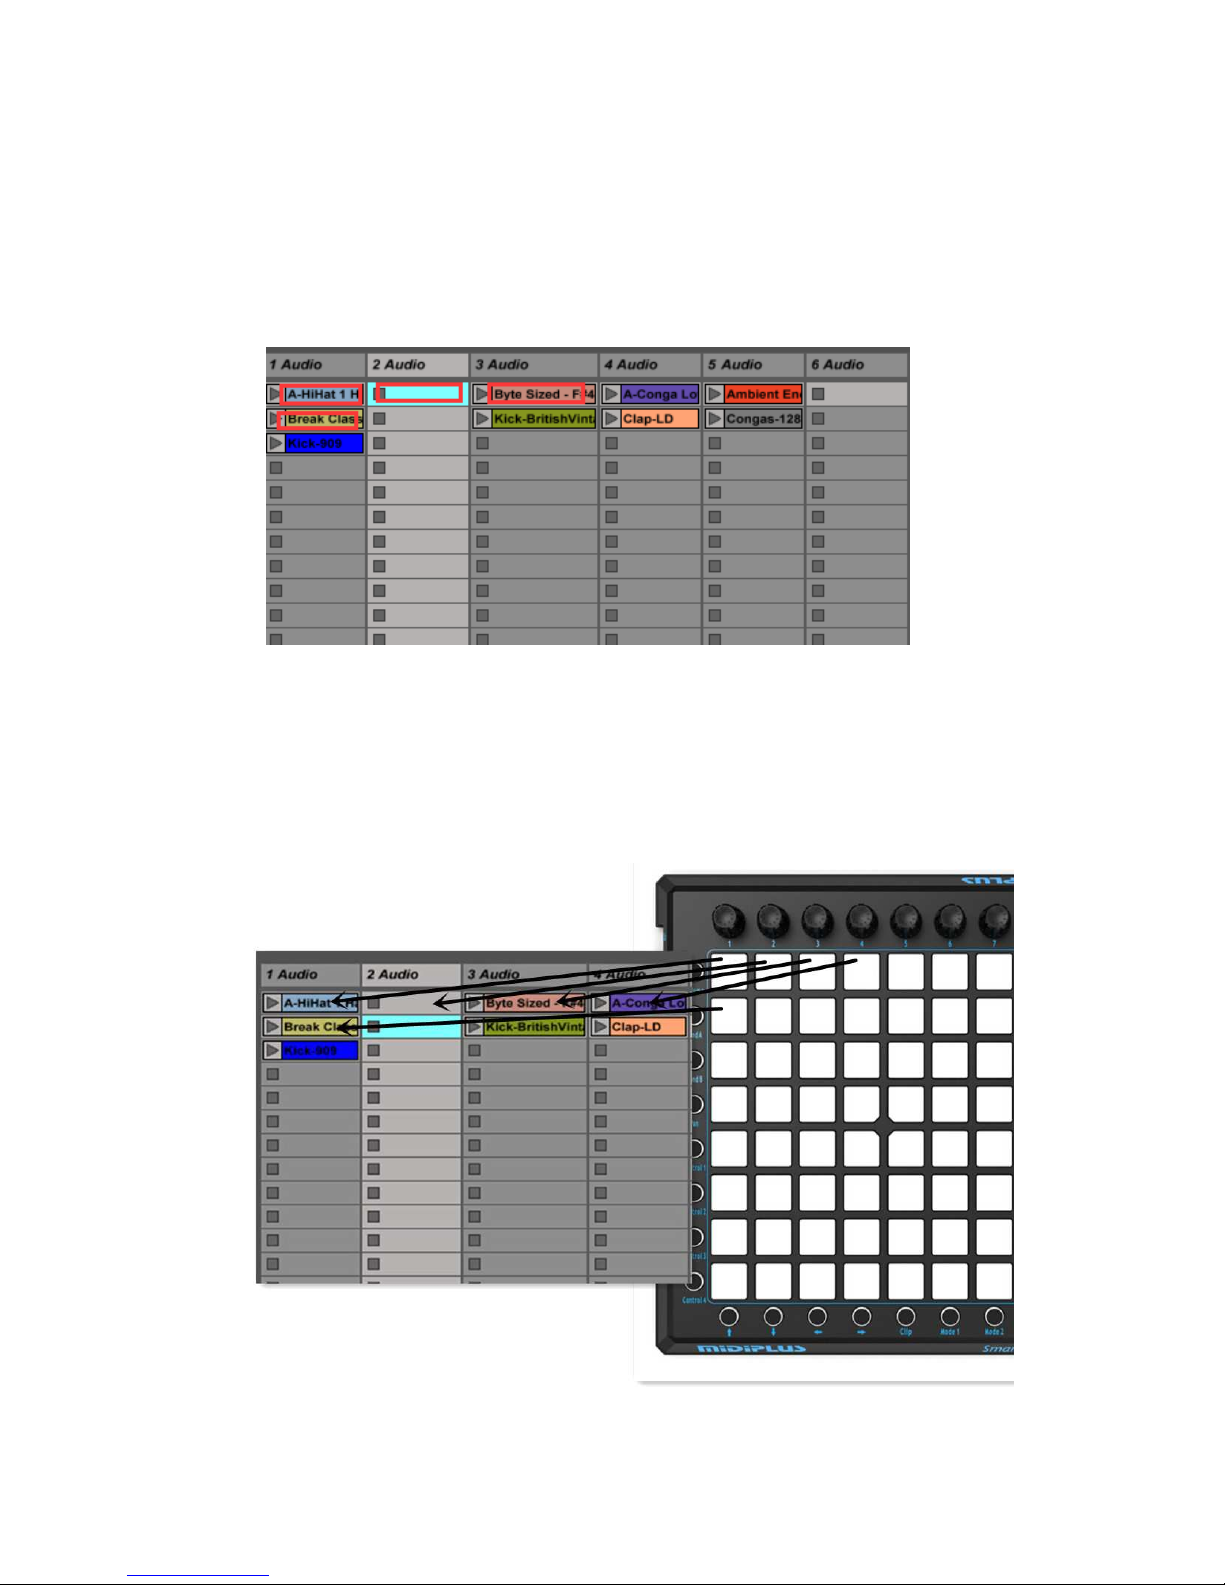
“Down”and“Right” are 0, that is 1-8 lines, 1-8 column
(“Down”and“Right” keysLED turn out state) :
Page 13
MIDIPLUS Co, Ltd.
13
http://www.midiplus.com.tw
SomeBUTTONenable or not , SmartPad state:
Enable makered, not to make blue
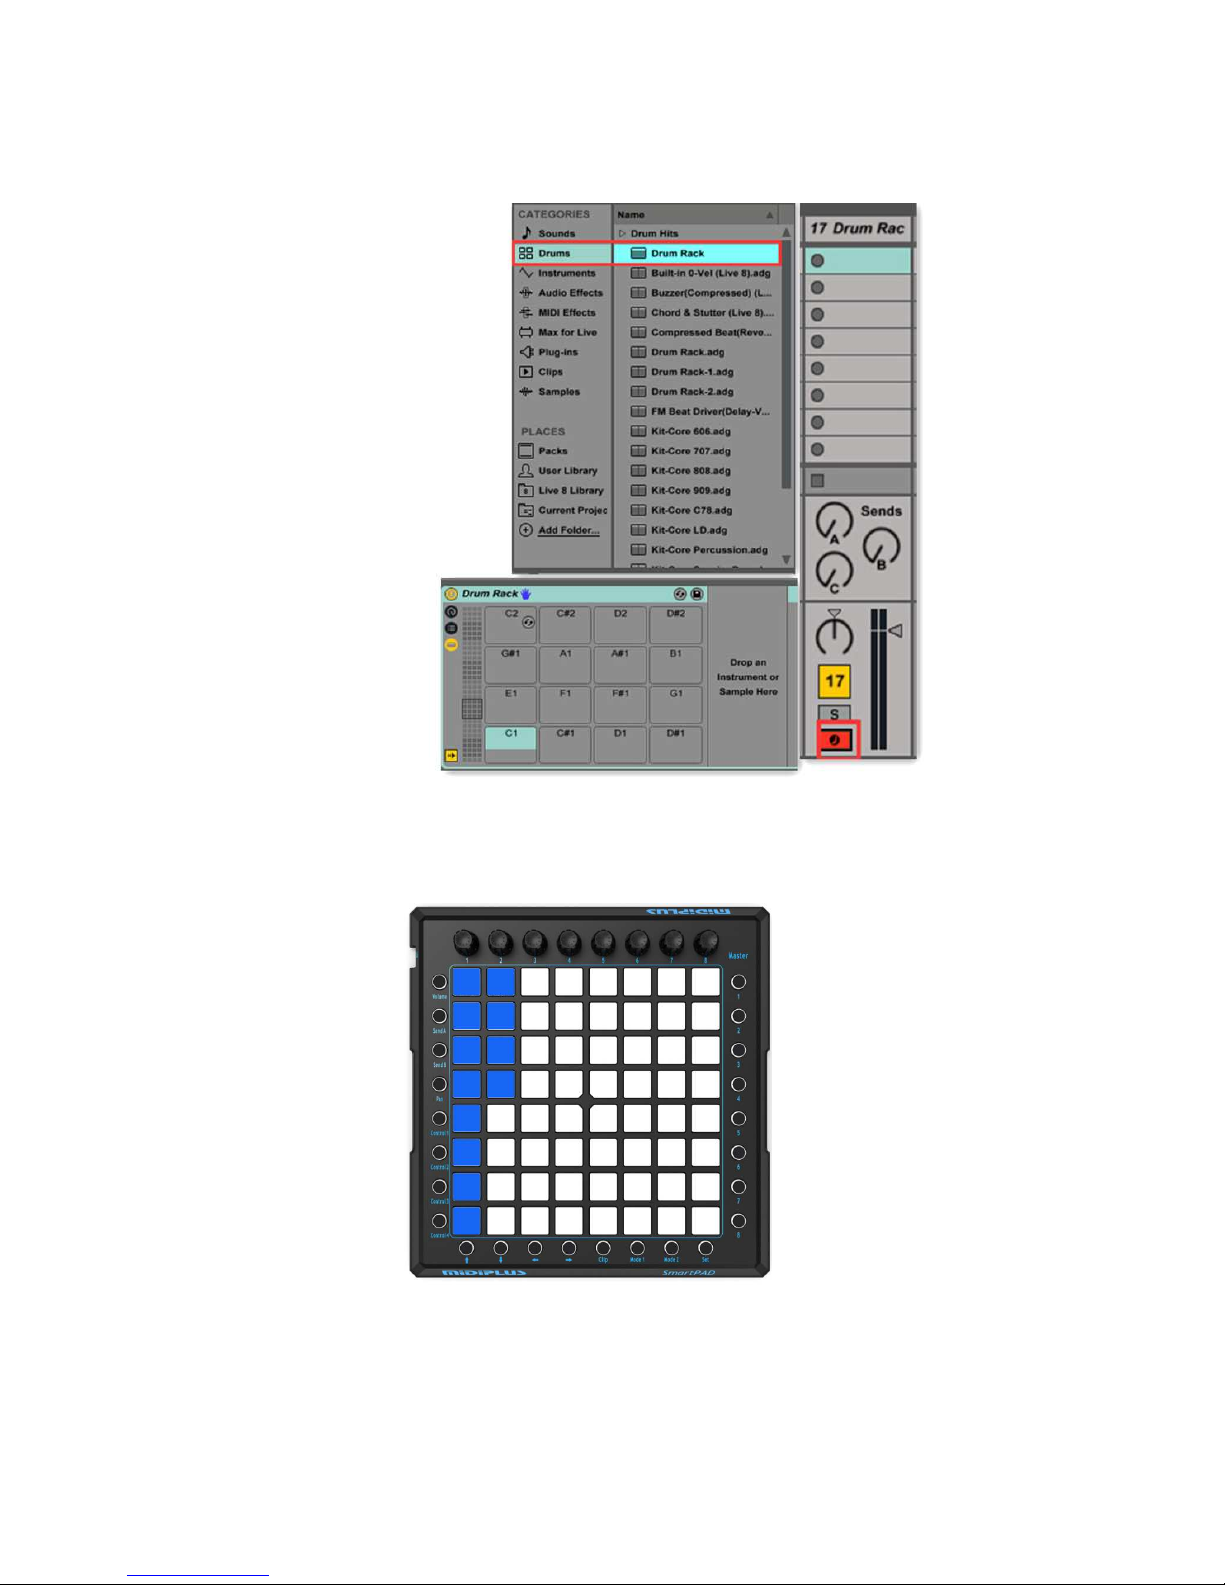
6. Mode 1-- Corresponding software on the Drum Rack
effect (The clip matrix buttons becomes PADs to use, press
the LED will light blue).
Page 14
MIDIPLUS Co, Ltd.
14
http://www.midiplus.com.tw
Software DRUM model
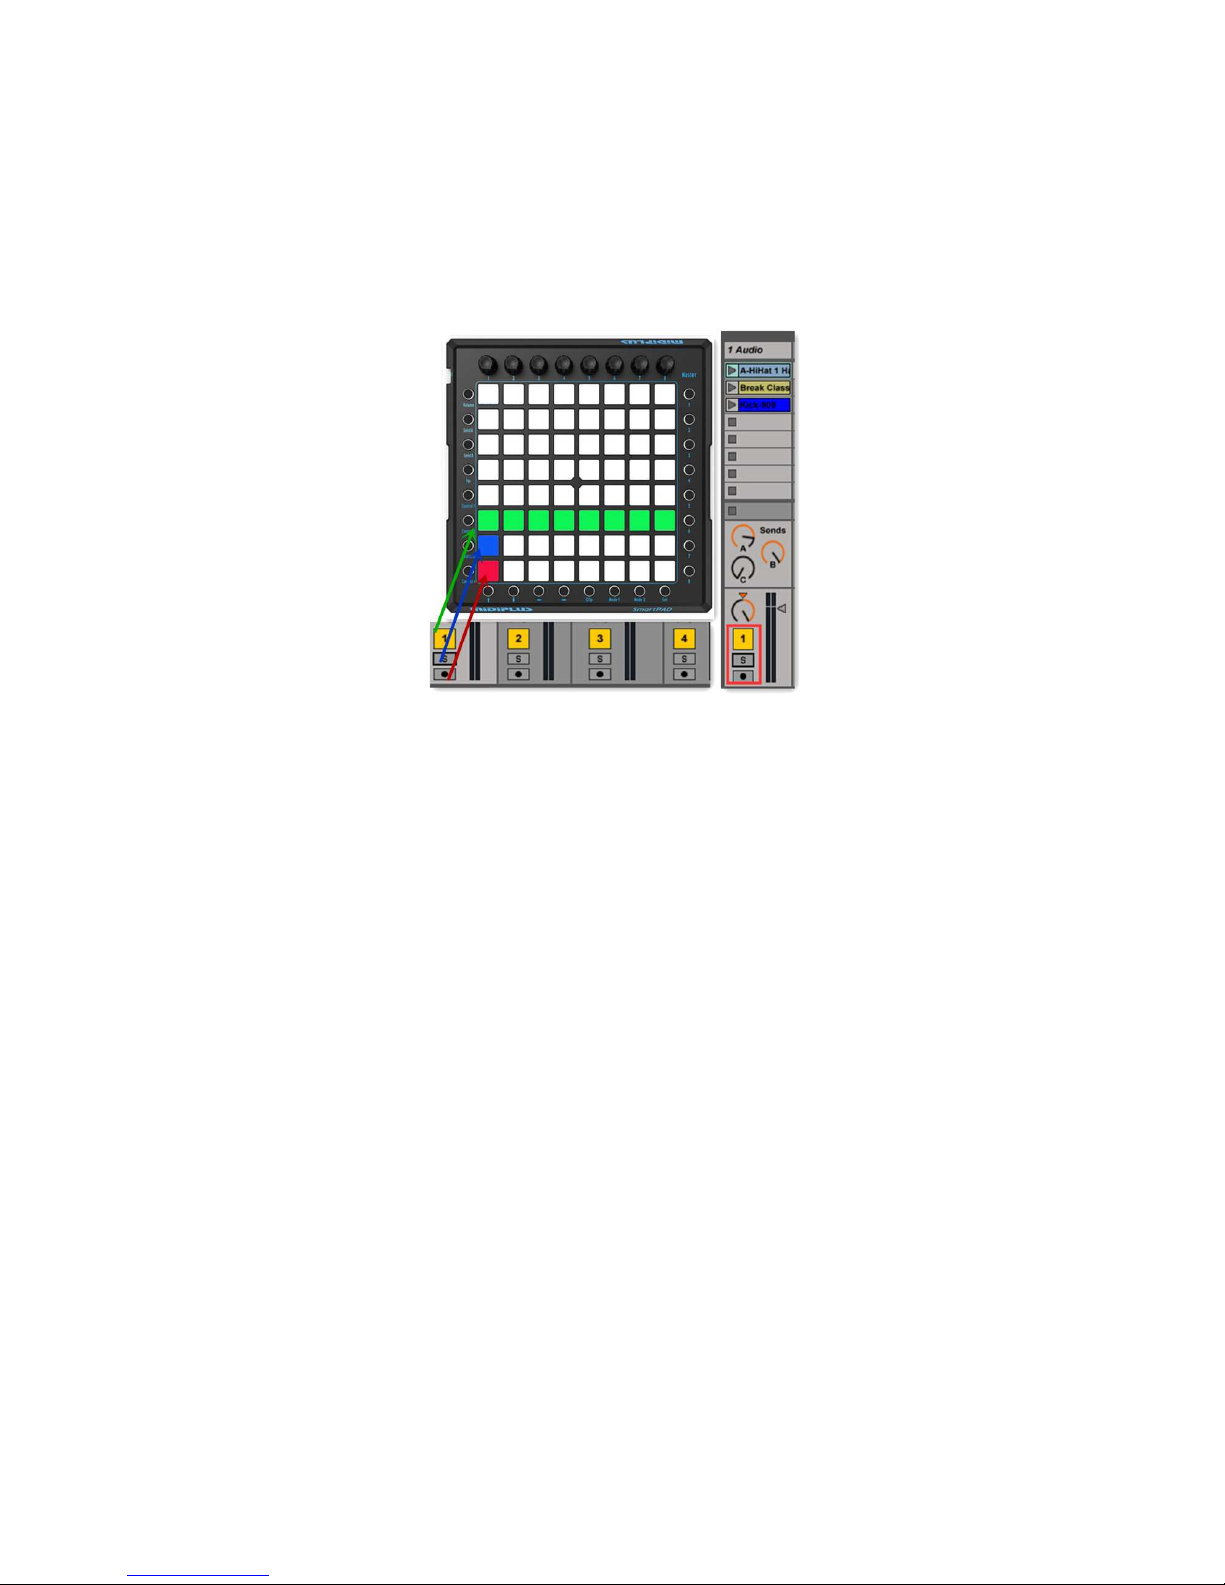
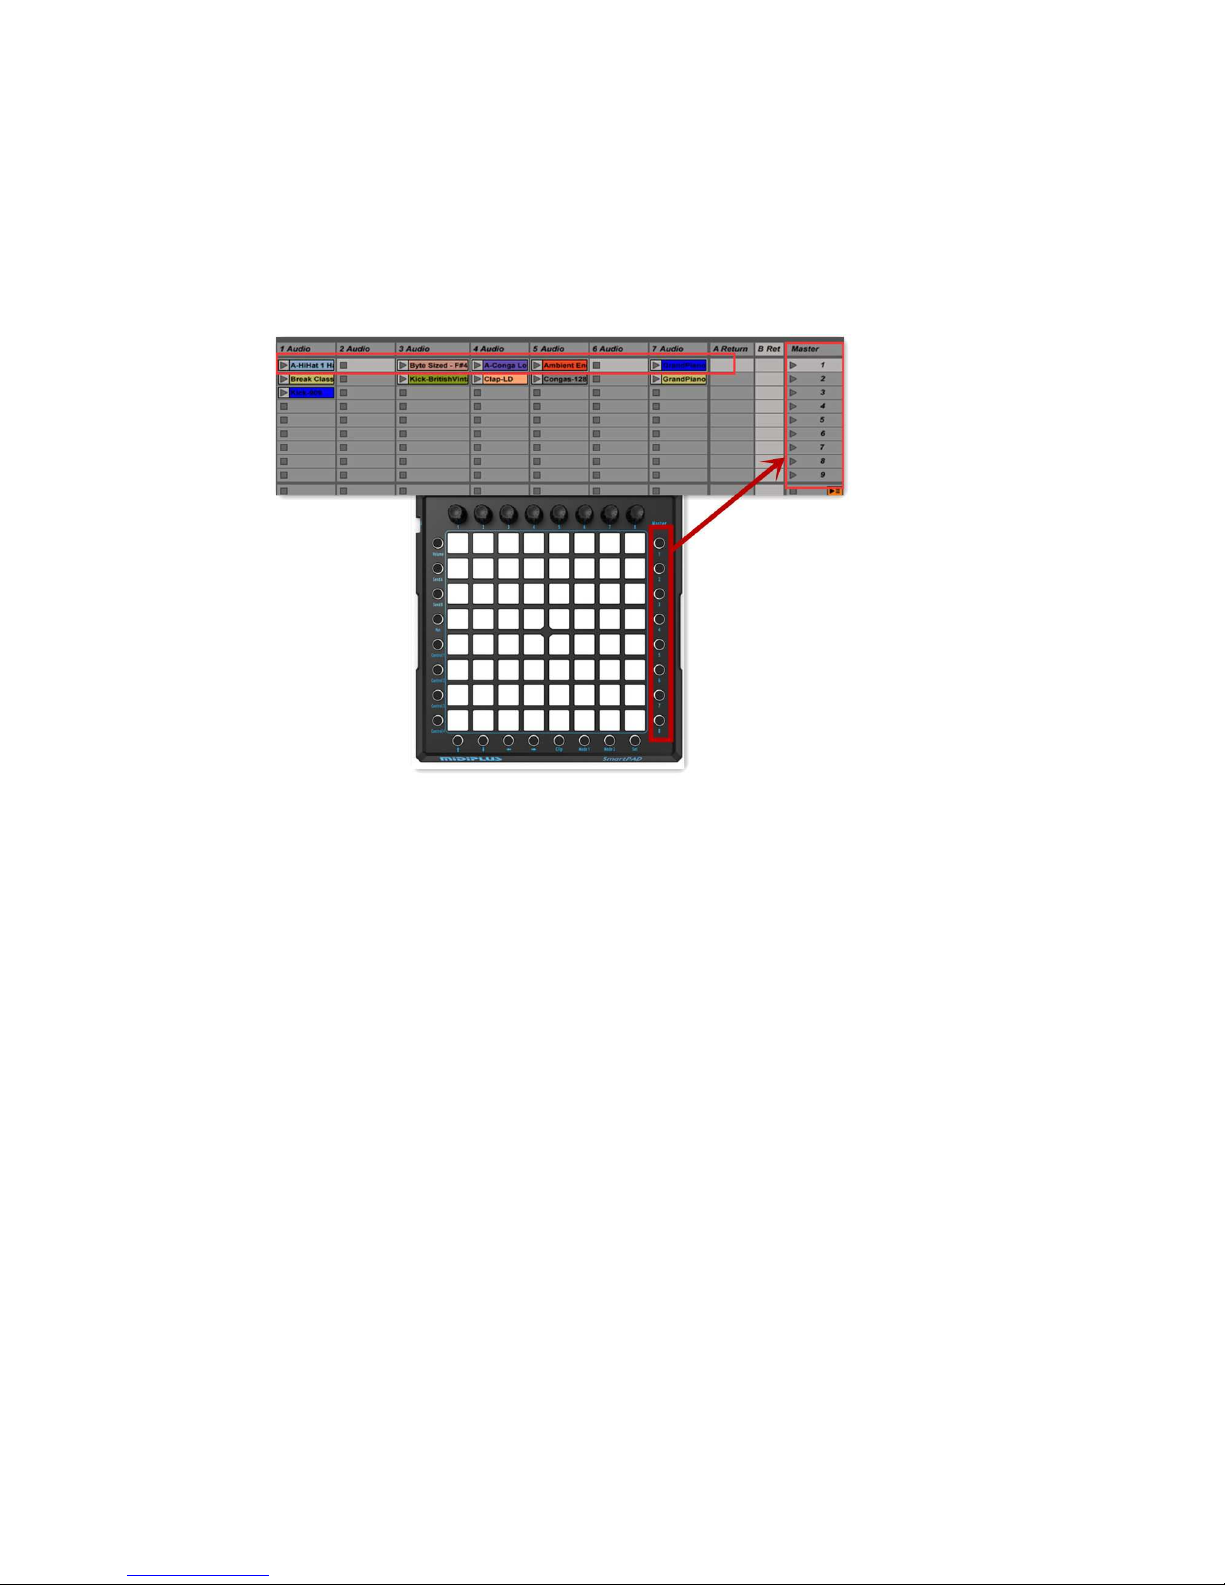
7. Mode 2 –Open the sequencer, corresponds to the
SmartPad matrix button 3 lines buttons on the bottom ,and it
can use the "Left", "Right" move around.
Page 15
MIDIPLUS Co, Ltd.
15
http://www.midiplus.com.tw
(1) MUTE(Green LED).
(2) SOLO(Blue LED).
(3) RECORD(Red LED).
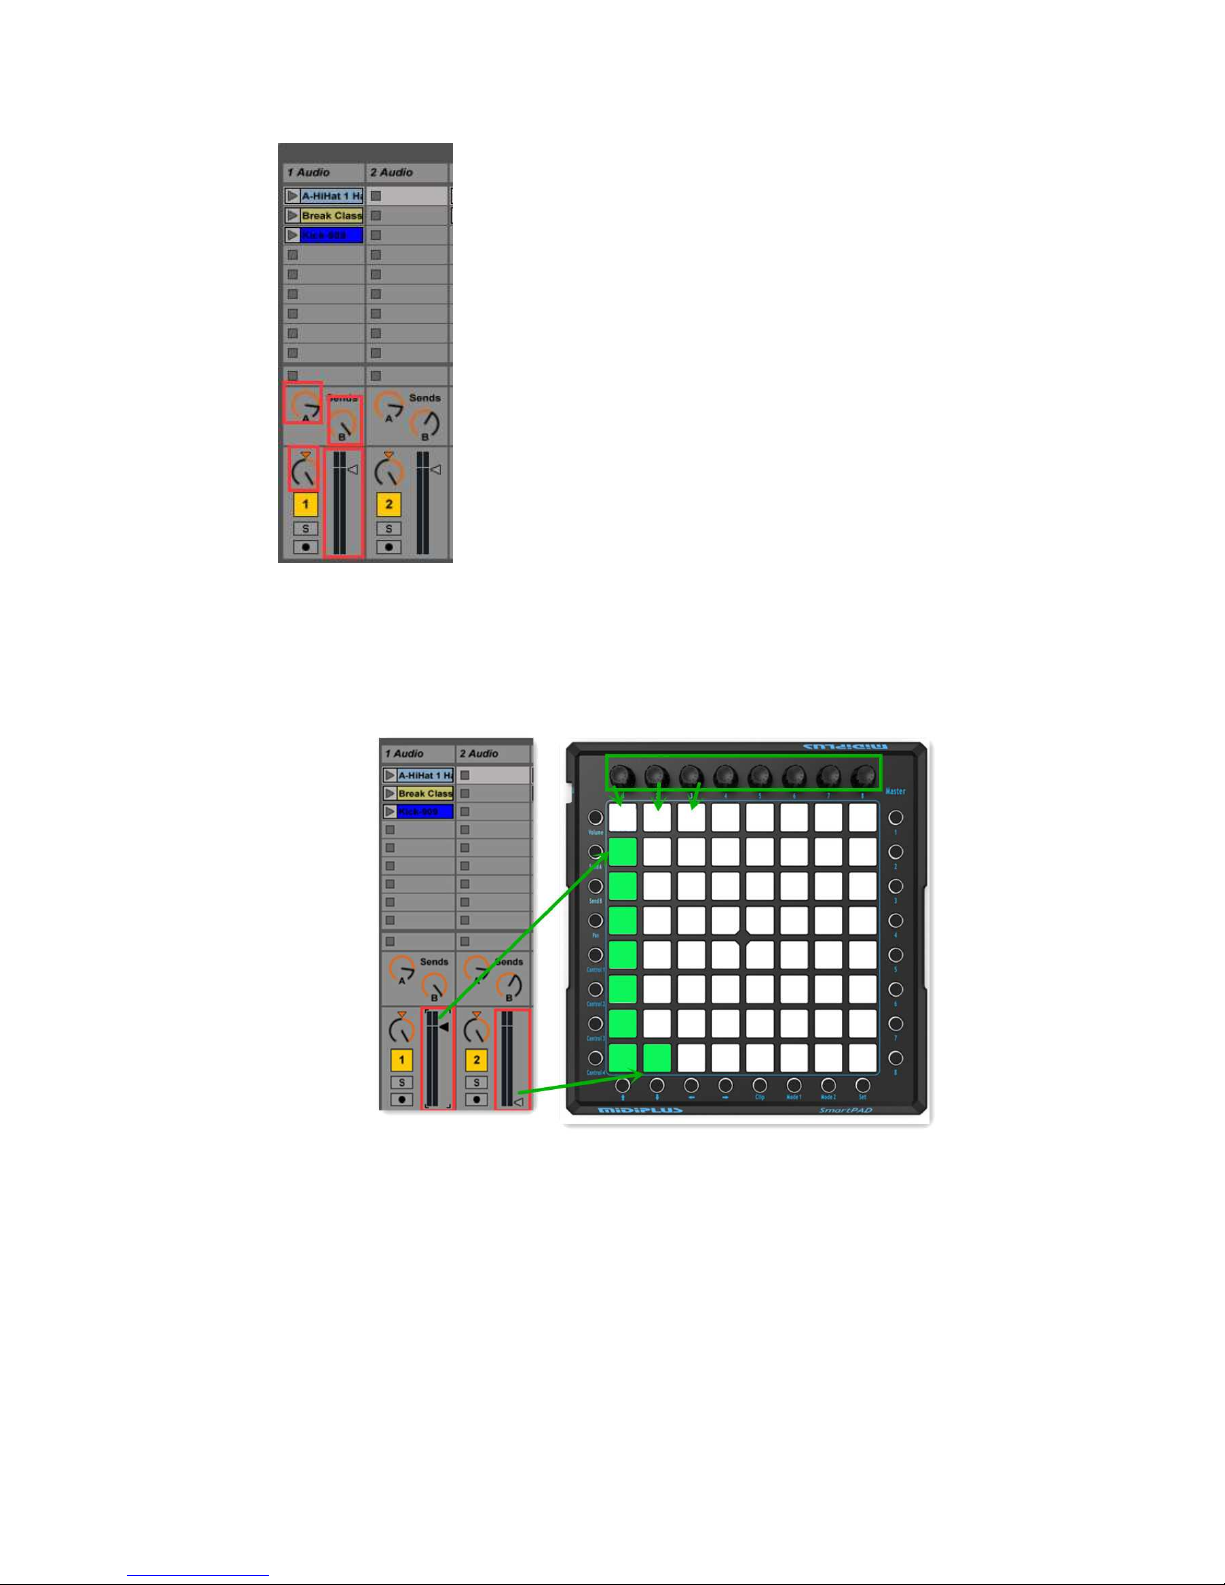
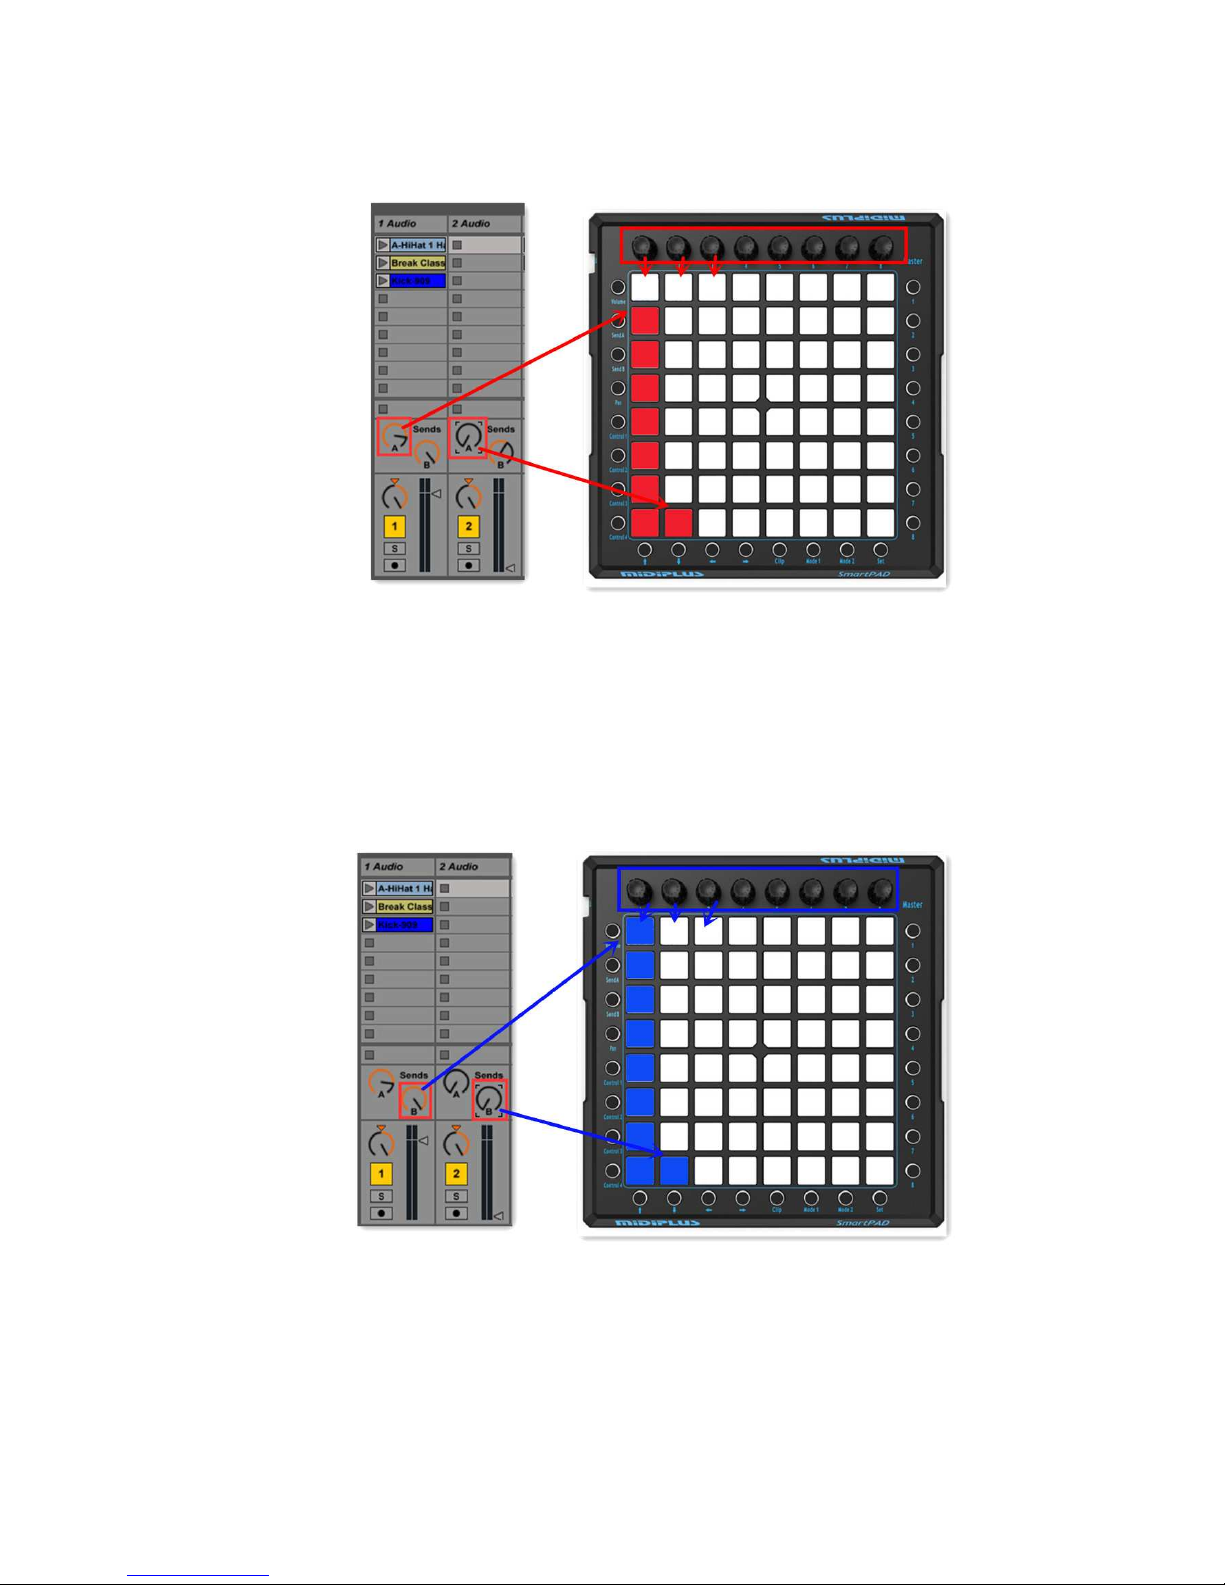
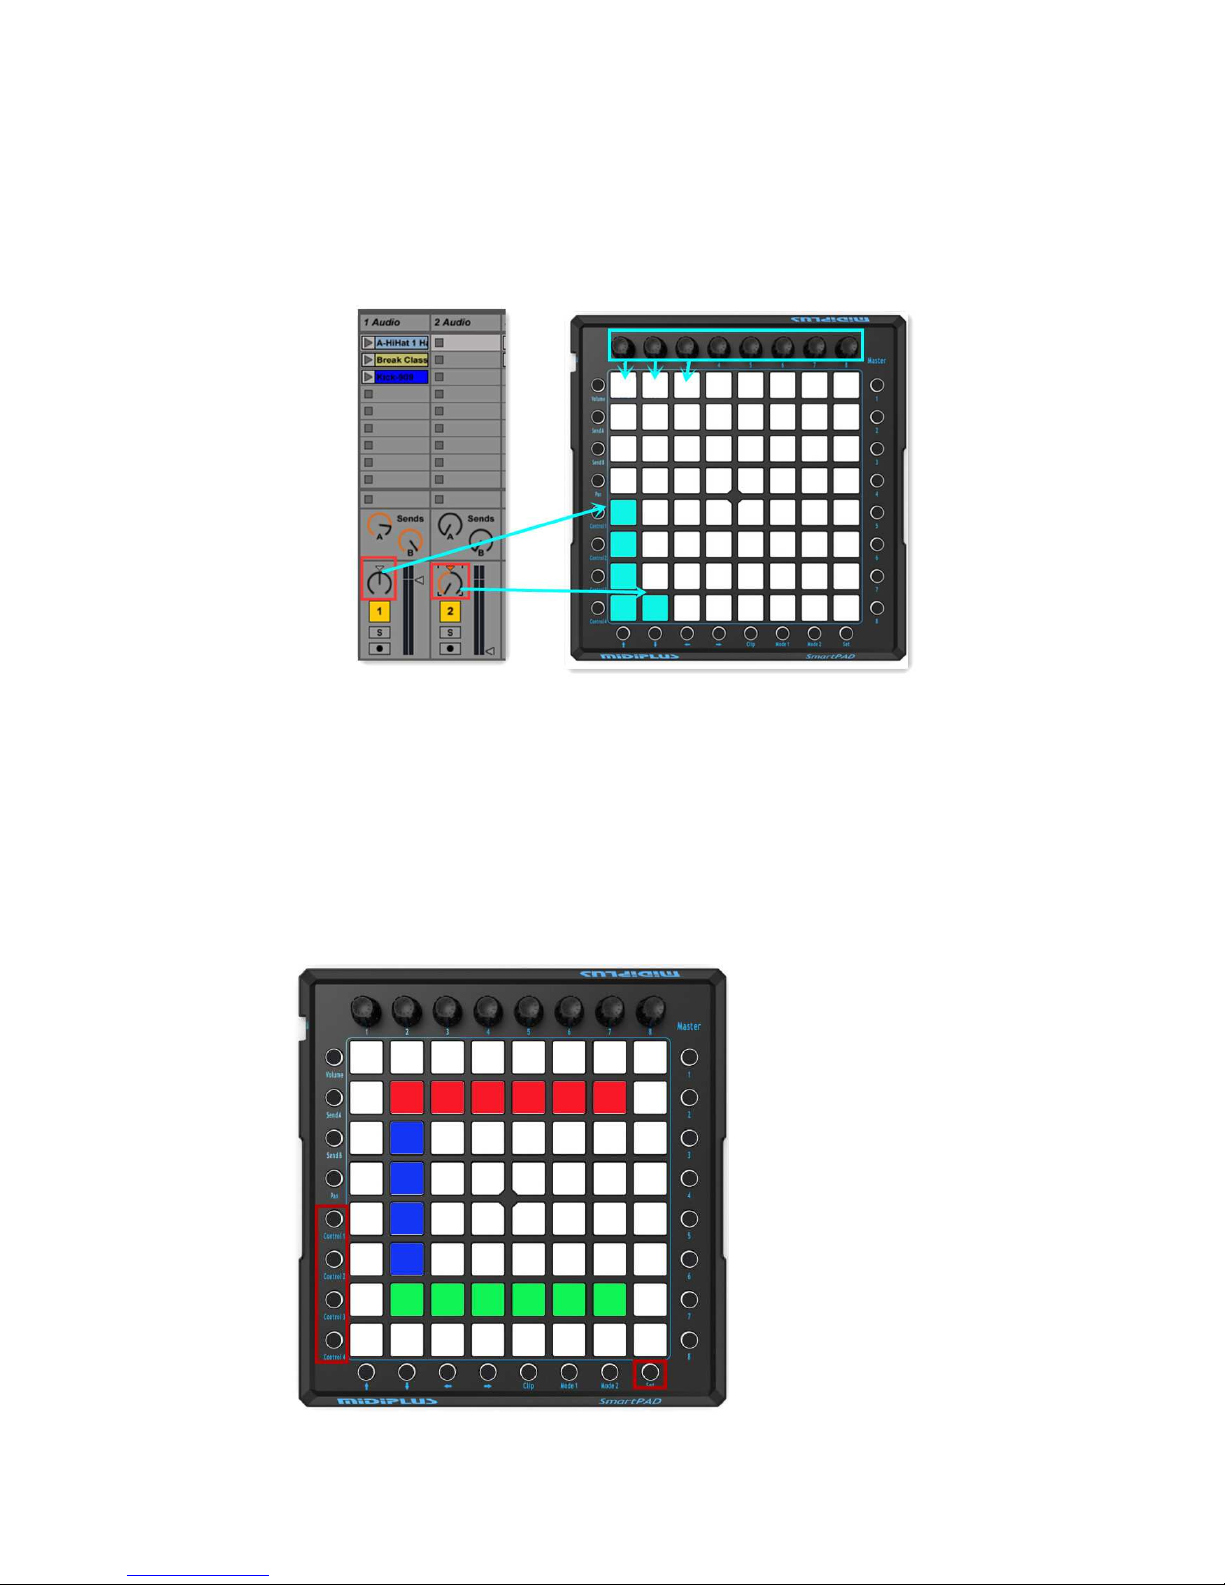
8. Set –This mode by pressing the buttons on the Clip
matrix to control the size of "Volume" and "Send A", "Send"
B "and "PAN" controller(you can also use the encoder to
control size), you can obviously see the LED light under the
corresponding audio track, the controller value greater that
LED light more, of course this is in the SET (SET) mode;You
can use the "Left", "Right" move around.
Page 16
MIDIPLUS Co, Ltd.
16
http://www.midiplus.com.tw
“Volume”: SET(SET) mode with“Volume”mode.
“Send A”: SET(SET) mode with“Send A”mode.
Page 17
MIDIPLUS Co, Ltd.
17
http://www.midiplus.com.tw
“Send B”: SET(SET) mode with“Send B”mode.
Page 18
MIDIPLUS Co, Ltd.
18
http://www.midiplus.com.tw
“PAN”: SET(SET) mode with“PAN”mode.
CONTROL1”-“CONTROL4”: SET(set) mode with“CONTROL1”
-“CONTROL4” mode,SmartPad matrix button can't control
the value of the encoder, but LED lights a specified
pattern.
Page 19
MIDIPLUS Co, Ltd.
19
http://www.midiplus.com.tw
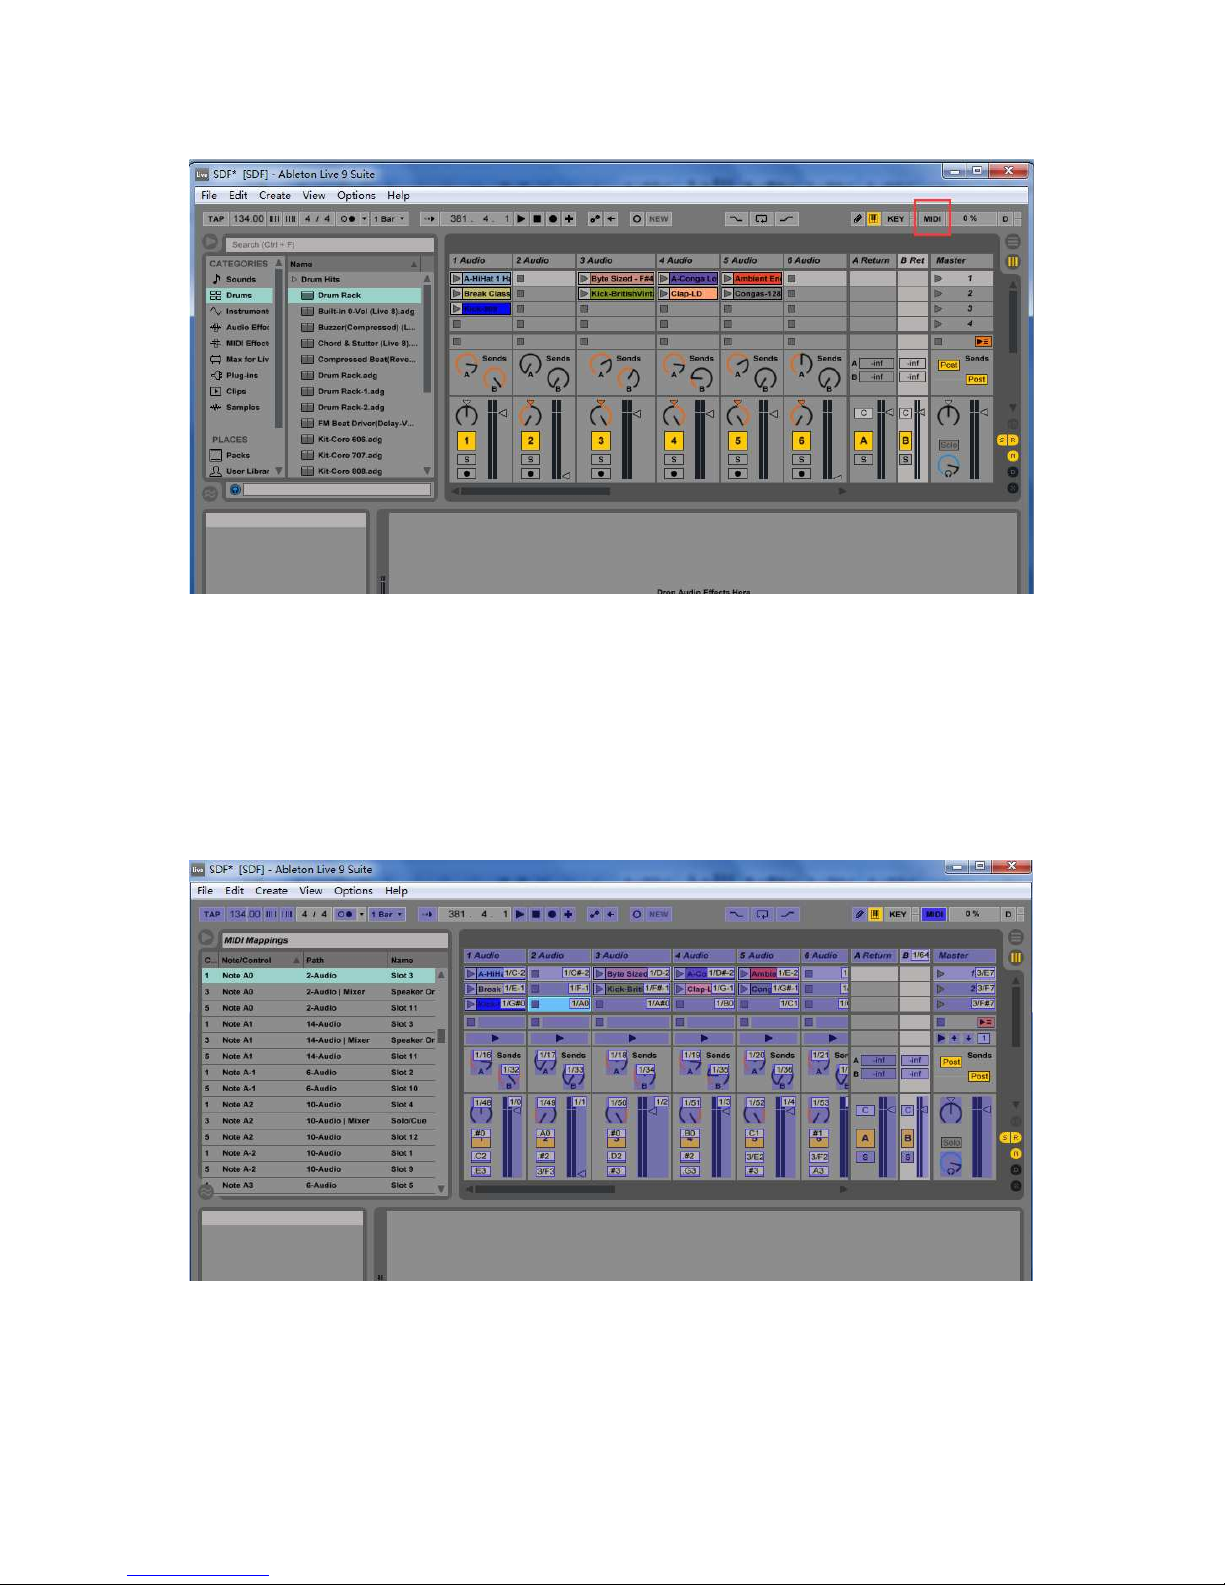
4 Scene launch
Each button of the group will trigger CLIP mode (Clip has been
mapping) matrix keys in each line (you can use the "Up", "Down"
to moveup and down).
5 Clip Launch/Session overview
Under the Clip starts(by default), this button is used to start 8 by 8
matrix Ableton Live software Clip and FL Studio software, in this
mode, the button color represents asfollows:
OFF:empty
BLUE: clippresent, not playing
RED:clip present,playing
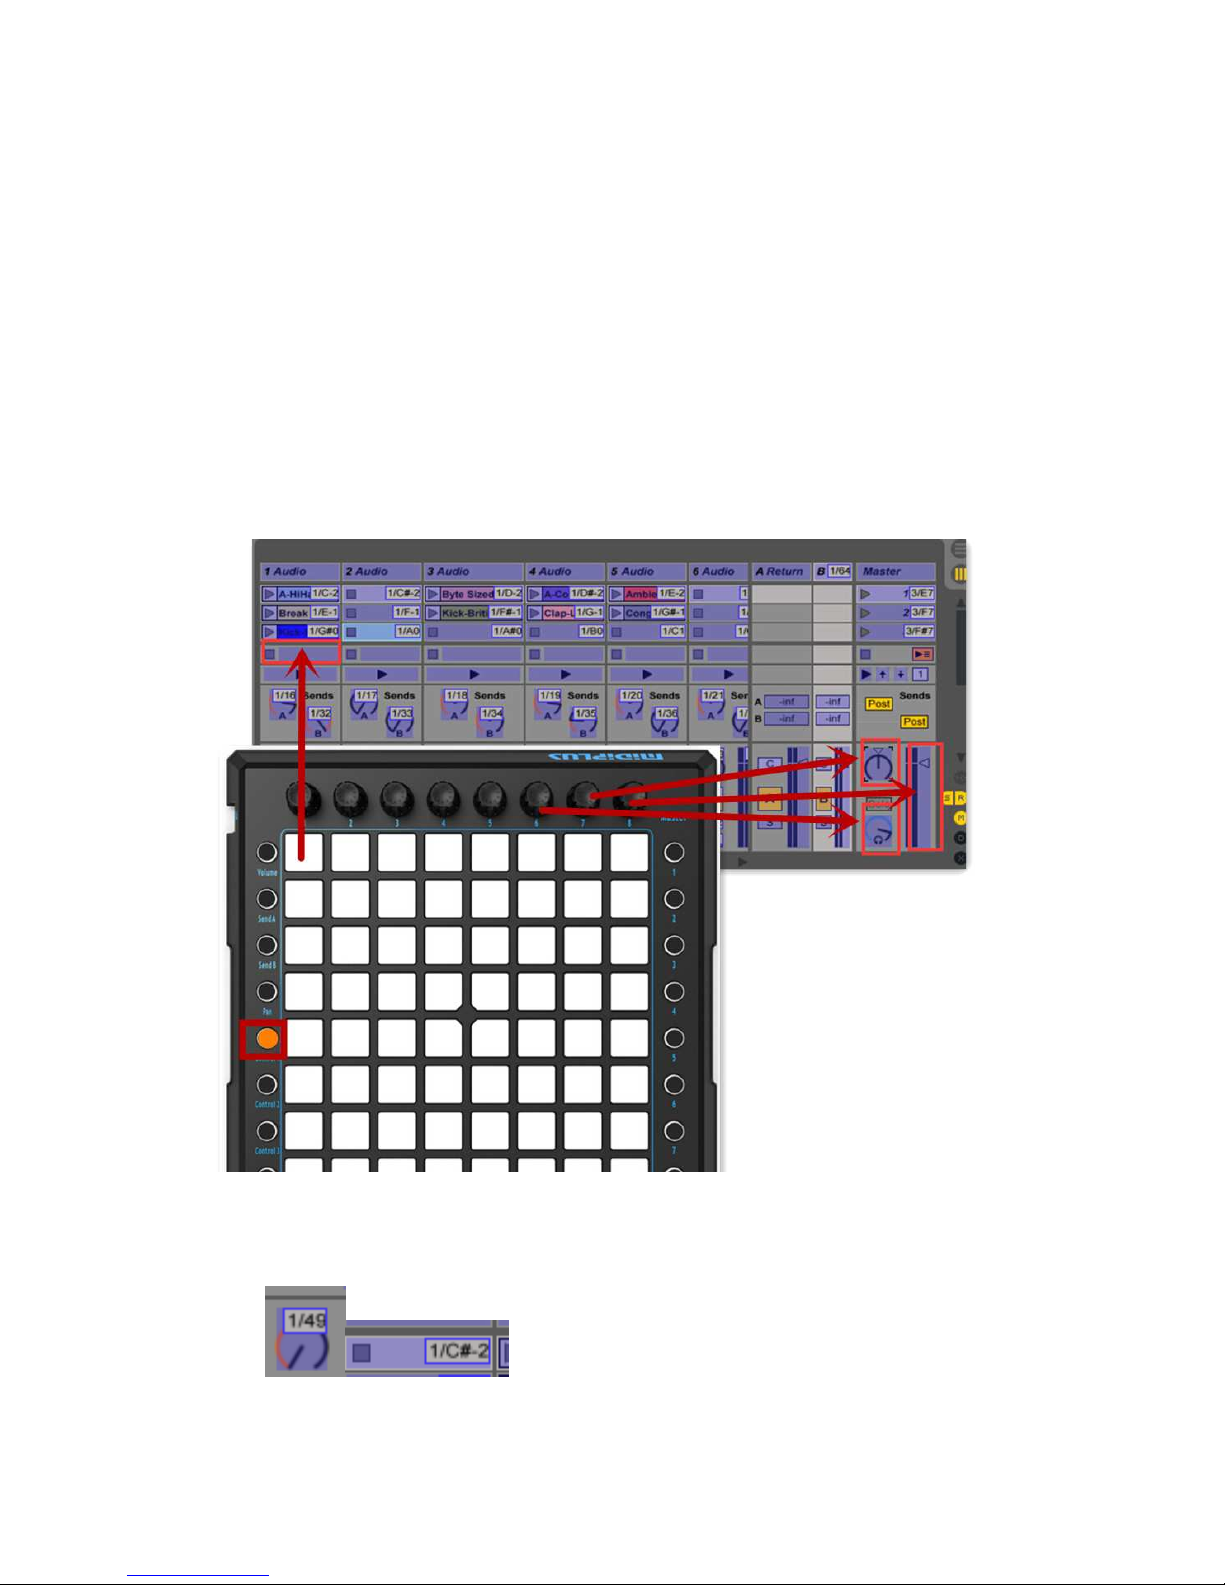
6 Mapping software
SmartPad connection on the computer, after open LIVE9 software,
themouse to click"MIDI"button
Page 20
MIDIPLUS Co, Ltd.
20
http://www.midiplus.com.tw
Appear
Purple shaded area in the picture can be mapped, the mouse to click
a particular area you want to map,then SmartPad send information
can be used. SmartPad encoder and 8 * 8 matrix button can send
Page 21
MIDIPLUS Co, Ltd.
21
http://www.midiplus.com.tw
information, after the completion of the mapping again, click on the
"MIDI" can exit the mapping model.
For example, in “CONTROL1”,SmartPad encoders can be mapped
to a specific function on software.
"CONTROL1","CONTROL2","CONTROL3"and"CONTROL4" a total
of 32 unmapped encoder for user-defined mapped to software.
Slightly twitched encoder or press the button will have information
to send, after the success of the map will have similar Numbers or
notes.
Notice: Map button, if you don't succeed, then you need to press a
Page 22
MIDIPLUS Co, Ltd.
22
http://www.midiplus.com.tw
few times more buttons or back into the software mapping interface
(" MIDI ").
1.2 Minimum System Requirement
If you are using your SmartPAD with a computer, the following
minimum system requirements need:
Windows Mac OS
Pentium 3 800 MHz or higher Macintosh G3*800/G4*733 MHz
or higher
CPU requirement may be higher
laptops or PC
CPU requirement may be higher
for laptops or PC
256 MB RAM OS X 10.3.9 with 256 MB RAM
Direct X 9.0b or higher
OS X 10.4.2 or greater with 512
MB RAM
Windows XP(SP2) or higher
*G3/G4 accelerator cards are not
supported.
(Attention:Window98/ME/2000 are not supported)
MIDIPLUS suggests that you connect directly to your computer built
in USB ports.
 Loading...