

midiplus Dreamer, Dreamer88, Dreamer61 Owner's Manual
MIDIPLUS
Dreamer Series Keyboard
Owner’s Manual
ENGLISH(page:1-14)
中文(页:15-29)


Preface
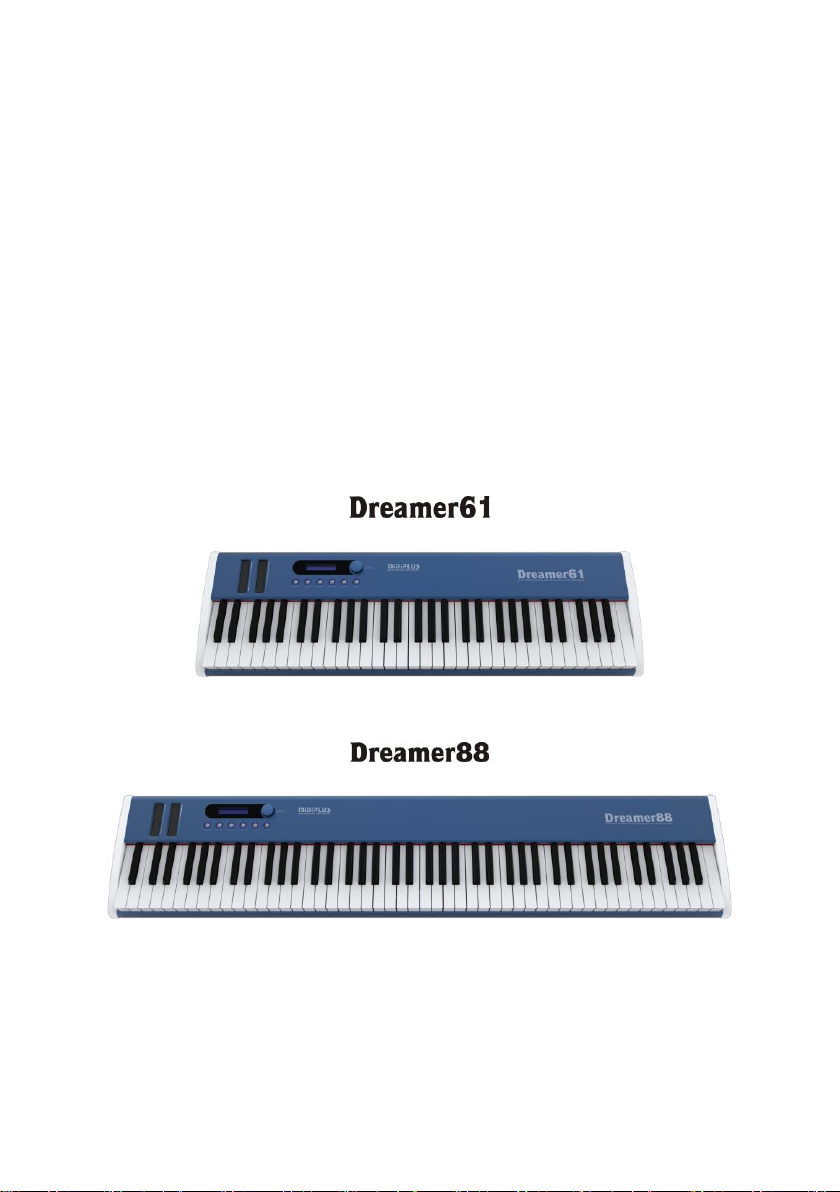
Thank you for purchasing Dreamer-series MIDI keyboard. This series includes two
kinds of keyboard: Dreamer61 with 61keys and Dreamer88 with 88keys.The keys
are semi-weighted and velocity sensitive.All the keys are designed as piano-style
keys which bring you an excellent piano feeling during playing.Typical interface
design makes this device to be easily connected with your computer and other MIDI
devices. In addition, Dreamer-series MIDI keyboard contains a built-in soundcard
and has some touch controllers.These will make your musical creation or teaching to
achieve a great effect.
Dreamer61/88 can work at Windows system and Mac OSX system without any other
special drivers.In order to make you more quickly and correctly work with the
Dreamer keyboard,please read this manual carefully.
1. You can find these in the package:
● Dreamer series MIDI keyboard
● USB cable
● User's Manual
● CD
● power adaptor
If your package misses one of the above, please contact with the dealer you
purchased.
2. Dreamer Series Operation Instruction
During play this device,please notice the following:
● Do not use the device under the humid,corrosive,dusty and higher or lower
temperature environment.
● Do not use the device in an unstable place where it might be fallen down.
● The touch button responses delayed or LED blinks sometime
If you find this problem, please power the device only by external power
adapter.
1
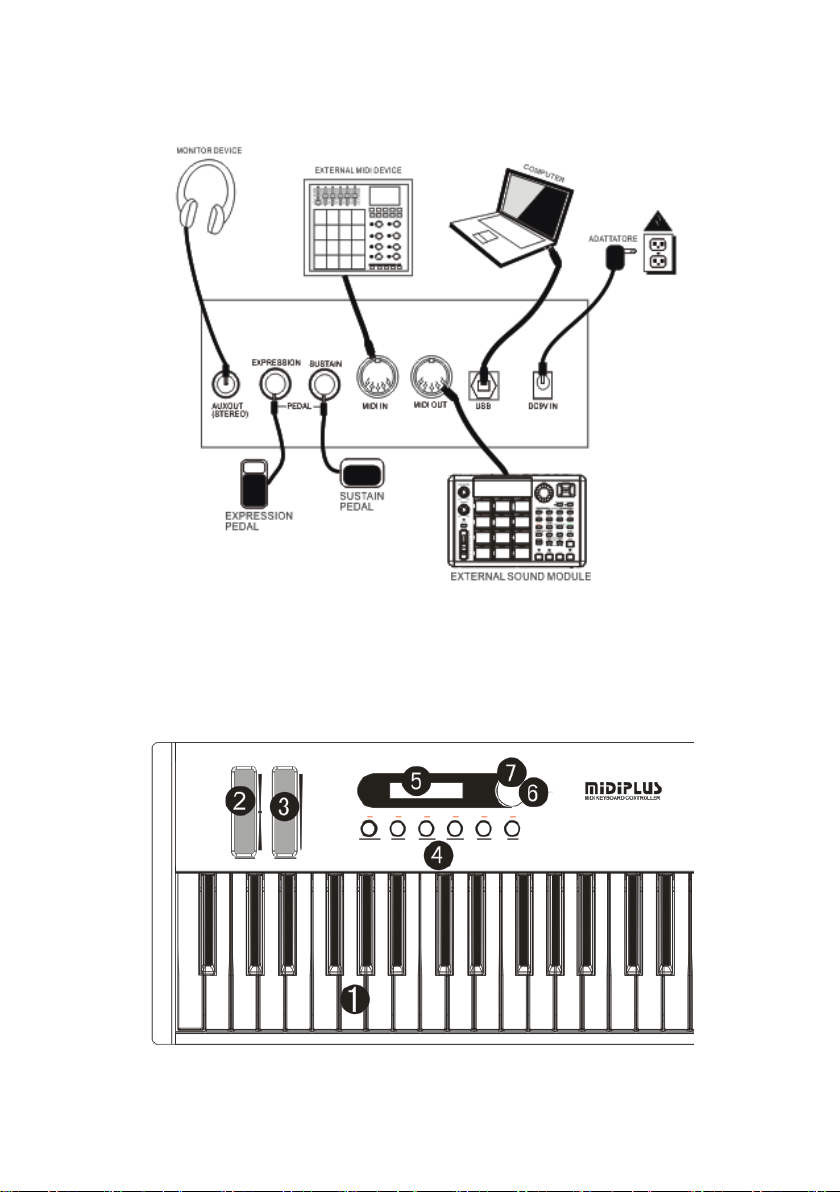
3. Diagram
Figure1.1 Diagram
4. Front Panel
Figure 1.2 Front Panel
2

1.Keyboard
● With 61 or 88 semi-weighted and velocity sensitive keys.
● By changing "Transpose" or "Octave" value,these 61/88 physical keys can be
used as 128 logical keys.
2.PitchBend Touch Bar
● You can modulate the Pitch by moving your finger up and down on the PitchBend
Touch Bar.Moving up the pitch will increase and down the pitch will decrease.
Release or touch the middle of the Bar,pitch unchanged.Just act as the custom
PitchBend Wheel.
3.Modulation Touch Bar
● You can increase or decrease the vibration by moving your finger up and down
on the Modulation Touch Bar.Moving up the vibration will increase and down the
vibration will decrease.Releasing will hold the vibration.Just act as the custom
Modulation Wheel.
4.6 editable Touch Buttons F1~F6
● Normal Mode:The CC value will increase 1 each time when you touch a button.
When touching the LED is on and releasing the LED is off.And the value will
display on the LCD at the same time.The default functions of F1~F6 are:
F1:Transpose F2:Octave F3:Chanel F4:Program F5:Volume F6:MIDI IN.
● Edit Mode:Touch and select the button you want to edit,then you can edit the
selected button's function by turning the Encoder.(Only the selected button's
LED will light on)
5. LCD display
● Power on display:LCD flickeringly displays with:Manufacture name,Product
name and the Version of Firmware.
● Standby display (Only at Normal Mode): First line:"MIDI IN:_ ",Second line:"
Chl:_ Pro:_ ".Each parameter is short for: MIDI IN ON/OFF, Chanel, Program.
● Operation display:Point out the current operated controller's information
First line:Controller's name,Second line:Parameter's CC Number and CC Value.
6. Encoder
● Normal Mode:you can use the Encoder to adjust the value of the last button you
touched.
● Edit Mode:You can use the Encoder to configurate the function of the last
button you touched.
7. Encoder Switch
● The Encoder Switch is used to switch the Mode of the button. You can switch
the two Modes by pressing the Encoder Switch.(Power on the device,the
default mode is Normal Mode.)
3
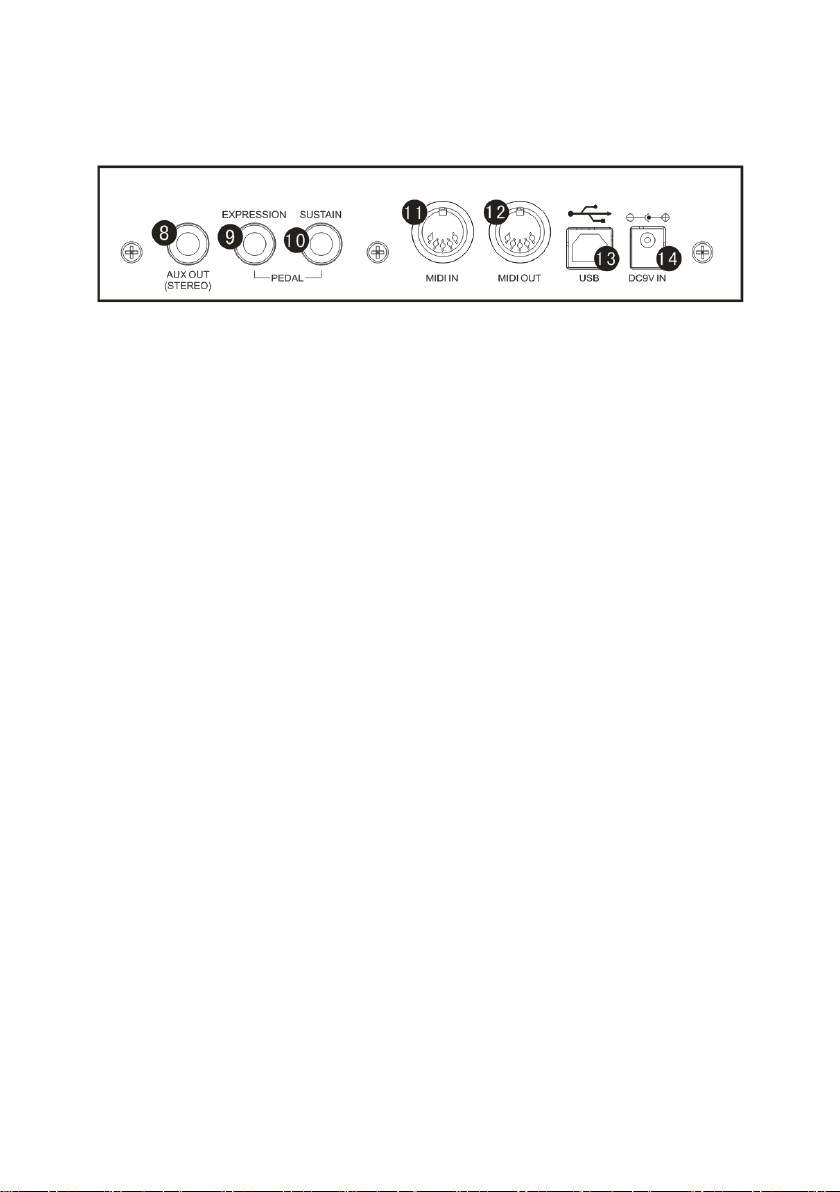
5. Rear Panel
Figure1.3 Rear Panel
8. AUXOUT
● You can monitor the audio(stereo) from this jack.
9. EXPRESSSION Pedal
● This jack allows you to connect an optional Expression Pedal to the keyboard.
10. Sustain Pedal
● This jack allows you to connect an optional Sustain Pedal to the keyboard.
11. MIDI IN
● This Jak is used to receive the external MIDI messages.If MIDI IN is ON,the
device can receive MIDI message,while MIDI IN is OFF,the device rejects to
receive any external MIDI messages.
12. MIDI OUT
● This jack is used to send MIDI messages to the external MIDI devices.
13. USB port
● This jack is used to connect the keyboard with the computer, to get power and
communicate with the computer.
14. External Power Supply
● This jack is used to get the external power.
6. Modes of Touch Button
The touch button has 2 Modes:Normal Mode and Edit Mode.Power on the device,the
default mode is Normal Mode.You can switch the Mode by pressing the Encoder
Switch.
4

1. Normal Mode
Each time you touch the button,the CC value of the button will change.By touching
the LED is on and releasing the LED is off.And at this mode,the Encoder is used to
change the selected button's CC value quickly( turn right to increase and left to
decrease).
For example,change the volume.The default button of "Volume"is F5.the following
steps will help you.
First,Select F5 button by touching.
Second,touch F5 button one or more times,or turn the Encoder to achieve the
volume.
Note:By touching the button one or more times,you can tune the CC value slowly.If
you want to change the value quickly,please use the Encoder.By turning the
Encoder,the value can be changed from 0 to 127 or from 127 to 0.
2. Edit Mode
At this Mode,you can select the button you want to edit by touching.When you
touching a button,the CC value will not be changed and the LED under the button will
light on.You can configurate the selected button by turning the Encoder.
For example,edit the F5 button to a "Program" button.The following steps will help
you.
First,Press the Encoder Switch to switch to Edit Mode.
Second,Select F5 button and the LED under it will light on.
Third,Turn the Encoder.Stop turning when the LCD displays:Program.
Forth,Press the Encoder Switch to switch to Normal Mode.
Note:Switch to the Normal Mode,the edit will be stored in the memory.For the details
of the function ID,please refer to Appendix 1.
7. Factory Reset
First press the Encorder Switch,then power on the device,now the device is ready to
restore to factory setting.During the factory reset,the LCD will dispaly "Enter to
confirm Factory reset>F1" and the F1 button LED will twinkle.If you want to restore to
5
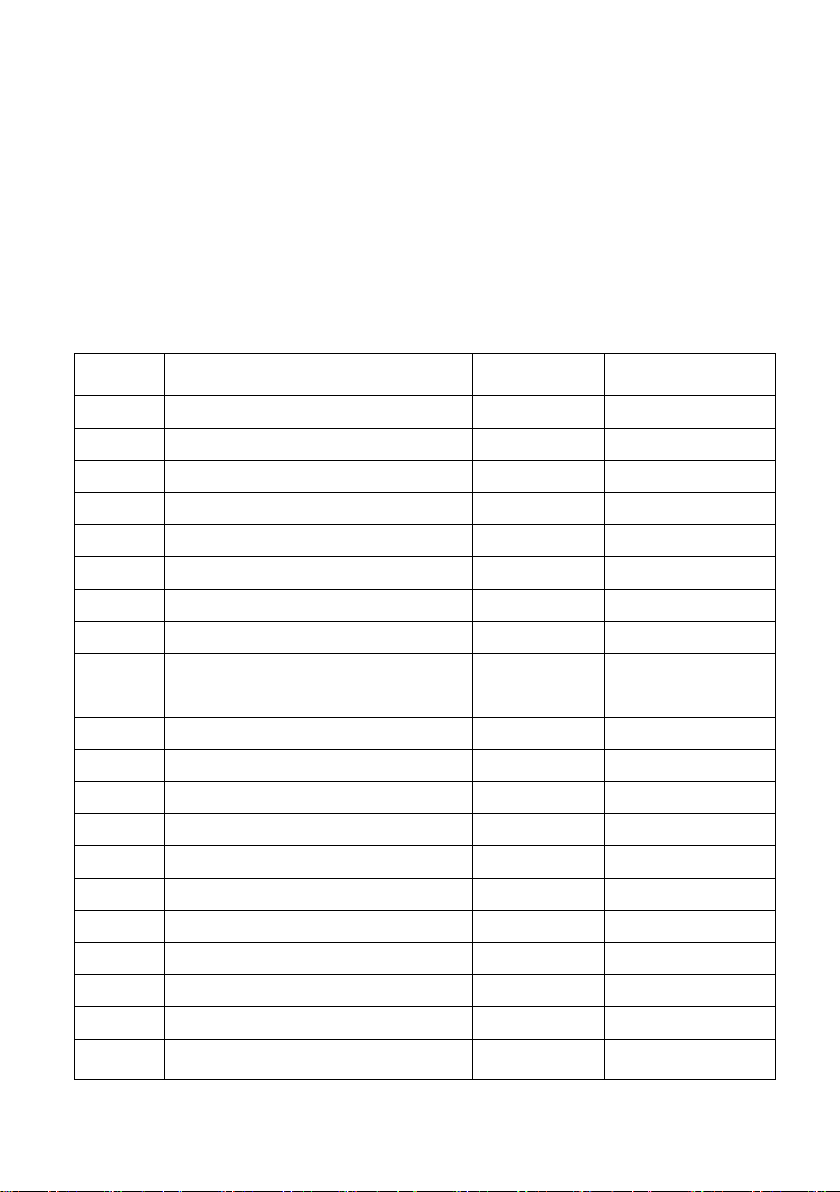
Control
Number
Control Function
Control Value
Display
0
Controller Off
/
"Controller Off"
1
Bank Select
0~127
"Bank MSB"
2
Modulation Wheel or Lever
0~127
"Mod.MSB"
3
Breath Controller
0~127
"Breath MSB"
4
Controller Change #3
0~127
"CC#3"
5
Foot Controller
0~127
"Foot MSB"
6
Portamento Time
0~127
"Port.TimeM"
7
Data Entry MSB
0~127
"Data MSB"
8
Channel Volume(formerly
Main Volume)
0~127
"Volume MSB"
9
Balance
0~127
"Balance MSB"
10
Undefined
0~127
"CC#9"
11
Pan
0~127
"Pan MSB"
12
Expression Controller
0~127
"Exp.MSB",
13
Effect Control 1
0~127
"Eff.1 MSB"
14
Effect Control 2
0~127
"Eff.2 MSB"
15
Controller Change #14
0~127
"CC#14"
16
Controller Change #15
0~127
"CC#15"
17
General Purpose Controller 1
0~127
"GPC.1"
18
General Purpose Controller 2
0~127
"GPC.2"
19
General Purpose Controller 3
0~127
"GPC.3"
factory setting,please press the F1 button in 3 seconds and will restore to factory
setting. After restoring completely,all the LEDs will be on and begin to start the device
normally.If you do not do any operation in 3 seconds,the device will begin to start
normally.Please refer to Appendix 2 for the factory settings.
Appendix 1 Function ID code List
6
20
General Purpose Controller 4
0~127
"GPC.4"
21~32
Controller Change #20~#31
0~127
"CC#20"~"CC#31"
33
LSB for Control 0 (Bank Select)
0~127
"Bank LSB"
34
LSB for Control 1 (Modulation Wheel or
Lever)
0~127
"Mod.LSB"
35
LSB for Control 2 (Breath Controller)
0~127
"Breath LSB"
36
LSB for Control 3 (Undefined)
0~127
"CC#35"
37
LSB for Control 4 (Foot Controller)
0~127
"Foot LSB"
38
LSB for Control 5 (Portamento Time)
0~127
"Port.TimeL"
39
LSB for Control 6 (Data Entry)
0~127
"Data LSB"
40
LSB for Control 7 (Channel Volume,
formerly Main Volume)
0~127
"Volume LSB"
41
LSB for Control 8 (Balance)
0~127
"Balance LSB"
42
LSB for Control 9 (Undefined)
0~127
"CC#41"
43
LSB for Control 10 (Pan)
0~127
"Pan LSB"
44
LSB for Control 11 (Expression Controller)
0~127
"Exp.LSB"
45
LSB for Control 12 (Effect control 1)
0~127
"Eff.1 LSB"
46
LSB for Control 13 (Effect control 2)
0~127
"Eff.2 LSB"
47
LSB for Control 14 (Undefined)
0~127
"CC#46"
48
LSB for Control 15 (Undefined)
0~127
"CC#47"
49
LSB for Control 16 (General Purpose
Controller 1)
0~127
"GPC.1"
50
LSB for Control 17 (General Purpose
Controller 2)
0~127
"GPC.2"
51
LSB for Control 18 (General Purpose
Controller 3)
0~127
"GPC.3"
52
LSB for Control 19 (General Purpose
Controller 4)
0~127
"GPC.4"
53~64
Controller Change #52~#63
0~127
"CC#52"~"CC#63"
65
Damper Pedal on/off (Sustain)
0~127
"Sus.Pedal"
7

66
Portamento On/Off
0~127
"Portamento"
67
Sostenuto On/Off
0~127
"Sostenuto"
68
Soft Pedal On/Off
0~127
"Soft Pedal"
69
Legato Footswitch
0~127
"Leg.Pedal"
70
Hold 2
0~127
"Hold2"
71
Sound Controller 1 (default Sound
Variation)
0~127
"S.Var."
72
Sound Controller 2 (default
Timbre/Harmonic Intens.) )
0~127
"S.Timbre"
73
Sound Controller 3 (default Release Time)
0~127
"S.Rel.Time"
74
Sound Controller 4 (default Attack Time)
0~127
"S.Att.Time"
75
Sound Controller 5 (default Brightness)
0~127
"S.Bri."
76
Sound Controller 6 (default Decay Time see MMA RP-021)
0~127
"Decay Time"
77
Sound Controller 7 (default Vibrato Rate see MMA RP-021)
0~127
"Vib.Rate"
78
Sound Controller 8 (default Vibrato Depth
- see MMA RP-021)
0~127
"Vib.Depth"
79
Sound Controller 9 (default Vibrato Delay see MMA RP-021)
0~127
"Vib.Delay"
80
Sound Controller 10 (default undefined see MMA RP-021)
0~127
"S.Cont.10"
81
General Purpose Controller 5
0~127
"GPC.5"
82
General Purpose Controller 6
0~127
"GPC.6"
83
General Purpose Controller 7
0~127
"GPC.7"
84
General Purpose Controller 8
0~127
"GPC.8"
85
Portamento Control
0~127
"Port.Ctrl"
86
Controller Change #85
0~127
"CC#85"
87
Controller Change #86
0~127
"CC#86"
88
Controller Change #87
0~127
"CC#87"
89
High Resolution Velocity Prefix
0~127
"HRVP"
8
 Loading...