

Page 1

Pedal Box / Pedal Board Usage Manual
Table of Contents
Introduction..........................................................................................................................................2
Understanding how it works, and what it does................................................................................3
Devices Files (or Device banksticks)...............................................................................................3
Master Settings (or Master bankstick).............................................................................................4
The Patches.................................................................................................................................4
The Settings.................................................................................................................................4
Expression Pedals............................................................................................................................5
Overview.....................................................................................................................................5
Dynamic and Locked Modes......................................................................................................5
Setup Expression Pedal MIDI Output.........................................................................................5
Expression Pedal Setup using PBE2 Software...........................................................................7
MIDI Input as Expression Pedals (New in 2.6)..........................................................................7
PedalSwap (New in 2.6)..............................................................................................................7
Footswitches....................................................................................................................................8
Overview.....................................................................................................................................8
Normal (meter handlers)....................................................................................................8
On/Off only........................................................................................................................8
Program Change................................................................................................................8
Tap Tempo.........................................................................................................................8
Static and Banked Footswitches.................................................................................................9
Footswitch Setup.........................................................................................................................9
Footswitch Setup using PBE2 Software...................................................................................10
Rig Control.....................................................................................................................................11
Overview...................................................................................................................................11
Configuring MIDI Messages to send........................................................................................11
Relay Setup...............................................................................................................................12
Configuring using PBE2 Software............................................................................................12
Triggering a Patch Change........................................................................................................13
Gig Control....................................................................................................................................14
Overview...................................................................................................................................14
Configuring...............................................................................................................................14
Configuring using the PBE2 Software......................................................................................15
Triggering..................................................................................................................................15
Storing Configurations (PC Software)...........................................................................................16
Save and Load...........................................................................................................................16
Uploading to PB........................................................................................................................16
Special MIDI Implementation.......................................................................................................17
Device Configuration.........................................................................................................................19
Overview........................................................................................................................................19
Program Changes......................................................................................................................19
Control Changes............................................................................................................................20
Value Maps................................................................................................................................21
Storing Configurations...................................................................................................................22
Save and Load...........................................................................................................................22
Uploading to PB........................................................................................................................22
Page 2

Introduction
PbX and PbD are almost identical, except that PbD uses it's own footswitches. Where as PbX uses
MIDI Input. PbX should be used when you already have external floorboard. PbD IS an external
floorboard.
PB is extremely powerful. Offering dynamic expression pedal setting changes (including the device
it's targeting) and Rig control which allows up to 32 MIDI events to sent, as well set change the
state of up to 8 relays.
PB is very flexible, it can be used as simple display tool, to powerful hub of your setup.
About the creator
Hi, I'm Durisian, I live in Melbourne Australia and spend most of my time as a theatre production
manager. I spent my youth dreaming of becoming of a sound engineer with maybe a hint of rock
star :)
I fell in love with creating music a young age when my dad (who ran a computer store) showed me
how to connect a keyboard up through a midi interface. I've always been fascinated by technology
and now I could combine it with music.
Before I started this project I had very little programming experience, certainly none on a PIC chip.
So if you looking from my code shaking your head, that's ok – I look back at it now and shake my
head too!! (There was lot's I didn't understand when I started this project).
In my late teens while studying music and sound engineering I learnt guitar – and began the never
ending quest for the perfect sounds.
It wasn't until after my studies and I had established myself as a live sound engineer and theatre
technician that I had enough money to buy my dream guitar (Ibanez SZ-320). By this stage I had a
Behringer FCB1010 and V-Amp pro. The V-Amp still provides some of the fantastic sounds I've
ever heard (I don't care what you think – this thing rocks, you just have to know how to use it). As I
got more creative (read bizarre) I realised that 2 expression pedals wasn't enough.
My search for a reasonably priced analogue to MIDI converter began in 2006-7. It took almost 6
months before I finally stumbled across SmashTV's website. I became very excited as I found my
way to ucapps.de and realised that it would not be difficult to create my application to drive more
expression pedals. After many months of learning I started my first app – Pedal Box, which in it's
first incarnation simply took the AIN and output MIDI. Then I went a little further with LCD
display, getting it to show me labels about what I was controlling.
It then dawned on me that I don't need my FCB1010, I can just use digital inputs. Pedal Board was
born.
From there things got really out of control – Especially when it came to rig control! I realised a PC
editor would be required to assist with config files, and spent almost a year creating the first version
in Java (which I had no idea about - I'd never done object oriented programming before). I've since
discovered how much easier VB is. So PBE2 will only run under windows and requires .Net 3.5...
sorry.
Today, almost 3 years after it's first conception - I can enjoy an enormously powerful floorboard –
With a PC editor to make configuration a breeze.
A very big thank you to all those that helped with my ridiculous questions through the forums. And
of course TK who makes this sort of thing possible for so many people.
Page 3

Understanding how it works, and what it does
PB needs to know what it is controlling, and the messages that it has to send. This is done via
device config files which are uploaded to a bankstick. Each device file requires a 24LC256
bankstick.
A maximum of 7 device config files can loaded (due to the MBHP limit of 8 banksticks, the first is
used for master settings).
When setting up pedals, footswitches and patches. You do not enter CC or program change
numbers, instead you select names from the list located in the device config file.
Pedals and footswitches are mapped to an event by the given bankstick number and event type and
event number.
MIDI IN events are matched up to a bankstick channel
Devices Files (or Device banksticks)
Device files hold vital information about your midi equipment.
1. The Event Map
A list of CC numbers and Program Change numbers.
Each entry contains:
• The name of the event
• And how the event is handled - On/Off, Tap Tempo, Link to value map, etc There are 9 types
to choose from.
2. 10x Value Maps
These maps contain named values (parameter 2 byte of a midi message).
These allow for CC's that are linked to an amp type, effect type, or anything that has a name
associated with it's value.
When using a CC linked to a value map, instead of seeing meaningless numbers, it will show the
name of the selection
Value Maps are linked to events list in the handler column of the event map.
Page 4

Master Settings (or Master bankstick)
There are 2 main sections. The Patches and The Settings.
The Patches
1. Rig Control Patch Maps (There are 128 patch maps)
• Firstly a name is given to the patch as a whole
• MIDI send Entries (there are 32 of these entries in each patch map)
• Enabled or Disabled for that entry. If disabled, the event will not be triggered.
• The bankstick number of the device you wish to trigger
• The event type
• The event number
• The value you wish to set the event to
• Relay Trigger s
• Relays 1 - 8 each have an enabled or disabled setting. If disabled nothing will
happen
• Relays 1 - 8 each have an on or off setting
2. Relay Settings
• The Name of the relay
• It's On label
• It's Off label
• Whether to invert the relay or not
2. Gig Control Cue Lists (There are 20 to choose from)
• The Song List can be given a name
• Entries contain the Rig Control patch # to be triggered
The Settings
1. DIN map (only required for PbD)
• Bankstick of device to control
• The MIDI event type
• The event #
• A Low value
• A High Value
• Button type - either momentary, or switching
2. AIN Map (8 maps, 1 for each pedal. 128 entries in map (1 for each patch change)
• Bankstick of device to control
• The MIDI event type
• The Event #
• Low Value
• High Value
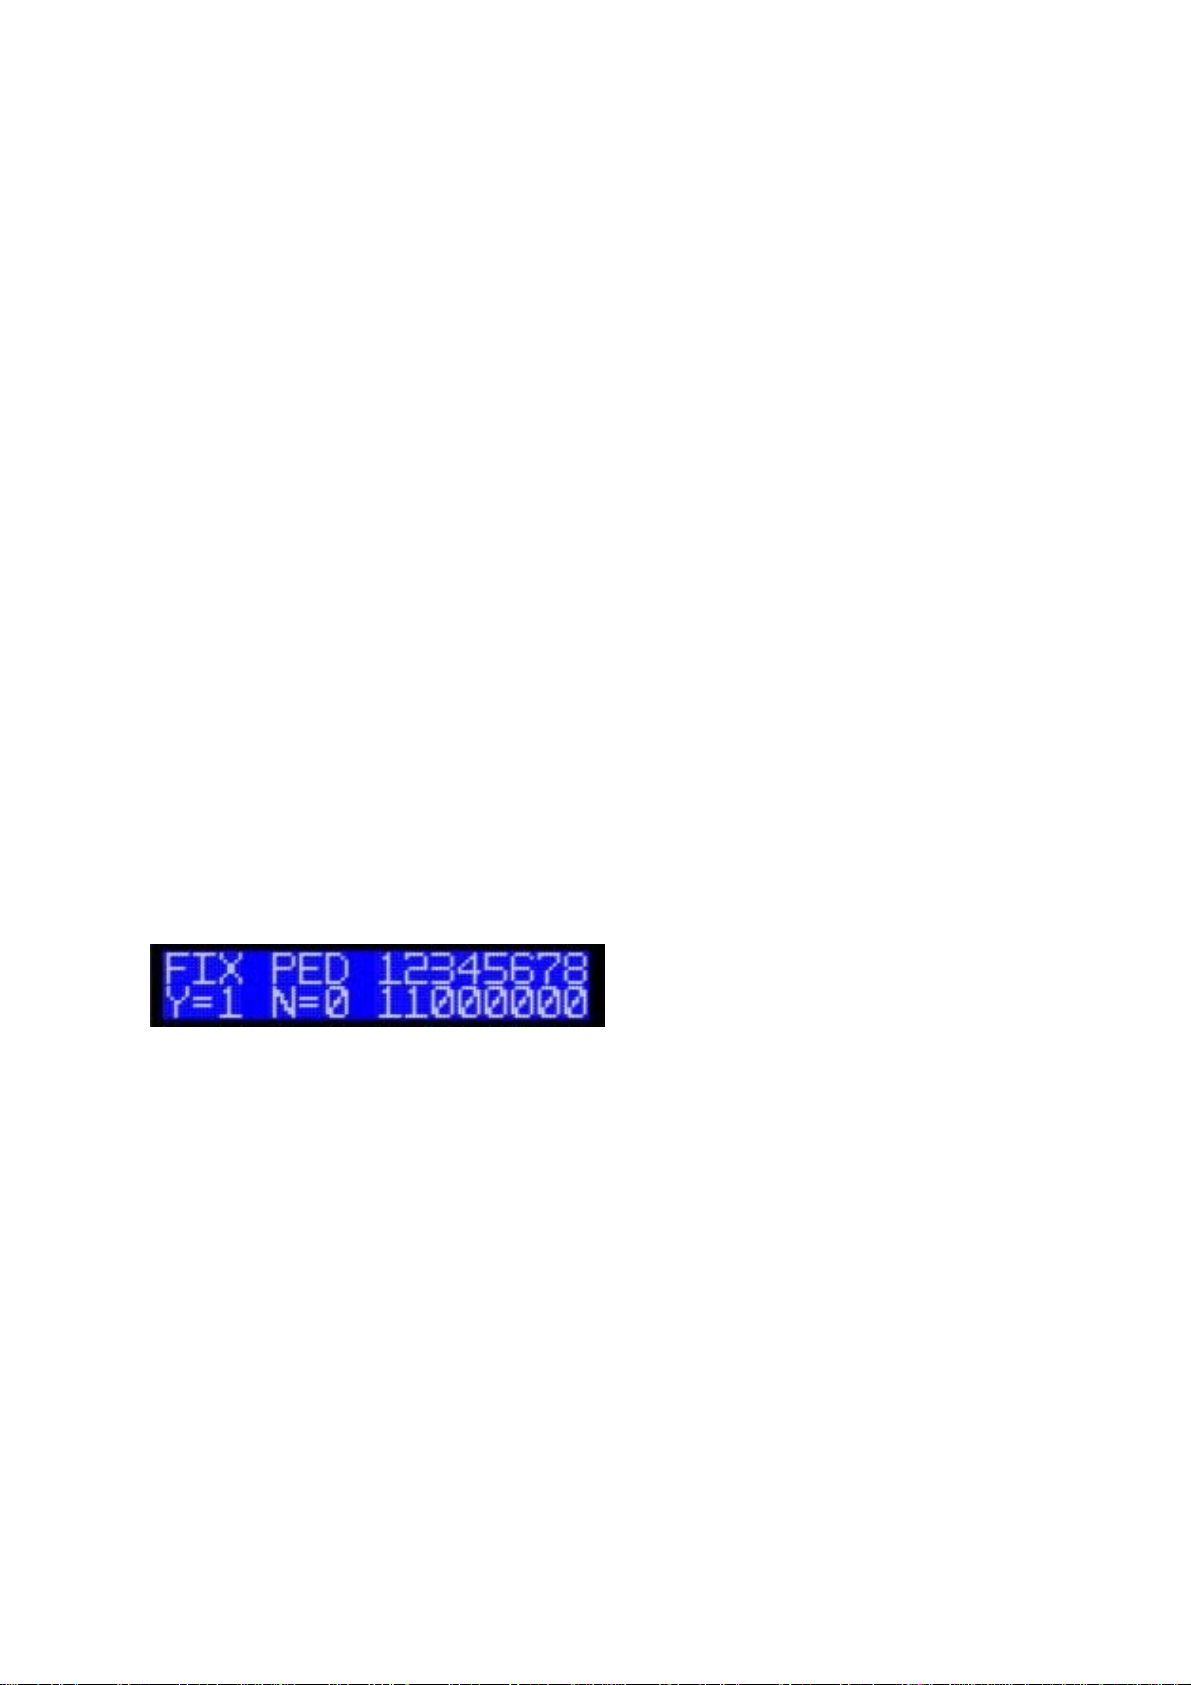
• Locked aka 'FIX PED'
Each pedal can be set to 1 (locked) or 0 (dynamic)
Dynamic pedals will change the bankstick/device and values they are set to by
following Rig Control patch change events.
Page 5
Expression Pedals
Overview
• Scales between the low and high value
• Displays either:
• a meter of approx position, some events will display 'off' when 0 and/or 'on' when
127.
• A pan meter
• the data 2 value
• or a named value (eg. 'Ping/Pong Delay' for an effect select control).
• Pedals can not be mapped to program change, on/off or tap events.
• Pedals can have different settings for each rig control patch change, or can be locked to the
same event.
Dynamic and Locked Modes
Dynamic Expression Pedals can have up 128 different settings applied. The current setting is chosen
by triggering a rig control patch. This allows you to have a different pedal setup for each of your rig
control patches.
Locked Expression Pedals will always keep the same setting regardless of any patch change (the
setting associated with patch 0).
To change the locked mode:
Enter the global setup menu (CC 127 at 125, or hold bank down and press the global setup
footswitch)
Move an Expression Pedal to alter the value Locked status of that pedal
Exit Setup to save (CC 127 at 127 or press the event setup footswitch)
Setup Expression Pedal MIDI Output
Setup mode is activated by pressing holding bank down and pressing the event setup button (pin
defined in main.h) or CC 127 at 127. The last pedal moved (or footswitch pressed) will selected for
editing. If the pedal is dynamic – you will be editing the setting for the current rig control patch.
There are 4 input programming screens. You can move to the next screen with the bank up
footswitch or CC 127 at 126.
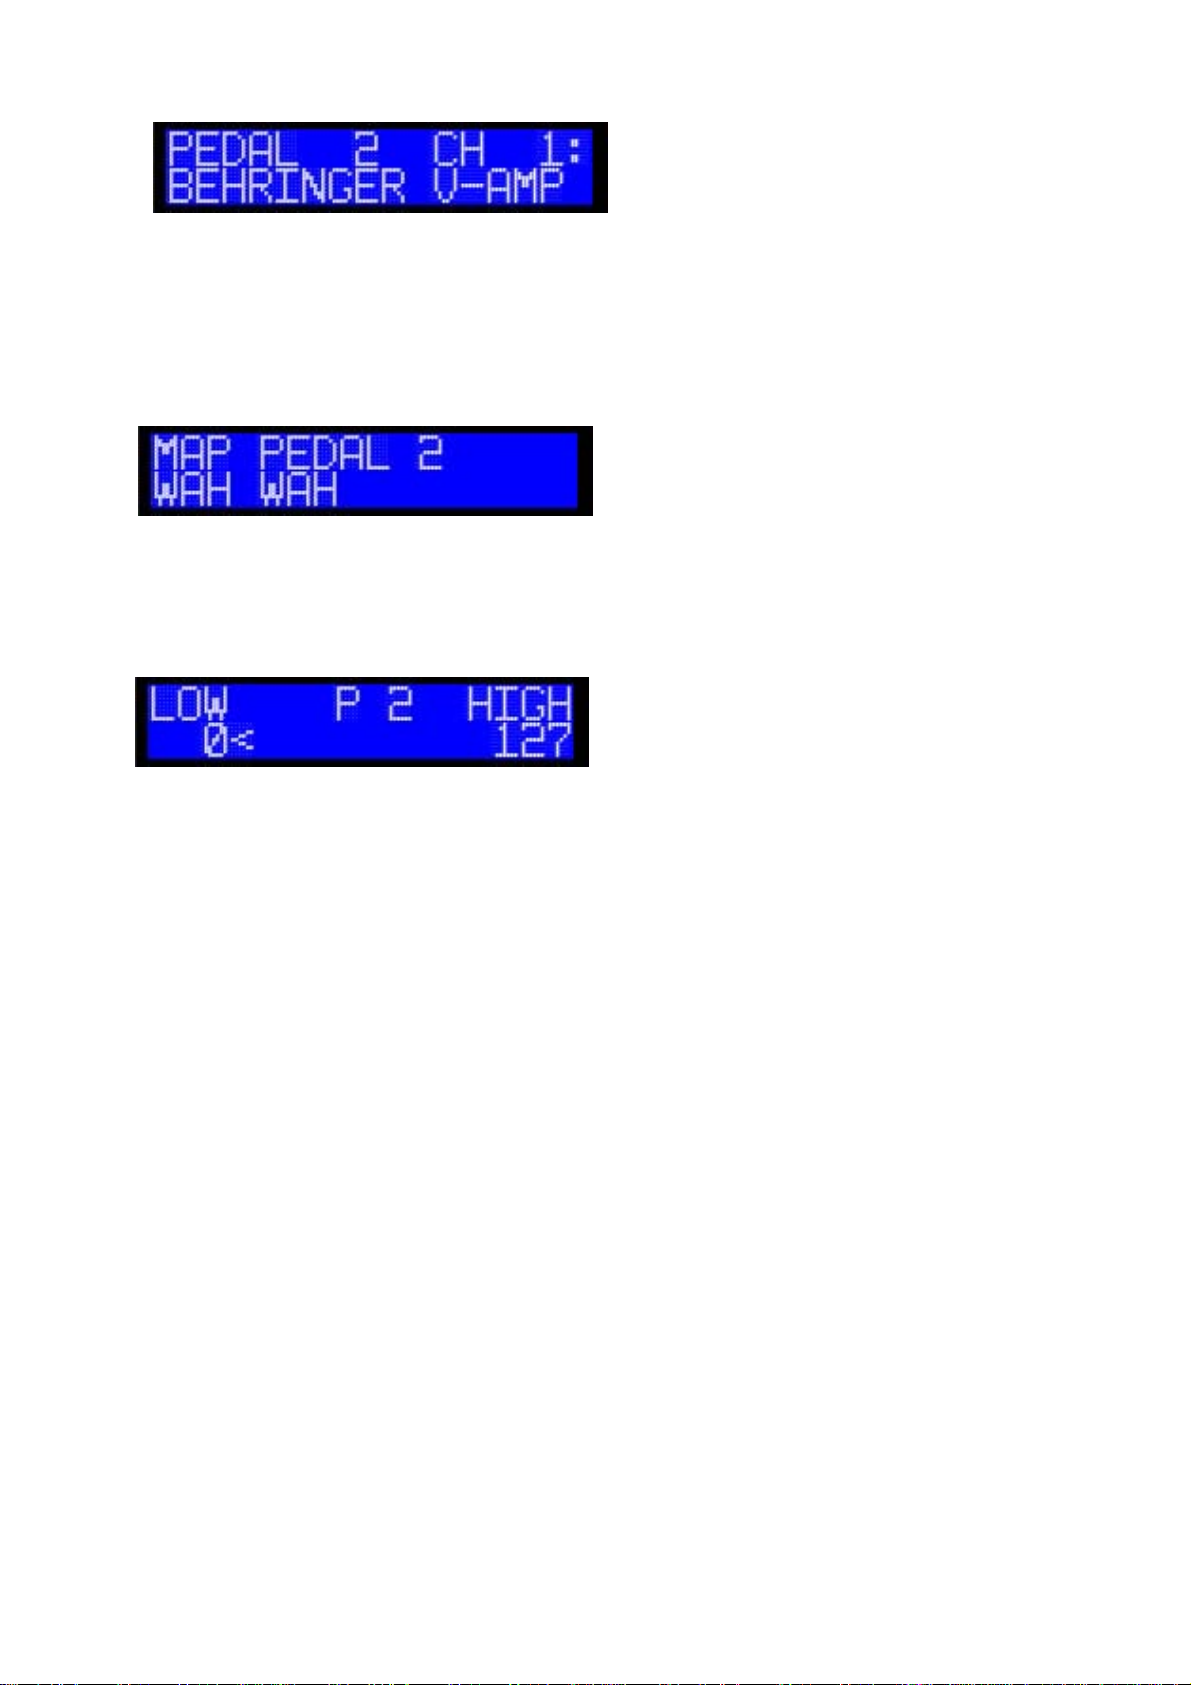
In the first screen, you select the device that should be used. Up to 7 devices can stored on 7
banksticks.
Page 6
Moving any pedal will select the device. If a bankstick is not present 'BS Not Available' will be
displayed.
The second screen allows you to select the desired event type. Move any pedal to scroll through
available types.
3rd screen; Moving any pedal connected will scroll the event selection, select the desired event.
Multiple pedals/footswitches can be set to the same event.
Finally
For each pedal a minimum and maximum value can be specified.
The value is scaled between the low and high.
First select the low value with any pedal or pot, and then trigger the screen change. Now you can
adjust the high value.
From here you can screen change to go back to screen 1.
Pressing bank down or CC 127 at 127 at any time saves settings and exits setup mode.
Page 7
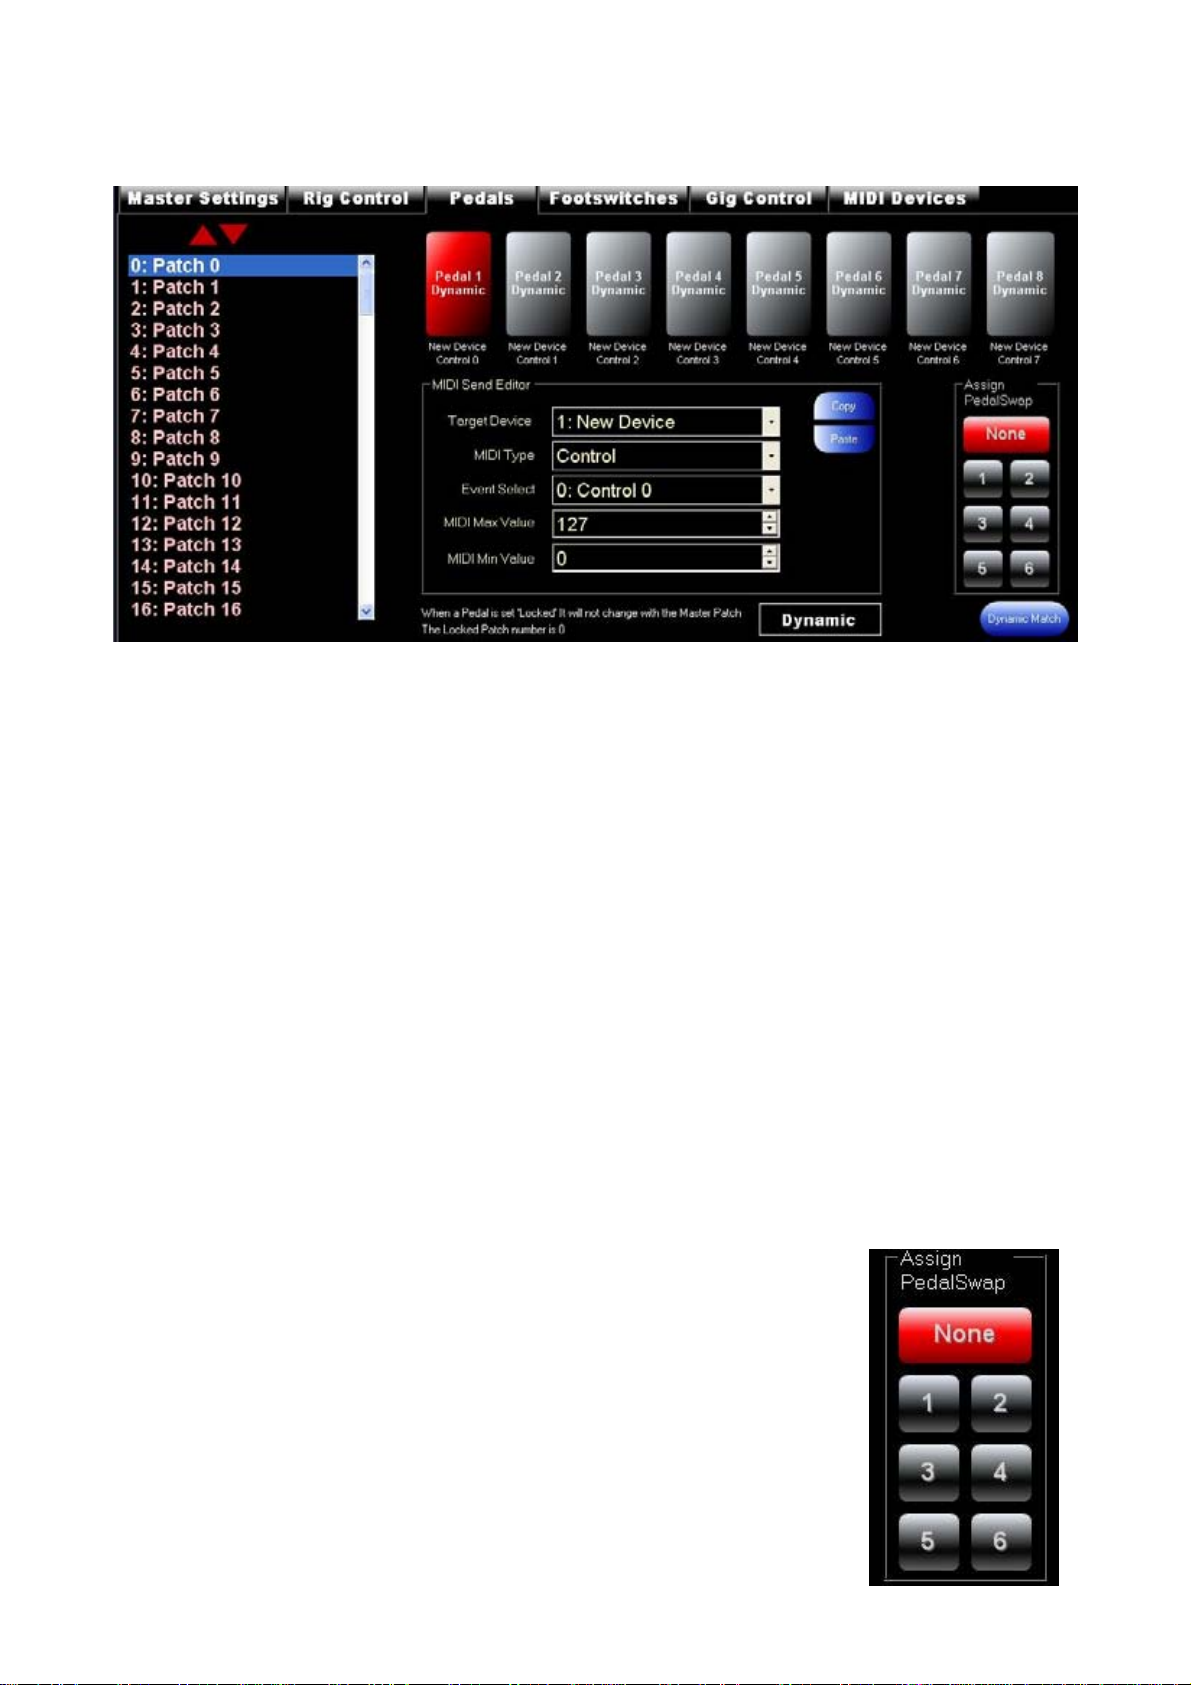
Expression Pedal Setup using PBE2 Software
Select the desired Rig Control Patch from the list and select the desired pedal.
Use the MIDI Send Editor section to assign the desired settings.
The red arrows above the list allow you to move the settings for ALL 8 PEDALS to a different
patch.
You can copy and paste individual settings
You can also swap ALL of an single pedals settings with another by dragging one pedal on top of
another.
Dynamic Match will set all of a pedals setting the current settings
MIDI Input as Expression Pedals (New in 2.6)
By default CC's 20 – 27 will act as though they are directly connected analogue pedals. Including
dynamic changes and setup functions.
PedalSwap (New in 2.6)
PedalSwap allows you to swap in a different set of dynamic pedal settings without triggering a rig
control patch change. The effect will last until PedalSwap is deactivated or a rig control patch is
triggered.
There are 6 slots available. These can only be assigned with Pedal Board
Editor 2 software.
Select the desired patch from the list and click any of the 6 slots. These Pedal
settings will now be applied when that PedalSwap slot is activated. Only 1
patch can be assigned to slot.
PedalSwap can be activated (and deactivated) by pressing dedicated
footswitches or by CC's 92-97 respectively (note: the data 2 byte is ignored).
Page 8

Footswitches
Overview
Static footswitches always output the same MIDI event regardless of bank.
Banked footswitches gives you up to a total of 128 midi commands (regardless of how many
physical banked footswitches you have)
Footswitches will display and behave in different ways depending on the handler chosen in the
device config file:
Normal (meter handlers)
• Toggles between the low and high value
• Can be toggle or momentary action
• LED indicator is on when at high value
• Displays either:
• a meter of approx position, some handlers will display 'off' when 0 and/or 'on' when
127.
• A pan meter
• the data 2 value
• a named value (eg. 'Ping/Pong Delay' for an effect select control).
On/Off only
• Toggles between 0 and 127, regardless of low/high value
• Can be toggle or momentary action
• LED indicator on when at 127
• Displays 'On' or 'Off'
Program Change
• Only sends the Status byte, and Parameter 1 byte
• Is momentary only (regardless of setting)
• LED indicator lights up on the footswitches assigned to the current program change
• Displays the program change name.
Tap Tempo
• Sends the reset tap tempo midi event, with a value of 127 on down press.
• Momentary only (regardless of setting)
• LED indicator is on when button down, off when button is up.
• Displays approximate BPM
Special
• Relay triggering
• Gig Control cue triggering
Footswitches can be setup to act with a toggle (press = high - press = low) or momentary action
(press = high, release = low)
Page 9

Static and Banked Footswitches
Footswitch Setup
Setup mode is activated by pressing holding bank down and pressing the event setup button (pin
defined in main.h) or CC 127 at 127. The last footswitch pressed (or pedal moved) will be selected
for editing.
There are 4 input programming screens. You can move to the next screen with the bank up
footswitch or CC 127 at 126.
In the first screen, you select the device that should be used. Up to 7 devices can stored on 7
banksticks.
Moving any pedal will select the device. If a bankstick is not present 'BS Not Available' will be
displayed.
The second screen allows you to select the desired event type. Move any pedal to scroll through
available types.
Relay and Gig Control cue functions can be found by selecting 'Special' as the event type when the
master bankstick is selected.
3rd screen; Moving any pedal connected will scroll the event selection, select the desired event.
Multiple pedals/footswitches can be set to the same event.
Finally
For each footswitch a low and high value can be specified. This can be the same value if you not
require any toggling
First select the low value with any pedal or pot, and then trigger the screen change. Now you can
adjust the high value.
To switch between Momentary and Toggle action – press the global setup footswitch or CC 127 at
125.
From here you can screen change to go back to screen 1.
Pressing bank down or CC 127 at 127 at any time saves settings and exits setup mode.
Page 10

Footswitch Setup using PBE2 Software
Firstly you need to set how many physical footswitches your hardware has. Click the logo at the top
to access the setting dialog.
Footswitches can be moved around on the screen, just click and hold for 1 second and drag to the
desired location.
Static footswitches are red, and banked are green.
To edit a setting, select the relevant footswitch and choose the relevant bank (if a banked
footswitch). You then use the MIDI send editor to adjust the settings.
You can copy and paste individual settings
The quick buttons:
Auto PC will assign program changes between desired physical banked footswitches. A dialog will
appear asking which footswitches to go between. The device it assigns program changes for is
whatever is currently selected in the MIDI send editor. This allows you have 8 banked footswitches,
but quickly assign as many program changes as possible between say footswitches 5 to 8.
Banked to Static will take the current setting of a selected banked footswitch and apply it all banks
Page 11

Rig Control
Overview
New in Version 2 - 'Rig Control'. This allows up to 32 midi events to sent at the same time, and also
to change up to 8 relays.
Changing the Rig Control patch can also effect the settings of any expression pedals set as
'dynamic'
Configuring MIDI Messages to send
Firstly, trigger the patch you want to edit, either by footswitch or program change command.
You know need to enter the Patch Setup mode. Hold bank down and press the event setup
footswitch (or CC 127 at 127), once your in event setup mode, press the event setup footswitch
again (or send the patch setup midi event - CC 127 at 124) The last patch change will be the one
that is edited.
In this first screen we set the bankstick to be used of the first message.
Use any pedal to scroll through the list
Press Bank Up or (CC 127 at 126) to move to the event type screen.
Again by moving any pedal, you can select any of the available types.
Press Bank Up or (CC 127 at 126) to move to the event select screen.
Again by moving any pedal, you can scroll though the list of events.
Press Bank Up or (CC 127 at 126) to move to the value select screen.
Moving any pedal will change the value.
Also at this screen, you set whether or not the event should be enabled or disabled. If enabled, the
midi event, with the value will be sent, if disabled it will not. This can be toggled by pressing the
Event Setup footswitch or CC 127 at 125.
Press Bank Up or (CC 127 at 126) to go back to the bankstick select screen, but for the next
message. Up to 32 messages can be sent.
At this time, the message you have just been editing will be saved.
You can press Bank Down (or CC 127 at 127) at any time to exit Rig Control Patch Setup Mode.
However the current message being edited will not be saved.
Page 12

Relay Setup
Up to 8 relays can connected to PB. Each Rig Control patch can turn the relay on or off.
Note: Relays can be inverted by PB, this setting can only be modified in the Pedal Board Editor 2
software
We start in the Rig Control patch setup screen (see Configuring MIDI Messages to send).
This time press the event setup button again, or send the patch setup midi command (CC 127 at
124) again.
The top line indicates whether the relay will be triggered or not. The bottom line indicates whether
it will be triggered on or off.
To toggle the enabled line - Press the Global Setup footswitch (or CC 127 at 125).
To adjust the on/off line - Move any pedal.
Bank up (or CC 127 at 126) will move to the next column.
When finished, press the Event Setup Button (or CC 127 at 124) to save and return to the Patch
Setup Screen.
Configuring using PBE2 Software
In the software we have a much more complete overview of what's happening.
To edit a patch, firstly choose it from the list. You can name it using the Patch name textbox
To edit midi events, choose the desired event from the second list – it can now be modified in the
midi send editor.
You can copy and paste individual settings
The arrows on top of the lists allow to change the order of patches and midi events. Note the
'Footswitch; checkbox. With is checked if a footswitch is assigned to a patch that is being moved,
the footswitch will update so it points to the moved patch.
Page 13

Relays can be set to trigger on or off (or no change). Green is ON, Red is Off, Black is No Change.
Relay names and inversion settings can access by holding down shift and clicking the logo at
the top of the window.
Match Name: Will copy the program change names of the currently selected device and apply
them to the rig control patch names
Auto PC: Will take program changes settings for the currently selected device in the MIDI send
editor and add them sequentially to each patch to the currently selected MIDI send slot in the list.
Triggering a Patch Change
Patch changes can be made by sending a program change midi event on the master bankstick
channel.
Or
By assigning a master bankstick program change to a footswitch.(see Footswitch Setup).
Page 14
Gig Control
Overview
Gig control is a cue based system of rig control patch selection.
There are 20 cuelists available. Each cuelist has up to 128 cues.
By triggering Next/Previous Cue you are able to trigger Rig Control Patch changes in a given order.
Configuring
If you wish to use footswitches for next/previous cue, it must be assigned (see Footswitch Setup).
Be sure to select the master bankstick, and choose the 'Special' event type, next and previous cue are
the first 2 in the list
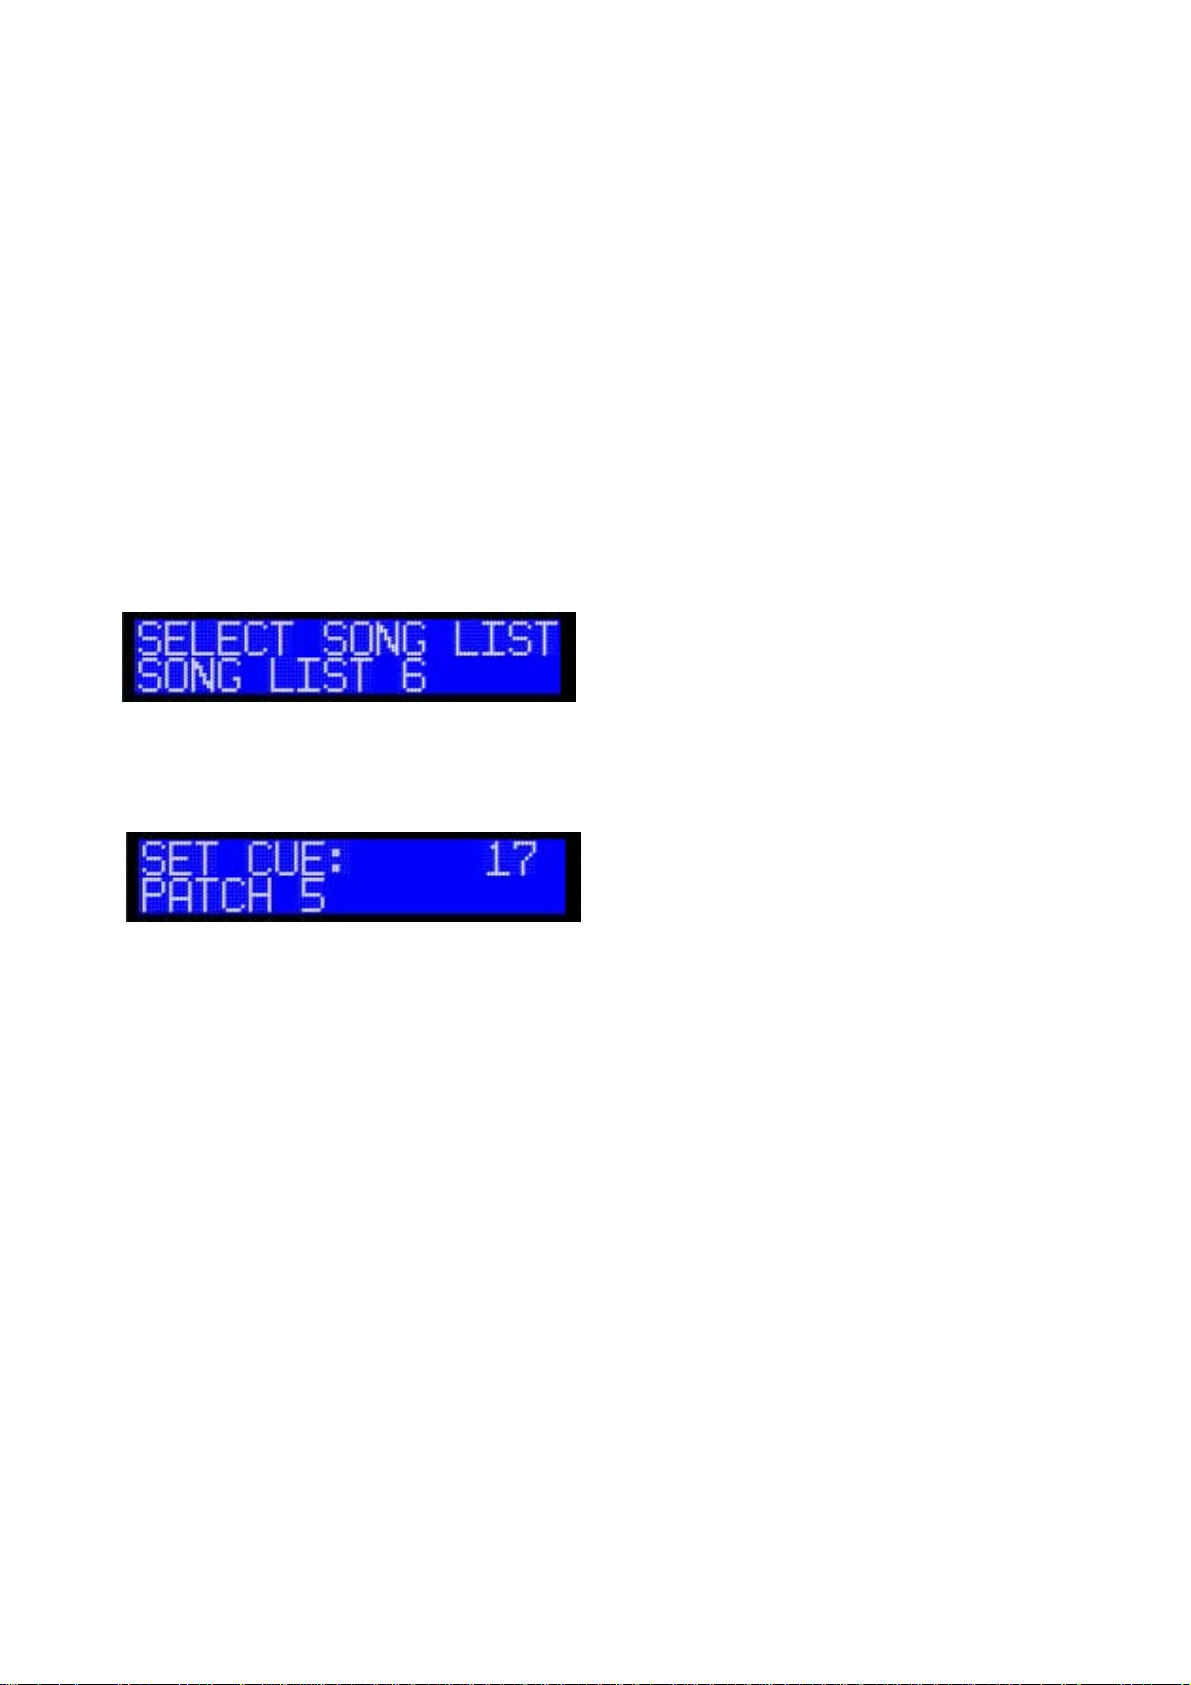
You can change the current cue list by holding the footswitch you have assigned as Next Cue and
pressing bank down or by sending CC 122 at127 to the master bankstick.
You can scroll the song list using any pedal connected.
Pressing Bank Down (or CC 127 at 127) will exit song list selection mode
To edit the cuelist – Press Bank Up (or CC 127 at 126) from the cuelist select screen.
Again using any pedal, you can select the patch number you want for the first cue.
Pressing the next cue footswitch (CC 122 at 2) or previous cue footswitch (CC 122 at 1) will take
you through the cue list to set each cue step.
Pressing Bank Down (or CC 127 at 127) will exit cue setup mode.
Cues are automatically saved.
Setting the cue to EOCL (End Of Cue List – Last in the cue select screen) tells PB to loop back to
the start if next cue is pressed, and also gives a a high cue number if previous is triggered from the
first cue.
Page 15

Configuring using the PBE2 Software
Choose a cuelist from the list (Name it if desired). Then choose cues from the second list. Use the
patch selection drop down list to choose the desired patch.
Red arrows above each list allow to move settings around.
Triggering
Gig control can be done MIDI events on the master bankstick channel CC 122 at 1 for Previous Cue
CC 122 at 2 for Next Cue
Or
By the assigning Next Cue and Previous Cue to footswitch.
Page 16

Storing Configurations (PC Software)
Make sure you have the appropriate MIDI channel selected (1-16). Ensure the channel does not
match any device.
Save and Load
File types:
.pbx: This is main save file type. It stores all master and device configuration.
You can save and load pbx files from the red buttons at the top.
.rbs: Stores individual master or device settings
Accessed by the Yellow Load and Save Config buttons
.syx: For upload via a separate program, such MIOS Studio 2 or MIDI-OX
Accessed by the Yellow Load and Save Config buttons
Uploading to PB
Choose you MIDI in and out and appropriate device ID. It is highly recommend to use feedback
from core. This allows the software to detect errors and halt the upload (which can prevent MIOS
from becoming corrupt and required the firmware to be re-uploaded).
When your ready hit upload. This uploads all of the Master bankstick settings
Page 17

Special MIDI Implementation
As PbX does not have any buttons for executing special commands, such as with setup modes,
triggering relays, etc. Special MIDI events are used for this functionality.
MIDI Implementation can be modified in pbx_midi_config.h)
The channel is set by the Master bankstick (the first bankstick)
General Setup Commands
Control Changes CC# Value
Event Setup 127 127
Screen Change 127 126
Global Setup 127 125
event setup is also used to save and exit most setup screens
Rig Control
Control Changes CC# Value
Patch Setup 127 124
PedalSwap 1 92 N/A
PedalSwap 2 93 N/A
PedalSwap 3 94 N/A
PedalSwap 4 95 N/A
PedalSwap 5 96 N/A
PedalSwap 6 97 N/A
Relay 1 112 0 = off 127 = on
Relay 2 113 0 = off 127 = on
Relay 3 114 0 = off 127 = on
Relay 4 115 0 = off 127 = on
Relay 5 116 0 = off 127 = on
Relay 6 117 0 = off 127 = on
Relay 7 118 0 = off 127 = on
Relay 8 119 0 = off 127 = on
Program Change 0 - 127
Page 18

Special
Control Changes CC# Value
MIDI In as AIN 0 20 0 - 127
MIDI In as AIN 1 21 0 - 127
MIDI In as AIN 2 22 0 - 127
MIDI In as AIN 3 23 0 - 127
MIDI In as AIN 4 24 0 - 127
MIDI In as AIN 5 25 0 - 127
MIDI In as AIN 6 26 0 - 127
MIDI In as AIN 7 27 0 - 127
Gig Control
Control Changes CC# Value
Cue Select 122 127
Next Cue 122 2
Previous Cue 122 1
Page 19

Device Configuration
Overview
In order to provide detailed information. PB requires device config files to tell it about your
equipment. Device config files can only be created and edited in the Pedal Board Editor 2 software.
PB will not function if it detects a bankstick that has not been uploaded with a device config file.
Pedal Board Editor 2 automatically generates a default device config file on startup.
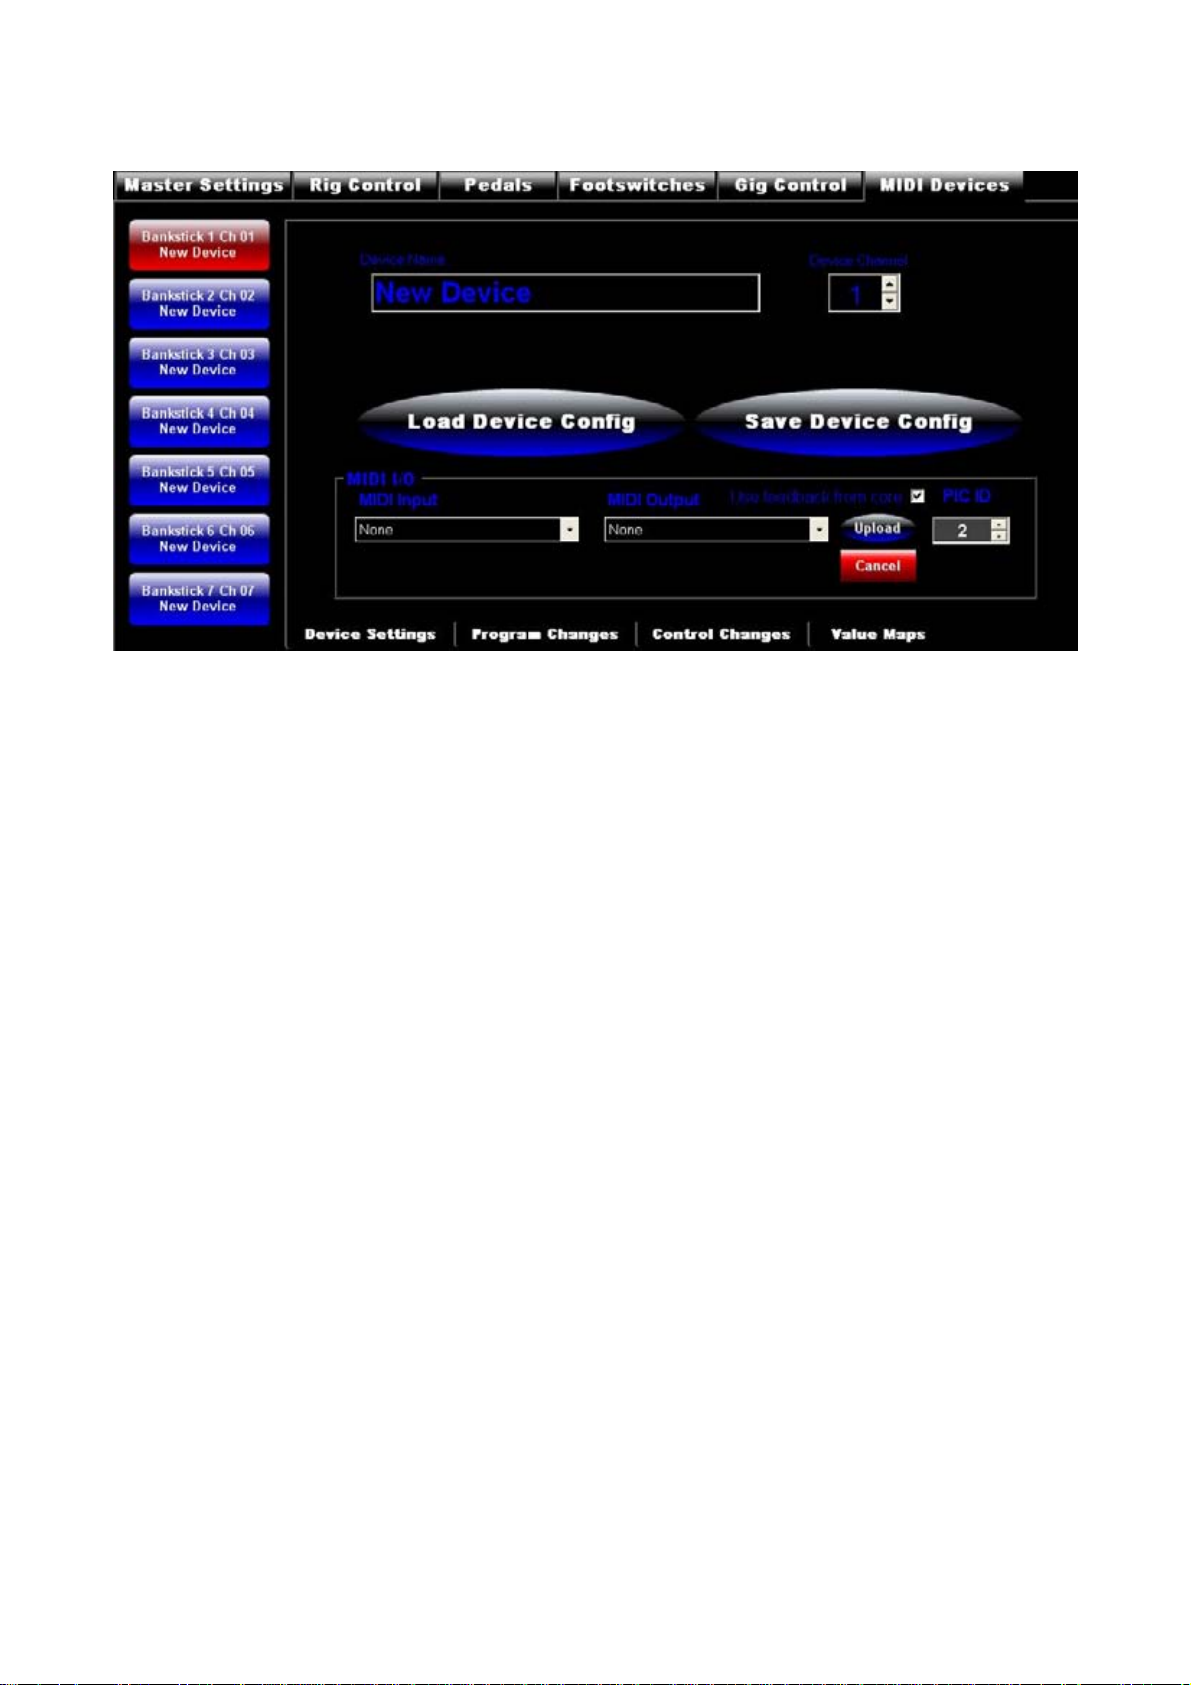
To access these. Go to the MIDI Devices Tab. From here can save/load .rbs and .syx files of your
devices. As well as edit them
A list of buttons down the left hand side allows you choose which device you are modifying
Note: You can change the number of device shown in the PBE2 setting by clicking the logo at the
top.
Program Changes
Down the bottom are the device config tab buttons. We'll start with program changes.
There's only one thing to deal with here, the name of the program change. Select the relevant
number from the list, and give it a name by entering it into the textbox.
The red arrows at the top of the list allow you to move the name around.
The 2 checkboxes, Footswitch and Patch - If checked if any footswitch/patch is configured to that
program change, it will update so it's triggering the same program change name.
Page 20

Control Changes
Very similar to program changes. Except there is the added handler drop down list.
This allows you to choose how PB will interpret and display data on the LCD
On/Off only: Regardless if low/high values it will only produce 0 and 127. The display will show
on or off
Tap Tempo: Regardless of low/high and toggle/momentary settings. It will always be a momentary
trigger and only send 127 as parameter 2. The display will show an approximate bpm reading.
Meter (inc. with off and with on/off): Displays a meter the value, with optional on when at high
value and off when at 0.
Pan Meter: Displays a meter that centres in the centre of the screen
Numeric Value: Show the parameter 2 value
Use Map: Display labels based on one of the 10 Value maps (see next section)
Page 21

Value Maps
Value maps allow you provide a 16 character text label to a CC parameter 2 value.
This is useful for things amp or cab selection, fx or noise gate settings, etc, etc.
Firstly choose the map you want to edit from the buttons at the top right hand side.
Now select the desired value from the list and enter a label into the textbox
If there a multiple sequential values that have the same label. You only need to enter it into the
lowest value. If no label is entered, PB will scan up the list to the first label it finds of a lower value.
The label EOM is keyword stating it is the end of the map and values equal to or above EOM are
not applicable. This allows PB to provide a warning if you trigger values that don't do anything.
Good for thins like amp selection where only the first 30 or so values a relevant.
Maps are assigned to CC via the CC's handler in the Control Change setup tab (see previous
section)
Page 22
Storing Configurations
Make sure you have the appropriate MIDI channel selected (1-16). Ensure the channel does not
match any other device or the master.
Save and Load
File types:
.pbx: This is main save file type. It stores all master and device configuration.
You can save and load pbx files from the red buttons at the top.
.rbs: Stores individual master or device settings
Accessed by the Blue Load and Save Config buttons
.syx: For upload via a separate program, such MIOS Studio 2 or MIDI-OX
Accessed by the Blue Load and Save Config buttons
Uploading to PB
Choose you MIDI in and out and appropriate device ID. It is highly recommend to use feedback
from core. This allows the software to detect errors and halt the upload (which can prevent MIOS
from becoming corrupt and required the firmware to be re-uploaded).
Select the device config you wish to upload from the buttons on the left hand side
When your ready hit upload. This uploads the chosen device config bankstick settings.
 Loading...