

Page 1
Water Dispenser
Instruction Manual
MODEL:
YL1635S-W
Page 2
A. SAFETY INSTRUCTION
1
B. FUNCTION INTRODUCTION
C. PART NAME
D. GETTING STARTED
E. CAUTION
F . TROUBLE SHOOTING
G. CLEANING
H. MACHINE INSTALLATION
1
2
3
3
5
5
6
The packaging material used is recyclable; we recommend that you separate plastic,
paper and cardboard and give them to recycling companies. To help preserve the
environment, the refrigerant used in this product is R134a (Hydrofluorocarbon -HFC),
which does not affect the ozone layer and has little impact on the greenhouse effect.
According to WEEE (Waste of Electrical and Electronic Equipment) guidelines, waste
from electrical and electronic devices should be collected separately. If
you need to dispose of this appliance in the future, do NOT throw it away
with the rest of your domestic garbage. Instead, please take the appliance
to the nearest WEEE collection point, where available.
Page 3

A. SAFETY INSTRUCTION
This appliance ca n be used by children aged f rom 8 years and above and
1.
persons with redu ced physical, sensor y or mental capabiliti es or lack of
experience and kn owledge if they have bee n given supervision or
instruction con cerning use of the appli ance in a safe way and under stand
the hazards invol ved. Children shall no t play with the appliance.
Cleaning and user m aintenance shall not b e made by children without
supervision.
This appliance is i ntended, or for commer cial use by lay persons.
2.
3.
If the supply cord is d amaged, it must be repla ced by the manufacturer, its
service agent or si milarly qualified pe rsons in order to avoid a hazard.
The appliance mus t not be cleaned by a water jet.
4.
5.
The appliance is su itable for indoor use on ly.
6.
WARNING: Keep ventilation apenings, is the ap pliance enclosure or i n the
built-in struct ure, clear of obstruct ion.
WARNING: Do not use mechanical devices or other m eans to accelerate the
7.
defrosting proc ess, other than those re commended by the manuf acturer.
8.
WARNING: Do not use electrical appliances ins ide the food storage
compartments of t he appliance, unless t hey are of the type recommended
by the manufactur er.
B. FUNCTION INTRODUCTION
This
1.
2.
3.
series model can satisfy the meed of tea & coffee and making drinking
It must be used indoor only
With adoption of distinctive thermal isolation technology, this machine can
minimize thermal exchange between hot & cold water.
Warning Do not damage the refrigerant circuit.
1
Page 4
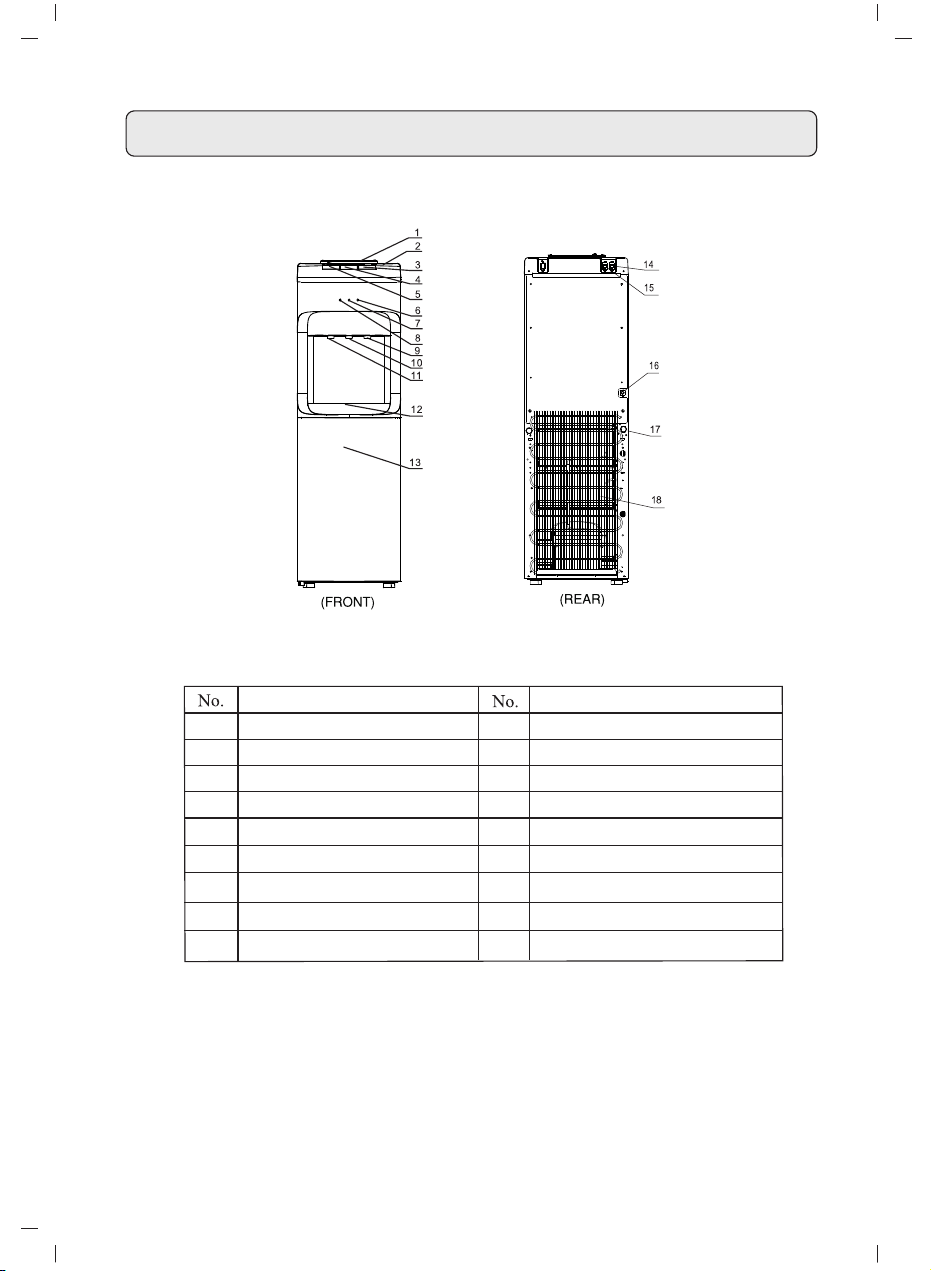
C. PART NAME
PART NAME PART NAME
Bottle Supporter
1
Top Cover
2
Button of cold water
3
4
Button of normal water
Button of hot water
5
Cooling pilot lamp
6
Heating pilot lamp
7
Power pilot lamp
8
9
Tap of cold water
10
11
12
13
14
15
16
17
18
Tap of natural water
Tap of hot water
Water collector
Door
Heating switch
Cooling switch
Power supply cord
Outlet of h ot w ater
Condenser
NOTE:
This machine can be suitable for bottle of 3 or 5 gallons, Don’t use unhealthy
2
hard water.
Page 5
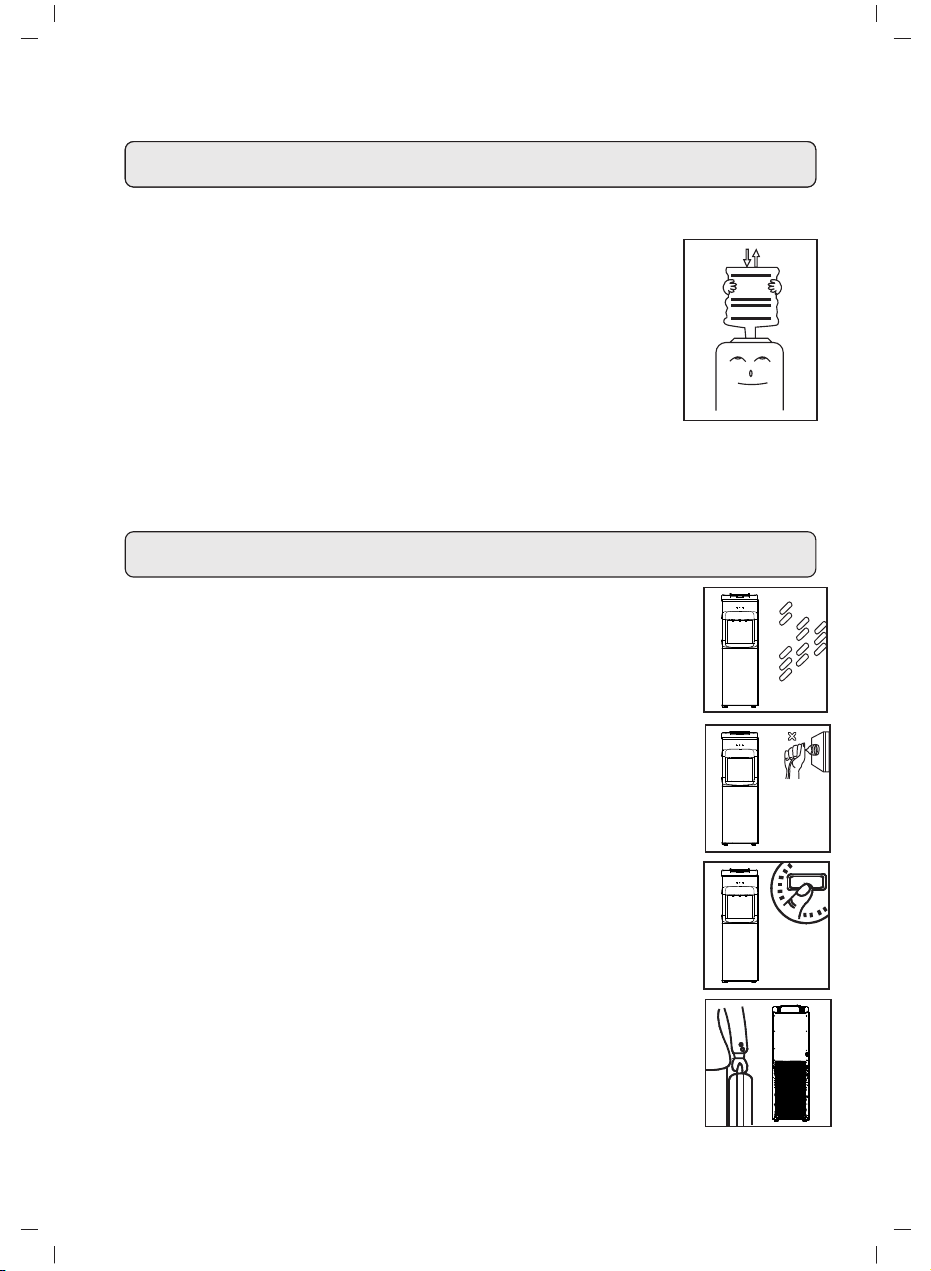
D. GETTING STARTED
1.
Tear the label from the bottle.
2.
Vertically insert the bottle into the bottle supporter on top of
the machine. Dont’t plug the power cord or push the red
switch until water runs out from the tap of hot water.
3.
Insert the plug to socket, then turn on the power switch.
Indicators light up accordingly once the machine works.
Vertically pull out the bottle with two hands when the bottle
4.
is empty, then replace it with another bottle of water.
This appliance should work under environment of temp from 10℃~43℃.
5.
This appliance is not suitable for installation in an area where a water jet
6.
could be used.
E: CAUTION
Keep this machine in a dry place and avoid direct sunlight.
1.
Rear of the machine should be at least 25cm away from the
wall. Never put the machine on paper or foam, which may
cause nustable surface, Never put anything flammable beside
this machine.
To avoid damage to the machine, don’t plug the power cord or
2.
turn on the heating switch until water runs out from the tap
of hot water.
In case hot (or cold) water is not needed for a long time, turn
3.
the switch accordingly to save power.
4.
In case when not using this machine for a long time, turn off
the switches, then pull the plug out from socket and drain the
remaining water through draining outlet.
D. OPERATION INSTRUCTION
3
Page 6

5.
Never use organic liquid to clean the machine. Strictly prohibit
splashing water on the unit.
6.
Never turn on(off) the machine by plugging the plug to
(pulling the plug out from) the socket. Never increase the
length of the power supply cord to avoid fire.
7.
If the power cord is damaged, it must be replaced by the
manufacturer, its service agent or similarly qualified persons in
order to avoid a hazard.
The water cooler shall plug into a ground fault
interrupter
receptacle.
8.
Never turn the machine upside down or tilt it more than 45 C.
9.
When the machine is below the freezing point and blocked by ice,
the cooling switch must be closde for 4 hours before turning
it on again to continue its operation .
10.
This machine should not be turned on until 3 minutes later after
turning off the power switch .
4
Page 7

F. TROUBLE SHOOTING
Please check the followings before having the machine repaired.
ELIMINATI ON
No hot or cold
water
No water running
out from taps
Leakage from
bottle supporter
Noisy operation
POSSIBL E CA USESPROBLEM S
1. Over consumption of hot
or cold water in short time.
2. No power supply.
1. Eenpty bottle.
2. Inlet of bottle supporter.
blocked by bo tt le s ea l.
Broken bottle.
Not placid installation.
1. Just wait a moment, then hot or
co ld w at er is available again.
2. Connect plug to socket, turn on
heating or cooling switch.
1. Replace it with another one.
2. Clean out wasted paper&bottle
seal, install bottle again.
Replace it with a new bottle.
Place the machine on
placid & solid surface.
G. CLEANING
To avoid accident, cut off the power supply before operation
according to the following instructions.
1. The machine had been disinfected before departed from factory.
Cleaning the dispenser prior to installing a full bottle or water for the
first time.
2. Cleaning and draining instruction:
Before cleaning, make sure the power switch in the O(off) position and
unplug the water dispenser.
Vertically insert the bottle into the supporter on tap of the machine.
Open the taps, let about 1 liter water flow into a container.
Remove the water bottle from the dispenser.
Place a large bucket beneath the drain outlet. Remove the drain cover
and allow water to drain.
After draining, replace the drain cover and you can use the machine.
Attention: The dispenser heats water to a temperature of approximately
185 F/85 C. It can cause sever scalding. Please operate it carefully.
5
Page 8

3. Sanitizing:
The machine should be disinfected with disinfectant separately bought
from drugstore or marketplace according to the instruction manual or
the disinfectant and the clean it with water( see cleaning and draining
instruction). Generally this should be done every three months.
4. To remove mineral deposits:
Mix 4 liters water with 200g citric acid crystals, inject into the machine
and make sure the water can flow out of the hot water tap. Switch on the
power and heat it about 10 minutes, 30 minutes later, drain off the liquid
and clean it with two or three times. Generally this should be done every
six months.
Never disassemble this machine by yourself to avoid danger from
damaged machine.
H. MACHINE INSTALLATION
Instructions for installation:
1-2. Loosen the screw of the left or right bottom angle
just as the picture shown.
3. Use the screw to fix th e bracket on the left or rig ht
bottom angle of the wate r dispenser.
4. Make a hole on the floo r ’s or the desk’s surface
where the water dis penser will be install ed.
5. Fix the bracket on t he floor by screw tightly.
6. Tighten the screw.
WARNI NG! To avoid a hazard due to instability of the appliance, it
must be fixed in accor dance with the instruc tions.
6
 Loading...