

Page 1
INSTALLATION AND OWNER’S MANUAL
Remote Controller
RM12D
Thank you for purchasing the remote controller.
This manual describes the safety precaution requirement of using this product.
Page 2

Thank you for purchasing this Kaysun remote controller. Carefully read this OPERATION AND INSTALLATION
MANUAL before using the controller. It will tell you how to use the controller properly and help you if any trouble
occurs. After reading the manual, please keep it for future reference.
Page 3

Contents
Installation ...................................................................................................................................1
1. Installation Precautions ....................................................................................................1
2. Installation Accessories ....................................................................................................2
3. Dimensions of Remote Controller and Bracket ................................................................2
4. Installation and Fixing.......................................................................................................3
5. Replace the Batteries .......................................................................................................4
Operating the Remote Controller.................................................................................................5
1. Using Precautions ............................................................................................................5
2. Model and Key Parameters ..............................................................................................6
3. Button Names and Functions ...........................................................................................7
4. Name and Function on Display Screen ............................................................................9
5. Operating Methods ........................................................................................................10
5.1 On/Off Operations ..................................................................................................10
5.2 Mode and Temperature Operations ........................................................................10
5.3 Fan Speed Operations ...........................................................................................11
5.4 Fan Direction Operations .......................................................................................12
5.5 Swing Operation .....................................................................................................12
5.6 IDU Display Operations ..........................................................................................13
5.7 Silent Mode Operation............................................................................................14
5.8 ECO Operations .....................................................................................................14
5.9 Follow Me Operations ............................................................................................15
5.10 Timer On/Off Operations ......................................................................................15
5.11 Button Lock Operations ........................................................................................16
Field Settings .............................................................................................................................17
1. Indoor Unit Address Query and Setting ..........................................................................17
2. Parameter Conguration for Remote Controller ................................................................18
Page 4
Installation
1. Installation Precautions
Safety considerations
Please read this "Safety considerations" carefully before installing Controller and be sure to install it correctly. After
completing the installation, make sure the controller operates properly.
Please instruct the customer how to operate the controller and how to perform maintenance.
Meaning of Caution Symbols
Failure to observe these instructions properly may result in property damage or personal injury.
Information classied as
• Ensure that nothing interrupts operation of the wireless remote controller.
• Ensure that the signal from the remote controller can easily be transmitted.
• Ensure that the operation display lamp and other indicator lamps can easily be seen.
• Ensure that there is neither a source of light nor a uorescent lamp near the receiver.
• Ensure that the receiver is not exposed to direct sunlight.
WARNING
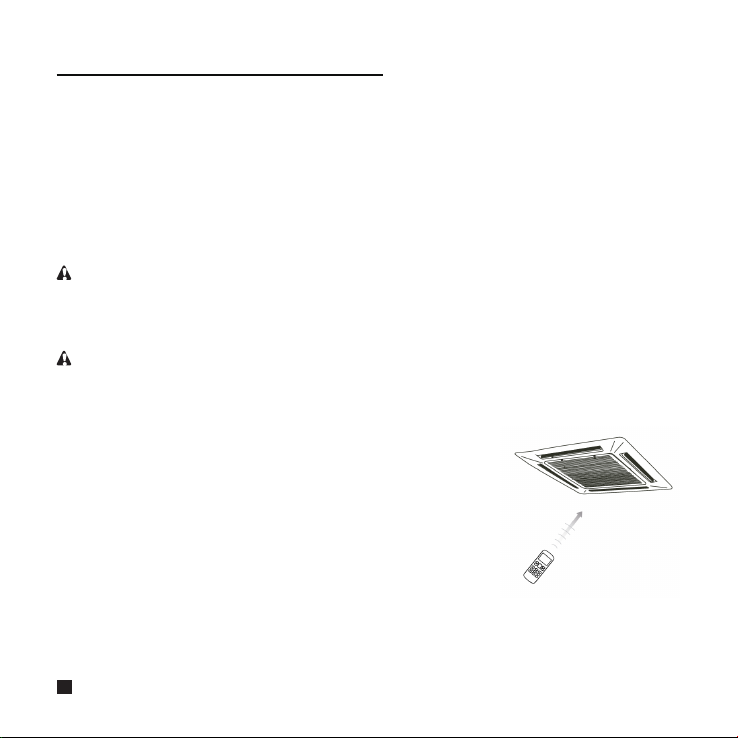
Precautions in handling remote controller
• Direct the transmitting part of the remote controller to the receiving part of the air
conditioner.
• If something blocks the transmitting and receiving path of the indoor unit and the
remote controller as curtains, it will not operate.
• Transmitting distance is approximately 7 m.
• 1 short beeps from the receiver indicates that the transmission is properly done.
• Do not drop or get it wet.
It may get damaged.
• Never press the button of the remote controller with a hard, pointed object.
The remote controller may get damaged.
Installation site
• It is possible that signals will not be received in rooms that have electronic
uorescent lighting. Please consult with the salesman before buying new
uorescent lights.
• If the remote controller operated some other electrical apparatus, move that
machine away or consult your dealer.
NOTE
contains instructions to ensure proper use of the controller.
1
Page 5

Installation
2. Installation Accessories
• Please check that you have all the following parts.
No. Name Schematic Qty
1
Remote controller bracket 1
2
3
4
5
Screw lid 1
Philips head screw (M2.0*4.5) 2
AAA battery 2
Remote controller manual 1
3. Dimensions of Remote Controller and Bracket
47 mm
170 mm
Figure 2.1 Dimensions of remote controller
72 mm
89 mm
Figure 2.2 Dimensions of remote controller bracket
25 mm
25 mm
2
Page 6
Installation
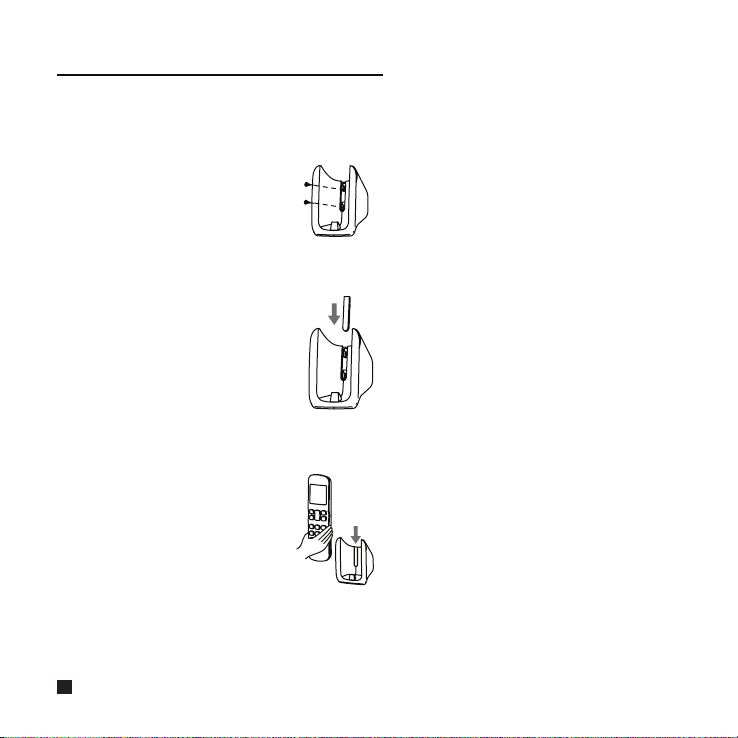
4. Installation and Fixing
1) Use the screws (accessories) to x and secure the remote controller bracket in a stable position (see Figure 2.3);
Make sure you refer to "1. Installation Precautions" to determine the location.
Figure 2.3
2) Slot the screw lid into the bracket cover on top of the screws (see Figure 2.4);
Figure 2.4
3) Slide the remote controller vertically down into the remote controller bracket (see Figure 2.5).
Figure 2.5
3
Page 7
Installation
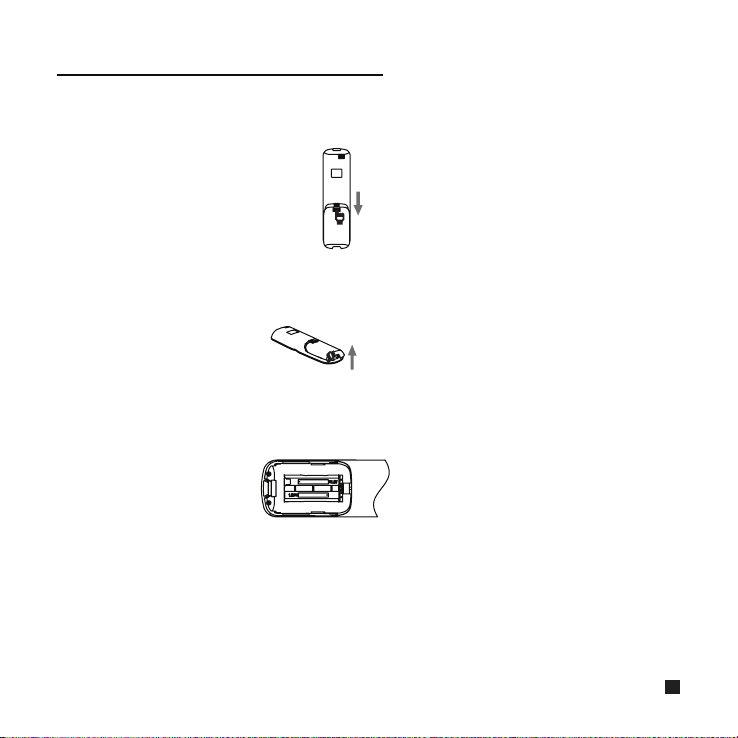
5. Replace the Batteries
1) Slide to move the battery cover at the back of the remote controller in the direction indicated by the arrow (Figure
2.6);
Figure 2.6
2) Lift up from the lower left end of the battery cover to open it (see Figure 2.7);
Figure 2.7
3) Take out the old batteries. Install two new AAA batteries according to the positive and negative polarities indicated
(see Figure 2.8). Close the battery cover.
Figure 2.8
4
Page 8

Operating the Remote Controller
1. Using Precautions
To gain full advantage of the controller's functions and to avoid malfunction due to mishandling, we recommend that
you read this instruction manual carefully before use.
The precautions described herein are classied as WARNING and CAUTION. They both contain important
information regarding safety. Be sure to observe all precautions without fail.
WARNING
Failure to follow these instructions properly may result in personal injury.
CAUTION
Failure to observe these instructions properly may result in property damage or personal injury, which may
be serious depending on the circumstances.
Information classied as
After reading, keep this manual in a convenient place so that you can refer to it whenever necessary. If the controller
is transferred to a new user, be sure also to hand over the manual.
WARNING
Note that prolonged, direct exposure to cool or warm air from the air conditioner or to air that is too cold or warm can
be harmful to your physical body and health.
• Do not use pesticides, disinfectants and ammable sprays to spray directly on the remote controller as these may
cause the device to become deformed.
• If there is a fault with the remote controller, turn off the remote controller and contact your local agent.
• Remove the dry batteries before cleaning or maintenance of the remote controller. Do not wash the controller with
water.
5
NOTE
contains instructions to ensure proper use of the controller.
Page 9

Operating the Remote Controller
CAUTION
• Do not operate the device with wet hands to prevent water from entering the remote controller and damage the
circuit board.
• Do not use the air conditioner for purposes other than those for which
it is intended. Do not use the air conditioner to cool precision instruments, food, plants, animals or works of art as this
may adversely affect the performance, quality, and/or lifespan of the object concerned.
• Ventilate the area from time to time. Be careful when you use the air conditioner with other heating equipment.
Insufcient ventilation may result in oxygen deciency.
2. Model and Key Parameters
Product Model
Rated Voltage
Ambient Temperature
Ambient Humidity
KI-03 S
3.0 V (AAA battery x 2)
-5 to 43°C
RH ≤ 90%
6
Page 10

Operating the Remote Controller
3. Button Names and Functions
High
Later
Figure 3.1 External view of remote controller
7
Page 11

Operating the Remote Controller
No. Button Function
1
ECO
2
Mode
3
Adjust downwards
4
Display
5
Timer on Set the time to turn on the unit
6
Silent Turn on/off the silent function
7
Follow me Turn on/off the follow me function
8
Auxiliary heater
9
Adjust upwards
10
On/off switch Switch on/off the unit
11
Fan speed Fan speed setting
12
Timer off Set the time to turn off the unit
13
Fan direction
14
Vertical swing Turn on/off the vertical swing function
15
Horizontal swing
Turn on/off the economic operation
function
Set operating mode: Auto → Cool →
Heat → Dry → Fan
Adjust the temperature setting or
timer (programmed time) downwards
Turn on or off the display of the indoor
unit
Turn on/off the auxiliary heater
function
Adjust the temperature setting or
timer (programmed time) upwards
Adjust the direction of the horizontal
louver
Turn on/off the horizontal swing
function
8
Page 12

Operating the Remote Controller
Note:
• The buttons and are not available for rst generation indoor units.
4. Name and Function on Display Screen
Figure 3.2 Display screen of remote controller
No. Name Display Function
1
Temperature Displays current temperature setting
2
Vertical swing Shows that Vertical Swing is on
3
Horizontal swing Shows that Horizontal Swing is on
4
Silent mode Shows that Silent is on
5
Follow me Shows that Follow Me is on
6
Operating mode Displays the current operating mode
7
Signal transmission
Displays signal sent to the indoor
unit from the remote controller
9
Page 13

Operating the Remote Controller
Power-on dis-
8
play
9
Fan speed Displays the current fan speed
10
Timer On/Off Displays times to turn on/off the unit
11
Lock
12
ECO Shows that ECO function is on
13
Auxiliary heater Shows that auxiliary heater is on
5. Operating Methods
5.1 On/Off Operations
1) Press (see Figure 3.3), and the remote controller displays the icon on its screen. Indoor unit starts to run;
2) Press again. The icon disappears from the display screen of the remote controller, and the indoor unit
stops running.
5.2 Mode and Temperature Operations
1) Press (see Figure 3.4). Display screen shows the operating mode;
Indicates a unit is turned on
Shows that the remote controller
button is locked
Figure 3.3
Figure 3.4
10
Page 14

Operating the Remote Controller
2) Press each time to change the operating mode according to the order shown in Figure 3.5;
Auto Cool
Heat
Dry Fan
Figure 3.5
3) In Auto, Cool, Dry or Heat mode, press ▲ and ▼ to adjust the temperature setting. Press ▲ and ▼ to adjust the
temperature by 1°C (default). Long press to change the temperature continuously.
Note:
• Fan speed cannot be adjusted in the Auto and Dry modes.
• Temperature setting cannot be adjusted in the Fan mode.
5.3 Fan Speed Operations
In Cool, Heat or Fan mode, press to set the operating fan speed (see Figure 3.6).
Figure 3.6
1) 7 fan speeds: The default in the remote controller is the mode with 7 fan speeds, where the Fan Speed will be
adjusted in turn as shown in Figure 3.7;
Auto
Speed 1
Speed 2
Speed 3 Speed 4
Speed 5
Speed 6
Speed 7
High
Figure 3.7
2) 3 fan speeds: Fan Speed will be adjusted in turn as shown in Figure 3.8.
Auto Low
Mid
High
Figure 3.8
Note: the default fan speed is 7 fan speeds, please refer to Field Setting to adjust the default fan speed.
11
Page 15

Operating the Remote Controller
5.4 Fan Direction Operations
Press to adjust the direction of the vertical louver (see Figure 3.9).
Figure 3.9
1) For second generation indoor units, there are 5 swing angles, and the vertical louver swings by a particular angle
each time the button is pressed (see Figure 3.10);
2) For rst generation of indoor units, the vertical louver will swing by about 6 degrees each time the button is pressed.
Note:
• Only valid for indoor units with vertical louvers.
• When the unit is off, the button is invalid. When the unit is turned off, the remote controller automatically turns
off the vertical louver direction function.
5.5 Swing Operation
1) Vertical Swing
When the unit is on. Press (see Figure 3.11). Start the vertical swing function, and the icon will light up,
and signal is sent to the indoor unit;
Figure 3.10
Figure 3.11
12
Page 16

Operating the Remote Controller
When the vertical swing is on, press to turn off this function.
Note:
• When the unit is turned off, the button is invalid.
• Each time the vertical swing signal is sent, the icon keeps lighting up for 15s and then disappears. The indoor unit
remains vertical swing operation.
2) Horizontal Swing
When the unit unit is on. Press (see Figure 3.12). Start the horizontal swing function, and will light up, and
signal is sent to the indoor unit;
Figure 3.12
When the horizontal swing is on, press to turn off the horizontal swing function.
Note:
• When the unit is turned off, the button is invalid.
• Each time the horizontal swing signal is sent, the icon keeps lighting up for 15s and then disappears. The indoor unit
remains horizontal swing operation.
5.6 IDU Display Operations
The Display function is used to control the on/off state of the display in the indoor unit.
1) When the remote controller is in on or off state, press (see Figure 3.13), and the display of the indoor unit
lights up;
Figure 3.13
13
Page 17

Operating the Remote Controller
2) When the display of the indoor unit lights up, press to turn off the light.
5.7 Silent Mode Operation
The Silent function is used by the remote controller to send the "Silent" signal to the indoor unit. The indoor unit
automatically optimizes the noise it generates when it is in the "Silent" mode.
1) When the unit is in the Cool or Heat mode, press (see Figure 3.14) to start the Silent function. Screen displays
the icon;
Figure 3.14
2) In Silent mode, press to turn off the Silent function, and the icon will disappear.
Note:
• Once it has been running for 8 hours, will no longer light up, and the unit will exit the Silent mode.
• The Silent and ECO functions cannot be implemented at the same time.
5.8 ECO Operations
The remote controller can send the ECO signal to the indoor unit when the unit is operating in Cool or Heat mode.
1) Press (see Figure 3.15) to send the ECO signal to the indoor unit. The icon is displayed;
2) Then press , or to exit the ECO function. The icon disappears.
Figure 3.15
14
Page 18

Operating the Remote Controller
Note:
• In cooling mode, when ECO is set up, the Fan Speed is forced to Auto and the temperature is 26°C; in heating
mode, when ECO is set up, the Fan Speed is forced to Auto and the temperature does not change.
• Once it has been running for 8 hours, will no longer light up, and the unit will exit the ECO mode.
• The Silent and ECO functions cannot be implemented at the same time.
5.9 Follow Me Operations
1) When the unit is in the Cool, Heat or Auto mode, press to start the Follow Me function. The screen will display
the icon (see Figure 3.16);
Figure 3.16
2) The remote controller will send the ambient temperature of the remote controller surroundings to the indoor unit
every 3 minutes;
3) When the Follow Me function is on, press to turn off this function, and the icon will disappear from the
display.
5.10 Timer On/Off Operations
"Timer" is used to set the timed on/off state of indoor unit.
1) Timer On Operation:
Press (see Figure 3.17), and the remote controller will display "Timer On", and "0.0h Later On" will appear in
the timer area. Adjust the Timer On settings now;
Figure 3.17
15
Page 19

Operating the Remote Controller
Press or ▲, ▼ to adjust the timer settings;
Once the adjustment is done, the timer information is sent to the indoor unit.
2) Timer Off Operation:
Press (see Figure 3.18), and the remote controller will display "Timer Off", and "0.0h Later Off" will appear in
timer area. Adjust the Timer Off settings now;
Figure 3.18
Press or ▲, ▼ to adjust the timer settings;
Once the adjustment is done, the timer information is sent to the indoor unit.
Note:
• Long press the timer adjustment buttons to adjust the time in units of 0.5 hours. If the adjustment exceeds 10 hours,
the changes will be in units of 1 hour, and the maximum time setting is 24 hours.
• Adjust the Timer On or Timer Off to 0.0h to cancel the Timer On or Timer Off settings.
• When the Timer settings have been completed, there may be a ±15 minutes time difference when the buttons for
adjustment, mode, fan speed and ECO are pressed again.
• The Timer On and Timer Off settings can be set at the same time.
5.11 Button Lock Operations
Once the buttons on the remote controllers are locked, all the other button operations except for Unlock and IDU
Address Setting are invalid.
1) Press and at the same time to lock the button (see Figure 3.19), and the screen will display the lock icon
;
Figure 3.19
2) Press and at the same time, and the lock icon will disappear. Button is unlocked.
16
Page 20

Field Settings
1. Indoor Unit Address Query and Setting
Long press the buttons for + + at the same time for 8 seconds (see Figure 4.1) to go to the page to set
the address of the indoor unit. Long press the same buttons again for 8 seconds or press to exit.
1) Indoor Unit Address Query:
Once in the address setting page, press the button to enter the Send page. In Send page, press the mode
button to send the query command (see Figure 4.2), and the indoor unit display will show the IDU's current address.
17
Figure 4.1
Figure 4.2
Page 21

Field Settings
2) Indoor Unit Address Setting:
Once in the address setting page, press the button to enter the Send page. In Send page, press ▲ and ▼ to
adjust the address up and down respectively. Press to send the address to the indoor unit. (See Figure 4.3)
2. Parameter Conguration for Remote Controller
1) Conguration Method:
Long press and on the remote controller at the same time for 5 seconds to go to the parameter settings
status (see Figure 4.4);
Figure 4.3
Figure 4.4
18
Page 22

Field Settings
Press ▲ and ▼ to adjust the parameter value;
Once the adjustment is done, press or wait for 5 seconds to save the parameter settings. The operation
sequence for the button is as shown in Figure 4.5.
Figure 4.5
19
Page 23

Field Settings
2) See Table 4.1 for details.
Table 4.1 parameters of remote controller
Parameter Parameter Denition
00
01
02
03
Note:
• For the rst generation indoor units, please set the parameter to 01.
7 fan speeds, temperature adjustment step of 0.5°C
3 fan speeds, temperature adjustment step of 1°C
7 fan speeds, temperature
adjustment step of 1°C (default
parameter)
3 fan speeds, temperature adjustment step of 0.5°C
MD18U-002BW
16117000001595
20
 Loading...