

Page 1
Control System
USER MANUAL for RM05/BGE; RM05/BG (T) E-A
Remote controller specifications
Model R05/BGE; RM05/BG (T) E-A
Rated Voltage 3.0V(2 pieces of LR03 7# batteries)
Lowest Voltage 2.4V
Effective Distance 8M~11M
Operation Condition
-5℃~60℃
Performance Features
1. Operating Mode: COOL HEAT DRY FAN and AUTO.
2. Timer Setting Function in 24 hours.
3. Indoor Setting Temperature Range: 17°C ~30°C.
4. LCD (Liquid Crystal Display) of all functions.
5. Night Light Function
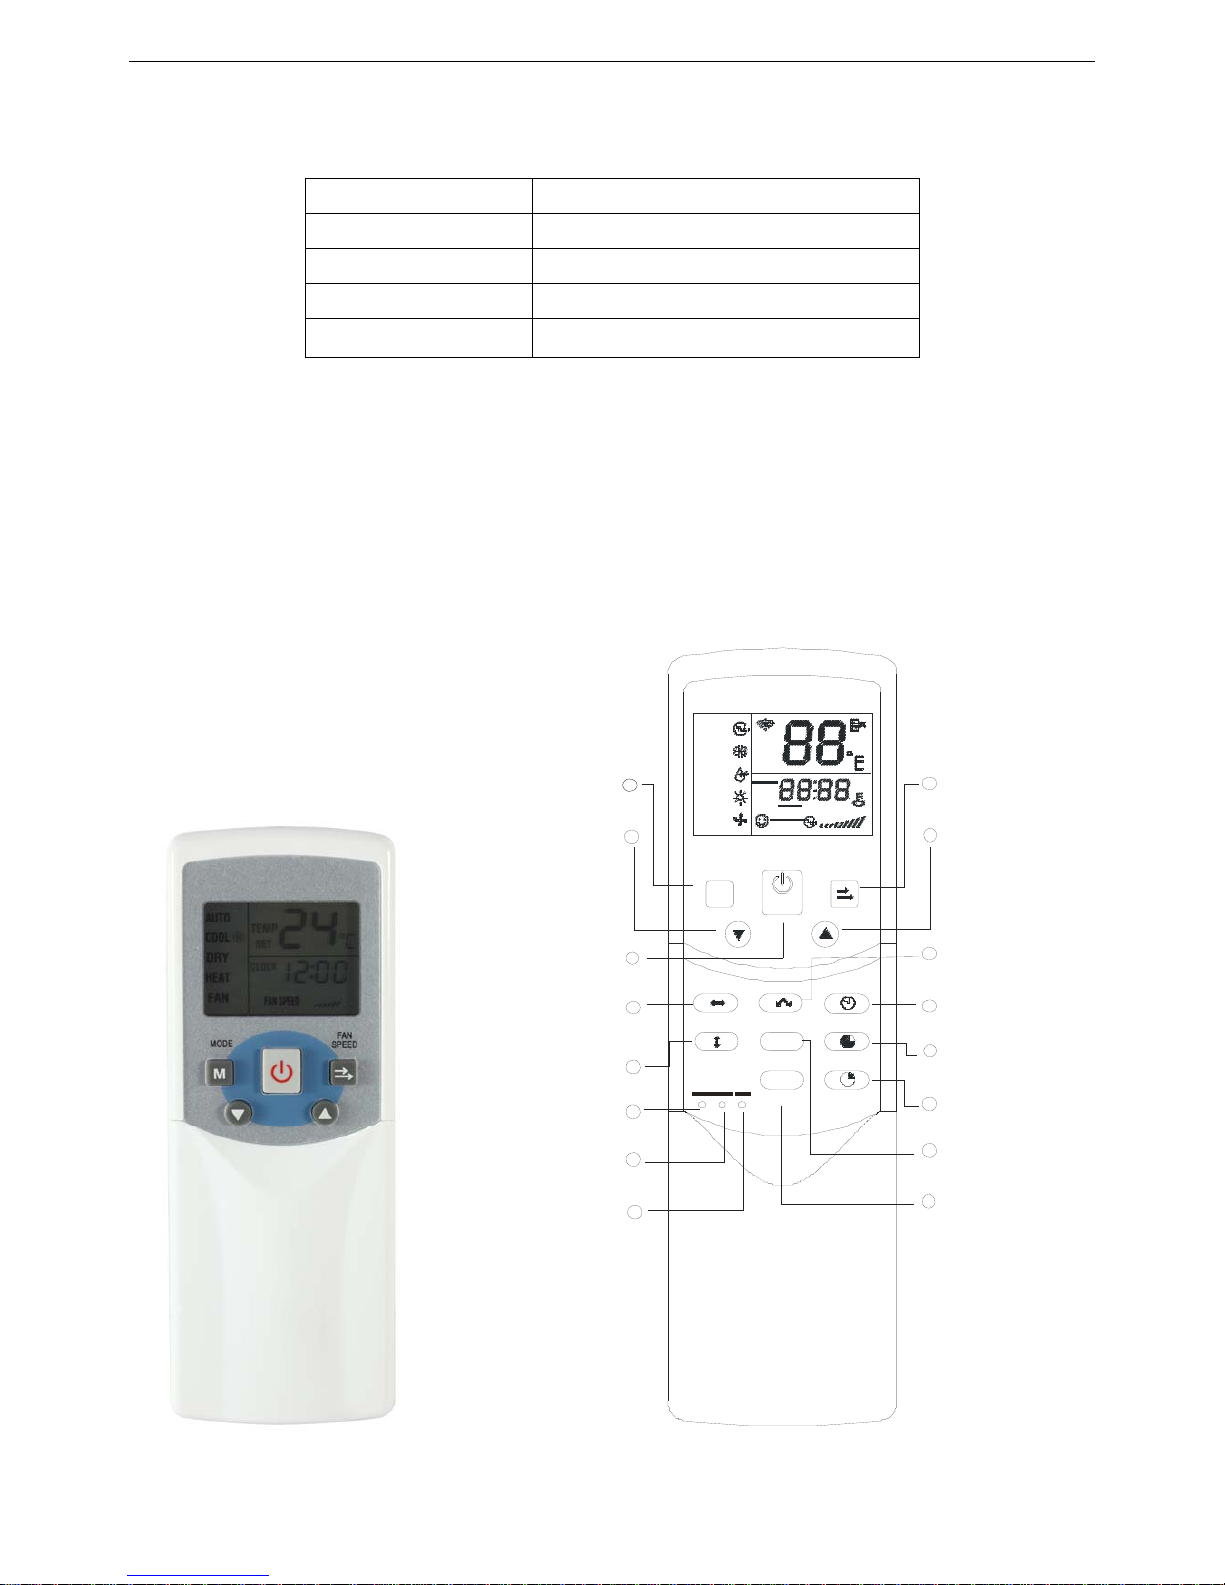
1.2.1 Parts name
1
5
7
9
6
8
11
10
2
4
1
3
15
13
12
14
16
TIME ON
TI ME OF F
CLOCK
SWIN G
AIR DIRE CTI ON
OK
ECO
SW I N G
MOD E
FAN
SPEED
M
AUTO
COOL
DRY
HEAT
FAN
TE M P
SET
SET
Page 2
Control System
(1) Mode Button
Once pressing, running mode will be selected in the following sequence:
Notes: No heating mode for cool only type unit.
(2) FanSpeed
Fan speed will be selected in following sequence once pressing this button:
(3) Adjust button ▼
Decrease the set temp. Keeping pressing will decrease the temp with 1℃ per 0.5s.
(4) Adjust button ▲
Increase the set temp. Keeping pressing will increase the temp with 1℃ per 0.5s.
(5) ON/OFF button
For turning on or turning off the air conditioner.
(6) Air Direction
Activate swing function of air deflector. Once pressing, air deflector will turn 6℃. For normal operation and
better cooling and heating effect, deflector will not turn to the degree which is the state of deflector when the
unit is turned off (Only available when remote controller is used with corresponding unit.)
(7) Horiz Swing
Activate or turn off horizontal swing function. (Only available when remote controller is used with
corresponding unit.)
(8) Vert Swing
Activate or turn off vertical swing function. (Only available when remote controller is used with corresponding
unit.)
(9) Clock
Display the current time. (12:00 is displayed when resetting or electrifying for the first time.) Press CLOCK for
5s, icon indicating hour will flash with 0.5s. Press it again, and are used to adjust the figure. Setting or
modification is effective onlyby pressing OK button to make confirmation.
(10)Time ON
For time ON setting. Once pressing this button, the time will increase by 0.5 hour. When the set time
exceeds10 hours, pressing the button will increase the time by 1 hour. Adjusting the figure to 0.00 will cancel
time ON setting.
(11)Time OFF
For time OFF setting. Once pressing this button, the time will increase by 0.5 hour. When the set time
exceeds10 hours, pressing the button will increase the time by 1 hour. Adjust the figure to 0.00 will cancel time
ON setting.
(12)Reset Button(inner located)
Press this button with a needle of 1mm to cancel the current setting and reset remote controller.
(13)Lock Button(inner located)
Press this button with a needle of 1mm to lock or unlock the current setting.
A UTO CO OL DR Y HEAT FAN → → → →
AUTO→LOW→MED→HIGH
Page 3

Control System
(14)OK button
Used to confirm the time setting and modification.
(15)COOL/HEAT (inner located)
Press this button with a needle of 1mm to shift mode between COOL only and COOL&HEAT.
During setting, backlight will be lightened. Factory default mode is COOL &HEAT.
(16)ECO Button
Activate or turn off economic operation mode. It is suggested to turn on this function when sleeping. (Only
available when remote controller is used with corresponding unit.)
1.2.2 LCD display
Notes: RM05/BG(T)E-A is able to set the indoor units’ addresses individually.
1.2.3 How to set address through Wireless Remote Controller RM05
● Press the LOCK button for more than 5 seconds, then the controller gets into address setting mode.
● Press the ON/OFF button to start transmitting signal in the address setting mode. If the transmitting signal
icon has been turned on, then step can be omitted. When working in address setting mode, press ON/OFF
will not turn the controller off.
● In the address setting mode, there are 2 main functions:
Querying address: Please point the remote controller to the indoor unit, then press MODE button, the
corresponding indoor unit will display its address.
Setting address: Use the UP and DOWN buttons to choose an address you want. Then point the remote
controller to the indoor unit and then press the FAN button to set the indoor unit’s address. The
corresponding indoor unit will display the new address and record it. After about 4 seconds, this displaying
will fade out and the indoor units turn to normal display mode.
Note: the address cannot be repeated in the same system
● After setting all the addresses, users can press the LOCK button for 5 seconds to exit the address setting
mode.
 Loading...