

Page 1

CR193-RG70E2(2)BGEU1
16117000001054
20171013
AIR CONDITIONER
REMOTE CONTROLLER ILLUSTRATI ON
Than k yo u ve ry m uc h fo r pur ch as in g ou r ai r condi ti on er.
Plea se r ea d th is o wner' s ma nu al c ar ef ully be fo re u si ng
your a ir c on di ti oner. Ma ke s ur e to s av e th is manu al f or
futu re r ef er en ce .
The de si gn a nd s pe cific at io ns a re s ub ject to c ha ng e wi th out pri or n ot ic e
for pr od uc t im pr oveme nt . Co ns ul t wi th the sa le s ag en cy o r manuf ac tu re r
for de ta il s.
Page 2

1
CONTENTS
2
Model
Rated Voltage
8m
3.0V(Dry batteries R03/LR03×2)
RG70E2(2)/BGEFU1, RG70E3(2)/BGEF, RG70E2(2)/BGEF
Model: RG70E2(2)/BGEFU1
RG70E2(2)/BGEF
Remote Controller Specifications
Environment
Signal Receiving Range
1
2
4
5
3
9
10
11
12
13
8
6
7
1
2
3
4
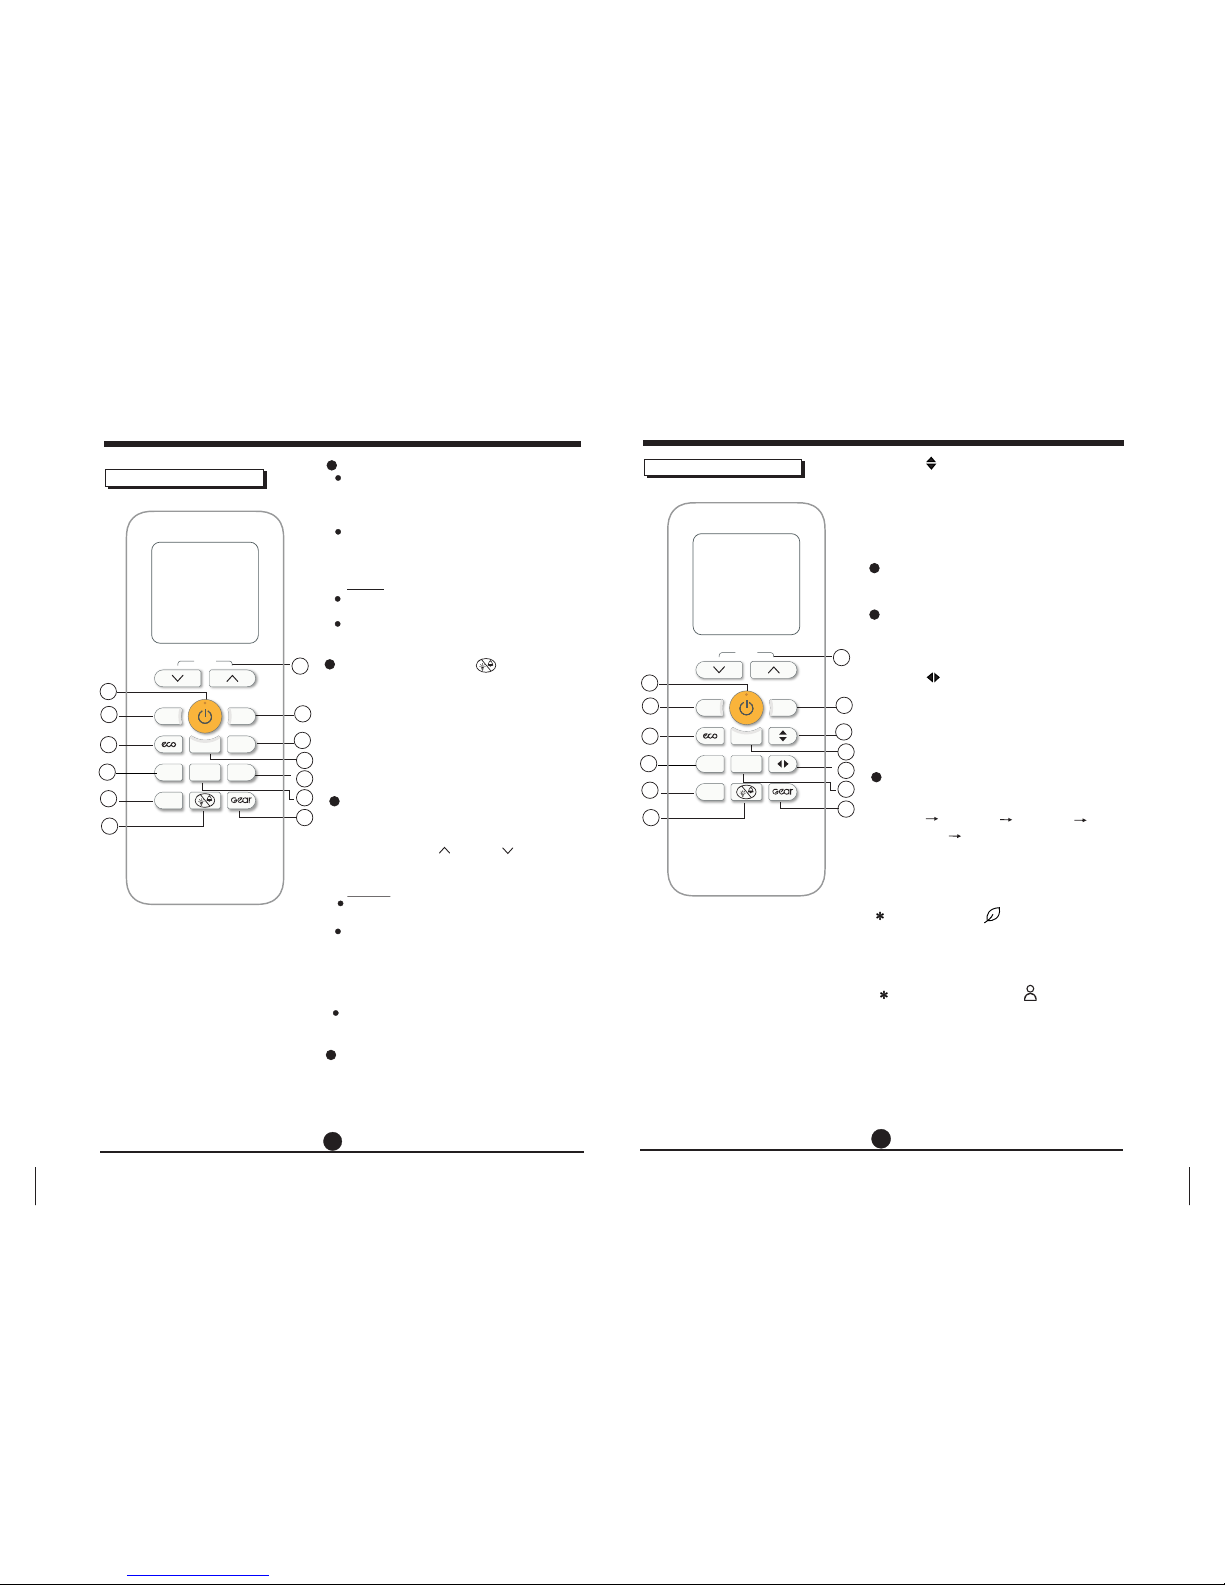
ON/OFF Button( )
Turns the air conditioner ON and OFF.
Operation of buttons
Temp Up Button( )
O O
Decreases temperature in 1 C(1 F)
O O
increments. Min. temperature is 16 C(60 F).
Temp Down Button( )
O O
Increases temperature in 1 C(1 F)
O O
increments. Max. temperature is 30 C(86 F).
NOT E:
Whe n the air c ondit ioner o perat es unde r
hea ting mo de with t he set te mpera ture of
O O
16 C( 60 F) , pr es si ng b ut to n tw ice in
one s econd w ill act ivate 8 D egree h eatin g.
The i ndoor u nit dis play sh ows FP .
,,
,,
Scrolls through operation modes as follows:
Mode Button
AUTO
COOL
DRY
HEAT
FAN
NOT E:Pl eas e do not se lect HE AT mode if t he
mac hine yo u purch ased is c oolin g only ty pe.
Hea t mode is n ot supp orted b y the coo ling on ly
app lianc e.
Used to enter the energy efficient mode.
Under cooling mode, press this button, the
air conditioner will automatically operate at
O O
24 C(75 F), with auto fan speed.
ECO Button
1
2
6
7
7
8
9
9
13
Handling the remote controller ......................................................
Remote controller Specifications...................................................
Operation of buttons ............ .........................................................
Indicators on LCD ..........................................................................
How to use the buttons .................................................................
AUTO/COOL operation....................................................................
DRY/FAN operation.........................................................................
HEAT operation ..............................................................................
Setting the Timer function .............................................................
Temp
Mode Fan
Swing
Direct
OK
Timer
Super
Options
NOTE:
Pressing the ECO button, or modifying the
mode or adjusting the set temperature to
O O
less than 24 C(75 F) will stop ECO operation.
The ECO operation will be stopped automatically
after 8 hours. Under ECO operation, the set
O O
temperature should be 24 C(75 F) or more,
it may result in insufficient cooling. If you feel
uncomfortable, just press the ECO button
again to stop it.
Press and hold UP and DOWN buttons
together for 3 seconds will alternate the tem-
O O
perature display between the C & F scale.
o o o o
-5 C~60 C(23 F~140 F)
5
Timer Button
Press this button to initiate the auto-on/
auto-off time sequence.
Page 3
3
4
7
8
Operation of buttons
Do Not Disturb Button( )
Fan Button
You can not switch the fan speed in AUTO
or DRY mode.
Press Fan, MODE, Sleep, ON/OFF ,ECO or
Gear button will cancel the Silent function.
NOT E:
Hold down this button for at least 2 seconds
to activate/cancel Silent mode. Due to low
frequency operation of compressor, it may
result in insufficient cooling and heating
capacity (applicable to the air conditioner
with Silent feature only)
Operation of buttons
9
10
11
Swing Button(for RG70E(2) series only)
OK Button
Direct Button(for RG70E(2) series only)
Used to confirm the optional functions.
Used to stop or start horizontal louver
movement. The louver will swing up and
down automatically.
Used to set the desired air flow direction.
The louver changes 6 degree in angle for
each press.
Options Button
12
Press this button to select the air conditioner
function in a sequence of following:
Sel f clean
Sle ep
Fol low me
Fre sh
Press the Options button to select the desired
function, the selected symbol will flash on
the display area, then press the OK button
to confirm.
Rep ellen t
FRESH function( )
When the FRESH function is initiated, the
Ionizer/Plasma Dust Collector(depending on
models) is energized and will help to
remove pollen and impurities from the air.
FOLLOW ME function( )
Whe n the Fol low Me fu nctio n is acti vated ,
the r emote d ispla y is actu al temp eratu re
at it s locat ion. Th e re mo te c on tr ol will s end
thi s signa l to the ai r condi tione r every 3
min utes in terva l until p ress th e FOLLO W
ME bu tton ag ain.
Press this button to turn off the indoor screen
display, and also turn off the Air conditioner
buzzer, the fan speed shifts to low, which
create a comfortable and quiet environment.
Press it again to cancel this function.
Under Do Not Disturb mode, the display
will illuminate for 10 seconds while adjusting
the mode, set temperature or fan speed, etc.
2
9
10
11
12
13
8
Temp
Mode Fan
Swing
Direct
OK
Timer
Super
Options
1
4
5
3
6
7
Selects fan speeds in the following order:
AU g
g
20%
60%
40%
80%
F%.
g
g
g
Press the Temp or Temp button to
increase/decrease the fan speed in 1%
increments.
6
Super Button
Press this button under cooling operation,
O o
the set temperature will change to 17 C(62 F),
the fan speed shift to high and bring faster
cooling operation.
Press this button under heating operation,
O o
the set temperature will change to 30 C(86 F),
the fan speed shift to high and bring faster
heating operation.
NOTE:
This function is not available under AUTO,
DRY,FAN,Self Clean or Comfort mode.
Press MODE,FAN,SLEEP or ECO button
will cancel Super function.
Model: RG70E3(2)/BGEF
1
2
4
5
3
9
10
11
12
13
8
6
7
Temp
Mode Fan
OK
Timer
Super
Options
Swing Button(for RG70E3(2)/BGEF only)
Used to stop or start horizontal louver movement or set the desired up/down air flow
direction. The louver changes 6 degree in
angle for each press. If keep pushing more
than 2 seconds, the louver will swing up and
down automatically.
Swing Button(for RG70E3(2)/BGEF only)
Used to stop or start vertical louver movement
and set the desired left/right air flow direction.
The louver changes 6 degree in angle for each
press. If keep pushing more than 2 seconds,
the louver will swing left and right automatically.
Model: RG70E2(2)/BGEFU1
RG70E2(2)/BGEF
Page 4

Indicators on LCD
Information are displayed when the remote controller is powered up.
5
6
( Ind icate o ption al func tions )
SLEEP function( )
Gear Button
13
Press this button to enter the energy efficient
mode in a sequence of following:
75% (up to 75% electrical energy consumption)
50% (up to 50% electrical energy consumption)
Previous setting mode
Turn off the unit or activate ECO, sleep, FP,
Super, Silent or Self clean function will
cancel the electrical energy consumption
control function.
This function is only available under COOL
mode.
NOTE:
But tons de sign is b ased on t ypica l model a nd migh t be slig htly di ffere nt f ro m th e
act ual one y ou purc hased,t he actu al shap e shall p revai l.
All t he func tions d escri bed are a ccomp lishe d by the un it. If th e unit ha s no this
fea ture, t here is n o corre spond ing ope ratio n happe ned whe n press t he rela tive
but ton on th e remot e contr oller.
Whe n there a re wide d iffer en ce s be tw ee n Remot e contr oller I llust ratio n and
USE R'S MAN UAL on fu nc ti on de scrip tion, t he desc ripti on of USE R'S MAN UAL
sha ll prev ail.
,,
,,
,,
,,
,,
,,
2
9
10
11
12
13
8
Temp
Mode Fan
Swing
Direct
OK
Timer
Super
Options
1
4
5
3
6
7
The SLEEP function is used to decrease
energy use while you sleep (and don t need
the same temperature settings to stay
comfortable). This function can only be
activated via remote control.
Note: The SLEEP function is not available
in FAN or DRY mode.
,
Transmission Indicator
Horizontal louver
auto swing display
Vertical louver auto
swing display
Not available for this unit
Sleep mode display
Super mode display
Fresh feature display
Follow me feature
display
Not available for
this unit
Not available for
this unit
Silence feature
display
Lights up when remote
sends signal to indoor
unit
ON/OFF display
Appears when the unit
is turned on, and disappears
when the it is turned off.
TIMER ON display
( )
Battery display
Fan speed display
Displays selected fan speed:
Temperature/Timer/Fan
speed display
Displays the set temperature
by default, fan speed or
timer setting when using
TIMER ON/OFF functions
Temperature range:
o O
16-30 C/60-86 F
Timer setting range:
0-24 hours
Fan speed setting range:
AU -F%(100%)
This display is blank when
operating in FAN mode.
Displays when ECO
feature is activated
Low battery detection
MODE display
Displays the current
mode, including:
Displays when TIMER
ON is set
TIMER OFF display
( )
Displays when TIMER
OFF is set
11%-20%
1%-10%
21%-30%
F%(100%)
AUTO
.... .. .. .. .. .. .. .
This fan speed can not be
adjusted in AUTO or DRY
mode.
Note:
operation only the relative functional signs are shown on the display window.
All indicators shown in the figure are for the purpose of clear presentation. But during the actual
Repellent function( )
The m osqui to repe llent m odule w ill be
act ivate d which g enera te some f reque ncy
sou nd to sca re off mo sq ui to .
Displays when select
self clean feature by
Options button
SELF CLEAN function( )
Und er SELF C LEAN mo de, the a ir
con ditio ner wil l autom atica lly cle an and
dry t he Evap orato r and kee p it as fre sh
for t he next o perat ion. It i s not ava ilabl e
und er heat ing or fa n mode.
Page 5

Temp
Mode Fan
OK
Timer
Super
Swing
Direct
Options
Temp
Mode Fan
Swing
Direct
OK
Timer
Super
Options
Temp
Mode Fan
Swing
Direct
OK
Timer
Super
Options
Temp
Mode Fan
Swing
Direct
OK
Timer
Super
Options
7
How to use the buttons
1. Pr ess the M ODE but ton to se lect
COO L mode.
2. Se t your de sired t emper ature u sing
the Te mp o r Temp but ton.
3. Pr ess the FA N butto n to sele ct the
fan s peed in a r ange of AU -F%, in
con junct ion wit h Temp o r Temp
but ton.
4. Pr ess the O N/OFF b utton t o start t he
uni t.
In AU TO mode , th e un it w il l au tomat icall y
sel ect the C OOL, FAN , HEAT or DRY m od e
bas ed on the s et temp eratu re.
1. Pr ess the M ODE but ton to se lect Aut o mode.
2. Se t your de sired t emper ature u sing th e
Temp o r Tem p butto n.
3. Pr ess the O N/OFF butto n to star t the uni t.
,
NOT E: FAN SPE ED can t be set i n Aut o mod e.
1. Pr ess the M ODE but ton to se lect DR Y
mod e.
2. Se t your de sired t emper ature u sing th e
Temp o r Tem p butto n.
3. Pr ess the O N/OFF butto n to star t the uni t.
,
NOT E: FAN SPE ED can t be cha ng ed in
DRY m od e.
1. Pr ess the M ODE but ton to se lect FAN
mod e.
2.P ress th e FAN butt on to sel ect the
fan s peed in a r ange of AU -F%, in
con junct ion wit h Temp o r Temp
but ton.
3. Pr ess the O N/OFF butto n to star t the
uni t.
,
NOT E: You can t set te mp era ture in FA N
mod e. As a resu lt, you r remot e contr ol s
LCD s creen w ill not d ispla y tempe ratur e.
How to use the buttons
7
8
3
3
3
4
3
2
2
2
2
1
1
1
1
SETTING TEMPERATURE
AUTO operation
DRY operation(dehumidifying)
FAN operation
The o perat ing tem perat ure ran ge for un its is
O O
16- 30 C/60 -8 6 F. You c an in creas e or
O O
dec rease t he set te mpera ture in 1 C /1 F
inc remen ts.
COOL operation
COOL
,
Page 6

9
10
How to use the buttons
Setting the TIMER function
Temp
Mode Fan
1. Pr ess the M ODE but ton to se lect
HEAT m od e.
2. Se t your de sired t emper ature u sing
the Te mp o r Temp but ton.
3. Pr ess the FA N butto n to sele ct the
fan s peed in a r ange of AU -F%, in
con junct ion wit h Temp o r Temp
but ton.
4. Pr ess the O N/OFF b utton t o start t he
uni t.
Your a ir c on ditio ning un it has tw o timer -rela ted
fun ction s:
TIM ER ON- se ts the am ount of t imer af ter
whi ch the un it will a utoma tical ly turn o n.
TIM ER OFF- s ets the a mount o f time af ter
whi ch the un it will a utoma tical ly turn o ff.
TIM ER ON fun ction
The T IMER ON f uncti on allo ws you to s et a
per iod of ti me afte r which t he unit w ill
aut omati cally t urn on , su ch a s when yo u
com e home fr om w or k.
HEAT operation
NOT E: As outd oor tem perat ure dro ps, the
per forma nce of yo ur unit s H EAT func ti on
may b e affec te d. I n su ch i ns tance s, we
rec ommen d using t his air c ondit ioner i n
con junct ion wit h other h eatin g appli ance.
NOT E:
" 0.0 h "
Whe n setti ng the TI ME R ON o r
TIM ER OFF fu nctio ns, up to 1 0 hours ,
the t ime wil l incre as e in 3 0 mi nu te
inc remen ts w it h ea ch p ress. Af te r 10
hou rs and up t o 24, it wi ll inc rea se i n 1
hou r incre me nt s. Th e timer w ill re ve rt t o
zer o af te r 24 h ou rs .
You ca n tu rn o ff eith er func tion by
set ting it s timer t o .
,
2. Pr ess the Te mp o r bu tt on t o se t
the t ime whe n you wan t the uni t to turn
on.
3. Wa it 2 s ec ond s, then t he TIME R ON
fun ction w ill be ac tivat ed. The d ig it al
dis play on y our rem ote con trol wi ll then
ret urn to th e tempe ratur e displ ay.
Example
hours.
: Setting unit to turn on after 2.5
Example
hours.
: Setting unit to turn off after 5
2sec
ON/OFF
MODE
FAN
SHORT
CUT
TIMER ON
TIMER OF
F
TEMP
S
L
E
EP
1sec
x5
1
3
2
4
Temp
or
TIM ER OFF fu nctio n
The T IMER OF F funct ion all ows you t o
set a p eriod o f time af ter whi ch the un it
wil l autom atica lly tur n off, su ch as whe n
you w ake up.
1.
Thi s numbe r indic ates th e
amo unt of ti me afte r the cur rent ti me
tha t you wan t the un it t o tu rn o n.
For e xampl e, if you s et T IMER ON f or
2 hou rs, wil l appea r on the
scr ee n, a nd t he u ni t wi ll t ur n on a ft er
2 hou rs.
Pre ss the Ti me r bu tt on , th e Timer on
ind icato r " " displ ays and f lashe s. By
def ault, t he last t ime per iod tha t you set
and a n "h" (in dicat ing hou rs)wi ll appe ar
on th e displ ay.
Not e:
" 2.0 h "
2sec
x10
ON/OFF
MODE
F
AN
SHORT
CUT
TIMER ON
TIMER OF
F
TEMP
S
L
EEP
1sec
1
3
2
4
Temp
or
Con tinue t o press
Temp or
but ton unt il desi red
tim e is reac hed.
Temp
Mode Fan
Swing
Direct
OK
Timer
Super
Options
4
3
2
1
HEAT
Page 7

11
12
11
12
Set ting bo th TIME R ON and TI MER OFF a t th e sa me t im e
Kee p in mind t hat the t ime per iods yo u set for b oth fun ction s refer t o hours a fter th e
cur rent ti me. For e xampl e, say th at the cu rrent t im e is 1 :0 0 PM , an d you w ant the u nit
to tu rn on au to ma tical ly at 7:0 0 PM. You wan t it to ope rate fo r 2 hours , then au tomatic ally tu rn off at 9 :00 PM.
Exa mple: S ettin g the uni t to turn o n after 6 h ours, o perat e for 2 hou rs, the n turn of f
(se e the fig ure bel ow)
Your r em ot e di sp la y
Do the following:
ON/OFF
ON/OFF
MODE
MODE
SHORT
SHORT
CUT
CUT
TIMER ON
TIMER ON
TEMP
TEMP
3
3
sec
sec
4
8
3
7
X12
X16
2
6
Temp
or
Temp
or
1
5
Timer is set To turn ON
6 hours from current time
Timer is set to turn OFF
8 hours from current time
Current
time 1PM
2PM 3PM
4PM 5PM
6PM 7PM 8PM 9PM
Timer starts
Unit turns Unit turns
ON
OFF
6 hours later
8 hours later
Page 8

8m
Use the remote controller within a distance of 8 meters from
the appliance, pointing it towards the receiver. Reception is
confirmed by a beep.
The remote controller can be attached to a
wall or pillar by using a remote controller holder
(not supplied, purchased separately).
Before installing the remote controller, check
that the air conditioner receives the signals
properly.
Install the remote controller with two screws.
For installing or removing the remote controller,
move it up or down in the holder.
The following cases signify exhausted batteries.
Replace old batteries with new ones.
Receiving beep is not emitted when a signal
is transmitted.
Indicator fades away.
Location of the remote contr oller.
Using the remote controller holder
(optional)
The remote controller is powered by two dry
batteries (R03/LR03X2) housed in the back rear
part and protected by a cover.
(1) Remove the back cover of the remote
controller.
(2) Remove the old batteries and insert the new
batteries, placing the(+) and (-) ends correctly.
(3) Install the cover back on.
NOTE: When the batteries are removed, the
remote controller erases all programming. After
inserting new batteries, the remote controller
must be reprogrammed.
Replacing batteries
CAUTIONS
The air conditioner will not operate if curtains, doors or
other materials block the signals from the remote
controller to the indoor unit.
Prevent any liquid from falling into the remote controller.
Do not expose the remote controller to direct sunlight or
heat.
If other electrical appliances react to the remote controller,
either move these appliances or consult your local dealer.
Do not drop the remote controller. Handle with care.
Do not place heavy objects on the remote controller,
or step on it.
CAUTIONS
Do not mix old and new batteries or batteries
of different types.
Do not leave the batteries in the remote
controller if they are not going to be used for
2 or 3 months.
Do not dispose batteries as unsorted
municipal waste. Collection of such waste
separately for special treatment is necessary.
Handling the remote controller
13
14
The d ev ic e co ul d co mp ly with t he loca l natio nal reg ulati ons.
In Ca nada, i t shoul d compl y with CA N ICES- 3( B) /N MB -3 (B ).
In US A, this d ev ic e co mp li es w it h pa rt 1 5 of t he FCC Ru les. Op erati on is sub ject to
the f ol lo wi ng t wo c on di ti on s:
(1) T hi s de vi ce m ay n ot c ause ha rmful i nterf erenc e, and
(2) t his dev ice mus t accep t any int er fe re nc e re ce iv ed , in cl uding i nterf erenc e that
may c au se u nd es ir ed o pe ra ti on .
Thi s eq ui pm en t ha s be en test ed and fo und to co mply wi th the li mits fo r a Class B
dig ital de vice, p ursua nt to par t 15 of the F CC R ul es . Th es e li mits ar e desig ned to
pro vide re asona ble pro tecti on agai nst har mful in terfe rence i n a resid entia l insta llati on.
Thi s eq ui pm en t ge ne rates , uses an d can rad iate ra dio fre quenc y energ y and, if n ot
ins talle d and use d in acco rdanc e with th e instr uctio ns, may c ause ha rmful i nterf erenc e
to ra dio com munic ation s. Howe ver, the re is no gu arant ee that i nterf erenc e will no t
occ ur in a par ticul ar inst allat ion. If t his equ ipmen t does ca use har mful in terfe rence t o
rad io or tel evisi on rece ption , which c an be det ermin ed by tur ning th e equip ment of f
and o n, the us er is enc ourag ed to try t o corre ct the in te rf er en ce b y on e or m or e of t he
fol lowin g measu res:
Reo rient o r reloc ate the r eceiv ing ant enna.
Inc rease t he s ep ar at io n be tw ee n th e eq uipme nt and re ceive r.
Con nect th e equip ment in to an out let on a ci rcuit d iffer en t fr om t ha t to w hi ch the
rec eiver i s conne cted.
Con sult th e deale r or an exp erien ced rad io/TV t echni cian fo r help.
Cha nges or m odifi catio ns not ap prove d by the pa rty res po ns ib le f or c om pl ia nc e
cou ld void u ser s aut horit y to oper ate the e qu ip me nt .
NOTE :
Page 9

 Loading...