

Page 1

1
2
4
6
3
5
重点
10.警语/认证
标志高度
11.档位、
控制面板
一致性
校对项
1.版面尺寸
2.材质标注
3.物料编码
4.颜色标注
5.客户型号
A
B
项目
库
文件名
1
2
3
4
单黑 钉装 145*210mm 70克双胶纸 双面印刷 10张
5
6
A
B
6.产品名称
7.重量标注
8.电压功率
9.说明书装
订要求
C
D
E
F
技术要求(版本号:B,2020-01)
1.备注[70P以下为钉装,70P以上为胶装(特殊要求除外)]
2.说明书警语及认证标志应满足CE/UL标准,CE:警语部分大写字母高度不低于3mm,CE标志不低于5mm,WEEE标志不低于7mm;
UL:大写字母字高不小于1/12”(2.11mm),小写字母字高不小于1/16”(1.6mm),“IMPORTANT SAFEGUARDS”,“SAVE
THESE INSTRUCTIONS”等词,其字高不小于3/16”(4.8mm),IMPORTANT SAFEGUARDS 必须在最前面。
3.产品应符合QMG-J53.021《产品说明书技术条件》的有关要求。
G
4.有ROHS指令要求的物料应符合美的企业标准QML-J11.006《产品中限制使用有害物质的技术标准》。
C
D
E
F
G
A/1/加意大利回收标志/2022-01-11
处数 更改 文件 号 签 字 日 期
标记
H
制 图
郭迁强 李艳
-- -- -
设 计
-- -- -
校 对
会 签
-- -- -
审 核
标准 化
审 定
日 期
古广君
古广君
2021.5.31
电暖器
说明书
K
1 1
16161000A17154
说明书 MIDEA-NY2311-20MR
(NY2311-20MRE)-0501
H
1:1
广东美的生活电器制造有限公司
Page 2

MANUALE D’USO
RISCALDATORE A OLIO
MODELLO:
...
NY2311-20MRE
Questo prodotto è adatto solo per spazi adeguatamente isolati o per un uso occasionale.
Midea Italia S.r.l. a socio unico
Viale Luigi Bodio 29/37
20158 Milano Italia
midea.com/it
Page 3

ISTRUZIONI DI SICUREZZA
1. Attenzione: per evitare il surriscaldamento, non
coprire il riscaldatore.
2. Se il cavo di alimentazione è danneggiato, deve essere sostituito dal produttore o dal rivenditore o da una persona altrettanto qualificata al fine di evitare qualsiasi pericolo.
3. Questo apparecchio può essere usato da bambini di età pari o
superiore a 8 anni e da persone con ridotte capacità fisiche,
sensoriali o mentali o con mancanza di esperienza e conoscenza, se sono supervisionati o hanno ricevuto istruzioni
sull'uso dell'apparecchio in modo sicuro e comprendono i
pericoli connessi.
I bambini non devono giocare con l'apparecchio. La pulizia e la
manutenzione dell'utente non devono essere effettuate da
bambini senza supervisione.
4. Il riscaldatore non deve essere collocato direttamente sotto
una presa di corrente.
5. Non utilizzare questo riscaldatore nelle immediate vicinanze di
un bagno, una doccia o una piscina.
6. I bambini di età inferiore ai 3 anni devono essere tenuti lontani,
a meno che non siano costantemente sorvegliati.
I bambini di età compresa tra i 3 e gli 8 anni possono accendere
e spegnere l'apparecchio solo se questo è stato collocato o
installato nella posizione di funzionamento normale prevista e
se sono stati sorvegliati o istruiti sull'uso dell'apparecchio in
modo sicuro e hanno compreso i pericoli connessi. I bambini di
età compresa tra 3 anni e meno di 8 anni non devono collegare,
regolare e pulire l'apparecchio o eseguire la manutenzione.
1
Page 4

7. ATTENZIONE — alcuni componenti di
questo prodotto possono surriscaldarsi e causare ustioni. Prestare particolare attenzione in
presenza di bambini e persone vulnerabili.
8. Questo riscaldatore è riempito con una quantità precisa di olio
particolare. Le riparazioni che richiedono l'apertura del contenitore dell'olio devono essere effettuate solo dal produttore o dal
rivenditore che deve essere contattato in caso di perdita di olio.
In caso di rottamazione del riscaldatore, seguire le norme
relative allo smaltimento dell'olio.
9. Smaltimento corretto del prodotto
Questo marchio indica che questo prodotto non deve essere
smaltito insieme ad altri rifiuti domestici in tutta l'UE. Per
evitare eventuali danni all'ambiente o alla salute umana
derivanti da uno smaltimento incontrollato dei rifiuti, riciclarlo
responsabilmente per promuovere il riutilizzo sostenibile delle
risorse materiali. Per restituire il dispositivo usato, avvalersi dei
sistemi di restituzione e raccolta o contattare il rivenditore dove
il prodotto è stato acquistato. Questi possono ritirare il prodotto
per un riciclaggio sicuro dal punto di vista ambientale.
10. Questo riscaldatore non può garantire un controllo accurato
della temperatura dell'ambiente e pertanto non può essere
utilizzato come dispositivo di isolamento per l'ambiente di
stoccaggio, oggetti, animali e piante.
2
Page 5

FIGURA DEI COMPONENTI
Aletta
Pannello di controllo
Avvolgimento del cavo
Gruppo di rotelle
Uso del radiatore a olio
1. Capovolgere il riscaldatore.
2. Come mostrato nella figura 1, allineare il foro di montaggio di un set di
rotelle e installarlo sulla vite della piastra del cuscinetto della rotella all'estremità dell'aletta del radiatore e allineare l'altro gruppo di rotelle alle viti
montate sul fondo del pannello di controllo.
3. Come mostrato nella figura 2, due set di rotelle sono serrati con quattro
dadi a farfalla. Installare saldamente e poi rimettere il riscaldatore in
posizione (basta mettere le ruote a terra.
Dadi a farfalla
Pannello di
Figura 1 Figura 2
controllo
3
Page 6

ISTRUZIONI PER L'USO
[Ispezione prima dell'avvio]
1. Il cavo di alimentazione non deve essere danneggiato o rotto.
2. Verificare che la corrente nominale della presa di corrente sia conforme ai requisiti
della tabella precedente e che sia dotata di un dispositivo di messa a terra di
sicurezza prima dell'uso; in caso contrario, sostituire la presa.
[Istruzioni per l'uso]
< Funzionamento/Standby >: Inserire l'alimentazione, il cicalino emetterà un "bip"
per un lungo periodo, premere il tasto di accensione “ ” per passare allo stato di
funzionamento del riscaldamento, quindi premere il tasto di accensione “ ” per
passare allo stato di standby.
< Selezione della velocità>: In stato di funzionamento, premere il tasto " " per
selezionare una delle modalità di funzionamento come velocità alta, media e bassa.
<Impostazione della temperatura>: In stato di funzionamento, tenere premuto il tasto
"+" o "-" per impostare la temperatura, tenere premuto il tasto "+" o "-" per impostare
rapidamente la temperatura; dopo aver impostato la temperatura, non azionare per 5
secondi, quindi uscire dalla schermata di impostazione della temperatura.
<Programmazione funzionamento>: Toccare il tasto del timer " " in modalità
standby per accedere alla schermata di impostazione del lavoro programmato.
Premere “+” o “-” per impostare il tempo previsto, premerli a lungo per impostare
rapidamente il tempo previsto: il tempo previsto raggiungerà lo stato di funzionamento della macchina.
< Programmazione standby>: In stato di funzionamento, premere il tasto del timer
" " per accedere alla schermata di impostazione della programmazione standby.
Premere il tasto "+" o il tasto "-" per impostare il tempo di programmazione, premere
il tasto "+" o il tasto "-" a lungo per impostare rapidamente il tempo di programmazione. A questo punto il tempo di programmazione è nello stato di standby.
A: l'intervallo di programmazione è 0~24 ore. Premere "+" o "-" ogni volta per
aumentare o diminuire di 1 ora. Quando il valore impostato è 0 ore, premere il tasto
"-" per impostare 24 ore. Quando il valore impostato è 24 ore, premere il tasto "+" e il
tempo di impostazione sarà 0 ore. Quando il valore impostato è 0 ore, la programmazione viene annullata. Quando il valore impostato non è 0 ore, la programmazione viene avviata. Impostare l'ora, premere il tasto di temporizzazione " " o il tasto
" ", o non effettuare alcuna operazione per 5 secondi. Uscire dalla modalità di
programmazione.
B: Se il tempo di programmazione è impostato, premere il pulsante di accensione
" " per passare allo stato di standby e annullare la programmazione.
C: Dopo l'avvio della programmazione, premere il tasto di programmazione " " per
controllare il tempo rimanente e reimpostare il tempo di programmazione. Durante il
tempo programmato, la macchina viene spenta o avviata con il controllo della
temperatura, il tempo programmato è sempre normale e privo di tempi di inattività.
Durante il tempo programmato, viene azzerato in caso di mancanza di corrente.
<Funzione memoria>: Quando si avvia nuovamente la macchina, funzionerà
secondo lo stato prima dell'ultimo standby.
4
Page 7

< Funzione di protezione di sicurezza>: Quando la temperatura ambiente interna
supera i 50 °C in stato di standby o di funzionamento, tutte le uscite vengono
spente, il cicalino emette 10 segnali acustici lunghi, lo schermo digitale visualizza
"FF" e lampeggia a 1 Hz per 75 secondi. Finché c'è la protezione, anche se la
temperatura ambiente è inferiore a 50 °C, il funzionamento o l'operazione non
possono essere ripresi e l'operazione può essere eseguita solo dopo aver spento e
riacceso l'alimentazione.
<Spegnimento>: In stato di funzionamento, premere il tasto di accensione “ ” sul
pannello di controllo per passare allo stato di standby, scollegare il cavo di alimentazione, attendere che l'intera macchina si raffreddi e posizionare il riscaldatore in
modo stabile.
[Nota]
Per utilizzare la macchina la prima volta o per reinserire la presa, prestare attenzione a controllare che la spina e la presa siano ben inserite.
<Metodo di ispezione>
Inserire la spina nella presa e iniziare l'uso; dopo circa mezz'ora, spegnere ed
estrarre la spina. Controllare se i perni della spina sono caldi; in caso affermativo
sostituire la presa (più di circa 50 °C) per evitare di bruciarla o addirittura causare un
incendio causato dal surriscaldamento della stessa a causa di un errato contatto.
Finestra di visualizzazione
Pannello di controllo
5
Page 8

USO DEL TELECOMANDO
Istruzioni per il telecomando. La funzione dei pulsanti è fondamentalmente coerente
con il pannello operativo della macchina; il telecomando non può controllare il tasto
di combinazione.
Tasto ON/OFF
Tasto funzione
Tasto "+"
Tasto "-"
Tasto del timer
...
6
Page 9

PULIZIA E MANUTENZIONE
1. Il riscaldatore elettrico deve essere pulito regolarmente per eliminare la polvere sulla superficie delle
flange, in quanto può influenzare l'efficienza di irradiazione.
2. Scollegare l'alimentazione elettrica e lasciare raffreddare il radiatore, pulire la polvere con un panno morbido e umido. Non usare detergenti o abrasivi.
3. Non raschiare le superfici delle flange con strumenti
duri e affilati, per evitare che le superfici si arrugginiscano a causa del deterioramento dello strato di vernice.
7
Page 10

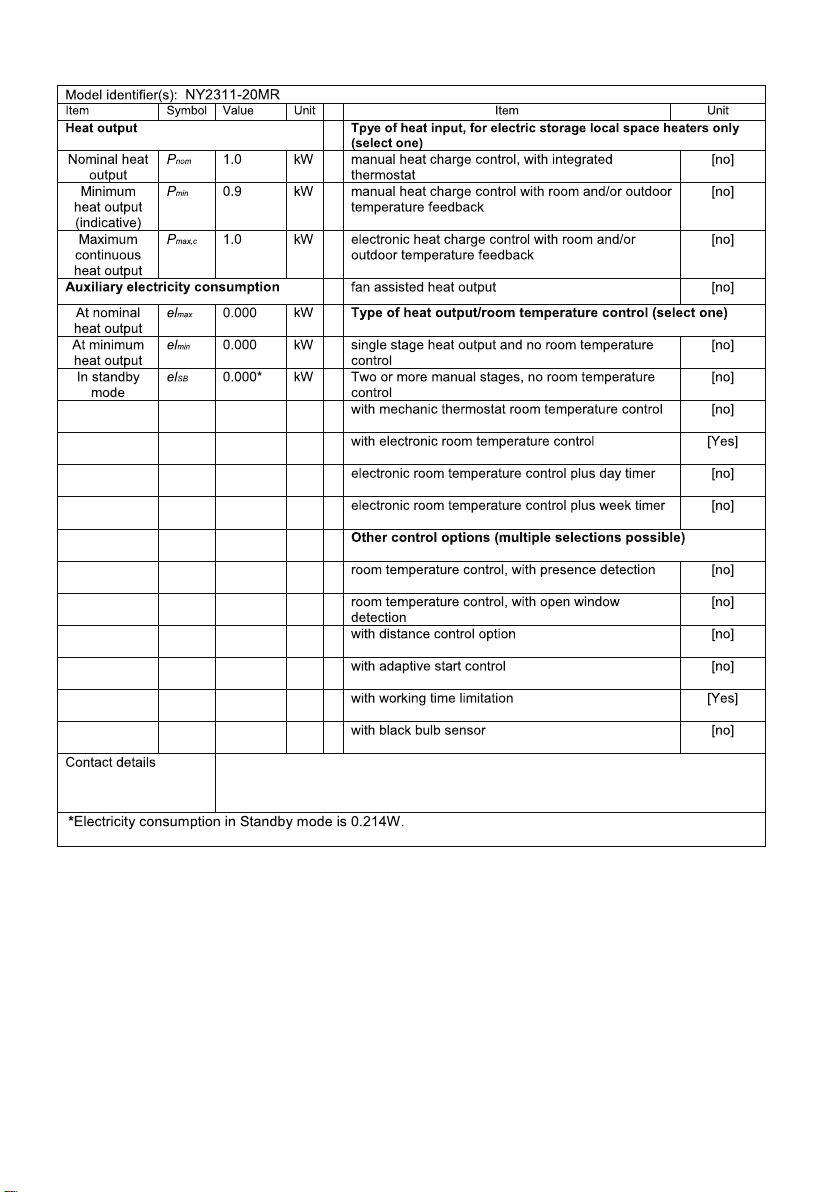
ID modello: NY2311-20MRE
Articolo
Produzione di calore
Produzione di calore
nominale
Produzione di calore
minima (indicativa)
Simbolo Valore Unità Articolo Unità
Tipo di ingresso del calore, solo per termoventilatori di
ambiente locali ad accumulo elettrici (selezionare uno)
P
nom
P
min
1,0
0,9
con termostato integrato
kW
controllo manuale della carica termica con
controllo manuale della carica termica,
kW
feedback sulla temperatura ambiente e/o
esterna
kW
Produzione di
calore continua
P
max,c
massima
Consumo ausiliario di elettricità
Alla produzione di
e/max
calore nominale
Alla produzione di
e/min
calore minima
In modalità
e/SB
standby
1,0
0,000
0,000
0,000
controllo elettronico della carica termica con
feedback sulla temperatura della stanza e/o
esterna
Uscita di calore assistita del ventilatore
kW
Tipo di uscita di calore/controllo della temperatura
ambiente (selezionarne uno)
kW
produzione di calore a stadio singolo e
nessun controllo della temperatura ambiente
kW
Due o più fasi manuali, nessun controllo
della temperatura ambiente
con termostato meccanico per il controllo
della temperatura ambiente
con controllo elettronico della temperatura
ambiente
controllo elettronico della temperatura
ambiente più timer diurno
controllo elettronico della temperatura
ambiente più timer settimanale
Altre opzioni di controllo (è possibile effettuare più selezioni)
controllo della temperatura ambiente, con
rilevamento presenza
controllo della temperatura ambiente, con
rilevamento di finestre aperte
con opzione di controllo della distanza
con controllo di avvio adattivo
con limitazione dell'orario di funzionamento
con sensore lampadina spenta
Dati di contatto:
Midea Italia S.r.l. a socio unico
Viale Luigi Bodio 29/37
20158 Milano Italia
midea.com/it
* Il consumo di elettricità in modalità Standby è di 0,214 W.
[no]
[no]
[no]
[no]
[no]
[no]
[no]
[Sì]
[no]
[no]
[no]
[no]
[no]
[no]
[Sì]
[no]
8
Page 11

Page 12

OWNER’S MANUAL
OIL FILLED HEATER
MODEL:
...
NY2311-20MRE
Midea Italia S.r.l. a socio unico
Viale Luigi Bodio 29/37
20158 Milano Italia
midea.com/it
Page 13

SAFETY INSTRUCTION
1. Warning: In order to avoid overheating, do not cover the
heater.
2. If the supply cord is damaged, it must be replaced by the manufacturer
or its service agent or a similarly qualified person in order to avoid a
hazard.
3. This appliance can be used by children aged from 8 years and above
and persons with reduced physical, sensory or mental capabilities or
lack of experience and knowledge if they have been given supervision
or instruction concerning use of the appliance in a safe way and understand the hazards involved. Children shall not play with the appliance. Cleaning and user maintenance shall not be made by children
without supervision.
4. The heater must not be located immediately below a socket-outlet.
5. Do not use this heater in the immediate surroundings of a bath, a
shower or a swimming pool.
6. Children of less than 3 years should be kept away unless continuously
supervised.
Children aged from 3 years and less than 8 years shall only switch
on/off the appliance provided that it has been placed or installed in its
intended normal operating position and they have been given supervision or instruction concerning use of the appliance in a safe way and
understand the hazards involved. Children aged from 3 years and
less than 8 years shall not plug in, regulate and clean the appliance or
perform user maintenance.
1
Page 14
7. CAUTION — Some parts of this product can
become very hot and cause burns. Particular attention has to be given where children and vulnerable
people are present.
8. This heater is filled with a precise quantity of special oil. Repairs requiring opening of oil-container are only to be made by the manufacturer or his service agent who should be contacted if there is an oil
leak. When scrapping the heater, follow the regulations concerning
the disposal of oil.
9. Correct Disposal of this product
This marking indicates that this product should not be disposed with
other household wastes throughout the EU. To prevent possible harm to
the environment or human health from uncontrolled waste disposal, recycle it responsibly to promote the sustainable reuse of material resources. To return your used device, please use the return and collection systems or contact the retailer where the product was purchased.
They can take this product for environmental safe recycling.
10. This heater cannot achieve accurate temperature control of the
enviroment, and thus cannot be used as insulation device for storage
environment, items, animals and plants.
2
Page 15

PART FIGURE
Control panel
Cord wrap
Caster assembly
Use of oil filled radiator
Fin
1,Turn the heater upside down.
2. As shown in figure 1, align the mounting hole of a set of caster assembly and install
it on the screw of the caster pad plate at the end of the radiator fin, and The other
caster assembly is aligned to the screws mounted at the bottom of the control box.
3,As shown in figure 2, two sets of caster components are tightened with four butterfly
nuts. Install solid and then put the heater in place-just put the wheels on the ground.
butterfly nuts
control box
figure 1 figure 2
3
Page 16

OPERATING INSTRUCTION
[Inspection before start]
1.The power cord shall not be damaged or fractured.
2.Please verify the rated current of the power socket is in line with the requirements
in the table above and is equipped with a safety grounding device before use; otherwise, replace the socket.
[Operating Instructions]
<
Work/Standby>:Plug in the power,the buzzer will “beep” for along time,press the
power key “ ” to enter the heating working state,and then press the
power key “ ” to enter the standby state.
<Gear selection>: For work status, press “ ” key to select one of work modes
such as high gear, medium gear and low gear .
<Temperature Setting>:Under the working status,press and hold the“ ”key or“ ”key
to set the temperature,press and hold the“ ”key or the“ ”key to quickly set the temperature;after setting the temperature,have non-operation for 5 seconds,exit the temperature setting screen.
<Scheduled work>:Tap the timer key" " in standby mode to enter the scheduled
work setting screen. Press“ ”key or“ ”key to set the scheduled time, press“ ”key
”key for along time to quickly set the scheduled time,and the scheduled time will
or“
reach the working status of the machine.
<Scheduling standby>:Under the working status,press the timer key" "to enter the
scheduling standby setting screen.Press“ ”key or“ ”key to set the scheduling time,
press“ ”key or“ ”key for along time to quickly set the scheduling time,and the
scheduling time is in the standby state to the machine.
A:the scope of scheduling is for 0~24hours,and press" "key or" "key each time to
increase or decrease 1 hour.When the set value is 0H,press the" "key to set the
time for 24H.When the set value is 24H,press the" "key,and the setting time is
0H.When the set value is 0H,the scheduling is canceled. When the set value is not
0H,the scheduling is started.Set the appointment time,press the timing key" "key or
" "key,or without operation for 5 seconds,exit scheduling mode.
B:If the scheduling time isset,press the power button" "to enter the standby state and
cancel the scheduling.
C:After the scheduling is started,press the scheduling key" "to check the remaining
time of the appointment and reset the scheduling time.During the scheduled time,the
machine is shut down or started upunder temperature control,and the scheduled time
is always normal,and free from down time.During the scheduled time,it is cleared
incase of power failure.
<Memory function>:When started up the machine again and it will operate according
to the status before the last standby.
-
4
Page 17

<Safety protection function>:When the indoor ambient temperature Th exceeds 50°C
under the standby or working state,all out puts are turned off,the buzzer prompts 10
long beeps,the digital screen displays"FF"and flash es at 1 Hz for 75 seconds.As long
as there is protection,even if the ambient temperature is less than 50°C,the running
or operation can not be resumed,and the operation can only be performed after the
power is turned off and on again.
<Shut down>:Under the working state,press the power key“ ”on the control panel
to enter the standby state,unplug the power cord,wait for the whole machine to
cool,and place the heater stably.
[Note]
To use the machine for the first time or to re-insert the socket, please pay attention
to check whether the plug and the socket are fitted well.
<Inspection method>
Insert the power plug into the socket and start for use; after about half an hour, turn
off and pull out the plug. Check whether the plug pins are hot; replace the socket if
so (more than about 50 °C) to avoid burning the plug or even causing a fire caused
by overheating of the socket due to poor contact.
display windor
control panel
5
Page 18

USING THE REMOTE CONTROL
Instructions for remote-control unit Button function are basically consistent
with the operation panel of the body, and the remote-control unit cannot control
the combination key.
ON/OFF key
Function key
“+”key
+
“-”key
-
Timer key
...
6
Page 19

CLEANING AND MAINTENANCE INSTRUCTION
1. The electric heater should be cleaned regularly to wipe out the dust on
the surface of flanges. As this may influence the radiating efficiency.
2. Disconnect electricity supply and allow radiator to cool, wipe out dust
with a soft damp cloth. Do not use detergent or abrasives.
3. Do not scrap the surfaces of flanges with sharp hard tools, to avoid
surfaces getting rusty, because of damage of the paint coat.
7
Page 20
E
Midea Italia S.r.l. a socio unico
Viale Luigi Bodio 29/37
20158 Milano Italia
midea.com/it
8
Page 21

 Loading...