

Page 1

1
2
4
6
3
5
重点
10.警语/认证
标志高度
11.档位、
控制面板
一致性
校对项
1.版面尺寸
A
项目
库
文件名
1
2
3
4
5
6
A
2.材质标注
3.物料编码
4.颜色标注
5.客户型号
6.产品名称
7.重量标注
8.电压功率
9.说明书装
订要求
145mm *210mm 双面印刷 28页 国产双胶纸 打钉 1色 70g
B
C
D
E
B
C
D
E
F
技术要求(版本号:B,2020-01)
1.备注[70P以下为钉装,70P以上为胶装(特殊要求除外)]
2.说明书警语及认证标志应满足CE/UL标准,CE:警语部分大写字母高度不低于3mm,CE标志不低于5mm,WEEE标志不低于7mm;
UL:大写字母字高不小于1/12”(2.11mm),小写字母字高不小于1/16”(1.6mm),“IMPORTANT SAFEGUARDS”,“SAVE
THESE INSTRUCTIONS”等词,其字高不小于3/16”(4.8mm),IMPORTANT SAFEGUARDS 必须在最前面。
3.产品应符合QMG-J53.021《产品说明书技术条件》的有关要求。
G
4.有ROHS指令要求的物料应符合美的企业标准QML-J11.006《产品中限制使用有害物质的技术标准》。
16156000A37525
说明书 MIDEA-NY2009-20MR
(NY2009-20MR)-0501
1:1
广东美的生活电器制造有限公司
A/2/加意大利回收标志/2021-12-20
A/1/Crod改Cord/李艳/2020-9-17
处数 更改 文件 号 签 字 日 期
标记
H
制 图
李艳 卢灿飞
-- -- -
设 计
-- -- -
校 对
会 签
-- -- -
审 核
标准 化
审 定
日 期
古广君
古广君
2020.8.17
电暖器
说明书
K
1 1
F
G
H
Page 2
MANUALE
DEL PROPRIETARIO
RISCALDATORE RIEMPITO AD OLIO
MODELLO: NY2009-20MR
...
22
PAP
Questo prodotto è adatto solo per spazi ben isolati o per un uso occasionale.
LEGGI E CONSERVA QUESTE ISTRUZIONI
Attenzione: le immagini nel manuale sono solo di riferimento.
Page 3

ISTRUZIONI DI SICUREZZA
1.
coprire il riscaldatore.
2. Se il cavo di alimentazione è danneggiato, deve essere sostituito
dal produttore o dal suo agente di servizio o da una persona
qualificata per evitare pericoli.
3. Questo apparecchio può essere utilizzato da bambini di età pari o
superiore a 8 anni e da persone con capacità fisiche, sensoriali o
mentali ridotte o mancanza di esperienza e conoscenza se sono
stati sottoposti a supervisione o istruzione relative all'uso dell'apparecchio in modo sicuro e comprensivo i pericoli coinvolti. I
bambini non devono giocare con l'apparecchio. La pulizia e la
manutenzione dell'utente non devono essere eseguite da bambini
senza supervisione.
4. Il riscaldatore non deve essere posizionato immediatamente sotto
una presa.
5. Non utilizzare questo riscaldatore nelle immediate vicinanze di un
bagno, una doccia o una piscina.
Avvertenza
: per evitare il surriscaldamento, non
6. I bambini di età inferiore a 3 anni devono essere tenuti a distanza
se non sottoposti a supervisione continua. I bambini di età compresa tra 3 e meno di 8 anni accendono / spengono l'apparecchio
solo a condizione che sia stato collocato o installato nella sua
normale posizione operativa prevista e che abbiano ricevuto
supervisione o istruzioni relative all'uso dell'apparecchio in modo
sicuro e capire i pericoli coinvolti. I bambini di età pari o inferiore a
3 anni non devono collegare, regolare e pulire l'apparecchio né
eseguire la manutenzione da parte dell'utente.
1
Page 4
7.
ATTENZIONE
possono diventare molto calde e causare ustioni.
Particolare attenzione deve essere data alla presenza di bambini e persone vulnerabili.
8. Questo riscaldatore viene riempito con una quantità precisa di olio
speciale. Le riparazioni che richiedono l'apertura del contenitore
dell'olio devono essere eseguite solo dal produttore o dal suo
agente di servizio che deve essere contattato in caso di perdite
d'olio. Durante la rottamazione del riscaldatore, seguire le norme
relative allo smaltimento dell'olio.
9. Smaltimento corretto di questo prodotto
Questo marchio indica che questo prodotto non deve essere
smaltito con altri rifiuti domestici in tutta l'UE. Per prevenire possibili danni all'ambiente o alla salute umana dovuti allo smaltimento
incontrollato dei rifiuti, riciclarli responsabilmente per promuovere il
riutilizzo sostenibile delle risorse materiali. Per restituire il dispositivo usato, utilizzare i sistemi di restituzione e raccolta o contattare il
rivenditore presso cui è stato acquistato il prodotto. Possono
prendere questo prodotto per un riciclaggio sicuro per l'ambiente.
- Alcune parti di questo prodotto
10. Questo riscaldatore non è in grado di ottenere un controllo accurato della temperatura dell'ambiente e quindi non può essere
utilizzato come dispositivo di isolamento per ambienti di stoccaggio, oggetti, animali e piante.
2
Page 5
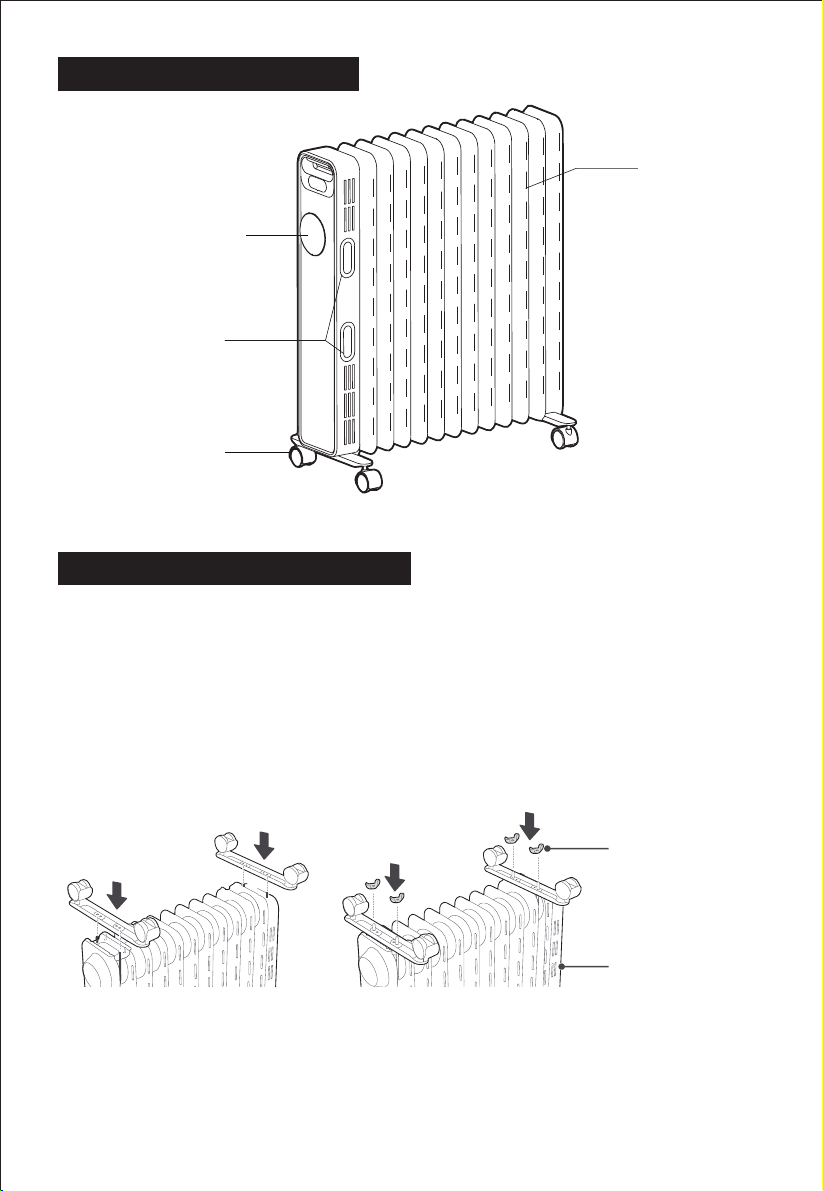
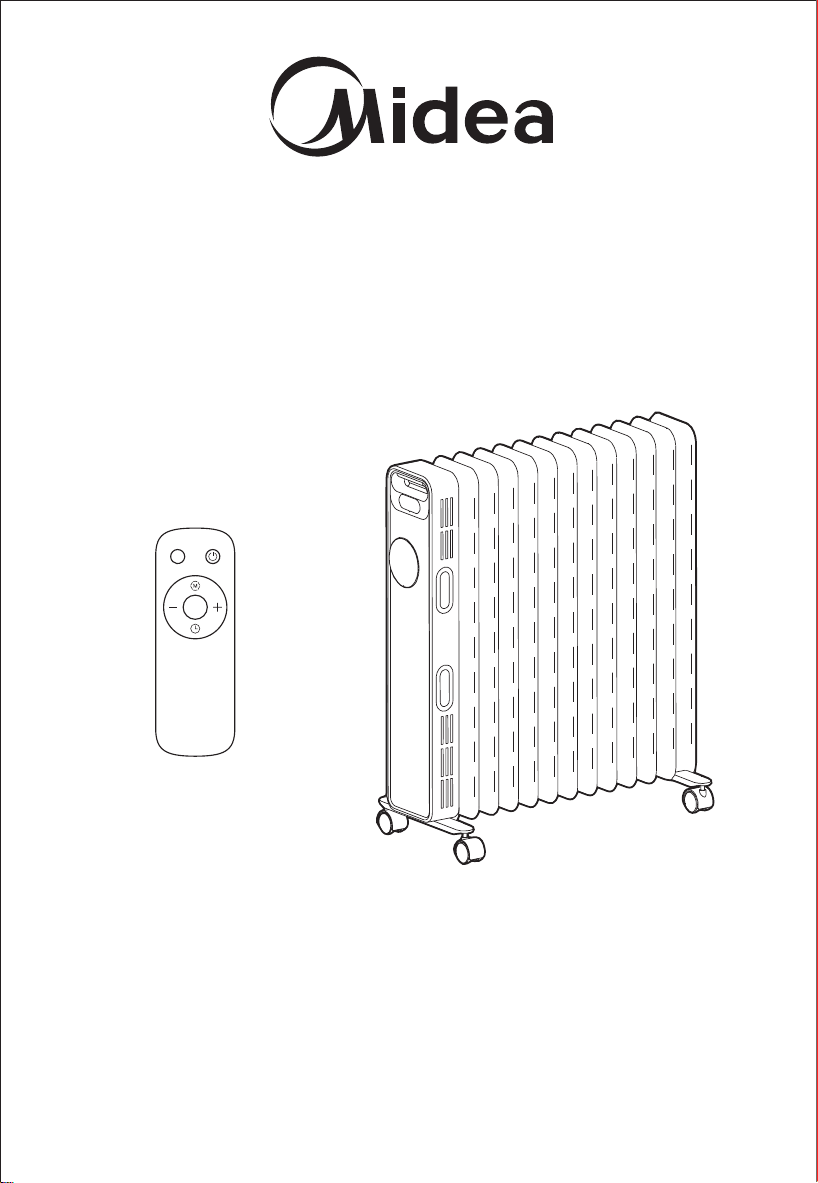
NOMI COMPONENTI
Pinna
Pannello di
controllo
Avvolgicavo
Assemblaggio
ruote
Uso del radiatore pieno d'olio
1. Capovolgere il riscaldatore.
2. Come mostrato nella Figura 1, allineare il foro di montaggio di un gruppo di
rotelle e installarlo sulla vite della piastra del cuscinetto orientabile all'estremità
dell'aletta del radiatore e l'altra il gruppo delle ruote orientabili è allineato alle
viti montate nella parte inferiore della scatola di controllo.
3. Come mostrato nella figura 2, due serie di componenti delle ruote sono
serrate con quattro farfalle noccioline. Installare solido e quindi posizionare il
riscaldatore in posizione: basta posizionare le ruote a terra.
figure 1 figure 2
3
Noci farfalla
Scatola di
controllo
Page 6
ISTRUZIONI PER L'USO
[Ispezione prima di iniziare]
1.Il cavo di alimentazione non deve essere danneggiato o rotto.
2. Verificare che la corrente nominale della presa di corrente sia in linea con i
requisiti della tabella sopra e sia dotata di un dispositivo di messa a terra di sicurezza prima dell'uso; altrimenti, sostituire la presa.
[Istruzioni per l'uso]
<Lavoro / Standby>: collegare l'alimentazione, il buzzer "emetterà un segnale
acustico" per lungo tempo, premere il tasto di accensione " " per entrare nello stato
di funzionamento del riscaldamento, quindi premere il tasto di accensione " " per
entrare nello stato di attesa.
<Selezione marcia>: per lo stato di lavoro, premere il tasto " " per selezionare una
delle modalità di lavoro come marcia alta, marcia media e marcia bassa.
<Impostazione della temperatura>: sotto lo stato di funzionamento, tenere premuto
il tasto "+" o il tasto "-" per impostare la temperatura, tenere premuto il tasto "+" o il
tasto "-" per impostare rapidamente la temperatura; dopo aver impostato la
temperatura, attendere 5 secondi di inattività, uscire dalla schermata di impostazione della temperatura.
<Lavoro programmato>: toccare il tasto timer " " in modalità standby per accedere
alla schermata delle impostazioni del lavoro programmato. Premere il tasto "+" o il
tasto "-" per impostare l'ora programmata, premere il tasto "+" o il tasto "-" per lungo
tempo per impostare rapidamente l'ora programmata e l'ora programmata raggiungerà lo stato di funzionamento della macchina.
<Standby di pianificazione>: sotto lo stato di funzionamento, premere il tasto timer
" " per accedere alla schermata di impostazione di attesa di pianificazione.
Premere il tasto "+" o il tasto - "per impostare il tempo di programmazione, premere il tasto" + "o" - " per un lungo periodo di tempo per impostare rapidamente
il tempo di pianificazione e il tempo di pianificazione è nello stato di standby della
macchina A: l'ambito della pianificazione è per 0-24 ore e premere il tasto "+" o il
tasto "-" ogni volta per aumentare o diminuire 1 ora. Quando il valore impostato è
OH, premere il tasto "-" per impostare l'ora per 24 ore. Quando il valore impostato è
24 ore, premere il tasto "+" e il tempo di impostazione è OH. Quando l'impostazione
il valore è OH, la programmazione viene annullata. Quando il valore impostato non
è OH, viene avviata la programmazione. Impostare l'ora dell'appuntamento,
premere il tasto di temporizzazione " ", o senza operazione per 5 secondi, uscire
dalla modalità di programmazione. B: Se l'intervallo di tempo di programmazione,
premere il pulsante di accensione " " per accedere allo stato di standby e annullare la programmazione. C: Dopo aver avviato la programmazione, premere il tasto
di programmazione e per controllare il tempo rimanente dell'appuntamento e
ripristinare il tempo di programmazione. Durante il tempo programmato, la macchina viene spenta o avviata sotto controllo della temperatura, e il tempo programmato
è sempre normale e privo di tempi morti. Durante il tempo programmato, viene
cancellato in caso di mancanza di corrente
<Funzione memoria>: una volta riavviata, la macchina funzionerà in base allo stato
precedente all'ultimo standby.
4
Page 7
<Funzione di protezione di sicurezza>:
quando la temperatura ambiente interna supera i 50 ° C in modalità standby o di
lavoro, tutte le uscite vengono disattivate, il buzzer emette 10 segnali acustici
lunghi, lo schermo digitale visualizza "FF" e lampeggia a 1 Hz per 75 secondi
Finché esiste protezione, anche se la temperatura ambiente è inferiore a 50 ° C,
il funzionamento o l'operazione non possono essere ripresi e l'operazione può
essere eseguita solo dopo aver spento e riacceso l'alimentazione.
<Spegni>:
sotto lo stato di funzionamento, premere il tasto di accensione " " sul pannello
di controllo per accedere allo stato di standby, scollegare il cavo di alimentazione, attendere il raffreddamento dell'intera macchina e posizionare stabilmente il
riscaldatore.
[Nota]
Per utilizzare la macchina per la prima volta o per reinserire la presa, prestare
attenzione a verificare che la spina e la presa siano inserite correttamente.
<Metodo di ispezione>
Inserire la spina nella presa e iniziare per l'uso; dopo circa mezz'ora, spegnere
ed estrarre la spina. Controllare se i pin della spina sono caldi; in tal caso
sostituire la presa (più di circa 50 ° C) per evitare di bruciare la spina o addirittura provocare un incendio causato dal surriscaldamento della presa a causa di
uno scarso contatto.
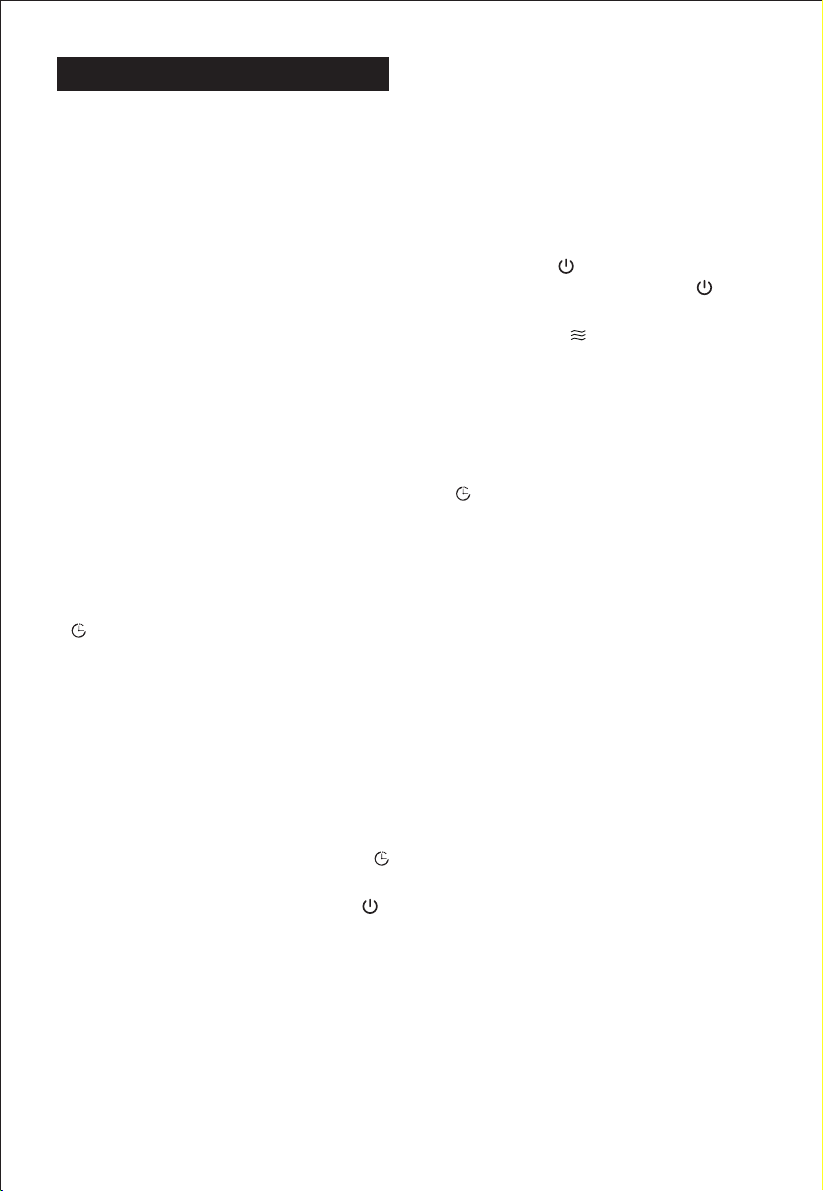
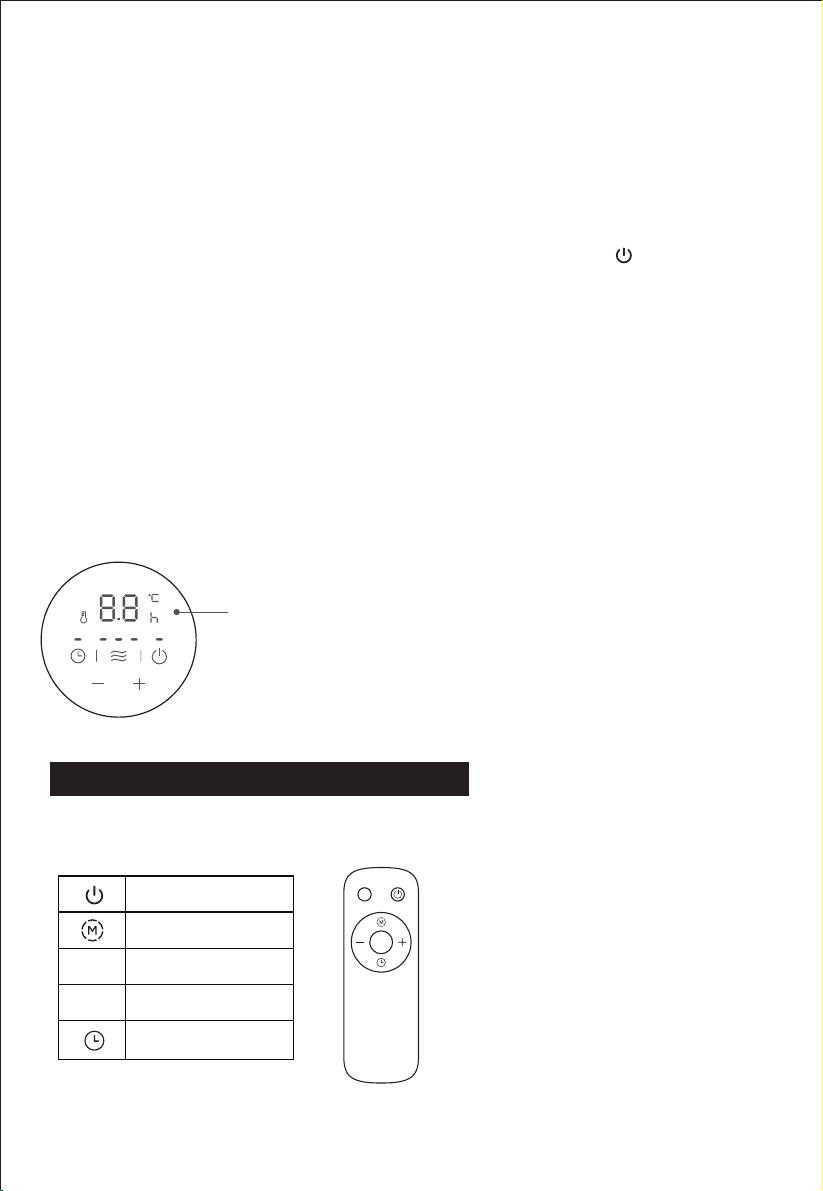
Display
Pannello di controllo
UTILIZZARE IL TELECOMANDO
La funzione dei pulsanti è sostanzialmente coerente con il pannello operativo
del corpo e il telecomando non può controllare il tasto combinato.
Tasto ON / OFF
Tasto funzione
tasto “+”
+
tasto “-”
-
...
Tasto timer
5
Page 8

Tabella per i requisiti informativi per gli apparecchi per il riscaldamento d'ambiente locale elettrici
Modello: NY2009-20MR
Oggetto Oggetto
Potenza termica
Potenza termica
nominale
Potenza termica
minima (indicativa)
Potenza termica
continua massima
Consumo elettrico ausiliario
Alla potenza termica
nominale
Alla potenza termica
minima
In modalità standby
Dettagli del
contatto:
Simbolo Valore Unità Unità
Tipo di ingresso di calore, solo per gli apparecchi per il riscaldamento d'ambiente locale elettrici (selezionarne uno)
0.8
0.7
0.8
0.000
0.000
0.000*
Controllo manuale della carica termica con
termostato integrato
Controllo manuale della carica termica con
feedback della temperatura ambiente e / o
esterna
Controllo elettronico della carica termica con
feedback della temperatura ambiente e / o
esterna
Potenza termica assistita da ventilatore
Tipo di potenza termica / controllo della temperatura
ambiente (selezionarne uno)
Potenza termica a stadio singolo e nessun
controllo della temperatura ambiente
Due o più fasi manuali, nessun controllo
della temperatura ambiente
Con termostato meccanico controllo della
temperatura ambiente
Con controllo elettronico della temperatura
ambiente
Controllo elettronico della temperatura
ambiente più timer giornaliero
Controllo elettronico della temperatura
ambiente più timer settimanale
Altre opzioni di controllo (possibili selezioni multiple)
Controllo della temperatura ambiente, con
rilevamento della presenza
Controllo della temperatura ambiente, con
rilevazione finestra aperta
Con opzione di controllo della distanza
Con controllo di avvio adattivo
Con limitazione dell'orario di lavoro
Con sensore a bulbo nero
Midea Italia S.r.l.
Via Lazzaroni 5, 21047 Saronno (VA)
Nota:
Per gli apparecchi per il riscaldamento d'ambiente locale elettrici, l'efficienza energetica stagionale
misurata del riscaldamento d'ambiente non può essere peggiore del valore delcaricato alla
potenza termica nominale dell'unità.
L'efficienza energetica stagionale del riscaldamento d'ambiente di tutti gli
apparecchi per il riscaldamento d'ambiente locale ad eccezione degli apparecchi
per il riscaldamento d'ambiente locale commerciali
6
Page 9

ISTRUZIONI DI PULIZIA E MANUTENZIONE
1. Il riscaldatore elettrico deve essere pulito regolarmente per eliminare la
polvere sulla superficie delle flange. Poiché ciò può influenzare l'efficienza
radiante.
2. Scollegare l'alimentazione elettrica e lasciare raffreddare il radiatore, rimuo-
vere la polvere con un panno morbido umido. Non utilizzare detergenti o
abrasivi.
3. Non raschiare le superfici delle flange con strumenti duri e affilati, per evitare
che le superfici si arrugginiscano, a causa di danni alla vernice.
7
Page 10

OWNER’S MANUAL
OIL FILLED RADITOR
MODEL: NY2009-20MR
...
This product is only suitable for well insulated spaces or occasional use.
READ AND SAVE THESE INSTRUCTIONS
Attention: Pictures in the IM are for reference only.
Page 11

SAFETY INSTRUCTION
1. Warning: In order to avoid overheating, do not
cover the heater.
2. If the supply cord is damaged, it must be replaced by the manufacturer or its service agent or a similarly qualified person in
order to avoid a hazard.
3. This appliance can be used by children aged from 8 years and
above and persons with reduced physical, sensory or mental
capabilities or lack of experience and knowledge if they have
been given supervision or instruction concerning use of the
appliance in a safe way and understand the hazards involved.
Children shall not play with the appliance. Cleaning and user
maintenance shall not be made by children without supervision.
4. The heater must not be located immediately below a socket-outlet.
5. Do not use this heater in the immediate surroundings of a bath,
a shower or a swimming pool.
6. Children of less than 3 years should be kept away unless continuously supervised. Children aged from 3 years and less than 8
years shall only switch on/off the appliance provided that it has
been placed or installed in its intended normal operating position
and they have been given supervision or instruction concerning
use of the appliance in a safe way and understand the hazards
involved. Children aged from 3 years and less than 8 years shall
not plug in, regulate and clean the appliance or perform user
maintenance.
1
Page 12

7. CAUTION — Some parts of this product can
become very hot and cause burns. Particular
atten-tion has to be given where children and
vulnerable people are present.
8. This heater is filled with a precise quantity of special oil. Repairs
re-quiring opening of oil-container are only to be made by the
manufac-turer or his service agent who should be contacted if
there is an oil leak. When scrapping the heater, follow the regulations concerning the disposal of oil.
9. Correct Disposal of this product
This marking indicates
that this product should not be disposed with other household
wastes throughout the EU. To prevent possible harm to the environment or human health from uncontrolled waste disposal, re-cycle it responsibly to promote the sustainable reuse of material
re-sources. To return your used device, please use the return and
collec-tion systems or contact the retailer where the product was
purchased. They can take this product for environmental safe
recycling.
10. This heater cannot achieve accurate temperature control of the
enviroment, and thus cannot be used as insulation device for
storage environment, items, animals and plants.
2
Page 13

PART FIGURE
Fin
Control panel
Cord wrap
Caster assembly
Use of oil filled radiator
1,Turn the heater upside down.
2. As shown in figure 1, align the mounting hole of a set of caster assembly
and install it on the screw of the caster pad plate at the end of the radiator fin,
and The other caster assembly is aligned to the screws mounted at the
bottom of the control box.
3,As shown in figure 2, two sets of caster components are tightened with four
butterfly nuts. Install solid and then put the heater in place-just put the wheels
on the ground.
figure 1 figure 2
3
butterfly nuts
control box
Page 14
OPERATING INSTRUCTION
[Inspection before start]
1.The power cord shall not be damaged or fractured.
2.Please verify the rated current of the power socket is in line with the requirements
in the table above and is equipped with a safety grounding device before use; otherwise, replace the socket.
[Operating Instructions]
<
Work/Standby>:Plug in the power,the buzzer will “beep” for along time,press the
power key “ ” to enter the heating working state,and then press the
power key “ ” to enter the standby state.
<Gear selection>: For work status, press “ ” key to select one of work modes
such as high gear, medium gear and low gear .
<Temperature Setting>:Under the working status,press and hold the“ ”key or“ ”key
to set the temperature,press and hold the“ ”key or the“ ”key to quickly set the temperature;after setting the temperature,have non-operation for 5 seconds,exit the temperature setting screen.
<Scheduled work>:Tap the timer key" " in standby mode to enter the scheduled
work setting screen. Press“ ”key or“ ”key to set the scheduled time, press“ ”key
or“
”key for along time to quickly set the scheduled time,and the scheduled time will
reach the working status of the machine.
<Scheduling standby>:Under the working status,press the timer key" "to enter the
scheduling standby setting screen.Press“ ”key or“ ”key to set the scheduling time,
press“ ”key or“ ”key for along time to quickly set the scheduling time,and the
scheduling time is in the standby state to the machine.
A:the scope of scheduling is for 0~24hours,and press" "key or" "key each time to
increase or decrease 1 hour.When the set value is 0H,press the" "key to set the
time for 24H.When the set value is 24H,press the" "key,and the setting time is
0H.When the set value is 0H,the scheduling is canceled. When the set value is not
0H,the scheduling is started.Set the appointment time,press the timing key" "key or
" "key,or without operation for 5 seconds,exit scheduling mode.
B:If the scheduling time isset,press the power button" "to enter the standby state and
cancel the scheduling.
C:After the scheduling is started,press the scheduling key" "to check the remaining
time of the appointment and reset the scheduling time.During the scheduled time,the
machine is shut down or started upunder temperature control,and the scheduled time
is always normal,and free from down time.During the scheduled time,it is cleared
incase of power failure.
<Memory function>:When started up the machine again and it will operate according
to the status before the last standby.
-
4
Page 15
<Safety protection function>:When the indoor ambient temperature Th exceeds 50°C
under the standby or working state,all out puts are turned off,the buzzer prompts 10
long beeps,the digital screen displays"FF"and flash es at 1 Hz for 75 seconds.As long
as there is protection,even if the ambient temperature is less than 50°C,the running
or operation can not be resumed,and the operation can only be performed after the
power is turned off and on again.
<Shut down>:Under the working state,press the power key“ ”on the control panel
to enter the standby state,unplug the power cord,wait for the whole machine to
cool,and place the heater stably.
[Note]
To use the machine for the first time or to re-insert the socket, please pay attention
to check whether the plug and the socket are fitted well.
<Inspection method>
Insert the power plug into the socket and start for use; after about half an hour, turn
off and pull out the plug. Check whether the plug pins are hot; replace the socket if
so (more than about 50 °C) to avoid burning the plug or even causing a fire caused
by overheating of the socket due to poor contact.
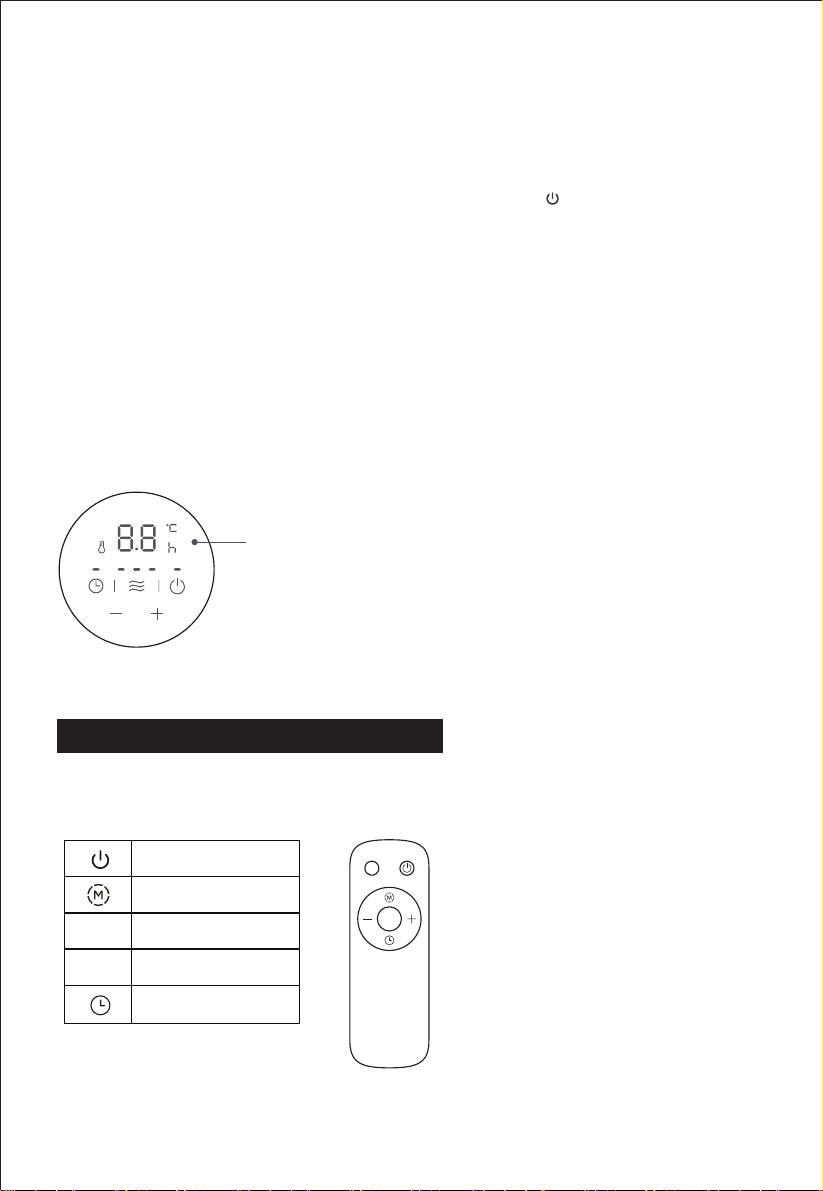
display windor
control panel
USING THE REMOTE CONTROL
Instructions for remote-control unit Button function are basically consistent
with the operation panel of the body, and the remote-control unit
cannot control the combination key.
ON/OFF key
Function key
+
-
“+”key
“-”key
...
Timer key
5
Page 16

NY2009-20MR
0.000
0.000
0.000*
0.8
0.7
0.8
Midea Italia S.r.l.
Via Lazzaroni 5, 21047 Saronno (VA)
6
Page 17

CLEANING AND MAINTENANCE INSTRUCTION
1. The electric heater should be cleaned regularly to wipe out the dust on
the surface of flanges. As this may influence the radiating efficiency.
2. Disconnect electricity supply and allow radiator to cool, wipe out dust
with a soft damp cloth. Do not use detergent or abrasives.
3. Do not scrap the surfaces of flanges with sharp hard tools, to avoid
surfaces getting rusty, because of damage of the paint coat.
7
Page 18
使用说明书
油汀
产品型号
NY2009-20MR
...
本产品仅适用于绝缘良好的空间或偶尔使用
此图纸不作印刷,仅用于产品使用说明。
说明书中图片仅为示意图,若有变动,请以实物为准!
Page 19

安全须知
1.
警告:
为避免过热,请勿覆盖加热器。
2.如果电源线损坏,则必须由制造商或其服务代理商或有
资格的人员更换电源线,以免造成危险。
3.本设备适用于8岁及以上的儿童,以及身体,感官或精神
能力较弱或缺乏经验和知识的人,只要他们接受过有关
本设备使用方面的监督或指示。安全而全面地涉及到危
险。禁止儿童玩耍本产品。在没有监督的情况下,儿童
请勿进行用户清洁和维护。
4.加热器不应直接放在插座下方。
5.请勿在浴室,淋浴间或游泳池附近使用此加热器。
6. 3岁以下的儿童必须放在远离外界的地方,除非受到持
续的监督。
3岁至8岁以下的儿童只有在将设备放置或安装在正常的预
期工作位置并且已接受有关设备安全使用的监管或说明
的情况下才能打开/关闭设备并了解所涉及的危险。 3岁
及以下的儿童不得连接,调节和清洁设备或由用户进行
维护。
1
Page 20

7.
警告
-
本产品的零件可能会变得很热并引起灼伤。 必须
特别注意儿童和弱势群体的存在。
8.该加热器中充满了精确量的特殊油。需要打开油容器的
维修只能由制造商或其服务代理商执行,如果发生油泄
漏,必须与他们联系。报废加热器时,请遵循处理油的
规则。
9. 正确处置本产品
此标记表示该产品不应与整个欧盟的其他家庭垃圾一起处
理。为防止不受控制的废物处理可能对环境或人类健康
造成的危害,请以负责任的方式对其进行回收,以促进
物质资源的可持续再利用。要退回使用过的设备,请使
用退回和收款系统,或与购买产品的零售商联系。他们
可以将此产品用于对环境安全的回收。
10.该加热器无法准确控制环境温度,因此不能用作存储环
境,物体,动植物的隔离装置。
2
Page 21

结构简图
控制面板
收线板
脚轮组件
脚轮使用说明
散热片
1
将取暖器机身倒置,底部朝上。
如图1所示,将一套脚轮组件的安装孔对准并安装在散热片尾部的脚轮垫板的
2
螺杆上另外一套脚轮组件对准安装在控制箱底部的螺钉上。
如图2所示 ,用四个蝶形螺母分别将两套脚轮组件拧紧。安装牢靠后再将取
3
暖器放正,轮子着地即可。
蝶形螺母
控制箱
图1 图2
3
Page 22

【开机前的检查】
1、电源线是否完好。
2、使用前请确认电源插座额定电流符合要求,否则应更换插座。
【操作说明】
<工作/待机>:插上电源,蜂鸣器发出“哔”的一声长响,按开关键“ ”进入加热工作状态,
再按开关键“ ”进入待机状态。
<档位选择>:工作状态下,轻按“ ”可以选择高档、中档、低档任意一种模式工作。
<温度设定>:工作状态下,按住“ ”键或“ ”键可进行温度设定,长按“ ”键或“ ”
键可快速温度设定;设定好温度之后,5秒无操作,退出温度设定界面。
<预约工作>:待机状态下轻按定时键“ ”,进入预约工作设定界面。按“ ”键或者“ ”
键设定预约时间,长按“ ”键或“ ”键可快速设定预约时间,预约时间到机器进入工作状态。
<预约待机>:工作状态下轻按定时键“ ”,进入预约待机设定界面。按“ ”或者“ ”设
定预约时间,长按“ ”键或“ ”键可快速设定预约时间,预约时间到机器处于待机状态。
A:预约范围0~24小时,每按一次“ ”或者“ ”,增加或者减少1小时。当设定值为0H时,按
“ ”键,设定时间变为24H,当设定值为24H时,按“ ”键,设定时间变为0H。当设定值为
0H时,取消预约,当设定值不为0H时,启动预约。设定好预约时间后,按定时键“ ”或
“ ”键,或5秒无操作,都退出预约模式。
B:如果预约时间设定好之后,按开关键“ ”,进入待机状态,预约取消。
C:预约启动后,按预约键“ ”可以随时查看预约的剩余时间以及重新设置预约时间。
在预约的时间内,机器在温控状态下停机或开启,预约时间都一直正常计时。不受停机影响。在预
约的时间内,如果断电,则清零。
<记忆功能>:机器再次重新开启,会按照最近一次的待机前的状态运行。
<安全保护功能>:无论在待机或工作状态,室内环境温度Th超过50℃时,关闭所有输出,蜂
鸣器急促长叫10声,数码屏显示“FF”并以1Hz的频率闪烁75秒。只要出现保护,即使环境温度
小于50℃时也不能恢复运行或操作,只能重新拔电再上电后才能进行操作。
<关机>:工作状态下,按控制面板的开关键“ ”进入待机状态,拔下电源线插头,待整机冷
却后,将取暖器放好。
4
Page 23

【电暖器移动】
若要移动电暖器,请先关机,拔下电源插头,然后推动机身使下面四个万向脚轮滚动即可。
注意:首次使用本机或需要重新插入插座时,请注意检查插头和插座的配合是否良好。
检查的方法:将电源插头插进插座并开机使用,约半个小时后,关机并拔下插头。检查插头的插脚
是否烫手,若插脚烫手(50℃),则必须更换插座,以免因接触不良引起插座过热,导致烧坏插
头,甚至引发火灾。
显示窗
控制面板
遥控器使用:按键功能与机身操作面板基本一致,遥控器不能操作组合键。
开关按键
模式按键
温度增加按键
+
-
温度降低按键
定时按键
...
5
Page 24

局部空间电加热器的信息要求表
模板: NY2009-20MR
目的 目的
火电
额定热量
最小热功率(指示性)
最大连续热功率
符号
值 单元 单元
输入热量的类型,仅适用于局部空间电加热器(选择一项)
0.8
0.7
0.8
带有集成恒温器的热电荷手动控制
手动控制热电荷,并反馈周围和/或外部温
度
电子控制热电荷,并反馈周围和/或外部温
度
辅助用电量
标称热量输出
热量输出最小
待机模式
系方式:
联
0.000
0.000
0.000*
Midea Italia S.r.l.
风扇辅助火力
火力类型/室温控制(选择一项)
单级热量输出,无室温控制
两个或多个手动步骤,无室温控制
带有用于室温控制的机械恒温器
带电子室温控制
电子室内温度控制和每日计时器
电子室内温度控制和每周定时
其他控制选项(可能有多个选择)
室温控制,带有存在检测
室温控制,带开窗检测
带距离控制选件
具有自适应启动控制
有工作时间限制
带黑色灯泡传感器
Via Lazzaroni 5, 21047 Saronno (VA)
注意:
对于局部空间电加热器,测得的季节性空间采暖能效不得低于设备额定热输出值。
除商用局部空间供热设备以外的所有局部空间供热设备的季节性空间供热能效
6
Page 25

清洁和保养说明
1.必须定期清洁电加热器,以除去法兰表面上的灰尘。 因为这会影响辐射效率
。
2.断开电源,让散热器冷却,然后用柔软的湿布擦去灰尘。 请勿使用清洁剂或
研磨剂。
3.请勿使用坚硬和锋利的工具刮擦法兰表面,以防止由于油漆损坏而使表面生锈
。
7
Page 26

BEDIENUNGSANLEITUNG
ÖLGEFÜLLTE HEIZUNG
VORLAGE: NY2009-20MR
...
Dieses Produkt ist nur für gut isolierte Räume oder
für den gelegentlichen Gebrauch geeignet.
LESEN UND SPEICHERN SIE DIESE ANWEISUNGEN
Warnung: Die Bilder im Handbuch dienen nur als Referenz.
Page 27

SICHERHEITSHINWEISE
1.
eine Überhitzung zu vermeiden.
2. Wenn das Netzkabel beschädigt ist, muss es vom Hersteller oder
seinem Servicemitarbeiter oder einer qualifizierten Person
ausgetauscht werden, um Gefahren zu vermeiden.
3. Dieses Gerät kann von Kindern ab 8 Jahren und von Personen mit
eingeschränkten körperlichen, sensorischen oder geistigen
Fähigkeiten oder mangelnder Erfahrung und Kenntnis verwendet
werden, wenn sie einer Aufsicht oder Anweisung in Bezug auf die
Verwendung des Geräts in unterzogen wurden sicher und umfassend die damit verbundenen Gefahren. Kinder dürfen nicht mit dem
Gerät spielen. Die Reinigung und Wartung durch den Benutzer
sollte nicht von Kindern ohne Aufsicht durchgeführt werden.
4. Die Heizung sollte nicht unmittelbar unter einer Steckdose
aufgestellt werden.
5. Verwenden Sie diese Heizung nicht in unmittelbarer Nähe eines
Badezimmers, einer Dusche oder eines Schwimmbades.
Warnung
: Decken Sie die Heizung nicht ab, um
6. Kinder unter 3 Jahren müssen ferngehalten werden, sofern sie
nicht ständig beaufsichtigt werden. Kinder zwischen 3 und weniger
als 8 Jahren schalten das Gerät nur unter der Bedingung ein / aus,
dass es in seiner normalen beabsichtigten Betriebsposition
aufgestellt oder installiert wurde und dass sie eine Aufsicht oder
Anleitung zur sicheren Verwendung des Geräts erhalten haben und
die damit verbundenen Gefahren verstehen. Kinder unter 3 Jahren
dürfen das Gerät nicht anschließen, einstellen und reinigen oder
vom Benutzer gewartet werden.
1
Page 28

7.
VORSICHT
heiß werden und Verbrennungen verursachen.
Besondere Aufmerksamkeit muss der Anwesenheit
von Kindern und schutzbedürftigen Personen
gewidmet werden.
8. Diese Heizung ist mit einer genauen Menge Spezialöl gefüllt.
Reparaturen, bei denen der Ölbehälter geöffnet werden muss,
dürfen nur vom Hersteller oder seinem Servicemitarbeiter durchgeführt werden, der bei Öllecks kontaktiert werden muss. Befolgen
Sie beim Verschrotten des Heizgeräts die Regeln für die Ölentsorgung.
9. Richtige Entsorgung dieses Produktes
Dieses Zeichen weist darauf hin, dass dieses Produkt nicht mit
anderen Haushaltsabfällen in der EU entsorgt werden darf. Um
mögliche Schäden für die Umwelt oder die menschliche Gesundheit durch unkontrollierte Abfallentsorgung zu vermeiden, recyceln
Sie diese verantwortungsbewusst, um die nachhaltige Wiederverwendung materieller Ressourcen zu fördern. Um das gebrauchte
Gerät zurückzugeben, verwenden Sie das Rückgabe- und Sammelsystem oder wenden Sie sich an den Händler, bei dem das
Produkt gekauft wurde. Sie können dieses Produkt für ein umweltfreundliches Recycling verwenden.
- Teile dieses Produkts können sehr
10. Diese Heizung kann keine genaue Kontrolle der Umgebungstemperatur erhalten und kann daher nicht als Isolationsvorrichtung für
Lagerumgebungen, Gegenstände, Tiere und Pflanzen verwendet
werden.
2
Page 29

Verwendung eines ölgefüllten Kühlers
Panel von
Steuerung
Kabeltrommeln
Montage
Räder
Verwendung eines ölgefüllten Kühlers
Flosse
1. Drehen Sie die Heizung um.
2. Richten Sie wie in Abbildung 1 gezeigt das Befestigungsloch einer Gruppe
von Rädern aus und bringen Sie es an der Schraube der Schwenklagerplatte
am Ende der Kühlerlamelle an. Die andere Schwenkradbaugruppe ist mit
den unten montierten Schrauben ausgerichtet des Kontrollkastens.
3. Wie in Abbildung 2 gezeigt, werden zwei Sätze von Radkomponenten mit
vier Erdnussschmetterlingen festgezogen. Installieren Sie den Feststoff und
stellen Sie die Heizung in Position: Stellen Sie die Räder einfach auf den
Boden.
Schmetterling
smuttern
Kiste von
Steuerung
figure 1 figure 2
3
Page 30

GEBRAUCHSANWEISUNG
[Inspektion vor dem Start]
1. Das Netzkabel darf nicht beschädigt oder gebrochen sein.
2. Überprüfen Sie vor dem Gebrauch, ob der Nennstrom der Steckdose den
Anforderungen der obigen Tabelle entspricht und mit einer Sicherheitserdungsvorrichtung ausgestattet ist. Andernfalls ersetzen Sie die Steckdose.
[Gebrauchsanweisung]
<Work / Standby>: Schließen Sie das Netzteil an. Der Summer "gibt lange Zeit ein
akustisches Signal aus" ". Drücken Sie den Netzschalter, um in den Betriebszustand der Heizung zu gelangen, und drücken Sie dann den Netzschalter, um den zu
aktivieren Wartezustand.
<Gangauswahl>: Drücken Sie für den Arbeitszustand die Taste " ", um einen der
Arbeitsmodi wie Hochgang, Mittelgang und Niedriggang auszuwählen.
<Temperatureinstellung>: Halten Sie im Betriebszustand die Taste "+" oder "-"
gedrückt, um die Temperatur einzustellen, und halten Sie die Taste "+" oder "-"
gedrückt, um die Temperatur schnell einzustellen. Warten Sie nach dem Einstellen
der Temperatur 5 Sekunden inaktiv und verlassen Sie den Bildschirm zur Temperatureinstellung.
<Geplanter Job>: Berühren Sie im Standby-Modus die Timer-Schaltfläche " ", um
auf den Bildschirm mit den Einstellungen für den geplanten Job zuzugreifen.
Drücken Sie die Taste "+" oder "-", um die programmierte Zeit einzustellen. Drücken
Sie lange die Taste "+" oder "-", um die programmierte Zeit schnell einzustellen. Die
programmierte Zeit erreicht die Maschinenbetrieb.
<Standby planen>: Drücken Sie im Betriebszustand die Timer-Taste
" ", um den Einstellungsbildschirm für den Zeitplan-Standby aufzurufen. Drücken
Sie die Taste "+" oder - ", um die Programmierzeit einzustellen. - Drücken Sie die
Taste" + "oder" - "über einen längeren Zeitraum, um die Planungszeit schnell
einzustellen, und die Planungszeit ist im Status Standby-Zeit von Maschine A: Die
Planung ist für 0-24 Stunden und drücken Sie jedes Mal die Taste "+" oder "-", um 1
Stunde zu erhöhen oder zu verringern. Wenn der eingestellte Wert OH ist, drücken
Sie " - ", um die Zeit für 24 Stunden einzustellen. Wenn der eingestellte Wert 24
Stunden beträgt, drücken Sie die Taste" + "und die Einstellzeit ist OH. Wenn die
Einstellung OH ist, wird die Programmierung abgebrochen. Wenn der Wert set ist
nicht OH, die Programmierung beginnt. Stellen Sie die Terminzeit ein, drücken Sie
die Timing-Taste " " oder verlassen Sie den Programmiermodus für 5 Sekunden
ohne Betrieb. B: Wenn das Programmierzeitintervall, Drücken Sie den Netzschalter
" ", um in den Standby-Zustand zu wechseln und den Vorgang abzubrechen
Programmierung. C: Drücken Sie nach dem Starten der Programmierung die
Programmiertaste und überprüfen Sie die verbleibende Zeit des Termins und stellen
Sie die Programmierzeit wieder her. Während der programmierten Zeit wird die
Maschine unter Temperaturregelung ausgeschaltet oder gestartet, und die programmierte Zeit ist immer normal und frei von Ausfallzeiten. Während der programmierten Zeit wird es bei einem Stromausfall abgebrochen
<Speicherfunktion>: Nach dem Neustart arbeitet das Gerät entsprechend dem
Status vor dem letzten Standby.
4
Page 31

<Sicherheitsschutzfunktion>:
Wenn die interne Raumtemperatur im Standby- oder Arbeitsmodus 50 ° C
überschreitet, werden alle Ausgänge deaktiviert, der Summer gibt 10 lange
Pieptöne aus, der digitale Bildschirm zeigt "FF" an und blinkt 75 Sekunden lang
mit 1 Hz. Solange Schutz besteht, Selbst wenn die Umgebungstemperatur unter
50 ° C liegt, kann der Betrieb oder Betrieb nicht wieder aufgenommen werden
und der Betrieb kann nur ausgeführt werden, nachdem die Stromversorgung
aus- und wieder eingeschaltet wurde.
<Aus>:
Drücken Sie im Betriebszustand den Netzschalter " " auf dem Bedienfeld, um
auf den Standby-Zustand zuzugreifen, ziehen Sie das Netzkabel ab, warten Sie,
bis die gesamte Maschine abgekühlt ist, und stellen Sie die Heizung stabil auf.
[Hinweis]
Achten Sie beim ersten Gebrauch des Geräts oder beim erneuten Einstecken
der Steckdose darauf, dass Stecker und Steckdose richtig eingesteckt sind.
<Inspektionsmethode>
Stecken Sie den Stecker in die Steckdose und verwenden Sie ihn. Schalten Sie
nach etwa einer halben Stunde den Stecker aus und ziehen Sie ihn heraus.
Überprüfen Sie, ob die Steckerstifte heiß sind. Ersetzen Sie in diesem Fall die
Steckdose (über 50 ° C), um ein Verbrennen des Steckers oder sogar einen
Brand zu vermeiden, der durch Überhitzung der Steckdose aufgrund schlechten
Kontakts verursacht wird.
Anzeige
Schalttafel
BENUTZEN SIE DIE FERNBEDIENUNG
Die Funktion der Tasten stimmt im Wesentlichen mit dem Bedienfeld des
Gehäuses überein, und die Fernbedienung kann die kombinierte Taste nicht
steuern.
An / aus Schalter
Funktionstaste
"+" Taste
+
"-" Taste
-
...
Timer-Taste
5
Page 32

Tabelle mit Informationsanforderungen für elektrische lokale Raumheizgeräte
Vorlage: NY2009-20MR
Objekt Objekt
Wärmekraft
Nennwärmeleistung
Minimale Wärmeleistung
(indikativ)
Maximale kontinuierliche
Wärmeleistung
Zusätzlicher Stromverbrauch
Bei nominaler
Wärmeabgabe
Bei minimaler
Wärmeabgabe
Im Standby-Modus
Kontaktdetails:
Symbol Wert Einheit Einheit
Art des Wärmeeintrags, nur für elektrische lokale Raumheizgeräte
(wählen Sie eines aus)
0.8
0.7
0.8
0.000
0.000
0.000*
Manuelle Steuerung der thermischen
Ladung mit integriertem Thermostat
Manuelle Steuerung der thermischen
Ladung mit Rückmeldung der
Umgebungs- und / oder Außentemperatur
Elektronische Steuerung der thermischen
Ladung mit Rückmeldung der Umgebungsund / oder Außentemperatur
Wärmeleistung durch Lüfter unterstützt
Art der Wärmeleistung / Raumtemperaturregelung
(wählen Sie eine aus)
Einstufige Wärmeabgabe und keine
Raumtemperaturregelung
Zwei oder mehr manuelle Schritte,
keine Raumtemperaturregelung
Mit mechanischem Thermostat zur
Raumtemperaturregelung
Mit elektronischer
Raumtemperaturregelung
Elektronische Raumtemperaturregelung
plus Tageszeitschaltuhr
Elektronische Raumtemperaturregelung
plus Wochenzeitschaltuhr
Andere Steuerungsoptionen (Mehrfachauswahl möglich)
Raumtemperaturregelung mit
Anwesenheitserkennung
Raumtemperaturregelung mit Erkennung
offener Fenster
Mit Abstandsregelung
Mit adaptiver Startsteuerung
Mit zeitlicher Begrenzung
Mit schwarzem Lampensensor
Midea Italia S.r.l.
Via Lazzaroni 5, 21047 Saronno (VA)
Hinweis:
Bei elektrischen lokalen Raumheizgeräten kann die gemessene Energieeffizienz der saisonalen
Raumheizung nicht schlechter sein als der Wert, der bei der Nennwärmeleistung des Geräts
berechnet wird.
Saisonale Raumheizungsenergieeffizienz aller lokalen Raumheizgeräte mit
Ausnahme der kommerziellen lokalen Raumheizgeräte
6
Page 33

REINIGUNGS- UND WARTUNGSANLEITUNG
1. Die elektrische Heizung muss regelmäßig gereinigt werden, um Staub auf
der Oberfläche der Flansche zu entfernen. Da dies den Strahlungswirkungsgrad beeinträchtigen kann.
2. Trennen Sie die Stromversorgung und lassen Sie den Kühler abkühlen.
Entfernen Sie den Staub mit einem weichen, feuchten Tuch. Verwenden Sie
keine Reinigungsmittel oder Schleifmittel.
3. Kratzen Sie die Oberflächen der Flansche nicht mit harten und scharfen
Werkzeugen ab, um zu verhindern, dass die Oberflächen aufgrund von
Lackschäden rosten.
7
Page 34

MANUAL
DEL PROPIETARIO
CALENTADOR DE ACEITE
MODELO: NY2009-20MR
...
Este producto solo es adecuado para espacios bien aislados o para uso ocasional.
LEA Y MANTENGA ESTAS INSTRUCCIONES
Advertencia: las imágenes en el manual son solo de referencia.
Page 35

LAS INSTRUCCIONES DE SEGURIDAD
1.
cubra el calentador.
2. Si el cable de alimentación está dañado, debe ser reemplazado
por el fabricante o su agente de servicio o una persona calificada
para evitar riesgos.
3. Este aparato puede ser utilizado por niños de 8 años en adelante y
por personas con capacidades físicas, sensoriales o mentales
reducidas o falta de experiencia y conocimiento si han sido supervisados o instruidos en relación con el uso del aparato en de
manera segura e integral los peligros involucrados. Los niños no
deben jugar con el aparato. La limpieza y el mantenimiento del
usuario no deben ser realizados por niños sin supervisión.
4. El calentador no debe colocarse inmediatamente debajo de una
toma de corriente.
5. No use este calentador en las inmediaciones de un baño, ducha o
piscina.
6. Los niños menores de 3 años deben mantenerse alejados a
Advertencia
: Para evitar el sobrecalentamiento, no
menos que estén continuamente supervisados.
Los niños de entre 3 y menos de 8 años encienden / apagan el
aparato solo con la condición de que se haya colocado o instalado
en su posición de funcionamiento normal prevista y que hayan
recibido supervisión o instrucciones relacionadas con el uso
seguro del aparato. y entender los peligros involucrados. Los niños
de 3 años y menores no deben conectar, ajustar y limpiar el aparato ni realizar tareas de mantenimiento por parte del usuario.
1
Page 36

7.
PRECAUCIÓN
pueden calentarse mucho y causar quemaduras.
Se debe prestar especial atención a la presencia
de niños y personas vulnerables.
8. Este calentador está lleno de una cantidad precisa de aceite
especial. Las reparaciones que requieren que se abra el contenedor de aceite solo deben ser realizadas por el fabricante o su
agente de servicio, a quien se debe contactar en caso de fugas
de aceite. Al desechar el calentador, siga las reglas para la
eliminación del aceite.
9. Eliminación correcta de este producto.
Esta marca indica que este producto no debe desecharse con
otros desechos domésticos en toda la UE. Para evitar posibles
daños al medio ambiente o la salud humana por la eliminación
incontrolada de residuos, recíclelo de manera responsable para
promover la reutilización sostenible de los recursos materiales.
Para devolver el dispositivo usado, use los sistemas de devolución y recolección o comuníquese con el minorista donde compró
el producto. Pueden tomar este producto para reciclaje ambientalmente seguro.
- Partes de este producto
10. Este calentador no puede obtener un control preciso de la
temperatura ambiente y, por lo tanto, no puede usarse como un
dispositivo de aislamiento para entornos de almacenamiento,
objetos, animales y plantas.
2
Page 37

NOMBRES DE COMPONENTES
Aleta
Panel de
controlar
Carretes
de cable
Montaje ruedas
Uso de radiador lleno de aceite
1. Ponga el calentador al revés.
2. Como se muestra en la Figura 1, alinee el orificio de montaje de un grupo
de ruedas e instálelo en el tornillo de la placa de apoyo giratoria al final de la
aleta del radiador y el otro conjunto de la rueda giratoria está alineado con
los tornillos montados en el parte inferior de la caja de control.
3. Como se muestra en la Figura 2, dos conjuntos de componentes de la
rueda se aprietan con cuatro mariposas de maní. Instale sólido y luego
coloque el calentador en posición: simplemente coloque las ruedas en el
suelo.
figure 1 figure 2
3
Nueces
de mariposa
Caja de
controlar
Page 38

INSTRUCCIONES DE USO
[Inspección antes de comenzar]
1.El cable de alimentación no debe estar dañado ni roto.
2. Compruebe que la corriente nominal de la toma de corriente está en línea con los
requisitos de la tabla anterior y está equipada con un dispositivo de conexión a
tierra de seguridad antes de su uso; de lo contrario, reemplace el zócalo.
[Instrucciones de uso]
<Trabajo / En espera>: conecte la fuente de alimentación, el zumbador "emitirá una
señal acústica" durante mucho tiempo, presione el botón de encendido " " para
ingresar al estado de funcionamiento de calefacción, luego presione el botón de
encendido " " para ingresar estado de espera
<Selección de marcha>: para el estado de trabajo, presione la tecla " " para
seleccionar uno de los modos de trabajo, como marcha alta, marcha media y baja.
<Configuración de temperatura>: bajo el estado de funcionamiento, mantenga
presionada la tecla "+" o "-" para ajustar la temperatura, mantenga presionada la
tecla "+" o "-" para ajustar rápidamente la temperatura; después de configurar la
temperatura, espere 5 segundos de inactividad, salga de la pantalla de configuración de temperatura.
<Trabajo programado>: toque el botón del temporizador " " en modo de espera
para acceder a la pantalla de configuración del trabajo programado. Presione la
tecla "+" o "-" para configurar el tiempo programado, presione la tecla "+" o "-"
durante mucho tiempo para configurar rápidamente el tiempo programado y el
tiempo programado alcanzará el máquina de operación.
<Programar espera>: en el estado operativo, presione el botón del temporizador
" " para ingresar a la pantalla de configuración de espera del horario. Presione la
tecla "+" o la tecla "- para configurar el tiempo de programación, - presione la tecla"
+ "o" - "durante un largo período de tiempo para configurar rápidamente el tiempo
de planificación y el tiempo de planificación está en el estado tiempo de espera de
la máquina A: la planificación es de 0 a 24 horas y presione la tecla "+" o "-" cada
vez para aumentar o disminuir 1 hora. Cuando el valor establecido sea OH, presione la tecla " - "para configurar el tiempo durante 24 horas. Cuando el valor establecido es 24 horas, presione la tecla" + "y el tiempo de configuración es OH.
Cuando la configuración es OH, la programación se cancela. Cuando el valor el
ajuste no es OH, la programación comienza. Configure la hora de la cita, presione
el botón de sincronización " ", o sin operación durante 5 segundos, salga del modo
de programación. B: Si el intervalo de tiempo de programación, presione el botón
de encendido " " para ingresar al estado de espera y cancelar el programación. C:
Después de comenzar la programación, presione el botón de programación y para
verificar el tiempo restante de la cita y restablecer el tiempo de programación.
Durante el tiempo programado, la máquina se apaga o arranca bajo control de
temperatura, y el tiempo programado es siempre normal y sin tiempo de inactividad.
Durante el tiempo programado, se cancela en caso de falla de energía
<Función de memoria>: una vez reiniciada, la máquina funcionará de acuerdo con
el estado anterior al último modo de espera.
4
Page 39

<Función de protección de seguridad>:
Cuando la temperatura interna de la habitación supera los 50 ° C en modo de
espera o de trabajo, todas las salidas se desactivan, el zumbador emite 10
pitidos largos, la pantalla digital muestra "FF" y parpadea a 1 Hz durante 75
segundos Siempre que exista protección, incluso si la temperatura ambiente es
inferior a 50 ° C, la operación u operación no se puede reanudar y la operación
solo se puede realizar después de apagar y volver a encender.
<Off>:
bajo el estado operativo, presione el botón de encendido " " en el panel de
control para acceder al estado de espera, desconecte el cable de alimentación,
espere a que toda la máquina se enfríe y coloque el calentador de manera
estable.
[Nota]
Para usar la máquina por primera vez o para volver a insertar el zócalo,
asegúrese de verificar que el enchufe y el zócalo estén insertados correctamente.
<Método de inspección>
Inserte el enchufe en el zócalo y comience a usar; Después de aproximadamente media hora, apague y desconecte el enchufe. Compruebe si los pines del
enchufe están calientes; en este caso, reemplace el enchufe (más de aproximadamente 50 ° C) para evitar quemar el enchufe o incluso causar un incendio
causado por el sobrecalentamiento del enchufe debido al mal contacto.
Monitor
Panel de control
UTILICE EL CONTROL REMOTO
La función de los botones es sustancialmente consistente con el panel
operativo del cuerpo y el control remoto no puede controlar el botón combinado.
Boton de encendido
/ apagado
Tecla de función
Botón "+"
+
Botón "-"
-
Botón de temporizador
...
5
Page 40

Tabla de requisitos de información para calentadores locales eléctricos
Modelo: NY2009-20MR
Objeto Objeto
Energía térmica
Salida de calor
nominal
Potencia térmica
mínima (indicativa)
Máxima potencia
térmica continua
Consumo electrico auxiliar
A potencia calorífica
nominal
Con salida de calor
mínima
En modo de espera
Detalles de contacto:
Símbolo Valor Unidad Unidad
Tipo de entrada de calor, solo para calentadores locales eléctricos
(seleccione uno)
0.8
0.7
0.8
0.000
0.000
0.000*
Control manual de la carga térmica con
termostato integrado.
Control manual de la carga térmica con
retroalimentación de la temperatura
ambiente y / o externa.
Control electrónico de la carga térmica con
retroalimentación de la temperatura
ambiente y / o externa.
Potencia térmica asistida por ventilador
A potencia calorífica nominal
Salida de calor de una etapa y sin control
de temperatura ambiente
Dos o más pasos manuales, sin control
de temperatura ambiente
Con termostato mecánico para control
de temperatura ambiente.
Con control electrónico de temperatura
ambiente.
Control electrónico de temperatura
ambiente más temporizador diario
Control electrónico de temperatura
ambiente más temporizador semanal
Otras opciones de control (posibles selecciones múltiples)
Control de temperatura ambiente, con
detección de presencia.
Control de temperatura ambiente, con
detección de ventana abierta.
Con opción de control de distancia
Con control de arranque adaptativo
Con limitación de horas de trabajo
Con sensor de bombilla negra
Midea Italia S.r.l.
Via Lazzaroni 5, 21047 Saronno (VA)
Nota:
En el caso de los calentadores locales eléctricos, la eficiencia energética estacional medida de la
calefacción de espacios no puede ser peor que el valor cargado en la salida de calor nominal de
la unidad.
Eficiencia energética estacional de calefacción de espacios de todos los
dispositivos de calefacción de espacios locales, excepto los dispositivos
comerciales de calefacción de espacios locales
6
Page 41

INSTRUCCIONES DE LIMPIEZA Y MANTENIMIENTO
1. El calentador eléctrico debe limpiarse regularmente para eliminar el polvo
en la superficie de las bridas. Dado que esto puede afectar la eficiencia
radiante.
2. Desconecte la fuente de alimentación y deje que el radiador se enfríe,
elimine el polvo con un paño suave y húmedo. No use detergentes ni abrasivos.
3. No raspe las superficies de las bridas con herramientas duras y afiladas
para evitar que las superficies se oxiden debido a daños en la pintura.
7
Page 42

MANUEL
DU PROPRIÉTAIRE
CHAUFFAGE REMPLI D'HUILE
MODÈLE: NY2009-20MR
...
Ce produit ne convient que pour les espaces bien
isolés ou pour une utilisation occasionnelle.
LISEZ ET CONSERVEZ CES INSTRUCTIONS
Attention: les images du manuel sont à titre indicatif uniquement.
Page 43

CONSIGNES DE SÉCURITÉ
1.
couvrez pas le radiateur.
2. Si le cordon d'alimentation est endommagé, il doit être remplacé
par le fabricant ou son agent de service ou une personne qualifiée
pour éviter tout danger.
3. Cet appareil peut être utilisé par des enfants âgés de 8 ans et plus
et par des personnes ayant des capacités physiques, sensorielles
ou mentales réduites ou un manque d'expérience et de connaissances s'ils ont subi une supervision ou des instructions relatives à
l'utilisation de l'appareil dans en toute sécurité et de manière
exhaustive les dangers encourus. Les enfants ne doivent pas jouer
avec l'appareil. Le nettoyage et l'entretien par l'utilisateur ne
doivent pas être effectués par des enfants sans surveillance.
4. Le radiateur ne doit pas être placé immédiatement sous une sortie.
5. N'utilisez pas cet appareil de chauffage à proximité immédiate
d'une salle de bain, d'une douche ou d'une piscine.
6. Les enfants de moins de 3 ans doivent être tenus à l'écart, sauf en
Avertissement
: pour éviter une surchauffe, ne
cas de surveillance continue.
Les enfants âgés de 3 à moins de 8 ans n'allument / éteignent
l'appareil qu'à la condition qu'il ait été placé ou installé dans sa
position de fonctionnement normale et qu'ils aient reçu une supervision ou des instructions concernant l'utilisation de l'appareil en
toute sécurité et comprendre les dangers impliqués. Les enfants
âgés de 3 ans et moins ne doivent pas connecter, régler et nettoyer l'appareil ou effectuer l'entretien par l'utilisateur.
1
Page 44

7.
MISE EN GARDE
duit peuvent devenir très chaudes et provoquer
des brûlures. Une attention particulière doit être
accordée à la présence d'enfants et de personnes
vulnérables.
8. Ce radiateur est rempli d'une quantité précise d'huile spéciale. Les
réparations nécessitant l'ouverture du réservoir d'huile ne doivent
être effectuées que par le fabricant ou son agent de service qui
doit être contacté en cas de fuite d'huile. Lors de la mise au rebut
du chauffe-eau, suivez les règles d'élimination de l'huile.
9. Élimination correcte de ce produit
Cette marque indique que ce produit ne doit pas être éliminé avec
les autres déchets ménagers dans l'UE. Pour éviter tout dommage
possible à l'environnement ou à la santé humaine résultant de
l'élimination incontrôlée des déchets, recyclez-le de manière
responsable afin de promouvoir la réutilisation durable des ressources matérielles. Pour retourner l'appareil utilisé, utilisez les
systèmes de retour et de collecte ou contactez le revendeur chez
qui le produit a été acheté. Ils peuvent prendre ce produit pour un
recyclage respectueux de l'environnement.
- Certaines parties de ce pro-
10. Ce radiateur n'est pas en mesure d'obtenir un contrôle précis de
la température ambiante et ne peut donc pas être utilisé comme
dispositif d'isolement pour les environnements de stockage, les
objets, les animaux et les plantes.
2
Page 45

NOMS DES COMPOSANTS
Ailette
Panel de
Control
Enrouleurs
de câble
Assemblage
roues
Utilisation d'un radiateur rempli d'huile
1. Retournez le radiateur.
2. Comme le montre la figure 1, alignez le trou de montage d'un groupe de
roues et installez-le sur la vis de la plaque de roulement pivotante à l'extrémité
de l'ailette de radiateur et de l'autre, la roue pivotante est alignée avec les vis
montées dans le en bas du boîtier de commande.
3. Comme le montre la figure 2, deux ensembles de composants de roue sont
serrés avec quatre papillons d'arachide. Installez solidement puis placez le
radiateur en position: placez simplement les roues au sol.
figure 1 figure 2
3
Noix de
papillon
Boîte de
Control
Page 46

MODE D'EMPLOI
[Inspection avant de commencer]
1.Le cordon d'alimentation ne doit pas être endommagé ou cassé.
2. Vérifiez que le courant nominal de la prise de courant est conforme aux exigenc-
es du tableau ci-dessus et est équipé d'un dispositif de mise à la terre de sécurité
avant utilisation; sinon, remplacez la prise.
[Mode d'emploi]
<Travail / Veille>: connectez l'alimentation, le buzzer "émettra un signal acoustique"
pendant longtemps, appuyez sur le bouton d'alimentation " " pour passer en mode
de fonctionnement chauffage, puis appuyez sur le bouton d'alimentation " " pour
entrer état d'attente.
<Sélection de vitesse>: pour l'état de fonctionnement, appuyez sur le bouton " "
pour sélectionner l'un des modes de fonctionnement tels que vitesse élevée, vitesse
moyenne et vitesse faible.
<Réglage de la température>: sous l'état de fonctionnement, maintenez la touche
"+" ou "-" enfoncée pour régler la température, maintenez la touche "+" ou "-"
enfoncée pour régler rapidement la température; après avoir réglé la température,
attendez 5 secondes d'inactivité, quittez l'écran de réglage de la température.
<Travail planifié>: appuyez sur le bouton de la minuterie " " en mode veille pour
accéder à l'écran des paramètres du travail planifié. Appuyez sur la touche "+" ou
"-" pour régler l'heure programmée, appuyez longuement sur la touche "+" ou "-"
pour régler rapidement l'heure programmée et l'heure programmée atteindra le
fonctionnement de la machine.
<Veille programmée>: sous l'état de fonctionnement, appuyez sur le bouton de la
minuterie " " pour accéder à l'écran de réglage de la mise en veille. Appuyez sur la
touche "+" ou la touche - "pour régler le temps de programmation, - appuyez sur la
touche" + "ou" - "pendant une longue période pour régler rapidement le temps de
planification et le temps de planification est à l'état autonomie en veille de la
machine A: la planification est de 0 à 24 heures et appuyez à chaque fois sur la
touche "+" ou "-" pour augmenter ou diminuer 1 heure. Lorsque la valeur réglée est
OH, appuyez sur la touche " - "pour régler l'heure sur 24 heures. Lorsque la valeur
réglée est de 24 heures, appuyez sur la touche" + "et l'heure de réglage est OH.
Lorsque le réglage est OH, la programmation est annulée. Lorsque la valeur réglé
n'est pas OH, la programmation démarre. Réglez l'heure du rendez-vous, appuyez
sur le bouton de synchronisation " ", ou sans opération pendant 5 secondes,
quittez le mode de programmation. B: Si l'intervalle de programmation, appuyez sur
le bouton d'alimentation " " pour passer en mode veille et annuler programmation.
C: Après avoir démarré la programmation, appuyez sur la touche de programmation
et pour vérifier le temps restant du rendez-vous et restaurer l'heure de programmation. Pendant le temps programmé, la machine est éteinte ou démarrée sous
contrôle de température, et le temps programmé est toujours normal et sans temps
d'arrêt. Pendant le temps programmé, il est annulé en cas de panne de courant
<Fonction mémoire>: une fois redémarrée, la machine fonctionnera selon l'état
avant la dernière veille.
4
Page 47

<Fonction de protection de sécurité>:
lorsque la température intérieure de la pièce dépasse 50 ° C en mode veille ou
en fonctionnement, toutes les sorties sont désactivées, le buzzer émet 10 bips
longs, l'écran numérique affiche "FF" et clignote à 1 Hz pendant 75 secondes
Tant que la protection existe, même si la température ambiante est inférieure à
50 ° C, le fonctionnement ou le fonctionnement ne peut pas être repris et le
fonctionnement ne peut être effectué qu'après la mise hors tension puis sous
tension.
<Off>:
sous l'état de fonctionnement, appuyez sur le bouton d'alimentation " " du
panneau de commande pour accéder à l'état de veille, débranchez le câble
d'alimentation, attendez que la machine entière refroidisse et positionnez le
chauffage de manière stable.
[Remarque]
Pour utiliser la machine pour la première fois ou pour réinsérer la prise, veillez à
vérifier que la fiche et la prise sont correctement insérées.
<Méthode d'inspection>
Insérez la fiche dans la prise et commencez à utiliser; après environ une
demi-heure, éteignez et débranchez la fiche. Vérifiez si les broches de la fiche
sont chaudes; dans ce cas, remplacez la prise (plus d'environ 50 ° C) pour éviter
de brûler la fiche ou même de provoquer un incendie provoqué par une
surchauffe de la prise due à un mauvais contact.
Afficher
Panneau de configuration
UTILISEZ LA TÉLÉCOMMANDE
La fonction des boutons est sensiblement cohérente avec le panneau de
commande du corps et la télécommande ne peut pas contrôler le bouton combiné.
Bouton ON / OFF
Clé de fonction
Touche "+"
+
Touche "-"
-
...
Bouton de
minuterie
5
Page 48

Tableau des exigences d'information pour les radiateurs électriques locaux
Modèle: NY2009-20MR
Objet Objet
Energie thermique
Puissance thermique
nominale
Puissance thermique
minimale (indicative)
Puissance thermique
continue maximale
Consommation électrique auxiliaire
À la puissance
thermique nominale
À la puissance
thermique minimale
En mode veille
Détails du contact:
Symbole Valeur Unité Unité
Type d'apport de chaleur, uniquement pour les radiateurs
électriques locaux (sélectionnez-en un)
0.8
0.7
0.8
0.000
0.000
0.000*
Contrôle manuel de la charge thermique
avec thermostat intégré
Contrôle manuel de la charge thermique
avec retour de la température ambiante
et / ou externe
Contrôle électronique de la charge
thermique avec retour de la température
ambiante et / ou externe
Puissance thermique assistée par ventilateur
Type de contrôle de la puissance thermique / de la
température ambiante (en sélectionner un)
Production de chaleur à un étage et
aucun contrôle de la température
ambiante
Deux étapes manuelles ou plus, pas de
contrôle de la température ambiante
Avec thermostat mécanique pour le
contrôle de la température ambiante
Avec contrôle électronique de la
température ambiante
Contrôle électronique de la température
ambiante et minuterie quotidienne
Contrôle électronique de la température
ambiante et minuterie hebdomadaire
Autres options de contrôle (plusieurs sélections possibles)
Contrôle de la température ambiante,
avec détection de présence
Contrôle de la température ambiante,
avec détection de fenêtre ouverte
Avec option de contrôle de distance
Avec contrôle de démarrage adaptatif
Avec limitation des heures de travail
Avec capteur à ampoule noire
Midea Italia S.r.l.
Via Lazzaroni 5, 21047 Saronno (VA)
Remarque:
Pour les radiateurs électriques locaux, l'efficacité énergétique saisonnière du chauffage des
locaux mesurée ne peut pas être inférieure à la valeur facturée à la puissance thermique
nominale de l'unité.
Efficacité énergétique saisonnière pour le chauffage des locaux de tous les
dispositifs de chauffage des locaux, à l'exception des dispositifs commerciaux
de chauffage des locaux
6
Page 49

INSTRUCTIONS DE NETTOYAGE ET D'ENTRETIEN
1. Le radiateur électrique doit être nettoyé régulièrement pour éliminer la poussière sur la surface des brides. Étant donné que cela peut affecter l'efficacité
radiante.
2. Débranchez l'alimentation électrique et laissez le radiateur refroidir, retirez la
poussière avec un chiffon doux et humide. N'utilisez pas de détergents ou
d'abrasifs.
3. Ne pas gratter les surfaces des brides avec des outils durs et tranchants, pour
éviter que les surfaces ne rouillent à cause des dommages à la peinture.
7
Page 50

PRIRUČNIK VLASNIKA
GLAVOM GRIJALNOM ULJOM
OBRAZAC: NY2009-20MR
...
Ovaj je proizvod prikladan samo za dobro izolirane
prostore ili za povremenu upotrebu.
PROČITAJTE I ČUVITE TE UPUTE
Upozorenje: slike u priručniku predstavljaju samo referencu.
Page 51

SIGURNOSNE UPUTE
1.
prekrivajte grijač.
2. Ako je mrežni kabel oštećen, mora ga zamijeniti proizvođač ili
njegov servisni agent ili kvalificirana osoba kako bi se izbjegle
opasnosti.
3. Ovaj uređaj mogu koristiti djeca u dobi od 8 godina i stariji te osobe
smanjenih tjelesnih, senzornih ili mentalnih sposobnosti ili nedo-
statka iskustva i znanja ako su prošli nadzor ili upute koje se
odnose na upotrebu uređaja u sigurno i sveobuhvatno uključene
opasnosti. Djeca se ne smiju igrati s uređajem. Čišćenje i održa-
vanje korisnika djeca ne smiju obavljati bez nadzora.
4. Grijač se ne smije postavljati odmah ispod utičnice.
5. Nemojte koristiti ovaj grijač u neposrednoj blizini kupaonice, tuša ili
bazena.
6. Djeca mlađa od 3 godine moraju se držati podalje, osim ako su
pod stalnim nadzorom.
Djeca u dobi između 3 i manje od 8 godina uređaj uključuju /
Upozorenje
: da izbjegnete pregrijavanje, ne
isključuju samo pod uvjetom da je postavljen ili instaliran u svom
uobičajenom predviđenom radnom položaju i da su dobili nadzor ili
upute koje se odnose na sigurnu upotrebu uređaja i razumjeti
opasnosti koje uključuju. Djeca starija od 3 godine ne smiju povezivati, podešavati i čistiti uređaj niti obavljati održavanje od strane
korisnika.
1
Page 52

7.
OPREZ
vrlo vrući i uzrokovati opekline. Posebna pažnja
mora se posvetiti prisutnosti djece i ranjivih ljudi.
8. Ovaj grijač napunjen je preciznom količinom posebnog ulja.
Popravke koji zahtijevaju otvaranje spremnika za ulje smije izvesti
samo proizvođač ili njegov servisni agent s kojima se mora obratiti
u slučaju curenja ulja. Pri uklanjanju grijalice pridržavajte se
pravila za uklanjanje ulja.
9. Ispravno odlaganje ovog proizvoda
Ova oznaka ukazuje da se ovaj proizvod ne smije odlagati s
drugim kućnim otpadom diljem EU-a. Da biste spriječili moguće
štete okolišu ili ljudskom zdravlju zbog nekontroliranog odlaganja
otpada, reciklirajte ga odgovorno za promicanje održive upotrebe
materijalnih resursa. Da biste vratili korišteni uređaj, koristite
sustave za povratak i prikupljanje podataka ili se obratite
prodavaču gdje je proizvod kupljen. Oni mogu uzimati ovaj proizvod za recikliranje u okolišu.
- Dijelovi ovog proizvoda mogu postati
10. Ovaj grijač ne može dobiti točnu kontrolu temperature okoline i
stoga se ne može koristiti kao izolacijski uređaj za skladišne
prostore, predmete, životinje i biljke.
2
Page 53

NAZIVI KOMPONENTE
Peraje
Ploča od
kontrolirati
Kabelske role
sastavljanje
kotači
Upotreba radijatora punjenog uljem
1. Okrenite grijač naopako.
2. Kao što je prikazano na slici 1, poravnajte otvor za montažu grupe kotača i
stavite ga na vijak okretne ležajne ploče na kraju pera radijatora, a drugi sklop
okretnog kotača poravnajte s vijcima pričvršćenim u dnu upravljačke kutije.
3. Kao što je prikazano na slici 2, dva seta komponenti kotača su zategnuta s
četiri leptira kikirikija. Ugradite čvrsto tijelo, a zatim postavite grijač u položaj:
samo postavite kotače na zemlju.
figure 1 figure 2
3
Matice leptira
Kutija od
kontrolirati
Page 54

UPUTE ZA KORIŠTENJE
[Pregled prije pokretanja]
1. Kabel za napajanje ne smije biti oštećen ili slomljen.
2. Provjerite je li nazivna struja utičnice u skladu sa zahtjevima gornje tablice i ima li
sigurnosni uređaj za uzemljenje prije upotrebe; u suprotnom, zamijenite utičnicu.
[Upute za korištenje]
<Rad / stanje pripravnosti>: uključite napajanje, zvučni signal "dugo će emitirati
zvučni signal", pritisnite tipku za uključivanje " " za ulazak u radno stanje grijanja,
zatim pritisnite tipku za uključivanje " " za ulazak u stanje čekanja.
<Izbor zupčanika>: za radno stanje pritisnite tipku " " za odabir jednog od načina
rada, poput visokog, srednjeg i niskog stupnja prijenosa.
<Podešavanje temperature>: u radnom stanju držite pritisnutu tipku "+" ili "-" da
biste postavili temperaturu, držite pritisnutu tipku "+" ili "-" za brzo podešavanje
temperature; nakon podešavanja temperature, pričekajte 5 sekundi neaktivnosti,
izađite iz zaslona podešavanja temperature.
<Planirani posao>: dodirnite gumb tajmera " " u stanju čekanja da biste pristupili
zaslonu postavki rasporeda zakaza. Pritisnite tipku "+" ili "-" za podešavanje
programiranog vremena, pritisnite tipku "+" ili "-" da biste brzo postavili programira-
no vrijeme i programirano vrijeme će dostići rad stroja.
<Stanje pripravnosti>: u radnom stanju pritisnite gumb za odbrojavanje
" " za ulazak u ekran za podešavanje stanja pripravnosti. Pritisnite tipku "+" ili - "za
podešavanje vremena programiranja, - pritisnite tipku" + "ili" - "duže vrijeme kako
biste brzo postavili vrijeme planiranja, a vrijeme planiranja je u stanju vrijeme
pripravnosti stroja A: planiranje je 0-24 sata i svaki put pritisnite tipku "+" ili "-" da
biste povećali ili smanjili 1 sat. Kada je postavljena vrijednost OH, pritisnite " - "za
podešavanje vremena od 24 sata. Kada je postavljena vrijednost 24 sata, pritisnite
tipku" + ", a vrijeme podešavanja je OH. Kad je postavka OH, programiranje se
otkazuje. Kada je vrijednost postavka nije OH, programiranje započinje. Postavite
vrijeme sastanka, pritisnite tipku " " ili nakon 5 sekundi bez rada, izađite iz načina
programiranja. B: Ako je vremenski interval programiranja, pritisnite tipku za
uključivanje " " da biste ušli u stanje pripravnosti i otkazali programiranje. C: Nakon
pokretanja programiranja pritisnite gumb za programiranje i provjerite preostalo
vrijeme sastanka i vratite vrijeme programiranja. Tijekom programiranog vremena
stroj se isključuje ili pokreće pod nadzorom temperature, a programirano vrijeme je
uvijek normalno i bez zastoja. Tijekom programiranog vremena, otkazuje se u
slučaju nestanka struje
<Memorijska funkcija>: nakon ponovnog pokretanja stroj će raditi u skladu s
stanjem prije zadnjeg stanja pripravnosti.
4
Page 55

<Sigurnosna zaštita>:
kada unutarnja temperatura okoline prelazi 50 ° C u stanju pripravnosti ili u radu,
svi su izlazi deaktivirani, zujalica emitira 10 dugačkih zvučnih signala, digitalni
ekran prikazuje "FF" i treperi na 1 Hz tijekom 75 sekundi dok postoji zaštita, čak i
ako je temperatura okoline niža od 50 ° C, rad ili rad se ne mogu nastaviti i rad
se može izvršiti tek nakon isključivanja i ponovnog uključivanja napajanja.
<Isključeno>:
u radnom stanju pritisnite tipku za napajanje " " na upravljačkoj ploči da biste
pristupili stanju pripravnosti, iskopčajte kabel napajanja, pričekajte da se cijeli
stroj ohladi i stabilno postavite grijač.
[Bilješka]
Da biste prvi put koristili stroj ili ponovo postavili utičnicu, budite pažljivi i provjerite jesu li utikač i utičnica pravilno umetnuti.
<Inspekcijski način>
Umetnite utikač u utičnicu i počnite koristiti; nakon otprilike pola sata, isključite i
izvucite utikač. Provjerite jesu li igle utikača vruće; u ovom slučaju zamijenite
utičnicu (više od oko 50 ° C) kako biste izbjegli izgaranje utikača ili čak izazvali
požar uzrokovan pregrijavanjem utičnice zbog lošeg kontakta.
Prikaz
Upravljačka ploča
KORISTITE DALJINSKU UPRAVU
Funkcija gumba uglavnom je u skladu s upravljačkom pločom karoserije, a
daljinski upravljač ne može upravljati kombiniranim gumbom.
Gumb ON / OFF
Funkcijska tipka
gumb "+"
+
gumb "-"
-
Gumb za
odbrojavanje vremena
...
5
Page 56

Tablica za potrebe informacija za električne grijače lokalnog prostora
Predložak: NY2009-20MR
Objekt Objekt
Toplinska snaga
Nominalna toplinska
snaga
Minimalna toplotna
snaga (indikativno)
Toplinska snaga
kontinuirani maksimum
Pomoćna električna potrošnja
Kod nazivne
toplinske snage
Uz minimalnu
toplinsku snagu
U stanju čekanja
Podaci za kontakt:
Simbol Vrijednost
Midea Italia S.r.l.
0.8
0.7
0.8
0.000
0.000
0.000*
Jedinica
Način unosa topline, samo za električne grijače lokalnog prostora
(odaberite jedan)
Ručno upravljanje termičkim nabojem s
integriranim termostatom
Ručno upravljanje toplinskim nabojem s
povratnim informacijama o okolišu i / ili
vanjskoj temperaturi
Elektronsko upravljanje toplinskim nabojem
s povratnim informacijama o okolišu i / ili
vanjskoj temperaturi
Toplinska snaga uz pomoć ventilatora
Vrsta regulacije toplinske energije / sobne
temperature (odaberite jednu)
Jednostupanjska toplina i bez sobne
temperature
Dva ili više ručnih koraka, bez kontrole
sobne temperature
S mehaničkim termostatom za kontrolu
sobne temperature
S elektroničkom kontrolom temperature u
prostoriji
Elektronska kontrola temperature u
sobi plus dnevni tajmer
Elektronička kontrola temperature u
prostoriji plus tjedni tajmer
Ostale mogućnosti upravljanja (moguće je više odabira)
Kontrola temperature u prostoriji, s
otkrivanjem prisutnosti
Regulacija temperature u prostoriji, s
otkrivanjem otvorenih prozora
S opcijom kontrole udaljenosti
Sa prilagodljivim upravljanjem startom
Uz ograničenje radnog vremena
Sa senzorom crne žarulje
Via Lazzaroni 5, 21047 Saronno (VA)
Unità
Bilješka:
Za električne lokalne grijače prostora, izmjerena sezonska energetska učinkovitost grijanja
prostora ne može biti lošija od vrijednosti nabijene na nazivni toplinski učinak jedinice.
Sezonska energetska učinkovitost grijanja prostora za sve uređaje za grijanje
prostora osim komercijalnih uređaja za lokalno grijanje prostora
6
Page 57

UPUTE ZA ČIŠĆENJE I ODRŽAVANJE
1. Električni grijač mora se redovito čistiti kako bi se uklonila prašina s
površine prirubnica. Budući da to može utjecati na učinkovitost zračenja.
2. Isključite napajanje i ostavite da se radijator ohladi, uklonite prašinu
mekom vlažnom krpom. Ne koristite deterdžente ili abrazive.
3. Ne ogrebajte površine prirubnica tvrdim i oštrim alatima kako ne biste
oštetili površine zbog oštećenja boje.
7
 Loading...