

Page 1
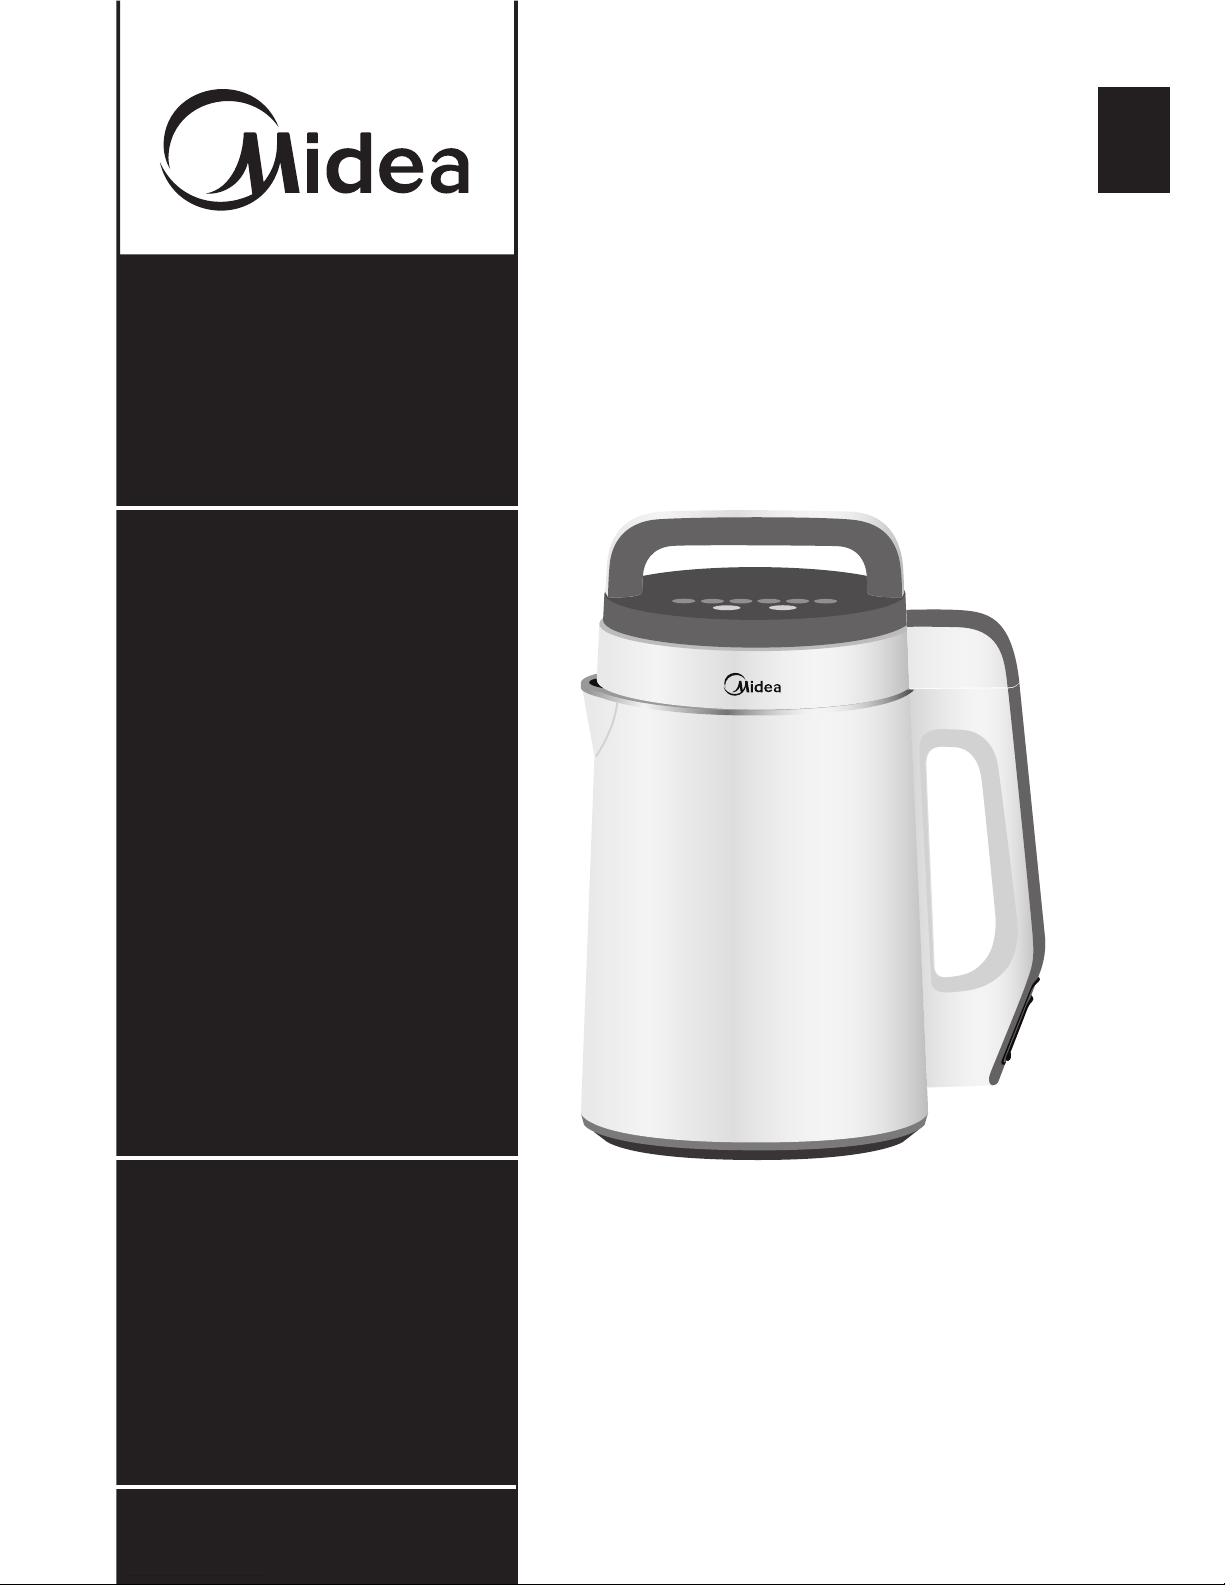
NRG™ Nut Rice Grain
Milk Extractor and
Blender
version A - 10 - 2017
MNRG17-W
www.midea.com
USER MANUAL
en
Warning notices: Before
using this product, please
read this manual carefully
and keep it for future
reference.
The design and
specifications are subject to
change without prior notice
for product improvement.
Consult with your dealer or
manufacturer for details.
Rated voltage: 120V-60 Hz
Rated power: Motor: 130 W
Heating: 1000 W
Frequency: 60Hz
Capacity: Min 48 oz (1.4 L)
Max 56 oz (1.7 L)
Page 2

Page 2
Table of Contents
1
MILK MAKER SAFETY ....................................................................... 3
2
OPERATING REQUIREMENTS .......................................................... 4
Electrical Requirements ....................................................................... 4
Location Requirements ........................................................................ 5
3
PARTS AND FEATURES ..................................................................... 6
4
MILK MAKER USE .............................................................................. 8
Processing Functions ........................................................................... 8
Controls ................................................................................................ 9
Making Nut, Rice or Grain Milk ............................................................ 9
Making Tofu ........................................................................................11
5
RECIPES ........................................................................................... 14
6
MILK MAKER CARE ......................................................................... 16
Cleaning ............................................................................................. 16
Storage ............................................................................................... 17
7
TROUBLESHOOTING ....................................................................... 17
Specifications
Model Dimensions Power Voltage Capacity
MNRG17-W 9
3/4 " x 71/4 " x
131/4 "
Motor: 130 W
Heating: 1000 W
120V-60 Hz Min 48 oz
(1.4 L)
Max 56 oz
(1.7 L)
Page 3

Page 3
Safety
Precautions
Milk Maker Safety
1
To prevent injury to the user or other people and property damage, the
instructions shown here must be followed. Incorrect operation due to
ignoring of instructions may cause harm or damage. The level of risk is shown
by the following indications.
CAUTION
WARNING
This symbol indicates the possibility of death or serious injury.
This symbol indicates the possibility of injury or damage to property.
When using electrical appliances, basic safety precautions should always be
observed, including the following:
•
Read all instructions before use.
•
To protect against risk of electrical shock, do not immerse the electric
cord, plug, milk chamber or processor in water or other liquids.
•
Unplug from outlet when not in use, before putting on or taking off parts,
and before cleaning. Make sure the motor stops completely and allow it to
cool before disassembling.
•
Never unplug the appliance by pulling the power cord. Always grip the
plug firmly and pull straight out from the receptacle.
•
Do not operate unattended.
•
Close supervision is necessary when any appliance is used by or near
children.
•
Avoid contact with moving parts.
•
Do not operate any appliance with a damaged cord/plug, after the
appliance malfunctions, or if it is dropped or damaged in any manner.
Return appliance to the nearest authorized service facility for examination,
repair, electrical, or mechanical adjustment.
•
The use of attachments not recommended or sold by the manufacturer
may cause fire, electric shock, or injury.
•
Do not use outdoors.
•
Do not let cord hang over the edge of table or counter, or touch hot
surfaces.
•
Do not place on or near a hot gas or electric burner, or in a heated oven.
Page 4

Page 4
Operating
Requirements
•
To disconnect, turn control to Off, and wait until motor stops before
removing plug from the electrical outlet.
•
Always connect power cord to appliance first, then plug cord into the
electrical outlet.
SAVE THESE INSTRUCTIONS
THIS APPLIANCE IS FOR HOUSEHOLD USE ONLY
Operating Requirements
2
Electrical Requirements
Ensure the voltage of your electrical wall outlet corresponds to the voltage
listed on the appliance.
Grounded Plug
As a safety feature, this product is equipped with a grounded plug, which will
only fit into a 3-prong outlet. Do not attempt to defeat this safety feature.
Improper connection of the grounding conductor may result in the risk of
electric shock.
Consult a qualified electrician if you are in doubt as to whether the outlet is
properly grounded.
Power Supply Cord
The power supply cord should only be plugged into a 120V AC electrical wall
outlet.
If the electric circuit is overloaded with other appliances, your appliance may
not operate properly. It should be operated on an electrical circuit separate
from other appliances.
•
To connect power: Attach the power cord plug to the appliance first, and
then plug the cord into the wall outlet.
•
To disconnect power: Turn the control to the Off position, and then grasp
the power cord by the plug to remove it from the wall outlet.
Page 5
Page 5
Operating
Requirements
Short Cord Instructions
A short power supply cord is provided to reduce the risk of becoming
entangled in or tripping over a longer cord.
Longer extension cords are available and may be used if care is exercised in
their use.
If a longer extension cord is used:
•
The marked electrical rating of the extension cord should be at least as
great as the electrical rating of the appliance. If the electrical rating of
the extension cord is too low, it could overheat and burn.
•
The resulting extended cord should be arranged so that it will not
drape over the counter top or tabletop where it can be pulled on by
children or tripped over.
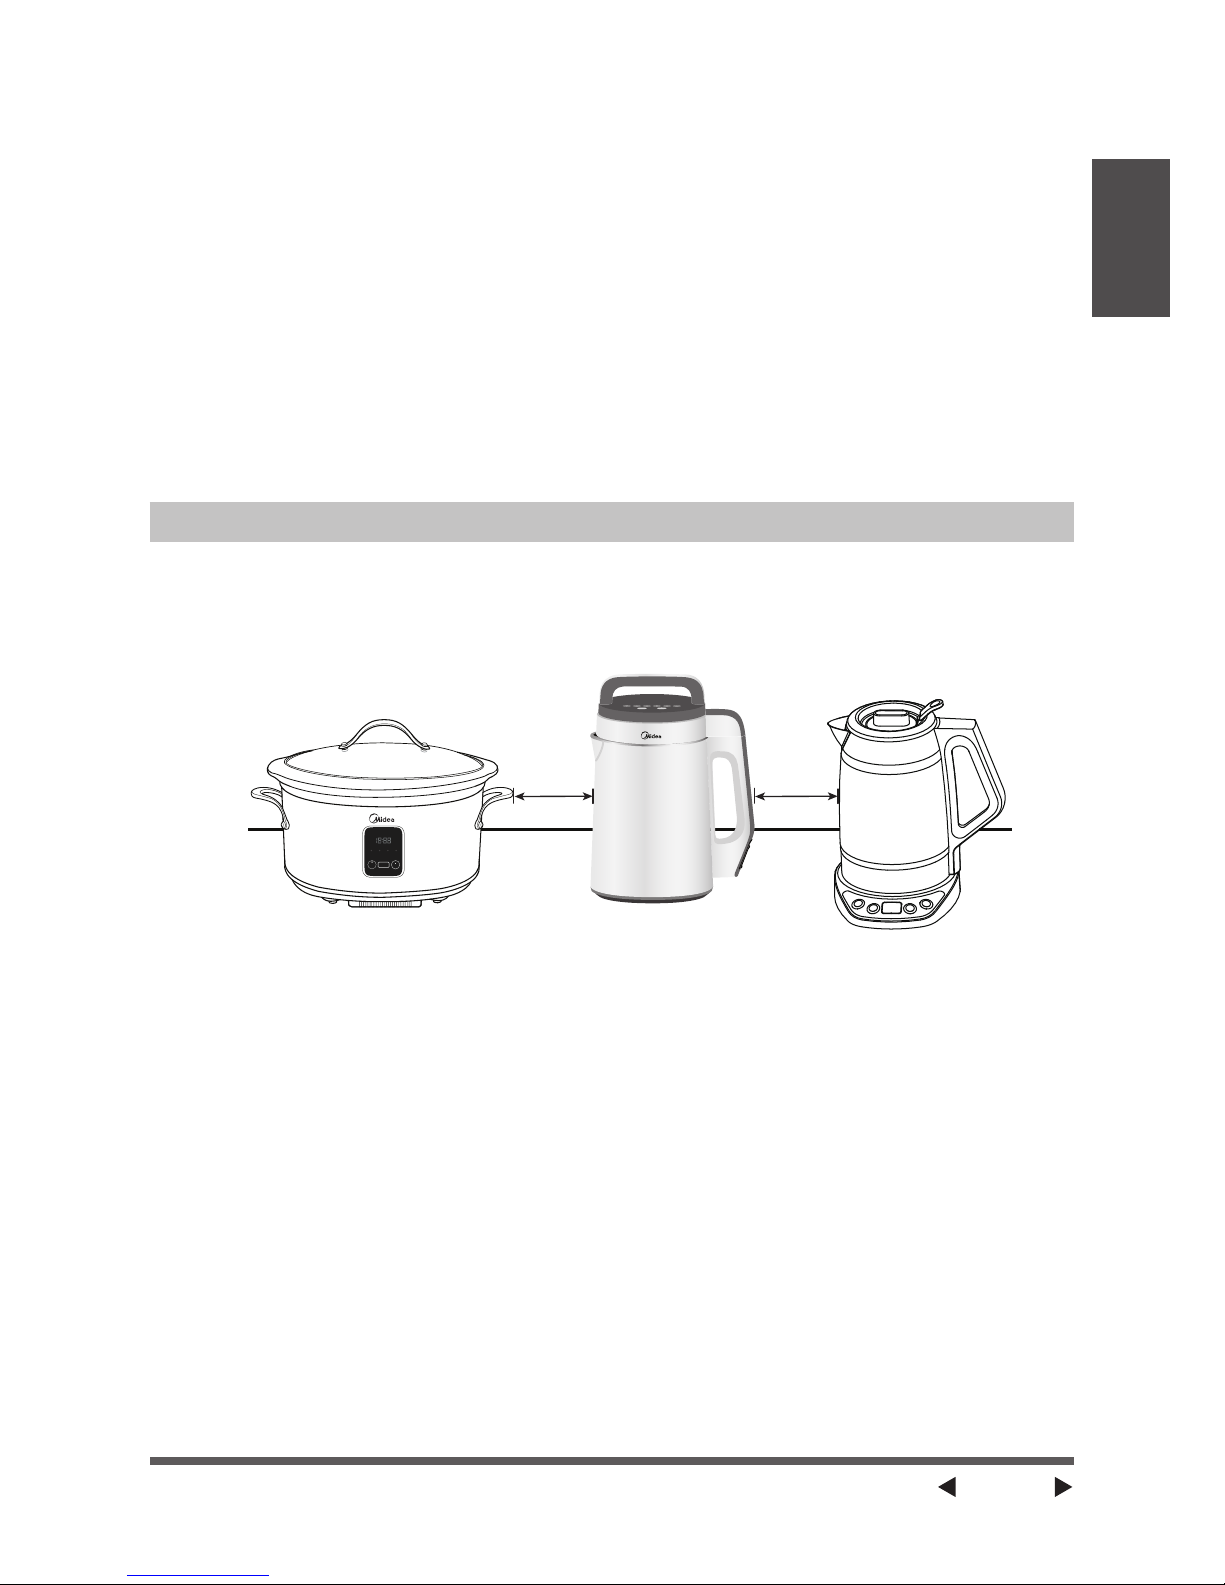
Location Requirements
•
Use milk maker only at altitudes less than 4921 ft (1500 m). Use at
altitudes greater than 4921 ft (1500 m) may result in raw soymilk, overflow
and paste.
•
Required clearance from other appliances is 12" (30 cm).
Cook
Mode
STOP
Low Med High Warm
Cook
Time
12"
(30 cm)
12"
(30 cm)
Page 6
Page 6
Parts and
Features
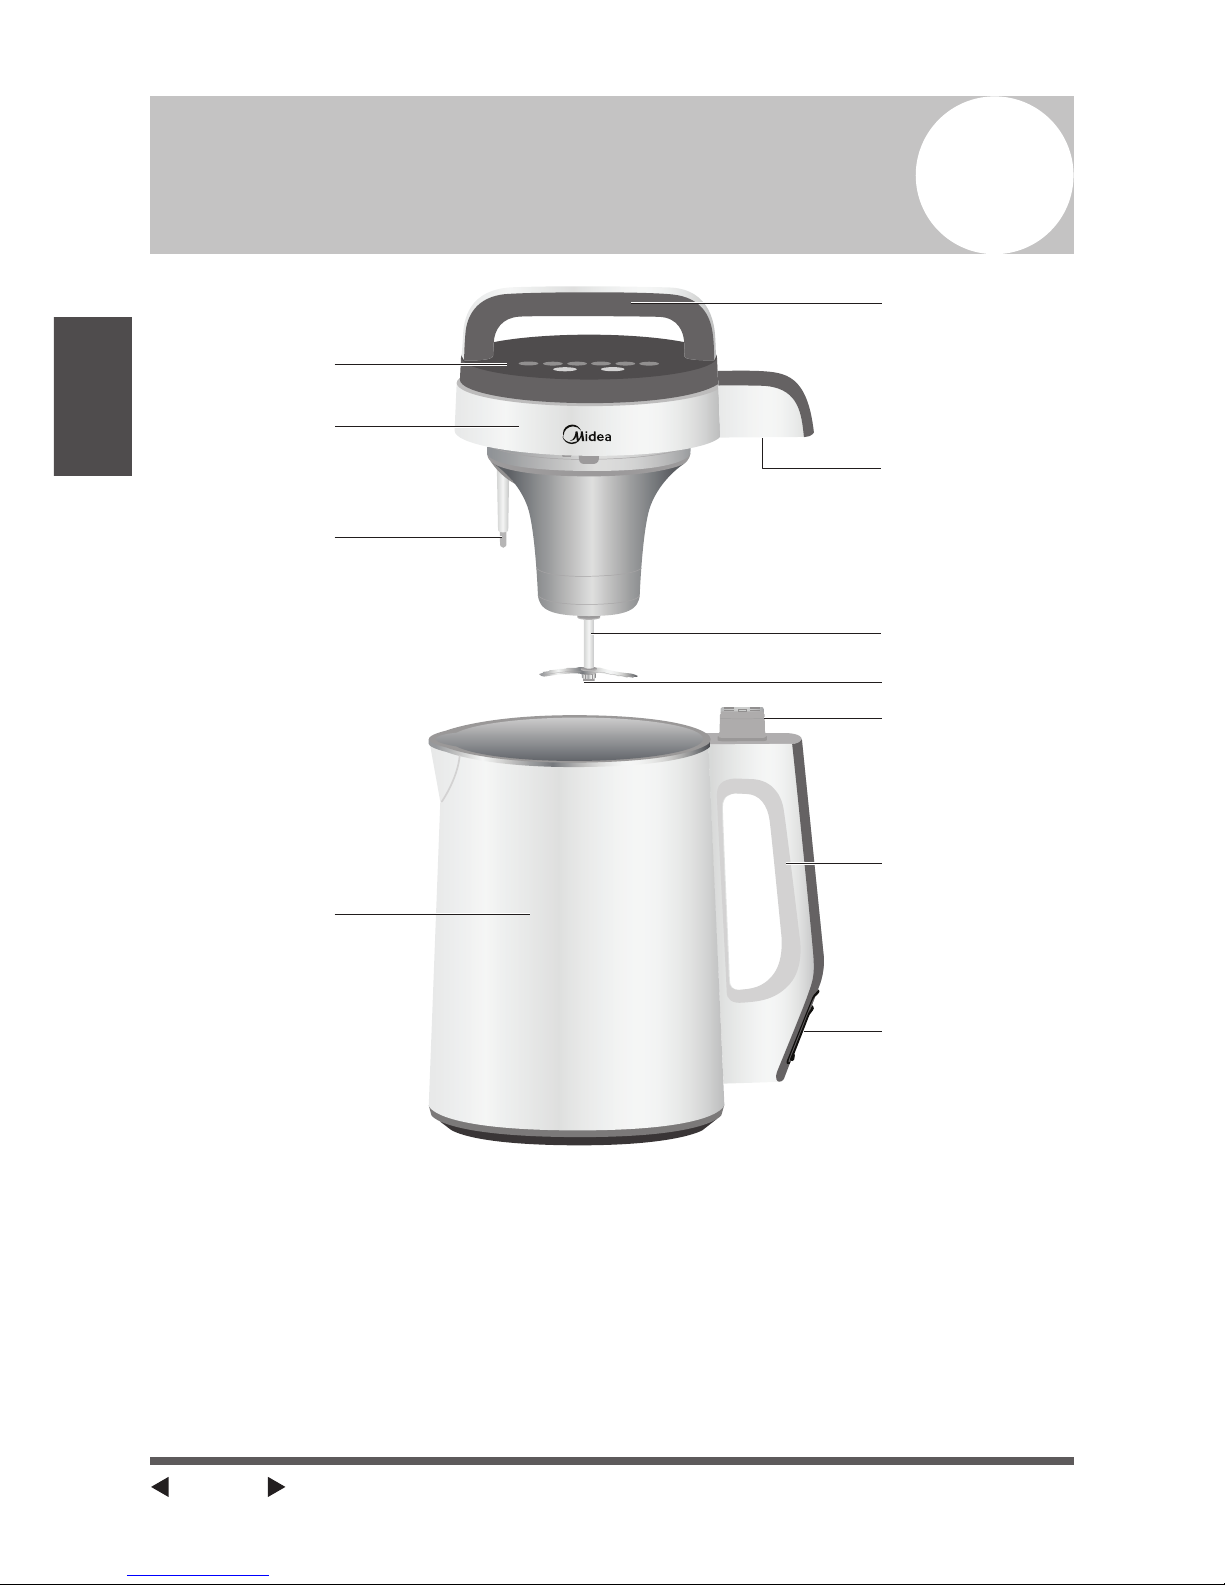
Parts and Features
3
a
b
c
d
e
f
g
h
j
k
i
a Control Panel
b Processor
c Overow Sensor
d Milk Chamber
e Processor Handle
f Processor Plug
g Motor Shaft
h Grinding Blade
i Plug Receptacle
j Milk Chamber Handle
k Power Cord
Receptacle
Page 7

Page 7
Parts and
Features
Attachments and Utensils
a b c d e
f g h i
a Pulp Container
b Pulp Container
Handle
c Filter
d Blender
e 4 oz Measuring Cup
f Power Supply Cord
g Tofu Mold
h Disc (2)
i Fine-mesh
Nut Milk Bag
NOTES:
•
Install the handle to convert the pulp container to a pitcher for the nut
milk.
a Pulp Container
b Pulp Container
Handle
•
Strain the processed milk through the filter to separate the milk from the
pulp. Use the blender to stir and press the pulp.
•
To avoid the risk of the contents overflowing the milk maker, the overflow
sensor reduces power to the milk maker when it senses the temperature of
the contents is becoming overheated.
CAUTION
During heating, there will be some hot spatters coming from the milk maker.
Page 8
Page 8
Use
Milk Maker Use
4
CAUTION
•
Homemade nut milk should last about a week, if refrigerated. The Midea
NRG milk maker heats the water during processing, which pasteurizes
the milk.
•
Do not use the milk maker to reheat cold nut milk, reheat cold paste or
boil water.
Processing Functions
Processing times vary depending on the processing function selected. Thicker
milks and oatmeal require a longer processing time, and some functions both
stir and heat.
For optimum results, use the ratio of liquid to solid recommended in your
recipe. However, the ratio can be adjusted to suit your personal taste.
Your model has a capacity of 48 oz to 56 oz (1.4 L to 1.7 L).
Processing
Function
Time
(minutes)
Main Ingredients
Tofu 33
Soybeans and Gypsum Powder
Nut Milk 30
Nut of choice: Almonds, Cashews, Walnut,
Pecans etc.
See recipe later in this section.
Rice/Grain Milk 30
White Rice, Brown Rice, or Quinoa
Oatmeal 28
Rolled Oats
Soup/Puree* 26
Fruit or Vegetable of choice
See recipe later in this section.
Smoothie (stir
only)*
3
Fruit and Milk or Juice of choice
See recipe later in this section.
*Dice food into
1/2 " pieces no larger than the size of a peanut.
½
"
Page 9

Page 9
Use
Controls
MENU
S
T
A
R
T
C
A
N
C
E
L
T
o
f
u
N
u
t
M
i
l
k
O
a
t
m
e
a
l
S
m
o
o
t
h
i
e
R
i
c
e
G
r
a
i
n
M
i
l
k
S
o
u
p
P
u
r
e
e
b
c
a
a Function LED
Indicators
b Start/Cancel
Control
c Menu Control
Making Nut, Rice or Grain Milk
Your milk maker uses dried bean pulping technology, so soy beans do not
REQUIRE pre-soaking before processing. However, soaking the soybeans
(legumes), nuts, rice or grain before processing will result in a greater milk
yield.
WARNING - Food Poisoning
• Soybean milk must be boiled before drinking.
• If kept at room temperature, fresh soybean milk should be drunk within 6 hours.
Failure to do so can result in food poisoning or sickness.
NOTE: Before first use, remove the pulp container from the milk chamber, and
then clean all the parts that come into direct contact with food.
1. Clean and prepare food for processing.
2. Measure the prepared food and add it to the milk chamber.
NOTE: Use the 4 oz. measuring cup (provided) to precisely measure
ingredients. For optimum results, use only the ingredients in the amounts
specified in your recipe.
3. Fill the milk chamber with room-temperature tap water until the water
level is between the minimum and maximum water-level lines.
NOTES:
•
Use room-temperature tap water. Using distilled or purified water, or
hot water will result in over-boiling causing a burnt taste.
•
You can control the consistency of the nut, rice or grain milk by adding
a little more or less water as long as the water level falls between the
minimum and the maximum water level marks.
•
Using too much or too little water will adversely affect the milk making
process.
Page 10
Page 10
Use
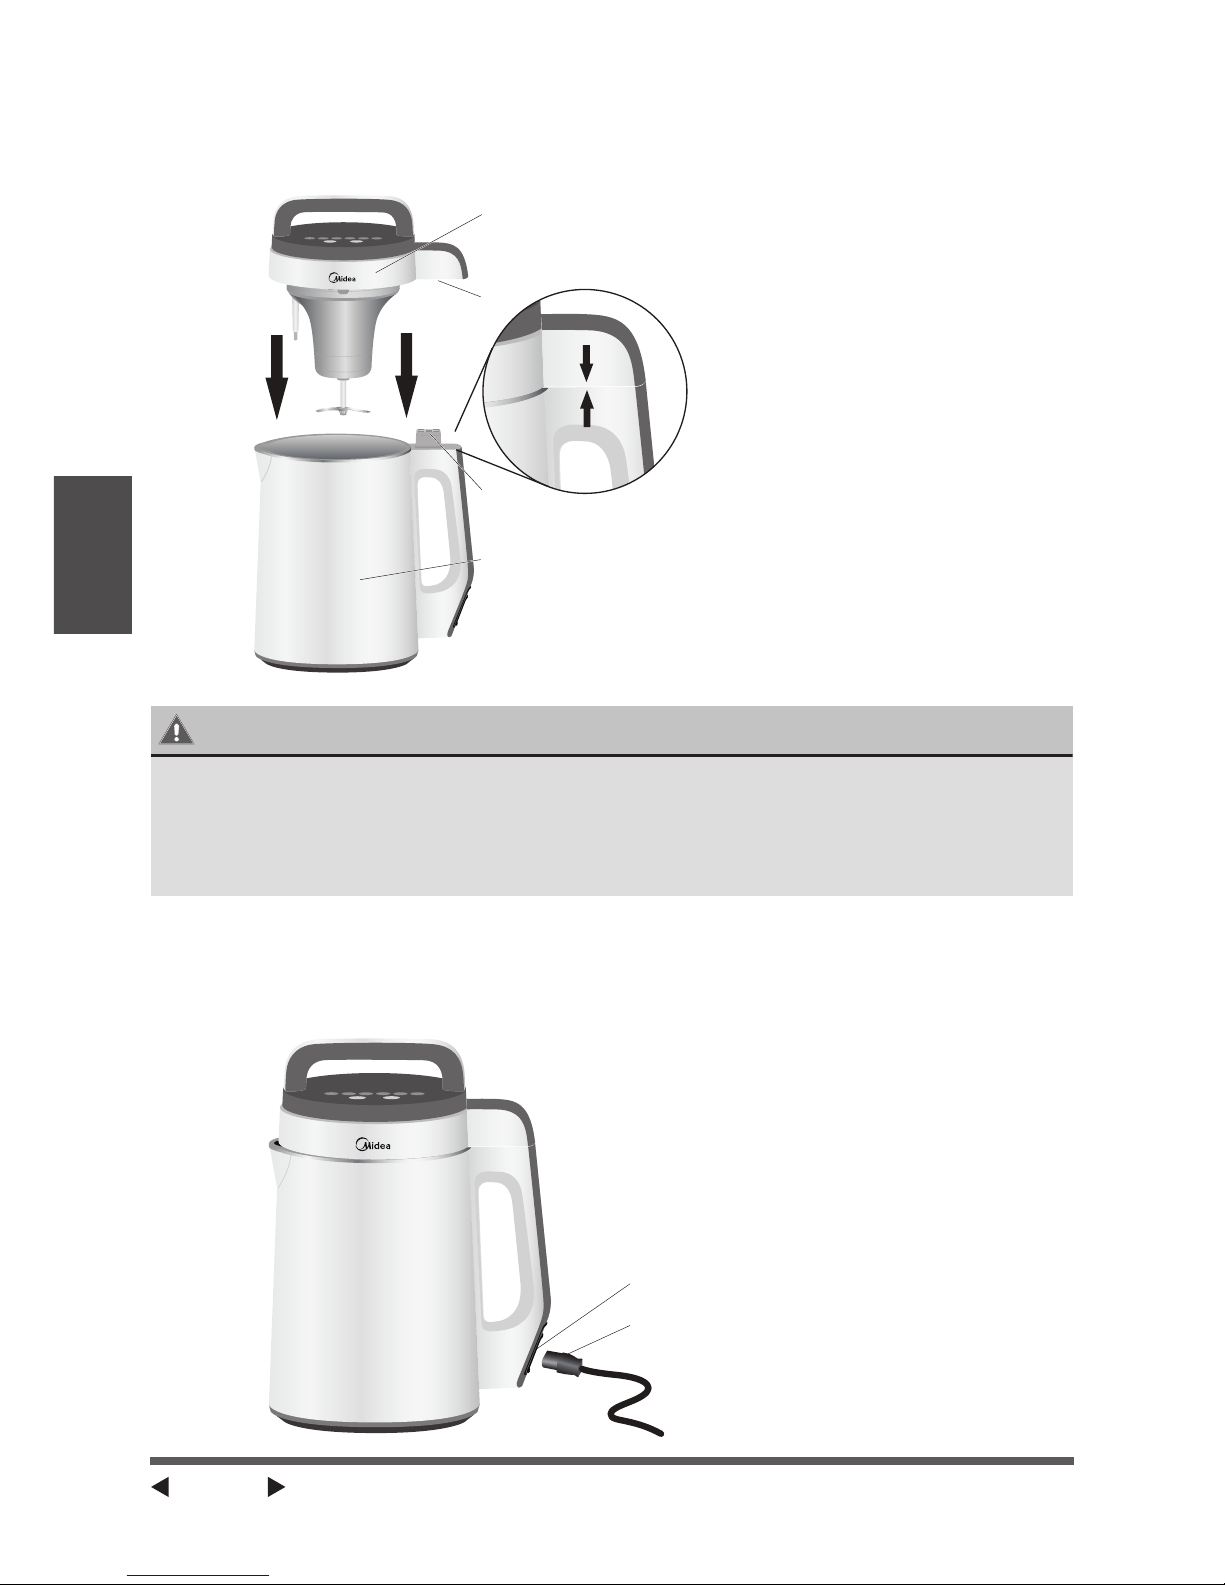
4. Plug the processor into the milk chamber. Make sure the plug on the
processor is fully inserted into the plug receptacle on top of the milk
chamber handle to complete the electrical connection.
a
d
c
b
a Processor
b Processor Plug
c Plug Receptacle
d Milk Chamber
WARNING - Electric Shock
• Plug into a grounded 3 prong outlet.
• Do not remove ground prong.
• Do not use an adapter.
Failure to follow these instructions can result in death, fire or electric shock.
5. Plug the power cord (provided) into the receptacle in the chamber handle,
and then plug the other end into a grounded 3-prong electrical outlet. The
milk maker will beep and the control lights will flash to indicate that the
power is on.
a
b
a Plug Receptacle
b Plug
Page 11

Page 11
Use
6. Press the MENU control. With each press of the MENU control, a
processing function icon will illuminate.
7. Press START/CANCEL to select the desired function and begin processing.
NOTE: If you unintentionally select the wrong function, press and hold
START/CANCEL for 3 seconds to cancel the function, and then press
MENU to reselect.
8. The milk maker will process according to the function selected. The
function light will flash and a tone will sound to indicate processing is
complete.
NOTE: During the warming phase of the process, it is normal for the
processor to stir intermittently.
WARNING - Burn
• Allow time for the hot milk to drain from the processor and into the milk chamber.
• Carefully remove the processor from the milk chamber so that hot milk does not
contact skin.
Failure to do so can result in burns.
9. Unplug the power supply cord from the wall outlet. Wait 30 seconds for
the processor to drain before lifting the processor from the milk chamber.
CAUTION
The milk will be hot.
10. Holding the filter or the fine-mesh bag over the container, pour the
processed milk through the filter or bag into a container.
NOTES:
•
The filter or milk bag acts as a strainer to separate the liquid from the
solids.
•
Use the blender to stir and press the liquid from the pulp.
11. Flavor the milk, if desired. Add a pinch of sea salt, brown sugar, vanilla, or
any other favorite flavors.
12. Allow milk to cool before serving.
CAUTION
Soybean milk must be boiled before drinking. If kept at room
temperature, fresh soybean milk should be drunk within 6 hours.
Making Tofu
1. Wash and prepare the amount of soybeans specified in your Tofu recipe.
2. Using the 4 oz measuring cup (provided), measure the soybeans and
place them into the milk chamber.
3. Add room-temperature water to the maximum fill line.
Page 12
Page 12
Use
4. Plug the processor into the milk chamber. Connect the power cord to the
milk chamber receptacle, and then plug into the wall outlet.
5. Press MENU to select TOFU from among the processing functions, and
then press START/CANCEL to begin processing.
6. While the soybeans are processing, add gypsum powder to a container
(larger than 2 L). To the gypsum powder, add 5 oz to 7 oz (15 g to 20 g)
room-temperature water. Shake well to mix.
NOTE: This step must be completed before removing the soybean milk.
7. Once the soybean milk is processed, strain the processed milk through the
filter into the pulp container to separate the milk from the pulp. Use the
blender to stir and press the milk from the pulp.
NOTE: If desired, you may add sugar or flavoring to the soybean milk at
this point.
8. Quickly pour the HOT, filtered soybean milk into the gypsum powder
solution. The soybean milk must be hot when it is added to the gypsum
solution to produce the correct tofu pudding consistency.
NOTE: Pour the soybean milk into the gypsum solution. DO NOT pour the
gypsum solution into the soybean milk.
9. Let the mixture stand for approximately 10 minutes. Once the tofu
pudding has solidified, the tofu is ready to eat or mold.
Molding Tofu
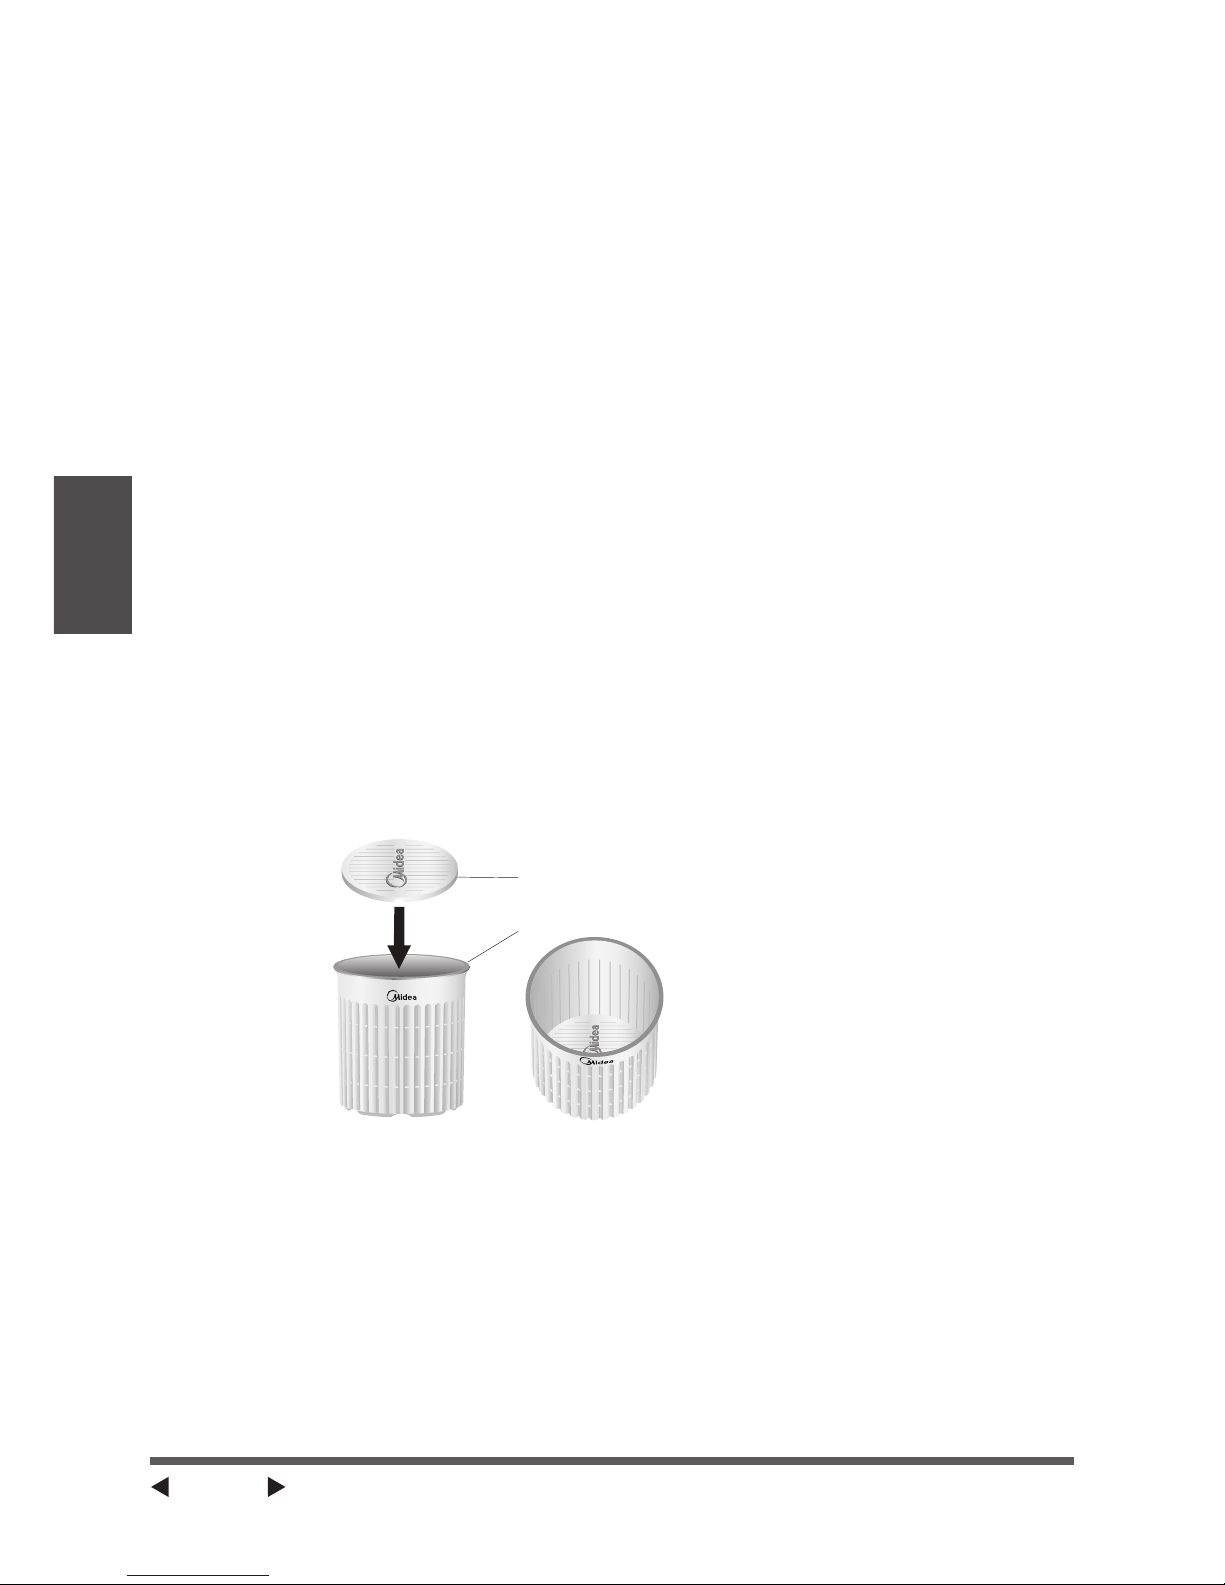
1. With the Midea logo facing upward, insert a disc into the tofu mold
cylinder to create the bottom of the tofu mold.
a
b
a Disc
b Tofu Mold
2. Place the tofu mold onto a rimmed receptacle such as a cake pan or
cookie sheet to capture the liquid being pressed out of the tofu pudding.
3. Place the fine-mesh bag (provided) inside the tofu mold to act as a liner.
4. Spoon the solidified tofu pudding into the nut milk bag.
5. Turn the other disc so that the Midea logo is facing downward and gently
press the disc into the tofu pudding.
Page 13

Page 13
Use
6. Fill the pulp container with water and place it on top of the disc to
compress the tofu pudding. The hot liquid in the tofu pudding will flow out
through the spaces in the mold.
a
b
a Pulp Container
b Tofu Mold
7. Allow the pulp container to remain in place for a minimum of 11/2 to 2 hours.
It can remain in place longer, depending on your firmness preference.
NOTES: To decrease the molding time, you may place a heavier object on
top of the water-filled pulp container.
8. After molding, remove the water-filled pulp container and pour out the
water. Replace the pulp container into the tofu mold, and then turn the
mold upside down.
9. Lightly press downward on the bottom disc while pulling up on the tofu
mold to push out the molded tofu.
b
a
c
a Bottom Disc
b Tofu Mold
c Pulp Container
Page 14

Page 14
Recipes
Recipes
5
Almond Milk
Yield: 44 oz. (1.3 L)
3 c. raw, Whole Almonds
5
1/2 c. Water
Directions
1. Rinse, and then soak 3 c. raw, whole almonds in a bowl overnight or for
8–12 hours.
NOTE: The longer you soak the almonds, the creamier the milk. Soaked
almonds will last 5 days, if refrigerated.
2. Place 3 c. soaked almonds and approximately 5
1/2 c. water into the milk
chamber.
3. Follow the instructions in the “Making Nut, Rice or Grain Milk” section to
process, cool and strain the milk.
Flavor the Almond Milk (Optional)
1/4 c. Raw Honey
1/2 Tbsp. Ground Cinnamon
1/2 Tbsp. Vanilla Extract
Dash of Nutmeg (optional)
Directions
1. Pour 3 c. almond milk into a pitcher.
2. In a small saucepan over med-high heat, place
1/4 c. raw honey, 1/2 Tbsp.
ground cinnamon, 1/2 Tbsp. vanilla extract and a dash of nutmeg (optional).
3. Heat until the honey is just melted.
4. Pour the honey mixture into the almond milk, and then stir until well
combined.
5. Place the pitcher into the refrigerator and chill for at least 2 hours. Stir well
before serving.
Page 15

Page 15
Recipes
Tomato Vegetable Soup
Yield: 7 - 8 cups
7 c. peeled, seeded and chopped
Tomato
1 c. finely chopped Carrot
3/4 c. finely chopped Onion
1 (13.75 ounce) can Chicken Broth
1 Tbsp. White Sugar
2 tsp. Sea Salt
1 c. 2% Milk
2 tsp. Dried Basil
1/2 tsp. Celery Salt
1/2 tsp. Ground Black Pepper
1/4 tsp. Garlic Powder
Directions
1. Add the tomatoes, carrots, and onion to the milk chamber.
2. Stir in the chicken broth, sugar, and salt.
3. Season with basil, celery salt, black pepper, and garlic powder.
4. Press MENU to select Soup/Puree, and then press START/CANCEL to
begin processing.
Smoothie/Fruit Puree
Yield: 7- 8 cups
4 c. Orange Juice
2 c. Strawberries (frozen)
1 c. Blueberries (fresh, washed)
Directions
1. Add orange juice, frozen strawberries and fresh blueberries to the milk
chamber.
2. Press MENU to select Smoothie, and then press START/CANCEL to begin
processing.
Page 16
Page 16
Care
Milk Maker Care
6
WARNING - Electric Shock
• DO NOT immerse processor in water or allow water to enter the processor.
• DO NOT immerse milk chamber in water.
Failure to follow these instructions can result in death, fire or electric shock.
Cleaning
If you have not recently used the milk maker, clean it well before using.
Clean the milk maker thoroughly after each use. Proper cleaning will ensure it
produces great results for many years.
CAUTION
Do not use harsh or abrasive materials to clean or dry the exterior, because
they may damage or dull the finish.
1. Unplug the power cord from the milk maker handle.
2. Remove all milk and nut, rice or grain paste or other food from the milk
chamber.
3. Clean the interior of the milk chamber with tap water taking care to not
immerse the base of the chamber in water.
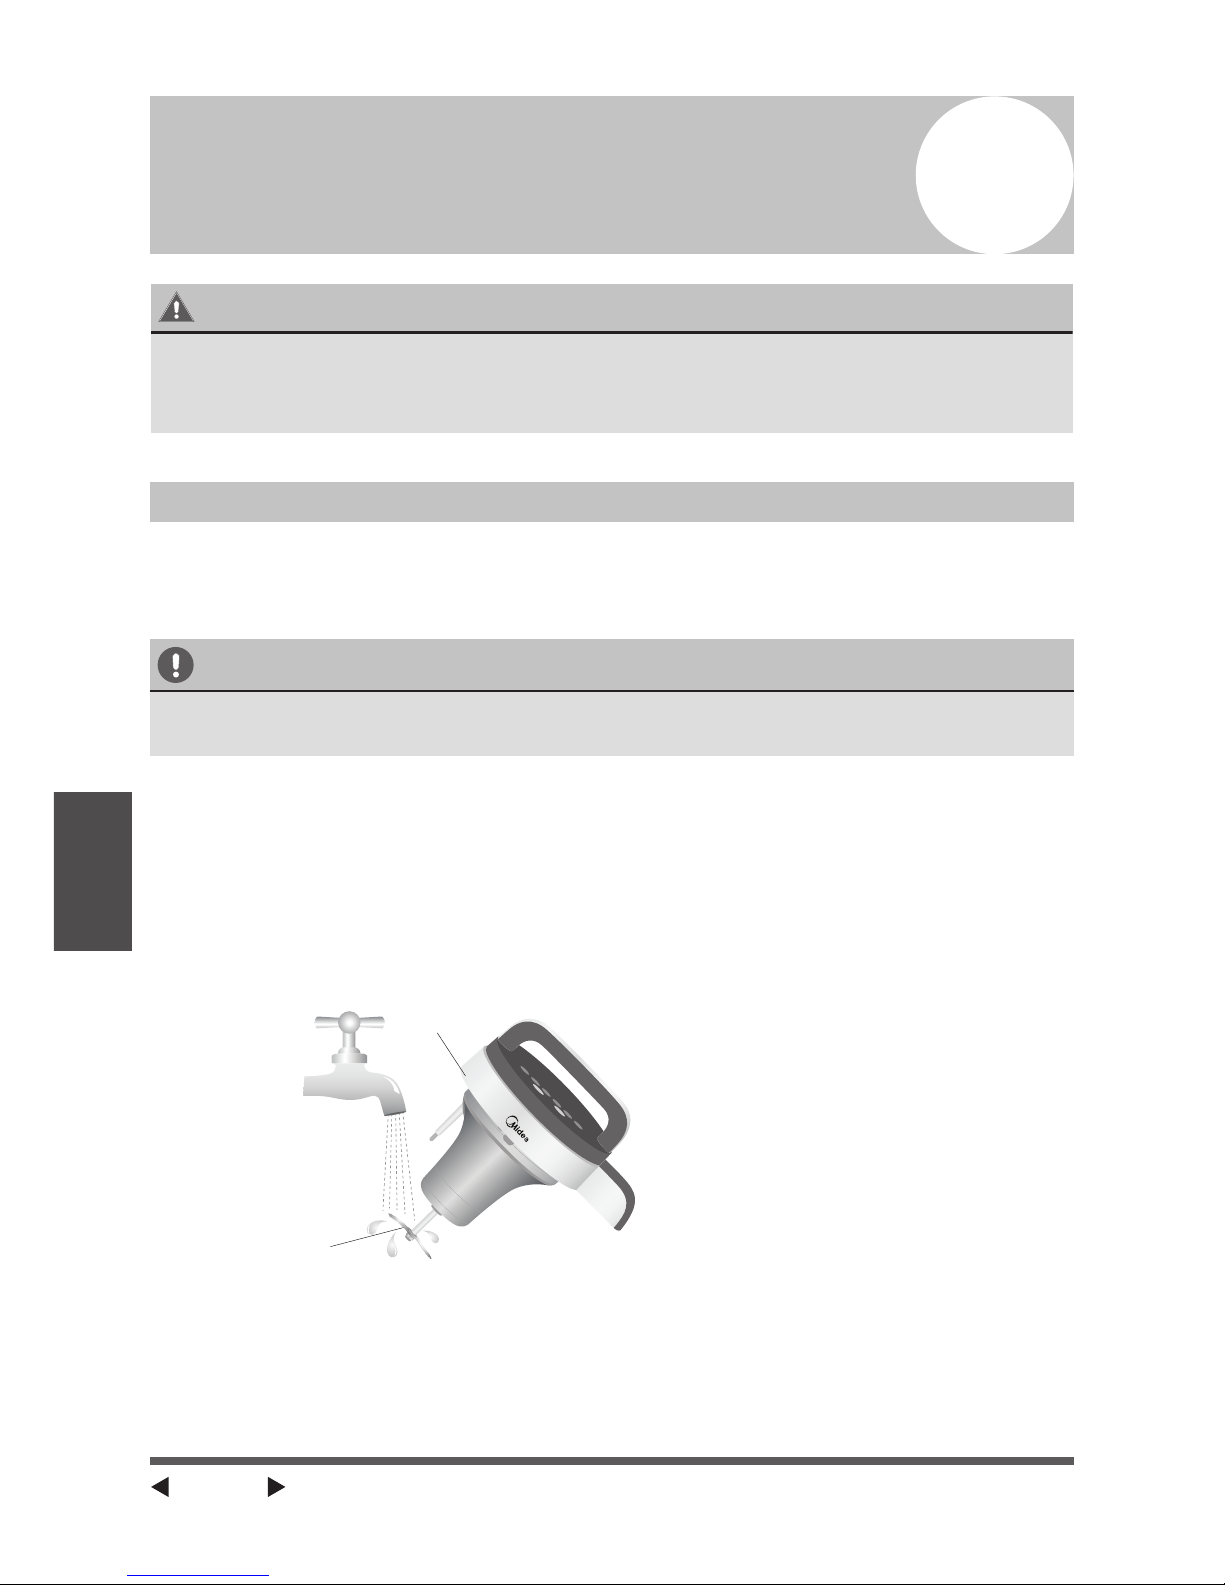
4. Rinse the grinding blades under running water taking care to not allow
water to enter the processor.
a
b
a Processor
b Grinding Blades
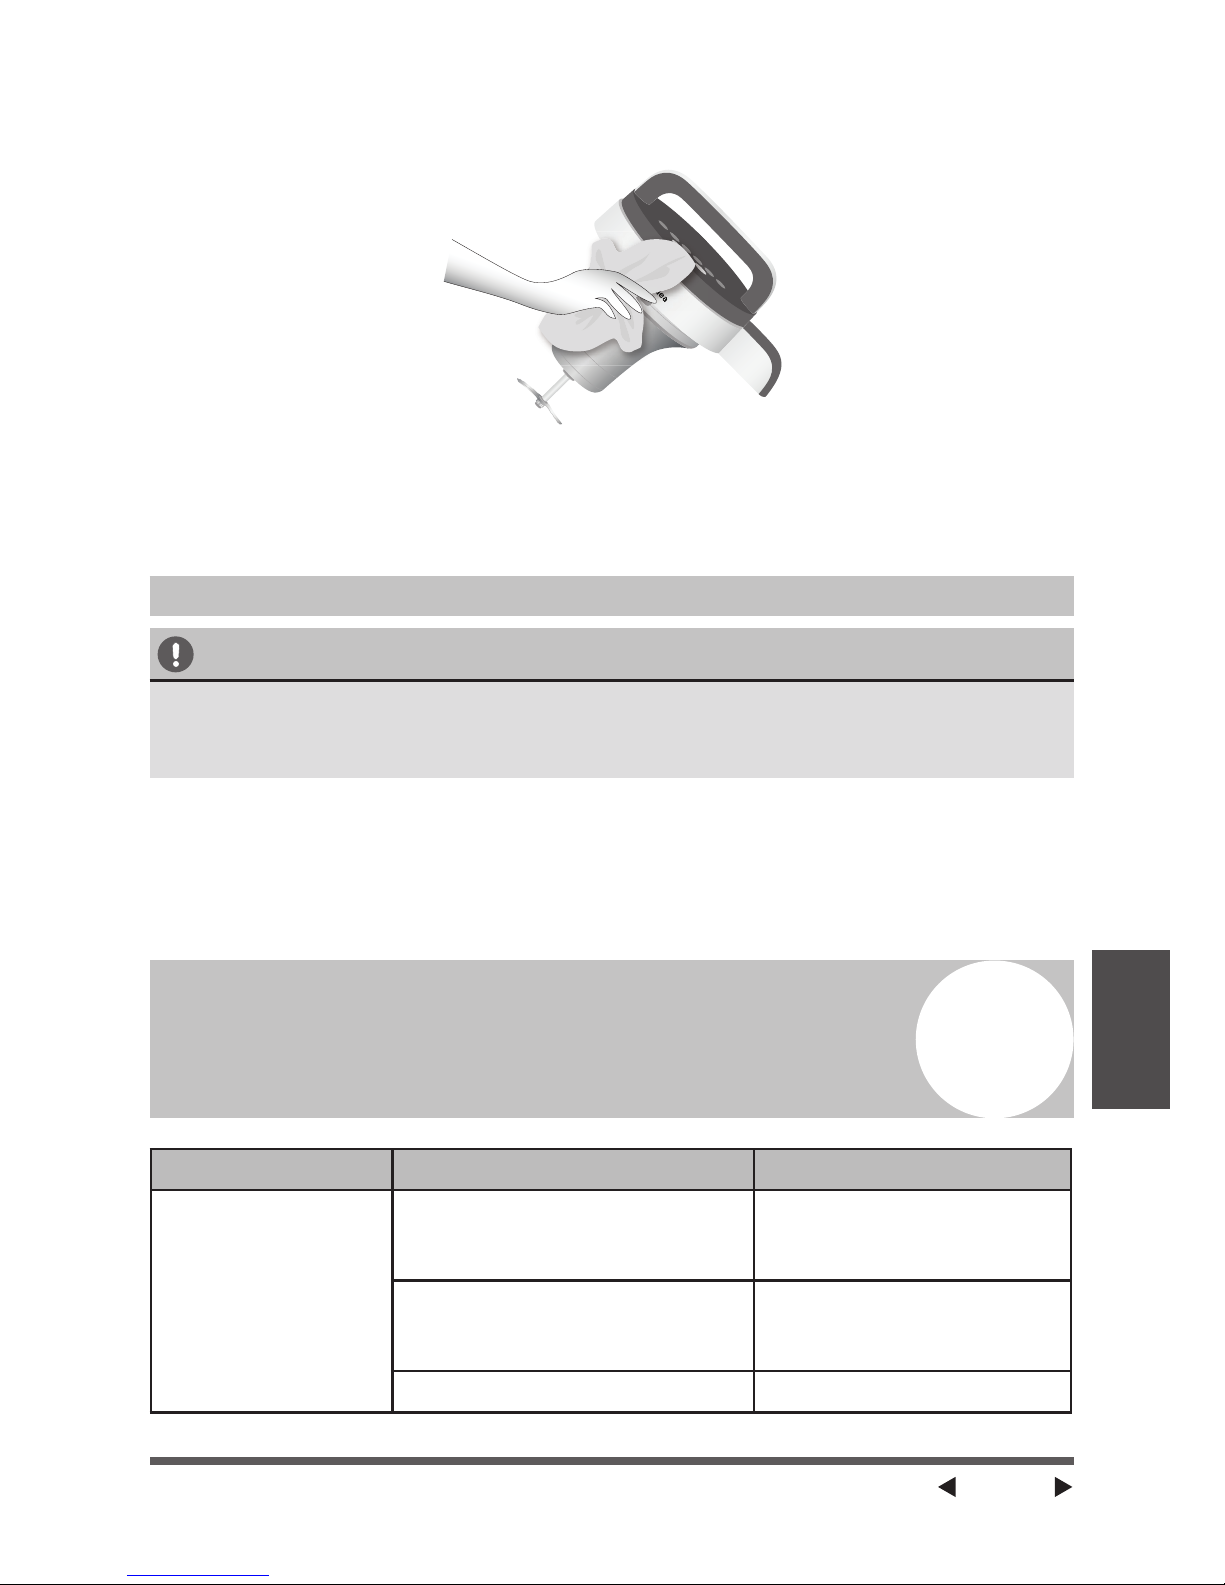
5. Using a soft, damp cloth, wipe any residue from the exterior of processor.
NOTE: If residue is allowed to dry on exterior surfaces, it may damage the
finish.
Page 17
Page 17
Troubleshooting
6. Using a soft dry cloth thoroughly dry both the exterior and interior of the
milk maker.
7. Hand wash the attachment parts with warm, sudsy water, rinse and dry
thoroughly.
NOTE: The accessory attachments are NOT dishwasher safe.
Storage
CAUTION
•
Do not store the milk maker while it is still hot or plugged into a wall
outlet.
•
Do not tightly wrap the power cord around the appliance.
1. Disconnect, clean and thoroughly dry the milk maker. See “Cleaning.”
2. Store in a dry, well-ventilated location.
NOTE: Excess humidity may reduce the life of the appliance.
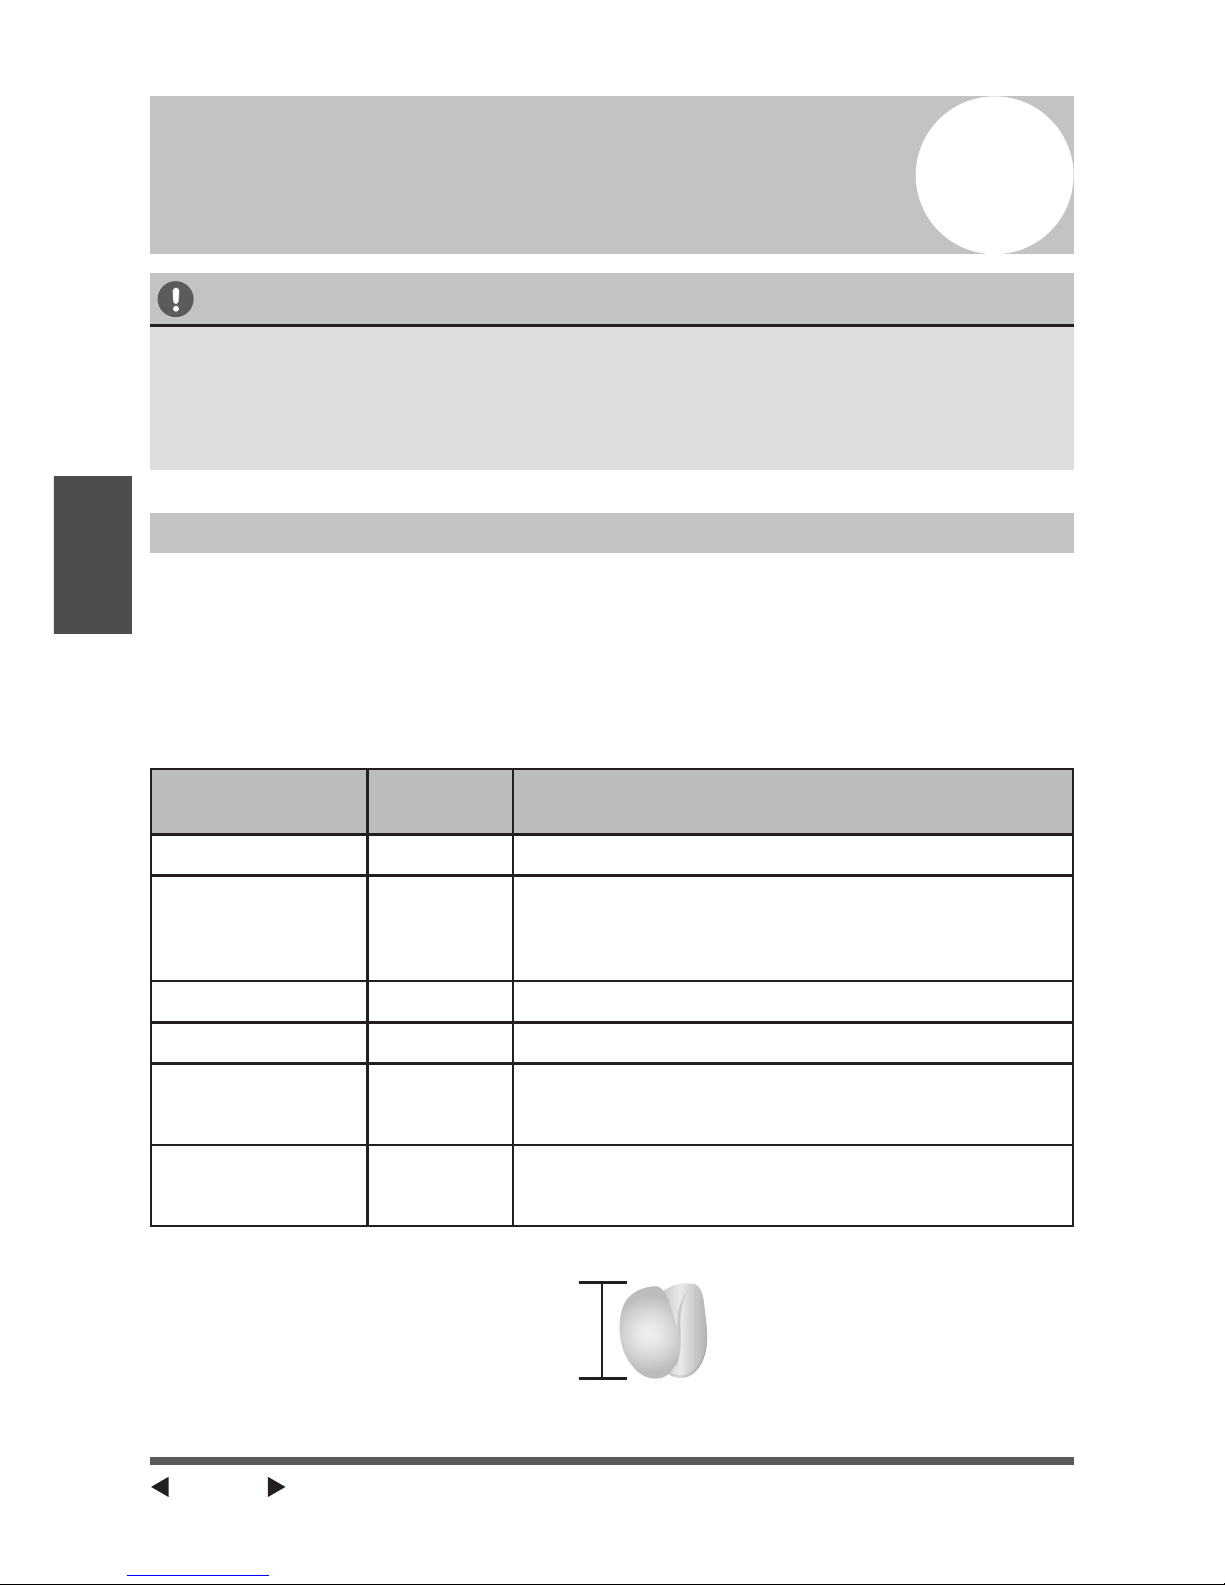
Troubleshooting
7
Problem Possible Cause Solution
Milk maker will
not operate.
Milk maker is not plugged
into a working electrical
outlet.
Plug the power cord
into a grounded 3-prong
electrical outlet.
Power cord is not inserted
correctly into the milk
chamber handle receptacle.
Check the power cord
connection at the
container handle.
Control is not turned ON. Press Start/Cancel.
Page 18

Page 18
Troubleshooting
The indicator
does not
illuminate.
The processor plug is not
firmly seated in the milk
chamber receptacle.
Check this electrical
connection. See “Parts
and Features.”
The milk maker
heats but does
not stir.
The milk maker is in the
heating stage of the
process.
Wait a few minutes.
The soybean milk
is not cooked
thoroughly or
the beans or rice
cannot be broken
into pieces.
Used too much or too little
water.
Add water until the
water level is between
the minimum and
maximum water lines.
Used too much or too little
of the solid ingredients.
NOTE: Good results require
a specific ratio of solid to
liquid.
Use only the
recommended amounts
of each ingredient
The function selected does
not match the food being
processed.
Select the function
appropriate for the food
being processed.
The milk maker is
operating for too
long a time.
The overflow sensor is not
clean.
Clean the processor and
the overflow sensor. See
“Cleaning.”
The water temperature is
too cold.
Use room temperature
tap water.
Used too much water. Add water until the
water level is between
the minimum and
maximum water lines.
All the LED
indicators flash
continuously
and an alert tone
sounds.
Used too much water. Add only the
recommended amounts
of both ingredients and
water to the processing
chamber. Plug in and
turn on to confirm that it
is functioning normally.
Page 19

Page 20

Page 21

Extracteur et
mélangeur pour laits
végétaux de noix, riz,
céréales NRG
™
version A - 10 - 2017
MNRG17-W
www.midea.com
MANUEL UTILISATEUR
fr
Avertissements : Avant d’utiliser
ce produit, veuillez lire
attentivement ce manuel et le
conserver pour référence
ultérieure.
Le design et les caractéristiques
techniques sont susceptibles de
changer sans avis préalable à des
fins d’amélioration du produit.
Pour plus de détails, renseignezvous auprès de votre détaillant ou
du fabricant.
Tension nominale : 120 V 60 Hz
Puissance nominale (W) :
Moteur : 130 W
Chauffe : 1 000 W
Fréquence : 60 Hz
Capacité
: 48 oz (1,4 L) min.
56 oz (1,7 L) max.
Page 22

Page 2
Table des matières
1
MESURES DE SÉCURITÉ À RESPECTER
AVEC LE ROBOT À LAITS VÉGÉTAUX .............................................. 3
2
EXIGENCES D’INSTALLATION ..........................................................4
Spécications électriques .................................................................... 4
Exigences d’emplacement ................................................................... 5
3
PIÈCES ET CARACTÉRISTIQUES ..................................................... 6
4
UTILISATION DU ROBOT À LAITS VÉGÉTAUX ................................ 8
Fonctions de préparation ..................................................................... 8
Commandes ......................................................................................... 9
Faire du lait de noix, de riz ou de céréales .......................................... 9
Faire du tofu ....................................................................................... 12
5
RECETTES ........................................................................................ 14
6
ENTRETIEN DU ROBOT À LAITS VÉGÉTAUX ................................ 16
Nettoyage ........................................................................................... 16
Entreposage ....................................................................................... 17
7
DÉPANNAGE ..................................................................................... 18
Caractéristiques techniques
Modèle Dimensions Alimentation Tension Capacité
MNRG17-W 9
3/4 " x 71/4 " x
131/4 "
Moteur : 130 W
Chauffe : 1000 W
120 V -
60 Hz
48 oz (1,4 L)
min.
56 oz (1,7 L)
max.
Page 23

Page 3
Précautions
de sécurité
1
Pour éviter toute blessure de l’utilisateur ou d’autres personnes ou tout
dommage matériel, les instructions fournies ici doivent être respectées.
Une mauvaise utilisation due à l’ignorance des consignes peut provoquer
des blessures ou des dommages. Le niveau de risque est indiqué par les
indications suivantes.
MISE EN GARDE
A
VERTISSEMENT
Ce symbole indique un risque de décès ou de grave blessure.
Ce symbole indique un risque de blessure ou de dommage matériel.
Lors de l’utilisation d’appareils électriques, il faut toujours observer certaines
précautions élémentaires de sécurité, y compris les suivantes :
•
Lire toutes les instructions avant la mise en marche.
•
Pour se protéger contre tout risque de décharge électrique, ne pas
immerger le cordon, la prise, la chambre à lait ou le robot dans de l’eau ou
dans tout autre liquide.
•
Débrancher l’appareil lorsqu’il n’est pas utilisé, avant d’y ajouter des
pièces ou d’en enlever et avant de le nettoyer. S’assurer que le moteur
est complètement arrêté et le laisser refroidir avant de commencer le
démontage.
•
Ne jamais débrancher l’appareil en tirant sur le cordon d’alimentation.
Toujours saisir la fiche de branchement fermement pour l’extraire de la
prise de courant.
•
Ne pas laisser fonctionner l’appareil sans surveillance.
•
Une surveillance attentive s’impose lorsqu’un appareil ménager est utilisé
par ou à proximité d’enfants.
•
Éviter tout contact avec les pièces en mouvement.
•
Ne pas faire fonctionner un appareil si le cordon ou la prise est
endommagé(e), si l’appareil ne fonctionne pas correctement, s’il tombe
ou s’il est endommagé d’une quelconque façon. Retourner l’appareil au
centre de service agréé le plus proche pour examen, réparation ou réglage
électrique ou mécanique.
•
L’utilisation d’accessoires non recommandés ou non vendus par le
fabricant peut causer un incendie, un choc électrique ou des blessures.
•
Ne pas utiliser à l’extérieur.
•
Ne pas laisser le cordon pendre sur le bord d’une table ou d’un plan de
travail, ou toucher une surface chaude.
Mesures de sécurité à respecter
avec le robot à laits végétaux
Page 24

Page 4
Exigences
d’installation
•
Ne pas placer sur ou près d’un brûleur électrique ou à gaz chaud, ou dans
un four chaud.
•
Pour débrancher l’appareil, mettre la commande sur arrêt (OFF) et
attendre que le moteur arrête de tourner avant de débrancher le cordon
de la prise électrique.
•
Toujours brancher le cordon d’alimentation sur l’appareil avant de
brancher le cordon sur la prise électrique.
CONSERVEZ CES INSTRUCTIONS
CE PRODUIT EST CONÇU UNIQUEMENT POUR UN USAGE
DOMESTIQUE
Exigences d’installation
2
Spécifications électriques
S’assurer que la tension de la prise électrique murale correspond à la tension
indiquée sur l’appareil.
Fiche de liaison à la terre
Par mesure de sécurité, ce produit est doté d’une prise de liaison à la terre,
ne pouvant être insérée que dans une prise à 3 alvéoles. Ne pas tenter
de contourner ce dispositif de sécurité. Un raccordement inapproprié du
conducteur de mise à la terre peut causer un risque de choc électrique.
Consulter un électricien qualifié en cas de doutes quant à savoir si la prise est
correctement reliée à la terre.
Cordon d’alimentation
Le cordon d’alimentation ne doit être branché que dans une prise électrique
murale de 120 VCA.
Si le circuit électrique est surchargé d’autres appareils, votre appareil pourrait
alors ne pas fonctionner correctement. Il devrait être branché sur un circuit
électrique distinct des autres appareils.
•
Pour brancher l’appareil à la source de courant électrique : Brancher
d’abord le cordon d’alimentation sur l’appareil, puis brancher le cordon sur
la prise murale.
•
Pour débrancher l’appareil de la source de courant électrique : Mettre la
commande sur la position d’arrêt (OFF), puis saisir le cordon par sa fiche
pour l’enlever de la prise murale.
Page 25

Page 5
Exigences
d’installation
Instructions concernant le court cordon d’alimentation
Un court cordon d’alimentation électrique est fourni pour réduire les risques
de trébucher et de s’emmêler que présente un long cordon.
Des rallonges plus longues sont disponibles et peuvent être utilisées si elles
sont employées avec précaution.
Si l’on utilise une rallonge plus longue :
•
La puissance électrique indiquée sur la rallonge doit être au moins
égale à celle de l’appareil. Si la puissance électrique de la rallonge est
trop faible, l’appareil peut alors surchauffer et brûler.
•
La rallonge ainsi utilisée doit être disposée de sorte qu’elle ne pende
pas par-dessus le plan de travail ou la table de cuisine, où des enfants
pourraient tirer dessus ou trébucher dessus involontairement.
Exigences d’emplacement
•
N’utiliser le robot à laits végétaux qu’à des altitudes inférieures à 1 500 m
(4 921 pi). Une utilisation à des altitudes supérieures à 1 500 m (4 921 pi)
peut produire un lait de soya cru, un débordement et une consistance
pâteuse.
•
Le dégagement requis par rapport aux autres appareils est de 30 cm
(12 po).
Cook
Mode
STOP
Low Med High Warm
Cook
Time
12"
(30 cm)
12"
(30 cm)
Page 26

Page 6
Pièces et
caractéristiques
Pièces et caractéristiques
3
a
b
c
d
e
f
g
h
j
k
i
a Tableau de commande
b Robot
c Capteur de débordement
d Chambre à lait
e Poignée du robot
f Prise du robot
g Axe du moteur
h Lame de broyage
i Prise
j Poignée de la
chambre à lait
k Fiche du cordon
d’alimentation
Page 27

Page 7
Pièces et
caractéristiques
Accessoires et ustensiles
a b c d e
f g h i
a Récipient à
pulpe
b Poignée du
récipient à pulpe
c Filtre
d Mélangeur
e Verre gradué de 4 oz
f Cordon
d’alimentation
g Moule à tofu
h Disque (2)
i Filet à mailles
nes pour le
lait de noix
REMARQUES :
•
Installer la poignée pour transformer le récipient à pulpe en pichet pour le
lait de noix.
a Récipient à pulpe
b Poignée du
récipient à pulpe
•
Verser le lait obtenu dans le filtre pour séparer le lait et la pulpe. Utiliser le
mélangeur pour mélanger et extraire le lait de la pulpe.
•
Pour éviter que le contenu ne déborde du robot à laits végétaux, le
capteur de débordement réduit la puissance du robot lorsqu’il détecte que
la température du contenu est trop élevée.
MISE EN GARDE
Durant la chauffe, il y aura des éclaboussures chaudes provenant du robot.
Page 28

Page 8
Utilisation
Utilisation du robot à laits végétaux
4
MISE EN GARDE
•
Si placé au réfrigérateur, le lait de noix peut être conservé pendant une
semaine. Le robot à laits végétaux NRG de Midea chauffe l’eau durant la
préparation, ce qui pasteurise le lait.
•
Ne pas utiliser le robot à laits végétaux pour réchauffer du lait de noix
froid ou de la pâte froide ou encore pour faire bouillir de l’eau.
Fonctions de préparation
Les temps de préparation peuvent varier en fonction de la fonction de
préparation sélectionnée. Les laits plus épais et le gruau nécessitent un temps
de préparation plus long et certaines fonctions mélangent et chauffent.
Pour des résultats optimaux, utiliser le rapport liquide/solides recommandé
par la recette. Ce rapport peut néanmoins être ajusté en fonction des goûts
personnels de chacun.
Ce modèle a une capacité de 1,4 à 1,7 L (48 à 56 oz).
Fonction de
préparation
Durée (en
minutes)
Ingrédients principaux
Tofu 33
Soya et poudre de gypse
Lait de noix 30
Type de noix au choix : amandes, noix de
cajou, noix de Grenoble, noix de pecan, etc.
Voir la recette plus loin dans cette section.
Lait de céréales/
riz
30
Riz blanc, riz brun ou quinoa
Gruau 28
Flocons d’avoine
Soupe/purée* 26
Fruit ou légume au choix
Voir la recette plus loin dans cette section.
Boisson fouettée
(fonction
de mélange
seulement)*
3
Fruit et lait ou jus au choix
Voir la recette plus loin dans cette section.
*Couper l’aliment en petits dés de
½ po, pas plus gros que la taille d’une cacahuète.
½
"
Page 29

Page 9
Utilisation
Commandes
MENU
S
T
A
R
T
C
A
N
C
E
L
T
o
f
u
N
u
t
M
i
l
k
O
a
t
m
e
a
l
S
m
o
o
t
h
i
e
R
i
c
e
G
r
a
i
n
M
i
l
k
S
o
u
p
P
u
r
e
e
b
c
a
a Voyants à DEL
de fonction
b Commande
de mise en
marche/
annulation
c Commande
de menu
Faire du lait de noix, de riz ou de céréales
Ce robot à laits végétaux utilise une technologie de dépulpage de haricots
secs, de sorte que le soya NE NÉCESSITE PAS de trempage avant sa
préparation. Cependant, faire tremper le soya (légumineuses), les noix, le
riz ou les céréales avant de les passer au robot permettra d’obtenir une plus
grande quantité de lait.
AVERTISSEMENT - Empoisonnement alimentaire
• Le lait de soya doit être bouilli avant d’être bu.
• Si conservé à une température ambiante, le lait de soya frais doit être consommé
dans les 6 heures.
Le non-respect de ces consignes peut causer un empoisonnement alimentaire ou
rendre malade.
REMARQUE : Avant la première utilisation, retirer le récipient à pulpe de la
chambre à lait, puis nettoyer toutes les pièces étant en contact direct avec les
aliments.
1. Laver et préparer les aliments pour la préparation.
2. Mesurer la quantité d’aliments préparés, puis les placer dans la chambre à
lait.
REMARQUE : Utiliser le verre gradué de 4 oz (fourni) pour mesurer avec
précision la quantité d’ingrédients. Pour des résultats optimaux, n’utiliser
les ingrédients que dans les quantités indiquées par la recette.
3. Remplir la chambre à lait d’eau du robinet à température ambiante jusqu’à
ce que le niveau d’eau soit entre les lignes de niveau d’eau minimum et
maximum.
REMARQUES :
•
Utiliser de l’eau du robinet à température ambiante. Utiliser de
l’eau distillée ou purifiée ou encore de l’eau chaude provoquera un
bouillonnement excessif et donc un goût de brûlé.
Page 30

Page 10
Utilisation
•
Il est possible de contrôler la consistance du lait de noix, riz ou céréales
en ajoutant plus ou moins d’eau tant que le niveau d’eau est situé entre
les lignes de niveau d’eau maximum et minimum.
•
Utiliser trop ou pas assez d’eau affectera défavorablement le processus
de préparation du lait.
4. Brancher le robot sur la chambre à lait. S’assurer que la fiche du robot est
complètement insérée dans la prise d’électricité située sur le dessus de
poignée de la chambre à lait pour un raccordement électrique complet.
a
d
c
b
a Robot
b Fiche du robot
c Prise
d Chambre à lait
AVERTISSEMENT - Choc électrique
• Brancher sur une prise de courant à 3 alvéoles, reliée à la terre.
• Ne pas enlever la prise de liaison à la terre.
• Ne pas utiliser d’adaptateur.
Le non-respect de ces instructions peut causer un décès, un incendie ou un choc
électrique.
5. Brancher le cordon d’alimentation (fourni) dans la prise de la poignée de
la chambre à lait, et brancher l’autre extrémité dans une prise électrique
à 3 alvéoles reliée à la terre. Le robot à laits végétaux émettra un signal
sonore et les voyants des commandes clignoteront pour indiquer que
l’appareil est allumé.
Page 31

Page 11
Utilisation
a
b
a Prise
b Fiche
6. Appuyer sur la commande MENU. À chaque pression sur la commande
MENU, une fonction de préparation s’illumine.
7. Appuyer sur START/CANCEL (mise en marche/annulation) pour
sélectionner la fonction désirée et lancer la préparation.
REMARQUE : Si une mauvaise fonction a été involontairement
sélectionnée, tenir la touche START/CANCEL (mise en marche/annulation)
enfoncée pendant 3 secondes pour annuler la fonction, puis appuyer de
nouveau sur le bouton MENU pour faire une nouvelle sélection.
8. Le robot à laits végétaux préparera l’aliment conformément à la fonction
choisie. Le voyant de la fonction clignotera et un signal sonore retentira
pour indiquer que la préparation est terminée.
REMARQUE : Durant la phase de chauffe de la préparation, il est normal
que le robot mélange le contenu par intermittence.
WARNING - Brûle
• Laisser le temps au lait chaud de s’écouler du robot jusque dans la chambre à lait.
• Retirer délicatement le robot de la chambre à lait de sorte que le lait chaud n’entre
pas en contact avec la peau.
Le non-respect de ces instructions peut causer des brûlures.
9. Débrancher le cordon d’alimentation de la prise murale. Attendre
30 secondes que le robot se vide avant de le retirer de la chambre à lait en
le soulevant.
MISE EN GARDE
Le lait sera chaud.
10. Tenir le filtre ou le filet à mailles fines au-dessus du récipient, verser le lait
préparé dans le filtre ou le filet dans le récipient.
Page 32

Page 12
Utilisation
REMARQUES :
•
Le filtre ou le filet à lait agit comme une passoire pour séparer le liquide
des solides.
•
Utiliser le mélangeur pour mélanger et extraire le lait de la pulpe.
11. Aromatiser le lait selon les goûts. Ajouter une pointe de sel de mer, de
sucre brun, de vanille ou tout autre arôme souhaité.
12. Laisser le lait refroidir avant de servir.
MISE EN GARDE
Le lait de soya doit être bouilli avant d’être bu. Si conservé à une
température ambiante, le lait de soya frais doit être consommé dans les
6 heures.
Faire du tofu
1. Laver et préparer la quantité de soya spécifiée dans la recette de tofu.
2. À l’aide du verre gradué de 4 oz (fourni), mesurer la quantité de soya et le
mettre dans la chambre à lait.
3. Ajouter de l’eau à température ambiante jusqu’à la ligne de niveau d’eau
maximum.
4. Brancher le robot sur la chambre à lait. Brancher le cordon d’alimentation
dans la prise de la chambre à lait, puis brancher la fiche dans la prise
murale.
5. Appuyer sur MENU pour sélectionner TOFU parmi les fonctions de
préparation, puis sur START/CANCEL (mise en marche/annulation) pour
lancer la préparation.
6. Pendant que le soya est en préparation, ajouter de la poudre de gypse
dans un récipient (d’une capacité supérieure à 2 L). Ajouter 15 à 20 g (5 à
7 oz) d’eau à température ambiante à la poudre de gypse. Bien secouer
pour mélanger.
REMARQUE : Il est nécessaire de réaliser cette étape avant de retirer le lait
de soya.
7. Une fois le lait de soya préparé, le passer à travers le filtre dans le récipient
à pulpe pour séparer le lait de la pulpe. Utiliser le mélangeur pour
mélanger et extraire le lait de la pulpe.
REMARQUE : Si désiré, il est possible à cette étape d’ajouter du sucre ou
un arôme au lait de soya.
8. Verser rapidement le lait de soya filtré CHAUD dans la solution de poudre
de gypse. Le lait de soya doit être chaud lorsqu’il est ajouté à la solution
de gypse pour produire la bonne consistance de pouding au tofu.
REMARQUE : Verser le lait de soya dans la solution de gypse. NE PAS
verser la solution de gypse dans le lait de soya.
9. Laisser le mélange reposé pendant environ 10 minutes. Une fois le pouding
de soya solidifié, le tofu est alors prêt à être mangé ou moulé.
Page 33

Page 13
Utilisation
Mouler le tofu
1. Avec le logo Midea orienté vers le haut, insérer un disque dans le cylindre
du moule à tofu pour créer le fond du moule.
a
b
a Disque
b Moule à tofu
2. Placer le moule à tofu sur un réceptacle à bords relevés comme un moule
à gâteau ou une plaque à pâtisserie afin de contenir le liquide extrait du
pouding de tofu.
3. Placer le filet à mailles fines (fourni) à l’intérieur du moule à tofu pour s’en
servir comme revêtement.
4. Prendre une cuillère de pouding de tofu solidifié dans le sachet de lait de
noix.
5. Tourner l’autre disque de sorte que le logo Midea soit orienté vers le bas,
puis enfoncer délicatement le disque dans le pouding de tofu.
6. Remplir le récipient à pulpe d’eau, puis le placer par dessus le disque pour
comprimer le pouding de tofu. Le liquide chaud dans le pouding de tofu
s’écoulera à travers les ouvertures du moule.
a
b
a Récipient à pulpe
b Moule à tofu
7. Laisser le récipient à pulpe en place pendant au minimum 11/2 à 2 heures.
Il peut rester en place plus longtemps, selon les goûts en matière de
fermeté.
REMARQUES : Pour diminuer le temps de moulage, il est possible de poser
un objet lourd sur le récipient à pulpe rempli d’eau.
8. Après le moulage, retirer le récipient à pulpe rempli d’eau et vider l’eau.
Replacer le récipient à pulpe sur le moule à tofu, puis retourner le moule.
Page 34

Page 14
Recettes
9. Pousser légèrement sur le disque du fond tout en tirant sur le moule à tofu
afin de faire sortir le tofu moulé.
b
a
c
a Disque du fond
b Moule à tofu
c Récipient à pulpe
Recettes
5
Lait d’amandes
Pour : 1,3 L (44 oz)
3 tasses d’amandes entières crues
5
1/2 tasses d’eau
Préparation
1. Rincer, puis prétremper 3 tasses d’amandes entières crues dans un bol
pendant toute une nuit ou pendant 8 à 12 heures.
REMARQUE : Plus les amandes tremperont, plus le lait sera crémeux. Si
placées au réfrigérateur, les amandes trempées peuvent être conservées
pendant 5 jours.
2. Mettre 3 tasses d’amandes trempées et environ 5
1/2 tasses d’eau dans la
chambre à lait.
3. Suivre les instructions de préparation des laits de noix, de riz et de
céréales pour préparer, laisser refroidir et filtrer le lait.
Aromatiser le lait d’amandes (facultatif)
1/4 de tasse de miel cru
1/2 c. à soupe de cannelle moulue
1/2 c. à soupe d’extrait de vanille
Une pointe de noix de muscade (facultatif)
Page 35

Page 15
Recettes
Préparation
1. Verser 3 tasses de lait d’amandes dans un pichet.
2. Dans une petite casserole, à feu moyen-vif, mettre 1/4 de tasse de miel cru,
1/2 c. à soupe de cannelle moulue, 1/2 c. à soupe d’extrait de vanille et une
pointe de noix de muscade (facultatif).
3. Chauffer jusqu’à ce que le miel ait fondu.
4. Verser le mélange de miel dans le lait d’amandes, puis bien mélanger
jusqu’à obtenir un mélange homogène.
5. Mettre le pichet dans le réfrigérateur et laisser refroidir pendant au moins
2 heures. Bien mélanger avant de servir.
Soupe de tomates aux légumes
Pour : 7 à 8 tasses
7 tasses de tomates pelées, épépinées
et émincées
1 tasse de carottes finement tranchées
3/4 de tasse d’oignons finement
émincés
1 boîte (13,75 once) de bouillon de
poulet
1 c. à soupe de sucre blanc
2 c. à thé de sel
1 tasse de lait 2 %
2 c. à thé de basilic séché
1/2 c. à thé de sel de céleri
1/2 c. à thé de poivre noir moulu
1/4 c. à thé d’ail en poudre
Préparation
1. Ajouter les tomates, les carottes et les oignons dans la chambre à lait.
2. Ajouter et mélanger le bouillon de poulet, le sucre et le sel.
3. Assaisonner avec du basilic, du sel de céleri, le poivre noir et l’ail en
poudre.
4. Appuyer sur MENU pour sélectionner Soup/Puree (Soupe/Purée) parmi
les fonctions de préparation, puis sur START/CANCEL (mise en marche/
annulation) pour lancer la préparation.
Boisson fouettée/Purée de fruits
Pour : 7 à 8 tasses
4 tasses de jus d’orange
2 tasses de fraises (surgelées)
1 tasse de bleuets (fraîs, lavés)
Préparation
1. Ajouter le jus d’orange, les fraises surgelées et les bleuets frais dans la
chambre à lait.
2. Appuyer sur MENU pour sélectionner Smoothie parmi les fonctions de
préparation, puis sur START/CANCEL (mise en marche/annulation) pour
lancer la préparation.
Page 36

Page 16
Entretien
Entretien du robot à laits végétaux
6
AVERTISSEMENT - Choc électrique
• NE PAS immerger le robot dans l’eau ou laisser l’eau entrer dans le robot.
• NE PAS immerger la chambre à lait dans l’eau.
Le non-respect de ces instructions peut causer un décès, un incendie ou un choc
électrique.
Nettoyage
Si le robot à laits végétaux n’a pas été utilisé depuis un certain temps, bien le
nettoyer avant de l’utiliser.
Nettoyer le robot à laits végétaux à fond avant chaque utilisation. Un
nettoyage approprié est nécessaire pour assurer des résultats optimaux
pendant de nombreuses années.
MISE EN GARDE
Ne pas utiliser de matériaux durs ou abrasifs pour nettoyer ou sécher
l’extérieur, car cela risquerait d’endommager ou ternir le fini.
1. Débrancher le cordon d’alimentation de la poignée du robot à laits
végétaux.
2. Éliminer tout le lait et tout résidu de pâte de noix, riz ou céréales ou tout
autre aliment de la chambre à lait.
3. Nettoyer l’intérieur de la chambre à lait avec de l’eau du robinet en
prenant soin de ne pas immerger la base de la chambre dans l’eau.
4. Rincer les lames de broyage sous l’eau du robinet en s’assurant de ne pas
laisser de l’eau pénétrer dans le robot.
a
b
a Robot
b Lames de broyage
Page 37

Page 17
Entretien
5. À l’aide d’un chiffon doux et mouillé, essuyer tout résidu présent sur
l’extérieur du robot.
REMARQUE : Les résidus séchés sur les surfaces extérieures peuvent
endommager le fi ni.
6. À l’aide d’un chiffon sec et doux, sécher à fond l’extérieur et l’intérieur du
robot à laits végétaux.
7. Laver à la main les accessoires avec de l’eau tiède et savonneuse, rincer,
puis sécher à fond.
REMARQUE : Les accessoires ne sont PAS lavables au lave-vaisselle.
Entreposage
MISE EN GARDE
•
Ne pas entreposer le robot à laits végétaux lorsqu’il est encore chaud ou
branché dans une prise murale.
•
Ne pas enrouler le cordon d’alimentation autour de l’appareil en le
serrant excessivement.
1. Débrancher, nettoyer et sécher à fond le robot à laits végétaux. Voir la
section “Nettoyage”.
2. Entreposer dans un endroit sec et bien aéré.
REMARQUE : Un niveau d’humidité excessif peut réduire la durée de vie de
l’appareil.
Page 38

Page 18
Dépannage
Dépannage
7
Problème Cause possible Solution
Le robot à laits
végétaux ne
fonctionne pas.
Le robot à laits végétaux
n’est pas branché dans
une prise électrique
fonctionnelle.
Brancher le cordon
d’alimentation dans une
prise à 3 alvéoles reliée
à la terre.
Le cordon d’alimentation
n’est pas correctement
inséré dans la prise sur la
poignée de la chambre à
lait.
Vérifier le branchement
sur la poignée du
récipient.
La commande n’est pas
placée sur ON (marche).
Appuyer sur Start/
Cancel (mise en marche/
annulation).
Le voyant ne
s’allume pas.
La fiche du robot n’est pas
fermement enfoncée dans la
prise de la chambre à lait.
Vérifier ce raccordement
électrique. Voir “Pièces
et caractéristiques”.
Le robot à laits
végétaux chauffe
mais ne mélange
pas.
Le robot à laits végétaux
se trouve dans la phase de
chauffe de la préparation.
Attendre quelques
minutes.
Le lait de soya
n’est pas bien
cuit ou il est
impossible de
broyer les graines
ou le riz.
Une quantité d’eau
excessive ou insuffisante a
été utilisée.
Ajouter de l’eau jusqu’à
ce que le niveau d’eau
se trouve entre les
lignes de niveau d’eau
minimum et maximum.
Une quantité d’ingrédients
solides excessive ou
insuffisante a été utilisée.
REMARQUE : Pour obtenir
de bons résultats, un
rapport précis solides/
liquide doit être respecté.
N’utiliser que
les quantités
recommandées pour
chaque ingrédient.
La fonction choisie ne
correspond pas à l’aliment
qui est en cours de
préparation.
Sélectionner la fonction
adaptée aux aliments à
préparer.
Page 39

Page 19
Dépannage
Le robot à
laits végétaux
fonctionne
trop longtemps
pour une même
préparation.
Le capteur de débordement
n’est pas propre.
Nettoyer le robot
et le capteur de
débordement. Voir la
section “Nettoyage”.
La température de l’eau est
trop froide.
Utiliser de l’eau du
robinet à température
ambiante.
Quantité d’eau utilisée
excessive.
Ajouter de l’eau jusqu’à
ce que le niveau d’eau
se trouve entre les
lignes de niveau d’eau
minimum et maximum.
Tous les voyants
à DEL clignotent
sans cesse et un
signal sonore
retentit.
Quantité d’eau utilisée
excessive.
N’ajouter que les
quantités d’ingrédients
et d’eau recommandées
dans la chambre de
préparation. Brancher
puis mettre l’appareil
en marche pour
vérifier qu’il fonctionne
normalement.
Page 40

Page 41

Extractor de leche de
nueces, arroz o granos
y licuadora NRG™
version A - 10 - 2017
MNRG17-W
www.midea.com
MANUEL UTILISATEUR
sp
Mensajes de alerta: Antes de
utilizar este producto, lea
detenidamente este manual y
guárdelo para consultas
futuras.
El diseño y las especificaciones
están sujetos a cambios sin
previo aviso, para la mejora del
producto. Consulte con su
distribuidor o fabricante para
obtener más detalles.
Tensión nominal: 120 V- 60 Hz
Potencia nominal:
Motor: 130 W
Calentamiento: 1,000 W
Frecuencia: 60 Hz
Capacidad:
Mín. 48 oz (1,4 L)
Máx. 56 onzas (1,7 L)
Page 42

Page 2
Índice
1
SEGURIDAD DE LA MÁQUINA PARA HACER LECHE .................... 3
2
REQUISITOS DE OPERACIÓN .......................................................... 4
Requisitos eléctricos ............................................................................ 4
Requisitos de ubicación ....................................................................... 5
3
PIEZAS Y CARACTERÍSTICAS .......................................................... 6
4
USO DE LA MÁQUINA PARA HACER LECHE .................................. 8
Funciones de procesamiento ............................................................... 8
Controles .............................................................................................. 9
Para hacer leche de nueces, arroz o granos ....................................... 9
Para hacer tofu ................................................................................... 12
5
RECETAS ........................................................................................... 14
6
CUIDADO DE LA MÁQUINA PARA HACER LECHE ....................... 16
Limpieza ............................................................................................. 16
Almacenamiento ................................................................................ 17
7
SOLUCIÓN DE PROBLEMAS .......................................................... 17
Especificaciones
Modelo Dimensiones Energía Voltaje Capacidad
MNRG17-W 9
3/4 " x 71/4 " x
131/4 "
Motor: 130 W
Calentamiento:
1,000 W
120 V- 60 Hz Mín. 48 oz
(1,4 L)
Máx. 56 onzas
(1,7 L)
Page 43

Page 3
Precauciones
de seguridad
1
Para evitar lesiones al usuario u otras personas y daños a la propiedad, deben
seguirse las instrucciones que se muestran aquí. El uso incorrecto por ignorar
las instrucciones puede causar lesiones o daños. El nivel de riesgo se muestra
según las indicaciones siguientes.
PRECAUCIÓN
ADVERTENCIA
Este símbolo indica la posibilidad de muerte o lesiones graves.
Este símbolo indica la posibilidad de lesiones o daños a la propiedad.
Cuando se utilicen electrodomésticos, se deben observar siempre
precauciones básicas de seguridad, entre las que se incluyen las siguientes:
•
Lea todas las instrucciones antes de usar.
•
Para protegerse contra el riesgo de descarga eléctrica, no sumerja en
agua u otros líquidos el cable eléctrico, el enchufe, la cámara de leche ni el
procesador.
•
Desconecte del tomacorriente cuando no esté en uso, antes de poner o
quitar las piezas, y antes de limpiar. Asegúrese de que el motor se detenga
por completo y de que se enfríe antes de desmontarlo.
•
Nunca desenchufe el aparato tirando del cable de alimentación. Siempre
sujete firmemente el enchufe y tire hacia afuera del receptáculo.
•
No lo ponga en funcionamiento sin vigilancia.
•
Es necesaria una supervisión cuidadosa cuando cualquier aparato es
usado por los niños o cerca de ellos.
•
Evite el contacto con piezas móviles.
•
No opere ningún aparato con un cable / enchufe dañado, después de
que el aparato funcione mal, o se caiga o se dañe de cualquier manera.
Devuelva el aparato al centro de servicio autorizado más cercano para su
examen, reparación, o ajuste eléctrico o mecánico.
•
El uso de accesorios no recomendados o vendidos por el fabricante puede
provocar incendios, descargas eléctricas o lesiones.
•
No lo utilice al aire libre.
•
No deje que el cable cuelgue sobre el borde de la mesa o el mostrador, ni
toque superficies calientes.
•
No lo coloque sobre o cerca de un quemador de gas caliente o eléctrico,
ni en un horno caliente.
Seguridad de la máquina
para hacer leche
Page 44

Page 4
Requisitos de
operación
•
Para desconectar, gire el control a apagado (Off), y espere a que el motor
se detenga antes de quitar el enchufe del tomacorriente.
•
Siempre conecte primero el cable de alimentación al aparato y, a
continuación, conecte el cable al tomacorriente.
GUARDE ESTAS INSTRUCCIONES
ESTE APARATO ES PARA USO DOMÉSTICO SOLAMENTE
Requisitos de operación
2
Requisitos eléctricos
Asegúrese de que el voltaje del tomacorriente de pared corresponde al
voltaje indicado en el aparato.
Enchufe de puesta a tierra
Como medida de seguridad, este producto está equipado con un enchufe de
puesta a tierra, que sólo se ajusta a una toma de 3 clavijas. No intente anular
esta función de seguridad. Una conexión incorrecta del conductor de puesta
a tierra puede resultar en un riesgo de descarga eléctrica.
Consulte a un electricista calificado si tiene dudas sobre si el tomacorriente
está debidamente conectado a tierra.
Cable de alimentación eléctrica
El cable de alimentación sólo debe enchufarse en un tomacorriente eléctrico
de pared de 120 V CA.
Si el circuito eléctrico está sobrecargado con otros aparatos, es posible que
su aparato no funcione correctamente. Debe ser operado en un circuito
eléctrico separado de otros aparatos.
•
Para conectar la alimentación: Conecte primero el enchufe del cable
de alimentación al aparato y, a continuación, conecte el cable al
tomacorriente de pared.
•
Para desconectar la alimentación: Gire el control a la posición de apagado
(Off) y, a continuación, sujete el cable de alimentación por el enchufe para
sacarlo del tomacorriente de pared.
Page 45

Page 5
Requisitos de
operación
Instrucciones para el cable corto
Se provee un cable de alimentación corto para reducir el riesgo de enredarse
o tropezarse con un cable más largo.
Los cables de extensión más largos están disponibles y se pueden utilizar si
se tiene cuidado en su uso.
Si se utiliza un cable de extensión más largo:
•
La clasificación eléctrica marcada en el cable de extensión debe
ser igual o mayor que la clasificación eléctrica del aparato. Si la
clasificación eléctrica del cable de extensión es demasiado baja, podría
sobrecalentarse y quemarse.
•
El cable extendido resultante debe ser dispuesto de manera que no
cuelgue de la encimera o mesa, donde podría ser tirado por niños o
tropezarse.
Requisitos de ubicación
•
Use la máquina para hacer leche solamente a altitudes inferiores a
4,921 pies (1,500 m). El uso a altitudes superiores a 4,921 pies (1,500 m)
puede dar lugar a una leche de soya cruda, que se desborde o quede
como un engrudo.
•
La distancia requerida de otros aparatos es de 12" (30 cm).
Cook
Mode
STOP
Low Med High Warm
Cook
Time
12"
(30 cm)
12"
(30 cm)
Page 46

Page 6
Piezas y
características
Piezas y características
3
a
b
c
d
e
f
g
h
j
k
i
a Panel de control
b Procesador
c Sensor de desbordamiento
d Cámara de leche
e Mango del procesador
f Enchufe del procesador
g Eje del motor
h Cuchilla para triturar
i Receptáculo del enchufe
j Mango de la cámara de leche
k Receptáculo del cable de
alimentación
Page 47

Page 7
Piezas y
características
Aditamentos y utensilios
a b c d e
f g h i
a Recipiente de
pulpa
b Mango del
recipiente de pulpa
c Filtro
d Licuadora
e Taza de medición
de 4 oz
f Cable de alimentación
eléctrica
g Molde de tofu
h Discos (2)
i Bolsa de malla
na para leche
de nueces
NOTAS:
•
Instale el mango para convertir el recipiente de pulpa en una jarra para la
leche de nueces.
a Recipiente
de pulpa
b Mango del
recipiente de
pulpa
•
Cuele la leche procesada a través del filtro para separar la leche de la
pulpa. Utilice la licuadora para mezclar y presionar la pulpa.
•
Para evitar el riesgo de que el contenido se desborde de la máquina
para hacer leche, el sensor de desbordamiento reduce la potencia de
la misma cuando detecta que la temperatura del contenido se está
sobrecalentando.
PRECAUCIÓN
Durante el calentamiento, habrá algunas salpicaduras calientes procedentes
de la máquina para hacer leche.
Page 48

Page 8
Uso
Uso de la máquina para hacer leche
4
PRECAUCIÓN
•
La leche de nueces casera debe durar alrededor de una semana, si se
refrigera. La máquina para hacer leche NRG de Midea calienta el agua
durante el procesamiento, pasteurizando la leche.
•
No utilice la máquina para hacer leche para calentar la leche de nueces
fría, recalentar la pasta fría ni hervir agua.
Funciones de procesamiento
Los tiempos de procesamiento varían dependiendo de la función de
procesamiento seleccionada. Las leches más espesas y la harina de avena
requieren un tiempo de procesamiento más largo, y algunas funciones como
mezclar y calentar.
Para obtener resultados óptimos, utilice la proporción de líquido a sólido
recomendada en su receta. No obstante, la relación se puede ajustar al gusto
personal.
El modelo tiene una capacidad de 48 oz a 56 oz (1,4 L a 1,7 L).
Función de
procesamiento
Tiempo
(minutos)
Ingredientes principales
Tofu 33
Soya y polvo de yeso
Leche de nueces 30
Nueces a elegir: almendras, marañones,
nueces de Castilla, pacanas, etc.
Vea la receta más adelante en esta sección.
Leche de arroz/
granos
30
Arroz blanco, arroz integral o quinoa
Harina de avena 28
Copos de avena
Sopa/Puré* 26
Fruta o vegetal de preferencia
Vea la receta más adelante en esta sección.
Licuado (mezcla
solamente)*
3
Fruta y leche o jugo de preferencia
Vea la receta más adelante en esta sección.
* Corte los alimentos en
cuadritos de 1/2 ", no más grandes que el tamaño de un
cacahuete.
½
"
Page 49

Page 9
Uso
Controles
MENU
S
T
A
R
T
C
A
N
C
E
L
T
o
f
u
N
u
t
M
i
l
k
O
a
t
m
e
a
l
S
m
o
o
t
h
i
e
R
i
c
e
G
r
a
i
n
M
i
l
k
S
o
u
p
P
u
r
e
e
b
c
a
a Indicadores
LED de función
b Control de
Inicio/Cancelar
(Start/Cancel)
c Control de
Menú (Menu)
Para hacer leche de nueces, arroz o granos
La máquina para hacer leche utiliza la tecnología de pulpa de granos
secos, por lo que los granos de soya no REQUIEREN pre-remojarse antes
del procesamiento. Sin embargo, remojar los granos de soya (legumbres),
las nueces, el arroz o los granos antes de procesar, dará lugar a un mayor
rendimiento de leche.
ADVERTENCIA - Intoxicación alimentaria
• La leche de soya debe hervirse antes de beberla.
• Si se mantiene a temperatura ambiente, la leche fresca de soya se debe beber en
un plazo de 6 horas.
De no hacerlo, puede resultar en intoxicación o enfermedad.
NOTA: Antes de usar el recipiente de pulpa por primera vez, retírelo de la
cámara de leche y luego limpie todas las partes que entran en contacto
directo con los alimentos.
1. Limpie y prepare los alimentos para su procesamiento.
2. Mida los alimentos preparados y agréguelos a la cámara de leche.
NOTA: Utilice la taza de medición de 4 oz (provista) para medir con
precisión los ingredientes. Para obtener resultados óptimos, use sólo los
ingredientes en las cantidades especificadas en su receta.
3. Llene la cámara de leche con agua del grifo a temperatura ambiente
hasta que el nivel de agua esté entre las líneas de nivel de agua mínimo y
máximo.
NOTAS:
•
Use agua del grifo a temperatura ambiente. El uso de agua destilada
o purificada, o agua caliente, resultará en un exceso de ebullición
causando un sabor a quemado.
Page 50

Page 10
Uso
•
Puede controlar la consistencia de la leche de nueces, arroz o granos
añadiendo más o menos agua mientras el nivel de agua esté entre el
mínimo y el máximo nivel.
•
El usar demasiada agua o muy poca afectará negativamente el proceso
de producción de leche.
4. Enchufe el procesador en la cámara de leche. Asegúrese de que el
enchufe del procesador esté completamente insertado en el receptáculo
del enchufe en la parte superior del mango de la cámara de leche para
completar la conexión eléctrica.
a
d
c
b
a Procesador
b Enchufe del
procesador
c Receptáculo del
enchufe
d Cámara de leche
ADVERTENCIA - Choque eléctrico
• Enchufe en un tomacorriente de 3 clavijas de puesta a tierra.
• No quite la clavija de puesta a tierra.
• No use un adaptador.
El incumplimiento de estas instrucciones puede provocar la muerte, incendio o
choque eléctrico.
5. Enchufe el cable de alimentación (provisto) en el receptáculo del mango
de la cámara y conecte el otro extremo a un tomacorriente de 3 clavijas
de puesta a tierra. La máquina para hacer leche emitirá un pitido y las
luces de control parpadearán para indicar que la energía eléctrica está
encendida.
Page 51

Page 11
Uso
a
b
a Receptáculo
del enchufe
b Enchufe
6. Presione el control de MENÚ (MENU). Con cada pulsación del control de
MENÚ, se ilumina un ícono de función de procesamiento.
7. Pulse INICIO/CANCELAR (START/CANCEL) para seleccionar la función
deseada y comenzar el procesamiento.
NOTA: Si selecciona involuntariamente una función incorrecta, mantenga
pulsado INICIO/CANCELAR (START/CANCEL) durante 3 segundos
para cancelar la función y, a continuación, pulse MENÚ para volver a
seleccionar.
8. La máquina para hacer leche comenzará el proceso según la función
seleccionada. La luz de función parpadeará y sonará un tono para indicar
que el procesamiento está completo.
NOTA: Durante la fase de calentamiento del proceso, es normal que el
procesador se agite intermitentemente.
ADVERTENCIA - Quemar
• Dé tiempo para que la leche caliente salga del procesador hacia la cámara de leche.
• Retire cuidadosamente el procesador de la cámara de leche para que la leche
caliente no entre en contacto con la piel.
De no hacerlo, se pueden producir quemaduras.
9. Desconecte el cable de alimentación del tomacorriente de pared. Espere
30 segundos para que el procesador se drene antes de levantarlo de la
cámara de leche.
PRECAUCIÓN
La leche estará caliente.
10. Sosteniendo el filtro o la bolsa de malla fina sobre el recipiente, vierta en
un recipiente la leche procesada a través del filtro o de la bolsa.
Page 52

Page 12
Uso
NOTAS:
•
El filtro o la bolsa de leche actúan como un colador para separar el
líquido de los sólidos.
•
Utilice la licuadora para mezclar y presionar el líquido de la pulpa.
11. Déle sabor a la leche, si lo desea. Añada una pizca de sal marina, azúcar
moreno, vainilla o cualquier otro sabor favorito.
12. Deje que la leche se enfríe antes de servir.
PRECAUCIÓN
La leche de soya debe hervirse antes de beberla. Si se mantiene la leche
fresca de soya a temperatura ambiente, se debe beber en un plazo de
6 horas.
Para hacer tofu
1. Lave y prepare la cantidad de soya especificada en la receta de tofu.
2. Usando la taza de medición de 4 oz (provista), mida los granos de soya y
colóquelos en la cámara de leche.
3. Agregue agua a temperatura ambiente hasta la línea de llenado máximo.
4. Enchufe el procesador en la cámara de leche. Conecte el cable de
alimentación al receptáculo de la cámara de leche y luego enchúfelo al
tomacorriente de pared.
5. Pulse MENÚ para seleccionar TOFU entre las funciones de procesamiento
y, a continuación, pulse INICIO/CANCELAR (START/CANCEL) para iniciar
el procesamiento.
6. Mientras la soya se está procesando, añada polvo de yeso en un recipiente
(mayor de 2 L). Al polvo de yeso, agregue de 5 a 7 oz (15 a 20 g) de agua
a temperatura ambiente. Agite bien para mezclar.
NOTA: Este paso debe ser completado antes de extraer la leche de soya.
7. Una vez que se haya procesado la leche de soya, cuele la leche procesada
a través del filtro en el recipiente de pulpa, para separar la leche de la
pulpa. Utilice la licuadora para mezclar y presionar la leche de la pulpa.
NOTA: Si lo desea, puede añadir azúcar o sabor a la leche de soya en este
momento.
8. Vierta rápidamente la leche de soya filtrada CALIENTE en la solución de
polvo de yeso. La leche de soya debe estar caliente cuando se agrega a la
solución de yeso, para producir la consistencia correcta de pudín de tofu.
NOTA: Vierta la leche de soya en la solución de polvo de yeso. NO vierta la
solución de polvo de yeso en la leche de soya.
9. Deje reposar la mezcla durante aproximadamente 10 minutos. Una vez
que el pudín de tofu se haya solidificado, el tofu está listo para comer o
moldear.
Page 53

Page 13
Uso
Para moldear el tofu
1. Con el logotipo de Midea hacia arriba, inserte un disco en el cilindro de
moldear para crear la parte inferior del molde de tofu.
a
b
a Disco
b Molde de tofu
2. Coloque el molde de tofu en un receptáculo con reborde, como una
cacerola o una bandeja de galletas para capturar el líquido que está
siendo presionado fuera del pudín de tofu.
3. Coloque la bolsa de malla fina (provista) dentro del molde de tofu para
actuar como un revestimiento.
4. Vierta con una cuchara el pudín de tofu solidificado en la bolsa para leche
de nueces.
5. Gire el otro disco para que el logotipo de Midea esté hacia abajo y
presione suavemente el disco en el pudín de tofu.
6. Llene el recipiente de pulpa con agua y colóquelo en la parte superior del
disco para comprimir el pudín de tofu. El líquido caliente en el pudín de
tofu fluirá a través de los espacios en el molde.
a
b
a Recipiente de
pulpa
b Molde de tofu
7. Deje que el recipiente de pulpa permanezca en su lugar durante un
mínimo de 1½ a 2 horas. Puede permanecer más tiempo en el lugar,
dependiendo de la preferencia de firmeza.
NOTAS: Para disminuir el tiempo de moldeo, puede colocar un objeto más
pesado lleno de agua encima del recipiente de pulpa.
8. Después de moldear, retire el recipiente de pulpa lleno de agua y vierta el
agua. Vuelva a colocar el recipiente de pulpa en el molde de tofu, y luego
dé vuelta el molde.
Page 54

Page 14
Recetas
9. Presione ligeramente hacia abajo en el disco inferior mientras tira hacia
arriba en el molde de tofu para empujar hacia fuera el tofu moldeado.
b
a
c
a Disco inferior
b Molde de tofu
c Recipiente de
pulpa
Recetas
5
Leche de almendras
Rendimiento: 44 oz (1,3 L)
3 tazas de almendras crudas, enteras
5
½ tazas de agua
Instrucciones
1. Enjuague y luego remoje 3 tazas de almendras crudas y enteras en un
recipiente durante la noche o durante 8 a 12 horas.
NOTA: Cuanto más tiempo remoje las almendras, más cremosa será la
leche. Las almendras remojadas tendrán una duración de 5 días, si se
refrigeran.
2. Coloque 3 tazas de almendras remojadas y aproximadamente 5
½ tazas de
agua en la cámara de leche.
3. Siga las instrucciones para hacer leche de nueces, arroz o granos para
procesar, enfriar y colar la leche.
Déle sabor a la leche de almendras (opcional)
1/4 taza de miel cruda
1/2 cucharada de canela molida
1/2 cucharada de extracto de vainilla
Pizca de nuez moscada (opcional)
Page 55

Page 15
Recetas
Instrucciones
1. Vierta 3 tazas de leche de almendras en una jarra.
2. En una cacerola pequeña a fuego medio-alto, coloque
1/4 de taza de miel
cruda, 1/2 cucharada de canela molida, 1/2 cucharada de extracto de vainilla
y una pizca de nuez moscada (opcional).
3. Caliente hasta que la miel se derrita.
4. Vierta la mezcla de miel en la leche de almendras, y luego revuelva hasta
que esté bien mezclada.
5. Coloque la jarra en el refrigerador y déjela enfriar durante al menos
2 horas. Revuelva bien antes de servir.
Sopa de verduras con tomate
Rendimiento: 7 a 8 tazas
7 tazas de tomates sin cáscara, sin
semillas y picados
1 taza de zanahoria finamente picada
3/4 de taza de cebolla finamente picada
1 lata (13,75 onzas) de caldo de pollo
1 cucharada de azúcar blanca
2 cucharaditas de sal marina
1 taza de leche de 2 %
2 cucharaditas de albahaca seca
1/2 cucharadita de sal de apio
1/2 cucharadita de pimienta negra
molida
1/4 cucharadita de ajo en polvo
Instrucciones
1. Agregue los tomates, las zanahorias y la cebolla a la cámara de leche.
2. Mezcle con el caldo de pollo, el azúcar y la sal.
3. Sazone con albahaca, sal de apio, pimienta negra y ajo en polvo.
4. Pulse MENÚ para seleccionar Sopa/Puré (Soup/Puree) y, a continuación,
pulse INICIO/CANCELAR (START/CANCEL) para iniciar el procesamiento.
Licuado/puré de frutas
Rendimiento: 7 a 8 tazas
4 tazas de jugo de naranja
2 tazas de fresas (congeladas)
1 taza de arándanos (frescos y lavados)
Instrucciones
1. Agregue el jugo de naranja, las fresas congeladas y los arándanos frescos
a la cámara de leche.
2. Pulse MENÚ para seleccionar Licuado (Smoothie) y, a continuación, pulse
INICIO/CANCELAR (START/CANCEL) para iniciar el procesamiento.
Page 56

Page 16
Cuidado
6
ADVERTENCIA - Choque eléctrico
• NO sumerja el procesador en agua ni permita que le entre agua.
• NO sumerja la cámara de leche en agua.
El incumplimiento de estas instrucciones puede provocar la muerte, incendio o
choque eléctrico.
Limpieza
Si no ha usado recientemente la máquina para hacer leche, límpiela bien
antes de usarla.
Limpie a fondo la máquina para hacer leche después de cada uso. La limpieza
adecuada asegurará que produzca grandes resultados durante muchos años.
PRECAUCIÓN
No use materiales ásperos ni abrasivos para limpiar o secar el exterior, ya
que pueden dañar o quitarle el brillo al acabado.
1. Desconecte el cable de alimentación del mango de la máquina para hacer
leche.
2. Remueva toda la leche y pasta de nueces, arroz o granos, u otro alimento,
de la cámara de leche.
3. Limpie el interior de la cámara de leche con agua del grifo, teniendo
cuidado de no sumergir la base de la cámara en agua.
4. Enjuague las cuchillas para triturar bajo el chorro de agua, teniendo
cuidado de no permitir que entre agua en el procesador.
a
b
a Procesador
b Cuchillas para
triturar
Cuidado de la máquina
para hacer leche
Page 57

Page 17
Cuidado
5. Utilizando un paño suave y húmedo, limpie cualquier residuo en el exterior
del procesador.
NOTA: Si se deja que los residuos se sequen en las superfi cies exteriores,
se puede dañar el acabado.
6. Utilizando un paño suave y seco, seque completamente tanto el exterior
como el interior de la máquina para hacer leche.
7. Lave a mano las piezas de los accesorios con agua tibia y jabonosa;
enjuague y seque a fondo.
NOTA: Los aditamentos de los accesorios NO son aptos para lavavajillas.
Almacenamiento
PRECAUCIÓN
•
No guarde la máquina para hacer leche mientras esté todavía caliente o
enchufada a un tomacorriente de pared.
•
No enrolle de modo tirante el cable de alimentación alrededor del
aparato.
1. Desconecte, limpie y seque completamente la máquina para hacer leche.
Consulte “Limpieza”.
2. Almacene en un lugar seco y bien ventilado.
NOTA: El exceso de humedad puede reducir la vida útil del aparato.
Page 58

Page 18
Solución de
problemas
Solución de problemas
7
Problema Causa posible Solución
La máquina para
hacer leche no
funciona.
La máquina para hacer
leche no está conectada a
un tomacorriente eléctrico
de pared que funcione.
Enchufe el cable de
alimentación en un
tomacorriente de
3 clavijas de puesta a
tierra.
El cable de alimentación
no está insertado
correctamente en el
receptáculo del mango de la
cámara de leche.
Compruebe la
conexión del cable
de alimentación en el
mango del recipiente.
El control no está
encendido.
Pulse INICIO/
CANCELAR (Start/
Cancel).
El indicador no se
ilumina.
El enchufe del procesador
no está firmemente
asentado en el receptáculo
de la cámara de leche.
Compruebe esa
conexión eléctrica.
Vea “Piezas y
características”.
La máquina para
hacer leche se
calienta, pero no
revuelve.
La máquina para hacer
leche está en la etapa de
calentamiento del proceso.
Espere unos minutos.
La leche de soya
no se cocina bien
o los granos o
el arroz no se
pueden romper
en pedazos.
Se ha usado demasiada
agua o muy poca.
Añada agua hasta que
el nivel de agua esté
entre las líneas mínima y
máxima.
Se ha usado demasiado
o muy poco de los
ingredientes sólidos.
NOTA: Para obtener buenos
resultados, se requiere una
relación específica de sólido
a líquido.
Utilice sólo
las cantidades
recomendadas de cada
ingrediente.
La función seleccionada no
coincide con el alimento que
se está procesando.
Seleccione la función
apropiada para el
alimento que se está
procesando.
Page 59

Page 19
Solución de
problemas
La máquina para
hacer leche está
funcionando
durante
demasiado
tiempo.
El sensor de
desbordamiento no está
limpio.
Limpie el procesador
y el sensor de
desbordamiento.
Consulte “Limpieza”.
La temperatura del agua es
demasiado baja.
Use agua del grifo a
temperatura ambiente.
Se ha usado demasiada
agua.
Añada agua hasta que
el nivel de agua esté
entre las líneas mínima y
máxima.
Todos los
indicadores
LED parpadean
continuamente y
suena un tono de
alerta.
Se ha usado demasiada
agua.
Agregue sólo
las cantidades
recomendadas
de ingredientes y
agua a la cámara
de procesamiento.
Enchufe y encienda
para confirmar que
está funcionando
normalmente.
Page 60

 Loading...