

Page 1

PEMBERSIH VAKUM
PANDUAN PENGGUNA
No. Model: MVC-V12K-GR
SILA BACA ARAHAN-ARAHAN KESELAMATAN SEBELUM PENGGUNAAN
DAN SIMPAN DENGAN BAIK UNTUK RUJUKAN KELAK.
Page 2

Page 3
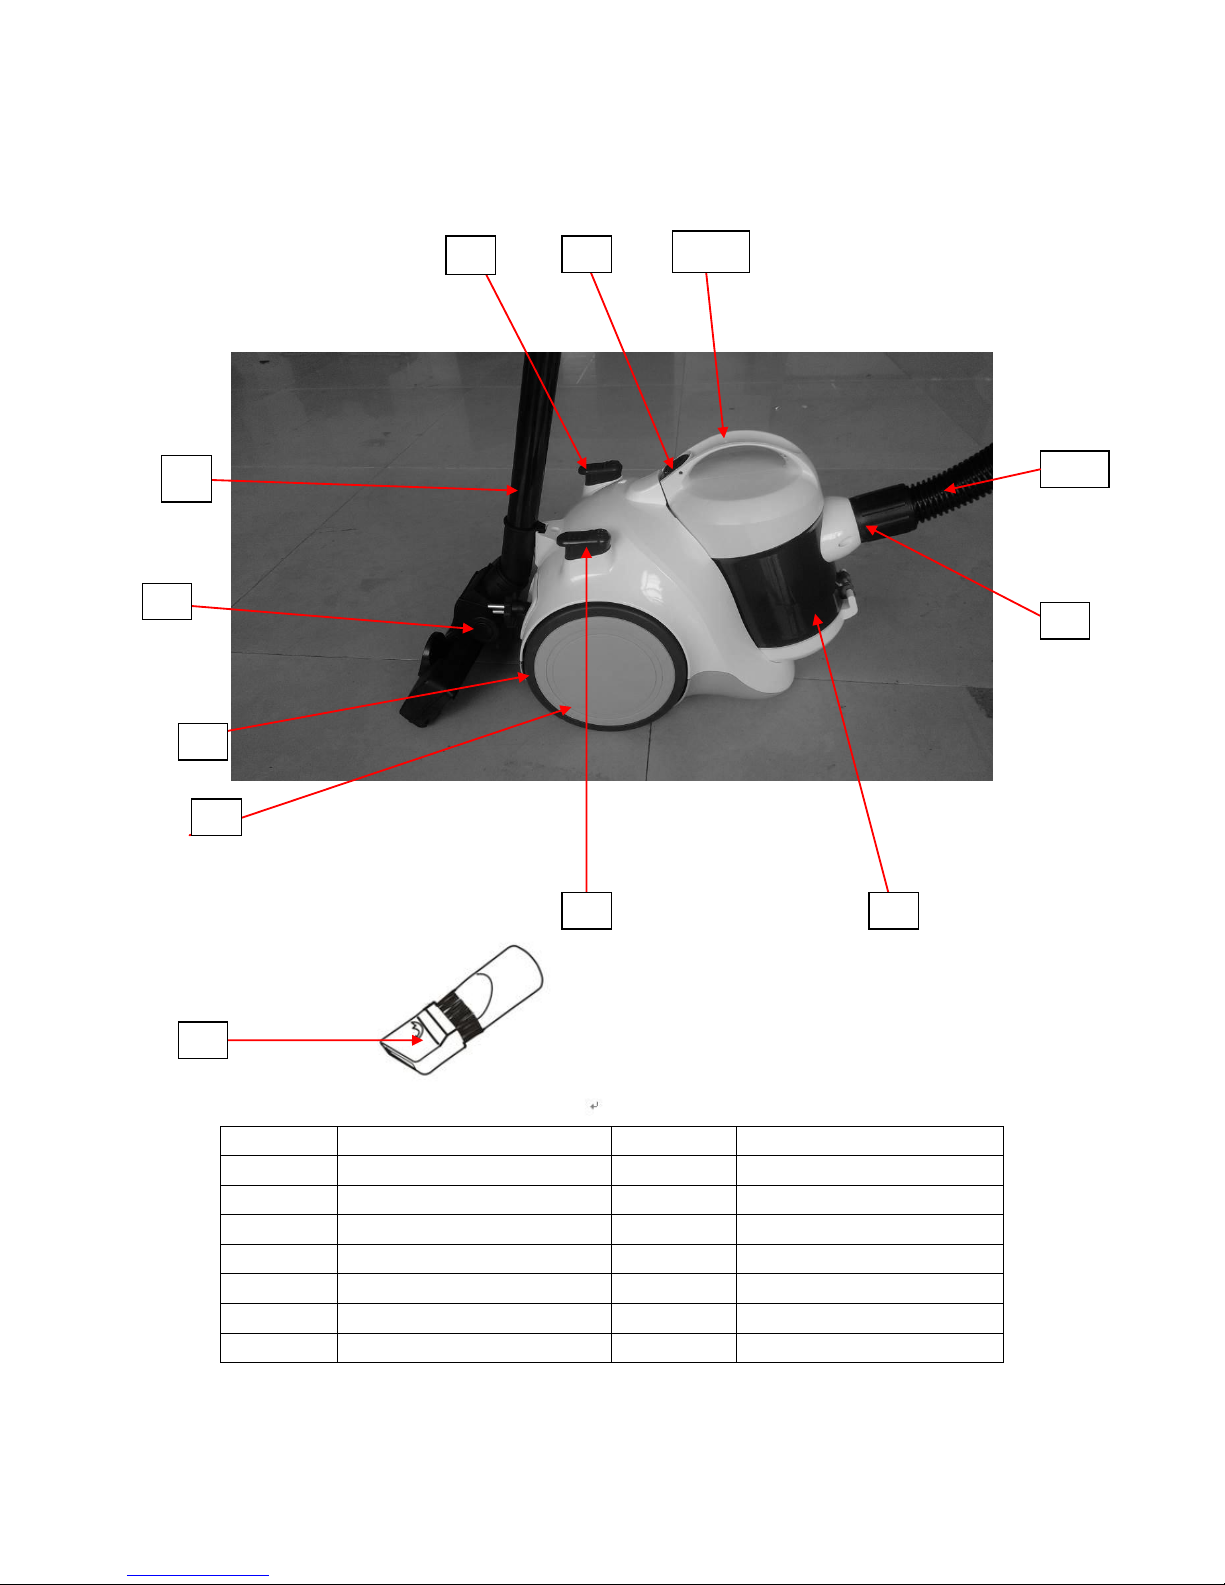
STRUKTUR PRODUK
1
Alat berus
9
Butang kuasa
2
Tiub penyambung plastik
10
Hos
3
Bekas debu
11
Butang peranti penggulung
4
Hos penyambung
12
Pemegang dan bekas debu
5
Berus mampatan
13 6
Butang pembuka
7
Roda belakang
8
Getah roda belakang
12
2
9
Page 4
CARA-CARA PENGGUNAAN
Pemasangan sebelum penggunaan
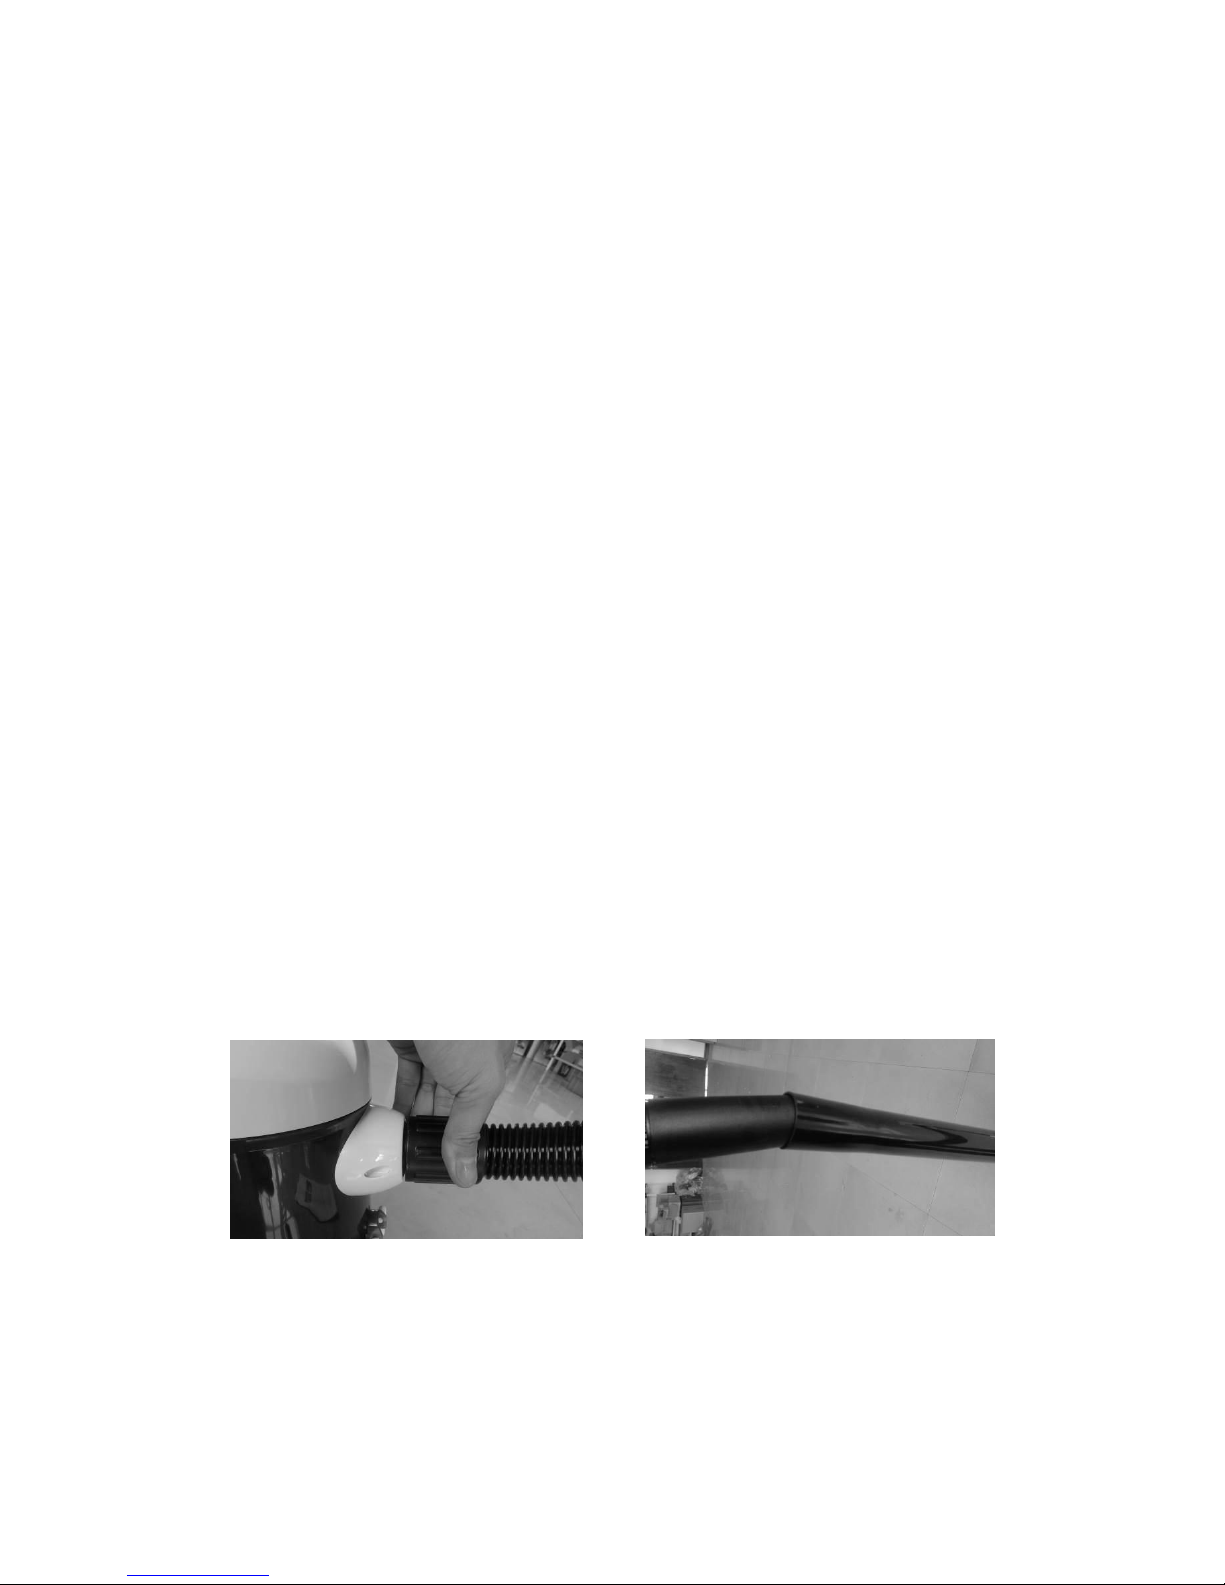
Gambarajah 1 menunjukkan cara menyambungkan hos dengan pembersih vakum:
Letakkan penyambung hos di hadapan pembersih vakum. Lepas itu dimasukkan ke
dalam lubang inlet dan putar ke kanan. Jika hendak tanggalkannya, anda boleh putar
penyambung hos ke kiri dan ditarik keluar.
Gambarajah 2 menunjukkan cara menyambungkan hos dengan tiub penyambung
plastik:
Pegang penyambung hos yang lentur dan dimasukkan ke dalam lubang tiub yang
lebih besar.
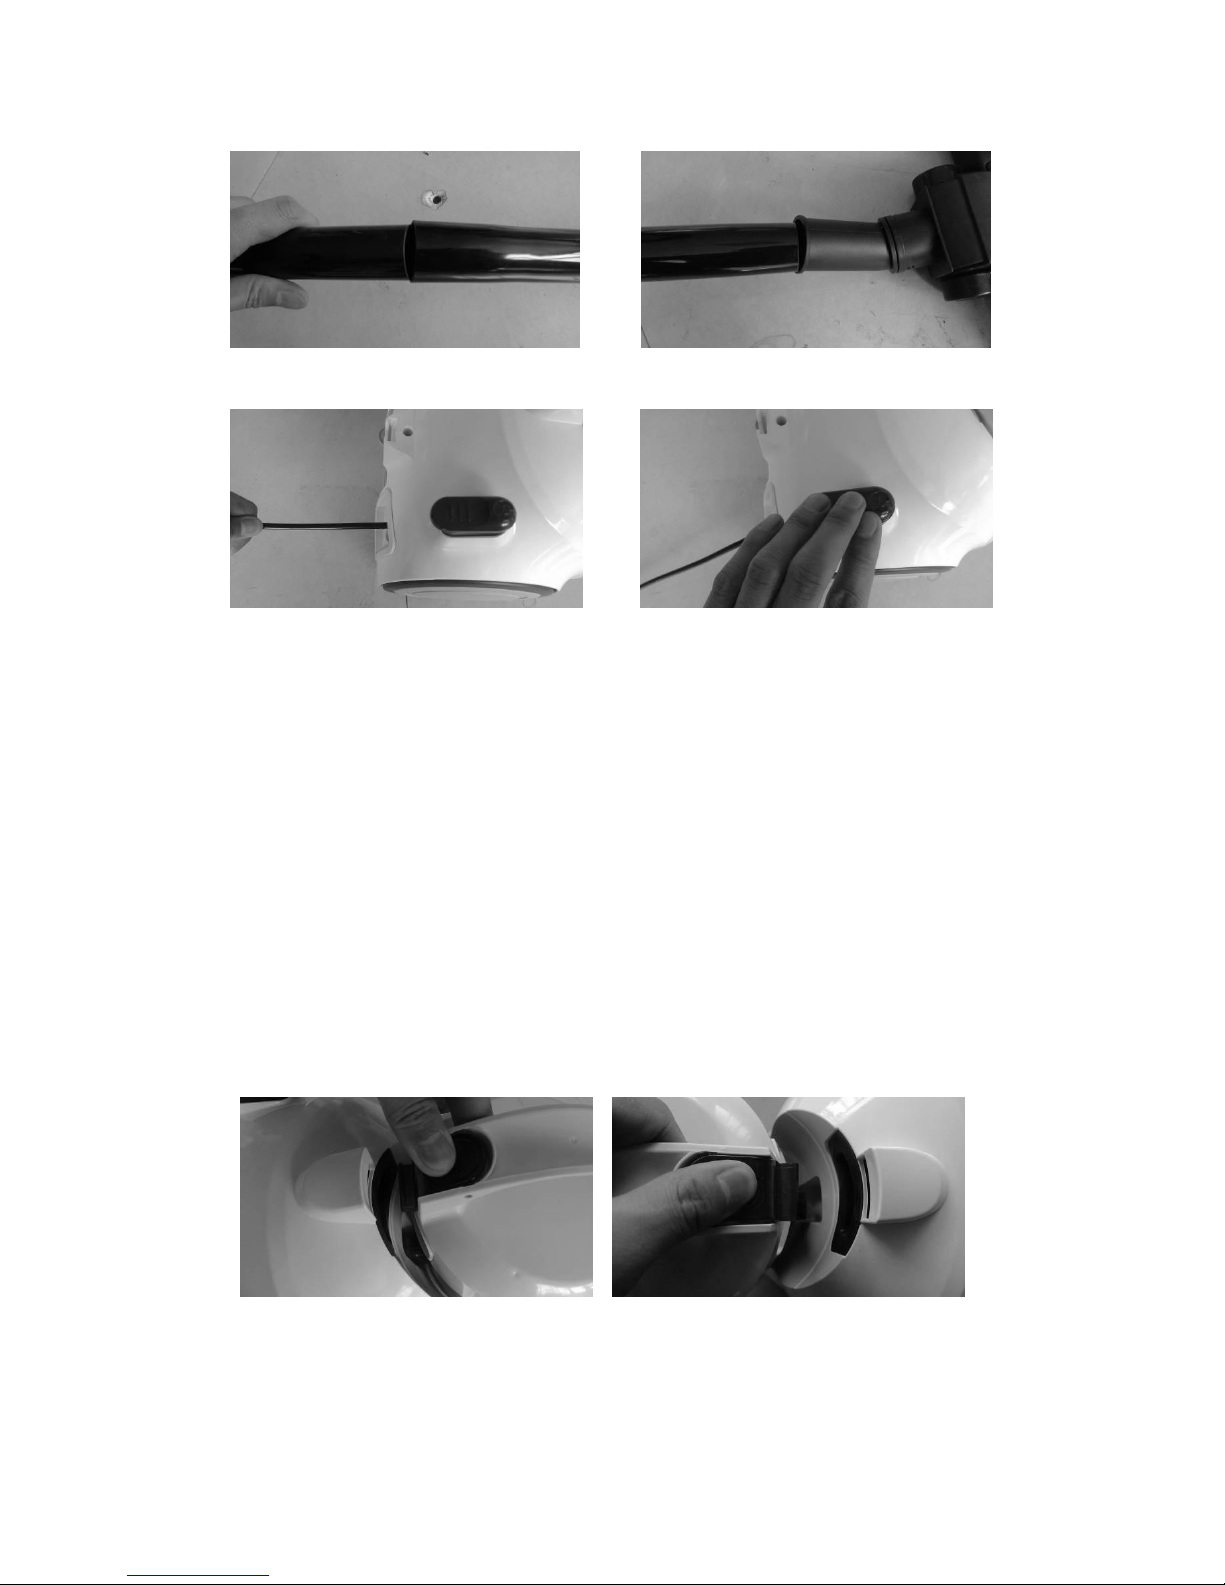
Gambarajah 3 menunjukkan cara melaraskan tiub penyambung plastik.
Masukkan tiub ke dalam lubang tiub lain yang lebih besar.
Gambarajah 4 menunjukkan cara menyambungkan tiub dengan alat berus:
Masukkan tiub plastik ke dalam lubang berus dan putar bagi mengetatkannya.
Gambarajah 5 menunjukkan cara memeriksa penggulungan kord kuasa:
Anda boleh tarik keluar kord kuasa dari mesin dan berhenti apabila kelihaatan tanda
kuning. Pastikan tanda merah tidak ditarik keluar. Apabila tamatnya kerja
pembersihan, padamkan kuasa dan tanggalkan plag dari soket, lepas itu tekan butang
peranti penggulung sehingga kord kuasa digulung ke dalam mesin dengan
sepenuhnya.
Gambarajah 6 menunjukkan butang kuasa.
Pasangkan plag pada soket, tekan butang kuasa untuk mengawal mesin ini melakukan
kerja pembersihan.
Gambarajah 1 Gambarajah 2
Page 5
Gambarajah 3 Gambarajah 4
Gambarajah 5 Gambarajah 6
PEMBERSIHAN BEKAS DEBU
Langkah-langkah membersihkan bekas debu:
1.Seperti ditunjukkan dalam Gambarajah 7, pegang pemegang dan bekas debu, tekan
butang pembuka.
2. Seperti ditunjukkan dalam Gambarajah 8, keluarkan bekas debu dari mesin.
3. Seperti ditunjukkan dalam Gambarajah 9, letakkan bekas debu di atas tong sampah,
tekan butang pembuka untuk membuka bahagian bawah bekas debu, kotoran dan
habuk akan jatuh ke dalam tong sampah dengan sendiri.
4. Seperti ditunjukkan dalam Gambarajah 10, tutup bekas debu yang telah dibersih
untuk penggunaan seterusnya.
5.Jika habuk di dalam bekas melebihi tanda MAX, dan terasa kuasa sedut semakin
menurun, sila padamkan kuasa dan memusing tombol pembersihan kendiri untuk
lebih daripada 2 kitaran, anda akan dapati kuasa sedut kembali ke paras awalnya.
Gambarajah 7 Gambarajah 8
Page 6

Gambarajah 9 Gambarajah 10
Alat-alat tambahan
Cara-cara penggunaan alat-alat tambahan:
1. Seperti ditunjukkan dalam Gambarajah 11, anda boleh gunakan berus mampatan
untuk membersihkan bahagian sudut dan celah yang sempit.
2. Seperti ditunjukkan dalam Gambarajah 12, buka bahagian berus mampatan dengan
bulu seperti tanda anak panah padanya untuk menyedut debu pada sofa, langsir dan
habuk pada alat hiasan.
3. Seperti ditunjukkan dalam Gambarajah 13, pijak pedal alat berus untuk
mengeluarkan bulu bagi membersihkan lantai.
4. Seperti ditunjukkan dalam Gambarajah 14, pijak pedal alat berus sekali lagi untuk
memasukkan bulunya bagi membersihkan permaidani.
Gambarajah 11 Gambarajah 12
Gambarajah 13 Gambarajah 14
PENYELENGGARAAN
Cara-cara penyelenggaraan
1. Penapis perlu dibersih sebanyak dua kali setiap tahun. Tibanya masa untuk mencuci
Page 7

apabila jelas kelihatan kotoran terlekat pada penapis.
2. Anda mesti pasang semula penapis dengan baik sebelum mesin ini digunakan
semula.
3. Penapis tidak boleh dicuci dengan mesin basuh atau dikeringkan dengan alat
pengering.
4. Kuasa sedut akan menurun dan motor akan rosak jika penapis digunakan dalam
keadaan basah.
5. Langkah-langkah penyelenggaraan
1) Seperti ditunjukkan dalam Gambarajah 15, tekan kancing outlet untuk membuka
penutup outlet.
2) Seperti ditunjukkan dalam Gambarajah 16, keluarkan penapis outlet.
3) Seperti ditunjukkan dalam Gambarajah 17, putar penutup HEPA untuk
mengasingkannya dari penutup bekas.
4) Seperti ditunjukkan dalam Gambarajah 18, tanggalkan penutup HEPA.
5) Seperti ditunjukkan dalam Gambarajah 19, keluarkan HEPA dan dicuci.
6) Cuci penutup HEPA, pasangan HEPA, span outlet dan bekas debu di dalam air
yang tanpa bahan pencuci, lepas itu dikeringkan sebelum penggunaan.
7) Pasangkan pasangan HEPA pada penutup bekas dan pastikan tiga kiub utama
perlu disisip ke dalam alur bekas debu.
8) Putar pasangan HEPA mengikut tanda arah pada penutup bekas.
9) Pasangkan penutup bekas dan bekas debu mengikut tanda di luar.
10) Masukkan bekas debu ke dalam mesin. Dalam proses ini, anda harus
memastikan bekas berada dalam kedudukan yang betul, kemudiannya tekan
pemegang bekas debu. Jika kedengaran bunyi berketak maka bermaksud ia telah
dipasang dengan kemas.
Gambarajah 15 Gambarajah 16
Gambarajah 17 Gambarajah 18
Page 8

Gambarajah 19
KAEDAH PELUPUSAN PRODUK INI YANG BETUL
Tanda ini menunjukkan produk ini tidak boleh dilupuskan bersama sisa
buangan isi rumah yang lain di semua negara EU. Untuk mengelakkan
kemudaratan yang mungkin berlaku terhadap alam sekitar atau kesihatan
manusia akibat pelupusan sisa yang tidak terkawal, mengitar semula
perkakas ini secara bertanggungjawab untuk menggalakkan penggunaan
semula sumber bahan yang mampan. Untuk memulangkan perkakas
terpakai anda, sila gunakan sistem pemulangan dan pengumpulan atau
hubungi peruncit di mana produk ini dibeli. Mereka boleh mengutip produk
ini untuk dikitar semula secara selamat dan mesra alam.
Page 9
VACUUM CLEANER
INSTRUCTION MANUAL
Model No.: MVC-V12K-GR
PLEASE READ THE MANUAL CAREFULLY BEFORE
USING AND KEEP IT PROPERLY FOR FUTURE USE
Page 10

STRUCTURE OF THE PRODUCT
1
Brush tool
9
Power button
2
Extending plastic tube
10
Hose
3
Dust chamber
11
Winding device button
4
Hose connector
12
Dust chamber and handle
5
Compressed brush
13 6
Release button
7
Back wheel
8
Back wheel rubber
12
2
9
Page 11

HOW TO USE
ASSEMBLY BEFORE USE
Fig.1 shows the connection of the hose and the vacuum cleaner:
Put the hose connector in front of the vacuum cleaner .Then insert it into the inlet hole
and turn right. If you want to disassemble it, you can turn the hose connection left and
then pull it out.
Fig.2 shows the connection of the hose and the extending plastic tube:
Hold the flexural connector of the hose and put it into the bigger hole of the tube.
Fig.3 shows the adjustment of the extending plastic tube:
Put the tube into the bigger hole of the other one.
Fig.4 shows the connection of the tube and the brush tool:
Put the plastic tube into the hole of the brush and rotate it to fasten them.
Fig.5 shows how to check the winding of the power cord.
You can pull the power cord out of the machine and stop it when you see the yellow
mark. Make sure the red mark is not out. When your sweep is over, first turn off the
power, pull the plug out of the socket, and then push the winding device button until
the cord is completely in the machine.
Fig.6 shows the power button
Put the plug into the socket, push the power button to control the work of the
machine.
Fig.1 Fig.2
Fig.3 Fig.4
Page 12

Fig.5 Fig.6
CLEANING OF THE DUST CHAMBER
The steps of the chamber cleaning:
1. As in Fig.7, hold the dust chamber and handle and push the release button.
2. As in Fig.8, take the dust chamber out of the machine.
3. As in Fig.9, put the dust chamber onto the rubbish bin, push the release button to
open the bottom of the dust chamber, and the dirt and dust will fall into the bin by
themself.
4. As in Fig.10, shut up the dust chamber for a circular use after your cleaning.
5. If the dust in the chamber is over the MAX line and you feel the suction force is
fallen down, please turn off the power and whirl the self-cleaning knob more than two
circles, so you will find the suction power return to the prime level.
Fig.7 Fig.8
Fig.9 Fig.10
ATTACHMENTS
HOW TO USE THE ATTACHMENTS:
1. As in fig.11, you can use the compressed brush in the corner and the aperture.
2. As in fig.12, open the other side with bristles of the compressed brush as the mark
of an arrow to clean the sofa, the curtain and the dust on the ornaments.
3. As in fig.13, tread on the pedal of the brush tool to let the bristles out, and you can
Page 13

clean the floor.
4. As in fig.14 , tread on the pedal of the brush tool again to put the bristles in, and
you can clean the carpet.
Fig.11 Fig.12
Fig.13 Fig.14
MAINTENANCE
HOW TO MAINTAIN
1. The filter should be cleaned twice a year, and when there is obvious dirt on the
filter, it is time.
2. You must fix the filter properly before running the vacuum cleaner.
3. The filter can't be cleaned in the washing machine or baked by the blower.
4. It will reduce the suction power and damge the motor if you use the wet filter.
5. Steps for maintenance:
1) As in fig.15, press the outlet lock to open the outlet board.
2) As in fig.16, get out the outlet filter.
3) As in fig.17, rotate the HEPA cover to separate it from the chamber cover
4) As in fig.18, get the HEPA cover
5) As in fig.19, get the HEPA and wash it.
6) Wash the HEPA cover, the HEPA assembly, the outlet sponge and the dust
chamber in the water without detergent and dry them before use.
7) Fix the HEPA assembly on the chamber cover and make sure three salient cubes
should be stuck in the grooves of the dust chamber.
8) Rotate the HEPA assembly in the direction of the mark on the chamber cover.
9) Assemble the chamber cover assembly and the dust chamber according to the
mark outside.
10) Put the dust chamber assembly into the machine. And in this process, first you
should make the chamber in the right position and then press the handle of the dust
chamber, if there is a cluck it means the operation is successful.
Page 14

Fig.15 Fig.16
Fig.17 Fig.18
Fig.19
Correct Disposal of this product
This marking indicates that this product should not be disposed with
other household wastes throughout the EU. To prevent possible harm
to the environment or human health from uncontrolled waste
disposal, recycle it responsibly to promote the sustainable reuse of
material resources. To return your used device, please use the return
and collection systems or contact the retailer where the product was
purchased. They can take this product for environmental safe
recycling.
Page 15

Page 16

 Loading...