

Page 1

Top Load Washer 4.5kg
USER MANUAL
MTWR45
Page 2

CONTENTS
Safety information ........................................ 2
Identifying parts of the Washer ........................................ 3
Installation ........................................ 4-6
Control Features and Functions ........................................ 7-8
Wash Programs ........................................ 9
Wash Guide ........................................ 10-11
Cleaning & Maintenance ........................................ 12
Troubleshooting Guide ........................................ 13
Repairs, Service & Warranty ........................................ 14
Specifications ........................................ 15
1
Page 3

SAFETY INFORMATION
Congratulations on your new Midea washer. This manual contains important information on the
installation, use and care of your appliance. Please read this manual carefully before use. Follow
instructions and keep the manual for future reference.
WARNING symbol
WARNING
The WARNING symbol indicates information that concerns your personal safety
CAUTION symbol
CAUTION
The CAUTION symbol indicates information on avoiding damage to the appliance
Safety precautions
- This appliance is not intended for use by persons (including children) with reduced physical,
sensory or mental capabilities, or lack of experience and knowledge, unless they have been given
supervision or instruction concerning use of the appliance by a person responsible for their safety.
- Young children should be supervised to ensure that they do not play with the appliance.
- Keep ventilation openings in the appliance enclosure or in the built in structure clear of obstruction.
- Choose a location that is indoors, completely dry and away from damp environments.
- The washer is designed to operate on a single phase power supply within a voltage range of
220~240V/50Hz.
- Please keep the appliance away from substances which could cause ignition.
- Do not store inflammable materials such as ether, benzene, LP gas and glue etc near the appliance.
- Do not splash water on the rear of the appliance, for it may cause malfunction or electric
shock.
- Before cleaning the appliance, always switch off and unplug it.
- Do not disassemble any part of the clothes washer.
- Do not insert your hand and remove items from the washer until it has come to a complete stop.
- Do not splash, wet or hose down the appliance. It is recommended to use a damp cloth when
cleaning the cabinet.
- Do not attempt to wash fabrics that contain latex or rubber material.
- Do not place items that have come in contact with any flammable materials such as
petrol/gasoline, kerosene, cleaning solvents, vegetable oil, cooking oil or any explosive
substances.
- Do not place heat sources (candle, heater, etc.) on top of or near the washer.
- Do not sit children or heavy object on top of the washer.
- Do not pull the power cord out of the power socket by the cord. Always unplug the washer holding
the plug.
- If the supply cord is damaged, it must be replaced by the manufacturer, its service agent or
similarly qualified persons in order to avoid hazard.
- When disposing of the appliance, do so only at an authorised waste disposal centre.
Safety of children
Packaging (e.g. wraps, polystyrene, etc.) can be dangerous for children. There is a risk of suffocation.
Keep packaging materials away from children. Remember to dispose of old appliances in accordance
with local laws. Pull out the mains plug, cut off the mains cable, break or remove spring or bolt catches
if fixed and ensure that children cannot lock themselves in the appliance when playing (there is risk of
suffocation) or involve themselves in other dangers. Children cannot recogonise the hazard present in
household appliances themselves, therefore it is very important for parents to make adequate
supervision and never let children play with appliances.
2
Page 4

Page 5
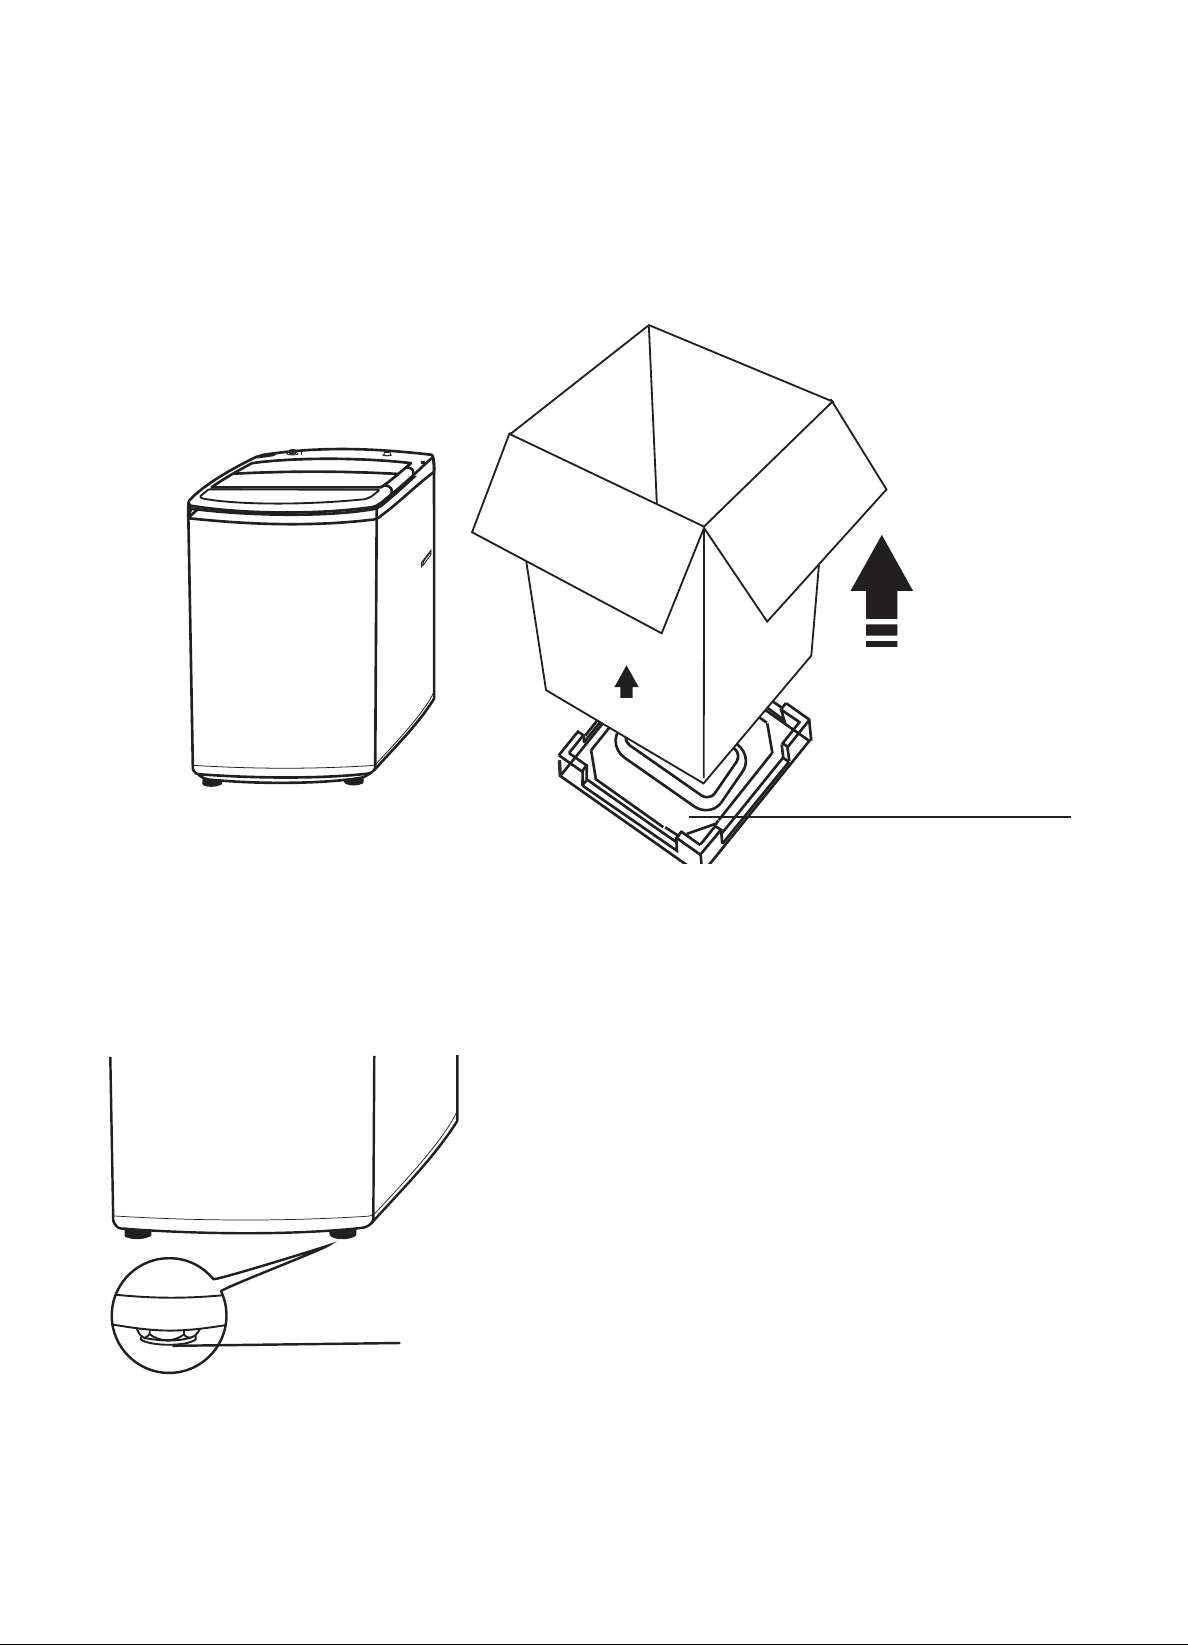
INSTALLATION
Unpack the clothes washer
Remove the washer from the carton by lifting the carton away from the foam cushion
1.
base.
2.
Lift the washer lid and remove the accessories from inside the washer.
3.
Ensure the foam cushion base is removed before installing the washer in place.
Level the clothes washer
adjustable foot
this way up
foam cushion base
The clothes washer can be levelled by
adjusting the front two feet.
Adjust the foot by turning clockwise to extend
or anti clockwise to shorten. Slightly tilt the
clothes washer back to access the adjustable
foot. Ensure all four corners are flat and level
to the surface it is placed on. Ensure the
clothes washer is level and stable prior to
starting each wash. An unstable clothes
washer can cause the drum to shake during a
wash and knock against the cabinet.
4
Page 6

INSTALLATION
Install & Fit the Drain Hose
Install the water inlet hose
water inlet hose
clamping nut
1.
Slide the drain hose completely over the
clothes washer drain outlet.
2.
Fix in place securely to prevent leakage.
1.
Fasten one end of the inlet hose to the tap.
Ensure there is a rubber washer inside the
hose before fastening. The washer prevents
water leakage.
Securely tighten the other end of the inlet
2.
hose to the clothes washer inlet valve.
Ensure the rubber washer is inside the hose
before tightening.
3.
When tightening the clamping nut, apply
even pressure. Do not apply too much force
or twist the valve as this may damage or
break the valve joint.
CAUTION
5
PLEASE NOTE
Be sure to install the correct HOT and
COLD water inlet hoses. Incorrect
installation can reduce performance or
damage the clothes washer.
Page 7

INSTALLATION
Connect to a power source
Open the main water supply
NOTE: Ensure your hands
are completely dry before
touching the mains outlet, any
WARNING
electrical plugs or cables.
Ensure the clothes washer is securely plugged
into the mains power supply and it is switched
to the ON position.
Position the drain hose
850~1000mm
Ensure the water mains are in the open
position and a steady water supply is available
to the clothes washer.
Ensure the drain hose is correctly mounted
between 850 to 1000mm above the ground.
The drain water may overflow if the drain hose
is below 850mm or decrease flow if placed
above 1000mm.
6
Page 8

LIG
HT
/
FLASH
Page 9

CONTROL FEATURES AND FUNCTIONS
4
Delay
Press this button to enable the delay start feature. Each press will
increase the delay time by 1 hour. Once 24 hours is reached, each press
will increase the delay by 6 hours until 48 hours is reached. To disable,
press the delay start button once when 48 is displayed. The Delay light
will be off indicating that delay start has been cancelled.
5
Tub Clean
Press both Delay and Program buttons to active the Tub Clean
program. With a high temperature wash , it cleans the tub of detergent
residue, dirt and bacteria. Do not add any detergent or clothes to the
washer when using this program. It is recommended you perform a tub
clean after every 60 washes.
6
Program
Press this button to select from the 6 wash programs.
Normal - Quick - Delicate will be selected when the corresponding light
is solid
Bulky - Wool - Easy Iron will be selected when the corresponding light is
flashing
7
Temp
Press this button to select the water temperature used during a wash.
Temperature selection is available in Bulky and Normal wash programs
only. Choose between hot, cold and warm (both hot and cold lights will
be displayed to indicate warm).
8
Start/Pause
Press this button once a wash program has been selected to start the
program. Once a wash has begun, press this button to pause the
program. Press Start/Pause again to resume.
9
On/Off
Press this button to switch the washer on and off.
Press once to switch on. When finished a wash program, press to switch
off. When a wash program is complete (buzzer sounds 6 times) or not
started within 10 minutes, the washer will automatically switch off.
Note:
The clothes washer will automatically stop if the lid is left open once the SPIN cycle
begins. If this occurs, there will be a warning buzzer and error code displayed. The
clothes washer will not start a wash cycle if the selected water level can not be
reached. Please refer to Page 13 for troubleshooting instructions.
Auto Unbalance Adjustment
During a wash cycle, if the laundry is not evenly placed, the clothes washer will
sense it is unbalanced and attempt to correct itself. The clothes washer attempts to
correct the unbalanced laundry for approximately 1 minute by adding water and
draining. It will attempt to correct itself 2 times. If it is unsuccessful, an alarm will
sound and the laundry will need to be manually corrected and distributed around the
bowl.
8
Page 10
32 7
Hot
Warm
Cold(Default)
3 3
12 8
17 8
Cold(Default)
Cold(Default)
Hot
Warm
Cold(Default)
17 8
10 7
Warm
Cold(Default)
Cold(Default)
Page 11

WASH GUIDE
Before you wash
Sorting
To get the best wash results it pays to sort your laundry before washing.
Read care labels as they will tell you how the fabric of each garments should be washed.
Sort clothes according to the type of and amount of soil. For example oily soils will require
a higher temperature to lift the stain, whereas mud and blood stains are better washed in
cold as heat can set the stain further into the fabric. Pretreating stains will also improve
upon wash results.
Always sort whites from coloured fabrics, and be sure to wash lint givers (such as towels)
separate to lint collectors (such as synthetics, socks and corduroy like fabric).
Loading
Before each wash be sure to check pockets and remove loose items that may cause
damage to both your washer and your clothes. Close all zippers, hooks and eyes to
prevent them catching on other garments.
Evenly distribute laundry around the bowl, and do not overload the clothes washer as this
will affect its performance.
CAUTION
Detergent
We recommend the use of a domestic top loader powder or liquid. The amount of
detergent to use will vary depending on the size of the load, the amount of soiling and the
type of laundry to be washed. For example, jeans and heavily soiled work clothes will
require more detergent, whereas towels will usually require less.
Follow the instructions on the back of the detergent to determine the correct dose for the
laundry to be washed. Too much detergent does not contribute to better wash results as
the rinse will not be as clean and efficient. This will unnecessarily add to environmental
pollution and a build up on the inside of your washer. Too little detergent may also cause
dirt and lint to settle back onto your clothes.
10
Page 12

WASH GUIDE
Adding detergent
Add measured detergent to the detergent dispenser drawer. Detergent is flushed from the
dispenser drawer at the beginning of the wash phase.
Fabric softener may be added to the softener dispenser and will automatically be added
during the last rinse cycle. Do not add more than the recommended one time dose per
cycle and be sure to reduce the amount used for smaller wash loads.
detergent dispenser
softer dispenser
It is not recommended that liquid detergents or fabric softeners are used when selecting a
long wash delay as they can congeal in the dispenser draws.
Washing
To select a wash program:
a. Press the ON/OFF button
b. Select a wash program
Note: the program on COLD wash will be selected by default Bulky
(see table on page for details)9
c. Adjust the water level or temperature if required
d. Press the START/PAUSE button
End of wash cycle
When the wash cycle is complete, the buzzer will sound 6 times and the power will
automatically switch off.
For safety, it is recommended that at this point you turn off the water supply to the washer,
turn off the power and remove the power plug from the main power source.
11
Page 13
CLEANING & MAINTENANCE
Always disconnect the clothes washer from the mains power source before
performing any maintenance or cleaning of the appliance.
For optimal performance, regular maintenance and cleaning is highly
recommended.
Regular maintenance and cleaning will extend the service life of the clothes
washer.
Cleaning the outer surface of the washer
To clean the cabinet and control panel, use a damp cloth and wipe dry.
Note: Cleansers such as soap powder, abrasive cleaning power, alkali cleansers,
chemical cloth, thinners, alcohol, acid petroleum products and hot water should not be
used to clean the washer as they may damage the painted cover and plastics.
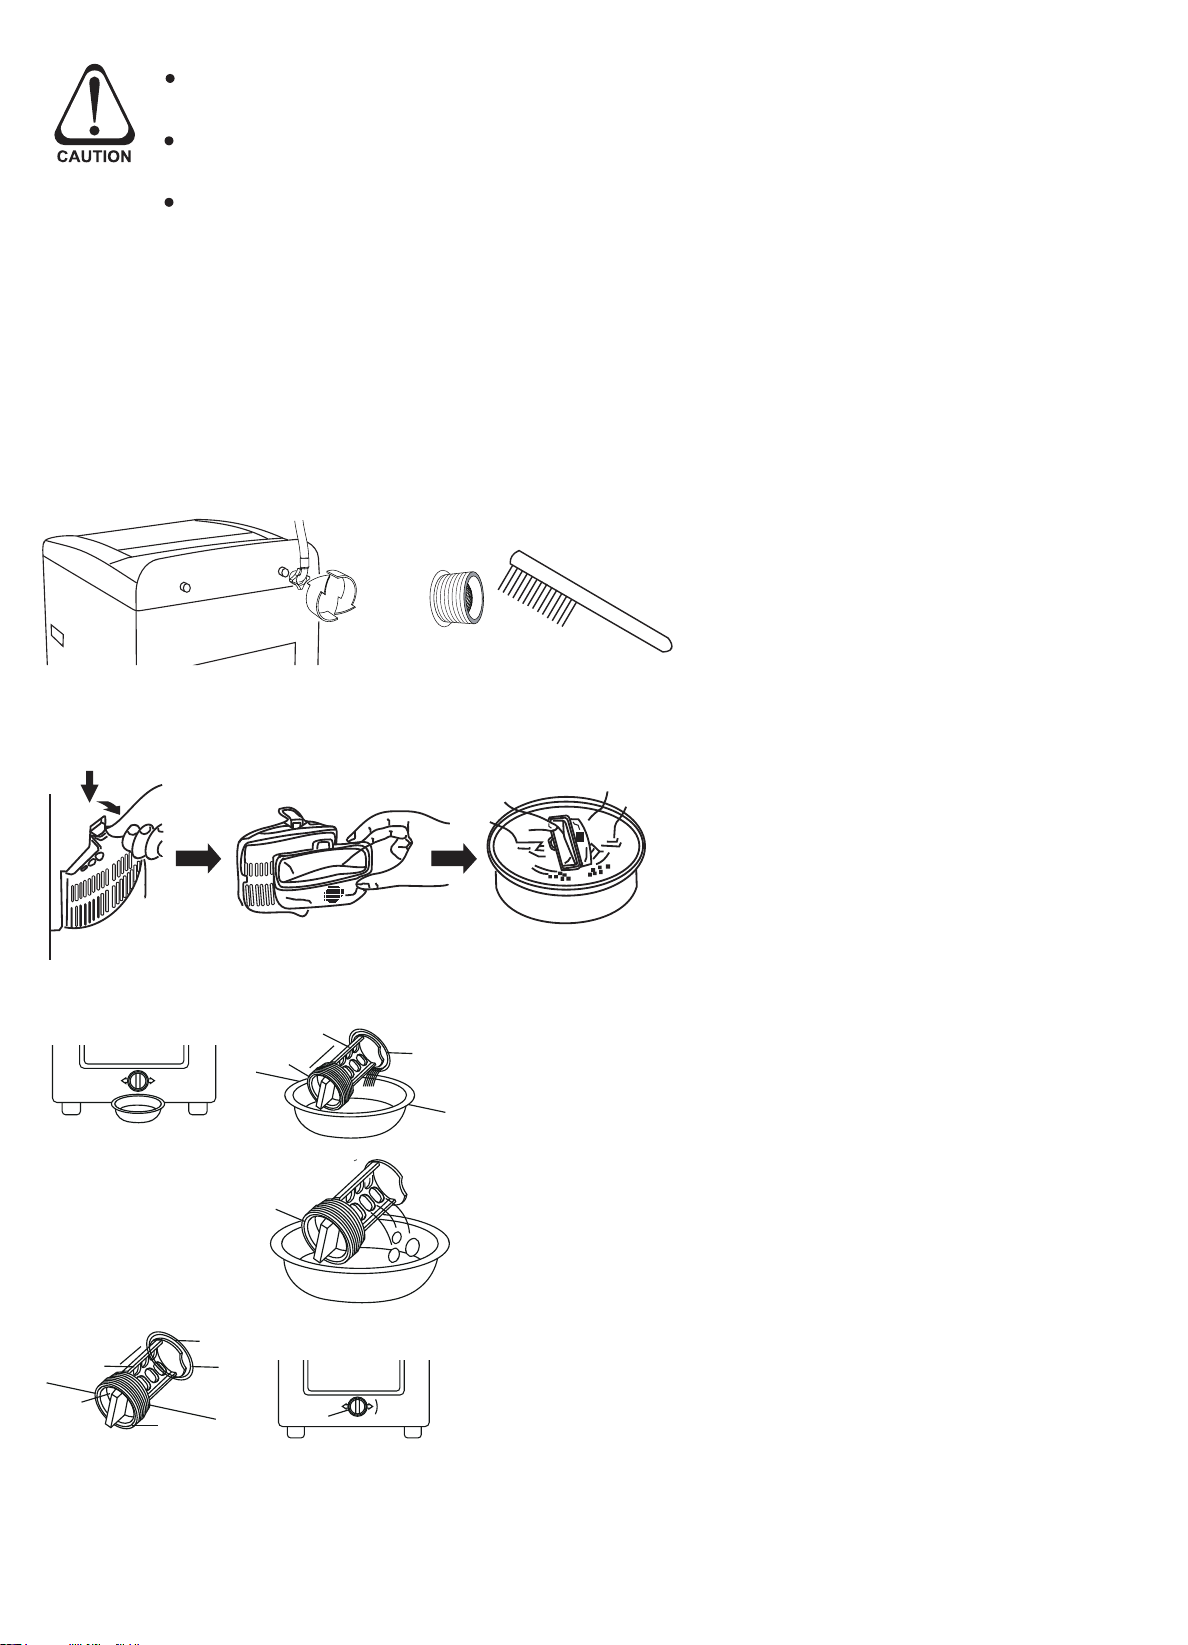
Cleaning the water inlet hose
Clean the water inlet hose joint by
unscrewing and removing the joint
from the washer. Clean the screen
filter gently by using a brush.
Cleaning the lint filter
Cleaning the drain pump lint filter
Be sure to clean the lint filter often
to keep the washer clean. Open the
washer lid and remove the lint filter
from inside the drum. Turn the filter
over and gently clean using water.
Allow to dry before replacing.
Drain the water from the drain pump. Have a
1.
container in place to catch the drained water.
Open by turning cover anti-clockwise.
2.
Remove the lint filter and gently clean with
water.
3.
Let filter dry before replacing. Align convex with
pump hole.
Replace the pump cover by tightening in a
4.
clockwise direction.
Please check the points below after maintenance:
Ÿ Is there any damage to the power lead?
Ÿ Can the power plug be inserted into the power socket correctly?
Ÿ Do the filters need cleaning?
12
Page 14

TROUBLESHOOTING GUIDE
If the clothes washer does not perform as expected, malfunctions or an alarm is
sounding, please check the following list of possible solutions.
If a solution can not be found or the problem persists, please contact Midea service (refer
to page 14).
Do not, under any circumstance, dismantle the appliance yourself.
FAULT POSSIBLE SOLUTION
No water is flowing in Ÿ Check the power source is ON
Ÿ Check if the circuit breaker has been triggered or fuse is not
burnt out
Ÿ Check the water supply is in the open position and the water
pressure reaches the minimum required by the washer
Ÿ Check the inlet hose has been installed correctly
Ÿ Check the filter of the inlet valve is not blocked or obstructed
Ÿ Check if the START / PAUSE button has been pressed
Not washing
Ÿ Check the power is on and the circuit breaker has not been
tripped or the fuse burnt out
Ÿ If the minimum water level is not reached
Ÿ Check if delay start has been set
Not draining
Abnormal or not spinning
Ÿ Check the drain hose is not too high
Ÿ Check the drain hose is not obstructed
Ÿ Check the drain pump is not obstructed
Ÿ Check the lid is completely closed
Ÿ Check that the laundry inside the drum has not accumulated
to one side
Ÿ Check the laundry is evenly distributed
Ÿ Check that the laundry does not exceed the rated capacity
Ÿ Check the clothes washer is level
The following table is a list of the fault indicators and corresponding alarms.
DISPLAY CAUSE SOLUTION
Occurs when filling drum
with water takes more
than 16 minutes
Alarm is triggered when
the lid is opened after
delay start, spin cycle or
in child lock mode
Triggered when
unbalanced
Occurs when draining
takes too long
Check the water taps are
in the open position
Close the lid.
Restart delay time if
necessary.
Check the laundry is
evenly distributed around
the drum
Check the drain hose is
not kinked, obstructed or
placed incorrectly.
Note:
To stop the alarm,
open the lid. Close the
lid once the issue has
been remedied and
resume the wash
program.
If problems persist,
Midea contact
customer care when
convenient.
13
Page 15

REPAIRS, SERVICE & WARRANTY
Model No.
Serial No.
Date of purchase
Retailer
It is hazardous for anyone installing, removing, repairing servicing or testing this
appliance. Only an Authorised Service Person can carry out servicing or repairs to
this appliance.
If service is required
If you have a problem which persists after you have made the checks listed in the
Troubleshooting Guide, please contact:
Midea Customer Care on 1300 132 371
Please refer to the enclosed warranty card or visit www.mideaappliances.com.au for
warranty information. Ensure you have the appliance model number and proof of
purchase handy before calling Midea Customer Care to enquire about a warranty
claim.
Complete and retain the following information for your records:
Please retain proof of purchase for warranty claims.
14
Page 16

SPECIFICATIONS
Model
MTWR45
Rated Motor Input Power
360W
Rated Capacity of wash and spinning
4.5Kg
Voltage
240V
Frequency
50Hz
Washing Type
Pulsator
Water Pressure
0.1MPa - 0.6MPa
Max. Spin Speed
700RPM
Dimensions
Height
915mm
Width
526mm
Depth
536mm
Net Weight
31Kg
IP rating
IPX4
NOTE: This product is subject to continuous improvement, specifications are subject
to change without prior notice.
This product was tested in accordance with AS/NZS 2040.2 and AS/NZS 6400 using
program: Normal, Hot & Cold, Water Level 7, which is ram recommended for the prog
a normally soiled cotton load at rated capacity.
15
Page 17

Page 18

Page 19

Page 20

V 05/15
 Loading...