

Page 1

Washing Machine
Twin Tub
Du al Fo rc e Pu ls at or
Ea sy -t o- cl ea n
Me ta l Li nt F it le r
Twin Tub Washing Machine
OWNER’S MANUAL
MODEL:
MT100W70
MT100W80
MT100W90
MT100W110
MT100W130
MT100W150
Ai rF re sh
Read This Manual
Inside you will find many helpful hints on how to use and maintain
your washing machine properly. Just a little preventative care on
your part can save you a great deal of time and money over thelife
of your washing machine. You'll find many answers to common
problems in the chart of troubleshooting tips. If you review the chart
of troubleshooting tips first, you may not need to call for service.
Page 2

CONTENTS
SAFETY INSTRUCTIONS
Safety precautions.....................................................
INSTALLATION
Product description...................................................
Unpacking the washing machine................... .........
Installation area..........................................................
Change the position of the drain hose...................
.
OPERATIONS
Control panel...............................................................
Preparation before washing.....................................
Washing.......................................................................
Rinse............. ................................................................
Spin................................................................................
Refer to the following table to select spinning time.........
Reference of laundry quantity .
...
Laundry volume and detergent dosage reference.............
Special functions........................................................
MAINTENANCE
Cleaning and Care ......................................................
Cleaning the cabinet..................................................
Cleaning the inlet filter................................................
Anti-freezing protection...........................................
Trouble shooting..........................................................
Technical specifications............................................
......................................................
.................
.................
.................
.................
.................
.................
.................
.................
.................
................
.................
.................
................
...............
................
...............
................
..
..
11
12
12
12
12
13
14
2
5
5
6
6
7
7
8
8
8
9
9
9
1
Page 3
SAFETY INSTRUCTIONS
Safety precautions
For your safety, the information in this manual must be followed to minimize the
risk of fireor explosion, electric shock, or to prevent property damage, personal
injury or loss of life.
This appliance is not intended for use by persons (including children) with reduced
physical, sensory or mental capabilities, or lack of experience and knowledge,
unless they have been given supervision or instruction concerning use of the
appliance by a person responsible for their safety.Children should be supervised to
ensure that they do not play with the appliance.If the supply cord is damaged, it
must be replaced by the manufacturer, its service agent or similarly qualified
persons in order to avoid a hazard.The new hose-sets supplied with the appliance
are to be used and that old hose-sets should not be reused.
The openings must not be obstructed by a carpet.
This appliance is intended to be used in household and similar applications such as:
− staff kitchen areas in shops, offices and other working environments;
− farm houses;
− by clients in hotels, motels and other residential type environments;
− bed and breakfast type environments;
− areas for communal use in blocks of flats or in launderettes.
Model
MT100W70
MT100W80
MT100W90
MT10 0W 11 0 11.0 kg 6.0kg
MT10 0W 13 0 13.0 kg 7. 0kg
MT10 0W 15 0
Wash rat ed
capa ci ty
7.0 kg 4.0kg
8.0 kg 5.0kg
9.0 kg 5.0kg
15.0 kg 9.0kg
2
Spin rate d
capa ci ty
Maxi mu m
Water Pressure
0.6MPa
0.6MPa
0.6MPa
0.6MPa
0.6MPa
0.6MPa
Page 4
SAFETY INSTRUCTIONS
Explanation of the symbols:
Warning!
This combination of symbol and signal word indicates a potentially
dangerous situation which may result in death or serious injuries
unless it’s avoided.
Caution!
This combination of symbol and signal word indicates a potentially
dangerous situation which may result in slight or minor injuries
or damage to property and the environment.
Note!
This combination of symbol and signal word indicates a potentially
dangerous situation which may result in slight or minor injuries.
3
Page 5

SAFETY INSTRUCTIONS
Do not dismantle the machine
by yourself.
For bid dis mantl ing
D
o n
o
t
w
a
s
w
o
D
or
Do
or
a
Do
it st
cc
h c
i
th
ke
rose
he
sim
not
n
pla
i
n
o
n
r fl
am
mab
was
h
d
il
ar
c
lo
t
waterp roof
ot
l
e
t ba
by
y
near
d
en
t
.
o
t
p
u
t han
pp
in
g r
u
n
t
o
lo
t
h
es t
e,
p
et
le s
ub
ow
n-
he
s.
clim
running
d
s
i
n
n
ing.
ha
r
ol
, a
s
t
f
i
ll
e
d
b t
to
t
! ! !
t a
re
st
a
in
e
l
c
oh
o
l
,
a
n
oa
e.
t,
ra
e
m
tub b
in
ach
o av
ef
coat
i
oid
ore
d
n
a
nc
c
o th
tub t
h
e
This appliance is for indoor use only.
Do not install the machine in damp or rainy
environment to avoid electric shock, fire,
machine failure, or deformation.
Do not spray water directly to the machine.
d
Make su re th at the wa ter i nl et
hose is c onnec ted and t he t ap
is open ed b efo re wa sh ing.
+
e
If use wa rm wa ter, the wa ter
tempe rat ure s ho uld not
exce ed 5 0℃.
Do not place inflammable materials
like burning candle, mosquito incense,
cigaret etc. or heating source like electric
stove, calorifier etc. on the machine.
Do not let baby sit on it or place heavy
things on it.
Do not exceed the max. water
level to avoid wate r overflowi ng
and machine fail ure.
! !!
To avoi d ele ct ric sho ck
res ul ting fr om el ec tric le akage ,
pleas e conne ct g rou nding w ire
of the pl ug p rop er ly.
Gro und in g
+
Wip
e of
f di
rt
y a
nd du
s
t o
n t
h
pl
ug o
ft
en t
o pr
e
v
conta
ct wi
If the supply cord is damaged, it must
be replaced by the manufacturer, its
service agent or similarly qualified
persons in order to avoid a hazard.
en
t
h p
ow
er s
t po
upp
or
e
l
y.
Do not insert or un plug th e plug
with wet hands to avoi d elect ric
shoc k.
Insert the plug tightly when use.
Unplug the plug from socket after use.
4
Do not re place p ower cord by
you rs elf.
Do not pu ll t he co rd when
unplu g th e plug.
Page 6
INSTALLATION
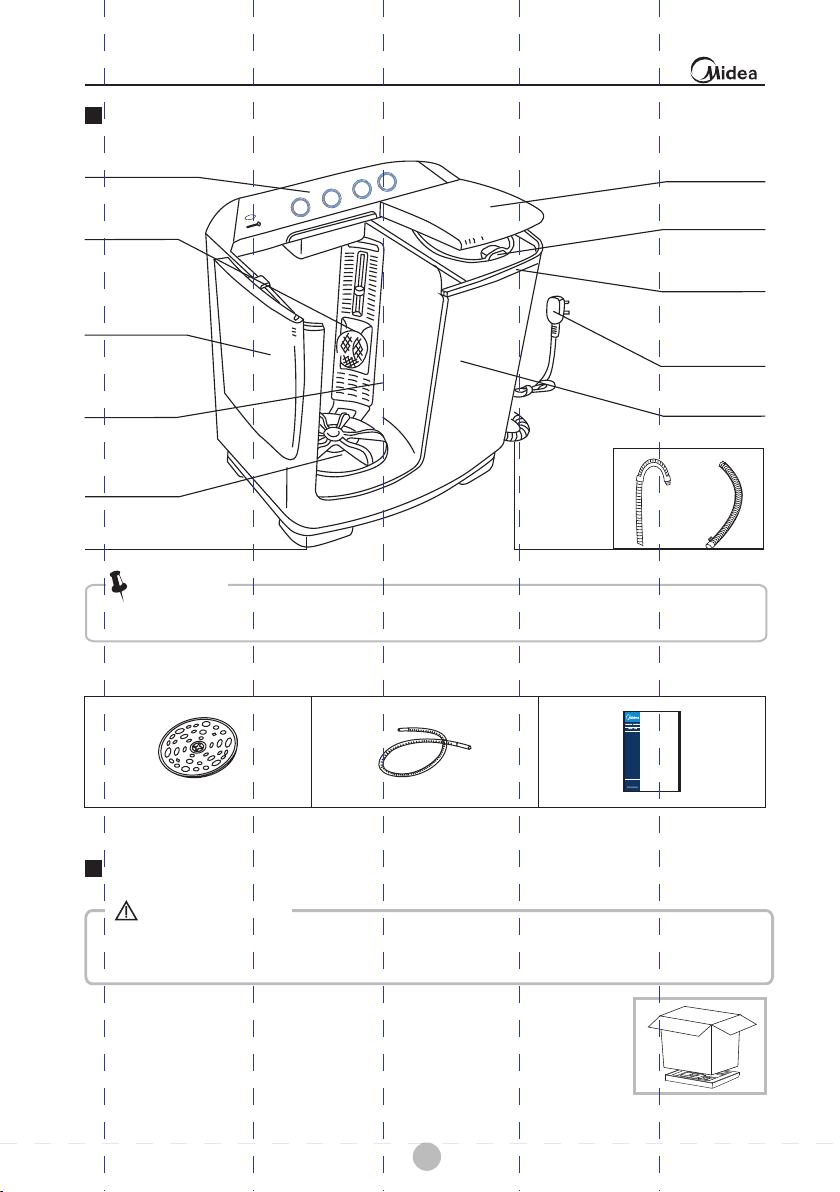
Product description
Control panel
Lint filter
Wash cover
Wash tub
Pulsator
Base
Drain hose
Spin c
Safety cove r
Frame
Power p lug
Cabi net
Or
Note!
• The product line chart is for reference only, please refer to real product as standard.
Accessories
o
ver
Inne r spin cover
Water inlet hos e
manu al
Unpacking the washing machine
Warning!
•
Packaging material (e.g. Films, Styrofoam) can be dangerous for children.
•
There is a r isk of suffocation ! Keep all packaging well away from children.
1. Remove the cardboard box and styrofoam packing.
2. Lift the washing machine and remove the base packing.
3. Remove the tape securing the power supply cord and drain hose.
4. Remove the inlet hose from the drum.
5
Page 7

INSTALLATION
Installation area
Warning!
Stability is important to prevent the product from
• wandering!
Make sure that the product should not stand on the power cord.
•
Before instal ling the machine, the location characterized
as
w
W> 20mm
follows shall be selected:
1.Rigid, dry, level surface
2.Sufficient ventilation
and Avoid direct sunlight
, Room temperature is above 0 C
3.Keep far away from the heat resources such as coal or gas.
Change the position of the drain hose
The ex-factory installation position of the drain hose is located the spin side .
According to the installation site, the drain hose can also be at the wash
side of the machine . The method is as follows:
.
1 Unplug the power cord and empty water in the drain hose
completely.
.
2 Spread a piece of soft cloth on the floor (e.g. a blanket)
and place the washing machine on it gently.
3.
Take the drain hose out from the buckle at the spin side,
and
put it into the buckle at the wash side.
4.
Hang up the drain hose kit.
at
installed
Blanket
Drain hose
Front
w
There are two ways to place the end of drain hose:
1.For lower drain system
Under3m
Under 15cm
water trough
2.For upper drain system
Trou gh
Hose
Retainer
ind
B
Max.100cm
Warning!
Do not kink or protract the drain hose.
•
• Position drain hose properly ,otherwise damage might result of water leakage.
• If drain hose is too long, do not force it into machine as it will cause abnormal noises.
6
m
c
0
0
.
1
x
Ma
Page 8

OPERATIONS
Control panel
Dr
HeavyHeavyHeavyHeavy
Wash-Drain SelectorWash-Drain SelectorWash-Drain SelectorWash-Drain Selector
a
i
n se
HeavyHeavy
Wash-Drain SelectorWash-Drain Selector
NormalNormalNormalNormal
DrainDrainDrainDrain
Drai
Spin timer
Wash
Drain
or
n s
elec to r
Wash/Rinse
Drain
Spin timer
l
e
c
t
o
r
NormalNormal
soft
Rinse
Washing
Spinning
Was
nlet s elector
h i
Water inlet selector
Washing
Spinning
Wa
s
h in
l
e
t s
e
le
ct
o
r
Water inlet
35
Soak
Wash timer
35
Soak
or
Wash timer
5
10
15
5
10
15
Wash selector
selector
Note!
• The product line chart is for reference only, please refer to real product as standard.
Wash timer: be used to selec t required washing time.
●
Spin timer: be used to select requ ired spinn ing time.
●
● Wash-Drain selector: For washing or rinsing, sele ct “ No rmal”or “ Heavy”.For
draining ,sel ect “Drain ”
● Water inle t: be used to inject water..
Preparation before washing
!
Warning!
• The maximum gradient of the supporting surface for the washing machine should not exceed 2º.
• Do not tear down electrical wires and components in the machine by yourself.
• There are holes on the base for ventilation. These holes should not be blocked by
foreign objects (carpets, etc.).
• Never connect the grounding wire with the live wire, or it may lead to an electric shock.
• Check that there are no objects such as coins, hairpins, mud or sand in the pocket.
• Strings should be knotted in advance to prevent entanglement.
• Clothes can be classified for washing according to the texture, dirty degree and color.
• For small pieces (e.g.,stockings) or fluffy clothes, put them into a nylon net for washing.
Plug in
Pu t down the d rain
Open tap
load and Close door
7
Page 9
OPERATIONS
Washing
Open the door
Add detergen t
Open the door
Add detergent
Rinse
Ope n tap
Arrived a fte r th e water
lev el, Close t he t ap
Rinse
Arrived after the water
level, close the tap
Arrived after the water
level, Close the tap
Choose washing
function
Rinse
Normal
Heavy
Wash-Drain Selector
Choose wa shing
program
Wash
Heavy
Wash-Drain Selector
Choose washing
program
Wash
Drain
Drain
Choose washing
program
Normal
Drain
Normal
Drain
Choose th e washing t im e
To start wa shing clo th es
Normal
Heavy
Choose washing
time
Cho ose the washing time
To start washing clothes
Heavy
Normal
Heavy
Wash-Drain Selector
Drain
Wash
Rinse
Drain
Normal
Heavy
Wash-Drain Selector
Drain
Wash
Rinse
Drain
Drain
Drain
Drain
Ope n tap
Arrived after the water
level, close the tap
Spin
Shake out the laundry and
put them into the spin tub.
Choose washing
function
Choose washing
program
Choose washing
time
spin cover
Spin tub
Correct
Put the inner spin cover on .
Confirm the inner spin cover is placed
horizontally.
Incorrect
the laundry
8
Drain
Spin cover
Safety cover
Close the safety cover
and the spin cover.
Page 10

OPERATIONS
Refer to the following table to select spinning time
Washing
materials
Spin time
Silk
About 50
seconds
Light clothes
About 1
minute
Knitwear
(fiber)
(fiber/blended)
About 1-2
minutes
Underwear
(cotton)
About 2-3
minutes
Slipover
(cotton/linen)
About 3-4
minutes
Toweling coverlet
(cotton)
About 5
minutes
Reference of laundry quantity
Capacit y
10.0kg Cap ac ity about 2 0 pc s. a bout 15 pcs . ab out 10 pcs. a bo ut 6 pcs.
12.0k g Capac it y ab out 24 pc s. about 18 p cs . ab out 13 pc s. a bo ut 7 pcs.
Laundry
2.0kg C apaci ty a bo ut 4 pcs. abo ut 3 p cs. about 2 p cs . about 1 pcs .
3.0kg C apaci ty a bo ut 6 pcs. abo ut 4 p cs. about 3 p cs . about 1 pcs .
3.6kg C ap acity abo ut 7 p cs. about 5 p cs . ab out 4 pcs . ab ou t 2 pcs.
4.6kg C ap acity abo ut 9 p cs. about 6 p cs . ab out 5 pcs . ab ou t 2 pcs.
5.0kg C apaci ty a bo ut 10 pcs. ab ou t 7 pcs. abou t 5 pc s. about 3 pc s.
5.5kg C ap acity abo ut 1 1 pcs. abou t 8 pc s. a bout 6 pc s. a bo ut 3 pcs.
6.0kg C apaci ty a bo ut 12 pcs. ab ou t 9 pcs. abou t 6 pc s. about 3 pc s.
7.0kg C ap ac ity about 1 4 pc s. about 10 p cs . ab out 7 pcs . ab ou t 4 pcs.
7.5kg Capac it y about 15 pc s. a bo ut 11 pcs. ab ou t 8 pcs. abou t 4 pc s.
8.0kg C apaci ty a bo ut 16 pcs. ab ou t 11 pcs. abo ut 8 p cs. about 4 p cs .
8.5kg C ap acity abo ut 1 7 pcs. abou t 12 p cs . about 9 p cs . ab out 5 pcs.
...... ...... ... .. . .. .. .. ......
Shirt
about 500 g
Uniform
about 650 g
Jeans
about 900 g
Jacke t
about 160 0 g
Laundry volume and dete rgent dosage reference
7.0kg Ca pac ity
Fab ri c ty pe
Synth et ic s, si lk ,
Delicat e fabri cs
Cotto n or l inen
Heavy s oils
Laundry
capacit y( kg )
0-3.0
3.0-4 .5
0-4.5
4.5-7.0
0-4.5
4.5-7.0
Wate r
lev el
Low
Mid
Mid
High
Mid
High
Wate r fl ow
Normal
Normal
Heavy
Wash time
(min utes)
3
3-5
7
7-10
10
10-35 (s oak 20)
Deter gent
amount( g)
About 36
About 46
About 46
About 55
About 46
About 55
9
Page 11

OPERATIONS
Laundry volume and dete rgent dosage reference
8.0kg Capac ity
Fab ri c ty pe
Synth et ic s, si lk ,
Delicat e fabri cs
Cotto n or l inen
Heavy s oils
Laundry
capacit y( kg )
9.0kg Capacity
Fab ri c ty pe
Synth et ic s, si lk ,
Delicat e fabri cs
Cotto n or l inen
Heavy s oils
Laundry
capacit y( kg )
5.0-9 .0
5.0-9 .0
11.0kg Capacity
Fab ri c ty pe
Synth et ic s, si lk ,
Delicat e fabri cs
Cotto n or l inen
Heavy s oils
Laundry
capacit y( kg )
6.5-1 1.0
6.5-1 1.0
13.0kg Capacity
Fab ri c ty pe
Synth et ic s, si lk ,
Delicat e fabri cs
Cotto n or l inen
Heavy s oils
Laundry
capacit y( kg )
8.0-13.0
8.0-13.0
0-3.0
3.0-5 .0
0-5.0
5.0-8 .0
0-5.0
5.0-8 .0
0-3.5
3.5-5.0
0-5.0
0-5.0
0-5.0
5.0-6 .5
0-6.5
0-6.5
0-4.5
4.5-8.0
0-8.0
0-8.0
Wate r
lev el
Low
Mid
Mid
High
High
Mid
Wate r
lev el
Low
Mid
Mid
High
High
Mid
Wate r
lev el
Low
Mid
Mid
High
High
Mid
Wate r
lev el
Low
Mid
Mid
High
High
Mid
Wate r fl ow
Normal
Normal
Heavy
Wate r fl ow
Normal
Normal
Heavy
Wate r fl ow
Normal
Normal
Heavy
Wate r fl ow
Normal
Normal
Heavy
Wash time
(min utes)
3
3-5
7
7-10
10
10-35 (s oak 20)
Wash time
(min utes)
3
3-5
7
7-10
10
10-35 (s oak 20)
Wash time
(min utes)
3
3-5
7
7-10
10
10-35 (s oak 20)
Wash time
(min utes)
3
3-5
7
7-10
10
10-35 (s oak 20)
Deter gent
amount( g)
About 39
About 51
About 51
About 59
About 51
About 59
Deter gent
amount( g)
About 39
About 48
About 48
About 63
About 48
About 51
Deter gent
amount( g)
About 50
About 61
About 61
About 77
About 61
About 77
Deter gent
amount( g)
About 42
About 65
About 65
About 87
About 65
About 87
15.0kg Capacity
Fab ri c ty pe
Synth et ic s, si lk ,
Delicat e fabri cs
Cotto n or l inen
Heavy s oils
Laundry
capacit y( kg )
5.0-9 .0
9.0 -15.0
9.0 -15.0
0-5.0
0-9.0
0-9.0
Wate r
lev el
Low
Mid
Mid
High
High
Mid
Wate r fl ow
Normal
Normal
Heavy
10
Wash time
(min utes)
3
3-5
7
7-10
10
10-35 (s oak 20)
Deter gent
amount( g)
About 50
About 61
About 61
About 90
About 61
About 90
Page 12

OPERATIONS
Special functions
For machines having the function only
Soak function
For serious ly stained cloth es, soak wash is usef ul to achieve better wash result.
15-35 minutes of the wash timer is for soak wash:(illustrate as foll ows)
35
about 5 ab ou t 5 about 5
about 1 .5 ab out 1 .5 about 2
Total: 35 ( min s)
Work time
Buzzer fu nction
Funct ion of th e buzzer is to alarm finish of wash ing, an d it is helpful to co ntrol
was h pro cess. Buzzer will alarm the com pletion of washing.
15
Stati c tim e
(un it: )m ins
Wash timer
Soak
5
35
15
10
11
Page 13

MAINTENANCE
Cleaning and care
Warning!
• Before your maintenance starts, please unplug the machine and close the tap.
Cleaning the cabinet
Proper maintenance on the washing machine can extend its
working life. The surface can be cleaned with diluted
non-abrasive neutral detergents when necessary. If there is
any water overflow, use the wet cloth to wipe it off immediately.
No sharp items are allowed.
Note!
Formic acid and its diluted solvents or equivalent are forbidden, such as
•
solvents or chemical products,etc.
alcohol,
Cleaning the inlet filter
Note!
• Inlet filter must be cleaned if there is less water.
Lint filter clean
1.
Press the button head, and pull the lint filter out.
2.
Turn the filter net inside out, and rinse it in water.
3.
After inserting the claw, press the button to insert it into place.
4.
A sound of “ba” means proper installation.
Butto n he ad
Claw
Anti-freezing protection
To prevent from freezing:
1. water
Turn off the water tap, remove the water inlet hose and empty water in the
hose completely.
inlet
Lay the drain hose and turn the drain selector knob to the “Drain”position to empty
2.
the water in the tub.
If the water is frozen, please take the following steps:
12.Put th e water inle t ho se into wa rm water of ab ou t 50℃.
.Keep about 2 liters of warm water below 50℃ in the wash
tub for ab out 10 minutes and th en l ay t he d rain h os e and
turn t he was h drai n se lector knob to the “Drain”pos it ion
to empty t he water .
12
Page 14

MAINTENANCE
3. Fit t he water inlet ho se and turn o n the water tap to
conf irm wa te r filling a nd draining work prop erly.
Operation when objects are dropped into the
outside of the sp in tub
1.Remove all screws on the frame with a screw driver and
loosen the connector of the brake belt .
2.Pull up the frame with both hands and turn it backwards.
3.Take out the clothes dropped into the outside of the spin tub.
4.Fasten the connector of the brake belt ,Press the frame to
reset and tighten screws.
Trouble shooting
If the following symptoms occur, please disconnect the power plug and
perform the following ch ecks:
Symptom
The was hing
machine d oe s
not wor k.
The dra in hose
does not wo rk.
There i s abnorma l
noise dur in g washi ng .
There i s abnorma l
noise and v io le nt
vibra ti on duri ng
spinnin g.
Check that the power supp ly is in good conditi on.
●
Check that the power plug is inserted proper ly.
●
● Check that th e wash ti mer kn ob or the spin timer kn ob is not
in the "0 " posi tion.
●
Check t hat the drai n hos e is not la id to o high.
●
Check t hat the drai n hos e is not frozen.
●
Check t hat the drai n hos e is not bl ocked by f ore ign mat ter.
Check t hat the re are no co ins or an y other f ore ign obj ec ts
●
dro pped in to the wash tu b.
●
Check that the washing machine is placed on flat, stable floor.
●
Check that clothes are evenly distributed in the spin tub.
●
Check that there are no washing materials or foaming debris
dropped into the outside of the spin tub.
Reason
Frame
Cabinet
13
Page 15

MAINTENANCE
Technical specifications
Maximum Water Pressure
0.6MPa
Model
MT100W70
MT100W80
MT100W90
MT100W110
MT100W130
MT100W150
Washing Capacity
Wash
7.0 kg 4.0kg
8.0 kg 5.0 kg
9.0 kg 5.0kg
11.0 kg 6.0kg
13.0 kg 7.0kg
15.0 kg 9.0kg
Spin
Maximum Time
wash:15 min
Spin :5 m in .
Rated Power
Spin
Wash
320W 125W
340W
370 W
400W
450W 180W
520W 22 0W
135W
135W
135W
Washing /spin level of noise
Dime ns io n
W*D* H mm)(
735*430 *8 55
761 *4 48 *8 85
827*485*895
870*5 12 *9 50
902*537 *974
995*555*1105
65/72 d B (A)
Water volume
H:/M :/ L: (L )
H:55 M:46 L:36
H:59 M:51 L:39
H1:70 H:65
M:53 L:41
H1:77 H:72
M:61 L:50
H1:92 H:87
M:65 L:42
H:115 M:78 L:55
Net
Weight
18.5kg
20.0kg
22.0kg
23.0kg
29.5kg
37.5kg
14
Page 16

QU ESTIONS OR COMM ENTS
Country
Contact C en ter
Web S ite
Thail an d
Mya nm ar
Cambodi a
Vietn am
Philipp in es
Indones ia n
Malay sia
Singapo re
+662107 779 9
+092603 672 29
+855232 12435
+180058 88 63
+632886 35522
+628001 88 8523
+6039 22 11033
+62222536
Th is p rodu ct i s RoHS compliant.
http://www.m id ea.co m/t h
https://www. gb s.c om.mm/en /about/vs k/
http://bluem id ea .co m
http;//vn.midea .com
http://www.m id eaph.com
http://id.mi de a.com
https://www. mi dea.c om/my/
https://www. mi dea.c om/sg/
Page 17

注:1.说明书版本号从V1.0开始计,每变更一次自动+1
1623 8000A *** **
2.虚线框内印刷物料编码,由供应商按照订单需求自行添加,字体:Arial,
大小:8pt,相对位置参照图号右对齐
3.此注意内容及虚线框无需印刷
V1.0
 Loading...